
Provide feedback
Saved searches
Use saved searches to filter your results more quickly
Sign up
If you want to configure access to files over the network for one or more users, you need to configure file sharing on the computer on which these files are stored. A common way to deploy a shared resource for storing files is by configuring a Windows file share. In this case, we are talking about a Windows SMB share, and this file share can be configured on any Windows version.
This blog post explains how to configure a Windows file share on Windows Server 2019 to allow multiple users to access this share.
What Is a Fileshare
A file share is a directory on a computer, server, or virtual machine that contains files and directories that are accessible to other users via the network by using one of the supported file sharing protocols. A file share can be configured on any operating system supporting the appropriate file sharing protocol, for example, SMB or NFS. We have already covered the SMB protocol and its dialects.
Both client Windows versions (Windows XP, 7, 8, 10, etc.) and server Windows versions (Windows Server 2003, 2008, 2012, 2016, 2019, etc.) support Windows file sharing via the SMB protocol. However, Windows Server versions provide more capabilities compared to the client versions. For example, the maximum number of concurrent connections. Recently, we have compared a file server and NAS. In this blog post, we will explain how to set up a server for file sharing in Windows or, in other words, how to configure a file server.
Our Window Server Environment
We configure a Windows SMB share in Windows Server 2019 that is in a workgroup. The configuration principle for Windows machines in an Active Directory domain is identical, but you need to specify (determine) domain users and local users on computers when setting share permissions.
The parameters of our Windows file server are:
- IP address: 192.168.101.209
- Computer name: Win2019
The workflow in this article can be used for older Windows Server versions. As for client Windows versions, you can mostly follow the same Windows file sharing workflow for top editions like Windows XP Pro, Windows 7 Ultimate, Windows 10 Pro, etc. However, note that there may be certain limitations.
Creating Users and Groups
First of all, we need to create users. Using existing user accounts in Windows for file sharing is technically possible, but this approach is not recommended for security reasons. That is why, we will not use the existing administrator and user accounts to configure a Windows file share, and we will not provide these credentials to users accessing the share.
We will create special accounts for users who need to access the file share server. If a username and password on a file server are the same as a user’s username and password on a remote client computer for Windows logon, then credentials are not prompted when accessing a Windows SMB share. This feature makes accessing a file share more convenient for users and optimal for administrators.
Open the Computer Management window, which you can access by going to Server Manager > Tools > Computer Management. Alternatively, you can simply run the compmgmt.msc command in CMD.

Note: In an Active Directory domain, you need to open the Active Directory Users and Computers window on a domain controller to create domain users and groups. You can do it by running dsa.msc in the command line or the Run (Win+R) prompt. Use Active Directory Users and Computers instead of Computer Management on a domain controller.
Creating users
- In the Computer Management Window that opens (that can also be called a collection of Microsoft Management Console snap-ins), go to System Tools > Local Users and Groups > Users.
- After selecting Users, right-click in the empty space of the right pane and click New User in the context menu.


- Enter a user name, which will be used for user authentication when accessing a Windows file share. Keep in mind that this account can also be used for login on the current Windows Server machine. The name of our user is user1.
- If your file server is a domain member, the created domain user accounts can be used to log in to domain computers.
- Enter a password and confirm the password.
- Click Create
- We create more users the same way. The users that we create for accessing the file share server are:
- user1, user2, user3, user4
- user11, user12, user13, user14
Creating groups
When you need to configure access with the same settings for several users, it is more convenient to manage groups of users.
We create two groups in our fileshare server configuration example:
- Group_A – for providing full access to the file share (Read, Write, Change). The group contains the following members: user1, user2, user3, user4.
- Group_B – for providing read-only access to the share. The group contains the following members: user11, user12, user13, user14.
You can create a group, add users to the group, and configure access to a Windows SMB share for a group rather than adding each user separately in the share configuration and configuring the same settings for each user manually.
To create a new group:
- Right-click Groups in the Computer Management window and click New Group in the context menu.

- Enter a group name (which is Group_A in our case) in the New Group window (see the screenshot below).
- Click Add to add users to the group.
- In the Select Users window, enter a user name such as user1, then click Check Names. When the user name is entered correctly, this user name is underlined and displayed as a full name (ComputerName\UserName or DomainName\UserName). To continue adding users, press Space or add semicolon and enter the next user name, then click Check Names, and so on.
If you want to set access for a local user account created on the computer that is a domain member, enter the full user name manually, like this: ComputerName\UserName. You can similarly enter the full name of a domain user.
- After entering all needed user names and checking them, click OK to save settings and close the Select Users window.
- Click Create in the New Group window to finish group creation.

Windows File Sharing Setup
Once we have created the needed users and groups, we can move forward to set up the Windows file share.
- Select the directory that you want to share or select a new directory. We create a new directory in our example and the path to this directory is:
E:\share
- Right-click this directory (folder) and in the context menu, hit Properties.

Setting up sharing permissions
- Select the Sharing tab in the directory Properties window and click the Advanced Sharing button.
- Select the Share this folder checkbox in the Advanced Sharing window and click Permissions.
You can see that everyone can read the contents of the shared folder by default. Everyone is the default group containing all users on the current computer. In our example, we select Everyone and click Remove because we need to create a custom configuration.
- Click Add to add the needed users and groups for configuring access to the Windows SMB share for them.

- The Select Users or Groups window is opened.
- Enter the name of users and groups for which you want to configure access. In our case, we enter Group_A.
- Click Check Names like you did when adding users to a group. An entered name is underlined and displayed in the full format if the name is correct (and exists). You can enter multiple user or group names if needed.
- Click OK to save settings and close this window.

- We can see Group_A in the list of group or user names in the Permissions window for our share folder.
- Select this user/group (Group_A in our case) and select the Allow Full Control checkbox.

- Then we add Group_B just like we added Group_A. Let’s keep the read-only sharing permissions for Group_B.
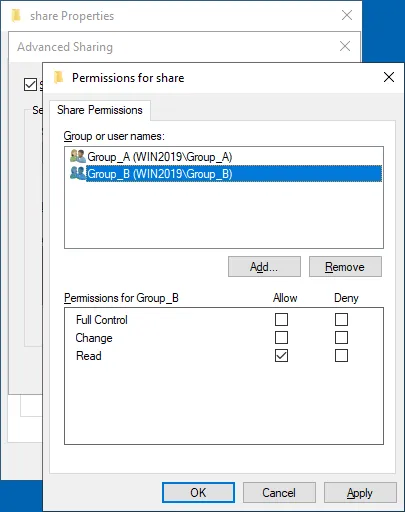
- We also add the built-in Administrators group and enable full access for administrators. (If a computer is a domain member, you can use the Domain Administrators group).
- Click OK to save permissions for the Windows file share and close the Permissions window.
Setting file system permissions
We have now configured file sharing permissions for the shared folder. In addition to that, we must configure file system permissions for this folder to set the appropriate access for users. NTFS is the file system we use on Windows volumes.
- Select the Security tab in the Properties window for the shared folder. Default NTFS permissions are set for CREATOR OWNER, SYSTEM, Administrators and Users.
- Click Edit to set permissions for a folder on the file system level.
- As you can see, users in the Users group have read access to this folder by default.
- Click Add to add the needed group or user and set permissions for them at the file system level.
- The Select Users or Groups window opens.
- Enter the name of the user or group that you want to add (Group_A in our case).
- Click Check Names.
- Hit OK to save settings.

- Select Group_A in the list of users and groups. Select the Allow Full Control checkbox to grant full access to Group_A.
- Add Group_B just like you added Group_A.
- We preserve the default permissions, which include Read & Execute, List folder contents, and Read for Group_B.
- Click OK in the Permissions window. Click OK in the shared folder Properties window.
We have configured sharing permissions and file system permissions for the shared folder. Similarly, you can create other shares on file sharing servers.
Accessing a Windows SMB Share
Now users can access the Windows file share (SMB share) from their computers.
To access the Windows SMB share from another computer, open Windows Explorer (click the My Computer or This PC icon) and enter the network address of the file server in the address bar in the format: \\Server-IP-Address or \\Server-Name
We enter the path:
\\192.168.101.209
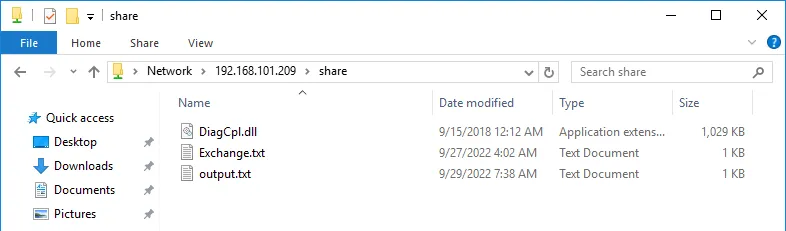
We access this file share from a Windows machine after logging in as user1.
We can see a shared folder with the name share on our shared file server.

Double-click the shared folder to access its contents. We see the files in the shared folder. Our user1 is a member of Group_A and has full access to the shared folder contents. This user can write, edit and delete files in this shared folder.
The workflow to create a hidden Windows SMB share is the same. The difference is in the file share name. Append the $ character at the end of a share name to make this shared directory hidden, for example, share_h$. A hidden file share is not displayed when you browse a file server over the network by adding the server IP address or name (\\192.168.101.209 or \\Server2019, for example).

To access a hidden file share, you must enter the full path to the share, for example:
\\192.168.101.209\share_h$

Note: There are hidden shares created by default in Windows for system purposes and administrative access.
- C$ for a system volume and similar shares for each disk volume
- Admin$ – access to the %SystemRoot% directory (usually C:\Windows)
- IPC$ – remote IPC used in named pipes
Advanced Sharing Settings
There are advanced sharing settings in the Network and Sharing Center in the Windows GUI.
To access these settings, go to Control Panel > Network and sharing center > Advanced sharing settings.
If you want to make a Windows machine visible over the network when sharing files and allow users to access shared resources, select the following options in the network profile you are using:
- Turn on network discovery
- Turn on file and printing sharing
These settings impact Windows Firewall settings to allow ICMP and SMB traffic.
TCP ports 445 and 139 must be opened in the firewall on the server for file sharing. Ensure that the File and Printer Sharing (SMB-In) rule in Windows Firewall is enabled to avoid issues.

Note that the Server service must be running in Windows to make a Windows file share work.
How to Map a Network Drive
As mentioned above, users can enter the path to the share to access shared files and folders. It is also possible to make shortcuts to the shared folders. However, this way may not be the most convenient for some users. In this case, you can map a file share as a network drive and access this network drive in My Computer or This PC (Windows Explorer) just like you would access local disk volumes.
Do the following to map a network drive:
- Access the file share server in Windows Explorer as explained above. Enter the server name or IP address in the address bar, for example, \\192.168.101.209
- Wait until the list of shared folders is displayed. You may need to enter a username and password if the credentials on the client and server don’t match.
- Right-click a shared folder you want to connect as a network drive and click Map network drive.


- Set the network drive parameters for the shared folder in the opened window.
- Select a drive letter, for example, H:
- The path to the shared folder has been automatically selected.
- Reconnect at sign-in – the shared folder is connected automatically when a user logs into Windows on a client machine.
- Connect using different credentials – use this option if the credentials of the user account you use to log in on a client computer don’t match the credentials of the user account configured on the file server to access the file share. An alternative use case is using the credentials of a user who has more permissions than the current logged-in user.
- Hit Finish to save settings and close this window.


Now you can see the mapped network drive in Windows Explorer and use it for accessing the folder on the fileshare server (file server).

How to Check the Windows SMB Share Status
Configuring a Windows file share is the main point for setting up a file server. However, you need to know how to monitor shared resources, including shared folders, connection status, and opened files. This information is also useful for troubleshooting.
You can get Windows file sharing status in the Computer Management window, which you can access by running the compmgmt.msc command in CMD.
Go to System Tools > Shared Folders in the Computer Management window. There you can locate three items: Shares, Sessions, and Open Files.
- Shares. This item shows you all folders shared on the current Windows machine, including hidden shares.
- Sessions. This item displays all active sessions by showing connected users, computers and connection time.
- Open files. Displays which files stored in shared folders are opened and in which mode (read/write).
You can right-click the needed item, such as an opened session or file and close this session or file (disconnect a connected user and remove the file lock).

Configure Windows File Sharing in the Command Line
Actions we made in the graphical user interface (GUI) to set up a Windows file share can also be performed in the command line interface (CMD). Knowing how to configure a Windows SMB share in CMD can help you automate the configuration process.
Let’s configure a file share with settings identical to the settings we configured before in the GUI.
- Press Win+R. In the Run prompt type cmd and hit Enter to open Windows Command Line.
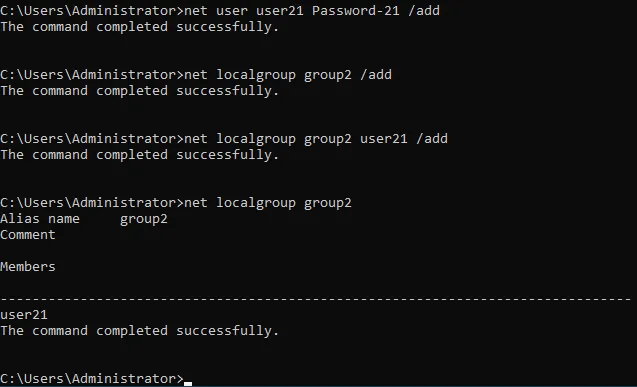
- Add a user with setting the username and password.The command syntax is:
net user username userpassword /addWe add user21 in CMD:
net user user21 Password-21 /add - The command to add a group is as follows:
net localgroup groupname /add.We add group2 in this case:
net localgroup group2 /add - Add the user to the group by using the command like:
net localgroup groupname username /add.In our case, we add user21 to group2:

net localgroup group2 user21 /add - Now we need to create a new directory, which we will share. We go to drive E: and create the share2c directory (c means command line or console for more clarity in our directory name).
e:md share2c - List directory contents to ensure that the directory has been created:
dir - Share the share2c directory by setting the folder path, user or group name and permissions for this user or group. The general command syntax is:
net share sharename=folderpath /grant:username, permissions.Permissions can be read, change, or full. In our case the exact command is:
net share share2c=e:\share2c /grant:group2,full.We grant full permissions to group2.

- Set NTFS permissions for the shared folder with
icacls. - We set full permissions to group2 for the E:\share2c directory:
icacls "E:\share2c" /grant group2:(OI)(CI)F /TYou can see how these settings applied in the command line are displayed in the GUI in the screenshot below.

- Check the Windows file share status.


- Check existing file shares:
net share - View sessions opened by users connected to the shares:
net sessions - View files opened by users over the network:
net files

- Useful commands to manage working Windows file shares.
- Close the files opened by users by defining the file id (the id is displayed with the net files command that you can see in the screenshot above):
net file id /close - List opened sessions for the appropriate computer name:
net session \\ComputerName - Disconnect incoming SMB connections for the selected machine:
net session \\ComputerName /delete - Connect to a file share and map the file share as a network drive using the logged-in credentials:
net use H: \\FileServer\SharedFolderIf a file share contains spaces, you must enclose the path in quotes (“path”).
- The alternative command:
pushd \\FileServer\SharedFolder
Conclusion
Configuring a server for file sharing is not difficult, especially on Windows Server 2019. Keep in mind that with access granted to multiple users, files on Windows SMB shares as well as NFS shares can get corrupted or permanently deleted. Make sure to use a dedicated solution to backup Windows servers and file sharing servers. The best choice is a solution that supports multiple platforms like NAKIVO Backup & Replication.
With an SMB File Server you can share folders and files within an Active Directory (AD) domain. For example, you can make a network folder available where people can store files from which they can work together.
In this guide, we will show you how to install the File Server role on a Windows Server and then create a ‘share’: a share is the term used for folders that are shared on a File Server.
- The disk on which you share data, for example a Big Storage, must be formatted as NTFS if you also want to use the File Server Resource Manager or DFS Replication.
- Before you start, add the VPS that will serve as File Server to your AD domain and to the same private network as your Domain Controller.
Installing a file server
TL;DR: Use the following command in powershell and then create file shares via Server Manager > File and Storage Services node > Shares > New Share.
Install-WindowsFeature -Name FS-FileServer -IncludeAllSubFeature -IncludeManagementTools
Step 1
Connect to the VPS you want to use as file server via Remote Desktop or the VPS console.
Step 2
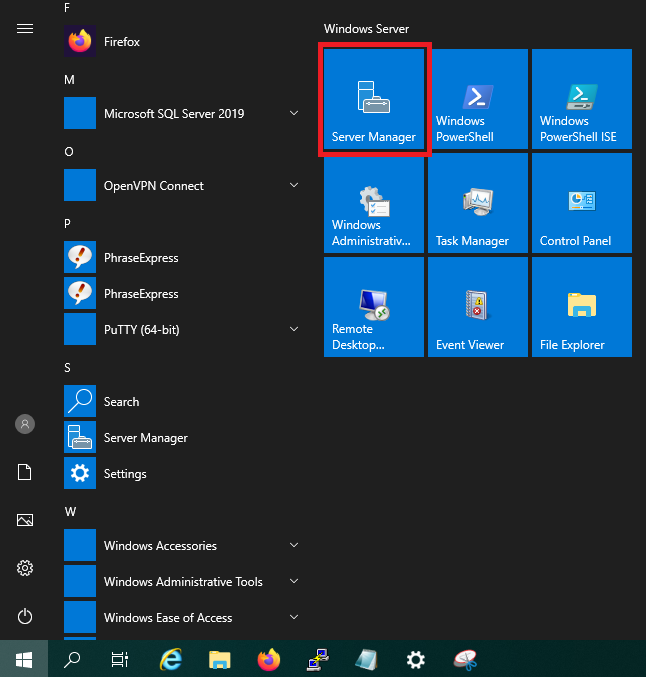
Click the Windows Start button and then click ‘Server Manager‘.
Step 3
Next click ‘Add roles and features‘.

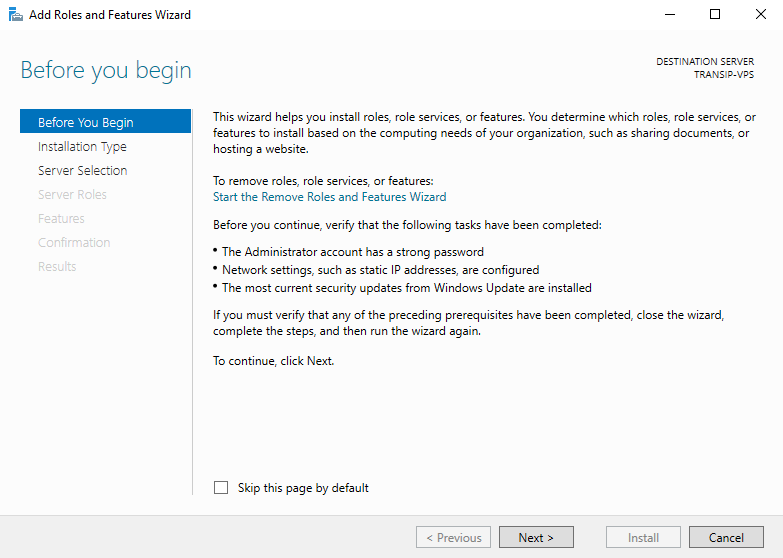
Step 4
You will now see the ‘Before You Begin‘ page. You can select not to see this page again when you add roles & features in the future. Click ‘Next‘ after you have gone through the points under ‘Before you continue‘.
Step 5
Under ‘Installation Type‘ you can choose from ‘Role-based or feature-based‘ and ‘Remote Desktop Services installation‘. Choose ‘Role-based or feature-based‘ and proceed to the next step.
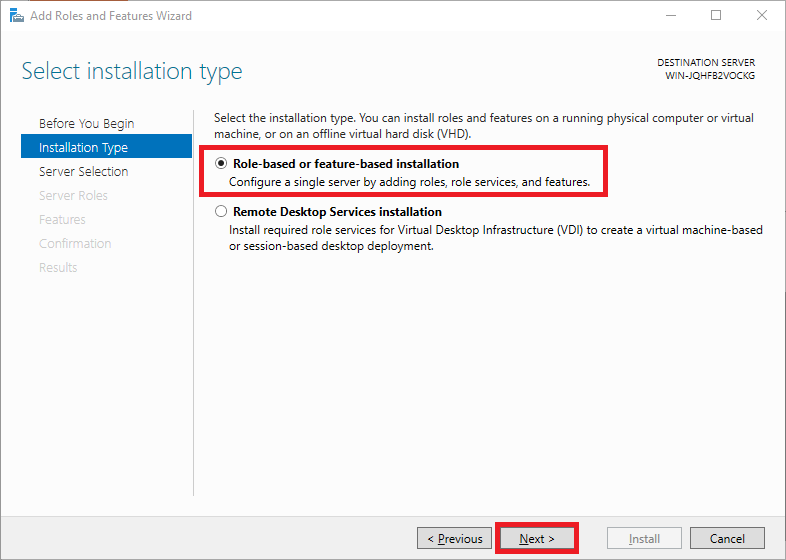
Roles add software focused on specific tasks such as hosting websites to Windows Servers, features add extra functionality to that software.
Step 6
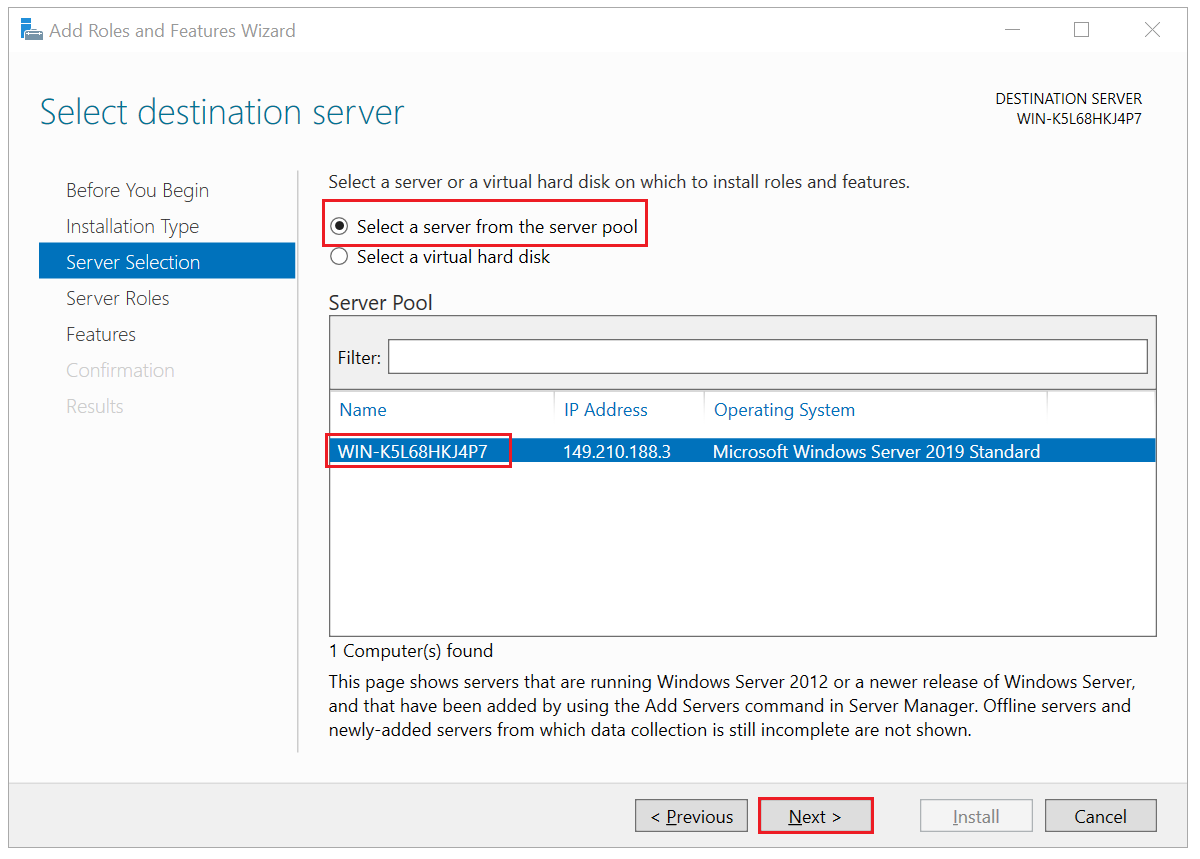
Then choose on which VPS you want to perform the installation. By default, the VPS on which you will go through the installation will be selected. Click next to continue.
When you use a server pool to install and manage roles from one central server, you will see multiple servers and select the desired server here.
Step 7
Expand the ‘File and Storage Services‘ and ‘File and iSCSI‘ options, check the ‘File Server‘ and ‘File Server Resource Manager‘ options.
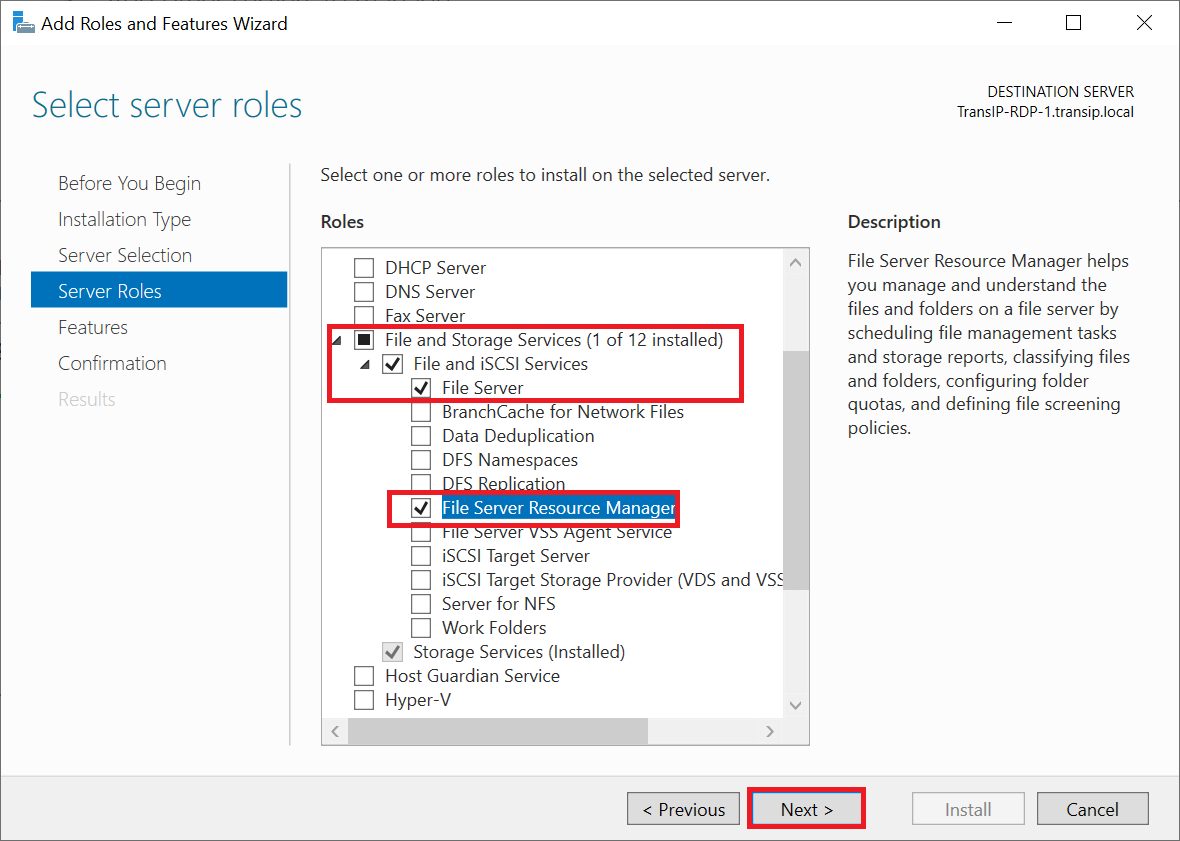
You will now see a pop-up asking if you want to install missing features. Click ‘Add features‘.
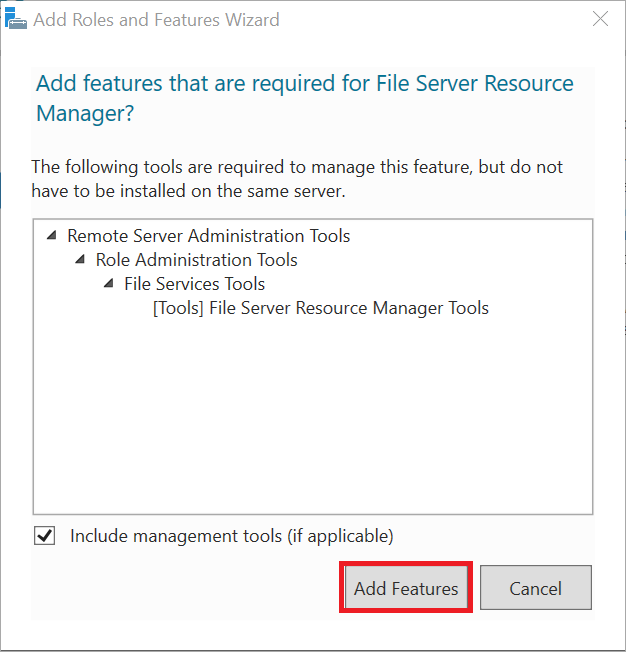
The File Server Resource Manager is optional, but provides useful options, such as the ability to set quotas.
The other options are outside the scope of this manual, but can be a very useful addition depending on your use case. On this page you will find an explanation of the roles that you can select.
Click ‘Next‘ to continue.
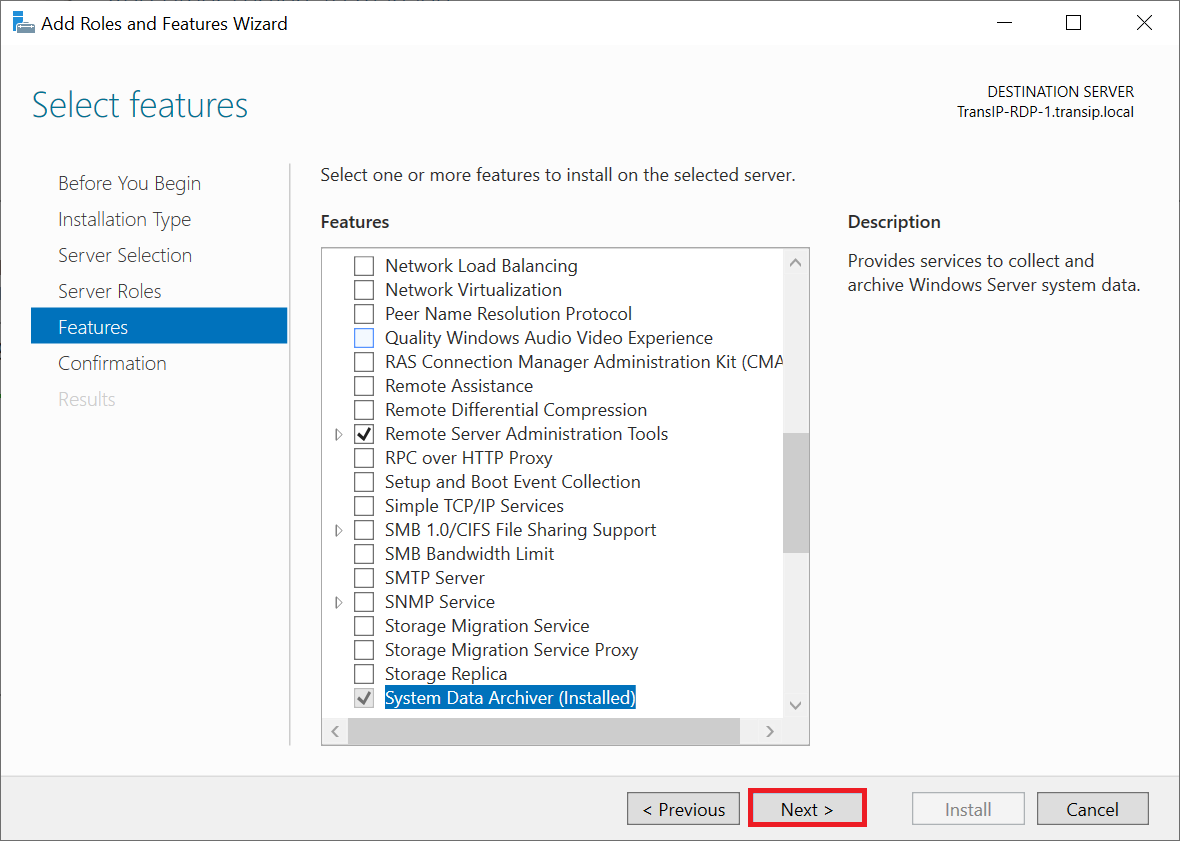
Step 8
Do not select any optional features and click ‘Next‘ directly to continue.
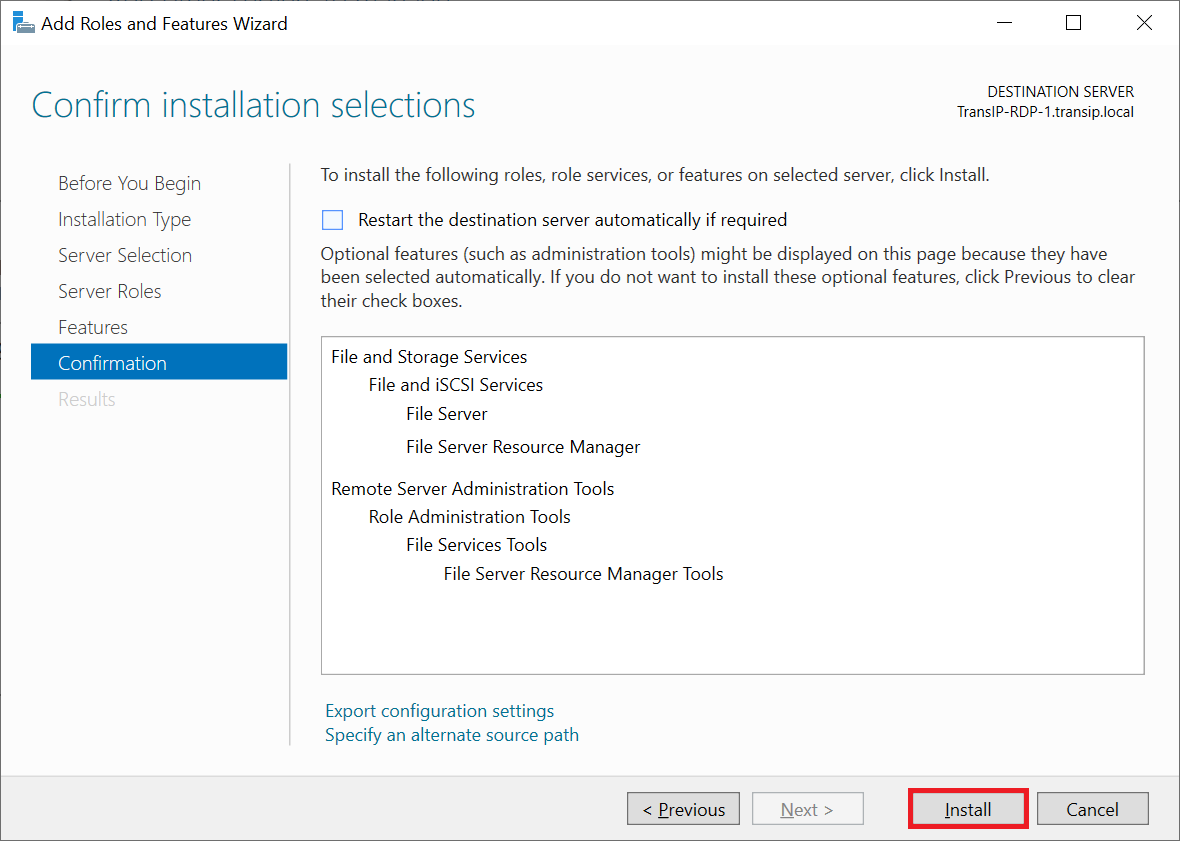
Step 9
You will now see a confirmation of the selected options. Click ‘Install‘ to start the installation. A server restart is not required.
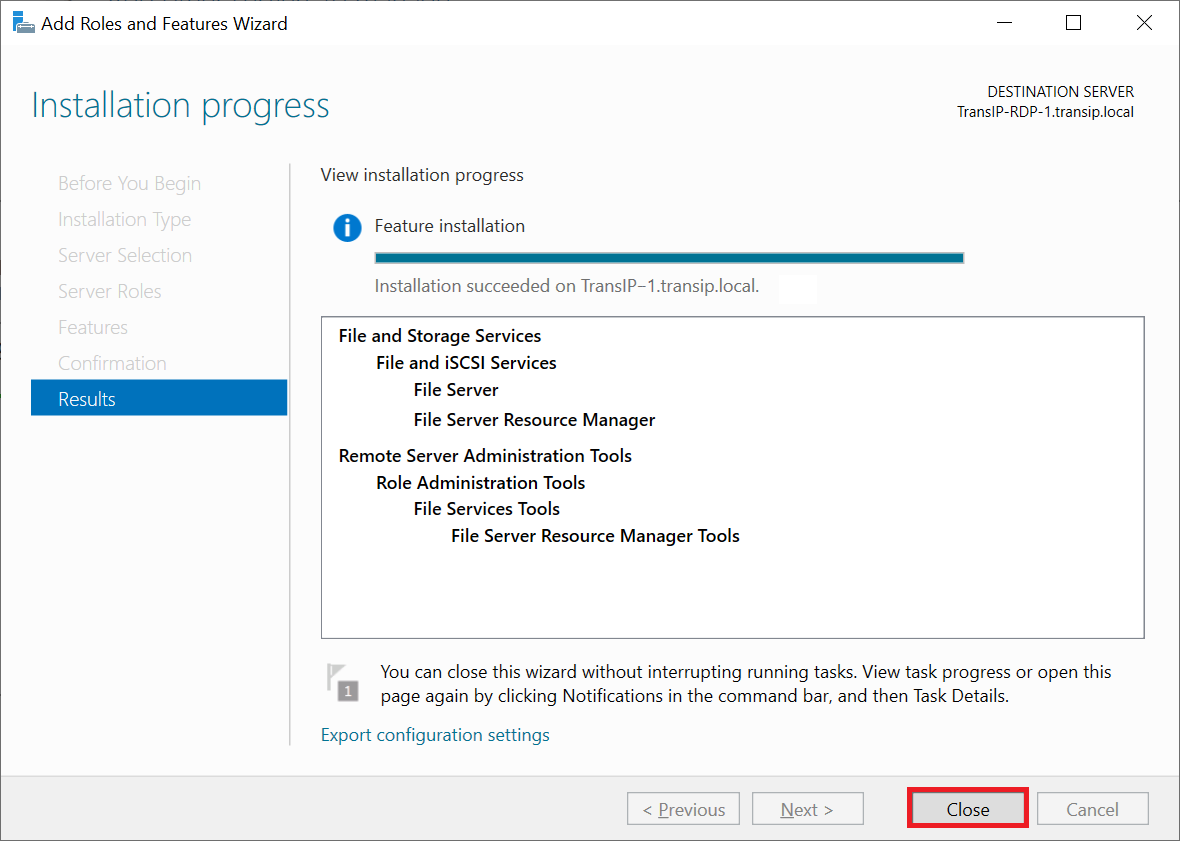
Step 10
The installation is completed quite quickly. Click ‘Close‘ to continue and return to the Server Manager. In the next section, we will show you how to add a ‘share‘ to your server.
Adding a share
If you use a server pool and went through the previous step from a central server on which you install and manage roles and features, first restart the SMB server and then follow the steps in the remainder of this article on the actual SMB server.
Step 1
Restart the Windows Server Manager if you closed it after installing the File Server Role and click ‘File and Storage Services‘.
Step 2
Then click ‘Shares‘ > ‘To create a file share, start the New Share Wizard‘.

Step 3
You will now be given the option to select a profile. SMB is the default solution for Windows Servers and can also be used on Linux systems by installing Samba. NFS is the default Linux solution that can also be used by Windows Servers. However, SMB is the standard for Windows and supports most features. Therefore, select ‘SMB quick‘ and click ‘Next‘.
You are free to use the ‘Advanced‘ option. However, the settings that you can adjust with this can also be adjusted afterwards.
Step 4
Then select the disk (volume) on which you want to create the share and click ‘Next‘. In the example below we use a Big Storage.
There is also an option to create a specific folder, but a folder will already be created on the selected drive automatically in the next step.
Step 5
Enter a name for your share and note the ‘Remote path to share‘. Other users need this to be able to use your share, see the ‘adding a network location‘ section.
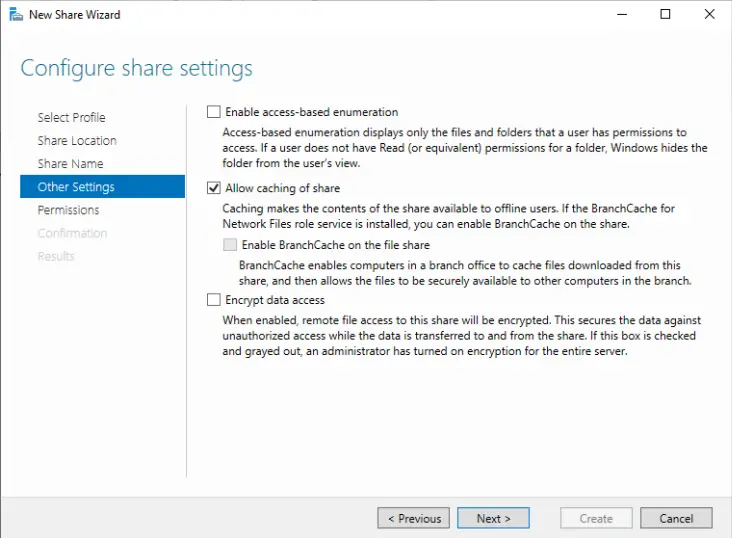
Step 6
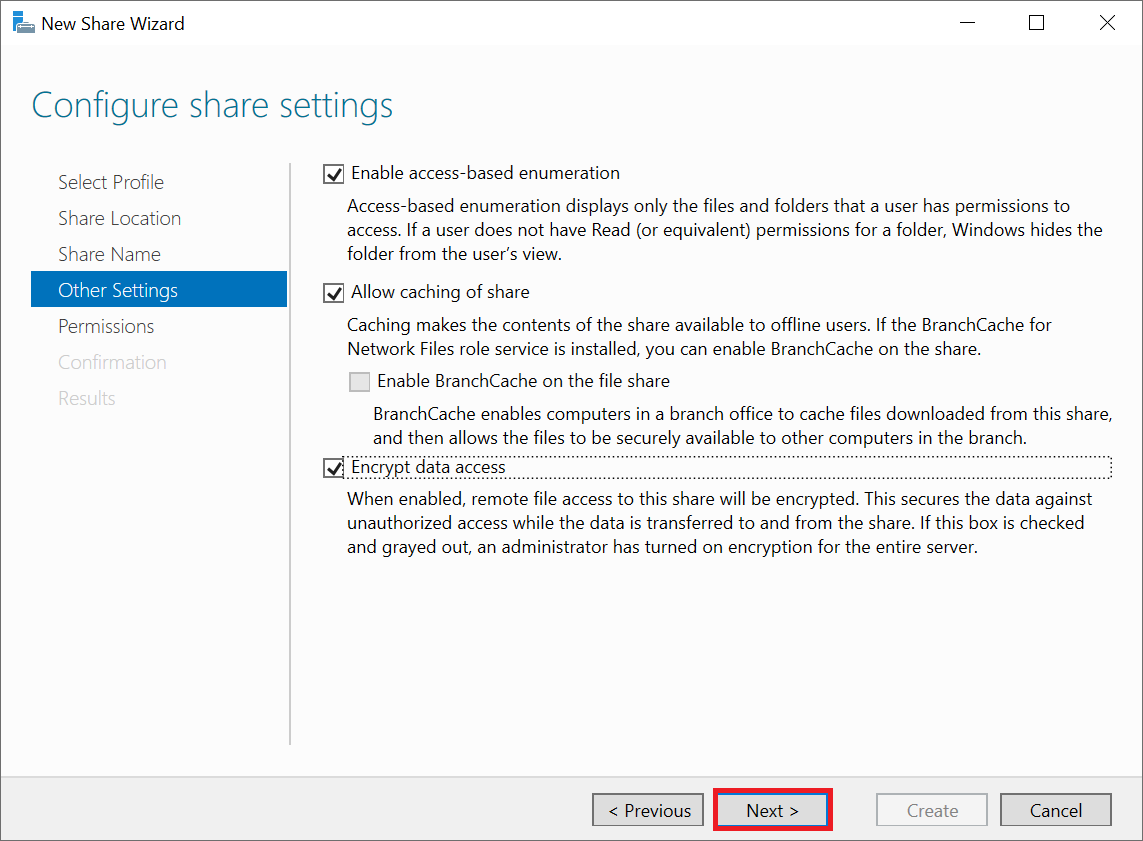
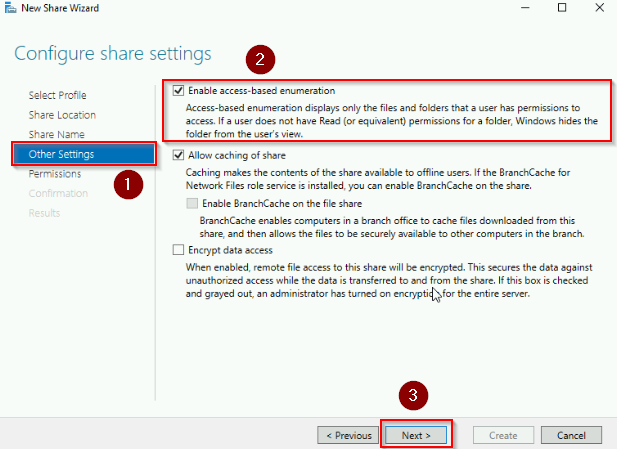
The options on the ‘Other settings‘ page are all optional, but no less important:
- Enable access-based enumeration: A user only sees the files and folders he/she has access to.
- Allow caching of share: Files are also available offline because they are cached.
- Encrypt data access: The connection to the share is encrypted.
- Check the options you want to use and click ‘Next‘.
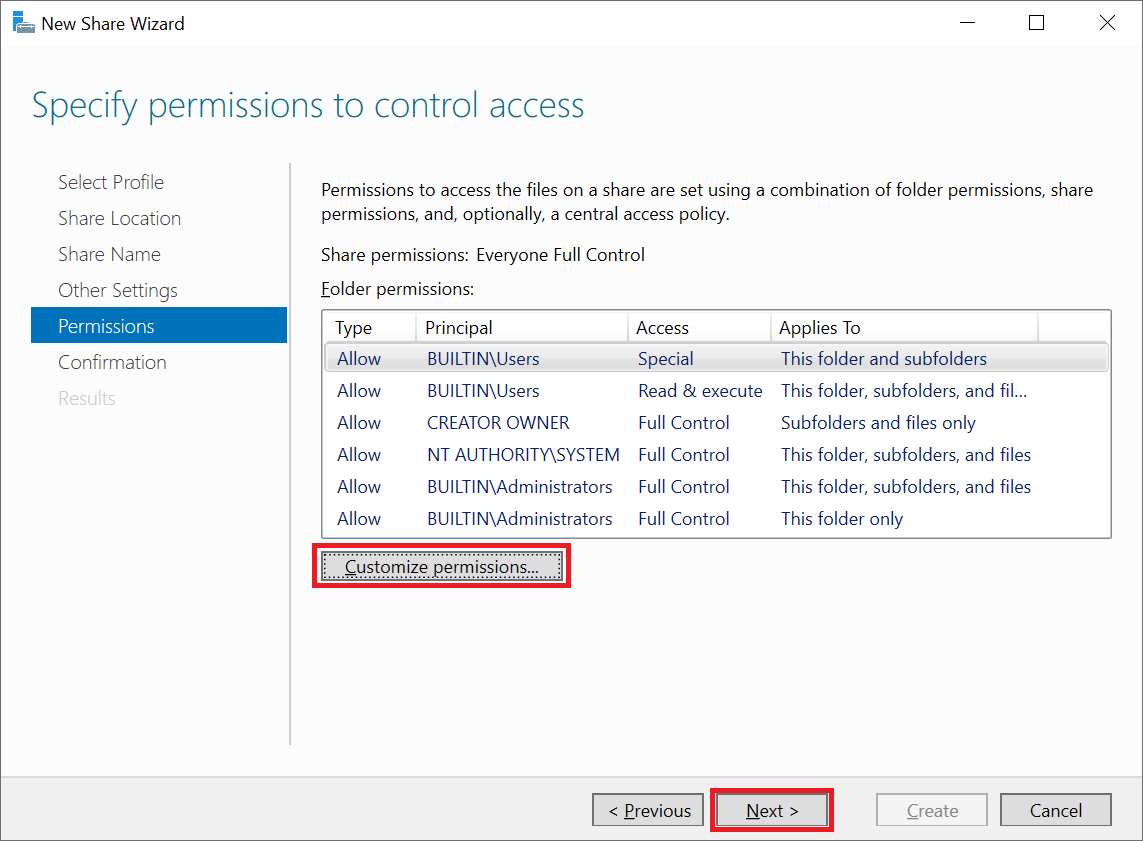
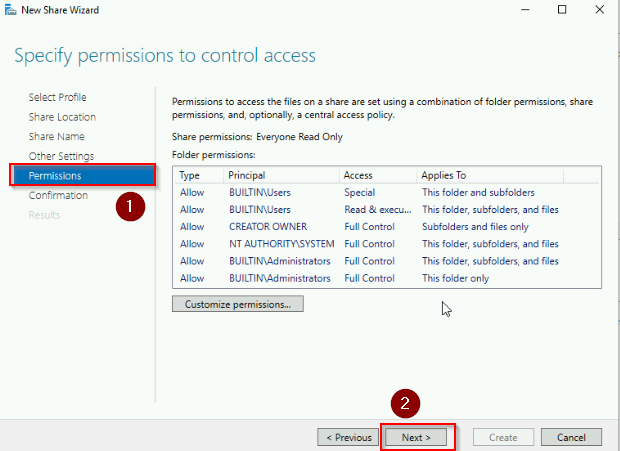
Step 7
In the permissions screen you can adjust which users have what kind of access to the share (e.g. full control or read only).
This is a very important but optional step and you can also change it later if, for example, you haven’t created any Active Directory users yet. You do this by right-clicking the name of a share in the Server Manager under ‘File and Storage Services‘ > ‘Shares‘ and selecting ‘Properties‘. In the screen that opens, you can further adjust the rights under ‘Permissions‘ as described in this step.
Click ‘Customize permissions‘.
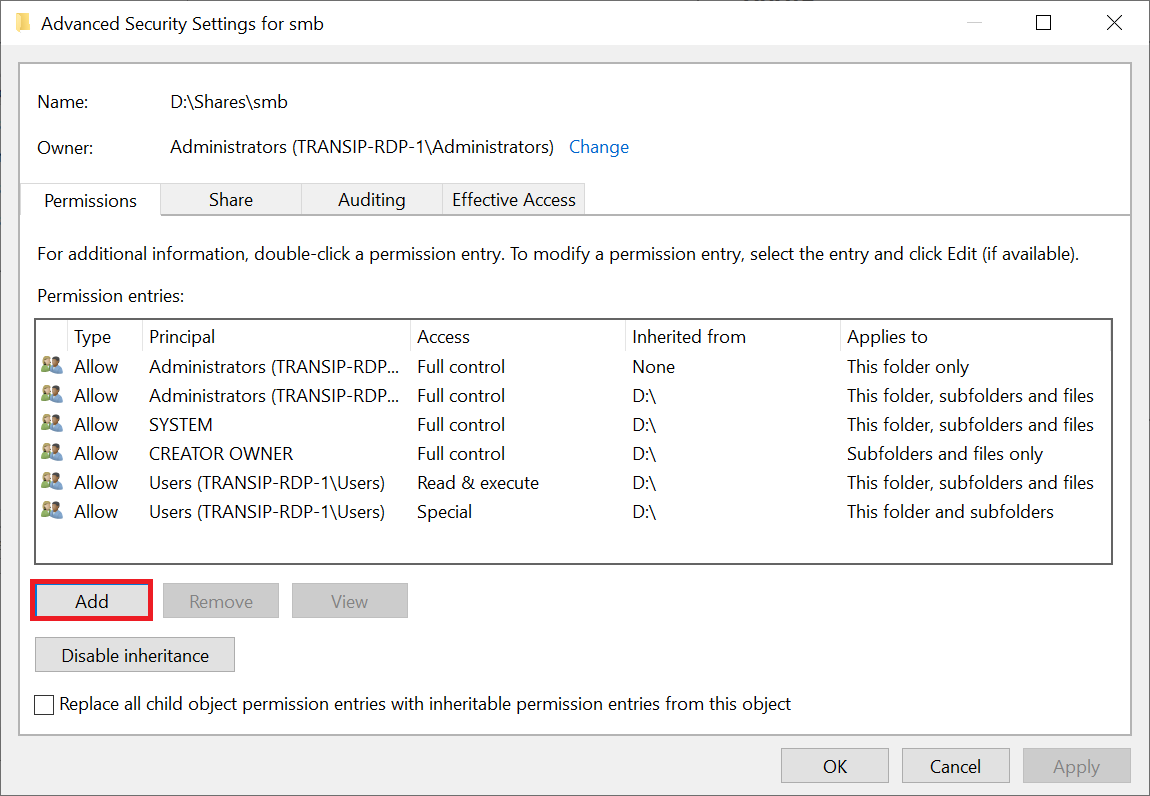
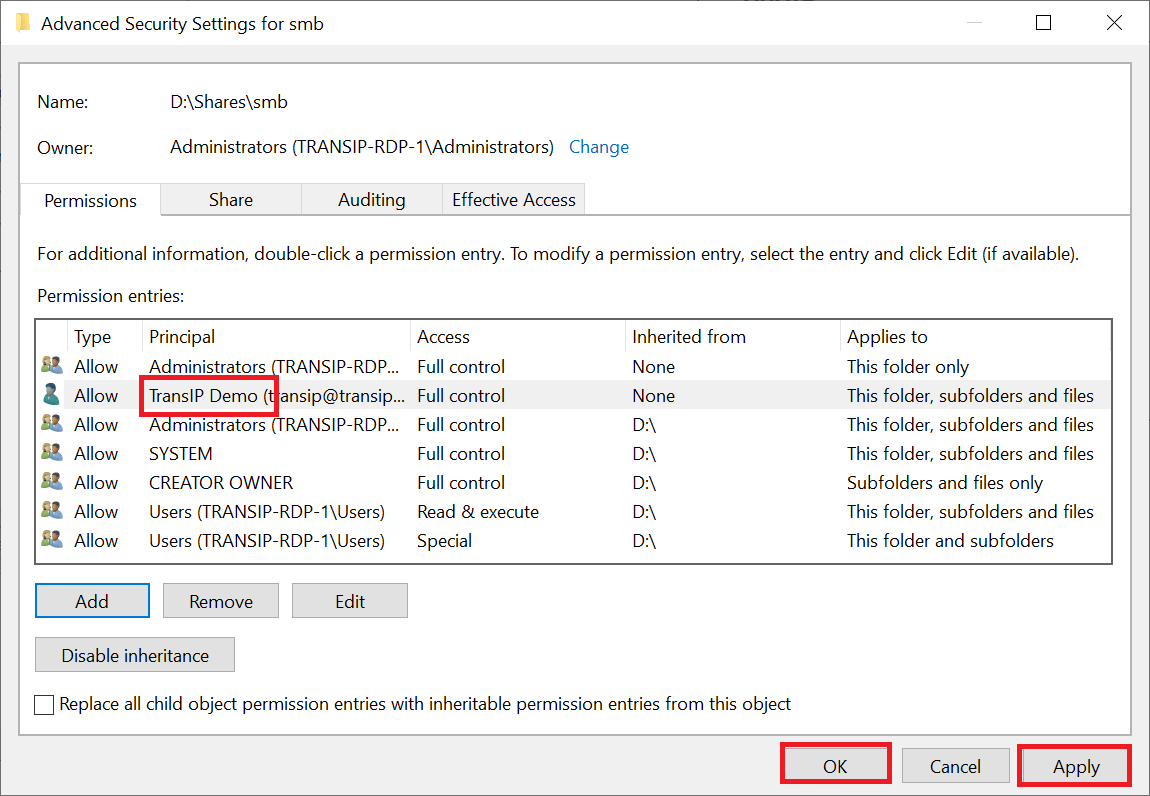
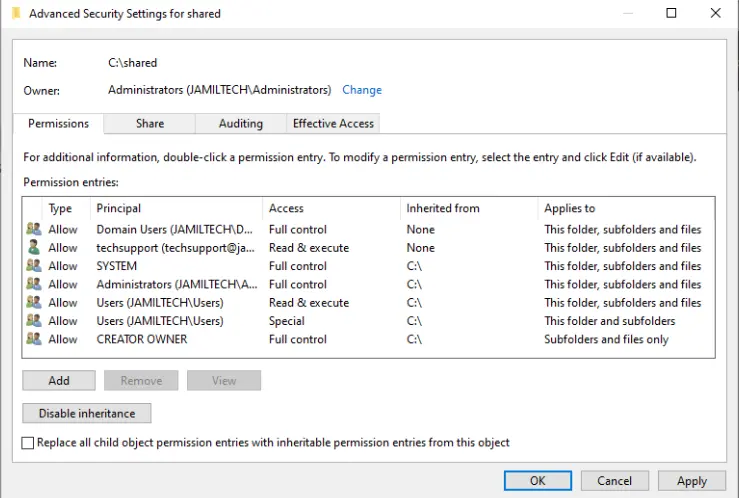
The ‘Advanced Security Settings‘ screen appears. Click ‘Add‘ to add a user or group (or select an existing user or group and click ‘View‘ to change the permissions).
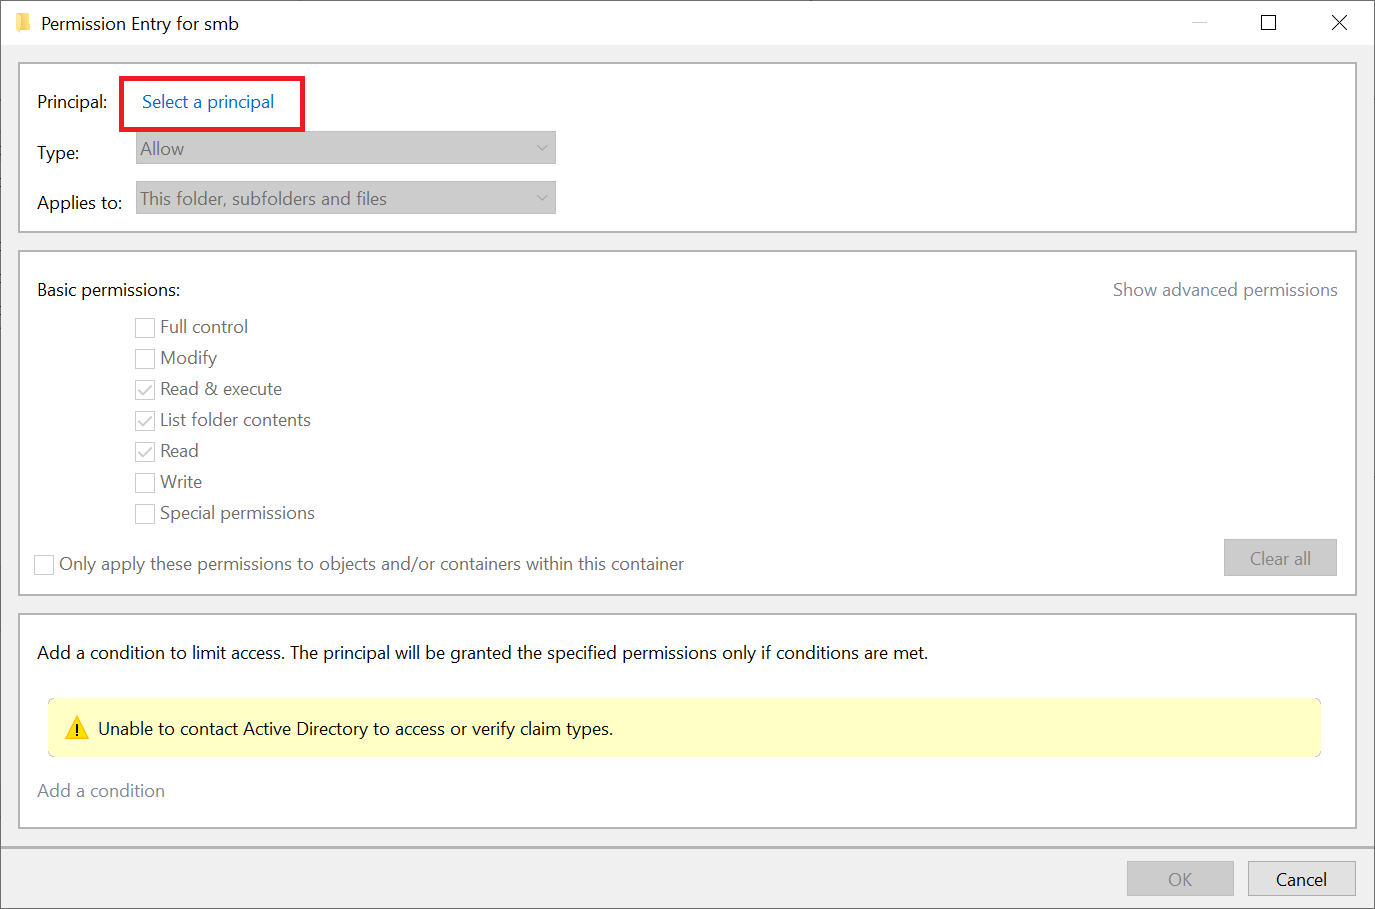
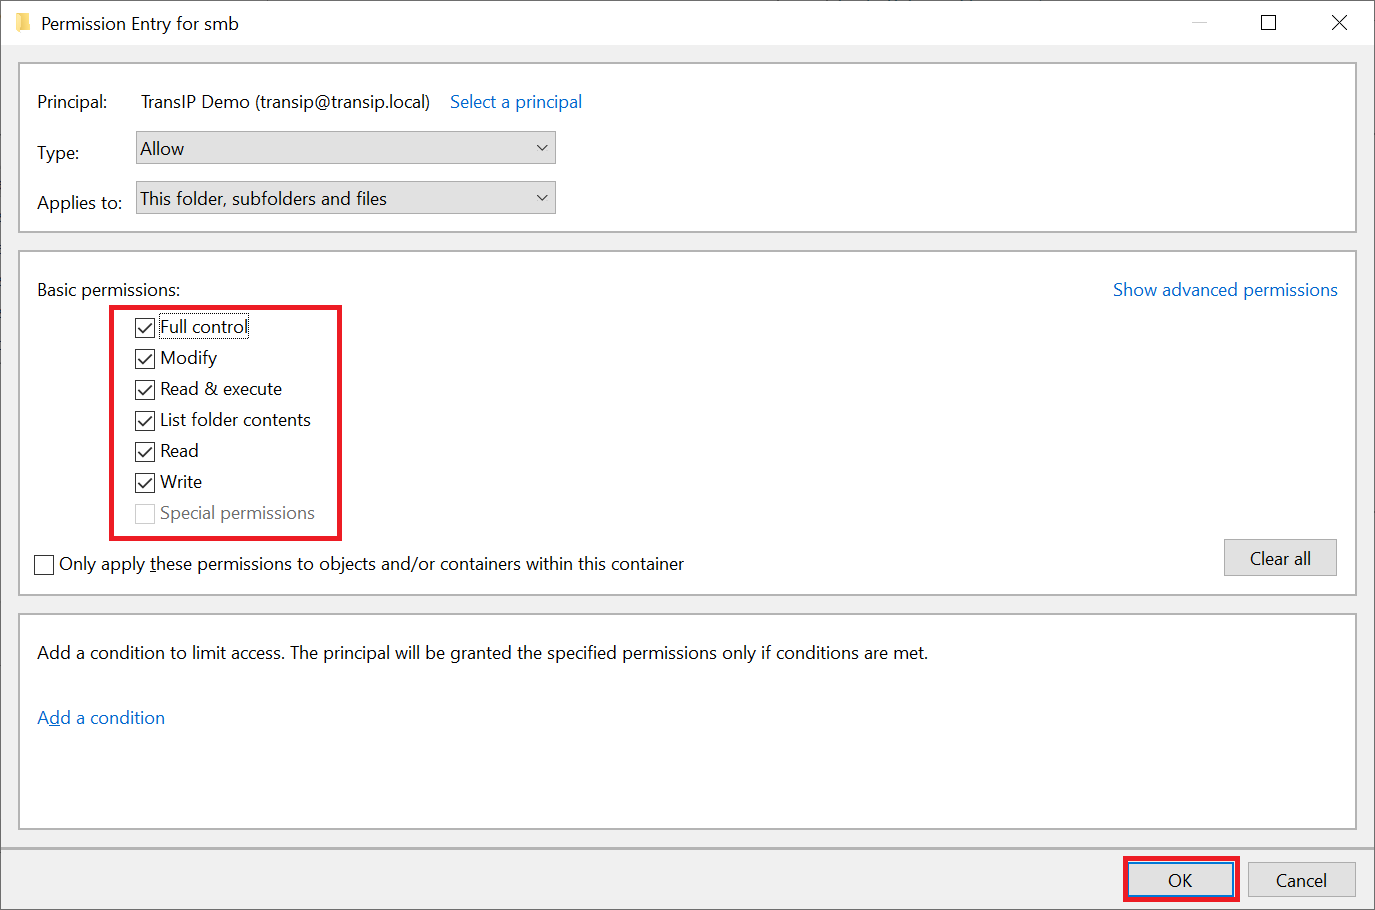
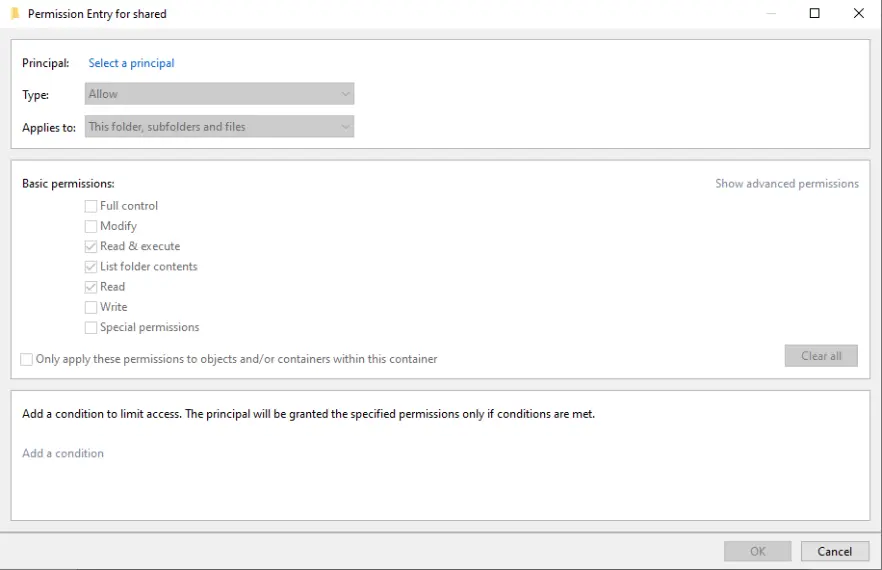
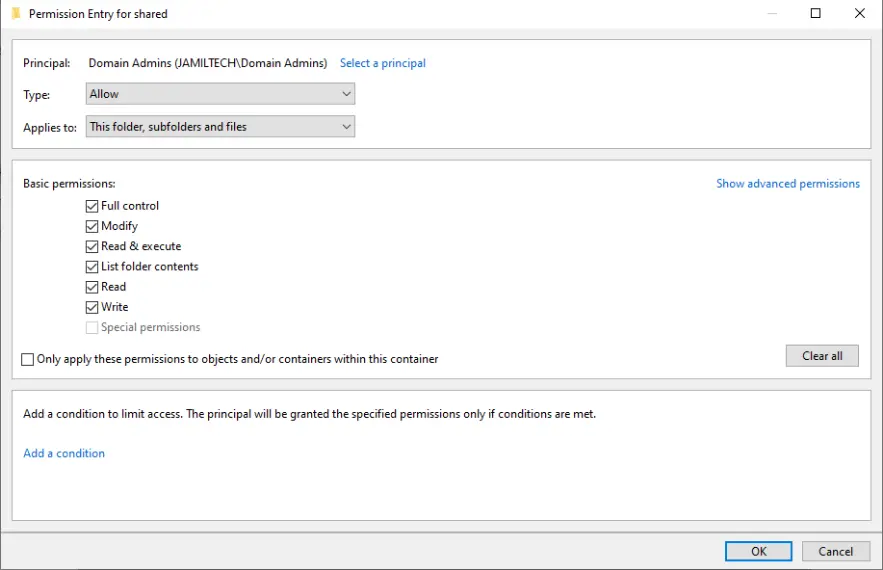
The ‘Permission Entry‘ screen appears. At the bottom you will see a heading ‘Conditions‘. Making use of this is optional and requires you to use ‘Claim Types‘. Additional documentation will be provided about this in 2022 and we will adjust this step in due course.
Click ‘Select a principal‘ to actually add a user or group.
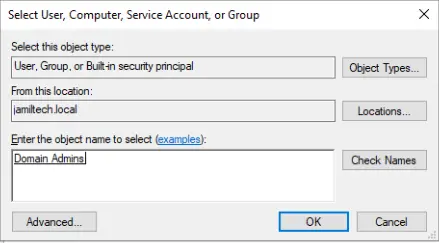
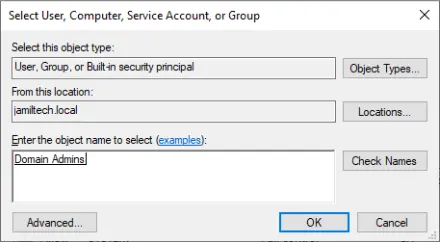
The familiar ‘Select User, Computer, Service Account or Group‘ screen appears. Search for the exact name here, or part of the name of a user, group, computer or service account and click ‘Check names‘.
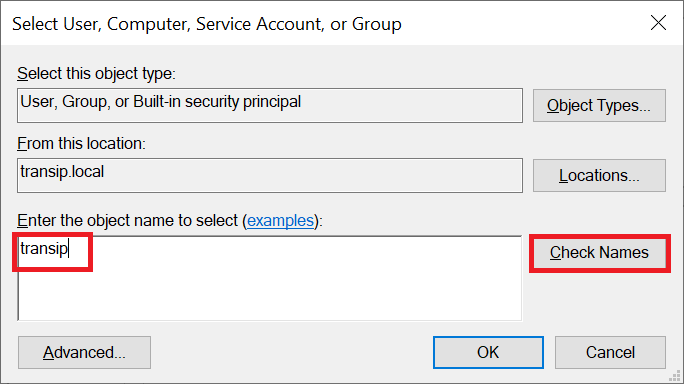
You will now see a pop-up. Enter the name and password of an AD user who has sufficient rights to join this server to the domain and click ‘OK‘.
For security reasons, it is recommended not to use the Administrator account in a production environment, but to create a separate user for each administrator with administrator rights.
You are now back in the previous ‘Advances Security Settings‘ screen. Click ‘Apply‘ and ‘OK‘ to apply the changes.
Click ‘Next‘ when you are back in the Permissions section of the New Share wizard.
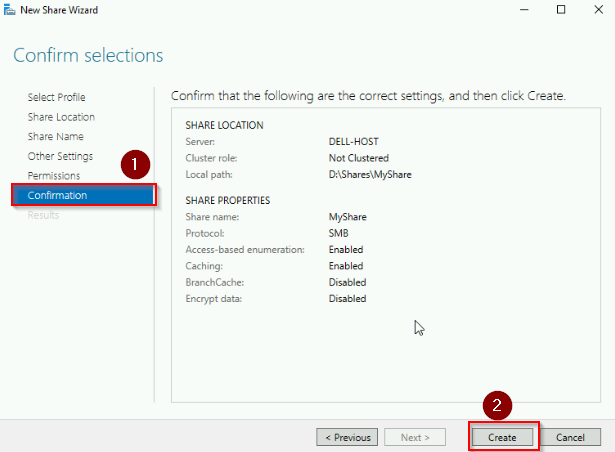
Step 8
You will now see a confirmation overview of the previous steps. Click ‘Create‘ to create the share.
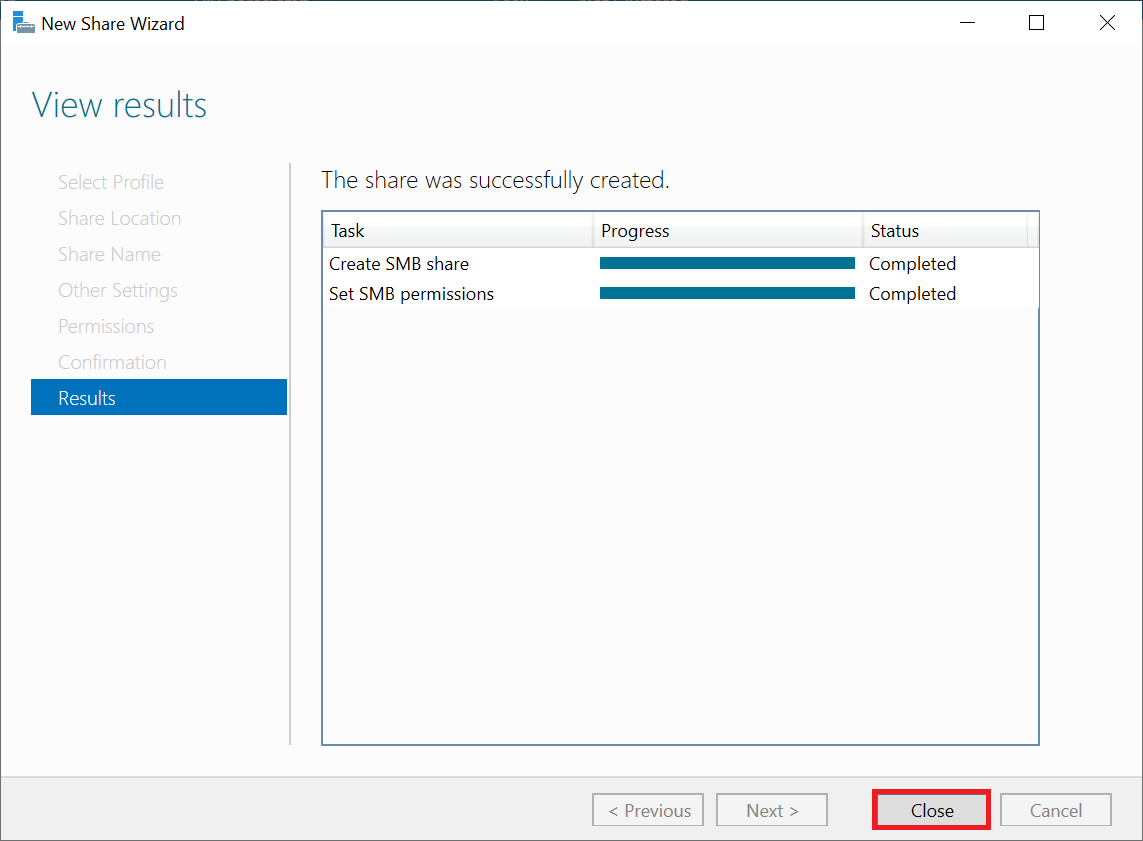
Step 9
After creating the share you will see the confirmation below. Click ‘Close‘ to close the wizard. In the next section, we’ll show you how to use the share from another Windows Server/computer within your Active Directory.
Adding a network location
Now that you’ve created a share, you naturally want to test it or use it right away. You do this by adding the share as a network drive in Windows Explorer.
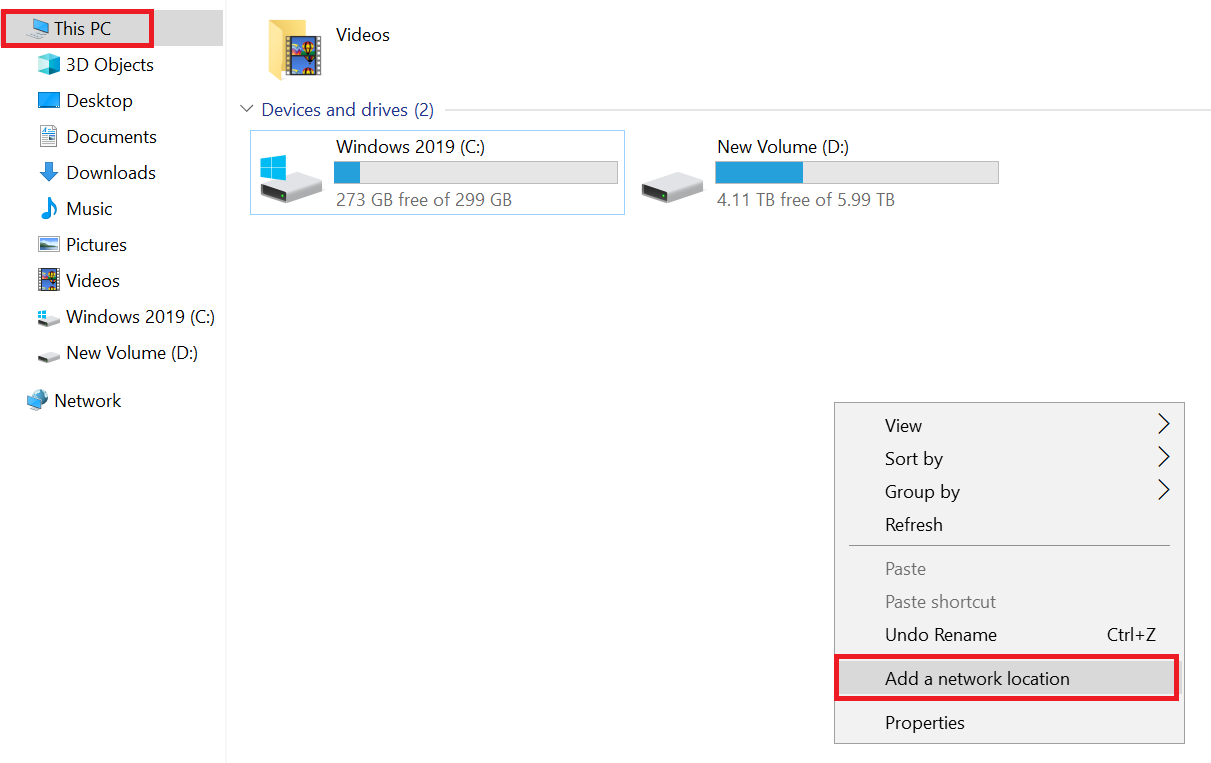
Step 1
Open Windows Explorer and go to ‘This PC‘. Right click an empty part and select ‘Add a network location‘.
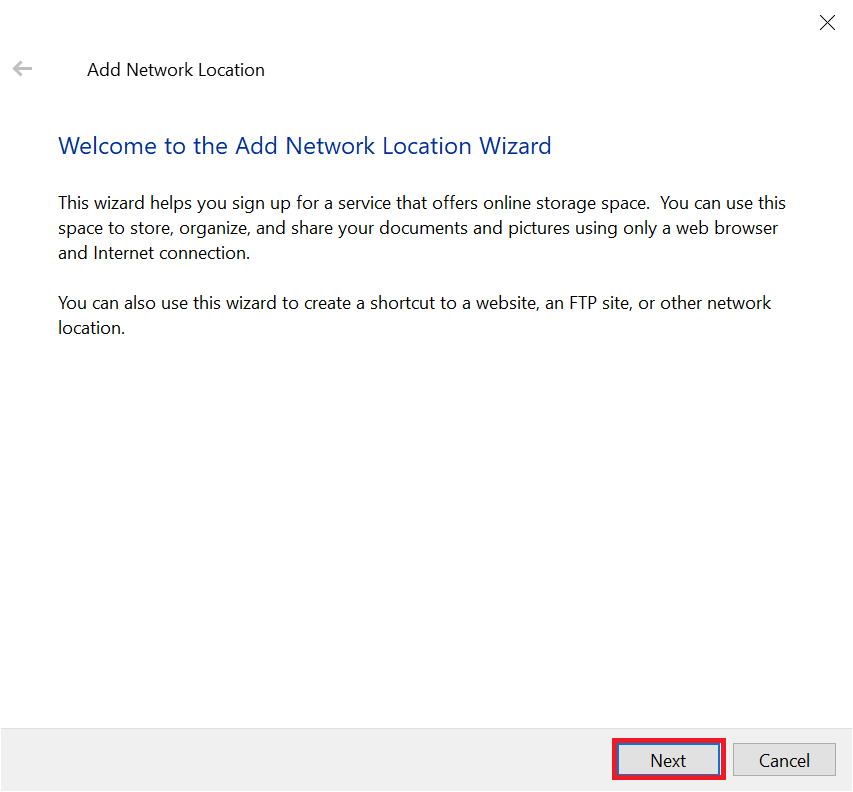
Step 2
The ‘Add Network Location‘ wizard opens. Click ‘Next‘ to get started.
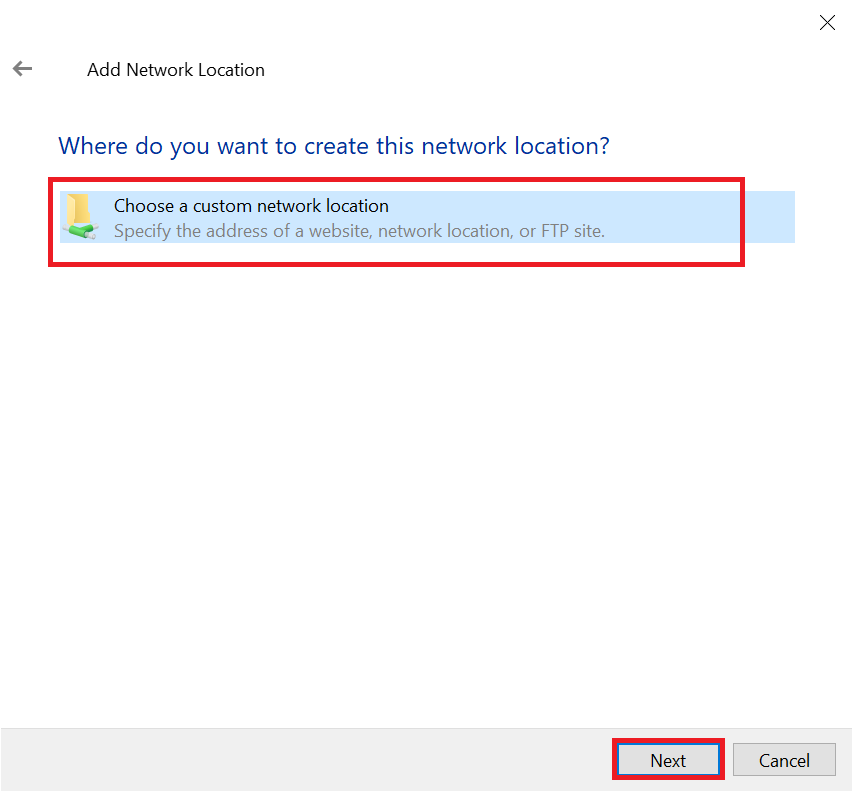
Step 3
You will now be asked where you want to create the network location, but there is only one option for that. Select ‘Choose a custom network location‘.
Step 4
Enter the network location you noted in step 5 of adding a share and click ‘Next‘.
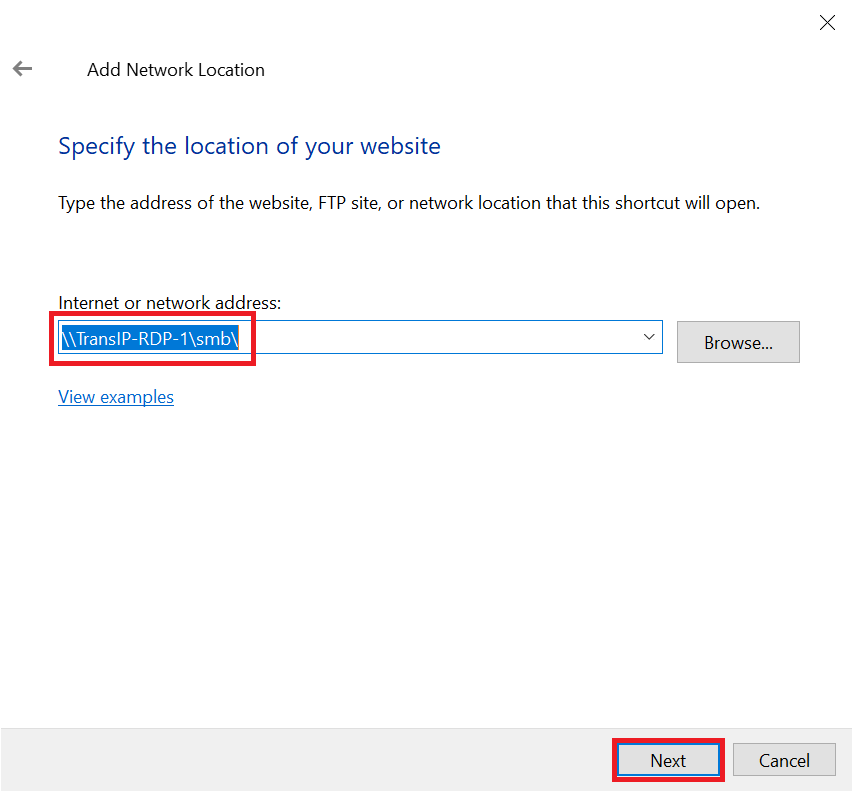
Have you lost the network location? In your File Server, go to Server Manager > File and Storage Services > Shares. The name of your share is here and the network location is \\thenameofyourserver\thenameofyourshare
Step 5
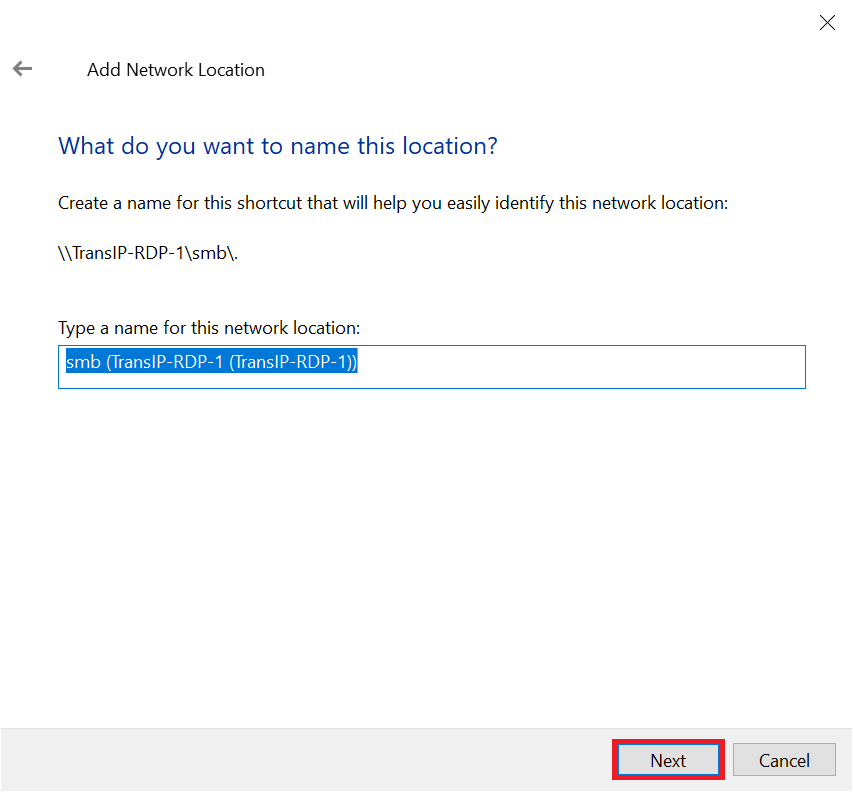
Give the network location a name that makes it easy to remember what the network location is for and click ‘Next‘.
Step 6
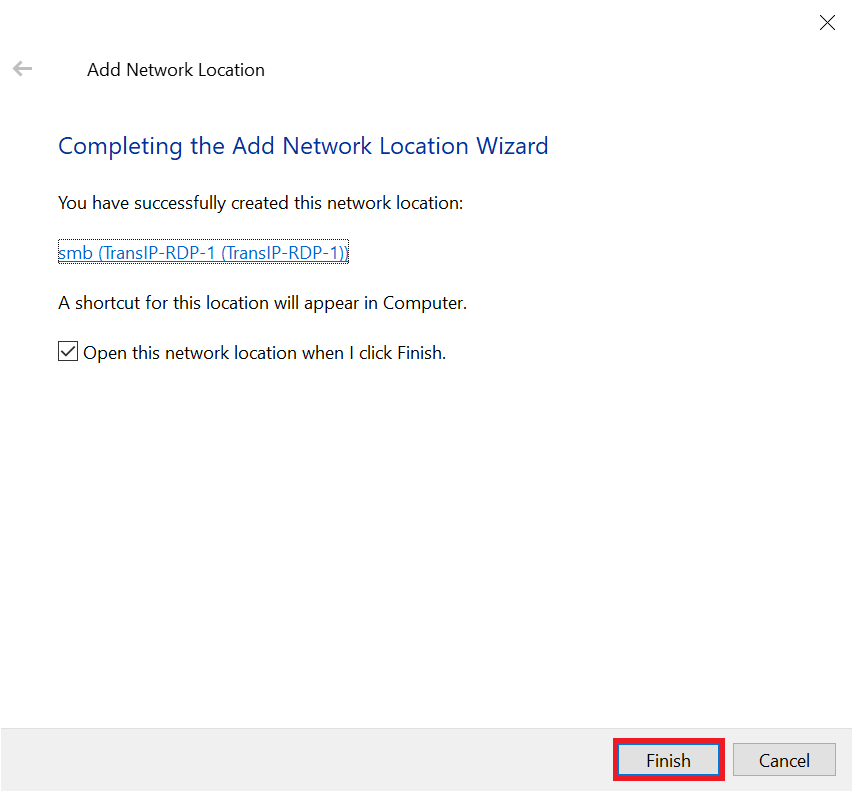
Click ‘Finish‘ to complete the wizard. You are now done adding your network share as a network location within Windows. For example, if you are working in an Office program and saving a file, you can now also navigate to this network location and save your file on the share instead of on your computer/server.
This brings us to the end of this guide on installing and configuring a Windows File Server. Additionally, take a look at our tutorial ‘Using the Windows File Server Resource Manager’.
Introduction
In Windows or Windows Server environment, SMB (Server Message Block) shares are essential for seamless network file sharing, allowing users and applications to access files remotely. This post explores several methods to create an SMB share, including using Server Manager, File Explorer, PowerShell, and Computer Management.
Understanding Permissions
When creating an SMB share in Windows Server, understanding how permissions work is crucial for securing access to your shared resources. Windows Server uses two types of permissions: NTFS permissions and Share permissions. These permissions control what actions users can perform on the files and folders, both locally and over the network.
NTFS Permissions
NTFS (New Technology File System) permissions are applied directly to the files and folders on the disk and determine what users can do when accessing the folder locally or over the network.
The permissions can be ranked from least restrictive (most permissive) to most restrictive (least permissive) based on the level of access they grant to files and folders. In other words:
- More Actions Allowed = Less Restrictive: The more actions a permission allows, the less restrictive it is.
- Fewer Actions Allowed = More Restrictive: The fewer actions a permission allows, the more restrictive it is.
Here’s the order from least restrictive to most restrictive:
- Full Control: Allows users to do everything, including modifying permissions and taking ownership.
- Modify: Users can read, write, and delete files, but cannot manage permissions.
- Read & Execute: Users can view and execute files, but cannot modify them.
- Read: Users can only view the contents of the folder.
- Write: Users can create and modify files, but cannot delete them.
Share Permissions
Share permissions control what users can do when they access the folder over the network. Unlike NTFS permissions, these are applied only when the folder is accessed as a network share.
Combining NTFS and Share Permissions
Windows Server determines a user’s effective permissions by combining NTFS and Share permissions, with the most restrictive permission applying. For example, if a user has “Read” permission on the Share level but “Modify” permission on the NTFS level, their effective permission will be “Read” when accessing the folder over the network.
Methods to Create an SMB Share
Windows Server provides multiple methods for creating an SMB share, each offering different advantages depending on your administrative needs. Below, we’ll walk through some common approaches:
Using Server Manager
Server Manager is a powerful tool that simplifies the process of managing server roles and features, including creating SMB shares. Here is the step by step guide:
- Make sure you have “File and iSCSI Services” Role installed first.
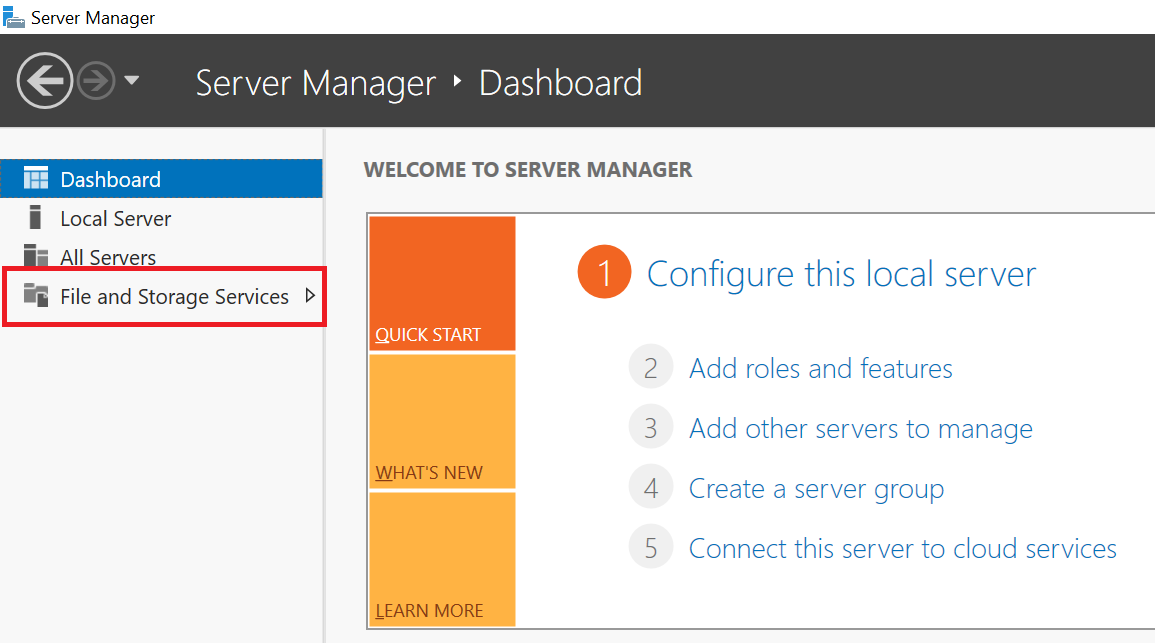
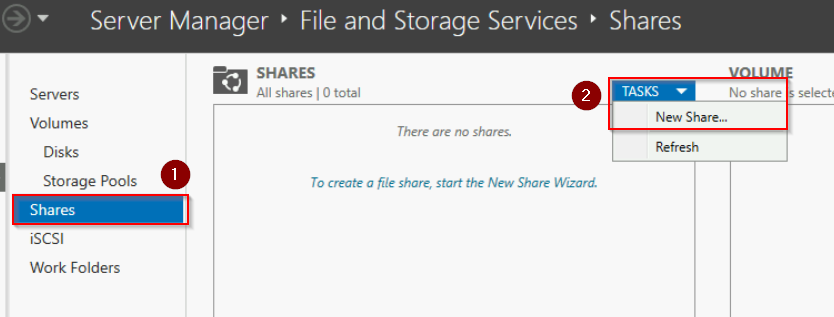
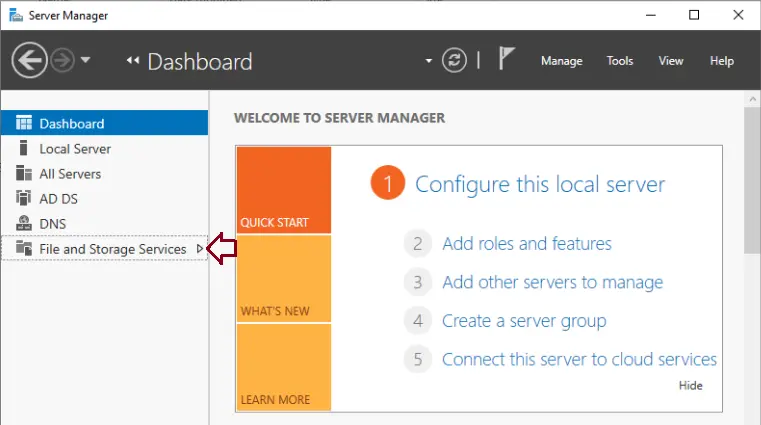
- Open Server Manager and navigate to “File and Storage Services.”
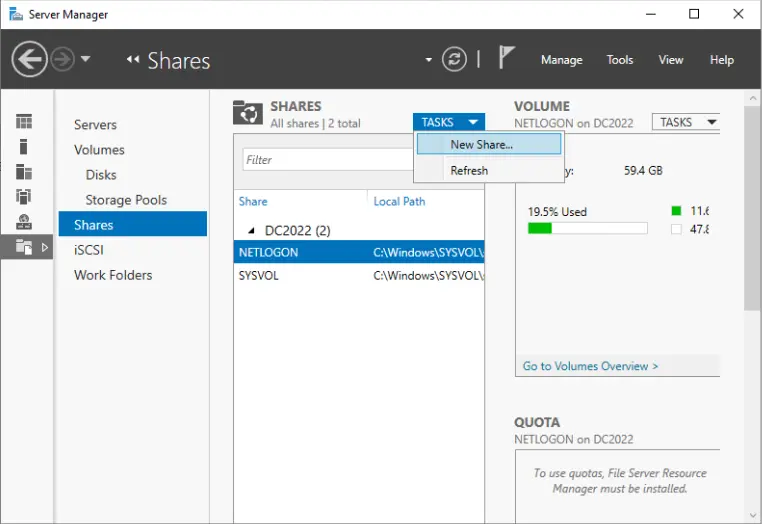
- Select “Shares,” then click on the “Tasks” menu and choose “New Share.”
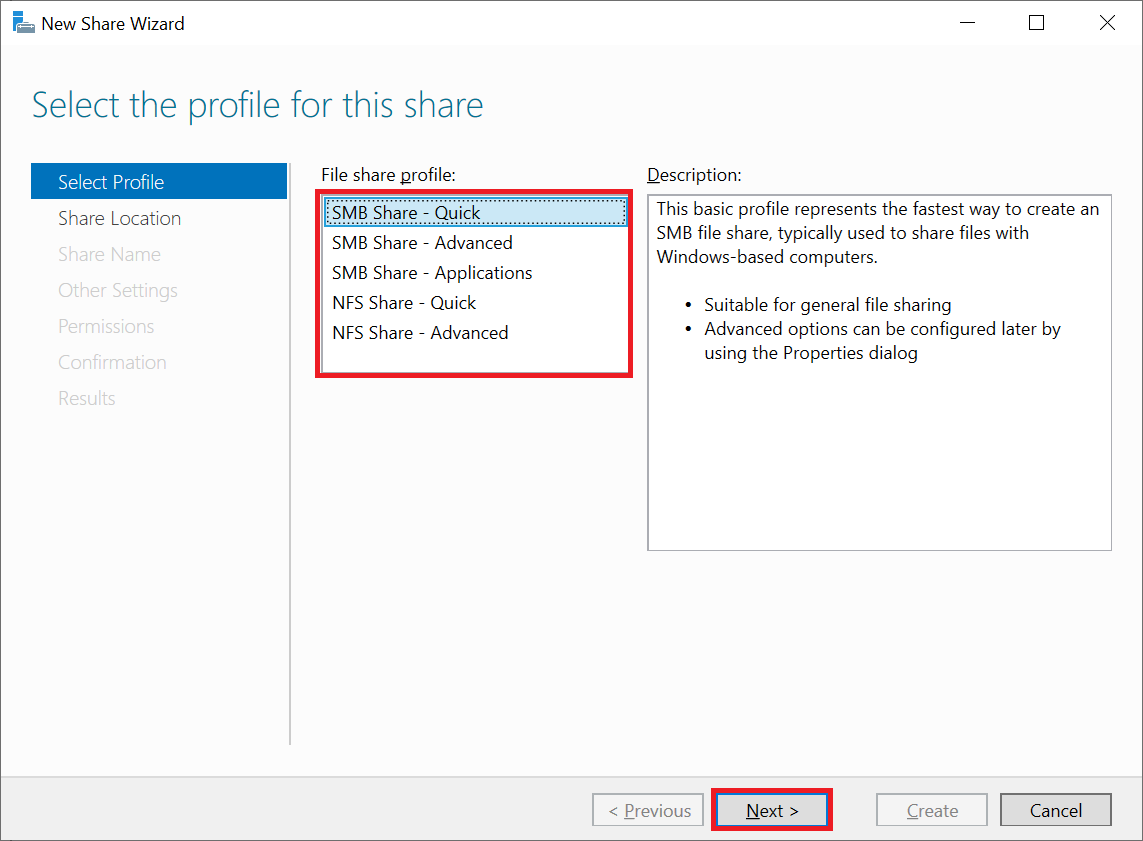
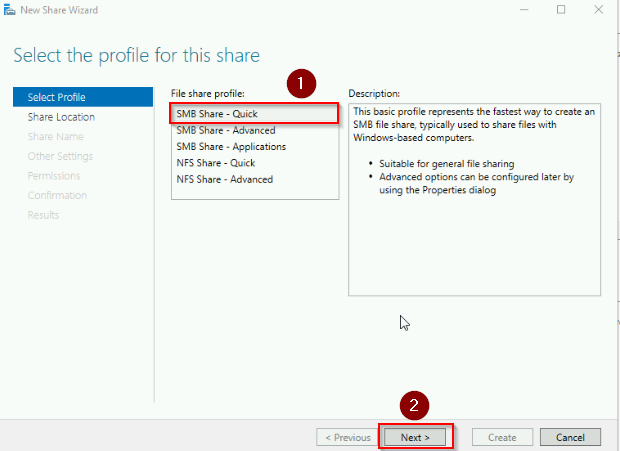
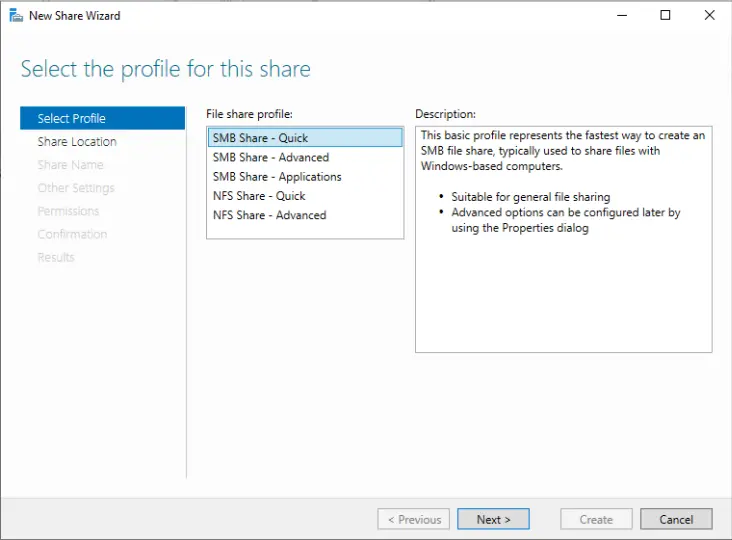
- On the New Share Wizard window, under File share profile section, select “SMB Share – Quick”. Then click “Next”.
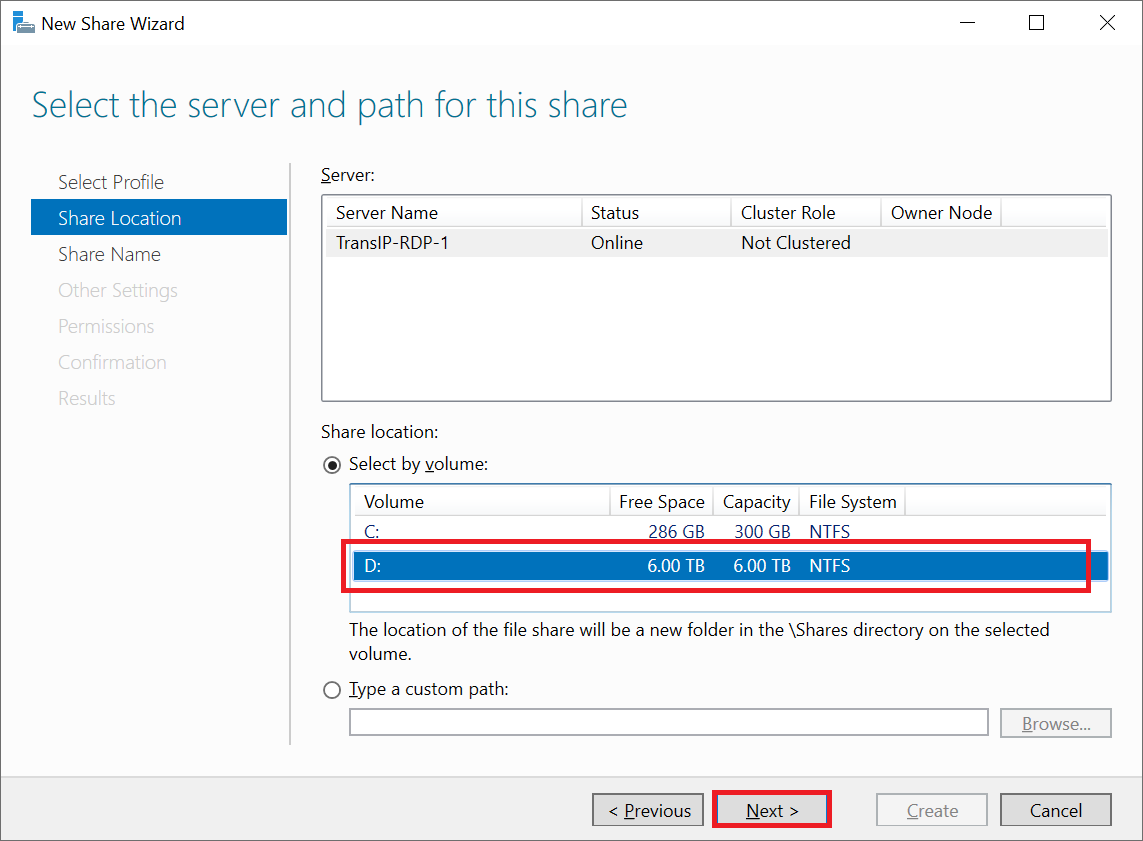
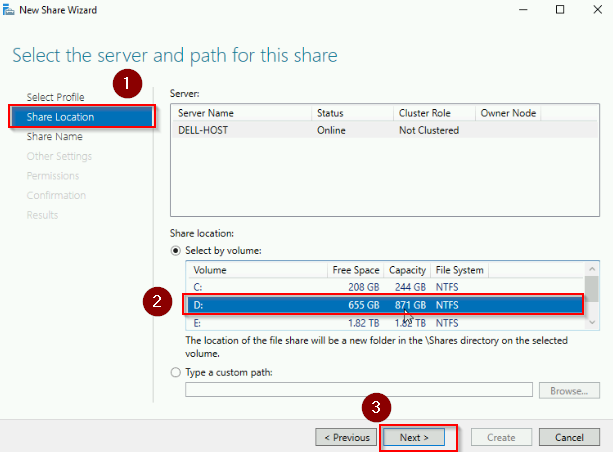
- Under the Share location section, choose the volume you want, in this case, we choose “D” volume. Click “Next”.
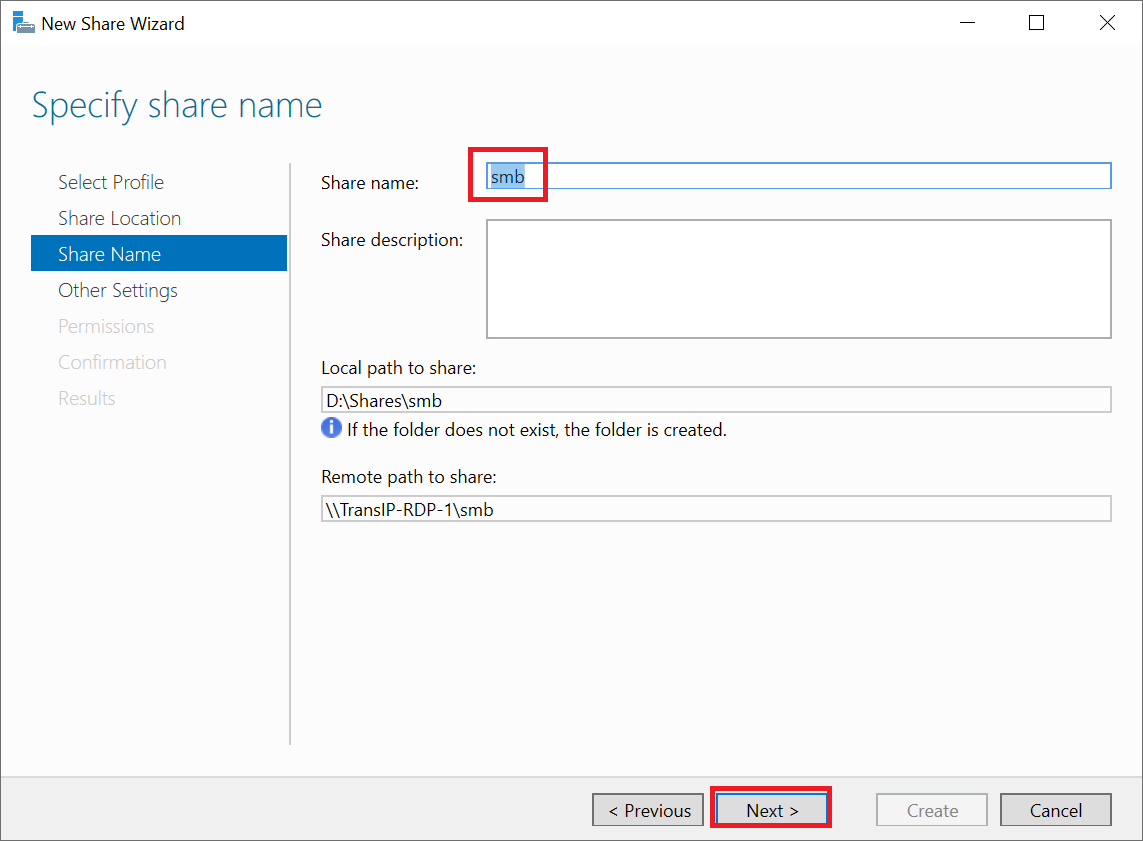
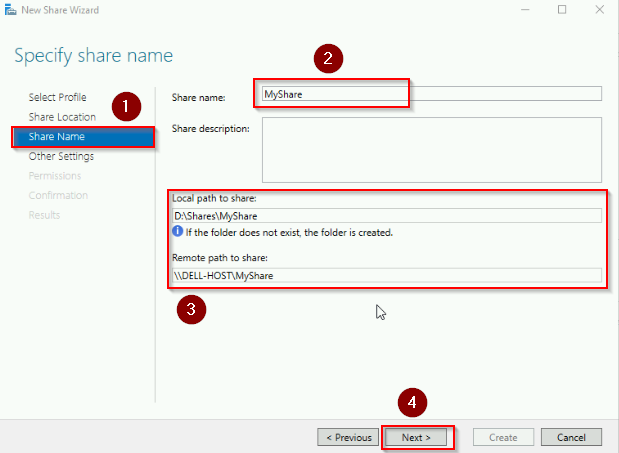
- Under Share Name, give it a name, the “Local path to share” and “Remote path to share” text boxes will automatically filled. Click “Next”.
- Under Other Settings , select “Enable access-based enumeration” checkbox. Click “Next”.
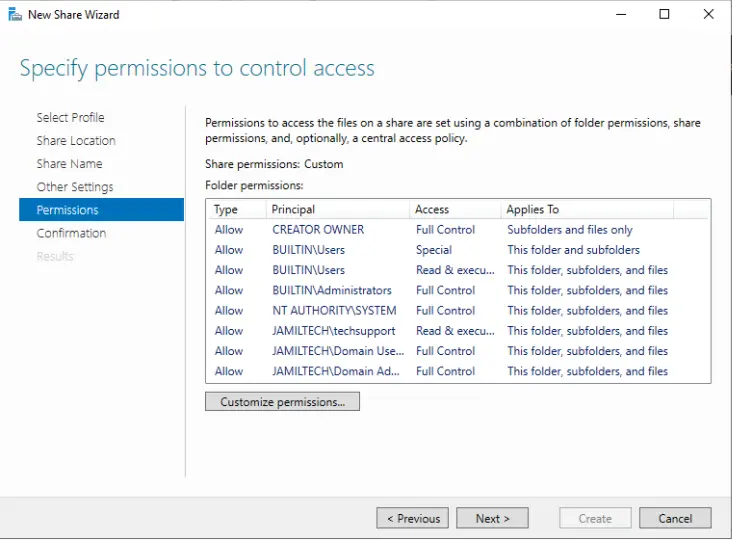
- Under Permission, keep things as default. Click “Next”.
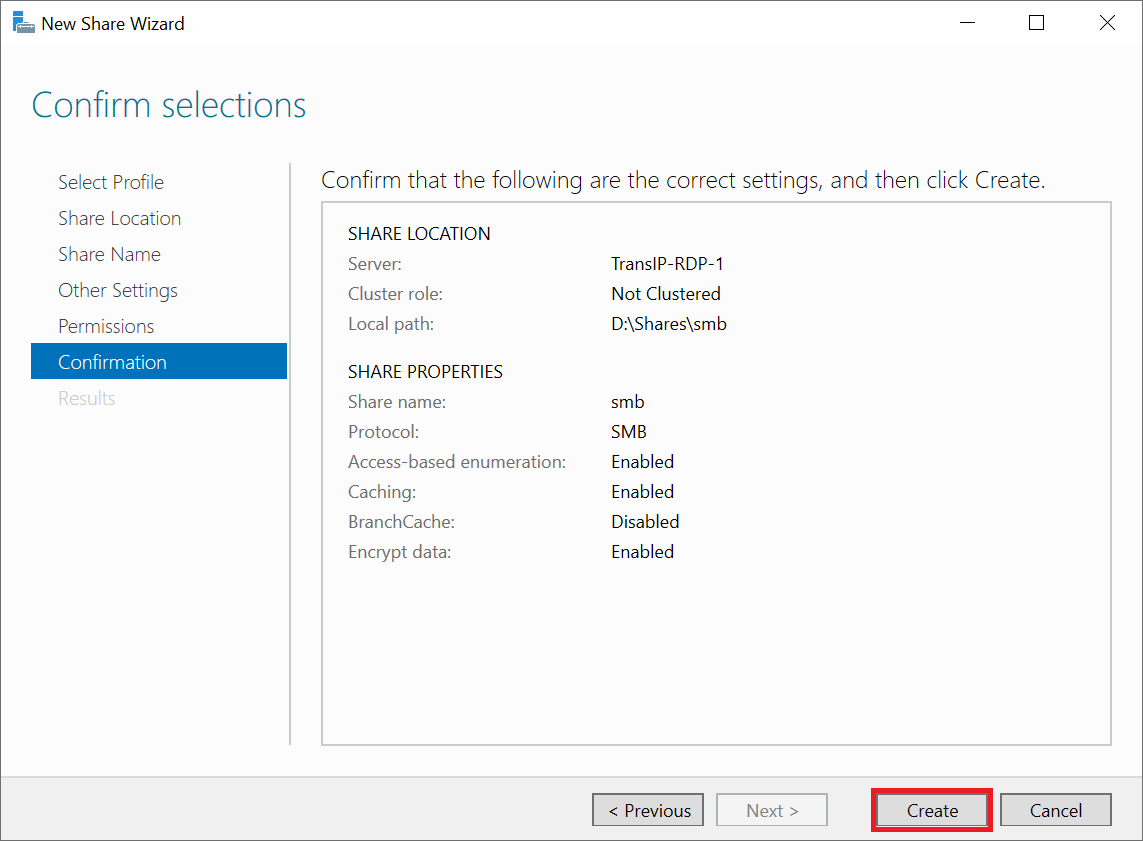
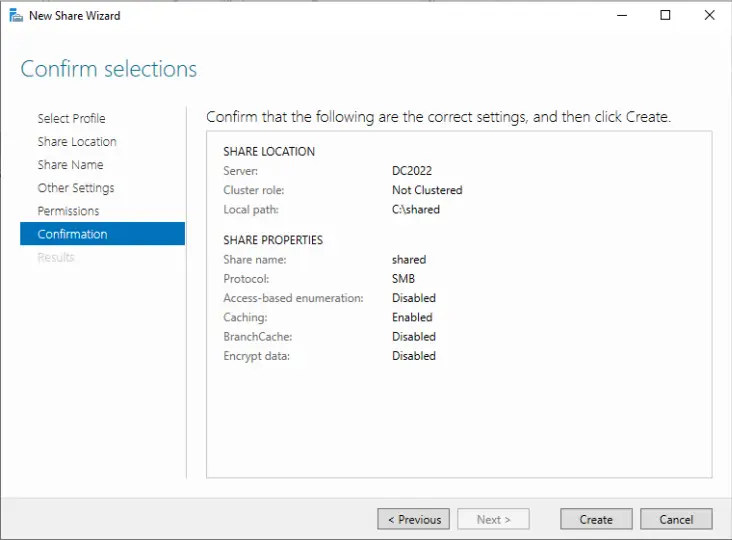
- Under Confirmation, review and click “Create”.
See screenshots of all the steps below:
Using File Explore
File Explorer offers a quick and straightforward way to create an SMB share, making it accessible even for those with minimal server management experience:
- Right-click on the folder you want to share and select “Properties.”
- Go to the “Sharing” tab and click “Advanced Sharing.”
- Check “Share this folder,” set the share name, and configure permissions as needed.
See screenshots below:
Using PowerShell
PowerShell provides a versatile and scriptable method to create and manage SMB shares, perfect for automation or bulk operations:
- Open PowerShell with administrative privileges.
- Use the
New-SmbSharecmdlet to create the share. For example:
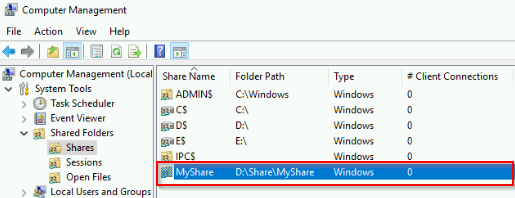
New-SmbShare -Name "MyShare" -Path "D:\Share\MyShare" -Read "Everyone"
PowerShell is excellent for administrators who need to automate tasks or manage shares across multiple servers.
Using Computer Management
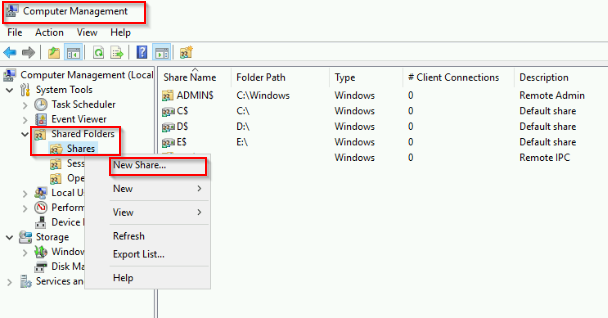
Computer Management is a versatile console that allows you to manage system tools, including shared folders, from a single interface. Here are the steps:
- Open Computer Management and navigate to “Shared Folders” > “Shares.”
- Right-click on “Shares” and select “New Share.”
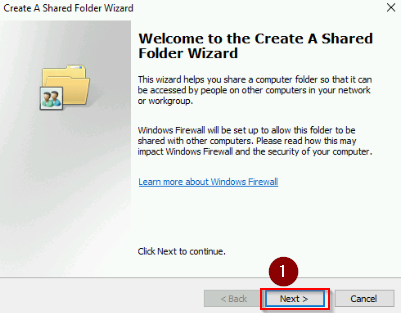
- On the Create a Shared Folder Wizard, Click “Next“.
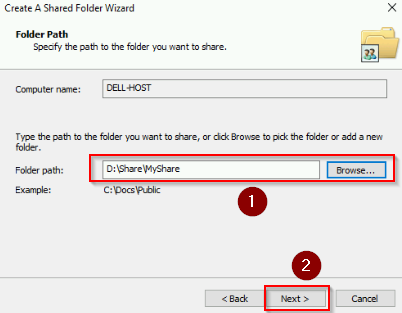
- Choose the path for the folder under “Folder path“. Click “Next“.
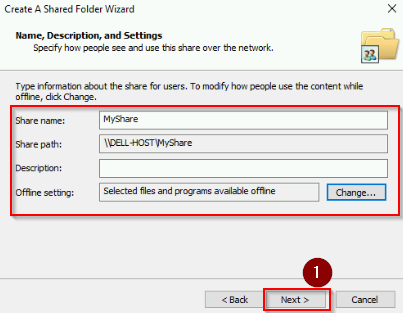
- Next you will specify Name, and Description for the share folder. We keep it as default for this case. Click “Next“.
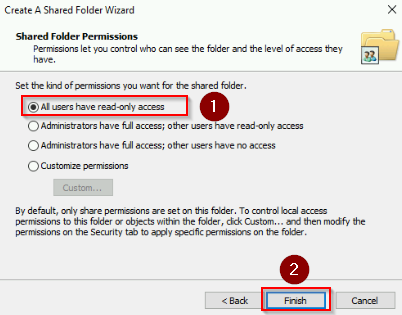
- On the Shared Folder Permissions. We choose “All users have read-only access“. Click “Finish“.
This method is useful for managing existing shares as well as creating new ones.
See screenshots below:
Conclusion
To sum up, creating and managing SMB shares in Windows Server can be done through various methods, each suited to different administrative needs. Whether you prefer the GUI of Server Manager or the automation capabilities of PowerShell, understanding the interplay between NTFS and Share permissions is key to ensuring your shared resources are both accessible and secure.
Creating an SMB (Server Message Block) shared folder on Windows Server 2022 allows multiple users to access and share files efficiently within an organization. This guide will walk you through the steps to set up a secure and effective SMB shared environment, streamlining file sharing and collaboration within your business.
Understanding SMB on Windows Server 2022
SMB is a network file sharing protocol that allows applications to read and write to files and request services from server programs in a computer network. In Windows Server 2022, SMB facilitates resource sharing, such as files and printers, making it easier for users to collaborate and share information.
Visit Microsoft to learn in detail how to set up SMB sharing on Server 2022.
Key Features of Windows Server 2022 for SMB:
- Enhanced Security: Advanced security features, including SMB over QUIC, to protect data in transit.
- Performance Improvements: Optimized for better file sharing performance, especially in distributed networks.
- Ease of Management: Simplified management tools to streamline the creation and management of shared resources.
Table of Contents
Step 1: Open Server Manager
- Launch Server Manager:
- Click on the Start menu and select Server Manager from the list of available applications.
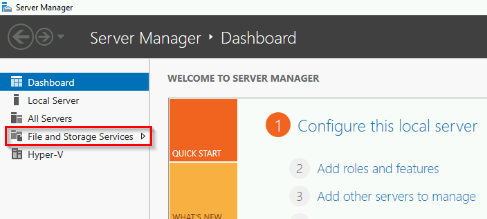
- In the Server Manager dashboard, navigate to File and Storage Services.
- Navigate to Shares:
- In the File and Storage Services section, click on Shares to view all existing shared folders.
- Click on Tasks and select New Share to initiate the process.
- Select Share Profile:
The New Share Wizard will appear. Choose SMB Share – Quick as the profile for creating a standard SMB share and click Next.
Click on Shared and click on Tasks and New Shared.
The new share wizard will be displayed; select SMB Shared – quick and click next.
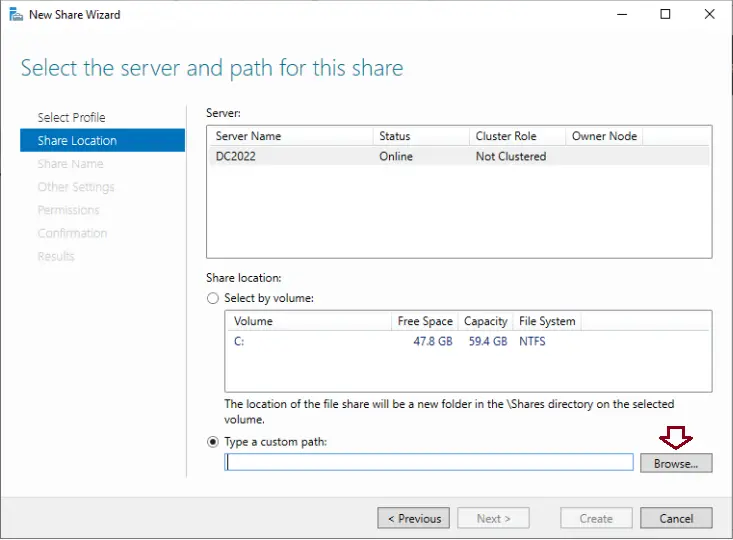
In the share location window, tick the box “Type a custom path” to select the folder to share.
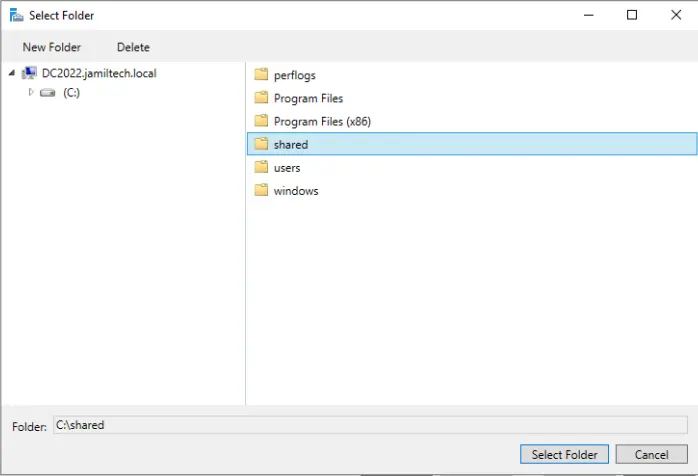
Find your shared folder and choose select folder.
Click next.

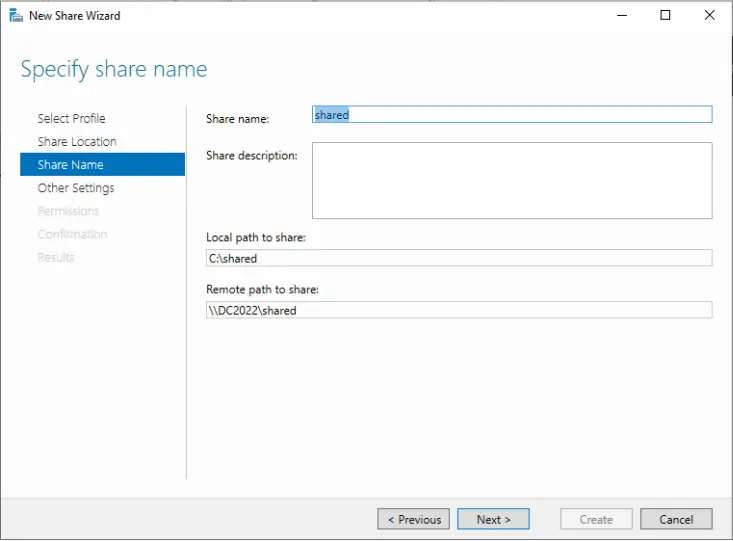
Specify a share name and click next.
Verify the configured share settings and click next.
- Select the Folder to Share:
- In the Share Location window, select Type a custom path to manually choose the folder you want to share.
- Click Browse to navigate to the folder on your server that you want to share. Once selected, click Next.
- Name Your Share:
- In the Share Name window, enter a name for the shared folder. This name will be used by users to access the share over the network.
- Click Next to proceed.
- Review and Configure Settings:
- Review the default share settings. If needed, adjust the settings according to your requirements.
Click Next to continue.

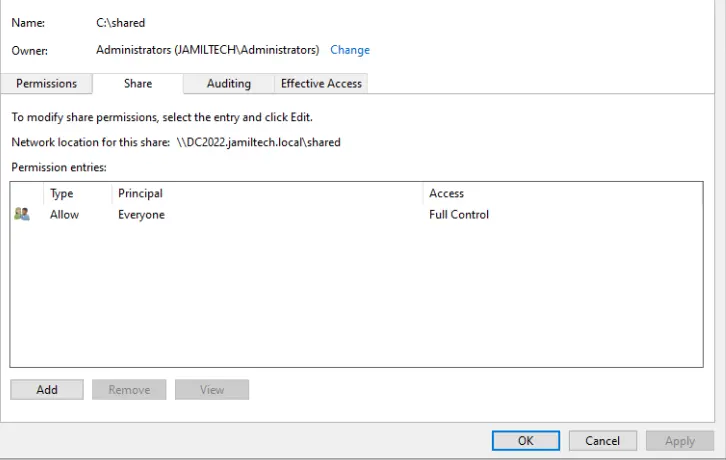
Click on the share tab.
In the Share tab, click on Add.
Click on Select a principal link.
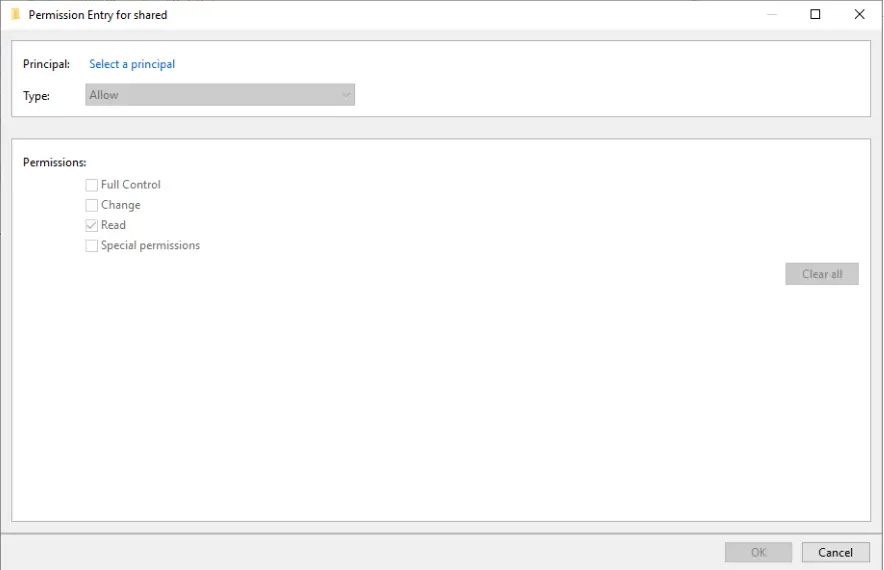
Type domain users and click OK.
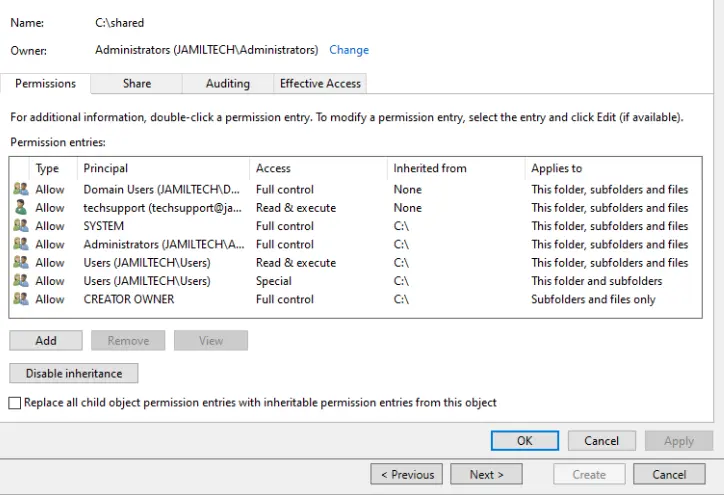
Step 5: Specify Permissions to Control Access
- Set Access Permissions:
- In the Specify Permissions window, click on Customize Permissions to define who can access the shared folder and what actions they can perform (read, write, etc.).
- Modify Share Permissions:
- Under the Share tab, click Add to include users or groups who will have access to this shared folder.
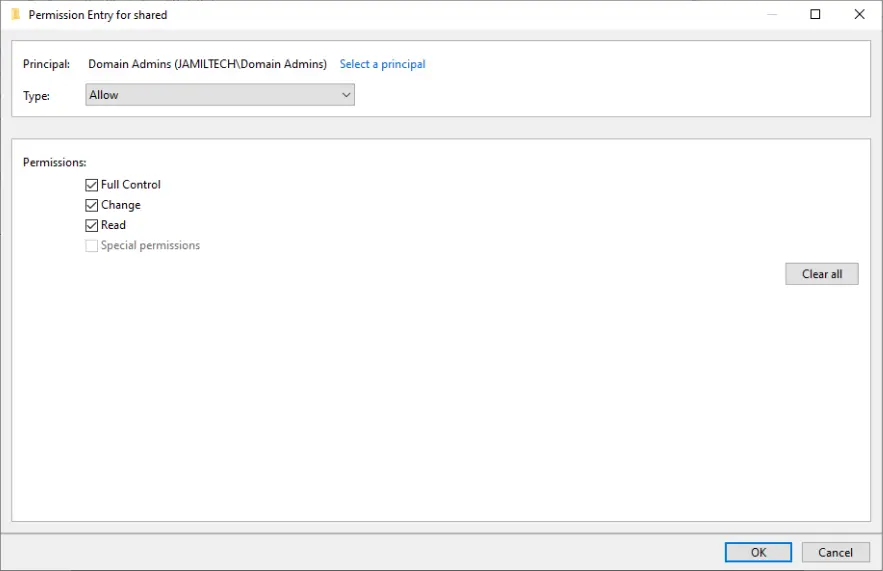
- Click on Select a Principal to choose the users or groups. For example, you might type Domain Users for general access and Domain Admins for administrative control.
- Set the required permissions (e.g., read, write) and click OK to apply the changes.
- Advanced Security Settings:
If you need to set more granular permissions, click on the Advanced Security Settings link. Here you can modify permissions at a more detailed level.
Click on the change link.
Choose to select a principal.
Type domain admins and click OK.
Click ok
- Finish and Create the Share:
- After configuring permissions, review the settings once more and click Create to finalize the setup.
- A confirmation page will appear. Click Close to exit the wizard.
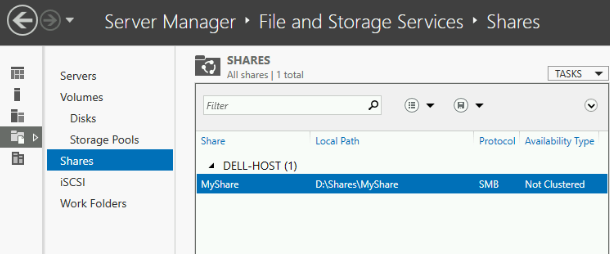
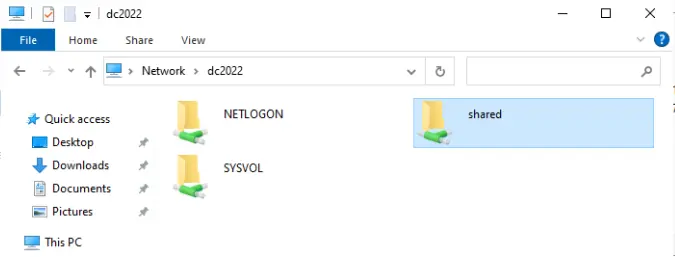
- Verify the Shared Folder:
- The new shared folder should now appear under the Shares section in Server Manager.
You can also verify its creation by navigating to Network in File Explorer. The shared folder should be visible and accessible to the users you have granted permissions.
Click Create to complete the process.
Choose Close.

We see the shared folder.
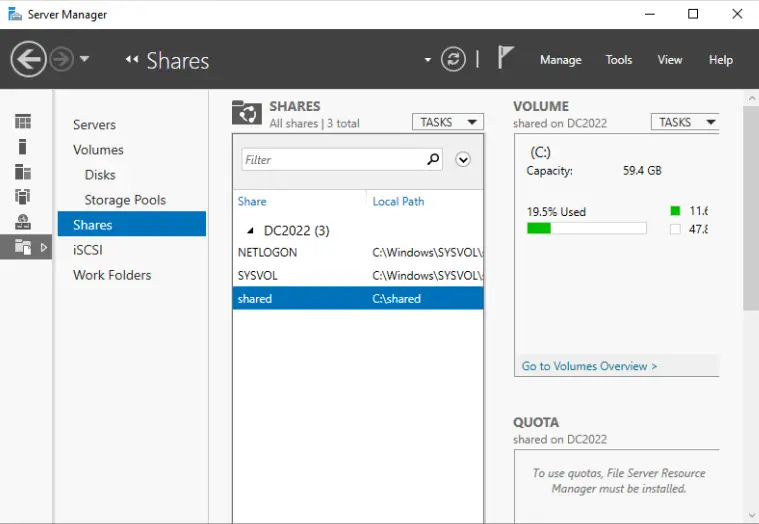
In File Explorer, go to Network Options, and there you will see the shared folder.
Conclusion
By following these steps, you can create an SMB shared folder on Windows Server 2022, enabling efficient and secure file sharing within your organization. This setup not only improves collaboration but also ensures that your shared resources are managed effectively. For more detailed information on setting up SMB sharing on Windows Server 2022.
With any of the above methods, we are able to create shared folders on Windows Server 2022.
Jamilhttp://jamiltech.com
A Professional Technology Blog Writer | An energetic professional with more than 20+ years of rich experience in Technology, Planning, Designing, Installation, and Networking.