
Windows File Recovery tool can help you recover lost or deleted files on your computer. However, sometimes you may find that the Windows File Recovery tool is not working or receive the error message saying winfr.exe is not recognized. In this post from MiniTool, you can learn several feasible ways to solve this issue.
Windows File Recovery is a free command-line utility for recovering files that have been deleted from your local storage devices (including internal drives, external drives, and USB drives). When you cannot rescue your files from the Recycle Bin because the Recycle Bin is grayed out or for other reasons, Windows File Recovery is a good choice for data recovery.
In our previous post, we discussed how to use Microsoft’s Windows File Recovery tool to rescue your data. In today’s post, we will tell you what should you do when the Windows File Recovery tool is not working.
Note:
Note: Windows File Recovery requires Windows 10 version 2004 or later Windows versions. Here you may be interested in this paper: What Operating System Do I Have? And it doesn’t support recovering files from cloud storage and network file shares.
To fix the “Windows 10 recovery tool not working” issue, here we list a couple of effective ways. You can try them one by one until the problem has gone.
Method 1. Reinstall Windows File Recovery
When faced with most software-related questions, reinstalling the app can be the most effective way to deal with it. So, if you are encountering the winfr.exe is not recognized error or other errors that cause Windows 10 recovery tool not to work, you can uninstall Windows File Recovery, then download the Windows File Recovery tool again to check if it’s back to normal.
Method 2. Use MiniTool Power Data Recovery to Recover Files
When the Windows File Recovery tool is not working, you can choose to use a piece of free data recovery software to help you get lost/deleted files or folders back. MiniTool Power Data Recovery, the best data recovery software, is recommended here.
MiniTool Power Data Recovery is designed to recover deleted/lost files, folders, pictures, screenshots, videos, audio, emails, and so on from internal hard drives (HDDs & SSDs), external hard drives, USB flash drives, CDs/DVDs, and other file storage devices.
It is fully compatible with almost all Windows operating systems, including Windows 11, Windows 10, Windows 8, and Windows 7. For Business editions, you can scan and recover data from your file storage devices in the Windows Server environment, and the free edition allows you to scan and view files in Windows Server.
Compared with Windows File Recovery, MiniTool Power Data Recovery is easier to operate because of its simple interface and clear data recovery steps. With only three easy steps, you can effectively restore your files lost due to various reasons, such as files getting deleted when left-clicking and Windows deleting your files automatically.
Now click the button below to free download MiniTool Power Data Recovery and start scanning and recovering your files.
MiniTool Power Data Recovery FreeClick to Download100%Clean & Safe
Step 1. Choose the target drive to scan.
After downloading and installing MiniTool Power Data Recovery, you need to launch it to get its main interface. Under the Logical Drives section, you can select the target partition and click the Scan button to start scanning data on it, or you can double-click the target partition to start scanning.

If you are not sure which partition your lost data should exist in, you can move on to the Devices data recovery module and then scan the entire device, like the whole HDD, SSD, USB flash drive, and so on.
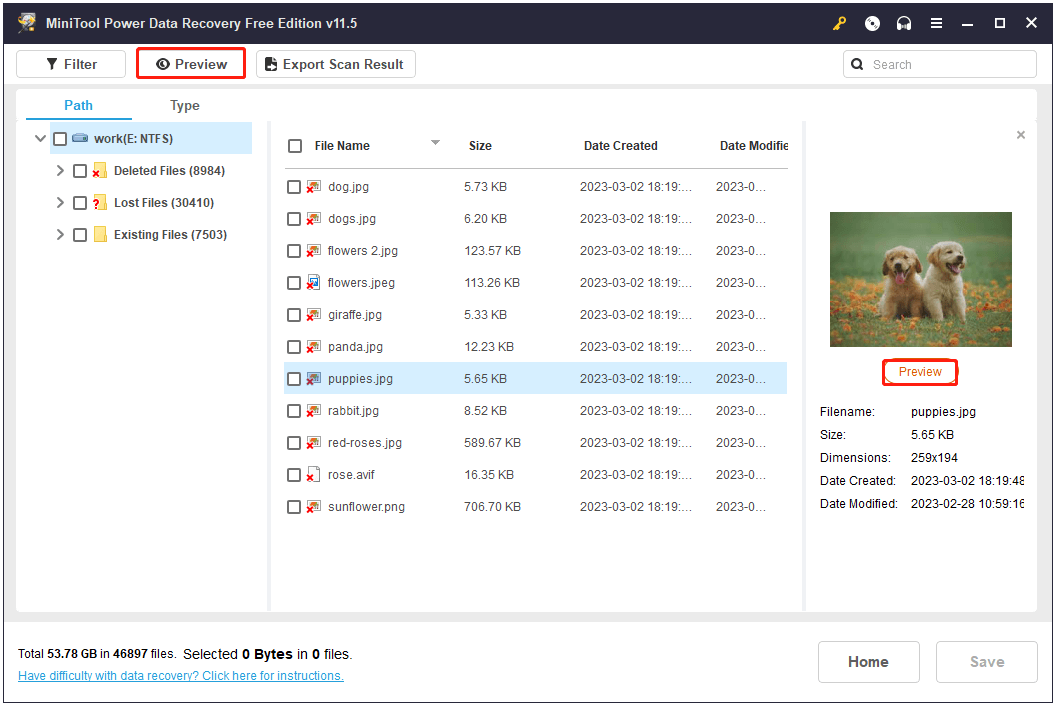
Step 2. Preview found files to check whether they are needed.
After scanning, all found files on the selected partition should be listed on your screen. Here you can preview them to check whether they are needed to be recovered. MiniTool Power Data Recovery supports previewing multiple types of files, such as DOC, DOCX, XLS, XLSX, PEG, JPG, JPE, PST, and more.
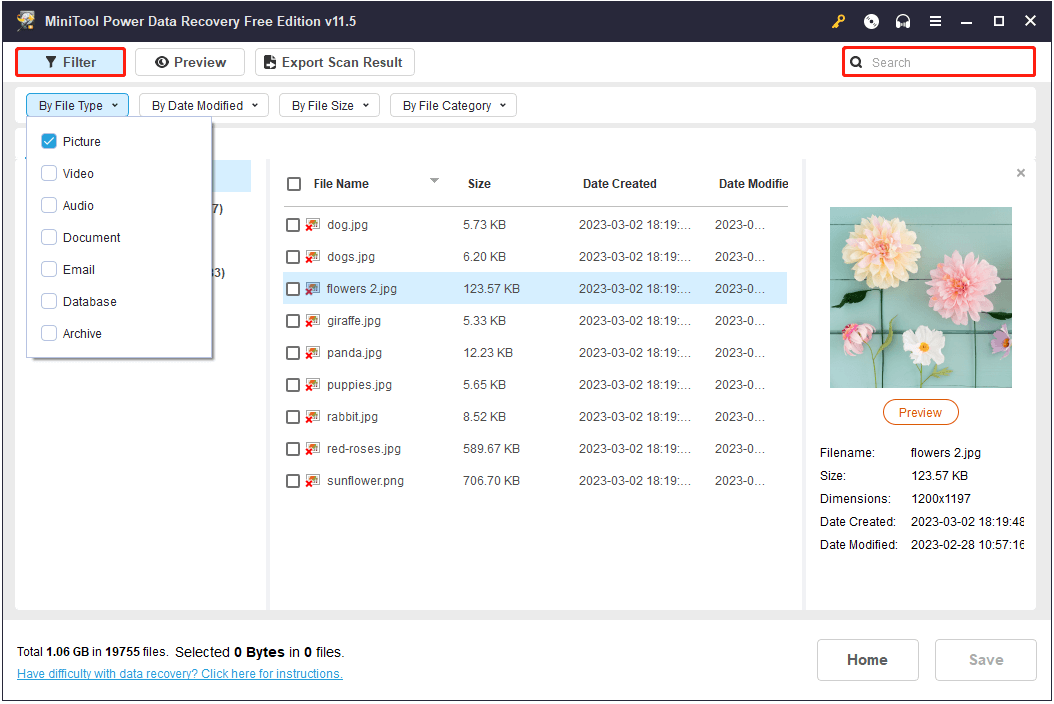
In addition to previewing files, MiniTool Power Data Recovery also offers other useful features like Filter and Search to help you find desired files quicker.
Filter: This feature allows you to filter found files by file size, file type, file category, and date modified.
Search: This feature supports searching for a certain file by part of or the full file name.
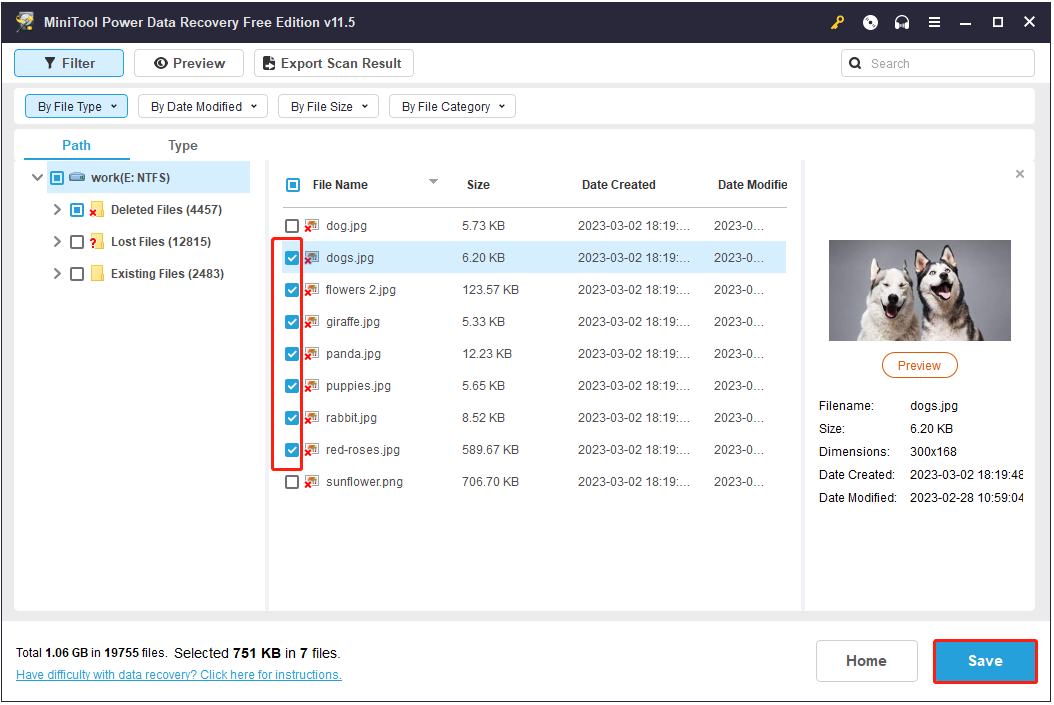
Step 3. Select a file location to restore the selected files.
After finding the wanted files, you need to select them all by checking the checkboxes next to them and then clicking the Save button to choose an appropriate file location to store them. It is not recommended to store them in the same location where they were previously.
Tips:
Tip: You may be prompted to upgrade to the full edition while recovering files because the free edition of MiniTool Power Data Recovery allows you to recover 1 GB of files for free. To break this data recovery limitation, you need to choose a registered edition.
Click to Tweet
MiniTool Power Data Recovery FreeClick to Download100%Clean & Safe
Method 3. Update Your Windows
As said before, Windows File Recovery is only available in Windows 10 version 2004 or later Windows versions. So, ineligible versions of Windows may be responsible for the “Windows File Recovery tool is not working” issue. In this situation, you need to update your Windows version to the required one.
To update your Windows version, you can follow the steps below:
Step 1. Press Windows + I key combinations to open Windows Settings.
Step 2. Click Update & Security from the settings list.
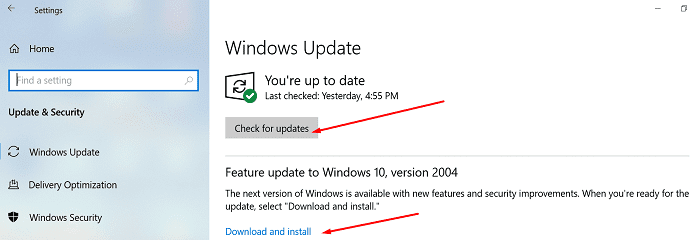
Step 3. Choose the Windows Update tab, then click Check for updates in the right panel and follow the instructions on your screen to finish the update process.
Step 4. Restart your computer and check whether the Windows File Recovery tool is working now.
Method 4. Disable Other Apps
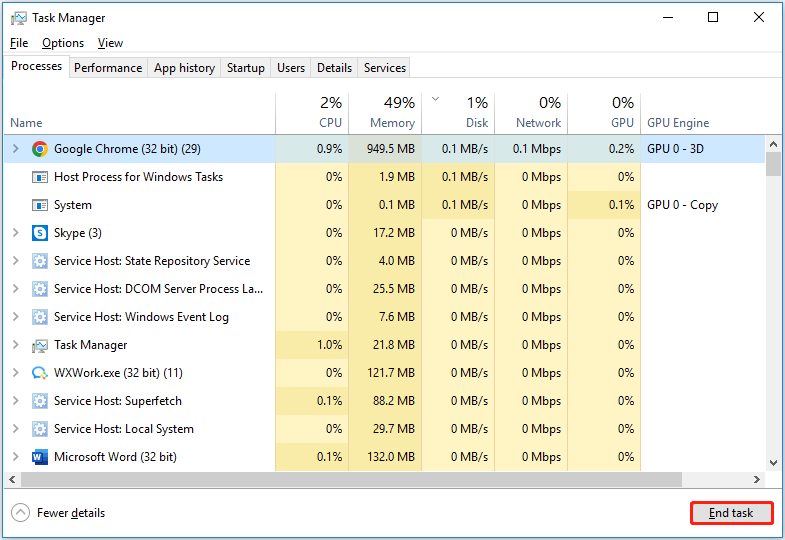
Some third-party applications may conflict with the Windows File Recovery tool, preventing this tool from working properly. To fix this issue, you can try to stop all unnecessary apps from the Task Manager.
Step 1. Right-click the Start button and choose Task Manager.
Step 2. Select the running app that needs to be closed and click End task in the lower right corner. Or you can right-click the unwanted process and click End task from the context menu.
Step 3. After that, launch Windows File Recovery again and check whether it can run normally.
Method 5. Run DISM and SFC Scan
Windows File Recovery may also not work properly when system files are corrupted. So, to scan and fix corrupted system files, you can run an DISM and SFC scan.
For an intuitive guide to scanning and fixing disk errors, you can read this post: Use the System File Checker tool to repair missing or corrupted system files .
Top Recommendation: Back up your files regularly
As you can see, though Windows File Recovery and MiniTool Power Data Recovery are both good solutions for data recovery, you had better back up your important files in advance. So, you can get files back easily from the backup files when something goes wrong instead of running data recovery software.
If you do not know how to back up your files effectively, you can try MiniTool ShadowMaker, a professional and reliable data backup tool that can help to back up your files, folders, partitions, disks, and even the whole system. And it offers full, differential, incremental, and scheduled backups that make it easy to customize your backup plan.
What’s more, you can try its features for free for 30 days. After this time limit, you need to choose a registered edition.
MiniTool ShadowMaker TrialClick to Download100%Clean & Safe
Wrapping Things Up
Now I believe you already know what to do when the Windows File Recovery tool is not working. Hope you can recover lost files successfully with the help of Windows File Recovery or MiniTool Power Data Recovery.
Should you have any questions or suggestions when using MiniTool software, please do not hesitate to leave your comments below or contact us via [email protected].

Windows File Recovery is a handy app that you can use to recover deleted files and folders. You can even use this tool to restore deleted Edge Favorites. Unfortunately, File Recovery may not always work on your computer. Simply put, nothing happens when you launch the app or run a command. You may also get an error message that says, “winfr.exe is not recognized as an internal or external command.” Follow the solutions below to fix the problem.
Contents
- 1 Windows File Recovery Does Not Work on This Device
- 1.1 Reinstall the App
- 1.2 Update Your Windows OS Version
- 1.3 Close Background Apps and Processes
- 1.4 Run SFC and DISM
- 1.5 Conclusion
Windows File Recovery Does Not Work on This Device
Reinstall the App
If your computer could not install Windows File Recovery properly, reinstall the app.
- Press the X key, and type “apps” and in the Windows Start search field.
- Double-click on Add or remove programs.
- Enter “file recovery” in the search field and select Windows File Recovery.
- Hit the Uninstall button.
- Restart your computer.
- Launch the Microsoft Store app, and download Windows File Recovery again.
Update Your Windows OS Version
Check for updates and install the latest Windows version available for your device.
- Go to Settings, and select Update and Security.
- Click on Windows Update.
- Hit the Check for updates button.

- Restart Windows File Recovery and check the results.
Close Background Apps and Processes
Close unnecessary apps and processes running in the background. They could be interfering with File Recovery preventing the app from running on your machine.
- Exit Windows File Manager.
- Launch Task Manager, and click on the Processes tab.
- Then right-click on the apps you want to close and select End task.
Run SFC and DISM
When you delete a file, the space it occupied on your drive becomes free. However, data about the deleted file remains on the drive until another app decides to use that space. That’s why File Recovery can recover and restore deleted files.
But if your system files got corrupted, the app may not work properly. Scan and repair your system files and disk and launch File Recovery again.
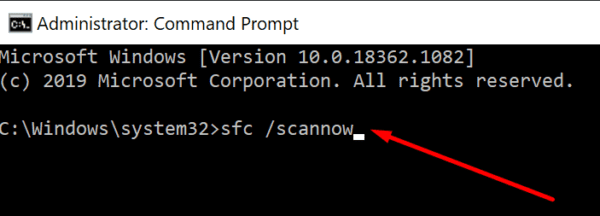
- Press the Windows and X keys and select Command Prompt (Admin).
- Run the following commands, and press Enter after each one:
- sfc / scannow

- DISM /Online /Cleanup-Image /RestoreHealth
- sfc / scannow
- Restart your computer and launch File Recovery.
Conclusion
If Windows File Recovery doesn’t run on your computer, uninstall and reinstall the app. Additionally, install the latest Windows OS version on your machine and close background apps. If the issue persists, run SFC and DISM. Did you find other ways to fix this problem? Share your ideas in the comments below.
Author Madalina Dinita
Madalina has been a Windows fan ever since she got her hands on her first Windows XP computer.
She is interested in all things technology, especially emerging technologies — AI and DNA computing in particular.
Discus and support Can Not Install Windows File Recovery Tool in Microsoft Windows 10 Store to solve the problem; Why can I not install Windows File Recovery? Here is the message that I get
«It looks like you don’t have any applicable devices linked to you…
Discussion in ‘Microsoft Windows 10 Store’ started by Thwackdown, Jun 29, 2020.
-
Can Not Install Windows File Recovery Tool
Why can I not install Windows File Recovery? Here is the message that I get
«It looks like you don’t have any applicable devices linked to you Microsoft account. To install, sign in on a device with you Microsoft account.»

-
Installing Drivers in Recovery M4 SSD
I can’t seem to figure out how to install drivers so that can copy my system image to new laptop hard drive. I went as far as to install a new inactivated windows 7 onto the hard drive so I know it works, but when I point recovery at C:\Windows\system32\drivers\disk.sys, I got an error something along the lines of «not relevant to system hardware» (or something like that I forget the exact wording).
I can list the drive in diskpart, and I made sure it is not excluded for copying the image, but after 3 days of fiddling, I still can’t get it to work. Where is the driver that I need for recovery to be able to install an image to the new hard drive? I checked crucial website, but they don’t seem to list drivers for M4. I assume that since I was able to install a fresh inactivated Windows 7 from a startup disk that the driver I need would be somewhere in that system so maybe I’m just pointing recovery at the wrong file?
-
windows xp installation and dual core am
could someone please list the steps they follow to install windows with a dual core processor and windows xp service pack to. I’m reletively new to amd dual core and i feel i’m missing a step. All help will be appreciated. thanx
-
Can Not Install Windows File Recovery Tool
recovery tool for lumia 925
Hi, lumia 925 user.
Thanks for posting on Microsoft Community.
We’d suggest you use the Windows Recovery Tool. Please see the following steps below.
- Start by downloading and installing Windows Device Recovery Tool (for Windows 10, 8.x and 7) from here:
Windows Device Recovery Tool. You may visit this link for more information on how to use this tool :
Windows Device Recovery Tool: FAQ.
When the installation has finished, start the application and the main screen will appear:
- The procedure to restore your phone using Windows Device Recovery Tool is as follows:
- Connect the phone to your PC (using the USB cable that came with the phone).
- After a few seconds the PC should find the phone and you’ll see the Phone Selection screen. Click your phone in this screen to select it.
- The latest available firmware version for your device will be shown. Click the ‘Install software‘/’Reinstall software‘ button to flash your phone
Windows Device Recovery Tool will then download and install the latest firmware + OS available for your phone.
Note: Your phone will be reset to factory status when using this tool.
You may also try
Nokia Software Recovery Tool.Please let us know if this helps.
- Start by downloading and installing Windows Device Recovery Tool (for Windows 10, 8.x and 7) from here:

Can Not Install Windows File Recovery Tool
-
Can Not Install Windows File Recovery Tool — Similar Threads — Install File Recovery
-
Recovery problem after media tool installation
in Windows 10 Software and Apps
Recovery problem after media tool installation: I messed up my partitions while trying to resize them and got a blue screen that has taken me two days to be even able to boot up my pc HP Pavillion Laptop 14-dvxx. I had difficulty in doing the reinstall as some drivers were missing but I have managed to install from the… -
Recovery problem after media tool installation
in Windows 10 Gaming
Recovery problem after media tool installation: I messed up my partitions while trying to resize them and got a blue screen that has taken me two days to be even able to boot up my pc HP Pavillion Laptop 14-dvxx. I had difficulty in doing the reinstall as some drivers were missing but I have managed to install from the… -
windows device recovery tool
in Windows 10 Software and Apps
windows device recovery tool: windows device recovery tool link does not work https://go.microsoft.com/fwlink/p/?LinkId=522381i need to recover my honeywell dolphin 75e L0N on windows mobile 10i need it now. i cannot vaitwhen i try to download i receive an error:… -
windows device recovery tool
in Windows 10 Gaming
windows device recovery tool: windows device recovery tool link does not work https://go.microsoft.com/fwlink/p/?LinkId=522381i need to recover my honeywell dolphin 75e L0N on windows mobile 10i need it now. i cannot vait… -
windows device recovery tool
in Windows 10 Software and Apps
windows device recovery tool: download link does not workhttps://answers.microsoft.com/en-us/windows/forum/all/windows-device-recovery-tool/7746a0b4-1ca0-4769-bd3e-9435512af36e
-
Windows Phone Recovery Tool installation problem
in Windows 10 Installation and Upgrade
Windows Phone Recovery Tool installation problem: Hello, I am currently using Windows 10 Home. Now I am facing a problem during installation of software Windows Phone recovery tool version: 3.14.07501. After clicking «install» and giving admin permission, it starts initializing process. After few moments it stuck into… -
unable to download windows file recovery tool on updated windows
in Windows 10 Software and Apps
unable to download windows file recovery tool on updated windows: Hi!I have been trying to download Windows file recovery on my system, it says the minimum requirement is Windows 10 version 0.19041 and I have Windows 10 version 1440.18363 so I can’t download it…
My system is updated.
thank you!…
-
Recovery tool
in Windows 10 Installation and Upgrade
Recovery tool: I tried to create a recovery usb, but got message that it couldn’t because some files are missing.Help? Can I use the windows media creation tool to repair missing files?
Thanks…
-
Good data recovery tool for deleted files?
in Windows 10 Performance & Maintenance
Good data recovery tool for deleted files?: I ran an Acronis «Cleanup» utility that supposedly completely removes Acronis products from a computer. Either I had a serious disk problem at the same time, or it also deletes backup files … including non-Acronis backup files. Is there a good, safe, reputable data recovery…

Про Windows File Recovery
Средство восстановления файлов Microsoft Windows не имеет графического интерфейса — это всего лишь утилита командной строки. Мы покажем вам, как его использовать, но это более сложный процесс, чем вы могли бы ожидать от официальной утилиты Microsoft, доступной в Магазине Windows 10.
Для этого инструмента требуется установленное майское обновление 2020 года для Windows 10 или более новая версия Windows 10. Он не работает в старых версиях Windows.
Может ли инструмент Microsoft действительно найти и восстановить удаленный файл, зависит от диска? Удаленные файлы не удаляются сразу с жестких дисков, но часто они сразу удаляются с твердотельных дисков. Если вы удалили много данных на устройстве, таком как SD-карта, то после удаления файла, вероятно, данные файла могли быть перезаписаны. Даже если вам удастся восстановить файл, вы можете получить только некоторые данные файла — файл может быть поврежден. Вы можете получить только те данные, которые еще находятся на диске. Здесь нет никаких гарантий, и поэтому резервные копии так важны.
Утилита также имеет несколько режимов, предназначенных для разных ситуаций и файловых систем. Мы как их использовать.
Как установить Windows File Recovery
Для начала установите Windows File Recovery из Магазина Microsoft, чтобы начать. Вы можете открыть Магазин и выполнить поиск «Windows File Recovery» или просто щелкнуть эту ссылку, чтобы открыть Магазин.
После установки откройте меню «Пуск» и выполните поиск и запустите ярлык Windows File Recovery один раз и нажмите «Да» для запроса UAC.

Вы увидите окно командной строки с доступом администратора. Здесь вы будете запускать команды восстановления файлов.
Вы можете использовать другие среды командной строки, такие как Windows Terminal и PowerShell, но не забудьте запустить их с правами администратора. (В меню «Пуск» щелкните правой кнопкой мыши тот файл, который хотите использовать, и выберите «Запуск от имени администратора».)

Как восстановить удаленные файлы в Windows 10
Чтобы использовать этот инструмент, вы запустите команду winfr, указав диск, на котором вы хотите найти удаленный файл, место назначения, куда вы хотите сохранить его, и различные ключи, которые управляют тем, что инструмент ищет и как он ищет. Вы должны сохранить удаленный файл на другой диск.
Вот формат команды:
winfr source-drive: destination-drive: /switches
После выполнения команды инструмент автоматически создаст каталог с именем Recovery_ [дата и время] на указанном целевом диске.
Какой режим использовать?
Прежде чем продолжить, вы должны определить режим, в котором вы хотите выполнить поиск удаленного файла. Существует три режима: Default, Segment и Signature. Default это самый быстрый режим, Segment похож на него, но медленнее и тщательнее. Режим Signature может искать файлы по типу — он поддерживает файлы ASF, JPEG, MP3, MPEG, PDF, PNG и ZIP. (При поиске файлов «ZIP» также будут найдены документы Office, хранящиеся в таких форматах, как DOCX, XLSX и PPTX.)
Вам нужно знать, в какой файловой системе отсканирован диск, который вы будете сканировать. Чтобы найти это, откройте проводник, щелкните правой кнопкой мыши диск в разделе «Этот компьютер» и выберите «Свойства». Вы увидите файловую систему, отображаемую на вкладке «Общие».

Вот когда вы должны использовать разные режимы:
- Вы пытаетесь найти файл, который вы недавно удалили, на диске, отформатированном в NTFS, которая является файловой системой Windows 10 по умолчанию? Используйте режим Default.
- Если вы сканируете диск NTFS в другой ситуации — например, если вы удалили файл некоторое время назад, отформатировали диск или имеете дело с поврежденным диском — сначала попробуйте режим Segment, а затем — режим Signature.
- Вы пытаетесь найти файл, сохраненный на диске FAT, exFAT или ReFS? Используйте режим Signature. Режимы Default и Segment работают только в файловых системах NTFS.
Если у вас есть сомнения, просто начните с режима Default. Затем вы можете попробовать Segment, а затем Signature, если режим по умолчанию не работает.
Как восстановить файл в режиме Default
Чтобы использовать режим Default, нужно написать /n, а затем путь поиска:
- Для поиска файла с именем
document.docxвы должны использовать/n document.docx. Вы также можете указать полный путь к файлу, например/n UsersAlexDocuments document.docx - Чтобы найти все файлы, которые были в папке «Документы», если ваше имя пользователя — Alex, вы должны использовать
/n UsersAlexDocuments. - Для поиска с wildcard используйте звездочку
*. Например,/n UsersAlexDocuments*.docxнайдет все файлы DOCX, которые были в папке «Документы».
Давайте соединим все это сейчас в примере. Чтобы найти все файлы DOCX на диске C: и скопировать их на диск D:, вы должны выполнить следующую команду:
winfr C: D: /n *.docx
Вам нужно будет набрать y, чтобы продолжить.

Как мы упоминали выше, вы найдете восстановленные файлы в каталоге с именем Recovery_ [дата и время] на целевом диске, который вы указали в командной строке.
![Recovery_ [дата и время]](https://legacy.merionet.ru/images/kak-vosstanavlivat-fajly-v-microsoft-windows-file-recovery/6.png "Recovery_ [дата и время]")
Чтобы найти все файлы со определенным словом в названии, используйте wildcard. Итак, чтобы найти все документы со словом «project» в любом месте в их имени, вы должны выполнить:
winfr C: D: /n *project*
Вы можете указать несколько поисков за раз с помощью нескольких ключей /n. Итак, чтобы найти все файлы Word, Excel и PowerPoint, вы должны выполнить следующее:
winfr C: D: /n *.docx /n *.xlsx /n *.pptx
Чтобы найти определенный файл с именем important_document.pdf, находящийся в папке UsersAlexDocuments на диске C:, а затем сохранить его на диске D: вы должны использовать:
winfr C: D: /n UsersAlexDocumentsimportant_document.pdf
Как восстановить файл в режиме Segment
Режим Segment работает почти так же, как режим Default. Чтобы использовать режим Segment, который проверяет сегменты записи файла, нужно использовать /r в дополнение к /n.
Другими словами, вы можете создавать команды восстановления в режиме Segment так же, как вы строите команды режима Default — просто добавьте /r.
Например, чтобы восстановить все удаленные файлы MP3 с вашего диска C: и сохранить их на диске D: вы должны выполнить:
winfr C: D: /r /n *.mp3
Поэтому, если поиск в режиме Default не находит того, что вы ищете, добавьте /r и попробуйте снова.

Как восстановить файл в режиме Signature
Режим Signature работает немного по-другому. Он проверяет типы файлов, поэтому он может найти только удаленные файлы определенных типов файлов. Чтобы использовать режим Signature, вам нужно использовать /x, чтобы указать режим Signature, и /y: чтобы указать список групп типов файлов, которые вы хотите найти.
Вот список поддерживаемых типов файлов и групп, в которые они отсортированы, взяты из документации Microsoft:
- ASF: wma, wmv, asf
- JPEG: jpg, jpeg, jpe, jif, jfif, jfi
- MP3: mp3
- MPEG: mpeg, mp4, mpg, m4a, m4v, m4b, m4r, mov, 3gp, qt
- PDF: pdf
- PNG: png
- ZIP: zip, docx, xlsx, pptx, odt, ods, odp, odg, odi, odf, odc, odm, ott, otg, otp, ots, otc, oti, otf, oth
Обратите внимание, что группа «ZIP» включает ZIP-файлы в дополнение к документам Microsoft Office и OpenDocument.
Вы можете открыть этот список в любое время, выполнив следующую команду:
winfr /#

Допустим, вы хотите найти на диске E: изображения в формате JPEG и сохранить их на диске D:. Вам нужно запустить следующую команду:
winfr E: D: /x /y:JPEG
Вы можете указать несколько групп файлов, разделяя их запятой. Итак, если вы хотите найти файлы JPEG, PDF и Word, вы должны выполнить:
winfr E: D: /x /y:JPEG,PDF,ZIP

Больше помощи с winfr
Более подробная информация доступна на официальной странице документации Microsoft winfr. На этой странице вы также найдете подробный список всех параметров командной строки winfr.
Для того чтобы изучить основы, просто запустите winfr или winfr /?.
Есть также дополнительные параметры, которые вы можете увидеть, запустив winfr /!.

Windows File Recovery is a powerful, free tool from Microsoft designed to help users recover lost or deleted files on Windows 10 and later versions. Despite its useful capabilities, you may encounter issues where the application doesn’t work as expected. In this detailed article, we will explore why Windows File Recovery might fail and provide you with step-by-step instructions to troubleshoot and resolve these problems.
Understanding Windows File Recovery
Windows File Recovery is designed to recover files that have been accidentally deleted from your PC, including documents, pictures, and other types. It operates mainly through command-line interface, which can be intimidating for users accustomed to graphical interfaces. The tool utilizes different recovery modes—Default, Segment, and Signature—to cater to various file loss scenarios.
Common Problems Faced with Windows File Recovery
Before diving into potential fixes, it’s essential to identify common problems users encounter:
- Failure to Launch: The application might not start at all.
- Incorrect Command Usage: Users may input commands incorrectly, leading to errors.
- Incompatibility Issues: Users may experience Windows version or hardware compatibility problems.
- Limited File Recovery: Users may not recover all expected files or find that the application does not recognize their file systems.
- Error Messages: Various error messages may appear, preventing successful file recovery.
- Insufficient Permissions: The tool may require administrative privileges that the user doesn’t possess.
Steps to Fix Windows File Recovery Issues
Step 1: System Requirements Check
Before proceeding, ensure that your system meets the prerequisites for running Windows File Recovery. The application requires:
- Windows 10 (Version 19041 or later): Ensure your operating system is up to date.
- Administrative Privileges: The application may require admin rights to run successfully.
To check for updates, navigate to Settings > Update & Security > Windows Update and click on Check for Updates.
Step 2: Proper Installation
Windows File Recovery can be downloaded from the Microsoft Store. Ensure that the application is installed correctly:
- Open Microsoft Store from the Start menu.
- Search for Windows File Recovery.
- If it shows an option to Install, click it. Otherwise, the application is already installed.
If the application still does not function after reinstalling, you might consider using the Windows PowerShell:
- Right-click on Start and choose Windows PowerShell (Admin).
- Execute the command:
Get-AppxPackage *Microsoft.BuiltInFileRecovery* | Remove-AppxPackage - Reinstall the application via Microsoft Store.
Step 3: Running as Administrator
In some cases, the application may not run correctly without administrator privileges. To run the application as an administrator:
- Right-click on the Windows File Recovery app in the Start menu.
- Select Run as administrator.
This enhances the app’s permissions, potentially resolving several issues related to access rights.
Step 4: Command Syntax Verification
Windows File Recovery requires precise command input. Missteps in command syntax are a common source of issues.
Here’s a basic structure for your command:
winfr source-drive: destination-drive: /mode /optionsExample Command
winfr C: D: /n *.jpgThis command would search for all JPEG files in the C: drive and restore them to the D: drive.
Take note of the following tips:
- Ensure you adhere to the correct syntax.
- Be cautious with command case sensitivity (not strictly necessary for Windows, but good practice).
- Always check that the source is not a drive that has been removed or unmounted.
Step 5: Utilizing Different Recovery Modes
Windows File Recovery operates in three distinct modes:
- Default Mode: Best for recovering non-corrupted files from the Recycle Bin.
- Segment Mode: Designed for more complex recovery, focusing on files that have been partially overwritten.
- Signature Mode: For specific file types, useful if a file type is known but not recognized.
Select your mode based on the situation; for instance, use Signature Mode if you’re searching for file types like images (e.g., JPG or PNG) or documents (e.g., DOCX).
winfr C: D: /n *.docx /mode signatureStep 6: Reviewing the Destination Drive
Ensure that the destination drive has sufficient space and is not corrupt. If it’s an external drive, make sure it’s connected properly and functioning.
-
Check for Disk Errors:
- Right-click on the destination drive in This PC.
- Select Properties > Tools > Check.
-
Free Up Space: If the drive lacks adequate space, delete unnecessary files.
Step 7: Disable Antivirus Software
Sometimes, third-party antivirus software can interfere with applications running on your computer, including Windows File Recovery. Temporarily disable your antivirus to see if it resolves the issue:
- Right-click the antivirus icon in the system tray.
- Select the option to disable or exit.
Step 8: Check for Command-Line Errors
The command-line interface can throw various error codes based on what went wrong. Here are a few common ones:
- Error 0x1: This could indicate an invalid path.
- Error 0x2: Check for drive letters; the source or destination may be incorrectly specified.
- Error 0x3: Permissions issues may be at play; running as an admin is again recommended.
Step 9: Searching for Hidden Files
Sometimes the files you seek may still exist but are merely hidden. You can check this through the File Explorer:
- Open File Explorer.
- Click on the View tab.
- Check Hidden items.
If you suspect files are hidden, you might also change settings in:
- Control Panel > File Explorer Options > View > Select “Show hidden files, folders and drives”.
Step 10: Advanced Troubleshooting with Windows PowerShell
If Windows File Recovery continues to fail, you might explore further issues with the PowerShell:
- Open Windows PowerShell as Admin.
- Execute this command to ensure your system has no missing files:
sfc /scannowThis will check for and repair corrupted system files that may be causing issues with applications like Windows File Recovery.
Step 11: Use Alternative Recovery Tools
If all else fails, consider alternative third-party file recovery software. There are numerous reputable tools available that offer graphical interfaces and often yield good results. Some notable mentions include:
- Recuva
- EaseUS Data Recovery Wizard
- Stellar Data Recovery
Step 12: Contact Support
If you’ve exhausted all troubleshooting methods and Windows File Recovery continues to fail, consider reaching out to Microsoft support or community forums. They can provide insights into known issues and sometimes specific solutions relevant to your situation.
Final Thoughts
Dealing with data loss can be stressful, but understanding how to effectively use tools like Windows File Recovery can ease the process. Fixing the application when it doesn’t work entails methodical troubleshooting: from verifying your system meets requirements to ensuring correct command usage and administrative access. By following the steps outlined above, you’re well on your way to resolving issues with Windows File Recovery.
In addition, it is prudent to regularly back up essential data to an external hard drive or cloud storage, thus minimizing future risks associated with accidental file deletions. Always stay informed about ongoing software updates and community tips to enhance your data recovery experience.
The road to successful file recovery can indeed be complex, but with persistence and the right strategies, you can navigate through challenges more effectively and keep your sensitive information safe.