
Sign in to your MUO account

Windows offers the feature to view the properties of any file or folder present on the disk. For many, it may appear as a non-useful utility because you can see a lot of data in File Explorer by changing the icons view. But you can do much more than just view metadata information in the Properties Window.
Apart from checking out the file type, location, size, and creation data, you can apply access restrictions and even encrypt the folder contents. Moreover, you can enable or disable file sharing, add security measures and customize icons. So, without further ado, let us dive deep into the multiple methods to open file or folder properties in Windows.
How to Open File or Folder Properties in Windows
Here are some easy ways to view the file or folder properties on a Windows PC. These methods will work for Windows 11 and older versions of Windows OS too.
1. Using the Keyboard Shortcut
You can view the file properties using the pre-defined shortcut keys on Windows. Here’s how to do it:
- Press Win + E to launch File Explorer on your system.
- Click on a file or folder to select it.
-
Then press Alt + Enter keys at once to open the file properties window.

2. Using the Mouse and Keyboard Shortcut
This method eliminates the usage of the enter key to open the file properties windows. Repeat the following steps to open the properties window:
- Open the File Explorer app and navigate to the folder location.
- Now, hold the Alt key and double-click on the file to display its properties.
If you don’t want to use the keyboard at all, then you can open the file properties using the context menu.
- Press Win + R to launch the Run command box and type explorer.exe. Press the enter key to open the File Explorer.
- Navigate to the desired file or folder location.
-
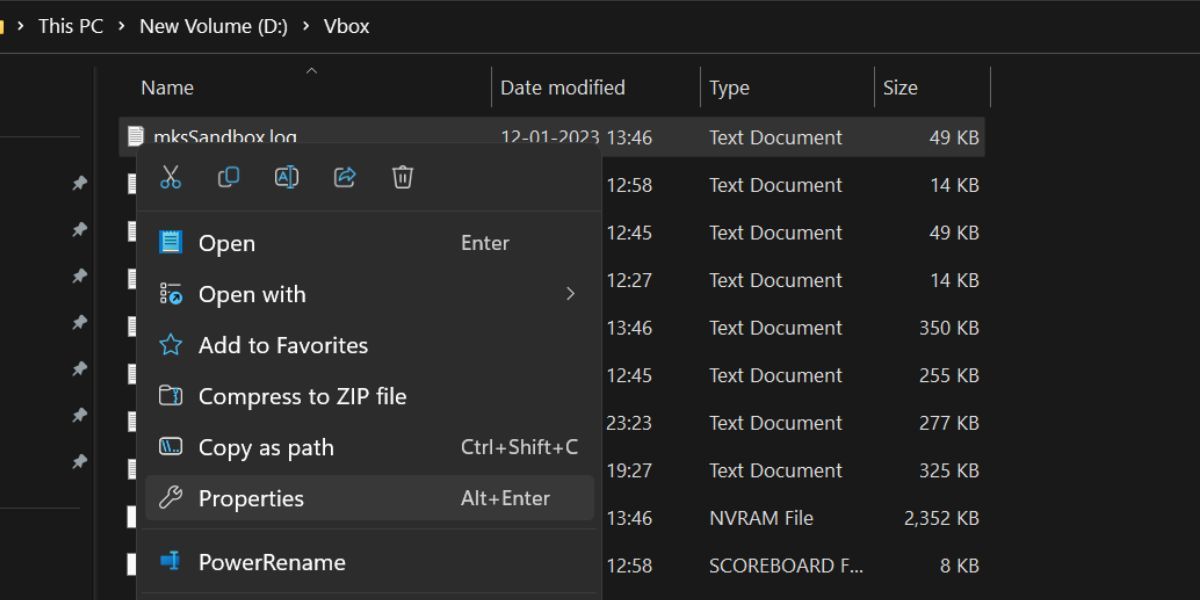
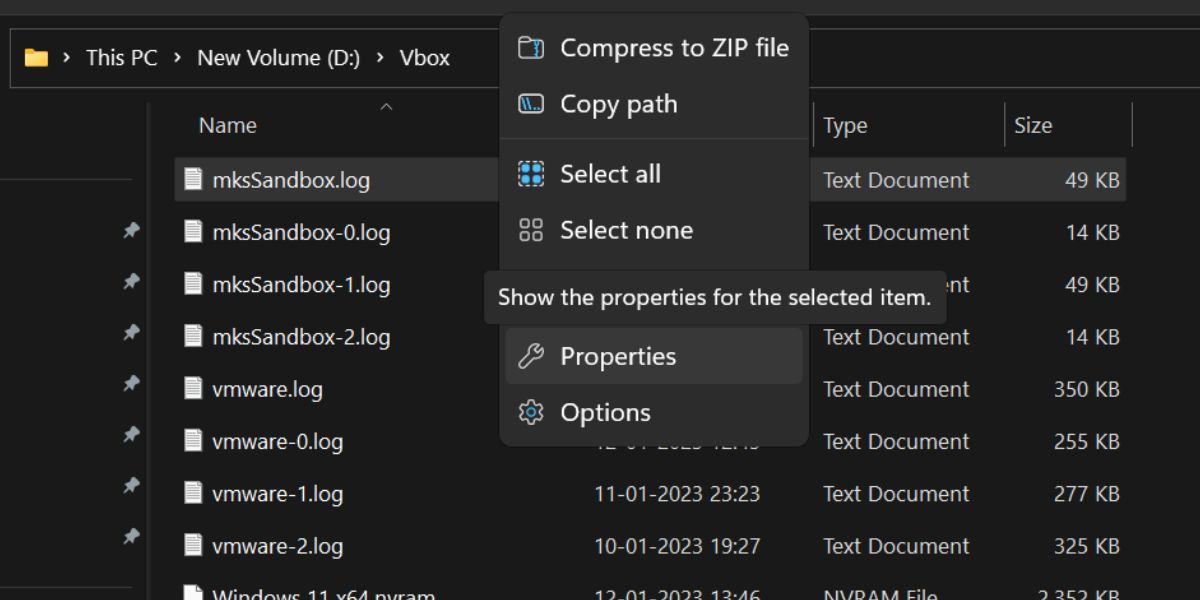
Now, right-click on the file and select the Properties option from the context menu.
- The file properties window will launch on your system.
Keep in mind that the right-click context menu will look a bit different from the older versions of Windows.
4. Using the File Explorer
You can also view the file properties using the File Explorer app and not press a keyboard key even once. The option to view properties is hidden in the menu bar. Here’s how to open file properties using File Explorer:
- Press Win + E to open the File Explorer.
- Go to the file location and click on it to highlight it.
- Now, navigate to the top menu and click on the three dots (…) button.
-
A drop-down menu will open. Select the Properties option from the menu.
- The Properties window will launch on your system. Press Alt + F4 to close it after you no longer need it.
5. Using the CMD Tool
The above-mentioned shortcuts launch the Properties window which shows the GUI version of File Properties. But, you can also view the properties of a folder or file using the command prompt on Windows. Repeat the following steps to view file properties using the command prompt utility:
- Press Win + R to launch the Run command box. Type cmd in the text box and press Ctrl + Shift + Enter key at once.
- UAC will pop up. Click on the Yes button to open the command prompt with administrator permissions.
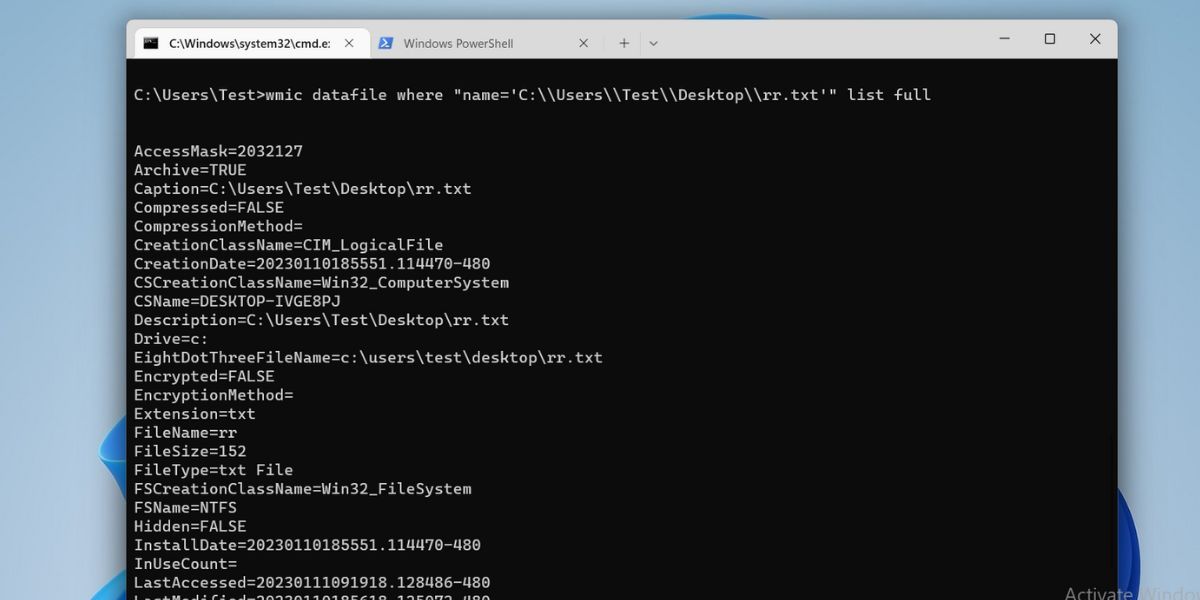
- Now, enter the following command and press the enter key: wmic datafile where «name=’File Path'» list full
-
Replace the “File Path” with the actual location of your file. We have a text file saved on the desktop. So, the command to display its properties will be: wmic datafile where «name=’C:\\Users\\Test\\Desktop\\rr.txt'» list full
- Scroll down to check the file properties such as size, creation date, and more attributes.
6. Using PowerShell
PowerShell has a different command to display folder or file properties. Like the CMD command, it also displays the file properties inside the shell in text format.
- Press Win + S and type PowerShell. Click on the first search result to launch PowerShell on your system.
- Now, type the following command: Get-Item -Path File Path | fl *
-
Replace “File Path” with the actual storage location like you did in the fifth method.
- Press the Enter key to execute the command.

Quickly View File or Folder Properties on Windows
These were the multiple methods to view file or folder properties in Windows. The first four options launch the GUI version of file properties, which is easier to navigate for users. However, you can also view file properties in CMD or PowerShell.
-
Home
-
News
- How to Open File Properties in Windows 10/11
By Shirley | Follow |
Last Updated
Do you know how to open file properties in Windows 10/11? Do you have any idea what the Windows file properties command line is? If not, now you can read this post on MiniTool to learn various ways to open the file or folder properties.
File properties show you detailed information about the file, including file size, file attributes, file location, date created, etc., and allow you to restore your files from a previous version. At the same time, you can share your files and set customs permissions easily with file properties.
Now let us see how to access file properties in a couple of ways.
1. Open File Properties Using Key Combinations
You can access file properties with the help of file properties shortcut keys in Windows 10. Both in File Explorer and on your desktop, you can open file properties by selecting the file and pressing the Alt + Enter key combinations.
2. Open File Properties by Double-Clicking the File
Another way to launch file properties using keyboard shortcuts is to use the Alt key on your keyboard.
First, press and hold the Alt key, then double-click the target file. Now you can view and edit the file information on the file properties page.
3. Open File Properties Using the File Explorer
File Explorer, also called Windows Explorer, is the default file manager tool in Windows 10. It offers you many features to help you manage your files or folders such as changing the default folder, enabling folder merger conflicts, and so on. Here you can see how to open file properties using File Explorer.
Step 1. Press the Windows + E key combinations to open File Explorer.
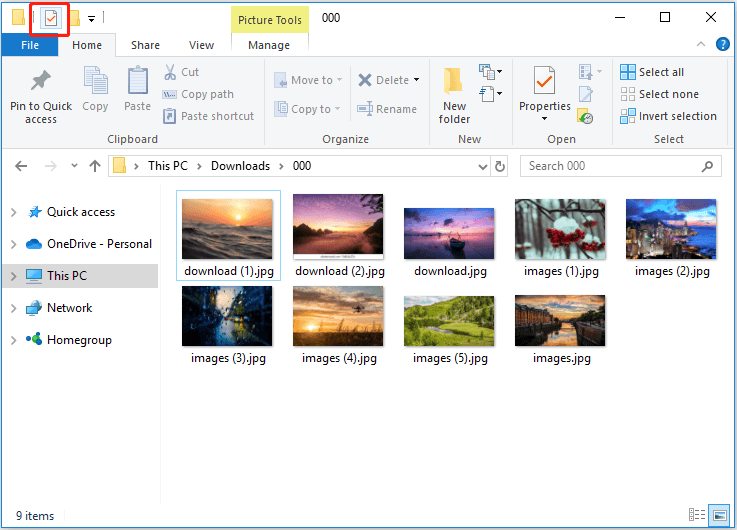
Step 2. In the upper left corner, click the Properties icon as shown below.
A right-click context menu is a pop-up menu that provides available shortcuts for actions specifically related to the selected object. In addition to using the default options of the context menu, you can customize it, such as adding the permanently delete option to the context menu.
To open file properties, you need to right-click the target file and select the option of Properties from the context menu.
5. Open File Properties Using Windows PowerShell
If you are familiar with Windows PowerShell, you may need to know the Windows file properties command line. With the correct command line, you can view your file information in the command window.
Step 1. Right-click the Windows logo key to click Windows PowerShell.
Step 2. In the new window, type this command and press Enter: Get-Item -Path file path | fl *.
You need to replace the file path with the actual one. For example, Get-Item -Path E: \OneDrive\ Desktop\000 | fl *.
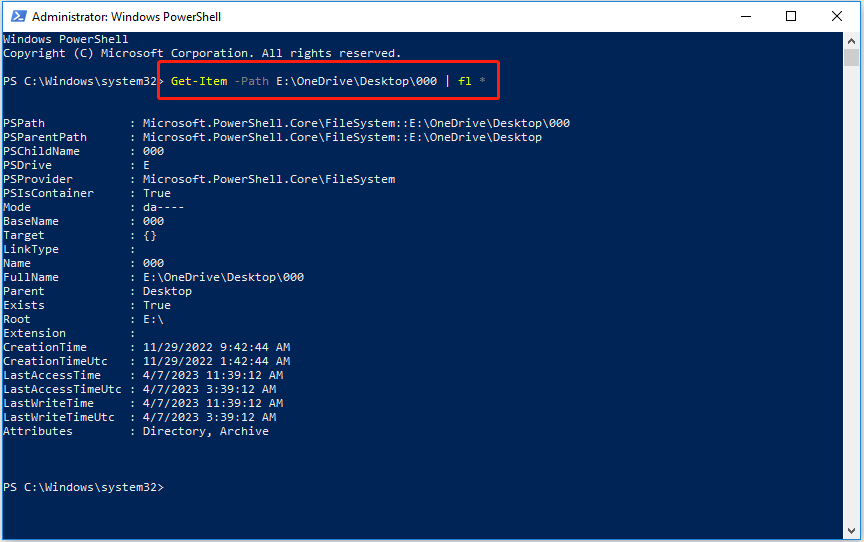
As you can see in the picture above, the information of the selected file is displayed in the Windows PowerShell window.
Bonus Tip: How to Recover Lost Files and Folders
If you are not proficient in using command lines, you may delete your files/folders with the Windows PowerShell with accidents. In this situation, how can you recover these lost files/folders?
You need to check the Recycle Bin for the lost files first of all. However, if you cannot find them in the Recycle Bin, you can try the best data recovery software – MiniTool Power Data Recovery. This data restore tool is designed to restore lost files (pictures, documents, emails, videos, audio, and so on) from all file storage devices (internal hard drives, external hard drives, USB flash drives, CDs/DVDs, etc.).
MiniTool Power Data Recovery offers a free edition that allows you to check whether you can find the desired files by previewing them (you can preview 70 types of files till now). and it supports no more than 1 GB of data recovery for free.
Now you can download the free edition to have a try.
MiniTool Power Data Recovery FreeClick to Download100%Clean & Safe
Wrapping Things Up
After reading this post, now you can open file properties with ease. And you should know how to recover lost files or folders by using MiniTool Power Data Recovery Free Edition. To get more information about files or folders, you can visit MiniTool News Center.
About The Author
Position: Columnist
Shirley graduated from English major and is currently an editor of MiniTool Team. She likes browsing and writing IT-related articles, and is committed to becoming a professional IT problem solver. The topic of her articles are generally about data recovery, data backup, and computer disk management, as well as other IT issues. In spare time, she likes watching movies, hiking and fishing.
Methods and Steps to Open File Properties in Windows 10. – Whenever you create a file, Windows generates details of the file and these details are saved in properties. The properties include creation date, size and many different info in multiple tabs. You might need to see the details of the file for certain causes on Windows 10.
File properties display information about a file such as its attributes, location, size, date of modification, owner, and a lot more. Through its dialog box, you can not only find the details but also perform several important tasks. Apart from this, it allows the modification of name, attribute, open with, permission as well. File Properties on Windows 10 makes your files easier to arrange – such as you can sort the files by going through its creation or modified date. See a guide including the methods to open File Properties in Windows 10.
How to Open File Properties in Windows 10
Way 1 – Through Right-click Context Menu
Step 1 – Begin the procedure by finding your file whose Properties you wish to open. Now, do a right-click on it, and from the pop-up context menu, click Properties.
Step 2 – Finally, your file or folder Properties dialog box will be visible on the screen.
Way 2 – Via File Properties Keyboard Shortcut
Step 1 – Locate and select your file.
Step 2 – After selecting the file, just press the combination of Alt and Enter keys. This combination of hotkeys will promptly launch file Properties in Windows 10.
Way 3 – Using Keyboard and Mouse Combination
Step 1 – Hold the Alt key on the keyboard.
Step 2 – Now, make a double-click your file. This is the quickest way to open File Properties dialog box in Windows 10.
Way 4 – Using Properties Icon in File Explorer
Step 1 – In File Explorer, navigate to your file. Once your appropriate file is visible, select it.
Step 2 – Now, move to the title bar and click the Properties icon. A little icon with a red color tick mark on the title bar is the Properties icon.
Step 3 – Within no time, the file Properties dialog box will appear on the screen.
Now let’s see what you will find after you open File Properties.
4 different tabs are there and each tab holds separate functionality. Let us now go through each tab of File Properties on Windows 10.
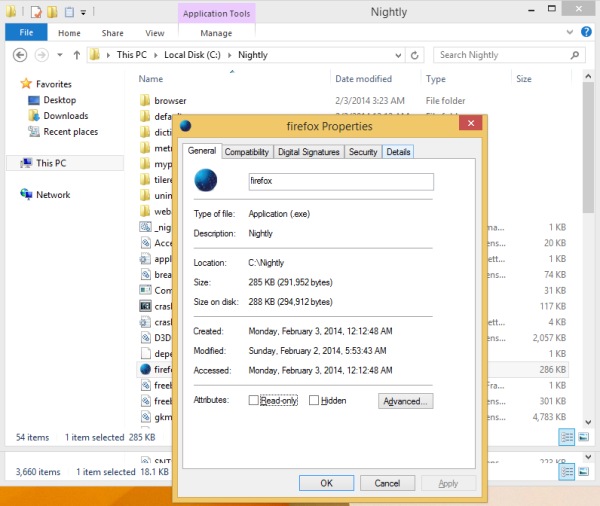
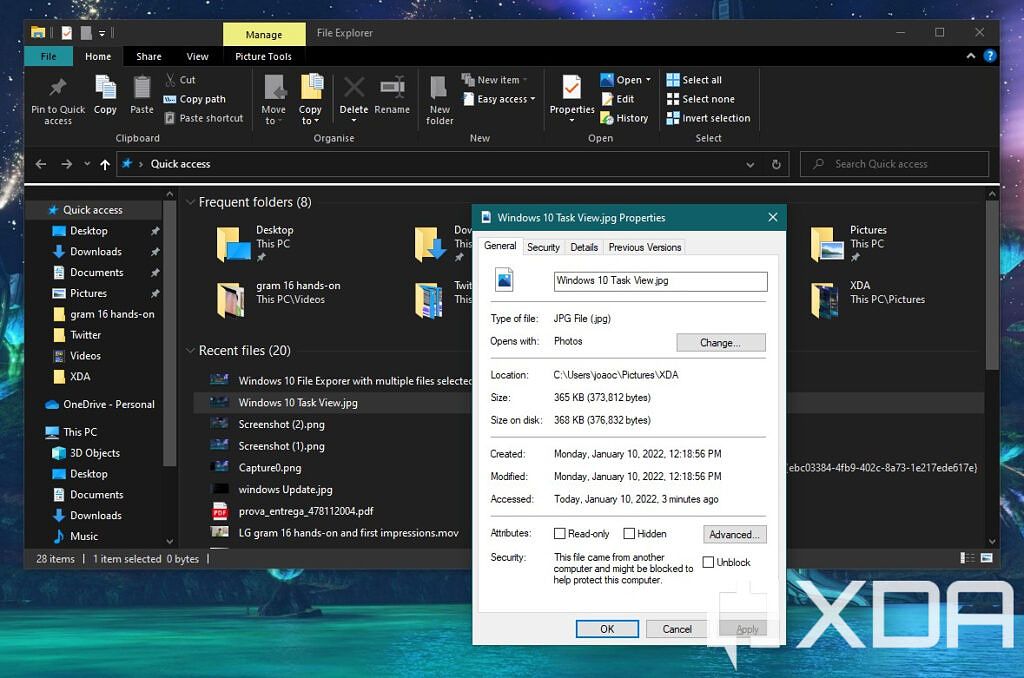
General – On the first tab you can see the fundamental information of the file such as its type, location, size, creation date, attributes, and a lot more.
Security – The second tab allows you to manage permissions as who can actually access the file.
Details – This tab shows every information of the file. The information on this tab varies for different file types – for songs, you will see album & artists name, length, etc whereas, for an image, its dimensions, size, type, and other related things are displayed.
Previous Versions – On this ending tab, you will find all the older versions of your file after you set up “File History backup”.
Conclusion
Well, the holding of the Alt key and then double-clicking the file or folder is certainly considered as the easiest method to open File Properties in Windows 10. If you know more methods, please take help of the comments form below and write them to us.
Skip to content
You can see many details of a file or folder on your disk drive from its Properties. You can even access the metadata of media files from Properties. Properties can be accessed using the mouse by right clicking on the file or folder and then choosing Properties from the context menu. However, there is a faster way to open Properties too. In this article, I would like to share with you a way to open file or folder properties directly without opening the context menu or the Ribbon.
In File Explorer, hold down the ALT key and simply double click the file or folder. The Properties window will open directly!
You don’t need to right click and select the Properties menu item. If you prefer exclusively using the keyboard, you can select the file and press Alt+Enter. That will also open the Properties of the selected item directly.
This is my favorite Explorer shortcut because it’s really useful and time saving.
If you select special items like This PC, it will open System Properties.
Bonus Tip: If you use Classic Shell’s Start Menu, you can also use Alt+Enter on a menu item to open its Properties! Even if you search for something, you can press Alt+Enter directly on search results to access the respective item’s Properties — whether it’s an app shortcut, or file. We wholeheartedly recommend Classic Shell along with our exclusive beautiful skin for it.
Support us
Winaero greatly relies on your support. You can help the site keep bringing you interesting and useful content and software by using these options:
If you like this article, please share it using the buttons below. It won’t take a lot from you, but it will help us grow. Thanks for your support!
Sign in to your XDA account
For the majority of people, using a computer with a keyboard and mouse is the most natural way to do this. It’s just how most modern computers are designed to be used, and in general it can be more intuitive. Using a mouse lets you easily see and point at the things you want to click, open, or move, so anyone can pick it up and understand how it works. But for proficient users, the keyboard alone can sometimes be a more powerful tool. In this guide, we’ll show you all the keyboard shortcuts you can use in Windows 10 to get things done faster.
There’s quite a lot you can do with just a keyboard that you might not know about. Whether it’s something as simple as copying text to opening apps and certain features, you might find yourself using your keyboard a lot more after reading this guide.
Navigate this article:
- Shortcuts for Windows 10 features and apps
- Shortcuts for multitasking and window management
- Shortcuts for File Explorer
- Shortcuts for dialog boxes
- Shortcuts for the taskbar
- Other general shortcuts (text, navigation, etc)
Keyboard shortcuts for Windows 10 features and apps
You may know the Windows key on your keyboard for opening the Start menu throughout the years, but did you know you can combine it with other keys to do a whole lot more? Here are a few shortcuts that use the Windows key to launch features and apps, plus a few others.
- Windows key + A — Open the Action Center. This displays or notifications along with quick action toggles for Wi-Fi, Bluetooth, Focus Assist, and more.
- Windows key + C — Launch Cortana, the digital assistant built into Windows 10. You can type questions and other queries to get help from Cortana, or configure Cortana to start listening for your voice when you use the shortcut.
- Windows key + D — Show or hide the desktop. Showing the desktop hides all your open windows and apps, and pressing the keyboard shortcut again restores the windows in their correct place.
- Windows key + Alt + D — Display the time and calendar flyout.
- Windows key + E — Open File Explorer.
- Windows key + F — Take a screenshot and open Feedback Hub. This lets you more easily send feedback to Microsoft about a problem you may have encountered.
-
Windows key + G — Open the Xbox Game Bar. This lets you record videos, take screenshots, and access various features while playing a game.
- Windows key + Alt + B — Turn HDR on or off. This requires an HDR-compatible monitor and a recent version of the Xbox Game Bar app.
- Windows key + Alt + R — Start recording a video of your app or game using the Xbox Game Bar.
- Windows key + H — Launch dictation, allowing you to enter text using your voice instead of typing. This is only available in select languages.
-
Windows key + I — Open the Settings app.
- Windows key + Pause — Open the About page in Settings. This includes information about your computer hardware and Windows itself.
-
Windows key + U — Open the Accessibility Settings page.
- Windows key + Ctrl + C — Turn color filters on or off. This feature needs to be enabled in the Accessibility settings first (in the Color Filters tab), and it lets you change how colors are displayed to account for various forms of color blindness.
- Windows key + K — Open the Connect pane, allowing you to connect to wireless displays that support Miracast, as well as other wireless devices such as Bluetooth.
- Windows key + L — Lock your PC. This keeps all your apps open, but requires you to unlock your PC before using them again.
-
Windows key + M — Minimize all your windows.
- Windows key + Shift + M — Restore your minimized windows. This only works if you haven’t opened any windows in the meantime.
- Windows key + O — Lock device orientation. For tablets and convertibles, this prevents the display from rotating when you rotate your PC.
- Windows key + P — Change the display mode for multiple monitors. If you have multiple displays connected, you can choose whether to use your screens as extensions to each other, duplicate them, or use only a single screen at a time.
- Windows key + Ctrl + Q — Open Quick Assist. This is a tool that allows you to provide assistance to another Windows user remotely by seeing their screen or taking control of their PC.
- Windows key + R — Open the Run dialog. This allows you to open any app on your PC, as long as you know the name of the executable file for the app.
- Windows key + S or Windows key + Q — Open Windows Search. You can search for files, apps, and search the web here.
- Windows key + Shift + S — Take a screenshot using the Snip & Sketch. After pressing the keys, you can choose your preferred capture mode, including free form, rectangle, window, and full-screen (this includes all connected monitors).
- Windows key + V — Open your clipboard history. This allows you to see multiple items you’ve copied, including text, links, and images. This feature is initially disabled, but you can also enable it in this window.
- Windows key + X — Open the Quick Link menu, which is equivalent to right-clicking the Start icon on your taskbar. This contains links to system features like Settings, File Explorer, Task Manager, and more.
- Windows key + Y (Windows Mixed Reality devices only) — Switch input between Windows Mixed Reality and the desktop.
- Windows + . (period) or ; (semi-colon) — Open the emoji panel. This lets you add emoji to any text field.
- Windows + , (comma) — Temporarily look at the desktop. Your desktop is only visible as long as you hold one of the keys after pressing them, then your windows are restored.
- Windows key+ Ctrl + F— Search for PCs on your network. This is meant for Azure Active Directory domains.
-
Windows key + Spacebar — Cycle between languages and input methods (if multiple are installed).
- Windows key + Shift + Spacebar — Cycle backwards through the list.
- Windows key + Ctrl + Spacebar — Switch to the last used input method.
- Ctrl + Shift — Switch to a different keyboard layout if multiple are available (for the same language).
- Ctrl + Spacebar — Turn the Chinese IME on or off (if the Chinese language is installed).
- Windows key + Ctrl+ Enter — Turn on Narrator. This accessibility feature reads on-screen elements to make navigation easier for those with vision impairments.
-
Windows key + + (plus) — Turn on the Magnifier and zoom into the screen.
- Windows key + — (minus) — Zoom out with the Magnifier.
- Windows key + Esc — Close the Magnifier.
- Windows key + / (forward slash) — Begin IME reconversion.
- Windows key + Ctrl + Shift + B — Wake up your PC from a blank or black screen.
-
Windows key + PrtScn(Print Screen, may be represented differently on different keyboards) — Take a full-screen screenshot and automatically save it to a file. Items are saved in the Pictures library in a folder called Screenshots.
- Windows key + Alt+ PrtScn — Take a screenshot of the active game or window and save it into a file. This feature uses the Xbox Game Bar, and files are saved in the Videos library, in a folder called Captures (by default).
- PrtScn — Take a full-screen screenshot and copy it to the clipboard, so you can paste it somewhere else without saving it as a file. You can also go to the Settings app > Accessibility > Keyboard to set the PrtScn key to open the Snipping Tool (making it the same as Windows key + Shift + S)
-
Ctrl + Esc — Open the Start menu.
- Ctrl + (arrow) — Resize the Start menu (when it’s open)
- Alt + Shift + (arrow) — When focus is set to a tile on the Start menu, move the tile in the direction of the arrow.
- Ctrl + Shift + (arrow) — When focus is set to a tile, move it into the next tile to create a folder.
- Ctrl + Shift + Esc — Open the Task Manager.
Keyboard shortcuts for multitasking and window management

Juggling multiple apps and windows at the same time can be troublesome, and the mouse isn’t always the fastest way to find the app you want. These keyboard shortcuts help you switch between apps, resize windows, or snap them next to each other in Windows 10.
- Windows key + Tab — Open Task View. This displays all your open apps as tiles so you can choose one to focus on. It also displays your virtual desktops and your timeline, including previously open apps and documents.
-
Alt + Tab — Switch to your last active window. Press Tab repeatedly while holding Alt to choose what window to switch to.
- Alt + Esc — Cycle through windows in the order in which they were opened.
- Ctrl + Alt + Tab — View all your open apps so you can choose one with the keyboard arrows. This is similar to Task View, but doesn’t display your virtual desktops and is only visible in your current active monitor.
- Alt + F4 — Close the active window or app. If used on the desktop, this opens the Windows power menu.
- Windows key + Up arrow — Maximize the active window so it takes up the entire desktop.
- Windows key + Down arrow — Set the active window to a smaller size if it’s maximized. Hide the window into the taskbar if it’s not maximized.
- Windows key + Left arrow — Snap the active window to the left half of the screen.
-
Windows key + Right arrow — Snap the active window to the right half of the screen.
- If you hold down the Windows key after snapping an app to half the screen, you can use one of the other arrows to snap the app into a quarter of the screen. You can also press the same arrow repeatedly to move windows to different monitors (still taking up half the screen).
- Windows key + Home — Minimize all windows except the active window. Press again to restore the minimized windows.
- Windows key + Shift + Up arrow — Stretch the active window to take up the entire vertical space, keeping the same width (for non-maximized windows). The same shortcut with the Down arrow reverses this.
- Windows key + Shift + Right arrow or Left arrow — Move the active window to a different monitor.
- Windows key + Ctrl + D — Create a new virtual desktop
- Windows key + Ctrl + Left arrow or Right arrow — Switch between virtual desktops to the left or right.
- Windows key + Ctrl + F4 — Close the current virtual desktop. Any open apps are moved to the next virtual desktop in line.
File Explorer keyboard shortcuts in Windows 10
The File Explorer is one of the core features of Windows, allowing you to see and manage all the files stored on your PC. There are a few shortcuts you can use to make this experience easier and faster using a keyboard instead of a mouse.
- Alt + D — Set focus to the address bar.
- Ctrl + E or Ctrl + F or F3 — Set focus to the search bar.
- Ctrl + N — Open a new window (also works in some web browsers)
- Ctrl + W — Close the active window (this can also be used to close the active tab in web browsers).
- Ctrl + mouse scroll wheel — Change the size of folder and file icons. Scrolling up makes icons bigger, scrolling down makes them smaller.
- Ctrl + Shift + N — Create a new folder.
-
Ctrl + Shift + E — Displays all the folders in the parent directory of the current active folder (by expanding the list on the sidebar) if the current folder has no sub-folders.
- Num lock + * (asterisk) or + (plus) — Display all the subfolders in the current selected folder on the siderbar.
- Num lock + — (minus) — Collapse an expanded folder.
- Alt + Enter — View properties of the selected file or folder.
- Alt + P — Show the preview panel.
- Alt + Left arrow or Backspace — Go back one page (also works in some apps like web browsers)
- Alt + Right arrow — Go forward one page (also works in apps like web browsers)
- Alt + Up arrow — View the parent folder of the current active folder.
-
Ctrl + (arrow) — Navigate the items in the current page without selecting them.
- Ctrl + Spacebar — Select individual items while navigating
- Shift + (arrow) — Select consecutive items starting from the currently selected one. In grid-style layouts, the up and down arrows select entire rows of items. If you start moving in the opposite direction, the last selected item(s) is/are deselected.
-
Right arrow (on navigation sidebar) — Expand a collapsed folder or switch to the first subfolder of an expanded folder.
- Left arrow — Collapse an expanded folder or select the parent folder of the currently selected one.
- Home — Go to the top of the current page (works in various other apps).
- End — Go to the bottom of the current page (also works in multiple apps).
- F2 — Rename the selected file or folder.
- F4 — Display the address bar list in File Explorer.
Keyboard shortcuts for dialog boxes
Dialog boxes are small windows apps can sometimes generate to present menu options and settings. There are a few keyboard shortcuts specifically meant for dialog boxes, but they can vary quite a bit depending on how complex the dialog box is. Here are some of the keyboard shortcuts you can use in these dialog boxes.
- F4 or Spacebar— Display items in an active dropdown list.
- Arrow keys — Select a button in a group of buttons or option in a list.
- Spacebar — Select or deselect an active item if it’s a checkbox.
-
Ctrl + Tab — Switch through different tabs (also works in web browsers)
- Ctrl + Shift + Tab — Switch backwards through tabs
-
Tab — Move through options on the current page
- Shift + Tab — Move backward through the options on the current page.
- Alt + (letter) — Select the option with the corresponding underlined letter in its description.
Windows 10 taskbar shortcuts

The taskbar is another central part of Windows 10, and while many of us would usually interact with it using a mouse, you can do it with keyboard shortcuts. But in some cases, you can also use the keyboard as an assistant to the mouse to make certain actions quicker.
- Windows key + T — Cycle focus through apps on the taskbar (open or pinned). You can then select them by pressing Enter.
- Windows key + (number) — Start the app pinned to the taskbar in the position indicated by the number. If the app is already running, switch to that app. If an app has multiple instances open, you can hold the Windows key and press the same number again to switch to a specific instance of the app.
-
Windows key + Shift + (number) — Start a new instance of the app pinned to the taskbar in the position indicated by the number, even if one is already open.
- Windows key + Ctrl + Shift + (number) — Open a new instance of the app located at the given position on the taskbar as an administrator.
- Windows key + Ctrl + (number) — Switch to the last active window of the app pinned to the taskbar in the position indicated by the number.
- Windows key + Alt + (number) — Open the Jump List for the app pinned to the taskbar in the position indicated by the number.
- Shift + left mouse click — Open a new instance of the selected app.
- Ctrl + Shift + left mouse click — Open the selected app as an administrator.
- Shift + right mouse click — Open the window menu for the selected app
- Ctrl + left mouse click (on an app with multiple windows open) — Cycle through the open windows for the app
- Windows key + B — highlight the first icon in the notification tray area. This allows you to navigate the icons with the arrow keys and select them with Enter.
General keyboard shortcuts in Windows 10
Beyond specific Windows 10 features, many keyboard shortcuts are available throughout the operating system and its apps. This can include things like copying text and items, navigation menus, and so on, but support for these features in apps can vary.
- Ctrl + A — Select all text or items in a document, page, or window.
- Ctrl + D — Delete the selected text or item(s).
- Ctrl + X — Cut the selected item or text.
- Ctrl + C — Copy the selected item or text.
- Ctrl + V — Paste copied or cut content from the clipboard.
- Ctrl + Z — Undo your last action.
- Ctrl + Y — Redo an undone action.
-
F5 or Ctrl + R — Refresh the active window or page (works in various apps, including web browsers).
- Ctrl + F5 — In some web browsers, this refreshes the active window by forcing the browser to reload files even if they’ve previously been cached. This can help if changes have been made to a page but you’re unable to see them in your browser.
- F6 — Cycle through screen elements of the active window or desktop.
- F10 — Activate the menu bar in the active window or app.
- Alt + F8 — Show your password on the Windows sign-in screen
- Alt + (letter) — When menus are being displayed, select the option with the corresponding underlined letter in the text.
-
Alt + Spacebar — Open the shortcut menu for the active window.
- Shift + F10 — Open the shortcut/context menu for the selected item.
-
Left arrow (in menus) — Move to the left on the menu, or close an open sub-menu.
- Right arrow (in menus) — Move to the right on the menu, or open a selected sub-menu.
- Ctrl + F4 — Close the open document or tab in apps that allow you to open multiple documents or tabs at once, such as web browsers.
- Ctrl + E — Open search (in some apps).
-
Ctrl + Right arrow — In a document, move the text cursor to the beginning of the next word.
- Ctrl + Left arrow — Move the text cursor to the beginning of the previous word.
-
Ctrl + Up arrow — In a document, move the text cursor up one paragraph.
- Ctrl + Down arrow — Move the text cursor down one paragraph.
- Alt + Shift + (arrow key) — When focus is set to a pinned app in the Start menu, move the pinned app in the direction of the arrow.
-
Shift + (arrow key) — In a document, select text starting from the position of the text cursor.
- Left arrow — Select the previous character. Right arrow deselects the last selected text.
- Right arrow — Select the next character. Left arrow deselects the last selected text.
- Up arrow — Select the previous line. Down arrow deselects the last selected line.
- Down arrow — Select the next line. Up arrow deselects the last selected line.
-
Ctrl + Shift + (arrow key) — In a document, select a block of text starting from the position of the cursor:
- Left arrow — Select the previous word. Right arrow deselects the last selected text.
- Right arrow — Select the next word. Left arrow deselects the last selected text.
- Up arrow — Select the previous paragraph. Down arrow deselects the last selected paragraph.
- Down arrow — Select the next paragraph. Up arrow deselects the last selected paragraph.
- Esc — Stop or leave an ongoing task (use varies by app).
With these Windows 10 keyboard shortcuts in hand, you may find yourself your keyboard more than your mouse soon enough. The first instinct many may have is that this isn’t as intuitive, but it can be very rewarding to learn all these shortcuts, as they save you a lot of time in the long run. For some of these shortcuts, specifically the ones based on the Windows key, Microsoft’s PowerToys software includes a tool called Shortcut Guide. You can hold down the Windows key to see all the shortcuts available for it.
Windows 10 is still the most widely used operating system out there, but if you have upgraded to Windows 11, we have a guide for Windows 11 keyboard shortcuts, too. Most of them are the same across both operating systems, but a few have changed, and Windows 11 has a few new ones, too. Check out our Windows 11 review if you want to know whether you should upgrade or not.