
Applies ToWindows 11 Windows 10
Support for Windows 10 will end in October 2025
After October 14, 2025, Microsoft will no longer provide free software updates from Windows Update, technical assistance, or security fixes for Windows 10. Your PC will still work, but we recommend moving to Windows 11.
Learn more
File History is a handy feature in Windows that helps you protect your personal files and folders from accidental loss or damage. Think of it as a backup system that automatically saves copies of your files, so you can easily restore them if something goes wrong. Whether you accidentally delete a file, make unwanted changes, or experience a technical issue, File History can come to your rescue by allowing you to recover previous versions of your files and folders.
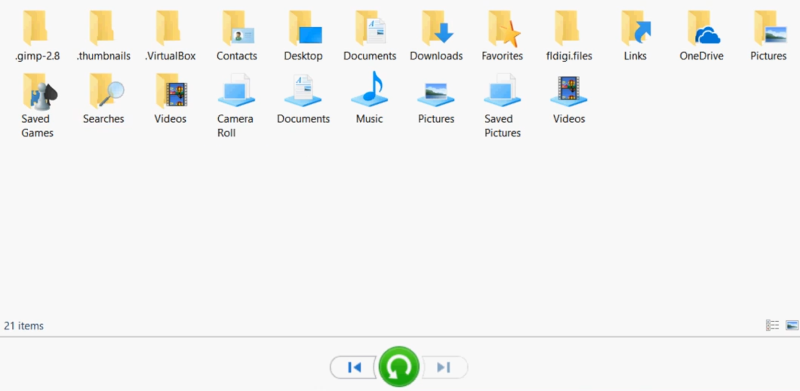
One of the great things about File History is that it automatically backs up all your libraries. This includes default libraries like Documents, Pictures, Videos, and Music, as well as any custom libraries you have created. If you have folders elsewhere that you want to back up, you can add them to an existing library or create a new library for them.
Setting up File History is straightforward. Once enabled, it continuously monitors your files and folders, making regular backups to an external drive or network location. This means you don’t have to worry about manually saving copies of your important documents, photos, videos, or entire folders. If you ever need to recover a file or folder, you can browse through the different versions saved by File History and restore the one you need. It’s a simple yet powerful tool that provides peace of mind by ensuring your valuable data is always protected.
Configure File History
Here are the steps to configure File History:
-
Connect an external drive or a network location: ensure you have an external drive connected to your computer or a network location configured where you want to save your backups
-
From the Control Panel, under System and Security, select Save backup copies of your files with File History
-
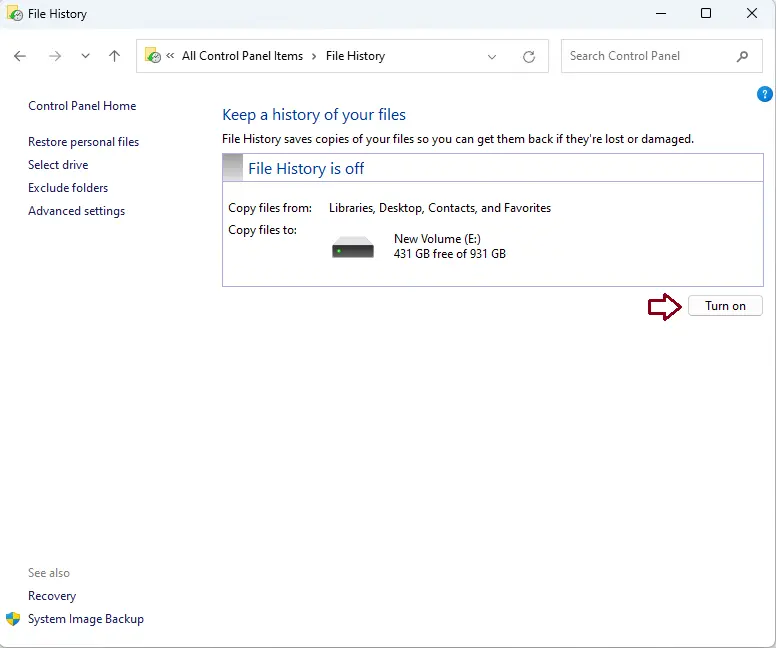
Select Turn on to enable File History


-
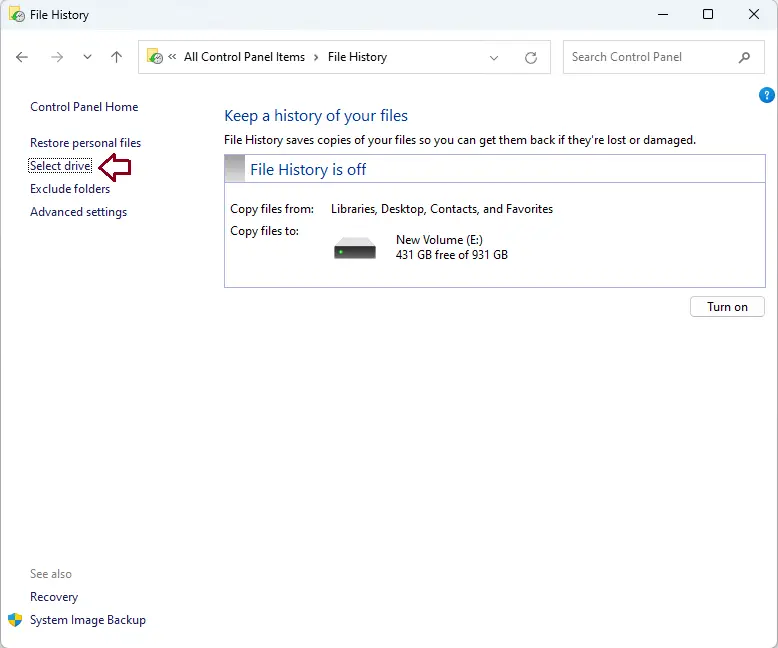
If no drive is selected by default, you can choose a different one by selecting the option Select drive
-
In the Select a File History drive window, choose the external drive or network location you wish to use for backups and select OK. If prompted, you can choose to move existing files to the new drive or start fresh
While File History automatically backs up essential folders like Documents, Pictures, Videos, and Desktop, you can add other folders by navigating to the folder, right-clicking on it, and selecting Show more options > Include in library to add it to a library for backup.
Restore files with File History
To restore deleted content, or to restore a file or folder to a previous state:
-
Open File Explorer and navigate to the folder that used to contain the file or folder
-
Right-click on the folder name, and then select Restore previous versions. If the folder was at the top level of a drive, for example C:\, right-click the drive, and then selectRestore previous versions
Note: To restore a previous version of a file or folder that’s included in a library, right-click the file or folder in the location where it’s saved, rather than in the library.
-
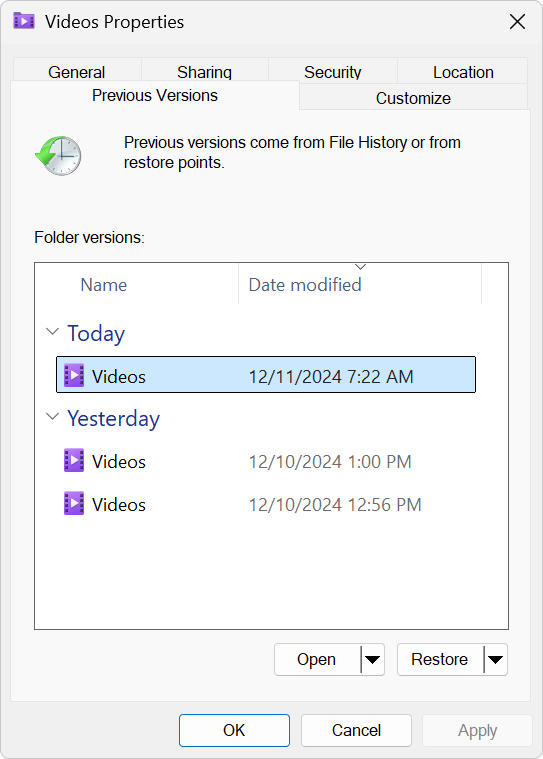
The Previous Versions tab lists the available previous versions of the file or folder

-
Select a previous version of the folder that contains the file or folder you want to restore. For example, if a file was deleted today, choose a version of the folder from yesterday, which should contain the file
-
To preview the content of the selected version, expand Open and select Open in File History
-
To restore the content of the selected version, select Restore. To avoid overwriting the current version, you can also restore to a different location by expanding Restore and selecting Restore to…
Warning: The file or folder replaces the current version on your computer, and the replacement can’t be undone.
Need more help?
Want more options?
Explore subscription benefits, browse training courses, learn how to secure your device, and more.
File History is a very useful feature on Windows systems that automatically backs up copies of your files on an external drive or network location. File History is primarily used to back up personal files from the user folders like Pictures, Music, Documents, Videos, etc. However, we can change these folders to back up other items as well.
The best feature of File History is that it keeps multiple versions of your files over time. So, unlike the backup, you can not just recover the latest version of the file but choose from multiple backed-up versions. This is helpful if you accidentally overwrite a document and want to make some changes to it later on. Just like the normal external Windows backup, you can set backup scheduling so that your files are in sync with the backup.
The restoration of files is pretty easy using the File History menu. However, file history can’t be used to create a System Image backup. So, if your system fails, you’ll have to first re-install Windows to recover the files from the File History backup. You can choose to back up the files externally or internally. But, again, in case of the overall system failure, the internal backup would also be vanished. If you want to know how you can set the Windows File history backup on your computer, this article is for you.
What is File History Tool in Windows?
File History is an interesting feature that is noticed when the files in the specific directories are changed. When changed, it saves the backup to an external drive. It runs the backup periodically and saves the backup files. It is not set by default and we need to manually enable it and change the settings if we want.
File History is not a replacement for the System Image backup that we have discussed in this article. For example, if the hard drive or SSD fails, it’s the system image backup that can be used to restore the system. File History gives you the more current version of the file that you have changed or changed by mistake.
With the help of file history, you get to see the different versions of the file and restore them as per your choice. The backups are generally used to restore from a single point when that backup was created.
The methods of enabling File History are different in Windows 10 and 11 and that is why I have given you the steps for both operating systems. So, let’s see how you can enable File history on your computer.
How to Enable File History in Windows 11?
Follow these steps to enable File History and customize the settings.
1. Connect an external drive or a Flash drive to your computer
It is good to format your drive once it is connected to the system. Also, choose the right amount of storage space depending on the size of the files you are going to save in the file history. In my case, I am using a 16GB Flash drive which is a standard drive size.
2. Open the File History Menu from the Control panel
Search for Control Panel in the Windows Start menu and open it. You can also search for the File History in the search but if you don’t find it, it is always in the control panel.
3. Exclude Folders if you want
By default, the File history tool will keep the file history of all the folders in the Library i.e. Music, Photos, Videos, etc. However, if you want, you can exclude and add the folders to File history. To exclude the folder, the option will be available on the left side of the File history menu.
4. Add New Folders in the File History
For example, if you want to add the Desktop to the File History, you can do it through Windows File Explorer. Just open up Explorer and locate the desktop folder. Right-click it and click Show More Options. Then, click Include in Library. You can create a new library for the desktop or add it to another one.
5. Change version frequency and saving schedule
Now, these settings are very important and you should change them with proper care. Click on the advanced settings option on the left side to access the scheduling settings.
The first option that says Save copies of files is the time interval between each new file version saved by the File history tool. Every 10 minutes is the most frequent time interval for storing the new version of your files. However, this would add multiple versions of your files in a very short time and can fill up your drive. However, you can adjust when should the older versions be deleted from the drive to save space. By default, it will save the file version forever but for that, you need
If you are using a low-space drive or a flash drive for File history, it is better to use the Until Space is Needed for saving versions of your files. If you have added many folders with a lot of data in the File history, the drive can fill up pretty quickly and once it is filled, the new version may not be stored anymore.
How to Enable File History in Windows 10?
In Windows 10, File History has a bit simpler interface because it is available in the Windows settings. To find the File history, just search for Backup in the Windows search bar. Make sure the external drive is connected to your computer.
In the Backup menu, click Add a Drive under the option Back up using File History. The system will automatically detect any external drive connected to it and ask you to choose your desired one. Just click on it and you are ready to go.
Once you have selected your drive, you’ll be asked to add your desired folders to file history and change the frequency as we did in the Windows 11 tutorial above. Just change these settings and click Backup Now. You can come back here to add new folders or delete them. Also, you can change the backup frequency.
How to Restore Previous Versions of Your Files?
If you have enabled File History for a specific folder, you can easily review and restore its backed-up versions through the File Explorer itself. Just right-click the folder first of all and open its properties. In Windows 11, you’ll have to first click Show More options.
A new properties menu will open with different tabs. Click the Previous Versions tab. There you will find the saved versions of your files with the time when they were saved. Click on your desired version and click restore or view to access or retrieve the previous content of the folder.
Today, society heavily relies on automation to make life more convenient and efficient. Millions of resources list the numerous ways IT automation benefits organizations of all sizes and industries (We’re no different: Check out this guide on “Everything You Need to Know About IT Automation”).
Still, there is something to be said about doing certain tasks manually for redundancy and security purposes. One such task is manually creating on how to create a file history backup in Windows 10. In this guide, we walk you through everything you need to know about how to back up personal files in Windows 10 without software, from its benefits to troubleshooting common issues, so you can confidently secure your important files.
Using this Windows 10 File History tutorial
Regular backups are crucial to any successful backup strategy. They ensure that your business-critical files are safe from unexpected hardware failures, malware attacks, or accidental deletions caused by human error. While Windows 10 has a built-in File History feature that helps you maintain regular backups, setting it up manually can give you greater control over the process.
What is File History in Windows 10?
To recap, File History is a built-in backup feature in Windows 10 that automatically saves copies of your files at regular intervals. It ensures that you can recover previous versions of your files in case of data loss. This has many benefits, not least of which is enabling you to keep multiple versions of your files, allowing you to restore an earlier version if needed.
You can manually save File History to an internal hard drive, an externally connected drive, or even a drive on a network.
Step-by-step guide: How to manually set up File History in Windows 10
Before you begin, ensure you have the necessary setup to use File History effectively. We recommend checking your:
- System requirements: Make sure that your Windows is up-to-date. File History is compatible with Windows 10.
- Backup storage: Ensure you have the right device for the specific type of backup you intend to do.
Option 1: Through Settings
- Access File History settings
-
-
- Click “Start” and select “Settings”
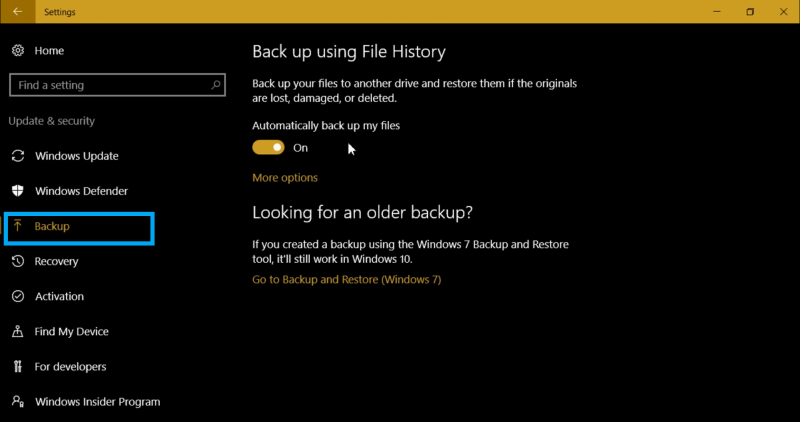
- Navigate to “Update & Security”, and click “Backup” from the left-hand menu.
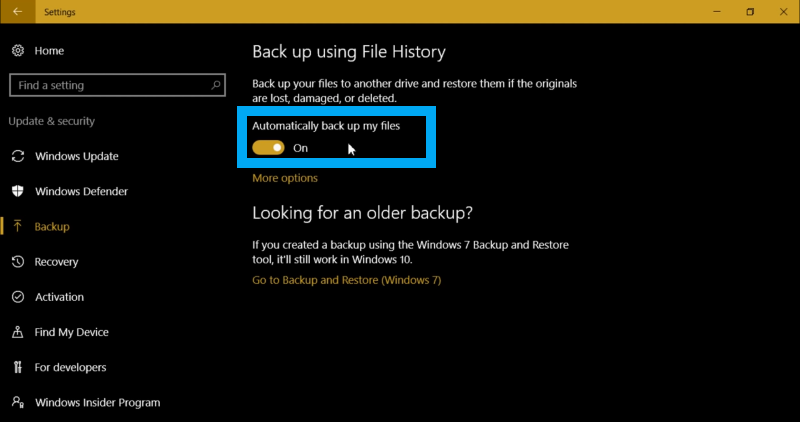
- Under “Back up using File History”, click “Add a Drive”
-
- Choose a backup drive
-
-
- Windows will display available drives. Select your desired external drive or network location.
- Once selected, File History will be activated.
-
- Configure backup settings
-
-
- Click “More Options” under the “Backup” section to adjust settings. We recommend:
- Backup frequency: Choose how often File History saves copies of your files.
- Retention period: Choose how long to keep saved versions.
- Add or exclude a folder by scrolling down to “Back up these folders” and selecting “Add a folder” or clicking on a folder to remove it.
- Click “More Options” under the “Backup” section to adjust settings. We recommend:
-
- Initiate a manual backup
-
- Scroll to the bottom of the settings page and click “Back up now” to start the backup.
- Monitor the progress to ensure the backup is completed successfully.
Option 2: Through Control Panel
- Open “Control Panel” and select “File History”
- Click “Run” under the “Selected Drive”
- File History will now create a new backup version.
- Monitor the progress to ensure the backup is completed successfully.
Some tips to properly configure File History manually
The process of manually creating a File History backup is simple enough. Still, we recommend some hygiene habits to ensure that everything runs smoothly—even after you’ve completed the process.
- Regularly check backup files on Windows 10: Verify that backups are running as scheduled. You can do this by opening File History settings and confirming if the latest backup date aligns with your expectations.
- Monitor storage space: Ensure your backup drive has enough space for ongoing backups. If space runs low, consider cleaning up older versions or upgrading to a larger storage device.
- Update included folders: Periodically evaluate your data storage needs and adjust backup settings to reflect them. This includes including or excluding folders.
- Label backup drive: It’s wise to label each backup drive in case you are using multiple drives for different purposes.
- Safeguard your backup device: Store your external drive in a safe location when not in use to prevent physical damage or data rot.
Troubleshooting common issues
This section details troubleshooting File History backup issues in Windows 10. On occasion, you may encounter some challenges, but thankfully, many common issues with File History have straightforward solutions.
Device not recognized
The most common issue is Windows failing to recognize the backup drive. This happens due to a faulty connection, an unsupported drive format, or drive issues.
To resolve this:
- Check your File History external drive setup. Ensure the external drive is properly connected and powered on. If necessary, try using another USB port.
- Check if the drive appears in File Explorer. If it doesn’t, open Disk Management. (You can do this by simply typing “Disk Management” in the “Start” menu.)
- Go to “Device Manager”, locate your drives under “Disk Drives”, right-click the drive, and select “Update driver”.
- Restart your computer to refresh the connection.
Backup not completing
Is your backup failing to complete or seems to be stuck in progress? This can be caused by insufficient storage space, interruptions during the backup process, or corrupted files.
To resolve this:
- Check the available space on your backup drive.
- Close all running and background applications to prevent interference during the backup process.
- Run Windows Troubleshooting.
- Open Settings > Update & Security > Troubleshooting > Additional troubleshooting.
- Select “File History” and follow the prompts.
- If the problem persists, try resetting File History. Turn it off in Settings, delete the File History folder from your backup drive, and restart the process. For more information, we’ve written an in-depth guide on “How to enable or disable File History”.
Missing files
This happens when folders are excluded from backup settings or if the files are stored in unsupported locations.
To resolve this:
- Open “File History Settings” and review the list of included folders under “Back up these folders”.
- Add any missing folders by clicking “Add a folder” and navigating to the desired location.
- Ensure the files are not in unsupported locations, such as system directories or third-party app folders.
- Verify the backup drive is properly connected during scheduled backup times.
Restoring fails or files are corrupted
Sometimes, you may encounter an error when you try to restore files from File History.
To resolve this:
- Verify the integrity of your backup by trying to restore a small, recently modified file.
- Check for earlier versions saved in File History if the backup is corrupted.
- Consider running a disk check on your backup drive to detect and fix errors.
- Open Command Prompt as an administrator and type: “chkdsk X: /f /r” (Replace “x” with your drive’s letter).
Additional tips for file backups
- Test your backups: Regularly check your backups and ensure you can restore files from them.
- Combine backup methods: File History works best when paired with other backup solutions for a comprehensive strategy.
- Consider alternatives: Advanced users may explore other tools like Windows Backup and Restore or third-party software like NinjaOne for more customization.
File History is a simple and convenient feature in Windows that automatically backs up important data. However, it’s a great idea to manually create these backups to secure business-critical information in case of unexpected events, whether caused by threat actors, insider threats, or random glitches.
Last Updated :
12 Mar, 2021
File History is an integrated backup system in Windows 10 and it replaced the earlier version of Windows Backup & Restore. One just needs a good size USB thumb drive or an external hard drive that is plugged in through the USB ports. Once it’s plugged in, then the system will know that there’s a hard drive. So let’s look into the use of File History on Windows for Backup and Restore.
Backup using File History:
Follow the below steps to take a backup of your files using File History:
- Go to the Settings panel.
- Go to Update and Security.
- On the left side of the panel click on Backup, and backup using file history pops up.
- If you haven’t used it before, turn the switch on and go to more options to manage backup.
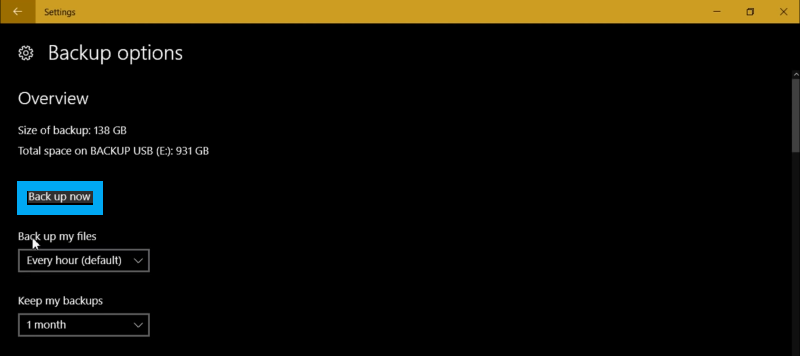
- On this page, the hard drive selected for backup will be displayed.
- It also displays the frequency of backups and the duration of keeping backups.
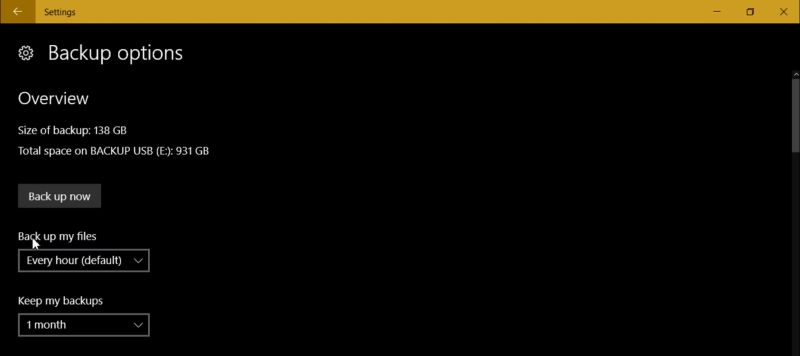
- Using file history one can keep versions of files that are older than the one which is actually been worked on.
- Now come to the frequency of backup one should choose. It depends on how and what you do on your PC. If you are a writer, you are somebody working on documents of all sorts, of course, every hour is a very good option because every time you made modifications it gets saved on your PC, but it doesn’t replace the other copy.
- For example, you are working on a Word document and saved it then it has a copy that file history backed up, now you are working on the same Word document, and you save it after an hour later, then file history does a backup an hour later and makes a new copy. So if you are working on a PC then it’s a great option as it actually backs up copies of your files regularly meaning no matter what happens you are not losing more than an hour’s worth of work which is great.
- Now, for this to work hard drive needs to be plugged in so on the desktop this is absolutely fine as you just leave your hard drive plugged in and backups are done regularly but on a laptop, it is not that convenient so in that case, one can unplug the hard drive from time to time.
- Another way one might want to use file history here is using network-attached storage mostly for laptop users.
- For that, to work it needs to show up as a drive on your file explorer.
- So after choosing the time, select how long do you want to keep backups based upon the size of your drive.
- If you do not have a massive hard drive then keeping too long files might be a problem.
- One of the best options to deal with this is to select until space is needed. By doing so you can detect when your hard drive is getting really low on space and if there’s not enough space in the drive then it will start erasing the oldest files of all.
- After that, click on add new folder to backup folders of your choice.
- If some default backup folders are unnecessary then you can right-click on and remove them.
- Click on folders you want to exclude by adding folders in exclude these folders option.
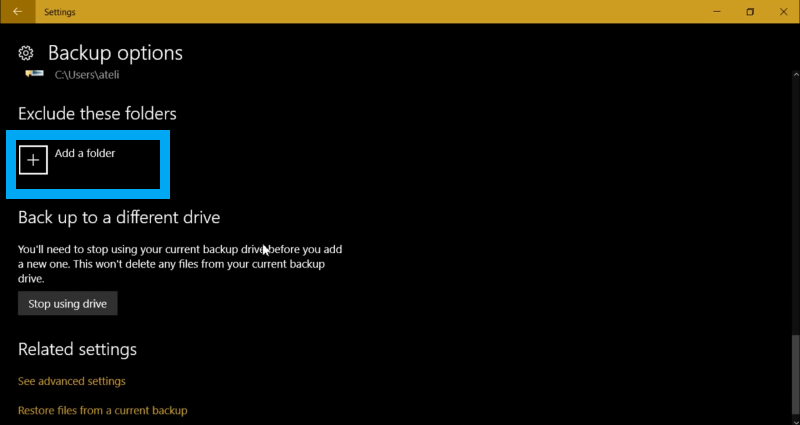
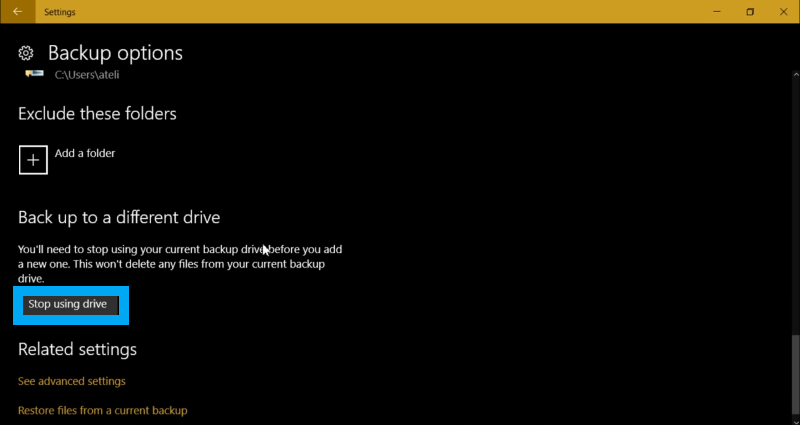
- And of course, you can backup to a different drive then what you do is click on stop using the drive and plug a new one and start a new backup.
- So once all the settings are done, it will start back up automatically after some time, but you can also force it by clicking on back up now.
- By doing backup two things are saved namely your files and configurations on your PC.
- So, that means if you have special configurations for any software well you have just the possibility of retrieving all those files and having your settings come back also.
- This is a great option for automatic backup.
- One last thing you need to be careful about is sometimes some software or hardware might prevent this from working then you have to think about the new piece of software you added.
- The first backup is the one that takes the longest time. After that everything is incremental i.e. only the modifications need to be backed up in the following versions that’s why most of the time it doesn’t take very long to operate.
Restoring Backup Files:
Not only this File History is a great way to get back files that you’ve accidentally erased. Backup is a great place to retrieve lost data. To restore your lost data follow the steps below,
- Go to Settings.
- Go to the Update & Security option.
- Go to the Backup option on the left side of the window.
- Go to more options.
- Scroll completely to the bottom and click on restore files from a current backup.

- It is a sort of page system as you can go through the different pages of the backups and there go to the original location of the files and restore them by clicking on big green button.
- This restores the file to the original location.
In this article, we will teach you how to setup and use File History Backup in Windows 11 to protect your important files. It’s very important to back up your library folders because they contain important data and files that are hard to replace, like your important documents, saved files, contacts, pictures, videos, and more.
More information ends up in your library folder the more you use a computer. OneDrive, which comes with Windows 11 and gives you 5 GB of free storage space, is a built-in backup tool. However, this space can be used up quickly. Because of this, Microsoft has another built-in tool called File History that lets you instantly back up your important files offline to an external drive.
With the File History feature, you can also decide how often and for how long you want to back up your files. Here’s how to setup File History and use in Windows 11.
Table of Contents
Setup and Use File History Backup
In Windows 11, it’s pretty easy to set up and use File History. First, let’s turn on the Windows 11 feature called File History.
Open the control panel by typing control panel in the run box. Or type file history in a Windows search and open it.
Under the control panel, choose File History.
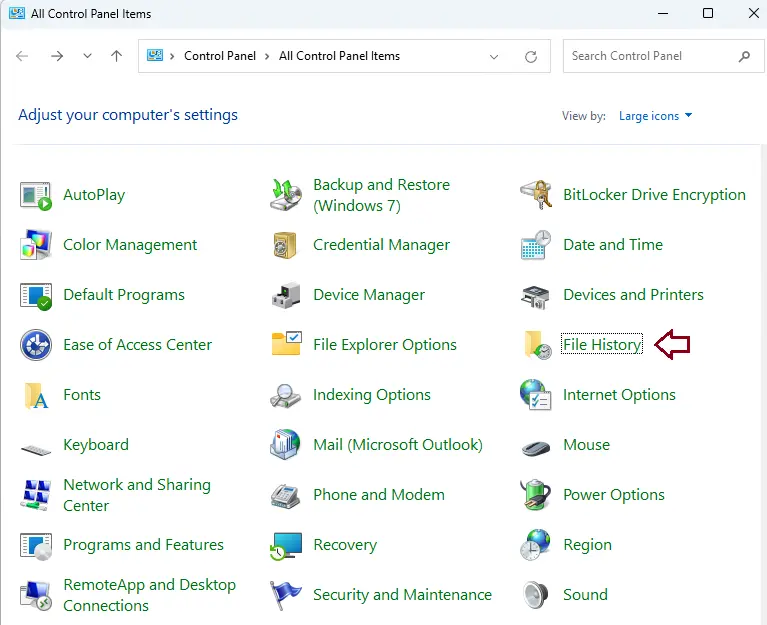
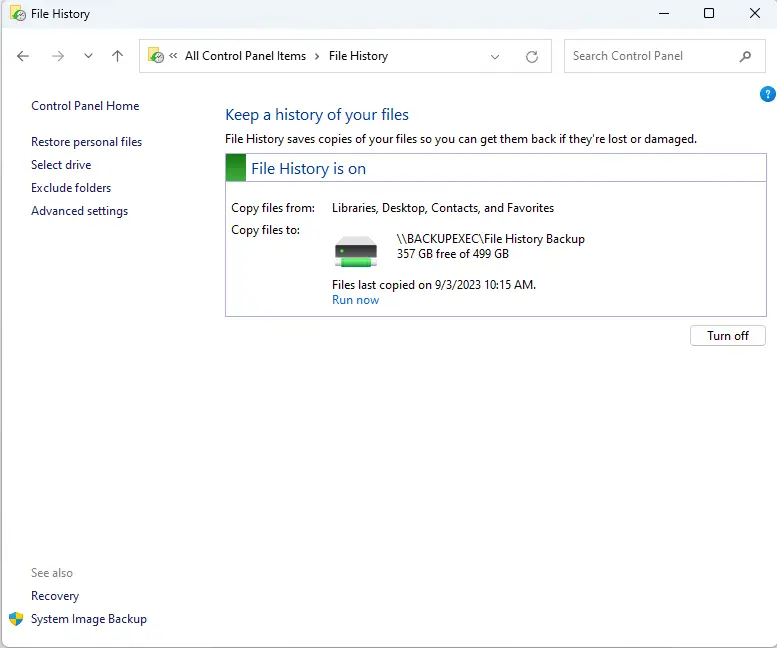
Turn on File History
When the File History window pops up, you will see that it has already scanned for drives that are compatible with your computer and picked one to be the File History drive (if there is a suitable drive).
Simply click on Turn on to enable File History.
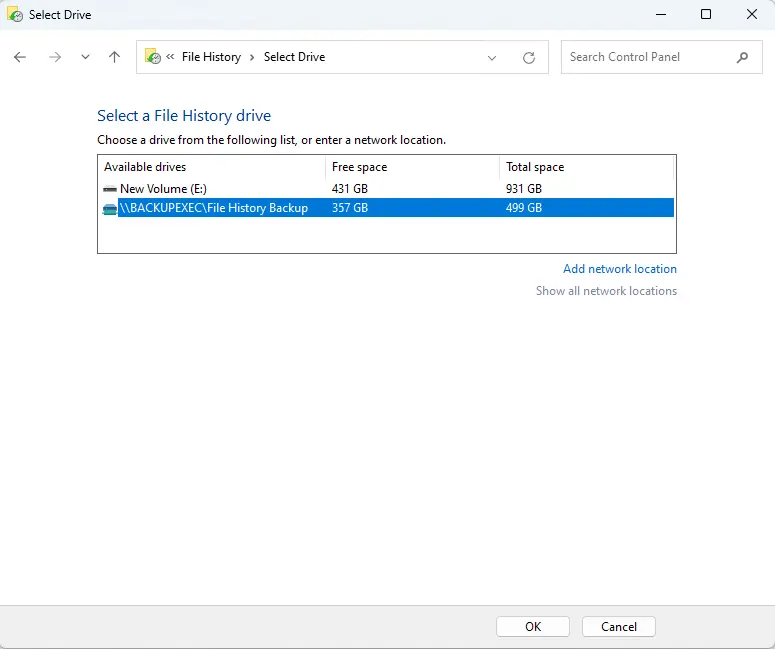
If you’re not satisfied with the chosen drive or there’s no drive selected, you can pick a different one by clicking on Select Drive from the menu on the left.
In this window, just choose the drive you want to use and click OK.
If you get the message, “Do you want to move your existing files?” you can choose Yes to transfer any previously copied files from the previously chosen drive to the new one. If not, simply choose no.
Click ‘Add network location’ and select the network folder if you want to back up your files to a network folder. After selecting the drive, File History will start saving your files in a folder named FileHistory on the provided drive.

Find your backup location and click on Select Folder.
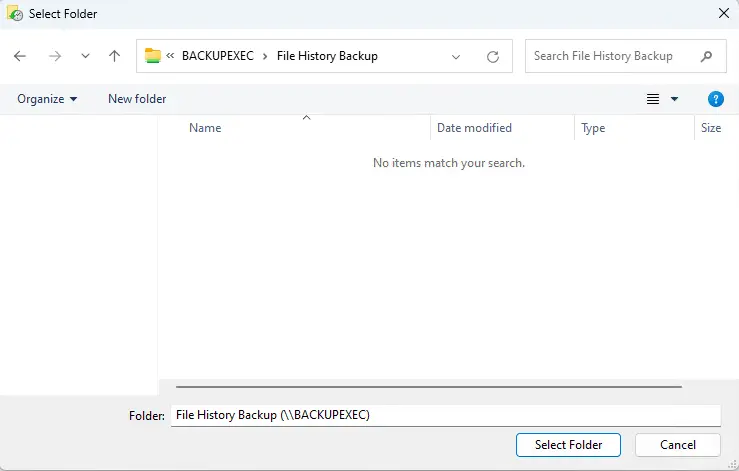
Choose ok.
By default, File History backups files hourly. Click Run now if you wish to start the backup immediately.
Add Folders to the File History.
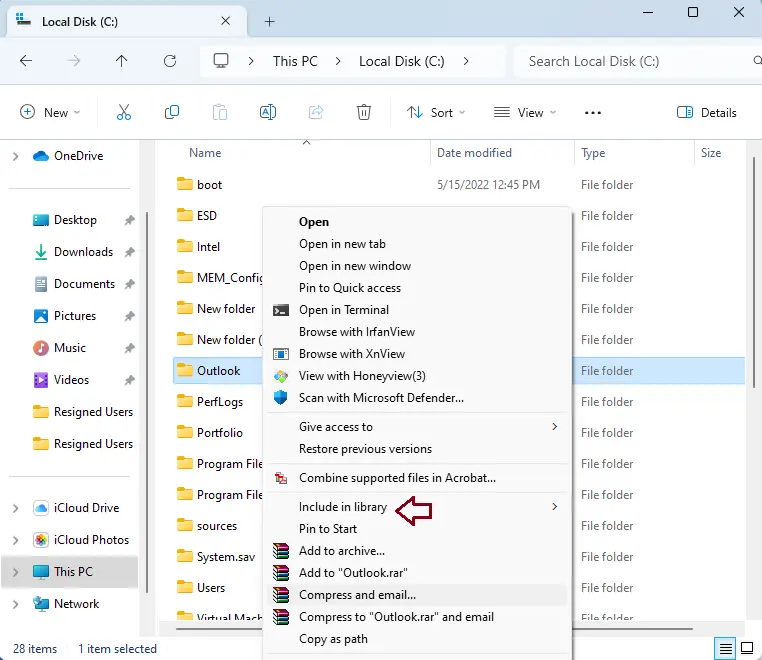
By default, File History backs up important files like documents, pictures, videos, and the desktop. But you can also make a copy of any other place you want. Find the folder you want to add to the File History, right-click on it, and choose Show more choices to open the classic Context menu.
Then, hover over the Include in Library option and select the library folder where the folder should be stored. Whenever you add a folder to the library, it will be backed up immediately.
Right-click on any folder and select Include in library.
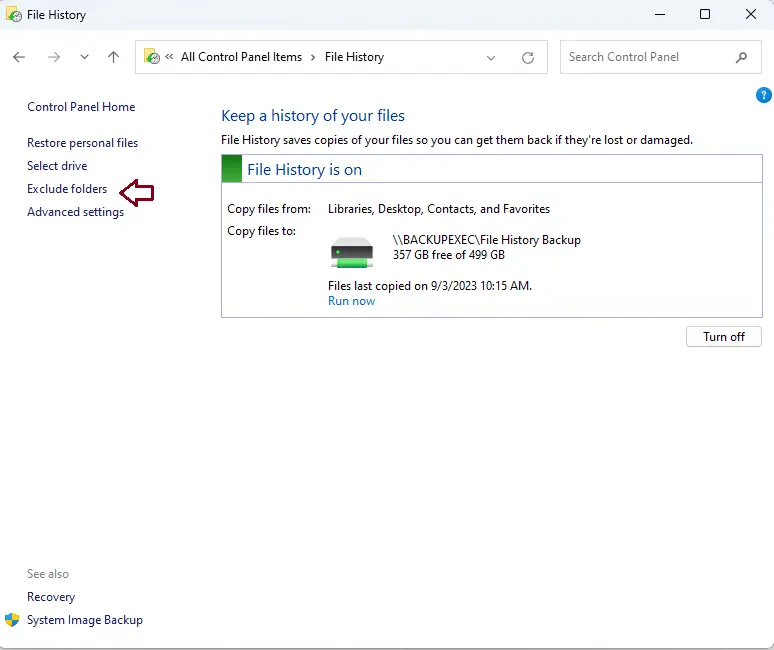
Exclude Folders from the File History
As mentioned before, File History stores copies of files from your libraries, desktop, contacts, and favorites. However, you can exclude folders that you’d rather not include in the backup. In Windows 10, there was a list of folders you could exclude from the backup; in Windows 11, you must explicitly add the folders you wish to exclude.
To exclude folders from File History, click on the Exclude folders link.
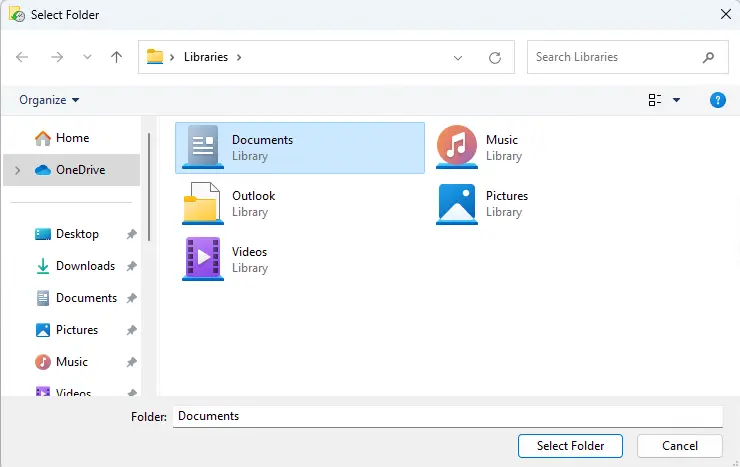
Click the Add button.
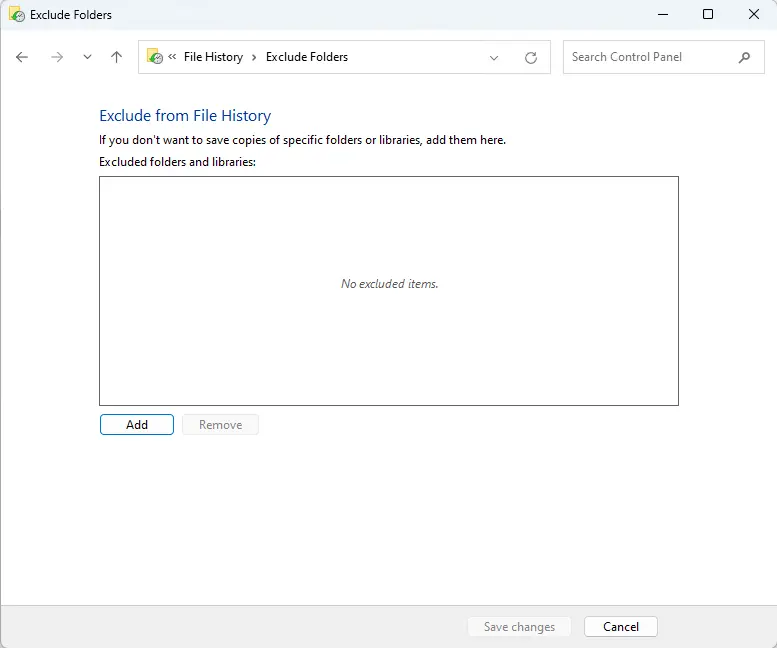
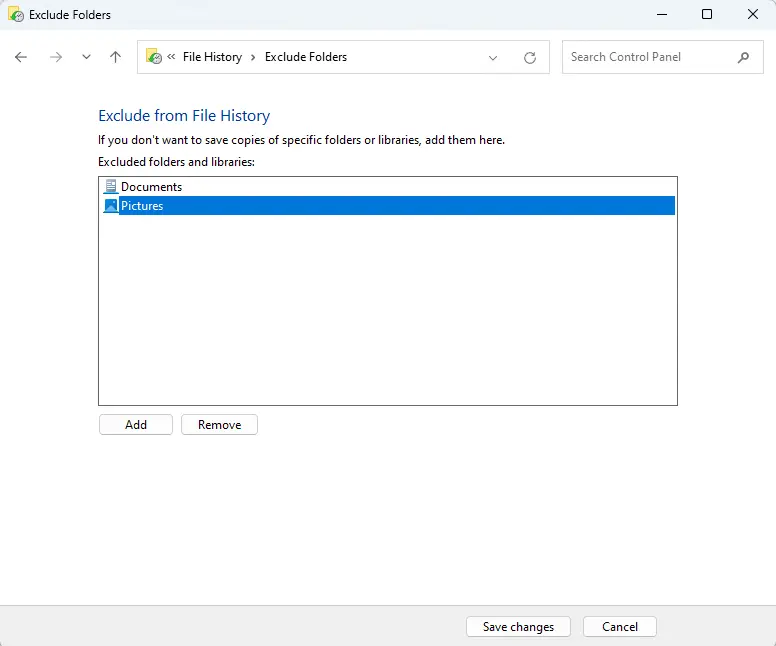
Go to the folders you wish to exclude, select them, and then click on Select Folder.
Repeat this procedure until you have excluded all the required folders. To remove a folder from the list, click Remove after selecting the folder. Click Save Changes.
Change Backup Frequency
You can also choose how often your folders are backed up and how long you want to retain backup copies. Follow these steps to modify the frequency of backups using File History.
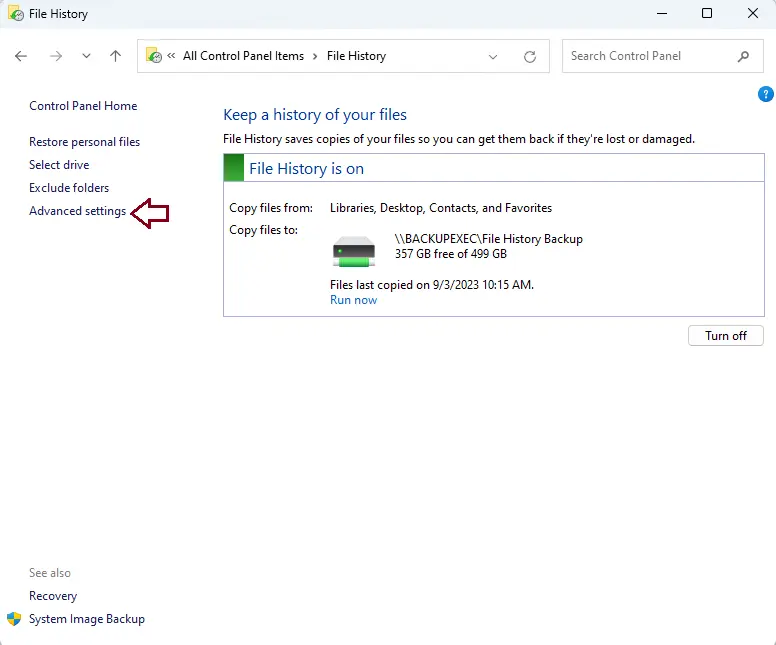
In the File History, select the Advanced Settings link.
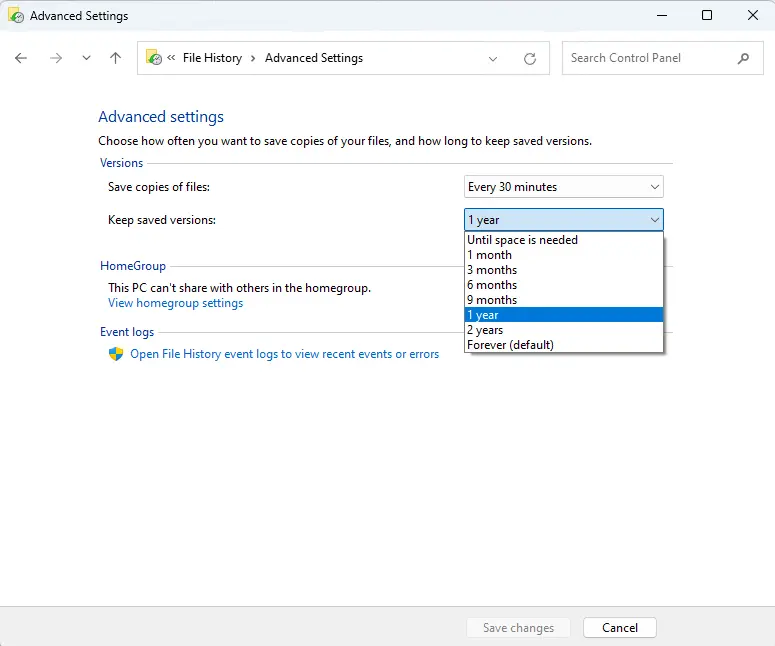
In the “Versions” area, use the “Save copies of files” dropdown menu to choose how often you want your files backed up to an external drive. You can save copies of the files anywhere from once a day to every 30 minutes.

Next, choose how long you want to keep saved versions of your files by using the “Keep saved versions” drop-down menu.
Click on Clean up versions directly below the drop-down selections to delete older versions of files.
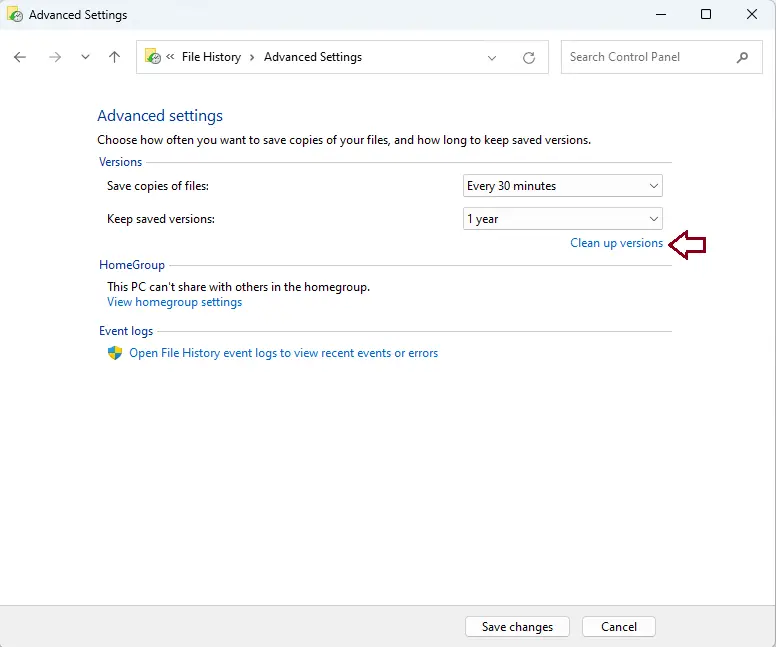
Then, specify a time frame for removing old versions of files and folders.
Choose the Clean Up button to start the cleanup process.
After making the necessary changes, click Save Changes to confirm your selections.
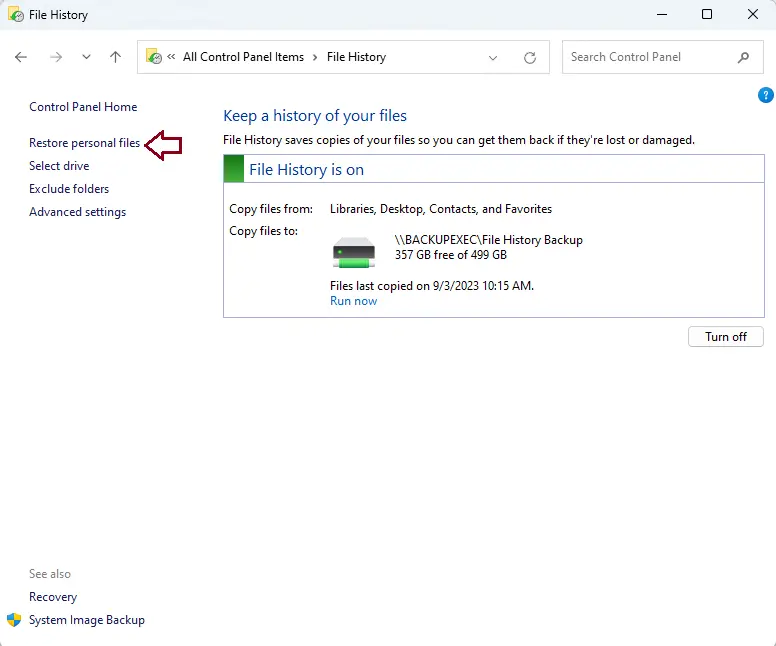
Restore Files with File History on Windows 11
If you lose or damage your files, you can recover them by using File History on an external device or network.
To do this, open the File History control panel and click the “Restore personal files” button on the left. You can also search Windows for “Restore your files” and choose “Restore your files with File History” from the results.
Here is a list of the folders and files that you have backed up. Using the forward and backward buttons, you can move between different versions of your files. There will be a timestamp on each version that says when it was saved.
When you find the files, you want to get back, pick them up and then click the “Restore” (green) button.

If the original file is still there, the tool will ask if you want to swap it with the backup file, skip it, or compare the two files. You may choose the option that makes the most sense to you. But if you delete the original file, File History will instantly put the backup file back where it was.
Even though OneDrive lets you share files, File History gives you another way to keep copies of your files as backups. Also, there are different ways to keep your data safe on Windows 11. For example, you can create a full system image backup that includes your personal files or set up a system restore point to get your computer back to a working state.
Read more: How to Change Video Frame Rate for Game Recording in Windows 11.
Refer to Microsoft to learn in detail how to use file history backup in Windows 11.
Jamilhttp://jamiltech.com
A Professional Technology Blog Writer | An energetic professional with more than 20+ years of rich experience in Technology, Planning, Designing, Installation, and Networking.