
You are here:
Home » Windows 10 » How To Install Windows Fax And Scan In Windows 10
Windows 10 ships with several apps. One of them is Scan. The Scan app was introduced to replace the classic Windows Fax and Scan program, as it has not seen updates for a long time. Additionally, the Fax function is no longer required.
The new inbox Scan app is pretty good. It offers all the features available in Windows Fax and Scan. However, the Scan app, at times, fails to detect the scanner or throws errors during a scan. Because of this, many users prefer using the old Windows Fax and Scan program.
While Windows Fax and Scan is very much part of Windows 10, many users have noticed that Windows Fax and Scan is missing from their Windows 10 installations. If the Windows Fax and Scan app is missing from your Windows 10 PC and you would like to use it instead of the Scan app, luckily, you can install it again with a few clicks.
Here is how to install Windows Fax and Scan in Windows 10.
Step 1: Launch the Windows 10 Settings app using search or Windows logo + I hotkey. On the Settings app home page, click System and then click Optional features located in the left pane.
Step 3: Next, click the Add a feature button.

Step 4: On the resulting dialog box, scroll down the list to see Windows Fax and Scan. Select the Windows Fax and Scan entry and then click the Install button to begin installing the Windows Fax and Scan program.

NOTE: If the Windows Fax and Scan is missing from the list, it’s likely because the program has already been installed on your Windows 10 computer. Please use the Start/taskbar search again to find the program.
The installation process might take a few minutes. The Settings app shows the installation progress. Once installed, if asked, please restart your Windows 10 PC once. That’s it!

If you are using Windows Fax and Scan, you might like to read our guide on how to save scanned documents in PDF.
Sometimes Windows system displays error messages regarding corrupted or missing Windows Fax and Scan.lnk files. Situations like that can occur, for example, during a software installation process. Each software program requires certain resources, libraries, and source data to work properly. Corrupted or nonexistent Windows Fax and Scan.lnk file can therefore effect in failed execution of the started process.
Windows Fax and Scan.lnk file Windows File Shortcut. The file was developed by Microsoft for use with Windows software. Here you will find detailed information about the file and instructions how to proceed in the event of Windows Fax and Scan.lnk related errors on your device. You can also download Windows Fax and Scan.lnk file compatible with Windows 10, Windows 7, Windows 8.1, Windows 8 devices which will (most probably) allow you to solve the problem.
Compatible with: Windows 10, Windows 7, Windows 8.1, Windows 8
User popularity
Fix Windows Fax and Scan.lnk errors
- 1 Information about Windows Fax and Scan.lnk file
- 2 Errors related to Windows Fax and Scan.lnk file
- 3 How to fix Windows Fax and Scan.lnk related errors?
- 3.1 Scanning for malicious software
- 3.2 System and driver update
- 3.3 System File Checker tool
- 3.4 System recovery
- 4 Download Windows Fax and Scan.lnk
- 4.1 List of Windows Fax and Scan.lnk file versions
File info
| General information | |
|---|---|
| Filename | Windows Fax and Scan.lnk |
| File extension | LNK |
| Type | Shortcut |
| Description | Windows File Shortcut |
| Software | |
|---|---|
| Program | Windows 10 |
| Software | Windows |
| Author | Microsoft |
| Software version | 10 |
| Details | |
|---|---|
| File size | 1096 |
| Oldest file | 2009-07-14 |
| Latest file | 2017-03-18 |
There are various types of errors related to Windows Fax and Scan.lnk file. Windows Fax and Scan.lnk file may be located in wrong file directory on your device, may not be present in the system, or may be infected with malicious software and therefore not work correctly. Below is a list of most common error messages related to Windows Fax and Scan.lnk file. If you encounter one listed below (or similar), please consider the following suggestions.
- Windows Fax and Scan.lnk is corrupted
- Windows Fax and Scan.lnk cannot be located
- Runtime Error — Windows Fax and Scan.lnk
- Windows Fax and Scan.lnk file error
- Windows Fax and Scan.lnk file cannot be loaded. Module was not found
- cannot register Windows Fax and Scan.lnk file:
- Windows Fax and Scan.lnk file could not be loaded
- Windows Fax and Scan.lnk file doesn’t exist
Windows Fax and Scan.lnk
Application could not be started because Windows Fax and Scan.lnk file is missing. Reinstall the application to solve the problem.
OK
Problems related to Windows Fax and Scan.lnk can be addressed in various ways. Some methods are meant only for advanced users. If you don’t have confidence in your skills, we suggest consulting a specialist. Fixing Windows Fax and Scan.lnk file errors should be approached with utmost caution for any mistakes can result in unstable or unproperly working system. If you have the necassary skills, please proceed.
Windows Fax and Scan.lnk file errors can be caused by various factors, so its is beneficial to try to fix them using various methods.
Step 1: Scan your computer for any malicious software
Windows files are commonly attacked by malicious software that prevents them from working properly. First step in addressing problems with Windows Fax and Scan.lnk file or any other Windows system files should be scanning the system for malicious software using an antivirus tool.
If by any chance you don’t have any antivirus software installed on your system yet, you should do it immediately. Unprotected system is not only a source of file errors, but, more importantly, makes your system vulnerable to many dangers. If you don’t know which antivirus tool to choose, consult this Wikipedia article – comparison of antivirus software.
Step 2: Update your system and drivers.
Installing relevant Microsoft Windows patches and updates may solve your problems related to Windows Fax and Scan.lnk file. Use dedicated Windows tool to perform the update.
- Go to the Windows «Start» menu
- Type «Windows Update» in the search field
- Choose the appropriate software program (name may vary depending on your system version)
- Check if your system is up to date. If any unapplied updates are listed, install them immediately.
- After the update has been done,restart your computer in order to complete the process.
Beside updating the system, it is recommended that you install latest device drivers, as drivers can influence proper working of Windows Fax and Scan.lnk or other system files. In order to do so, go to your computer or device producer’s website where you will find information regarding latest driver updates.
Step 4: Restoring Windows system
Another approach is to restore system to previous state, before the Windows Fax and Scan.lnk file error occured. In order to restore your system, follow the instructions below
- Go to the Windows «Start» menu
- Type «System Restore» in the search field
- Start the system restore tool – it’s name may differ depending on version of the system
- The application will guide you through the process – read the messages carefully
- After the process has finished, restart your computer.
If all the above-mentioned methods failed and the Windows Fax and Scan.lnk file problem has not been resolved, proceed to the next step. Remember that the following steps are intended only for advanced users.
Download and replace Windows Fax and Scan.lnk file
The last solution is to manually download and replace Windows Fax and Scan.lnk file in appropriate folder on the disk. Select file version compatible with your operating system and click the «Download» button. Next, go to your web browser’s «Downloaded» folder and copy the downloaded Windows Fax and Scan.lnk file.
Go to the folder where the file should be located and paste the downloaded file. Below is the list of Windows Fax and Scan.lnk file example directory paths.
- Windows 10: C:\ProgramData\Microsoft\Windows\Start Menu\Programs\Accessories\
- Windows 7: —
- Windows 8.1: —
- Windows 8: —
If the steps did not solve your Windows Fax and Scan.lnk file problem, you should consult a professional. A probability exists that the error(s) might be device-related and therefore should be resolved at the hardware level. A fresh operating system installation might be necessary – a faulty system installation process can result in data loss.
File versions list
Filename
Windows Fax and Scan.lnk
System
Windows 10
File size
1096 bytes
Date
-0001-11-30
| File details | ||
|---|---|---|
| MD5 | 091e0b863720af624c745faa5275bd3b | |
| SHA1 | d3454a5de9f91d7213037180beed098e2b2a9ef4 | |
| SHA256 | 4cb76e5ed950201ff97a063c5eea0873c1aeabf8397b62013958a5bd2c072642 | |
| CRC32 | ffd08f21 | |
| Example file location | C:\ProgramData\Microsoft\Windows\Start Menu\Programs\Accessories\ |
Filename
Windows Fax and Scan.lnk
System
Windows 7
File size
1210 bytes
Date
2009-07-14
| File details | ||
|---|---|---|
| MD5 | 88100febd81c88c5ee8ac124123e18bc | |
| SHA1 | 4da1e60070f8e2338f6fd7bf7080dd41e43e8413 | |
| SHA256 | 664df91f76b6a7b647cff01374c91445670efac5fc43c5ae664c4d8b99bcef67 | |
| CRC32 | 60d17af7 | |
| Example file location | — |
Filename
Windows Fax and Scan.lnk
System
Windows 8.1
File size
1096 bytes
Date
-0001-11-30
| File details | ||
|---|---|---|
| MD5 | 091e0b863720af624c745faa5275bd3b | |
| SHA1 | d3454a5de9f91d7213037180beed098e2b2a9ef4 | |
| SHA256 | 4cb76e5ed950201ff97a063c5eea0873c1aeabf8397b62013958a5bd2c072642 | |
| CRC32 | ffd08f21 | |
| Example file location | — |
Filename
Windows Fax and Scan.lnk
System
Windows 8
File size
1096 bytes
Date
-0001-11-30
| File details | ||
|---|---|---|
| MD5 | 091e0b863720af624c745faa5275bd3b | |
| SHA1 | d3454a5de9f91d7213037180beed098e2b2a9ef4 | |
| SHA256 | 4cb76e5ed950201ff97a063c5eea0873c1aeabf8397b62013958a5bd2c072642 | |
| CRC32 | ffd08f21 | |
| Example file location | — |
Windows Fax and Scan is a useful built-in utility program in Windows that allows users to:
- Scan documents using a connected scanner
- Send and receive faxes through a fax modem or fax server
- View, edit, and organize scanned documents and faxes
- Save scanned documents in various formats (like PDF, JPEG, or PNG)
In Windows 11, it is not included by default, unlike the previous versions. So here is how to add it:
Open Windows Settings (Win key + I) and click on System.
From the right pane, scroll down and click on Optional features.
Then, click on Add an optional feature > View features.

Either search for Windows Fax and Scan or scroll down and select it from the list of available features that can be added.
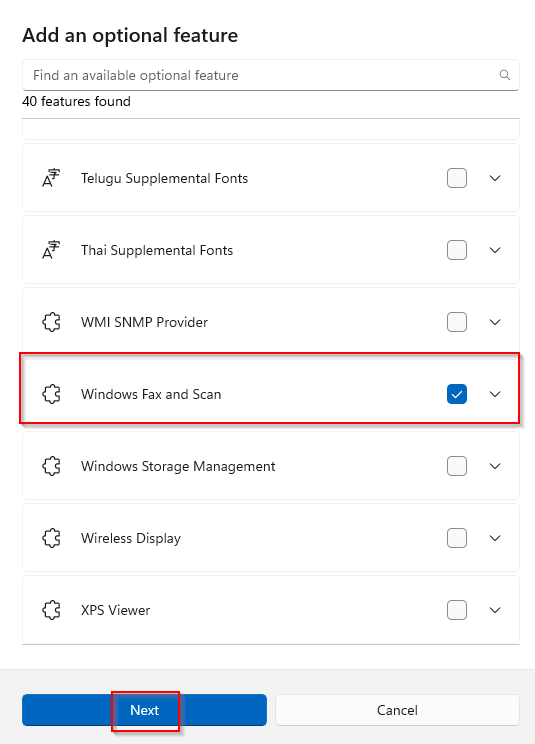
Click the Next button to proceed.
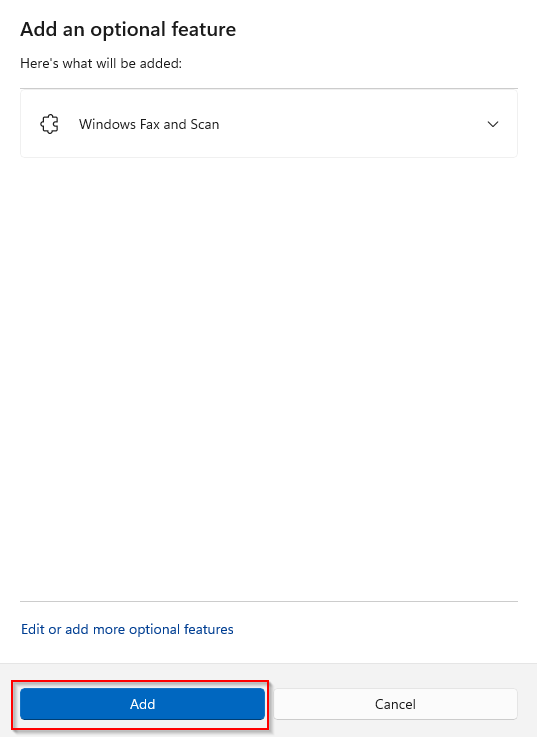
Click Add to begin installation. It will be shown as being added under the Recent actions section.
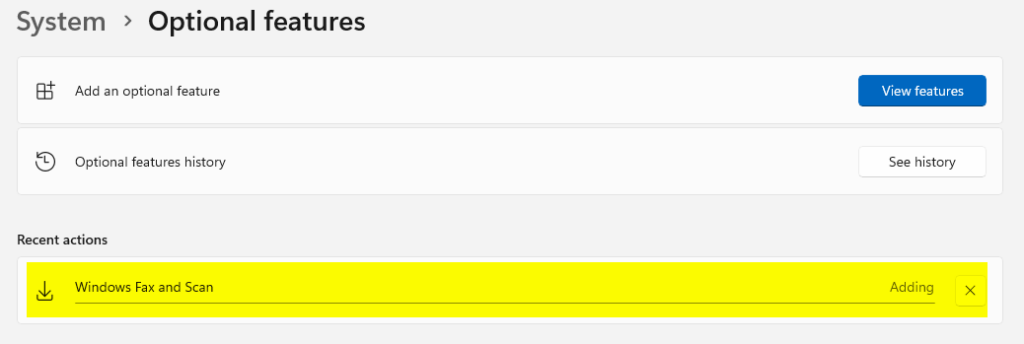
Wait for the installation to complete.
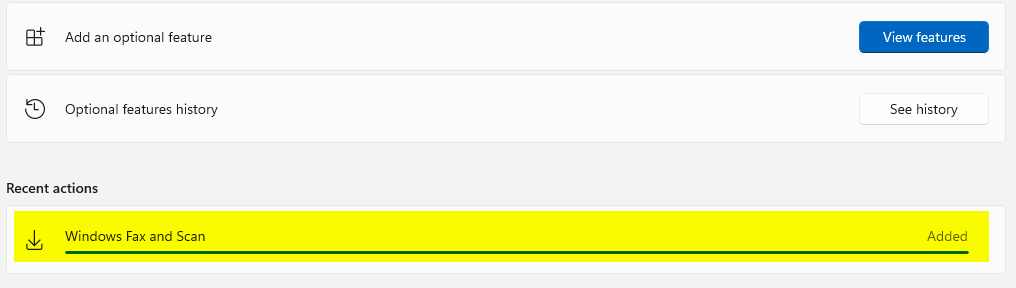
You can then search for it from the Start menu and launch it.
All done.
Windows Fax and Scan is a built-in application that allows users to send and receive faxes and scan documents using a connected scanner. While Windows 11 brings several exciting features and enhancements to the operating system, the installation and use of Windows Fax and Scan remain vital for users who need to manage physical documents digitally. This guide will walk you through the steps needed to install and use Windows Fax and Scan on Windows 11.
Understanding Windows Fax and Scan
Before diving into the installation process, it’s essential to understand what Windows Fax and Scan is. This utility offers two primary functions:
-
Faxing: Users can send faxes directly from their PC. This feature is ideal for businesses and individuals who must send documents without using a physical fax machine.
-
Scanning: The scanning function allows users to scan physical documents and images into their computer, which can then be saved, shared, or edited as needed.
Equipped with these functionalities, Windows Fax and Scan can be a valuable tool for home and office users alike.
System Requirements
Before installing or using Windows Fax and Scan, ensure your system meets the following requirements:
- Operating System: Windows 11 (12, 64-bit)
- Device Requirements: A connected fax modem if you plan to send faxes or a compatible scanner for scanning documents.
- Network Connection: For online fax services, an active internet connection may be required.
Installing Windows Fax and Scan
Windows Fax and Scan is a built-in feature in Windows 11, and you don’t need to install it as a separate application. However, it’s essential to ensure that the necessary components and settings are configured correctly for optimal use. Here’s how to access and configure it.
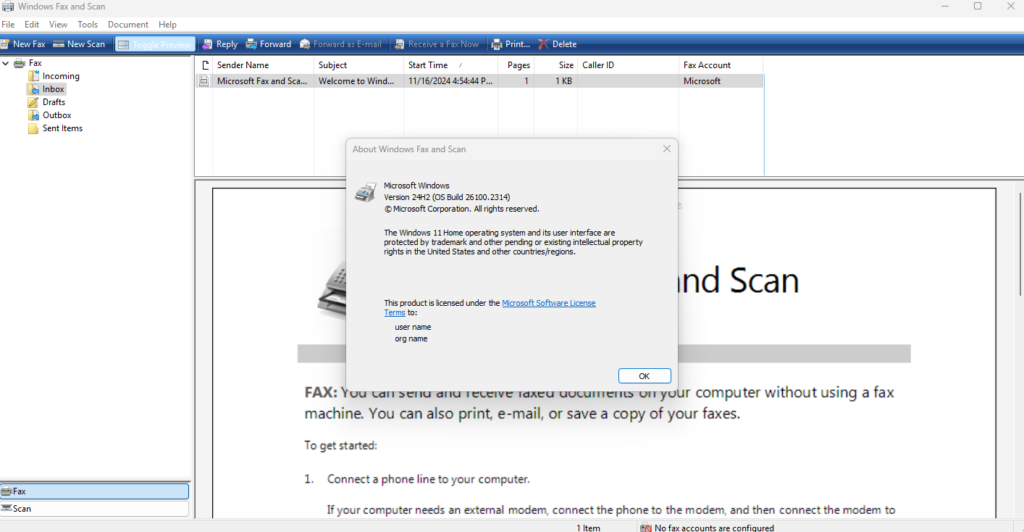
Step 1: Accessing Windows Fax and Scan
-
Open Start Menu: Click on the Windows icon located at the bottom left corner of your screen.
-
Search for Windows Fax and Scan: In the search bar, type «Windows Fax and Scan.»
-
Select Windows Fax and Scan: When it appears in the search results, click to open it.
Step 2: Setting Up Windows Fax and Scan
If you plan to send faxes, you’ll need to set up your fax capabilities. Here’s how:
-
Connect Your Fax Modem: Ensure that your fax modem is connected to your computer. This could be an internal modem or an external USB fax modem.
-
Configure Fax Settings:
- In the Windows Fax and Scan window, click on «Fax» at the top navigation.
- Select «New Fax» from the toolbar.
- A wizard will guide you through configuring your fax settings, including selecting your modem and entering your fax number.
-
Add Fax Cover Page: Optionally, you can create cover pages for your faxes by selecting «Cover Page» in the Fax wizard. This can add a professional touch to your communications.
Step 3: Setting Up Your Scanner
To use the scanning feature in Windows Fax and Scan, make sure the scanner is set up correctly.
-
Connect Your Scanner: Plug your scanner into your computer via USB or connect it to the same network if it’s a wireless scanner.
-
Install Scanner Drivers: Most scanners come with an installation disk or require drivers to be installed from the manufacturer’s website. Follow the instructions provided to ensure that your scanner is recognized by the operating system.
-
Test Scanner Detection:
- Open Windows Fax and Scan.
- Click on «Scan» in the top navigation.
- Select «New Scan» and see if your scanner appears in the drop-down list.
Sending a Fax Using Windows Fax and Scan
Now that your fax modem is set up, you can start sending faxes. Here’s how:
-
Open Windows Fax and Scan: Make sure it’s open.
-
Click on Fax: Choose the fax option from the navigation bar.
-
Start a New Fax:
- Click on «New Fax.»
- A new fax wizard will appear.
-
Fill in the Required Fields:
- Enter the recipient’s fax number.
- Add a subject and a message in the body of the fax.
- Attach any documents you want to fax.
-
Send the Fax:
- Review your settings and attached documents.
- Click “Send” to dispatch your fax.
-
Monitor the Fax Status: You can view the status of sent faxes in the «Sent Items» folder within the application.
Scanning a Document
The scanning process is equally straightforward. Here’s how to do it:
-
Open Windows Fax and Scan: Launch the application.
-
Click on Scan: Go to the scan option in the top navigation.
-
Start a New Scan:
- Click on «New Scan.»
- In the dialog that appears, you’ll need to configure a few settings.
-
Select Your Scanner: In the «Scanner» drop-down menu, choose your connected scanner.
-
Choose the Scan Type: Select a scan type based on your need— “Photo” for images, “Documents” for text.
-
Configure Resolution Settings: Adjust the resolution settings depending on the quality required for your scan. Higher resolutions yield better quality but larger file sizes.
-
Select File Type: You can typically save the scan in various formats such as JPEG, PNG, or PDF. Make your selection based on your needs.
-
Scan the Document:
- Place the document in your scanner.
- Click on “Preview” to see how the scan will appear. Adjust any settings if necessary.
- Hit “Scan” to perform the actual scanning.
-
Save the Scanned Document: Once the scanning is finished, you will be prompted to save the file. Choose the desired location and file name, then click “Save.”
Troubleshooting Common Issues
Even with a straightforward installation process, you might encounter some issues when using Windows Fax and Scan. Let’s explore common problems and how to solve them.
Issue: My Fax Modem Isn’t Recognized
- Solution: Check your connections to ensure that the modem is properly connected. Reboot your computer and verify that the modem drivers are installed. You might need to update or reinstall the drivers from the manufacturer’s website.
Issue: Scanner Is Not Detected
- Solution: Ensure your scanner is powered on and properly connected. Restart both the scanner and the computer, and check for updated drivers. If all else fails, try using the scanner on another device to rule out any hardware issues.
Issue: Sending Faxes Fails
- Solution: Verify the recipient’s fax number for accuracy. Check your phone line connections and confirm that your modem is functioning correctly. Assess whether any special dialing rules are required (like area codes).
Issue: Scans Are Poor Quality
- Solution: Make sure you have selected the correct type of scan for your document. Adjust the resolution settings and check if your scanner’s glass is clean. Use a higher DPI (dots per inch) setting for text documents.
Additional Tips for Using Windows Fax and Scan
Understanding some useful tips can enhance your experience with Windows Fax and Scan:
-
Batch Scanning: If your scanner supports it, batch scanning allows you to scan multiple pages at once, saving you time.
-
Emailing Faxes: If your fax modem supports email integration, you can even send faxes directly from your email client.
-
Regular Software Updates: Keep your Windows 11 operating system updated for the latest features and enhancements, which can also improve device compatibility.
-
Using Third-party Services: If you frequently send faxes, consider subscribing to online fax services that integrate with your email for a hassle-free experience.
Conclusion
Windows Fax and Scan is a robust utility for managing faxes and scans on Windows 11. The installation and setup process is user-friendly, allowing you to quickly send and receive faxes or scan important documents without requiring additional software. By following the steps outlined in this guide, troubleshooting common issues, and incorporating best practices, you can maximize your productivity and make the most of this tool.
Whether you’re a home user or a business professional, mastering Windows Fax and Scan can streamline your document management and communication processes, helping you keep up with the fast-paced digital world.
Last Updated: 11/25/2024
[Reading Time Required: 3.5 minutes]
LNK files such as Windows Fax and Scan.lnk are categorized as Shortcut (Windows File Shortcut) files. As a Windows File Shortcut file, it was created for use in Windows 10 by Microsoft.
The release of Windows Fax and Scan.lnk introduced for Windows was on 07/22/2009 in Windows 7.
The latest file update released for Windows 10 was on 07/29/2015 [file version 10].
Windows Fax and Scan.lnk is included in Windows 10, Windows 8.1, and Windows 8.
This article discusses complete file details, LNK file troubleshooting instructions for problems with Windows Fax and Scan.lnk, and a comprehensive set of free downloads for every file version that has been catalogued by our team.
What are Windows Fax and Scan.lnk Error Messages?
General Windows Fax and Scan.lnk Runtime Errors
Windows Fax and Scan.lnk file errors often occur during the startup phase of Windows, but can also occur while the program is running.
These types LNK errors are also known as “runtime errors” because they occur while Windows is running. Here are some of the most common Windows Fax and Scan.lnk runtime errors:
- Windows Fax and Scan.lnk could not be found.
- Windows Fax and Scan.lnk error.
- Windows Fax and Scan.lnk failed to load.
- Error loading Windows Fax and Scan.lnk.
- Failed to register Windows Fax and Scan.lnk / Cannot register Windows Fax and Scan.lnk.
- Runtime Error — Windows Fax and Scan.lnk.
- The file Windows Fax and Scan.lnk is missing or corrupt.
Microsoft Visual C++ Runtime Library
Runtime Error!
Program: C:\ProgramData\Microsoft\Windows\Start Menu\Programs\Accessories\Windows Fax and Scan.lnk
This application has requested the Runtime to terminate it in an unusual way.
Please contact the application’s support team for more information.
Most LNK errors are due to missing or corrupt files. Your Windows Fax and Scan.lnk file could be missing due to accidental deletion, uninstalled as a shared file of another program (shared with Windows), or deleted by a malware infection. Furthermore, Windows Fax and Scan.lnk file corruption could be caused from a power outage when loading Windows, system crash while loading or saving Windows Fax and Scan.lnk, bad sectors on your storage media (usually your primary hard drive), or malware infection. Thus, it’s critical to make sure your anti-virus is kept up-to-date and scanning regularly.
How to Fix Windows Fax and Scan.lnk Errors in 3 Steps (Time to complete: ~5-15 minutes)
If you’re encountering one of the error messages above, follow these troubleshooting steps to resolve your Windows Fax and Scan.lnk issue. These troubleshooting steps are listed in the recommended order of execution.
Step 1: Restore your PC back to the latest restore point, «snapshot», or backup image before error occurred.
To begin System Restore (Windows XP, Vista, 7, 8, and 10):
- Hit the Windows Start button
- When you see the search box, type «System Restore» and press «ENTER«.
- In the search results, find and click System Restore.
- Please enter the administrator password (if applicable / prompted).
- Follow the steps in the System Restore Wizard to choose a relevant restore point.
- Restore your computer to that backup image.
If the Step 1 fails to resolve the Windows Fax and Scan.lnk error, please proceed to the Step 2 below.

Step 2: Run SFC (System File Checker) to restore the corrupt or missing Windows Fax and Scan.lnk file.
System File Checker is a utility included with every Windows version that allows you scan and restore corrupted system files. Use the SFC tool to fix missing or corrupt Windows Fax and Scan.lnk files (Windows XP, Vista, 7, 8, and 10):
- Hit the Windows Start button
- In the search box, type «cmd» but DO NOT PRESS «ENTER».
- Press and hold «CTRL-Shift» on your keyboard while pressing «ENTER«.
- You’ll be prompted with a permission dialog box.
- In the box, click «YES«.
- You should have a black screen with a blinking cursor.
- In that black screen, type «sfc /scannow» and hit «ENTER«.
- SFC will begin scanning for Windows Fax and Scan.lnk issues and any other system file problems.
- Follow any on-screen commands to complete the process.
Please be aware that this scan might take a while, so please be patient while it is working.
If this Step 2 fails as well, please proceed to the Step 3 below.
Step 3: Perform a Windows Update.
When the first two steps haven’t solved your issue, it might be a good idea to run Windows Update. Many Windows Fax and Scan.lnk error messages that are encountered can be contributed to an outdated Windows Operating System. To run Windows Update, please follow these easy steps:
- Hit the Windows Start button
- In the search box, type «Update» and press «ENTER«.
- In the Windows Update dialog box, click «Check for Updates» (or similar button depending on your Windows version)
- If updates are available for download, click «Install Updates«.
- After the update is completed, restart your PC.
If Windows Update failed to resolve the Windows Fax and Scan.lnk error message, please proceed to next step. Please note that this final step is recommended for advanced PC users only.

If Those Steps Fail: Download and Replace Your Windows Fax and Scan.lnk File (Caution: Advanced)
If none of the previous three troubleshooting steps have resolved your issue, you can try a more aggressive approach (Note: Not recommended for amateur PC users) by downloading and replacing your appropriate Windows Fax and Scan.lnk file version. We maintain a comprehensive database of 100% malware-free Windows Fax and Scan.lnk files for every applicable version of Windows. Please follow the steps below to download and properly replace you file:
- Locate your Windows operating system version in the list of below «Download Windows Fax and Scan.lnk Files».
- Click the appropriate «Download Now» button and download your Windows file version.
- Copy the file into the appropriate directory for your Windows version:
- Restart your computer.
Windows 7: C:\ProgramData\Microsoft\Windows\Start Menu\Programs\
Windows 8: C:\ProgramData\Microsoft\Windows\Start Menu\Programs\Accessories\
Windows 8.1: C:\ProgramData\Microsoft\Windows\Start Menu\Programs\Accessories\
Windows 10: C:\ProgramData\Microsoft\Windows\Start Menu\Programs\Accessories\
If this final step has failed and you’re still encountering the error, you’re only remaining option is to do a clean installation of Windows 10.
GEEK TIP : We must emphasize that reinstalling Windows will be a very time-consuming and advanced task to resolve Windows Fax and Scan.lnk problems. To avoid data loss, you must be sure that you have backed-up all of your important documents, pictures, software installers, and other personal data before beginning the process. If you are not currently backing up your data, you need to do so immediately.
Download Windows Fax and Scan.lnk Files (Malware-Tested 100% Clean)
CAUTION : We strongly advise against downloading and copying Windows Fax and Scan.lnk to your appropriate Windows system directory. Microsoft typically does not release Windows LNK files for download because they are bundled together inside of a software installer. The installer’s task is to ensure that all correct verifications have been made before installing and placing Windows Fax and Scan.lnk and all other LNK files for Windows. An incorrectly installed LNK file may create system instability and could cause your program or operating system to stop functioning altogether. Proceed with caution.
You are downloading trial software. The purchase of a one-year software subscription at the price of $29.97 USD is required to unlock all software features. Subscription auto-renews at the end of the term (Learn more). By clicking the «Start Download» button above and installing «Software», I acknowledge I have read and agree to the Solvusoft End User License Agreement and Privacy Policy.