
If you are facing this error, then chances are you may have installed new hardware or software which is causing the issue. Sometimes installing the latest Windows updates seems to cause this issue but you can’t be sure until you troubleshoot the issue. Now as far as software problems are concerned, these might be the possible reasons as to
why you are facing this error:
- Corrupted BCD information
- System File is damaged.
- Loose or faulty SATA/IDE Cable
- Conflicting 3rd party software
- Virus or malware

The error which you will get after a reboot will be:
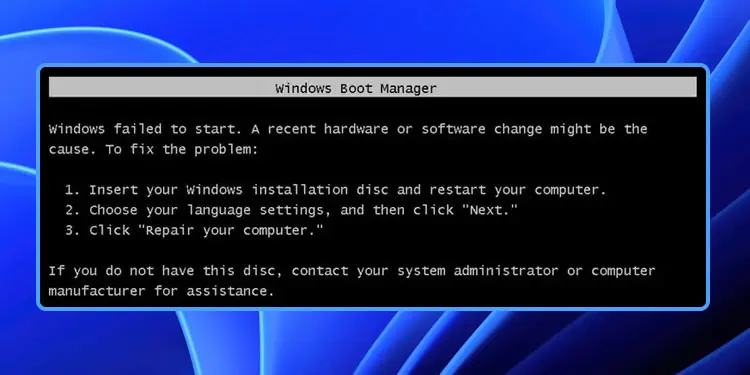
Error: Windows failed to start. A recent hardware or software change might have caused the issue after you install Windows Updates
The main problem is that you won’t boot into Windows and you will be stuck at this error message screen. In short, you will be inside a reboot loop as every time you restart your PC you will again face the same error message until you fix the issue. So without wasting any time let’s see how actually to Fix “Windows failed to start. A recent hardware or software change might be the cause” with the below-listed troubleshooting steps.
Table of Contents
Method 1: Run Startup/Automatic Repair
1. Insert the Windows 10 bootable installation DVD or Recovery Disc and restart your PC.
2. When prompted to Press any key to boot from CD or DVD, press any key to continue.

3. Select your language preferences, and click Next. Click Repair your computer in the bottom-left.

4. On choose an option screen, click Troubleshoot.

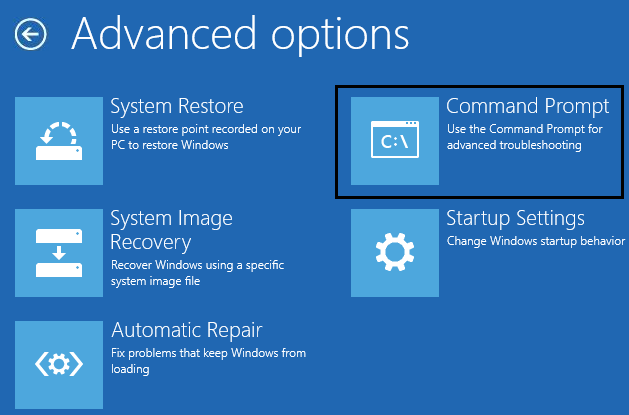
5. On Troubleshoot screen, click the Advanced option.

6. On the Advanced options screen, click Automatic Repair or Startup Repair.

7. Wait till the Windows Automatic/Startup Repairs complete.
8. Restart and you have successfully Fix Windows failed to start. A recent hardware or software change might be the cause, if not, continue.
Also Read: How to fix Automatic Repair couldn’t repair your PC.
Method 2: Boot into Last Known Good Configuration
Before going any further let’s discuss how to Enable Legacy Advanced Boot Menu so that you can easily get Boot Options:
1. Restart your Windows 10.
2. As the system restarts enter into BIOS setup and configure your PC to boot from CD/DVD.
3. Insert the Windows 10 bootable installation DVD and restart your PC.
4. When prompted to Press any key to boot from CD or DVD, press any key to continue.
5. Select your language preferences, and click Next. Click Repair your computer in the bottom-left.
6. On choose an option screen, click Troubleshoot.
7. On Troubleshoot screen, click the Advanced option.

8. On Advanced options screen, click Command Prompt.

9. When the Command Prompt(CMD) open type C: and hit enter.
10. Now type the following command:
BCDEDIT /SET {DEFAULT} BOOTMENUPOLICY LEGACY
11. And hit enter to Enable Legacy Advanced Boot Menu.

12. Close Command Prompt and back on the Choose an option screen, click Continue to restart Windows 10.
13. Finally, don’t forget to eject your Windows 10 installation DVD to get Boot options.
14. On the Boot Options screen, choose “Last Known Good Configuration (Advanced).”

Method 3: Perform a System Restore
1. Put in the Windows installation media or Recovery Drive/System Repair Disc and select your language preferences, and click Next
2. Click Repair your computer at the bottom.
3. Now, choose Troubleshoot and then Advanced Options.
4. Finally, click on “System Restore” and follow on-screen instructions to complete the restore.

5. Restart your PC to save changes and see if you can fix Windows failed to start. A recent hardware or software change might be the cause error.
Method 4: Run SFC and CHKDSK
1. Again go to command prompt using the method 1, click on command prompt in the Advanced options screen.
2. Type the following command in cmd and hit enter after each one:
sfc /scannow /offbootdir=c:\ /offwindir=c:\windows
chkdsk C: /f /r /x
Note: Make sure you use the drive letter where Windows is currently installed. Also in the above command C: is the drive on which we want to check disk, /f stands for a flag which chkdsk the permission to fix any errors associated with the drive, /r let chkdsk search for bad sectors and perform recovery and /x instructs the check disk to dismount the drive before beginning the process.

3. Exit the command prompt and restart your PC.
Method 5: Rebuild BCD configuration
1. Using above method open command prompt using Windows installation disk.
2. Now type the following commands one by one and hit enter after each one:
bootrec.exe /FixMbr
bootrec.exe /FixBoot
bootrec.exe /RebuildBcd

3. If the above command fails, then enter the following commands in cmd:
bcdedit /export C:\BCD_Backup
c:
cd boot
attrib bcd -s -h -r
ren c:\boot\bcd bcd.old
bootrec /RebuildBcd

4. Finally, exit the cmd and restart your Windows.
5. This method seems to Fix Windows failed to start. A recent hardware or software change might cause the error, but if it doesn’t work for you, then continue.
Method 6: Set Correct Boot Order
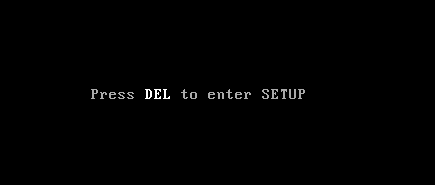
1. When your computer starts (Before the boot screen or the error screen), repeatedly press Delete or F1 or F2 key (Depending upon your computer’s manufacturer) to enter BIOS setup.
2. Once you are in BIOS setup, select the Boot tab from the list of options.

3. Now make sure that the computer Hard disk or SSD is set as a top priority in the Boot order. If not, use up or down arrow keys to set hard disk at the top, which means the computer will first boot from it rather than any other source.
4. Finally, press F10 to save this change and exit.
Recommended:
- Fix High CPU Usage By TiWorker.exe
- 10 ways to fix A disk read error occurred
- Fix High CPU Usage by svchost.exe (netsvcs)
- Fix High CPU Usage by RuntimeBroker.exe
That’s it you have successfully Fix Windows failed to start. A recent hardware or software change might be the cause, but if you still have any questions regarding this post, please ask them in the comment’s section.
Download Windows Speedup Tool to fix errors and make PC run faster
Sometimes, the boot loader is unable to decipher what to do when the system has hardware or software change, hence, it just fails to start the operating system. In this post, we will discuss what to do if Windows fails to start and a recent hardware or software change might be the cause.
Windows failed to start. A recent hardware or software change might be the cause

It is very likely that, in your case, the Windows Boot Manager might say “Windows failed to start. A recent hardware or software change might be the cause” if the bootloader is missing or the hardware is not connected properly. You will need to make a bootable USB drive to boot into advanced recovery since you won’t be able to boot into your computer. Once done, try the following solutions and suggestions to resolve the issue.
- Set Correct Boot Order
- Check Hardware
- Automatic System Repair
- Rebuild BCD
You will also need an admin account in one of the processes so make sure you remember that.
1] Set Correct Boot Order

When Windows starts, the bootloader looks for a set of files from where it can start loading Windows. If it will not find the right files, Windows will not load. You need to make sure that the default bootable drive is your SSD or HDD. When it’s not set as default, and you have a USB drive connected, Windows will be stuck. So boot into the BIOS using DEL or F2 key when you power up the computer, and change the order.
2] Check Hardware
If there is no Boot Order problem, you can check if there is an issue with the Hard drive. The first thing you should check the BIOS can detect it. If it does, then you need to check it with another computer. If the hard drive or SSD cannot be recognized, you have a hardware issue.
In case you are facing this on a laptop, you need to manually take it out, and check. If it voids your warranty. please take it to the service center, and do not open it yourself.
3] Automatic Startup Repair

Windows Advanced Recovery offers an Automatic Repair feature (Startup Repair) that scans system files, Registry settings, configuration settings, and more and tries to fix the problem on its own, automatically. It usually starts automatically if the reboot process is interrupted multiple times.
You can use a bootable USB drive to boot into Recovery.
You will have to select Troubleshoot > Advanced Options > Automatic Repair. Enter account details when prompted, and let the process do its job. Post this, you can reboot the computer, and check if the error still remains.
4] Rebuild BCD

BCD or Boot Configuration Data contains information that allows the bootloader to find the right files to boot Windows. If BCD is corrupt or doesn’t have information then Windows gets stuck. Follow the steps to rebuild BCD:
- Boot your computer into Advanced Recovery Mode
- Launch Command Prompt available under Advanced Options.
- To rebuild the BCD or Boot Configuration Data file use the command –
bootrec /rebuildbcd - It will scan for other operating systems and let you select the OS you want to add to BCD.
If it doesn’t find the boot partition, you can use bootrec /scanos it to find the list of the partitions where the OS is installed. Then use the bcdboot command to add it to the list. More about BCD configuration editor here. Once the path is set, reboot the computer, and the error should not occur anymore.
You can also try to fix MBR or Master Boot Record by executing the commands in the Command Prompt bootrec/fixMbr and bootrec /fixboot.
I hope the post was easy to follow, and that you were able to fix the problem.
Read: Fix Windows Services will not start
How to fix when Windows failed to start?
If Windows fails to start for you, the first thing you should do is run Startup Repair. It will scan system files, Registry settings, configuration settings, and more and try to fix the problem automatically. You can check the aforementioned steps to do the same.
How to fix Windows failed to start without disc?
If Windows fails to start without a disc, we recommend you repair the Windows installation using the bootable Installation USB. For this, you would require a separate computer to create a bootable drive. Check our guide to repair system images using Installation Media.
Also Read: Fix Task Scheduler failed to start, Event ID 101.
Anand Khanse is the Admin of TheWindowsClub.com, a 10-year Microsoft MVP (2006-16) & a Windows Insider MVP (2016-2022). Please read the entire post & the comments first, create a System Restore Point before making any changes to your system & be careful about any 3rd-party offers while installing freeware.
Home
Windows
By
Abhishek Silwal
If you have enabled Windows Boot Manager or use an older Operating System where the UEFI bootloader is not available, you will encounter the error message: “Windows failed to start. A recent hardware or software change might be the cause.” It appears when the Boot Manager can’t access the boot device.
It will also display a possible cause, such as, “A required device isn’t connected or can’t be accessed.” This issue mainly happens because of the corruption of the boot files necessary to start the OS. But it is also possible that the necessary boot device is not connected properly.
Remove External Devices
Depending on your Boot priority order, your system may be trying to boot from another media, such as a USB or a network device. So, before trying other possible solutions, try removing all unnecessary external devices.
This way, only the normal OS storage device or installation media is available as the current boot device.
Check BIOS Settings
Before you begin repairing the potentially corrupt boot files, you need to ensure that your computer is detecting the OS drive and interfacing with it properly. Also, you need to check the boot order list to make sure that the OS drive is the first priority.
- Start your computer and press the BIOS key immediately after you see the logo to get to BIOS.
- Go to Boot or a similar tab and select something like Boot Priority.

- Make sure your OS drive (generally C Drive) is at the top of the list. If the drive does not show up, it is not connected properly, and you need to reinsert it in this scenario.
- If you are trying to boot from a Windows installation media, you have to move the media to the top instead.
- Now, look for the SATA mode option. You can usually find it under Advanced or Storage Controller settings.
- If you are using older operating systems, IDE is the preferred choice. And for newer systems, set it to AHCI. We recommend checking if the computer boots when enabling each option to ensure what mode you need.

- If you still encounter the error regardless of the mode, set the SATA mode to AHCI for now if you are using Windows Vista and later OS. After trying other methods, you can switch the SATA mode and check which works best for you.


Perform Startup Repair Using Windows Installation Media
Windows includes the Startup Repair feature that automatically checks for errors with the boot configuration data or other boot files and attempts to repair them. You will get an option to perform the startup repair whenever you encounter the error.
However, if it can’t solve it, the source file for the repair may have some issues as well. In such cases, you need to use an installation media to use it as the source.
- Create a Windows installation media with the same version as your system on another computer.
- Boot using this installation media. If you have an MBR disk, you need to manually change the Boot order from the BIOS to prioritize the installation media.
For a GPT disk or UEFI system, you should get the choice to boot from the media. Or you may need to press a certain key to access the boot menu. Search official sources for such a key for your motherboard. - Set the language preferences and agree with any license terms.
- Then, on the installation screen, click on Repair your computer.

- On newer Windows OS, go to Troubleshoot > Advanced options > Startup Repair. For older ones, you can directly select Startup Repair.

- Follow the on-screen instructions to finish the repair and then boot again.
- This time, boot using your original OS drive and then check if you still encounter the error.


Manually Repair Boot Files
Sometimes, the automatic startup repair utility can’t repair the boot files. In such cases, you need to manually repair them using the Command Prompt.
- Boot using the proper Windows installation media (see above solution).
- Specify your language preferences and click Next.
- On the Install screen, click Repair your computer.
- Select Command Prompt or Troubleshoot > Advanced options > Command Prompt.

- Type the two commands below to check if you have a GPT partition system in your OS disk and press Enter after each:
diskpartlist disk(here, the Gpt column should show an asterisk (*) sign if you have a GPT partition on the disk)
- Enter the commands below depending on the partition scheme of your system disk:


For GPT,
For MBR,
exit(to exit out of diskpart)bootrec /fixmbrbootrec /fixbootbootrec /rebuildbcd

Re-create Boot Files
If the boot configuration and file repairing commands don’t work, you must recreate these files from scratch using your operating system files.
- Boot using the proper Windows installation media and go to the Command Prompt (see above method).
- Type the two commands below to check if you have a GPT partition system in your OS disk and press Enter after each:
diskpartlist disk(here, the Gpt column should show an asterisk (*) sign if you have a GPT partition on the disk)
- Enter the commands below depending on the partition scheme of your system disk:
For GPT,
select disk #(replace # with the relevant disk number)list volume(check the number of the volume with the FAT32 partition that is hidden)select volume #assign letter = S:(or any unused drive letter)exitcd /d S:\EFI\Microsoft\Boot\(replace S: with the drive letter you used earlier)ren BCD BCD.old(to create a backup to account for unforeseen situations)bcdboot C:\Windows /l en-us /s S: /f all(here, replace C: with the drive letter of the operating system and S: with the letter you assigned earlier.)
bootrec /rebuildbcd(not necessary if you have a Windows version before Windows 10 Version 1709)

For MBR,
select disk #(replace # with the required disk number)list volume(check the number of the volume with where Info says System)select volume #assign letter = S:(or any unused drive letter)exitbootrec /fixmbrbcdboot C:\Windows /s S:(here, replace C: with the drive letter of the operating system and S: with the letter you assigned earlier.)

Clean Install Windows
If you cannot boot into your operating system after repairing the boot files, your final option is to clean install Windows. A clean install removes the partition containing the boot files as well as the OS partition. This way, you can reinstall all such files (but without corruption) to resolve your issue.
Clean installing Windows will delete all the data on the disk (of your non-system drives as well). So, first, try backing the data on the disk by booting with a Linux live disk or Windows-to-go disk.
- Create a Windows installation media of the version you want (using the same as the Windows in your disk is not necessary).
- Boot using this media and specify your language preferences.
- Click on Install now on the Install screen.
- Enter your product key if you have it. If not, select I don’t have a product key as well as the Windows build you want (Home, Pro, etc.)
- Click on Next.
- Agree with the license agreements and select Next.
- Choose Custom: Install Windows only.
- Select all the partitions for your OS disk (Drive 0) and click Delete for each. Confirm your choice as well.
- After you only have the unallocated space for the disk, select it and click Next.

- Ignore the warning as the setup process will automatically create the necessary partitions.
- Click on the partition that says Primary and then Next.
- Follow the on-screen instructions to clean install Windows.
- After restarting, check if you can boot from the OS drive. Then, you will need to go through the initial account and privacy setup.


Use USB 2.0 Port to Install Older Windows
All computers that already have Windows 10+ may not support installing old OS like Windows 7 from USB 3.0 ports or flash drives. If you try doing so, you’ll get the above error while trying to boot from the installation media.
This is mainly because of the lack of USB 3.0 drivers on the installation media. But on some computers, you might still be able to install the OS. Regardless, it’s better to either use USB 2.0 or include USB 3.0 drivers in the Windows image on the installation media. You may also need to enable CSM or Legacy support on your BIOS settings.
Additionally, if you only have USB 3.0 ports, you have to enable USB debug mode on BIOS to use them as USB 2.0 ports.
Windows errors can be a daunting issue for users, and «Windows Failed to Start: A Recent Hardware or Software Change Might Be The Cause» is one of the most commonly faced problems. This error often causes frustration and anxiety as users find themselves unable to boot their systems. In this detailed guide, we will explore the causes of this error, steps for troubleshooting it, and various solutions to restore your Windows system to full functionality.
Understanding the Error
When Windows fails to boot, it usually displays a message indicating that the failure was caused by a recent hardware or software change. This can happen due to various factors, including:
-
Recent Software Installations: If software does not install correctly, it can corrupt essential system files.
-
Driver Issues: New drivers may be incompatible, causing conflicts in the system.
-
Hardware Changes: New hardware that isn’t installed correctly or is incompatible can lead to boot failure.
-
Corrupted System Files: Critical Windows files may become corrupted due to improper shutdowns or malware.
-
Windows Updates: Occasionally, an update may fail and render the system unbootable.
-
Malware Attacks: Viruses or malicious software may damage system files and settings.
-
File System Errors: Problems in the file system can prevent Windows from starting correctly.
Initial Troubleshooting Steps
Before diving into specific solutions, it’s essential to take some preliminary steps to understand better the situation.
1. Disconnect External Devices
Sometimes external devices (USB drives, printers, etc.) can interfere with the boot process. Disconnect all unnecessary peripherals and attempt to boot the computer again.
2. Access Safe Mode
Safe Mode is a diagnostic mode that starts Windows with a minimal set of drivers. If you can boot in Safe Mode, you can troubleshoot the problem more easily.
- Restart your computer and as it begins to boot, repeatedly press the F8 key until you see the Advanced Boot Options menu.
- Select «Safe Mode» and press Enter.
If Safe Mode loads, you may address the issue by uninstalling new software, rolling back drivers, or performing virus scans.
3. Use Last Known Good Configuration
If you recently made changes and cannot boot into Safe Mode, try using the «Last Known Good Configuration» option.
- Restart the computer and press F8.
- Select «Last Known Good Configuration» and attempt to boot.
This option will start Windows with the last set of drivers and configuration settings that worked.
4. Check System Hardware
If the system fails to start even in Safe Mode, there may be a hardware issue at play. Carefully check all physical connections within your computer. Ensure RAM, hard drives, and other cards are securely installed.
Detailed Solutions
If the basic steps do not resolve the issue, you can move on to more advanced solutions. Here are several methods to potentially fix the boot error.
1. Repair Startup Using Windows Installation Media
If you’re unable to boot into Windows, using Windows installation media (USB or DVD) can help fix startup problems.
Steps to Repair Startup:
- Create Windows installation media using Microsoft’s Media Creation Tool.
- Boot your computer from this media.
- Select your language preferences, and click «Next.»
- Click on «Repair your computer.»
- Choose «Troubleshoot,» then «Advanced options,» and click on «Startup Repair.»
The Startup Repair tool will automatically diagnose and attempt to fix issues preventing Windows from booting.
2. Perform a System Restore
If the error began after recent changes to software or drivers, a System Restore might rectify the issue by returning your system to a previous state.
Steps to Perform a System Restore:
- Boot from the Windows installation media.
- After selecting your language, click «Next,» and then choose «Repair your computer.»
- Go to «Troubleshoot,» then «Advanced Options,» and select «System Restore.»
- Follow the prompts to restore your system to a point before the issue began.
3. Using Command Prompt to Fix Files
If the issue persists, try using Command Prompt to check for and fix corrupted system files.
Steps to Use Command Prompt:
- Boot from Windows installation media.
- Go to «Repair your computer,» then «Troubleshoot,» and select «Command Prompt.»
- Once the Command Prompt opens, type the following commands one by one, pressing Enter after each command:
bootrec /fixmbr
bootrec /fixboot
bootrec /scanos
bootrec /rebuildbcd
These commands can help repair boot records, which might be corrupted and causing the boot failure.
4. Check Disk for Errors
Sometimes, disk errors can cause boot failures. You can check and repair disk errors using Command Prompt.
Steps to Check Disk:
- Boot from Windows installation media and open the Command Prompt as discussed earlier.
- Type the following command and press Enter:
chkdsk C: /f /rThis command will check the C drive (where Windows is usually installed) and fix errors.
5. Update or Roll Back Drivers
If you suspect that a driver update might be the reason for the boot error, you can try to roll back to a previous version or update to the latest drivers in Safe Mode.
Steps to Update/Roll Back Drivers:
- Boot into Safe Mode.
- Right-click on «This PC» or «My Computer» and select “Manage.”
- Click on «Device Manager.»
- Locate any devices marked with an exclamation mark (usually indicates issues).
- Right-click on the device, and select either «Update Driver» or «Roll Back Driver.»
6. Remove Recently Installed Software
Sometimes newly installed software applications can conflict with system files. If you installed any new software prior to the issue, consider uninstalling them through Safe Mode.
Steps to Uninstall Software:
- Boot into Safe Mode.
- Go to the Control Panel and select «Programs and Features.»
- Find recently installed software, select it, and click “Uninstall.”
7. Check for Malware
Malware can corrupt essential files, resulting in boot problems. If you can access Safe Mode, you should perform a deep scan of your computer.
Steps to Check for Malware:
- Boot into Safe Mode with Networking.
- Download a reputable anti-malware program, such as Malwarebytes.
- Run a full system scan and follow the prompts to remove any detected malware.
8. Reset Your PC
If everything fails and you still can’t boot into Windows, resetting your PC might be a viable solution. Note that this process will remove all applications but can keep your files if you choose that option.
Steps to Reset Your PC:
- Boot from Windows installation media.
- Go to «Repair your computer,» then «Troubleshoot,» and select “Reset this PC.”
- Follow the prompts, choose to keep your files or remove everything, and proceed.
9. Clean Install Windows
As a last resort, if none of the above solutions work, you may need to perform a clean install of Windows. This will wipe everything on the drive, including files, applications, and settings, so ensure you have backups of any important data.
Steps for a Clean Installation:
- Boot from Windows installation media.
- Follow the prompts until you reach «Where do you want to install Windows?»
- Select the drive where Windows is installed and choose to format it. Note that formatting will erase all data.
- Proceed with the installation as instructed.
Conclusion
The error «Windows Failed to Start: A Recent Hardware or Software Change Might Be The Cause» can be a significant obstacle for users attempting to access their systems. However, by following the troubleshooting methods and solutions provided in this guide, you can often resolve the issue without needing professional assistance. Remember to keep regular backups of your files and create restore points whenever you make system changes to reduce the likelihood of encountering such errors in the future. Whether it’s a minor glitch or a serious failure, understanding the cause of the problem and knowing the right solutions can help you regain access to your Windows environment effectively.
Introduction
The «Windows Failed to Start» error message is a common problem that many Windows users encounter. This error message typically appears when there is an issue with the computer’s boot configuration or when a recent hardware or software change has caused the system to fail to start properly. In this tutorial, we will explore the possible causes of this error message and provide step-by-step instructions on how to fix it.
Causes of the Windows Failed to Start Error
There are several possible causes for the «Windows Failed to Start» error message. Some of the most common causes include:
-
Corrupted Boot Configuration Data (BCD): The BCD is a database that contains information about how the operating system should boot. If the BCD becomes corrupted, the system may fail to start properly.
-
Missing or Corrupted System Files: If important system files become corrupted or missing, the system may fail to start properly.
-
Incompatible or Faulty Hardware: If a recent hardware change has caused compatibility issues with the system, the system may fail to start properly.
-
Incompatible or Faulty Software: If a recent software installation has caused compatibility issues with the system, the system may fail to start properly.
-
Virus or Malware Infection: A virus or malware infection can cause the system to fail to start properly.
Fixing the Windows Failed to Start Error
Now that we have identified some of the possible causes of the «Windows Failed to Start» error, let’s explore how to fix this issue. Below are step-by-step instructions on how to troubleshoot and fix this error:
Step 1: Use the Windows Recovery Environment
The Windows Recovery Environment (WinRE) is a set of tools that can help you diagnose and fix problems with your Windows operating system. To access the WinRE, follow these steps:
-
Insert the Windows installation disc or USB drive into your computer and restart the system.
-
Press any key when prompted to boot from the installation disc or USB drive.
-
Select your language and keyboard layout, then click «Next.»
-
Click on «Repair your computer.»
-
Select the operating system you want to repair and click «Next.»
-
Click on «Startup Repair» and follow the on-screen instructions to repair the system.
Step 2: Rebuild the Boot Configuration Data (BCD)
If the BCD is corrupted, you can rebuild it using the Bootrec tool. To do this, follow these steps:
-
Access the Windows Recovery Environment as described in Step 1.
-
Click on «Command Prompt» to open a Command Prompt window.
-
Type the following commands one by one and press Enter after each command:
- bootrec /rebuildbcd
- bootrec /fixmbr
- bootrec /fixboot
-
Restart the system and check if the error has been resolved.
Step 3: Check for Missing or Corrupted System Files
To check for missing or corrupted system files, you can use the System File Checker (SFC) tool. Follow these steps to run the SFC tool:
-
Open a Command Prompt window as an administrator.
-
Type the following command and press Enter:
- sfc /scannow
-
The SFC tool will scan the system for missing or corrupted files and repair them if necessary.
-
Restart the system and check if the error has been resolved.
Step 4: Check for Incompatible or Faulty Hardware
If you suspect that a recent hardware change has caused the error, you can try removing or replacing the hardware to see if the error is resolved. Follow these steps to check for incompatible or faulty hardware:
-
Disconnect any recently added hardware from the system.
-
Restart the system and check if the error has been resolved.
-
If the error persists, try replacing the hardware with a known working one.
-
Restart the system and check if the error has been resolved.
Step 5: Check for Incompatible or Faulty Software
If you suspect that a recent software installation has caused the error, you can try uninstalling the software to see if the error is resolved. Follow these steps to check for incompatible or faulty software:
-
Access the Windows Recovery Environment as described in Step 1.
-
Click on «Command Prompt» to open a Command Prompt window.
-
Type the following command and press Enter to open the System Restore tool:
- rstrui.exe
-
Follow the on-screen instructions to restore the system to a previous state before the software installation.
-
Restart the system and check if the error has been resolved.
Step 6: Scan for Virus or Malware Infections
A virus or malware infection can cause the system to fail to start properly. To scan for virus or malware infections, follow these steps:
-
Access the Windows Recovery Environment as described in Step 1.
-
Click on «Command Prompt» to open a Command Prompt window.
-
Type the following command and press Enter to open the Windows Defender Offline tool:
- mpcmdrun.exe -scan -scantype 1
-
The Windows Defender Offline tool will scan the system for virus or malware infections and remove them if necessary.
-
Restart the system and check if the error has been resolved.
Conclusion
The «Windows Failed to Start» error message can be a frustrating problem to deal with, but with the right troubleshooting steps, you can resolve this issue and get your system back up and running. In this tutorial, we have explored some of the possible causes of this error message and provided step-by-step instructions on how to fix it. By following these steps, you can effectively troubleshoot and fix the «Windows Failed to Start» error on your Windows system.