
- Home
- Blog
-
How To Export A Private Key File From A Windows Machine?
/
/

It is easy to locate and export a private key file on non-windows platforms. Both public and private keys will be created and saved in a separate file in .key or .pem extensions on non-windows platforms. However, Windows doesn’t store the private key in a separate file to view as a text file. you can’t export the private key alone. If you need to export the private key from either MMC or IIS, you should export the certificate in .pfx (PKCS#12) file format along with the private key. If this is the case, you may ask if it is not possible to export a private key file on the Windows platform. To answer this question, there is no direct way. However, there is a way. Let’s see how to export a private key file from a Windows machine.
Procedure To Export A Private Key File From Windows:
We have broken down the procedure into four sections to make it simple to understand.
Note: We have covered right from the beginning from creating a CSR to exporting the private key for those who need help in getting a certificate. If you have the certificate in your hand or it’s deployed on your Windows server, then you can skip the first three steps. You can start directly from the fourth step.
-
Create CSR.
-
Submit the CSR to a CA and get the Certificate.
-
Import the Certificate on your Windows machine.
-
Export the Certificate in PFX format.
-
Install OpenSSL on your Windows machine.
-
Export the private key file from the PFX certificate.
How To Export a Private Key File from a Windows Machine?
Step 1: Create a CSR
1. Open MMC console:
Win + R > mmc > Ok > File > Add/Remove Snap-in > Certificates > Add > Computer account > local computer > Finish > Ok.
2. Create a CSR file:right-click the
Personal folder > All Tasks > Advanced Operations > Create Custom Request > Next > Proceed without enrollment policy > Click Next > PKCS # 10 > Next > Details > Properties.
3. Add CSR contents:
Subject tab > Fill Subject nameCommon Name (CN) = Host or domain name
DNS (SAN) =
Organization (O) =
Organizational Unit (OU) =
City/Locality (L) =
State/County/Region (S) =
Country (C) =
Email Address =
Private Key tab >
Key options > select Key size: 2048 > Ok
4. Save the CSR file:Select
Base 64 and Click Next > Click Browse.
Please visit this post to see how to
create a CSR on a Windows machine.
Step 2: Submit the CSR to a CA and get the Certificate
Submit the CSR to your Certificate Authority (CA) or you can also submit it to third party CA to sign the certificate.
If you have Microsoft’s ADCS CA service and want to sign the CSR with your internal CA. Please read how to submit and download the certificate from ADCS.
Step 3: Import the Certificate on your Windows machine
After CA has issued the certificate. You should download that and import it along with the chain certificates.
Note: If you don’t have the chain certificates imported to trusted stores, please import chain certificates (intermediate & root CA certificates) on your machine.Right Click on the Certificate > Install Certificate > Next > Automatically select the certificate store > Finish > Ok
Step 4: Export the certificate in PFX format
This is the place where the export of the private key happens. Windows doesn’t store the private key in a separate file. you can’t export the private key alone. If you need to export the private key from either MMC or IIS, you should export the certificate in .pfx (PKCS#12) file format along with the private key.
1. Open MMC console:
Win + R > mmc > Ok > File > Add/Remove Snap-in > Certificates > Add > Computer account > local computer > Finish > Ok.
2. Export the certificate in PFX:
Right Click on the Certificate > All Tasks -> Export > Next > yes, export the private key > Next > Personal INformation Exchange – PKCS # 12 (PFX) > Include all certificate in the path > Next > Passwords > Browse > Finish.
Step 5: Install OpenSSL on your Windows machine.
OpenSSL is a powerful full cross-platform open-source utility used in various digital certificate activities? The installation procedure is very simple and straightforward. Read this post to learn how to install OpenSSL on a Windows machine.
1. Download the OpenSSL installer from the official OpenSSL download link: https://slproweb.com/products/Win32OpenSSL.html
2. Run the installer to complete the installation.
3. Add OPENSSL_CONF and Path environment variable on System Properties:
Step 6: Export the private key file from the PFX certificate.
Run this command to extract the private key from PFX file:
> openssl pkcs12 -in [yourfile.pfx] -nocerts -out [drlive.key]
Run this command to extract the certificate from PFX file:
> openssl pkcs12 -in [yourfile.pfx] -clcerts -nokeys -out [drlive.crt]
Run this command to decrypt the private key:
> openssl rsa -in [drlive.key] -out [drlive-decrypted.key]
In this way, you can export a private key file from the Windows machine.
Thanks for reading this post. Please let us know if you want to know more about this. We recommend reading the below post to know in detail.
You may also like these articles:
Arun KL
Arun KL is a cybersecurity professional with 15+ years of experience in IT infrastructure, cloud security, vulnerability management, Penetration Testing, security operations, and incident response. He is adept at designing and implementing robust security solutions to safeguard systems and data. Arun holds multiple industry certifications including CCNA, CCNA Security, RHCE, CEH, and AWS Security.

This post was most recently updated on August 31st, 2023.
5 min read.
This article explains another small but significant gotcha you “just need to know” when working with certificates and certification authorities, and you – just like me – are for some reason still using Windows as your workhorse. I’ll go through how to export the private key that has been stored on your machine when you generated a Certificate Signing Request (or a “Certificate Enrollment Request” if you’re speaking Contosoan”) to get someone to issue you a certificate according to your specification.
I’ll also go through the confusing terminology and some other points about the process. It’s a part of my ongoing learning journey, too 
Background
Table of Contents
Lately, I’ve been working a lot with AKS. And while working with AKS, you run into all kinds of requirements for certificates. And when working with certificates, you’ll probably end up requesting new ones occasionally (instead of just self-signing everything) – and to upload your fancy certificates to a form AKS understands (“TLS” secrets), you’ll need a certificate and a matching private key.
Makes sense. But where do these 2 come from?
Solution
Well, the short answer is that the certificate you get from a Certificate Authority (or, as it quite often actually happens, your IT team), but they usually only generate a certificate for you based on a CSR – a Certificate Signing Request – which is something you create.
And creating the CSR stores the private key on your machine. And almost stashes it away, if you’re using Windows. This guide explains how to find it!
Time needed: 10 minutes
How to export a private key generated for a CSR using Certificate Store on Windows?
- Open the Windows Certificate Store (certlm) for Local Computer (not Personal!)
Opening the Certificate Store is going to be your first step. You’ll probably want to open it for Local Computer – not your personal one – as at least some tools to generate CSRs place the private key there.
Do all tools do that, though? I don’t know. I haven’t tried them all yet!

- Navigate to Certificate Enrollment Request > Certificates
From the left hand side “folder” navigation, select “Certificate Enrollment Requests”, and then “Certificates” – and you should be presented with a list of dummy certificates. They represent certificates you’ve requested from an authority or issuer – they aren’t actual certificates! But they do contain the private key…
- Select the domain you created the CSR for
You should probably know the host name or domain you generated the Certificate Signing Request for – find it in the list.
- Export the private key
Now we’ll use the extremely user-friendly and straightforward UI to export the private key! 😉
Jokes aside, a couple of steps to go through, really: Right-click and select “All Tasks > Export” > “Next” > “Yes, export the private key” > and whatever you need to do to get the private key out of there. If you have to enter a password (and you probably will), be sure to remember it
 Encrypting the .pfx and the key itself are the only things this is used for.
Note: Please only use boring characters. This password can not contain any extra-safe (or as we call them in Europe, normal and in-every-day-use) characters such as Ö, Ä or Å.
Just call it “password” or something. Maybe add a number in the end for good measure.
Name the file to mykey.pfx and place it in C:\temp\export (or whatever else location you like).
- Install OpenSSL
Now we’ll use a tool called OpenSSL to export the key from the .pfx file. Figuring out where to get that tool can be a pain, but this wiki maintains a nice list of mirrors and tool versions for you.
Or you can just use winget:
winget install -e --id ShiningLight.OpenSSL - Use OpenSSL to export the key to console from the .pfx -file
Anyway – here’s what to run in command prompt, PowerShell, or a shell of your choice:
cd C:\temp\export
openssl pkcs12 -info -in mykey.pfx -nodes
That should bring up a nice, long output of certificate details. You’ll want the RSA PRIVATE KEY, and you’ll find it nicely in caps. Copy it from the output. Save it to my.key or similar file.
- Use OpenSSL to export the key to a file from the .pfx file
Now we’ll export the key to a file. In the sample below, I’ll presume your .pfx password was, well, “password”, and that you’ll just reuse it for the exported, encrypted key:
openssl pkcs12 -in mykey.pfx -nocerts -out mykey-encrypted.key
Enter Import Password: password
Enter PEM pass phrase: password
Verifying - Enter PEM pass phrase: password
Now we’ll have an encrypted key (key-encrypted.key). That might not be very useful to us, and if we want to export it to be unencrypted (someone might even call it “decrypting” the key!), we’ll need to do this:
openssl rsa -in mykey-encrypted.key -out mykey.key
Enter pass phrase for .\key-encrypted.key: password
writing RSA key
And now we’ll have mykey.key that is unencrypted.
That’s it! You should now have the private key. Now you can proceed to compare it to a certificate to make sure they match, or do something else with it.
Questions, answers, and interesting discussion points
What is the difference between Certificate Enrollment Request and CSR?
Ah, well this is a source of some confusion! When you generate a CSR in Windows Certificate Manager (a Snap-in “extension” of Microsoft Management Console – mmc.exe), it’s actually stored under a folder called “Certificate Enrollment Requests”.
If you want to add to the confusion, it’s a great idea to call the dummy certificates in this folder “CERs” (abbreviation from Certificate Enrollment Request). Please don’t do that though, since a .cer -file is something else.
The dummies in that folder are actually CSRs that appear to be certificates. You can export them as .pfx – further adding to the confusion!
But the main point of the story is that a “CSR” and a “Certificate Enrollment Request” are the same thing, just in a really different format.
What’s the easiest way to generate a CSR on Windows?
That’s going to be very subjective – but I’ve found DigiCert’s certutil.exe really useful!
You can use it to generate a CSR, that will – very conveniently – end up in your Computer’s Certificate Store’s Certificate Enrollment Requests. That way you will (initially) get the “standard”, PEM-formatted CSR, and the private key (and other CSR details) will get stored in your Certificate Enrollment Requests as something you can export in .pfx.
Confusing, but kinda convenient.
However, you can also create CSRs with OpenSSL or even in some random online tool, if that’s to your liking.
References
- On CSR vs Certificate Enrollment Requests differences:
- https://social.technet.microsoft.com/Forums/windows/en-US/54817b6a-6246-43b6-a4da-66e85009074d/generating-csr-using-mmc-getting-it-signed-by-ca-and-exporting?forum=winserversecurity
- Author
- Recent Posts
Antti Koskela is a proud digital native nomadic millennial full stack developer (is that enough funny buzzwords? That’s definitely enough funny buzzwords!), who works as Solutions Architect for Precio Fishbone, building delightful Digital Workplaces.
He’s been a developer from 2004 (starting with PHP and Java), and he’s been working on .NET projects, Azure, Office 365, SharePoint and a lot of other stuff. He’s also Microsoft MVP for Azure.
This is his personal professional (e.g. professional, but definitely personal) blog.
Certificate Security: Export Cert with Non-Exportable Private Key / Marked as “Not Exportable” (Windows PKI)
-
View Larger Image


Contents
Toggle
Non-Exportable Private Key Export
Is it possible for Microsoft Windows to export a Certificate with its Private Key whose key had been marked as non-exportable? Yes. This also presents a security concern.
Background
Private Key Present
Sometime in 2016/2017, I inherited administration of an Active Directory Federation Service (ADFS) server that kept crashing and took down Single Sign-On (SSO) services. Trying to replace it needed overcoming one major hurdle: the installed Certificates on the farm’s Windows servers were marked to NOT allow export of their Private Keys. This was a feature available in Microsoft Windows but, as I recently found out, not Linux. A backup of the .PFX files containing the Private Keys was not available. That left us in a difficult position about what to do with the failing server:
- Leave server as-is, periodically reboot it, and cause a momentary SSO outage each time
- Not a desirable option. Should server no longer boot up, SSO could cease to function entirely
- Replace server with a fresh installation
- Not an option. We had no copy of the Certificates’ Private Keys to install onto the new server with
- Migrate to a new server
- Feasible, but time-consuming option. Setting up brand-new ADFS servers and manually migrating hundreds of SSO configurations would have taken weeks or months
- Required cutover coordination with each SSO partner
- Could not be scripted or automated
- Feasible, but time-consuming option. Setting up brand-new ADFS servers and manually migrating hundreds of SSO configurations would have taken weeks or months
We ultimately chose to go with the migration. Fast-forward 5-6 years later, could there have been a better path? As it turned out — Yes! There is a way to export a Certificate with the Private Key whose key had been marked as not exportable. It could subsequently be copied onto and used by the new server.
A Certificate whose Private Key had been marked as not exportable CAN be exported with the key, contrary to popular beliefs. However, one should note that even though this article worked to resolve the few situations I faced, it may not apply to all certificate types or Windows versions. Your results may vary.
Before we proceed, please be sure to familiarize yourself with Certificate basics as this article assumes you have some degree of knowledge already.
Importance of Certificates
Certificates are essential in securing access, communication, and verifying authenticity. They are issued by Certificate Authorities entrusted with vouching for their authenticity, and there are two scopes that certificates can be requested from: Public and Private. There are different certificate types available, including web, code signing, and document signing. SSH “Certificates” (Keys) are NOT the same.
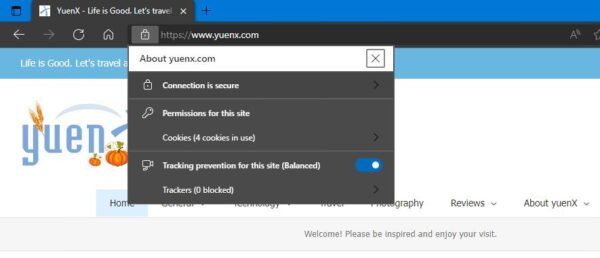
YuenX offers a secure web connection
Certificate Owners manage the systems and applications where the certificate is used, and the Certificate Services Team manages the Certificate Authorities.
“The Certificate Services team is typically the group that has been given responsibility for managing relationships with public CAs and for the internal CAs. The Certificate Services team typically comprises one to three people. Though the team members have good knowledge and expertise about TLS server certificates, they do not have the resources or access required to directly manage certificates on the extensive number of systems where certificates are deployed. However, the Certificate Services team is often blamed when TLS certificate incidents, such as outages, occur.” (NIST.gov, Header 4.2)
Private Key Security
A Private Key is generated by the Certificate Owner with the Certificate Signing Request (CSR). Once signed by the Certificate Authority and properly paired, it holds the secret key to unlocking the Certificate and should not be shared. A threat actor could use a compromised Private Key for nefarious reasons, such as those described here (SSLstore) and here (GitGuardian).
Access to Private Keys must be limited to authorized, trained personnel. (NIST “5.1.10 Private Key Security”). Mission-critical systems should have their key stored in a HSM (Hardware Security Module), and Certificate Owners must be trained on proper procedures to keeping their private keys secure.
NIST
NIST recommends (“5.1.11 Rekey/Rotation“) that when the Certificate Owner/Administrator is terminated or re-assigned, the Certificates should be replaced with a new CSR/Private Key within 30 days of re-assignment or 5 days of termination unless automation was put in place. The previous certificate, once replaced, must be revoked. Furthermore, unless a valid business reason exists or an automated service is used that removes an administrator from manually accessing private keys, always generate a NEW CSR so a new Private Key is created.
Wildcard certificates, if compromised, pose an even greater threat (NSA).
All certificates should be inventoried. This ensures visibility for monitoring expiration dates, vulnerabilities, compliance and regulatory performance, and allows for more rapid response to large-scale incidents and attacks. (NIST “5.1.1 Inventory“)
Mark Private Key As “Not Exportable”?
Microsoft Windows has a feature to mark a Certificate’s Private Key as not exportable during installation or import.
Mark key as NOT exportable
For years, my PKI administration peers and I thought that was a secure way to implement the SSL Certificate, but while researching best practices for Private Key security and storage, I learned that was not the case. Contrary to widespread belief, it can STILL be exported — few administrators, myself included, knew that. This article will show you how.
What about Linux and Mac OS X? Do they have the option to mark a key as not exportable? No. In fact, certificates are stored as files on the filesystem and are accessible by anyone with root access. See SSLs.com for where the Private Keys are stored. Windows keeps them in the Registry and can also be accessed through the Certificates MMC Snap-in.
Because anyone with Administrator (or root) rights could export the Private Key — whether on Windows, Linux, or OS X, access to it must be limited to authorized, trained personnel.
How To Export A Non-Exportable Private Key
Now that we have covered what Certificates are and why Private Keys should be kept secret and secure, let us go over how to export a Certificate with its Private Key whose key was marked as “not exportable” in Windows. You may have a legitimate reason for doing so — like the 2016/2017 example I provided in the “Background” section above with regards to a failing Active Directory Federation Service (ADFS) server. Knowing how to do this back then would have saved weeks of unnecessary work that could have been spent on other projects instead!
Verify Private Key Existence
There are multiple ways to check whether a Private Key is connected to a certificate. From the Certificates MMC Snap-in, double-click on the Cert to view its General information:
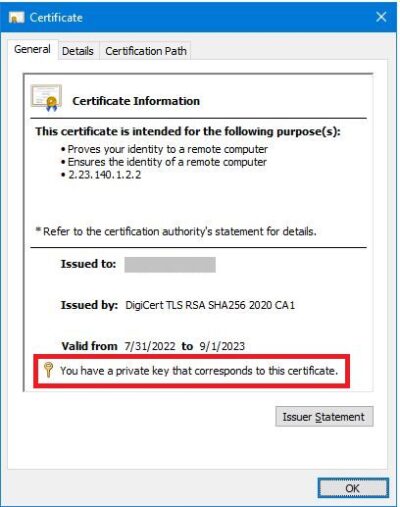
Private Key Present
PowerShell
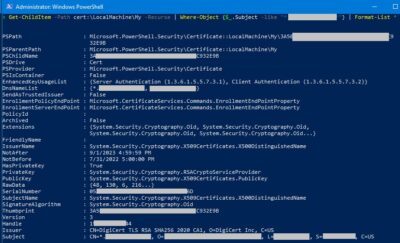
Launch a PowerShell instance with Administrator rights. Substitute “*cert.yuenx.com*” with the name of the Certificate you want to check. It should return “HasPrivateKey” as “True”.
# Replace "*cert.yuenx.com*" with the name of the Cert you want to work on
Get-ChildItem -Path Cert:\LocalMachine\My -Recurse |
   Where-Object {$_.Subject -like "*cert.yuenx.com*"} |
   Select-Object HasPrivateKey
Replace “Cert:\LocalMachine” with “Cert:\CurrentUser” to view the logged-on user’s certificates instead of the Computer’s.
You may view the cert’s other properties by changing “Select-Object HasPrivateKey” to “Select-Object *” or “Format-List *”:
# Replace "*cert.yuenx.com*" with the name of the Cert you want to work on
Get-ChildItem -Path Cert:\LocalMachine\My -Recurse |
   Where-Object {$_.Subject -like "*cert.yuenx.com*"} |
   Format-List *
Certificate Details (PowerShell)
Confirm Export Options
Let us confirm that the Private Key is not exportable. MMC Snap-In > Right-click the certificate > All Tasks > Export:
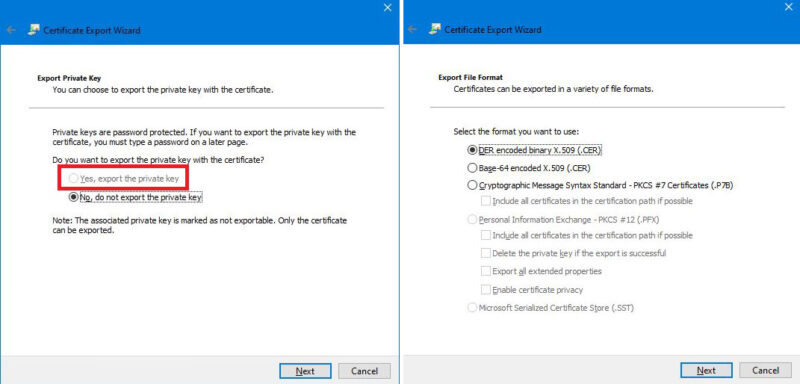
Private Key “Marked as not exportable”
Notice that “No, do not export the private key” is the only option available. Next, only the DER, Base-64, and PKCS #7 (P7B) export file formats are selectable and not PKCS #12 (PFX).
PowerShell
An error should occur when attempting to export: “Export-PfxCertificate: Cannot export non-exportable private key”.
# Replace "YuenX" with the password you want to protect the PFX export with
$Passwd = ConvertTo-SecureString -String "YuenX" -Force -AsPlainText
# Replace "*cert.yuenx.com*" with the name of the Cert you want to work on
Get-ChildItem -Path cert:\LocalMachine\My -Recurse |
   Where-Object {$_.Subject -like "*cert.yuenx.com*"} |
   Export-PfxCertificate -FilePath c:\temp\YuenX.pfx -Password $Passwd

Private Key Non-Exportable (PowerShell)
Get Certificate’s Thumbprint
Obtain the Certificate’s thumbprint to ensure the right one will be worked on. MMC Snap-In > double-click the Certificate > Details tab > Thumbprint field:
Certificate Thumbprint
PowerShell
A hexadecimal string representing the certificate’s Thumbprint should be output:
# Replace "*cert.yuenx.com*" with the name of the Cert you want to work on
(Get-ChildItem -Path Cert:\LocalMachine\My -Recurse |
   Where-Object {$_.Subject -like "*cert.yuenx.com*"}).Thumbprint

Certificate Thumbprint (PowerShell)
Export Certificate with Private Key
This step will make a backup copy of the Certificate with its Private Key by exporting the appropriate piece of the Windows Registry. Administrator rights may be required.
Warning: The Windows Registry is an extremely important part of Windows and should NOT be edited without first performing a backup. In fact, trying to modify the Registry with the Registry Editor will result in the following warning:
“Using Registry Editor incorrectly can cause serious, system-wide problems that may require you to re-install Windows to correct them. Microsoft cannot guarantee that any problems resulting from the use of Registry Editor can be solved.”
Proceed at your own risk.
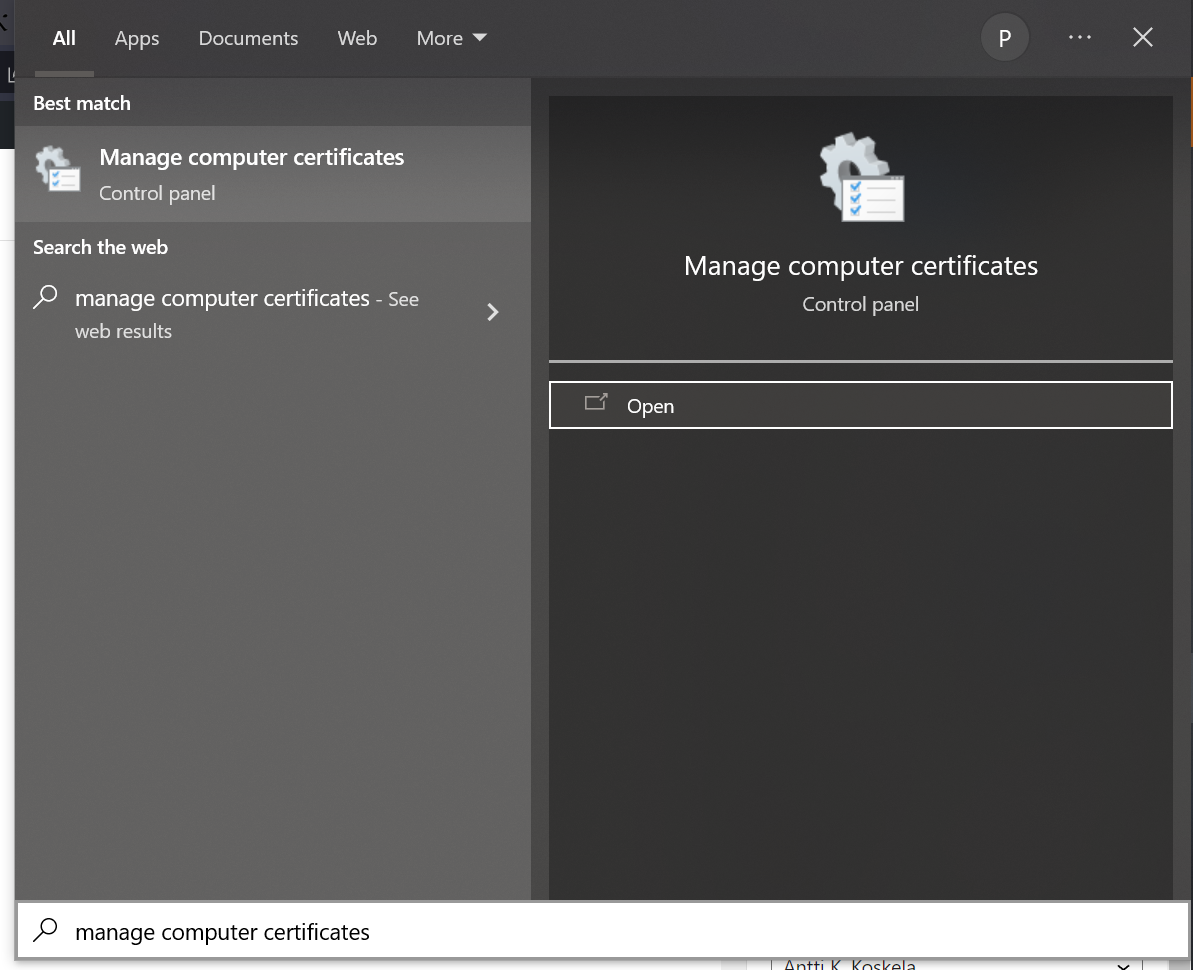
Launch the Registry Editor by using the search box on the taskbar and typing “regedit“. Locate the HKLM “Certificates” Registry key by navigating to: HKEY_LOCAL_MACHINE\SOFTWARE\Microsoft\SystemCertificates\My\Certificates. Find the cert with the Thumbprint recorded in the previous step.

Windows Registry: Certificates (HKLM)
Right-click on the certificate you want to export a copy of and select “Export”. On the “Export Registry File” screen, you will see that the “Selected branch” has been selected. Have the file saved to a secure location.
PowerShell
There was an option to export the certificate as an XML file from the Registry (see Microsoft’s DevBlogs), but I was not able to find a simple way to import it back without lengthy coding. As such, this section is here just for informational purposes. If anyone knows how, please share in the Comments! Use the Windows Registry to make an export of the branch.
# Replace "*cert.yuenx.com*" with the name of the Cert you want to work on
Get-ChildItem -Path cert:\LocalMachine\My -Recurse |
   Where-Object {$_.Subject -like "*cert.yuenx.com*"} |
   Export-Clixml c:\temp\YuenX.reg
PowerShell export of the Registry as XML could not be re-imported. Use the Windows Registry to make a backup of the branch instead.
The exported XML file should look like the below (sensitive data has been removed). It cannot be double-clicked to re-import back into the Registry:
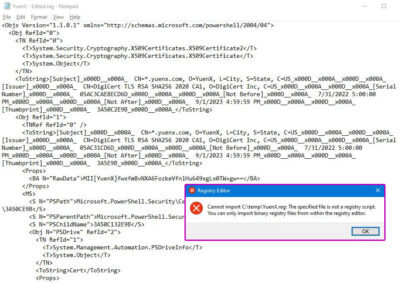
Registry XML Export (PowerShell) and Import Error
Import Certificate with Private Key
Private Key Present
Copy the Windows Registry-exported file to the new system you want to install the Certificate with the Private Key onto. Double-click it to merge content into the target computer’s Registry. You should now find the Certificate installed on that system AND have the corresponding Private Key associated. Use the Certificate MMC Snap-In or PowerShell to confirm.
Although a Certificate and its Private Key can be installed onto a different Windows system with the backup method described in this article, the key remains not exportable. I have not been able to find a mechanism to change that.
Certificate copied to a different computer will continue to have its Private Key NOT be exportable on that system.
Bonus: Delete Certificate
One or more Certificates can easily be removed from a computer using PowerShell. Please proceed with extreme caution!
#####################################
# WARNING! The below could accidentally be used to delete the WRONG or ALL
# certificates if not done right! Always make a backup!
#####################################
# Replace "*cert.yuenx.com*" with the name of the Cert you want to work on
Get-ChildItem -Path cert:\LocalMachine\My -Recurse |
   Where-Object {$_.Subject -like "*cert.yuenx.com*"} |
   Remove-Item
Final Thoughts
This article has shown how easy it was to copy a system’s Certificate and its Private Key onto another without knowing the key’s password (if any set) or having a backup. Just like Linux and Mac OS X, all one needed was to have Administrator (root) rights and make a backup of the Windows Registry. For that very reason, access to Private Keys must be limited to authorized, trained personnel — with strict controls and monitoring policies in place. Mission-critical systems should have their key stored in a HSM (Hardware Security Module), and Certificate Owners must be trained on proper procedures to keeping their private keys secure. Administrator or Root-level access should be limited and regularly monitored and audited.
Wildcard certificates pose an especially greater risk when compromised, should be limited in use despite their convenience and flexibility, and have even greater security controls in place.
One should note that even though this article worked to resolve the few situations I faced, it may not apply to all certificate types or Windows versions. Your results may vary.
With all that said, this article hopefully helped save you some time and headaches, reminded you of the importance of having backups of Certificates with their Private Keys, and had you examine how Private Key security may be managed at your organization. If you have not yet done so, start by reading through NIST’s TLS Server Certificate Management guidelines.
Credits:
– Featured Image by Pat Whelen via Unsplash
References
- NIST: TLS Server Certificate Management
Related Posts
- OpenSSL Command Reference: Convert, Check, Verify, Extract
- FortiManager: CA-Signed Web Admin Certificate
- Google Chrome: Revoked Web Certificates
Share this Post
Page load link
Go to Top
Данный материал является переводом оригинальной статьи «ATA Learning : Michael Soule : Manage Certs with Windows Certificate Manager and PowerShell».
Работа с сертификатами обычно является одной из тех дополнительных задач, которые вынужден брать на себя системный администратор Windows. Диспетчер Сертификатов Windows (Windows Certificate Manager) — это один из основных инструментов, который позволяет выполнять эту работу.
В этой статье мы рассмотрим работу с сертификатами применительно к операционной системе Windows. Если же вы хотите узнать больше о том, как работают сертификаты в целом, ознакомьтесь с сопутствующей статьей «Your Guide to X509 Certificates».
Понимание хранилищ сертификатов
В диспетчере сертификатов Windows все сертификаты находятся в логических хранилищах, называемых «хранилищами сертификатов». Хранилища сертификатов – это «корзины», в которых Windows хранит все сертификаты, которые в настоящее время установлены, и сертификат может находиться более чем в одном хранилище.
К сожалению, хранилища сертификатов — не самая интуитивно понятная концепция для работы. О том, как различать эти хранилища и как с ними работать, вы прочитаете ниже.
Каждое хранилище находится в Реестре Windows и в файловой системе. При работе с сертификатом в хранилище вы взаимодействуете с логическим хранилищем, не изменяя напрямую реестр или файловую систему. Этот более простой способ позволяет вам работать с одним объектом, в то время как Windows заботится о том, как представить этот объект на диске.
Иногда можно встретить хранилища сертификатов, называемые физическими или логическими хранилищами. Физические хранилища ссылаются на фактическую файловую систему или место в реестре, где хранятся разделы реестра и / или файл(ы). Логические хранилища — это динамические ссылки, которые ссылаются на одно или несколько физических хранилищ. С логическими хранилищами намного проще работать, чем с физическими хранилищами для наиболее распространенных случаев использования.
Windows хранит сертификаты в двух разных областях — в контексте пользователя и компьютера. Сертификат помещается в один из этих двух контекстов в зависимости от того, должен ли сертификат использоваться одним пользователем, несколькими пользователями или самим компьютером. В остальной части этой статьи сертификат в контексте пользователя и компьютера будет неофициально называться сертификатами пользователей и сертификатами компьютеров.
Сертификаты пользователей
Если вы хотите, чтобы сертификат использовался одним пользователем, то идеальным вариантом будет хранилище пользовательских сертификатов внутри Диспетчера сертификатов Windows. Это общий вариант использования процессов аутентификации на основе сертификатов, таких как проводной IEEE 802.1x.
Сертификаты пользователей находятся в профиле текущего пользователя и логически отображаются только в контексте этого пользователя. Сертификаты пользователей «сопоставлены» и уникальны для каждого пользователя даже в одних и тех же системах.
Компьютерные сертификаты
Если сертификат будет использоваться всеми пользователями компьютера или каким-либо системным процессом, его следует поместить в хранилище в контексте компьютера. Например, если сертификат будет использоваться на веб-сервере для шифрования связи для всех клиентов, размещение сертификата в контексте компьютера будет подходящим вариантом.
Вы увидите, что хранилище сертификатов компьютера логически сопоставлено для всех пользовательских контекстов. Это позволяет всем пользователям использовать сертификаты в хранилище сертификатов компьютера в зависимости от разрешений, настроенных для закрытого ключа.
Сертификаты компьютера находятся в кусте реестра локального компьютера и в подкаталогах \ProgramData. Сертификаты пользователя находятся в кусте реестра текущего пользователя и в подкаталогах \AppData. Ниже вы можете увидеть, где каждый тип хранилища находится в реестре и файловой системе.
| Контекст | Путь реестра | Объяснение |
|---|---|---|
| User | HKEY_CURRENT_USER SOFTWARE\Microsoft\SystemCertificates\ |
Физическое хранилище для пользовательских открытых ключей |
| User | HKEY_CURRENT_USER SOFTWARE\Policies\Microsoft\SystemCertificates\ |
Физическое хранилище для пользовательских открытых ключей, установленных объектами групповой политики Active Directory (AD) (GPO) |
| Computer | HKEY_LOCAL_MACHINE SOFTWARE\Microsoft\SystemCertificates\ |
Физическое хранилище общедоступных ключей для всей машины |
| Computer | HKEY_LOCAL_MACHINE SOFTWARE\Microsoft\Cryptography\Services\ |
Физическое хранилище ключей, связанных с определенной службой |
| Computer | HKEY_LOCAL_MACHINE SOFTWARE\Policies\Microsoft\SystemCertificates\ |
Физическое хранилище открытых ключей для всей машины, установленных объектами групповой политики. |
| Computer | HKEY_LOCAL_MACHINE SOFTWARE\Microsoft\EnterpriseCertificates\ |
Физическое хранилище общедоступных ключей, установленных корпоративными контейнерами PKI в домене AD |
| Контекст | Расположение файла | Объяснение |
|---|---|---|
| User | $env:APPDATA\Microsoft\SystemCertificates\ | Физическое хранилище для пользовательских открытых ключей и указателей на закрытые ключи |
| User | $env:APPDATA\Microsoft\Crypto\ | Физическое хранилище для контейнеров закрытых ключей для конкретных пользователей |
| Computer | $env:ProgramData\Microsoft\Crypto\ | Физическое хранилище для контейнеров закрытых ключей для всей машины |
Предварительные требования
В оставшейся части этой статьи вы найдете несколько примеров, демонстрирующих взаимодействие с хранилищами сертификатов Windows. Чтобы воспроизвести эти примеры, убедитесь, что выполняются следующие требования:
- Windows Vista, Windows Server 2008 или более новая операционная система. В показанных примерах используется Windows 10 Корпоративная версии 1903.
- Знакомство с PowerShell. Хотя это и не обязательно, этот язык будет использоваться для ссылки на сертификаты, где это необходимо. Все показанные примеры были созданы с помощью Windows PowerShell 5.1.
- Вам не потребуется устанавливать какие-либо специальные сертификаты, но использование самозаверяющего сертификата полезно.
Управление сертификатами в Windows
В Windows есть три основных способа управления сертификатами:
- Оснастка консоли управления Microsoft (MMC) сертификатов (certmgr.msc)
- PowerShell
- Инструмент командной строки certutil
В этой статье вы узнаете, как управлять сертификатами с помощью оснастки Certificates MMC и PowerShell. Если вы хотите узнать больше о том, как использовать certutil, ознакомьтесь с документацией Microsoft.
PowerShell против диспетчера сертификатов Windows
Поскольку в Windows можно управлять сертификатами несколькими способами, встаёт вопрос выбора, что лучше использовать — GUI (MMC) или командную строку с PowerShell.
Во-первых, рассмотрим жизненный цикл сертификата. Если вы собираетесь установить или удалить один сертификат только один раз, рассмотрите возможность использования MMC. Но если вы управляете несколькими сертификатами или выполняете одну и ту же задачу снова и снова, использование командной строки может оказаться правильным решением. Даже если вы не умеете писать сценарии PowerShell, вам стоит этому научиться, если у вас есть много разных сертификатов, которыми нужно управлять.
Давайте сначала посмотрим, как обнаружить сертификаты, установленные в Windows, с помощью диспетчера сертификатов и PowerShell.
Использование диспетчера сертификатов Windows (certmgr.msc)
Чтобы просмотреть сертификаты с помощью MMC, откройте Диспетчер сертификатов: откройте меню «Пуск» и введите certmgr.msc. Это вызовет Windows Certificates MMC. Это начальное представление предоставит обзор всех логических хранилищ, отображаемых в левом окне.
На снимке экрана ниже видно, что выбрано логическое хранилище доверенных корневых центров сертификации

Просмотр физических хранилищ
По умолчанию Диспетчер сертификатов Windows не отображает физические хранилища. Чтобы показать их, в верхнем меню оснастки выбирайте «View» > «Options«. Затем вы увидите варианты отображения физических хранилищ сертификатов. Включение этого параметра упрощает определение конкретных путей в Windows.
Теперь вы можете видеть, что дополнительные контейнеры показаны в примере логического хранилища доверенных корневых центров сертификации, показанном ранее. Сертификаты по-прежнему сгруппированы относительно их логических хранилищ, но теперь вы можете увидеть физическое хранилище «Реестр».

Проверка атрибутов в диспетчере сертификатов Windows
Есть много атрибутов сертификата, которые вы можете увидеть при просмотре их с помощью MMC. Например, вы, вероятно, захотите выбрать определенные сертификаты по их атрибутам. Самый простой способ сделать это — указать Serial Number сертификата или значение Thumbprint. Если сертификат был подписан центром сертификации (CA), при выдаче он будет иметь серийный номер. Thumbprint вычисляется каждый раз при просмотре сертификата.
Вы можете увидеть некоторые атрибуты сертификата, открыв его в MMC, как показано ниже.

Следует отметить одну важную особенность — встроенные закрытые ключи. Сертификаты в Windows также могут иметь соответствующий закрытый ключ. Эти закрытые ключи хранятся в соответствующих физических хранилищах в виде зашифрованных файлов.
Чтобы быстро отличать сертификаты с соответствующим закрытым ключом и без него, посмотрите на значок сертификата. В Диспетчере сертификатов Windows, если значок просто выглядит как лист бумаги с лентой, соответствующий закрытый ключ отсутствует. Если у сертификата есть закрытый ключ, вы увидите ключ на значке MMC, и ключ в нижней части вкладки «Общие» при открытии сертификата

Использование PowerShell по физическому хранилищу
Как и в случае с MMC, вы можете просматривать сертификаты и управлять ими с помощью PowerShell. Давайте сначала проверим сертификаты в их физических хранилищах (реестр и файловая система).
Используя PowerShell командлет Get-ChildItem, вы можете перечислить все ключи и значения внутри родительского пути в реестре. Приведенная ниже команда перечислит все сертификаты вошедшего в систему пользователя в логическом хранилище промежуточных центров сертификации.
Get-ChildItem -Path 'HKCU:\Software\Microsoft\SystemCertificates\CA\Certificates'
Каждая запись в кусте реестра, который вы видите, будет соответствовать отпечатку сертификата доверенного центра сертификации и его сертификату в соответствующем свойстве. Вы можете увидеть пример вывода ниже.

Другое распространенное хранилище — это Personal store. Ваши сертификаты для этого хранилища находятся в файловой системе, а не в реестре. В следующих командах мы покажем эти различные физические пути и их цели.
Каждый файл в каталоге, возвращенный приведенной ниже командой, соответствует сертификату, установленному в личном хранилище текущего пользователя.
Get-ChildItem -Path $env:APPDATA\Microsoft\SystemCertificates\My\Certificates\
Каждый файл, возвращаемый в приведенной ниже команде, является ссылкой на объект для закрытого ключа, созданный поставщиком хранилища ключей (KSP). Имя файла соответствует идентификатору ключа субъекта сертификата. К каждому устанавливаемому вами закрытому ключу будет добавлен соответствующий файл.
Get-ChildItem -Path $env:APPDATA\Microsoft\SystemCertificates\My\Keys\
Каждый файл в каталоге, возвращаемый следующей командой, является уникальным контейнером для зашифрованного закрытого ключа, созданного KSP. Нет прямой связи между именем файла и сертификатом, но файл является целью указателя в предыдущей команде.
Get-ChildItem -Path $env:APPDATA\Microsoft\Crypto\Keys
Использование PowerShell по логическому хранилищу
Поскольку работа с сертификатами на их физических путях встречается редко, в остальных примерах вы будете работать с логическими хранилищами.
PowerShell может получить доступ к логическим хранилищам Windows с помощью PSDrive-объекта «Cert:\«, который сопоставляет сертификаты с физическими хранилищами так же, как это делает MMC.
К сожалению, MMC и «Cert:» не маркируют логические хранилища одинаково. Ниже вы можете увидеть сравнительную таблицу общих хранилищ и их названий как в MMC, так и в «Cert:» PSDrive.
| Cert: | Certificates MMC |
|---|---|
| My | Personal |
| Remote Desktop | Remote Desktop |
| Root | Trusted Root Certification Authorities |
| CA | Intermediate Certification Authorities |
| AuthRoot | Third-Party Root Certification Authorities |
| TrustedPublisher | Trusted Publishers |
| Trust | Enterprise Trust |
| UserDS | Active Directory User Object |
Выбор сертификатов
Когда вы работаете с сертификатами, вам понадобится способ фильтрации и выбора сертификатов для выполнения определенных операций. В большинстве случаев вы будете фильтровать и выбирать сертификаты на основе значения определенного расширения.
Для следующих примеров вам нужно начать с перечисления всех установленных сертификатов в хранилище корневого ЦС.
Get-ChildItem -Path 'Cert:\CurrentUser\Root\'
Возвращенные объекты будут объектами сертификатов, которые вы можете использовать в следующих примерах.
Общие расширения уже доступны как свойства объектов сертификата. В приведенном ниже примере вы используете Get-Member для вывода списка всех свойств возвращаемых объектов.
Get-ChildItem -Path 'Cert:\CurrentUser\Root\' | Get-Member -MemberType Properties

Как видим, некоторые из этих расширений, например «Issuer», помогают найти сертификат, который вы ищете. Расширения предоставляют информацию о сертификате, например, кому он выдан, для чего его можно использовать и любые ограничения на него.
В более сложных случаях использования вам может понадобиться найти сертификаты других расширений, таких как используемый шаблон сертификата. Сложность в том, что значения этих расширений возвращаются как массив целых чисел. Эти целые числа соответствуют содержимому в кодировке ASN.1.
Покажем пример взаимодействия с свойствами типа ScriptProperty. В приведенной ниже команде вы извлекаете Key Usages.
((Get-ChildItem -Path 'Cert:\CurrentUser\Root\' | Select -First 1).Extensions | Where-Object {$_.Oid.FriendlyName -eq 'Key Usage'}).format($true)
Новая часть, которую мы вводим в приведенной выше команде, — это метод форматирования, который выполняет декодирование ASN.1. Вы передаете ему логическое значение (например, $true), чтобы определить, хотим ли мы, чтобы возвращаемый объект был однострочным или многострочным.
Попробуем использовать значение Thumbprint из сертификата в приведенной ниже команде. Значение Thumbprint устанавливается как переменная PowerShell и используется для выбора конкретного сертификата в приведенных ниже командах.
$thumb = "cdd4eeae6000ac7f40c3802c171e30148030c072"
Get-ChildItem -Path 'Cert:\CurrentUser\Root\' | Where-Object {$_.Thumbprint -eq $thumb}
Создание самозаверяющих (self-signed) сертификатов с помощью PowerShell
PowerShell может создавать самозаверяющие (self-signed) сертификаты с помощью командлета New-SelfSignedCertificate. Самозаверяющие сертификаты полезны для тестирования, поскольку они позволяют генерировать пару открытого и закрытого ключей без использования центра сертификации.
Теперь давайте создадим самозаверяющий сертификат в хранилищах текущего пользователя и локального компьютера, чтобы использовать его в примерах для следующих шагов.
В приведенном ниже примере PowerShell создает пару открытого и закрытого ключей, самозаверяющий сертификат и устанавливает их все в соответствующие хранилища сертификатов.
New-SelfSignedCertificate -Subject 'User-Test' -CertStoreLocation 'Cert:\CurrentUser\My'
New-SelfSignedCertificate -Subject 'Computer-Test' -CertStoreLocation 'Cert:\LocalMachine\My'
Использование самозаверяющих сертификатов для продуктивных сервисов не рекомендуется, поскольку не существует всех механизмов, основанных на доверии.
Импорт и экспорт сертификатов в MMC
Криптография с открытым ключом основана на широкой доступности открытого ключа. Учитывая это, вам нужны стандартные способы эффективного обмена сертификатами. Не менее важна безопасность ваших личных ключей. Хранение закрытых ключей на недоступных носителях или с материалами для аварийного восстановления — обычная практика для определенных закрытых ключей.
Оба они требуют способов хранения этих криптографических объектов в стандартных форматах. Экспорт предоставляет функции для сохранения этих объектов и обеспечения использования широко распространенных стандартных форматов файлов. Импорт позволяет вам переносить криптографические объекты в операционные системы Windows.
Экспорт сертификатов из MMC относительно прост. Чтобы экспортировать сертификат без закрытого ключа, щелкните сертификат в MMC, выберите меню «Все задачи», а затем «Экспорт».
Во время экспорта вам будет предложено указать формат файла, как показано ниже. Наиболее распространены варианты кодирования — DER или Base-64

Экспорт закрытых ключей
Чтобы экспортировать сертификат с соответствующим закрытым ключом, вы должны соответствовать двум критериям:
- Вошедшая в систему учетная запись должна иметь разрешение на закрытый ключ (только для сертификатов компьютеров);
- Закрытый ключ должен быть помечен как экспортируемый.
Чтобы проверить разрешения для закрытых ключей локального компьютера, вы можете выбрать сертификат с закрытым ключом, выбрать «Все задачи» и «Управление закрытыми ключами» в MMC «Сертификаты». В открывшемся диалоговом окне отображаются записи управления доступом для закрытых ключей.
Когда выше обозначенные условия выполнены, вы можете выбрать сертификат, щелкнуть «Все задачи», а затем «Экспорт», как если бы вы использовали сертификат только с открытым ключом. При экспорте теперь у вас должна присутствовать возможность выбора экспорта закрытого ключа («Yes, export the private key»), как показано ниже.

Когда вы экспортируете закрытый ключ в Windows, вы можете сохранить файл только как PFX. Этот и другие типы файлов и форматы кодирования подробно описаны в этом посте.
Для остальных параметров, отображаемых в мастере экспорта, вы можете использовать значения по умолчанию. В таблице ниже приводится краткое изложение каждого из них.
| Настройка | Описание |
|---|---|
| Including all certificates in the certification path if possible | Помогает с переносимостью эмитентов сертификатов и включает все соответствующие открытые ключи в PFX. |
| Delete the private key if the export is successful | Удаляет закрытый ключ из файла и имеет несколько распространенных вариантов использования, но одним из примеров является проверка доступа к закрытым ключам. |
| Export all extended properties | Будет включать любые расширения в текущем сертификате, они относятся к сертификатам [конкретные настройки] для интерфейсов Windows. |
| Enable certificate privacy | Обычно в экспортируемом PFX-файле шифруется только закрытый ключ, этот параметр шифрует все содержимое PFX-файла. |
| Group or user names | Вы можете использовать участника безопасности группы или пользователя из Active Directory для шифрования содержимого файла PFX, но пароль является наиболее переносимым вариантом для устаревших систем или компьютеров, не присоединенных к тому же домену. |
Импорт сертификатов
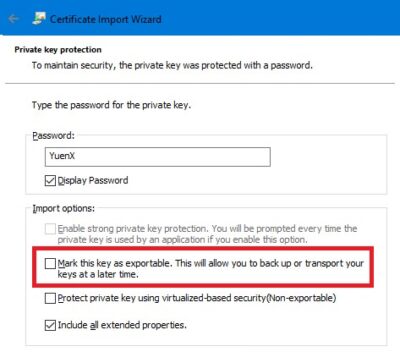
Функция импорта одинакова для всех поддерживаемых типов файлов сертификатов. Единственная разница в том, что если файл содержит закрытый ключ, вы можете «Отметить этот ключ как экспортируемый», о чем вы узнаете подробнее ниже. Windows будет использовать мастер импорта сертификатов.

При использовании мастера импорта сертификатов для PFX вам потребуется указать пароль, используемый для шифрования закрытого ключа. Вот еще один обзор вариантов импорта.
| Настройка | Описание |
|---|---|
| Enable strong private key protection | Требуется пароль для каждого доступа к закрытому ключу. Будьте осторожны с новыми функциями, поскольку они не будут поддерживаться во всех программах. |
| Mark this key as exportable | Вы должны стараться избегать использования этого параметра в любой конечной системе, закрытые ключи следует рассматривать так же, как и хранение паролей. |
| Protect private key using [virtualization-based security] | Этот параметр обеспечивает дополнительные функции безопасности для защиты закрытых ключей от сложных атак вредоносного ПО. |
| Include all extended properties | Относится к тем же настройкам Windows, что и при экспорте. |
Сертификаты для подписи кода PowerShell — хороший вариант использования надежной защиты закрытого ключа.
С автоматическим размещением сертификатов следует проявлять осторожность. Скорее всего, вы получите наилучшие результаты, выбрав хранилище сертификатов вручную.
Импорт и экспорт сертификатов в PowerShell
Теперь с помощью PowerShell экспортируйте один из самозаверяющих сертификатов, которые вы создали ранее. В этом примере вы выбираете сертификат в личном логическом хранилище CurrentUser, который был самозаверяющим.
$certificate = Get-Item (Get-ChildItem -Path 'Cert:\CurrentUser\My\' | Where-Object {$_.Subject -eq $_.Issuer}).PSPath
Теперь, когда вы выбрали сертификат, вы можете использовать команду Export-Certificate, чтобы сохранить файл в кодировке DER, используя команду ниже.
Export-Certificate -FilePath $env:USERPROFILE\Desktop\certificate.cer -Cert $certificate
Теперь давайте посмотрим на экспорт закрытого ключа. Ниже вы проверяете, что у выбранного сертификата есть закрытый ключ. Если он не возвращает True, то команда Get-Item, скорее всего, выбрала неправильный сертификат.
$certificate.HasPrivateKey
Ниже вы установите пароль, который будет использоваться для шифрования закрытого ключа. Затем экспортируйте выбранный сертификат в файл PFX и используйте пароль, который вы ввели ранее, чтобы зашифровать файл.
$pfxPassword = "ComplexPassword!" | ConvertTo-SecureString -AsPlainText -Force
Export-PfxCertificate -FilePath $env:USERPROFILE\Desktop\certificate.pfx -Password $pfxPassword -Cert $certificate
В случае, если необходимо выполнить импорт, как и при экспорте, есть две команды. Одна команда для импорта сертификатов и одна для импорта файлов PFX.
Ниже команда Import-Certificate импортирует файл в формате DER, который вы экспортировали ранее, в личное хранилище текущего пользователя.
Import-Certificate -FilePath $env:USERPROFILE\Desktop\certificate.cer -CertStoreLocation 'Cert:\CurrentUser\My'
Допустим, вы тоже хотите установить закрытый ключ этого сертификата.
$pfxPassword = "ComplexPassword!" | ConvertTo-SecureString -AsPlainText -Force
Import-PfxCertificate -Exportable -Password $pfxPassword -CertStoreLocation 'Cert:\CurrentUser\My' -FilePath $env:USERPROFILE\Desktop\certificate.pfx
Имейте в виду, что пароль должен быть защищенной строкой. Кроме того, если вы импортируете в хранилище локального компьютера (например, «Cert:\LocalMachine«), вам нужно будет запустить команду из командной строки администратора с повышенными привилегиями.
В приведенном выше примере вы также используете параметр -Exportable с командой, отмечая закрытый ключ как экспортируемый в будущем. По умолчанию (без указания этого параметра) экспорт не используется. Экспортируемые закрытые ключи – отельный аспект информационной безопасности, заслуживающий отдельного внимания.
Удаление сертификатов с помощью PowerShell
При удалении сертификатов помните, что понятие «Корзина Windows» в этом случае отсутствует. Как только вы удалите сертификат, он исчезнет! Это означает, что очень важно подтвердить, что вы удаляете правильный сертификат, путем проверки уникального идентификатора, такого как серийный номер или значение расширения Thumbprint.
Как и выше, в приведенной ниже команде мы выбираем самозаверяющий сертификат из личного хранилища текущего пользователя.
$certificate = Get-Item (Get-ChildItem -Path 'Cert:\CurrentUser\My\' | Where-Object {$_.Subject -eq $_.Issuer}).PSPath
Ниже вы можете увидеть свойства отпечатка, серийного номера и темы для выбранного сертификата, чтобы убедиться, что это именно тот сертификат, который вы собираетесь выбрать.
$certificate.Thumbprint
$certificate.SerialNumber
$certificate.Subject
Убедитесь, что вы выбрали правильный сертификат, который собираетесь удалить.
Приведенная ниже команда удаляет все выбранные объекты сертификата, используйте с осторожностью! Передав объект $certificate через конвейер в командлет Remove-Item в приведенной ниже команде, вы удалите все содержимое сертификата без каких-либо запросов на проверку.
$certificate | Remove-Item
Резюме
На протяжении всей этой статьи вы работали с сертификатами в Windows, изучая, как получить к ним доступ, и некоторые инструменты, которые можно использовать при работе с ними. По этой теме можно изучить гораздо больше, в том числе о том, как связать установленные сертификаты с конкретными службами или даже о том, как реализовать инфраструктуру закрытого открытого ключа (PKI) путем развертывания собственных центров сертификации (CA).
Readers help support Windows Report. We may get a commission if you buy through our links.
Read our disclosure page to find out how can you help Windows Report sustain the editorial team. Read more
As you most probably know, Microsoft has stopped updating Windows 7, and now users are left with the choice of either getting the Extended Support or upgrading to Windows 10.
While some users may choose the Extended Support, they need to keep in mind that this is a temporary and costly solution. Thus, they will have to upgrade to Windows 10 at some point.
Their biggest concern with upgrading to a newer OS is how they will migrate their data since not all of it can be simply copied and pasted from one computer to another.
One good example is how some users may want to export their Windows Certificates with the Private Key.
That is precisely why we’ve compiled this step-by-step guide that will show you how you can export your Windows Certificates with the Private Key, and maybe make it usable in Windows 10.
How do I export a Windows Certificate with the Private Key?
Before starting, you need to remember several things regarding the process:
- A private key is exportable only when it is specified in the certificate request or certificate template that was used to create the certificate.
- You should clear the Enable strong protection checkbox if you will use the private key with any program that does not support strong protection
- You need to be a User or local Administrator to complete this procedure
Once you’ve taken this situation into account, you can proceed with the steps:
- Open the Certificates snap-in for a user, computer, or service. This involves using the Microsoft Management Console
- To view the certificates for a certain device
- Select Run from the Start menu, and then enter certlm.msc.
- To view the certificates for the current user
- Select Run from the Start menu, and then enter certmgr.msc.
- To view the certificates for a certain device
- Look in the console tree under the logical store that contains the certificate to export
- Click Certificates
- Look in the Details pane
- Click the certificate that you want to export
- On the Action menu, point to All Tasks
- Click Export
- When the Certificate Export Wizard appears, click Yes, export the private key
- Under Export File Format, you will need to choose one of the following:
- Include all certificates in the certification path if possible
- This will include all certificates in the certification path
- Delete the private key if the export is successful
- This will delete the private key if the export is successful
- Export all extended properties
- This will export the certificate’s extended properties

- This will export the certificate’s extended properties
- Include all certificates in the certification path if possible
- Choose a password to encrypt the key that you are exporting
- Give the file a name, and select a file path for it to be exported

By following these steps, the certificate will remain in the certificate store in addition to being in the newly created file.
Did you find this article useful? Let us know in the comments section below.
RELATED ARTICLES YOU SHOULD CHECK OUT:
- How to export Group Policy settings in Windows 7
- How to migrate a profile from Windows 7 to Windows 10
- Migrate Windows 7 to an SSD without reinstall
Teodor Nechita
Eager to help those in need, Teodor writes articles daily on subjects regarding Windows, Xbox, and all things tech-related.
When not working, you may usually find him either at the gym or taking a stroll in the park, trying to find inspiration for the next articles he may write.