
Чтобы вы могли без проблем пользоваться SSL-сертификатом на разных платформах и устройствах, иногда требуется изменить его формат. Дело в том, что некоторые форматы лучше подходят для работы с различными видами программного обеспечения. Далее мы расскажем о том, какие форматы бывают, в каких случаях используются и какими способами можно конвертировать один формат сертификата в другой.
Форматы сертификатов
Существует четыре основных формата сертификатов:
PEM — популярный формат используемый Центрами Сертификации для выписки SSL-сертификатов.
Основные расширения этого типа .pem, .crt, .cer, .key. В файлах содержатся строки вида
-----BEGIN CERTIFICATE-----
-----END CERTIFICATE-----
-----BEGIN PRIVATE KEY-----
-----END PRIVATE KEY ------
Сертификаты PEM подходят для установки на веб-серверы nginx, apache2.
DER — это бинарная форма сертификата PEM.
Основные расширения этого типа сертификата .der .cer
Сертификаты DER подходят для установки на серверы Java.
P7B. Файлы P7B кодируются в формате Base64 и имеют расширение .p7b или .p7c.
В файлах содержатся строки вида
-----BEGIN PKCS7-----
-----END PKCS7-----
Сертификаты P7B подходят для установки на серверы MS Windows, Java Tomcat
PFX — это сертификат в бинарном формате, выданный для домена, включающий в себя сертификат, цепочку сертификатов (корневые сертификаты) и приватный ключ. Имеют расширение .pfx или .p12.
Сертификаты PFX подходят для установки на серверы Windows, в частности Internet Information Services(IIS).
Способы конвертации
Существует несколько способов конвертации сертификатов, которые отличаются между собой только простотой конвертирования и уровнем безопасности. Мы расскажем о трех из них.
Конвертация SSl сертификатов посредством OpenSSL
OpenSSL — это надежный, коммерческий и полнофункциональный инструментарий для протоколов Transport Layer Security (TLS) и Secure Sockets Layer (SSL). А также библиотека криптографии общего назначения. Конвертация с использованием библиотеки OpenSSL считается одним из самых безопасных способов: все данные будет сохранены непосредственно на устройстве, на котором будут выполняться операции по конвертированию.
Для того чтобы воспользоваться им, вам необходимо перейти в командную строку и выполнить команды.
Предоставленные ниже примеры команд OpenSSL позволяют конвертировать сертификаты и ключи в нужный формат.
Конвертировать PEM в DER можно посредством команды:
openssl x509 -outform der -in site.crt -out site.der
Аналогично, для других типов:
PEM в P7B
openssl crl2pkcs7 -nocrl -certfile site.crt -out site.p7b -certfile site.ca-bundle
PEM в PFX
openssl pkcs12 -export -out site.pfx -inkey site.key -in site.crt -certfile site.ca-bundle
Обращаем ваше внимание, что после выполнения команды, будет запрошена установка пароля ключа.
DER в PEM
openssl x509 -inform der -in site.der -out site.crt
P7B в PEM
openssl pkcs7 -print_certs -in site.p7b -out site.cer
P7B в PFX
openssl pkcs7 -print_certs -in site.p7b -out certificate.ceropenssl pkcs12 -export -in site.cer -inkey site.key -out site.pfx -certfile site.ca-bundle
PFX в PEM
openssl pkcs12 -in site.pfx -out site.crt -nodes
Конвертация при помощи онлайн-сервисов
Для конвертации сертификатов самый удобный способ — использование специальных сайтов. Этот способ считается наименее безопасным методом: никогда не знаешь, сохраняет ли автор сайта ваш приватный ключ при конвертации.
Конвертация с PEM в DER
Для конвертации необходим только файл сертификата .crt, .pem

Конвертация с PEM в P7B
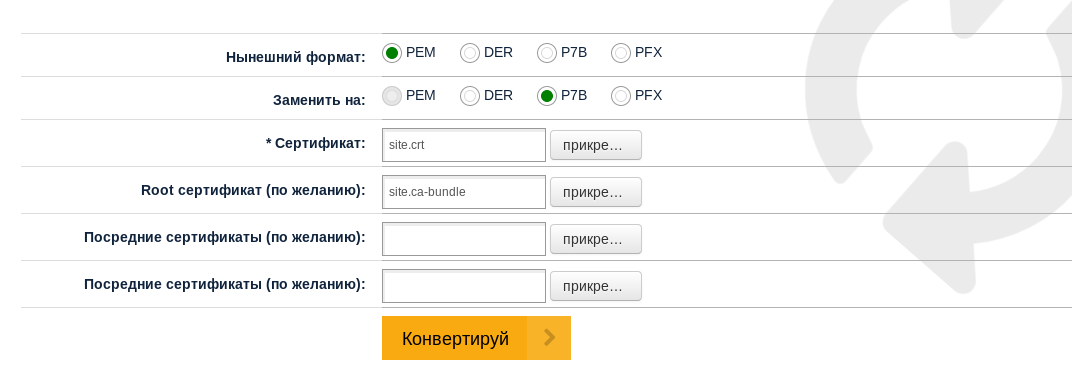
В этом случае существует возможность добавить также цепочку сертификатов.
Что такое цепочка сертификатов и для чего она нужна, можно узнать в статье «Что такое корневой сертификат»
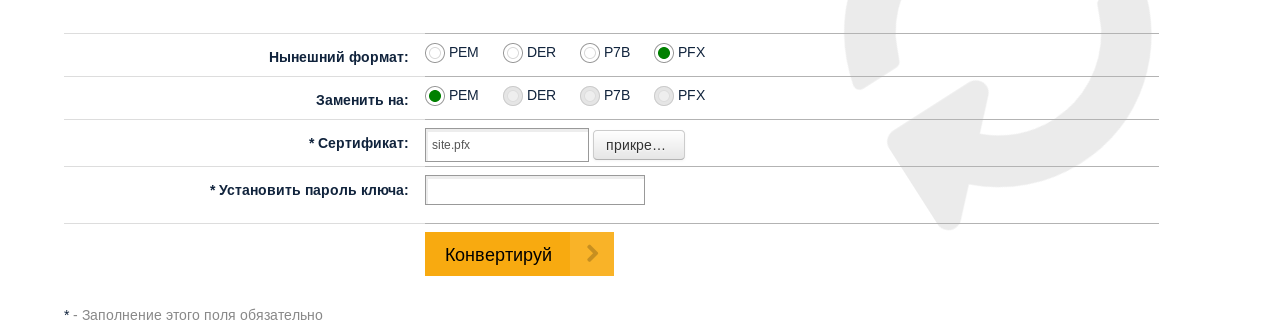
Конвертация с PEM в PFX
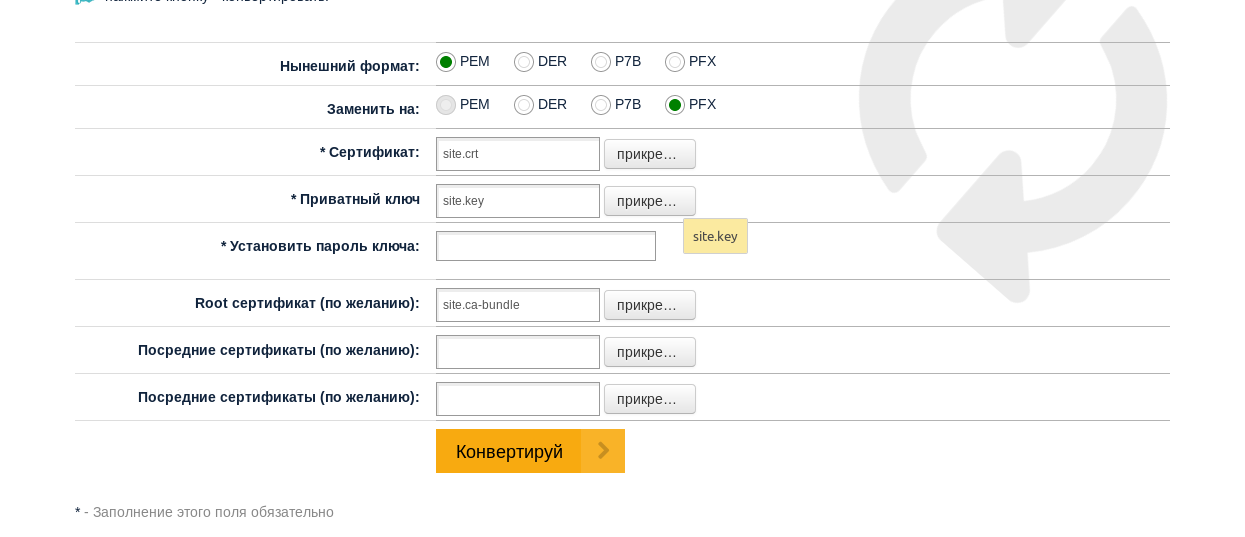
В этом случае необходимо обратить внимание на то, что обязателен ключ сертификата, а также необходимо установить пароль ключа.
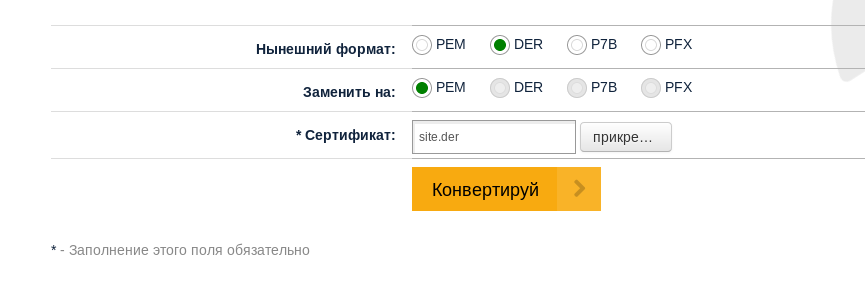
Конвертация из DER в PEM
Конвертация из P7B в PEM

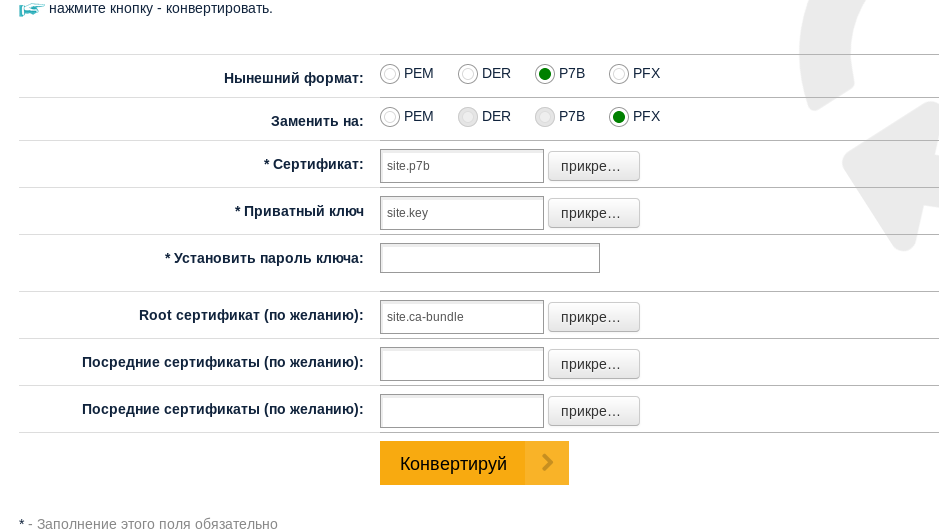
Конвертация из P7B в PFX
Конвертация из PFX в PEM
Конвертация скриптом openssl-ToolKit
OpenSSL ToolKit — скрипт, который облегчает работу с библиотекой OpenSSL. Работа со скриптом является безопасным решением, т.к сертификаты и ключи сертификата никуда не передаются, а используются непосредственно на вашем сервере.
Для начала работы скрипт необходимо скачать и запустить. Сделать это можно одной командой:
echo https://github.com/tdharris/openssl-toolkit/releases/download/1.1.0/openssl-toolkit-1.1.0.zip \
| xargs wget -qO- -O tmp.zip && unzip -o tmp.zip && rm tmp.zip && ./openssl-toolkit/openssl-toolkit.sh
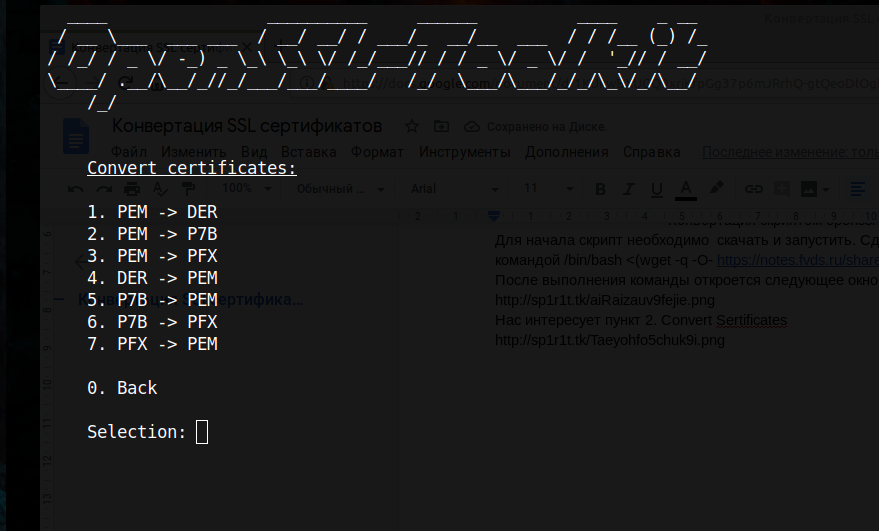
После выполнения команды откроется следующее окно:

Нас интересует пункт 2. Convert certificates
После перехода в пункт 2. появится следующее меню, с выбором нужного типа конвертирования
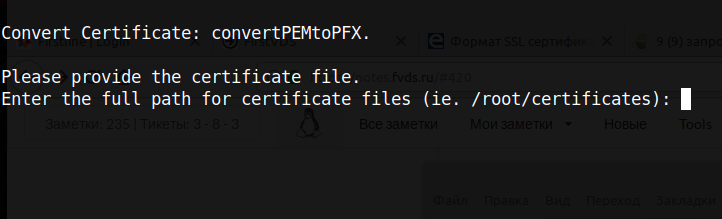
После выбора преобразования, в данном случае PEM to FPX, скрипт предложит выбрать директорию с сертификатами на том устройстве, где запускается скрипт.
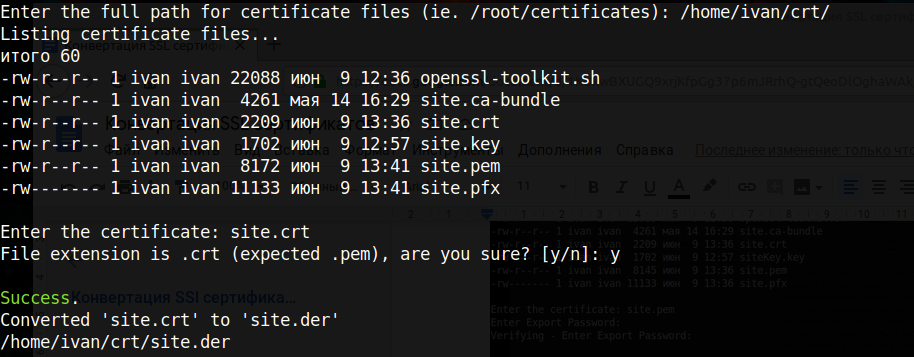
В нашем случае мы их скачали в директорию /home/ivan/crt/
После корректного ввода директории, скрипт отобразит все файлы в этой директории.
Далее нужно ввести имя сертификата, который будем конвертировать, в нашем случае это site.pem

Обращаю ваше внимание, что для корректной конвертации, с PEM в PFX, необходимо вручную объединить файл сертификата, цепочки и ключа в один файл, иначе будет возникать ошибка конвертации.
Сделать это можно простой командой
cat site.crt site.ca-bundle site.key > site.pem
Данное действие необходимо только для конвертации из PEM в PFX.
Мы рассмотрели пример конвертации PEM в PFX. Этим же путем можно конвертировать сертификаты в другие форматы. Единственное, что вам уже не понадобится шаг с объединением файлов.
Пример конвертации PEM В DER.
A common task we have to perform in our iPhone and Android app development projects is moving certificates around mixed platform environments, namely from Windows to Linux, or from Windows to Amazon Web Services (AWS).
For example, you may have a certificate and private key installed on a Windows Server machine and used by IIS, but how do you export it so you can then use it within Apache or NGINX running on a Linux server?
Or what about importing the certificate so you can use it to secure a HTTPs endpoint on AWS Application Load Balancer?
In this post, I will show you very quickly how to export and transform a certificate used in Windows so that it can be used in non-Windows environments.
Pre-requisites
- A Windows Server machine with an installed certificate and private key pair. The private key must have been imported and marked as Exportable, otherwise this tutorial will not work.
- OpenSSL module installed for PowerShell.
Export Certificate from Windows
1.) Open up the local machine Certificate Manager (run “certmgr” from the Windows Search box)
2.) Find your installed certificate within one of your local certificate stores, right click on it, go to All Tasks -> Export.
3.) This launches the “Certificate Export Wizard”. Within this, click Next and make sure to check the “Yes, export the private key” option.
4.) For the Export File Format, make sure to check “Personal Information Exchange – PKCS #12” and accept the default checked values underneath it.
5.) Set a password that will be used to protect the exported PFX file, note this down for later.
6.) Choose a file location and name, and hit “Finish”.
At this point you now have a .PFX file exported that contains both the public and private keys for the certificate we are looking to convert.
Convert PFX File Format to PEM Format
1.) Open up a PowerShell Command window.
2.) The first step is to export the private key from the PFX file, to do that type:
openssl pkcs12 -in <filename>.pfx -nocerts -out key.pem
This will ask you to input the password you set on the PFX file in Step 5 of the previous section. You will also be prompted to provide a new password for the generated key.pem file, just pick any password for now, we are going to remove it at the end of the tutorial.
3.) Next, we will export the certificate from the pfx file itself and put it into its own .PEM file:
openssl pkcs12 -in <filename>.pfx -clcerts -nokeys -out cert.pem
4.) Finally, we will take the output of step 2 and remove the passphrase from it:
openssl rsa -in key.pem -out server.key
That’s it!
The cert.pem file contains the public key of your certificate. The server.key contains the private key associated with that certificate.
Copy PEM and KEY Files to Linux
1.) Copy the cert.pem and server.key files to your Linux instance.
2.) Ensure the right permissions are set on both files:
- Set the directory permission to 700.
- Set the file permission on both the .pem and .key files to 600.
- Ensure the directory and files themselves are owned by the root user.
3.) Modify Apache or NGINX configurations to reference the above copied files.
Import Certificates into Amazon Certificate Manager
If you are looking to use the certificate within AWS as a SSL certificate on an Application Load Balancer, then you will need to first import the certificates into Amazon Certificate Manager.
1.) Login into the Amazon Certificate Manager
2.) Click on Import Certificate
3.) In the box labelled “Certificate Body”, paste the contents of cert.pem file.
4.) In the box labelled “Certificate Private Key”, paste the contents of the server.key file.
5.) If there is an intermediate certificate authority used by your certificate then copy and paste the public key of any intermediate certificates into the Certificate Chain box.
6.) Modify your Application Load Balancer listener endpoints to use the certificate you imported in step 5.
Bobby Gill
Co-Founder & Chief Architect
at
BlueLabel
|
+ posts
Последнее обновление

Работа с SSL-сертификатами часто подразумевает работу с различными форматами файлов, и иногда они нужны в формате PEM. Независимо от того, есть ли у Вас файлы CRT, CER или DER, понимание того, как выполнять эти преобразования, может поначалу показаться непосильной задачей. Но не волнуйтесь, мы Вас подстрахуем!
В этом руководстве Вы узнаете, как использовать OpenSSL для плавного преобразования Ваших SSL-сертификатов в PEM, шаг за шагом, независимо от того, работаете ли Вы в Linux или Windows. Давайте упростим этот процесс вместе!
Оглавление
- Преобразование CRT в PEM с помощью OpenSSL (Linux и Windows)
- Как преобразовать DER или CER в PEM
- Как установить OpenSSL

Преобразование CRT в PEM с помощью OpenSSL (Linux и Windows)
Выполните эти простые шаги, чтобы преобразовать CRT-файл в PEM-файл с помощью OpenSSL. Инструкции работают как в Linux, так и в Windows, с небольшими отличиями в навигации по каталогам и выполнении команд.
Шаг 1: Откройте инструмент командной строки
- В Linux: Откройте Терминал, нажав Ctrl + Alt + T или найдя“Terminal” в Ваших приложениях.
- В Windows: Откройте Командную строку или PowerShell, нажав Win + R, введя cmd или powershell и нажав Enter.
Шаг 2: Проверьте, установлен ли OpenSSL
OpenSSL – это основной инструмент, используемый для преобразования, независимо от того, работаете ли Вы с сертификатами или безопасно управляете своим закрытым ключом. Убедитесь, что он установлен в Вашей системе, выполнив следующую команду:
версия openssl
Если OpenSSL установлен, Вы увидите номер версии (например, OpenSSL 1.1.1).
Если он не установлен, Вы получите сообщение об ошибке, например, ‘openssl’ не распознан как внутренняя или внешняя команда. Не волнуйтесь! Вы можете следовать нашим подробным инструкциям по его установке.
Шаг 3: Перейдите в директорию
С помощью команды cd перейдите в папку, где находится Ваш файл CRT.
В Linux:
cd /path/to/certificate/folder
В Windows:
cd C:\path\to\certificate\folder
Замените /path/to/certificate/folder или C:\path\to\certificate\folder на реальный путь.
Шаг 4: Выполните команду OpenSSL
Выполните следующую команду, чтобы преобразовать файл CRT в формат PEM:
openssl x509 -in certificate.crt -outform PEM -out certificate.pem
Замените certificate.crt на имя Вашего файла CRT.
Полученный файл certificate.pem будет сохранен в той же директории, готовый к использованию вместе с Вашим закрытым ключом в конфигурациях SSL.

Шаг 5: Проверьте вывод
Найдите файл certificate.pem в Вашей директории.
Откройте файл в текстовом редакторе и убедитесь, что он начинается с :
----- НАЧНИТЕ СЕРТИФИКАТ-----
который является типичным заголовком для PEM-сертификатов.
Как преобразовать DER или CER в PEM
Если у Вас есть сертификат в кодировке DER или CER в формате DER и Вам нужно преобразовать его в формат PEM, OpenSSL может работать с обоими форматами с помощью одной и той же команды. Просто выполните соответствующую команду для преобразования файлов сертификатов в зависимости от типа файла:
Для преобразования DER в PEM
openssl x509 -inform DER -in certificate.der -outform PEM -out certificate.pem
Для CER в PEM
openssl x509 -inform DER -in certificate.cer -outform PEM -out certificate.pem
Замените certificate.der или certificate.cer на имя Вашего файла в формате DER.
Полученный файл certificate.pem будет сохранен в той же директории.
Ознакомьтесь с нашим подробным руководством по форматам SSL, чтобы еще лучше понять, как они работают.
Как установить OpenSSL
Если OpenSSL еще не установлен в Вашей системе, выполните следующие шаги для его установки:
В Linux
Используйте менеджер пакетов, чтобы установить его:
Ubuntu/Debian:
sudo apt update
sudo apt install openssl
CentOS/Red Hat:
sudo yum install openssl
В Windows
- Загрузите программу установки OpenSSL из надежного источника, например, Shining Light Productions.
- Следуйте инструкциям по установке, убедившись, что Вы добавили OpenSSL в PATH Вашей системы во время установки.
Защитите свой сайт как профессионал с помощью SSL Dragon!
Преобразование файлов формата CRT, DER, PFX или CER в формат PEM – необходимый навык для управления сертификатами SSL, и OpenSSL делает этот процесс быстрым и простым.
Если Вы ищете универсальный магазин для всех Ваших потребностей в SSL-сертификатах, SSL Dragon поможет Вам в этом. Мы предлагаем широкий ассортимент SSL-продуктов, а также экспертные рекомендации, которые помогут Вам защитить свой сайт. Посетите SSL Dragon сегодня, чтобы ознакомиться с нашими предложениями и упростить управление SSL-сертификатами!
Сэкономьте 10% на SSL-сертификатах при заказе сегодня!
Быстрая выдача, надежное шифрование, 99,99% доверия к браузеру, специализированная поддержка и 25-дневная гарантия возврата денег. Код купона: SAVE10
Опытный автор контента, специализирующийся на SSL-сертификатах. Превращает сложные темы кибербезопасности в понятный, увлекательный контент. Вносите свой вклад в повышение уровня цифровой безопасности с помощью впечатляющих рассказов.
Many Certificate Authorities (CAs) provide certificates in X.509 format (a file with a CER or CRT extension). A certificate of this type is usually provided in the DER-encoding format. However, the majority of services that use SSL Certificates will only accept certificates in PEM format (Base64 encoded). In this post we will cover how to convert a DER-encoded certificate with a CRT or CER extension to PEM format.
What are PEM and DER certificates?
- PEM (Privacy Enhanced Mail) is the most common format for X.509 certificates. PEM files are plain text-based and supported by most web browsers, servers, and apps. It includes the header and footer lines: —–BEGIN CERTIFICATE—– and —–END CERTIFICATE—–.
- DER (.der, .crt) – is a Binary certificate format. It is less common than PEM, but is still used, especially in Java environments.
Renaming Base64 CRT to PEM
Before converting a CER/CRT certificate file to PEM, check if the file already contains a certificate in Base64-encoded format. Open the certificate file in any text editor. If it contains ASCII text that starts and ends with one of the following prompts, it has already been converted to Base64 PEM format:
-----BEGIN CERTIFICATE-----

-----END CERTIFICATE-----

----- BEGIN PRIVATE KEY -----

-----END PRIVATE KEY ------

-----BEGIN PUBLIC KEY -----

-----END PUBLIC KEY -----

Change the certificate file extension from CRT or CER to PEM in this example.

If the certificate file contains binary data, it cannot be viewed as a text file. Such a CER/CRT file containing a certificate in binary format (DER) can be converted to Base64 ASCII certificate format (PEM) using one of the methods described below.

Converting Binary CRT to PEM using the Certificate Export Wizard in Windows
In Windows, you can convert CERs to the PEM certificate file format using the built-in Certificate Export tool. It can be used to convert a CRT file or export an installed certificate from the certificate store.
Locate the CRT file and double-click to open it.

Or run the Certificate Manager MMC snap-in:
- certlm.msc – to export local machine certificate
- certmgr.msc – to export user certificate

Open the certificate properties, navigate to the Detail tab and click Copy to file.

Select Base-64 encoded X.509 (.CER) format in the Certificate Export Wizard and click Next.

Specify the filename to export and click Next (he filename extension will automatically be set to *.cer).

When the export is complete, locate the exported CER file and rename it to change the extension to PEM.

Converting Binary CRT to PEM using OpenSSL
To convert SSL certificates into the appropriate format, you can use the OpenSSL library. OpenSSL is primarily a Linux tool available out-of-the-box in most distros, but you can also use it on Windows. To install OpenSSL, use the OpenSSL for Windows port, or install it using the WinGet package manager:
winget install ShiningLight.OpenSSL.Light

The command and syntax for converting a binary CRT file to PEM is the same whether you’re using Linux or Windows:
openssl x509 -in <BINARY CRT FILE> -inform DER -out <PEM OUTPUT FILE> -outform PEM
Go to the directory with the OpenSSL binaries:
cd "C:\Program Files\OpenSSL-Win64\bin"
Convert the certificate file:
./openssl x509 -in "C:\temp\mycert.cer" -inform DER -out "C:\temp\mycert_converted.pem" -outform PEM

Open the PEM file in any text editor and confirm that it contains ASCII text.

Cyril Kardashevsky
I enjoy technology and developing websites. Since 2012 I’m running a few of my own websites, and share useful content on gadgets, PC administration and website promotion.
Table of Contents
- Installing OpenSSL
- OpenSSL on Linux
- OpenSSL on Windows
- From PEM (pem, cer, crt) to PKCS#12 (p12, pfx)
- From PKCS#12 to PEM
- From DER (.der, cer) to PEM
- From PEM to DER
- From PEM to PKCS#7 (.p7b, .p7c)
- From PKCS#7 to PEM
- From PKCS#7 to PFX
- Online SSL Converters
- Conclusions
In this post, part of our «how to manage SSL certificates on Windows and Linux systems» series, we’ll show how to convert an SSL certificate into the most common formats defined on X.509 standards: the PEM format and the PKCS#12 format, also known as PFX. The conversion process will be accomplished through the use of OpenSSL, a free tool available for Linux and Windows platforms.
Before entering the console commands of OpenSSL we recommend taking a look to our overview of X.509 standard and most popular SSL Certificates file formats — CER, CRT, PEM, DER, P7B, PFX, P12 and so on.
Installing OpenSSL
The first thing to do is to make sure your system has OpenSSL installed: this is a tool that provides an open source implementation of SSL and TLS protocols and that can be used to convert the certificate files into the most popular X.509 v3 based formats.
OpenSSL on Linux
If you’re using Linux, you can install OpenSSL with the following YUM console command:
If your distribution is based on APT instead of YUM, you can use the following command instead:
|
> apt—get install openssl |
OpenSSL on Windows
If you’re using Windows, you can install one of the many OpenSSL open-source implementations: the one we can recommend is Win32 OpenSSL by Shining Light Production, available as a light or full version, both compiled in x86 (32-bit) and x64 (64-bit) modes . You can install any of these versions, as long as your system support them.
OpenSSL is basically a console application, meaning that we’ll use it from the command-line: after the installation process completes, it’s important to check that the installation folder (C:\Program Files\OpenSSL-Win64\bin for the 64-bit version) has been added to the system PATH (Control Panel > System> Advanced > Environment Variables): if it’s not the case, we strongly recommend to manually add it, so that you can avoid typing the complete path of the executable everytime you’ll need to launch the tool.
Once OpenSSL will be installed, we’ll be able to use it to convert our SSL Certificates in various formats.
From PEM (pem, cer, crt) to PKCS#12 (p12, pfx)
This is the console command that we can use to convert a PEM certificate file (.pem, .cer or .crt extensions), together with its private key (.key extension), in a single PKCS#12 file (.p12 and .pfx extensions):
|
> openssl pkcs12 —export —in certificate.crt —inkey privatekey.key —out certificate.pfx |
If you also have an intermediate certificates file (for example, CAcert.crt) , you can add it to the «bundle» using the -certfile command parameter in the following way:
|
> openssl pkcs12 —export —in certificate.crt —inkey privatekey.key —out certificate.pfx —certfile CAcert.cr |
From PKCS#12 to PEM
If you need to «extract» a PEM certificate (.pem, .cer or .crt) and/or its private key (.key)from a single PKCS#12 file (.p12 or .pfx), you need to issue two commands.
The first one is to extract the certificate:
|
> openssl pkcs12 —in certificate.pfx —nokey —out certificate.crt |
And a second one would be to retrieve the private key:
|
> openssl pkcs12 —in certificate.pfx —out privatekey.key |
IMPORTANT: the private key obtained with the above command will be in encrypted format: to convert it in RSA format, you’ll need to input a third command:
|
> openssl rsa —in privatekey.key —out privatekey_rsa.key |
Needless to say, since PKCS#12 is a password-protected format, in order to execute all the above commands you’ll be prompted for the password that has been used when creating the .pfx file.
From DER (.der, cer) to PEM
|
> openssl x509 —inform der —in certificate.cer —out certificate.pem |
From PEM to DER
|
> openssl x509 —outform der —in certificate.pem —out certificate.der |
From PEM to PKCS#7 (.p7b, .p7c)
|
> openssl crl2pkcs7 —nocrl —certfile certificate.pem —out certificate.p7b —certfile CAcert.cer |
From PKCS#7 to PEM
|
> openssl pkcs7 —print_certs —in certificate.p7b —out certificate.pem |
From PKCS#7 to PFX
|
> openssl pkcs7 —print_certs —in certificatename.p7b —out certificatename.cer > openssl pkcs12 —export —in certificatename.cer —inkey privateKey.key —out certificatename.pfx —certfile cacert.cer |
Online SSL Converters
If you can’t (or don’t want to) install OpenSSL, you can convert your SSL Certificates using one of these web-based online tools:
- SSL Certificates Converter Tool by SSLShopper.com
- SSL Converter by NameCheap
Both of them work really well and can convert most, if not all, the format detailed above: at the same time, you need to seriously think about the security implications that come with uploading your SSL Certificates (and possibly their private keys) to a third-party service. As trustable and secure those two site have been as of today, we still don’t recommend such move.
Conclusions
That’s it, at least for the time being: we hope that these commands will be helpful to those developers and system administrators who need to convert SSL certificates in the various formats required by their applications.
See you next time!