
The default file management tool in Windows operating system is File Explorer. This in-built application named File Explorer allow you to locate, rename, add or delete files and folders. While opening File Explorer, Windows may display a message stating Windows Explorer has stopped working or Windows Explorer not responding. Also, the screen might flicker. Often, File Explorer works too slow, making the work of navigating between different folders tedious for users. If you are looking for a solution to fix File Explorer not responding in Windows 10, then this guide will help you.

Table of Contents
Listed below are the main reasons for File Explorer not responding in Windows 10 PCs:
- Outdated Windows version
- No space in system drives
- Corrupt operating system files
- Virus or malware attack
- Outdated or damaged video card driver
- RAM or ROM errors
- Microsoft log-in account issue
- Problems with Windows search bar
- Excessive context menu items
Pro Tip: Determine Why File Explorer is Not Responding
Find the cause of File Explorer not responding error using Reliability History as follows:
1. Click on Start, type View reliability history, then press the Enter key.

2. Wait until Windows generates the Review your computer’s reliability and problem history report.
3. Click on the latest date when the error occurred and check Reliability details.

4. Here, you can view Windows Explorer Stopped working summary.

5. Click on View technical details option to see the complete details of the error.
Note: Before implementing the given solutions, it is advised to clean boot your system. This will load only the essential files and programs and help identify the non-Microsoft apps that are causing problems like File Explorer not responding in Windows 10. Read our guide to Perform Clean boot in Windows 10 here.
Method 1: Restart Windows Explorer
Ending or Restarting its task will help fix the said issue. Follow these steps to restart File Explorer, previously known as Windows Explorer, from Task Manager:
1. Hit the Ctrl + Shift + Esc keys simultaneously to launch Task Manager.
2. In the Processes tab, right-click on Windows Explorer and click Restart as depicted below.

Method 2: Disable Preview and Details Panes
Often, File Explorer may face issues while opening if Preview and Details panes are enabled. Follow the below steps to disable these panes:
1. Press Windows + E keys together to open File Explorer.
2. Click on View in the menu bar as shown.

3. Ensure that the Preview pane and Details pane options are disabled.

Also Read: How to Remove OneDrive from Windows 10 File Explorer
Method 3: Delete Temporary Files
Your device should have enough disk space for the File Explorer process and service to run properly. Insufficient disk space may also be one of the reasons for this issue. Follow given steps to delete temp files to free-up memory space:
1. Press the Windows + R keys simultaneously to open Run dialog box.
2. Type %temp% and hit Enter key to open AppData Local Temp folder.

3. Press Ctrl + A keys together to select all the unrequired files and press the Shift + Del keys together to delete them permanently.
Note: Some files cannot be deleted coz they are being used, so you can skip these.

Method 4: Troubleshoot Windows Hardware and Devices
Windows provides users with in-built troubleshooter to fix any minor issues. Hence, try running Hardware and Devices troubleshooter to resolve File Explorer not responding in Windows 10 issue.
Note: Additionally, to clear out more space read our guide on How to Delete Win Setup Files in Windows 10.
1. Launch the Run dialog box as earlier. Type msdt.exe -id DeviceDiagnostic and hit Enter to open the Hardware and Devices troubleshooter.
2. Click on the Advanced option, as shown.

3. Check the Apply repairs automatically option and click on Next.

4. Click on Next to proceed.

5. The troubleshooter will now run. If problems are detected, it will display two options:
- Apply this fix
- Skip this fix.
6. Here, click on Apply this fix, and restart your PC.
Also Read: How to Eject External Hard Drive on Windows 10
Method 5: Run Windows Memory Diagnostic Tool
Any issues with the memory card also cause problems with File Explorer. You can diagnose and fix it using Windows Memory Diagnostic tool as follows:
1. Click on Start, type Windows Memory Diagnostic and press the Enter key.

2. Click on Restart now and check for problems (recommended) option shown highlighted.

3. After booting up, try launching the File Explorer.
Method 6: Clear File Explorer History
All the visited locations in the File Explorer are stored. Clearing this cache can help fix File Explorer working on it or not responding in Windows 10 problem as follows:
1. Hit the Windows key, type control panel, and click on Open.

2. Set View by: as Large icons and choose File Explorer Options from the list.

3. In the General tab, go to the Privacy section and click on Clear button corresponding to Clear File Explorer history.

4. Then, click OK to save these changes.

Also Read: How to Run File Explorer as Administrator in Windows 11
Method 7: Reset File Explorer Options
If you have recently made changes to your File Explorer options, then this could also cause the Windows 10 File Explorer not to respond to right-click issue. Here’s how to reset File Explorer and folder options:
1. Launch Control Panel and go to File Explorer Options as instructed in Method 6.
2. Here, in the General tab, click Restore Defaults button shown highlighted.

3. Next, switch to the View tab.

4. Click on Reset Folders, then click Yes to confirm as depicted.

5. Finally, click Apply to save changes and click OK to exit.

Method 8: Open File Explorer to This PC
If the issue persists even after clearing the File Explorer history, then open the File Explorer to this PC. Follow the below steps.
1. Again, go to the Control Panel > File Explorer Options as illustrated in Method 6.
2. Under the General tab, in the Open File Explorer to: drop-down choose This PC option.

3. Click Apply > OK to save changes.

Also Read: Fix Windows 10 Start Menu Search Not Working
Method 9: Rebuild Search Index
File Explorer is integrated with Windows Search. So, any issues with Windows Search will cause problems with File Explorer. Follow this method to rebuild the search index on Windows 10.
Note: Ensure that you log into your PC as an administrator.
1. Open Control Panel and set View by > Large icons.
2. Then, choose Indexing Options from the list as shown.

3. Click on the Advanced button.

4. Now, click on Rebuild in the Index Settings tab.

5. Click on OK to confirm.

6. Restart your PC and try opening File Explorer as it should work without problems.
Method 10: Change Display Settings
Changing the display settings like font size and type can also cause File Manager not to respond. Follow the below steps to modify display settings:
1. Hit the Windows + I keys simultaneously to open Settings.
2. Click on System settings tile, as shown.

3. In the Scale and layout section, choose Recommended options for the following sections.
- Change the size of text, apps, and other items
- Display resolution

4. Then, click on Advance scaling settings

5. Here, clear the values under Custom scaling and click on Apply.

Also Read: Fix PC Turns On But No Display
Method 11: Update Graphics Driver
Outdated or damaged video drivers may be the reason for display issues. This also causes File Explorer not responding Windows 7 or 10 issue. Follow the below steps to update graphics driver:
1. Click on Start, type device manager, and hit the Enter key.

2. Double-click Display adapters to expand it.

3. Right-click on video driver (e.g. Intel (R) UHD Graphics) and choose Update driver as depicted below.

4. Next, click on Search automatically for drivers as shown.

5A. If the drivers have been updated already, it shows The best drivers for your device are already installed.

5B. If the drivers are outdated, then they will get updated automatically. Lastly, restart your PC.
Method 12: Run SFC & DISM Scans
If any of the operating system files get damaged or missing, then the Windows functionality like File Explorer may fail to perform. Repairing system files in Windows 10 will resolve most issues including File Explorer not responding.
1. Hit the Windows key, type Command Prompt and click on Run as administrator.
2. Click on Yes in the User Account Control prompt.
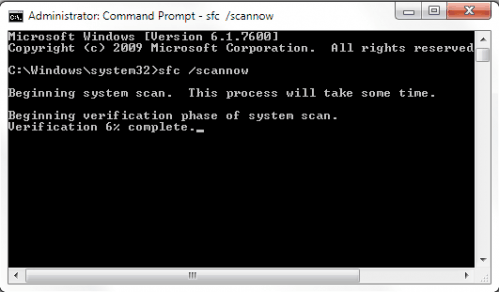
3. Type sfc /scannow and press Enter key to run System File Checker scan.
Note: A system scan will be initiated and it will take a couple of minutes to finish. Meanwhile, you can continue performing other activities but be mindful of not accidentally closing the window.
After completing the scan, it will show either of the messages.
- Windows Resource Protection did not find any integrity violations
- Windows Resource Protection could not perform the requested operation
- Windows Resource Protection found corrupt files and successfully repaired them
- Windows Resource Protection found corrupt files but was unable to fix some of them
4. Once the scan is finished, restart your PC.
Check whether the error prevails. If yes, then follow these instructions to run DISM scan:
5. Again, launch Command Prompt as administrator and execute the given commands one after the other:
dism.exe /Online /cleanup-image /scanhealth
dism.exe /Online /cleanup-image /restorehealth
dism.exe /Online /cleanup-image /startcomponentcleanup
Note: You must have a working internet connection to execute DISM commands properly.
Also Read: How to Configure Indexing Options on Windows 11
Method 13: Log-in with Local User Account
Any issues in Microsoft account may also result in a File Explorer not responding issue. Log in using a local user account as follows:
1. Launch Windows Settings click on Accounts tile, as shown.

2. Click on the Sign in with a local account instead.

3. Click on the Next button in the Are you sure you want to switch to a local account window.

4. Enter the Windows Security PIN to verify.

5. Then, enter your local account info viz User name, New password, Confirm password & Password hint and click on Next.

6. Click Sign out and finish button shown highlighted.

7. Sign in using your newly created local account and launch File Explorer.
Method 14: Run Malware Scan
Sometimes, virus or malware may also cause your File Explorer dark theme to not work. Follow the below steps to run malware scan:
1. Hit Windows + I keys simultaneously to launch Settings.
2. Here, click on Update & Security settings as shown.

3. Go to Windows Security in the left pane.
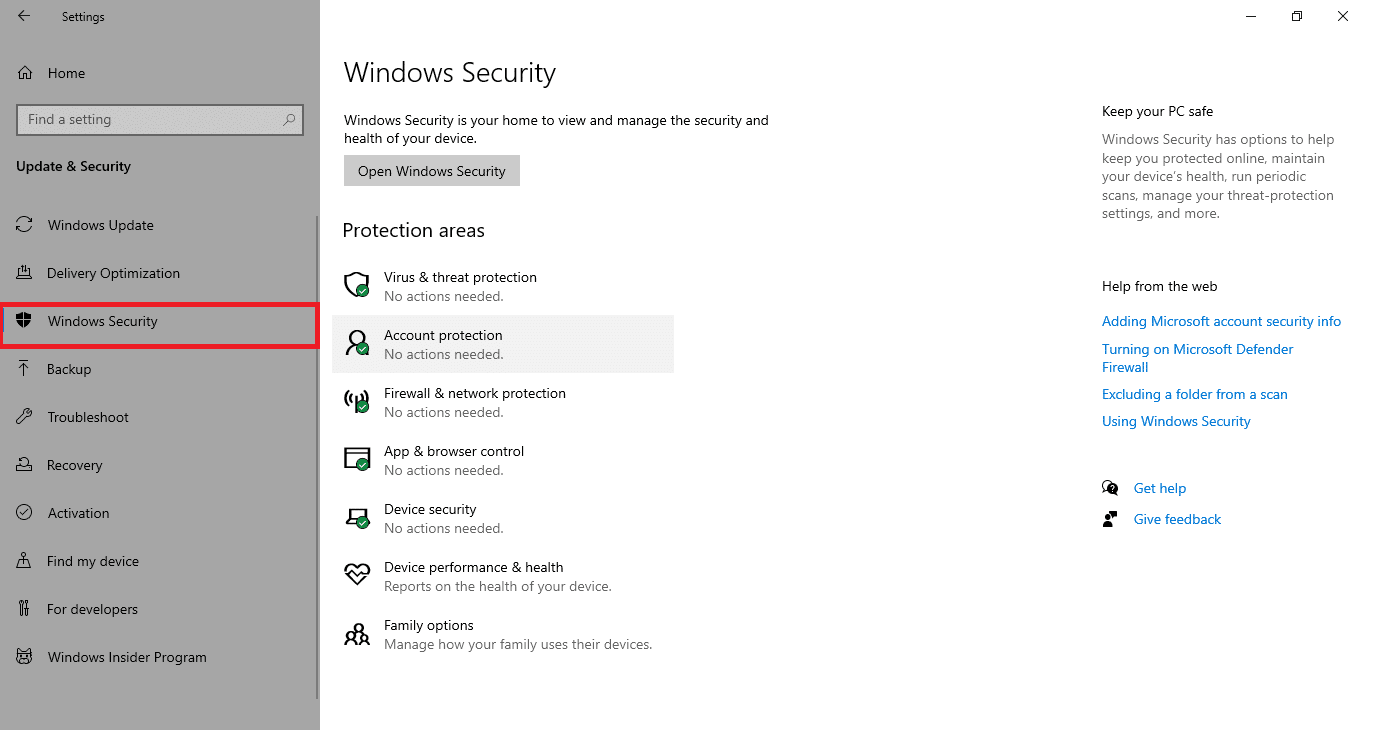
4. Click on the Virus & threat protection option in the right pane.

5. Click on the Quick Scan button to search for malware.
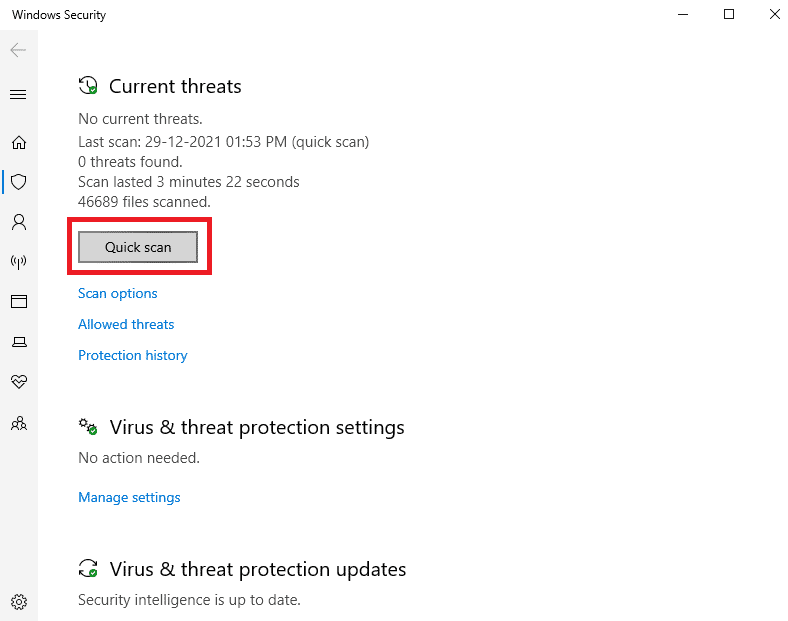
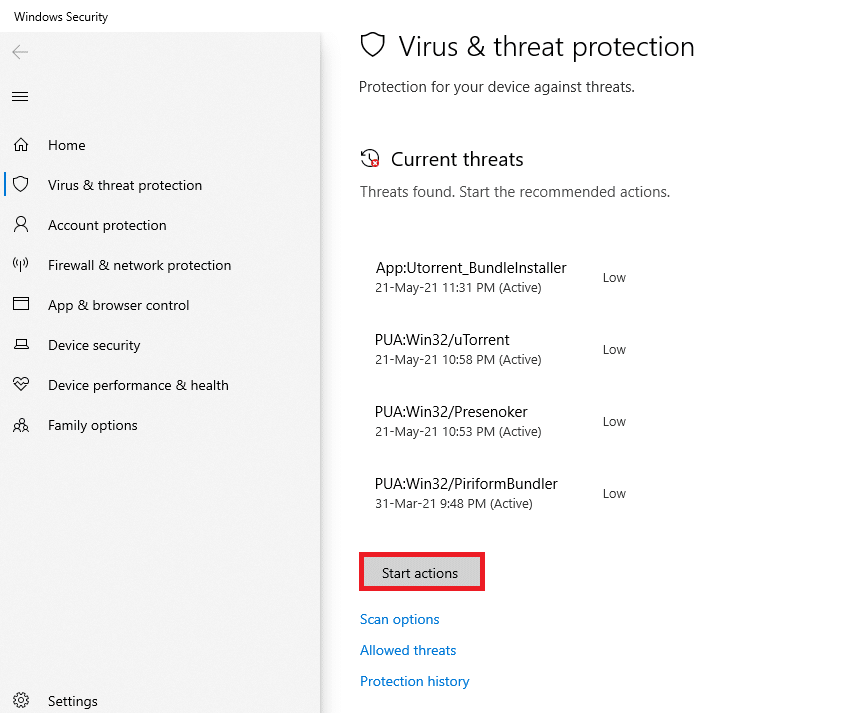
6A. Once the scan is done, all the threats will be displayed. Click on Start Actions under Current threats.
6B. If there is no threat in your device, the device will show the No current threats alert.

Also Read: Enable or Disable User Accounts in Windows 10
Method 15: Update Windows OS
Updating Windows would greatly help in fixing Windows 10 File Explorer not responding errors:
1. Navigate to Windows Security > Update & Security as shown in Method 14.
2. In the Windows Update tab, click on Check for updates button.

3A. If a new update is available, click Install now and restart your PC to implement it.

3B. Otherwise, if the Windows is up-to-date, then it will show You’re up to date message.

Also Read: Fix Windows Update Error 0x80070005
Method 16: Roll Back Updates
New updates may cause File Explorer not responding Windows 7/10 issue in your device. To fix this issue, you have to roll back the Windows update as follows:
1. Navigate to Settings > Update & Security as shown previously.
2. In the Windows Update, Click on the View update history.

3. Click on Uninstall updates.

4. Choose the latest update of Microsoft Windows (For example, KB5007289) and click on Uninstall button as highlighted.

5. Finally, restart your Windows 10 PC.
Frequently Asked Questions (FAQs)
Q1. Does resetting the PC help fix File Explorer not responding issue?
Ans. Yes, this method would help in fixing the problem. But make sure that you back up your files and install applications before resetting. You can choose the Keep my files option while resetting, but this option will still remove installed applications and settings.

Q2. Does restoring the PC using recovery mode help fix the File Explorer not responding issue?
Ans. Yes, it will help in resolving this issue. Similar to resetting the PC, all the installed applications and games will be deleted. Ensure to back up your files and install applications before resetting them.

Hence, it is advisable to Create a System Restore Point regularly.
Recommended:
- How to Disable Wakeup Password in Windows 11
- How to Fix The Audio Service is Not Running Windows 10
- How to Fix Windows 10 Touchscreen Not Working
- How to Fix StartupCheckLibrary.dll Missing Error
We hope that this guide could help you fix File Explorer not responding in Windows 10. Let us know which of the methods above helped you resolve this issue. Drop your queries and suggestions in the comment section below.
Event Viewer may sometimes display a strange alert that says, “This explorer.exe version stopped interacting with Windows and was closed.” In other words, File Explorer stopped communicating with the OS. As a result, Windows automatically closed the explorer.exe process. Let’s see what’s causing these alerts and how you can get rid of them.
Contents
- 1 What to Do When Explorer.exe Stops Interacting With Windows
- 1.1 Restart Explorer
- 1.2 Run SFC, DISM, and Disk Cleanup
- 1.3 Unplug Your Peripherals
- 1.4 Disable the Details Pane
- 1.5 Delete Recent Files
- 1.6 Conclusion
What to Do When Explorer.exe Stops Interacting With Windows

Restart Explorer
Try restarting File Explorer using Task Manager and check if this quick method solves the problem.
- Launch the Task Manager and click on the File menu.
- Select Run new task.
- Enter explorer.exe in the search field and press Enter.
- Don’t forget to create the task with admin rights.
- Check if Event Viewer detects the same error.
Run SFC, DISM, and Disk Cleanup
If certain hard drive sectors got corrupted, you might experience all kinds of glitches, including File Explorer issues. Repair your drive and delete temporary files to fix the problem.
- Press the Windows and X keys and click on Command Prompt (Admin).
- Allow the app to make changes to your computer.
- Then run the following commands one by one:
sfc /scannowDISM /Online /Cleanup-Image /CheckHealthDISM /Online /Cleanup-Image /ScanHealthDISM /Online /Cleanup-Image /RestoreHealth

After that, run Disk Cleanup to remove unnecessary files.
- Go to This PC and right-click on the OS drive.
- Select Properties, and go to the General tab.
- Hit the Disk Cleanup button to delete temporary files and other junk files.
Unplug Your Peripherals
Disconnect all the external devices connected to your computer and check if the problem persists. Restart your computer and then plug in your peripherals.
Interestingly enough, many Windows users noticed that Razer keyboards and mice often trigger this issue. Launch the Device Manager and update your keyboard and mouse drivers to the latest version. If you have a spare keyboard or mouse (non-Razer), use it and check if the issue persists.
Disable the Details Pane
Many users confirmed that disabling the Details pane did the trick for them.
- Launch File Explorer and maximize the window.
- Then click on the View menu.
- Simply click on the Details pane to disable the option.
Alternatively, you can also press the Alt, Shift, and P keys at the same time. If the issue persists, disable the Preview pane as well.
Delete Recent Files
Other users solved the problem by clearing recent files.
- Press the Windows and R keys and open a new Run window.
- Enter recent in the search field and press Enter.
- You should now see the list of your recently viewed files.
- Delete the files you no longer need or have access to.
- Restart File Explorer and check if the issue persists.
Conclusion
To sum up, if explorer.exe stops interacting with Windows, restart File Explorer using Task Manager. Additionally, repair your hard drive by running SFC, DISM, and Disk Cleanup. Try unplugging your peripherals and check if you notice any improvements. If the issue persists, disable the Details pane, and delete recent files. Did these tips help you solve the problem? Let us know in the comments below.
14 Ways to Fix Windows Explorer Not Responding in Windows 10 – Windows Explorer is a file manager program on the Windows operating system, and all running applications rely heavily on this program. If Windows Explorer not responding or experiencing problems then other applications will also have problems.
![[Solved] Windows Explorer Not Responding in Windows 10](https://technadvice.com/wp-content/uploads/2022/08/Solved-Windows-Explorer-Not-Responding-in-Windows-10.jpg "[Solved] Windows Explorer Not Responding in Windows 10")
Table of Contents
How to Fix Windows Explorer Not Responding & Has Stopped Working
One of the problems that often occurs is Windows Explorer not responding and stopping working, causing Windows to go blank, the mouse can’t be moved, the application often closes itself, or the screen stops altogether.
Read more:
- How to Start in Safe Mode in Windows 11
- 6 Ways to Uninstall Applications that Windows Can’t Remove
- What To Do if Windows 11 Doesn’t Work After Updating
Usually, an error message will also appear on the “Windows Explorer Not Responding” or “Windows Explorer Has Stopped Working” screen. If it is like this then your work will be hampered because this problem will not go away by itself. Usually, it will appear continuously as long as the source of the problem has not been fixed.
In this post, I will try to provide some solutions that you can try. Please try one by one in sequence, I will start from the simplest way first.
#1. Restart Windows Explorer
Before trying anything else, the first thing you can try is to restart Windows Explorer. This method sometimes works if the problem occurs simply because the system requires a restart to reload the system.
How to restart Windows Explorer can be done through the Task Manager:
First, open the Task Manager by right-clicking on the Taskbar > then selecting Task Manager. For Windows 10 users, you can also type directly in Task Manager in the Search Bar and then select the application that appears there.
Once the Task Manager opens, click on the Processes tab, then find a program called Windows Explorer, or explorer.exe for users of Windows 7 and earlier.
After that right click on Windows Explorer > select Restart.

The laptop screen will look blank for a while during the restart process, then it will return to normal.
After restarting try again using the computer and see if the explorer not responding problem still appears or has disappeared.
#2. Run System File Checker
System File Checker (SFC) is a feature in Windows that we can use to repair damaged or corrupt system files automatically. This feature runs through the Command Prompt (CMD).
Problems like Windows Explorer Not Responding can also be caused by corrupt system files, to fix this we can try using this SFC feature.
First, open Command Prompt with administrator access permissions. For Windows 10 and Windows 8 users, click the Start button > type cmd > the Command Prompt application will appear > click Run as administrator on the right panel.
For Windows 7 users, click on the Start button > select All programs > select Accessories > right-click on Command Prompt > select Run as administrator.
After the Command Prompt program opens, type the following command:
sfc /scannow
Then press enter.

SFC will scan all system files in Windows and will repair any errors found automatically. Just wait until the process is complete, a description will appear that you can see in CMD.
After making repairs with CMD, try to check again whether the Windows Explorer Not Responding or Windows Has Stopped Working error has disappeared.
#3. Clear File Explorer History
Just like other programs, Windows Explorer also stores history and cache which can be cleaned if an error occurs. You also need to try this because an existing bad cache can cause problems not responding to explorer.
To clear history in Explorer, follow these steps.
First, open the Control Panel then click on the File Explorer Options menu.
On the General tab, pay attention to the menu at the bottom, there is a description of Clear File Explorer history, and on the right, there is a Clear button.
Click the button to start the cleaning process, wait until the process is complete, then click the OK button.

Done, we have successfully cleared the history in Windows Explorer, try to use the laptop again to work as usual and see if the problem is gone.
#4. Change Display settings
The way to fix Windows Explorer Not Responding and frequent crashes are to adjust the display settings on your computer. This may sound like nothing to do but it’s worth a try.
Inappropriate display settings will cause the graphical display of icons, text, images, and others not to match the screen resolution. This can cause problems for explorers such as frequently closing themselves or stopping working.
Follow these steps.
For Windows 10 users, click on the Start button > then select Settings (gear icon)
Then select the System menu.
Once the System window opens, click on the Display tab present in the left pane.
The Scale and layout options change to 100% (Recommended). In the Resolution option, adjust the screen resolution on your computer. In Orientation select Landscape.

For Windows 7 users, right-click on an empty area on the Desktop > select Resolution > change the resolution to suit your laptop or PC screen.
After that exit, the settings menu and try running Windows Explorer again, and see if the problem has been resolved.
#5. Turn off the Customer Experience Improvement feature
Customer Experience Improvement is a feature on the Windows operating system that functions to send user data to Microsoft’s servers automatically. This feature aims to get feedback from users to make improvements to Windows.
Actually, we don’t really need this feature and it’s safe to turn it off, moreover, there is an issue if this feature can be the cause of problems in Windows Explorer.
Follow the steps below to do this.
Open the Group Policy Editor program by pressing the Start + R key on the keyboard > then type gpedit.msc > click OK.
After the Group Policy Editor program opens, in the right pane go to the following directory:
Computer Configuration > Administrative Templates > System > Internet Communication Management > Internet Communication Settings
Then right-click on Turn off Windows Customer Experience Improvement > right-click> select Edit > click Enable > click OK.


Close the gpedit program and use the computer as usual.
#6. Show files as icons instead of Thumbnails
If Windows Explorer always crashes and stops working when opening a certain directory, it can be suspected that the cause is a corrupt thumbnail. This causes disturbances in the process of loading files in it, as a result, the explorer becomes not respond.
To make sure we have to change the appearance of the files in the directory to icons, not thumbnails.
You do this by changing the View option in the explorer to an icon.
Follow these steps.
Go to Control Panel > select File Explorer Options.
Click on the View tab > check the option Always show icons, never thumbnails > click OK.
Close the Control Panel window and try to use the computer as usual again. Go to the directory that caused explorer to not respond and see if the problem is gone.
#7. Turn off the Automatic Folder Type Discovery feature
This feature is also related to how files in a directory are displayed, its function is to optimize the display of files based on the most file types in it.
If in a directory there are most types of files in the form of photos, then all files will be displayed in the form of thumbnails with previews that can be viewed without having to open the file. The problem is, that explorer will try to load previews on other files that are not photos, as a result, the loading process will be slow.
Turning off this feature is a powerful way to speed up explorer loading on Windows, and it is hoped that it can also solve the problem of explorer often not responding, there’s no harm in trying.
Follow the steps below to do this.
Open Windows Explorer > right-click on the directory or folder that is the source of the problem > select Properties > click on the Customize tab.
Pay attention to the What kind of folder do you want? Optimize this folder for> change to General items > click Apply > click OK.

After making the above changes, try opening the folder that was the cause of the slow and crashing explorer, now the loading process should be faster.
This is because all existing files are treated as regular files, there is no preview loading process that explorer is trying to do so that loading becomes faster.
#8. Replace explorer.exe with a new one
The cause of Explorer Not Responding and Explorer Has Stopped Working on Windows could also be because the explorer.exe program is damaged. To overcome this we can replace the program with a new one.
First, download the explorer.exe program here:
Download
After that copy-paste the new program file that has been downloaded to the C:\Windows directory > select Replace.
Restart your computer then try to check if this method works.
#9. Increase Drive C capacity if full
The division of storage capacity in laptops usually only provides relatively small space for Drive C and larger for data partitions. This causes Drive C to fill up quickly as more applications are installed and the computer is used continuously.
The full capacity of Drive C can cause computer performance to be slow, and it is also suspected that it can cause problems in the explorer work process.
Try to check whether Drive C on your computer is almost full or not, if it is almost full then you can increase its capacity by taking it from another partition.
#10. Increase Virtual Memory size
In simple terms, Virtual Memory is an extension of RAM that serves as a temporary storage place for files from programs that are running.
Increasing the size of the Virtual Memory is a pretty powerful way to speed up Windows 10 and older versions of Windows.
#11. Scan the computer with an antivirus
The next way to overcome Windows Explorer Not Responding is to try to clean the virus from the computer. Viruses and malware are the cause of many problems with the Windows operating system.
When experiencing problems with explorer, you should suspect that the cause is viruses and malware, especially if the antivirus on your computer has not been updated for a long time.
You can use one of these recommendations best antivirus for windows. Especially for Windows 10 users, you can use the Windows Security feature which is a pretty good antivirus, the important thing is that it is always up to date.
Perform a thorough scan of the computer, see if any viruses or malware are detected, and then clean them. After that restart the computer and check if the problem in Windows Explorer is gone.
#12. Update Windows
Performing a Windows Update is a powerful way to prevent problems due to an out-of-date system. The update will provide patches to cover bugs in the Windows operating system and improve security.
For Windows 8 and Windows 10 users, the way to update is to go to the Settings menu > Update & Security > click the Check for updates button > wait until the download and install process is complete > restart the computer.

Unfortunately, for those who are still using Windows 7, there is currently no more recent update because support from Microsoft has officially been discontinued.
#13. Run System Restore
System Restore Point is a useful feature for making backups of the entire system which can be used at any time when the computer has an error and can’t find a way to fix it. When System Restore is run, Windows will be restored to its previous state when the Restore Point was created.
To solve the problem of explorer that often crashes, does not respond, often exits by itself, or stops altogether in Windows, then you can take advantage of this feature. You just have to restore Windows when the explorer problem has not occurred using System Restore.
To be able to run it, this feature must have been activated before, if it turns out that on your computer the System Restore is not active then this method cannot be used.
#14. Reset PC
The way to fix Windows Explorer Not Responding without reinstalling the last one is to reset the PC. This process will have a similar effect to reinstalling, the difference is that we can choose so that personal files in Drive C are not deleted.
A PC reset will remove all third-party programs and restore Windows settings to their original state, similar to a factory reset on a smartphone.
Doing a PC reset is an almost always successful way to deal with various errors that often occur, including errors in explorer.
The error messages that often appear are as follows:
- explorer.exe is not a valid Win32 application.
- explorer.exe is not running.
- Cannot find explorer.exe.
- Error starting program: explorer.exe.
- Faulting Application Path: explorer.exe.
- The file explorer.exe is missing or corrupt.
- Windows failed to start – explorer.exe.
- The instruction at 0x00007FFF64B0CCC0 referenced memory at 0x000000000000000. The memory could not be read. Click OK to terminate the program.
- explorer.exe Application Error.
- explorer.exe could not be found.
- explorer.exe could not be installed.
- explorer.exe could not be launched. Class not registered.
- explorer.exe could not be started.
- explorer.exe failed to initialize properly.
- explorer.exe has encountered a problem and needs to close. We are sorry for the inconvenience.
After resetting your PC you may need to reinstall one with the necessary programs and readjust Windows settings. Although a little troublesome this method will most likely work.
Conclusion:
So, friends, This is the explanation of 14 ways to fix windows explorer not responding in Windows 10, here are some tips to solve the problem of windows explorer not responding and windows explorer having stopped working that you can try. I hope this article is helpful to you.
Windows Explorer has a long history of stability issues, and the “File Explorer” rebranding in recent Windows iterations did little to improve things. So, it’s not uncommon to encounter random freezes and crashes with accompanying error messages such as “Windows Explorer is not responding” and “Windows Explorer has stopped working” when interacting with the file system on a PC.
Most complications with Windows Explorer or File Explorer are one-off instances that only show up while the operating system is under stress. But if you experience the same problem repeatedly, the troubleshooting tips below should allow you to sort it out.

Restart File Explorer
Restarting Windows Explorer (which continues to be the underlying process behind File Explorer) is a quick fix for minor system-related glitches that cause it to freeze or crash.
1. Right-click the taskbar and select the option labeled Task Manager. If the taskbar appears unresponsive, use the Shift + Ctrl + Esc keystroke to launch Task Manager.
2. Select More details to expand the default Task Manager view.
3. Under the Processes tab, locate and right-click Windows Explorer. Then, select Restart.

Reopen File Explorer
File management aside, File Explorer also powers the user interfaces behind elements such as the taskbar and desktop. So if it crashes completely (as in, you don’t see the taskbar and desktop), you must re-open it manually.
1. Press Shift + Ctrl + Esc to open Task Manager.
2. Open the File menu and select the Run new task option.
3. Type explorer.exe and select OK.

Disable Details and Preview Panes
If you only encounter the “Windows Explorer is not responding” or “Windows Explorer has stopped working” errors while selecting files and folders in File Explorer, try turning off the Details and Preview panes.
1. Open a new File Explorer window.
2. Select the View tab.
3. Inside the Panes group, deactivate both the Preview pane and Details pane.

4. Restart the Windows Explorer process via Task Manager.
5. Relaunch File Explorer and check if the issue persists. If so, move on with the rest of the fixes.
Change Default File Explorer View
If File Explorer freezes or crashes as soon as you open it, changing the default view from Quick access to This PC could prevent that. You won’t see a list of your recent files and folders anymore, but it does allow you to rule out issues caused by obsolete or broken entries within the File Explorer history.
1. Press Windows + R to open the Run box. Then, type control folders and select OK. The File Explorer Options dialog should show up on the screen.
2. Under the General tab, open the pull-down menu next to Open File Explorer to and select This PC.
3. Select Apply > OK to save the changes.
If that helped, re-open the File Explorer Options dialog and select Clear to delete the File Explorer history. Then, change back the default view to Quick access. After that, the problem should not occur again.
Clear Thumbnail Cache
File Explorer displays thumbnail previews of files and folders. But an outdated thumbnail cache is another possible reason for freezes and crashes, so clearing it can help.
1. Press Windows + R, type cleanmgr into the Run box, and select OK.
2. Check the box next to Thumbnails.
3. Select OK.
Disable Thumbnail Previews
If clearing the thumbnail cache didn’t help, try turning off all thumbnail previews in File Explorer.
1. Open the File Explorer Options dialog and switch to the View tab.
2. Under Advanced settings, check the box next to Always show icons, never thumbnails.
3. Select Apply > OK.
Set Display Scale and Layout to Defaults
Using a larger display size for text and apps can also trigger the “Windows Explorer is not responding” and “Windows Explorer has stopped working” errors. It’s best to revert that to the default recommended setting.
1. Open the Start menu and go to Settings > System > Display.
2. Scroll down to the Scale and layout section.
3. Set Change the size of text, apps, and other items to 100% (Recommended).

Update or Roll Back Display Driver
An outdated display driver can result in all sorts of File Explorer-related issues. You can download and install the latest version of the driver by heading over to the video card manufacturer’s website – NVIDIA, AMD, or Intel.
However, if the issue occurred right after a recent display driver update, you must roll it back.
1. Press Windows + X and select Device Manager.
2. Expand Display adapters.
3. Right-click the video card driver that you want to roll back and select Properties.
4. Switch to the Drivers tab.
5. Select Roll Back Driver.

Update Windows 10
Display drivers aside, File Explorer can also fail to respond or stop working due to an outdated version of Windows 10. If you haven’t updated the operating system recently, try doing that as soon as possible.
1. Go to Start > Settings > Update & Security > Windows Update.
2. Select Check for updates to scan for new updates.

3. Select Download and install to apply pending updates.
Additionally, check for and install any display-related drivers under View optional updates (if you see the option).
Run Malware Scan
Malicious programs can induce all sorts of issues and prevent critical Windows components such as File Explorer from working correctly. If you don’t have a third-party antivirus solution on your computer, you can use Windows Security to remove malware instead.
1. Select Windows Security on the system tray.
2. Go to Virus & threat protection > Check for updates to install the latest antimalware definitions.
3. Select Quick scan.

If Windows Security fails to detect malware, select Scan options and follow up with a Full scan or a Microsoft Defender Offline scan.
Disable Third-Party Shell Extensions
Does File Explorer freeze or crash only when right-clicking items? Conflicting contextual menu entries from third-party programs usually cause that. Use a program such as ShellExView to disable them.
1. Download and open ShellExView on your computer.
2. Open the Options menu and select Hide All Microsoft Extensions.
3. Select all third-party extensions and select Disable Selected Items.

If File Explorer begins to work correctly, re-activate each deactivated shell extension until you come across the problematic item. Then, update the related program (which could fix the issue), keep the extension disabled, or remove it from your computer.
Reset File Associations
Incorrect, conflicting, or broken file associations in Windows 10 are another reason that results in File Explorer-related freezes and crashes. Try resetting them.
1. Open the Start menu and select Settings.
2. Go to Apps > Default Apps.
3. Select Reset.

Resetting file associations also revert default programs (such as the web browser) to Microsoft’s stock apps, so you may have to reconfigure your preferences.
Run SFC Scan and DISM Tool
If the “Windows Explorer is not responding” and “Windows Explorer has stopped working” errors continue to show up, it’s a good idea to run the System File Checker and the DISM (Deployment Image Servicing and Management) tool. That should fix File Explorer-related issues caused by corrupted system files.
Run System File Checker
1. Press Windows + X to open the Power User Menu. Then, select Windows PowerShell (Admin).
2. Type the following command:
sfc /scannow

3. Press Enter to run the System File Checker.
For best results, repeat the SFC scan a total of three times.
Run DISM Tool
1. Open an elevated Windows PowerShell console.
2. Run the following command:
DISM /Online /Cleanup-Image /CheckHealth

3. If the DISM tool detects any issues, execute the two commands below:
DISM /Online /Cleanup-Image /ScanHealth
DISM /Online /Cleanup-Image /RestoreHealth
Windows Explorer Still Not Working: What Else?
The fixes above should’ve helped you resolve issues with File Explorer not responding. If not, here are several advanced fixes that you can try:
- Retry the fixes above after loading Windows 10 in Safe Mode
- Delete temporary files in Windows 10
- Perform a clean boot
- Use System Restore to revert Windows 10
- Restore Windows 10 to factory settings
Going forward, keeping the operating system updated is the best way to minimize potential File Explorer-related issues.
Related Posts
- How to Fix a “This file does not have an app associated with it” Error on Windows
- How to Fix an Update Error 0x800705b4 on Windows
- How to Resolve “A JavaScript error occured in the main process” Error on Windows
- How to Fix the Network Discovery Is Turned Off Error on Windows
- How to Change Folder Icons in Windows
This is a common problem for computer users that they get the error “Windows Explorer has stopped working” suddenly while working on their computer or playing games or Surfing Internet. This error is associated mostly with Windows XP, Vista and windows 7 Operating systems. In Windows 10 we didn’t notice till now. Sometimes this error displayed occasionally and some times this error get displayed in the loop and stop you doing anything. Here we will guide you step by step that how you can fix this error.
What is the Cause of “Windows explorer has stopped working” error?
There could be many reason behind this error. But basic idea is that windows releases its security updates for Windows regularly, but many people ignores them and do not install the updates on their windows PC. So those users are more vulnerable to this error. SO here are some common causes of this issue.
- Due to outdated security and without presence of a good antivirus software it is possible that your system is being infected with some virus, malware or trojan which can be the cause of this error. You should at least install a free antivirus.
- Due to any corrupted device driver specially Video driver etc.
- Due to Outdated Device drivers.
- Any particular software or Game can also be the cause of this error.
“Windows explorer has stopped working” mostly occurs due to a software / driver which is installed into your computer and it has got corrupted anyhow due to some reasons. Anyway, we have given below all the possible methods to fix this issue. If our all the method doesn’t help you, then let us know with the result of method 8.
Method 1: Scan with a good Antivirus and Antimalware program
The first step to fix this issue is to immediately scan with a good antivirus and malware software which is updated with the latest updates. You can use the HitmanPro or Malwarebytes Antimalware program to scan for any malware, And to scan for viruses use the Norton Antivirus or any other reputed antivirus software. Hopefully it will resolve your issue. If yes then buy a good antimalware and antivirus program for your computer to keep protected in future.
- Run an windows repair tool ComboFix
- HitmanPro
- Malwarebytes
- Norton Antivirus
Method 2: Remove unwanted / corrupted 3rd party software’s menu from registry (Shellex – Content Menu).
Most of the cases of “Windows explorer has stopped working” issue occurs due to corrupted shellex menus. Some 3rd party softwares got corrupted suddenly anyhow. And after this corrupted shellex menu making conflicting with explorer.exe and occurs this error message “windows explorer has stopped working”. Follow the following steps to remove this corrupted menus.
- Click on Start menu and click on search bar or RUN.
- Type “regedit” in search bar. If you have windows xp then you can do this in run box.
- Click on found regedit.exe. After click, it will prompt you an authorization, click on yes to start it.
- Click on the arrow of HKEY_CLASSES_ROOT (expend it)
- Then Click on the arrow of * (expend it)
- Click on the arrow of shellex (expend it)
- Click on the arrow of ContextMenuHandlers (expend it). The complete path is: HKEY_CLASSES_ROOT\*\shellex\ContextMenuHandlers
- Under ContextMenuHandlers you’ll see lots of keys. Remove the following keys
- 7-zip
- winrar
- winrar32
- winzip
- Demon Tool
- Daemon
- Advance system care
- And also remove other unwanted / corrupted 3rd party software keys (). To remove keys, right click on the key and click on delete.
- Reboot your computer after done this.
Method 3: Remove unwanted / corrupted software entries from Startup
- First we preferred that perform all following steps in safemode. So please start your computer in safemode and follow the following steps.
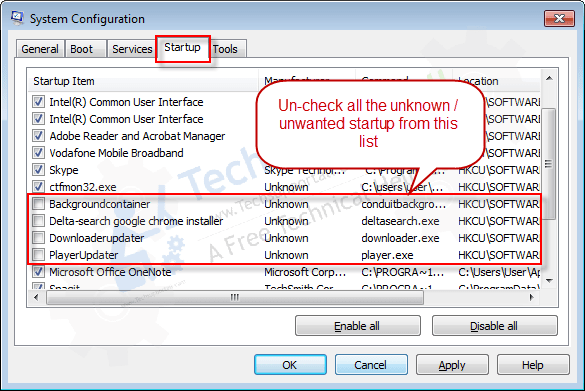
- Press “window key + R” key (Flag sign key + R) you will get Run box then type “MSCONFIG into the run box then click on OK. You’ll get a msconfig window.
- In the msconfig window click on Startup tab, here you’ll get all the startup entries, so look on the list and then do Un-check the entries which is contains unwanted software. Also Un-check all the others entries which you found unwanted (You can uncheck all the 3rd party programs from here for time being). Then click on OK to apply all the changes.
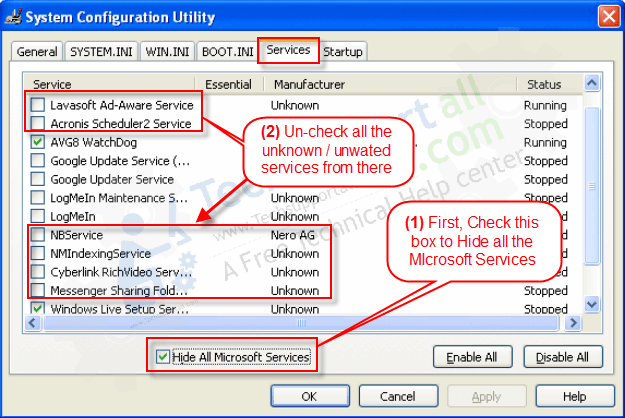
Method 4: Remove unwanted / corrupted software services from startup services
- Press “window key + R” (Flag sign key + R) you will get Run box then type “MSCONFIG” into the run box then click on OK. . You’ll get a msconfig window.
- In the msconfig window click on Services tab, here you’ll get all the start-up services list, click on “Hide Windows Services” all the windows related services will be hidden. now it’s only display the 3rd party installed services, now look on the list and then do Un-check the service which have contains unwanted and corrupted software. Also Un-check all the unknown / unwanted services. then click on OK to apply all the changes.
Method 5: Do update your Windows drivers like; USB drivers / Network Adapter Drivers / Wifi Drivers etc.
Some time this issue occurs due to driver corruption. So please check your drivers and reinstall the drivers if you got any sign of that. You can also use automatic driver updater software to check, identify and update the drivers automatically.
Method 6: Check windows system file with system file checker (SFC)
If you are unable to fix the error using first method then try this method to fix any corrupted windows system files using SFC (system file checker) command. It is an official Microsoft tool available in windows to find and fix errors related to corrupted system files.
To run this tool you have to insert the original windows CD/DVD when asked by the SFC command. This command can only be run from the Command prompt (MS-DOS window).
Follow the steps to run SFC command.
- Open the command prompt in elevated mode means run the command prompt as an administrator. You can this by searching CMD in start menu search bar and then right click and select “run as administrator”.
- Choose continue if it prompt or enter the admin password for the admin if it asks.
- Then type command sfc /scannow on the command prompt to start the scanning.
- Insert the windows CD/DVD in the disk drive when it asks to insert the disk.

Method 7: Install latest windows update
Install latest windows update or updating any device driver. During windows update windows will automatically update your common device drivers and other security updates. To install the latest updates turn on the windows update feature and check for the latest updates after connecting your computer the Internet. It will download and install the latest windows updates to the computer. It will fix your lots of issues and also help you to keep protected in future.
Method 8: Find the “.dll” or “.exe” file name & path which is conflicting with windows explorer (Explorer.exe) and do appropriate action on it.
If your windows explorer issue has not fixed yet by following above methods, that means must a “.dll” or “.exe” file which is making conflicting with explorer.exe. We have to find that “.dll / .exe” file name & path through EVENTVIEWER (Windows system logs). Please follow below steps.
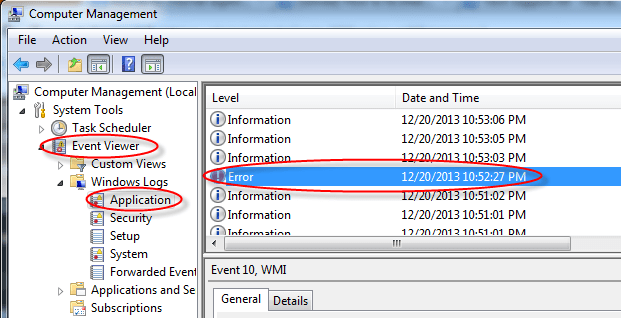
- Right click on MyComputer and then click on Manage. You’ll get an another window. Click on arrow of the “Event Viewer” (Expand it) on that window. (You can also type “eventviewer” on search bar and click on found evenviewer)
- Click on arrow of the “Windows Logs” (Expand it) on eventviewer.
- Click on “Application” under windows Logs.
- Now look on the right side pane, it have listed all the system logs here.
- Now scroll down and find an error (Red Cross Error or explanation error) related to explorer.exe. Do double click on it to get the details if you found it. (That log was created when you got the error message (windows explorer has stopped working), so please find it by the “Time”).
- Now you have the Error Message complete detail. Find the name & path of “.dll” or “.exe” on that detail.
- Now you have the particular “.dll” or “.exe” file name & path which one is doing conflicting with explorer.exe.
- Now Stop the conflicting via repair, rename and delete that file (Don’t delete or rename if it is part of system files because it may cause system failure). You have to do some research on that file before doing any action because it is very sensitive step. You can also share this detail with us for more help using below given comment form. Then we can help you more about it.
Method 9: Replace your computer RAM (Random Access Memory).
If nothing worked for you then we recommend you to please try the last thing and that is; replacing your RAM memory.
IF you are still getting the error message. It means the problem is with some other software installed or have somewhere else which can not detected corrected by the above methods. Then you can choose to restore the system from System restore point by restarting the system in Safe mode. Hopefully after all this you will get rid of your windows explorer has stopped working error. Please leave your feedback whether your issue resolved or not. It can help us to guide you and everyone better for this error.
We have no evidence that this error occur in Windows 10. So you may consider an in-place upgrade to Windows 10.