
Below is a list of common Windows file name extensions and formats.
|
Extension |
Format |
|---|---|
|
aac, adt, adts |
Windows audio file |
|
accdb |
Microsoft Access database file |
|
accde |
Microsoft Access execute-only file |
|
accdr |
Microsoft Access runtime database |
|
accdt |
Microsoft Access database template |
|
aif, aifc, aiff |
Audio Interchange File format file |
|
aspx |
ASP.NET Active Server page |
|
avi |
Audio Video Interleave movie or sound file |
|
bat |
PC batch file |
|
bin |
Binary compressed file |
|
bmp |
Bitmap file |
|
cab |
Windows Cabinet file |
|
cda |
CD Audio Track |
|
csv |
Comma-separated values file |
|
dif |
Spreadsheet data interchange format file |
|
dll |
Dynamic Link Library file |
|
doc |
Microsoft Word document before Word 2007 |
|
docm |
Microsoft Word macro-enabled document |
|
docx |
Microsoft Word document |
|
dot |
Microsoft Word template before Word 2007 |
|
dotx |
Microsoft Word template |
|
eml |
Email file created by Outlook Express, Windows Live Mail, and other programs |
|
eps |
Encapsulated Postscript file |
|
exe |
Executable program file |
|
flv |
Flash-compatible video file |
|
gif |
Graphical Interchange Format file |
|
htm, html |
Hypertext markup language page |
|
ini |
Windows initialization configuration file |
|
iso |
ISO-9660 disc image |
|
jar |
Java architecture file |
|
jpg, jpeg |
Joint Photographic Experts Group photo file |
|
m4a |
MPEG-4 audio file |
|
mdb |
Microsoft Access database before Access 2007 |
|
mid, midi |
Musical Instrument Digital Interface file |
|
mov |
Apple QuickTime movie file |
|
mp3 |
MPEG layer 3 audio file |
|
mp4 |
MPEG 4 video |
|
mp4 |
MPEG 4 video |
|
mpeg |
Moving Picture Experts Group movie file |
|
mpg |
MPEG 1 system stream |
|
msi |
Microsoft installer file |
|
mui |
Multilingual User Interface file |
|
|
Portable Document Format file |
|
png |
Portable Network Graphics file |
|
pot |
Microsoft PowerPoint template before PowerPoint 2007 |
|
potm |
Microsoft PowerPoint macro-enabled template |
|
potx |
Microsoft PowerPoint template |
|
ppam |
Microsoft PowerPoint add-in |
|
pps |
Microsoft PowerPoint slideshow before PowerPoint 2007 |
|
ppsm |
Microsoft PowerPoint macro-enabled slideshow |
|
ppsx |
Microsoft PowerPoint slideshow |
|
ppt |
Microsoft PowerPoint format before PowerPoint 2007 |
|
pptm |
Microsoft PowerPoint macro-enabled presentation |
|
pptx |
Microsoft PowerPoint presentation |
|
psd |
Adobe Photoshop file |
|
pst |
Outlook data store |
|
pub |
Microsoft Publisher file |
|
rar |
Roshal Archive compressed file |
|
rtf |
Rich Text Format file |
|
sldm |
Microsoft PowerPoint macro-enabled slide |
|
sldx |
Microsoft PowerPoint slide |
|
swf |
Shockwave Flash file |
|
sys |
Microsoft DOS and Windows system settings and variables file |
|
tif, tiff |
Tagged Image Format file |
|
tmp |
Temporary data file |
|
txt |
Unformatted text file |
|
vob |
Video object file |
|
vsd |
Microsoft Visio drawing before Visio 2013 |
|
vsdm |
Microsoft Visio macro-enabled drawing |
|
vsdx |
Microsoft Visio drawing file |
|
vss |
Microsoft Visio stencil before Visio 2013 |
|
vssm |
Microsoft Visio macro-enabled stencil |
|
vst |
Microsoft Visio template before Visio 2013 |
|
vstm |
Microsoft Visio macro-enabled template |
|
vstx |
Microsoft Visio template |
|
wav |
Wave audio file |
|
wbk |
Microsoft Word backup document |
|
wks |
Microsoft Works file |
|
wma |
Windows Media Audio file |
|
wmd |
Windows Media Download file |
|
wmv |
Windows Media Video file |
|
wmz, wms |
Windows Media skins file |
|
wpd, wp5 |
WordPerfect document |
|
xla |
Microsoft Excel add-in or macro file |
|
xlam |
Microsoft Excel add-in after Excel 2007 |
|
xll |
Microsoft Excel DLL-based add-in |
|
xlm |
Microsoft Excel macro before Excel 2007 |
|
xls |
Microsoft Excel workbook before Excel 2007 |
|
xlsm |
Microsoft Excel macro-enabled workbook after Excel 2007 |
|
xlsx |
Microsoft Excel workbook after Excel 2007 |
|
xlt |
Microsoft Excel template before Excel 2007 |
|
xltm |
Microsoft Excel macro-enabled template after Excel 2007 |
|
xltx |
Microsoft Excel template after Excel 2007 |
|
xps |
XML-based document |
|
zip |
Compressed file |
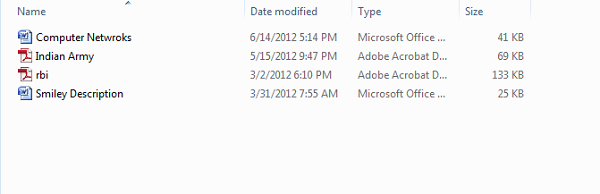
File Extension is that which identifies the file type. If you are a regular Windows user, then it is not at all a problem to identify the file type. For it is very important to see file extension to identify the type of file you are trying to open from a security point of view. So in this post, we will see how to hide or show File Extensions in Windows 11/10 and why you should show them.
Since file names allow you to use multiple full stops, the real name of a malware file could be realword.docx.exe. But because you have not set Windows to show file extensions, you would see only realword.docx. Thinking it’s a Word document, you could well end up clicking on it and infecting your computer. If you had, on the other hand, set your PC to show file extensions, you would see its full name – realword.docx.exe, which would help you to identify that it was actually an executable file and in all probability a malware file. This will thus help you tell if a file is malicious or not.
What are File Extensions & how are they useful
Different file types have different extensions. Audio files have .mp3, .wav, .wma, and more based on the program used to open that file. File extensions also help the operating system to identify the corresponding program to open that particular file. So, you should be able to see file extensions to be at the safer side, and we will let you know how to enable options to see file extensions in Windows.
As mentioned earlier, by default Windows does not show file extensions and they are hidden. But, you can toggle the option to see them.
There are five ways how you can go about accessing this setting:
- Through the File Explorer Options
- Through Windows Explorer Ribbon
- Using the Registry
- Using Command Prompt
- Using Group Policy Editor.
1] Through Folder or File Explorer Options
To Show File Extensions in Windows 11/10 via File Explorer Options, follow these steps:
- Open Control Panel > Appearance and Personalization.
- Now, click on Folder Options or File Explorer Option, as it is now called
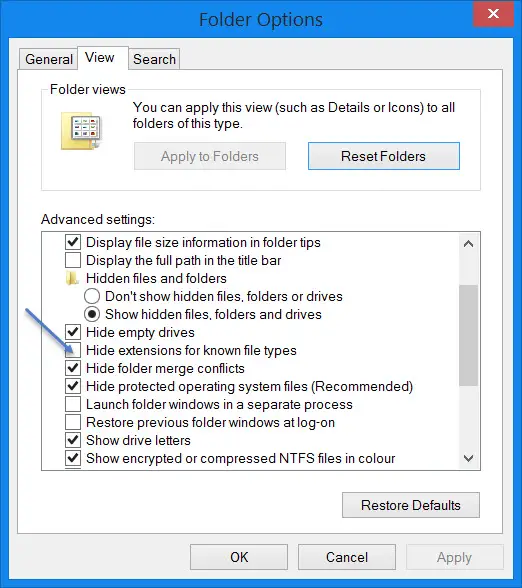
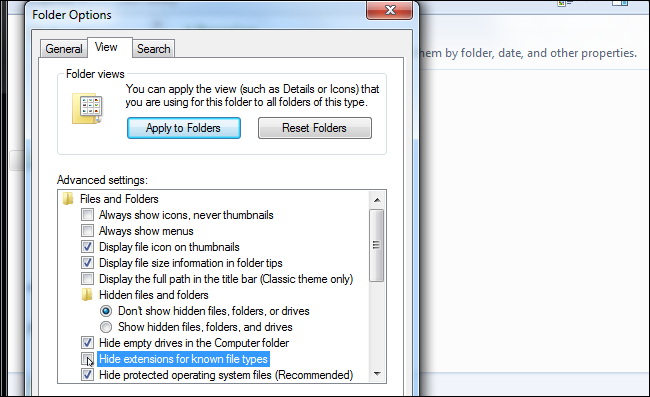
- Select the View tab.
- In this tab, under Advanced Settings, you will see the option Hide extensions for known file types.
- Uncheck this option
- Click on Apply and OK.
Windows 11/10 users may also search for File Explorer Options in Start search box and open this box.
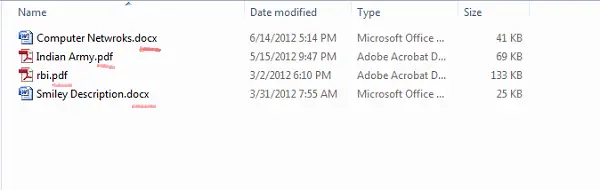
Now, you can see file extensions for all files anywhere on your Windows system.
In Windows 11/10/8.1 Explorer, you can access File Explorer Options via Explorer.
Click View > Options > Change folder and search options.
Once here, you can do the needful as explained above.
In Windows 7, open Explorer, press Alt on your keyboard to make the Classic bar appear. Next, click on Tools > Folder Options. Now follow the steps mentioned above.
These are very simple steps to follow, and you do not need any third-party software to view file extensions. Windows provides us with everything which can be easily achieved, and the point lies in knowing and implementing them. This is the first way to see file extensions in Windows 7.
2] Via Windows File Explorer

To show File name extensions in Windows 11:
- Open Explorer
- Click on View in the top menu
- Click on Show next
- Select File name extensions.
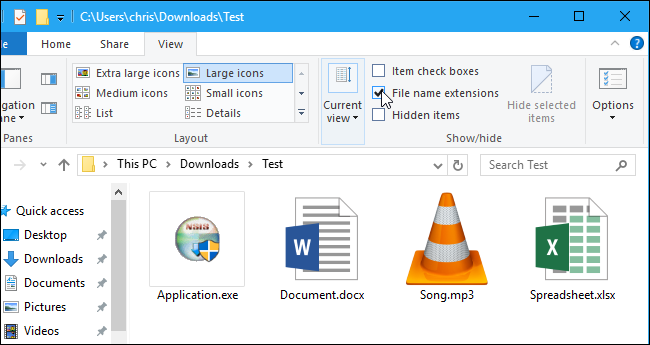
To show File name extensions in Windows 10, open Explorer and click on the View tab.
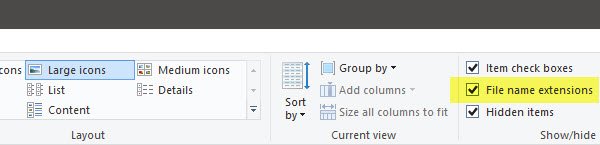
Simply select the File name extensions checkbox, and you are all set.
3] Using the Registry Editor
Hit the WINKEY + R button combination to launch the Run utility, type in regedit and hit Enter. Once Registry Editor opens, navigate to the following key-
Computer\HKEY_CURRENT_USER\Software\Microsoft\Windows\CurrentVersion\Explorer\Advanced
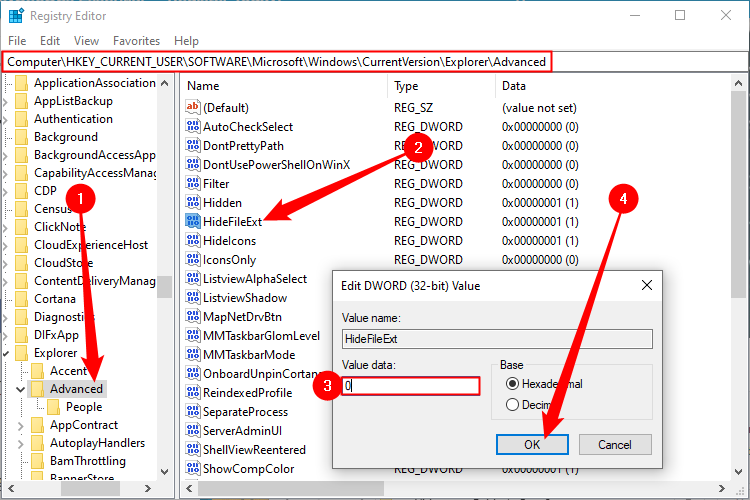
Look up for a DWORD entry labeled as HideFileExt.
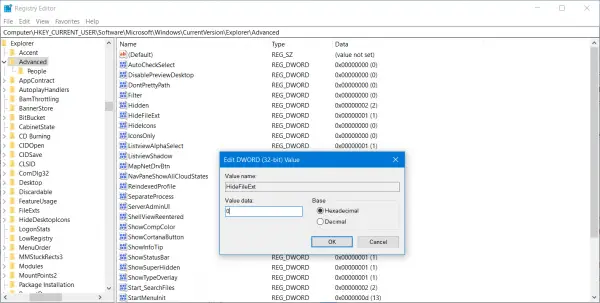
Double click on the mentioned DWORD entry and set its value as 0. This will show up the hidden file extensions.
A value of 0 will hide the file extensions.
Exit the Registry Editor and then reboot your computer for the changes to take effect.
4] Use Windows Command Prompt
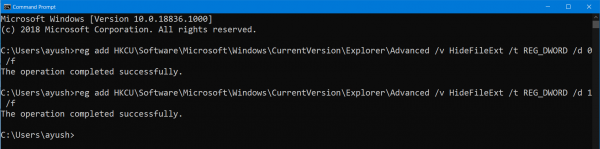
This fix can be used in both the scenarios mentioned above. Insert a bootable drive of Windows 11/10 installer.
Start by hitting the WINKEY + X combinations and select Command Prompt (Admin) to launch Command Prompt with Administrator Privileges.
Navigate to the root location of that bootable device inside the Command Prompt command line. Once you get there, type in the following to show the file extensions-
reg add HKCU\Software\Microsoft\Windows\CurrentVersion\Explorer\Advanced /v HideFileExt /t REG_DWORD /d 0 /f
And then hit Enter.
You can also enter the following command to hide the file extensions,
reg add HKCU\Software\Microsoft\Windows\CurrentVersion\Explorer\Advanced /v HideFileExt /t REG_DWORD /d 1 /f
5] Using Group Policy Editor
You can also use the Group Policy Editor and change the setting here:
User Configuration > Preferences > Control Panel Settings > Folder Options.
Set “Show hidden files and folders” and uncheck “Hide extensions for known file types”.
Thus, you can set your Windows to show file extensions in Windows 11/10.
Read: How to create a file without an Extension in Windows.
How do I show file type extensions in Windows 11?
To show the file type extension or file extension in Windows 11/10, you need to open the Folder Options panel and remove the tick from the Hide extensions for known file types checkbox. At last, click the OK button to save the change. After that, you can find the file extensions of all the files you may have on your computer.
Read: How to open a file with no extension in Windows.
How do I see all file extensions in Windows?
The process to see all file extensions in Windows 11/10 is the same as the above one. That said, you need to remove the tick from the Hide extensions for known file types checkbox in the Folder Options window.
If you have anything to add, please do share it with us through comments.
Quick Links
-
Why You Should Show File Extensions
-
How to Show File Extensions in Windows 11
-
How to Show File Extensions in Windows 10
-
How to Show File Extensions in Windows 7
-
Show File Extensions Through the Registry Editor
Summary
To view file extensions on Windows 10, launch File Explorer, then click on the «View» tab and check the «File Name Extensions» box. To show file extensions on Windows 11, open File Explorer, and then click View > Show > File Name Extensions.
Windows doesn’t show file extensions by default, but you can change a single setting and make Windows always show you each file’s full file extension. This works in File Explorer on Windows 10 and Windows 11 as well as Windows Explorer on Windows 7 and Windows 8.
Why You Should Show File Extensions
Each file has a file extension that tells Windows what type of file that is. File extensions are usually three or four digits long, but can be longer. For example, Word documents have the .doc or .docx file extension. If you have a file named Example.docx, Windows knows it’s a Word document and will open it with Microsoft Word.
There are many different file extensions. Audio files may have a file extension like .mp3, .aac, .wma, .flac, .ogg, or many other possibilities depending on what type of audio file they are. Some common image file extensions are .jpeg, .png, .gif, and .heic.
Setting Windows to show file extensions is helpful for security. For example, the .exe file extension is one of many file extensions that Windows runs as a program. If you can’t see what a file’s extension is, it’s hard to tell whether it’s a program or a safe document or media file at a glance.
As an example, you may have a file named «document» that has the icon of your installed PDF reader. With file extensions hidden, there’s no quick way to tell if this is a legitimate PDF document or is actually a malicious program using your PDF reader’s icon as a disguise. If you had Windows set to show file extensions, you’d be able to see whether it’s a safe document with the name «document.pdf» or a dangerous file with a name like «document.exe». You could look at the file’s properties window for more information, but you don’t need to do that if you’ve enabled file extensions.
How to Show File Extensions in Windows 11
Windows 11 changed the user interface for File Explorer quite a bit between Windows 10 and 11, but the option to show file extensions is still readily accessible.
Click the «View» tab along the top of the File Explorer window. Mouse over «Show» at the bottom of the drop-down menu, and then click «File Name Extensions» in the sub-menu.
File extensions will be visible for all files in all folders.
How to Show File Extensions in Windows 10
This option is easily accessible in File Explorer on Windows 10, and it’s in the same place on Windows 8.
Click the «View» tab on the ribbon. Activate the «File name extensions» box in the Show/hide section to toggle file extensions on or off. File Explorer will remember this setting until you disable it in the future.
How to Show File Extensions in Windows 7
This option is a little more hidden on Windows 7, where it’s buried in the Folder Options window.
Click the «Organize» button on Windows Explorer’s toolbar and select «Folder and search options» to open it.
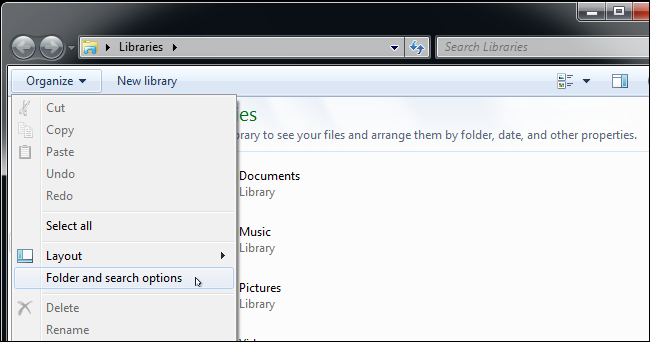
Click the «View» tab at the top of the Folder Options window. Disable the «Hide extensions for known file types» checkbox under Advanced settings. Click «OK» to change your settings.
This options window is also accessible on Windows 8, 10, and 11 — just click the «Options» button on the View toolbar. But it’s faster to quickly toggle file extensions on or off via the ribbon.
This window is also accessible via the Control Panel on any version of Windows. Head to Control Panel > Appearance and Personalization > Folder Options. On Windows 8, 10, and 11, it’s named «File Explorer Options» instead.
Show File Extensions Through the Registry Editor
You can also enable File Extensions through the Registry Editor on any version of Windows.
Don’t randomly change or delete values in the Windows Registry. You may cause bugs, crashes, or even (theoretically) render your computer inoperable.
First, open up the Start Menu and search «regedit,» then click the «Registry Editor» result.
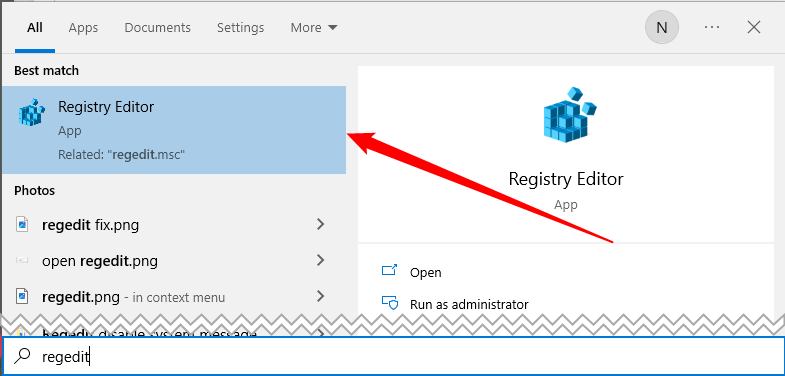
Navigate to the path we list below, open up the «HideFileExt» entry, and set the value to 0.
Computer\HKEY_CURRENT_USER\SOFTWARE\Microsoft\Windows\CurrentVersion\Explorer\Advanced
Once that is done, you’ll need to refresh any open File Explorer windows you have open before file extensions will be visible.
A file extension is the last part of the file name coming after the last dot (.). For example, if we have created a Microsoft Word file, its file extension will show up as .docx. File extensions help us to identify the file type associate a program with the file which can open it in a readable manner.
By default, file types are hidden in Windows 10. It can be a security risk as we could run an executable whose icon was set as a document type. Normally the viruses and other malware disguise their executables as documents or pictures. A user can, unknowingly, double-click and run the file expecting the file to open in its appropriate program. Instead, the executable could wreak havoc on the system.
That’s why it is recommended to change the Windows setting to always show file extensions. In this article, we share five ways to show file extensions in Windows.
Table of Contents
How to show file extensions in Windows 10
Although these methods will work in earlier versions of Windows like Windows 8.1, Windows 8, Windows 7 and even Windows XP, but since we have only tested these on Windows 10, that’s why we have specified the specific Operating System.
Using Folder Options
- Go to Run –> control folders

- Go to View tab

- Un-check “Hide extensions of known file types”

Hide extensions for known file types


That’s it. Now you will see the file extensions for each filetype.
Using File Explorer
Windows 10 File Explorer ribbon interface makes it easier to instantly show or hide file extensions. Here are the steps to show/hide file extensions in Windows Explorer:
- Open File Explorer (Windows Key + E)
- Go to View Tab on the Ribbon menu

- Check “File Extensions” under Show/Hide section


Checking File Extensions will show the file extensions while unchecking it will hide the extensions.
Using Registry Editor
- Open Registry Editor by going to Run –> regedit
- Navigate to the following key:
HKEY_CURRENT_USER\Software\Microsoft\Windows\CurrentVersion\Explorer\Advanced - Double-click HideFileExt from the right-hand pane.
- Set the value to 0 to show File extensions of known files and 1 to hide File extensions.

Show file extensions in Windows using Registry


Usually, the changes will be immediate. If you don’t see the changes, you may want to restart File Explorer from the task manager or restart the computer altogether.
Using Command Line
Command line method can be used to quickly change the File extension settings for many computers at once. You can create a batch file with the following commands and run the batch file on any computer to change the settings immediately.
To hide file extensions using command line, open command-prompt and run the following command:
reg add HKCU\Software\Microsoft\Windows\CurrentVersion\Explorer\Advanced /v HideFileExt /t REG_DWORD /d 1 /f
To show file extensions, run the following command:
reg add HKCU\Software\Microsoft\Windows\CurrentVersion\Explorer\Advanced /v HideFileExt /t REG_DWORD /d 0 /f
For your ease, you can download the batch files from below and run them according to your situation.
Hide File Extensions (108 bytes, 2,316 hits)
Show File Extensions (108 bytes, 2,059 hits)
Using Group Policy Editor
This method is limited for system administrators who want to implement the show or hide file extensions policy across their domain network.
- Open Domain Group Policy Management Editor
- Go to User Configuration –> Preferences –> Control Panel items –> Folder Options
- Right-click Folder Options on the left-hand pane and select New –> Folder Options (Windows XP) or Folder Options (Atleast Windows Vista)
- This will open the regular Folder Options window. You can make changes to this window and the changes will be made across the domain or where the group policy is applied.

Group Policy management folder options for domain

Which method do you prefer to show or hide file extensions on your computer? We have listed all the techniques used for almost all versions of Windows including Windows 10, Windows 8.1, Windows 7, Windows Vista and even Windows XP. These methods also work for Windows Server Operating Systems including Windows Server 2008, Windows Server 2012, Windows Server 2016 and Windows Server 2019.
If you’re using Windows 11 and want to display file extensions, it’s a straightforward process. File extensions help you identify the type of file you’re dealing with, such as .txt for text files or .jpg for images. To reveal these extensions, open File Explorer, navigate to the ‘View’ tab, and check the box labeled ‘File name extensions.’ That’s it! You’ve now enabled file extensions, giving you a clearer understanding of your files at a glance.
These steps will guide you through the process of displaying file extensions on your Windows 11 system. By the end, you’ll be able to see file types easily, enhancing your ability to manage files more effectively.
Step 1: Open File Explorer
Launch File Explorer by clicking the folder icon on your taskbar or pressing the Windows key + E.
File Explorer is your go-to tool for navigating through your files and folders. It’s the gateway to accessing all the important stuff stored on your computer.
Step 2: Navigate to the View Tab
Once File Explorer is open, locate and click on the ‘View’ tab at the top of the window.
The ‘View’ tab is where you can customize how you see your files. It offers various options to adjust your file viewing experience to suit your needs.
Step 3: Check the File Name Extensions Box
In the ‘View’ tab, find and check the box labeled ‘File name extensions.’
By checking this box, you enable the display of file extensions, which are the letters following the period in file names. This change gives you a better understanding of file types at a glance.
Step 4: Verify File Extensions are Visible
Look at your files in File Explorer to confirm that the file extensions are now visible.
Seeing the file extensions appear next to the file names means you’ve successfully completed the task. If you ever want to hide them again, you can uncheck the same box.
Step 5: Close File Explorer
Once you’ve confirmed the changes, you can close File Explorer if you’re finished.
Closing File Explorer once you’re done helps keep your workspace tidy and prevents unnecessary clutter on your screen.
After following these steps, you’ll notice that each file now displays its extension. This visibility aids in quickly identifying file types, which is especially handy when dealing with multiple files of various kinds.
Tips for Showing File Extensions in Windows 11
- Use Keyboard Shortcuts: You can quickly open File Explorer by pressing Windows key + E.
- Check Security: Seeing file extensions can help you avoid opening potentially harmful files.
- Organize Files: Knowing file types can assist in organizing your files better.
- Quick Access: Add the ‘View’ tab to your Quick Access Toolbar for faster changes.
- Customize Views: While in the ‘View’ tab, explore other viewing options to suit your needs.
Frequently Asked Questions
Why can’t I see file extensions by default?
Windows hides file extensions to keep file names neat, but you can easily display them.
Can I change file extensions?
Yes, but be cautious. Altering file extensions can cause files to become unusable if not done correctly.
What if I don’t see the ‘File name extensions’ option?
Ensure you’re in File Explorer’s ‘View’ tab, and your system is up to date.
Are file extensions important?
Yes, they help identify the file type and determine which program can open it.
Can I hide extensions again?
Absolutely! Just uncheck the ‘File name extensions’ box in the ‘View’ tab.
Summary
- Open File Explorer.
- Navigate to the View tab.
- Check the File name extensions box.
- Verify file extensions are visible.
- Close File Explorer.
Conclusion
Congratulations! You’ve successfully learned how to show file extensions in Windows 11. By following these simple steps, you’ve unlocked a valuable tool for managing your files more effectively. File extensions are like little clues that help you identify what kind of file you’re dealing with, and knowing how to display them can save you from headaches down the line.
Understanding file extensions can also enhance your computer’s security. Sometimes, harmful files disguise themselves with misleading icons. Seeing the actual file extension can help you spot potential threats before they become problems. It’s like having an extra pair of eyes watching out for you!
If you’re interested in further enhancing your Windows 11 experience, explore other settings within File Explorer. Customizing your file view can streamline your workflow and make your computer feel uniquely yours.
Remember, technology is here to make our lives easier, so taking a few moments to understand these features can pay off in the long run. Whether you’re a student, a professional, or someone who simply wants to keep their digital life organized, showing file extensions is a small but mighty tool in your arsenal.
Matthew Burleigh has been writing tech tutorials since 2008. His writing has appeared on dozens of different websites and been read over 50 million times.
After receiving his Bachelor’s and Master’s degrees in Computer Science he spent several years working in IT management for small businesses. However, he now works full time writing content online and creating websites.
His main writing topics include iPhones, Microsoft Office, Google Apps, Android, and Photoshop, but he has also written about many other tech topics as well.
Read his full bio here.