
You are here:
Home » Windows 10 » 5 Ways To Open File Explorer Settings In Windows 10/11
Do you want to change the default settings and options of File Explorer in Windows 10/11? This guide will show you how to open File Explorer settings in Windows 10/11.
Following are the five easy ways to open the File Explorer settings in Windows 10 and 11.
Important: Some of the File Explorer options can be changed right from within File Explorer in Windows 10. For instance, you can click on the View tab and then select a view to change the default view settings. Likewise, you can show/hide the File Explorer navigation pane (left pane) by clicking on the Navigation pane option under the View tab and then selecting/deselecting the Navigation pane option.
Method 1 of 5
Step 1: Launch the File Explorer by clicking on its icon on the taskbar, search, or Windows + E keyboard shortcut.
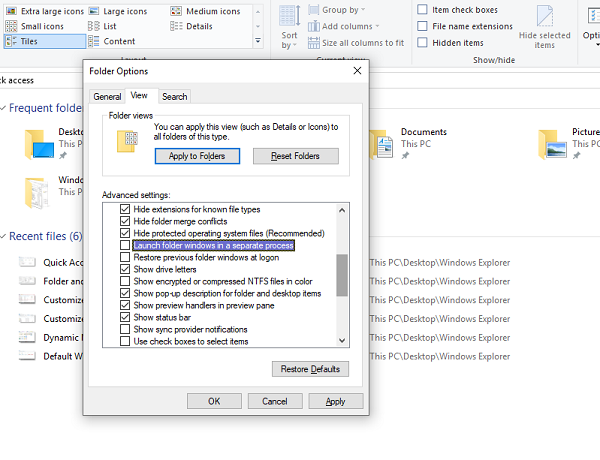
Step 2: Once the File Explorer is launched, click on the File menu and then click Change folder and search options. This will open the Folder Options dialog, where you can change various File Explorer settings.


And if you are on Windows 11, in the File Explorer, click on the three dots (refer to the picture below) on the toolbar and then click Options to open Folder Options.

Method 2 of 5
Open File Explorer settings in Windows 10/11 using search
Step 1: In Windows 10/11’s search, type File Explorer options and then hit the Enter key to open the File Explorer Options, which is nothing but Folder Options.

Method 3 of 5
Open File Explorer settings via CMD in Windows 10/11
Step 1: Open the Command Prompt using search.
Step 2: At the Command Prompt window, type control.exe folders and press the Enter key to open the File Explorer Options dialog.

Method 4 of 5
Open File Explorer settings via Run in Windows 10/11
Step 1: Open the Run command dialog box using search or Windows + R hotkey.
Step 2: Type control folders in the Run command dialog and then hit the Enter key to open the Folder Options.

Method 5 of 5
Another way to open File Explorer settings from within File Explorer in Windows 10
Step 1: In the File Explorer, click on the View tab, click Options and then click Change folder and search options. That’s it!

Difference between File Explorer and Windows Explorer
Users who have been using Windows for over a decade know that both Windows Explorer and File Explorer are the same. With Windows 8, Microsoft renamed Windows Explorer to File Explorer.
Our File Explorer tips and tricks for Windows 10 guide might also interest you.
Applies ToWindows 10 Internet Explorer Windows 8.1 Windows 7
Support for Internet Explorer ended on June 15, 2022
Internet Explorer 11 has been permanently disabled through a Microsoft Edge update on certain versions of Windows 10. If any site you visit needs Internet Explorer 11, you can reload it with Internet Explorer mode in Microsoft Edge. We recommend you use Microsoft Edge for a faster, more secure and more modern web browsing experience.
Get started with Microsoft Edge
Change Internet Explorer settings
There are many changes you can make to customize your browsing experience in Internet Explorer. To view all settings and options, open Internet Explorer on the desktop, select Tools > Internet options.
Reset Internet Explorer settings
You can reset Internet Explorer settings to what they were when Internet Explorer was first installed on your PC. This is useful for troubleshooting problems that may be caused by settings that were changed after installation. Be aware that this process isn’t reversible, and all previous Internet Explorer settings are lost after reset.
-
Close all open windows and programs.
-
Open Internet Explorer, select Tools > Internet options.
-
Select the Advanced tab.
-
In the Reset Internet Explorer Settings dialog box, select Reset.
-
In the box, Are you sure you want to reset all Internet Explorer settings?, select Reset.
-
When Internet Explorer finishes applying default settings, select Close, and then select OK. Restart your PC to apply changes.
If Internet Explorer won’t open, or pages won’t load…
If Internet Explorer won’t open, or if pages aren’t loading, there may be an add-on that is interfering with the process. To tell whether this issue is with an add-on or not, you can try the following:
-
Find your processor speed.
-
Select Start > Settings > System > About.
-
Under Device specifications, see System type.
Check your processor speed
For more information, see 32-bit and 64-bit Windows: Frequently asked questions.
-
-
Based on your processor speed, choose the appropriate line of code below and copy and paste or type the code into the Search box on the toolbar.
For 32-bit:«C:\Program Files (x86)\Internet Explorer\iexplore.exe» -extoff
For 64-bit:«C:\Program Files\Internet Explorer\iexplore.exe» -extoff
Internet Explorer will open and you can find out which add-ons were causing issues. To manage add-ons in Internet Explorer, see Manage add-ons in Internet Explorer 11.
Need more help?
Want more options?
Explore subscription benefits, browse training courses, learn how to secure your device, and more.
One way to change the default Internet Explorer settings on your Windows 10 computer is to use the Local Group Policy. This way, you can maintain your browser settings for everyone on your computer. If you’re using a shared computer, you can use Local Group Policy to copy the default user profile to other computers. You’ll need administrator privileges to do this. However, if you’re using Windows 7, you’ll have to first use an administrative account.
To reset Internet Explorer settings to the default, go to the Windows Settings panel and click Network and internet. Choose Advanced network settings. Click Reset now. The Internet Explorer settings will be reset to factory defaults. Note that you can’t undo this step, so be sure you’re able to recover before doing so. You may lose important data and files if you try this. Instead, follow the steps below to reset Internet Explorer settings to All users in Windows 10.
How Do I Set Internet Explorer to Group Policy?
To control Internet Explorer, go to the Internet Settings tab. There, select Privacy Options. Click the Internet Explorer tab. Select the option to control group policies. Click OK. The group policy is now applied to all IE instances. Internet Explorer 11 will use the same settings as Internet Explorer 10.
If you’d like to force Internet Explorer to be the default browser, export the IE home page XML file from the network share. Then, you can use this XML file to change the default browser for all computers on the network. This can be done with Group Policy Set a default associations configuration file located at Computer Configuration, Administrative Templates, Windows Components, File Explorer. The IE home page URL is not changed, so disable the option if you don’t want the change.
The registry has few group policy settings for Internet Explorer. So, you must be very careful not to change the settings – you might end up causing a failure on your PC. Therefore, I suggest that you download the Microsoft Edge Policy Template instead and enable Internet Explorer mode using Edge flags and settings. Then, install it and configure it for your organization. If you’re still having issues, you can try the Microsoft Edge policy template to enable the option.
Is Microsoft Edge the Same As Internet Explorer?
When it comes to browsers, Microsoft Edge isn’t like Internet Explorer. It’s built from scratch and launched alongside Windows 10 in 2015. Four years later, it’s still undergoing significant changes. Microsoft is using open-source Chromium code and has stripped out old technology and code. This means that Edge runs much faster than Internet Explorer, and it includes a number of under-the-hood tweaks to prevent the browser from overheating your computer’s resources.
Another feature of Edge is its Immersive Reader mode, which makes reading web pages easier to digest. The reading view icon on the address bar indicates compatibility. If it is grayed out, the page can’t be read using Edge. If it’s black, it means you can use the feature. Edge also includes built-in learning tools and accessibility tools. Moreover, it integrates an immersive reader for some websites, which enables you to read articles without having to look at distracting ads.
As for the future, Microsoft Edge will replace Internet Explorer. The support for IE 11 is ending on June 15, 2022. It’s also important to note that the compatibility mode will let you view IE 11 websites without using the browser. To access this mode, simply open the Settings menu in Microsoft Edge and choose ‘Internet Explorer Mode’. Using this mode will allow you to view IE-based pages. However, users must note that IE 11 will be decommissioned by then. Besides, Microsoft Edge’s security and speed will help you make the switch.
How Do I Change Group Policy Preferences?
You’re probably wondering, “How do I change Group Policy preferences for Internet Explorer in Windows”? Well, that’s actually quite simple. First, you need to open the Group Policy Management Console and locate the OU containing USERS. Then, click on “Create a new policy”. You’ll notice that you have the option to apply the group policy preferences to all Internet Explorer versions.
Once you’ve done that, you can start customizing your Internet Explorer settings. While you can use the Internet Options in Windows 10, they’re difficult to manage if you have multiple users and are used to different settings. Using Local Group Policy to control Internet Explorer’s preferences is a good solution. After installing the tool, you can customize your Internet Explorer settings and make your computers follow company standards.
Another way to customize your browser is to change your home page. Most companies have a GPO that prevents their employees from changing their homepage. This prevents them from changing it. However, you can also change this setting in Windows 10 by opening the Group Policy Management console and right-clicking on Group Policy Objects. If you don’t see any Internet Explorer settings in the UI, you can always create a new one by double-clicking the GPO in the context menu.
To enable Internet Explorer settings for all users in Windows 10, you can use the system administration tool, Windows Device Manager. By using this tool, you can change the settings of the IE browser, as well as other programs on your computer. You can also copy the default user profile. If you have multiple users on the same computer, you may want to disable IE for all users and then enable it for them later.
If you want to make your Internet Explorer settings available to other users, you can choose to set it to open specific types of files. To do this, go to the Start Menu and type in ‘Default apps’. You will see a window with your browser currently set as the default application. On the Default apps window, click Choose default apps by file type. Then click Apply. This will automatically change your Internet Explorer settings to Internet Explorer 11.
Why is Microsoft Retiring Internet Explorer?
The internet is no longer the same without Internet Explorer, the company’s long-running browser. It’s no secret that the company is phasing out support for Internet Explorer in 2022. In recent years, the browser’s usage has declined significantly, and it now has less than 0.5 percent of the browser market. However, the company’s decision to retire Internet Explorer is no surprise to web users, and a complete list of what’s covered in the transition is available here.
The company is phasing out support for IE 11 after June 15, 2022. However, it’s worth noting that the transition period won’t happen overnight. Instead, devices will be redirected gradually. This way, organizations will have ample time to identify and address any issues. In the meantime, the company is encouraging web developers to upgrade legacy apps and websites to Microsoft Edge. Regardless of the exact date, the company’s move will likely lead to a huge change for the web.
What is the Meaning of Enterprise Mode?
If you use Windows 10, then you are probably familiar with Enterprise Mode. This feature allows you to change browser settings to open websites in a more secure manner. Microsoft has designed a tool called Enterprise Mode Site List Manager. If you use this tool, the site list is maintained and updated automatically. However, if you’d prefer to manually update the site list, you can change the version number in the root node. In the future, you can also deploy this new feature to all users.
The Enterprise Mode feature is built to solve common compatibility problems in simple web applications and static websites. It provides an easy-to-use solution, while maintaining compatibility with legacy web applications. In addition, it can be deployed with existing enterprise management tools. Those who use mission-critical business applications should use Enterprise Mode because they are typically customized, highly customizable, and not affected by the user agent string. This feature will also give them more control and greater security without compromising compatibility with legacy applications.
How Do I Remove Browser Restrictions?
If you are concerned that your Internet Explorer is blocking certain websites because they are insecure or harmful, you can remove browser restrictions by going to the Security settings in your Windows 10 PC. If you are unable to disable the browser restriction using the group policy editor, you can do so manually. Go to HKEY_LOCAL_MACHINE and locate the Internet Explorer key. In the list of restricted sites, type “Internet Options” without the quotes. Click the “OK” button to save your changes.
After selecting the folder, click “Program Files”. On the right hand side, look for the Internet Explorer executable. If the Internet Explorer is in the Program Files folder, block it there too. It may have no effect. You can try blocking the program executables. Be sure to select all the available types and give it a descriptive name. If you are unsure of which option to choose, enter “internet explorer”.
Learn More Here:
1.) Windows Help Center
2.) Windows – Wikipedia
3.) Windows Blog
4.) Windows Central
Windows File Explorer, popularly known as just Explorer, is the heart of Windows UI. Every interaction you make with files and folders is through Explorer. As the OS has evolved, so has the File Explorer, and in this guide, we will share how you can customize Explorer in Windows 10.

The default Explorer view offers access to all user folders and drives. On the top, you have a few fixed tabs like File, View, and more show up based on what you select and your current location. For example, when you choose an image, you get a Picture Tools menu, while you get Application tools when you select an executable. The fact is, the list is dynamic and keeps changing all the time based on the situation.

Since we are dealing with customizing Explorer in Windows 10, most of them are available in the Options section of the View tab, and some are related to the context menu.
To customize File Explorer in Windows 10, right-click the down arrow at the end of the Quick Access Toolbar. From there, you can check the items you want to add and uncheck any you wish to remove. This allows you to easily personalize your toolbar by adding or removing icons.
Customize “View” in Explorer
How you want to look at your files depends entirely on the kind of work you engage in regularly. In the view tab of the ribbon menu, you can switch from extra large (suitable for images) to Large icons to Details, which adds date, type, and size to the files, folders, and tags if you use it.
Next, you can choose to Sort & Group files and folders by size, date, name, etc. If you feel something is missing, you can select “Add Columns” in detailed view.

You can add two side panes to extend them apart from file views. It is useful for individual files if you do not wish to use details mode.
- Preview Pane: Useful for Images and media files.
- Details Pane: Useful when you deal with many files where you need to check details like size, creation date, and so on.
Then you have a Navigation Pane, which adds a tree-like explorer structure on the left. It helps you navigate between the folders quickly.
Lastly, you have a few more options. Enable
- checkboxes for easy selection of multiple items
- viewing of file extensions
- View hidden files and folders. More here on how to hide/unhide folders in Windows
Windows 11 user? Read how to customize and use Windows 11 Explorer
Customize “Folder Options” in Explorer

In the view menu, you have the Options. When you click on it, it opens a pop-up window that offers many choices you can make. They are mainly for folders and searches. Here, you have three significant configurations – General, View, and Search. We are going to look at the first two.
TIP: Make sure to check out Windows Explorer Tips and Tricks.
General Folder Options

Change Default Folder
Choose quick access when you want to go to your frequently used folders, and files without wasting much time. If you also want quick access to drives, enable the navigation pane, and you have the best of both.
Do you use a Touch Screen?
You can choose to open the folders with a single click, but it could be annoying when using a mouse. If you have a touch screen, a single tap can open the folder. Double-click with touch is slightly irritating.
Others
- Display or clear Recently used files, and frequently used folders.
- Open every folder in their view.
Customize View Options
Here, you get micro control on what you see for the files and folders. Right from icons to menus, to full path, the option to hide empty drives, and so on. Here are few that you should look at-
Automatically type in the search box:
When we open any folder, we usually search an item. If you have an extensive collection of files and folders, enable this option. So when you need to find something, it will type it in the search box and filter the results.

When you click on the search box or type with this option enabled, you get a couple of filter options. It helps you to narrow down search results to find the exact file or folder you were trying to find. You can limit file size, type, date modified, and so on.
Restore Previous Folders on Login:
It helps you to resume work even faster as it will open the folders you work often. All you need to do is shut down those the computer without closing them.
Using these options in View, you can create a minimal or an illustrated view of the folders. Useful or not depends on your work.
Lastly, you don’t have to apply the same view to all folders. When you open the view configuration in a folder, you only customize the look for that folder. So the best way to go ahead is to customize the folders you work with and leave others. However, you can choose to apply the current view to all folders with “Apply to folders” button.
If something doesn’t fit, you can always reset the Folder view.
That is pretty much what you should know about how you can customize Explorer in Windows 10. Though I would repeat that everything depends on your work, most of the consumers don’t really change anything unless it’s a need, but for those who need to handle a lot of files and folders, these are really helpful.
(Image credit: Mauro Huculak)
On Windows 10, File Explorer is an essential app with a simple user interface for navigating, accessing, and organizing your files, folders, and apps stored on your device, external drives, and anywhere in the network.
If you have experience using older versions of Windows, you know that the file management system has been around for a long time. However, over the years, it has received many changes, and features have been removed. The basic functionality, however, remains unchanged.
Although File Explorer is relatively easy to use, there are many features and settings that can help you be a little more productive on Windows 10.
In this how-to guide, I’ll outline the best tips and tricks for being more productive with File Explorer.
How to open File Explorer on Windows 10
On Windows 10, you can open File Explorer in several ways, including:
- Clicking the File Explorer icon in the taskbar.
- «Windows key + E» keyboard shortcut.
- Clicking the File Explorer icon in the navigation pane of the Start menu.
- Searching for File Explorer in the Start menu.
- Using the «explorer» command in the Run command.
- Right-click the Start button and select the «File Explorer» option.
How to set This PC as startup page on File Explorer
To change the start location in File Explorer, use these steps:
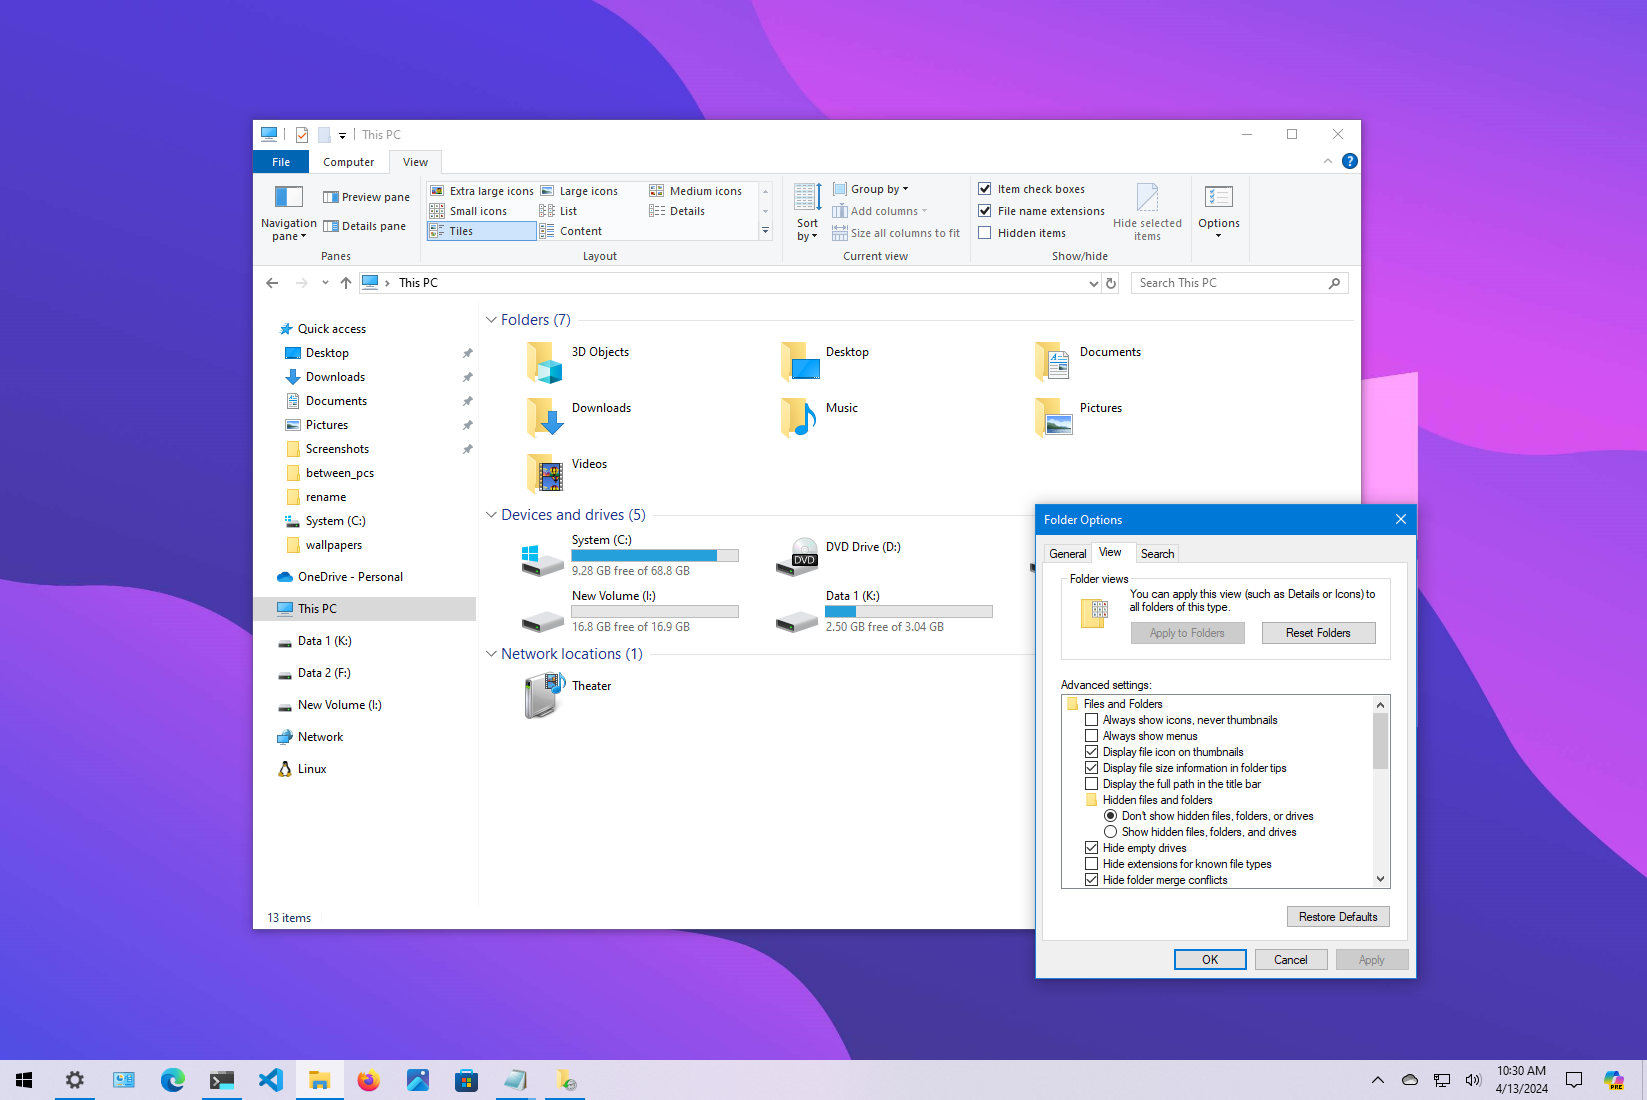
- Open File Explorer.
- Click the Options button from the «View» tab.
- Select the This PC option from the «Open File Explorer to» drop-down menu.
- Click the Apply button.
- Click the OK button.
Once you complete the steps, File Explorer will open on This PC for faster access to your files, local drives, and network shares.
All the latest news, reviews, and guides for Windows and Xbox diehards.
How to show file extensions on File Explorer
To show extensions for files in File Explorer, use these steps:
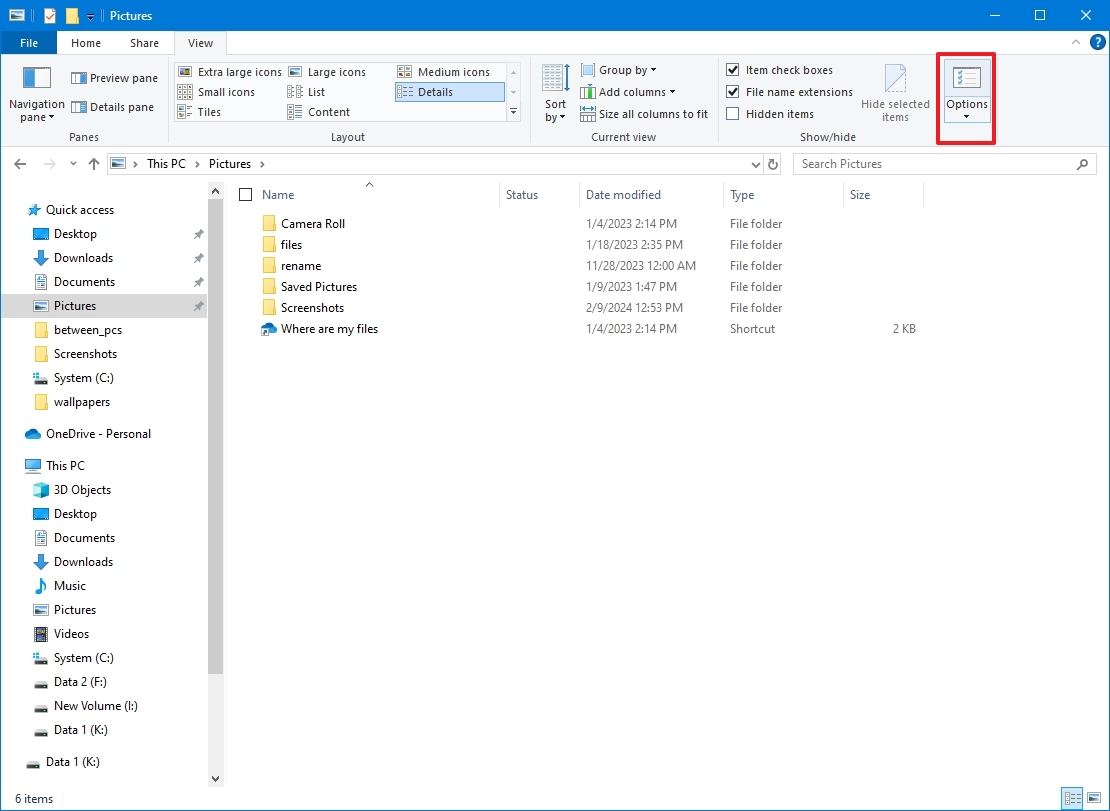
- Open File Explorer.
- Click the Options button from the «View» tab.
- Click the View tab.
- Clear the «Hide extension for known file types» option.
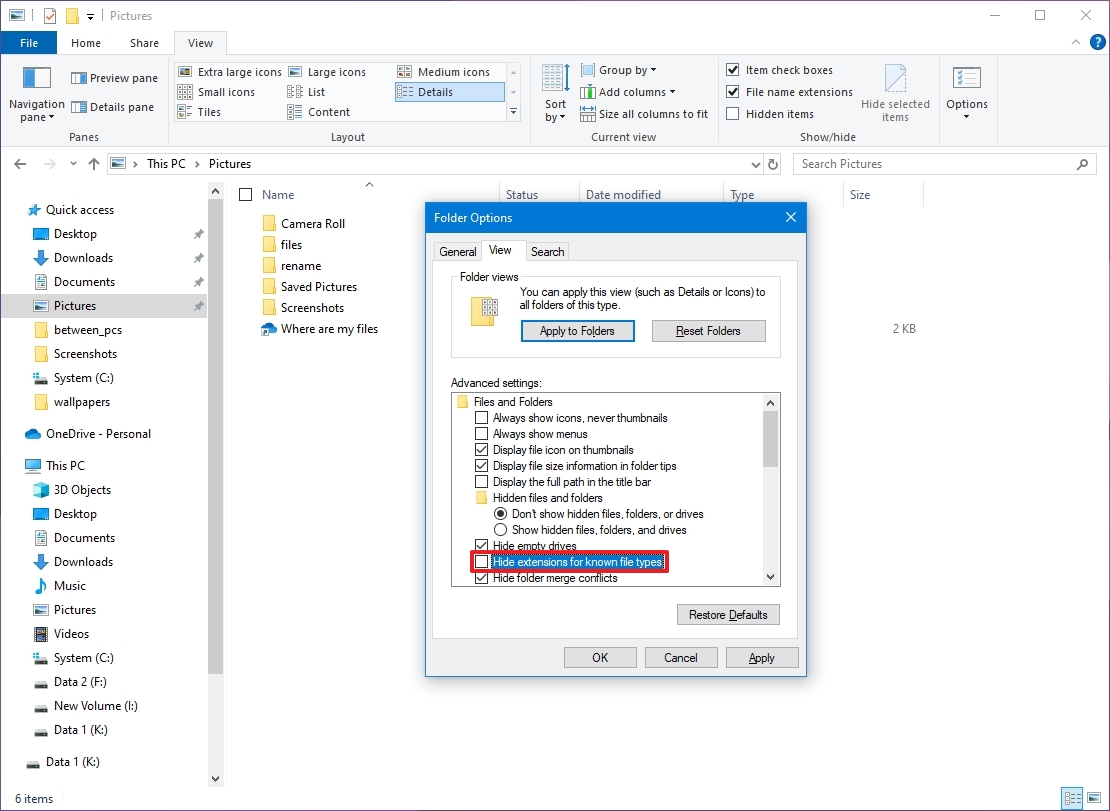
- Click the Apply button
- Click the OK button.
Alternatively, check the «File name extensions» option from the File Explorer’s ribbon «View» tab.
How to show hidden files on File Explorer
To show files with the hidden attribute set to enabled on Windows 10, use these steps:
- Open File Explorer.
- Click the Options button from the «View» tab.
- Click the View tab.
- Select the «Show hidden files, folders, and drives» option under the «Hidden files and folders» section.
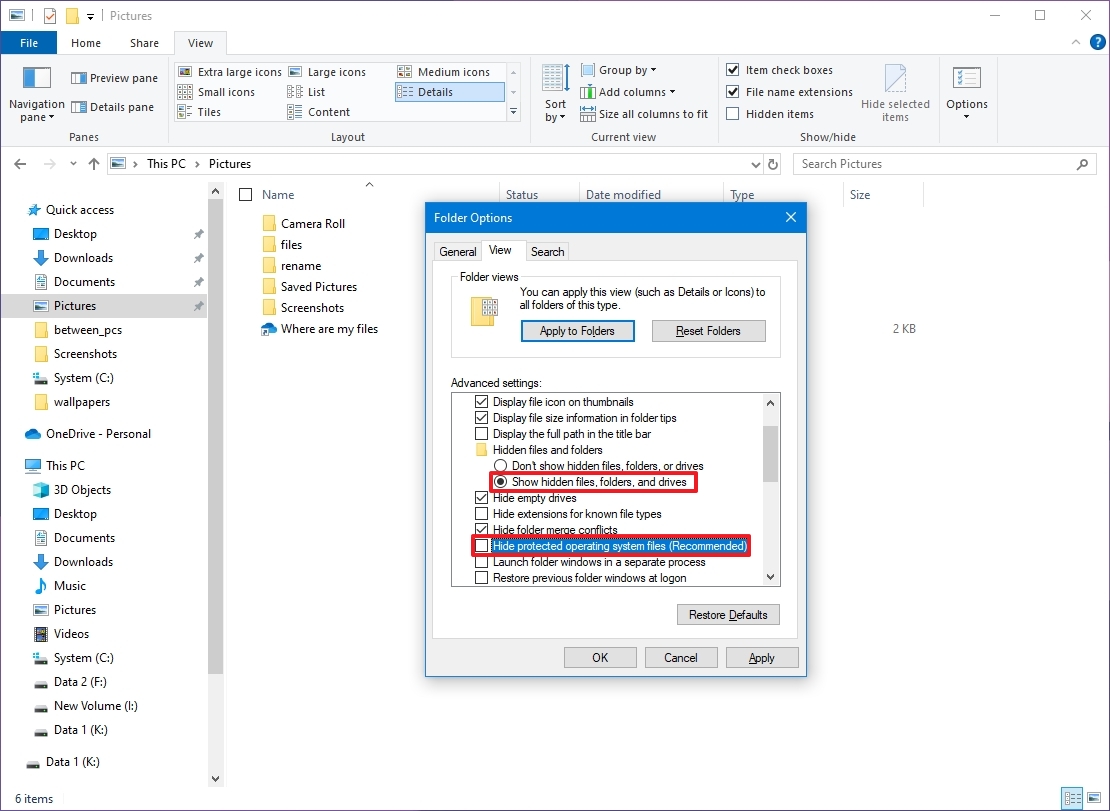
- (Optional) Clear the «Hide protected operating system files» option.
- Quick tip: This option is usually only used to troubleshoot problems with system files on Windows 10.
- Click the Apply button
- Click the OK button.
Alternatively, check the «Hidden items» option from the File Explorer’s ribbon «View» tab.
How to customize Quick Access on File Explorer
File Explorer offers quick access to the locations you navigate most frequently from the left pane. Then there’s the quick access toolbar in the top-left corner, which you can customize for quicker access to commands like undo, redo, and delete.
Quick access on the navigation pane
To add or remove locations to Quick access in File Explorer, use these steps:
- Open File Explorer.
- Browse to the location that includes the folder you want to pin to Quick Access.
- Select the folder.
- Click the Pin to Quick access button from the «Home» tab.
- Quick tip: You can also browse the folder location, right-click the «Quick Access» item, and select the «Pin current folder to Quick access» option.
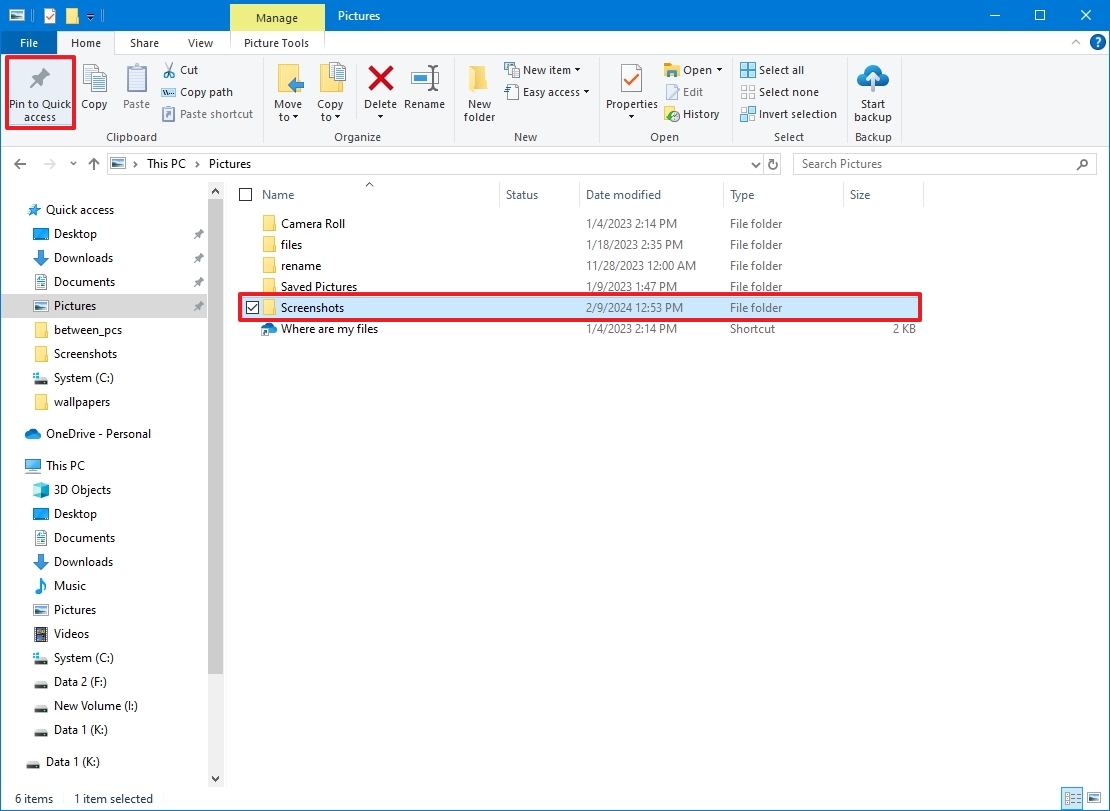
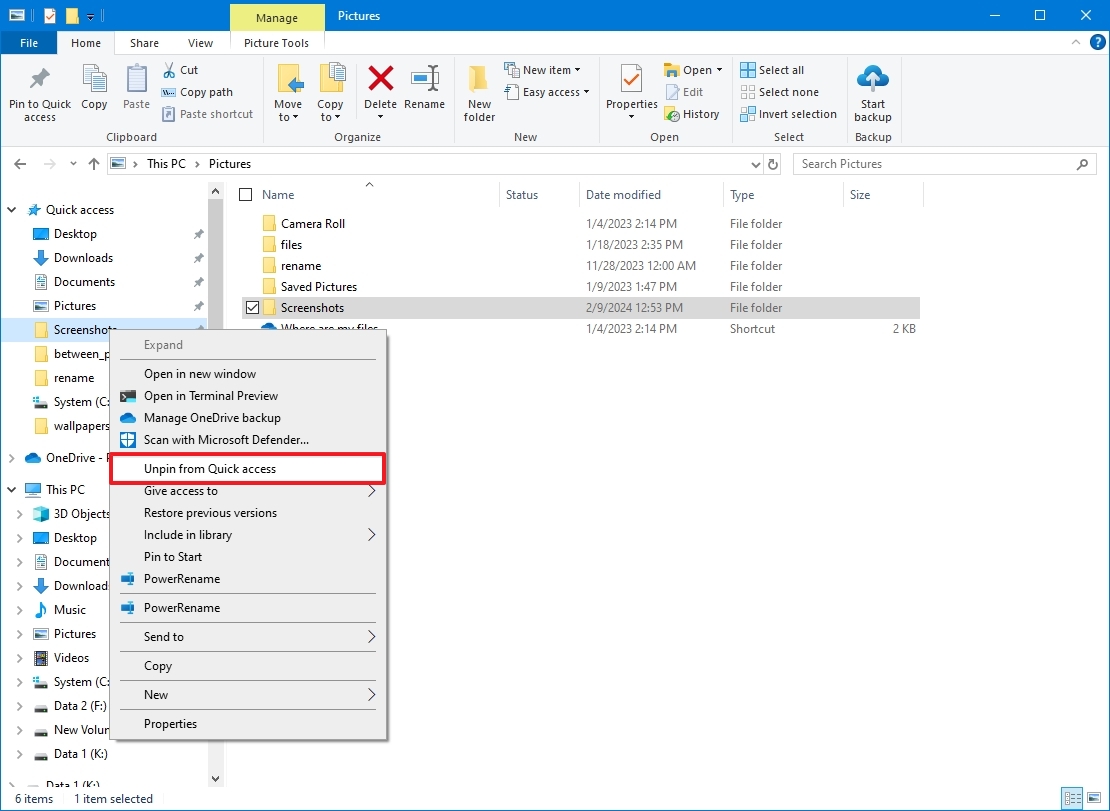
- (Optional) Right-click the folder and select the «Unpin from the Quick Access» option to remove it under the «Quick Access» section.
After you complete the steps, you may need to repeat the above steps to add or remove more items.
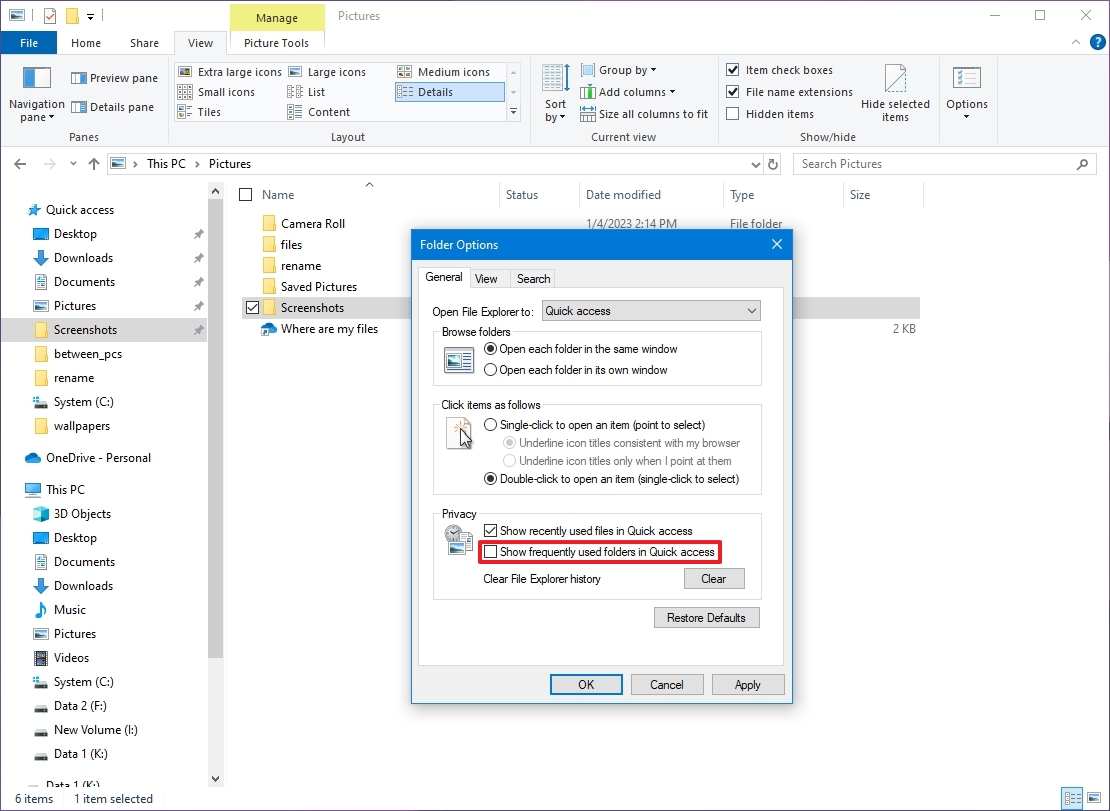
Show only manually pinned folders
Quick access can show frequently used folders as well as folders that you pin manually. If you want to keep the list organized showing only those locations that you pinned manually, then use these steps:
- Open File Explorer.
- Click the Options button from the «Home» tab.
- Click the General tab.
- Clear the «Show frequently used folders in Quick access» option under the «Privacy» section.
- Click the Apply button.
- Click the OK button.
Once you complete the steps, only the items that you pinned manually will appear in the navigation pane.
Using the Quick Access toolbar, you can get faster access to specific commands, and the best part is that you can customize the toolbar with only the buttons you need.
To customize the Quick Access toolbar, use these steps:
- Open File Explorer.
- Click the down arrow button from the top-left corner.
- Check the button you want to see in the toolbar. For example, «Undo,» «Redo,» «Properties,» «New Folder,» or «Rename.»
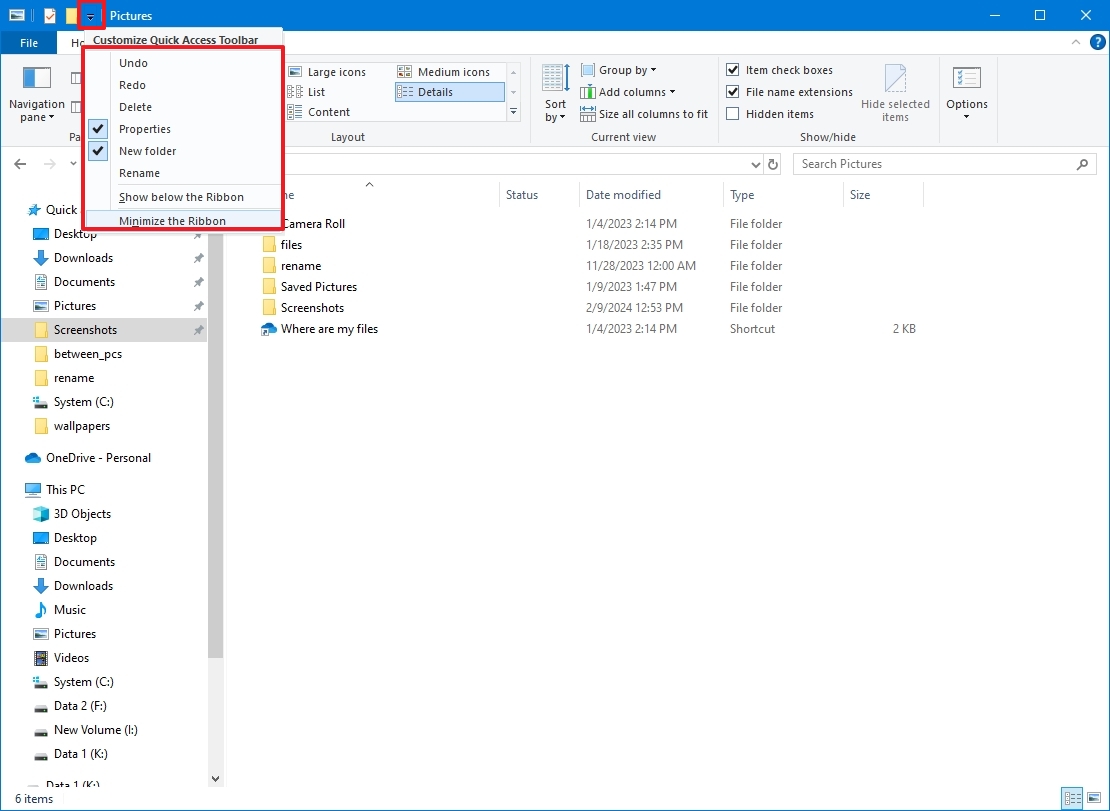
- Repeat steps 2 and 3 to add or remove more buttons.
- (Optional) Right-click any button that you use frequently, and select the «Add to Quick Access toolbar» option.
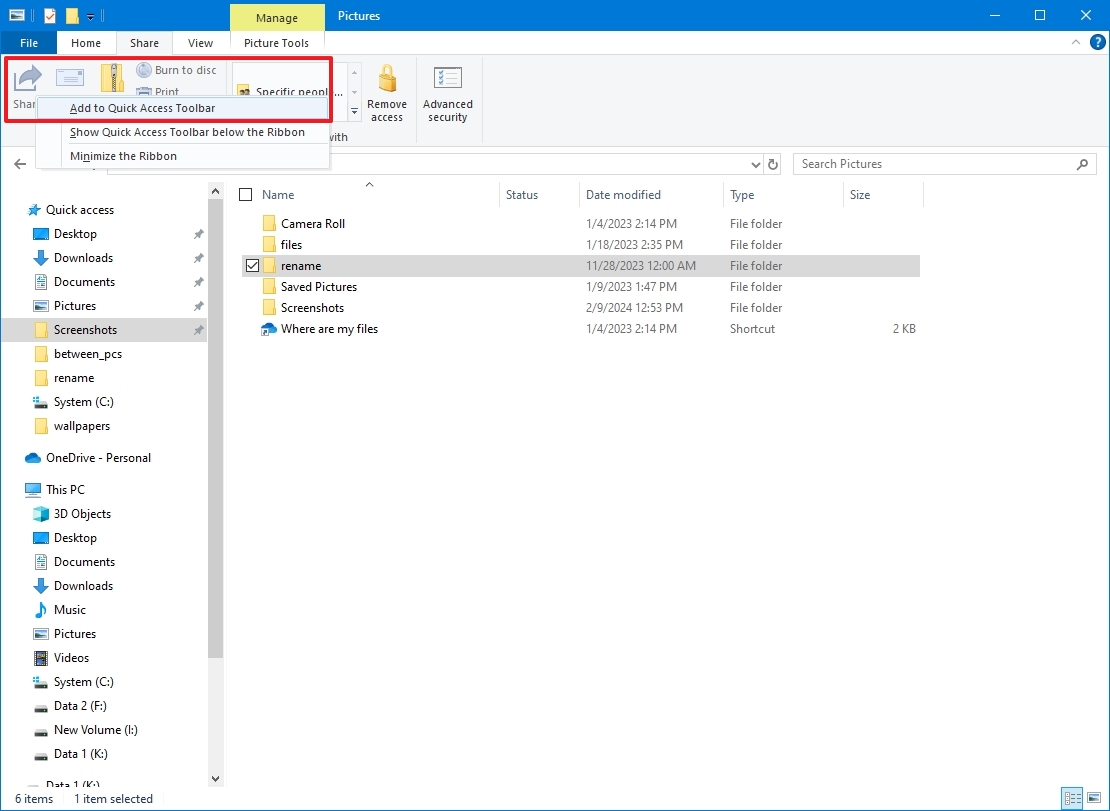
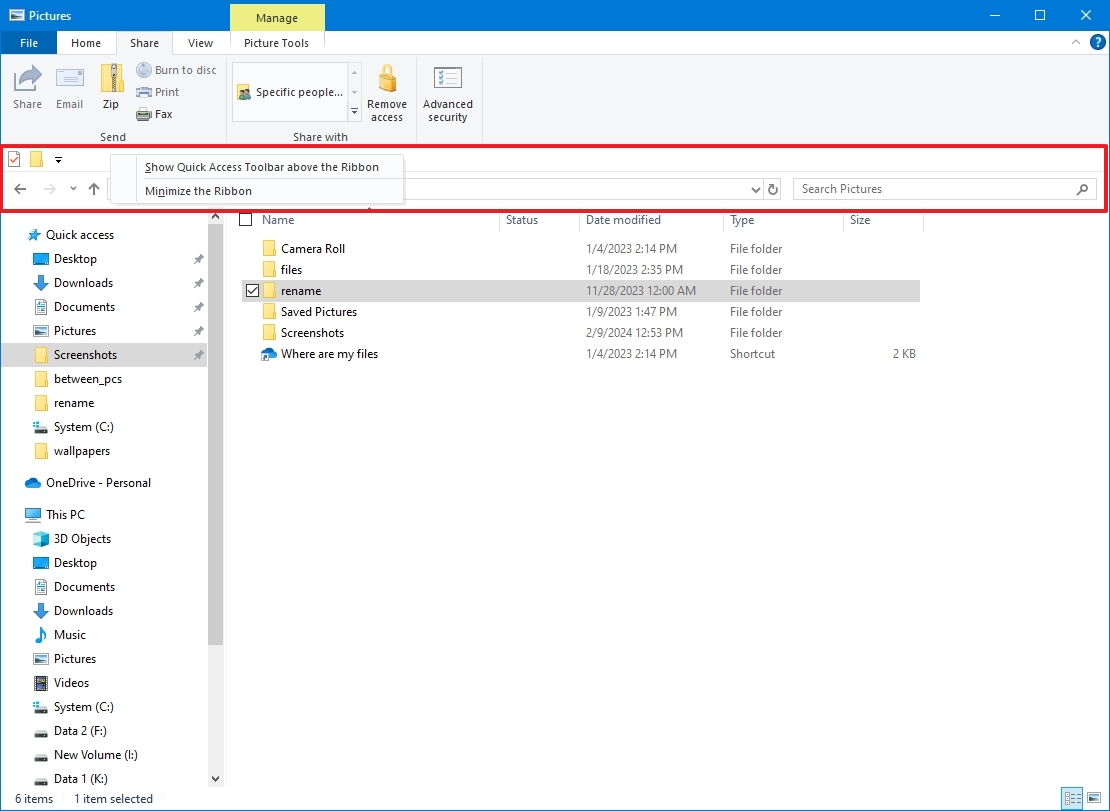
In addition to adding and removing items, you can relocate the toolbar below the ribbon menu by right-clicking the toolbar and selecting the «Show Quick Access Toolbar below the Ribbon» or «Show Quick Access Toolbar above the Ribbon» option.
How to display file previews on File Explorer
To display file previews and details in File Explorer, use these steps:
- Open File Explorer.
- Click the View tab.
- Click the Preview pane option.
- Select the file to view a preview of its content on the right side.
- Click the Details pane option.
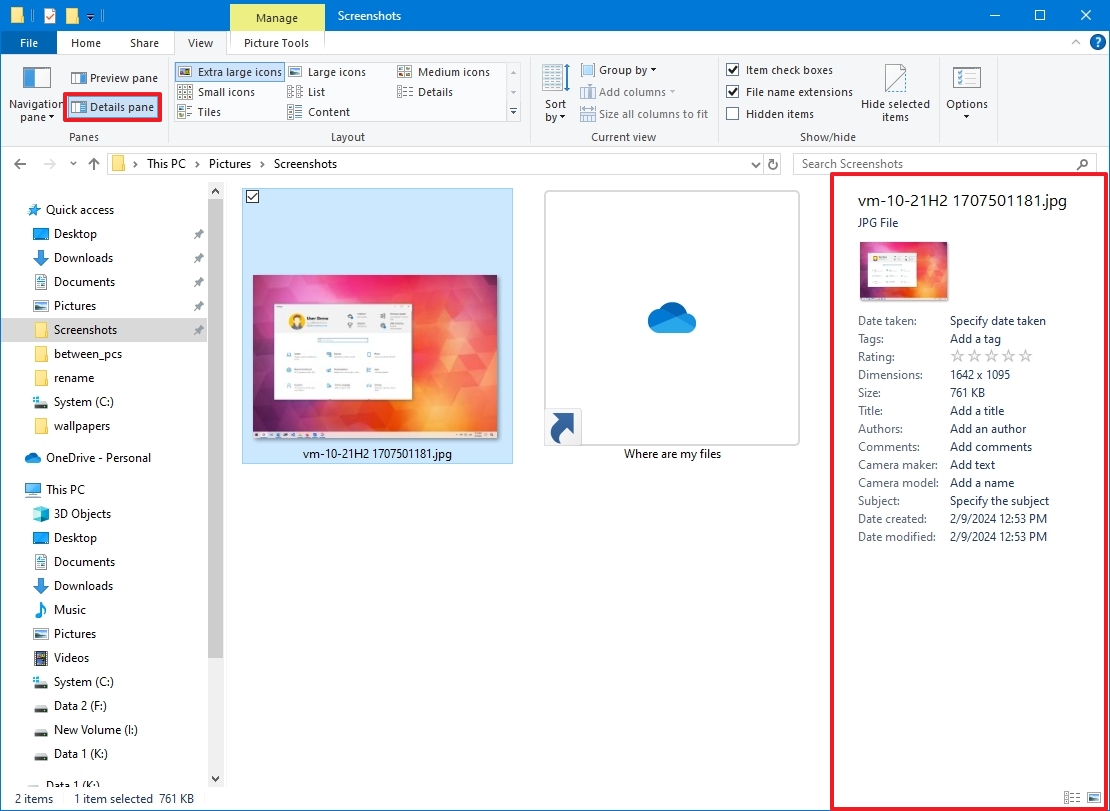
- Select the file to display the details (such as title, author, size, date created, etc.) on the right side.
After you complete the steps, every time you select a file, depending on your configuration, you’ll see the details or preview of its content on the right side.
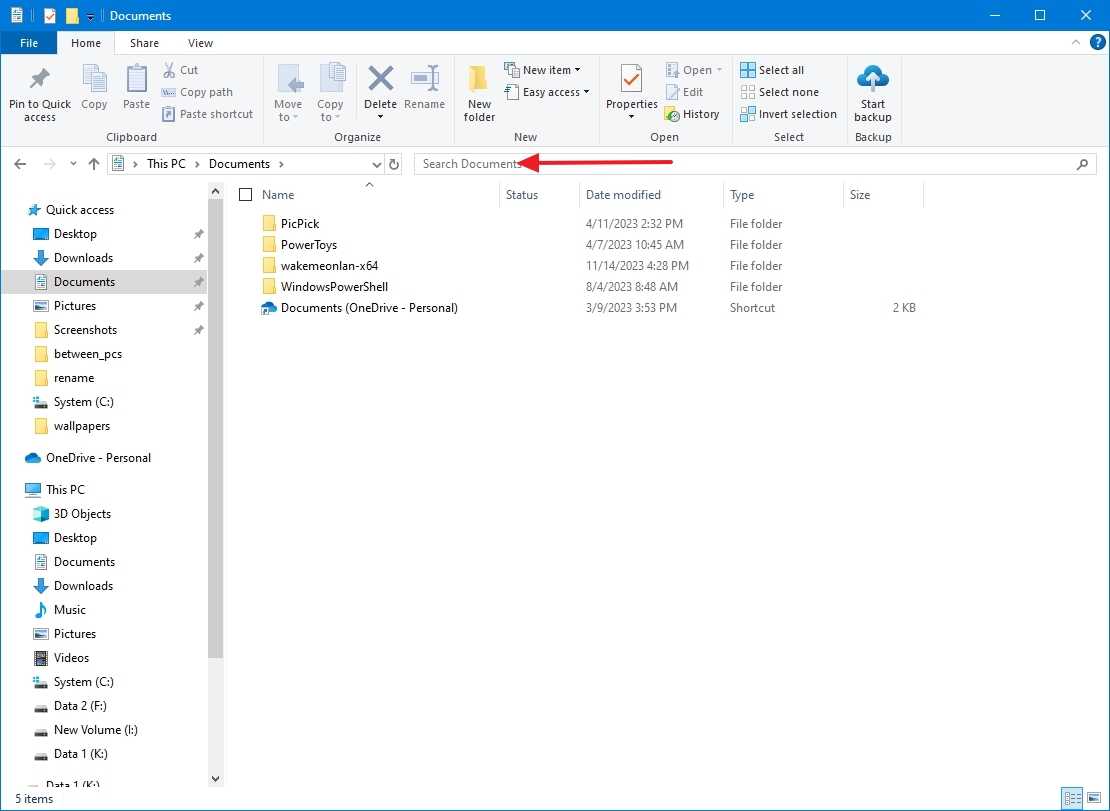
How to use search on File Explorer
Although finding files and folders is as simple as typing the query in the search box, there are a few tips to get the most out of the feature.
To use advanced search in File Explorer, use these steps:
- Open File Explorer.
- Type the query in the search box and press Enter.
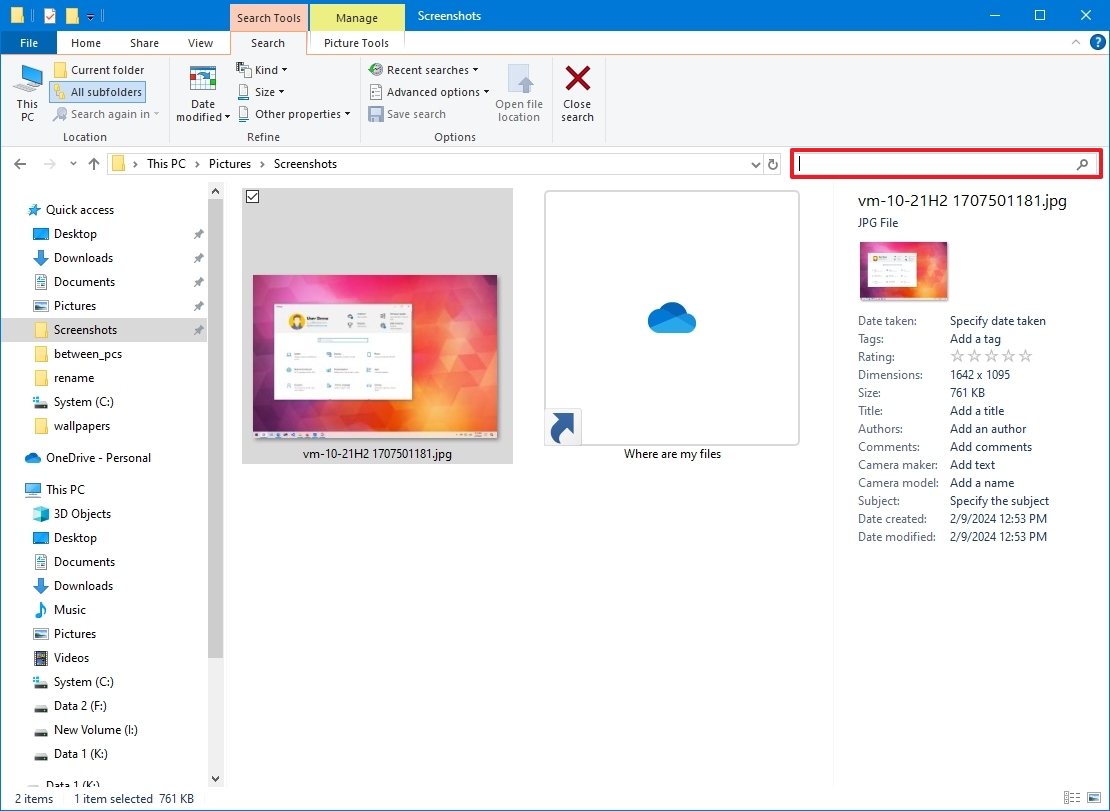
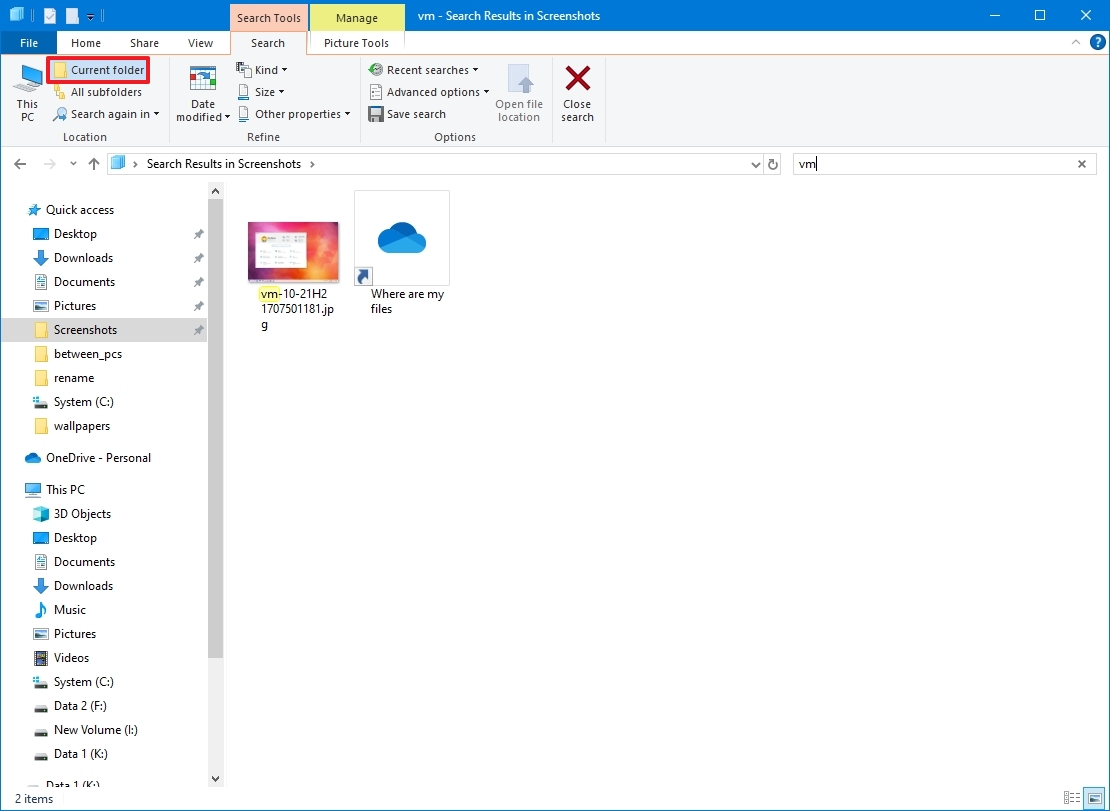
If the search doesn’t include the result that you’re expecting, you can use the «Search» tab to refine the result. For example, you can click the «Current folder» button to limit the search to the current location.
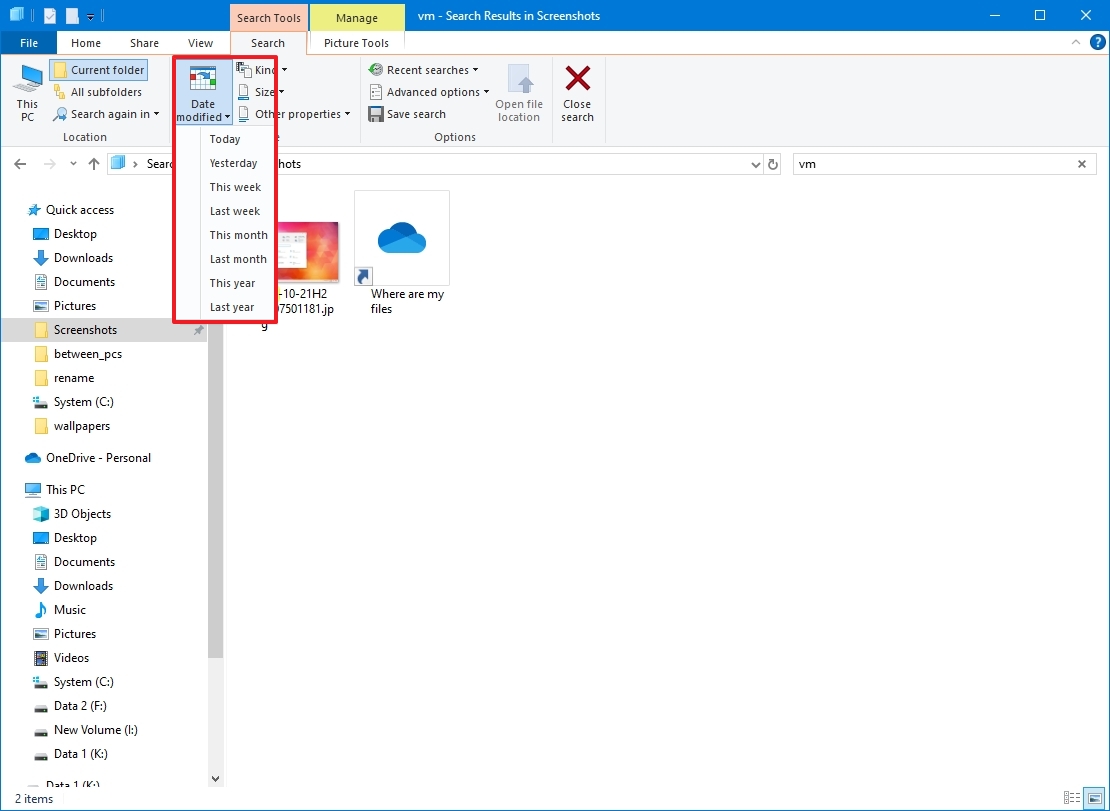
Refine search
In the case that you’re looking for a file that was modified during a specific time range, you can use the «Date modified» button, and then select a time range, such as «Today,» «Yesterday,» «This week,» or «Last Year.»
If you can’t narrow down the content, you can use the «Refine» options. For instance, you can use the «Kind» option to specify the content type, such as «Document,» «Folder,» «Music,» «Picture,» Game,» etc. In the same way, you can use the «Size» option to limit the search to files of a certain size. You can also use the «Other properties» option to search files created by a specific author, tag, etc.
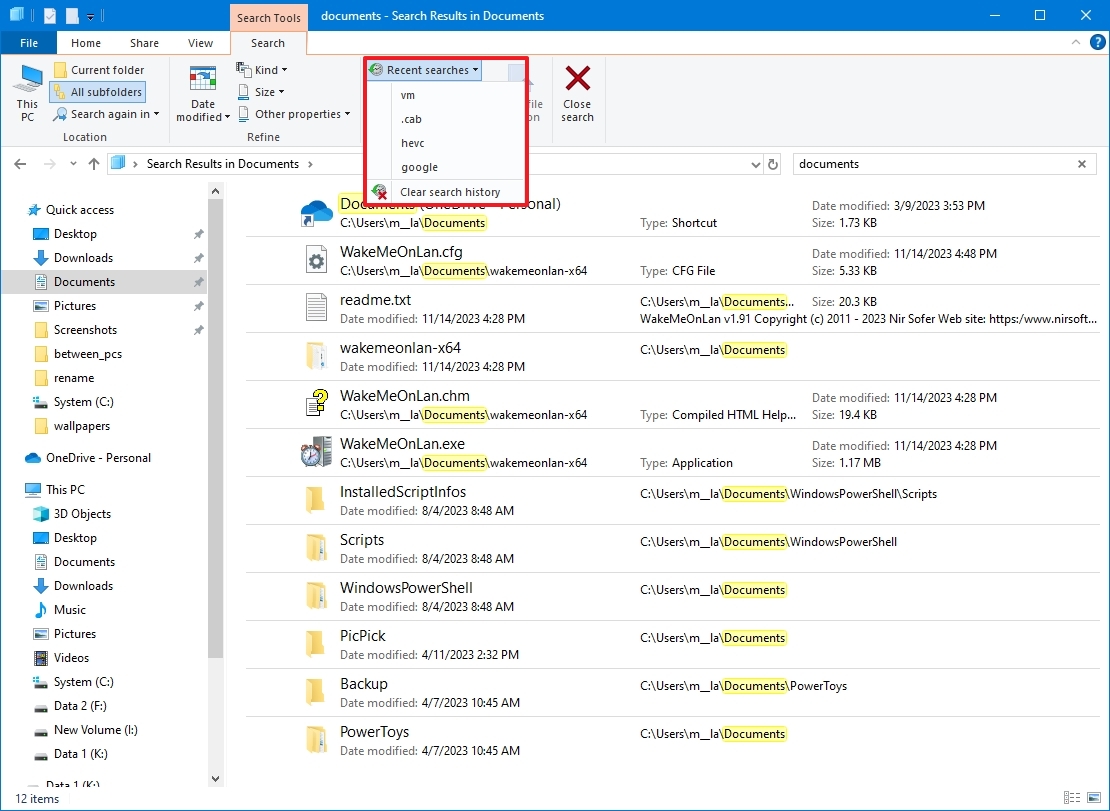
Search options
Finally, the «Options» section includes the «Recent searches» menu to quickly access previous searches, which can come in handy to reuse customized searches that you may have used in the past, and the «Advanced options» menu to include or exclude non-index locations as well as zipped folders in search results.
Resize search box
If you notice that the search box is too narrow to type a query, you can always drag the left edge of the box to make it larger.
How to use ribbon on File Explorer
On File Explorer, the ribbon works similarly to the ribbon you see in Word, Excel, PowerPoint, and other Office apps. By default, it’s always collapsed, and you can access the commands by clicking the «Home,» «Share,» or «View» tab.
However, for most users, it’s best to have the ribbon expanded, which you can do by clicking the «arrow» button from the top-right corner or using the «Ctrl + F1» keyboard shortcut.
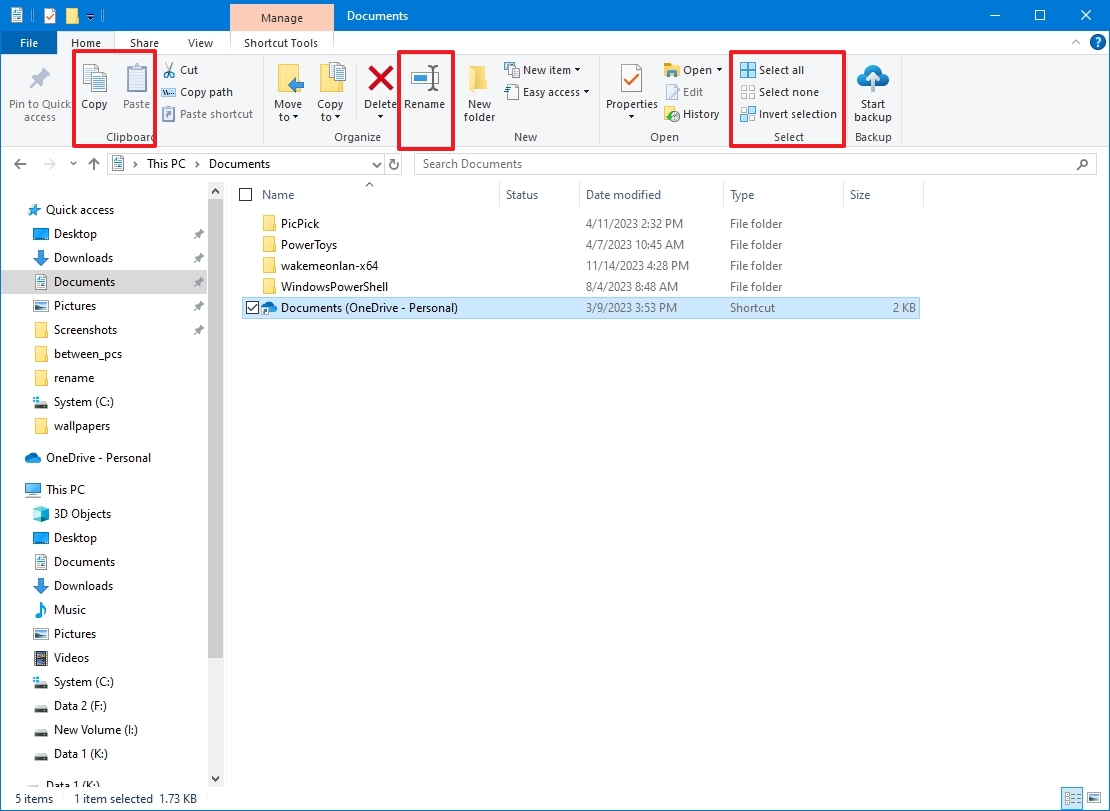
Home tab
The «Home» tab is where you’ll find all of your basic commands, such as «Copy,» «Cut,» and «Paste,» to «Rename,» «New folder,» «Properties,» to the option to select items.
The «Share» tab includes commands to share files with other people and configure advanced sharing options. It also allows you to create a zip folder.

View tab
The «View» tab is the place that has the commands to control the appearance and sorting options to view files and folders.
Using this tab, you can enable or disable the navigation pane, or enable a preview or details on the right side to see more info about the files in the location. You can change the layout by listing items as large icons or listing with details, and sorting data by criteria (name, type, size, modified date, etc.).
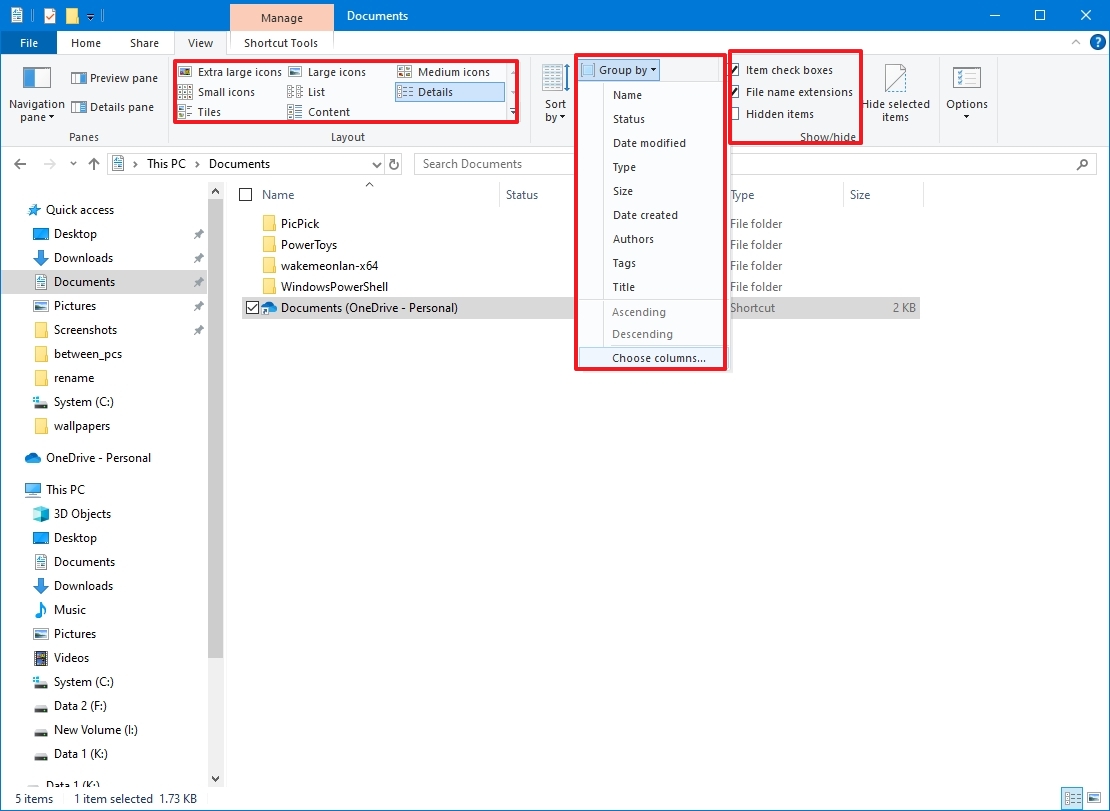
In addition, you get quick access to the most common folder options, including the options to see file extensions and hidden files. Of course, you also get the option to access the rest of the File Explorer option.
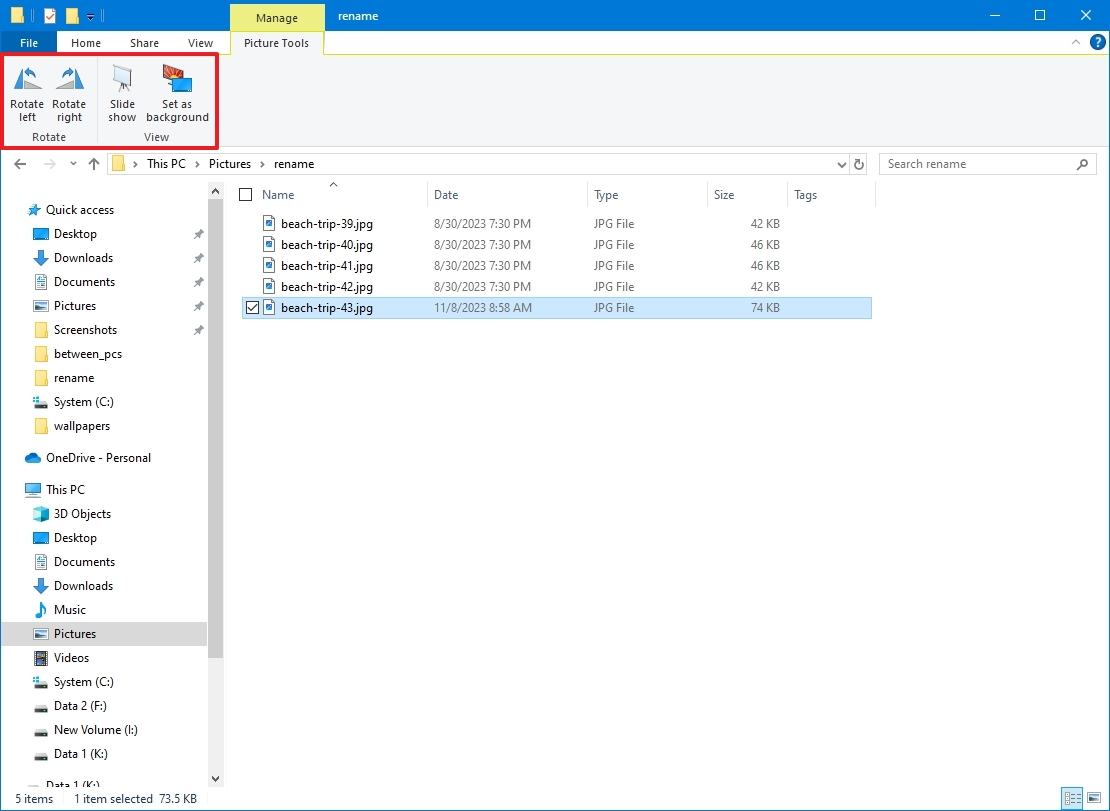
Pictures tab
The «Pictures» tab isn’t visible until the options are needed. For instance, if you select a supported image file, you can use this tab to rotate the image without needing to open the file. Also, you can start a slide show or set as background.
How to access network drives on File Explorer
If you need to work with files on another computer or server within the local network, File Explorer includes several ways to browse the data you need. For instance, you can use the «Network» tab to browse files. If you want quicker access, you can always pin the location to «Quick access,» or you can mount the network folder as a network drive to This PC.
Browsing network files
To access network drives from File Explorer, use these steps:
- Open File Explorer.
- Click the Network item from the navigation pane.
- Double-click the computer.
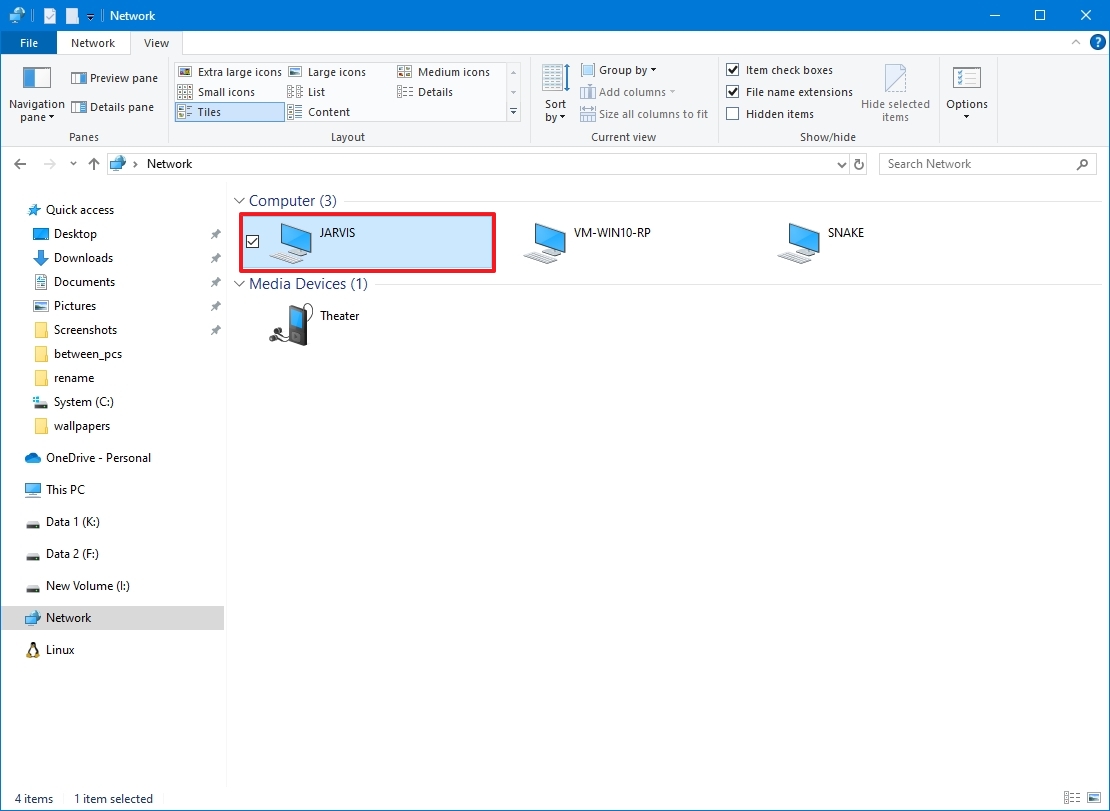
- Sign-in with the required account credentials (if applicable).
- Browse to the folder location.
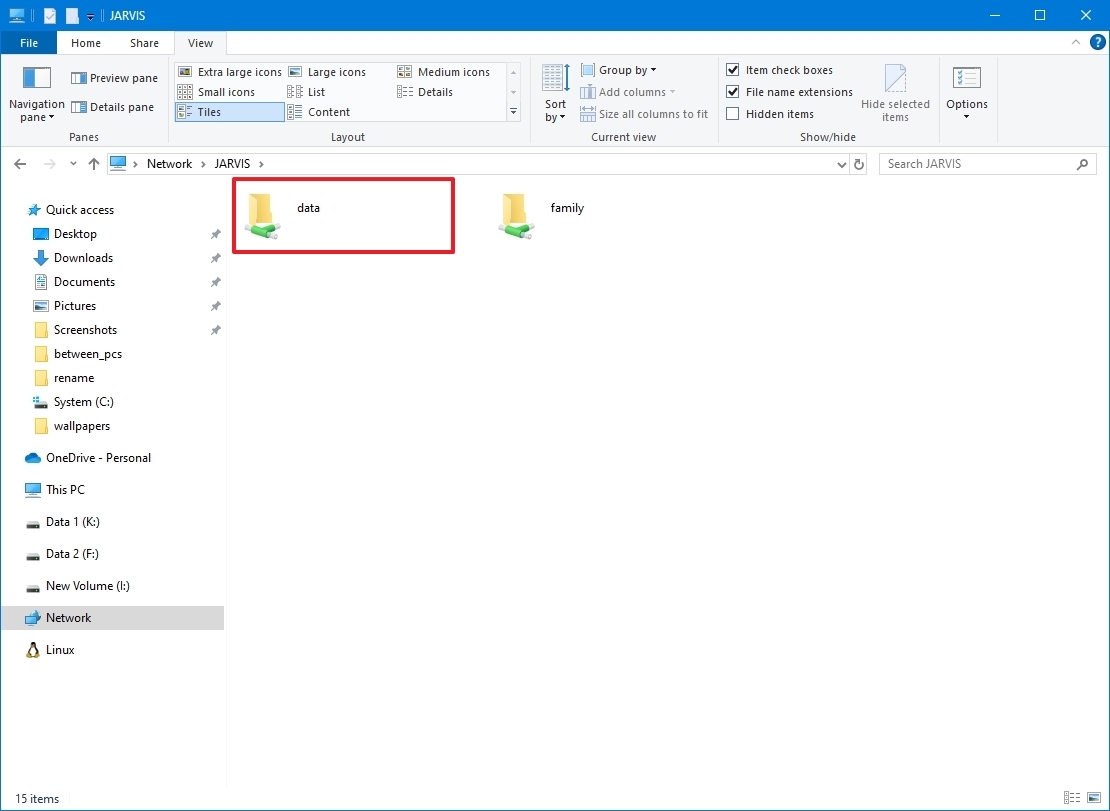
After you complete the steps, you’ll be able to access the files located on a different computer.
Mounting network drive
If you need quick access to network files, you can map the drive using these steps:
- Open File Explorer.
- Click on This PC from the navigation pane.
- Click the «Map network drive» button from the «Computer» tab.
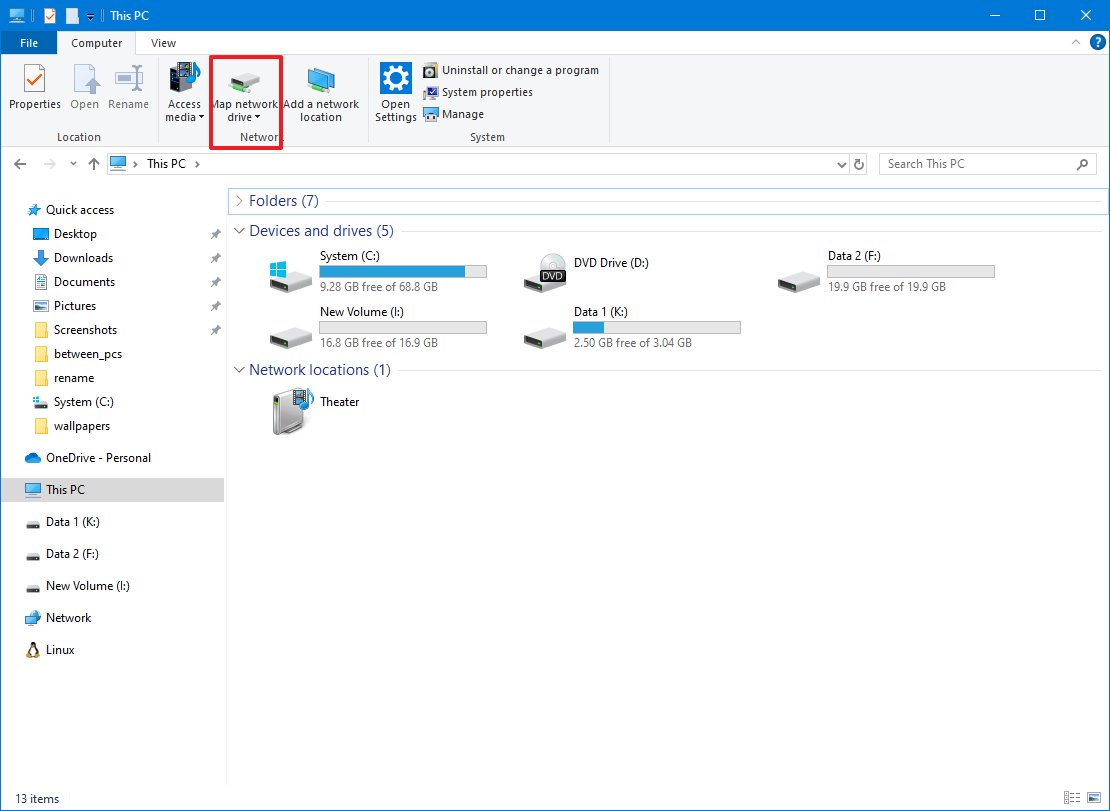
- Use the Drive drop-down menu and select a letter for the drive.
- Click the Browse button and select the network folder that you want to mount.
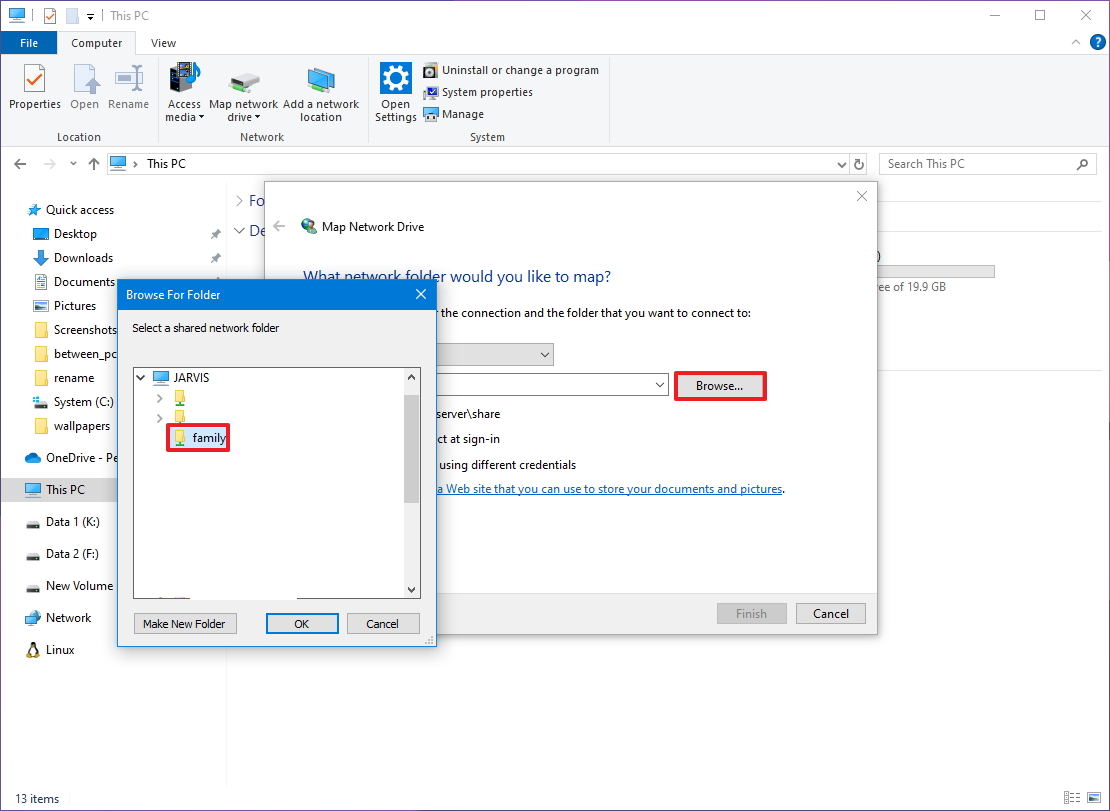
- Click the OK button.
- (Optional) Check the «Reconnect at sign-in» option.
- Check the «Connect with different credentials» option (if applicable).
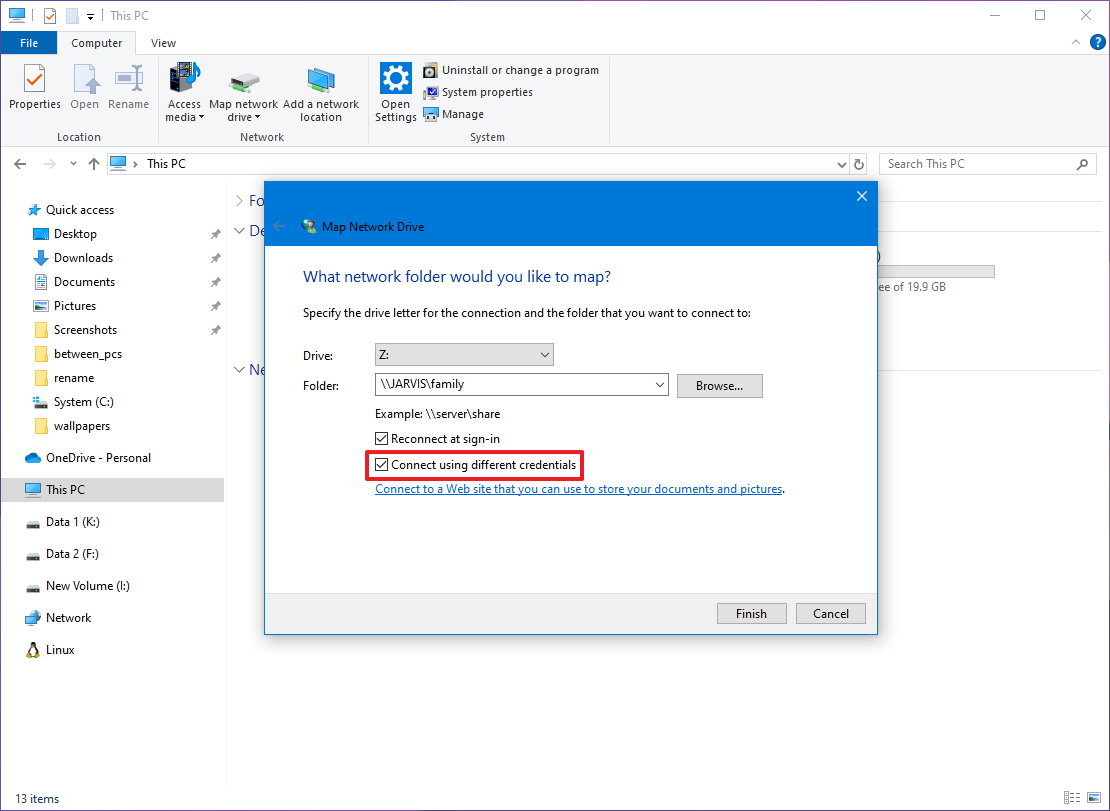
- Click the Finish button.
- Confirm your network account credentials (if applicable).
Once you complete the steps, the network folder should appear as a network drive on «This PC.»
Alternatively, you can always pin the network folder location to Quick Access for faster access to the files by opening the folder, right-clicking «Quick Access» from the navigation pane, and selecting the «Pin current folder to Quick Access» option.
How to reset settings to default on File Explorer
Although you can restore the File Explorer original settings, there’s not a switch to reset all the settings at once. Instead, you have to reset the settings individually, in groups.
Reset General
To reset the general File Explorer settings, use these steps:
- Open File Explorer.
- Click the Options button from the «Home» tab.
- Click the General tab.
- Click the Restore Default button.
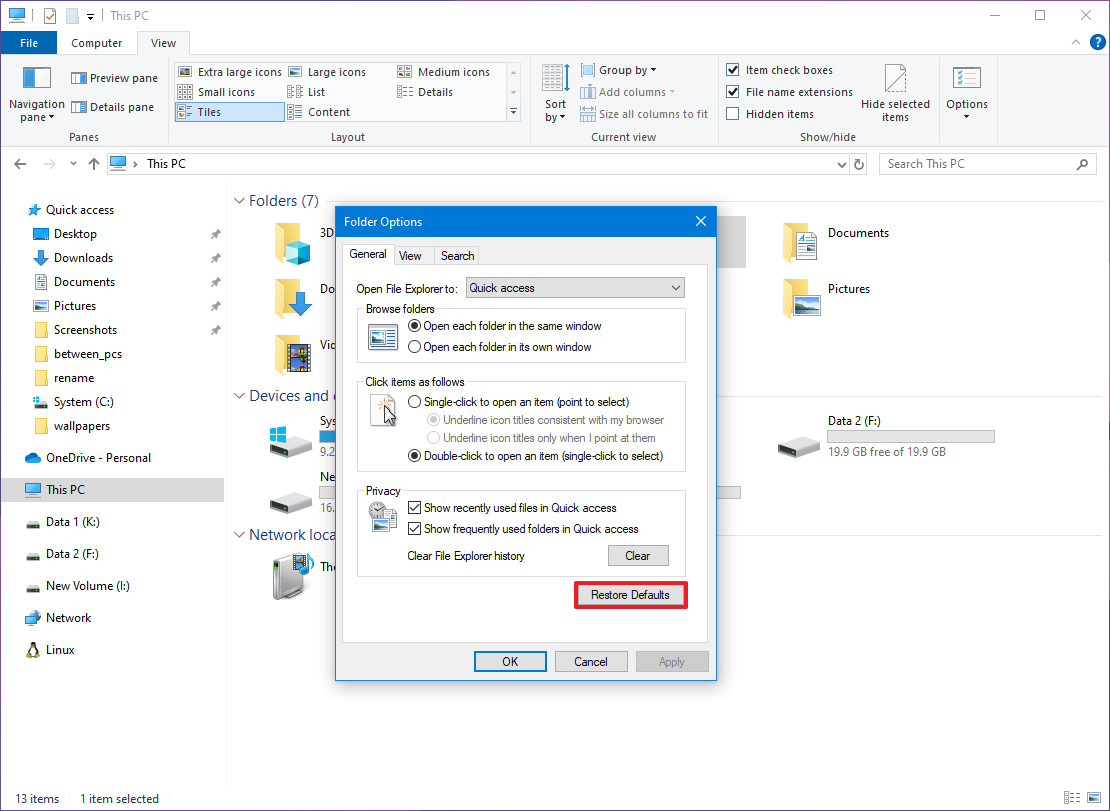
- Click the Apply button.
- Click the OK button.
After you complete the steps, the default option to File Explorer, browse folders settings, navigation, and privacy settings will reset to their default configurations.
Reset folder views
To reset the folder views to their defaults in File Explorer, use these steps:
- Open File Explorer.
- Click the Options button from the «Home» tab.
- Click the View tab.
- Click the Reset Folders button under the «Folder views» section.
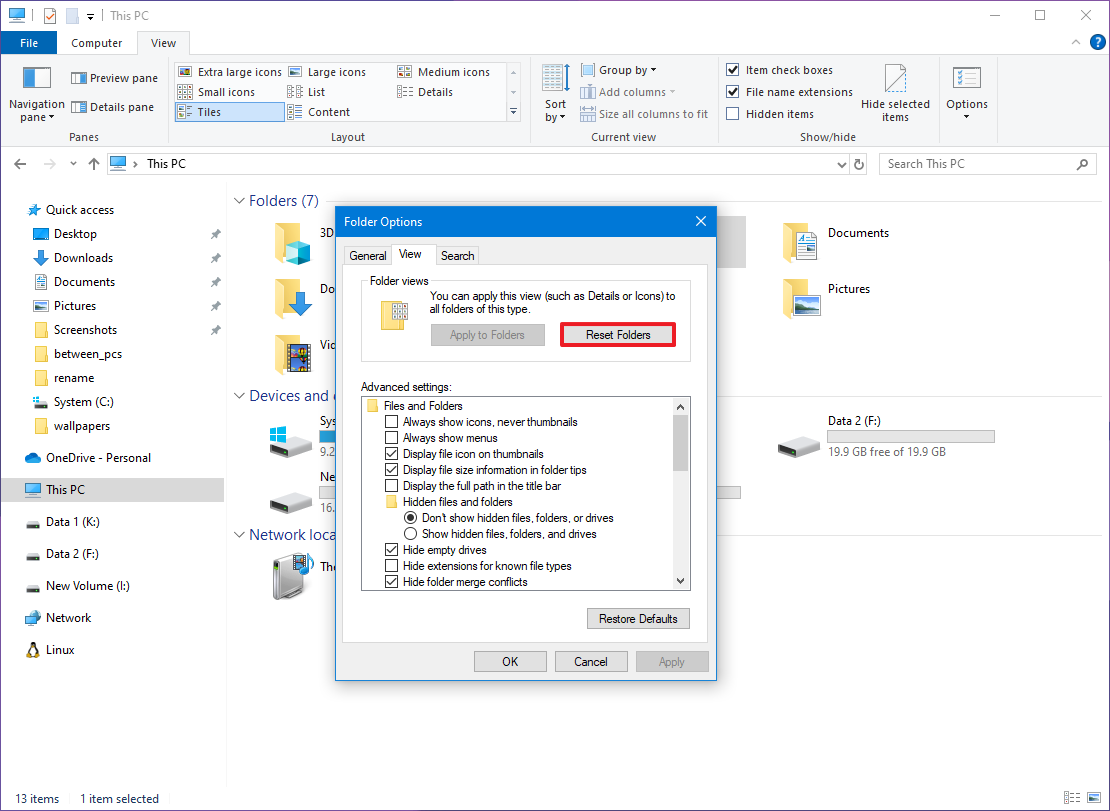
- Click the Apply button.
- Click the OK button.
Once you complete the steps, the folders will return to their default view settings. For instance, if the folders with documents used the «Large icons» view, the view will reset to «Details.»
Reset view settings
If you have been changing the File Explorer advanced settings, and you want to restore the original settings, you can use these steps:
- Open File Explorer.
- Click the Options button from the «Home» tab.
- Click the View tab.
- Click the Restore Default button.
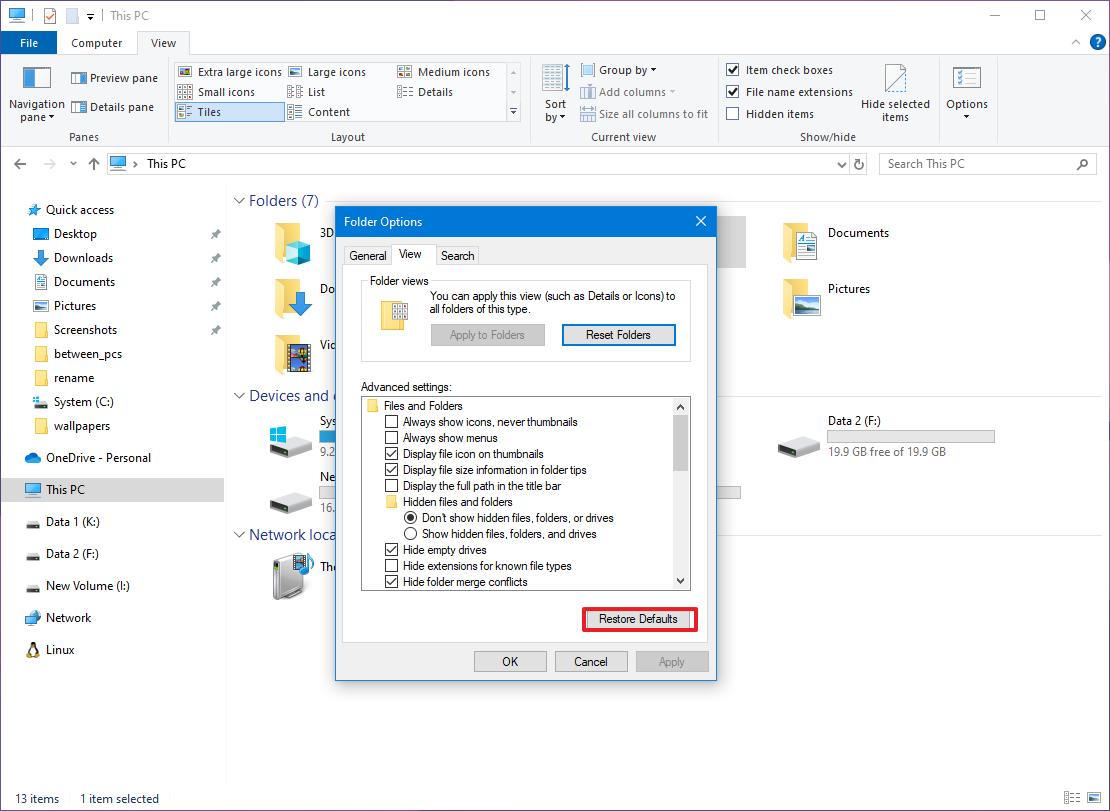
- Click the Apply button.
- Click the OK button.
After you complete the steps, this action will reset all advanced settings, such as files and folders, hidden files and folders, and navigation pane to their defaults.
How to access recycle bin from navigation pane on File Explorer
To add the recycle bin option to File Explorer, use these steps:
- Open File Explorer.
- Click the Options button from the «Home» tab.
- Click the Views tab.
- Check the «Show all folders» option under the «Advanced settings» section in the «Navigation pane» settings.

- Click the Apply button.
- Click the OK button.
Once you complete the steps, the recycle bin, along with the Control Panel, will be accessible from the navigation pane.
How to show libraries in navigation pane on File Explorer
If you’ve recently upgraded to Windows 10, you’re probably still used to accessing libraries from the «Libraries» tab in the navigation pane, which is no longer available by default on Windows 10.
If you want to show the libraries in File Explorer, use these steps:
- Open File Explorer.
- Click the Options button from the «Home» tab.
- Click the Views tab.
- Check the «Show libraries» option under the «Advanced settings» section in the «Navigation pane» settings.
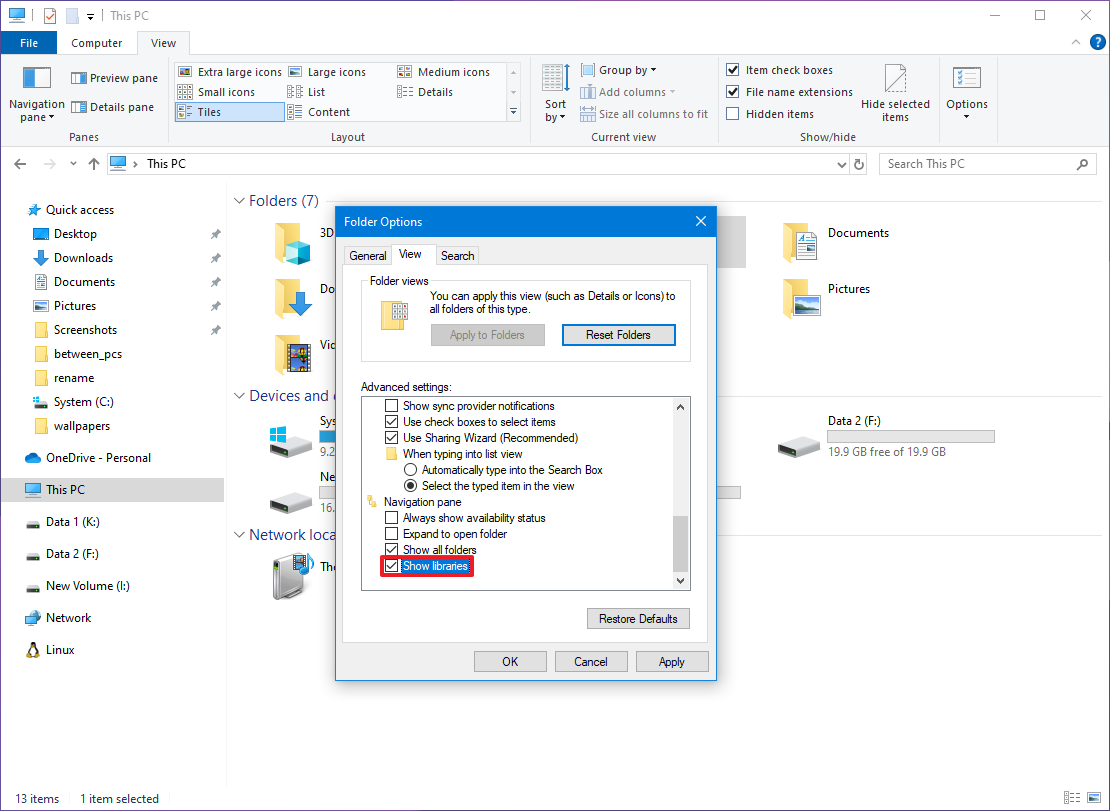
- Click the Apply button.
- Click the OK button.
After you complete the steps, the Libraries item will appear in the navigation pane with quick access to the Camera Roll, Documents, Music, Pictures, and Videos libraries.
How to customize folder view on File Explorer
File Explorer includes five different templates to customize the view of folders, including «General items,» «Documents,» «Pictures,» «Music,» and «Videos.» Each template provides a unique layout with icons as well as specific sorting and grouping depending on the folder’s content type to further customize the experience.
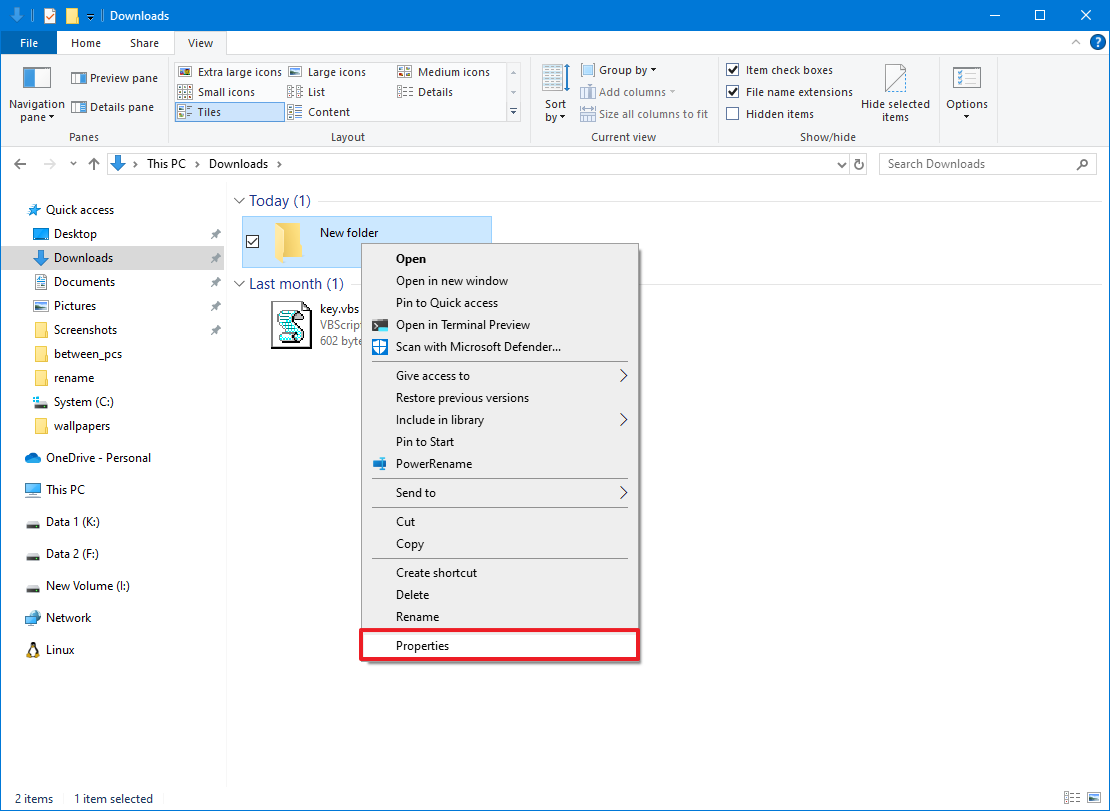
To customize the view for a specific folder on Windows 10, use these steps:
- Open File Explorer.
- Browse to the folder that you want to customize its view settings.
- Right-click the folder and select the Properties option.
- Click the Customize tab.
- Under the «What kind of folder you want» section, use the «Optimize this folder for» drop-down menu and select the best option that fits the contents. For example, «General items,» «Documents,» «Pictures,» «Music,» or «Videos.»

- (Optional) Check the «Also apply this template to all subfolders» option.
- (Optional) Under the «Folder pictures» section, click the «Choose File» button.
- Select a custom image to use as a folder icon in File Explorer.
- Quick tip: File Explorer can generate a thumbnail to make it easier to identify the folder in the location, but you can also use this option to set a custom image.
- (Optional) Click the Change Icon button under the «Folder icons» section.

- Select one of the icons available in the folder.
- Quick tip: You can also use any .ico file. If you want to use a custom icon, simply click the Browse button and select the icon that you want for the folder.
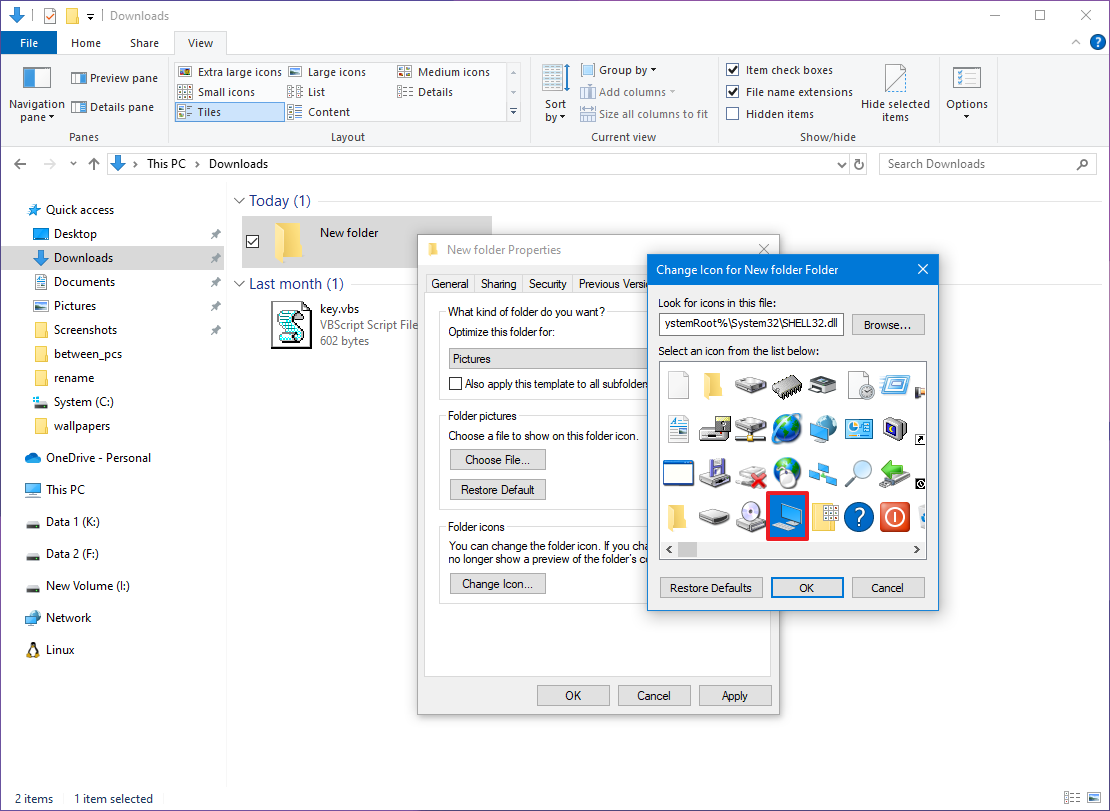
- Click the OK button.
Once you complete the steps, you may need to repeat the steps to customize the view for other folders.
How to show icons instead of thumbnails on File Explorer
File Explorer can create a folder preview to make it easier to identify its content. However, it’s possible to disable this option to show icons instead, which can come in handy if Windows 10 has problems displaying thumbnails or you’re not interested in seeing previews.
To disable thumbnail views in File Explorer, use these steps:
- Open File Explorer.
- Click the Options button from the «Home» tab.
- Click the Views tab.
- Check the «Always show icons, never thumbnails» option under the «Advanced settings» section in the «Files and Folders» settings.
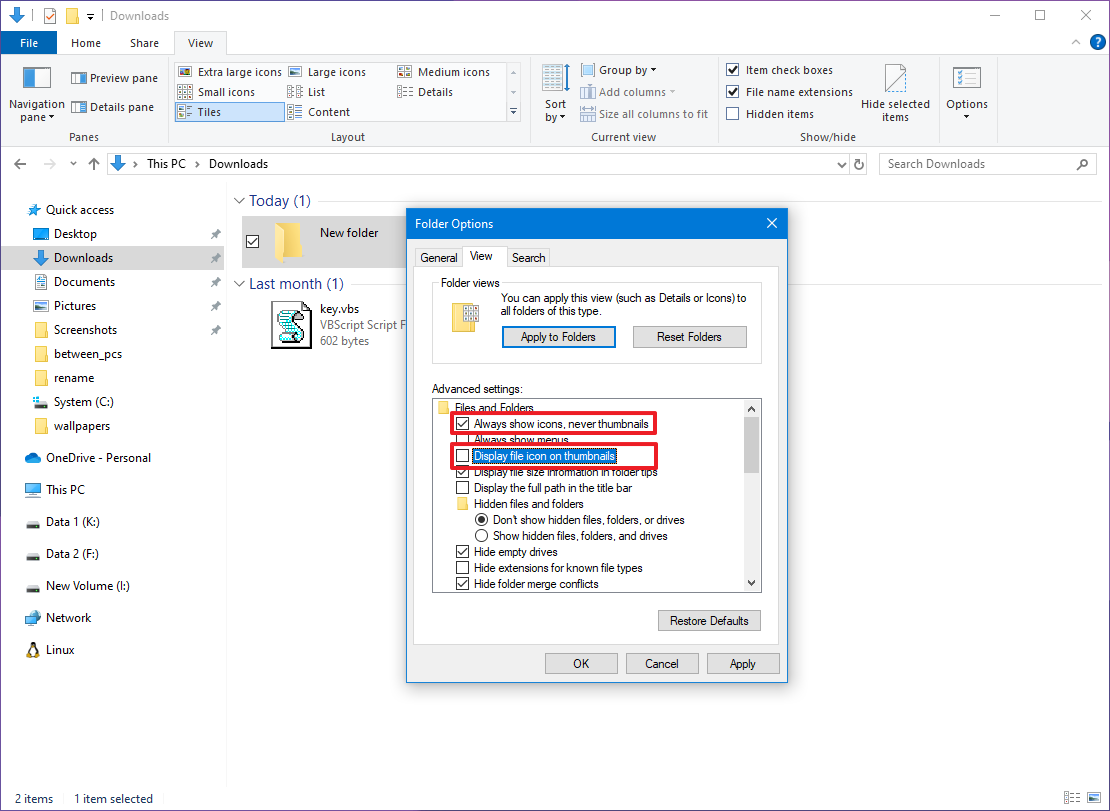
- Clear the «Display file icon thumbnails» option.
If you’re having problems displaying thumbnails and don’t want to disable the feature, you can use these steps to fix the problem.
How to restore previous version of files on File Explorer
If you’re using File History on Windows 10, you can quickly restore previous versions of files or files that you accidentally delete using File Explorer.
To restore the previous version of files with File Explorer, use these steps:
- Open File Explorer.
- Browse to the location with the content that you want to restore.
- Select the file that you want to restore the previous version, or select the folder containing the missing file.
- Click the History button from the «Home» tab.
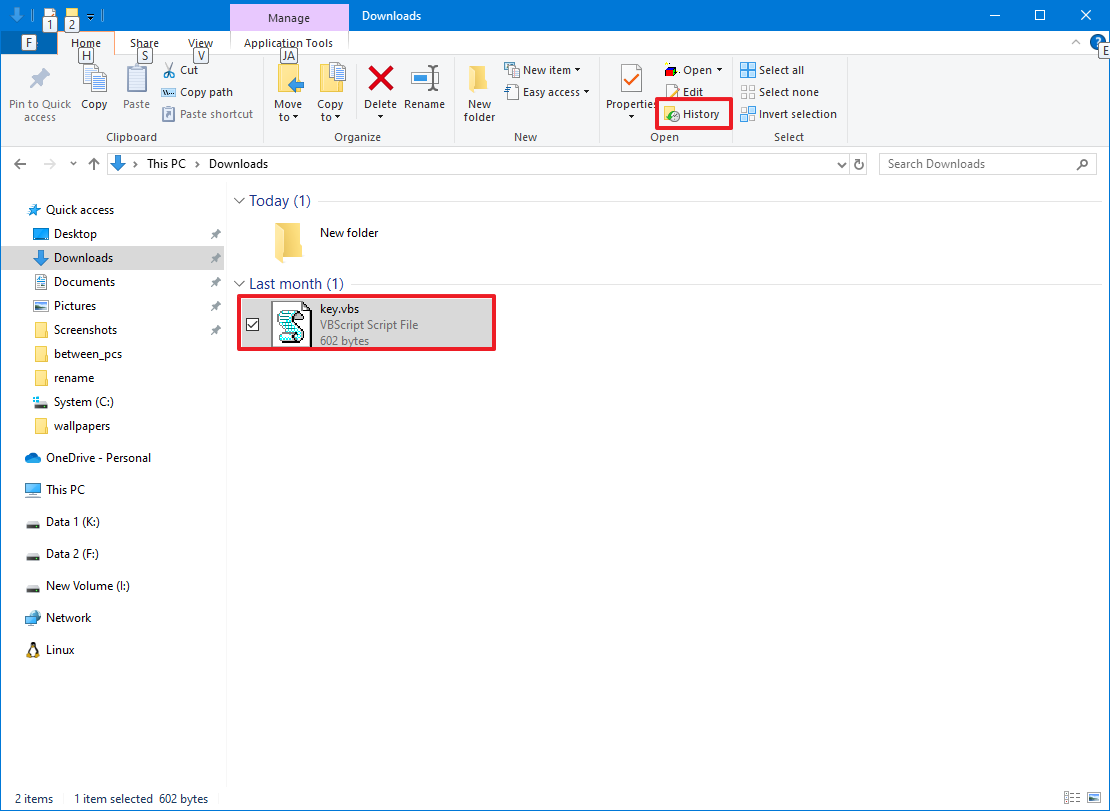
- Use the back-and-forth controls to find the version to restore.
- Select the file or folder.
- Quick tip: If you’re restoring a previous version of a file, understand that this process will replace the current version. You can avoid overwriting the data by copying the existing file.
- Click the green Restore button.
- Click the «Replace the file in the destination» option.
Once you complete the steps, the data will be restored to its original location.
How to use keyboard shortcuts to manage File Explorer
If you want complete tasks even faster, File Explorer includes a handful keyboard shortcuts, and here’s are the most useful:
- Windows key + E: Opens File Explorer.
- Ctrl + Shift + N: Creates new folder.
- Ctrl + N: Opens new instance of File Explorer.
- Alt + Left arrow: Returns to previous folder in the history.
- Alt + Right arrow: Jumps to next folder in the history.
- Alt + Up arrow: Moves a level up.
- Ctrl + F or F3: Starts a search.
- Ctrl + L: Focus on the address bar.
- Ctrl + Shift + Number 1-8: Changes folder view (large to small icons, list, details, etc.).
- F4: Focus on the address bar and opens recent history.
- F5: Refresh the instance of File Explorer.
- Ctrl + C: Copies an item.
- Ctrl + X: Cuts an item.
- Ctrl + V: Pastes an item.
- Ctrl + A: Select all items.
- Ctrl + Z: Undo last action.
- Ctrl + Y: Redo last action.
- F2: Renames item.
More resources
For more helpful articles, coverage, and answers to common questions about Windows 10 and Windows 11, visit the following resources:
- Windows 11 on Windows Central — All you need to know
- Windows 10 on Windows Central — All you need to know
Mauro Huculak has been a Windows How-To Expert contributor for WindowsCentral.com for nearly a decade and has over 15 years of experience writing comprehensive guides. He also has an IT background and has achieved different professional certifications from Microsoft, Cisco, VMware, and CompTIA. He has been recognized as a Microsoft MVP for many years.