
How to Exit Test Mode in Windows 11
Windows operating systems come equipped with various testing features and modes to enhance development and performance. One such mode is «Test Mode,» which is primarily used by developers and advanced users to run unsigned drivers without entering the Secure Boot process. However, working in Test Mode may not be ideal for everyday users due to potential security risks, system instability, or clutter on your screen, which includes the watermark that states «Test Mode».
If you’ve enabled Test Mode and want to revert back to normal functioning without the associated messages or risk, this article will guide you through the process in a detailed and methodical way.
Understanding Test Mode
What is Test Mode?
Test Mode in Windows 11 is a special operating mode that allows users to load unsigned drivers or test various software without the stringent security protocols that systems typically enforce. While this mode may be necessary for software developers testing their applications or hardware manufacturers testing new drivers, it can create issues for regular users, such as instability, compromised security, or general performance degradation.
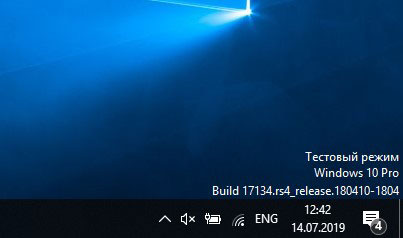
When you enter Test Mode, Windows will display a watermark in the corner of your desktop, clearly indicating that the system is operating under this specific mode. This can be particularly distracting or annoying for users who are not engaged in development.
Why Exit Test Mode?
There are several reasons why you might want to exit Test Mode in Windows 11:
- Security Concerns: Running unsigned drivers can make your system more vulnerable to attacks.
- System Stability: Test Mode can lead to system instability, affecting performance and usability.
- Watermark Removal: The «Test Mode» watermark can be obstructive and undesired for day-to-day use.
- Personalization Conflicts: Normal themes and visual settings may not operate properly while in Test Mode.
- Compliance and Licensing Issues: Some software may enforce restrictions when running in Test Mode.
With these concerns in mind, let’s go through the comprehensive steps to exit Test Mode in Windows 11.
Exiting Test Mode
Method 1: Through Command Prompt
The most straightforward method to exit Test Mode is by using the Command Prompt with elevated privileges.
-
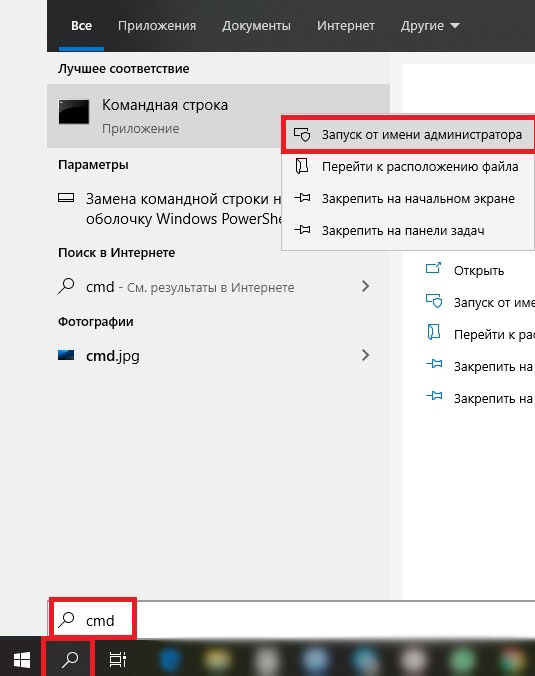
Open Command Prompt as Administrator:
- Click on the Start menu.
- Type
cmdorCommand Promptin the search bar. - Right-click on Command Prompt from the search results and select
Run as administrator.
-
Enter the Command to Disable Test Mode:
In the Command Prompt window, type the following command and hit Enter:bcdedit /set testsigning off -
Success Message:
If the command is successful, you will see a message indicating that the operation completed successfully. -
Restart Your Computer:
To apply the changes, restart your computer. Upon rebooting, the system should be operating in its normal mode, and the watermark should be gone.
Method 2: Using Windows PowerShell
Another way to exit Test Mode is by utilizing Windows PowerShell, which offers a flexible command-line interface.
-
Open Windows PowerShell as Administrator:
- Right-click on the Start button or press
Windows + X. - Select
Windows Terminal (Admin)orWindows PowerShell (Admin).
- Right-click on the Start button or press
-
Disable Test Mode:
Enter the command below in the PowerShell environment:bcdedit /set testsigning off -
Confirm Completion:
Much like the Command Prompt, a message will indicate that the operation has completed successfully. -
Restart the Device:
Restart your PC to ensure the changes take effect.
Method 3: Editing the System Configuration
If you prefer to use a graphical interface rather than command lines, you may opt to disable Test Mode through the System Configuration utility.
-
Open Run Dialog:
PressWindows + Ron your keyboard to open the Run dialog box. -
Access System Configuration:
Typemsconfigand hit Enter. -
Go to the Boot Tab:
In the System Configuration window, navigate to theBoottab. Here you will see various boot options for your device. -
Uncheck Test Mode:
If there’s an option for Test Mode, uncheck it. This setting may not appear in all configurations, depending on how the Test Mode was enabled originally. -
Apply Changes and Restart:
After making the changes, click onOKand thenRestartto apply the new settings.
Method 4: Modify Group Policy (For Advanced Users)
If you are on a Windows 11 Pro, Education, or Enterprise version, you might want to check the Group Policy Editor as an additional method.
-
Open Run Dialog:
PressWindows + R. -
Launch the Group Policy Editor:
Typegpedit.mscand press Enter. -
Navigate to the Path:
Go toComputer Configuration>Windows Settings>Security Settings>Local Policies>Security Options. -
Locate the Test Mode Option:
Look for any entries that relate to Test Mode. If you find one, you can disable it from there. -
Apply and Exit:
Apply the changes, close the Group Policy Editor, and restart your PC.
What to Do After Exiting Test Mode
Once you’ve exited Test Mode, it’s vital to check the following system components to ensure everything is functioning as expected:
-
Update Drivers:
After exiting Test Mode, it’s advisable to check for updates for your drivers. You can do this via:- Right-clicking on Start > Device Manager > navigating through device categories and checking for updates.
-
System Performance:
Monitor your system’s performance after disabling Test Mode. Check for any unusual behavior or errors. -
Install Necessary Software:
If you were using Test Mode to install unsigned software, ensure that any necessary applications are properly signed. -
Revert Security Settings:
If you modified security settings to allow unsigned drivers, revert these settings once Test Mode is disabled.
Troubleshooting
If you encounter problems exiting Test Mode or if your system behaves abnormally afterwards, consider the following troubleshooting steps:
-
Check Command Results:
If the command to disable Test Mode does not yield a success message, ensure you entered it correctly. -
System File Check:
Running a System File Check can identify and repair corrupted system files. Open Command Prompt as an administrator and type:sfc /scannow -
Consult Event Logs:
Use the Event Viewer to pinpoint any issues that may have arisen during the transition from Test Mode to standard operation. -
Reinstall Windows (As a Last Resort):
If all else fails and your system remains problematic, consider reinstalling Windows 11. However, make sure to back up your data before doing this.
Conclusion
Exiting Test Mode in Windows 11 is a straightforward process that can be accomplished through various methods, including command prompt utilization, PowerShell commands, and graphical system configurations. It is essential to exit Test Mode not only for better security and system stability but also to remove distractions like the persistent watermark.
Following the detailed instructions outlined in this guide ensures a smooth transition back to standard operating mode. If you experience any issues during or after the process, several troubleshooting options and best practices are available to help resolve them.
Always remember, working with modes like Test Mode is primarily recommended for experienced users and developers. For the average user, staying in standard operating mode provides the best security and user experience.
- Test Mode allows execution of custom code and installation of unsigned drivers.
- To enable Windows Test Mode, disable Secure Boot and run the command “bcdedit.exe -set TestSigning On” in Command Prompt, or go to WinRE > Troubleshoot > Advanced options > Startup Settings, and Disable driver signature enforcement.
- To exit Test Mode and remove the watermark, run the command “bcdedit.exe -set TestSigning Off” in the Command Prompt.
The Windows operating system has several built-in checks in place to make sure that unauthorized software and pieces of code cannot run without proper safety nets. This prevents malicious code and malware from corrupting your system.
Normally, if you try executing an unsigned piece of code or driver, it will be blocked as Windows will not be able to detect the (digitally) signing authority. However, the Windows “Test mode” allows users to run and install unsigned and unauthorized software.
If you are a developer who needs constant testing of your custom code, then you can benefit from this post by learning how to activate it. Or, if you are seeing the “Test Mode” watermark on your desktop and want to remove it, then you can see how to disable and exit the Test Mode using the steps given below.
Table of Contents
What is Test Mode in Windows
The Test Mode is a Windows testing environment that bypasses all security checks and allows users to perform any action without scrutinization. This mode is normally used by developers that allow them to run unsigned and raw code without the Windows security checks interrupting it. Another purpose the Test Mode serves is installing unsigned drivers which otherwise would not be allowed by the Windows OS.
Although useful, it is advised not to use the Windows Test Mode in production environments as it leaves the computer vulnerable to malicious software and attacks.
The test Mode was introduced in Windows 7 and has been a part of all Windows operating systems after that, including Windows 8, 8.1, 10, and 11.
How to enable Test Mode in Windows
The Test Mode in Windows can be enabled by disabling the Driver Signature Enforcement. A driver signature ensures that the software is from a verified and allowed source/manufacturer, and is therefore safe to run on the computer. Disabling this feature will automatically enable the Test Mode.
Here are two ways to enable the Windows Test Mode.
Enable Test Mode from Command Prompt
-
Press the Windows key + R to launch the Run Command box.
-
Type in “cmd” and press CTRL + Shift + Enter to launch an elevated Command Prompt.
-
Execute the following command in the Command Prompt:
bcdedit.exe -set TESTSIGNING ON
Enable test mode from Command Prompt Note: If you encounter the “An error has occurred setting the element data. The value is protected by Secure Boot policy and cannot be modified or deleted” error, you must disable Secure Boot and rerun the command.
-
Restart the computer.

When the computer restarts, you’ll notice the “Test Mode” watermark in the bottom-right corner of the desktop.

You may now continue to perform your testing. When done, you may exit the Windows Test Mode using the steps given below.
Enable Test Mode from Settings
-
Press the Windows Key + i to open the Settings app.
-
Go to System > Recovery.
-
Click “Restart now” in front of “Advanced startup.”

Restart into Advanced Startup -
When asked for confirmation, click “Restart now” again.
Confirm restart The computer will now boot into the Windows Recovery Environment (WinRE).
-
Click Troubleshoot.

Select Troubleshoot from WinRE -
Now click “Advanced options.”

-
Now click “Startup settings.”

-
Click Restart.
Restart the computer The device will now restart again. This time, you will be presented with a list of options you can choose from by using the function keys on the keyboard (F1-F9).
-
Press the function key corresponding with “Disable drive signature enforcement” (F7).

Disable driver signature enforcement


The computer will now restart and you will see the “Test Mode” watermark at the bottom of the screen.
This concludes the two methods to enter the Test Mode on a Windows computer. Note that there are other methods to disable driver signature enforcement (from Group Policy and Advanced Boot Menu). However, those methods do not activate the Test Mode since not all requirements are met.
Once you are done testing your software or code, I recommend turning off Safe Mode to restore the computer’s security integrity.
Disable Windows Test Mode (Remove Test Mode watermark)
Use the following steps to exit the Test Mode on a Windows PC:
-
Press the Windows key + R to open the Run Command box.
-
Type in “cmd” and press CTRL + Shift + Enter launch Command Prompt with administrative rights.
-
Now run the following 2 commands one after the other:
Bcdedit.exe -set loadoptions ENABLE_INTEGRITY_CHECKS
Bcdedit.exe -set TESTSIGNING OFF
Turn off Windows Testing Mode -
Restart the computer for the changes to take effect.

When the computer restarts, you’ll notice that the “Test Mode” watermark has disappeared, and you will no longer be allowed to run unverified code or install unsigned drivers.
Takeaway
If you haven’t noticed already, the Windows “Test Mode” is simply allowing it to run unsigned code and software, and involves the same steps and processes that are needed to manage Driver Signature Enforcement. Therefore, it can be concluded that disabling the said feature enables the Test Mode, and vice versa.
That said, not all methods that apply to disabling Driver Signature Enforcement will enable the Test Mode, or show its watermark. Only the methods given above can be used to enable or disable it.
Note that we do not recommend disabling Secure Boot or keeping the Test Mode enabled for prolonged periods, as it leaves your PC vulnerable to cyber threats. Therefore, it is recommended that you restore your default PC settings as soon as you are done with your testing.
Every time we install an application that isn’t from the Microsoft Store, we are greeted by a pop-up message warning us about the same. This is to ensure that no external software causes any harm to the system unbeknownst to us. Similarly, Microsoft verifies all kinds of drivers & applications for any malicious code and then digitally signs them as safe to use. Any piece of software that isn’t verified or doesn’t have an authentication certificate can and will most likely be blocked by the Windows OS. While these security measures help keep our computers safe and sound, they prove to be an annoyance for developers trying to test out their yet-to-released applications on Windows 10. These applications are usually in their alpha or beta stages and need quite a bit of testing before being released on the internet. This is where Windows Test Mode comes into play. In this article, we will be learning about the Test Mode, how to enter and exit Test Mode on Windows 10.

Test Mode is a temporary Windows state which permits the installation of unverified drivers and applications. Users need to manually enter (and exit) test mode. By installing applications still in their development phase in the test mode, developers can gauge real-time/real-world performance and also check how the code holds up in everyday use. A Test Mode watermark at the bottom-right corner of the desktop along with the Windows version and build number indicates that Windows is operating in Test Mode.

Since test mode is like an open invitation for all kinds of unsigned applications, regular users are recommended to stay away from this mode, and others should exit/disable it as soon as the testing is done. One must also avoid downloading any files from the internet as Windows doesn’t perform the customary security check while in testing mode.
Also Read: What is Wondershare Helper Compact?
How to Enter and Exit Test Mode
Entering and exiting test mode is a very simple task and requires executing only a single command. The command can be executed in either PowerShell or the Command Prompt application launched with administrative privileges. We will be using Command Prompt for this guide, but feel free to use PowerShell if you feel more comfortable with it.
1. Press the Windows key, type command prompt, and click on Run as administrator.

2. Enter the following command to enter Test Mode and hit the Enter key.
bcdedit -set TESTSIGNING ON

3. Now, type the given command to exit Test Mode and press the Enter key.
bcdedit -set TESTSIGNING OFF

You will receive a confirmation message that reads The operation completed successfully on executing either of the two commands.
Also Read: 17 Best Mobile Testing Tools
4. Go ahead and close the Command Prompt window and restart your PC. Depending on the command executed, your system will either enter the test mode or exit out of it after it restarts.
5. If you received an error message while trying to disable testing mode, first execute the given command. This will grant Windows the extra permission it needs to disable test mode.
bcdedit.exe -set loadoptions ENABLE_INTEGRITY_CHECKS

6. Finally, execute bcdedit -set TESTSIGNING OFF command to exit test mode.
Some users may get an error message that reads “Protected by Secure Boot policy”; this simply signifies that Secure Boot is enabled and in order to exit Test Mode, you will first need to disable Secure Boot from the BIOS menu.
If you are only looking to remove the Test Mode watermark from your screen, download Universal Watermark Disabler. Follow the on-screen instructions to install the tool and get rid of the watermark.
Recommended:
- 26 Best Free Malware Removal Tool
- Fix Windows 10 Update Error 0x80072ee7
- How to Set Up Rainmeter Dual Monitor Skins on Windows 10
- How to Extract Frames from Video in Windows 10
So, that was our guide on how to enter and exit test mode in Windows 10. Feel free to get in touch with us via the comments section below if you are facing any issues with the test mode.
If you’ve had trouble with your Windows PC lately, you might want to know how to take Windows 10 out of test mode. If your PC is stuck in this mode, the main reason could be that you’re using a test version of an application. Windows 10 has built-in support for this mode. This mode is a safe place to install new applications, try out security features, or run tests to identify bugs.
To exit from test mode, you need to restart the computer. First, you need to press the Windows key to open a command prompt. Then, enter cmd in the command prompt, as an administrator. After entering the command, you should see a confirmation message that states that the operation was successful. To exit test mode, simply restart your PC. You may need to restart your computer once more after completing the procedure.
To remove test mode, you must start a command prompt. To do so, press the Windows Key and then type “cmd” into the search box. Next, choose the option to run CMD as administrator. Then, press the Enter key to confirm the selection. Type the command once more and hit Enter. You’ll need to restart the system to make the changes permanent. Make sure you type the command correctly!
Why Does My Computer Say Windows 10 Test Mode?
When you encounter the error, you might have a couple of options. One is to try entering the command prompt. To do so, simply press the Win+Q key combination. If you do not have access to the command prompt, you can type cmd in the search bar. Next, you need to confirm the “Run as administrator” option. Finally, save any unsaved work and restart the computer.
Another option is to disable the test mode on your computer. This will prevent the error from showing up. You can do this by selecting the “Run as administrator” option from the start menu. From there, choose the “Power Shell” command. In the next window, click on the SLMGR -REARM button. Then, restart your PC, and the error message will no longer appear. If you haven’t had any trouble before, try restarting your PC.
Another option is to install a software program that removes the watermark. In some cases, the Test Mode watermark appears on applications that have unsigned driver files. The command sigverif will reveal the applications or devices that are tied to unsigned drivers. To remove the watermark, you can install the Microsoft Fix it 50756 program. This is a free download, and you can try it out for yourself.
How Do You Exit Out of Test Mode?
If you have trouble getting Windows to exit out of test mode, you can use the Powershell command to turn it off. You may also want to reboot your computer to remove the test mode. Disabling this mode is a great way to secure your computer and prevent hackers from infiltrating your computer. If you get an error message, it’s usually because Windows needs additional permissions or commands to perform certain tasks.
To enable the command prompt, you can press the Win+Q combination. Type in CMD or Powershell. Then hit Enter to open the command prompt. Then, choose Run as administrator. Once you’re in the command prompt, type “exit windows 10 out of test mode” and press enter. It’ll open the command prompt. You can now use PowerShell to perform various tasks on your PC.
Although the test mode is safe for the most part, you should avoid it as much as possible. You should never download files from the internet while in test mode. Moreover, if you want to make sure that your computer is safe, disable test mode. Windows 10 offers a management tools menu that will help you disable this mode. To disable this feature, open the Windows Powershell (admin) application.
How Do I Get Windows 10 Back to Normal Mode?
If you’re having trouble running Windows on your PC, you can reinstall the operating system to reactivate S Mode. However, you may not be able to use Windows in S Mode after exiting the operating system. In such a case, you can try reinstalling the OS using the Microsoft Store app. This option will also enable you to back up your files and revert Windows to its default settings.
To open the System Configuration Utility, press Win+R on your keyboard. This will open the Run dialog where you need to type msconfig. In this window, select the Boot tab, and click the Windows installation. Next, uncheck the Safe boot option and enable Make all boot settings permanent. If the box is already checked, simply uncheck it to boot into normal mode. If you can’t find this option, try the following methods:
The ‘Reset this PC’ option in the Control Panel lets you wipe your system and install a fresh version of Windows. This option reinstalls Windows and restores it to its default state. It also removes apps and settings that aren’t essential. Make sure to backup any personal files and data before selecting this option. Backup all your important data and settings by copying them to another storage media. You’ll need to choose an account that has administrative privileges. To do this, simply type your password and hit “OK”.
What is Test Mode?
If you’re running Windows 10, you probably have heard of Test Mode. The term explains the process of installing untested drivers on your computer. But how can you enable it? To enable it, you must either press the Win+Q key combination, or open the command prompt. Run the command prompt as an administrator. Then, type “cmd” in the search box. Once you’ve tapped in the right location, click “ok.”
To access Test Mode, you must be logged in and enrolled in your course. During your practice mode, you can answer the questions in order to improve your score. However, you must be aware that you cannot view notes or tutorials during the testing period. This is because all your progress will be lost if you navigate away during the testing session. And because of this, you can only test yourself on starred terms. However, be careful to use Test Mode wisely.
Test Mode is an environment where you can safely test changes before releasing them in production. When you’re in Test Mode, the modifications you make are visible only to visitors in the current domain. Furthermore, they’re persistent across protocols and shared context. So, if you’re going to be launching a new version, make sure you turn on Test Mode before you commit it to production. Otherwise, you’ll have to remove it from your test environment.
Why is My PC on Test Mode?
If you’re wondering why your PC is in test mode, there are a couple of things you can do. If the message keeps appearing, you’re likely installing new drivers that will put your PC into this mode. You can resolve this problem by pressing the Windows key and Q at the same time. Next, open the command prompt. Choose Run as administrator, and then enter the following command: “cmd” to launch the command prompt.
Run the command prompt as an administrator and type the command bcdedit -set TESTSIGNING OFF. Then, reboot your PC. Make sure you save your work or close programs before you run the command. Test Mode will be disabled once you’ve successfully done this. If you still see the ‘testsigning’ watermark, run the command again and your PC should start normally.
Another way to resolve this issue is to disable the feature that prevents driver signatures. Microsoft charges a premium for testing driver software, and not all manufacturers are willing to pay. You can also use your PowerShell to perform the same action. You’ll find the Command Prompt application near the clock. Type’sfc’ and press Enter to open it. You should see a message stating that the operation was successful.
How Do I Get Rid of Diagnosing My Computer?
A problem with Windows 10 is the ‘diagnosing my computer’ screen. The screen appears when the system starts up. While the automatic repair feature is great, it can’t fix all problems on its own. Sometimes, the diagnostics process can get stuck and the PC won’t boot. This issue can cause frustration for those who have to wait hours for their computer to start. To fix the problem, try one of the following solutions.
Check your system for system file corruption. If the diagnostic utility is appearing when the computer is ready to boot, it means it’s not able to find the system file it needs to run. It’s important to run a scan for viruses and other problematic files. If the diagnostic utility is stuck, you can try running the command-line utilities to fix it. Alternatively, you can just press the power button for 20 seconds to force the Windows 10 system to reboot.
If the problem is a hardware driver, you can try booting into Safe Mode. To do this, open the Windows command prompt (Admin) and install the updated driver. Another way to troubleshoot this issue is to run the Windows startup repair. Click on the Advanced Options menu and then click on Startup Repair. The diagnostic process will automatically select the most appropriate hardware driver for your system. It’s worth noting that the diagnostic process can be a lengthy process, so you can use a professional tool to help you through the process.
What is Test Mode in Centre Or Remote?
If you want to see all the data generated by your test, you can use the Test Mode. It is turned on by default, but you can switch it off and use other modes. While it is switched on, data generated during the test will not appear in reports or Insights. You will not be able to export data from your test in Excel or PDF format, as well. However, it is helpful to have this mode enabled for certain events.
The first step in testing the layout of your DCM is initial log-in. Once you log in, you can use Oracle Clinical to redefine synonyms that point to test data tables. This allows you to use existing CPEs and patient positions while testing the layout of the DCM. You can also check the database settings for error conditions. Oracle Clinical also allows you to edit the First-Pass data. The test mode maintains the system’s functionality, which means you don’t have to perform a complete system upgrade to run the test.
Learn More Here:
1.) Android Help Center
2.) Android – Wikipedia
3.) Android Versions
4.) Android Guides
Тестовый режим в Windows — это режим, позволяющий установить драйверы без цифровой подписи, обычно это требуется для работы различного специфического оборудования. Данный режим может работать как на обычных версиях Windows, так и на серверных Windows Server. Бывает, что в правом нижем углу появляется надпись «Тестовый режим», или «Test mode», рассмотрим как эту надпись можно убрать, или наоборот включить, если Вам нужен тестовый режим для установки драйверов без цифровой подписи.
Отключить тестовый режим: (Данная инструкция подходит для всех версий Windows и Windows Server)
— Заходим в командную строну от имени администратора. Сделать это можно путем ввода в поиск cmd = > Запуск от имени администратора
— Вводим в окне консоли: bcdedit.exe -set TESTSIGNING OFF
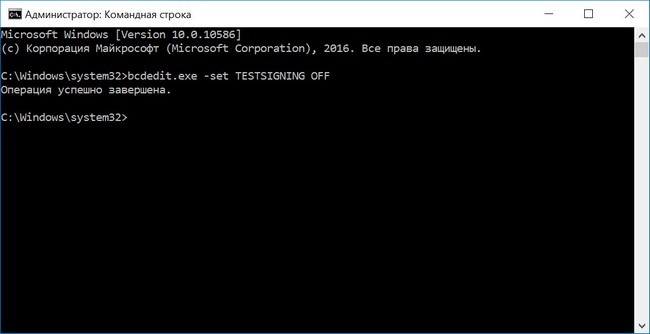
— Нажимаем Enter и перезагружаемся. После перезагрузки надпись «Тестовый режим» должен отключиться.
Если же, по каким-то причинам этот способ не помог, то делаем следующее:
— Так же заходим к командную строку от имени администратора и вводит по очереди следующие команды. (после каждой строки нажимаем Enter)
— bcdedit.exe -set loadoptions ENABLE_INTEGRITY_CHECKS
— Второй строкой вводим: bcdedit.exe -set TESTSIGNING OFF
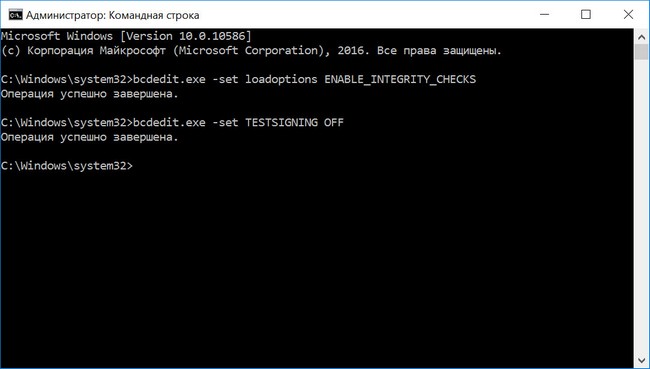
Жмем Enter и перезагружаем ПК. Теперь надпись «Тестовый режим» точно должна уйти.
Включить тестовый режим:
Здесь все так же предельно просто. Открываем командную строку от имени администратора и вводим: bcdedit.exe -set TESTSIGNING ON
Перезагружаем ПК и тестовый режим будет включен.