
Время на прочтение17 мин
Количество просмотров100K
Уважаемые друзья, в предыдущих публикациях мы говорили об основах информационной безопасности, законодательстве по защите персональных данных и критической информационной инфраструктуры, безопасности в кредитно-финансовой сфере, а также провели анализ основных стандартов по управлению рисками информационной безопасности и обсудили системы класса IRP, предназначенные для автоматизации реагирования на инциденты ИБ. Как мы знаем, при обработке инцидентов детальный анализ событий безопасности с устройств является одним из ключевых этапов. В данной публикации мы рассмотрим настройку подсистемы аудита ОС Windows, принципы анализа и централизованного сбора журналов аудита с Windows-устройств и их пересылку в SIEM-систему IBM QRadar, а также покажем, как можно с помощью штатных средств Windows и утилиты Sysmon настроить простейшую систему реагирования на инциденты ИБ. Вперед!
Для решения задачи обработки инцидентов ИБ логично рассуждать, что чем больше данных (логов, событий безопасности) мы собираем, храним и анализируем, тем проще нам будет в дальнейшем не только оперативно среагировать на инцидент, но и расследовать обстоятельства произошедших атак для поиска причин их возникновения. При этом большое количество данных для обработки имеет и очевидный минус: нас может просто «засыпать» сообщениями, алертами, уведомлениями, поэтому необходимо выбрать самые значимые с точки зрения ИБ события и настроить соответствующие политики аудита. Microsoft предлагает использовать бесплатный набор утилит и рекомендаций (Baselines) в своем наборе Microsoft Security Compliance Toolkit, в котором в том числе приведены и рекомендуемые настройки аудита для контроллеров домена, рядовых серверов и рабочих станций. Кроме рекомендаций вендора можно обратиться еще к документам CIS Microsoft Windows Server Benchmark и CIS Microsoft Windows Desktop Benchmark, в которых, в числе прочего, указаны рекомендуемые экспертами политики аудита для, соответственно, серверных и десктопных версий ОС Windows. Однако зачастую выполнение абсолютно всех рекомендаций неэффективно именно по причине потенциального появления большого количества «шумящих», малозначительных с точки зрения ИБ событий, поэтому в настоящей статье мы сначала приведем список наиболее полезных и эффективных (с нашей точки зрения) политик аудита безопасности и соответствующих типов событий безопасности ОС Windows.
Напомню, что в ОС Microsoft Windows, начиная с Microsoft Windows Server 2008 и Vista, используется достаточно продвинутая система аудита, настраиваемая при помощи конфигурирования расширенных политик аудита (Advanced Audit Policy Configuration). Не стоит забывать о том, что как только на устройствах будут включены политики расширенного аудита, по умолчанию старые «классические» политики аудита перестанут быть эффективными, хотя данное поведение может быть переопределено в групповой политике «Аудит: принудительно переопределяет параметры категории политики аудита параметрами подкатегории политики аудита (Windows Vista или следующие версии))» (Audit: Force audit policy subcategory settings (Windows Vista or later) to override audit policy category settings).
Политики аудита Windows
Пройдем последовательно по настройкам, эффективным для решения задач аудита ИБ и выработки целостной политики аудита безопасности.
|
Категория аудита |
Подкатегория аудита |
События аудита |
EventID |
Комментарии |
|
Вход учетной записи |
Аудит проверки учетных данных |
Успех, Отказ |
4776 |
Целесообразно контролировать на домен-контроллерах при использовании NTLM-аутентификации. |
|
Аудит службы проверки подлинности Kerberos |
Успех, Отказ |
4771 |
Неуспешная аутентификация учетной записи на контроллере домена с использованием Kerberos-аутентификации. |
|
|
4768 |
Запрос билета Kerberos, при этом следует анализировать коды ответа сервера. |
|||
|
Примечание: Данный тип аудита следует включать на контроллерах домена, при этом для детального изучения попыток подключения и получения IP-адреса подключающегося устройства на контроллере домена следует выполнить команду nltest /dbflag:2080ffff и проводить аудит текстового лог-файла %windir%\debug\netlogon.log |
||||
|
Управление учетными записями |
Аудит управления учетными записями компьютеров |
Успех |
4741 |
Заведение устройства в домен Active Directory; может использоваться злоумышленниками, поскольку любой пользователь домена по умолчанию может завести в домен 10 устройств, на которых может быть установлено неконтролируемое компанией ПО, в том числе вредоносное. |
|
Аудит управления группами безопасности |
Успех, Отказ |
4728 |
Добавление члена глобальной группы. |
|
|
4732 |
Добавление члена локальной группы. |
|||
|
4756 |
Добавление члена универсальной группы. |
|||
|
Аудит управления учетными записями пользователей |
Успех, Отказ |
4720 |
Создание учетной записи. |
|
|
4725 |
Отключение учетной записи. |
|||
|
4740 |
Блокировка учетной записи. |
|||
|
4723 |
Смена пароля. |
|||
|
4724 |
Сброс пароля. |
|||
|
Подробное отслеживание |
Аудит создания процессов |
Успех |
4688 |
При создании процесса. |
|
4689 |
При завершении процесса. |
|||
|
Примечание: Чтобы для командного интерпретатора велась запись введенных команд, следует включить политику «Конфигурация компьютера — Конфигурация Windows — Административные шаблоны — Система — Аудит создания процессов -> Включать командную строку в события создания процессов». Примечание: Чтобы велась запись выполняемых PowerShell-команд и загруженных PowerShell-модулей, следует включить в каталоге «Конфигурация компьютера — Конфигурация Windows — Административные шаблоны — Компоненты Windows — Windows PowerShell» политики «Включить ведение журнала модулей» (в настройках политики указать все модули символом «*») и «Включить регистрацию блоков сценариев PowerShell» (в настройках политики отметить check-box «Регистрация начала или остановки вызова блоков сценариев»). Работа PowerShell-скриптов регистрируется с EventID=4104,4105,4106 в журнале Microsoft-Windows-PowerShell/Operational, а загрузка PowerShell-модулей регистрируется с EventID=800 в журнале Windows PowerShell. |
||||
|
Вход/выход |
Аудит выхода из системы |
Успех |
4634 |
Для неинтерактивных сессий. |
|
4647 |
Для интерактивных сессий и RDP-подключений. |
|||
|
Примечание: При этом следует обращать внимание на код Logon Type, который показывает тип подключения (интерактивное, сетевое, с закэшированными учетными данными, с предоставлением учетных данных в открытом виде и т.д.). |
||||
|
Аудит входа в систему |
Успех, Отказ |
4624 |
При успешной попытке аутентификации, создается на локальном ПК и на домен-контроллере при использовании NTLM и Kerberos-аутентификации. |
|
|
4625 |
При неуспешной попытке аутентификации, создается на локальном ПК и на домен-контроллере при использовании NTLM аутентификации; при Kerberos-аутентификации на контроллере домена создается EventID=4771. |
|||
|
4648 |
При попытке входа с явным указанием учетных данных, например, при выполнении команды runas, а также при работе «хакерской» утилиты Mimikatz. |
|||
|
Примечание: При этом следует обращать внимание на код входа (Logon Type), который показывает тип подключения (интерактивное, сетевое, с закэшированными учетными данными, с предоставлением учетных данных в открытом виде и т.д.). Целесообразно также обращать внимание на код ошибки (Status/SubStatus), который также сохраняется в событии аудита и характеризует причину неуспешного входа — несуществующее имя учетной записи, недействительный пароль, попытка входа с заблокированной учетной записью и т.д. |
||||
|
Аудит других событий входа и выхода |
Успех, Отказ |
4778 |
RDP-подключение было установлено. |
|
|
4779 |
RDP-подключение было разорвано. |
|||
|
Аудит специального входа |
Успех |
4672 |
При входе с административными полномочиями. |
|
|
Доступ к объектам |
Аудит сведений об общем файловом ресурсе |
Успех, Отказ |
5145 |
При доступе к системных сетевым ресурсам, таким как \\C$\ . Данное событие будет создаваться при работе ransomware, нацеленного на горизонтальное перемещение по сети. |
|
Аудит других событий доступа к объектам |
Успех, Отказ |
4698 |
При создании задания в «Планировщике задач», что часто используется злоумышленниками как метод закрепления и скрытия активности в атакованной системе. |
|
|
Изменение политики |
Аудит изменения политики аудита |
Успех |
4719 |
Изменение политики аудита. |
|
4906 |
Изменение настройки CrashOnAuditFail. |
|||
|
Примечание: Изменить реакцию ОС на невозможность вести журнал аудита безопасности (настройка CrashOnAuditFail) можно в каталоге «Конфигурация компьютера — Конфигурация Windows — Параметры безопасности — Локальные политики — Параметры безопасности» в политике «Аудит: немедленное отключение системы, если невозможно внести в журнал записи об аудите безопасности». |
||||
|
Система |
Аудит расширения системы безопасности |
Успех |
4610 4614 4622 |
При появлении в системе новых пакетов аутентификации, что не должно происходить несанкционированно. |
|
4697 |
При создании нового сервиса, что часто используется злоумышленниками как метод закрепления и скрытия активности в атакованной системе. |
Кроме описанных выше настроек, имеет смысл также контролировать появление в журнале безопасности события с EventID=1102, которое формируется сразу после очистки журнала безопасности, что может говорить о вредоносной активности. Более того, разумно будет включить в каталоге «Конфигурация компьютера — Конфигурация Windows — Параметры безопасности — Локальные политики — Параметры безопасности» политику «Сетевая безопасность: ограничения NTLM: исходящий трафик NTLM к удаленным серверам» в значение «Аудит всего». После этого EventID=8001 в журнале Microsoft-Windows-NTLM/Operational будет содержать информацию об автоматической аутентификации на веб-ресурсах с учетной записью пользователя. Следующим шагом станет allow list с перечнем веб-ресурсов, которые легитимно могут запрашивать учетные записи, а указанную политику можно будет перевести в режим блокировки. Это не позволит вредоносным ресурсам получать NTLM-хэши пользователей, которые кликнули на ссылку из фишингового письма.
Обратим внимание и на то, что подсистема журналирования Windows весьма гибка и позволяет настроить аудит произвольных папок и веток реестра — следует лишь выбрать критичные для ИТ-инфраструктуры объекты аудита и включить данные опции.
Настройка Windows Event Forwarding, интеграция с IBM QRadar
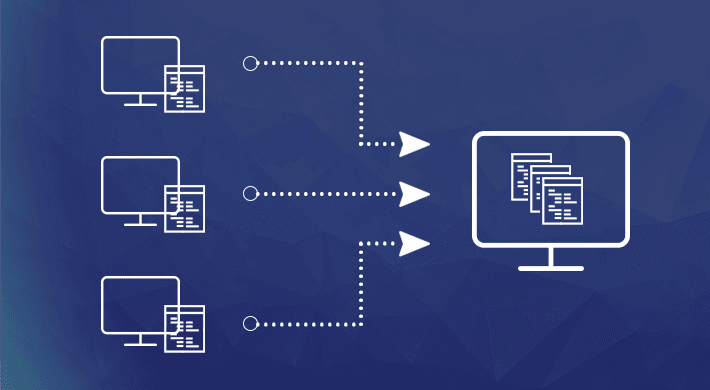
Настроив необходимые параметры аудита, перейдем к решению вопроса автоматизации сбора журналов аудита и их централизованного хранения и анализа. Штатный механизм Windows Event Forwarding, который работает из коробки с Microsoft Windows Server 2008 / Vista и старше, позволяет осуществлять централизованный сбор журналов аудита на устройстве-коллекторе (не ниже Windows Server 2008 и Vista, но все же рекомендуется использовать выделенный Windows Server 2012R2 и старше) с устройств-источников с применением функционала WinRM (Windows Remote Management, использует протокол WS-Management) и использованием т.н. «подписок» на определенные события (набор XPath-выражений, о которых мы поговорим далее, для выбора интересующих журналов и событий на источнике). События с удаленных устройств могут быть как запрошены коллектором (режим Pull/Collector initiated), так и отправлены самим источником (режим Push/Source computer initiated). Мы рекомендуем использовать последний режим, поскольку в режиме Push служба WinRM слушает входящие соединения только на коллекторе, а на клиентах-источниках WinRM не находится в режиме прослушивания и лишь периодически обращается к коллектору за инструкциями, что уменьшает поверхность потенциальной атаки на конечные устройства. По умолчанию для шифрования трафика от источников к коллектору, принадлежащих одному Windows-домену, используется Керберос-шифрование SOAP-данных, передаваемых через WinRM (режим HTTP-Kerberos-session-encrypted), при этом HTTP-заголовки и соответствующие метаданные передаются в открытом виде. Другой опцией является использование HTTPS с установкой SSL-сертификатов на приемнике и источнике, при этом они могут не принадлежать одному домену. При дальнейшем изложении будем считать, что мы работаем в одном домене и используем настройку по умолчанию.
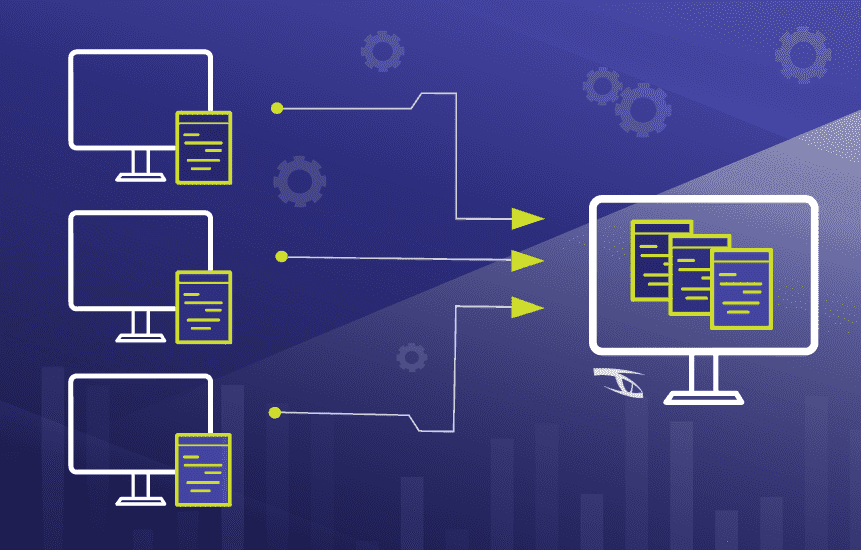
Рассмотрев концепцию пересылки логов с Windows-устройств, перейдем непосредственно к настройке нашей связки: источник событий -> сервер-коллектор -> утилита IBM WinCollect -> SIEM-система IBM QRadar.
Для включения сервиса сбора логов следует выполнить нижеописанные шаги:
1. На сервере-коллекторе выполнить команду winrm qc, ответить согласием на оба последующих вопроса (включение службы WinRM и прослушивание порта TCP:5985 для входящих соединений от источников). Следует учесть, что выполнение команды winrm qc одновременно включает Windows Remote Shell (WinRS) и разрешает принимать входящие соединения для удаленного управления через функционал WinRS. Отключить WinRS можно либо через политику «Конфигурация компьютера / Административные шаблоны / Компоненты Windows / Удаленная оболочка Windows / Разрешить доступ к удаленной оболочке -> Запретить» (Computer Configuration / Administrative Templates / Windows Components / Windows Remote Shell / Allow Remote Shell Access -> Disabled), либо командой winrm set winrm/config/winrs @{AllowRemoteShellAccess=»false»}
2. На сервере-коллекторе выполнить команду wecutil qc, согласиться на включение службы «Сборщик событий Windows» (Windows Event Collector). При этом в Windows Firewall создается разрешающее правило для входящих соединений на коллектор по TCP:5985.
3. На источниках событий следует включить службу WinRM: установить «Тип запуска» в значение «Автостарт» и запустить «Службу удаленного управления Windows» (Windows Remote Management (WS-Management)).
4. Проверить состояние службы WinRM на сервере-колекторе можно командой winrm enumerate winrm/config/listener, в результате выполнения которой отобразятся настройки порта и список локальных IP-адресов, на которых прослушиваются соединения по TCP:5985. Команда winrm get winrm/config покажет подробные настройки службы WinRM. Переконфигурировать настройки можно либо непосредственно через утилиту winrm, либо через групповые политики по пути «Конфигурация компьютера / Административные шаблоны / Компоненты Windows / Удаленное управление Windows» (Computer Configuration / Administrative Templates / Windows Components / Windows Remote Management).
5. На источниках событий требуется предоставить доступ к журналам аудита службе WinRM путем включения встроенной учетной записи NT AUTHORITY\NETWORK SERVICE (SID S-1-5-20) в локальную группу BUILTIN\Event Log Readers («Читатели журнала событий»). После этого необходимо перезапустить «Службу удаленного управления Windows» (WinRM) и службу «Журнал событий Windows» (EventLog).
6. Затем следует создать и применить конфигурацию групповой политики для источников, в которой будет указана конфигурация и адрес сервера-коллектора. Требуется включить политику «Конфигурация компьютера / Административные шаблоны / Компоненты Windows / Пересылка событий / Настроить адрес сервера…» (Computer Configuration / Administrative Templates / Windows Components / Event Forwarding / Configure the server address…) и указать адрес сервера-коллектора в следующем формате:
Server=http://servername.domain.local:5985/wsman/SubscriptionManager/WEC,Refresh=60
где 60 – частота обращения (в секундах) клиентов к серверу за новыми инструкциями по пересылке журналов. После применения данной настройки на устройствах-источниках следует сделать перезапуск службы WinRM.
7. Далее создаем и применяем конфигурацию подписки на сервере-коллекторе: открываем оснастку управления журналами аудита (eventvwr.msc) и находим внизу раздел «Подписки» (Subscriptions). Нажимаем правой кнопкой мыши и выбираем «Создать подписку», задаем имя подписки. Далее выбираем опцию «Инициировано исходным компьютером» (Source Computer Initiated, это означает предпочтительный режим Push). Нажимаем на кнопку «Выбрать группы компьютеров» (Select Computer Groups), выбираем из Active Directory те устройства или их группы, которые должны будут присылать логи на коллектор. Далее, нажимаем «Выбрать события» (Select Events) и вводим XPath-запрос (пример для сбора журналов Security):
<QueryList>
  <Query Id="0" Path="Security">
    <Select Path="Security">*</Select>
  </Query>
</QueryList>
8. В итоге, клиенты должны иметь активные сетевые соединения по TCP:5985 с сервером-коллектором. На сервере-коллекторе в eventvwr.msc в свойствах «Подписки» можно будет увидеть список клиентов-источников, а пересланные события будут находиться в разделе «Журналы Windows – Перенаправленные события» (Windows Logs – Forwarded Events) на сервере-коллекторе.
9. Далее решаем задачу пересылки собранных на сервере-коллекторе логов с источников в SIEM систему IBM QRadar. Для этого нам потребуется установить на сервере-коллекторе утилиту IBM WinCollect.
Рекомендуем использовать управляемый (Managed) режим работы WinCollect для упрощения его администрирования. Для того, чтобы отправляемые через WinCollect агрегированные события корректно обрабатывались в IBM QRadar, нам следует воспользоваться рекомендациями IBM и на сервере-коллекторе с установленной утилитой WinCollect перевести формат пересылаемых событий в RenderedText, а также сменить их локаль на EN-US командой wecutil ss SubscriptionName /cf:RenderedText /l:en-US (где SubscriptionName — имя подписки, заданное в п.7 выше). Кроме того, необходимо обеспечить сетевую доступность между сервером-коллектором с установленным WinCollect и нодами IBM QRadar по TCP:8413 и TCP/UDP:514.
10. После установки утилиты WinCollect на сервер-коллектор, в самой SIEM-системе IBM QRadar нужно будет добавить этот сервер в список источников (тип источника Microsoft Security Event Log, в поле Target Destination в выпадающем списке лучше выбрать вариант с TCP-syslog-подключением, отметить check-box Forwarded Events).
После применения указанных настроек новые события и устройства-источники, пересылающие Windows-логи на сервер-коллектор, появятся в консоли IBM QRadar автоматически. В итоге, после внедрения SIEM-системы данные в ней и регистрацию событий информационной безопасности можно будет легко обогатить журналами аудита Windows, собранными описанным способом с различных устройств в инфраструктуре компании.
Утилита Sysmon
Кроме задействования штатного функционала подсистемы журналирования, можно воспользоваться и официальной бесплатной утилитой Sysmon из пакета Microsoft Windows Sysinternals, которая существенно расширяет и дополняет возможности мониторинга ОС. Данная утилита дает возможность проводить аудит создания файлов, ключей реестра, процессов и потоков, а также осуществлять мониторинг загрузки драйверов и библиотек, сетевых подключений, WMI-событий и именованных каналов. Из особо полезных функций отметим возможность утилиты показывать родительский процесс и командную строку процесса, отображать значение хэш-сумм при событиях создания процесса и загрузки драйверов и библиотек с указанием наличия и действительности цифровой подписи. Несложным путем можно автоматизировать сравнение полученных хэш-сумм с индикаторами компрометации (IoCs, Indicator of Compromise) из данных фидов CyberThreat Intelligence, а также использовать приложение QVTI для IBM QRadar, с помощью которого хэши запускаемых файлов автоматически проверяются через сервис VirusTotal. Еще одной приятной опцией является возможность создания XML-конфигураций, в которых можно предельно четко указать объекты контроля и настройки работы Sysmon. Одними из наиболее продвинутых и детальных вариантов XML-конфигураций, с нашей точки зрения, являются конфиги https://github.com/ion-storm/sysmon-config и https://github.com/SwiftOnSecurity/sysmon-config .
Установка Sysmon предельно проста и также может быть легко автоматизирована:
1. Дистрибутив скачивается с https://docs.microsoft.com/en-us/sysinternals/downloads/sysmon
Все исполняемые файлы подписаны.
2. Создается или скачивается по приведенным выше ссылкам xml-файл с конфигурацией Sysmon.
3. Установка sysmon для x64 производится командой:
C:\folder\sysmon64.exe -accepteula -i C:\folder\sysmonconfig-export.xml , где sysmonconfig-export.xml – файл конфигурации, sysmon64.exe – файл-установщик.
Поддерживается запуск установки из сетевой папки.
4. После установки создается журнал Microsoft-Windows-Sysmon/Operational , размер которого мы сразу рекомендуем увеличить как минимум до 100 Мб.
Перезапуск устройства не требуется, Sysmon работает в виде сервиса, его исполняемый файл находится в C:\Windows\sysmon64.exe . По нашим подсчетам, footprint на конечной системе даже при использовании максимально детального конфига Sysmon не превышает 5-10% ЦПУ и около 100 Мб ОЗУ.
XPath-запросы
Наконец, выполнив необходимые настройки файлов журналов Windows, перейдем непосредственно к поиску интересующей информации. Заметим, что в случае включения всех рекомендованных политик аудита ИБ сами журналы событий становятся достаточно объемными, поэтому поиск по их содержимому может быть медленным (этих недостатков лишены специализированные решения, предназначенные в том числе для быстрого поиска информации — Log Management и SIEM-системы). Отметим также, что по умолчанию не все журналы Windows отображаются к графической оснастке (eventvwr.msc), поэтому в данной оснастке следует перейти в меню «Вид» и отметить check-box «Отобразить аналитический и отладочный журналы».
Итак, поиск по журналам аудита будем осуществлять с помощью встроенного редактора запросов XPath (XPath queries). Открыв интересующий нас журнал, например, журнал безопасности Windows (вкладка «Журналы Windows» -> «Безопасность» / Security), нажатием правой кнопки мыши на имени журнала выберем пункт «Фильтр текущего журнала». Нам откроется графический редактор поисковых запросов, при этом для наиболее продуктивной работы следует открыть вторую вкладку открывшегося окна с названием XML, отметив внизу check-box «Изменить запрос вручную». Нам будет предложено изменить XML-текст (по сути, XPath запрос) в соответствии с нашими критериями поиска.
Результат запроса будет также представляться в различных формах, но для лучшего понимания и получения детального контента в конкретном событии рекомендуем переключиться на вкладку «Подробности», а там выбрать radio-button «Режим XML», в котором в формате «ключ-значение» будут представлены данные события безопасности.
Приведем несколько полезных XPath запросов с комментариями.
1. Поиск по имени учетной записи в журнале Security — возьмем для примера имя Username:
<QueryList>
<Query Id="0" Path="Security">
<Select Path="Security">*[EventData[Data[@Name='TargetUserName']='Username']]
</Select>
</Query>
</QueryList>
2. Поиск по значению конкретного свойства события в журнале Sysmon — возьмем для примера поиск событий, в которых фигурировал целевой порт 443:
<QueryList>
  <Query Id="0" Path="Microsoft-Windows-Sysmon/Operational">
    <Select Path="Microsoft-Windows-Sysmon/Operational">*[EventData[Data[@Name='DestinationPort'] = '443']]</Select>
  </Query>
</QueryList>
3. Произведем поиск сразу по двум условиям — возьмем для примера событие входа с EventID=4624 и имя пользователя Username:
<QueryList>
  <Query Id="0" Path="Security">
    <Select Path="Security">
*[System[(EventID=4624)]]
and
*[EventData[Data[@Name='TargetUserName']='Username']]
</Select>
  </Query>
</QueryList>
4. Поиск по трем условиям — дополнительно укажем Logon Type = 2, что соответствует интерактивному входу в ОС:
<QueryList>
  <Query Id="0" Path="Security">
    <Select Path="Security">
*[System[(EventID=4624)]]
and
*[EventData[Data[@Name='TargetUserName']='Username']]
and
*[EventData[Data[@Name='LogonType']='2']]
</Select>
  </Query>
</QueryList>
5. Рассмотрим функционал исключения из выборки данных по определенным критериям — это осуществляется указанием оператора Suppress с условиями исключения. В данном примере мы исключим из результатов поиска по фактам успешного входа (EventID=4624) все события, которые имеют отношения к системным учетным записям (SID S-1-5-18/19/20) с нерелевантным для нас типам входа (Logon Type = 4/5), а также применим функционал задания условий поиска с логическим оператором «ИЛИ», указав не интересующие нас имя процесса входа (Advapi) и методы аутентификации (Negotiate и NTLM):
<QueryList>
  <Query Id="0" Path="Security">
    <Select Path="Security">*[System[(EventID=4624)]]</Select>
<Suppress Path="Security">*[EventData[(Data[@Name='TargetUserSid'] and (Data='S-1-5-18' or Data='S-1-5-19' or Data='S-1-5-20') and Data[@Name='LogonType'] and (Data='4' or Data='5'))]]
or
*[EventData[(Data[@Name='LogonProcessName'] and (Data='Advapi') and Data[@Name='AuthenticationPackageName'] and (Data='Negotiate' or Data='NTLM'))]]
</Suppress>
  </Query>
</QueryList>
IRP-система штатными средствами Windows
Как мы увидели, встроенный функционал подсистемы журналирования Windows позволяет весьма гибко осуществлять поиск по зафиксированным событиям аудита ИБ, комбинируя различные условия поиска. Однако, у Windows есть еще одна интересная «фишка», которая позволяет использовать сформированные описанным выше образом правила поиска событий — мы говорим про создание задач с определенным триггером в «Планировщике заданий» Windows, что также является штатным функционалом ОС.
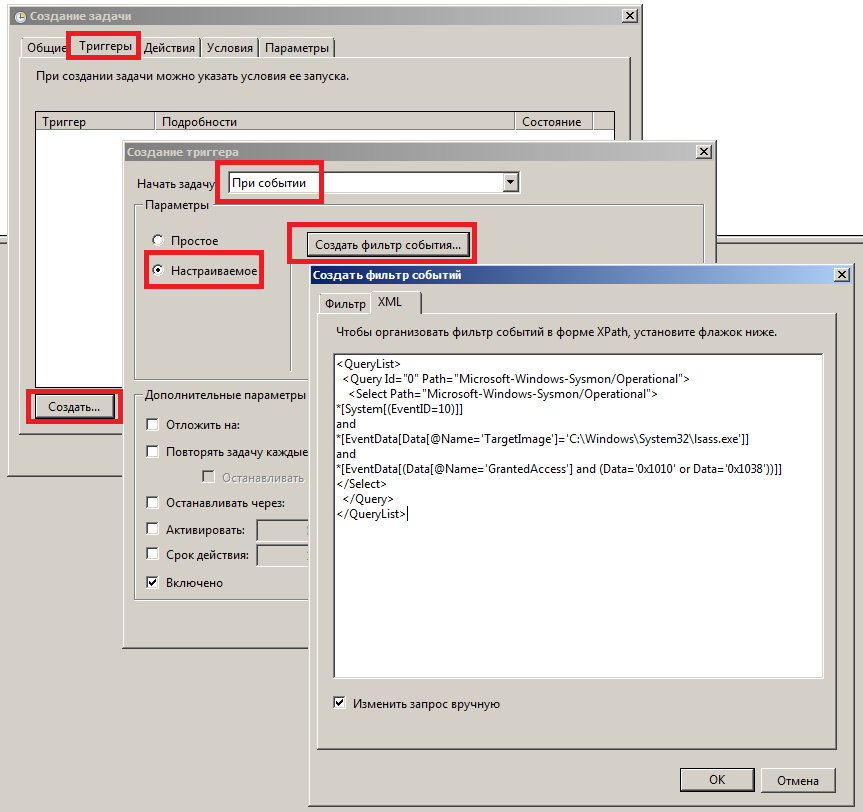
Как мы знаем, задачи в ОС Windows могут выполнять совершенно разные функции, от запуска диагностических и системных утилит до обновления компонент прикладного ПО. В задаче можно не только указать исполняемый файл, который будет запущен при наступлении определенных условий и триггеров, но и задать пользовательский PowerShell/VBS/Batch-скрипт, который также будет передан на обработку. В контексте применения подсистемы журналирования интерес для нас представляет функционал гибкой настройки триггеров выполнения задач. Открыв «Планировщик заданий» (taskschd.msc), мы можем создать новую задачу, в свойствах которой на вкладке «Триггеры» мы увидим возможность создать свой триггер. При нажатии на кнопку «Создать» откроется новое окно, в котором в drop-down списке следует выбрать вариант «При событии», а в открывшейся форме отображения установить radio-button «Настраиваемое». После этих действий появится кнопка «Создать фильтр события», нажав на которую, мы увидим знакомое меню фильтрации событий, на вкладке XML в котором мы сможем задать произвольное поисковое условие в синтаксисе XPath-запроса.
Например, если мы хотим выполнять некоторую команду или скрипт при каждом интерактивном входе в систему пользователя Username, мы можем задать в качестве триггера задачи следующее поисковое выражение, уже знакомое нам по примеру выше:
<QueryList>
  <Query Id="0" Path="Security">
    <Select Path="Security">
*[System[(EventID=4624)]]
and
*[EventData[Data[@Name='TargetUserName']='Username']]
and
*[EventData[Data[@Name='LogonType']='2']]
</Select>
  </Query>
</QueryList>
Другой пример: оповещение администратора при подозрительном обращении к системному процессу lsass.exe, который хранит в своей памяти NTLM-хэши и Керберос-билеты пользователей Windows, что может говорить об использовании утилиты Mimikatz или аналогичных ей:
<QueryList>
  <Query Id="0" Path="Microsoft-Windows-Sysmon/Operational">
    <Select Path="Microsoft-Windows-Sysmon/Operational">
*[System[(EventID=10)]]
and
*[EventData[Data[@Name='TargetImage']='C:\Windows\System32\lsass.exe']]
and
*[EventData[(Data[@Name='GrantedAccess'] and (Data='0x1010' or Data='0x1038'))]]
</Select>
  </Query>
</QueryList>
Таким образом, при условии работоспособности системы журналирования событий Windows можно не только детально и глубоко анализировать все произошедшее на устройстве, но и выполнять произвольные действия при появлении в журнале ОС событий, отвечающих условиям XPath-запроса, что позволяет выстроить целостную систему аудита ИБ и мониторинга событий безопасности штатными средствами ОС. Кроме того, объединив рекомендованные политики аудита информационной безопасности, утилиту Sysmon с детально проработанными конфигами, запрос данных из TI-фидов, функционал XPath-запросов, пересылку и централизацию событий с помощью Windows Event Forwarding, а также настраиваемые задачи с гибкими условиями выполнения скриптов, можно получить фактически бесплатную (по цене лицензии на ОС) систему защиты конечных точек и реагирования на киберинциденты, используя лишь штатный функционал Windows.
Did you know that Windows has had a built-in capability to function as a SIEM (Security Information and Event Management) system for years, provided you stay within the Windows ecosystem? This powerful feature, known as Windows Event Forwarding (WEF), allows you to centralize event logs from multiple Windows machines, giving you a comprehensive view of your network’s activities.
Today, we’re going to delve into how to use and set up Windows Event Forwarding to get an inventory going on NTLM v1 traffic. By configuring WEF, you can monitor and analyze all kinds if events, helping you detect and address potential security issues in real-time.
Introduction
Windows Event Forwarding (WEF) is a built-in feature available in Microsoft Windows operating systems designed to help organizations manage and analyze event logs in a structured and efficient manner. With WEF, system administrators can centralize event logs from multiple Windows computers and forward them to a central server, providing a consolidated overview of what is happening on those computers.
This functionality is particularly valuable for security and monitoring purposes because it allows organizations to track events in real-time, detect suspicious activities, and quickly identify security incidents. By using WEF, organizations can also reduce the amount of data traffic needed to retrieve event logs from multiple sources, thereby decreasing network load and improving efficiency.
This guide will show the steps on how Windows Event Forwarding should be configured, managed, and used to gain insights from the event logs of Windows computers connected to a domain, with a specific focus on the inventory of NTLMv1. Understanding and correctly implementing WEF can be an important step in improving the security and management of any IT infrastructure.
Architecture overview
The architecture for Windows Event Forwarding (WEF) in this document is based on a domain network where various components play critical roles in effectively managing and analyzing event log data.
- Domain Controllers: Domain controllers play a crucial role in handling authentication and enforcing configuration settings on all computers and devices within the domain. They ensure that event logs are correctly generated and logged by the endpoints.
- Log collectors: Log collectors are responsible for gathering event log data from endpoints, both clients, and servers, within the domain. These log collectors act as central storage points for log data, enabling consolidated analysis and monitoring.
- Endpoints (clients and servers): All machines within the domain are configured to forward event log data to the log collectors. These endpoints are essential for capturing relevant events and forwarding them to the central collection points.
It is important to note that machines outside the domain network are out of the scope of this blog, I’ll write about that feature in the near future. External machines perform their authentication against the domain controllers and servers within the domain where events are captured and logged. For the inventory of NTLMv1 authentication, there is less emphasis on these external machines since most relevant authentication events occur within the internal domain network and can be intercepted accordingly.

Requirements
Before Windows Event Forwarding (WEF) can be used, certain requirements must be met. These ensure smooth implementation without limitations.
- Windows version and edition: Ensure that both the source computers and the destination computer where you want to centralize event logs are running Windows operating systems that support WEF. WEF is available in Windows Vista and later versions, including Windows Server operating systems. It is recommended to use the latest version of Windows Server (Windows Server 2019+).
- Network connectivity: Ensure that all involved computers can communicate within the network. Necessary firewall rules must be configured to ensure that event logs can be safely forwarded to the central server. Using secure communication with Kerberos is strongly recommended to ensure the confidentiality and integrity of log data. Network traffic uses WSMAN port 5985.
- Rights and permissions: To set up and manage WEF, you need administrative rights on both the source computers and the target server. No domain admin rights are needed other than configuring the group policy objects.
- Log source configuration: Carefully configure the event logs on the source computers. You need to determine which events you want to collect and forward to the central server. This includes enabling the correct log channels and filtering events based on their relevance to your monitoring and security purposes.
Hardware requirements
The hardware requirements for a single log collector can vary depending on several factors, such as the volume of log data you want to collect, the frequency of events, and the complexity of your analysis needs. Generally, the more data you collect and analyze, the more powerful the hardware needs to be. Here are some general recommendations for the hardware requirements of a log collector:
- Processor (CPU): A multi-core processor with good processing speed is important for efficiently processing event logs. The exact requirements vary, but a modern quad-core processor or better is recommended. The processor should have a minimum of 4 cores.
- Memory (RAM): The amount of RAM depends on the volume of log data and the complexity of your analyses. Generally, at least 16 GB of RAM is recommended.
- Storage: Sufficient storage space is needed to store log data before it is forwarded to a central location. The required storage space depends heavily on the amount of data you collect and how long you want to retain it. Due to the high level of I/O used for writing the data, a fast and reliable storage solution, such as an SSD, is recommended for optimal performance. A minimum storage disk of 80GB is also recommended for the OS Disk.
- Network Interface: A fast network connection is essential, especially if you are collecting log data from multiple sources. A gigabit Ethernet connection is minimally recommended.
Collector requirements
The log collector has the capacity to receive data from a maximum of 4000 clients. This means that up to 4000 Windows computers or devices can forward their event logs to this collector for further analysis and storage. It is important to keep this maximum number in mind when planning the implementation to ensure it meets the needs of your organization. If you plan to collect data from more than 4000 clients, consider deploying multiple collectors to distribute the load and maintain optimal performance.
Performance updates
For users of Windows Server 2016 and Windows Server 2019, specific updates are available that offer performance improvements for the use of Windows Event Forwarding (WEF). These updates, KB4537806 for Windows Server 2016 and KB4537818 for Windows Server 2019, are designed to enhance the overall performance and efficiency of WEF.
It is important to note that these updates are typically installed as part of regular Windows updates, provided optional updates are enabled. Given that they can offer significant improvements for WEF implementations, they are highly recommended for organizations deploying WEF to collect and manage event logs.
- Windows Server 2016: KB4537806
- Windows Server 2019: KB4537818
Windows event collector setup
The Windows Event Collector (WEC) is a crucial component for the centralized inventory of event logs. It acts as the central collection point for event logs within the domain network and is responsible for receiving and storing log data from endpoints such as clients and servers. Here are the steps to configure it.
Windows Remote Management (WinRM – WSMAN)
Windows Remote Management (WinRM) is a Microsoft service that enables remote communication and management of Windows systems over a network. It allows administrators to execute commands, change configurations, and retrieve data from remote computers running Windows operating systems. With WinRM, administrators can manage system resources and retrieve data from multiple Windows machines without physically accessing each individual computer, which is useful for tasks such as configuration management, troubleshooting, and automation. WinRM is an essential component in using WEF. The following actions are necessary on the WEF collectors.
Note! Windows Server 2008R2 and higher have WinRM enabled by default. The steps below are necessary to ensure this configuration.
WinRM listener
Command-line:
winrm enumerate winrm/config/listenerExpected output:

To view the complete configuration, use the command-line:
Windows firewall
Run the following command-line in an elevated PowerShell console:
Get-NetFirewallRule | Where-Object {$_.Displayname -Like "Windows Remote Management (HTTP-In)" -and $_.Profile -like "*Domain*"} | Select EnabledExpected output:

Windows Remote Management service
Run the following command-line in an elevated PowerShell console:
Get-Service -Name WINRM | select StartTypeExpected output:

Corrective action
If any of the above measures do not produce the desired effect, the following cmdlet can be executed to configure the log collector for using Windows Remote Management:
WinRM collector adjustments for Server 2016/2019
On the collector, both the Windows Event Collector service (WecSvc) and the Windows Remote Management service (WinRM) use certain URLs. However, the default access control lists (ACLs) for these URLs only allow access for the svchost process that runs WinRM. In the default configuration of Windows Server 2016, both WinRM and WecSvc run in a single svchost process. Because this process has access, both services function correctly. However, if you change the configuration so that the services run in separate host processes, WecSvc no longer has access, and event forwarding stops working.
The services function differently in Windows Server 2019. If a Windows Server 2019 computer has more than 3,5 GB of RAM, WinRM and WecSvc run in separate svchost processes by default. Due to this change, event forwarding may also not work correctly in the default configuration.
To correct this oversight, run the following commands in an elevated command console:
netsh http delete urlacl url=http://+:5985/wsman/
netsh http add urlacl url=http://+:5985/wsman/ sddl=D:(A;;GX;;;S-1-5-80-569256582-2953403351-2909559716-1301513147-412116970)(A;;GX;;;S-1-5-80-4059739203-877974739-1245631912-527174227-2996563517)
netsh http delete urlacl url=https://+:5986/wsman/
netsh http add urlacl url=https://+:5986/wsman/ sddl=D:(A;;GX;;;S-1-5-80-569256582-2953403351-2909559716-1301513147-412116970)(A;;GX;;;S-1-5-80-4059739203-877974739-1245631912-527174227-2996563517)
Note! When you have upgraded to Server 2022 from 2016 or 2019 you should also take the steps described here.
Note! This correction does not apply to a new installation of Windows Server 2022.
Restart the server or service after making the changes. To view the current configuration, use the command-line:
Source: https://learn.microsoft.com/en-us/troubleshoot/windows-server/admin-development/events-not-forwarded-by-windows-server-collector
Setting up a Windows Event Forwarding (WEF) subscription
A WEF subscription is used to collect specific events from source computers within the domain and forward them to the Windows Event Collector (WEC) for centralized storage and analysis. Here are the steps to set up a WEF subscription:
On the log collector server, open the event viewer and navigate to “Subscriptions”. Click “Yes” when you receive the following prompt.
Right-click on “Subscriptions” and select “Create Subscription”.
In the dialog box, give the subscription a name and select: “Source computer initiated” then click on “Select Computer Groups…”.

Click on “Add Domain Computers” and add the computer group that needs to forward events. It is advisable to select “Domain Computers” here. Machines will then have the ability to forward events but will need further configuration.

Note! When targeting Domain Controllers, select the group “Domain Controllers” as these are not a part of “Domain Computers”.
Click “OK” in this dialog box. Click “Advanced” at the bottom of the screen and select the option “Minimize Latency”. Click “OK”. These options are available:
- “Normal” pull delivery every 15 minutes.
- “Minimize Bandwidth” push delivery every 6 hours.
- “Minimize Latency” for critical events push delivery every 30 seconds.
Note! The “HTTP” protocol is secured by Kerberos encryption.
In the “Select Events” dialog box, specify the event configuration. This can be done in the UI section or via an XPATH (XML tab). Since detecting NTLMv1 is outside the scope of the UI, the following configuration via an XPath filter is recommended:
<QueryList>
  <Query Id="0" Path="Security">
    <Select Path="Security">*[System[(EventID=4624)]] and Event[EventData[Data[@Name='LmPackageName'] and (Data='NTLM V1' or Data='LM')]] </Select>
    <Suppress Path="Security">*[EventData[Data[@Name='TargetUserName'] and (Data='ANONYMOUS LOGON')]]</Suppress>
  </Query>
</QueryList>
Note! When Windows does not detect NTLMv2 authentication, it assumes NTLMv1 is being used even when an “Anonymous Logon” occurs. This can create the impression that NTLMv1 authentication is taking place despite enforced policies. To filter this out, the “Suppress” option is added as shown above. For more information, see Microsoft’s documentation.
Click “OK” twice to return to the subscription. It will now be configured according to the set conditions. The following will be representative of this setup.

Event log size
Adjusting the size of the “Forwarded Events” log is important to ensure there is enough space to store log data. Here’s the command-line to set the event log size to 1 gigabyte:
wevtutil sl forwardedevents /ms:1000000000Log archiving
Log archiving is an important part of event log management. When an event log is full and can no longer contain data, archiving can be enabled to store older events before new data is recorded. This ensures important log data is preserved for further analysis even when the log is full. Enabling this feature ensures no valuable data is lost. Here is the command-line to enable archiving:
wevtutil sl forwardedevents /ab:true /rt:trueWEF configuration via a Group Policy object (GPO)
A Group Policy Object (GPO) is the way to manage the Windows Event Forwarding (WEF) configuration on multiple computers within the domain. Here are the steps to create a WEF configuration via a GPO:
In “Group Policy Management,” create a group policy object in the organizational unit where the machines that need to receive the WEF configuration are located. This GPO can be filtered based on computer names or a specific group.
Note! Assigning a group to a computer object requires a reboot of the respective host.
Hint! This policy exclusively uses computer configuration, therefore set the GPO Status to: “User configuration settings disabled.”
In the policy, navigate to:Computer Configuration -> Policies -> Windows Settings -> Security Settings -> Restricted Groups
Add a group named “Event Log Readers” and click “OK”.
In “Member of this group,” click “Add” and add the pseudo group “NT AUTHORITY\Network Service.” Click “OK” twice to return.
Note! The above must be done to give the “Network Service” rights to read and forward event logs to the collector.
In the policy, navigate to:Computer Configuration -> Policies -> Windows Settings -> Security Settings -> System Services
Configure the “Windows Remote Management” service to start automatically. Click “OK” to return.

In the policy, navigate to:Computer Configuration -> Policies -> Administrative Templates -> Windows Components -> Event Forwarding
Set the following policies:
- Configure forwarder resource usage: Enabled
- The maximum forwarding rate: 500
- Configure target Subscription Manager: Enabled
Server=http://<FQDN of the collector>:5985/wsman/SubscriptionManager/WEC,Refresh=120
Note! The maximum forwarding rate indicates how many log entries a host can forward at a time. A typical deployment will be between 500 and 1000 entries.
Note! The specified refresh interval is for retrieving the WEF configuration from the subscription. When there are few or no changes, this value can be increased.
In the policy, navigate to:Computer Configuration -> Policies -> Administrative Templates -> Windows Components -> Event Log Service -> Security
Set the following policy:
- Configure Log Access: Enabled
- Log Access:
O:BAG:SYD:(A;;0xf0005;;;SY)(A;;0x5;;;BA)(A;;0x1;;;S-1-5-32-573)(A;;0x1;;;S-1-5-20)Note! In many blogs, S-1-5-20 is replaced by “NS”. This does not work on a Domain Controller; hence, the SID is used in this rule.
Checking the WEF configuration
Once the previously shown configuration is successfully implemented, the log collector configured, and the policies applied to the hosts that need to forward the event log, the endpoints will eventually check in with the log collector.
On the log collector, open the Event Viewer – Subscriptions. The number of “Source Computers” will increase over time.

Right-click and select “Runtime Status” to observe the individual endpoints.

Generating a control event
To test and verify the functionality of Windows Event Forwarding (WEF) and ensure that events are correctly forwarded to the ‘Forwarded Events’ logs, you can execute the following PowerShell command on one of the hosts within the domain:
Write-EventLog -LogName System -EventId 4624 -EntryType Information -Source "System" -Message "This is an event generated for WEF testing purposes"Note! This event uses the “System” event log instead of “Security”. Access to the security log is restricted and cannot be easily written. To test the above, an additional subscription is needed with the System event log selected.
Open the Event Viewer –> Forwarded Events to check for the generated test event.

Auditing and Group Policy requirements for NTLMv1 logging
To properly capture and log NTLMv1 events, advanced auditing must be enabled, and the correct Group Policy settings must be configured on the relevant Windows computers within the domain. Here are the requirements and steps:
Advanced auditing
Advanced auditing is a feature in Windows operating systems that allows detailed logging of specific events and actions on a computer. It provides more in-depth and accurate information than standard logging, enabling administrators and security professionals to gain detailed insights into system behavior and identify potential security issues.
The default configuration already activates the relevant settings. However, it is advisable to perform a preliminary check to ensure the desired auditing is present. Execute the following command-line:
auditpol.exe /get /category:Logon/Logoff
Note! Logon must have at least success enabled to generate the desired events.
NTLM Auditing in Group Policy
Ensure that the GPO with the configured audit policy settings is applied to the target computers. Link the GPO to the relevant organizational unit (OU).
In the policy, navigate to:
Computer Configuration -> Policies -> Windows Settings -> Security Settings -> Local Policies -> Security Options
- (All domain members, incl DCs):
Network Security: Restrict NTLM: Audit Incoming NTLM Traffic:
Enable auditing for domain accounts. - (All domain members, incl DCs):
Network Security: Restrict NTLM: Outgoing NTLM traffic to remote servers: Audit All. - (Domain Controllers only):
Network Security: Restrict NTLM: Audit NTLM authentication in this domain: Enable all.


Forcing NTLMv1 for testing purposes
Forcing NTLMv1 authentication within a managed domain requires specific steps and considerations to ensure it is done safely. This chapter focuses on the procedure and considerations for enabling NTLMv1 authentication for testing purposes within a Windows environment. The following steps are discussed to effectively manage this process.
Domain Controller
In a policy on the organizational unit for domain controllers, the group policy setting “Network security: LAN manager authentication level” should not be set to or should not have the maximum value of 5 “Send NTLMv2 response only/refuse LM”, any other setting is fine for testing.
Server class devices
Server class devices do not require changes as long as domain accounts are used for testing.
EndPoint devices
A Windows EndPoint device must have the value “Send LM & NTLM responses” in the group policy setting “Network security: LAN manager authentication level”.
A reboot is not strictly necessary.
Authentication test
From the Windows EndPoint device, open a CIFS/SMB share on an IP address or an HTTP(S) request on an IP address to an IIS web server configured for NTLM authentication. This server can be part of the created subscription, but it’s not a requirement as the DC handles the authentication.
The 4624 event will appear in the security event log of the DC where a connection is made. If properly configured, this event will be forwarded to the log collector within 30 seconds.
Troubleshooting
Although Windows Event Forwarding is a powerful tool for collecting and centrally managing Windows events, challenges and issues can sometimes arise during its implementation. This chapter is dedicated to identifying, diagnosing, and resolving problems that may occur with Windows Event Forwarding. I will cover various common issues along with steps and techniques to effectively address them. By becoming familiar with troubleshooting, you can ensure that the Windows Event Forwarding implementation runs smoothly and that important data is always available for analysis.
Event log locations
- Application and Services Logs – Microsoft – Windows
- EventLog-Forwarding Plugin (log)
- Windows Remote Management (log)
- Event Collector (log)
Firewall rules
- Windows Firewall ports Windows Remote Management (HTTP-In) Port 5985 configured for inbound communication.
- Windows Firewall ports Windows Remote Management (HTTP-In) – Compatibility Mode – Port 80 configured for inbound communication.
- Windows Firewall ports Windows Remote Management (HTTPs-In) configured for inbound communication.
Basic firewall connectivity
Test-NetConnection -ComputerName prod-mon.corp.michaelwaterman.nl -port 5985
Check WinRM connectivity
winrm id -remote:<source_computer_name> -auth:none
WinRM settings
WinRM client configuration
winrm get winrm/config/client/authWinRM server configuration
winrm get winrm/config/service/authWinRM service configuration
winrm get wmi/root/cimv2/Win32_Service?Name=WinRMReset WinRM to default
winrm invoke restore winrm/config @{}WinRM related security groups
- Local administration.
- Domain administrator
Display all registered machines to the subscription
wecutil gr <Subscription>
All about NTLM values
LM-manager (LM) authentication is the protocol used to authenticate Windows clients for network operations, including domain memberships, access to network resources, and user or computer authentication. The LM authentication level determines which challenge/response authentication protocol is negotiated between the client and server computers. Specifically, the LM authentication level determines which authentication protocols the client will attempt to negotiate or which the server will accept. The value set for LmCompatibilityLevel determines which challenge/response authentication protocol is used for network logons. This value affects the level of the authentication protocol used by clients, the level of session security negotiated, and the level of authentication accepted by servers.
| Value | Setting | Description |
|---|---|---|
| 0 | Send LM & NTLM responses. | EndPoints use LM and NTLM authentication and never use NTLMv2 session security. Domain controllers accept LM, NTLM, and NTLMv2 authentication. |
| 1 | Send LM & NTLM – use NTLMv2 session security if negotiated. | EndPoints use LM and NTLM authentication and use NTLMv2 session security if the server supports it. Domain controllers accept LM, NTLM, and NTLMv2 authentication. |
| 2 | Send NTLM response only. | EndPoints use only NTLM authentication and use NTLMv2 session security if the server supports it. Domain controllers accept LM, NTLM, and NTLMv2 authentication. |
| 3 | Send NTLMv2 response only.
(Windows 7+ default) |
EndPoints use only NTLMv2 authentication and use NTLMv2 session security if the server supports it. Domain controllers accept LM, NTLM, and NTLMv2 authentication. |
| 4 | Send NTLMv2 response only/refuse LM. | EndPoints use only NTLMv2 authentication and use NTLMv2 session security if the server supports it. Domain controllers refuse LM authentication and only accept NTLM and NTLMv2 authentication. |
| 5 | Send NTLMv2 response only/refuse LM & NTLM. | EndPoints use only NTLMv2 authentication and use NTLMv2 session security if the server supports it. Domain controllers refuse LM and NTLM authentication and only accept NTLMv2 authentication. |
Additional info
This chapter contains various references that are not included in the main part of the post and are intended to further support the NTLM traffic inventory process.
NTLM Registry key settings
- Key:
HKEY_LOCAL_MACHINE\SYSTEM\CurrentControlSet\Control\Lsa - Value:
LmCompatibilityLevel - Type:
DWORD
PowerShell for auditing activation
# Audit NTLM Authentication in this domain: Enable all - Domain Controllers Only
Set-ItemProperty -Path 'HKLM:\SYSTEM\CurrentControlSet\services\Netlogon\Parameters' -Name AuditNTLMInDomain -Value 7

# Audit incoming NTLM traffic: Enable auditing for all accounts
Set-ItemProperty 'HKLM:\SYSTEM\CurrentControlSet\Control\Lsa\MSV1_0' -Name AuditReceivingNTLMTraffic -Value 2

# Restrict NTLM: Outgoing NTLM traffic to remote servers: Audit All
Set-ItemProperty 'HKLM:\SYSTEM\CurrentControlSet\Control\Lsa\MSV1_0' -Name RestrictSendingNTLMTraffic -Value 1
Final thoughts
Implementing Windows Event Forwarding (WEF) is a powerful way to enhance your organization’s security and monitoring capabilities. By centralizing event logs and focusing on NTLM v1 traffic, you can gain valuable insights into your network’s authentication processes and identify potential security risks.
While setting up WEF may require some initial effort and configuration, the benefits of having a comprehensive, real-time view of your network’s activities are well worth it. This guide has provided you with the necessary steps and considerations to get started, but remember that ongoing monitoring and adjustment are key to maintaining an effective security posture.
Windows Event Forwarding Guidance
About This Repository
Over the past few years, Palantir has a maintained an internal Windows Event Forwarding (WEF) pipeline for generating and centrally collecting logs of forensic and security value from Microsoft Windows hosts. Once these events are collected and indexed, alerting and detection strategies (ADS) can be constructed not only on high-fidelity security events (e.g. log deletion), but also for deviations from normalcy, such as unusual service account access, access to sensitive filesystem or registry locations, or installation of malware persistence.
The goal of this project is to provide the necessary building blocks for organizations to rapidly evaluate and deploy WEF to a production environment, and centralize public efforts to improve WEF subscriptions and encourage adoption. While WEF has become more popular in recent years, it is still dramatically underrepresented in the community, and it is our hope that this project may encourage others to adopt it for incident detection and response purposes. We acknowledge the efforts that Microsoft, IAD, and other contributors have made to this space and wish to thank them for providing many of the subscriptions, ideas, and techniques that will be covered in this post.
About Windows Event Forwarding
Windows Event Forwarding (WEF) is a powerful log forwarding solution integrated within modern versions of Microsoft Windows. One of the most comprehensive descriptions of WEF can be found on the Microsoft Docs page here, but is summarized as follows:
- Windows Event Forwarding allows for event logs to be sent, either via a push or pull mechanism, to one or more centralized Windows Event Collector (WEC) servers.
- WEF is agent-free, and relies on native components integrated into the operating system. WEF is supported for both workstation and server builds of Windows.
- WEF supports mutual authentication and encryption through Kerberos (in a domain), or can be extended through the usage of TLS (additional authentication or for non-domain joined machines).
- WEF has a rich XML-based language that can control which event IDs are submitted, suppress noisy events, batch events together, and send events as quickly or slowly as desired. Subscription XML supports a subset of XPath, which simplifies the process of writing expressions to select the events you’re interested in.
Repository Layout
This repository is organized as follows:
- WEF Subscriptions: Subscriptions are the core component of WEF that determine which events should be forwarded, how they should be stored, and at what cadence and batch size they are sent.
- Windows Event Channels: Event Channels are queues that can be used for collecting and storing event log entries on a collector server.
- Group Policy Objects: GPO recommendations for configuring auditing, enabling windows event collection/forwarding, etc.
- AutorunsToWinEventLog: A script leveraging existing WEF infrastructure and Sysinternals’ Autoruns to collect persistence and auto-start related artifacts.
Using This Repository
Note: We recommend that you spin up a lab environment before deploying any of these configurations, scripts, or subscriptions to a production environment.
- Download the repository and review the contents.
- Deploy auditing GPOs to your fleet to start collecting security-critical events.
- Configure one or more Windows Event Collector servers. Apply the associated GPOs.
- (Optional) Configure your WEC server(s) to function as a powershell transcription logging target.
- Deploy the windows event channels to the WEC server(s).
- Load one or more WEF subscriptions on the WEC server(s).
- Start collecting data and hunting badness.
Contributing
Contributions, fixes, and improvements can be submitted directly against this project as a GitHub issue or pull request. When contributing an update to CustomEventChannels.man, please do not include the compiled .DLL for security reasons. Once your pull request has been merged, we will compile the updated manifest into a DLL and add it to the repository.
License
MIT License
Copyright (c) 2018 Palantir Technologies Inc.
Permission is hereby granted, free of charge, to any person obtaining a copy
of this software and associated documentation files (the «Software»), to deal
in the Software without restriction, including without limitation the rights
to use, copy, modify, merge, publish, distribute, sublicense, and/or sell
copies of the Software, and to permit persons to whom the Software is
furnished to do so, subject to the following conditions:
The above copyright notice and this permission notice shall be included in all
copies or substantial portions of the Software.
THE SOFTWARE IS PROVIDED «AS IS», WITHOUT WARRANTY OF ANY KIND, EXPRESS OR
IMPLIED, INCLUDING BUT NOT LIMITED TO THE WARRANTIES OF MERCHANTABILITY,
FITNESS FOR A PARTICULAR PURPOSE AND NONINFRINGEMENT. IN NO EVENT SHALL THE
AUTHORS OR COPYRIGHT HOLDERS BE LIABLE FOR ANY CLAIM, DAMAGES OR OTHER
LIABILITY, WHETHER IN AN ACTION OF CONTRACT, TORT OR OTHERWISE, ARISING FROM,
OUT OF OR IN CONNECTION WITH THE SOFTWARE OR THE USE OR OTHER DEALINGS IN THE
SOFTWARE.
Further Reading and Acknowledgements
Many open source publications were referenced for the development of these Subscriptions, and we wish to acknowledge those who have contributed to this effort.
- Palantir Medium: Windows Event Forwarding for Network Defense
- Microsoft Windows Event Forwarding to help with intrusion detection
- Monitoring What Matters
- Spotting the Adversary
- Creating Custom Windows Event Forwarding Logs
- Windows Logging Cheat Sheet
- Event Forwarding Guidance
- Windows Event Log Reference:
- Windows Event Log Consuming Events
- Advanced XML Filtering
- XPath Documentation
- Exploit Guard Event Views
Windows Event Forwarding (WEF) is a built-in feature that allows you to collect logs from multiple Windows machines and centralize them on a single collector system. It’s perfect for monitoring, auditing, security analysis, and compliance.
Instead of logging into each machine and browsing Event Viewer (which, let’s face it, no one enjoys), WEF sends logs over the network to a collector computer, letting you analyze everything in one place.
Whether you’re a sysadmin, SOC analyst, or just someone trying to tame the chaos of logs—this guide is for you.
🧱 Requirements
| ✅ Required Element | 💡 Description |
|---|---|
| Collector Machine | Central system to gather logs |
| Source Computers | Systems that forward events |
| Windows Firewall Config | Must allow WEF traffic |
| Administrative Privileges | Required for setup |
| Group Policy | For automatic configuration (recommended) |
🛠️ Step-by-Step: Configure Windows Event Forwarding
🔧 Step 1: Set Up the Collector Computer
On the machine that will receive events:
- Open Event Viewer (
eventvwr.msc) - In the left panel, right-click Subscriptions > Create Subscription
- Name your subscription (e.g., “Security Events from Clients”)
- Choose Collector Initiated or Source Initiated:
| Type | Use When |
|---|---|
| Collector Initiated | You control which computers to pull from 🧲 |
| Source Initiated | Remote systems push logs automatically 📤 |
- Click Select Computers to add clients
- Choose which events to collect (e.g., Application, System, Security)
- Click Advanced > Minimize Latency for real-time-ish results
- Click OK to save the subscription
📦 You’ve now created the channel for collecting logs!
🧭 Step 2: Configure the Source Computers
There are two ways to do this:
– Automatically via Group Policy (preferred for domain environments)
– Manually for standalone or test systems
🏢 Method A: Configure with Group Policy
- Open Group Policy Management Console (
gpmc.msc) - Create or edit a GPO linked to the OU with source computers
- Go to:
Computer Configuration > Policies > Administrative Templates > Windows Components > Event Forwarding - Enable Configure Target Subscription Manager
- Set the server (collector) using this format:
Server=http://COLLECTOR-HOST:5985/wsman/SubscriptionManager/WEC,Refresh=60 - Apply and force the GPO with
gpupdate /force
💡 If you have DNS, use the hostname instead of IP.
🧪 Method B: Configure Manually (Testing or Small Setups)
Run this on each source computer (with admin rights):
wecutil qc
winrm quickconfig
Then register the subscription manager:
winrm set winrm/config/client @{TrustedHosts="COLLECTOR-HOST"}
And finally:
eventcreate /T INFORMATION /ID 100 /L Application /D "Test WEF Log"
Watch for this on the collector machine.
🧪 Validate the Setup
On the Collector:
- Open Event Viewer
- Navigate to Forwarded Events
- Check for logs from source machines
On the Source Machine:
- Run
gpresult /rto ensure GPO applied - Run
Get-WinEvent -LogName ForwardedEventsto confirm logs are sending
🔒 Tips for Secure WEF Setup
| Tip | Why It Matters |
|---|---|
| Use HTTPS/SSL | Encrypts log traffic (default is HTTP) |
| Filter sensitive event logs | Avoids flooding the collector |
| Use Least Privilege | Don’t use domain admin accounts unnecessarily |
| Monitor Collector Health | Set alerts if it stops receiving logs 🧠 |
🧰 Useful Commands
| Command | Purpose |
|---|---|
wecutil qc |
Quick config on collector |
wecutil es <subscription.xml> |
Import a subscription |
winrm quickconfig |
Set up WinRM for log transport |
Get-WinEvent -LogName ForwardedEvents |
Check logs programmatically |
🧠 Why Use WEF?
| Use Case | How WEF Helps |
|---|---|
| Security Monitoring | Collects logs for SIEMs like Splunk/Sentinel |
| Audit Compliance | Tracks access and system changes |
| Troubleshooting | Centralized event access = faster resolution |
| Resource Efficiency | Avoids installing log agents everywhere |
✅ Summary Table
| Component | Role |
|---|---|
| Collector Computer | Gathers logs |
| Source Computers | Send logs to collector |
| Group Policy | Automates source setup |
| WinRM/WEC | Transports logs securely |
🧭 Final Thoughts
Windows Event Forwarding is one of the most underrated tools in the Windows ecosystem. It’s lightweight, native, and powerful—especially when paired with a SIEM or centralized dashboard.
If you’re managing more than one Windows device, setting up WEF is absolutely worth the effort.
Just don’t forget to monitor the collector—and make sure it’s actually receiving logs. Because a silent collector is worse than a chatty one. 😉
Last Updated on January 17, 2025 by Satyendra
The DMTF WS-Eventing standard was first introduced in Windows Server 2008 so that system administrators could centralize Windows event logs. As part of the open Web Services-Management (WS-Man) protocol that’s included in the Windows Management Framework (WMF), event forwarding provides a means to read and store event logs from Windows devices in one place.
Windows Event Forwarding (WEF) is agentless, so you don’t need to install any additional software to enable it, all the required technology is built-in to the operating system. At least one server must be set up as a collector, where subscriptions are configured to pull the required logs from other devices. While agents aren’t needed, Windows Remote Management (WinRM), and associated firewall exceptions, must be enabled on participating devices.
If the participating devices are in a workgroup, i.e. not joined to an Active Directory (AD) domain, then some extra configuration will be required to get WEF to work. Pull subscriptions only require one or more collectors to be configured, but source-initiated ‘push’ subscriptions require each device that will push logs to a collector, be configured using Group Policy.
Pull versus Push
Collectors pull logs from servers using a domain user account that’s added to the Event Log Readers group. Pull event forwarding is easy to set up, because only the collector needs to be configured. But collector-initiated event forwarding doesn’t scale well, and can be inefficient as the collector must contact all devices even if they don’t have any new events to forward.
Push event forwarding requires every device to be configured using Group Policy, not just the collector, but additionally supports HTTPS for securing event forwarding in a workgroup scenario. Remember, that NTLM exchanges between workgroup computers don’t provide the same level of authentication security as Kerberos in an AD environment.
Custom Forwarding Logs
Collectors receive events from subscribed servers in the Windows Event log called Forwarded Events. That might suffice in small environments, but it’s likely that you’ll want to organize collected events in to separate logs. To create these logs, download the Windows Software Development Kit (SDK) for the version of Windows you’re using, and compile an event DLL, using the Manifest Generator app, to add a custom event channel to the collector.
Collecting Events
Once you’ve decided that you’d like to set up WEF, it’s important to determine what are the most important events to collect, and from which devices. If you plan to collect lots of event data, make sure you have enough disk space and that Windows is configured not to purge logs too quickly.
- Auditing