При скачивании образов Windows 10, особенно если речь идет о предварительных сборках, вы можете получить файл ESD вместо привычного образа ISO. Файл ESD (Electronic Software Download) — зашифрованный и сжатый образ Windows (хотя может содержать и отдельные компоненты или обновления системы).
При необходимости установки Windows 10 из файла ESD вы легко можете конвертировать его в ISO и затем использовать уже обычный образ для записи на флешку или диск. О том, как конвертировать ESD в ISO — в этой инструкции.
Существует множество бесплатных программ, которые позволяют выполнить конвертацию. Я остановлюсь на двух из них, которые мне кажутся лучшими для этих целей.
Adguard Decrypt
Adguard Decrypt by WZT — предпочитаемый мной метод конвертации ESD в ISO (но для начинающего пользователя, возможно, более простым будет следующий способ).
Шаги для конвертации в общем случае будут следующими:
- Скачайте комплект Adguard Decrypt с официального сайта https://rg-adguard.net/decrypt-multi-release/ и распакуйте его (потребуется архиватор, который работает с файлами 7z).
- Запустите файл decrypt-ESD.cmd из распакованного архива.
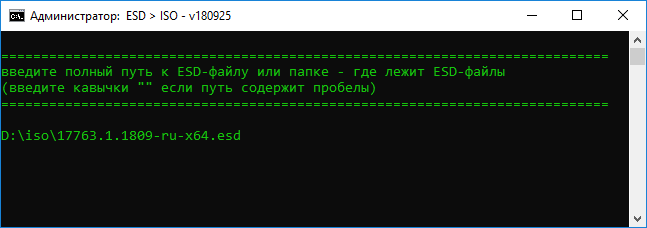
- Укажите путь к файлу ESD на вашем компьютере и нажмите Enter.

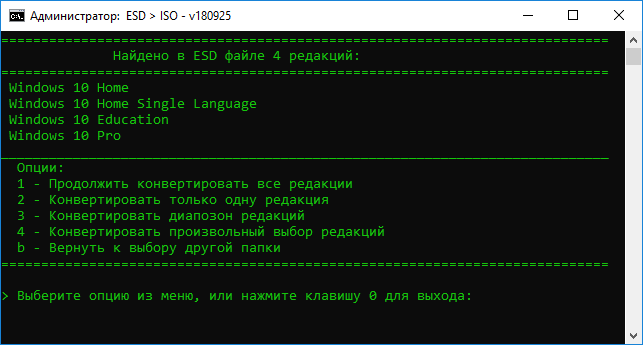
- Выберите, конвертировать ли все редакции, либо выбрать отдельные редакции, присутствующие в образе.

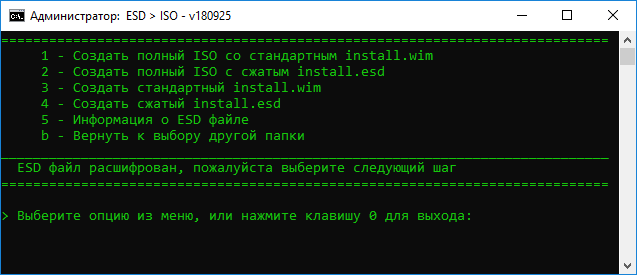
- Выберите режим создания ISO файла (также можно создать WIM-файл), если не знаете, что выбрать — выбирайте первый или второй вариант.

- Дождитесь завершения расшифровки ESD и создания ISO-образа.


Образ ISO с Windows 10 будет создан в папке Adguard Decrypt.
Конвертация ESD в ISO в Dism++
Dism++ — простая и бесплатная утилита на русском языке для работы с DISM (и не только) в графическом интерфейсе, предлагающая множество возможностей по настройке и оптимизации Windows. В том числе, позволяющая выполнить конвертацию ESD в ISO.
- Скачайте Dism++ с официального сайта https://www.chuyu.me/en/index.html и запустите утилиту в нужной разрядности (в соответствии с разрядностью установленной системы).
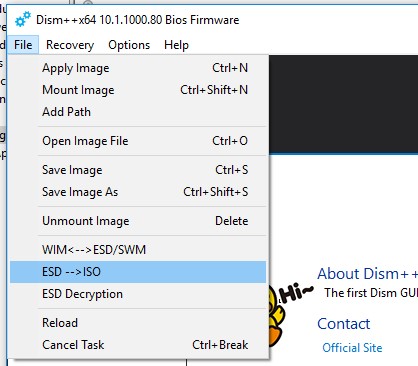
- В разделе «Инструменты» выберите «Дополнительно», а затем — «ESD в ISO» (также этот пункт можно найти в меню «Файл» программы).

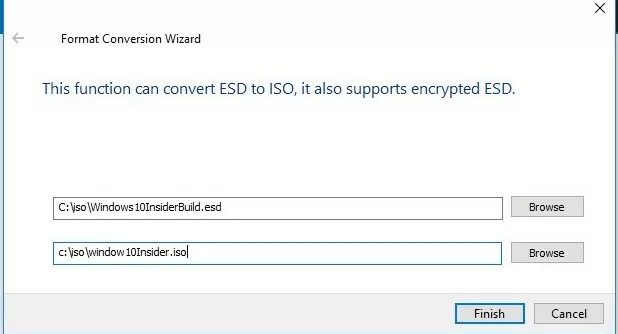
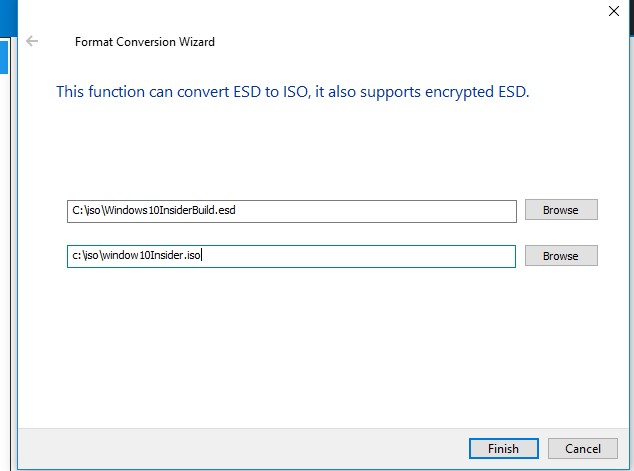
- Укажите путь к файлу ESD и к будущему образу ISO. Нажмите кнопку «Готово».

- Дождитесь завершения конвертации образа.


Думаю, одного из способов окажется достаточно. Если же нет, то еще один хороший вариант — ESD Decrypter (ESD-Toolkit), доступная для загрузки github.com/gus33000/ESD-Decrypter/releases

При этом в указанной утилите, версия Preview 2 (от июля 2016) имеет, в том числе, графический интерфейс для конвертации (в более новых версиях он был убран).
При выполнении обновлении билда Windows 10 через систему обновлений Windows, установочный образ новой предварительной (инсайдерской) сборки Windows скачивается на компьютер пользователя в специально новом формате образа – ESD (Electronic Software Download). ESD – это зашифрованный и сжатый .WIM (Windows Imaging Format) образ Windows.
Этот формат распространения образа впервые стал использоваться в Windows 8.1 при онлайн обновления операционной системы. В отличии от WIM файла, образ ESD нельзя cмонтировать и модифицировать. Microsoft планирует широко использовать данный формат для развёртывания систем. В сравнении с WIM файлом, размер .ESD файла примерно на 30% меньше, что является большим преимуществом при его распространении через Интернет.
В этой статье мы покажем, как расшифровать и сконвертировать ESD образ Windows 10 в привычный установочный образ Windows, который можно записать на DVD или USB диск и использовать для чистой установки Windows 10 или выполнения обновления.
Содержание:
- Как получить ESD файл с образом Windows 10
- Утилита ESD Decrypter
- Утилита Dism++ для конвертации файла install.esd
Примечание. На самом деле – самый простой способ получить установочный ISO образ Windows 10 и записать его на флешку / DVD – воспользоваться бесплатной утилитой Media Creation Tool, которая поможет вам скачать последнюю версию образа Windows 10 напрямую с серверов Microsoft.
Как получить ESD файл с образом Windows 10
Разберемся, где же можно получить ESD файл? При обновлении Windows 8 до Windows 8.1 файл install.esd скачивается в фоновом режиме с репозитария Microsoft и сохраняется в каталог C:\Windows\SoftwareDistribution\Download\{некий ID}.
Получить файл Install.ESD с последней сборкой Windows 10 можно, перейдя на установленной системе в раздел Пуск -> Параметры –> Обновления и безопасность ( Start -> PC Settings -> Update and recovery -> Preview builds). Если для вашей Windows 10 доступна новая сборка, вам будет предложено скачать и установить новый образ.

Запустите обновление системы для нового билда, но не перегружайте компьютер. В процессе обновления Windows загрузит файлы, необходимые для выполнения обновления версии системы. После окончания загрузки, откройте проводник и перейдите в каталог C:\$Windows.~BT\Sources. Найдите в данном каталоге файл Install.ESD (он является скрытым) и скопируйте его в любой другой каталог. Это и есть .ESD файл со сжатым образом последней сборки Windows 10.
Совет. В уже установленной Windows 10 Technical Preview ESD файл можно скопировать из каталога C:\RecoveryImage\Install.esd.

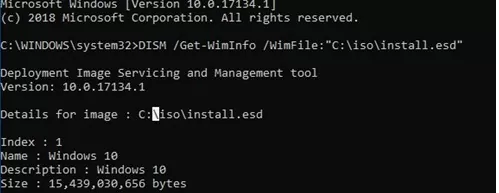
Чтобы получить информацию о том, какие образы Windows находятся внутри ESD файла, можно использовать стандартную утилиту DISM:
DISM /Get-WimInfo /WimFile:"C:\iso\install.esd"
Deployment Image Servicing and Management tool
Version: 10.0.17134.1
Details for image : C:\iso\install.esd
Index : 1
Name : Windows 10 Домашняя
Description : Windows 10 Домашняя
Size : 15,439,030,656 bytes
Index : 2
Name : Windows 10 Домашняя для одного языка
Description : Windows 10 Домашняя для одного языка
Size : 15,439,078,082 bytes
Index : 3
Name : Windows 10 для образовательных учреждений
Description : Windows 10 для образовательных учреждений
Size : 15,662,641,239 bytes
Index : 4
Name : Windows 10 Pro
Description : Windows 10 Pro
Size : 15,662,520,267 bytes
The operation completed successfully.
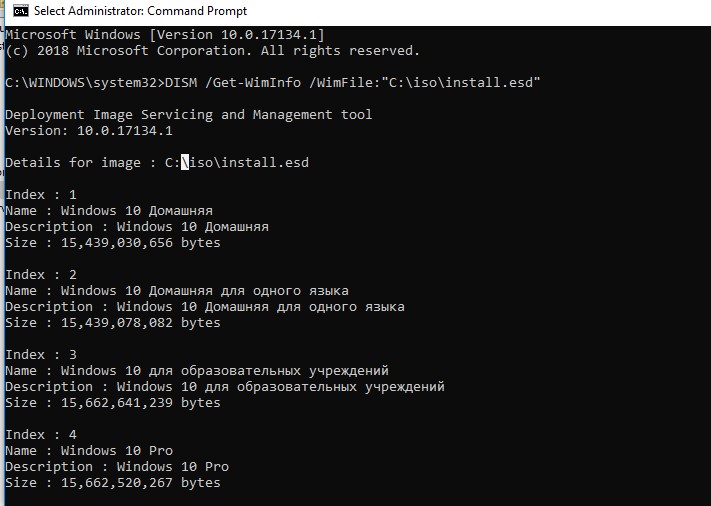
В нашем примере внутри архива install.esd находится несколько образов системы. Например, Windows 10 Pro имеет индекс 4.
Зная порядковый индекс образа Windows в ESD файле, можно экспортировать его в WIM файл с помощью команды:
dism /export-image /SourceImageFile:c:\iso\install.esd /SourceIndex:4 /DestinationImageFile: c:\iso\win10pro.wim /Compress:max /CheckIntegrity

Полученный WIM файл можно сконвертировать в ISO образ с помощью сторонних утилит.
Утилита ESD Decrypter
Для конвертации ESD образа в ISO файл воспользуемся утилитой командной строки ESD Decrypter (ESD ToolKit), скачать которую можно на GitHub: https://github.com/gus33000/ESD-Decrypter/releases/. Утилита ESD Decrypter написана на PowerShell, так что вы легко можете ознакомиться с ее исходным кодом (для генерации ISO образа из WIM файла используется утилита cdimage.exe).
- Распакуйте архив 4.0.0.0.fbl_prerelease.gustavem.160815-0800.zip в произвольный каталог.
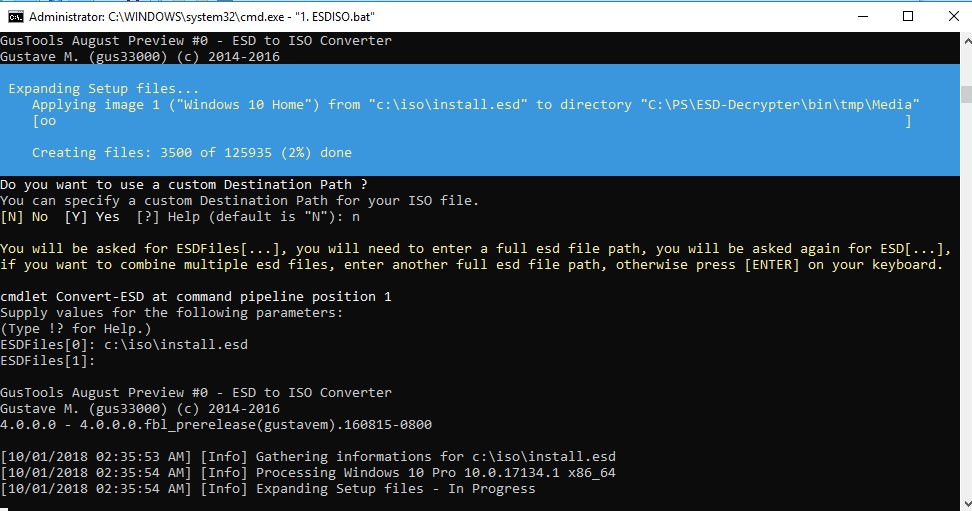
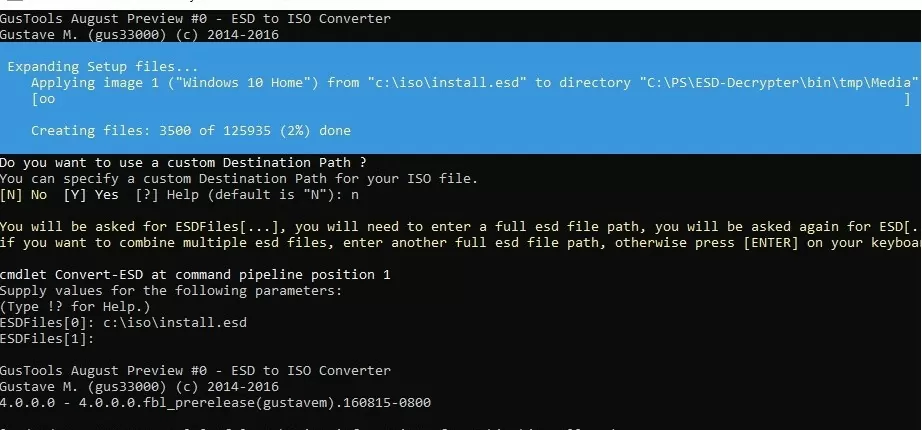
- Запустите файл ESDISO.bat с правами администратора.
- Мастер попросит вас указать путь к файлу CryptoKeys с ключами для расшифровки ESD образа и путь к каталогу, в который нужно поместить итоговый ISO файл (я не указывал эти параметры, выбрав оба раза N).
- Далее укажите путь к вашему ESD файлу и два раза нажмите Enter.
- Запустите процесс преобразования образа в ESD формате в ISO файл. В зависимости от производительности вашей системы, процесс займет от 20 до 30 минут.

- После окончания работы скрипта, проверьте что в каталоге с утилитой появился установочный ISO файл с образом Windows 10, который в можно записать на DVD или создать на его основе загрузочную USB флешку.
Утилита Dism++ для конвертации файла install.esd
Для конвертации ESD образа в ISO файл можно воспользоваться простой и удобной графической утилитой Dism++ (https://www.chuyu.me/en/index.html), которая выполняет то же самое, что и скрипт ESD Decrypter, но имеет более удобный графический интерфейс.
- Скачайте и распакуйте архив с утилитой Dism++.
- Запустите исполняемый файл Dism++ в зависимости от разряднсти вашей ОС (на Windows 10 x64 нужно запускать Dism++x64.exe).
- Примите пользовательское соглашение.
- Откройте меню File и выберите пункт меню Esd —> ISO.

- Укажите путь к вашему ESD файлу, который вы сохранили ранее. Затем укажите каталог и имя ISO файла, который должен получится.

- Нажмите кнопку Finish и дождитесь окончания конвертации (занимает 10-15 минут).
windows-esd-to-iso
A tool to convert a Windows 11 electronic software distribution (ESD) to a bootable ISO image.
Since Microsoft does not distribute Windows ARM ISO images, a way to download ESDs plus this tool allows you to obtain a Windows ARM ISO image—e.g. for use in a virtual machine, such as UTM or the free VMware Fusion Player.
Requirements
- The command-line tools from wimlib (available in Homebrew)
All remaining requirements are already included in macOS. Patches are welcome for portability.
Usage
windows-esd-to-iso ESD_FILE
Converts the ESD in ESD_FILE to ISO format.
How it works
windows-esd-to-iso will use the wimlib tools to inspect, deconstruct, and assemble into an installation tree the images inside an ESD.
Specifically, it assumes:
- Image 1 is the base Windows setup media, which serves as the base of the installation tree
- Image 2 is Windows PE, exported to sources/boot.wim
- Image 3 is Windows Setup, appended to sources/boot.wim, and set bootable
- All remaining images are Windows editions, which will be exported into sources/install.esd
These steps are performed into a temporary directory. When finished, hdiutil is used to create the ISO image from this temporary tree.
If the script exits for any reason—successful or otherwise—the temporary directory is cleaned.
Downloading ESDs
There are a few ways you can get an ESD to convert with this tool.
- My own download-windows-esd tool will get the Windows 11 ESD catalog from Microsoft, then download any ESD you wish that is referenced in that catalog and verify its SHA1 checksum.
- Paul Rockwell’s w11arm_esd2iso does both downloading and conversion of ARM images in a single shot.
- Bogdan’s ESD to ISO on macOS explains how to get and search through the catalog and download manually.
Converting to USB drives
You can convert an ISO produced with this tool to a USB drive with windows-iso-to-usb.
Licensing
While this tool itself is already licensed to you, Windows itself may require licensing and activation.
You must address this; this tool does not.
- To convert an ESD file to ISO, download and run DISM++, click File, and then select “ESD -> ISO,” then select the ESD file to convert, and enter the complete path and name of the ISO file to create.
- Alternatively, you can also use ESD Decrypter and NTLite to convert ESD files to ISO images.
Windows 10 ESD files, also known as Electronic Software Download files, are used in Microsoft’s proprietary Windows update format. Files downloaded through Windows Update are saved locally in ESD format. However. Microsoft has now shifted to UUP-based formatting. People who still have ESD files need to use them from time to time.
ESD files are compressed and encrypted versions of WIM files and need to be decrypted before you can view and use the content within. Unlike ISO files, Windows does not natively support ESD files, and thus cannot be mounted.
A few methods are used in which you can convert an ESD file into an ISO file so that they can be used easily.
Table of Contents
What is an ESD FIle?
Electronic Software Download or ESD files are mainly used to deliver Windows update packages or new operating system versions by Microsoft. You are likely to see a file with a “.ESD” file extension when updating your Windows operating system, or downloading an update from Microsoft.
ESD files store compressed and encrypted versions of Windows Imaging Format (.WIM) files, which may usually contain update packages or a full copy of a Windows OS. Note that an ESD file is capable of holding one or more OS images.
What is an ISO file?
An Optical Disc Image or ISO file is an exact copy of a physical disc, like a CD or DVD. An ISO image is an archived file format where one or multiple files are stored into a single file.
ISO files, or ISO images, are often used to deliver operating systems and back up optical discs since they are capable of copying the content one-to-one, which means exactly as it was on the disc.
An ISO file is an uncompressed copy of a disc, sector by sector. ISO images can be used to store an identical digital duplicate of a disc, which in turn can be used to burn another exact copy of the original disc.
The Windows operating system supports mounting an ISO file directly, so the content becomes readable and accessible. However, that is not the case for ESD files, and therefore, they need to be converted into ISO image files.
Convert ESD File to ISO
DISM++
Dism++ is a tool that gives a Graphical User Interface (GUI) to the Windows DISM utility. DISM is a powerful command-line tool from Microsoft for different Windows operations like adding/removing Windows components, compacting the operating system, installing/uninstalling Windows updates, backing up and restoring the system, etc.
While DISM is a command-line tool, DISM++ uses a GUI to perform the same tasks. In addition to other useful tasks, DISM++ can also convert ESD files to ISO format. The process is simple and can be done by non-professional users.
Perform the following to convert an ESD file to an ISO image:
-
Download DISM++ from here.
-
Right-click the downloaded package and click “Extract all.”
-
In the extraction wizard, click Extract.
-
Navigate to the extracted folder using File Explorer and then run either “DISM++x64.exe” or the “DISM++x86.exe” file (depending upon your operating system architecture).

Run the DISM++ tool -
Proceed by agreeing to the Terms and Conditions, and then click File from the top menu, then click ESD –> ISO.

Convert ESD to ISO -
Click the top Browse and select the ESD file to convert, then click the second Browse button and enter a name and location for the converted ISO file. Once done, click Finish.
Convert ESD to ISO using DISM++


The DISM++ tool will now begin converting the ESD file into an ISO file. The conversion process may take some time to complete. Once completed, you will receive your desired ISO file in the directory you selected.
ESD Decryptor Utility
You can also perform the same as above using the ESD Decryptor Utility. This is a command-line tool that will convert any ESD file into an ISO image in a few simple cmdlets. Here is how:
-
Download ESD Decrypter Utility and extract the contents.
-
Navigate to the extracted folder, right-click the file “1.ESDISO.bat”, and then click “Run as administrator.”
Run the Decrypter batch file The tool will now run using Command Prompt
-
You will be asked if you wish to use a custom Cryptographic key. Select “No” by entering “N.”

Reject using a cryptographic key -
You will then be asked if you want to use a custom Destination path. Enter “N” again.
Reject using a custom destination path -
Now provide the complete path to the ESD file along with the extension when asked by the tool, then press “Enter” twice.

Provide the path and name for the ESD file to convert


The tool will now begin decrypting and converting the ESD file into an ISO image, which will be saved automatically in the same directory as the extracted folder.
NTLite
NTLite is another tiny utility that converts your ESD files to ISO images. Follow the given steps to use this tool for conversion:
-
Download NTLite (Free) and install the tool.
-
From the utility, click Add at the top, and then click “Image file (WIM, ESD, SWM)” from the expanded menu.

Add an ESD file -
Now browse to the ESD file you want to convert and select it.
-
Now click “Create ISO” from the top menu, and then select the name and location where you want to save the converted file.

Once selected, the tool will begin converting the ESD file into an ISO file, which can be found in the selected directory.
Closing Words
Once you have converted an ESD file into an ISO image, you should be able to use it like another ISO file. You may then directly mount ISO images to your system on Windows.
There are other tools available online that we have not discussed in this post, such as ESDtoISO and ESD Toolkit. This is because ESDtoISO does not officially work, and the latter (ESD Toolkit) is basically a renamed version of the ESD Decrypter utility.
Frequently Asked Questions
What are ESD Files and Their Role in Windows?
ESD files, or Electronic Software Download files, are used by Microsoft primarily for delivering Windows updates and new OS versions. They are compressed and encrypted, containing Windows Imaging Format (WIM) files.
What Common Issues Might Arise During Conversion?
Users may encounter issues like cryptographic key errors or conversion errors due to corrupted ESD files. Ensuring the integrity of the ESD file and following the correct procedures can mitigate these issues.
Is the Converted ISO File Bootable?
Yes, the ISO file converted from an ESD file is typically bootable. This means it can be used to create bootable media for Windows installations or repair discs.
Why has Microsoft shifted from ESD to UUP in Windows?
Microsoft has shifted to UUP (Unified Update Platform) format for a more efficient update process. However, ESD files are still prevalent and often need conversion for various uses.
Windows OS Hub / Windows 10 / How to Convert Install.ESD to the Bootable .ISO Image in Windows 10
When updating the Windows 10 build using the Windows Update, the installation image of the new (or insider) Windows build is downloaded to the user’s computer in a new special image format – ESD (Electronic Software Download). ESD is an encrypted and compressed .WIM (Windows Imaging Format) image file.
This image distribution format was first used in Windows 8.1 for the online update of the operating system. Unlike a WIM file, an ESD image cannot be mounted and modified. Microsoft plans to use this format extensively for system deployment. Comparing to a WIM file, an .ESD file takes 30% less space, which is a big advantage when it is distributed over the Internet.
In this article, we will show how to decrypt and convert an ESD image of Windows 10 to a familiar ISO installation image that can be burned to an DVD or USB drive and used to cleanly install Windows 10 or perform an update.
Contents:
- How to get ESD file with Windows 10 image
- ESD Decrypter Utility
- Dism++ Utility for Converting the Install.esd File
Note. In fact, the easiest way to get the installation ISO image of Windows 10 and burn it to an USB flash drive or DVD is to use the free Media Creation Tool utility that helps you download the latest version of the Windows 10 image directly from Microsoft servers.
How to get ESD file with Windows 10 image
Let’s find out where to get an ESD file. When upgrading Windows 8 to Windows 8.1, the install.esd file is downloaded from Microsoft repository in a background mode and is saved to the C:\Windows\SoftwareDistribution\Download\{some ID} directory.
You can get the Install.ESD file with the latest Windows 10 build by going to Start -> PC Settings -> Update and recovery -> Preview builds section on the installed system. If a new Windows 10 build is available for your system, you will be prompted to download and install a new image.

After the download is over, open Windows Explorer without clicking Install and go to C:\$Windows.~BT\Sources. Find Install.ESD here (it is hidden) and copy it into any other directory. This is the ESD file with the compressed image of the latest version of Windows 10 TP.
Run the system update to the new build, but don’t restart the computer. During the update process, Windows will download the files that are necessary to perform the update. After the download is complete, open Explorer and navigate to the C:\$Windows.~BT\Sources directory. Find the Install.ESD file in this directory (it is hidden) and copy it to any other directory. This is an .ESD file with a compressed image of the latest Windows 10 build.
Tip. In the installed Windows 10 Technical Preview the file can be copied from the C:\RecoveryImage\Install.esd folder.

To get information about which Windows images are inside the ESD file, you can use the standard DISM utility:
DISM /Get-WimInfo /WimFile:"C:\iso\install.esd"
Deployment Image Servicing and Management tool
 Version: 10.0.17134.1
 Details for image : C:\iso\install.esd
 Index : 1
 Name : Windows 10 Home
 Description : Windows 10 Home
 Size : 15,439,030,656 bytes
 Index : 2
 Name : Windows 10 Home Single Language
 Description :Windows 10 Home Single Language
Size : 15,439,078,082 bytes
Index : 3
Name : Windows 10 Education
Description :Windows 10 Education
Size : 15,662,641,239 bytes
Index : 4
Name : Windows 10 Pro
Description : Windows 10 Pro
Size : 15,662,520,267 bytes
The operation completed successfully.
In our example, there are several system images inside the install.esd archive. For example, Windows 10 Pro has an index of 4.
Knowing the index of a Windows image in an ESD file, you can export it to a WIM file using the command:
dism /export-image /SourceImageFile:c:\iso\install.esd /SourceIndex:4 /DestinationImageFile: c:\iso\win10pro.wim /Compress:max /CheckIntegrity

The resulting WIM file can be converted to an ISO image using third-party utilities.
ESD Decrypter Utility
To convert an ESD image to an ISO file, we will use the command line utility ESD Decrypter (ESD ToolKit), which can be downloaded from GitHub: https://github.com/gus33000/ESD-Decrypter/releases/. The ESD Decrypter utility is based on PowerShell, so you can easily open its source code (the cdimage.exe tool is used to generate an ISO image from a WIM file).
- Extract the archive 4.0.0.0.fbl_prerelease.gustavem.160815-0800.zip into a local folder;
- Run the file ESDISO.bat as administrator;
- The wizard will ask you to specify the path to the CryptoKeys file with the keys to decrypt the ESD image and the path to the directory where the final ISO file should be placed (I did not specify these parameters, by pressing N two times);
- Next, specify the path to your ESD file and press Enter twice;
- Start the process of converting an image in ESD format to an ISO file. Depending on the performance of your system, the process will take from 20 to 30 minutes;

- After the script is finished, check that the installation ISO file with the Windows 10 image has appeared in the utility directory, which can be burned to DVD or the standard or UEFI bootable USB flash drive can be created.
Dism++ Utility for Converting the Install.esd File
To convert an ESD image to an ISO file, you can use a simple and convenient graphical utility Dism ++ (https://www.chuyu.me/en/index.html), which does the same thing as the ESD Decrypter script, but has a more user-friendly graphical interface.
- Download and unzip the archive with the Dism++ utility;
- Run the executable file Dism ++ depending on your OS bitness (on Windows 10 x64 you need to run Dism++ x64.exe file);
- Accept the user agreement;
- Open the File menu and select the menu item Esd —> ISO;
- Specify the path to your ESD file that you saved earlier. Then specify the directory and the name of the ISO file to be created;

- Click Finish button and wait until the .esd file converting is completed (it takes 10-15 minutes).