
Служба Windows Error Reporting (WER) служит для сбора и отправки отладочной информации о падении системных и сторонних приложений в Windows на сервера Microsoft. По задумке Microsoft, эта информация должна анализироваться и при наличии решения, вариант исправления проблемы должен отправляется пользователю через Windows Error Reporting Response. Но по факту мало кто пользуется этим функционалом, хотя Microsoft настойчиво оставляет службу сбора ошибок WER включенной по умолчанию во всех последних версиях Windows. В большинстве случае о службе WER вспоминают, когда каталог C:\ProgramData\Microsoft\Windows\WER\ReportQueue\ начинает занимать много места на системном диске (вплоть до нескольких десятков Гб), даже не смотря на то что на этом каталоге по умолчанию включена NTFS компрессия.
Содержание:
- Служба Windows Error Reporting
- Очистка папки WER\ReportQueue в Windows
- Отключение Window Error Reporting в Windows Server
- Отключаем сбор и отправки отчетов об ошибках в Windows 10
- Отключение Windows Error Reporting через GPO
Служба Windows Error Reporting
Служба Windows Error Reporting при появлении ошибки показывает диалоговое окно, предлагающее отправить отчет об ошибке в корпорацию Microsoft. Когда в Windows вы видите сообщение об ошибке
YourApp has stop working
, в это время в служба Windows Error Reporting запускает утилиту WerFault.exe для сбора отладочных данных (могут включать в себя дамп памяти).
Данные пользователя сохраняются в профиль пользователя:
%USERPROFILE%\AppData\Local\Microsoft\Windows\wer
Системные данные – в системный каталог:
%ALLUSERSPROFILE%\Microsoft\Windows\WER\
Служба Windows Error Reporting представляет собой отдельный сервис Windows. Вы можете проверить состояние службы командой PowerShell:
Get-Service WerSvc
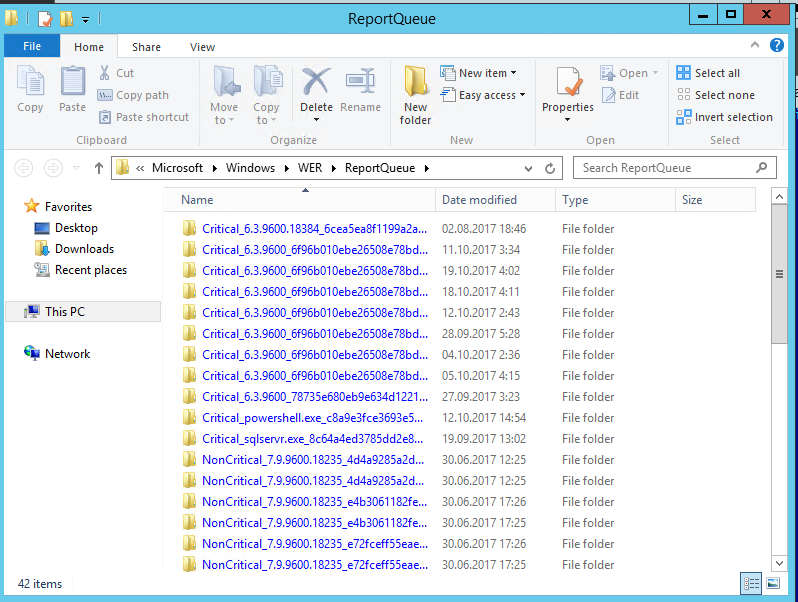
Внутри каталога WER\ReportQueue\ содержится множество каталогов, с именами в формате:
- Critical_6.3.9600.18384_{ID}_00000000_cab_3222bf78
- Critical_powershell.exe_{ID}_cab_271e13c0
- Critical_sqlservr.exe__{ID}_cab_b3a19651
- NonCritical_7.9.9600.18235__{ID}_0bfcb07a
- AppCrash_cmd.exe_{ID}_bda769bf_37d3b403
Как вы видите, имя каталога содержит степень критичности события и имя конкретного exe файла, который завершился аварийно. Во всех каталогах обязательно имеется файл Report.wer, который содержит описание ошибок и несколько файлов с дополнительной информацией.
Очистка папки WER\ReportQueue в Windows
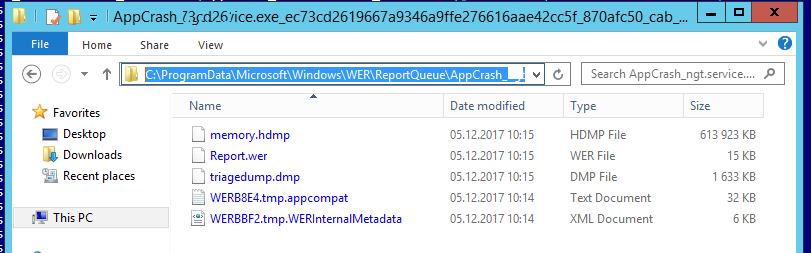
Как правило, размер каждой папки в WER незначителен, но в некоторых случаях для проблемного процесса генерируется дамп памяти, который занимает довольно много места. На скриншоте ниже видно, что размер файла дампа memory.hdmp составляет около 610 Мб. Парочка таким дампов – и на диске исчезло несколько свободных гигибайт.
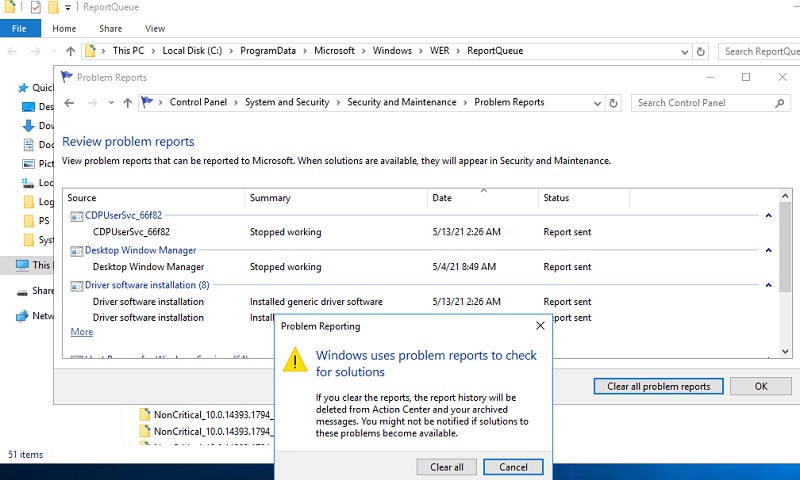
Чтобы очистить все эти ошибки и журналы штатными средствами, откройте панель управления и перейдите в раздел ControlPanel -> System and Security -> Security and Maintenance -> Maintenance -> View reliability history -> View all problem reports (Control Panel\System and Security\Security and Maintenance\Problem Reports) и нажмите на кнопку Clear all problem reports.
Для быстрого освобождения места на диске от файлов отладки, сгенерированных службой WER, содержимое следующих каталогов можно безболезненно очистить вручную.
- C:\ProgramData\Microsoft\Windows\WER\ReportArchive\
- C:\ProgramData\Microsoft\Windows\WER\ReportQueue\
Следующие команды PowerShell удалят из каталога каталогов WER все файлы, старше 15 дней:
Get-ChildItem -Path  'C:\ProgramData\Microsoft\Windows\WER\ReportArchive' -Recurse | Where-Object CreationTime -lt (Get-Date).AddDays(-15) | Remove-Item -force -Recurse
Get-ChildItem -Path  'C:\ProgramData\Microsoft\Windows\WER\ReportQueue' -Recurse | Where-Object CreationTime -lt (Get-Date).AddDays(-15) | Remove-Item -force –Recurse
Для очистки каталогов WER в пользовательских профилях используйте такой скрипт:
$users = Get-ChildItem c:\users|where{$_.name -notmatch 'Public|default'}
foreach ($user in $users){
Get-ChildItem "C:\Users\$User\AppData\Local\Microsoft\Windows\WER\ " –Recurse -ErrorAction SilentlyContinue | Remove-Item –force –Recurse
}
Отключение Window Error Reporting в Windows Server
В Windows Server 2019/2016/2012R2 вы можете управлять состоянием WER с помощью PowerShell. Вы можете отключить службу Windows Error Reporting:
Get-Service WerSvc| stop-service –passthru -force
Set-Service WerSvc –startuptype manual –passthru
Но есть более корректные способы отключения WER в Windows. В версии PowerShell 4.0 добавлен отдельный модуль WindowsErrorReporting из трех командлетов:
Get-Command -Module WindowsErrorReporting

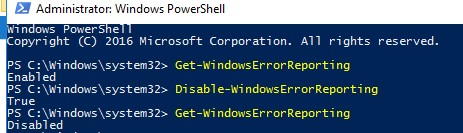
Проверить состояние службы Windows Error Reporting можно командой:
Get-WindowsErrorReporting
Для отключения WER, выполните:
Disable-WindowsErrorReporting
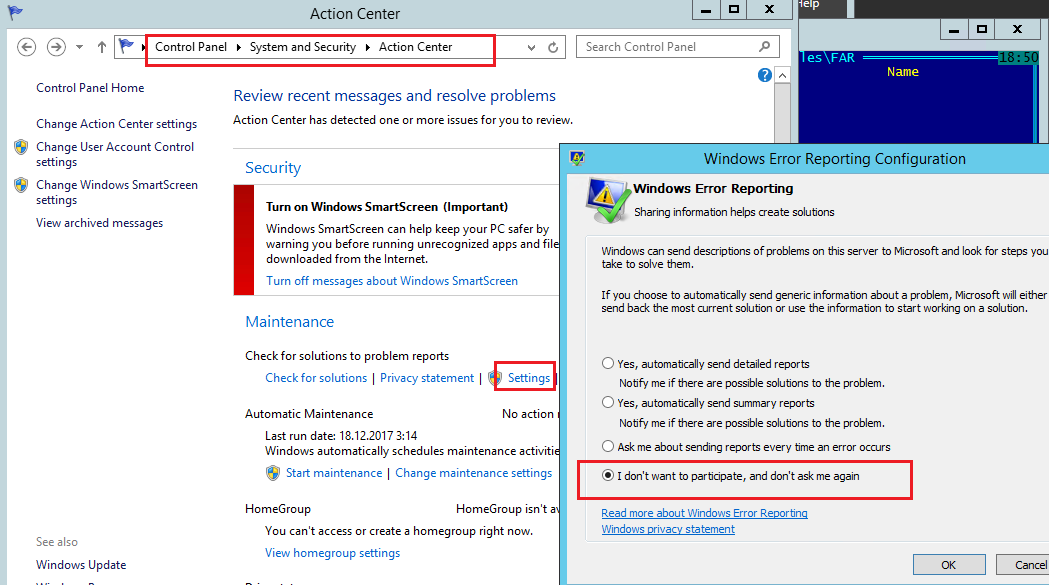
В Windows Server 2012 R2 можно отключить запись информации об ошибках Windows Error Reporting через панель управления (Control Panel -> System and Security -> Action Center -> раздел Maintenance -> Settings -> выберите опцию I don’t want to participate, and don’t ask me again
Отключаем сбор и отправки отчетов об ошибках в Windows 10
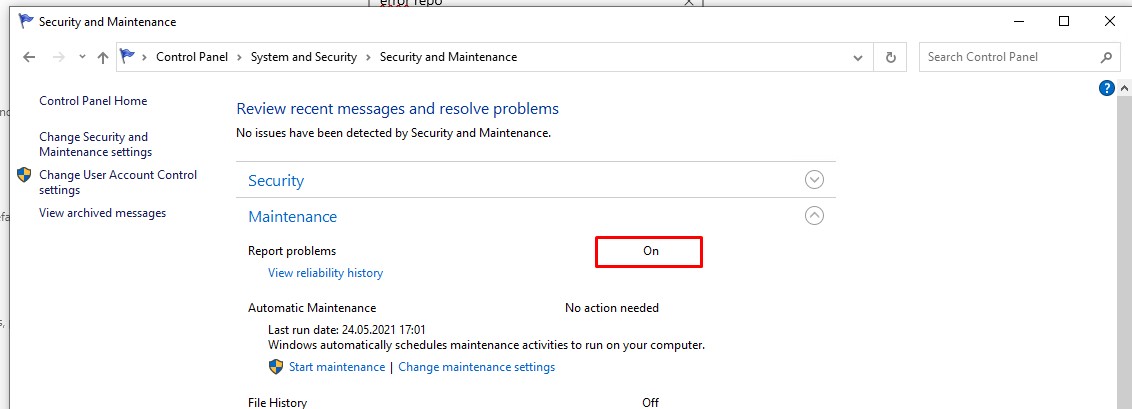
В Windows 10 нельзя отключить Error Reporting через панель управления. В графическогм интерфейсе можно только проверить ее статус (Система и безопасность ->Центр безопасности и обслуживания -> секция Обслуживание). Как вы видите, по умолчанию параметр Поиск решения для указанных в отчетах проблем включен (Control Panel -> System and Security -> Security and Maintenance -> Maintenance -> Report problems = On).
HKLM\SOFTWARE\Microsoft\Windows\Windows Error Reporting нужно создать новый параметр типа DWORD (32 бита) с именем Disabled и значением 1.
Можно отключить сбор ошибок WER для конкретных пользователей:
reg add "HKCU\Software\Microsoft\Windows\Windows Error Reporting" /v "Disabled" /t REG_DWORD /d "1" /f
Или отключить WER для всех:
reg add "HKLM\Software\Microsoft\Windows\Windows Error Reporting" /v "Disabled" /t REG_DWORD /d "1" /f

Измените параметр реестра и проверьте статус параметра Поиск решения для указанных в отчетах проблем в панели управления. Его статус должен изменится на Отключено.

Отключение Windows Error Reporting через GPO
Также вы можете управлять настройками службы Windows Error Reporting через групповые политики.
Запустите редактор локальной (
gpedit.msc
) или доменной GPO (
gpmc.msc
) и перейдите в ветку реестра Computer Configuration -> Administrative Templates -> Windows Components -> Windows Error Reporting (Компоненты Windows -> Отчеты об ошибках Windows). Для отключения сбора и отправки ошибок через WER включите политику Disable Windows Error Reporting (Отключить отчеты об ошибках Windows).
Аналогичная политика есть в пользовательском разделе политик (User Configuration).

Обновите GPO (перезагрузка не потребуется).
В результате в Windows перестанут формироваться сообщения об ошибках Windows и отправляться в Microsoft.
Windows Error Reporting is a service that allows users to send all the operating system errors, alerts related content to Microsoft. The error reporting service is intended to help the user to ensure the PC works optimally.
When Your PC/Laptop hangs or crashes then OS immediately sends an error report to Microsoft automatically. If the solution is available then Microsoft will send you fixes but if not then they try to find the solutions.
And in every Windows version, the service is enabled by default, so whenever you will face any error then the Windows system sends an error report to Microsoft automatically.
Windows Error Reporting is enabled by default. And when you send general information about errors than Microsoft (For more you can visit the official page: https://technet.microsoft.com/en-us/library/cc754364(v=ws.11).aspx) will send back either the most current fix or use the information to find a perfect solution for the related issue.
Well, the Windows error reporting feature always prompt you to send the information about the problem to Microsoft whenever a certain program or operating system encounter issues.
And this is the reason many users are searching how to disable error reporting feature, in order to:
- Prevent the system from sending private information about your computer to Microsoft
- To avoid annoying alerts along with the error message
- The error reporting can’t help to fix the problem all the time.
The Microsoft Error Reporting service becomes irritating sometimes and becomes necessary to stop this service.
So, in this article, I am sharing with you the best possible ways on how to disable or enable error reporting services on Windows 10 as well as Windows 8 & 7.
Well, you can disable the error reporting in Windows 10 in three different ways. Follow the steps listed to disable the service easily.
Step 1 – Disable Error Reporting via Registry Editor
If you are good at following the commands then follow the steps listed to disable Windows Error Reporting service through the Registry Editor.
Follow the steps to do so:
- Press Windows + R key > to type regedit > click OK
- Now in the Registry Editor > locate the listed address
- HKEY_LOCAL_MACHINE\SOFTWARE\Microsoft\Windows\Windows Error Reporting.
- Then right-click the Windows Error Reporting key > click New > DWORD (32-bit) Value.
- Now right-click on the new DWORD value > rename it to Disabled.
- Next double click on it > to set the value data to 1 > click OK for saving the changes.
Well, the Windows Error Reporting is successfully disabled on your Windows 10 system. Now open the Control panel and verify the error reporting service status, it must be changed from On to Off.
Step 2 – Disable Windows Error Reporting via Services
If you are Windows 10 user then learn how to turn off Windows error reporting service in Windows 10 through services:
- Press Windows + R button > to open Run box > type services.msc > press Enter key
- Now search for the Windows Error Reporting Service > right-click on the entry from the list.
- After right-clicking, you need to select the Properties option.
- Go to the Startup type and from the dropdown menu choose Disabled.
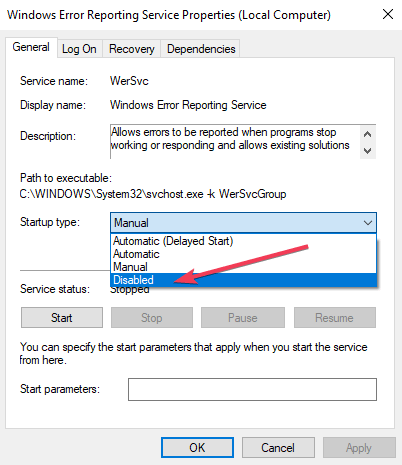
- Click OK or Apply to save the modifications.
- Exit from the Services window and reboot your system.
The Error Reporting service in Windows 10 is disabled now.
Step 3 – Turn off Windows Error Reporting via Group Policy
Here follow the steps to disable the Windows error reporting service through the group policy.
- Press Windows + R keys > and in the Run box type gpedit.msc > click OK
- Now in the Group Policy editor> browse to Computer Configuration and click Administrative Templates and Windows Components > click Windows Error Reporting.
- Then on the right-side click on Settings and locate the Disable Windows Error Reporting option > double click on it.
- Select Enabled > Apply > OK for saving changes.
Now the Windows error reporting feature is disabled successfully on Windows 10.
How to Disable Error Reporting in Windows 8 & Windows 7?
Well, the steps to disable error reporting service is same for the both Windows 8 and 7 OS. So, follow the steps given carefully.
- Go to the Control Panel and click on the System and Security link.
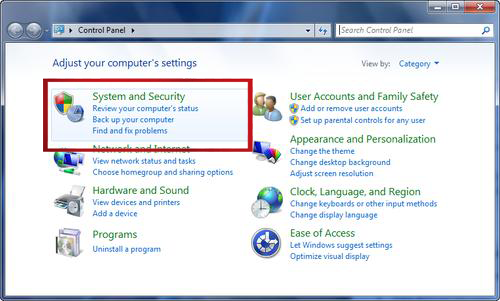
- Click on the Action Center link.
- Now, in the Action Center window, click/tap the Change Action Center settings link on the left.

- Click on the Problem reporting settings link present in the “Related settings” section at the bottom of the “Change Action Center settings” window.
Here you will found four Problem Reporting Settings options:
-
- Automatically check for solutions (the default option)
- Automatically check for solutions and send additional report data, if needed
- Each time a problem occurs, ask me before checking for solutions
- Never check for solutions
- Select Never check for solutions will completely disable error reporting in Windows.

Note: If you want to partially disable this service then you should choose Each time a problem occurs, ask me before checking for solutions.
- After it, click the OK button present at the bottom of the window.
- Click the OK button present at the bottom of the Change Action Center settings window.
- After all, exit from the Action Center window.
The Windows error reporting feature is disabled successfully now.
Now if after disabling the Windows error reporting feature on Windows 10, wondering how to enable service in Windows 10, then learn how to do so:
How to Enable Windows Error Reporting in Windows 10?
If you are looking to enable error reporting service in Windows 10 then simply follow the below-given steps:
- Press Windows + R keys > click on the Run after it type oobe and > press Enter.
- Click on the Enable automatic updating and feedback in the Update This Server area.
- Click on the Manually configure settings.
- After it, in the Windows Error Reporting area of the Manually Configure Settings dialog box, click on the Change Setting.
- Now you need to configure the Windows Error Reporting Service, in the Configuration dialog box select one of the following options.
-
- Yes, automatically send detailed reports
- Yes, automatically send summary reports
- Save them by clicking on OK
- On the Manually Configure Settings dialog box, click Close.
And that’s it now your Windows error reporting service is enabled in Windows 10 OS.
Is it Safe to Disable Windows Error Reporting Service?
Well, disabling the Windows error reporting service won’t impact the system performance but if everyone starts disabling the windows error reporting then this will be harder for Microsoft to know about the background problems encountered by the users.
And ultimately getting immediate support and improvements may get delayed.
Make Your Windows PC/Laptop Error-Free
Well if you are encountering various Windows PC/laptop errors or your system is running slow then here it is suggested to scan your system with the PC Repair Tool.
This is an advanced repair tool, that just by scanning once detect and fix various PC problems including BSOD error, repair the corrupted Windows system files, DLL errors, registry errors, prevent virus or malware infection, and much more.
This not only fixes errors but also optimizes your Windows PC performance like a new one to optimize the gaming performance.
Get PC Repair Tool, to make your PC Error-Free & Speed up
Conclusion:
Well, the Windows Error Reporting service is one of the useful things and it helps the user to fix the appeared issue.
But, if in case you want to get rid of Error Report Service notification along with the errors or have concerns about privacy then you should immediately disable the error reporting service.
Here, you can follow the steps to apply the steps based on different Windows versions and avoid the error reporting service to fetch any personal information.
Hope the article works for you.
Hardeep has always been a Windows lover ever since she got her hands on her first Windows XP PC. She has always been enthusiastic about technological stuff, especially Artificial Intelligence (AI) computing. Before joining PC Error Fix, she worked as a freelancer and worked on numerous technical projects.
Readers help support Windows Report. We may get a commission if you buy through our links.
Read our disclosure page to find out how can you help Windows Report sustain the editorial team. Read more
When there was a problem or crash in earlier Windows editions, you would receive a prompt asking if you wanted to send an error report. This way, you could decide at every point if you wanted details of your system errors to be logged in a giant Microsoft database.
With the more recent Windows version, a lot has changed. You will no longer get the pop-ups seeking your consent to report errors, but these errors are still reported.
You can learn how to enable or disable error reports for Windows 10 to ensure that you’re ready to deal with this task no matter what OS you’re using.
This article explains what error reporting is and how it can be disabled in Windows 11.
What is Microsoft Windows error reporting service?
Error reporting is critical to finding software bugs and necessary for fixing them. Microsoft developers need to understand what processes the PC was running when a problem occurred for solutions to be found.
They also need to know what other computers had the same crash and if the problem is specific to a manufacturer.
The Windows error reporting (WERP) service is robust and will send out errors even for virtual machines hosted on your PC.
The reports created are very detailed and may include:
- The sevierity of the problem.
- What part of a software or hardware the problem occurred.
- Logs that are important in explaining the problem.
- Information about your hardware or software.
- Possible compatibility issues.
The WERP service generates a GUID or a globally unique identifier on your computer. This GUID stored on your computer will be sent along with an error report to represent your PC uniquely.
Microsoft’s WERP service provides a Setup Repair. This tool may be triggered to run if there is a problem during the Windows setup. Your PC errors are processed automatically if you chose the recommended settings while setting up Windows 11.
How can I check the error logs on my Windows 11 PC?
When you have an error or Windows malfunction, you may start panicking without knowing what caused the problem. The error logs gives a good clue of the cause, and helps you know what fixes you may apply.
On Windows 11, error logs can be seen using the Event Viewer. This utility shows application logs and system messages, including warnings, errors, and information messages.
Our guide on checking for error logs on Windows 11 explains how to view error logs on the Events Viewer.
Even when your PC seems to be functioning perfectly, the Event Viewer may still show errors and warnings in the log. Therefore, it is good maintenance practice to note and resolve the warnings before they escalate into real PC problems.
How can I disable the error reporting service?
1. Through the Services Windows
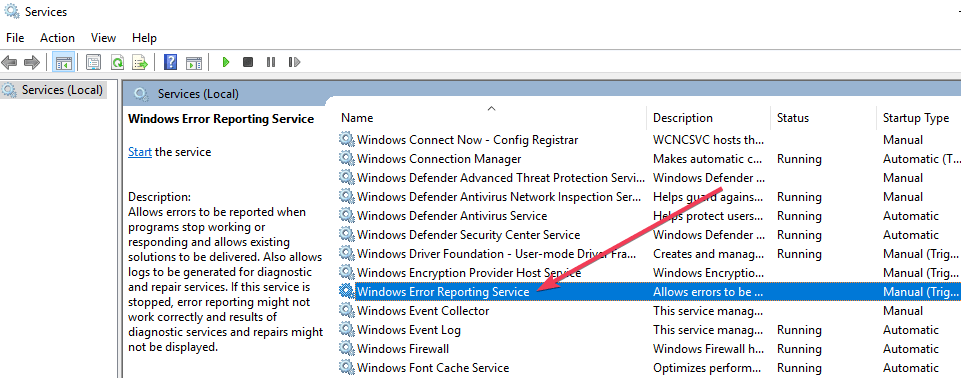
- Open the Run dialog using hotkeys Windows + R, then type services.msc and hit enter or the OK button.
- In the Services Window, right click on Windows Error Reporting Service in the right pane and select Properties.

- Click on the General tab. From the dropdown menu in the Startup type section, select Disable, click Stop under the Services status section, and click Apply the OK.

- Restart your PC.


2. Using the Registry editor
- Once again launch the Run dialog (Windows + R).
- Type in regedit and hit the OK button or click enter.
- Paste this path in the navigation bar:
HKEY_LOCAL_MACHINE\SOFTWARE\Microsoft\Windows\Windows Error Reporting
- Right click on the Windows Error Reporting folder, from the context menu select New, and select DWORD (32-bit).

- Name the newly created file Disabled.
- Change the value of Disabled to 1, and click OK.
- Restart the computer.


- Recent Windows 11 update lets you disable profanity filter in voice typing
- Microsoft wants Windows 10 users to upgrade to Windows 11 or Copilot + PCs
3. Using the Group Policy Editor
- Once again open the Run dialog.
- Type in gpedit.msc and hit the OK button or click enter.
- Navigate to Computer Configuration / Administrative Templates / Windows Components / Windows Error Reporting.

- On the right pane, double click on Disable Windows Error Reporting.

- In the Disable Windows Error Reporting window, select the Enable radio button, click Apply and OK.

- Restart the computer.


Does disabling the Windows error reporting service pose a security risk?
Disabling the service does not pose a risk, but you should exercise some restraint. The service benefits you as well as Microsoft. For example, Microsoft can develop service packs and updates to deal with system glitches, which improves the user experience on Windows 11.
We recommend this service is not diabled, but if you are low on memory, that may be reason to disable some services.
Let me know which of these three solutions you find the easiest in disabling the reporting service. If you want to learn about specific processes associated with WERP check out our guide on WerFault.exe error.
Vladimir Popescu
Being an artist his entire life while also playing handball at a professional level, Vladimir has also developed a passion for all things computer-related.
With an innate fascination for research and analysis, and realizing many other people share his passion for this subject, he delved into writing Windows-related articles, so other people can also benefit from the acquired information.
When not writing kick-ass articles, Vladimir likes to spend his time doing Crossfit and creating art.
-
Home
-
News
- Try These Methods to Disable Windows 10 Error Reporting Service
By Echo |
Last Updated
If you want to know how to disable Windows 10 Error Reporting Service, you really need to read this post written by MiniTool. It will show you two workable methods. You can try to do this job in Services or in Registry Editor. Hope this post will be helpful to you.
Overview of Windows 10 Error Reporting Service
The purpose of the Windows 10 Error Reporting Service is to help ensure that your PC works optimally by keeping Microsoft informed about problems with users using Windows.
Windows 10 Error Reporting Service aims to discover hardware and software issues from the user’s PC and then reports them to Microsoft. With a database of possible complaints using Windows 10, Microsoft can then send solutions for troubleshooting.
Windows error report always appears after program crashes, refused to load properly, a system failure or operating system errors. In order to help proffer solutions in the future, you need to submit an error report online that includes program name, date, time of error and version.
This service is enabled by default with each version of the Windows operating system. However, you can choose to disable it if needed. This post will show you how to disable Windows 10 Error Reporting Service.
Should You Disable Windows Error Reporting Service?
You may disable error reporting because of disk space or privacy issues, but you need to exercise restraint. Windows 10 Error Reporting Service offers dual benefits to both Microsoft and PC users.
Every error report can help Microsoft develop more advanced service packs to handle glitches. That means Windows 10 will provide a better user experience based on the information gathered. However, it is safe to disable Windows Error Reporting Service. Now, you can try the following methods.
Disable Windows 10 Error Reporting Service
Method 1: Disable Windows 10 Error Reporting Service in Services
First, you can try to disable Windows 10 Error Reporting Service in Services. Here are the steps to do this job.
Step 1: Press the Windows key + R key together to open the Run window.
Step 2: Type services.msc in the dialog box and press Enter to open the Services window.
Step 3: In the Services window, navigate to Windows Error Reporting Service, right-click it and then choose Properties.
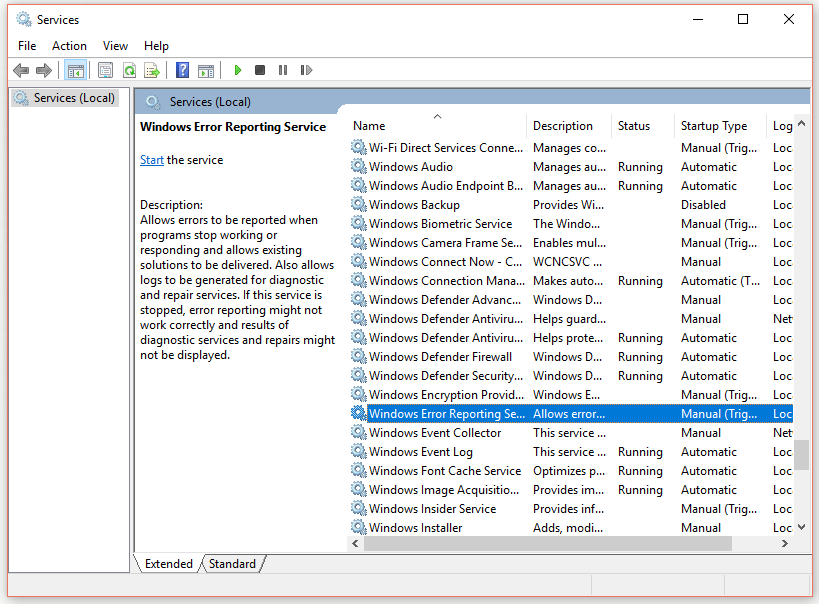
Step 4: In the General tab, change Startup type to Disabled.
Step 5: Click OK or Apply to complete the action. Close the Services window to exit.
After you finish all the steps above, you should successfully disable Windows 10 Error Reporting Service now.
Method 2: Disable Windows 10 Error Reporting Service in Registry Editor
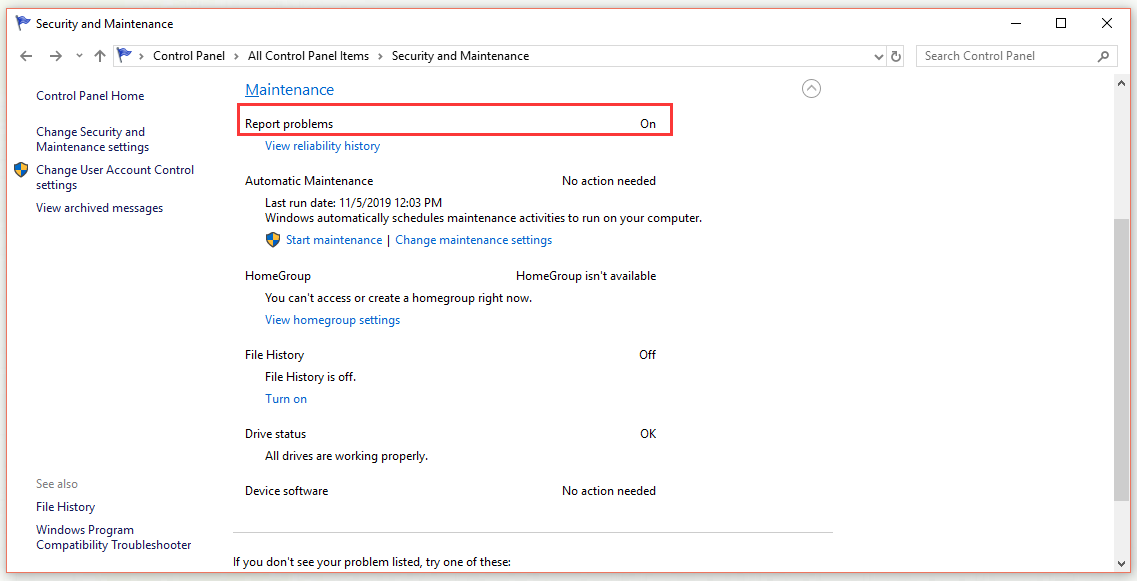
The second method you can try is to disable Windows 10 Error Reporting Service in Registry Editor. But first, you need to check for Report problems.
Check for Report Problems in Control Panel
Step 1: Type control panel in the search bar and click Control Panel to open it.
Step 2: Choose View by: Small icons and select Security and Maintenance.
Step 3: Locate Report problems. It should display On by default.
Start to Disable Windows Error Reporting Service in Registry Editor
Step 1: Type regedit in the search bar and click it to open the Registry Editor window.
Step 2: Navigate to this path: HKEY_LOCAL_MACHINE\SOFTWARE\Microsoft\Windows
Step 3: Then locate the Windows Error Reporting key.

Step 4: Find the Disabled value. If it doesn’t exist, right-click the blank area to create a new 32-Bit DWORD value with that exact name.
Step 5: Double-click the Disabled value to change Value data to 1, and then click OK to save the change.
Step 6: Open the Security and Maintenance applet again. The Report problems line will change from On to Off.
After you finish all the steps above, now you should disable Windows 10 Error Reporting Service successfully.
Bottom Line
In conclusion, that’s all the information about the methods to disable Windows problem reporting. If you also want to do this job, try these two methods.
About The Author
Position: Columnist
Echo is a technology enthusiast, has published many professional technical articles. She previously specialized in backup and recovery of data, files, disk partition, and system. Now she writes mostly about YouTube expertise.
As an enthusiastic technical writer, Echo believes that technology makes our life better and she has been trying to make her technical articles easier to understand and help more people. You must benefit a lot from reading her article.
On her spare time, she likes listening to songs and hiking.

The Windows Problem Reporting Service, also known as Windows Error Reporting (WER), is designed to collect information about software crashes and other issues, sending these reports to Microsoft to improve the overall system stability. However, some users may prefer to disable this service to prevent unnecessary resource usage or to enhance privacy. This guide will walk you through the steps to disable the Windows 11 Problem Reporting Service.
Why Disable the Problem Reporting Service?
Before proceeding, it’s important to understand the reasons why you might want to disable the Windows 11 Problem Reporting Service:
- Privacy Concerns: Some users prefer not to send error reports to Microsoft for privacy reasons.
- Performance: Disabling the service can potentially free up system resources, improving overall performance.
- Customization: Advanced users may want to manage error handling on their own without relying on the automatic reporting service.
Step-by-Step Guide to Disable the Problem Reporting Service
Method 1: Using Services
- Open the Run Dialog: Press
Windows + Rto open the Run dialog box. - Access Services: Type
services.mscand pressEnter. This will open the Services window. - Locate Problem Reporting Service: Scroll down and find the service named “Windows Error Reporting Service.”
- Stop the Service: Right-click on “Windows Error Reporting Service” and select
Stop. - Disable the Service: Right-click again, select
Properties, and in theStartup typedropdown, chooseDisabled. ClickApplyand thenOK.
Method 2: Using Group Policy Editor
- Open the Run Dialog: Press
Windows + Rto open the Run dialog box. - Access Group Policy Editor: Type
gpedit.mscand pressEnter. This will open the Local Group Policy Editor. - Navigate to Error Reporting: Go to
Computer Configuration>Administrative Templates>Windows Components>Windows Error Reporting. - Disable Error Reporting: Find the setting named “Disable Windows Error Reporting,” double-click it, select
Enabled, then clickApplyandOK.
Method 3: Using Registry Editor
Warning: Editing the registry can have unintended consequences if not done correctly. Proceed with caution and consider backing up the registry before making changes.
- Open the Run Dialog: Press
Windows + Rto open the Run dialog box. - Access Registry Editor: Type
regeditand pressEnter. This will open the Registry Editor. - Navigate to Error Reporting Key: Go to
HKEY_LOCAL_MACHINE\SOFTWARE\Microsoft\Windows\Windows Error Reporting. - Modify Registry Values: Create or modify the
DisabledDWORD (32-bit) value and set it to1. This will disable the Windows Error Reporting service.
Re-Enabling the Problem Reporting Service
If you decide to re-enable the Problem Reporting Service in the future, follow the same steps but revert the changes:
- In Services, set the
Startup typetoManualorAutomatic. - In Group Policy Editor, set the “Disable Windows Error Reporting” to
Not ConfiguredorDisabled. - In Registry Editor, set the
Disabledvalue to0or delete it.
Conclusion
Disabling the Windows 11 Problem Reporting Service can be beneficial for users concerned about privacy, system performance, or who prefer to manage error handling themselves. By following the methods outlined above, you can easily disable this service and tailor your Windows experience to better suit your needs. Remember to proceed with caution, especially when modifying the registry, and ensure you fully understand the implications of disabling this service.