
Служба Windows Error Reporting (WER) служит для сбора и отправки отладочной информации о падении системных и сторонних приложений в Windows на сервера Microsoft. По задумке Microsoft, эта информация должна анализироваться и при наличии решения, вариант исправления проблемы должен отправляется пользователю через Windows Error Reporting Response. Но по факту мало кто пользуется этим функционалом, хотя Microsoft настойчиво оставляет службу сбора ошибок WER включенной по умолчанию во всех последних версиях Windows. В большинстве случае о службе WER вспоминают, когда каталог C:\ProgramData\Microsoft\Windows\WER\ReportQueue\ начинает занимать много места на системном диске (вплоть до нескольких десятков Гб), даже не смотря на то что на этом каталоге по умолчанию включена NTFS компрессия.
Содержание:
- Служба Windows Error Reporting
- Очистка папки WER\ReportQueue в Windows
- Отключение Window Error Reporting в Windows Server
- Отключаем сбор и отправки отчетов об ошибках в Windows 10
- Отключение Windows Error Reporting через GPO
Служба Windows Error Reporting
Служба Windows Error Reporting при появлении ошибки показывает диалоговое окно, предлагающее отправить отчет об ошибке в корпорацию Microsoft. Когда в Windows вы видите сообщение об ошибке
YourApp has stop working
, в это время в служба Windows Error Reporting запускает утилиту WerFault.exe для сбора отладочных данных (могут включать в себя дамп памяти).
Данные пользователя сохраняются в профиль пользователя:
%USERPROFILE%\AppData\Local\Microsoft\Windows\wer
Системные данные – в системный каталог:
%ALLUSERSPROFILE%\Microsoft\Windows\WER\
Служба Windows Error Reporting представляет собой отдельный сервис Windows. Вы можете проверить состояние службы командой PowerShell:
Get-Service WerSvc
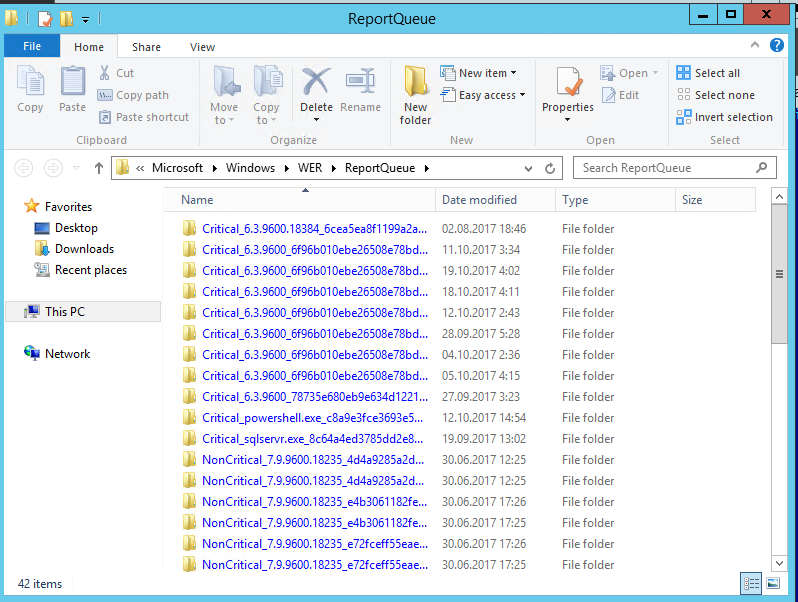
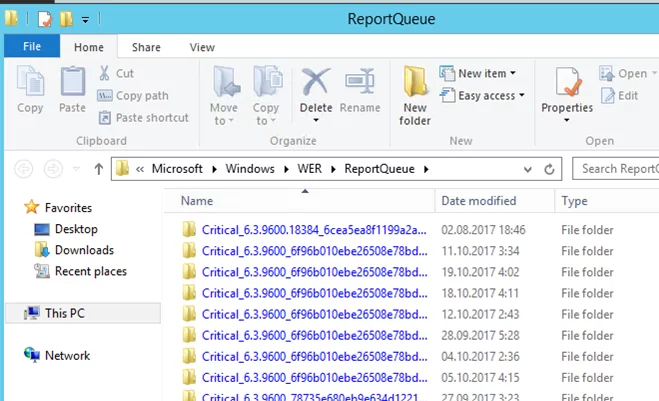
Внутри каталога WER\ReportQueue\ содержится множество каталогов, с именами в формате:
- Critical_6.3.9600.18384_{ID}_00000000_cab_3222bf78
- Critical_powershell.exe_{ID}_cab_271e13c0
- Critical_sqlservr.exe__{ID}_cab_b3a19651
- NonCritical_7.9.9600.18235__{ID}_0bfcb07a
- AppCrash_cmd.exe_{ID}_bda769bf_37d3b403
Как вы видите, имя каталога содержит степень критичности события и имя конкретного exe файла, который завершился аварийно. Во всех каталогах обязательно имеется файл Report.wer, который содержит описание ошибок и несколько файлов с дополнительной информацией.
Очистка папки WER\ReportQueue в Windows
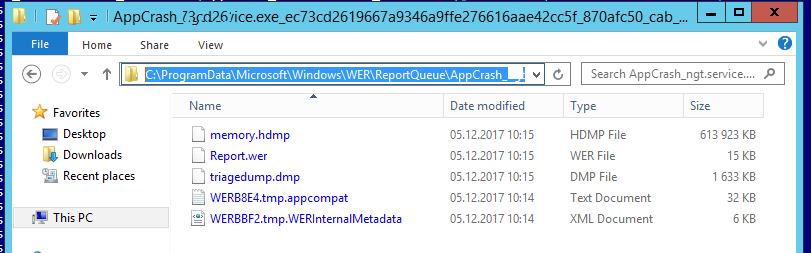
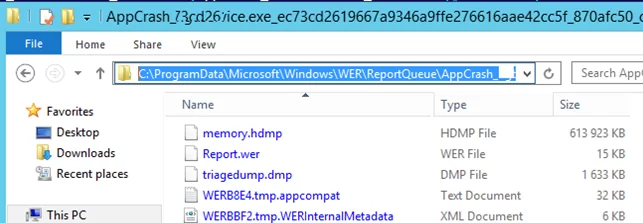
Как правило, размер каждой папки в WER незначителен, но в некоторых случаях для проблемного процесса генерируется дамп памяти, который занимает довольно много места. На скриншоте ниже видно, что размер файла дампа memory.hdmp составляет около 610 Мб. Парочка таким дампов – и на диске исчезло несколько свободных гигибайт.
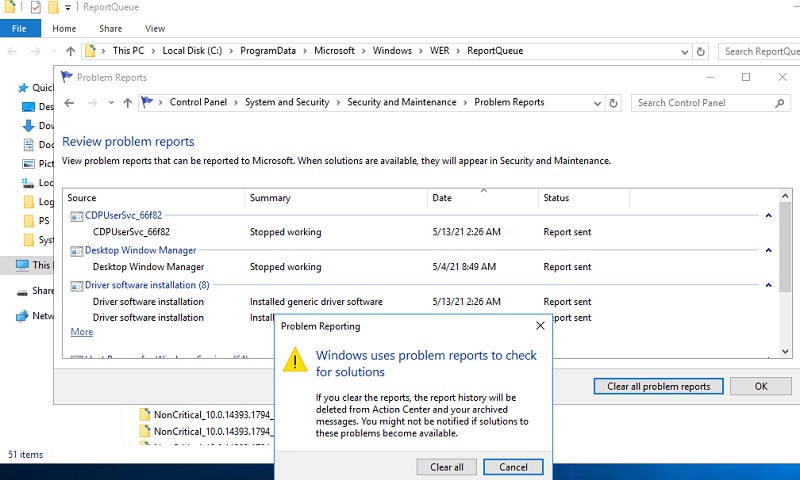
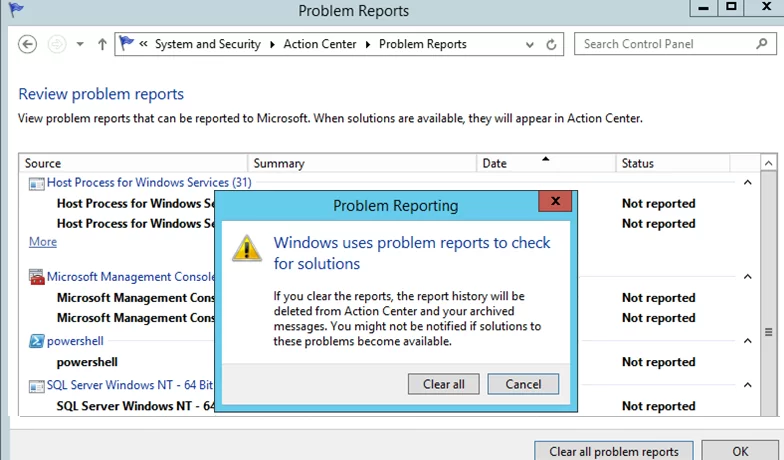
Чтобы очистить все эти ошибки и журналы штатными средствами, откройте панель управления и перейдите в раздел ControlPanel -> System and Security -> Security and Maintenance -> Maintenance -> View reliability history -> View all problem reports (Control Panel\System and Security\Security and Maintenance\Problem Reports) и нажмите на кнопку Clear all problem reports.
Для быстрого освобождения места на диске от файлов отладки, сгенерированных службой WER, содержимое следующих каталогов можно безболезненно очистить вручную.
- C:\ProgramData\Microsoft\Windows\WER\ReportArchive\
- C:\ProgramData\Microsoft\Windows\WER\ReportQueue\
Следующие команды PowerShell удалят из каталога каталогов WER все файлы, старше 15 дней:
Get-ChildItem -Path  'C:\ProgramData\Microsoft\Windows\WER\ReportArchive' -Recurse | Where-Object CreationTime -lt (Get-Date).AddDays(-15) | Remove-Item -force -Recurse
Get-ChildItem -Path  'C:\ProgramData\Microsoft\Windows\WER\ReportQueue' -Recurse | Where-Object CreationTime -lt (Get-Date).AddDays(-15) | Remove-Item -force –Recurse
Для очистки каталогов WER в пользовательских профилях используйте такой скрипт:
$users = Get-ChildItem c:\users|where{$_.name -notmatch 'Public|default'}
foreach ($user in $users){
Get-ChildItem "C:\Users\$User\AppData\Local\Microsoft\Windows\WER\ " –Recurse -ErrorAction SilentlyContinue | Remove-Item –force –Recurse
}
Отключение Window Error Reporting в Windows Server
В Windows Server 2019/2016/2012R2 вы можете управлять состоянием WER с помощью PowerShell. Вы можете отключить службу Windows Error Reporting:
Get-Service WerSvc| stop-service –passthru -force
Set-Service WerSvc –startuptype manual –passthru
Но есть более корректные способы отключения WER в Windows. В версии PowerShell 4.0 добавлен отдельный модуль WindowsErrorReporting из трех командлетов:
Get-Command -Module WindowsErrorReporting

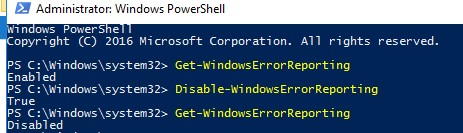
Проверить состояние службы Windows Error Reporting можно командой:
Get-WindowsErrorReporting
Для отключения WER, выполните:
Disable-WindowsErrorReporting
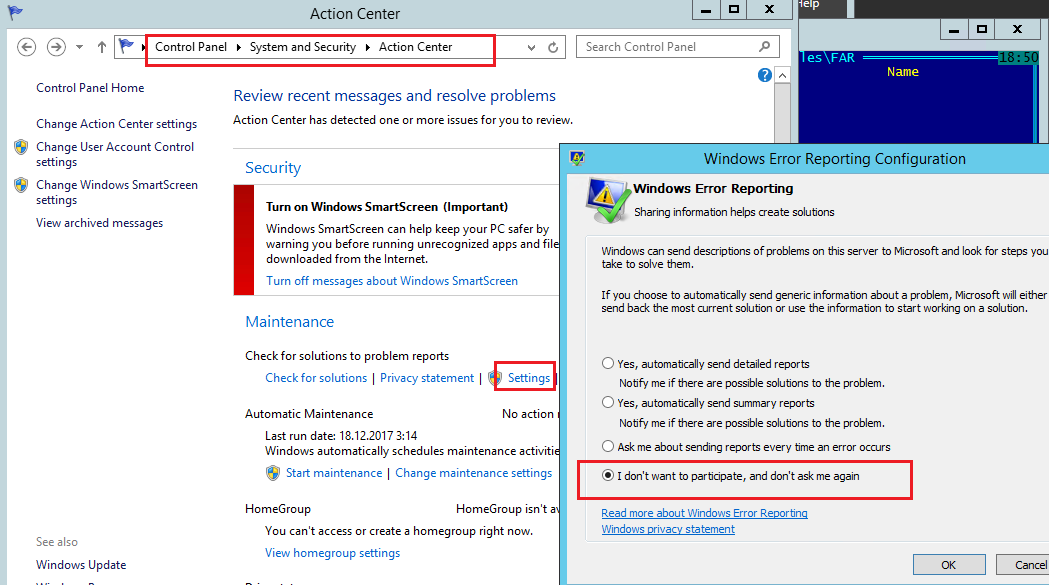
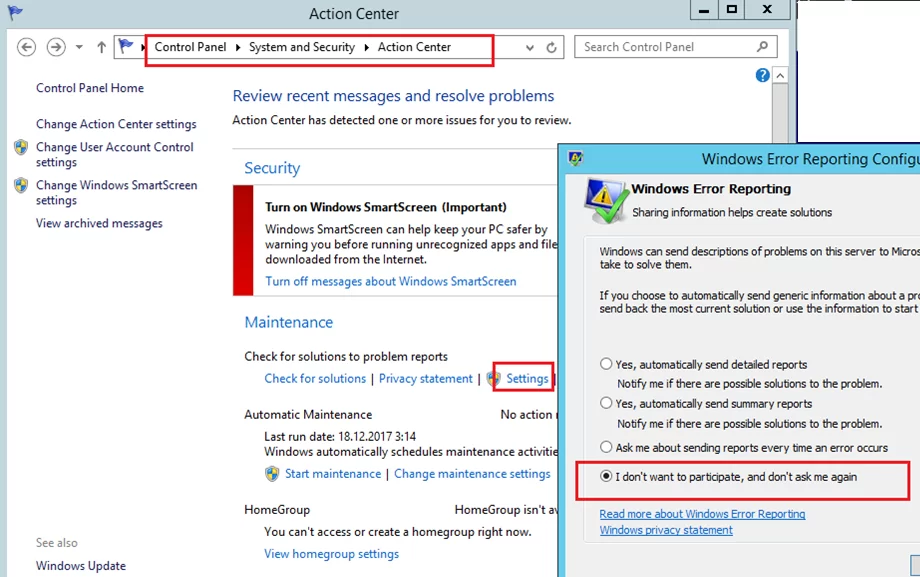
В Windows Server 2012 R2 можно отключить запись информации об ошибках Windows Error Reporting через панель управления (Control Panel -> System and Security -> Action Center -> раздел Maintenance -> Settings -> выберите опцию I don’t want to participate, and don’t ask me again
Отключаем сбор и отправки отчетов об ошибках в Windows 10
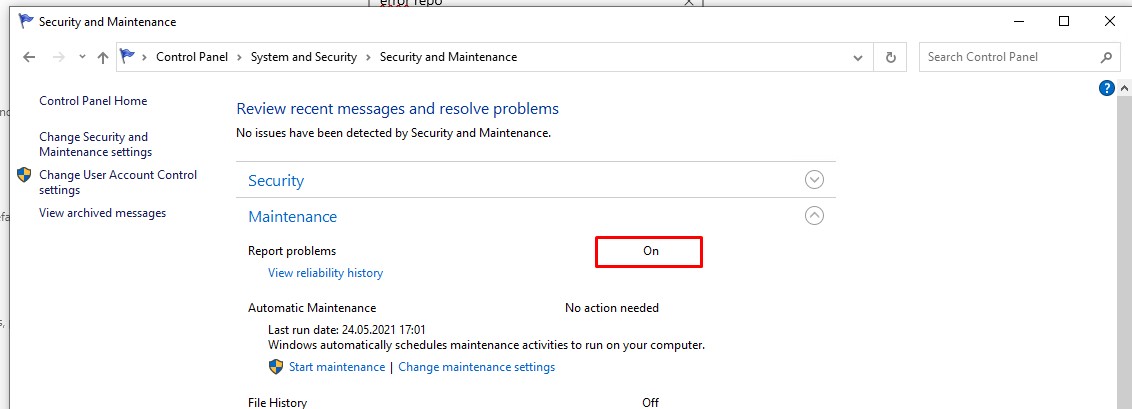
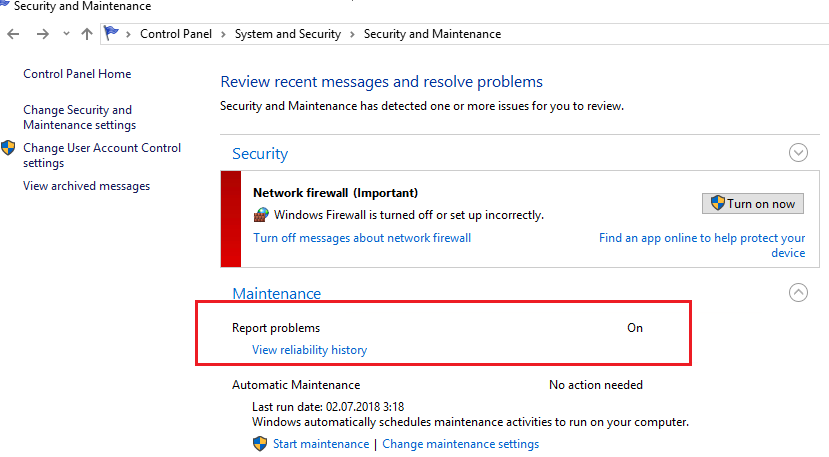
В Windows 10 нельзя отключить Error Reporting через панель управления. В графическогм интерфейсе можно только проверить ее статус (Система и безопасность ->Центр безопасности и обслуживания -> секция Обслуживание). Как вы видите, по умолчанию параметр Поиск решения для указанных в отчетах проблем включен (Control Panel -> System and Security -> Security and Maintenance -> Maintenance -> Report problems = On).
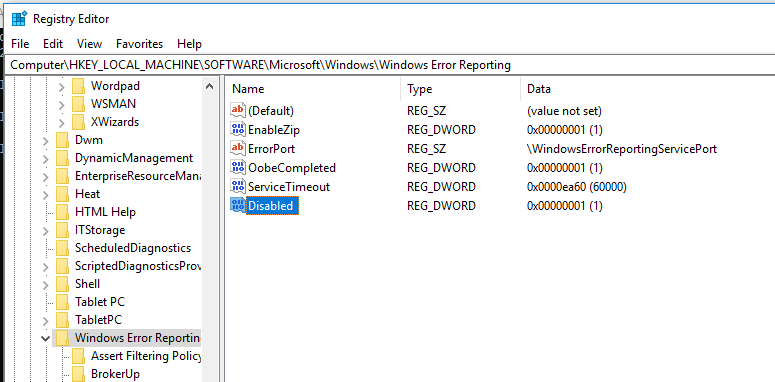
HKLM\SOFTWARE\Microsoft\Windows\Windows Error Reporting нужно создать новый параметр типа DWORD (32 бита) с именем Disabled и значением 1.
Можно отключить сбор ошибок WER для конкретных пользователей:
reg add "HKCU\Software\Microsoft\Windows\Windows Error Reporting" /v "Disabled" /t REG_DWORD /d "1" /f
Или отключить WER для всех:
reg add "HKLM\Software\Microsoft\Windows\Windows Error Reporting" /v "Disabled" /t REG_DWORD /d "1" /f

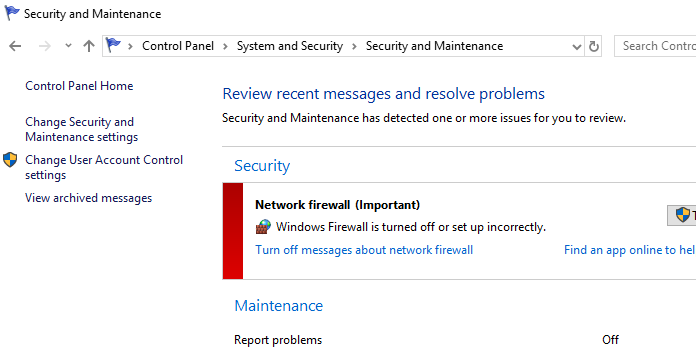
Измените параметр реестра и проверьте статус параметра Поиск решения для указанных в отчетах проблем в панели управления. Его статус должен изменится на Отключено.

Отключение Windows Error Reporting через GPO
Также вы можете управлять настройками службы Windows Error Reporting через групповые политики.
Запустите редактор локальной (
gpedit.msc
) или доменной GPO (
gpmc.msc
) и перейдите в ветку реестра Computer Configuration -> Administrative Templates -> Windows Components -> Windows Error Reporting (Компоненты Windows -> Отчеты об ошибках Windows). Для отключения сбора и отправки ошибок через WER включите политику Disable Windows Error Reporting (Отключить отчеты об ошибках Windows).
Аналогичная политика есть в пользовательском разделе политик (User Configuration).

Обновите GPO (перезагрузка не потребуется).
В результате в Windows перестанут формироваться сообщения об ошибках Windows и отправляться в Microsoft.
Q
What is the scheduled task «\Microsoft\Windows\Windows Error Reporting\QueueReporting» on my Windows 7 computer?
A
«\Microsoft\Windows\Windows Error Reporting\QueueReporting» is a scheduled task on Windows 7 system
added as part of Windows installation.
You will see «\Microsoft\Windows\Windows Error Reporting\QueueReporting» listed on Task Scheduler with the following information:
Name: QueueReporting
Location: \Microsoft\Windows\Windows Error Reporting
Description: Windows Error Reporting task to process queued reports.
Actions: %windir%\system32\wermgr.exe -queuereporting
Triggers: At log on of any user
History:
Program file information about «wermgr.exe»:
File name: wermgr.exe
File path: C:\Windows\system32\wermgr.exe
File size: 50688 bytes
Last modified time: 7/13/2009 9:39:51 PM
File description: Windows Problem Reporting
File version: 6.1.7600.16385 (win7_rtm.090713-1255)
Company name: Microsoft Corporation
«wermgr.exe» is scheduled to run whenever you login to your computer.
It is recommended to disable «\Microsoft\Windows\Windows Error Reporting\QueueReporting»
as a scheduled task.
⇒ «BfeOnServiceStartTypeChange» Scheduled Task on Windows 7
⇐ «ResolutionHost» Scheduled Task on Windows 7
⇑ System Scheduled Tasks on Windows 7
⇑⇑ Windows 7 Scheduled Tasks
In December 2018, a hacker who goes by the alias ‘SandboxEscaper’ publicly disclosed a zero-day vulnerability in the Windows Error Reporting (WER) component. Digging deeper into her submission, I discovered another zero-day vulnerability, which could be abused to elevate system privileges. According to the Microsoft advisory, attackers exploited this bug as a zero-day in the wild until the patch was released in May 2019.
So how did this bug work exactly?
Microsoft WER Under the Hood
The Windows Error Reporting tool is a flexible event-based feedback infrastructure designed to gather information about hardware and software problems that Windows can detect, report the information to Microsoft, and provide users with any available solutions.
For example, if Windows encounters a system crash or a failure, an error report is generated and stored under the WER report queue directory (C:\ProgramData\Microsoft\Windows\WER\ReportQueue), where each report gets its own subdirectory and a unique Report.wer INI file with the relevant metadata. To enable all processes to report their failures, the ReportQueue directory is writable for all users, as you can see below:
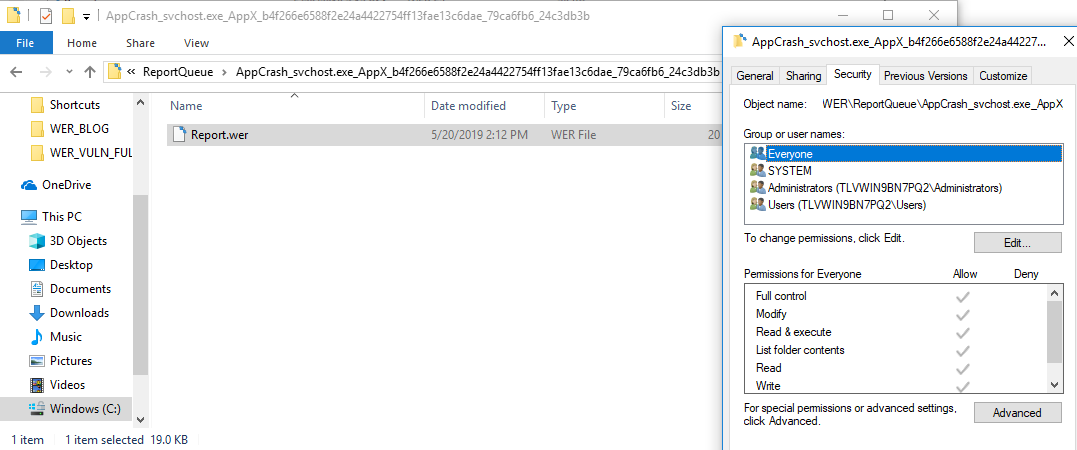
Figure 1. Windows Error Reporting queue directory
After a report is generated, it has to be sent to Microsoft for further analysis. This interaction can be triggered in several ways, one of which is by using a scheduled task called Windows Error Reporting\QueueReporting. This task is interesting from a security perspective because:
- It runs with System permissions, as defined in the ‘Security Options’ section of the task.
- It can be triggered on demand.
- It runs a dedicated binary code with a fixed command line argument – wermgr.exe -upload.
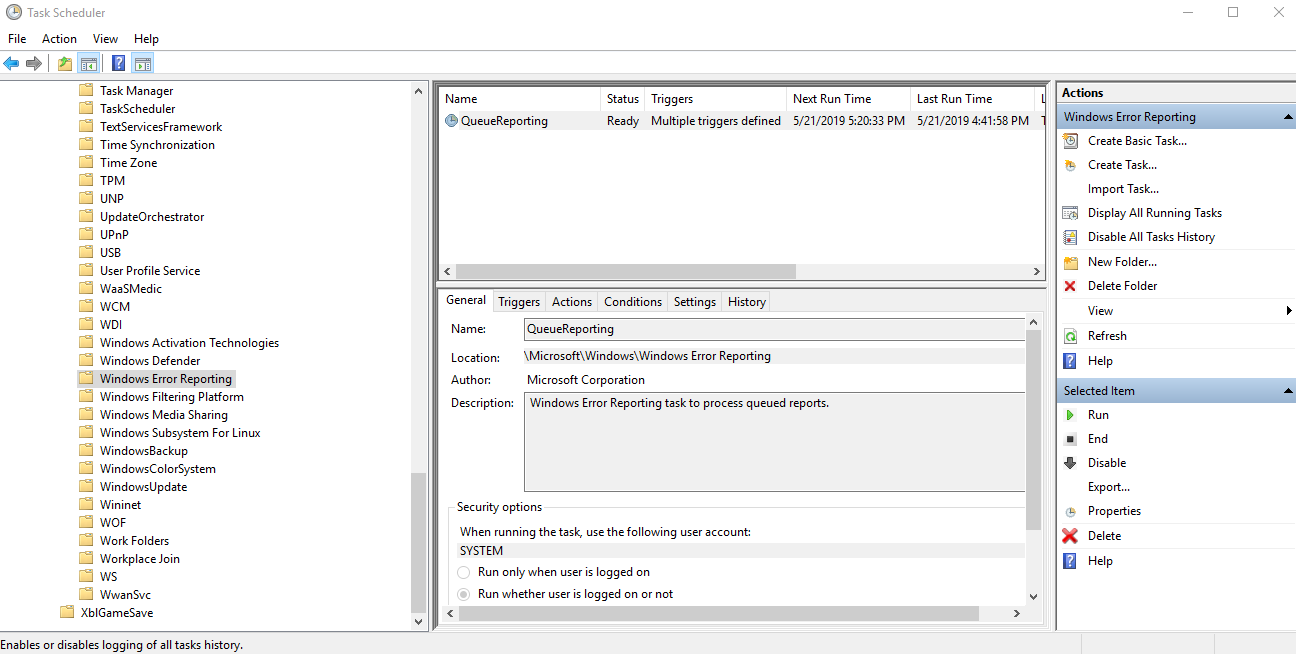
Figure 2. Windows Error Reporting Task Schedule
After it executes, wermgr.exe interacts with the pending report files and directories. It reads the files, parses them, copies them to other directories, and sometimes even deletes them. Point being, now we have a high privileged component accessing files that can be written by any user. If not implemented with caution, this could introduce some serious security vulnerabilities.
Abusing Filesystem Links
Windows supports different types of filesystem links, that can be used to point files and directories to other target files and directories. Quite simply, once the links are scanned and reparsed, they redirect the user to the target path(s). From a security perspective, the greatest threat comes from abusing hard links and mount points since users can link them to files or directories to which they have no writing permissions in the first place.
The example below depicts how a user with no writing permissions to kernel32.dll can create a link between c:\temp\Dir\x.dll and C:\Windows\System32\kernel32.dll. Being able to redirect to more privileged components is essentially all a hacker needs, enabling him to read, write and even delete sensitive, critical files.
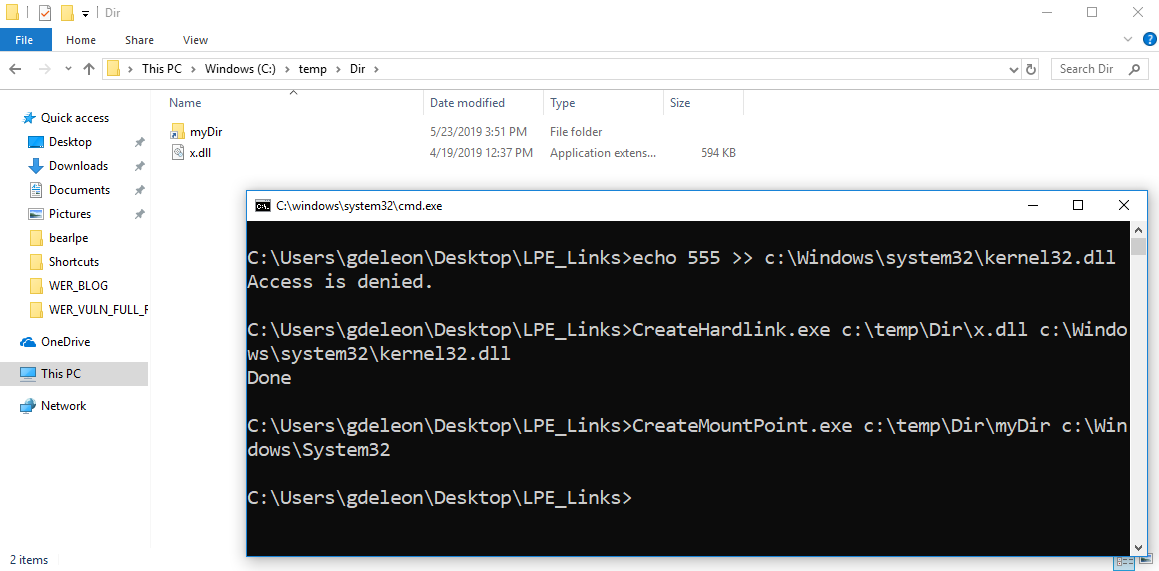
Figure 3. Creating a hard link to a file that the user does not have privileges to writespa
Explaining the Bug
In short, the hacker exploits the ability of WER to change file permissions in order to assign himself read, write, edit and delete permissions to any other file he wants, by linking files in the report directory to different target files on the computer, using the above-mentioned filesystem linking.
In more detail, this is the full bug scenario:
- Step 1: wermger.exe parses all files in the report directories, one by one, and submits them to Microsoft.
- Step 2: When wermger.exe detects a corrupt Report.wer INI file, it will eventually delete it, however first it changes the file’s DACL properties by adding the process executer permission to delete this file.
- Exploit: The hacker exploits the short window of opportunity that occurs between the time wermger.exe reads the file’s DACL, and the time it takes for it to add the delete permission to the file. If the attacker creates a link between such a file to any other file on the system, after the DACL is read, wermgr.exe will incorrectly modify the security descriptor of the other file. We can all agree this is a very, very bad scenario.
Step 1:
The first thing wermgr.exe -upload does is call the wermgr!DoCoreUpload function, which lists all the subdirectories under ReportQueue. It reads the error reports and submits them to Microsoft:
|
int64 DoCoreUpload(/* … */) { /* … */ Ret = WerpSubmitReportFromStore(ReportPath, /* … */); if (Ret >= 0) { /* Report successfully uploaded */ } else { if (Ret == ERROR_FILE_CORRUPT) { DeleteCorruptedReportFromStore(ReportPath); } } } |
Step 2:
When wermgr.exe encounters a corrupt Report.wer INI file, it changes its DACL in order to later on delete it. More specifically,
- First, wermgr!DeleteCorruptedReportFromStore lists all the files under the report’s subdirectory;
- Then, wermgr!PreparePathForDeletion modifies the permissions for each file. This is where the core bug resides, since this function reads the file’s security descriptor using kernel32!GetFileSecurity and calls kernel32!SetFileSecurity to apply the delete descriptor to the file.
|
1 2 3 4 5 6 7 8 9 10 11 12 13 14 15 16 17 18 19 20 21 22 23 24 25 26 27 28 29 30 31 32 33 34 35 36 37 38 39 40 41 42 43 44 45 46 47 48 49 50 |
int64 PreparePathForDeletion(wchar_t* FileName) { PSECURITY_DESCRIPTOR SecurityDescriptor = NULL; DWORD BytesRead = 0; PDACL Dacl = NULL; /* … */ if ( !GetFileSecurity(FileName, DACL_SECURITY_INFORMATION, NULL, 0, &BytesRead) ) { /* … */ return; } SecurityDescriptor = new BYTE[BytesRead]; if ( !GetFileSecurity(FileName, DACL_SECURITY_INFORMATION, SecurityDescriptor, BytesRead, &BytesRead) ) { /* … */ return; } if ( GetSecurityDescriptorDacl(SecurityDescriptor, &DaclPresent, &Dacl, &DaclDefaulted) ) { /* … */ HANDLE TokenHandle = NULL; PACL NewAcl = NULL; EXPLICIT_ACCESS ExplicitAccess = {0}; /* … */ LPVOID UserName = new BYTE[/* … */]; GetTokenInformation(TokenHandle, TokenUser, UserName, &BytesRead); ExplicitAccess.Trustee.ptstrName = UserName; ExplicitAccess.Trustee.TrusteeType = TRUSTEE_IS_NAME; ExplicitAccess.grfAccessMode = GRANT_ACCESS; ExplicitAccess.grfAccessPermissions = DELETE | /* … */; /* … */ SetEntriesInAcl(1, &ExplicitAccess, Dacl, &NewAcl); InitializeSecurityDescriptor(&SecurityDescriptor, 1); SetSecurityDescriptorDacl(&SecurityDescriptor, 1, NewAcl, 0); SetFileSecurity(FilePath, DACL_SECURITY_INFORMATION, &SecurityDescriptor); } } |
Creating the link at the exact right time is extremely difficult, yet a persistent hacker will try again and again until he succeeds. Attackers are likely to target executable files (DLLs, EXEs or scripts) and override them with malicious payload, knowing they will later on be executed with System permissions.
Traps Provides Behavior-based Protection
Palo Alto Networks Traps for endpoint protection and response stops threats on endpoints and coordinates enforcement with network and cloud security to prevent successful cyberattacks. Traps stops malware, exploits and ransomware by observing attack techniques and behaviors, incorporating Machine Learning (ML) and Artificial Intelligence (AI) to automatically detect and respond to sophisticated attacks. To prevent this bug, the Behavioral Threat Protection (BTP) feature in Traps would monitor malicious behaviors across a sequence of events, and immediately terminate the attack when it was detected. In addition, Traps Local Analysis via ML prevents malicious payloads from executing.
To learn more about Traps, visit us at ttps://www.paloaltonetworks.com/products/secure-the-endpoint/traps.
Время на прочтение7 мин
Количество просмотров40K
Автоматическая установка операционных систем семейства Windows требует от системного администратора тщательной проработки всех этапов выполнения. Давно интересуюсь данной темой, однако, в ходе многолетнего опыта по созданию собственных настроенных и обновлённых сборок Windows мной был упущен аспект работы с Планировщиком заданий. Разработчики Windows закладывают задачи, выполняемые в будущем по-расписанию, но ненужные и порой вредные «рядовому» пользователю. Список этих задач предлагаю к рассмотрению и обсуждению в данной статье.
Я уже писал здесь статьи про быструю и тонкую настройку операционной системы путём применения собранных мной твиков реестра, также была серия статей посвященных работе с образом Windows посредством DISM, где выкладывались мои скрипты: добавления пакетов обновлений, отключения компонентов, удаления «магазинных» приложений, получения информации из образа Windows. Скрипт приведённый в этой статье элементарный, основной интерес направлен на сам список задач, которые я предлагаю убрать из Планировщика заданий.
Скрипт
@echo off

schtasks /Delete /tn "\Microsoft\Windows\AppID\SmartScreenSpecific" /f                                        &rem - 9 B
schtasks /Delete /tn "\Microsoft\Windows\Application Experience\AitAgent" /f                                  &rem 7 9 -
schtasks /Delete /tn "\Microsoft\Windows\Application Experience\Microsoft Compatibility Appraiser" /f         &rem 7 9 B
schtasks /Delete /tn "\Microsoft\Windows\Application Experience\ProgramDataUpdater" /f                        &rem 7 9 B
schtasks /Delete /tn "\Microsoft\Windows\Application Experience\StartupAppTask" /f                            &rem - 9 B
schtasks /Delete /tn "\Microsoft\Windows\ApplicationData\appuriverifierdaily" /f                              &rem - - B
schtasks /Delete /tn "\Microsoft\Windows\ApplicationData\appuriverifierinstall" /f                            &rem - - B
schtasks /Delete /tn "\Microsoft\Windows\Autochk\Proxy" /f                                                    &rem 7 9 B

schtasks /Delete /tn "\Microsoft\Windows\Customer Experience Improvement Program\BthSQM" /f                   &rem - 9 -
schtasks /Delete /tn "\Microsoft\Windows\Customer Experience Improvement Program\Consolidator" /f             &rem 7 9 B
schtasks /Delete /tn "\Microsoft\Windows\Customer Experience Improvement Program\KernelCeipTask" /f           &rem 7 9 B
schtasks /Delete /tn "\Microsoft\Windows\Customer Experience Improvement Program\UsbCeip" /f                  &rem 7 9 B

schtasks /Delete /tn "\Microsoft\Windows\Defrag\ScheduledDefrag" /f                                           &rem 7 9 B
schtasks /Delete /tn "\Microsoft\Windows\Device Information\Device" /f                                        &rem - - B
schtasks /Delete /tn "\Microsoft\Windows\Diagnosis\Scheduled" /f                                              &rem 7 9 B
schtasks /Delete /tn "\Microsoft\Windows\DiskDiagnostic\Microsoft-Windows-DiskDiagnosticDataCollector" /f     &rem 7 9 B

schtasks /Delete /tn "\Microsoft\Windows\LanguageComponentsInstaller\Installation" /f                         &rem - - B
schtasks /Delete /tn "\Microsoft\Windows\LanguageComponentsInstaller\Uninstallation" /f                       &rem - - B

schtasks /Delete /tn "\Microsoft\Windows\Maintenance\WinSAT" /f                                               &rem 7 9 B
schtasks /Delete /tn "\Microsoft\Windows\Maps\MapsToastTask" /f                                               &rem - - B
schtasks /Delete /tn "\Microsoft\Windows\Maps\MapsUpdateTask" /f                                              &rem - - B
schtasks /Delete /tn "\Microsoft\Windows\Mobile Broadband Accounts\MNO Metadata Parser" /f                    &rem - 9 B
schtasks /Delete /tn "\Microsoft\Windows\MobilePC\HotStart" /f                                                &rem 7 - -
schtasks /Delete /tn "\Microsoft\Windows\MUI\LPRemove" /f                                                     &rem 7 9 B

schtasks /Delete /tn "\Microsoft\Windows\NetTrace\GatherNetworkInfo" /f                                       &rem 7 9 B

schtasks /Delete /tn "\Microsoft\Windows\Power Efficiency Diagnostics\AnalyzeSystem" /f                       &rem 7 9 B

schtasks /Delete /tn "\Microsoft\Windows\RAC\RacTask" /f                                                      &rem 7 9 -
schtasks /Delete /tn "\Microsoft\Windows\RemoteAssistance\RemoteAssistanceTask" /f                            &rem 7 9 B
schtasks /Delete /tn "\Microsoft\Windows\RetailDemo\CleanupOfflineContent" /f                                 &rem - - B

schtasks /Delete /tn "\Microsoft\Windows\SettingSync\BackgroundUploadTask" /f                                 &rem - 9 B
schtasks /Delete /tn "\Microsoft\Windows\SettingSync\BackupTask" /f                                           &rem - 9 B
schtasks /Delete /tn "\Microsoft\Windows\SettingSync\NetworkStateChangeTask" /f                               &rem - 9 B
schtasks /Delete /tn "\Microsoft\Windows\Setup\EOSNotify" /f                                                  &rem 7 9 -
schtasks /Delete /tn "\Microsoft\Windows\Setup\EOSNotify2" /f                                                 &rem 7 9 -
schtasks /Delete /tn "\Microsoft\Windows\Setup\SetupCleanupTask" /f                                           &rem - 9 B
schtasks /Delete /tn "\Microsoft\Windows\Speech\SpeechModelDownloadTask" /f                                   &rem - - B
schtasks /Delete /tn "\Microsoft\Windows\SystemRestore\SR" /f                                                 &rem 7 9 B

schtasks /Delete /tn "\Microsoft\Windows\Time Synchronization\SynchronizeTime" /f                             &rem 7 9 B

schtasks /Delete /tn "\Microsoft\Windows\Windows Error Reporting\QueueReporting" /f                           &rem 7 9 B
schtasks /Delete /tn "\Microsoft\Windows\WindowsBackup\ConfigNotification" /f                                 &rem 7 - -
schtasks /Delete /tn "\Microsoft\Windows\WS\License Validation" /f                                            &rem - 9 -
schtasks /Delete /tn "\Microsoft\Windows\WS\WSRefreshBannedAppsListTask" /f                                   &rem - 9 -

schtasks /Delete /tn "\Microsoft\XblGameSave\XblGameSaveTask" /f                                              &rem - - B
schtasks /Delete /tn "\Microsoft\XblGameSave\XblGameSaveTaskLogon" /f                                         &rem - - B

timeout 3 > nul
Использование
Запуск под учётной записью администратора приводит к выполнению последовательности команд schtasks с аргументом /Delete (удалить) последующее имя задачи за аргументом /tn. Ключ /f подавляет вывод уведомлений о подтверждении. Достаточно одного выполнения скрипта, а повторные запуски лишь отобразят список ошибок из-за невозможности удалить то, чего уже нет. Скрипт не наделён «интерактивностью», так как используется в процессе автоматической установки Windows.
Применимость
Список задач, подлежащих удалению данным скриптом, составлен для следующих версий ОС: Windows 7 Professional VL SP1 (updated Jan 2020 — End of Support), Windows 8.1 Professional VL Update3 (updated Jan 2023 — End of Support), Windows 10 v1607 Enterprise LTSB (updated Jan 2023). Изначально хотел написать отдельные скрипты для каждой версии Windows, но увидел, что список задач значительно повторяется и поэтому объединил в один. В планах добавить в список ненужные задачи из следующих версий ОС: Windows 10 v1809 Enterprise LTSC, Windows 10 v21H2 Professional BE (business editions) — на базе которых также делаю свои сборки.
Комментирование
Чтобы не запутаться в списке задач — откуда каждая из них взялась и стоит ли её удалять — в комментарии, в конце строки каждой команды можно видеть подсказку в каких версиях Windows удаляемая задача встречается. Это удобно для анализа и редактирования списка. Также присутствует алфавитная сортировка задач, с группировкой разделов по первой букве. Взгляните, в Windows 7 ненужных задач было не много — всего 22, в Windows 8.1 их уже стало 30, в Windows 10 LTSB уже 41! Страшно представить сколько «мусора» в Планировщике заданий я обнаружу в версии Windows 10 Enterprise LTSC и особенно в Windows 10 21H2.
Откуда список
Я составлял данный список путём вдумчивого чтения описания каждой задачи и анализа параметров её запуска. За дополнительной информацией обращался к источникам в Интернете, в том числе англоязычным, в том числе официальным. Не всегда мне удавалось найти однозначный ответ на вопрос: «стоит удалять данную задачу или нет?». Бывало так, что описание у задачи отсутствовало, параметры запуска скрыты, триггеры срабатывания отсутствуют, но при этом задача почему-то выполнялась. В сети Интернет не нашел аналогичного списка с развёрнутой дискуссией обсуждения целесообразности включения в него тех или иных задач.
Удаление или отключение?
Консольная команда schtasks имеет полный набор аргументов для управления Планировщиком заданий Windows. В ходе поиска информации по отдельным задачам в сети Интернет мне попадались скрипты других авторов, где ненужные задачи отключались (подаргумент /disable аргумента /Change). Я использую более радикальный подход — просто удаляю (аргумент /Delete) ненужные мне задачи. Ведь вариант «отключение» подразумевает что мне когда-нибудь понадобится включить некоторую задачу. Не представляю себе ситуацию, когда мне понадобится снова включить, например, уведомление об окончании срока поддержки или телеметрию. Что скажете?
Вердикт на удаление
Какие задачи в Планировщике заданий принимать к рассмотрению? Рассмотрим какие задачи бывают, в каком состоянии и насколько открыты. На начальном этапе были мысли написать простой скрипт, который бы удалял вообще все задачи (без разбора), но данный подход опасен тем, что может привести к снижению производительности и надёжности системы, так что пришлось разбираться. Итак:
- Состояние — Отключено
Я не включал в список на удаление задачи в состоянии «Отключено». Как правило это либо «артефакты» прошлых версий Windows, либо уже отключенные самими разработчиками посредством пакетов обновлений, либо ещё что… - Бесполезное обслуживание
Это пример задач которые запускают ежедневное/еженедельное выполнение различных служб в назначенное время, как правило ночью. Как итог, эти задачи не выполняются так как ночью мой компьютер («рядового» пользователя) отключён. Также мне не надо чтобы днём отвлекались ресурсы моего компьютера. - Телеметрия
Это страшное слово знакомо многим системным администраторам и не только. Значительная часть удаляемых по моему списку задач относится к средствам телеметрии и слежения за пользователем со стороны компании Майкрософт. Мой компьютер — это МОЙ КОМПЬЮТЕР! - «Тёмные лошадки»
Самая сложная категория задач. Как правило, много их появилось в версии Windows 10. Отличительные особенности: описание размыто или отсутствует, параметры запуска скрыты, триггеры срабатывания отсутствуют, но при этом задача каким-то чудом регулярно запускается, о чём указано в поле «Время прошлого запуска».
Обсуждение
Конечно, представленный мной список может быть не полным или наоборот избыточным. Есть вероятность, что я не распознал в какой-то задаче «скрытого пожирателя ресурсов» или наоборот включил в список задачу удаление которой скорее навредит работоспособности ОС. Прошу аргументированно высказывать своё мнение, делится опытом. В данном ключе обсуждение может начинаться по двум сценариям:
- Вы включили в список задачу «X», удаление которой приведёт к следующим негативным последствиям…
- Вы не включили в список задачу «Y», которая является вредной, так как выполняет следующие действия…
Список составлен для компьютера предназначенного для домашнего использования. Прошу к рассмотрению и обсуждению!
The Windows Error Reporting service (WER) is used to collect the debug information about system and third-party app failures and send error reports to Microsoft servers. This information should be analyzed by MSFT and if there is a solution, it will be sent to a user through Windows Error Reporting Response. Actually, few people use this feature, although Microsoft always leaves the WER service enabled by default in the latest Windows versions. In most cases, people remember about WER when they see that C:\ProgramData\Microsoft\Windows\WER\ReportQueue\ occupies much space on the system drive (up to several dozens of GB) even though NTFS compression is enabled for this directory by default.
Contents:
- Windows Error Reporting Service
- How to Clear the WER\ReportQueue Folder on Windows?
- Disable Windows Error Reporting on Windows Server
- How to Disable or Enable Error Reporting on Windows 10
- How to Disable Automatic Windows Error Reporting via GPO
Windows Error Reporting Service
Windows Error Reporting displays a dialog box when an application error occurs, prompting you to submit an error report to Microsoft. When you see the “YourAppName.exe has stopped working, Windows is collecting more information about the problem” error message in Windows, the Windows Error Reporting service runs the WerFault.exe tool to collect debug data (may include a memory dump).
User data is saved to the user profile:
%USERPROFILE%\AppData\Local\Microsoft\Windows\WER\
And the system data goes to the ProgramData directory:
%ALLUSERSPROFILE%\Microsoft\Windows\WER\
The Windows Error Reporting service is a separate Windows service. You can check the status of the service using the PowerShell command:
Get-Service WerSvc
In the WER\ReportQueue\ directory there are a lot of folders with the names in the following format:
- Critical_6.3.9600.11285_{ID}_00000000_cab_3212dd23
- Critical_powershell.exe_{ID}_cab_332a45c5
- Critical_sqlservr.exe__{ID}_cab_b3a200181
- NonCritical_7.9.9600.11285__{ID}_0bfab19a
- AppCrash_cmd.exe_{ID}_dba332ad_12eb5425
As you can see, the directory name contains the severity level of an event and the name of the specific EXE file that has crashed. In all folders, there is a file called Report.wer, which contains the description of the errors and some files with the additional information.
How to Clear the WER\ReportQueue Folder on Windows?
Typically, the size of each folder is small, but in some cases a memory dump is generated for a problem process that occupies much space. The screenshot below shows that the size of memory.hdmp is about 610 MB. A couple of such dumps can occupy several gigabytes of the system drive.
To clear all these errors and logs using the built-in tools, open the Control Panel and go to System and Security -> Security and Maintenance -> Maintenance -> View reliability history -> View all problem reports, then click Clear all problem reports.
To free up some disk space quickly, you can manually delete debug and log files generated by the WER service in the following folders:
- C:\ProgramData\Microsoft\Windows\WER\ReportArchive\
- C:\ProgramData\Microsoft\Windows\WER\ReportQueue\
The following PowerShell commands will remove all files older than 30 days from the WER directories:
Get-ChildItem -Path  'C:\ProgramData\Microsoft\Windows\WER\ReportArchive' -Recurse | Where-Object CreationTime -lt (Get-Date).AddDays(-30) | Remove-Item -Force -Recurse
 Get-ChildItem -Path  'C:\ProgramData\Microsoft\Windows\WER\ReportQueue' -Recurse | Where-Object CreationTime -lt (Get-Date).AddDays(-30) | Remove-Item -Force –Recurse
To clean up the WER directories in all user profiles, use the following PowerShell script:
$users = Get-ChildItem c:\users|where{$_.name -notmatch 'Public|default'}
 foreach ($user in $users){
 Get-ChildItem "C:\Users\$User\AppData\Local\Microsoft\Windows\WER\ " –Recurse -ErrorAction SilentlyContinue | Remove-Item –force –Recurse
 }
Disable Windows Error Reporting on Windows Server
On Windows Server 2019/2016/2012R2, you can manage the WER service state using PowerShell. You can disable the Windows Error Reporting service:
Get-Service WerSvc| stop-service –passthru -force
 Set-Service WerSvc –startuptype manual –passthru
You can disable WER on Windows using the built-in WindowsErrorReporting PowerShell module:
Get-Command -Module WindowsErrorReporting

You can check the status of the Windows Error Reporting service with the command:
Get-WindowsErrorReporting
To disable WER, run:
Disable-WindowsErrorReporting
On Windows Server 2012 R2 you can disable Windows Error Reporting via the control panel (Control Panel -> System and Security -> Action Center -> Maintenance -> Settings -> select I don’t want to participate, and don’t ask me again.
How to Disable or Enable Error Reporting on Windows 10
In Windows 10 you cannot disable the Error Reporting through the Control Panel. You can check the component status in the Control Panel -> System & Security -> Security and Maintenance -> Maintenance. As you can see, the Report problems parameter is enabled.
You can disable Windows Error Reporting on Windows 10 via the registry. To do it, create a new DWORD (32-bit) parameter with the name Disabled and the value 1 under the registry key HKLM\SOFTWARE\Microsoft\Windows\Windows Error Reporting.
You can disable Windows error collection for specific users with the command:
reg add "HKCU\Software\Microsoft\Windows\Windows Error Reporting" /v "Disabled" /t REG_DWORD /d "1" /f
Or disable WER for everyone:
reg add "HKLM\Software\Microsoft\Windows\Windows Error Reporting" /v "Disabled" /t REG_DWORD /d "1" /f
Now let’s check the status of the Report problems parameter in the Control Panel again. It should be Off.
How to Disable Automatic Windows Error Reporting via GPO
You can disable logging by the Windows Error Reporting service through Group Policy. Open the local (gpedit.msc) or domain GPO (gpmc.msc) editor and go to the following GPO section Computer Configuration -> Administrative Templates -> Windows Components -> Windows Error Reporting. Find the policy named Disable Windows Error Reporting and set it to Enabled. This will disable Windows data collection and error reporting.
There is a similar policy in the User Configuration section.
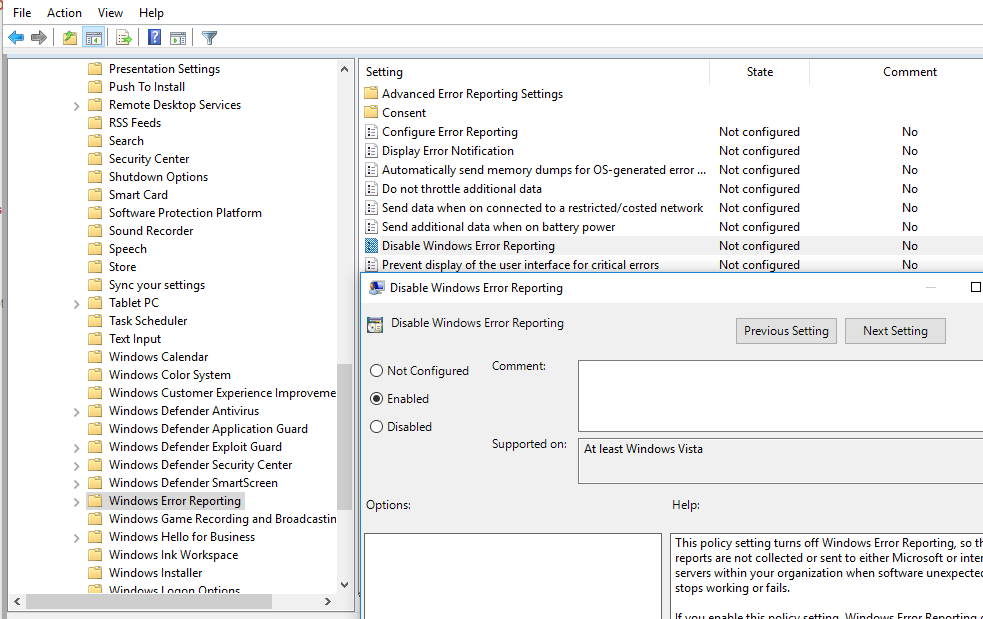
Update the GPO settings (no reboot required).
As a result, Windows will no longer generate application and system error messages and will no longer be sent to Microsoft.