
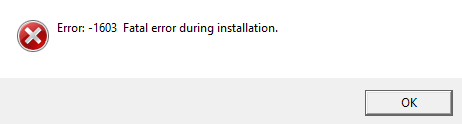
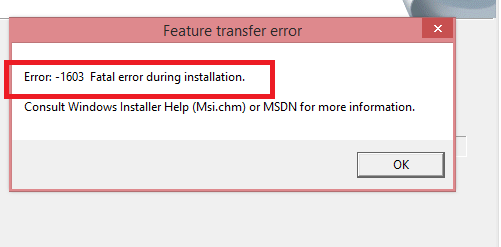
You may encounter an error with a code of 1603 when you are attempting to install something on your Windows. The error message is basically something like “Error: -1603 Fatal error during installation.” It usually occurs when you are using a Windows Installer package to install the program.
You can try the methods below that can be help you fix the error.
1) Change installation location
2) Completely uninstall the same program installed
3) Start and re-register Microsoft Installer service
4) Acquire full permissions on the drive for installation
1) Change installation location
You may encounter an error 1603 because the installation location is you choose is not available due to various reasons — such as being encrypted. You can use another installation folder to install the program and see if the error is gone.
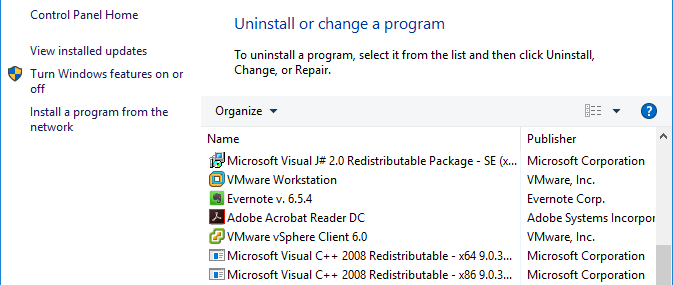
2) Completely uninstall the same program installed
If you have previously installed the same program (or its earlier version), the error can occur when you try to install the application again. If you want to install your program successfully, you need to perform a clean uninstall of the one installed on your computer. This means you need to remove all the temporary files and preferences it leaves in addition to the major program.
Sometimes you may lose the desktop shortcut of a program due to some reasons and therefore you may forget that you have installed it. In this case you can go to Control Panel to check if it is still on your computer:
Press Win + R, and enter “control“;
Find and open Programs and Features;

Then you can check if the application is listed here. If it is, uninstall it.
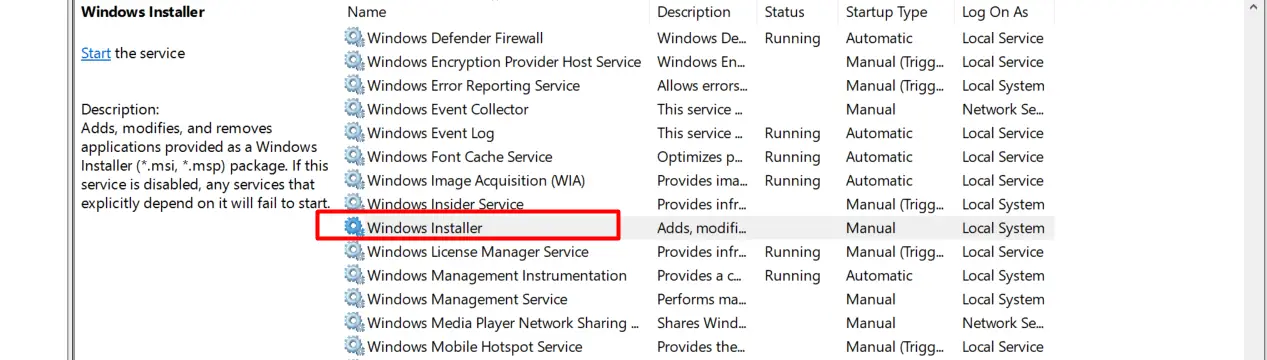
3) Start and re-register Microsoft Installer service
There may be something going wrong with Microsoft Installer service and therefore resulting in error 1603. You can fix the problem by (re)starting and re-registering Microsoft Installer service.
To start Windows Installer service:
a) Press Win + R and enter “services.msc“;
b) Find and double click on Windows Installer;
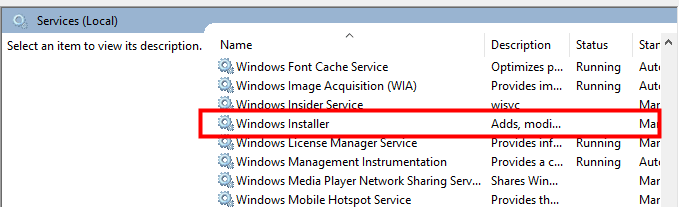
c) Hit Start button under Service status and hit OK. (If its service status is running, you should click on Stop first and then hit Start.)

To re-register Windows Installer service:
a) Press Win + R, type “msiexec /unregister” and hit Enter.
b) Press Win + R again and enter “msiexec /regserver“.
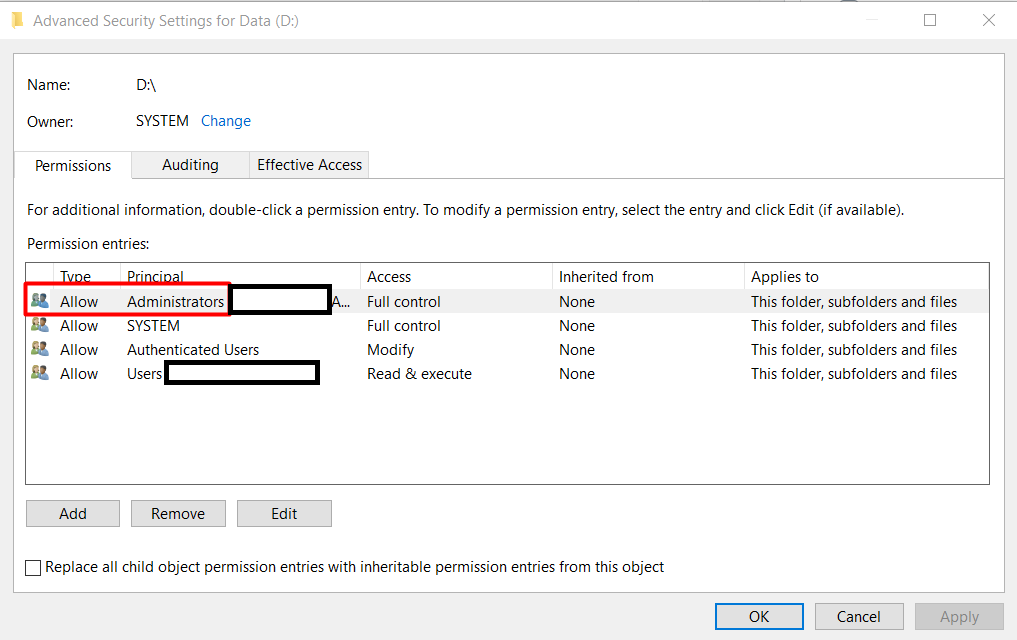
4) Acquire full permissions on the drive for installation
It is possible that the error 1603 occurs because you don’t have full permissions on the file location. Try getting the permissions on the drive you are installing your application to and see if this fixes the problem.
a) Open File Explorer, right click on the drive containing the installation location and select Properties.
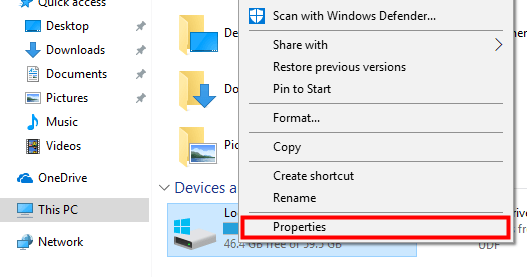
b) Go to Security tab and click on Edit.
c) Single click on SYSTEM and ensure that the Allow box of every item in Permissions for SYSTEM is checked (if it is checkable). Do the same check for Administrators.
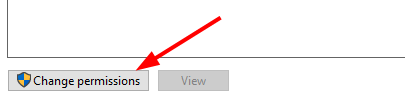
d) Click on OK to go back to Properties dialog. Then click on Advanced.
e) Click on Change Permissions.
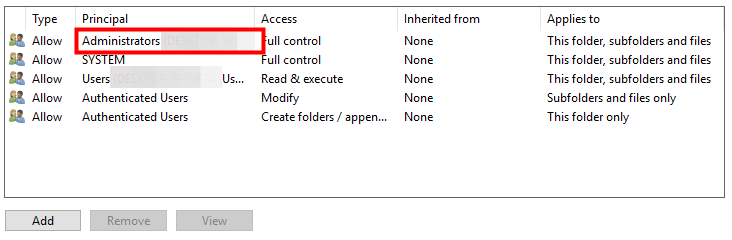
f) On Permissions tab, double click on Administrators.
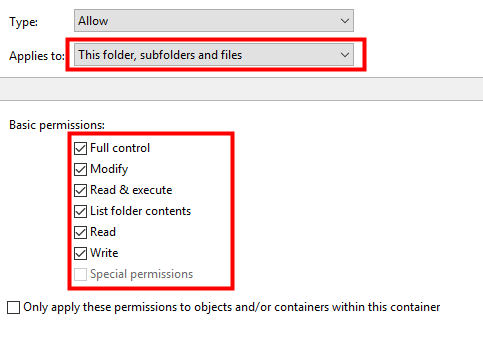
g) Select This folder, subfolders and files for Applies to field and tick all the available basic permissions. After that hit OK.
h) Do the same operation above for SYSTEM.

i) Click on OK all the way out. Now you have acquired full permissions on this drive. Try installing your application and see if the issue is fixed.
94
94 people found this helpful
A great many people received the fatal MSI error 1603 while they want to install the software in Windows 10/11? If you also encounter this error, then this article of MiniTool Partition Wizard is worth reading. It provides several ways for the MSI installer error 1603.
Here is a user report from the Microsoft forum:
“I am trying to redownload Alienware Command Center on my PC but when I try to download it, it gets close to the end then it says ‘Error -1603 fatal error during installation. Consult Windows installer help (msi.chm) or MSDN for more information.”https://answers.microsoft.com/en-us/windows/forum/all/error-1603-fatal-error-during-installation
What Is MSI Error 1603? Why Does It Happen?
An MSI file is a Windows Installer package that contains the information needed to install a product and the instructions and data needed to install (or uninstall) a program in many installation situations.
However, when running an MSI installation using the Windows Installer service, sometimes you encounter a fatal error with exit code 1603. This MSI error code 1603 means the installation failed. The MSI error message is usually something like “error – 1603 fatal error during installation.”
Well, what causes this MSI error 1603? Here we have listed the reasons why the MSI error 1603 is generated.
- Windows Installer is trying to install an application that is already installed on your PC.
- The folder into which the Windows Installer package is installed is encrypted.
- The drive of the folder where the Windows Installer package is installed will be accessed as an alternative drive.
- The Windows Temp folder is full or the target drive has not enough free space.
- The SYSTEM account does not have full control over the folder into which Windows Installer packages are installed.
- Disable short filename creation on the target machine.
Now that we know all the potential causes of the MSI error 1603, please try the following solutions.
How to Fix MSI Error 1603?
How to fix MSI installer error 1603? After analyzing the causes and users’ reports, we summarize the following methods that may help you solve this issue. Please try them in order.
Before you start troubleshooting, you can try some general tricks to get rid of this MSI 1603 error:
- Make sure the drive you are trying to install is not encrypted.
- Disable BitLocker.
Method 1: Run the Application Installer as Administrator
If the application won’t install on your computer, the installer may lack administrative permission to access certain required files. So, you can try relaunching the application installer with administrative privileges.
You just need to right-click the downloaded installer and choose the Run as an administrator option from the context menu. Then, check if the installation can proceed without the MSI 1603 error.
Method 2: Close the Background Software
Background software may corrupt Windows Installer while installing programs. Therefore, close unnecessary background software before installing programs. You can close all windows on the taskbar and third-party software icons in the notification area and also use the task manager to close more programs.
To do so, here are detailed steps:
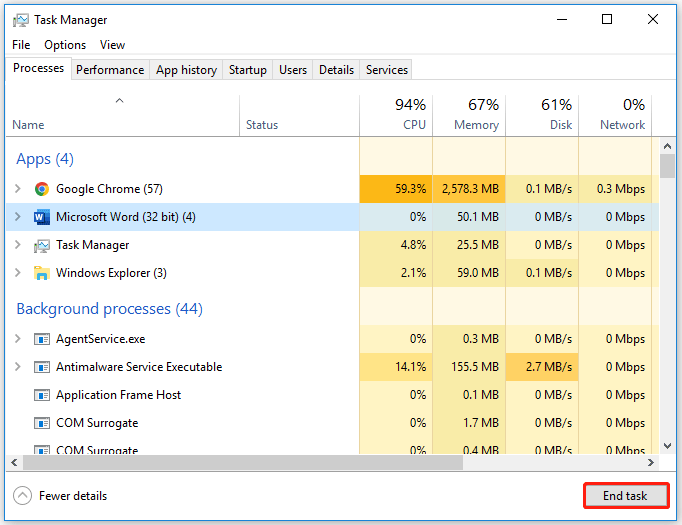
Step 1: Press the Win + X key to open the menu, and then select the Task Manager option to open the Task Manager window.
Step 2: Under the Processes tab, select each program and click on the End task button to close all software listed under the Apps section.
Method 3: Uninstall the Same Program Installed Completely
If you have previously installed the same program or an earlier version, an error may occur when you try to install the application again. If you want to successfully install your program, you need to completely uninstall the program installed on your computer. This means that in addition to the main program, you’ll need to delete any temporary files and preferences it leaves behind.
To do so, here is the guide:
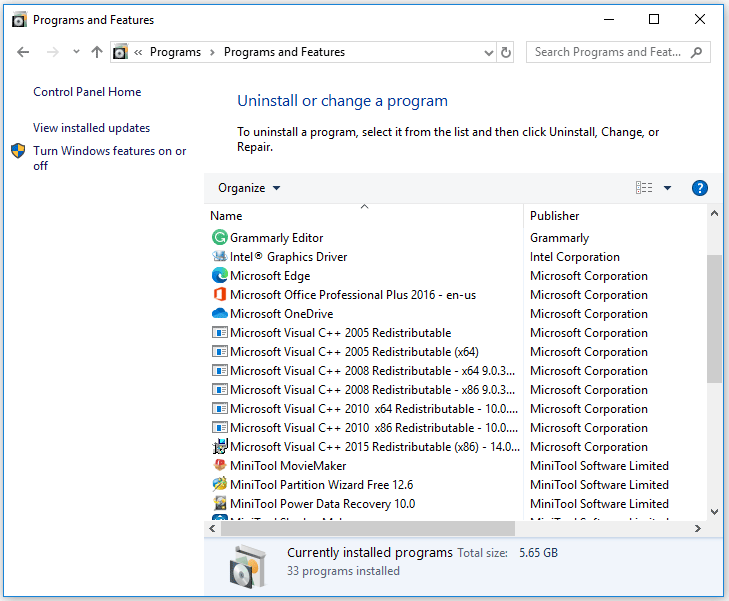
Step 1: Press the Win + R key to open the Run dialog box. Then type control panel in the box and press Enter.
Step 2: Select View by Category from the upper right corner of the Control Panel. Then click Uninstall a program.
Step 3: Then you can check if the application is listed here. If it is, right-click on it and select Uninstall.
After that, you can try to install the software and see the MSI 1603 error disappears. If it still exists, you can refer to the next method.
Method 4: Make Sure There’s Enough Hard Drive Space for the Program
If there is not enough space on the target hard drive, the MSI installer error 1603 error message may appear. Well, you can try clearing any temporary or junk files to free up hard drive space. Here are the detailed steps:
Step 1: Press the Win + E key to open File Explorer and click on This PC.
Step 2: Under the Devices and drives section, right-click on your drive where you want to install the application and choose Properties. Then, click Disk Cleanup under the General tab.
Step 3: After a few minutes of calculations, you’ll get a new interface listing the total number of files that can be cleaned and the size of each file type. At this point, check the files you want to delete and click OK.
Once done, you can restart your computer and try the installation again to check if the MSI error 1603 has been removed.
However, if the Disk Cleanup tool won’t open or work or after Disk Cleanup cleans junk files, but there is still not enough space to install the program on the partition, you can extend the target partition or free up disk space in other ways.
Then you can use a professional third-party partition manager to extend the target partition. Here, MiniTool Partition is recommended for you. This useful utility can help you manage hard drives, recover data, measure disk performance, etc.
To extend the target partition using MiniTool Partition Wizard, just follow the instructions below.
Tip: If your target partition is a system partition, it is recommended you use Bootable edition to avoid damage to the system or data loss.
MiniTool Partition Wizard FreeClick to Download100%Clean & Safe
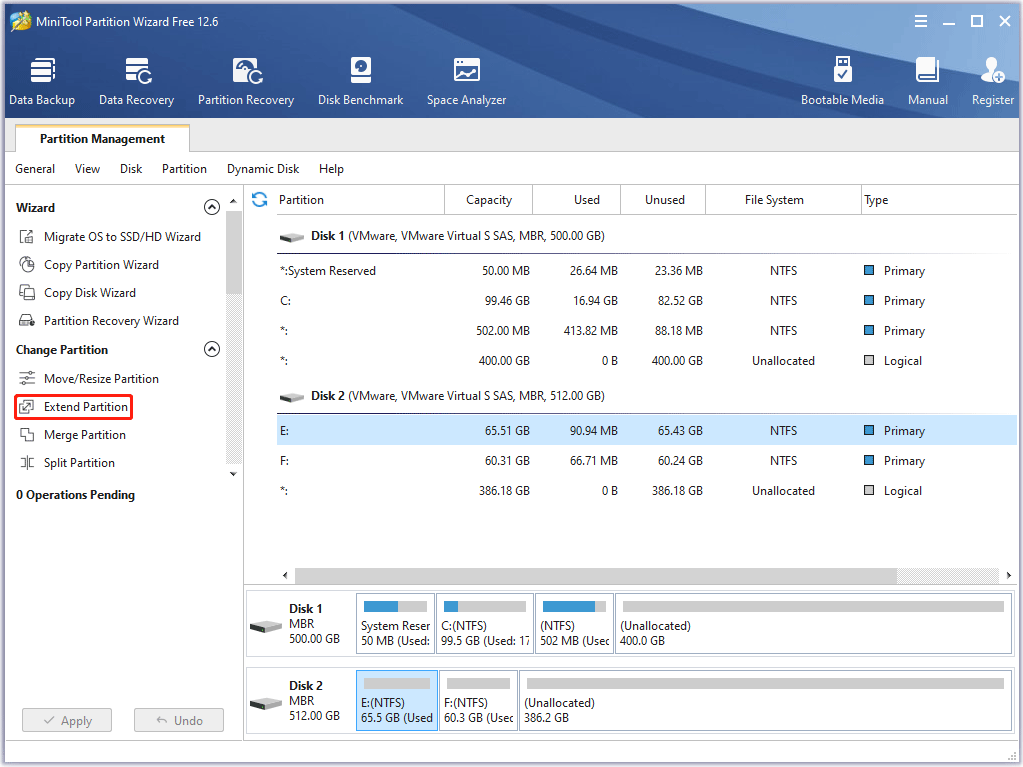
Step 1: Click the download button and install it on your computer. Then launch this program to enter its main interface.
Step 2: Click on the target partition and select the Extend Partition option from the left action panel.
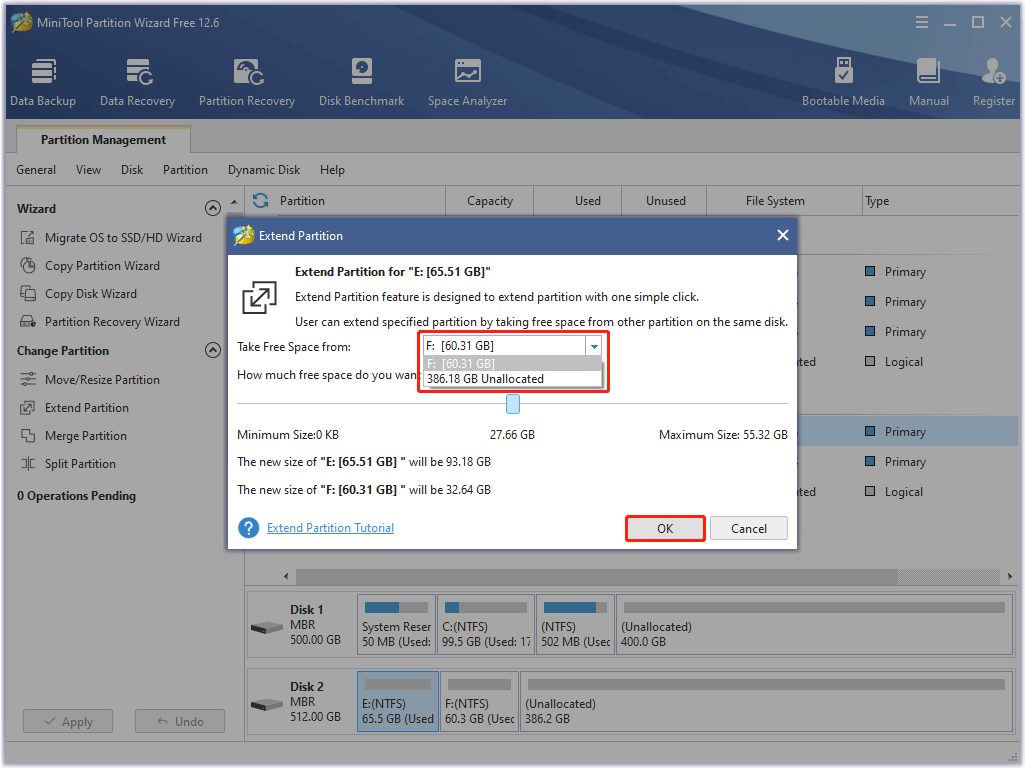
Step 3: Select where to take free space and drag the light blue block to decide how much free space you want to take. Then click the OK button.
Step 4: Finally, click on the Apply button to execute this operation.
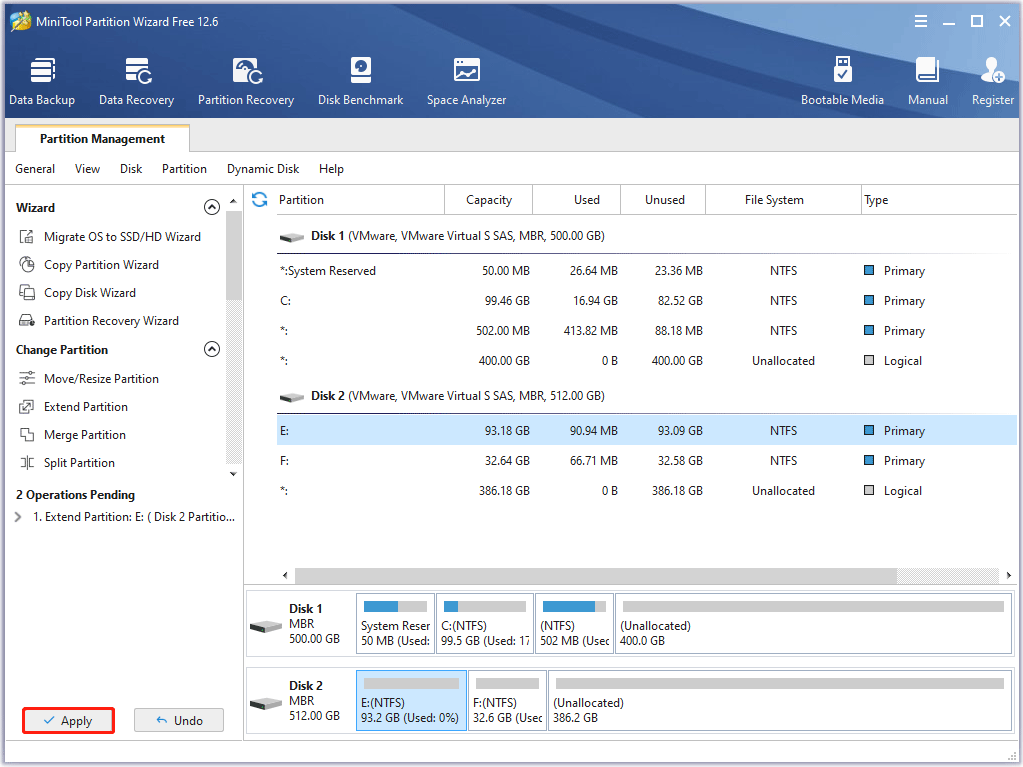
Now, your hard drive should have enough free space to install the application.
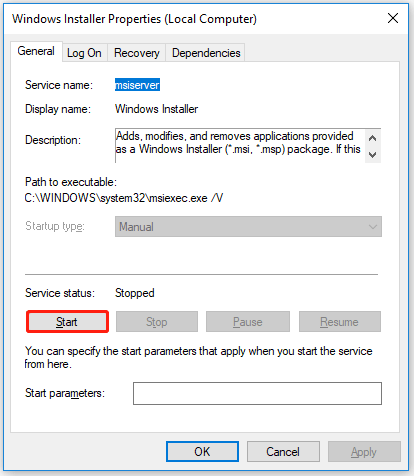
Method 5: Start and Re-register Windows Installer Service
There may be a problem with the Windows Installer service, resulting in MSI error 1603. You can fix the problem by (re)starting and re-registering the Windows Installer service.
To start the Windows Installer service, you need to do:
Step 1: Open the Run dialog box and enter services.msc. Then press Enter to open the Services panel.
Step 2: Scroll down to the Windows Installer service and double-click it to open its Properties window.
Step 3: Click on the Start button under Service status, then click on OK. If its service status is running, you should first click on Stop and then click on Start.
To re-register Windows Installer, you need to do:
Step 1: Type msiexec /unregister in the Run dialog box and press Enter.
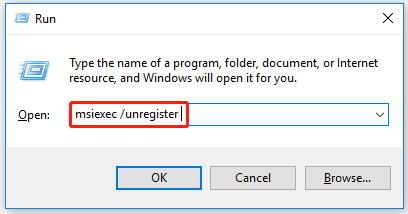
Step 2: Open the Run dialog again and enter msiexec /regserver. Then press Enter to run.
After that, reinstall the application and the MSI installer error 1603 may disappear.
Method 6: Grant Full Control of the Installation Drive
If you get the MSI error 1603 message, it is because the SYSTEM account does not have full control over the folder where you are installing the Windows Installer package. Therefore, to grant full control to the SYSTEM account, perform the following steps:
Step 1: Open File Explorer, right-click on the hard drive where the software is installed and then click on Properties.
Step 2: In the next new box, switch to the Security tab. Verify the Group or User names box contains the SYSTEM user account. If the SYSTEM user account does not appear in the box, follow these steps to add the SYSTEM account:
- Click on Edit. If prompted, approve User Account Control.
- Click on Add. The Select User or Group dialog box appears.
- In the Enter the object names to select field, type SYSTEM, and click on Check names.
- Click on OK.
Step 3: Click on the Edit button.
Step 4: In the next pop-up box, click SYSTEM and make sure that the Allow box for each item in Permissions for SYSTEM is checked. Perform the same check for Administrators.
Step 5: Click on OK and go back to the Properties dialog box. Then click on Advanced > Change permissions.
Step 6: In the Permissions tab, select the SYSTEM entry and click on Edit.
Step 7: Click on the Applies to the drop-down menu and select This Folder, subfolder, and files. Then click on OK. Do the same operation above for Administrators.
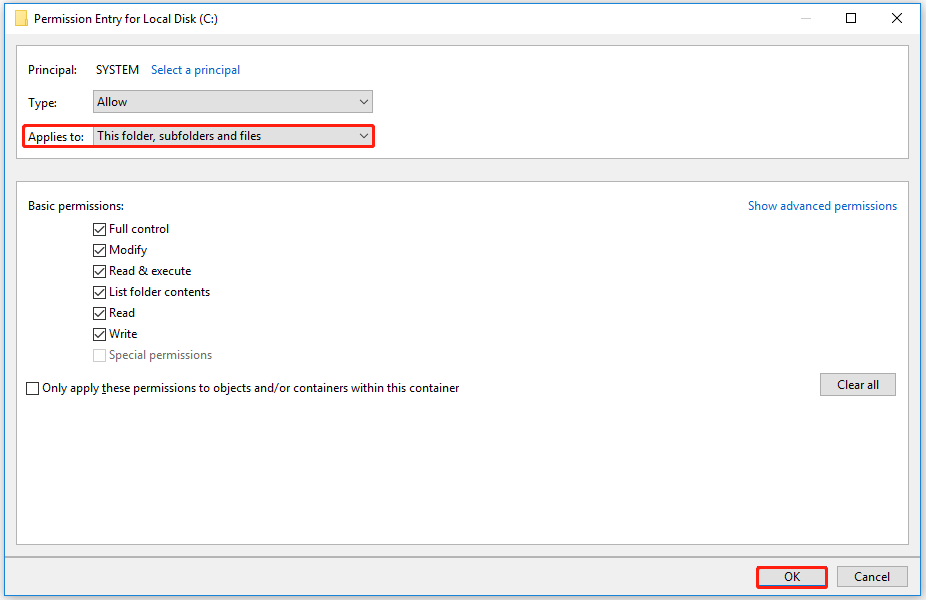
Wait for the operating system to apply the permissions you selected to all subfolders. Then you have acquired full permissions on this drive. Try installing your application and see if the MSI 1603 error is fixed.
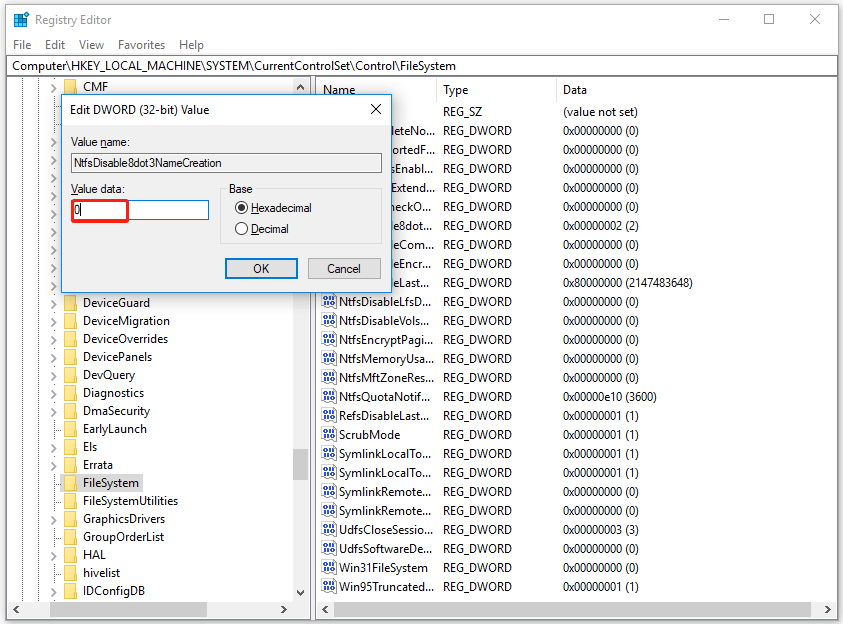
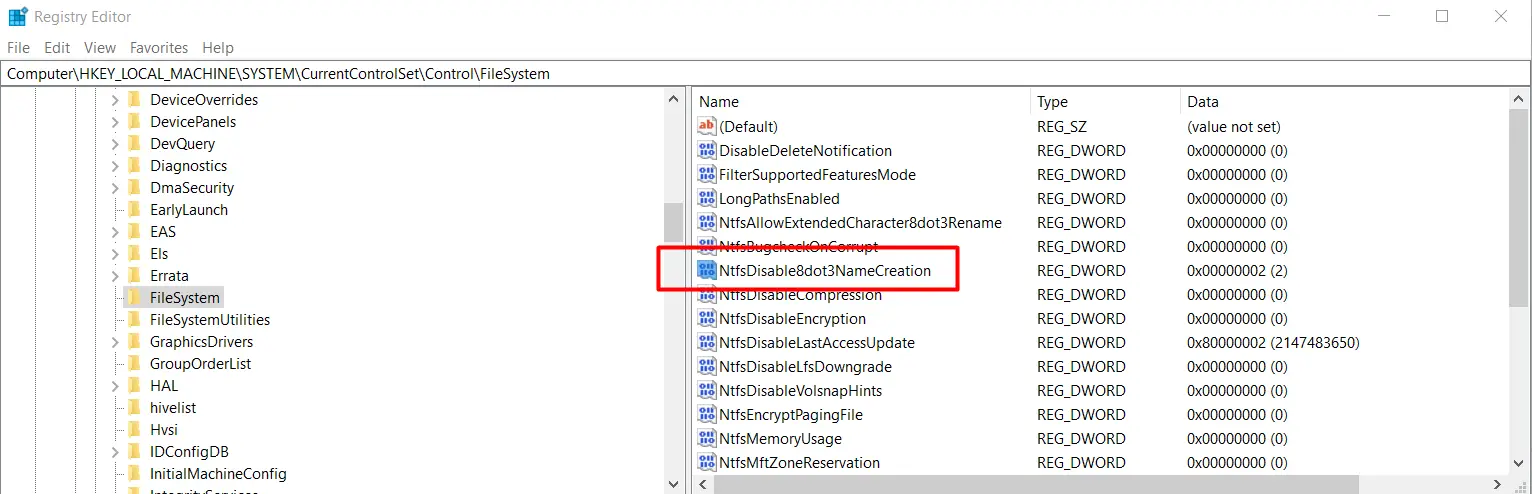
Method 7: Enable Short Filename Creation on the Target Machine
If short filename creation is disabled, the MSI 1603 error would occur. Therefore, enabling short filename creation by editing its NtfsDisable8dot3NameCreation value in the registry is another way to fix the 1603 error. Please follow the detailed steps below:
Note: It’s better to backup your registry in advance to prevent other problems since you are going to edit a registry key.
Step 1: Type regedit in the Run dialog box and press Enter to open the Registry Editors.
Step 2: Navigate to the following path:
HKEY_LOCAL_MACHINESYSTEMCurrentControlSetControlFileSystem
Step 3: Double-click the NtfsDisable8dot3NameCreation DWORD to open its Edit DWORD (32-bit) Value window.
Step 4: Change the Value data to 0 to enable short file name creation. The value of 1 indicates that it is disabled. Then click on OK to close its window.
Then restart your computer and install your application to see if the MSI installer error 1603 exists.
What can you do if you come across MSI error1603? This post introduces the causes of it and offers several ways to fix it. Try it!Click to Tweet
Bottom Line
This article has introduced some methods for you to solve MSI error 1603. Do the above solutions work for you? You can share your better solutions or questions with us in the following comment section. If you have any problems with MiniTool software, you can contact the support team via [email protected].
The error 1603 is a general code that shows there is a problem with your Windows installation, and it’s displayed by the Microsoft Installer Engine. MSI package formats are used to install or remove the software. When Windows fails to install the software as it should be, the user will end up with error 1603. The error message displayed is “1603 Fatal Error During Installation”.
Understanding Error 1603 Fatal Error During Installation
What Are The Causes Of Error 1603 Fatal Error During Installation?
- Windows installer is trying to install an app that exists on your PC.
- Windows Installer wants to replace a file that’s currently used by another program.
- Windows installer service isn’t installed correctly or has not been started.
- Corrupt setup or Windows installation wasn’t completed.
- The user account doesn’t have permissions on the folder they want to install the windows installer package.
- The Windows temp folder is full.
- The Install Shield Developer used is outdated.
- The folder you want to use for installing the “Windows Installer Package” is encrypted.
Error 1603 Fatal Error During Installation
These are some of the major causes of error 1603 fatal error during installation on your windows device, as already stated, it’s a general error and that means it can show up for so many reasons. Let’s now take a look at the fixes to this error.
How To Fix Error 1603 Fatal Error During Installation
Close all background Apps
Software running in the background can prevent Windows Installer from installing programs, and by closing the apps running in the background you can get rid of the error fast. You can locate programs running in the background by opening the task manager. To open task manager, you should right-click on taskbar, and you’ll see “Task Manager” from the context menu, you can also press Windows + X keys to launch Task Manager directly.
Click on the Processes Tab, you should close every software that’s under apps by clicking on the program and then select “End Task”. You now check for the error to see if it’s fixed.
Check to ensure the program isn’t already installed
It can happen that you have the program installed on your PC, this happens when you a lot of programs installed on your PC that you don’t normally use, and for most of them you’ve forgotten that they’re already installed. You should go through your “programs” folder, or any location where you normally install your programs, by default though it’s the “programs” folder for most applications. Once you find it’s already installed, you should Open Control Panel and click on “Programs and Features”. Locate the program and right-click to “Uninstall”. Then you can attempt to install the new program.
Make sure you have enough space on your Hard drive
Every application comes with the minimum space requirements, including Hard Disk Space and RAM, you need to check and see whether your PC has met the requirements. It can be possible that your hard drive is almost full, open File Explorer and locate the hard drive you’re trying to install the program which should be located by the left pane of Windows Explorer. Right-click on your drive and select “properties” from the context menu, you can now see the available space, if it’s almost full, you should free up more space to accommodate your installation.
Delete temporary files in the Windows Temp folder
The next thing to do now is to erase temporary files using Disk Clean up tool, there are of course other methods, but using the disk clean up tool is faster. Here is how to do it.
- Search for “Disk Clean Up” in the Windows search, it will show up in the list of options, click to open it.
- Click on C: drive from the menu and hit ok.
- You can view the details of the info that will be cleared.
- You can check the boxes for the data you want to be erased, you should make sure that “Temporary files and Temporary Internet files” boxes are checked. You can also select other files you believe aren’t useful to you.
- Click OK and then the “Delete Files” option.
- You have now cleared temporary files and there is a chance the error is gone.
Delete windows 7 and 10 temp files
Use Microsoft Fix it a tool
This simple Microsoft tool has proven to fix the error 1603 fatal error during installation with a few clicks.
- Download Microsoft Fix It tool.
- Locate the download and click to install.
- When the installation finishes, you then run the program on your PC.
- This tool will fix the “1603 fatal error during installation” right away.
- You can now continue with your installation to see if the error is removed or not.
Change the location of your Installation
If you choose a destination that doesn’t exist, you’ll end up with the 1603 fatal error during installation, and changing the installation folder will help you fix the problem if that’s the case. It might all be possible the folder is encrypted and hence won’t support your installation either. Changing the installation destination for the program you’re trying to install will fix the problem for you.
Restart Windows installer service
We’ve already stated that when the Windows installer service isn’t running, the 1603 fatal error during installation is bound to show up, even if it’s running, we need to Restart it. Here is how to do that:
- Open the Run dialog by pressing Windows + R keys.
- Then you type msc in the box.
- Press enter to open the Services Manager or just click OK.
- In the list of services, you should locate “Windows Installer Service”, when you follow alphabetically, it’s at the button, you can also use the search box to locate it.
- You now right-click on “Windows installer service” and select “Properties” from the context menu.
- You can now see whether the service is running or not, if it’s not running you should click on the “Start” button to start it. If it’s already running, you should right-click and click on the option “Restart”.
- Restart your PC and proceed with your program installation to see if the error 1603 fatal error during installation is removed or not.
Restart Windows installer service
Register Microsoft Windows Installer Service Again
Open Command Prompt, for Windows 8 and 10 you can see it by right-clicking on start and you’ll see the option “Command Prompt (Admin). Select that to launch the Command Prompt Windows. Alternatively, you can type cmd in windows search and right-click, select the option “Run As Administrator”.
You now run the four commands listed below, you’ll run them one by one. That’s, you copy one command, paste it, and then hit enter. When it finished running you then copy or type the second command, that’s how you do for all the commands. Here are the commands to run.
%windir%\system32\msiexec.exe /unregister
%windir%\system32\msiexec.exe /regserver
%windir%\syswow64\msiexec.exe /unregister
%windir%\syswow64\msiexec.exe /regserver
After running all the commands, you should restart your PC.
Provide permissions on the drive
When you don’t have full control permissions the MSI error 1603 can arise and that’s why you need to grant permissions if you’re still not able to fix the error. Here is how to provide permissions:
- Open Windows File Explorer.
- You can now see all drives connected to your PC by your left, right-click on the drive that has installation file location, and click on “Properties” from the context menu.
- On the Window that opens, you should click on the “Security” Tab.
- Then you click on the “Edit” button.
- Under “Permissions”, you should click on the ‘System” button.
- You should check the option “Allow” that is next to the “Full Control” option.
- Click Apply and then Ok for the changes to take effect. We’ll have to do this even for the PC administrator.
Provide permissions on the drive
- You now go back to the “Properties” Window as you did above, and click the “Advanced” button.
- Next, you click on the button “Change Permission” button.
- On the “Permissions” Tab, you should double click on “Administrators”.
- Then you select “This folder, subfolders Files” from the “Applies” in the menu.
- You should also check all the permissions applicable and then click Ok.
- You should follow these steps for “SYSTEM” also and click ok.
- You have now provided full permissions for accessing the drive and if that’s the cause of the error, it will be fixed.
Provide permissions on the drive
Edit NtfsDisable8dot3NameCreation registry value
The MSI error 1603 can show up when File Name Creation has been deactivated, enabling can help us get rid of the error. Follow these steps:
- Open the Run dialog by pressing Windows + R keys.
- Type “regedit” and hit Enter or click OK.
- The registry editor window will open, and you need to navigate to this path: Computer\HKEY_LOCAL_MACHINE\SYSTEM\CurrentControlSet\Control\FileSystem
- Locate and double click on NtfsDisable8dot3NameCreation DWORD.
- This will open the Windows to edit the DWORD (32-bit), if DWORD’s value is 1, you should change it to 0.
- Press OK to close the window and also close the registry editor.
- Restart your PC and check the error to see if it is cleared.
Edit NtfsDisable8dot3NameCreation registry value
Those are all the steps to troubleshoot MSI installation error 1603. Let’s hope that you fix it.
Struggling with Java error 1603 on Windows? Learn how to troubleshoot and fix this common installation issue with our step-by-step guide. Follow detailed solutions to resolve error code 1603 and install Java successfully.

Encountering Java error 1603 can be frustrating, especially when you’re trying to install or update Java on your system.
This error indicates that the installation process did not complete successfully, often due to various system or software conflicts. In this blog post, we will discuss the causes of Java error 1603 and provide solutions to resolve this issue.
How to Fix Java Error Code 1603
Java error code 1603 typically signifies an installation failure. Understanding the root causes can help in addressing the problem effectively. Here are some of the common reasons:
- Existing Java installations: Corrupted or incomplete previous installations.
- Software conflicts: Other running software, especially antivirus programs, interfering with the installation process.
- Permission issues: Lack of administrative rights necessary for the installation.
- System configuration problems: Issues with system settings or configurations that hinder the installation.
Java Install Did Not Complete: Error Code 1603
When you see the error message “Java install did not complete: Error Code 1603,” it means the installation was interrupted or failed. Here are some of the methods to troubleshoot this issue:
Here are Some of the Methods to Troubleshoot This Issue:
Restart Your Computer Before Installation
Restarting your computer can often resolve installation issues. Follow these steps:
- When you get the 1603 error message, restart your system.
- After the restart, try installing Java again.
Uninstall Java Versions Before Installation
If restarting your computer doesn’t resolve the issue, try uninstalling all existing versions of Java from your system:
- Press
Windows + Rto open the Run dialog. - Type
appwiz.cpland press Enter to open the Programs and Features window. - Locate any existing Java installations, select them, and click
Uninstall. - Follow the on-screen instructions to complete the uninstallation.
- Restart your computer and attempt to install Java again.
Install Missing Patches
Installing missing patches can also help resolve Java error 1603. Here’s how you can do it:
- Navigate to the Patches tab.
- Go to Missing Patches.
- Select the patches you want to install and click on Install Patch.
- Specify the deployment policy and the computers/users to deploy the hotfixes/patches.
Note: You can either configure the deployment policy to initiate deployment during the ‘System Startup’ and then reboot your machine or reboot the machine and then apply the deployment policy as the ‘Default policy’.
Java Error Code 1603 Windows 10
Java error code 1603 can be particularly common on Windows 10 systems. Users may face this error due to outdated Windows updates, conflicts with other software, or incomplete Java installations. Make sure your Windows 10 system is up to date and follow the troubleshooting steps mentioned above.
Java Error Code 1603 Windows 11
With the newer Windows 11 operating system, compatibility issues can sometimes arise. If you encounter Java error code 1603 on Windows 11, ensure that you are using the latest version of the Java installer and that your system meets all necessary requirements. Additionally, follow the same troubleshooting methods to resolve the issue.
Additional Resources
If restarting doesn’t work, there’s a chance you have multiple versions of Java fighting for space on your system. This can lead to conflicts. To fix this, uninstall any existing Java versions before attempting a fresh installation. Think of it like cleaning out your closet – get rid of the old stuff to make room for the new.
Here’s the official Java download page where you can find the latest version and instructions for uninstalling older versions: Java download
The official Java website has a detailed document specifically for troubleshooting the 1603 error code. It might have additional solutions depending on your situation. So, if the first two steps don’t work, head over to the Java website and see if their guide can help you out: Java Help – Error 1603
Conclusion
By following the steps outlined above, you should be able to resolve Java error 1603 and successfully install or update Java on your system. If you continue to face issues, consider reaching out to Java support or consulting online forums for additional assistance. Keeping your system updated and ensuring no conflicting software is running can prevent similar issues in the future.
Feel free to share your experiences or ask questions in the comments below!
Visit Our Post Page: Blog Post
Readers help support Windows Report. We may get a commission if you buy through our links.
Read our disclosure page to find out how can you help Windows Report sustain the editorial team. Read more
Installation errors are rare, and in most cases, the process goes through relatively smoothly. However, many users reported Error 1603 during installation. And it’s not just limited to a particular program but can be encountered in many.
The error message doesn’t reveal much about the underlying cause, but you could go through the error log to learn more about the situation. However, before you do, we have solutions that work in most cases and have helped several users fix Error 1603.
Why am I receiving error 1603?
Here are a few reasons why you may be getting Error 1603 in Windows:
- The program already exists on the PC: If the program you are trying to install is already on the PC, you may receive Error 1603, especially on MSI.
- Missing permissions: Often, the folder where the program is to be saved is missing access permissions, and the files can’t be installed.
- The target folder is encrypted: In some cases, users later realized that the folder where the program files were to be saved was encrypted, which triggered Error 1603.
- Security software blocking the installation: Your third-party antivirus or other similar security software may prevent the program’s installation. You need to disable or uninstall the software to fix this.
Where can I find error code 1603, and what does it look like?
The error message may differ depending on the situation and how it appears, depending on the application throwing it. For example, here are a few programs that are likely to throw Error 1603:
- Error 1603 Adobe: Several users installing Adobe applications reported the error, and it’s usually caused due to incorrect permissions.
- FortiClient Error 1603: The FortiClient installer, too, throws the error and rolls back any changes made.
- Error 1603 AMD: A common issue encountered by users trying to install AMD drivers.
- Error 1603 QuickBooks: The QuickBook Tools Hub usually comes to the rescue of users.
- Altiris Error 1603: Here, users receive the message, Error 1603: A fatal error occurred during installation, and our solutions would fix things.
- Error 1603 Revit: It’s a particularly tricky situation, and users had to go through a great deal of effort to get things working.
How do I fix error code 1603?
Before we head to the slightly complex solutions, here are a few quick ones for you to try:
- Verify if the program is already installed on the computer. Sometimes, the desktop launcher may not be available after an upgrade, so you must check the list of installed programs and confirm the same.
- Restart the computer.
- Launch the installer with administrative privileges. To do that, right-click on it, and select Run as administrator.
- Check for Windows updates and install the latest available version.
In case none of these works, try the solutions listed next.
1. Clear the contents of the temp folder
- Press Windows + R to open Run, type %temp% in the text field, and hit Enter.
- Press Ctrl + A to select all the files here and hit Delete.

- Choose the appropriate response in case a confirmation prompt pops up.

This is the most straightforward fix if you encounter Error 1603 in Windows 10 while installing any application. Sometimes, the Temp folder may run full, and as a result, installers encounter an issue while executing critical processes, leading to the error.
2. Disable antivirus software
- Press the Windows key, type virus, and select Virus & threat protection.

- Click the Manage settings option.

- Now, toggle the switch for Real-time protection backward to disable it.
- Finally, if you have a third-party antivirus, right-click the icon on the taskbar and select the Disable option.


If you are facing Error 1603 on AutoCAD or AutoDesk, it might be due to interference from your antivirus. In this case, you must disable your third-party antivirus and Microsoft Defender.
You can also temporarily disable your firewall too. After installing the program, you can now enable your antivirus and firewall.
3. Clear storage space
- Press the Windows key, type cleanmgr, and select Disk Cleanup.
- Choose the drive you want to clear files on and click OK.
- Now, select the files to clear and click the OK button.

One of the significant causes of Error 1603 on Java and other apps is insufficient storage space for the installation process. You can create space by deleting some files in File Explorer.
To make things easier, you can run Disk Cleanup or try other methods to free storage.
- How can I fix HP driver error 1603 on Windows 10/11 PCs?
- Fix Skype install errors 1603, 1618, and 1619 on Windows 10/11
- Installer encountered an error 0x800f0905
- Windows Installer Service could not be accessed
- Fix Fatal System error on Windows 10
4. Uninstall conflicting apps
- Press Windows + R to open the Run, type appwiz.cpl in the text field, and click OK.
- Locate any application that controls the aspect related to the program you are trying to install, right-click it, and click on Uninstall.

- Follow the on-screen instructions to complete the process.

Conflicts triggered by third-party apps are a common reason behind Error 1603, and the best solution here is to uninstall the problematic app. For instance, Adobe reports that Google Desktop may affect the installation of its application.
Also, you could use a software uninstaller tool to remove any traces of the concerned app altogether.
One of the best tools available is CCleaner. It removes all junk files on your PC and all programs, including all associated files.
5. Run the Program Install and Uninstall troubleshooter
When faced with issues in Windows, the ideal course is to always look for a dedicated troubleshooter. And you have one, in this case, the Program Install and Uninstall troubleshooter, which is easily downloadable.

Once downloaded, run it, choose the appropriate responses, follow the on-screen instructions, and make the recommended changes to fix Error 1603 in Windows 10.
This troubleshooter can fix all the installation-related errors, including error codes 2502 & 2503 on Windows 11.
6. Reconfigure the Windows Installer service
- Press Windows + R to open Run, type services.msc, and click OK.
- Locate the Windows Installer service, right-click on it, and select Properties.

- Now, click on the Start button and then on OK to save the changes.
- Again, press Windows + R, paste the following command, and hit Enter:
msiexec /unregister - Similarly, execute the following command in Run:
msiexec /regserver


After restarting the Windows Installer service, you can fix the FortiClient Error 1603.
7. Grant Full Control Permission to Installation Drive
- Press Windows + E to open File Explorer, right-click on the installation drive for the software (usually C:), and select Properties.
- Navigate to the Security tab, and click the Edit button.
- Select SYSTEM, tick the checkbox for Full Control, and click OK.
- Now, click on Advanced.
- Click the Change Permissions option.

- Select SYSTEM from the list, and then click the Edit button.
- Choose This folder, sub-folders, and files from the Applies to the drop-down menu, and click OK to save the changes.

- Click OK on all opened windows as well.


That’s it! If the previous methods didn’t work, modifying the permissions certainty would have an Error 1603 fixed. You can now seamlessly install the application that earlier threw the error.
Also, find out what to do if you can’t install anything in Windows 10.
If you know of other possible solutions, drop them in the comments below.
Matthew Adams
Windows Hardware Expert
Matthew is a freelancer who has produced a variety of articles on various topics related to technology. His main focus is the Windows OS and all the things surrounding it.
He is passionate about the tech world, always staying up-to-date with the latest and greatest. With an analytical view, he likes problem-solving, focusing on errors and their causes.
In his free time, he likes to read and write about history and tries to always develop new skills.