
Полнодисковое шифрование: что это такое, кому это нужно, как выбрать
Уровень сложностиСредний
Время на прочтение9 мин
Количество просмотров9.1K
Привет, Хабр! Меня зовут Игорь, я эксперт исследовательской лаборатории компании «ИнфоТеКС», в которой мы проводим сертификацию криптографии в различных продуктах. Сегодня поговорим о защите личных данных и о полнодисковом шифровании как о методе защиты информации.
Full Disk Encryption (FDE) — это метод защиты информации, предполагающий шифрование всех данных на диске, включая временные файлы, программы, системные файлы и т.д. Чаще всего использовать полнодисковое шифрование рекомендуется на портативных устройствах, которые крадут или теряют чаще, чем стационарные.
Полное шифрование диска, в отличие от создания зашифрованных разделов или папок, позволяет защитить конфиденциальную информацию, о которой пользователь мог забыть или не знать, например служебные и временные файлы. При этом даже если злоумышленник извлечет диск и установит в свое устройство, он не сможет получить доступ к хранящимся на нём данным, если не знает пароля или ключей шифрования.
Средства полнодискового шифрования можно разделить на аппаратные и программные. В этой статье я рассмотрю программные реализации полнодискового шифрования в рамках как коммерческих, так и Open Source проектов. У меня не было цели перечислить их все, поэтому в комментариях можете дополнить, чем пользуетесь сами или о каких продуктах знаете.
Цель статьи – показать некоторый срез имеющихся на рынке решений для полнодискового шифрования и наметить их плюсы и минусы, учитывая специфические потребности пользователя и требования к безопасности данных.

Требования к программам шифрования
Исходя из своего опыта, предлагаю сформулированную модель, подразумевающую поэтапный анализ программных средств шифрования данных. Данная модель подразумевает оценку следующих критериев:
-
Формат шифрования: полнодисковое шифрование (Full Disk Encryption, FDE) или контейнеры;
-
Алгоритмы шифрования;
-
KDF (Key Derivation Function) и хеш-функции;
-
Генератор псевдослучайных чисел (ГПСЧ);
-
Наличие открытого исходного кода;
-
Поддержка разработчиков;
-
Удобство использования (юзабилити);
-
Наличие метаданных заголовка зашифрованного контейнера.
Рассмотрим каждый пункт подробнее.
В зависимости от ситуаций, требования к программам шифрования данных могут быть разные. Например, при организации удалённого хранения конфиденциальных данных или их транспортировке оптимальным решением будет являться использование зашифрованных контейнеров – закинул информацию в контейнер, контейнер на флешку или в облако, и можно ни о чем не переживать. Слабая сторона криптографических контейнеров заключается в том, что риск утечки данных и расшифровки контейнеров остаётся в месте их создания.
При защите информации в случае кражи устройства-носителя или случайного доступа к нему, наиболее рациональным будет использование FDE. Сильная сторона полнодискового шифрования заключается в том, что тебе не нужно беспокоиться о возможности утечек таких частей критичной информации, как фрагменты в файле подкачки, временные файлы, остаточная информация в кластерах файловой системы и так далее.
При этом важно понимать: если диск «накрыт» FDE, а файл с него, например, отправляется по электронной почте, то данный файл уйдёт получателю уже в незашифрованном виде, так что в подобных сценариях информацию необходимо дополнительно шифровать.
С форматом определились, перейдём непосредственно к криптографическим алгоритмам. Если мы говорим о хранении данных, значит рациональнее всего будет использовать симметричное шифрование, при котором существует один секретный ключ, расшифровывающий данные. Примеры симметричных стойких алгоритмов: AES, Serpent, Twofish, Camellia, ГОСТ 34.12-2018 (Магма, Кузнечик) и так далее. Эти алгоритмы имеют открытую спецификацию и реализацию, есть исследования об их стойкости. Разумеется, чем больше длина ключа, тем более шифр устойчив к атакам. Я рекомендую использовать длину ключа от 256 бит (с такой длиной ключа может быть обеспечена защита от взлома на квантовом компьютере при помощи алгоритма Гровера).
В тандеме с алгоритмами шифрования работают функции формирования одного или нескольких ключей из пароля – KDF. Часто даже опытные пользователи недооценивают важность использования стойких функций KDF, хотя их наличие обязательно при серьёзном отношении к стойкости выбранного средства FDE к перебору паролей.
Функции KDF должны быть медленными, в идеале используя большой объем памяти для своей работы. Под «медленными» имеются в виду функции, которые относительно медленно порождают последовательность из-за использования большого количества вычислений для этого. Обусловлено это следующим: если при формировании ключа используется много памяти и тактов процессора, то и злоумышленнику потребуется пойти на существенные временные и (или) финансовые издержки при организации перебора паролей.
В качестве примеров хороших функций KDF я могу выделить три: PBKDF2 (при условии, что используется достаточное количество итераций), Argon2, Scrypt. Часто, в качестве одного из аргументов функции KDF выступает какая-либо псевдослучайная функция, являющаяся хеш-функцией, например, SHA-512, BLAKE2, Whirlpool и т.д. На её криптостойкость так же следует обращать внимание.
Пара слов об использовании ГПСЧ в программах шифрования. Хоть выбор алгоритмов и методов выработки последовательности случайных чисел важен при работе с шифрованием, очень редко программы для защиты данных его предоставляют. Если продукт имеет открытый исходный код – можно ознакомиться с ним и понять примерные принципы выработки случайной последовательности, если закрытый – искать информацию в документации производителя или реконструировать алгоритм в IDA Pro (конечно же, только для собственных нужд и решения проблем совместимости  занимайтесь реверсом на свой страх и риск).
Открытый исходный код. На самом деле, много копий сломано на этом вопросе. Кто-то говорит, что программы для шифрования абсолютно всегда должны иметь открытый исходный код всех своих компонентов, чтобы каждый смог убедиться в отсутствии закладок. Кто-то утверждает, что баги десятилетней давности находят даже в Open Source-проектах, и настоящей пользы в открытости кода нет. Моё личное мнение заключается в том, что настолько критичный продукт должен иметь либо открытый исходный код, либо сертификат соответствия от какой-либо исследовательской лаборатории, подтверждающий, что криптография реализована корректно.
Поддержка разработчиков ПО. Существуют проекты, разработка и поддержка которых окончательно прекратилась. В качестве примеров таких проектов можно вспомнить FreeOTFE и TrueCrypt. Кто-то может сказать в их оправдание «Ну и что? Криптография ведь осталась по-прежнему стойкой!». Однако, всё не так просто. Дело в том, что с этим можно смириться, например, если в проекте используются криптоконтейнеры и хорошие алгоритмы, при этом вся криптография реализована правильно.
Но если речь идёт о полнодисковом шифровании, то без своевременной поддержки со стороны разработчиков оно достаточно быстро утратит корректность работы с актуальными версиями операционных систем.
Удобство использования решения – немаловажный пункт для пользователя, однако, к сожалению, хорошее юзабилити != безопасность, так что удобные в использовании решения могут подойти не всем.
Пунктик для параноиков: формат защищённых данных. На самом деле, чем меньше вводной информации мы даём потенциальному злоумышленнику, тем нам лучше. Например, если в заголовке криптоконтейнера содержится в незашифрованном виде такая информация, как алгоритм шифрования, количество итераций, используемый алгоритм KDF, метаданные доступа и прочее – атаковать такой контейнер будет в разы проще, чем если, к примеру, из незашифрованных данных будет одна «соль».
Итак, с примерными требованиями мы определились, теперь взглянем на имеющиеся продукты и разберём их преимущества и недостатки.
VeraCrypt
Проект с открытым исходным кодом, который является продолжением известной программы шифрования TrueCrypt. VeraCrypt поддерживает создание контейнеров, полнодисковое шифрование, несколько ОС (Windows, MacOS, Linux), имеет в своём арсенале стойкие алгоритмы шифрования. Проект достаточно амбициозный, однако имеет большие проблемы с поддержкой актуальных версий ОС и долгоживущие баги, так как фактически ведётся одним разработчиком и получает очень редкие коммиты от сообщества.
Плюсы:
-
Полностью открытый исходный код;
-
Поддержка сильной криптографии (AES, Serpent, Camellia, Twofish, ГОСТ 34.12-2018);
-
Возможность настройки итераций функции KDF PBKDF2;
-
Минимум метаданных в заголовке контейнера.
Минусы:
-
Проблемы с поддержкой;
-
Используется только одна функция KDF (PBKDF2), не являющаяся самой сильной из существующих. Такие современные алгоритмы, как scrypt и argon2 значительно эффективнее противостоят атакам на микросхемах FPGA;
-
Используется не одно крипто-ядро. Различные реализации из разных библиотек, разное время реакции авторов на баги и уязвимости и другие особенности делают решение «неоднородным» по качеству и вносят непредсказуемость поддержки. Подобное мы можем наблюдать в случае с реализацией шифра AES, имеющей уязвимость утечки по сторонним каналам, т.к. решение требует нецелесообразных временных затрат;
-
Плохое юзабилити.
DiskCryptor
Достаточно долго не обновляющийся Open Source-проект, хотя его разработчик проявляет активность на GitHub проекта. Надо сказать, что архитектурно проект достаточно неплох, но один из очевидных минусов в том, что в нём нет добавлений новой криптографии, что особенно актуально с функцией KDF – SHA-512. Да, она пока не взломана, но лучше использовать более актуальные алгоритмы.
Плюсы:
-
Полностью открытый исходный код;
-
Поддержка сильной криптографии (AES, Serpent, Twofish);
-
Минимум метаданных в заголовке контейнера.
Минусы:
-
Медленное развитие проекта;
-
Используется только одна, не самая сильная, функция KDF;
-
Нет поддержки работы с контейнерами;
-
Плохое юзабилити.
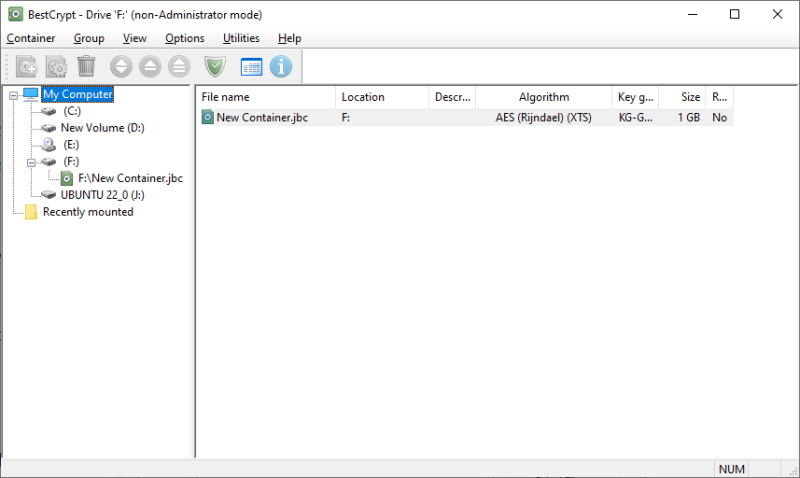
Jetico BestCrypt (Volume Encryption\Container Encryption)
Коммерческий продукт для шифрования, который поддерживает актуальные версии Windows, Linux, MacOS и использует несколько криптоалгоритмов для шифрования. Также, в продукте используются сильные функции KDF и реализовано соответствие различным законодательным требованиям (SOX, GLBA, POPI, NESA, ISM и т.д.).
Плюсы:
-
Поддержка сильной криптографии (много алгоритмов);
-
Поддержка нескольких функций KDF;
-
Хорошая поддержка;
-
Возможность шифрования метаданных заголовка контейнера или раздела.
Минусы:
-
Закрытый исходный код;
-
Плохое юзабилити.
LUKS2
Ещё одна реализация полнодискового шифрования с открытым исходным кодом, широко используемая в ОС Linux. LUKS2 поддерживает несколько режимов шифрования, несколько функций KDF и сильные алгоритмы, в том числе AES, Serpent и Twofish.
Плюсы:
-
Поддержка сильной криптографии (много алгоритмов);
-
Используются сильные алгоритмы KDF;
-
Хорошая поддержка;
-
Хорошее юзабилити.
Минусы:
-
Отсутствие поддержки работы с контейнерами;
-
Большое количество метаданных в заголовке раздела.
Bitlocker
Реализация полнодискового шифрования, встроенная в ОС Windows. Используется сильная криптография, полностью прозрачная реализация для пользователя (хорошее юзабилити), есть такая дополнительная функциональность, как сетевая разблокировка, поддерживается использование модуля TPM.
Однако, для настоящих параноиков сетевая разблокировка – огромная брешь в безопасности, так как её наличие указывает на возможность полного снятия криптографии третьими лицами. То же касается и модуля TPM, реализация шифратора которого закрыта. Так что такое решение подойдёт явно не для всех.
Плюсы:
-
Поддержка сильной криптографии (много алгоритмов);
-
Используются сильные алгоритмы KDF;
-
Хорошая поддержка;
-
Хорошее юзабилити.
Минусы:
-
Закрытый исходный код;
-
Отсутствие поддержки работы с контейнерами;
-
Большое количество метаданных (как минимум, код алгоритма шифрования).

Вывод
Хоть шифрование дисков и кажется вполне логичным процессом, многие не используют метод FDE, так как не уверены в простоте его использования или не могут разобраться во многообразии продуктов. Помимо прочего, я не раз слышал опасения, что раз FDE шифрует все данные, то его использование может повлиять на производительность устройства, но такой сценарий крайне маловероятен. Например, встроенный в VeraCrypt бенчмарк на моём стареньком ноутбуке показывает скорость AES 7ГБ/с (имеется в виду тестирование способности CPU шифровать данные). Показать такую скорость сможет не всякий SSD, не говоря уж о HDD. Кстати, эффективность работы FDE на SSD накопителях – это тоже частый вопрос. Если вкратце, то HDD более безопасны в контексте использования FDE, так как в SSD имеется контроллер, который может менять используемые области записи на микросхеме, делая их недоступными для покрытия шифрованием.
Ещё одно частое опасение «вдруг я забуду пароль» и вовсе парируется тем фактом, что отсутствие шифрования – это точно не меньший риск для ваших конфиденциальных данных.
Подводя итог, можно выделить некоторые свойства, характерные для Open Source-проектов, например, медленное развитие, которое в итоге влечёт за собой отсутствие поддержки актуальных версий ОС и новых примитивов шифрования.
Главным недостатком коммерческих проектов является использование закрытого исходного кода, вследствие чего корректность шифрования невозможно проверить самостоятельно, если не брать в расчёт реконструкцию бинарного кода при помощи дизассемблера. При работе же с сертифицированным решением всё зависит от (не)доверия пользователя органу сертификации.
Что важнее для конечного пользователя – зависит от степени чувствительности защищаемой информации и степени паранойи самого юзера Например, на мой взгляд, для шифрования в Windows оптимальным выбором будет Veracrypt (FDE и контейнеры), для Linux – LUKS2 (FDE) и Veracrypt (контейнеры).
Я не перечислял все возможные требования к программам шифрования и не рассматривал все существующие реализации защиты, но предложил вам определённый шаблон для упрощения выбора под конечного пользователя.
Пишите в комментариях, пользуетесь ли вы средствами полнодискового шифрования? В каких случаях и что используете?
Quick Links
-
If Your Computer Supports It: Windows Device Encryption
-
For Windows Pro Users: BitLocker
-
For Everyone Else: VeraCrypt
Windows 10 sometimes uses encryption by default, and sometimes doesn’t—it’s complicated. Here’s how to check if your Windows 10 PC’s storage is encrypted and how to encrypt it if it isn’t. Encryption isn’t just about stopping the NSA—it’s about protecting your sensitive data in case you ever lose your PC, which is something everyone needs.
Unlike all other modern consumer operating systems—macOS, Chrome OS, iOS, and Android—Windows 10 still doesn’t offer integrated encryption tools to everyone. You may have to pay for the Professional edition of Windows 10 or use a third-party encryption solution.
If Your Computer Supports It: Windows Device Encryption
Many new PCs that ship with Windows 10 will automatically have «Device Encryption» enabled. This feature was first introduced in Windows 8.1, and there are specific hardware requirements for this. Not every PC will have this feature, but some will.
There’s another limitation, too—it only actually encrypts your drive if you sign into Windows with a Microsoft account. Your recovery key is then uploaded to Microsoft’s servers. This will help you recover your files if you ever can’t log into your PC. (This is also why the FBI likely isn’t too worried about this feature, but we’re just recommending encryption as a means to protect your data from laptop thieves here. If you’re worried about the NSA, you may want to use a different encryption solution.)
Device Encryption will also be enabled if you sign into an organization’s domain. For example, you might sign into a domain owned by your employer or school. Your recovery key would then be uploaded to your organization’s domain servers. However, this doesn’t apply to the average person’s PC—only PCs joined to domains.
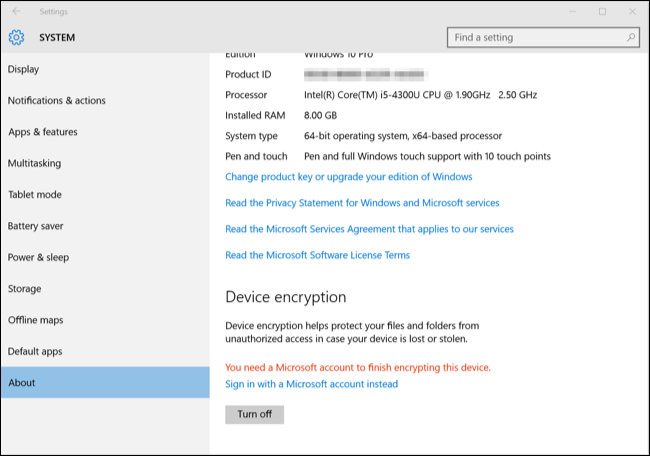
To check if Device Encryption is enabled, open the Settings app, navigate to System > About, and look for a «Device encryption» setting at the bottom of the About pane. If you don’t see anything about Device Encryption here, your PC doesn’t support Device Encryption and it’s not enabled. If Device Encryption is enabled—or if you can enable it by signing in with a Microsoft account—you’ll see a message saying so here.
For Windows Pro Users: BitLocker
If Device Encryption isn’t enabled—or if you want a more powerful encryption solution that can also encrypt removable USB drives, for example—you’ll want to use BitLocker. Microsoft’s BitLocker encryption tool has been part of Windows for several versions now, and it’s generally well regarded. However, Microsoft still restricts BitLocker to Professional, Enterprise, and Education editions of Windows 10.
BitLocker is most secure on a computer that contains Trusted Platform Module (TPM) hardware, which most modern PCs do. You can quickly check whether your PC has TPM hardware from within Windows, or check with your computer’s manufacturer if you’re not sure. If you built your own PC, you may able to add a TPM chip to it. Search for a TPM chip that’s sold as an add-on module. You’ll need one that supports the exact motherboard inside your PC.
Windows normally says BitLocker requires a TPM, but there’s a hidden option that allows you to enable BitLocker without a TPM. You’ll have to use a USB flash drive as a «startup key» that must be present every boot if you enable this option.
If you already have a Professional edition of Windows 10 installed on your PC, you can search for «BitLocker» in the Start menu and use the BitLocker control panel to enable it. If you upgraded for free from Windows 7 Professional or Windows 8.1 Professional, you should have Windows 10 Professional.

If you don’t have a Professional edition of Windows 10, you can pay $99 to upgrade your Windows 10 Home to Windows 10 Professional. Just open the Settings app, navigate to Update & security > Activation, and click the «Go to Store» button. You’ll gain access to BitLocker and the other features that Windows 10 Professional includes.
Security expert Bruce Schneier also likes a proprietary full-disk encryption tool for Windows named BestCrypt. It’s fully functional on Windows 10 with modern hardware. However, this tool costs $99—the same price as an upgrade to Windows 10 Professional—so upgrading Windows to take advantage of BitLocker may be a better choice.
For Everyone Else: VeraCrypt
Spending another $99 just to encrypt your hard drive for some additional security can be a tough sell when modern Windows PCs often only cost a few hundred bucks in the first place. You don’t have to pay the extra money for encryption, because BitLocker isn’t the only option. BitLocker is the most integrated, well-supported option—but there are other encryption tools you can use.
The venerable TrueCrypt, an open-source full-disk encryption tool that is no longer being developed, has some issues with Windows 10 PCs. It can’t encrypt GPT system partitions and boot them using UEFI, a configuration most Windows 10 PCs use. However, VeraCrypt—an open-source full-disk encryption tool based on the TrueCrypt source code—does support EFI system partition encryption as of versions 1.18a and 1.19.
In other words, VeraCrypt should allow you to encrypt your Windows 10 PC’s system partition for free.
TrueCrypt’s developers did famously shut down development and declare TrueCrypt vulnerable and unsafe to use, but the jury is still out on whether this is true. Much of the discussion around this centers on whether the NSA and other security agencies have a way to crack this open-source encryption. If you’re just encrypting your hard drive so thieves can’t access your personal files if they steal your laptop, you don’t have to worry about this. TrueCrypt should be more than secure enough. The VeraCrypt project has also made security improvements, and should potentially be more secure than TrueCrypt. Whether you’re encrypting just a few files or your entire system partition, it’s what we recommend.
We’d like to see Microsoft give more Windows 10 users access to BitLocker—or at least extend Device Encryption so it can be enabled on more PCs. Modern Windows computers should have built-in encryption tools, just like all other modern consumer operating systems do. Windows 10 users shouldn’t have to pay extra or hunt down third-party software to protect their important data if their laptops are ever misplaced or stolen.
One of the key elements of data protection is encryption. Users who regularly back up their files are familiar with the concept since Acronis always recommends to store data in an encrypted form. Doing so protects your data in transit to a local server or to the cloud, and it protects data when it is being stored on different media. If someone gains access to your file – either accidentally or maliciously – that person won’t be able to read it or easily decrypt it if strong encryption algorithms like AES-256 are used.
The same applies to a work machine. Full disk encryption can be enabled by default in your organization, but often it is not since it’s not as critical in a protected office environment. If you’re working remotely, either at a home office or on the road, full disk encryption definitely should be enabled, because the likelihood is much higher that someone can get access to your machine.
Given the number of machines suddenly being used to work from home, we’ve prepared this short post on how to enable full disk encryption on Windows and macOS machines.
How to use Microsoft Bitlocker
BitLocker is a full-volume encryption feature that’s been built into different versions of Microsoft Windows beginning with Windows Vista. It is designed to protect data by providing encryption for entire volumes. By default, it uses the AES encryption algorithm in cipher block chaining (CBC) or XTS mode with a 128-bit or 256-bit key. CBC is not used over the whole disk; it is applied to each individual sector.
To turn on Device Encryption in Windows 10, you need to be logged in to your Microsoft Windows account. The easiest way to launch a BitLocker is just type it in a search window.
As every encryption uses an encryption key, full disk encryption on Windows uses some machine or user data as a key for encryption. That key could be your Microsoft account, your Microsoft account password, your computer’s name, or any combination of these in a further encrypted way.
Once you got into the main screen for Bitlocker, you need to turn it on. You’ll be asked if you want to back up your security key, which you should do, but on another drive (preferably a USB stick). You can choose whether to encrypt only used space or the whole disk during the next step.
After that, you are basically good to go, although the disk encryption that will take some time.
macOS has its own full disk encryption tool called FileVault. FileVault 2 uses XTS-AES-128 encryption with a 256-bit key, which is pretty similar to its Windows counterpart. FileVault 2 is available in OS X Lion or later.
When FileVault is turned on, your Mac always requires that you log in with your account password.
To turn it on:
- Choose Apple menu () > System Preferences, then click Security & Privacy.
- Click the FileVault tab.
- Click , then enter an administrator name and password.
- Click Turn On FileVault.
You have to choose how you’ll want to unlock your disk or reset your password (if you ever forget your password). Apple recommends the following:
• If you’re using OS X Yosemite or later, you can choose to use your iCloud account to unlock your disk and reset your password.
• If you’re using OS X Mavericks, you can choose to store a FileVault recovery key with Apple by providing the answers to three security questions. Choose answers that you’ll be sure to remember*.
• If you don’t want to use iCloud FileVault for recovery, you can create a local recovery key. Keep the letters and numbers of the key somewhere safe—other than on your encrypted startup disk.
Once initiated, the encryption occurs in the background so you can continue using your Mac. It only runs while your Mac is awake and plugged into AC power. Any new files that you create are automatically encrypted as they are saved to your startup disk.
When the FileVault setup is complete and you restart your Mac, you will use your account password to unlock your disk, allowing your Mac to finish starting up.
Full Disk Encryption is excellent for preventing access if the device gets stolen. Let’s check Windows native BitLocker and its alternatives.
Do you know what is scary about the stolen laptop of West Virginia-based Coplin Health Systems containing data of 43,000 patients?
Or what’s bad in a contractor in Japan losing a USB drive having the personal information of 460,000 residents?
The data wasn’t encrypted.
So, a bad actor could easily access and sell personal data on the dark web.
They learned the lesson the hard way. But that shouldn’t be the case knowing how easy it is to encrypt the data.
The following sections discuss disk encryption, how to do it with BitLocker, and a few BitLocker alternatives.
Full Disk Encryption

Full Disk Encryption (FDE) refers to locking the drives to your system. It prevents access to the data on compromised devices and can allow for a boot-time check for additional security if applied on system drives.
BitLocker
Windows professional, enterprise and education versions come preloaded with BitLocker device encryption.
Using BitLocker, one can password-protect the drives, which function normally once you’re inside. There is also a recovery key to reset the password, without which the disk contents will be illegible.
Besides, this works cross-platform. For instance, a drive encrypted on Windows will remain safe on Linux.
Notably, this won’t protect you once the system is unlocked. These encryption mechanisms will be fruitless for, say, spyware stealing your personal information, which you might’ve unknowingly installed. Ergo, they aren’t a replacement for antivirus or anti-spyware tools.
To get started, type BitLocker in the taskbar search and open Manage BitLocker.
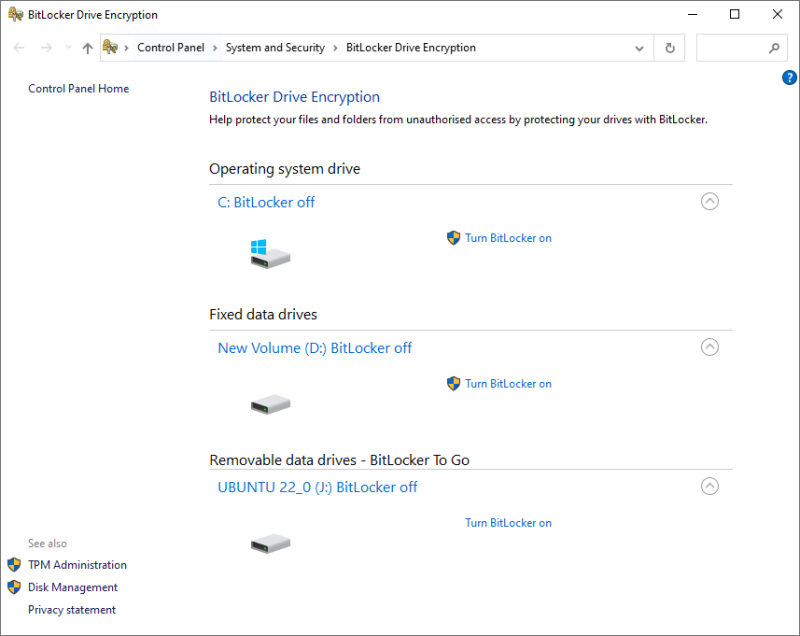
Now choose the subject disk and click on Turn BitLocker on.
The subsequent process is different for the operating system drive and non-system partitions, including portable disks.
BitLocker on System Drives
This, by default, uses the TPM security chip (version 1.2 or later) for authentication. And the machine boots up once the TPM returns the key.
A Trusted Platform Module (TPM) is a chip modern PCs ship with. This is a separate chip ensuring overall device integrity. But you may need to activate this if your system does not detect TPM even after having one.
In such cases, there is no pre-boot authentication and anyone having your PC can turn it on by brute forcing through the Windows log-on password.
However, one can turn on the pre-boot PIN from the local group policy editor to enjoy maximum security. Afterward, the TPM chip will ask for the recovery key and the pin before letting the machine boot.
The differentiator here is that these chips come with brute-force protections. So, the attacker will have only a handful of tries before giving up.
Just remember to configure this before initiating encryption.
The process is simple enough. First, open Windows Run by pressing ⊞+R, type gpedit.msc, and hit enter.
Then navigate to Computer Configuration > Administrative Templates > Windows Components > BitLocker Device Encryption > Operating System Drives:
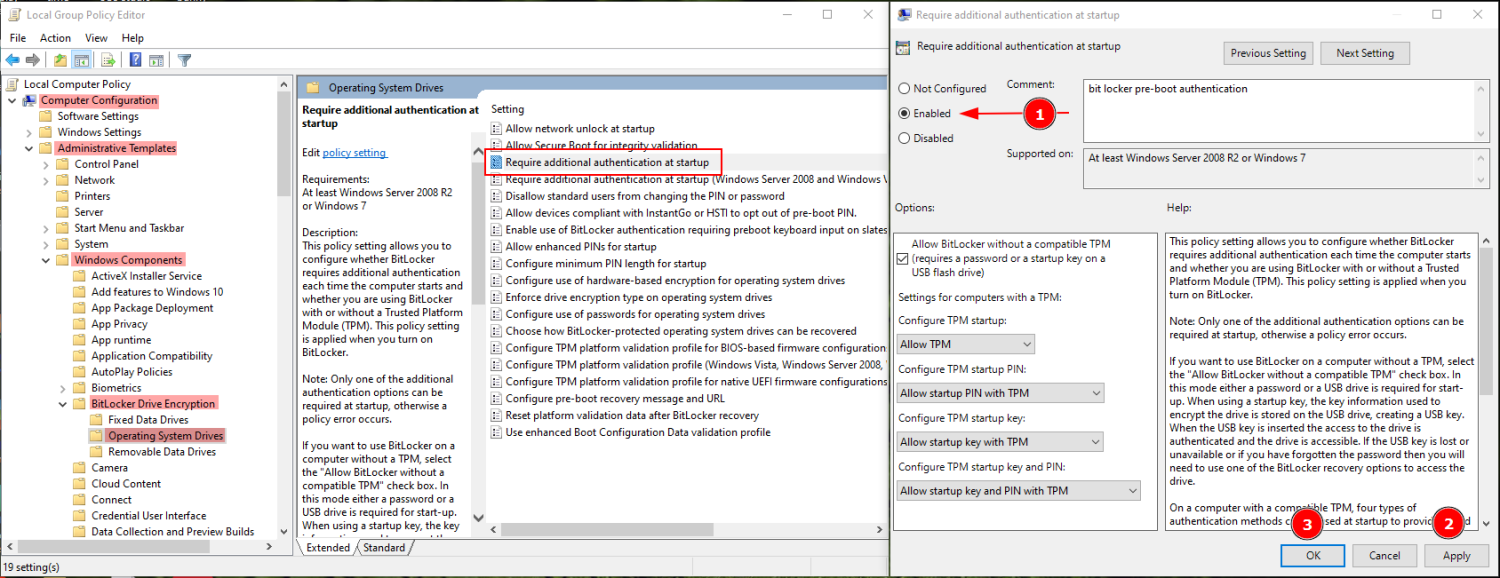
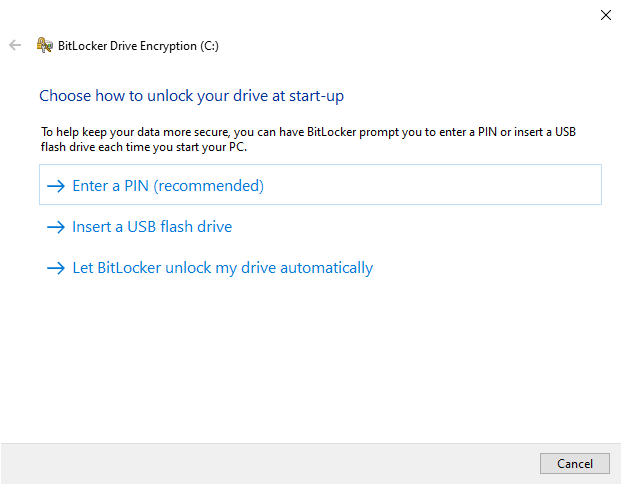
Now the BitLocker Encryption will need a PIN or a pre-set USB drive as a physical authentication before booting.
Next, you progress to Encrypt entire drive or the used disk space only.
Encrypting everything is generally the better idea for older computers since you may have data that can be retrieved from the empty sectors using Windows data recovery tools.
Subsequently, you decide between using New encryption or a compatible mode. You can choose the New encryption mode since this is an operating system drive. The compatible mode would be more suitable for portable drives.
Finally, it’s recommended to Run BitLocker system check on the following window to see if everything works perfectly.
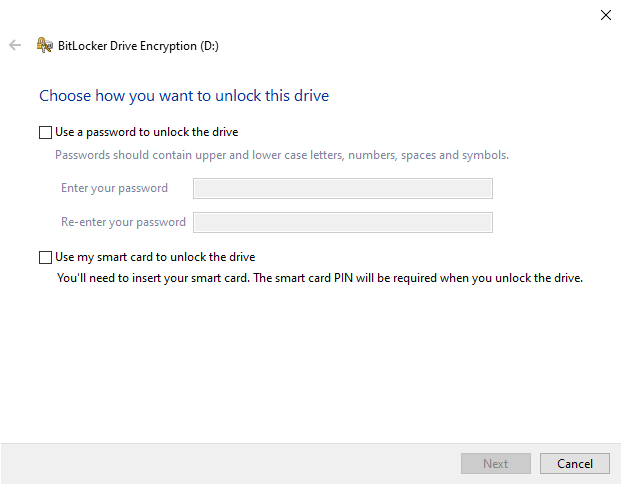
BitLocker on Fixed Data Drives
Encrypting these partitions and drives is more straightforward. This will ask you to set a password upfront.
Once you get over this, the process is similar to encrypting operating system drives barring the BitLocker system checks.
While BitLocker is handy, it’s unavailable to people using Windows Home variants. The second best free option is Windows Device Encryption, if your device supports it.
This is different from the BitLocker in that it mandates TPM requirements. Besides, there is no means of pre-boot authentication.
You can check the availability with System Information. Open Windows Run, type msinfo32, and press enter. Scroll down to the bottom and validate if Meet prerequisites are mentioned against Device Encryption Support.
If it isn’t, most probably your device won’t support Device Encryption. However, you can contact manufacturer support to see for possible resolution.
Alternatively, there are a few full disk encryption tools, free and paid, that you can use.
VeraCrypt
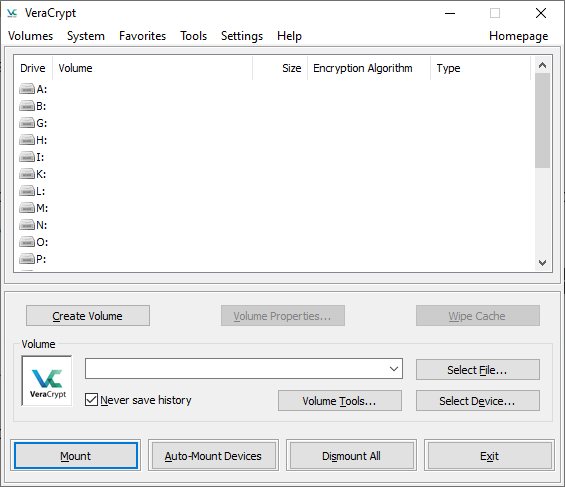
VeraCrypt is free, open-source encryption software for Windows, Mac, and Linux. Similar to BitLocker, you can encrypt system drives, fixed data drives, and portable drives.
This is more flexible and gives many options for encryption algorithms. Besides, it can also encrypt on the fly. So, create an encrypted container and transfer your files to encrypt them.
Additionally, VeraCrypt can create encrypted hidden volumes and supports pre-boot authentication like BitLocker.
However, the user interface may be overwhelming, but nothing that a YouTube tutorial can’t sort out.
BestCrypt
You can call BestCrypt a user-friendly and paid version of Veracrypt.
This gives you access to various algorithms and a host of options to achieve full disk encryption. It supports creating encrypting containers and system drives.
Besides, you can deploy a password-approved booting.
BestCrypt is a multi-platform encryption tool and comes with a 21-days free trial.
Commercial BitLocker Alternatives
These consist of enterprise-ready solutions based on volume licensing.
ESET
ESET full disk encryption (now part of ESET Protect Elite) is excellent for remote management. It gives you flexibility with on-premise and cloud encryption solutions.
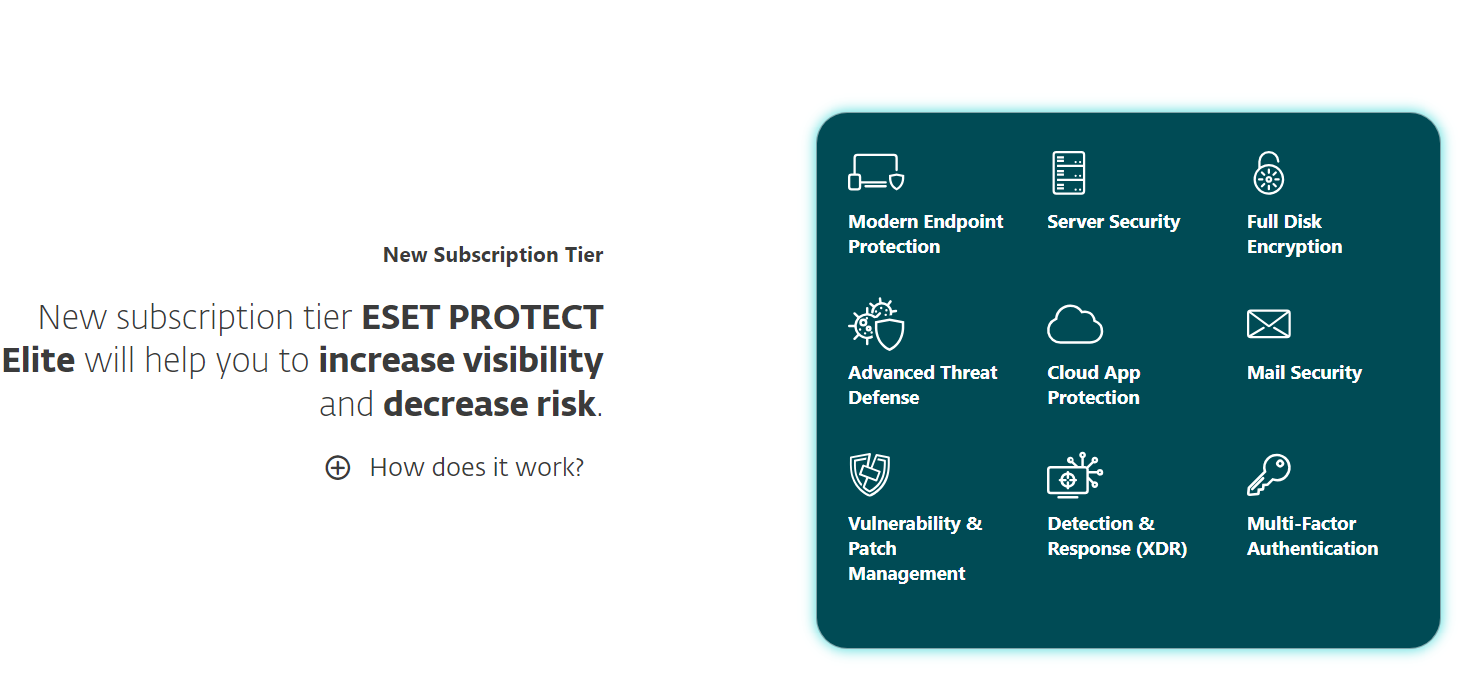
This features safeguarding hard drives, portable drives, emails, etc., with the industry-standard 256-bit AES encryption.
In addition, this lets you encrypt individual files using File Level Encryption (FLE).
You can check this out with the interactive demo or a 30-day free trial for a full-blown hands-on.
Symantec
Symantec, by Broadcom, is another leading player in providing enterprise-grade encryption facilities. This full disk encryption supports TPM ensuring the tamper-free state of institutional devices.
Moreover, you get pre-boot checks, email, and removable disk encryption.
Symantec helps you set single sign-on and can also protect cloud-based applications. This supports smart cards and has various recovery methods if the user forgets the passcode.
Additionally, Symantec comes with file-level encryption, a sensitive file monitor, and various other features making it an irresistible end-to-end encryption solution.
ZENworks
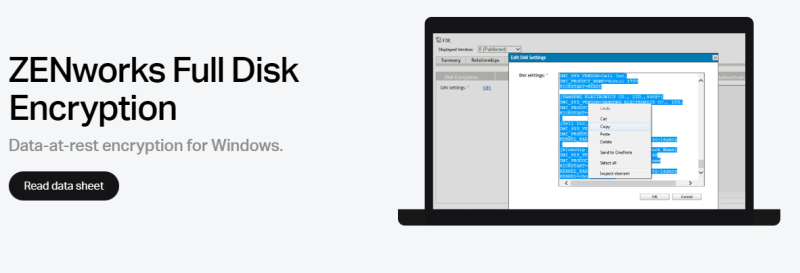
ZENworks from Microfocus is the simplest way of handling AES-256 encryption in any organization.
This supports an optional pre-boot authentication with username & password or a smart card with a PIN. ZENworks features centralized key management to help users stuck at boot logins.
You can make encryption policies for devices and enforce them over a standard HTTP web connection.
Finally, you can avail of its free, no-credit card trial to see it firsthand.
FDE vs FLE
Sometimes it’s not worth encrypting an entire disk. In such cases, it’s wise to protect a specific file giving birth to File Level Encryption or File Based Encryption (FBE).
FLE is more common, and we often use it without acknowledging its presence.
For instance, WhatsApp conversations are end-to-end encrypted. Similarly, emails sent via Proton mail are also automatically encrypted and only the recipient can access the contents.
In a similar fashion, one can protect a file with FLE with tools such as AxCrypt or FolderLock.
A distinct advantage of FBE over FDE is that all files can have different encryption keys. Ergo, if one gets compromised, the others will remain safe.
However, this brings in the additional hassle of managing such keys.
Conclusion
Full Disk Encryption is crucial when you lose a device containing sensitive information.
While every user has some crucial data onboard, it’s the businesses that need disk encryption more than anyone else.
Personally, BitLocker is the best encryption tool for Windows users. VeraCrypt is another option for someone who can endure a dated interface.
And the organizations shouldn’t rely on someone’s verdict but take the trials to choose the best for their use case. The only thing a business owner should avoid is vendor locks.
PS: Check out our encryption vs authentication software to brush up on the basics.
Have you ever wondered exactly how encryption protects your sensitive data? Or wanted to enable encryption but found the options overwhelming? In this comprehensive guide, I’ll make encryption approachable for any reader.
We’ll explore the critical importance of encryption in today’s data security landscape. Then compare popular encryption tools available for securing Windows devices at a disk and file level. I’ll share insights from my 15 years in IT security drawing on real world successes and failures.
My goal is to break down the key considerations for implementing rock-solid encryption. You‘ll finish this guide armed with the knowledge to evaluate and compare solutions like Windows BitLocker, VeraCrypt, and beyond. Time to unlock the secrets of encryption!
Why Encryption Matters in Safeguarding Sensitive Data
Before diving into the encryption details, it helps to understand exactly why encryption serves as a vital last line of defense:
$283 billion – The projected financial impact of data breaches over a five year period from 2022 to 2026. Encrypting sensitive data significantly reduces breach impact.
26 billion records – Amount of sensitive data exposed in breaches during just the past 5 years according to Privacy Rights Clearinghouse. Unencrypted records mean complete compromise once network defenses fail.
99% likelihood – Odds of sensitive data like healthcare records being sold on the dark web following a breach according to CynergisTek. Encrypted data remains protected even after exfiltration from corporate networks.
The numbers speak for themselves. Despite best efforts at network security, determined attackers periodically succeed in compromising corporate defenses. Encryption serves as the last barrier preventing complete disaster when the perimeter falls.
Emerging data privacy laws now codify encryption requirements in regulation such as under CCPA in California and GDPR in the EU. Expect encryption mandates only to expand further over the next decade.
Let‘s explore exactly how encryption works…
Understanding Encryption 101
At the most basic level, encryption converts readable plaintext into scrambled ciphertext using a secret key or password:
Without the right encryption key, ciphertext disguises the original structured information even for powerful adversaries. Correctly implemented encryption ensures only those possessing keys can restore scrambled data back into usable form.
The strength of any encryption scheme ultimately depends on protecting keys/passphrases and using encryption algorithms resilient against brute force guessing. poor implementations get defeated not due to math flaws but operational security issues.
Now let‘s examine full disk encryption…
Full Disk Encryption (FDE) vs File Encryption
When protecting data via encryption, you face choose between whether to encrypt entire storage devices (drives/volumes) or just individual files:
For most situations, full disk encryption provides simplicity and comprehensive protection capable of securing entire devices. Windows Bitlocker uses this approach.
File encryption gives flexibility for robustly protecting specific high value data like customer lists. It also facilitates sharing encrypted documents via cloud storage. Solutions like Microsoft Office integrate transparent file encryption.
With background covered, let‘s dive into implementing disk encryption on Windows.
BitLocker: Windows Native Full Disk Encryption
The first stop for enabling drive encryption on Windows devices is the built-in BitLocker technology included with Windows Pro and Enterprise editions.
Released over 15 years years ago with Windows Vista, BitLocker makes applying disk encryption nearly as simple as flipping a switch. But under the hood lays a complex framework fine tuned over the years to balance security, performance, and usability.
Inside BitLocker Encryption
-
BitLocker utilizes AES-128 or AES-256 encryption to encipher drive contents. AES represents the industry standard for encryption algorithms able to withstand brute force guessing attempts even from state actors.
-
At runtime, each 512-byte block of data written to disk gets encrypted independently using a randomized initialization vector to ensure unique cipher text output. This limits exposure if an attacker compromised a portion of encrypted data.
-
Encryption keys get secured using hardware backing from a Trusted Platform Module (TPM) chip on the motherboard. This hardware root of trust stores keys in secured memory isolated from the operating system where malware could access them in software only schemes.
By combining gold standard AES encryption alongside hardware protections for key material, BitLocker balances strong security with performance that avoids bogging down system resources for most computers produced in the last decade. Threat modeling by Microsoft has resulted in high robustness against common attack vectors.
Of course no solution remains bulletproof forever against funded sophisticated adversaries. Using BitLocker should be one layer within a defense-in-depth strategy. Now let‘s get into specifics on rolling out device encryption with BitLocker.
Enabling BitLocker Step-by-Step
Here is the playbook for enabling the core Windows disk encryption capabilities:
- Open the BitLocker control panel
- Select the drive to encrypt
- Choose additional key protectors like TPM or USB startup key
- Begin the encryption process
I strongly suggest also backing up recovery keys to a secure location like a password manager or physical safe. Loss of passwords could mean permanent locked drives.
Expect wait times from tens of minutes up to a few hours before drives finish encrypting depending on size and performance profile. Processor overhead after setup completes proves minimal – most users notice no performance lag from idle disk encryption.
Now that BitLocker serves as an easy button for rollout, what about management?
Centralized Administration and Monitoring
While client BitLocker setup stays simple, Microsoft provides optional tools for centralized administration and monitoring at scale.
The BitLocker Administration and Monitoring (MBAM) utilities extend capabilities in these key areas:
- Key backup and recovery
- Compliance reporting and auditing
- Pushing client policies remotely
- Helpdesk assist for unlocking drives
- Automating client upgrades
- Integrating with existing infrastructure
MBAM offers both on-prem server and cloud MaaS options flexibly designed to slot into large environments. For most small businesses, sticking with standalone BitLocker provides sufficient capabilities. But growth demands greater oversight.
BitLocker: Pros and Cons
Let‘s summarize some key strengths but also areas lacking in Windows built-in full disk encryption:
Pros
✅ Seamless enablement
✅ Hardware encryption via TPM
✅ Transparent to users
✅ Centralized administration
Cons
❌ Home Windows not supported
❌ File/folder encryption absent
❌ Requires TPM chip for added security
BitLocker excels at making drive encryption nearly invisible housed inside Windows itself. And the hardware roots of trust allow bypassing less secure software only schemes. Consider it the default choice on Windows devices containing sensitive data.
But limitations around multi-platform support, granular file encryption, and dependence on TPM chips open the door for third party solutions. Let‘s now examine popular alternatives.
VeraCrypt: Open Source Encryption for Windows, macOS and Linux
VeraCrypt fills gaps left by Windows BitLocker capabilities. Available completely for free, VeraCrypt delivers open source, multi-platform transparent disk encryption. It originated as a fork of the now discontinued TrueCrypt project.
To start, VeraCrypt extends platform support to Apple and Linux systems – crucial for heterogeneous environments. But it also outpaces BitLocker by allowing containers for securely storing encrypted files as easily shareable single units.
Combined this makes VeraCrypt ideally suited for select use cases:
Scenarios Optimized for VeraCrypt
- Cross-platform data sharing
- Air gapped data transfer like via external drives
- Contingency encryption redundant from native OS options
Now let‘s get into the implementation details…
How VeraCrypt Encrypts Disk Volumes
VeraCrypt utilizes similar encryption algorithms as BitLocker – AES, Serpent, Twofish. But it allows greater flexibility including use of cascading algorithms and encryption modes like XTS for enhanced protection on storage media.
Key derivation stretches user supplied passphrases to form more complex encryption keys resisting brute force guessing. Salted hashing adds randomness enabling use of longer keys previously cracking due to algebraic shortcuts against Microsoft‘s PBKDF2 standard.
Runtime performance stays on par with BitLocker through supporting hardware acceleration instructions from commodity CPUs. Decryption handoff to storage controllers in self encrypting drives allows avoiding even minimal overhead when present.
For users more familiar with crypto terminology or wanting custom tailored algorithms, VeraCrypt proves more accessible than BitLocker to Open users don‘t take security promises at face value from closed source solutions.
Overall open design and components makes VeraCrypt security provable. Now let‘s get to specifics on setup.
Enabling VeraCrypt Disk Encryption
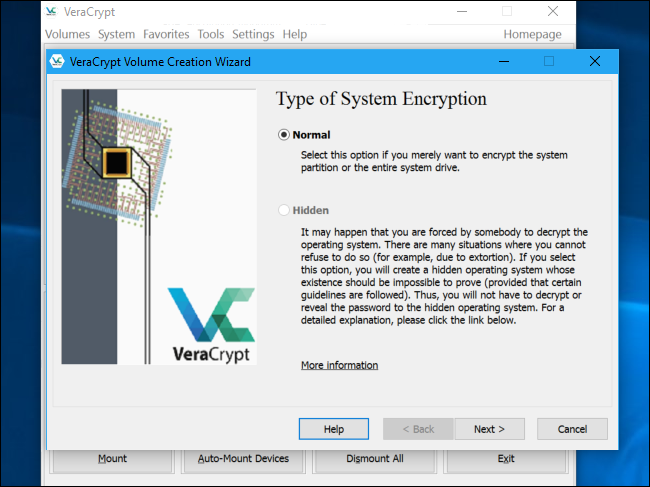
Welcome simplicity permeates the VeraCrypt user experience – critical for mainstream adoption. The following steps walk through a standard full disk encryption configuration:
- Download and install VeraCrypt
- Launch the Create Volume Wizard
- Select volume encryption and specify target drive
- Select encryption options like AES and hash algorithm
- Specify password and generate keys
- Format target drive
- Mount the encrypted volume
The wizard makes seemingly advanced options approachable for even novice users. Those desiring more granular boot authentication or hidden operating systems can consult the online documentation.
Occasional complexities aside, VeraCrypt delivers the flexibility and transparency necessary from data security tools for diverse environments. Now let‘s round up some other disk encryption options before comparing approaches.
More Encryption Alternatives for Windows
Many commercial options exist like BitLocker but with expanded feature sets. A sample of leading solutions:
Sophos SafeGuard
- Centrally managed endpoint encryption
- Uses SEDs for performance
- Authenticates against AD
CheckPoint Full Disk Encryption
- Dual encryption for drives
- Encrypted backupsincluded
- Endpoint and server support
PrivateCore vCage
- Fine-grainedprocess enryption
- Application aware privilege isolation
- Uses SGX trusted execution
Combined hardware and software offerings also continue maturing to address shortcomings from single layered approaches. As an example, Seagate now offers self encrypting drives utilizing both custom ASIC crypto blocks paired with AMD technology for hardened key storage resistant even to Nation state attackers.
Such commercial packages meet critical enterprise needs around centralized administration, domain integration, and polished interfaces. Most require integration services and elaborate rollout planning tailored to existing processes. Some leverage MDM for simplified deployment.
Now that alternatives covered, should you choose full disk or file encryption? Or both?
When to Use (Just) File Encryption
Full device encryption simplifies safeguarding entire drives. But focusing only on high value data using file or folder encryption crypto brings advantages:
File Encryption Wins When…
🗂️ Small, portable data subsets need securing
🗄️ Sharing across mixed trust devices essential
🔐 Controlling third party app access critical
🏷️ Marking sensitive data mandatory
📁 Cloud storage or backup compatibility required
Common examples demanding file crypto include financial documents like loan applications and tax returns as well as medical history records. Most organization utilize both file and disk encryption as complementary rather than either-or capabilities.
Integrated operating systems tools like Windows EFS (Encrypting File System) or Office 365 message encryption simplify leveraging file encryption. Or third party tools like AxCrypt fill gaps.
The same encryption algorithms like AES work interchangeably file or full disk scenarios (with small optimizations). Data sliced small enough even allows use of asymmetric public key encryption.
Bottom line: both full disk and file encryption serve vital purposes in segmenting access and limiting damage from compromise events. Now let‘s round out recommendations on rounding out planning.
Strategic Planning Areas for Encryption Rollout
Getting encryption right organization wide requires considerations beyond just technical software configuration:
Any enterprise initiative spanning governance, software, hardware, and personnel risks potholes slowing progress if ignoring change management 101.
Common roadblocks encountered:
- Discovery of incompatible legacy apps not encryptable
- Funding disputes around required hardware upgrades like TPM enablement
- Poor encryption hygiene practices necessitating policy updates
- Resistance from product groups around perceived performance impacts
- Delays related to custom engineering required for proprietary hardware
Successful encryption campaigns proactively surfaced risks early while socializing benefits across stakeholders. Leadership emphasis highlighting breaches at peers reinforced urgency during rollout to hit targets.
Closing Recommendations
Hopefully this guide demystified the world of using encryption to protect sensitive files and devices. Here are my parting recommendations as you being putting protections in place:
🔒 Use Windows BitLocker for straightforward full disk encryption on supported Windows devices
🔓 VeraCrypt adds cross platform, open source strong encryption with bonus features
🗄️ Protect critical data like customer lists via additional file encryption
🔑 Centralize administration for recovery keys, policies and other encryption infrastructure
No silver bullet gets encryption right across environments. Tailor the mix of disk and file encryption tools to your specific regulatory, technology, and workflow constraints. But prevent putting data at risk by delaying rollout. Tune guardrails later but start now even with partial solutions while perfecting mature strategies.
What questions remain around your encryption planning initiative? Have you launched encryption in your organization before? I welcome any feedback below!