
Use Remote Desktop on your Windows, Android, or iOS device to connect to a Windows PC from afar. Here’s how to set up your PC to allow remote connections and then connect to the PC you set up.
Note: While a Remote Desktop server (as in, the PC that you are connecting to) needs to be running a Pro edition of Windows, a client machine (the device you are connecting from) can be running any edition of Windows (Pro or Home), or even a different operating system altogether.
-
Set up the PC you want to connect to so it allows remote connections:
-
Make sure you have Pro edition of Windows. To check this, select Start , and open Settings . Then, under System , select About , and under Windows specifications, look for Edition. For info on how to get Pro edition of Windows, go to Upgrade Windows Home to Windows Pro.
-
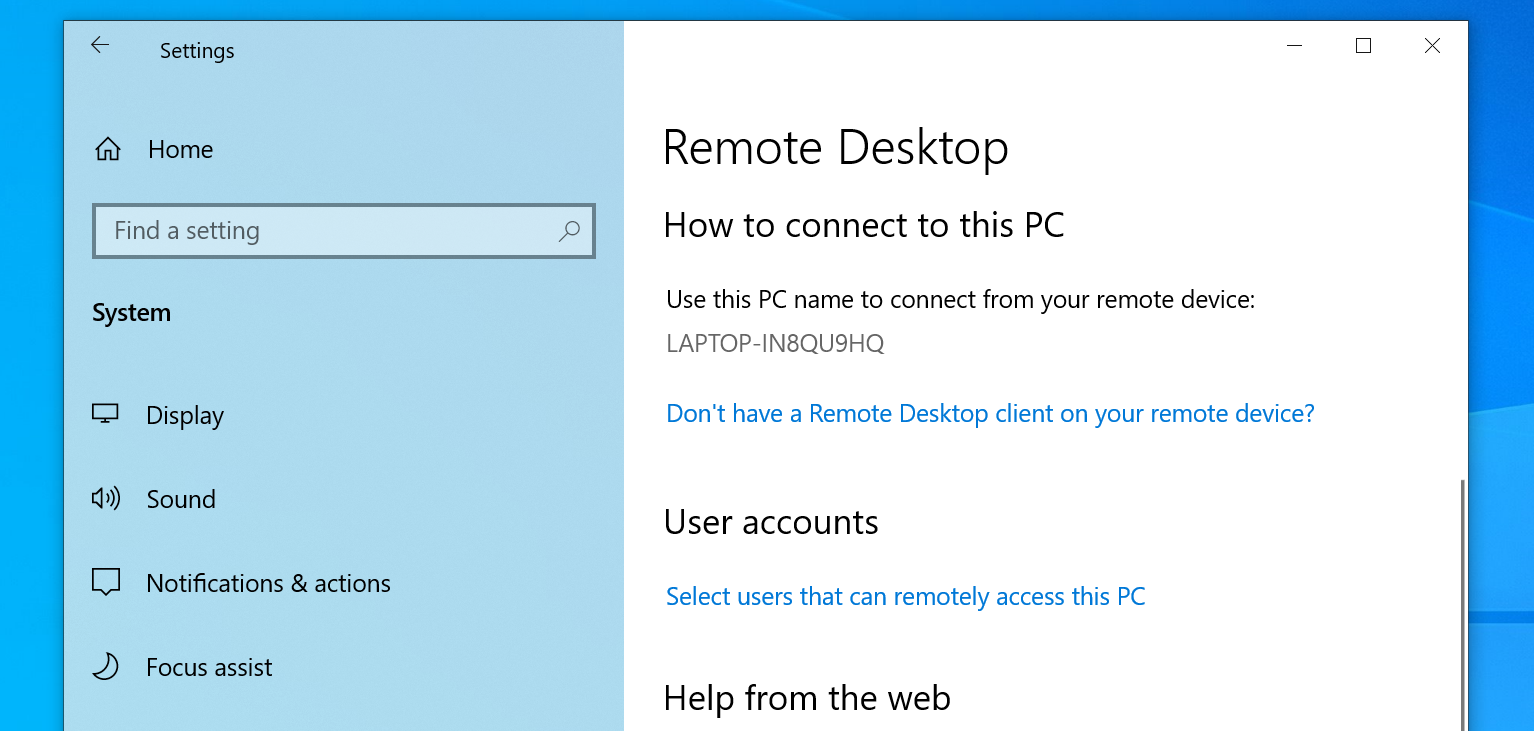
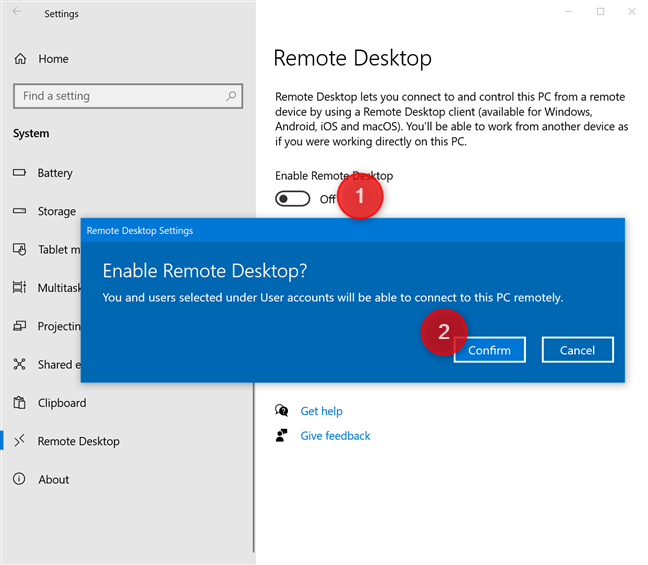
When you’re ready, select Start , and open Settings . Then, under System , select Remote Desktop, set Remote Desktop to On, and then select Confirm.
-
Make note of the name of this PC under PC name. You’ll need this later.
-
-
Use Remote Desktop to connect to the PC you set up:
-
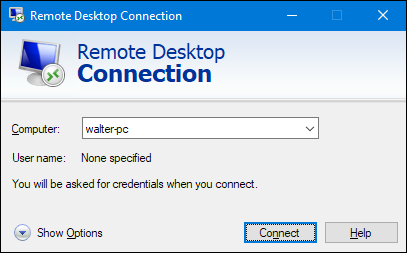
On your local Windows PC: In the search box on the taskbar, type Remote Desktop Connection, and then select Remote Desktop Connection. In Remote Desktop Connection, type the name of the PC you want to connect to (from Step 1), and then select Connect.
-
On your macOS or iOS device: Open Windows App (available for free from Microsoft Store and the Apple App Store), and add the name of the PC that you want to connect to (from Step 1). Select the remote PC name that you added, and then wait for the connection to complete.
-
On your Android device: Open the Remote Desktop app (available for free from the Google Play Store) and add the name of the PC that you want to connect to (from Step 1). Select the remote PC name that you added, and then wait for the connection to complete.
-
Enable Remote Desktop
Need more help?
Want more options?
Explore subscription benefits, browse training courses, learn how to secure your device, and more.
В Windows 11, как и в предыдущих версиях системы есть встроенные функции удаленного доступа к компьютеру, одна из них — «Удаленный рабочий стол» или Microsoft Remote Desktop, позволяющая легко подключаться к компьютеру с другого устройства с ОС Windows, MacOS, Android или iOS.
В этой инструкции подробно о том, как включить удаленный рабочий стол в Windows 11, в том числе в Домашней редакции, подключиться к удаленному рабочему столу и решить возможные проблемы с подключением.
Включение удаленного рабочего стола в Windows 11 Pro
Модули удаленного рабочего стола представлены в двух частях:
- Сервер (Хост) — для устройства, к которому выполняется подключение. Есть только в Windows 11 Pro и Enterprise (но есть обходной путь и для Home, который также будет рассмотрен далее). Эта функция по умолчанию отключена и её требуется включить.
- Клиент — для устройства, с которого выполняется подключение. Этот модуль по умолчанию доступен в Windows, независимо от редакции.
Чтобы включить удаленный рабочий стол (возможность подключаться к этому компьютеру) в Windows 11 можно использовать один из следующих способов.
Параметры
Базовый вариант — включение удаленного рабочего стола в Параметрах Windows 11:
- Откройте Параметры — Система — Удаленный рабочий стол.

- Включите переключатель «Удаленный рабочий стол».
- Подтвердите включение удаленного рабочего стола.


Здесь же можно настроить другие параметры: в частности, включить или отключить аутентификацию на уровне сети.
Свойства системы
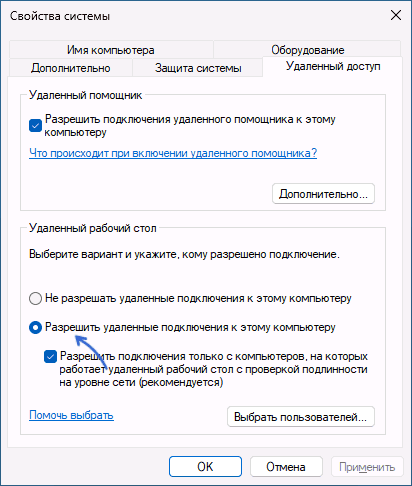
Второй способ — окно «Свойства системы»:
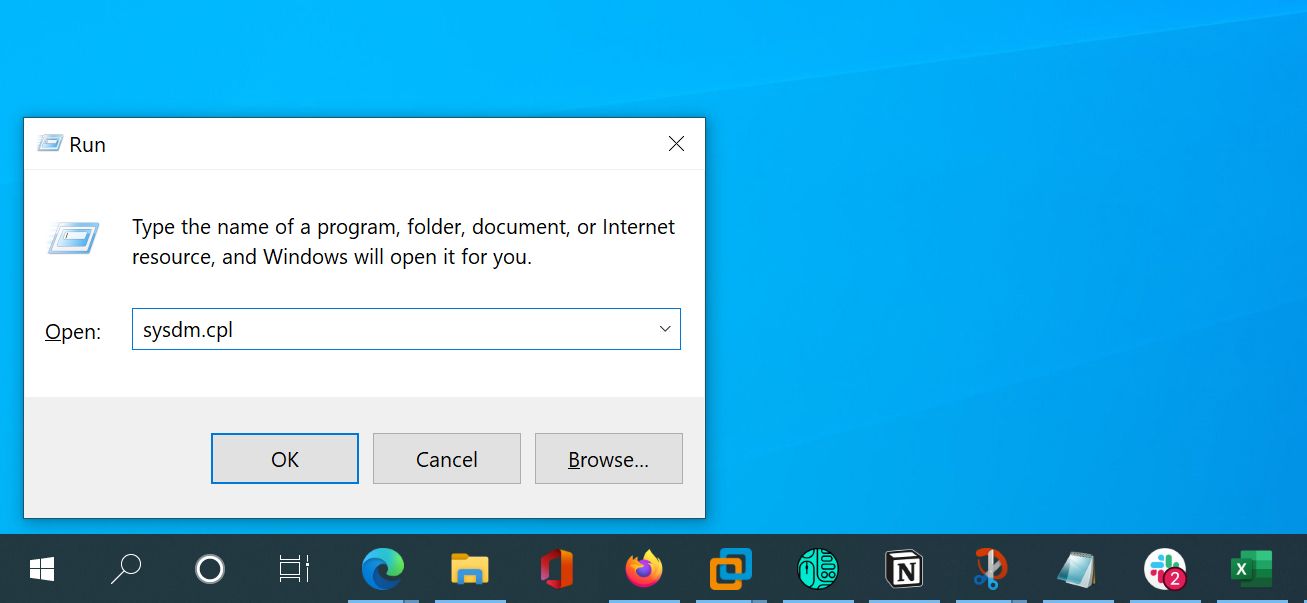
- Нажмите клавиши Win+R на клавиатуре, введите sysdm.cpl в окно «Выполнить» и нажмите Enter.
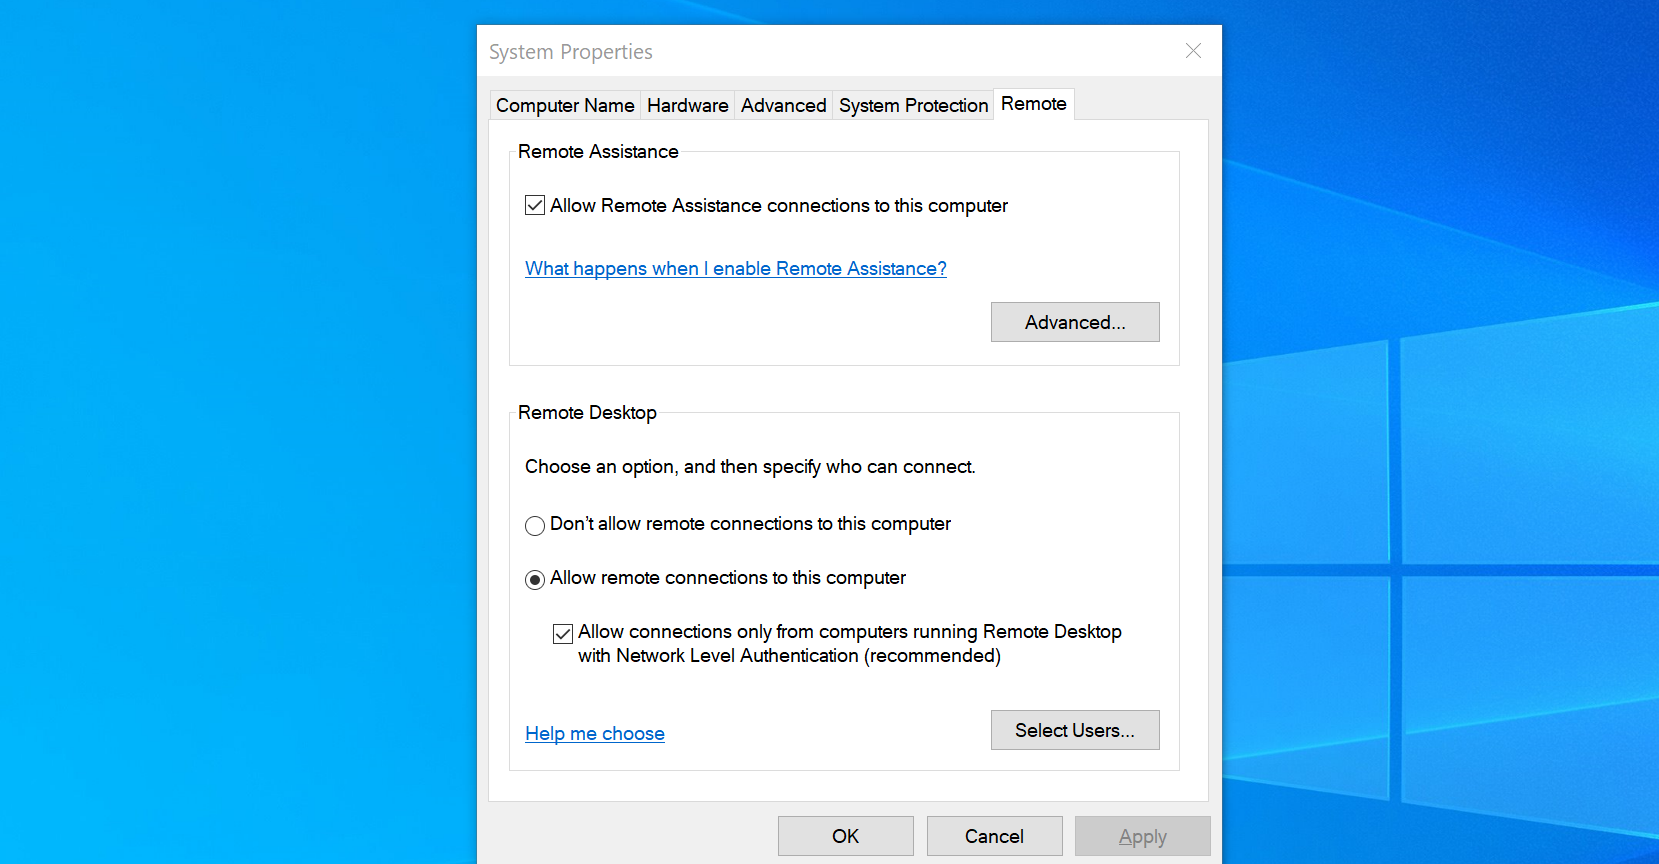
- В открывшемся окне перейдите на вкладку «Удаленный доступ».
- Включите опцию «Разрешить удаленные подключения к этому компьютеру», при необходимости задайте пользователей компьютера, под аккаунтами которых возможен вход в систему с использованием удаленного рабочего стола.

Командная строка или PowerShell
Включение удаленного рабочего стола возможно и посредством команд, выполненных от имени администратора.
Далее — команды командной строки и Windows PowerShell соответственно, и в том и другом случае команда изменяет значение параметра реестра, отвечающего за включение и отключение удаленного рабочего стола:
reg add "HKEY_LOCAL_MACHINE\SYSTEM\CurrentControlSet\Control\Terminal Server" /v fDenyTSConnections /t REG_DWORD /d 0 /f
Set-ItemProperty -Path "HKLM:\System\CurrentControlSet\Control\Terminal Server" -name "fDenyTSConnections" -value 0
Как включить удаленный рабочий стол в Windows 11 Home (Домашняя)
Несмотря на то, что в Windows 11 редакции Home или Домашняя отсутствует возможность включить сервер удаленного рабочего стола Microsoft Remote Desktop, сами компоненты для этой функциональности в системе присутствуют. Задача — их активировать. Для этого можно использовать сторонний инструмент RDP Wrapper Library, который можно скачать с GitHub разработчика https://github.com/stascorp/rdpwrap/releases
Достаточно загрузить архив, распаковать в удобное расположение и запустить Install.bat для установки, по завершении которой рекомендуется перезагрузить компьютер.
Удаленный рабочий стол будет включен и подключение к компьютеру с Windows 11 Домашняя станет возможным. Настройки хоста Microsoft RDP будут доступны в утилите RDPConf, находящейся в том же архиве:

Как подключиться к удаленному рабочему столу
Подключение к удаленному рабочему столу возможно:
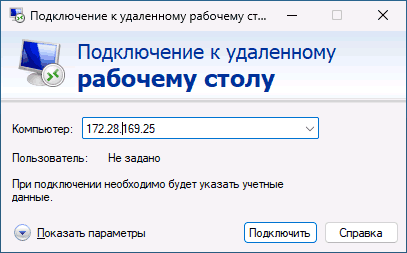
- Из встроенной утилиты «Подключение к удаленному рабочему столу» в Windows, которую можно найти через поиск на панели задач, либо запустить с помощью Win+R — mstsc.exe
- Для Windows 11 и Windows 10 также можно использовать приложение «Удаленный рабочий стол (Майкрософт)» из магазина Microsoft Store.
- Через приложение Удаленный рабочий стол (Microsoft Remote Desktop), которое доступно бесплатно в официальных магазинах приложений для Android, iPhone или Mac.
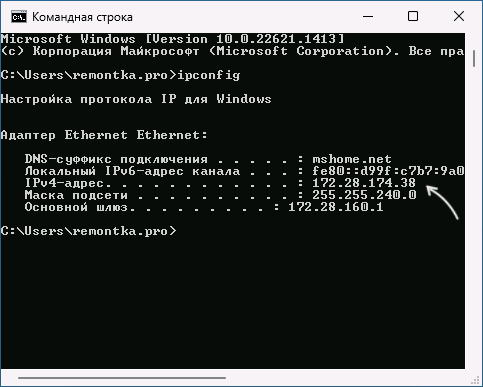
Для подключения к компьютеру в локальной сети потребуется его IP-адрес (IPv4) в этой сети, к которому выполняется подключение (можно посмотреть с помощью командной строки и команды ipconfig), либо имя компьютера, а также учетные данные для входа.
Сам процесс подключения с другого компьютера Windows с использованием встроенного инструмента состоит из следующих шагов:
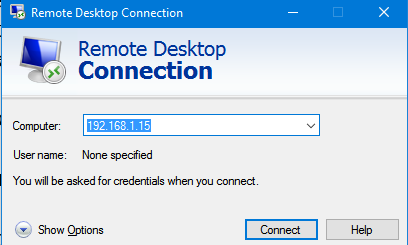
- Запустите подключение к удаленному рабочему столу (Win+R — mstsc) и введите IP-адрес или имя удаленного компьютера.

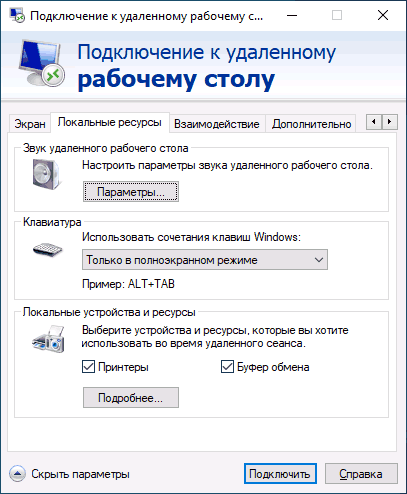
- При необходимости, нажав кнопку «Параметры» вы можете настроить параметры экрана при удаленном подключении и изменить дополнительные параметры взаимодействия.

- После установки подключения вам будет предложено ввести имя пользователя и пароль для входа в удаленную систему — это должен быть аккаунт пользователя именно на удаленном компьютере, которому разрешен вход через RDP, обязательно с паролем (если пароль у учетной записи отсутствует, создайте его). По умолчанию доступ есть у пользователей группы «Администраторы», других пользователей можно добавить в настройках удаленного доступа в свойствах системы (Win+R — sysdm.cpl).

- Если всё прошло успешно, соединение будет установлено, и вы увидите рабочий стол удаленного компьютера.


Подключение с устройств на других ОС выполняется тем же образом: добавление компьютера, ввод IP-адреса и данных аккаунта для подключения и последующая установка соединения.
Для подключения к удаленному рабочему столу через Интернет вам потребуется:
- Знать ваш IP-адрес в Интернете. Если компьютер подключен кабелем и без роутера, обычно этого достаточно и можно выполнить подключение по этому IP-адресу (однако учитывайте, что он может меняться, если у вас не включена услуга выделенного IP у провайдера).
- Если подключение выполняется через роутер, в настройках роутера, к которому подключен удаленный компьютер потребуется пробросить подключения к порту 3389 на соответствующий порт компьютера, подключенного к этому роутеру по его IP в локальной сети (который тоже имеет смысл сделать статическим в настройках подключения). Более простой метод — настройка виртуальной локальной сети между компьютерами (даже за роутером и в Интернете), например, с помощью Meshnet.
Решение проблем при подключении по RDP к удаленному рабочему столу
Если при подключении к удаленному рабочему столу сообщается об ошибках, подключение выполняется бесконечно или возникают иные проблемы, можно попробовать следующие подходы к решению:
- Проверьте, что служба «Службы удаленных рабочих столов» (Remote Desktop Services) не отключена. Тип запуска для неё следует установить «Вручную».

- Попробуйте снять отметку «Требовать использование устройствами аутентификации на уровне сети для подключения» на хосте (компьютере, к которому выполняется подключение).
- При подключении вы можете увидеть сообщение о том, что не удается проверить подлинность удаленного компьютера из-за проблем с сертификатом безопасности. Если речь идет о вашем компьютере в локальной сети, переживать не о чем — можно выполнять подключение.
- Убедитесь, что порт 3389 открыт в текущем профиле брандмауэра защитника Windows (Как открыть порт в Windows), либо проверьте, чтобы для всех правил группы «Дистанционное управление рабочим столом» в брандмауэре защитника Windows подключение было разрешено. В крайнем случае можно попробовать полностью отключить брандмауэр и посмотреть, решит ли это проблему, а при наличии стороннего ПО для защиты компьютера в сети — проверить, не является ли оно причиной ошибок подключения.
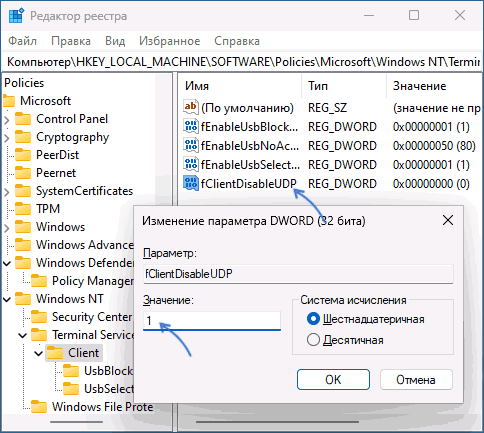
- Попробуйте отключить использование протокола UDP для подключения. Для этого в реестре перейдите к разделу
HKEY_LOCAL_MACHINE\SOFTWARE\Policies\Microsoft\Windows NT\Terminal Services\Client
и создайте параметр DWORD с именем fClientDisableUDP и значением 1

- Подключение по UDP можно отключить в редакторе локальной групповой политики (Win+R — gpedit.msc). В разделе Конфигурация компьютера — Административные шаблоны — Компоненты Windows — Службы удаленных рабочих столов — Клиент подключения к удаленному рабочему столу дважды нажмите по параметру «Отключение UDP на клиенте» и установите значение «Включено» (именно это значение отключит UDP).

- Проверьте используемые для RDP номера портов в разделе реестра
HKEY_LOCAL_MACHINE\SYSTEM\CurrentControlSet\Control\Terminal Server\WinStations\RDP-Tcp
имя параметра — PortNumber на случай, если они по какой-либо причине были изменены и отличаются от стандартного 3389.
- Если проблема возникла после обновлений Windows, можно попробовать удалить обновления, либо использовать точки восстановления системы.


Если остаются вопросы или есть чем поделиться, ниже открыты комментарии. Также в контексте темы может пригодиться: Как отключить удаленный рабочий стол в Windows 11 и 10, Программы для удаленного доступа к компьютеру.
Протокол Remote Desktop Protocol (RDP) позволяет удаленно подключиться к рабочему столу компьютера с Windows и работать с ним, как будто это ваш локальный компьютер. По умолчанию RDP доступ в Windows запрещен. В этой статье, мы покажем, как включить и настроить RDP доступ в Windows 10 и Windows Server 2016/2019.
Содержание:
- Включаем удаленный рабочий стол в Windows 10
- Как включить RDP доступ с помощью PowerShell?
- RDP доступ к Windows Server 2016/2019
- Включение RDP с групповых политик в домене Active Direcrtory
- Как удаленно включить RDP на компьютере Windows?
Включаем удаленный рабочий стол в Windows 10
Самый простой способ включить RDP доступ в Windows – воспользоваться графическим интерфейсом.
Откройте свойства системы через панель управления, или выполнив команду SystemPropertiesRemote.
Перейдите на вкладку Remote Settings (Удаленный доступ), включите опцию Allow remote connection to this computer (Разрешить удалённые подключения к этому компьютеру).
В целях безопасности желательно разрешить подключение только с клиентов RDP с поддержкой протокола NLA (Allow connections only from computers running Remote Desktop with Network Level Authentication/ Разрешить подключение только с компьютеров, на которых работает удаленный рабочий стол с проверкой подлинности на уровне сети).

Сохраните изменения, нажав ОК.
По умолчанию право на подключение к компьютеру через RDP есть только у членов группы локальных администраторов. Если вам нужно разрешить RDP доступ другим пользователям, нажмите кнопку Select Users.
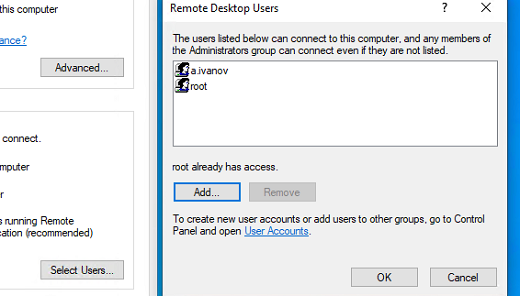
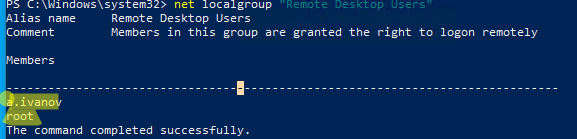
Все пользователи, которых вы укажете здесь будет добавлены в локальную группу Remote Desktop Users. Вы можете в командной строке вывести список пользователей в этой группе:
net localgroup "Remote Desktop Users"
или
net localgroup “Пользователи удаленного рабочего стола”
Чтобы добавить нового пользователя в группу доступа RDP, выполните:
net localgroup "Remote Desktop Users" /add publicuser
В русской версии Windows измените название группы на “Пользователи удаленного рабочего стола”.
В новых билдах Windows 10 классическая панель для включения RDP доступа теперь спрятана и Microsoft рекомендует пользоваться новой панелью Setting.
- Перейдите в Settings -> System —> Remote Desktop;
- Включите опцию Enable Remote Desktop;

- Подтвердите включение RDP на компьютере.
Обратите внимание, что вы не можете включить RDP доступ к редакции Windows 10 Home. RDP сервер работает только на Windows 10 Pro и Enterprise. Впрочем, есть обходное решение.
Обратите внимание, что по умолчанию при включении Remote Desktop, включаются две опции:
- Keep my PC awake for connection when it is plugged in ;
- Make my PC discoverable on private networks to enable automatic connection from a remote device
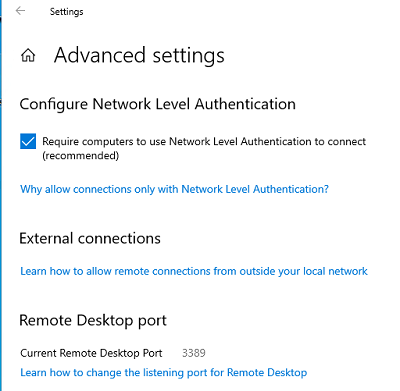
На жмите на ссылку “Advanced settings”. Здесь можно включить использование протокола “Network Level Authentication” для RDP подключений (рекомендуется).
Если на компьютере включен Windows Defender Firewall (брандмауэр), то нужно проверить, что в нем разрешены входящие RDP подключения. По умолчанию для RDP подключений используется порт TCP
3389
, а в последних билдах Windows также используется
UDP 3389
( см. статью про кейс с черным экраном вместо рабочего стола при RDP доступе).
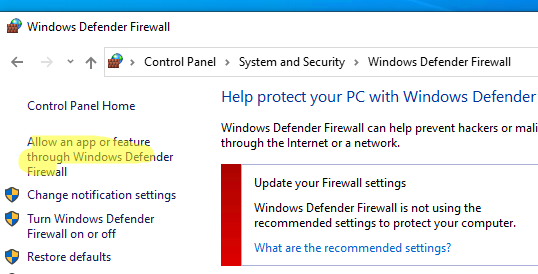
Перейдите в панель управления и выберите элемент Windows Defender Firewall. Откройте список стандартных правил брандмауэра Windows, щелкнув в левом столбце по ссылке Allow an app or feature through Windows Firewall.
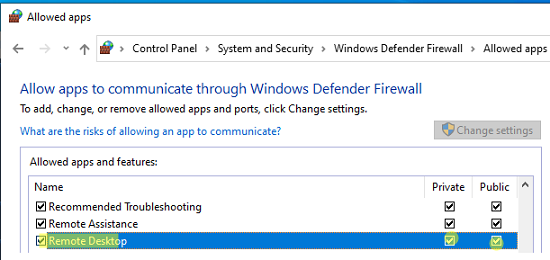
Проверьте, что правило Remote Desktop включено для профиля Private (домашняя или рабочая сеть) и, если необходимо, для профиля Public (общедоступные сети).
Подробнее про типы сетей и профили брандмауэра Windows здесь.
Если нужно, вы можете дополнительно ограничить длительность RDP сессий с помощью GPO.
Теперь к данному компьютеру можно подключится с помощью RDP клиента. Встроенный RDP клиент Windows –
mstsc.exe
. Он сохраняет всю историю RDP подключений с компьютера. Поддерживается копирование файлов между локальным и удаленным компьютером прямо через буфер обмена RDP.
Также вы можете использовать менеджеры RDP подключений, такие как RDCMan или mRemoteNG, или альтернативные клиенты.
Для удобства пользователей пароль для RDP подключения можно сохранить в Windows Credential Manager.
Как включить RDP доступ с помощью PowerShell?
Вы можете включить RDP доступ в Windows с помощью пары PowerShell команд. Это гораздо быстрее:
- Запустите консоль PowerShell.exe с правами администратора;
- Включите RDP доступ в реестре с помощью командлета Set-ItemProperty:
Set-ItemProperty -Path 'HKLM:\System\CurrentControlSet\Control\Terminal Server' -name "fDenyTSConnections" -value 0Чтобы закрыть RDP доступ, измените значение fDenyTSConnections на 1.
- Разрешите RDP подключения к компьютеру в Windows Defender Firewall. Для этого включите предустановленное правило :
Enable-NetFirewallRule -DisplayGroup "Remote Desktop"
- Если нужно добавить пользователя в группу в локальную группу RDP доступа, выполните:
Add-LocalGroupMember -Group "Remote Desktop Users" -Member 'a.petrov'

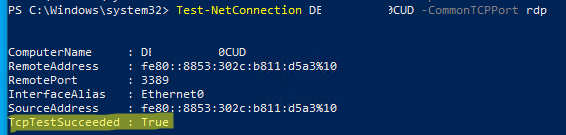
Чтобы проверить, что на компьютере открыт RDP порт, воспользуйтесь командлетом Test-NetConnection:
Test-NetConnection -ComputerName deskcomp323 -CommonTCPPort rdp
RDP доступ к Windows Server 2016/2019
В отличии от десктопной редакции Windows 10, в Windows Server по умолчанию поддерживается два одновременных RDP подключения. Эти подключения используются администраторами для управления сервером.
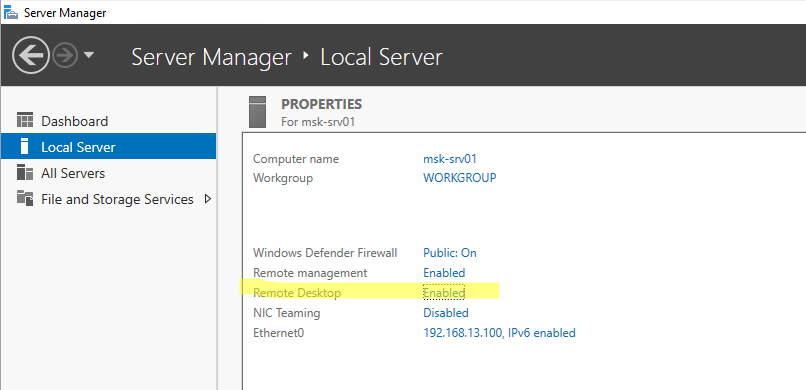
Включается RDP в Windows Server аналогично. Через SystemPropertiesRemote, через Server Manager или командами PowerShell, рассмотренными выше.
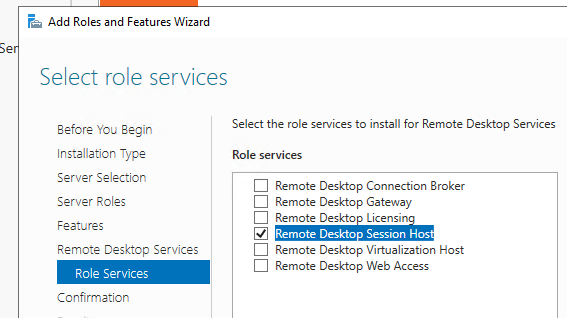
Вы можете использовать Windows Server в качестве терминального сервера. В этом случае множество пользователей могут одновременно подключаться к собственному рабочему столу на сервере. Для этого нужно установить и настроить на сервере роль Remote Desktop Session Host. Это требует приобретения специальных RDS лицензии (CAL). Подробнее о RDS лицензировании здесь.
Для дополнительно защиты RDP сессий можно использовать SSL/TLS сертификаты.
Включение RDP с групповых политик в домене Active Direcrtory
Если вам нужно включить RDP доступ сразу на большом количестве компьютеров, можно воспользоваться групповыми политиками (GPO). Мы подразумеваем, что все компьютеры включены в домен Windows.
- Запустите консоль управления доменными GPO
gpmc.msc
; - Создайте новую (или отредактируйте уже существующую) групповую политику и привяжите ее к целевой OU с компьютерами или серверами;
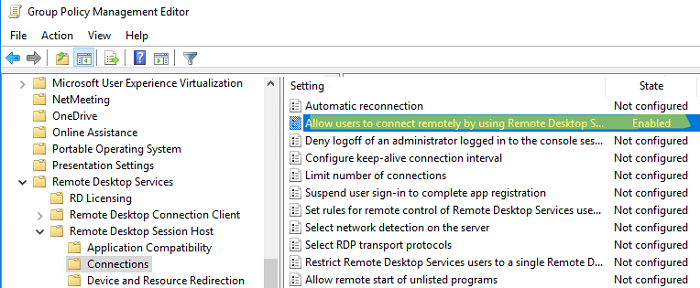
- Переключитесь в режим редактирования политики и перейдите в секцию GPO Computer Configuration -> Administrative Templates -> Windows Components -> Remote Desktop Services -> Remote Desktop Session Host -> Connections;
- Найдите и включите политику Allow Users to connect remotely by using Remote Desktop Services, установив ее в Enable;
- Обновите параметры групповых политик на клиентах;
- После применения данной политики вы сможете подключится ко всем компьютерам по RDP (политика применится как к десктопным клиентам с Windows 10, так и к Windows Server). Если нужно, вы можете более тонко нацелить политики на компьютеры с помощью WMI фильтров GPO.
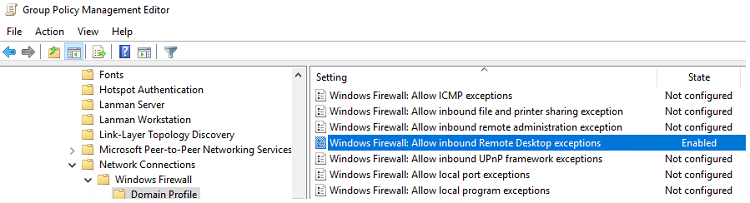
- Если на компьютерах включен Windows Defender Firewall, нужно в этой же GPO разрешить RDP-трафик для доменного профиля. Для этого нужно активировать правило Windows Firewall: Allow inbound Remote Desktop Exceptions (находится в разделе Computer Configuration -> Administrative Templates -> Network -> Network Connections -> Windows Firewall -> Domain Profile).
Подробнее о настройке правил брандмаура Windows через GPO рассказано здесь.
Как удаленно включить RDP на компьютере Windows?
Также вы можете удаленно включить RDP на любом компьютере Windows. Для этого у вас должен быть удаленный доступ к этому компьютеру (через PowerShell или WMI) и ваша учетная запись состоять в группе локальных администраторов на этом компьютере.
Вы можете удаленно включить RDP через реестр. Для этого на удаленном компьютере должна быть включена служба Remote Registry (по умолчанию она отключена). Чтобы запустить службу:
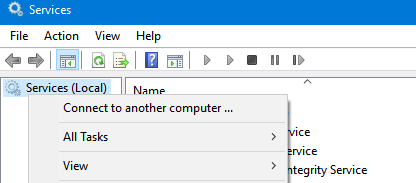
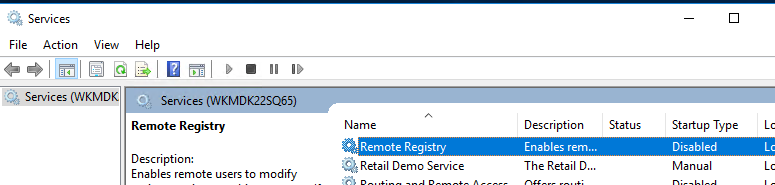
- Запустите консоль управления службами (
services.msc
); - Выберите Connect to another computer и укажите имя удаленного компьютера;
- Найдите в списке службу Remote Registry, измените тип запуска на Manual (ручной) и затем запустите службу – Start.
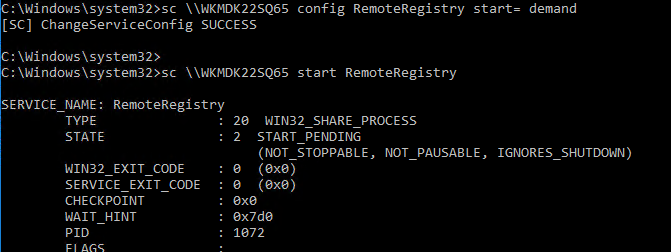
Тоже самое можно выполнить удаленно из командной строки с помощью встроенной утилиты
sc
(позволяет создавать, управлять или удалять службы Windows):
sc \\WKMDK22SQ65 config RemoteRegistry start= demand
sc \\WKMDK22SQ65 start RemoteRegistry
Затем на локальном компьютере
- Запустите редактор реестра
regedit.exe - Выберите в меню Файл пункт Connect Network Registry (Подключить сетевой реестр)
- Укажите имя или IP адрес удаленного компьютера, на котором нужно включить службу RDP;
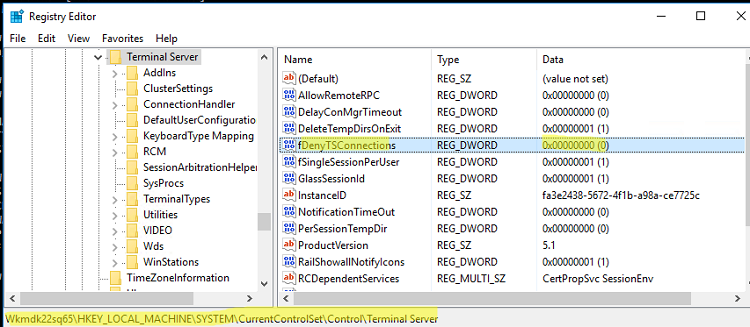
- Перейдите в раздел
HKEY_LOCAL_MACHINE\SYSTEM\CurrentControlSet\Control\Terminal Server
; - Найдите параметр fDenyTSConnections (тип REG_DWORD). Если данный ключ отсутствует – создайте его. Измените его значение на 0, чтобы включить RDP.
Для отключения RDP доступа нужно изменить значение fDenyTSConnections на 1.
Сразу после этого без перезагрузки удаленный компьютер должен стать доступным по RDP.
Но гораздо быстрее можно включить RDP в реестре удаленого компьютера через командную строку:
REG ADD "\\WKMDK22SQ65\HKLM\SYSTEM\CurrentControlSet\Control\Terminal Server" /v fDenyTSConnections /t REG_DWORD /d 0 /f
Если на удаленном компьютере настроен PowerShell remoting, вы можете выполнить на нем удаленную команду через Invoke-Command:
Invoke-Command -Computername WKMDK22SQ65 -ScriptBlock {Set-ItemProperty -Path "HKLM:\System\CurrentControlSet\Control\Terminal Server" -Name "fDenyTSConnections" –Value 0}
Если в Windows установлен OpenSSH сервер, вы можете подключиться к нему любым ssh клиентом и внести изменения в реестр в локальной ssh сессии.
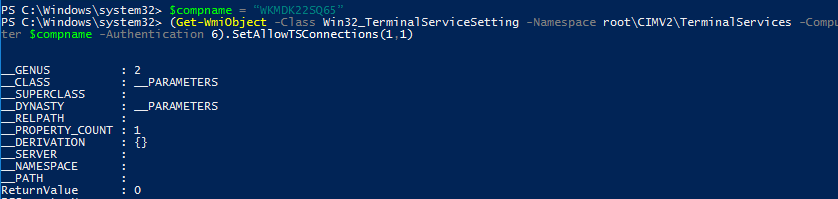
Также вы можете подключиться к удаленному компьютеру и включить RDP через WMI:
$compname = “WKMDK22SQ65”
(Get-WmiObject -Class Win32_TerminalServiceSetting -Namespace root\CIMV2\TerminalServices -Computer $compname -Authentication 6).SetAllowTSConnections(1,1)
Quick Links
-
How to Enable Remote Desktop Connections with Windows 10 Settings
-
How to Enable Remote Desktop Connections with Control Panel
-
Enable Remote Desktop Connections to Windows 7
-
How to Connect to Another PC Using Remote Desktop
Summary
You can enable Remote Desktop in Windows 10 by simply searching the Start Menu for «Remote Desktop settings» and flipping «Enable Remote Desktop» to «On».
Remote Desktop is disabled by default in Windows, but it’s easy enough to turn on if you want your PC to be remote control requests from the network. Today we’ll cover how to enable it from Windows 10 and earlier versions.
Remote Desktop allows you to take remote control over another networked PC. It’s comprised of a Remote Desktop server service that allows connections to the PC from the network and a Remote Desktop client that makes that connection to a remote PC. The client is included in all editions of Windows—Home, Professional, Enterprise, and so on. The server part is only available on Professional and Enterprise versions. This means that you can initiate a Remote Desktop connection from pretty much any PC running Windows, but you can only connect to PCs running a Pro or Enterprise edition.
Of course, if you are running a Home edition of Windows on a PC to which you want to make a connection, you can always use a third party service like TeamViewer, or even Chrome.
We’re covering Windows 10 and earlier versions in this article, but you can also easily enable Remote Desktop connections on Windows 11.
How to Enable Remote Desktop Connections with Windows 10 Settings
To enable Remote Desktop connections, open up the Start Menu and search for «remote desktop settings» to directly access the Remote Desktop panel from the PC Settings app. You could also open up Settings and then search from it within there, but it’s simpler to do it this way.
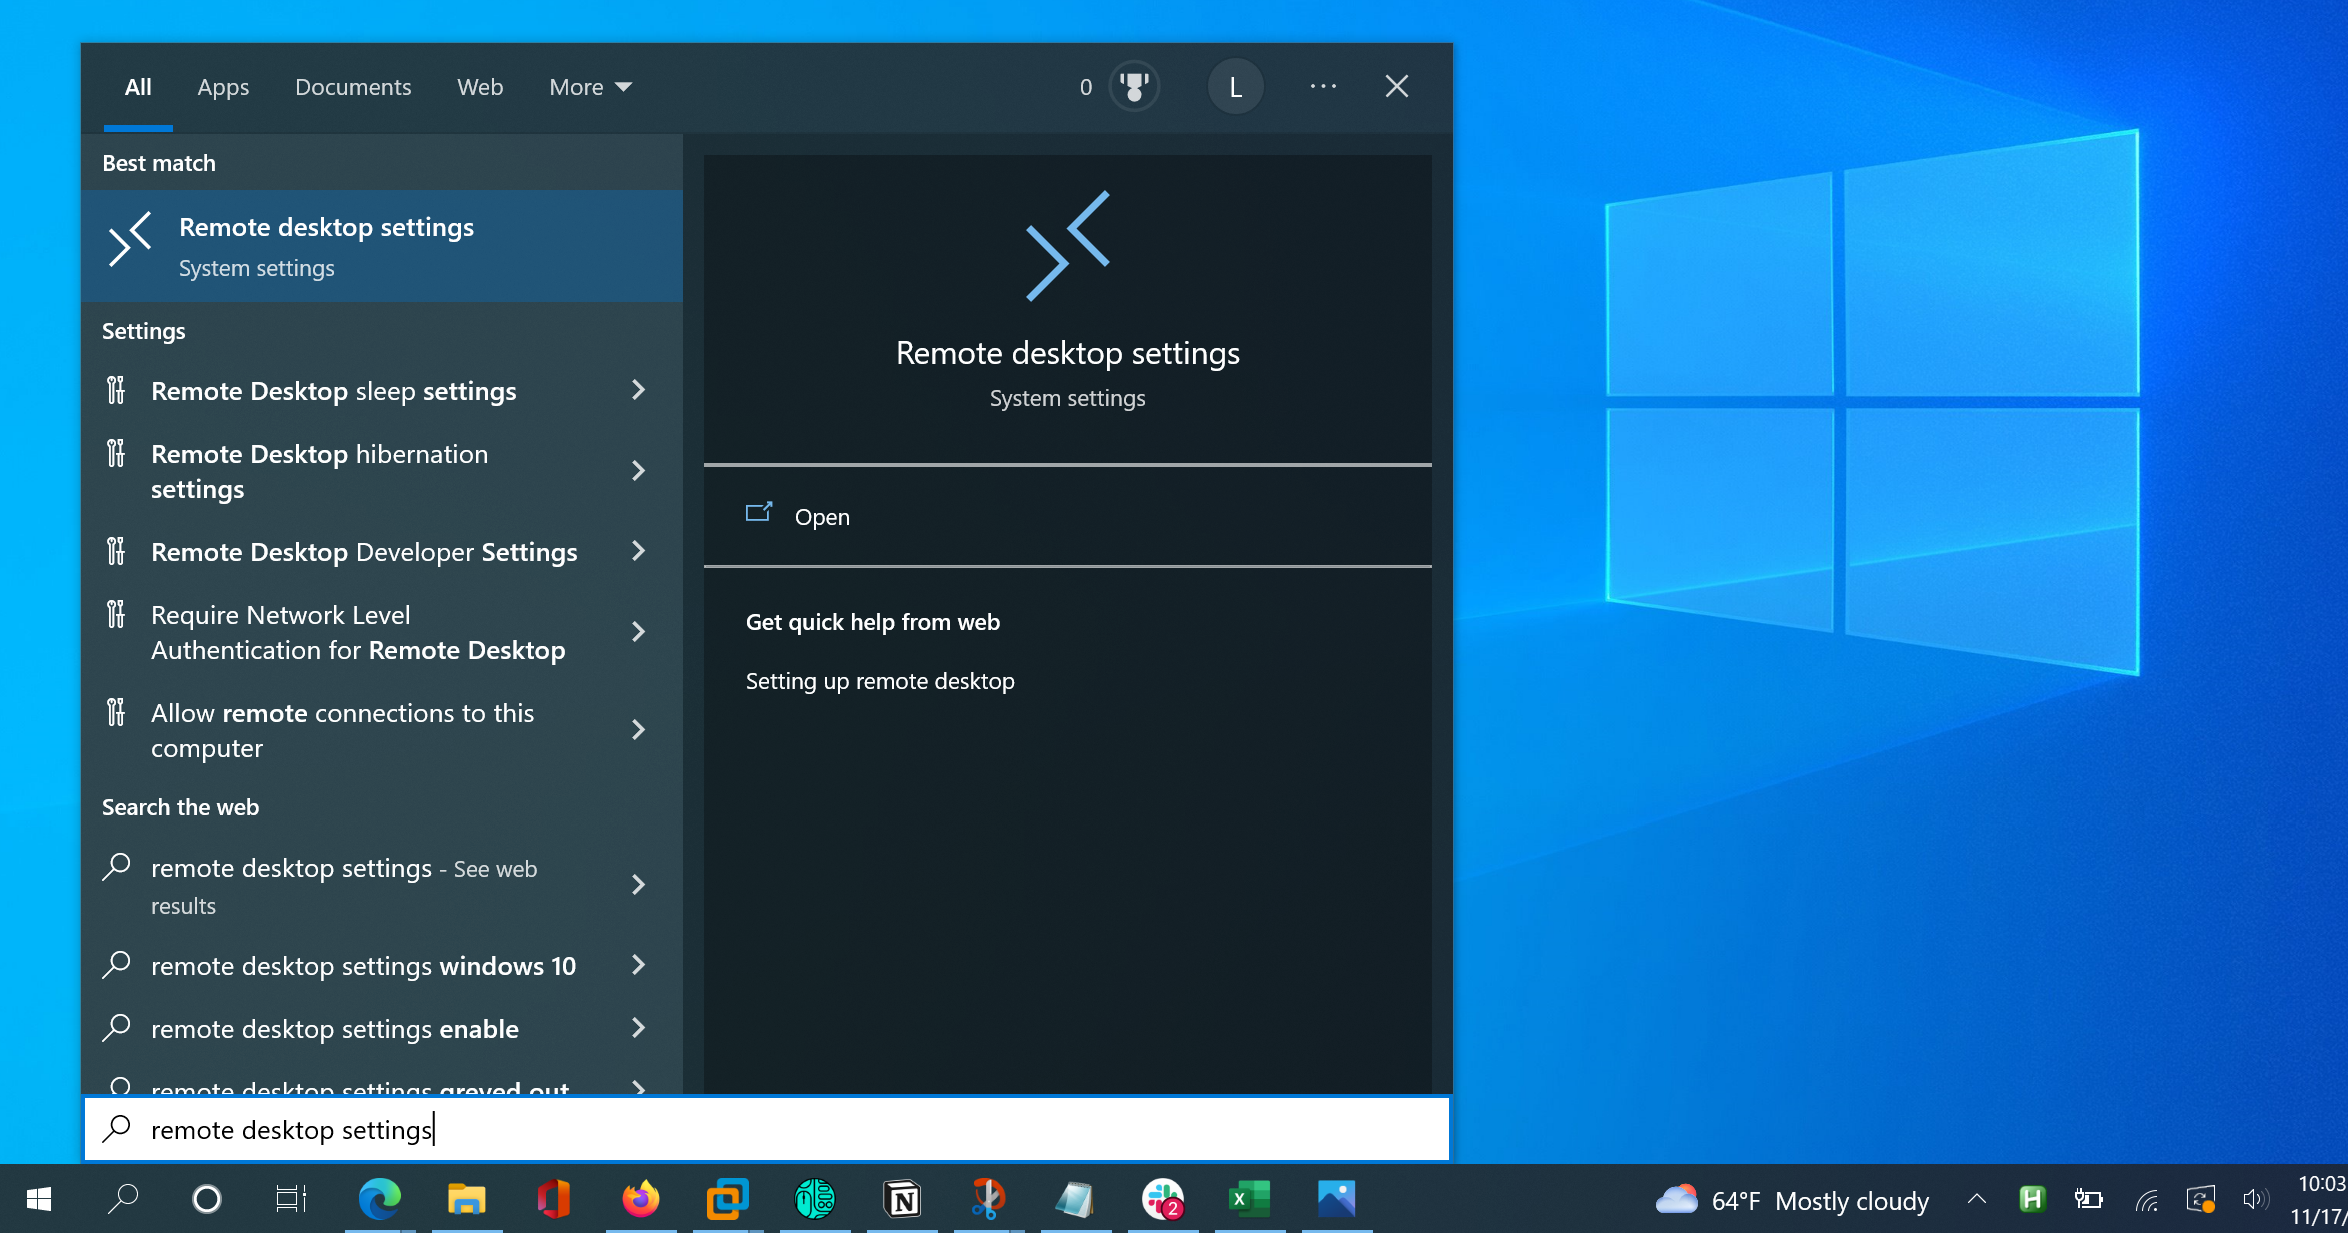
Once you’re at the Remote Desktop settings panel, you can simply flip the «Enable Remote Desktop» toggle from Off to On, which will enable incoming connections from a Remote Desktop client. When you flip the toggle, you’ll be asked to verify that you really meant to do that, and you can simply confirm that you do.

Once Remote Desktop connections are enabled, you’ll be presented with multiple options for keeping your PC awake or making it discoverable, but you’ll have to click through the Show settings for each to get to the details for them.
If you select the Advanced Settings link you can do other things like change the RDP port on Windows 10 or Windows 11, or change whether you are using Network Level Authentication, but those are generally things only advanced users should be doing, so you might want to leave them alone.
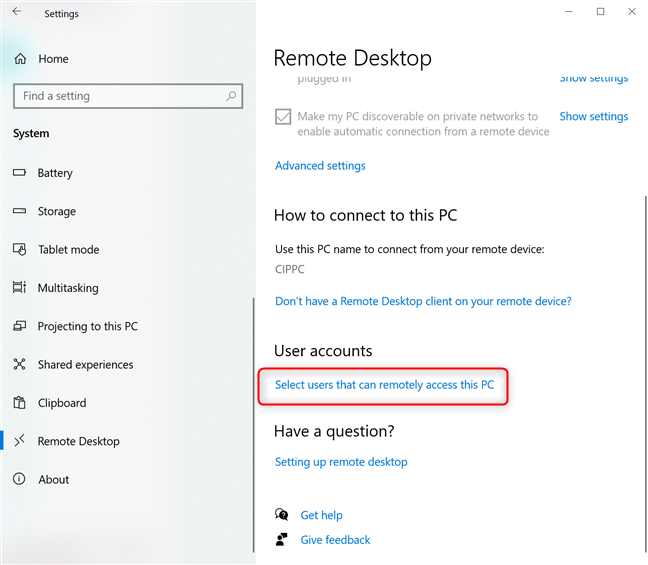
If you scroll down further on the Remote Desktop settings panel, you can click the «Select users that can remotely access this PC» option to choose whether you want specific users to be able to access the PC—but it’s worth noting that accounts with Administrator privileges can automatically access the PC, and you’re almost certainly using an Administrator account if this is your personal PC.
You’ll also note that you can find your PC’s name on this screen, which is handy for when you connect from another computer.
How to Enable Remote Desktop Connections with Control Panel
The old-school Control Panel still exists in Windows 10, and you can use it to enable Remote Desktop connections. For many of us, this is the easiest way to do things.
To enable Remote Desktop Connections with the old Control Panel, use the WIN + R shortcut key combination to pull up the Run dialog, and then type in
sysdm.cpl
and hit the Enter key.
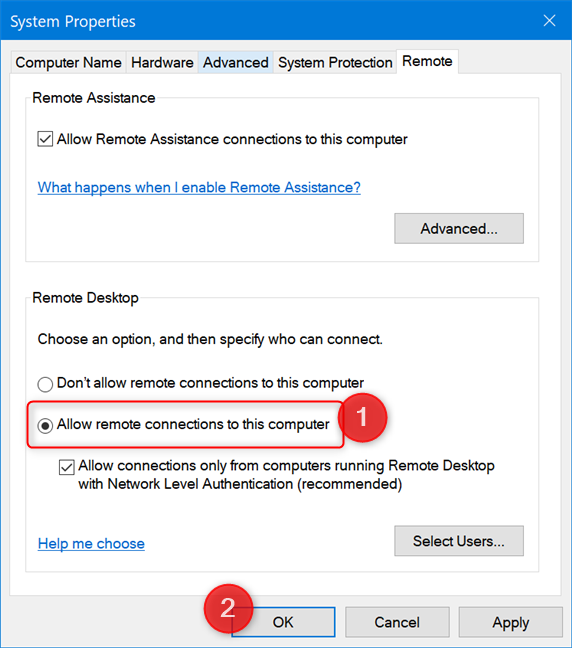
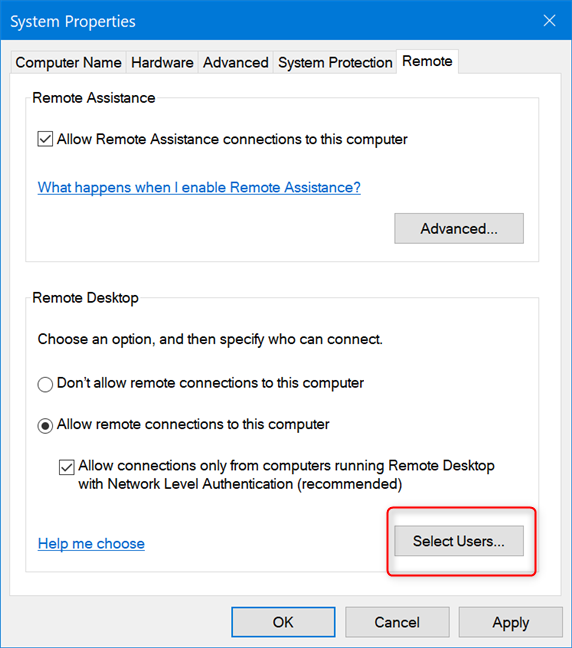
You’ll be presented with the System Properties panel, where you’ll want to switch to the Remote tab on the right. Once you are there, you can simply select «Allow remote connections to this computer» from the Remote Desktop section, click the Apply button, and you’ll be ready to go.
You can use the «Select Users» button to configure exactly which users have access to connect to this PC, but it’s worth noting that users with Administrator access are already enabled by default, so you probably won’t need to bother with this.
In Windows 8 and 10, the option for only allowing connections from PCs running Remote Desktop with Network Level Authentication is also enabled by default. Modern versions of Windows all support this level of authentication, so it’s best to leave it enabled. If you must allow connections from PCs running Windows XP or earlier, you’ll need to disable this option.
Enable Remote Desktop Connections to Windows 7
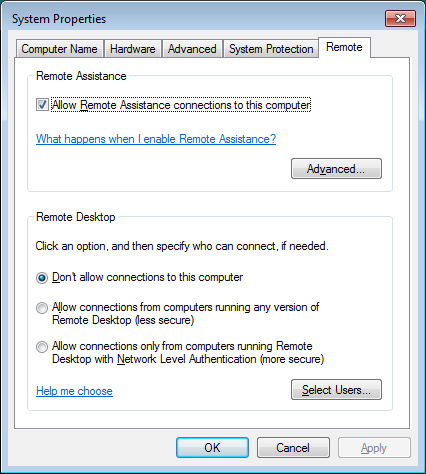
If you’re using Windows 7 or Vista, you’ll want to use the WIN + R shortcut key combination to open the Run Dialog, type in sysdm.cpl, and hit Enter. From there, you’ll select the Remote tab.
Things here work the same as in Windows 10, but are presented in a slightly different way. Notice that you have three distinct options in Windows 7—don’t allow remote access, allow connections from any version of Remote Desktop, and allow only connections that run with Network Level Authentication.
On any version of Windows, you can also click the «Select Users» button to set up specific users that are allowed to make remote connections. When you’re done setting things up, click the «OK» button to have your PC start listening for remote connections.
If you’re planning to connect from other PCs on the same local network, that should be all you have to do. Windows automatically creates exceptions in the Windows Firewall to allow remote connection traffic to get through.
How to Connect to Another PC Using Remote Desktop
You can start a remote connection from those computers by clicking Start, typing «remote,» and then choosing the «Remote Desktop Connection» result. Just type in the name or IP address for the PC to initiate the connection.
If you’re planning to connect to the remote PC over the Internet, you’ll have to do a little extra setup that involves allowing Remote Desktop traffic through your router and forwarding those types of packets to the right PC. Check out our guide to accessing Remote Desktop over the Internet for more information about that.
Remote Desktop connections allow you to connect to a PC or device through the internet or a local network. When you are connecting to a Windows 10 or Windows 7 PC, you see that computer’s desktop, and you can access its apps, files, and folders as if you were sitting in front of its screen. This is useful for IT professionals and business users who have to work remotely. Here is how to enable Remote Desktop Connections in Windows 10 or Windows 7:
NOTE: If you are interested in enabling a Remote Desktop for a Windows 7 PC, skip to the second section of this article. After enabling Remote Desktop Connections on your Windows PC or device, it is a good idea to configure the user accounts that can access your PC remotely. To learn how that is done, read the fourth section of this guide.
How to use the Settings app to enable Remote Desktop on Windows 10
The quickest way to enable Remote Desktop in Windows 10 is from the Settings app. Start Settings by pressing on its shortcut in the Start Menu or hitting the Windows +I keys on your keyboard. Then, open the System category.

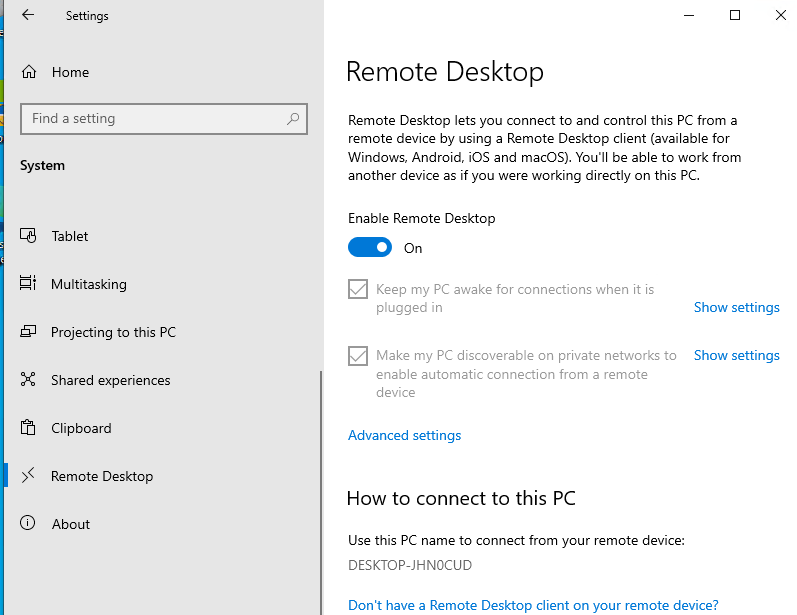
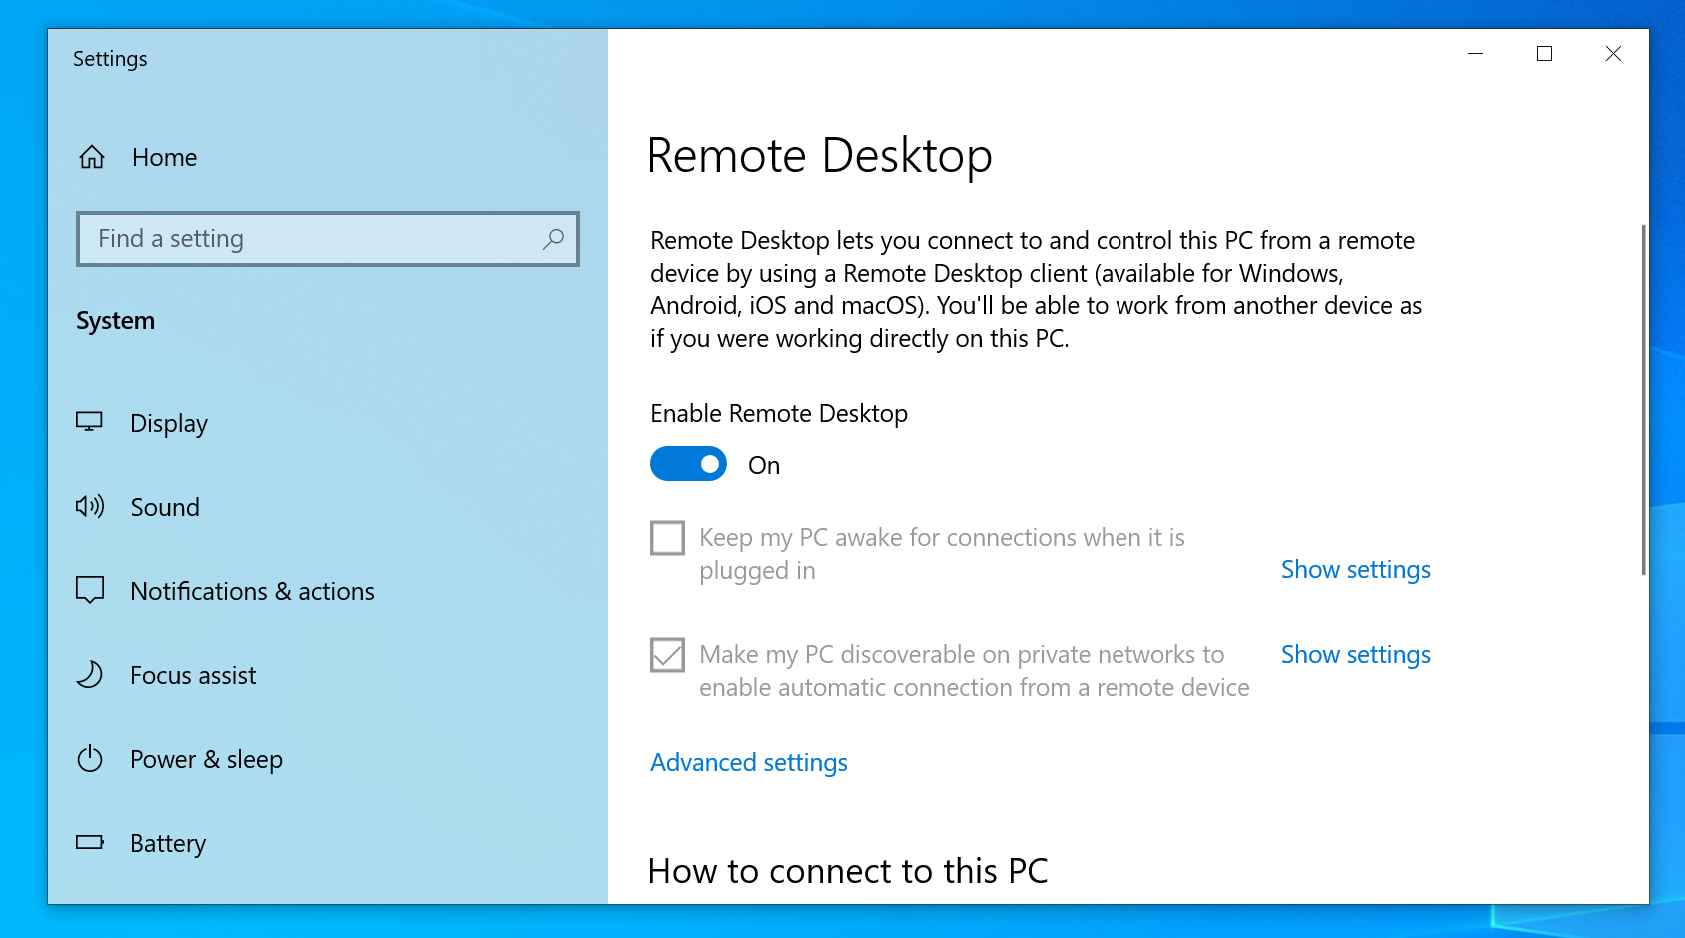
Scroll down to Remote Desktop in the column on the left, and click or tap on it. On the right, you should see a switch for this feature called «Enable Remote Desktop,« as shown in the screenshot below.

Set the «Enable Remote Desktop» switch to On, and Confirm that you want to enable Remote Desktop.
The «Enable Remote Desktop» switch is On, and a couple of settings are shown beneath it, as you can see in the screenshot below:
- «Keep my PC awake for connections when it is plugged in»
- «Make my PC discoverable on private networks to enable automatic connection from a remote device»
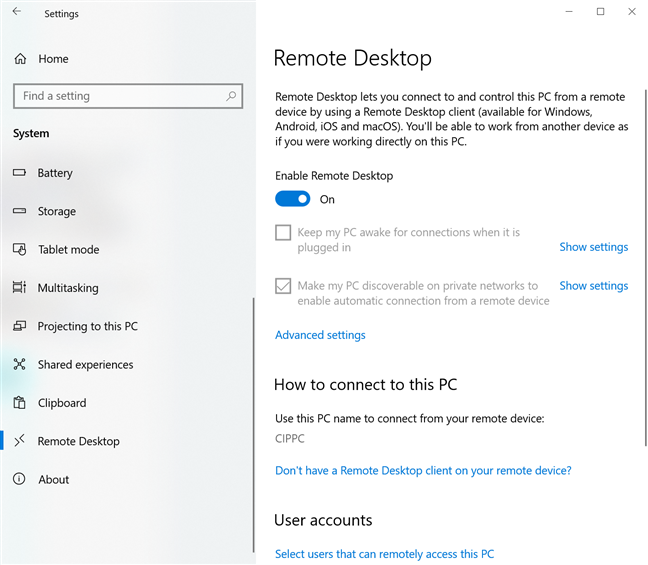
Close the Settings app, and Remote Desktop connections can now be established to your Windows 10 PC. To connect remotely to your PC, read: How to use Remote Desktop Connection (RDC) to connect to a Windows PC.
How to enable Remote Desktop from the Control Panel on Windows 10 or Windows 7
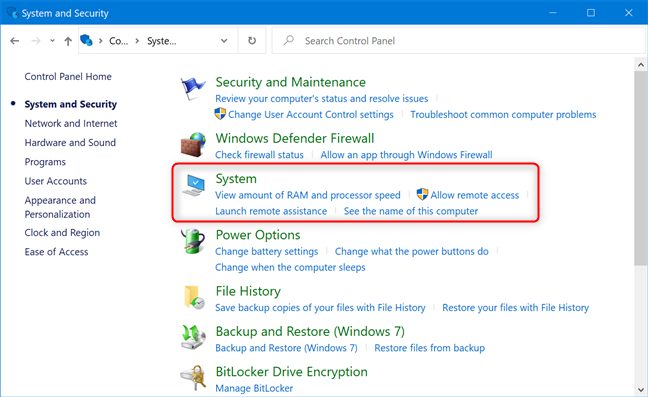
You can also enable Remote Desktop from the Control Panel, no matter which version of Windows you use. However, if you are on Windows 7, the Control Panel is your only option for enabling it. First, open the Control Panel and go to «System and Security -> System.»
On the left side of the System window, click or tap the link called «Remote settings.»
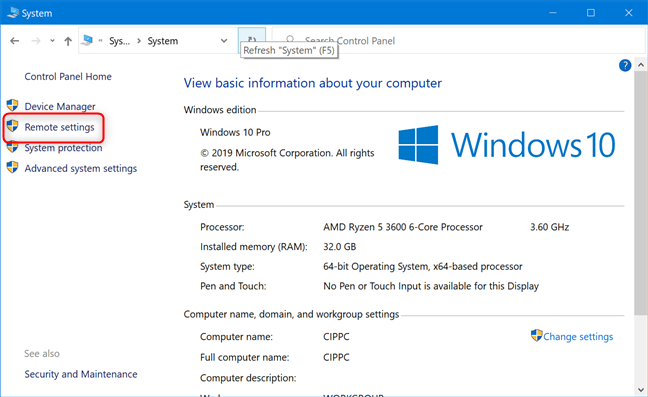
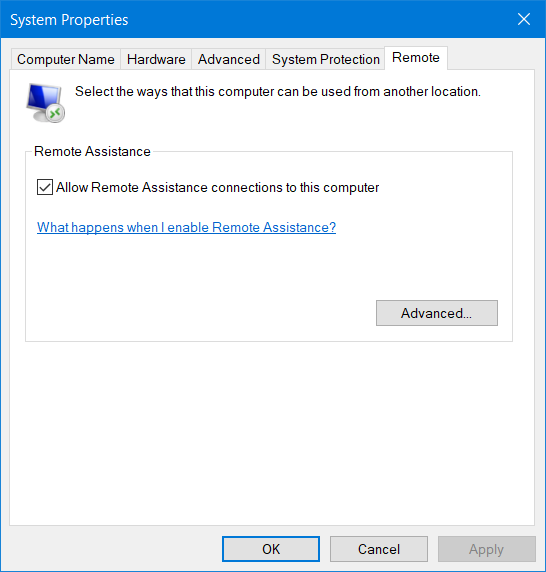
The System Properties window opens. On its Remote tab, go to the Remote Desktop section.
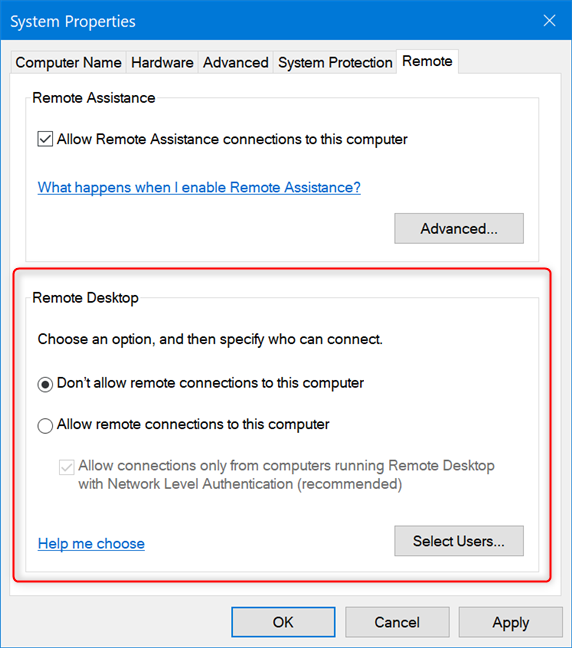
Check the option that says «Allow remote connections to this computer,» and click or tap OK. If you are not sure which version of Remote Desktop is used by the client that is going to connect to your PC, uncheck the option that says: «Allow connections only from computers running Remote Desktop with Network Level Authentication.»
After enabling Remote Desktop, on some Windows 10 PCs, you might also see a warning saying that «This computer is set up to go to sleep or hibernation when not in use. While this computer sleeps or hibernates, people cannot connect to it remotely.» Press OK and you are done.
Important note for Windows 7 users enabling Remote Desktop
In Windows 7, the available Remote Desktop options are organized and named slightly differently. See the screenshot below for details.
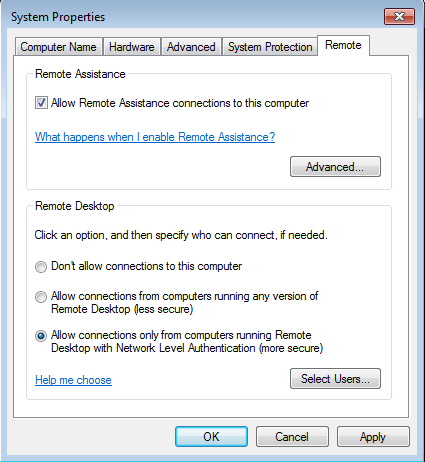
In the Remote Desktop area from Windows 7, choose one of the available settings to enable it:
- «Don’t allow remote connections to this computer» — turns off Remote Desktop.
- «Allow connections from computers running any version of Remote Desktop» — allows users running any version of Remote Desktop Connection to connect to your PC. Use this if you are not sure about the version of Remote Desktop used by the client, or if they are using a third-party Remote Desktop Connection application. For example, Linux clients likely require this option.
- «Allow connections only from computers running Remote Desktop with Network Level Authentication» — restricts Remote Desktop Connections to those running versions of Remote Desktop that have Network Level Authentication. Network Level Authentication was introduced in Remote Desktop Client 6.0. If the client computer is running Windows, or they have recently downloaded the Remote Desktop Connection client, use this option, as it is more secure.
How to select the users that are allowed to connect through Remote Desktop
By default, Windows 10 allows connections only from devices running Remote Desktop with Network Level Authentication. If the client computer or device is running the Remote Desktop Connection (RDC) from Windows, the Microsoft Remote Desktop app from the Microsoft Store, or the Microsoft Remote Desktop app for Android, iOS, or macOS, you should have no issues in connecting to your PC using the login credentials of an administrator account. However, you probably don’t want to give out your administrator credentials to others without good reason. To avoid this situation, you should configure the users allowed to initiate remote desktop connections.
If you have enabled Remote Desktop from the Settings app, click or tap the «Select users that can remotely access this PC» link. This opens the Remote Desktop Users window.
If you have enabled Remote Desktop from the Control Panel, in the System Properties window, click or tap the Select Users button to open the Remote Desktop Users window.
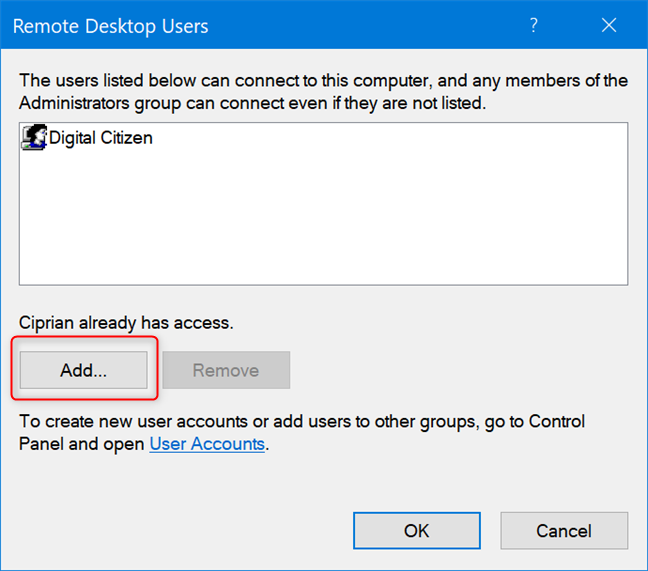
To add the users to whom you want to give permissions, in the Remote Desktop Users window, click or tap on Add.
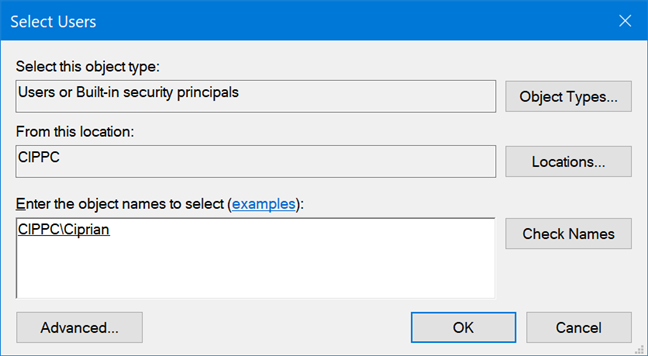
In the Select Users window, type the user account name that you want to give access to, and click or tap on Check Names.
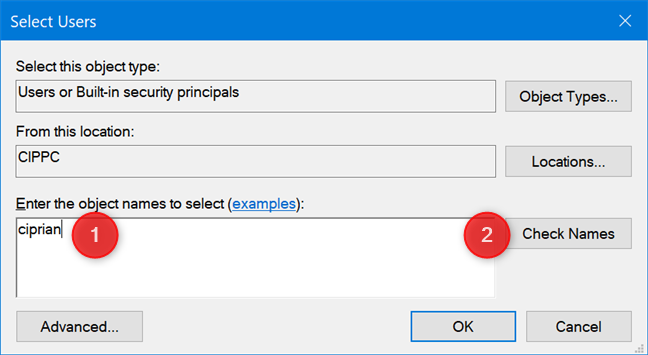
Windows checks that a user account with that name exists and adds the location in front of it if you are using a local account, or completes the email address if you are using a Microsoft account. When done, click or tap on OK.
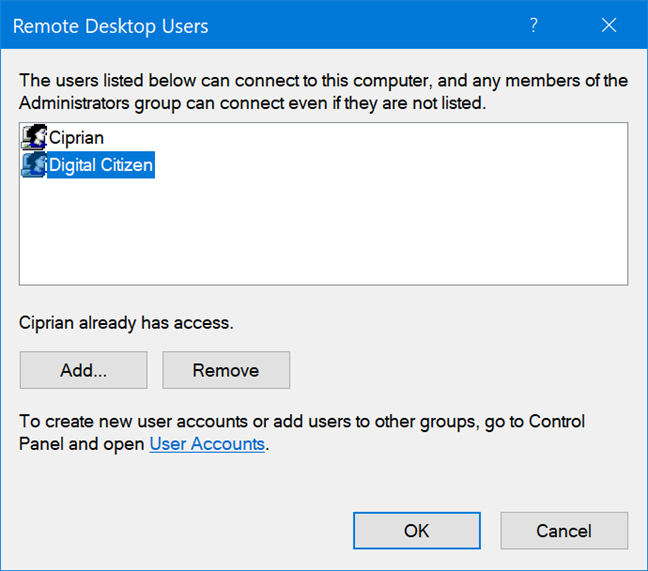
You are back to the «Remote Desktop Users» window where you see the user account you just added. To remove an account from this list, click or tap on it and then press Remove. When you are done setting up the users that can connect to your PC through Remote Desktop, press OK.
Remote Desktop is not available in the Home editions of Windows 10 and Windows 7
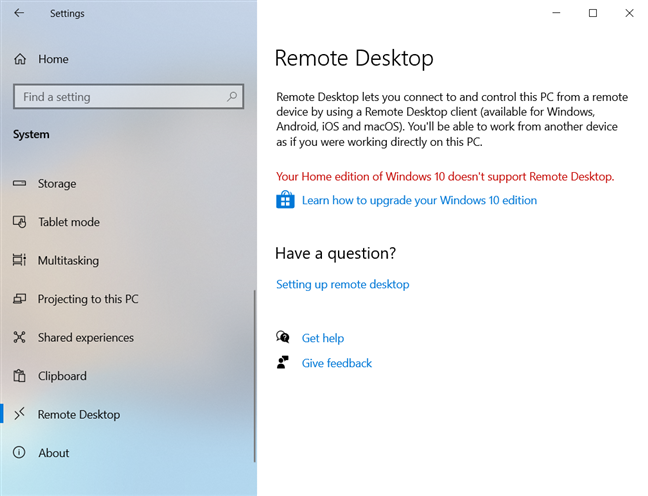
If you run Windows 10 Pro or Enterprise, Windows 7 Professional, Windows 7 Ultimate, or Windows 7 Enterprise, you can enable Remote Desktop. If you run any other edition, like Windows 10 Home or Windows 7 Home, you cannot enable this feature. In Windows 10 Home, when you open the Remote Desktop section in the Settings app, you see this message: «Your Home edition of Windows 10 doesn’t support Remote Desktop.»
When you’re using a Home edition of Windows and you open the System Properties window, you do not see any settings or notes related to Remote Desktop.
Did you succeed in enabling Remote Desktop on your Windows PC?
After you enable Remote Desktop on your Windows 10 or Windows 7 PC, other users, including yourself, can connect to it remotely. Any devices running Linux, macOS, or Windows can connect using the Remote Desktop protocol, if they know the appropriate details like the IP address of your computer, and the user account allowed to connect remotely. Before closing this tutorial, tell us whether you succeeded in enabling Remote Desktop.