
Друзья!
Буквально на днях я столкнулся с проблемой включения «Удаленного рабочего стола» на системе Windows 7.
Многие тут же подумали:«Ай, да наверняка у него стоит какая-нибудь Win 7 Home Premium или вообще Starter». Однако это совсем не так. У меня полноценная Windows 7 x64 Professional, в которой казалось бы все должно заработать моментально и без оговорок.
Стандартный алгоритм включения
Заходим в свойства компьютер Пуск->Компьютер(правый клик)->Свойства
Слева в списке выбираем «Настройка удалённого доступа»
В разделе «Удалённый рабочий стол» выбираем второй или третий пункт. Различие: второй пункт — любые ОС, третий — Vista и выше
Жмем кнопку выбрать пользователей и добавляем нужных. (Например своего пользователя на этом компьютере. Или вы можете создать отдельного пользователя для удаленного рабочего стола)
Настройка закончена
У меня это всё выглядело совсем иначе. И пункт номер 3 был для меня недоступен. Пункты есть, но они — disabled.
Примерно вот так у меня выглядели настройки включения RDP
Различного рода поиски не привели меня к однозначному и ясному ответу на вопрос: «Что же делать с такой ерундой»?
Только куски разрозненной информации, которые мне хотелось бы свести воедино. Справившись с этой небольшой проблемой, я решил, что таки стоит поделится ее решением с общественностью.
Итак, приступим.
Нам потребуется:
- Компьютер
- Глазка/руки/голова
- Права администратора
Нестандартный алгоритм включения
1. Идем в службы (Пуск->Панель управления->Администрирование->Службы)
2. Находим там брендмауэр Windows. Ставим ему автоматический запуск, и запускаем службу.
Примерно вот так:
3. Идем в локальные политики безопасности (Пуск->Панель управления->Администрирование->Локальная политика безопасности ИЛИ Пуск->Выполнить->Вводим secpol.msc)
4. Выбираем там Брэндмауэр Windows в режиме повышенной безопасности — Объект локальной групповой политики -> Правила для выходящих подключений.
5. В правой части оснастки выбираем по правому клику мыши «Создать правило». Далее по шагам (каждый пункт — ссылка на картинку с шагом):
- В списке выбираем «Настраиваемые»
- Все программы
- Тип протокола — выбираем TCP. Локальный порт — 3389. Удалённый порт — все порты
- Любые ip-адреса (если вы хотите заходит из любого места, если не уверены, разрешите все)
- Разрешить подключение
- Отмечайте те сети, в которых вы хотели бы, чтобы ваш компьютер принимал эти соединения
- Задайте имя новому правилу
В конце концов, вы должны получить что-то вроде этого:
6. Заходим в редактор локальной групповой политики (Пуск -> Выполнить -> gpedit.msc).
7. Конфигурация компьютера -> Административные шаблоны -> Компоненты Windows -> Службы удалённый рабочих столов -> Узел сеансов удаленный рабочих столов -> Подключения
8.Далее вы можете сами решить, что же вам нужно. Обязательным является включение опций:
- Разрешать удаленное подключение с использование служб удаленных рабочих столов
- Устанавливает правила удаленного управления для пользовательских сеансов служб удаленного рабочего стола (значение параметра выберите сами, я поставил лично для себя «Полный контроль без разрешения клиента»).
Итого у вас получится:
9. Заходим в свойства компьютер Пуск->Компьютер(правый клик)->Свойства
10. Слева в списке выбираем «Настройка удалённого доступа»
11. В разделе «Удалённый рабочий стол» выбираем второй или третий пункт. Различие: второй пункт — любые ОС, третий — Vista и выше.
12. Жмем кнопку выбрать пользователей и добавляем нужных. (Например своего пользователя на этом компьютере. Или вы можете создать отдельного пользователя для удаленного рабочего стола)
В общем и целом после этого я смог подключаться к данному компьютеру удалённо без каких-либо вопросов.
Спасибо за внимание!
Протокол Remote Desktop Protocol (RDP) позволяет удаленно подключиться к рабочему столу компьютера с Windows и работать с ним, как будто это ваш локальный компьютер. По умолчанию RDP доступ в Windows запрещен. В этой статье, мы покажем, как включить и настроить RDP доступ в Windows 10 и Windows Server 2016/2019.
Содержание:
- Включаем удаленный рабочий стол в Windows 10
- Как включить RDP доступ с помощью PowerShell?
- RDP доступ к Windows Server 2016/2019
- Включение RDP с групповых политик в домене Active Direcrtory
- Как удаленно включить RDP на компьютере Windows?
Включаем удаленный рабочий стол в Windows 10
Самый простой способ включить RDP доступ в Windows – воспользоваться графическим интерфейсом.
Откройте свойства системы через панель управления, или выполнив команду SystemPropertiesRemote.
Перейдите на вкладку Remote Settings (Удаленный доступ), включите опцию Allow remote connection to this computer (Разрешить удалённые подключения к этому компьютеру).
В целях безопасности желательно разрешить подключение только с клиентов RDP с поддержкой протокола NLA (Allow connections only from computers running Remote Desktop with Network Level Authentication/ Разрешить подключение только с компьютеров, на которых работает удаленный рабочий стол с проверкой подлинности на уровне сети).

Сохраните изменения, нажав ОК.
По умолчанию право на подключение к компьютеру через RDP есть только у членов группы локальных администраторов. Если вам нужно разрешить RDP доступ другим пользователям, нажмите кнопку Select Users.
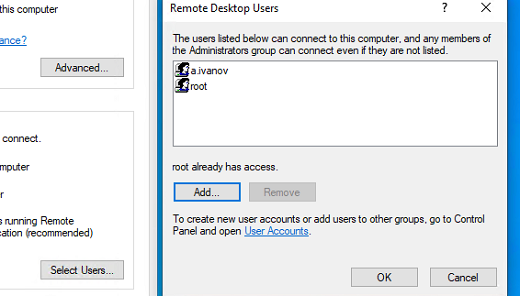
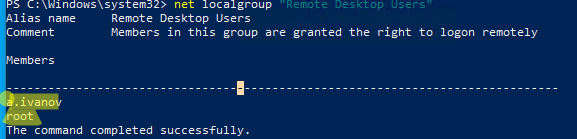
Все пользователи, которых вы укажете здесь будет добавлены в локальную группу Remote Desktop Users. Вы можете в командной строке вывести список пользователей в этой группе:
net localgroup "Remote Desktop Users"
или
net localgroup “Пользователи удаленного рабочего стола”
Чтобы добавить нового пользователя в группу доступа RDP, выполните:
net localgroup "Remote Desktop Users" /add publicuser
В русской версии Windows измените название группы на “Пользователи удаленного рабочего стола”.
В новых билдах Windows 10 классическая панель для включения RDP доступа теперь спрятана и Microsoft рекомендует пользоваться новой панелью Setting.
- Перейдите в Settings -> System —> Remote Desktop;
- Включите опцию Enable Remote Desktop;

- Подтвердите включение RDP на компьютере.
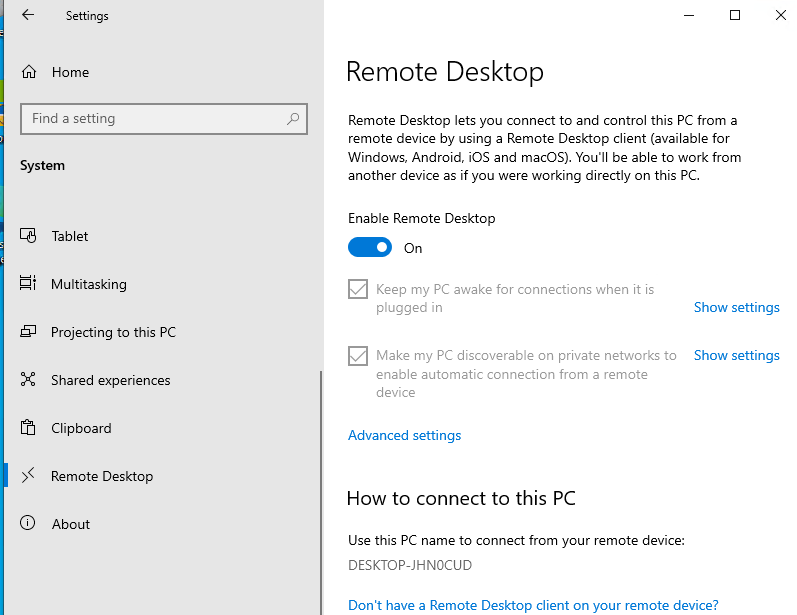
Обратите внимание, что вы не можете включить RDP доступ к редакции Windows 10 Home. RDP сервер работает только на Windows 10 Pro и Enterprise. Впрочем, есть обходное решение.
Обратите внимание, что по умолчанию при включении Remote Desktop, включаются две опции:
- Keep my PC awake for connection when it is plugged in ;
- Make my PC discoverable on private networks to enable automatic connection from a remote device
На жмите на ссылку “Advanced settings”. Здесь можно включить использование протокола “Network Level Authentication” для RDP подключений (рекомендуется).
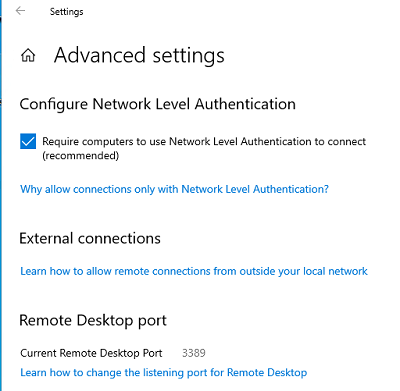
Если на компьютере включен Windows Defender Firewall (брандмауэр), то нужно проверить, что в нем разрешены входящие RDP подключения. По умолчанию для RDP подключений используется порт TCP
3389
, а в последних билдах Windows также используется
UDP 3389
( см. статью про кейс с черным экраном вместо рабочего стола при RDP доступе).
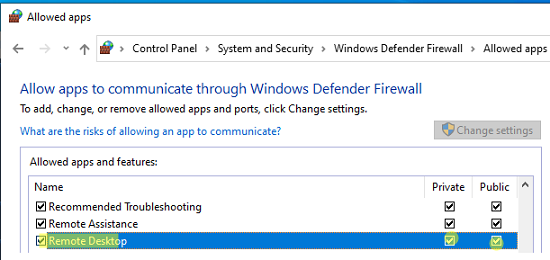
Перейдите в панель управления и выберите элемент Windows Defender Firewall. Откройте список стандартных правил брандмауэра Windows, щелкнув в левом столбце по ссылке Allow an app or feature through Windows Firewall.
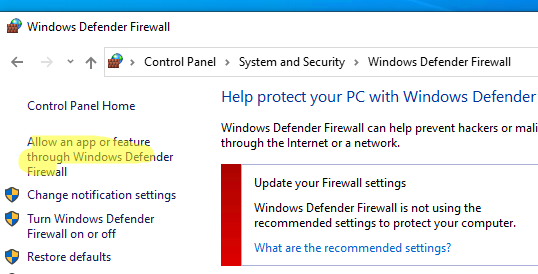
Проверьте, что правило Remote Desktop включено для профиля Private (домашняя или рабочая сеть) и, если необходимо, для профиля Public (общедоступные сети).
Подробнее про типы сетей и профили брандмауэра Windows здесь.
Если нужно, вы можете дополнительно ограничить длительность RDP сессий с помощью GPO.
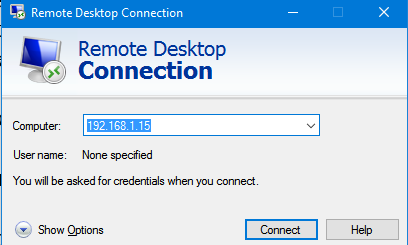
Теперь к данному компьютеру можно подключится с помощью RDP клиента. Встроенный RDP клиент Windows –
mstsc.exe
. Он сохраняет всю историю RDP подключений с компьютера. Поддерживается копирование файлов между локальным и удаленным компьютером прямо через буфер обмена RDP.
Также вы можете использовать менеджеры RDP подключений, такие как RDCMan или mRemoteNG, или альтернативные клиенты.
Для удобства пользователей пароль для RDP подключения можно сохранить в Windows Credential Manager.
Как включить RDP доступ с помощью PowerShell?
Вы можете включить RDP доступ в Windows с помощью пары PowerShell команд. Это гораздо быстрее:
- Запустите консоль PowerShell.exe с правами администратора;
- Включите RDP доступ в реестре с помощью командлета Set-ItemProperty:
Set-ItemProperty -Path 'HKLM:\System\CurrentControlSet\Control\Terminal Server' -name "fDenyTSConnections" -value 0Чтобы закрыть RDP доступ, измените значение fDenyTSConnections на 1.
- Разрешите RDP подключения к компьютеру в Windows Defender Firewall. Для этого включите предустановленное правило :
Enable-NetFirewallRule -DisplayGroup "Remote Desktop"
- Если нужно добавить пользователя в группу в локальную группу RDP доступа, выполните:
Add-LocalGroupMember -Group "Remote Desktop Users" -Member 'a.petrov'

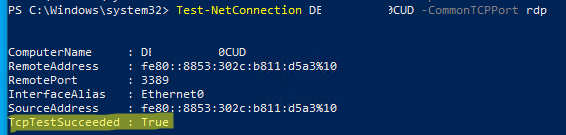
Чтобы проверить, что на компьютере открыт RDP порт, воспользуйтесь командлетом Test-NetConnection:
Test-NetConnection -ComputerName deskcomp323 -CommonTCPPort rdp
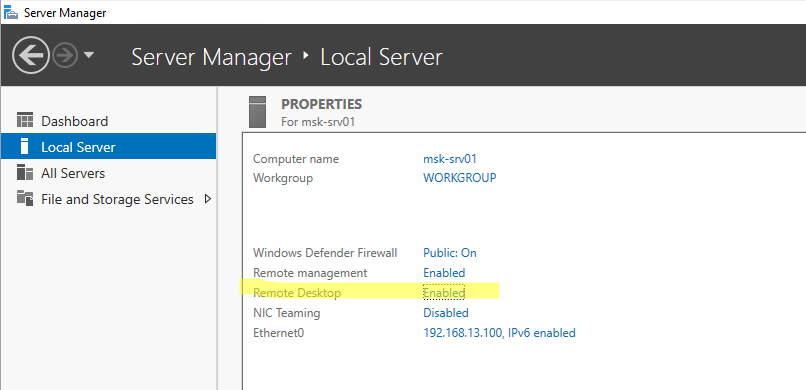
RDP доступ к Windows Server 2016/2019
В отличии от десктопной редакции Windows 10, в Windows Server по умолчанию поддерживается два одновременных RDP подключения. Эти подключения используются администраторами для управления сервером.
Включается RDP в Windows Server аналогично. Через SystemPropertiesRemote, через Server Manager или командами PowerShell, рассмотренными выше.
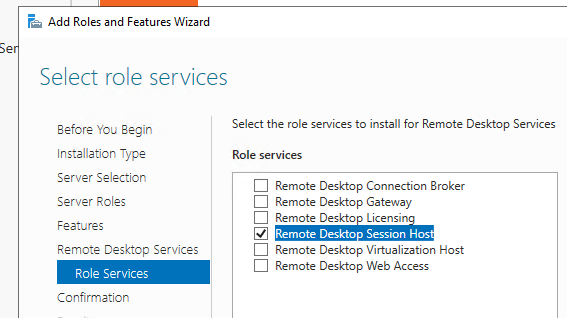
Вы можете использовать Windows Server в качестве терминального сервера. В этом случае множество пользователей могут одновременно подключаться к собственному рабочему столу на сервере. Для этого нужно установить и настроить на сервере роль Remote Desktop Session Host. Это требует приобретения специальных RDS лицензии (CAL). Подробнее о RDS лицензировании здесь.
Для дополнительно защиты RDP сессий можно использовать SSL/TLS сертификаты.
Включение RDP с групповых политик в домене Active Direcrtory
Если вам нужно включить RDP доступ сразу на большом количестве компьютеров, можно воспользоваться групповыми политиками (GPO). Мы подразумеваем, что все компьютеры включены в домен Windows.
- Запустите консоль управления доменными GPO
gpmc.msc
; - Создайте новую (или отредактируйте уже существующую) групповую политику и привяжите ее к целевой OU с компьютерами или серверами;
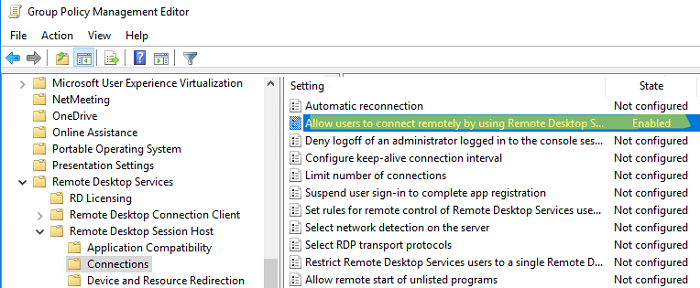
- Переключитесь в режим редактирования политики и перейдите в секцию GPO Computer Configuration -> Administrative Templates -> Windows Components -> Remote Desktop Services -> Remote Desktop Session Host -> Connections;
- Найдите и включите политику Allow Users to connect remotely by using Remote Desktop Services, установив ее в Enable;
- Обновите параметры групповых политик на клиентах;
- После применения данной политики вы сможете подключится ко всем компьютерам по RDP (политика применится как к десктопным клиентам с Windows 10, так и к Windows Server). Если нужно, вы можете более тонко нацелить политики на компьютеры с помощью WMI фильтров GPO.
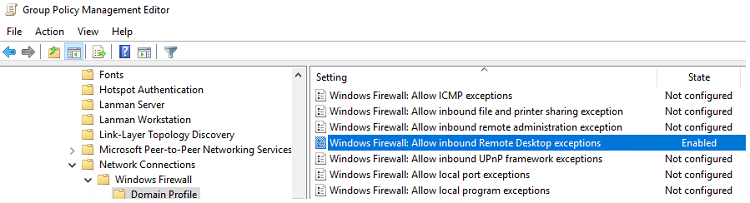
- Если на компьютерах включен Windows Defender Firewall, нужно в этой же GPO разрешить RDP-трафик для доменного профиля. Для этого нужно активировать правило Windows Firewall: Allow inbound Remote Desktop Exceptions (находится в разделе Computer Configuration -> Administrative Templates -> Network -> Network Connections -> Windows Firewall -> Domain Profile).
Подробнее о настройке правил брандмаура Windows через GPO рассказано здесь.
Как удаленно включить RDP на компьютере Windows?
Также вы можете удаленно включить RDP на любом компьютере Windows. Для этого у вас должен быть удаленный доступ к этому компьютеру (через PowerShell или WMI) и ваша учетная запись состоять в группе локальных администраторов на этом компьютере.
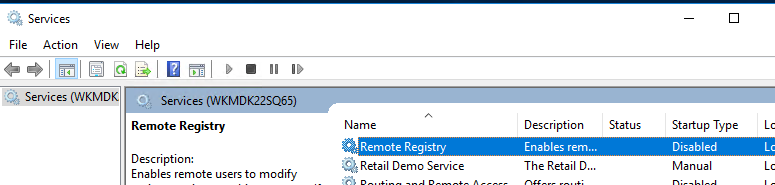
Вы можете удаленно включить RDP через реестр. Для этого на удаленном компьютере должна быть включена служба Remote Registry (по умолчанию она отключена). Чтобы запустить службу:
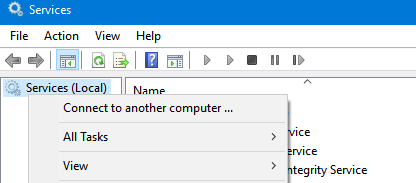
- Запустите консоль управления службами (
services.msc
); - Выберите Connect to another computer и укажите имя удаленного компьютера;
- Найдите в списке службу Remote Registry, измените тип запуска на Manual (ручной) и затем запустите службу – Start.
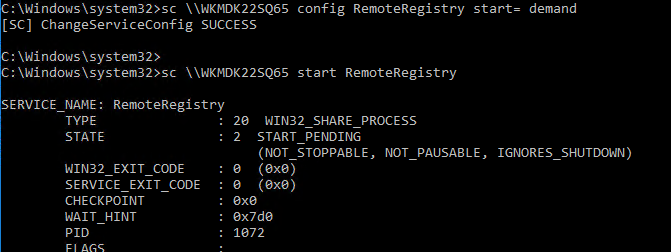
Тоже самое можно выполнить удаленно из командной строки с помощью встроенной утилиты
sc
(позволяет создавать, управлять или удалять службы Windows):
sc \\WKMDK22SQ65 config RemoteRegistry start= demand
sc \\WKMDK22SQ65 start RemoteRegistry
Затем на локальном компьютере
- Запустите редактор реестра
regedit.exe - Выберите в меню Файл пункт Connect Network Registry (Подключить сетевой реестр)
- Укажите имя или IP адрес удаленного компьютера, на котором нужно включить службу RDP;
- Перейдите в раздел
HKEY_LOCAL_MACHINE\SYSTEM\CurrentControlSet\Control\Terminal Server
; - Найдите параметр fDenyTSConnections (тип REG_DWORD). Если данный ключ отсутствует – создайте его. Измените его значение на 0, чтобы включить RDP.
Для отключения RDP доступа нужно изменить значение fDenyTSConnections на 1.
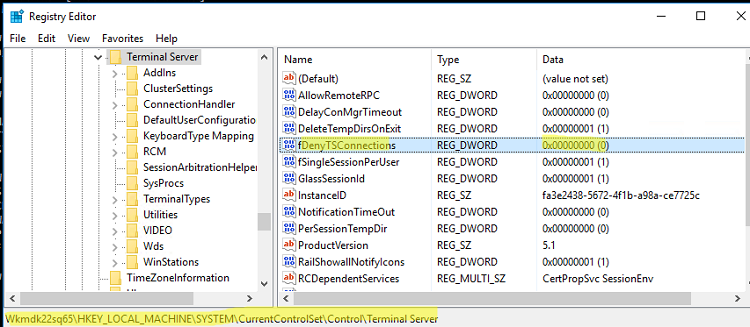
Сразу после этого без перезагрузки удаленный компьютер должен стать доступным по RDP.
Но гораздо быстрее можно включить RDP в реестре удаленого компьютера через командную строку:
REG ADD "\\WKMDK22SQ65\HKLM\SYSTEM\CurrentControlSet\Control\Terminal Server" /v fDenyTSConnections /t REG_DWORD /d 0 /f
Если на удаленном компьютере настроен PowerShell remoting, вы можете выполнить на нем удаленную команду через Invoke-Command:
Invoke-Command -Computername WKMDK22SQ65 -ScriptBlock {Set-ItemProperty -Path "HKLM:\System\CurrentControlSet\Control\Terminal Server" -Name "fDenyTSConnections" –Value 0}
Если в Windows установлен OpenSSH сервер, вы можете подключиться к нему любым ssh клиентом и внести изменения в реестр в локальной ssh сессии.
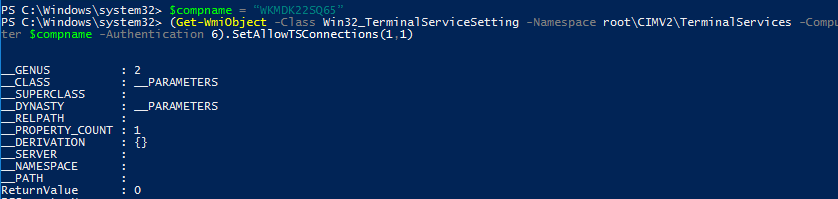
Также вы можете подключиться к удаленному компьютеру и включить RDP через WMI:
$compname = “WKMDK22SQ65”
(Get-WmiObject -Class Win32_TerminalServiceSetting -Namespace root\CIMV2\TerminalServices -Computer $compname -Authentication 6).SetAllowTSConnections(1,1)
Remote Desktop Protocol (RDP) is a proprietary protocol developed by Microsoft that allows users to connect to another computer over a network connection. Enabling Remote Desktop on Windows 7 is a versatile tool that can help you manage your PC remotely, making it easier to access files or applications when you are away from your workstation. In this comprehensive article, we will guide you step-by-step through the processes required to enable Remote Desktop on Windows 7.
Understanding Remote Desktop RDP
Before diving into the technical aspects of enabling RDP, it’s essential to understand what Remote Desktop entails. The Remote Desktop feature enables a user to control a PC from another computer, as if they were sitting right in front of it. It allows for remote working, technical support, and file access, all without being physically present in the same location.
System Requirements for Remote Desktop RDP
For Remote Desktop to function correctly, your system must meet certain requirements. Here are the fundamental prerequisites:
-
Windows 7 Edition: Remote Desktop is available only on Windows 7 Professional, Ultimate, and Enterprise editions. If you have Windows 7 Home Basic or Home Premium, native support for Remote Desktop is not available, although you can use third-party software as an alternative.
-
Network Configuration: Ensure that both computers (the one you are connecting from and the one you wish to connect to) are connected to the same network or have accessible internet configurations.
-
Firewall Settings: The firewall settings on the host computer should allow Remote Desktop connections. Ensure that port 3389 is open to enable RDP communication.
-
User Permissions: The user account you intend to use for Remote Desktop access must have permission to access the device remotely.
Step 1: Configuring Remote Desktop Settings on Windows 7
-
Accessing System Properties:
- Click on the Start button.
- Right-click on Computer and then select Properties.
- In the System window, select Remote settings from the left-hand panel.
-
Enabling Remote Desktop:
- In the Remote tab, you will see the Remote Desktop settings.
- Choose the option that best suits your security and access needs:
- Don’t allow connections to this computer (the default).
- Allow connections from computers running any version of Remote Desktop (less secure).
- Allow connections only from computers running Remote Desktop with Network Level Authentication (more secure) (recommended).
- Click on Apply and then OK to save the settings.
-
Select Users for Remote Desktop Access:
- If you opted for the second or third option, you will need to specify which user accounts can connect remotely.
- Click on the Select Users button.
- In the Remote Desktop Users window, you can add user accounts by clicking Add. Enter the usernames of those you want to grant access to, or use the Advanced button to search for users.
Step 2: Configuring Firewall Settings
Windows employs a firewall to augment security, but this can also prevent Remote Desktop connections. The built-in Windows Firewall can be configured to allow RDP connections.
-
Accessing Windows Firewall:
- Click on the Start button, go to Control Panel, and click on System and Security.
- Now, click on Windows Firewall.
-
Allowing Remote Desktop Through the Firewall:
- In the left panel, click on Allow a program or feature through Windows Firewall.
- Click on Change settings.
- Scroll down to find Remote Desktop and ensure both Private and Public boxes are checked (if you want connections on both types of networks).
- Click OK to save changes.
Step 3: Finding Your Computer’s IP Address and Computer Name
In order to connect remotely, you need to know the IP address or the computer name of the host computer.
-
Finding Your Computer’s IP Address:
- Open the Command Prompt by typing
cmdin the Start Menu search box and hit Enter. - In the Command Prompt window, type
ipconfigand press Enter. - Look for the line labeled IPv4 Address. This is your computer’s IP address.
- Open the Command Prompt by typing
-
Finding Your Computer Name:
- Right-click on Computer and select Properties.
- Your computer name will be displayed in the window under Computer name, domain, and workgroup settings.
Step 4: Connecting to the Host Computer from Another Device
Now that you have enabled Remote Desktop and configured your firewall settings, you can connect to the remote computer using another Windows machine.
-
Using Remote Desktop Connection:
- On the client device (the one you want to connect from), click on the Start button.
- In the search box, type
Remote Desktop Connectionand press Enter. - In the Remote Desktop Connection window, enter the IP address or computer name of the host computer you want to connect to.
- Click on Connect.
-
Entering Credentials:
- You will be prompted to enter the username and password of the account allowed for Remote Desktop access. Enter the correct credentials and click OK.
-
Adjusting Display Options (Optional):
- Before connecting, you can adjust settings such as display resolution by clicking on Show Options. This allows you to customize how the Remote Desktop session will appear.
-
Disconnecting the Remote Session:
- Once you are done, you can disconnect the session by clicking on the Start menu in the remote session and selecting Disconnect.
Step 5: Troubleshooting Common Problems
Even after following all these steps, you might run into some issues while trying to connect via Remote Desktop. Here are some common problems and their fixes:
-
Connection Failed: Make sure the host computer is turned on and not in sleep mode. Also, double-check the IP address or computer name.
-
Access Denied Errors: Ensure the user account you are trying to connect with has been added under the Remote Desktop Users in the Remote settings.
-
Firewall Blocking Connection: Review the firewall settings and ensure that Remote Desktop is allowed. You can temporarily disable the firewall on the host computer to test if this is the issue.
-
Network Issues: If connecting over the internet, ensure that proper port forwarding has been established on your network router to redirect port 3389 to the local machine.
-
Compatibility Issues: Using a Remote Desktop client that is not compatible with the version of your RDP installation can lead to connection failures. Ensure you are using compatible software.
Step 6: Using RDP with a Dynamic IP Address
If your host computer has a dynamic IP address, it may change over time, which complicates remote connections. Here’s how to manage this issue:
-
Dynamic DNS Services: Register with a Dynamic DNS (DDNS) service. This service allows a domain name to be mapped to a dynamic IP address, which automatically updates whenever the IP address changes.
-
Configuring Router for DDNS: Many routers support DDNS configuration directly. Access your router’s settings and look for a Dynamic DNS option. Input your DDNS account details to keep your hostname updated.
Enhanced Security Measures for Remote Desktop
While Remote Desktop is a powerful tool, it can also pose security risks. Here are some recommended best practices:
-
Use Strong Passwords: Ensure that all user accounts that have RDP access are protected by strong and complex passwords.
-
Network Level Authentication (NLA): Enabling NLA requires the user to authenticate before a session is established, adding an extra layer of security.
-
Limit Access: Only allow necessary users to have Remote Desktop access. This minimizes potential security breaches.
-
Regular Updates: Keep your Windows operating system updated to defend against vulnerabilities that could be exploited by attackers.
-
Consider Using a VPN: For added security, consider connecting to your home network via a Virtual Private Network (VPN). This ensures your RDP traffic is encrypted and secured.
-
Logging and Monitoring: Enable logging features that monitor Remote Desktop access. Regularly review logs to ensure there aren’t any unauthorized access attempts.
Conclusion
Enabling Remote Desktop Protocol on Windows 7 can significantly enhance your ability to manage and control your PC remotely. By following the steps outlined in this article, you can set up RDP efficiently while taking the necessary precautions to secure your connections. Whether you’re working from home, traveling, or providing tech support, RDP becomes a critical tool that supports modern workflows. Make sure to stay informed about the best practices and security measures to keep your remote sessions safe and effective.
Remote Desktop Protocol (RDP) is a useful feature that allows you to connect to another computer remotely. Whether you’re managing servers, troubleshooting issues, or accessing files from another location, RDP can simplify your work. In this guide, we’ll cover how to allow Remote Desktop connection connections on Windows 7, including enabling the feature, configuring settings, and addressing potential issues. Let’s dive in!
Understanding RDP on Windows 7
Windows 7 offers built-in support for Remote Desktop, but the feature is not enabled by default. It’s available in Windows 7 Professional, Ultimate, & Enterprise editions. If you’re using Windows 7 Home Premium or Home Basic, you’ll only be able to connect to other machines as a client and won’t be able to host RDP sessions.
Step-by-Step Guide How to Allow Remote Desktop Connections on Windows 7
Step 1: Check Your Windows 7 Edition
Before proceeding, confirm that your edition of Windows 7 supports Remote Desktop hosting:
- Click the Start button.
- Right-click Computer and select Properties.
- Under the Windows edition section, check your version.
If you’re using a Home edition, consider upgrading to a version that supports RDP hosting.
Step 2: Enable Remote Desktop on Windows 7
To enable RDP, follow these steps:
- Access System Properties:
- Press Windows + Pause/Break or right-click Computer and select Properties.
- Click Remote settings on the left-hand side.
- Configure Remote Desktop Settings:
- Under the Remote Desktop section, choose one of the seeing options:
- Don’t allow connections to this computer (default).
- Permit connections from computers running any version of Remote Desktop (less secure).
- Permit connections only from computers running Remote Desktop with Network Level Authentication (more secure).
- For better security, select the third option if your client systems support Network Level Authentication (NLA).
- Under the Remote Desktop section, choose one of the seeing options:
- Apply Changes:
- Click Apply and then OK.
Step 3: Add Users to Allow Remote Access
By default, only administrators can connect via RDP. To allow other users:
- In the System Properties window, click Select Users under the Remote Desktop section.
- Click Add and type the usernames of the users you want to grant access to.
- Click OK to save changes.
Step 4: Configure Firewall Settings
Windows Firewall may block RDP connections. To allow them:
- Open the Control Panel & run to System and Security > Windows Firewall.
- Click Permit a program or feature through Windows Firewall on the left.
- Locate Remote Desktop in the list & ensure both Private & Public checkboxes are checked.
- Click OK to save changes.
Alternatively, you can manually open the RDP port (default: 3389):
- In the Windows Firewall, click Advanced settings.
- Under Inbound Rules, locate Remote Desktop (TCP-In).
- Right-click the rule and choose Enable Rule.
Step 5: Ensure Network Configuration
To connect successfully, your network must be configured to allow RDP traffic:
- Set a Static IP Address (optional):
- Assigning a static IP ensures consistent connectivity to your Windows 7 computer.
- Configure Port Forwarding (if accessing via the internet):
- Log in to your router’s admin panel.
- Forward port 3389 to the IP address of your Windows 7 device.
- Verify Connectivity:
- Use the command ping [IP address] from another device to ensure the Windows 7 PC is reachable.
Step 6: Test the Remote Desktop Connection
To verify that RDP is working:
- From another Windows machine, open the Remote Desktop Connection app:
- Press Windows + R, type
mstsc, & press Submit.
- Press Windows + R, type
- Submit the IP address or hostname of the Windows 7 computer.
- Click Connect and log in using your username and password.
If the connection fails, check for potential issues such as incorrect credentials, firewall blocks, or network problems.
Troubleshooting Common Issues
If RDP doesn’t work as expected, consider the following:
1. Incorrect RDP Settings
Double-check that Remote Desktop is enabled and that your user account has permission to connect.
2. Firewall or Antivirus Blocking RDP
Ensure your firewall settings allow RDP connections and that your antivirus software isn’t blocking the port.
3. Network-Level Authentication (NLA)
If the client computer doesn’t support NLA, choose the “Allow connections from computers running any version of Remote Desktop” option.
4. Port Conflict
If port 3389 is already in use, modify the RDP port:
- Open the Registry Editor (regedit).
- Navigate to
HKEY_LOCAL_MACHINE\System\CurrentControlSet\Control\Terminal Server\WinStations\RDP-Tcp. - Modify the PortNumber value.
- Restart the computer for changes to take effect.
Enhancing Security for Remote Desktop
Remote Desktop can expose your system to security risks. Here are some tips to protect your Windows 7 machine:
- Use Strong Passwords:
- Ensure all accounts permitted to connect have strong, unique passwords.
- Enable Network Level Authentication (NLA):
- This adds an extra layer of security by requiring authentication before establishing a connection.
- Change the Default RDP Port:
- Use a non-standard port to less the risk of automated attacks.
- Use a VPN:
- Restrict RDP access to devices connected via a virtual private network.
- Limit IP Address Access:
- Use firewall rules to allow connections only from specific IP addresses.
Conclusion
Enabling Remote Desktop on Windows 7 can be incredibly useful for remote access and troubleshooting. By following this step-by-step guide, you can configure RDP securely and ensure smooth connectivity. Remember to prioritize security to protect your system from unauthorized access.
Whether you’re accessing your PC from another room or another city, Remote Desktop is a powerful tool that keeps you connected. With the setup complete, you can now enjoy the convenience and efficiency of remote computing on Windows 7!
Remote desktop functionality is an incredibly useful tool that allows users to connect to a computer from another location. Whether you need to access files, run programs, or provide assistance to someone, Remote Desktop Protocol (RDP) offers a seamless experience. As one of the earlier versions of Windows, Windows 7 provides users with the ability to utilize this feature, although the process requires careful attention to configuration and security. In this article, we will detail the step-by-step process of enabling Remote Desktop on a Windows 7 machine, discuss potential hurdles, security considerations, and some common troubleshooting steps to keep in mind.
Understanding Remote Desktop Protocol (RDP)
RDP is a protocol developed by Microsoft that enables remote access to Windows-based computers. In practice, it creates a graphical interface that allows users to control another computer as if they were sitting in front of it. RDP is commonly used for remote support, remote working, and accessing resources from different locations.
Before you enable RDP on Windows 7, it’s vital to understand the advantages it offers:
- Access from Anywhere: Users can connect to their desktops remotely, facilitating better work flexibility and support.
- File Management: Easily manage files located on the remote computer.
- Software Access: Execute applications installed on the remote system without needing to be physically present.
Pre-Requisites
Before diving into the setup, ensure that:
- Windows 7 Edition: RDP is available on Windows 7 Professional, Enterprise, and Ultimate editions. It is not available on Starter or Home Basic editions.
- Network Stability: A stable internet connection is crucial for a successful remote desktop experience.
- Administrative Privileges: You need administrative access to enable Remote Desktop on the target machine.
Steps to Enable Remote Desktop on Windows 7
Let’s break down the process into clear steps that you can follow to enable RDP on your Windows 7 machine.
Step 1: Accessing System Properties
- Open Control Panel: Click on the Start Button and select Control Panel from the menu.
- System and Security: Inside the Control Panel, locate and click on ‘System and Security’.
- System: Click on the ‘System’ icon. This will open the system properties window.
Step 2: Enabling Remote Desktop
- Remote Settings: On the left sidebar of the System window, you’ll see an option labeled ‘Remote settings’. Click on it.
- Remote Desktop Section: In the Remote tab, you will find the Remote Desktop section at the bottom of the window.
- Choosing a Setting: You will have three options:
- Don’t allow connections to this computer (the default setting)
- Allow connections from computers running any version of Remote Desktop (less secure). This allows connections from all Windows versions but provides a lower level of security.
- Allow connections only from computers running Remote Desktop with Network Level Authentication (more secure). This is the recommended option as it provides a higher level of security. Check this box to enable RDP.
Step 3: Select Users
- User Accounts: After selecting your preferred connection setting, click on the ‘Select Users…’ button. This brings up a dialog that allows you to specify which users can connect through RDP.
- Adding Users: If your user account is not already listed, click on ‘Add’ to include it. You’ll need to enter the name of the user account and click ‘Check Names’ to validate it. After that, click OK.
Step 4: Configuring Windows Firewall
For RDP connections to work, you must ensure that the Windows Firewall is configured to allow RDP traffic.
- Return to Control Panel: If you’re not already there, go back to the Control Panel.
- Windows Firewall: Click on ‘Windows Firewall’, then click on ‘Allow a program or feature through Windows Firewall’ on the left.
- Allow Remote Desktop: Look for the ‘Remote Desktop’ option in the list and ensure that both the Private and Public boxes are checked. If it is not listed, click on ‘Allow another program…’, find Remote Desktop in the Program Files, and add it.
Step 5: Note the Computer Name
To connect remotely to this machine, note down the computer name or IP address.
- Access System Properties: Go back to the System Properties window (as described in Step 1).
- Computer Name: At the bottom of the window, you’ll see the full computer name. Make sure to note this name down or the IP address if you have it assigned.
Security Considerations
Enabling RDP on your machine exposes it to potential security threats. Thus, it’s critical to implement certain safety measures:
- Strong Passwords: Ensure that all accounts allowed to use RDP have strong, secure passwords to prevent unauthorized access.
- Network Level Authentication: Always opt for Network Level Authentication (NLA) when enabling remote desktop.
- Updates and Patches: Regularly update Windows to the latest version to protect against known vulnerabilities.
- Firewall Configuration: Ensure your firewall is active and configured to allow only necessary communications.
Connecting to a Remote Desktop
Once you have enabled RDP on your Windows 7 machine, you will need another device from which to connect. Here’s how to do that:
- Open Remote Desktop Connection: On the computer you want to connect from, click on the Start button, and type ‘Remote Desktop Connection’ in the search box.
- Enter the Computer Name: In the Remote Desktop Connection window, enter the computer name or IP address of the Windows 7 machine you wish to connect to.
- Hit Connect: Click the ‘Connect’ button. You may be prompted for the username and password. Enter the credentials for an account that has access.
- Security Warning: You might receive a warning about the identity of the remote computer. If you are sure this is correct, you can proceed.
Troubleshooting Common Issues
If you encounter issues while enabling or connecting to Remote Desktop, try the following solutions:
- Network Issues: Confirm that both the local and remote machines are on the same network or have a valid VPN setup.
- Firewall Blocks: Revisit the firewall settings to ensure RDP traffic is allowed.
- Check Services: Ensure the ‘Remote Desktop Services’ service is running. You can access this by typing ‘services’ in the Start menu and locating ‘Remote Desktop Services’.
- Account Permissions: Make sure the account you are trying to connect with is part of the Remote Desktop Users group.
Conclusion
Enabling Remote Desktop on Windows 7 allows for easy access and management of your system from anywhere. Through careful configuration and consideration of security practices, you can maximize the benefits of RDP while minimizing potential risks. Remember that technology is constantly evolving, and keeping your system updated is crucial in maintaining security and functionality. With these steps, you should feel confident in setting up and using Remote Desktop Protocol on your Windows 7 machine.
Now that you are equipped with the knowledge and steps necessary to enable RDP, enjoy the flexibility and remote access it provides!