
When you restart your computer, all system drivers and USB drives reboot as well. Only when the essential drivers are turned ON, one can use his/her computer to its fullest performance. The information like which drivers actually start and which ones don’t during Windows startup is stored inside a text file named “Boot Log“. If you are struggling with some error code or issue on your Windows PC, you may take the help of this file and check where the problem actually lies.
By default, the Boot Log is disabled in Windows. So, you need to first enable this process on your computer. After you enable Boot Log in Windows 11/10, you may open the same to see which drivers are actually failing to start on your PC.

MBR vs. GPT: Which one is better for your SSD?
What is Windows Boot Log and how do you find it?
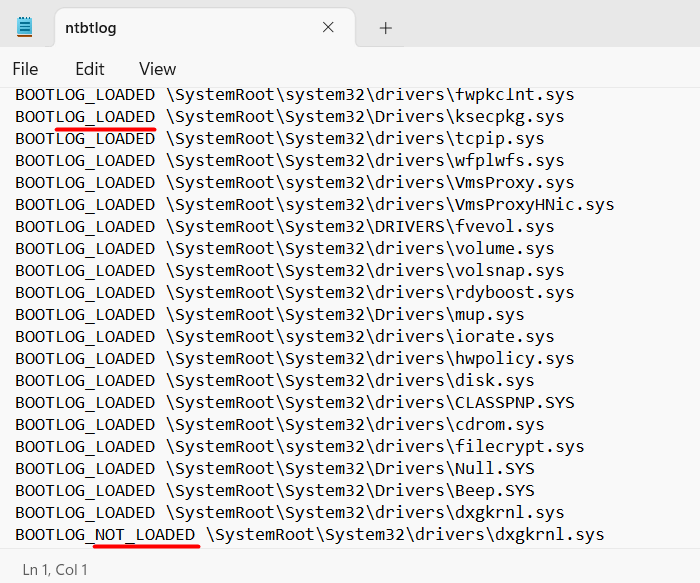
The Boot Log is basically a text file in Windows 11/10 that stores your computer’s boot sequence. Apart from noting down your device’s boot sequence, it also stores the information related to a driver which does or doesn’t start during Windows startup.
By enabling this boot log, you can have a grasp on what actually is not starting during Windows startup. This includes all network drivers, hardware devices, and a few other pieces of information which are preventing Windows from loading properly. This aids to find and work on the problematic device drivers and thus get rid of the persisting issue by applying the appropriate fixes.
By default, this boot log process is disabled in Windows. To enable storing your computer’s boot sequence, you may either use the System Configuration tool or the Command Prompt. After you have turned on this boot log process, follow these steps to locate and open this file on Windows 11/10 –
- Make sure to sign in as an administrator on your PC and launch File Explorer (Win + E).
- Type the following in its address bar and press Enter –
C:\Windows\ntbtlog.txt
- The selected text file will open inside the notepad. If you have set any other application to open the text file, this boot log file will open into that.
In the text file, you will find all the drivers listed separately with labels like LOADED or NOT_LOADED. You can also see the path of each of these device drivers.
How to convert your hard disk from MBR to GPT
Enabling Windows Boot Log on your PC
You may enable the Boot Log in Windows 11/10 using either of the following two options –
1] Using the System Configuration Tool
The most effective way to turn on the boot log process in Windows is by using the system configuration tool. Follow the below instructions to enable the same –
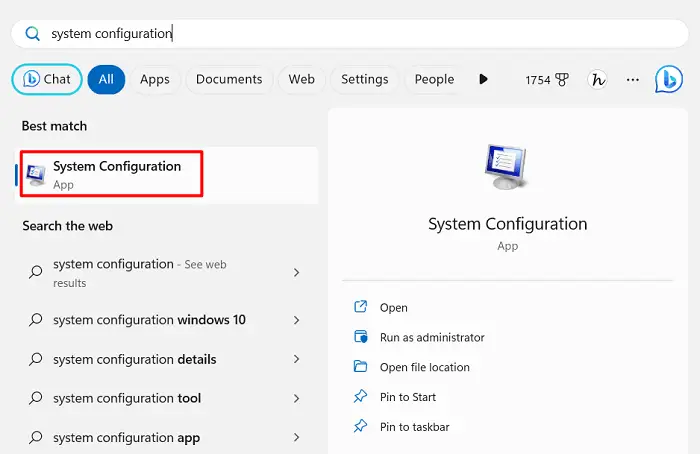
- Press Windows + S to launch the Run dialog.
- Type “System Configuration” in the text field, and click on the top result.
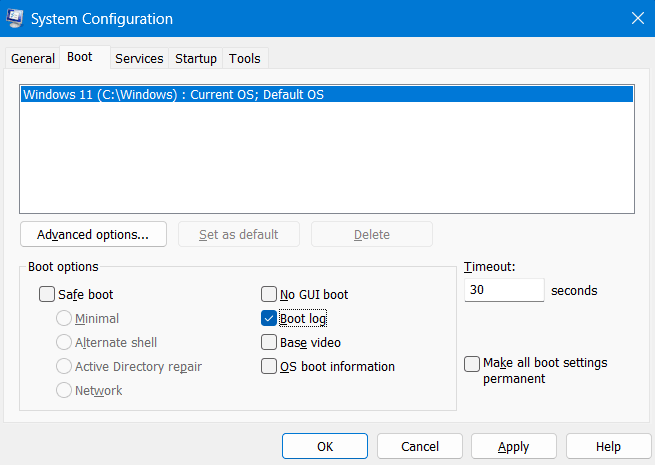
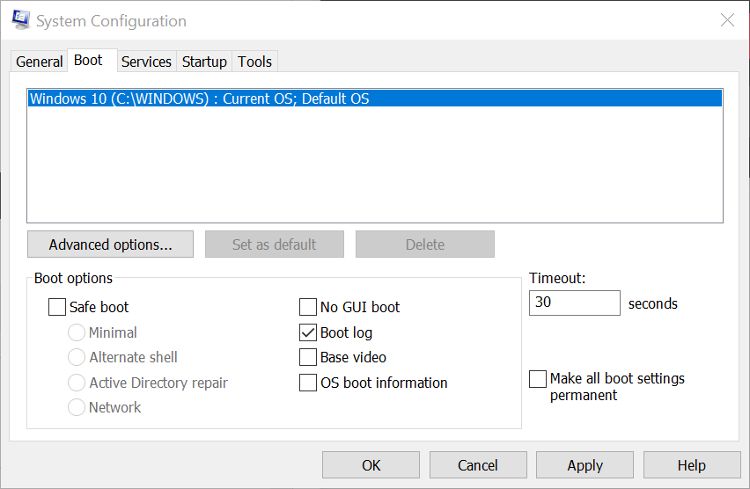
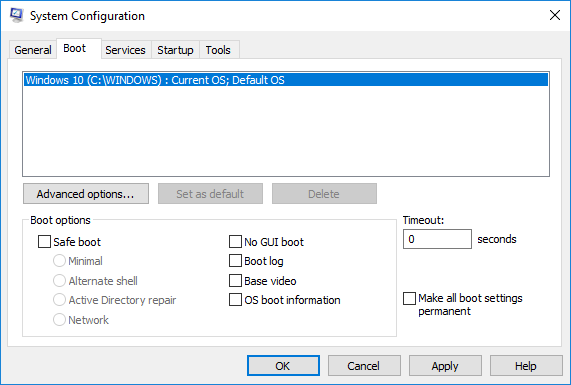
- When the System Configuration tool opens up, head over to the Boot tab.
- Under Boot options, check the box available left of “Boot log” and hit Apply followed by the OK button.
Close this tool and other running windows and restart your Windows PC. Sign back into your device again and you may now find the Boot log process enabled on your computer.
2] Using the Command Prompt
Alternatively, one may also use Command Prompt to enable the Boot log process in Windows 11/10. Here’s what you need to perform on your PC –
- Press Windows + X and select Terminal (Admin).
- The UAC window will prompt next, click Yes to authorize accessing the terminal.
- Press Ctrl + Shift + 2 to open Command Prompt inside the terminal.
- Type the following code on the console, and press Enter –
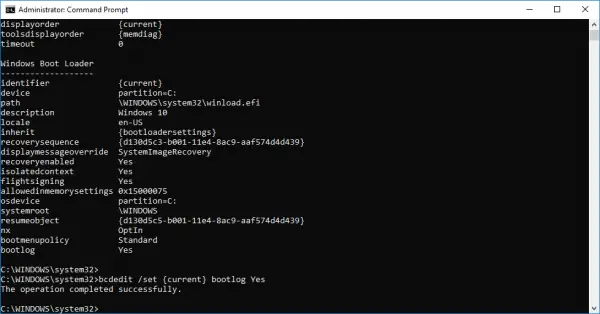
bcdedit

- Under Windows Boot loader, check what’s there next to the identifier.
- Copy this identifier and run the following code on the terminal next.
bcdedit /set {identifier} bootlog Yes
- Make sure to replace the identifier in the above code with your actual identifier. In our case, this is set to “current”, so we run the following code on our PC.
bcdedit /set {current} bootlog Yes

That’s it, you have successfully enabled storing the Boot log process on your computer. Restart your PC so that the recent changes come into effect from the next login.
How do I check if Boot Log is enabled or disabled using CMD?
To check if the boot log is enabled or disabled on a computer, launch Command Prompt as administrator and run the below code on it –
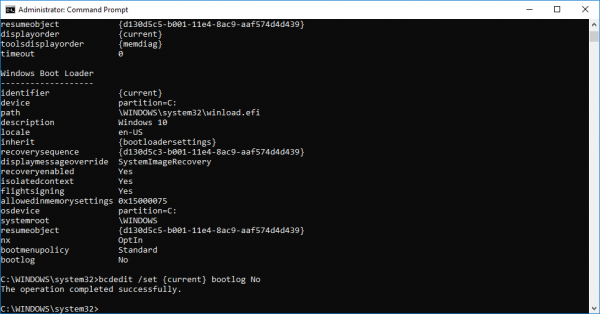
bcdedit
Under Windows Boot Loader, scroll down to the last line and check if there’s an entry named “bootlog“. If indeed there is such an entry, you will find “Yes” written next to it. This means that the Boot Log process is enabled on your computer.
However, if the boot log is disabled, you will not see such an entry as”bootlog” at the end of Windows Boot Loader. To confirm the same, see the snapshot provided above.
How do I disable Windows Boot Log?
Every time you restart your computer, this boot log file updates automatically, and while doing so, it maintains a record of your computer’s boot sequence from all times. With new information added to this boot log file, the size of this Boot Log file also increases.
To easily locate the problematic drivers, and make troubleshooting a bit easier in Windows, we suggest keeping this file disabled. Enable this file only when the need arises. Else, keep the boot log disabled by using either of the following two options –
1] Using the System Configuration Tool
The System Configuration tool provides you with the easiest way to disable the Boot Log in Windows. Here’s how to use this tool to disable the same –
- Press Windows + R to launch the Run dialog.
- Type “
msconfig” without quotes on it and hit OK. - When the System Configuration tool opens up, go to the Boot tab, and uncheck the box left of the Boot Log. You may find this under the Boot options.
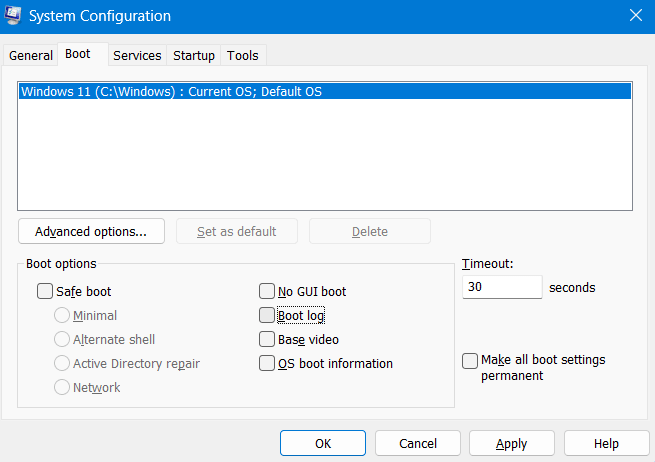
- Click Apply and then OK to confirm the recent changes.
Restart your PC and from the next login, you will not find any Boot log data on your computer.
2] Using Command Prompt
Just like enabling the Windows Boot Log using CMD, one can also use Command Prompt to disable the Boot Log as well. For this, you must follow these easy steps –
- Press Windows + R to launch the Run dialog.
- Type CMD and press Ctrl + Shift + Enter keys altogether to launch Command Prompt as administrator.
- On the elevated console, type the following code and press Enter –
bcdedit/ set {identifier} bootlog No
Make sure to replace the identifier in the above command with the one existing on your computer. If the same is set to current, run this code –
bcdedit /set {current} bootlog No
- That’s it, you have successfully forced your system not to store any boot log on your Windows PC.
Restart your PC next and the recent changes will come into effect from the subsequent login.
Whether should I keep enabling this Boot Log file in Windows?
Enable the Boot Log process only when you are facing troubles or issues accessing different drivers or services on your Windows PC. For the remaining time, when your operating system is functioning pretty well, keep this process disabled.
Read Next:
- How to Fix Dual Boot Option Not Showing In Windows
- How to Delete the EFI System Partition in Windows 11/10
When troubleshooting problems with your Windows computer, it is useful to have as much system information as possible. There are several ways to generate information about what is going on underneath the hood of your PC. And if you are experiencing startup issues, one of the most useful things to check is the boot log.
Here’s how to enable the boot log and where to find it on your Windows computer.
What Is the Windows Boot Log?
The Boot Log or System Initialization Log is a text file that can be generated during your computer’s boot sequence. It contains a list of all the drivers that are loaded during boot, as well as any expected drivers that are not loaded.
The boot log feature is disabled by default. There are two ways to enable or disable the boot log, both of which are explored below. Because you are making changes to an important part of Windows, both methods require you to be signed in as an administrator. If you do not have elevated privileges, you won’t be permitted to enable the boot log.
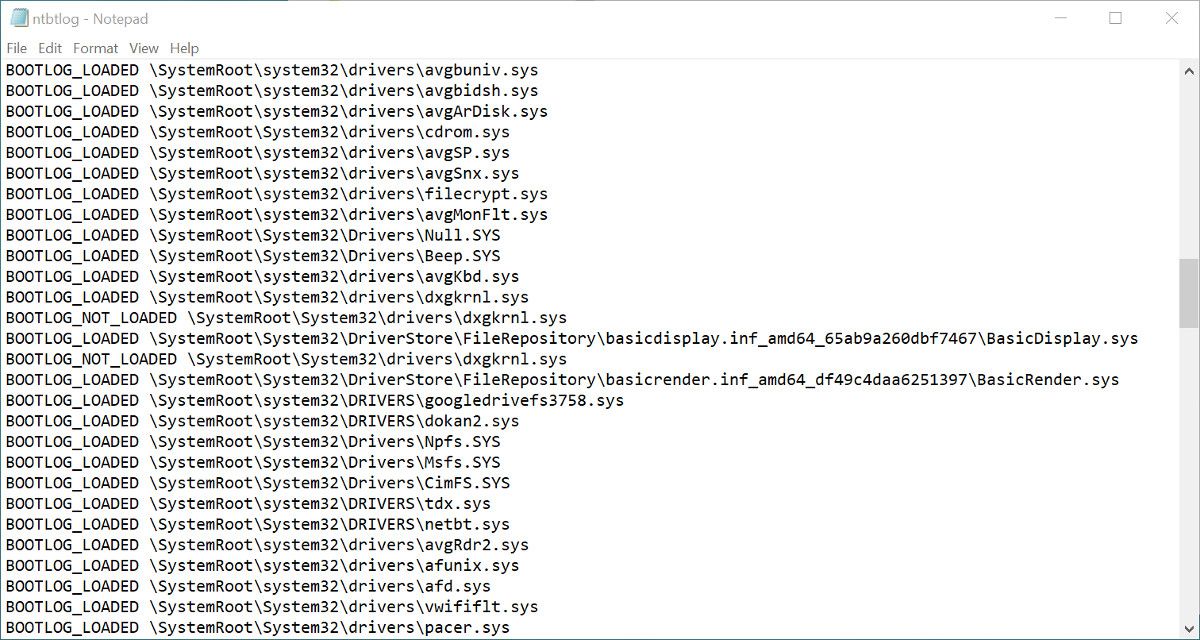
The text file generated after you enable boot logging can be opened and read in a text editor such as Notepad. Each driver is listed separately, and either labeled as LOADED or NOT_LOADED. The folder path to each driver is also shown.
How to Enable the Boot Log With MSConfig
Using the MSConfig tool, also known as the System Configuration tool, is probably the easiest of the two methods for enabling the boot log.
- Open the Run dialog by searching for Run in Windows Search, or by using the Win + R shortcut.
- In the Run app, type msconfig and press Return. If prompted, confirm your administrator privileges.
- Select the Boot tab in the System Configuration app. The default OS should already be selected.
- Check the box next to Boot log in the Boot options section, then click Apply.
You will be prompted to restart your computer. Doing so will immediately generate the boot log. You can also exit without restarting if you need to save and close any unfinished files. In this case, the boot log will be created the next time you restart the PC.
How to Modify Boot Settings With BitLocker Enabled
Enabling the boot log is seen by Windows as editing boot settings. This will be an issue if you have BitLocker Encryption turned on for the disk where the OS is installed. Enabling the boot log and then restarting will activate BitLocker protections.
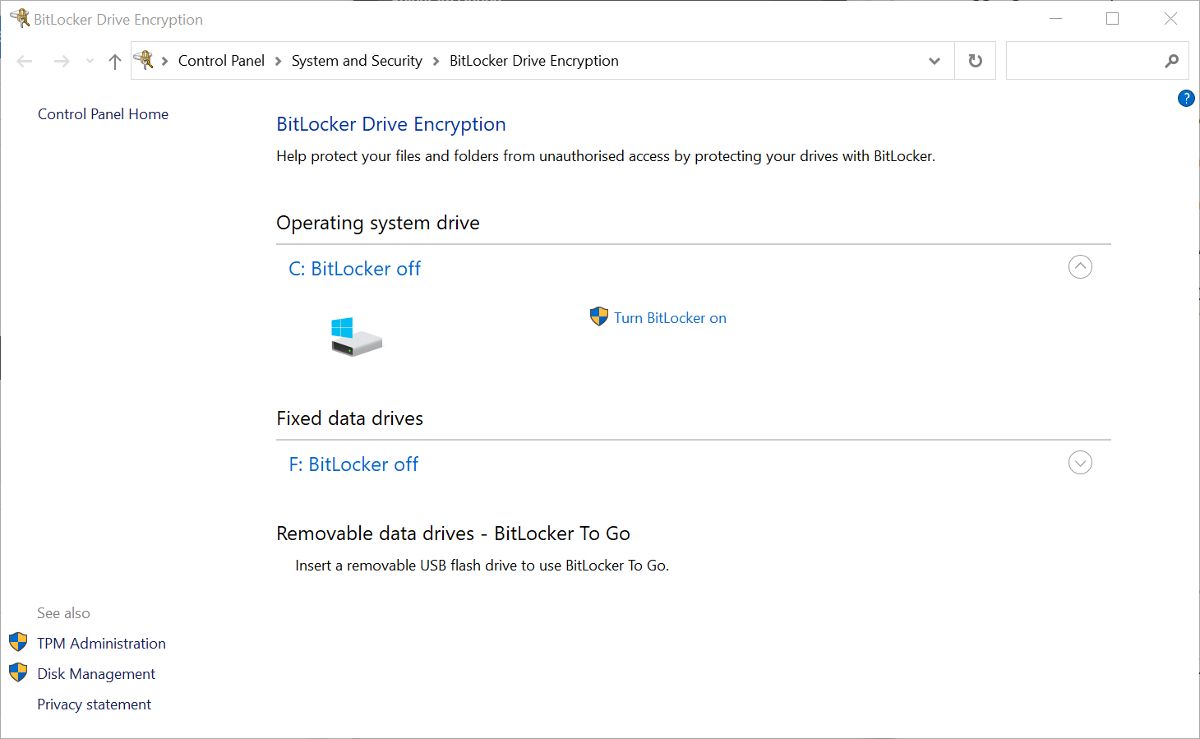
If BitLocker is enabled, you will see a message when you apply the boot settings changes in MSConfig. The message will remind you that when you restart after making changes to boot settings, your computer will enter recovery mode. You will be required to enter a BitLocker Recovery Key or Recovery Password to continue startup.
If you see the message and do not have a BitLocker recovery key or password, do not proceed with the changes to the boot options. If you don’t know where to find it, our guide will help you locate your BitLocker Recovery Key.
How to Enable the Boot Log With Command Prompt
If you cannot access MSConfig for some reason, you can enable the boot log using Command Prompt (Elevated). This method requires a bit more work but is still simple to do if you follow the steps here.
- In Windows Search, type Command Prompt. Right-click on it in the results and select Run as Administrator.
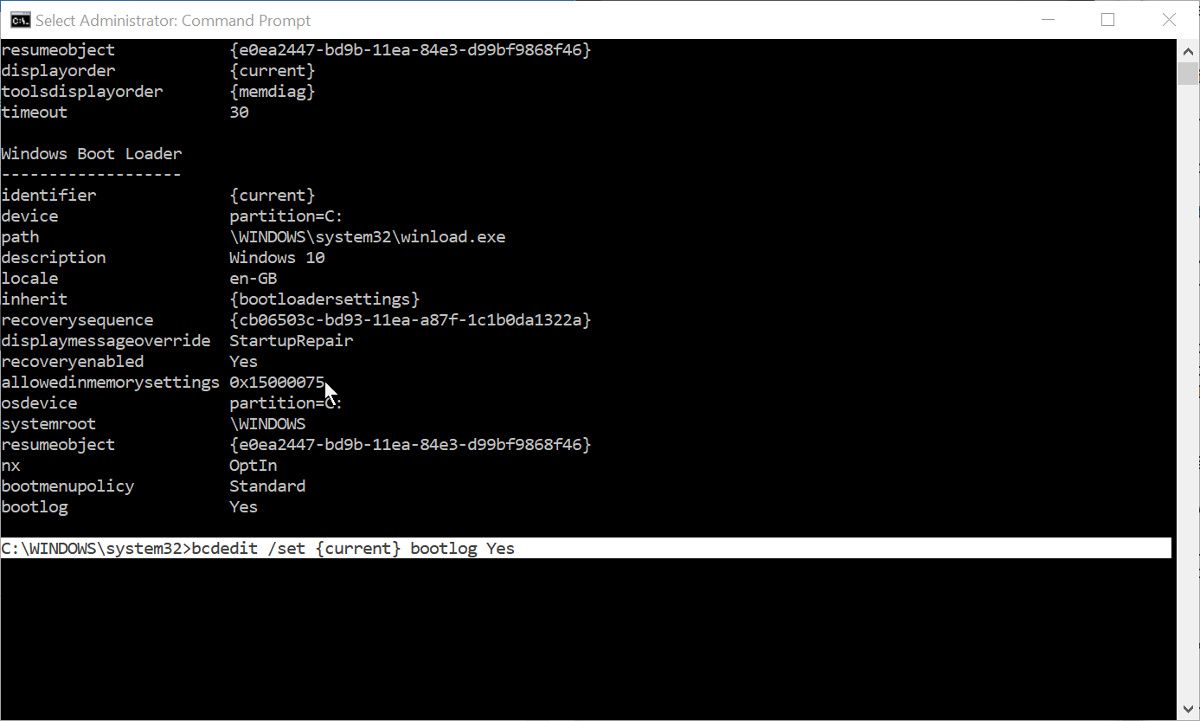
- In the Elevated Command Prompt, type bcdedit and press Return. This generates a list of boot details.
- Make a note of the Identifier in the Windows Boot Loader section. This will usually be {current}.
- To enable the boot log, type the following: bcdedit /set {identifier} bootlog Yes. Replace identifier with the value you noted in the previous step.
- Type bcdedit again to check if the boot log has been enabled. It will be shown at the bottom of the list of boot information.
- You can then close Command Prompt and restart your PC to generate the log.
Using the Command Prompt can be a little daunting for new Windows users, or if you have never used the tool before. It really isn’t anything to be scared of, as long as you follow the command instructions from a trusted information source like MakeUseOf. If you want to become more familiar with this useful Windows tool, check out our beginner’s guide to the Command Prompt.
Where Is the Windows Boot Log Saved?
The generated boot log file will be called ntbtlog.txt. You can find it at C:\Windows\ntbtlog.txt. If you don’t see the file at that location, ensure you have restarted the computer at least once since you enabled the boot log.
There will only be one version of the file, and each time you start up your computer with boot logging enabled, it will be overwritten. To prevent this, you can move a generated log to your desktop or elsewhere on your computer. This allows you to compare boot logs from different times. You will need to confirm administrator privileges before you can move the boot log out of the Windows folder.
How to Disable the Boot Log
After completing your troubleshooting with the boot log, there is no need to keep it enabled. You can disable the boot log by simply reversing the processes shown above.
- Run MSConfig and select the Boot tab. Uncheck the box next to Boot log in the Boot options section. Then click Apply.
- Open an Elevated Command Prompt, and then type: bcdedit /set {identifier} bootlog No. Replacing identifier with the one you used previously, e.g. {current}.
You can use either method to disable the boot log, even if it is a different method from the one you used to enable it.
Troubleshoot Startup Issues With the Windows Boot Log
Enabling the boot log in Windows allows you to see a text list of every driver that is loaded and not loaded during the boot process. This can be very useful for troubleshooting startup issues and also problems with apps and services not working properly after startup.
При выполнении анализа процедуры загрузки иногда бывает очень важно получить полный список загружающихся и незагружающихся драйверов и библиотек. Использовать для этих целей специальные утилиты необязательно, получить список загружаемых программных компонентов можно средствами самой операционной системы. Список представляет собой обычный текстовый файл ntbtlog.tхt, сохраняемый в корневой системной папке Windows.
Как в Windows 10 включить лог загрузки
Есть два способа создания журнала загрузки Windows. Сначала самый простой. Нажатием Win + R вызовите диалоговое окошко запуска и выполните в нём команду msconfig. В открывшемся окне конфигурации системы переключитесь на вкладку «Загрузка» и установите птичку в чекбоксе «Журнал загрузки». Теперь нажмите «Применить» и «OK».

При этом появится окошко с предложением перезагрузить компьютер. Соглашаемся, выполняем перезагрузку,

после чего идём в расположение C:/Windows, находим там текстовый файл ntbtlog

и открываем его Блокнотом или иным редактором.

Второй способ чуть сложнее. Запустите от имени администратора командную строку и выполните в ней команду bcdedit. В консоли появится список всех ваших операционных систем и их загрузочных записей. У нас установлена только одна Windows 10, поэтому элементов списка будет два — диспетчер загрузки и загрузка Windows. Нам нужна вторая запись, а именно её идентификатор со значением {current}.

Тут же в командной строке выполните команду такого вида:
bcdedit /set {Идентификатор} bootlog Yes

На место идентификатора подставьте его значение. В нашем примере это current (смотрите скриншот). Теперь выполните перезагрузку. Как и в предыдущем случае, журнал загрузки будет создан в папке Windows. Как понять из содержимого журнала, был ли загружен драйвер или нет? Очень просто. Запись BOOTLOG_LOADED указывает, что драйвер загрузился, запись BOOTLOG_NOT_LOADED будет указывать, что во время старта операционной системы загрузка драйвера была пропущена.
Windows boot logs are critical diagnostic tools that trace every step of your system’s startup process. These detailed records have evolved significantly since their introduction in early Windows versions, becoming increasingly sophisticated with each operating system update. When you configure boot logs in Windows, you create a comprehensive record that helps maintain system stability and troubleshoot potential issues before they become critical problems.
Understanding your system’s startup behavior provides valuable insights into its overall health and performance. When you properly configure boot logs in Windows, you gain visibility into the intricate processes that occur during system initialization. This visibility becomes particularly valuable in enterprise environments where system reliability directly impacts productivity.
Boot logs help identify subtle system changes that might otherwise go unnoticed. For example, a gradually increasing startup time might indicate developing hardware issues or conflicts between recently installed software. These logs also prove invaluable when diagnosing intermittent problems that only occur during system startup.
Key benefits of boot logging include:
- Precise tracking of driver loading sequences.
- Early detection of failing hardware components.
- Identification of conflicting system services.
- Performance optimization opportunities.
- Historical data for trend analysis.
- Compliance documentation support.
How to enable the boot log in Windows
Enabling the boot log in Windows offers flexibility through multiple configuration methods. Each approach provides distinct advantages depending on your technical expertise and specific needs.
Enabling through system configuration
The graphical interface (GUI) is easy to access. The System Configuration utility, also called msconfig, offers a straightforward way to manage boot logging preferences while providing additional startup configuration options.
The steps for GUI-based configuration are:
- Access System Configuration through Windows search.
- Navigate to the Boot tab in the configuration window.
- Locate and enable the boot logging option.
- Apply changes and perform a system restart.
- Verify log creation in the Windows directory.
Enabling with command prompt
Command-line configuration gives your administrators an efficient way to manage multiple systems. This method also supports remote configuration through administrative tools and scripts.
PowerShell and Command Prompt provide these advantages over msconfig:
- Rapid deployment across multiple systems
- Integration with existing maintenance scripts
- Remote configuration capabilities
- Automated setup processes
- Consistent configuration results
Checking boot log files after enabling
After you enable logging, the system generates detailed records of each startup sequence. These logs contain timestamps, event descriptions and status codes that help diagnose potential issues. The default location for these files remains consistent across Windows versions, simplifying long-term monitoring and analysis.
How to disable the boot log in Windows
Circumstances may require you to temporarily or permanently disable boot logging. Whether you’re performing system maintenance or optimizing performance, knowing how to properly disable the boot log in Windows helps maintain system efficiency.
Advanced boot log configuration options
Beyond basic enabling and disabling, Windows provides advanced configuration options that help you configure boot logs to your specific needs. These options control log detail levels, file locations and retention policies.
Some boot log configuration options include:
- Log file size management
- Rotation policies for long-term storage
- Compression settings for archived logs
- Network storage integration options
- Backup and retention strategies
Boot log best practices
Using effective boot log management strategies helps you get the most out of these diagnostic tools while maintaining system performance. These boot log best practices apply equally to single-system users and enterprise environments.
Enterprise-level management strategies
Your large organization requires a structured approach to boot log management. This includes centralized storage, automated analysis and integration with existing system monitoring tools.
Here are the essentials to consider at the enterprise level:
- Centralized log collection systems
- Automated analysis tools integration
- Alert threshold configuration
- Compliance documentation processes
- Disaster recovery planning
Common error codes and solutions
Understanding common boot log error codes speeds up your troubleshooting efforts. These standardized codes provide quick insight into specific issues affecting system startup.
Integration with diagnostic tools
Boot logs work most effectively when they’re integrated with other Windows diagnostic tools. This comprehensive approach gives you complete system visibility and accelerates problem resolution.
Some complementary Windows diagnostic tools include:
- Event Viewer logs
- Performance Monitor data
- System health reports
- Hardware diagnostics
- Network trace tools
Long-term monitoring strategies
Effective long-term monitoring helps identify gradual system changes that might indicate developing problems. This proactive approach helps prevent system failures and optimize performance.
Scheduled monitoring should include:
- Weekly performance trend analysis
- Monthly system health reviews
- Quarterly configuration audits
- Annual policy updates
Boot log security and compliance
Security considerations for boot logs go beyond basic system diagnostics. These logs often contain sensitive information about system configurations and potential vulnerabilities that require careful protection. You must balance accessibility for troubleshooting with strong security measures to maintain compliance with various regulatory requirements.
Access control implementation
You need to carefully manage boot log access to prevent unauthorized exposure while maintaining utility for system administrators. Modern Windows environments offer comprehensive access control mechanisms that integrate with existing security frameworks.
Implementing proper access control includes:
- Role-based access permissions
- Multi-factor authentication requirements
- Audit trail documentation
- Time-limited access grants
- Emergency access procedures
- Regular permission reviews
Regulatory compliance measures
Different industries face varying compliance requirements affecting boot log management. Healthcare organizations must consider HIPAA requirements, financial institutions need to address SOX compliance and companies handling European data must align with GDPR standards.
Compliance considerations by industry include:
- Healthcare: Patient data protection
- Finance: Transaction system security
- Government: National security standards
- Education: Student privacy requirements
- Retail: Payment system compliance
Encryption and protection
Boot logs require appropriate encryption both at rest and in transit. This protection makes sure that sensitive system information remains secure while allowing authorized access for legitimate troubleshooting needs.
Retention requirements
You must establish clear retention policies that align with both operational needs and regulatory requirements. These policies should address storage duration, archival procedures, and secure disposal methods.
Some key retention considerations include:
- Minimum retention periods
- Maximum storage limitations
- Archival procedures
- Deletion protocols
- Recovery capabilities
- Legal hold procedures
Documentation and training
Proper documentation helps keep security measures consistent across your organization. Regular training helps your technical staff maintain awareness of security requirements and compliance obligations.
Essential documentation should cover:
- Security procedures
- Access request processes
- Emergency protocols
- Compliance requirements
- Incident response plans
This comprehensive approach to boot log security and compliance helps you maintain system visibility while protecting sensitive information and meeting regulatory obligations. Regular review and updates of these measures ensure continued effectiveness as security requirements change.
Future considerations
As Windows continues to evolve, boot logging capabilities will likely expand to address emerging technical challenges. Staying current with these developments will help you maintain effective system management practices.
The future of boot logging may include:
- Enhanced artificial intelligence analysis
- Predictive failure detection
- Automated optimization recommendations
- Improved integration capabilities
- Advanced security features
Maintaining system health
Periodic boot log review and management contribute significantly to overall system health. By following boot log best practices and maintaining consistent monitoring procedures, you can ensure optimal system performance and reliability.
Remember to configure boot logs in Windows appropriately for your specific needs, whether managing a single system or an enterprise environment. This tailored approach helps balance diagnostic capabilities with system performance requirements while making sure that necessary information remains available when needed.
Transform your IT operations and experience simpler, smarter IT management with NinjaOne. Start your free trial to see how our unified platform streamlines monitoring, management, and security across all your endpoints. Your dedicated product specialist will help you discover the features that matter most to your business.
Booting the computer system involves loading an operating system from the various boot devices like drivers, network, and USB drives when the computer is switched on. Once the startup sequence finishes loading the operating system, the system hardware will be ready to perform complex operations. The Boot log is a record that maintains the list of success or failure of various pieces of Windows system during the booting process.
The Boot log keeps a record of everything that has happened while loading from the computer storage system to the memory during the boot process. It is available for various devices like network, hardware devices, and operating system which assists in identifying problems during the boot process and other issues pertaining to the troubleshooting. With the help of the Boot log, users can find out the drivers unloaded and loaded from the start of the system during the boot process. In Windows, users can either enable or disable the Boot log feature.
The log file is named as ntbtlog.txt which lists all the successfully loaded processes as well as an unsuccessful process during the boot process. The log is saved to drive C:\Windows\ntbtlog.txt. Users can enable or disable the Boot log in two ways. One is by using System Configuration (msconfig), and the other way is to use a Command Prompt. In this article, we explain how to enable or disable Boot log in Windows 11/10.
Enable Boot Log in System Configuration
Open Run by pressing Win + R key. To open System Configuration, type msconfig and click on OK.
In the System Configuration window, Go to Boot tab and check the with option Boot Log under Boot options to enable the Boot log feature.

Click on OK to save the changes.
Click on Restart button in the prompt window to start the Boot log process.
Once the restart is complete, navigate to C:\Windows\ntbtlog.txt to access the boot log.
The log file consists of a list of all the successfully loaded drivers as well as the list of drivers that failed to load during the startup sequence. Every time the user restarts the system, the log file keeps updating and eventually increases the list entries. To easily locate the drivers and make your troubleshooting easier It is recommended to disable the boot log after troubleshooting.
Disable Boot Log in System Configuration
Open Run by pressing Win + R key. To open System Configuration, type msconfig and click on Ok.
In the System Configuration window, Go to Boot tab and uncheck the option with Boot Log under Boot options to disable the Boot log feature.
Click on OK to save the changes.
Enable Boot Log using Command Prompt
In the Start menu, type Command Prompt in the search bar. Right click on Command Prompt option and Run as administrator.
Type bcdedit in the command prompt and click Enter.

To enable the Boot log, you need to first find the Identifier of the current operating system. You can find the OS under the Windows Boot Loader section in the field called “Description”. In our case, it is Windows 10.
You can find the operating system identifier under the Windows Bootloader section next to the field name identifier. Generally, the identifier will be {current }. To know if the boot log entry is enabled or disabled, check the field “Bootlog” under Windows Boot Loader. If the “bootlog” entry is enabled, the entry will be ‘Yes’. If the boot log is disabled, the entry will be ‘No’.
To enable the boot log, type the following command with the operating system identifier.
bcdedit /set {identifier} bootlog Yes
Make sure that you substitute your operating system identifier in the field {identifier } above
In this case we replace {identifier} with actual operating system identifier as {current} shown below
bcdedit /set {current} bootlog Yes
Restart the system to start the Boot log process.
Once the restart is complete, navigate to C:\Windows\ntbtlog.txt to access the boot log.

Every time the user restarts the system, the log file keeps updating and eventually increases the size of the log. To easily locate the drivers and make your troubleshooting easier It is recommended to disable the boot log after troubleshooting. Follow the below steps to disable the boot log using the command prompt
Disable Boot Log using Command Prompt
In the start menu, type Command Prompt in the search bar. Right click on Command Prompt option and Run as administrator.
Type the below command to disable the boot log-
bcdedit/ set {identifier} bootlog No
Make sure that you substitute your operating system identifier in the field {identifier } above
In this case, we replace {identifier} with actual operating system identifier as {current} shown below
bcdedit /set {current} bootlog No
Once done, close the command prompt.
That’s all.