
Technical information about “Windows Embedded Standard 7 SP1 Runtime (x86 ) — DVD (English)” available from MSDN Subscriber Downloads. You cannot download this file from msdn.su but you can use the information below to find and download it from official sources.
| File Name | en_windows_embedded_standard_7_sp1_runtime_x86_dvd_651894.iso |
|---|---|
| File Rating |
0 (0 votes) |
| SHA-1 Hash | 828311930602A92278E6857AE5CF1338C021AD09 |
| File Size | 2GB |
| Release Date | |
| Operating System | Windows |
| Computer Architecture | 32-bit |
| File Format | ISO |
| Language | English |
| MSDN Product Category | Developer Tools |
| MSDN Product Family | Windows Embedded Standard 7 |
| MSDN File ID | 45792 |
| MSDN File Description | Windows Embedded Standard 7 SP1 Runtime (x86 ) — DVD (English) |
| MSDN Subscriptions |
|
Per the MSDN Subscriptions Licensing terms (http://msdn.microsoft.com/en-us/subscriptions/cc150618.aspx) please note:
- If you do NOT enter the static key, this evaluation copy will expire in 30 days.
- If you DO enter the static key, this evaluation copy will expire in 180 days.
- Microsoft Imagine members: If you DO enter the Microsoft Imagine static key, this evaluation copy will expire in 365 days.
Item Preview
There Is No Preview Available For This Item
This item does not appear to have any files that can be experienced on Archive.org.
Please download files in this item to interact with them on your computer.
Show all files
2,487
Views
DOWNLOAD OPTIONS
Uploaded by
v-v
on
SIMILAR ITEMS (based on metadata)
Date Published:
15/07/2024
File Name:
Standard 7 SP1 64bit IBW.part7.rar
Standard 7 SP1 64bit IBW.part4.rar
Standard 7 SP1 Toolkit.part01.exe
Standard 7 SP1 32bit IBW.part3.rar
Standard 7 SP1 32bit IBW.part5.rar
Standard 7 SP1 64bit IBW.part1.exe
Standard 7 SP1 32bit IBW.part4.rar
Standard 7 SP1 Toolkit.part05.rar
Standard 7 SP1 64bit IBW.part3.rar
Standard 7 SP1 Toolkit.part06.rar
Standard 7 SP1 Toolkit.part07.rar
Standard 7 SP1 Toolkit.part03.rar
Standard 7 SP1 64bit IBW.part6.rar
Standard 7 SP1 32bit IBW.part1.exe
Standard 7 SP1 64bit IBW.part5.rar
Standard 7 SP1 64bit IBW.part2.rar
Standard 7 SP1 Toolkit.part02.rar
Standard 7 SP1 Toolkit.part04.rar
Standard 7 SP1 32bit IBW.part2.rar
Standard 7 SP1 Toolkit.part08.rar
File Size:
100.2 MB
476.8 MB
476.8 MB
476.8 MB
455.2 MB
476.8 MB
476.8 MB
476.8 MB
476.8 MB
476.8 MB
476.8 MB
476.8 MB
476.8 MB
476.8 MB
476.8 MB
476.8 MB
476.8 MB
476.8 MB
476.8 MB
297.1 MB
Windows Embedded Standard 7 SP1 delivers the power, familiarity, and reliability of the Windows 7 operating system in a componentized form for developers to create advanced commercial and consumer devices running thousands of existing Windows applications and drivers.
Supported Operating Systems
Windows 7, Windows Server 2008, Windows Server 2008 R2, Windows Vista Service Pack 2
- The system must have the following software installed:
- Microsoft .NET Framework 2.0 or a later version
- 1 GHz 32 bit (x86) or 64 bit (amd64) processor
- 1 GB of system memory (32 bit), 2 GB of system memory (64 bit)
- 7 GB of free hard disk space for complete installation of the toolkit
- DVD drive
- USB 2.0 port
The system must have network access if the developer will use network resources.
Development Environment Hardware Requirements
Windows Embedded Standard 7 SP1 consists of 3 DVD5 images (ISO’s). Download the .exe and .rar files for each DVD image into its own folder and run the .exe file in that folder to reconstitute the .ISO file. Once the .ISO file is created you can then burn the ISO onto a blank DVD. The toolkit DVD is used to install the Image Configuration Editor (ICE) and associated distribution share(s) onto a PC. The 32-bit and 64-bit Standard 7 SP1 DVDs are bootable WinPE DVDs that contain the Image Builder Wizard (IBW) and the corresponding 32-bit or 64-bit distribution share. Typically these DVDs are used to boot into Windows PE on the target device and apply the runtime image created with ICE or to prototype image creation using the wizard and various templates available in IBW. Please read the Windows Embedded Standard 7 SP1 documentation for more information on using ICE and IBW to create and deploy runtime images to your devices.
Runtime images created by the Windows Embedded Standard 7 Evaluation will run for 30 days with no product key and 180 days with a product key. Evaluation product keys can be obtained from Microsoft at the following location: Download Windows Embedded Standard 7 and select the «Getting Started» button.
Windows Embedded Standard 7 SP1 Evaluation
Информация о системе:
| Версия: | Windows Embedded Standard 7 SP1 Evaluation |
| Сборка ОС: | 6.1.7601.17514 |
| Дата обновления: | Май 2011 |
| Архитектура: | x86 x64 |
| Язык интерфейса: | Английский |
Скачать с Яндекс Диска
English
Скачать с Интернет Архива
For Mui
Runtime
Toolkit
Toolkit December 2013
Купить Лицензионные ключи активации в России
Для активации вам понадобится лицензионный ключ.
У наших партнеров вы можете его приобрести по довольно низкой цене.
Office
Офисные приложения
Антивирусы
Windows Server
Microsoft SQL Server
Так же вы можете получить скидку 5% по промокоду: DOW
- About
- Embedded / IoT
- Embedded / IoT Operating Systems
- IoT / Embedded
- Windows 11 IoT Enterprise 2024 LTSC
- Windows IoT on ARM
- Windows 10 IoT Enterprise 2021 LTSC
- Windows Embedded 8.1 Industry Pro
- Windows Embedded 8 Industry Pro
- Windows Embedded 8 Standard
- Windows Embedded Standard 7
- POSReady 7
- POS Ready 2009
- Windows Embedded Standard 2009
- XP Embedded
- Compact
- Windows 10 IoT Core Pro
- Compact7
- CE6
- For Embedded Systems
- Windows Embedded 8 Pro
- Windows 7 For Embedded Systems
- XP Professional
- Embedded / IoT Server
- Windows Server 2022
- SQL Server 2022
- Windows Server 2012
- SQL Server 2012
- Storage Server 2012
- Azure Sphere
- IoT / Embedded
- Basics & Availablility
- CLA
- Licensing
- Product Key Request
- Value Based Pricing
- Embedded / IoT Operating Systems
- Services
- Technical Partner zereOS
- Technical Support
- License Consulting
- Technical Trainings
- Image Development
- ESU Specialists
- News
- Events
- References
- Tools
- Embedded Toolkit
- Embedded Configuration Manager
- Footprint Technology (zOFT)
- Device Manager (zDM)
- Smart Activation (zSA)
- Onscreen Keyboard (zOSK)
- Contact
- English
- Deutsch
- Français
- Italiano
- Español
- Nederlands
- Magyar
- Čeština
- Polski
- Svenska


1. Available Now — Order your Windows Embedded Standard 7 NOW!
2. Windows Embedded Standard 7 — E and P versions
You can find a full list of which features are available in which version here:
More information
3. Media Center
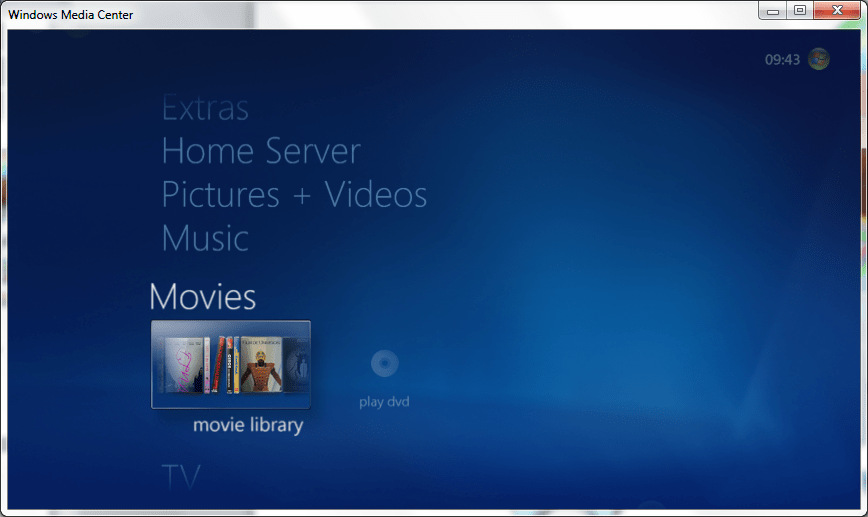
Building a Media Device?
Now you can use the full Windows Media Center experience on your device. Microsoft has released Windows Media Center as a Feature Pack allowing you to boot directly into the Media Center application and make fully usage of all its features including: Live-TV, EPG, Medialibraries, Addin-System, …
The Windows Media Center is included in the P license of Windows Embedded Standard 7.
4. Compatibility
5. Synchronous and Asynchronous Commands
With these commands you can deploy custom applications, settings or simply copy or delete files.
These commands can run in the following phases of the image creation process:
- WindowsPE – the command will still run during the setup in Windows PE.
- Specialize – the command will run during specialize phase.
- auditUser – the command will run during audit mode and can be used to install drivers, applications, …
- oobeSystem – the command will run with OOBE and can be used to modify the CurrentUser registry hive to apply specific settings.
6. Driver Integration
During the setup the Image Build Wizard will execute the Target Analyzer in the background to retrieve the information about which hardware is available in the device.
In the next step IBW will search for fitting drivers in the default driver set of Windows 7. Additionally it is possible to add drivers regardless if they were found during driver enumeration. This is helpfull if there are devices on a bus system which has no driver loaded during enumeration. If this happens IBW cannot find devices on that bus. If you add the drivers during setup time, the created image will install the drivers correctly after the first boot. With this option you can preload all needed drivers into your image.
An easy solution for this is to put all needed drivers into a directory on a USB drive. During setup time you can easily select this folder to include all drivers to the image. Windows will then load all needed drivers automatically.
7. Bitlocker To Go
Windows Embedded Standard also includes Bitlocker To Go.
Bitlocker To Go provides the powerful encryption of Bitlocker also for removable devices. This way you can use encrypted USB drives which can only be accessed from your Embedded system.
The encrypted drive can only be accessed if the correct password is entered after it has been connected. The password can also be stored for the specific device in the Windows Credential Manager – this way Windows will automatically grant access to the drive after it has been connected.
8. Automated Image Updates with VHD Boot
All you need to do is to create two different VHDs – one containing only the operating system – and the other one contains the data for your application.
If you have set up your system like this you can implement a program which does the following:
- periodically checks for image updates
- download the new image VHD if there is any
- register the new VHD in the bootmanager
- register the new VHD as default OS in the bootmanager
- restart the system
This way the new image will automatically boot up – if there is a problem with the new image you can easily revert back to the previous one by selecting the old version in the bootmenu.
If everything is ok you can delete the old image and remove the bootmanager entries.
You can use the free tool BootVHD to ease the VHD registration in the bootmanager.
9. Sysprep
Sysprep can be used like on a normal Windows 7 pc to install additional drivers, software, etc. to you image and then remove all the unique id and data to prepare the image for deployment.
After sysprep has been executed the system will come up with OOBE (Out-Of-The-Box-Experience) Wizard which lets the end user configure user account, network location, etc.
OOBE can also be supressed by creating an answer file for sysprep.
More information
10. Base Image
The base image already contains base functionality like device driver installation, event logging.
All other features can be added and/or removed during the installation with Image Builder Wizard and/or DISM (or DISMUI).
11. Installation from USB
With Windows Embedded 8.1 Industry Pro you can also include the new Modern UI to allow finger-friendly input on your devices. Even if you don’t need the new Modern interface you can make use of the new powerful WinRT library when building your applications.
12. List View
Tree View
In the tree view all features packages are grouped by their common use – e.g. .NET Frameworks are in the .NET Framework group.
Different fonts are in the “Font” group.
List View
The list view will display all feature packages in a sorted list. This will help you to find specific feature packages if you don’t know in which group they are located.
You can switch between both views on the fly by just selecting the link (“Switch to…”) above the view box in the feature package selection screen.
13. .NET Framework — Client Profile
The full version of the framework includes all assemblies to ensure maximum compatibility however the size of the framework is also big.
If you need a small footprint and your application does not need all features of the framework you can use the .NET Framework Client Profile.
The client profile is a subset of the full .NET Framework which has a much lower footprint but still offers the most important assemblies.
To check if your application can run using the client profile please have a look at the following website:
More information
14. Enhanced Firewall
Windows contains now a powerful firewall which can be configured more granular than the XP version. It even supports multiple setups depending on the devices location. A policy can be setup to be applied only for a Private, Public or Domain network. Depending on wheter the device is located to one of the 3 network types the correct firewall policy gets enforced.
More information
15. Dependency Check
The dependency check now takes only a few seconds and is much faster than in Target Designer. This impovment is because of the new structure and the use of the Distribution Share instead of a hughe database.
16. Sensor API
More information
17. Static Dependency Analyzer
Finding dependencies has always been hard in previous embedded version. Tools like Dependency Walker helped to find necessary DLLs which could then be searched in the Target Designer to add the necessary component.
This is now much easier because the Image Configuration Editor offers a new tool called the Static Dependency Analyzer which automatically adds the necessary feature packages to the image. You can specify an executable (EXE) or Microsoft Installer file (MSI) to check for the dependencies. The rest is done automatically by the Static Dependency Analyzer.
18. OEM Folder
For example you can use $OEM$\$$ to put files to the Windows directory and/or use $OEM$\$1 to place files in the systems root.
With a command in ICE you can even run unattended setups to install you application automatically if the setup has finished.
More information
19. No Product Activation
As with previous Windows Embedded versions (XPe, WES2009, POSReady,..) the new Windows Embedded version will not require Windows Activation.
All you need to do is to request a product key once for your project and enter it once in your runtime image. Windows is then activated and will not require activation via telephone or internet. You can clone the image as often as you need it and license it by putting the license sticker (COA) to the device.
20. Graphical User Interface for DISM
DISM is a command line tool which allows you to modify your Windows image even after deployment. However using the command line is not very comfortbale. Therefore we have created a tool called DISM UI which allows you to use a graphical wizard which looks similar to the Image Build Wizard to modify your runtime image. All you need to do with the tool is to uncheck the packages which you want to remove and check the packages you wish to add. The rest is done by DISM UI.
You can find this tool and other tools for Windows Embeded for free in our Windows Embedded Tools area: www.elbacom.com/embedded/products#Unique-Tools
21. Templates
You can also create templates which you can use as starting base for several device groups. Lets assume you have different device groups which should contain specific feature packages but some devices should have additional feature packages. If this is the case you can create an answer file for each device group in the Image Configuration Editor. This answer file can then be selected using the Browse button below the Templateselection in the Image Build Wizard. If you click on “Modify Features” in the next step you can add the needed features packages afterwards.
22. USB Boot
Normally this is not possible because the USB driver gets loaded too late causing Windows to fail loading its files and resulting into a BSOD 0x0000007B.
The USB Boot driver ensures that the USB driver is loaded earlier to allow access to the USB drive. This way Windows can boot successfully.
You can even combine USB Boot with VHD Boot to load your complete system from just one file on your USB drive!
23. Hibernate Once Resume Many (HORM)
With enabled Hibernate Once Resume Many (HORM) and enabled Enhanced Write Filter you put your device into hibernation mode once.
After that your device will always continue from the saved hibernation state which will decreases boot time!
24. Registry Filter
The Registry Filter is important if you use EWF or FBWF to protect you device which is in a domain environment. Normally your device would loose the trust to the domain after some time because Windows cannot persist the domain key in the Windows Registry.
With Registry Filter you can solve this issue by specifying that the domain key will still be persistet even if a filter driver is enabled.
25. File Based Write Filter
Generally FBWF redirects all the writes into a RAM overlay – this way you image is protected from any changes. However you can create exclusions to allow writes directrly to the disk.
This enables scenarios like protection the whole disk except you Data folder where all the configuration of your application is stored.
26. Custom Shell
To set your application as shell you have to change only one registry key to the absolute path of the executable:
[HKEY_LOCAL_MACHINE\Software\Microsoft\Windows NT\CurrentVersion\Winlogon]
Shell=<YourExecutable.exe>
27. Custom Windows Logon
Windows will always use the best fitting background image to ensure the quality of the image is the best.
The custom wallpaper can be specified by setting up a single policy.
28. Enhanced Write Filter
A big advantage of the EWF in combination with a flash drive is that the flash will live much longer as only reads occur when the driver is active. Also the performance is better because of the fast RAM.
With the new version of EWF the overlay size can be much bigger than in the previous version.
Previously in WES2009 the maximum overlay size on a 32-Bit system with 2 GB RAM was 684 MB.
Now with the new version it can be 1300 MB!
On a 64-Bit system it could theoretically be up to 128 GB!
More information
29. Dialog Blocker
With Dialog Blocker you can block all kinds of windows (MessageBoxes, Task Dialogs, Windows, …). The configuration can be done via a graphical editor where you can specify a list of unwanted windows by entering either the window title or the classname of a window.
30. Speech — Text To Speech and Speech Recognition
Windows Embedded included a powerful API to implement speech services.
With Text-To-Speech you can easily implement professional TTS applications with a wide range of available SAPI voices.
The improved speech recognition engine allows you to control Windows and your applications completely per voice.
More information
31. F1 — Help
The documentation also offers samples how to use the tools.
32. Windows Update
Previous Embedded versions of Windows (e.g. XP Embedded, Windows Embedded Standard 2009) did not support using Windows Update. The reason for this was that Windows did not know which components are included and which not. Therefore it could happen that there is an update for a component which is not included in the image and it fails and renders Windows Update useless.
Now with the newest Embedded version Windows Update is supported. This is possible because Windows Update knows which features are installed and only fetches update for these components! Devices can now directly connect to Microsoft Update to retrieve the latest security updates for Windows.
33. Deployment Image Servicing and Management Tool
Previous Embedded versions of Windows (e.g. XP Embedded, Windows Embedded Standard 2009) did not support using Windows Update. The reason for this was that Windows did not know which components are included and which not. Therefore it could happen that there is an update for a component which is not included in the image and it fails and renders Windows Update useless.
Now with the newest Embedded version Windows Update is supported. This is possible because Windows Update knows which features are installed and only fetches update for these components! Devices can now directly connect to Microsoft Update to retrieve the latest security updates for Windows.
34. Full Control with Image Configuration Editor
The Image Configuration Editor (ICE) is a tool which works together with the Image Builder Wizard (IBW).
ICE allows you to create full configurations of your Windows Embedded Image including which features should be installed with which configuration and also allows to setup the disk layout. ICE will create an answer file containing the configuration which can be used in IBW to automatically deploy Windows image without the need to do anything on the target device.
ICE allows to create a customized IBW DVD which will run the whole setup process unattended. After it finishes you will have your fully customized Windows Embedded running on the device.
35. Feature Packages
36. Image Builder Wizard and VHD Boot
More information
37. A new setup experience with Image Build Wizard
The next version of Windows Embedded offers a whole new setup experience which makes it much simpler to setup Windows Embedded on device and also customize it to your needs. The new setup is named Image Builder Wizard which is a bootable setup DVD for either 32-Bit or 64-Bit. The installation of the Embedded operating system will be done directly on the embedded device using a easy to use graphical setup wizard which allow you to select only the features you need. Building an Windows Embedded image now takes only a few minutes!
38. Differential VHDs
VHD Boot offers an additional benefit: Differential VHDs. This way you can setup a Windows environment which is located in a master VHD file. All the changes (writes) to the image will be stored in a seperate VHD file (differential VHD) so the master image itself never gets changed. You can use this for example if you use a flash device where your master image is stored and a HDD which stores the differential VHD to increase the lifetime of the flash device. Also you could setup a PE system which will periodically erases the differential VHD file and recreates it to undo all the changes and use a fresh image all the time.
39. VHD Boot
With VHD Boot you can now natively boot your system from a Virtual Hard Disk, the file format known from Windows Virtual PC.
VHD files are Virtual Hard Disks stored in a file which can be used like real harddisks. VHDs can be partitioned and formatted just like a real harddisk.
The possibility to boot directly from a VHD offers great new advantages:
- Easy Deployment
There is no need to create seperate image files (like .WIM) because the VHD itself is the image.
To deploy Windows stored in a VHD you just need to copy the VHD and the bootmanager to a new primary active NTFS partition with NT60 MBR. - Easy Backup
To backup your system all you need to do is to create a copy of the VHD. - Easy Update
If you need to upgrade your whole system all you need to do is to either replace the existing VHD file or copy a new VHD file to the system and create the bootmanager entries to boot the new VHD as default OS. The next time you boot your device it will load the updated system. In case you still have the old VHD in place and something went wrong with the update you can still revert to the old OS by just selecting the previous version in the bootmanager.
40. SSD Aware
41. Support for up to 128GB of RAM
64-Bit support allows your devices to handle more than 3 GB of RAM. Up to 128 GB of RAM is now possible – so 64-Bit should be your choice if you build devices which need more RAM.
If you are going to use new Embedded Enabling Features (EEFs) you will also notice that the new File Based Write Filter also supports RAM overlays that are bigger than 4 GB.
42. 64-Bit
Windows can now be installed also as 64-Bit version. There are several advantages in using 64-Bit than 32-Bit like a faster system and the ability to use more than 3GB of RAM. Windows-On-Windows for 32 Bit still allows users to run 32-Bit programs on a 64-Bit Windows environment without a problem. Also driver support for 64-Bit Windows is now available for a wide range of hardware.
43. MultiTouch
With a touch-sensitive screen you can use your fingers to scroll, resize windows, play media, and pan and zoom on your PC.
Use the Windows Touch API to create powerful multitouch aware applications. .NET 4 also support MultiTouch and allows you to easily create multitouch aware applications to drive your applications with the newest input technology.
More Information
44. BranchCache
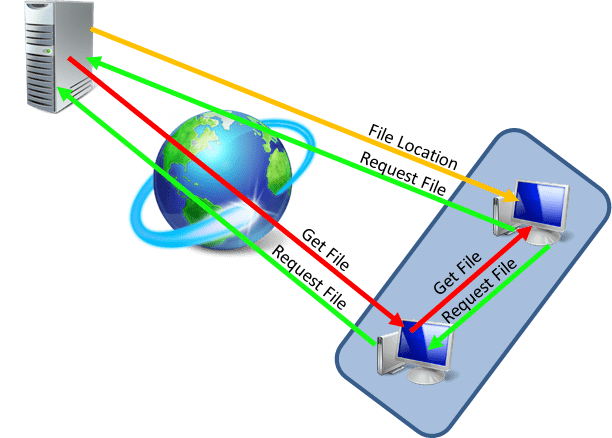
BranchCache optimizes the use of WAN if many devices are in a local network and need to download the same files from a server.
If a client downloads a file from a server the server will provide the file to the client for the first time.
When a second client in the same LAN asks for the same file upon the server will recognize that this file does already exists in the clients LAN. The server will point the client to the other machine which downloaded the file previously. The file will be copied locally – this will save bandwith, time and cost.
BrachCache ensures that the files match – if a downloaded file is changed it will be transferred again the next time a client asks for it.
More information
45. DirectAccess

DirectAccess automatically connects your device to the corporate network whenever internet is available. There is no need to dial in via VPN anymore – the connection to the corporate network will be established even before a user logs on.
With DirectAccess enabled you can administrate your device whenever it has internet access – you can easily access it like any pc on the local network.
To use DirectAccess you will need Windows Server 2008 R2.
More Information
46. Language Packs

There will be 36 language packs available for Windows. Windows itself is language neutral and can be translated in the language you need on the fly by installing the approperiate language pack. Also a switch between languages is possible with few clicks during runtime.
Windows is translated 100% into the available language packs and there will not be any English strings anywhere in the system.
Smbolic links helps to direct applications and the user himself to the correct folders (such as Users) as these folder will also appear in the selected language.
More information
47. Hardware Abstraction Layer (HAL)-independent
48. AppLocker
Prevent unwanted applications to run on your Embedded device with AppLocker by setting up Blacklists or Whitelist of applications.
The AppLocker policy can either be configured as local policy or can be deployed via group policy in a domain environment.
3 ways to configure your Blacklist/Whitelist:
Path
Define an application by its program path.
Hashvalue
Define an application by its unique hash.
Publisher
All applications by a specified publisher. These applications must be signed by the publisher.
This is the recommended way of defining an application pool which is [not] allowed to run.
49. Bitlocker
Bitlocker completly encrypts your drives including pagefile and hibernationfile. There are different possibilities how to use Bitlocker:
TPM Module
The encrypton key can be saved on a TPM chip. This way the disk will only work on the hardware which encrpyted the disk and Windows will boot automatically without the need to enter a key on each boot.
If the disk will be taken out and will be connected to a different hardware all the data is encrypted. If the disk is inserted again into the original hardware Windows can boot.
USB Key
The encryption key can be saved on a USB key. Bitlocker will only allow access to the disk if the USB key is connected. If not the disk drive remains encrypted.
PIN Entry
On every boot Bitlocker will ask a user to enter a password. If the password is correct Bitlocker will allow access to the disk.
More information
Image Build Process
Windows Embedded Standard 7 offers a new and easy way of creating images. The image is being build directly on the target hardware using Image Build Wizard. This tool offers an easy to use graphical setup wizard, similar to the normal Windows 7 setup, which guides you through the whole image build process.
Alternatively you can use the Image Configuration Editor on a development machine to pre-configure your image and create an answer file. This answer file can be used together with the Image Builder Wizard on the target device to run the setup unattended.
E, P and C version
Licenses and Toolkit
| Licensenumber | Description | Notes |
| 7WT-00049 | Windows Embedded Standard 7 E Runtime License | E version – Each device needs one license |
| 7WT-00050 | Windows Embedded Standard 7 P Runtime License | P version – Each device needs one license |
| 2QG-00003 | Windows Embedded Standard 7 C Runtime License | C version – Each device needs one license for Connected Media Devices (Set-Top-Boxes, …) |
| 5CA-00039 | Windows Embedded Standard 7 Toolkit – with SP1 | Toolkit to create your Windows Embedded Standard 7 SP1 images – only needed once Per toolkit you have 2 free support cases included! |
Please Note: Product Keys for the this product are no longer shipped with the runtime license envelopes. To request your product key please follow the steps atProduct Key Information.
Availability and Support
| Available | End of Mainstream Support | End of Extended Support |
| 27.07.2025 | 13.10.2015 | 13.10.2020 |
Page load link
Go to Top