
Инженеры Microsoft реализовали в Windows хранилище загрузки, известное ещё как Boot Configuration Data (BCD), и меню загрузки. Первое содержит в себе идентификаторы загрузчиков всех имеющихся на ПК операционных систем, а второе считывает их и выводит в виде перечня ОС, доступных для запуска. Это значительно облегчает жизнь пользователю, на компьютере которого стоит несколько систем. Ему не нужно что-то мудрить, чтобы переключиться между ними. Достаточно перезагрузить компьютер и выбрать нужную из представленного списка. Как и другие части ОС Windows, меню загрузки поддаётся настройке. В этом руководстве перечислены доступные способы редактирования данного раздела.
Примечание: практически все действия, описанные в этом руководстве, нужно выполнять из-под учётной записи с правами администратора. В противном случае вы должны знать пароль от неё.
Редактирование меню загрузки Windows 10 в окне загрузчика
Меню загрузки Windows 10 обладает небольшим разделом настроек. Он предоставляет минимальный набор опций — изменение значения таймера автоматического запуска основной системы, смена ОС, загружаемой по умолчанию, а также дополнительный раздел с режимами старта системы и функцией выключения компьютера.
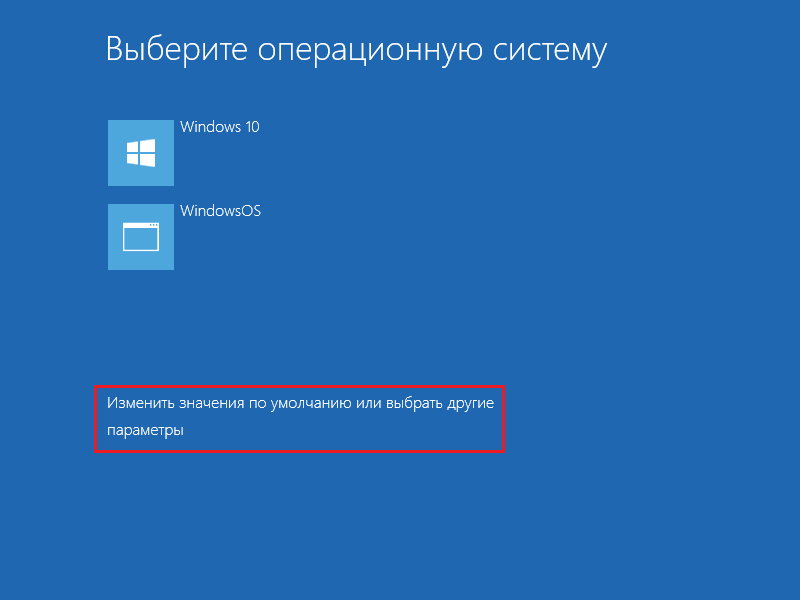
- Чтобы получить доступ к этим настройкам, вам нужно нажать на пункт Изменить значения по умолчанию или выбрать другие параметры во время отображения экрана со списком доступных для запуска систем.

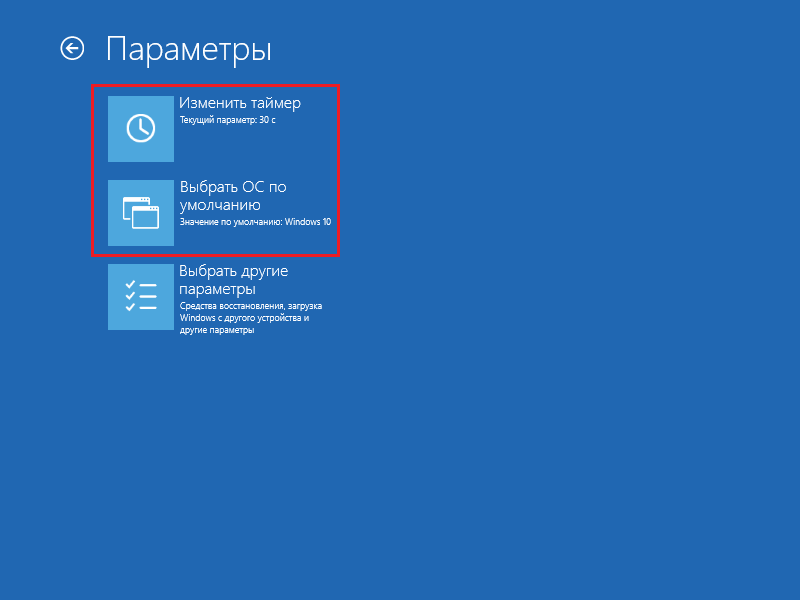
- Далее вам остаётся нажать на пункт Изменить таймер, чтобы установить время отсрочки автоматической загрузки системы (5 и 30 секунд, а также 5 минут) или же на Выбрать ОС по умолчанию, чтобы указать, какую систему стоит грузить по завершению таймаута.
Редактирование меню загрузки Windows 10 в параметрах системы
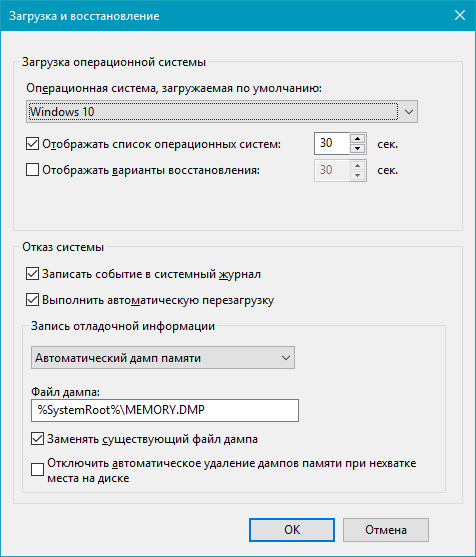
В дополнительных параметрах системы, зайти в которые можно через свойства ОС, находится раздел Загрузка и восстановление. Он хранит в себе небольшой список функций для редактирования меню загрузки, который подойдёт нетребовательным пользователям. Так с его помощью вы можете выбрать, какая операционная система будет загружаться по умолчанию, выставить время отображения списка установленных систем или вовсе выключить таймаут, а также активировать вывод вариантов восстановления.
Чтобы попасть в указанный раздел, вам нужно сделать следующее:
- Нажмите на сочетание Win + Pause (Break).
- Кликните по ссылке Дополнительные параметры системы, расположенную в левой части окна.

- Под заголовком Загрузка и восстановление щёлкните на кнопку Параметры.


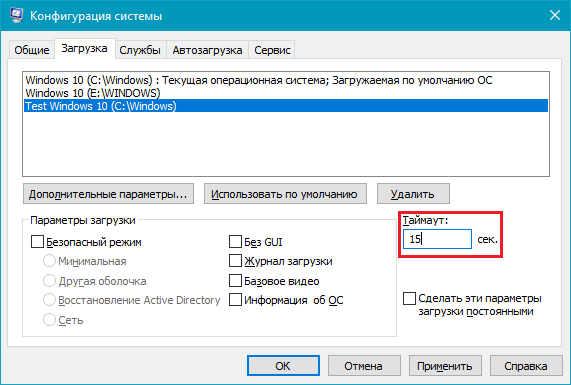
Редактирование меню загрузки Windows 10 в Конфигурация системы
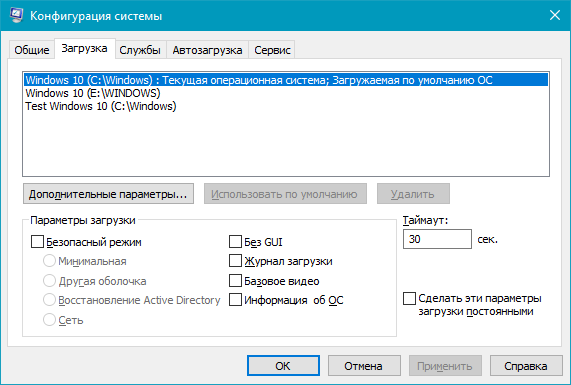
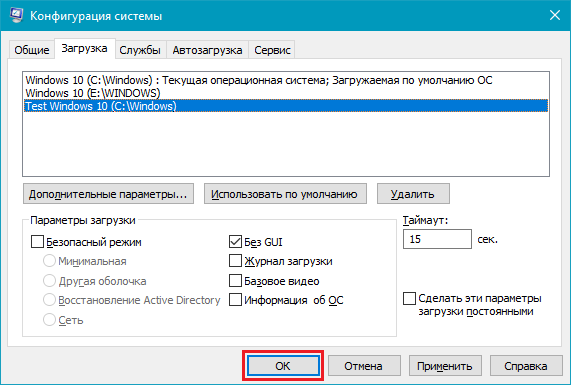
Если вам необходимо немного больше возможностей по настройке, вы можете попробовать утилиту Конфигурация системы. Помимо упомянутых настроек, она предлагает функцию удаления загрузочных записей операционных систем, опцию для вывода информации об ОС, возможность запустить Windows без графической оболочки, выбрать параметры загрузки безопасного режима и ещё несколько второстепенных функций.
Отредактировать меню загрузки с помощью Конфигурация системы можно следующим образом:
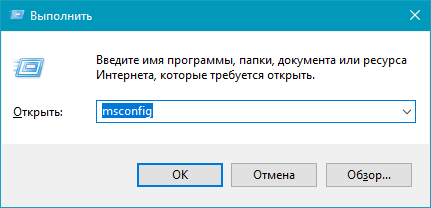
- Нажмите Win + R и введите msconfig. Появится окно утилиты.

- Откройте вкладку Загрузка.

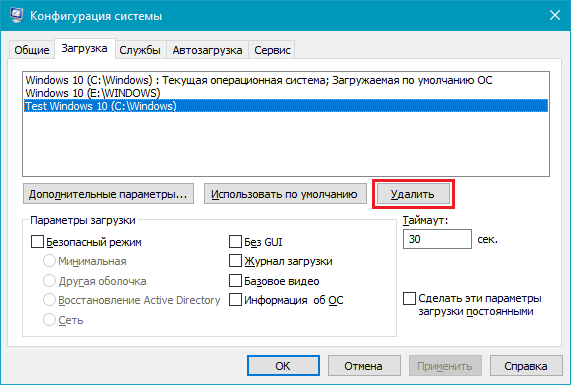
- Выберите из списка интересующую вас запись. Если вы желаете избавиться от неё, нажмите на кнопку Удалить.
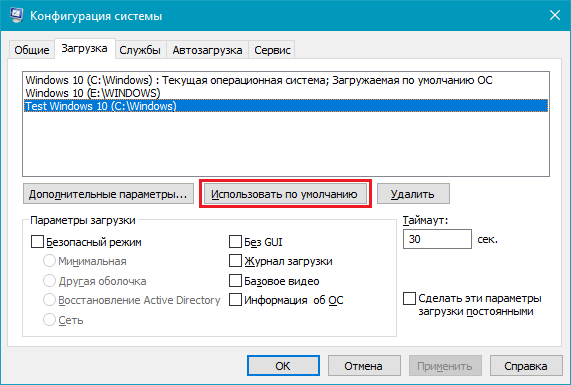
- Хотите пометить ОС в качестве основной? Кликните по кнопке Использовать по умолчанию.
- В случае необходимости, установите предпочитаемое время таймаута.
- Нажмите на ОК и перезагрузите компьютер, чтобы система применила изменения.
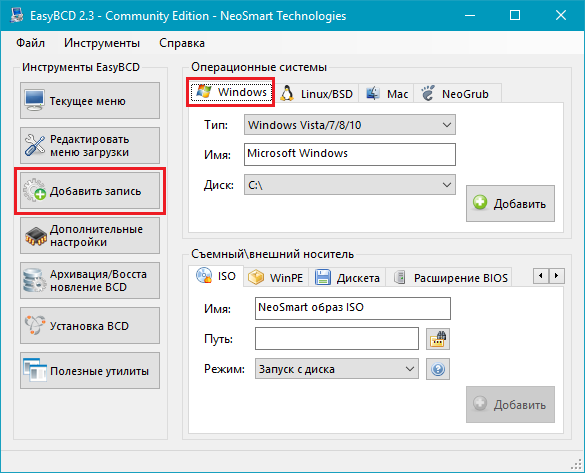
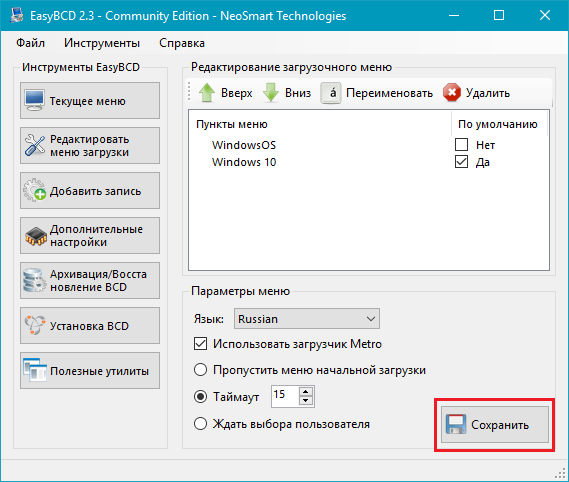
Как отредактировать меню загрузки Windows 10 с помощью EasyBCD
EasyBCD — бесплатная утилита, предоставляющая широкий выбор возможностей для редактирования меню загрузки. В сравнении с ней все стандартные системные инструменты (кроме Командной строки) смотрятся весьма примитивно.
Эта компактная программа позволяет:
- Удалять ОС из списка доступных для запуска.
- Добавлять новые записи Windows (в том числе и устаревших), Linux / BSD, Mac.
- Добавлять записи для установки систем с помощью ISO-образов или отдельных разделов жёсткого диска.
- Переименовывать записи операционных систем.
- Выставлять систему по умолчанию.
- Изменять положение записей в списке.
- Устанавливать язык меню загрузки.
- Выбирать оболочку интерфейса загрузчика (Metro или более раннюю от Windows Vista / 7).
- Выставлять длительность таймаута.
- Архивировать и восстанавливать настройки хранилища загрузки (BCD).
- Просматривать содержимое BCD и меню загрузки.
Интерфейс программы полностью локализован на русский, а сама она достаточно простая в использовании и не требует от пользователя никаких сверхъестественных способностей.
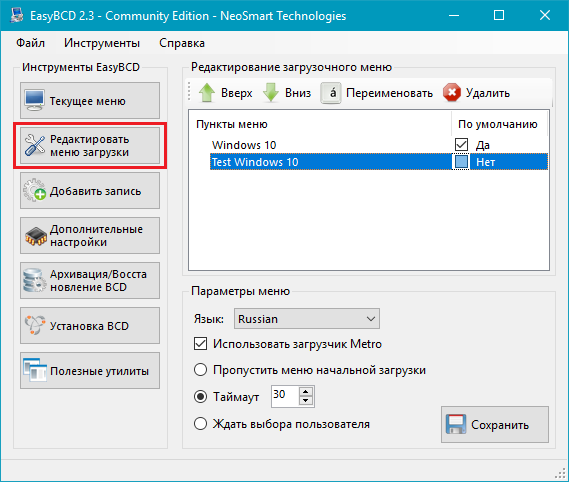
Как добавить запись системы в меню загрузки
- Скачайте и установите EasyBCD. Во время установки укажите, что вы будете использовать программу в личных целях, а не в коммерческих.
Примечание: для редактирования меню загрузки в старших версиях Windows может понадобиться EasyBCD 1.7.2. - Запустите программу и выберите язык интерфейса.
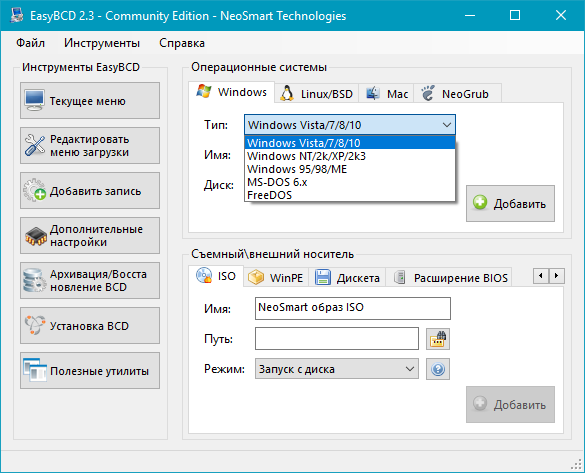
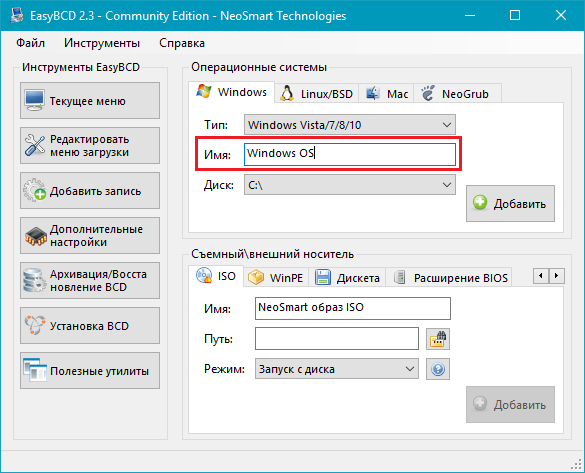
- Нажмите на Добавить запись и выберите вкладку Windows.

- Напротив пункта Тип выберите Vista / 7 / 8 / 10. Если добавляемая запись должна загружать более старую версию «винды», разверните выпадающий список и кликните по подходящему варианту.
- В поле Имя укажите предпочитаемое название записи.
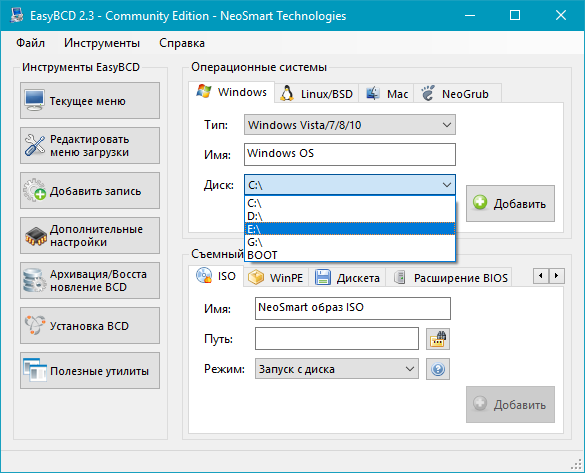
- Напротив пункта Диск откройте список разделов жёсткого диска и выберите тот, где установлена ОС, к которой вы хотите восстановить доступ.
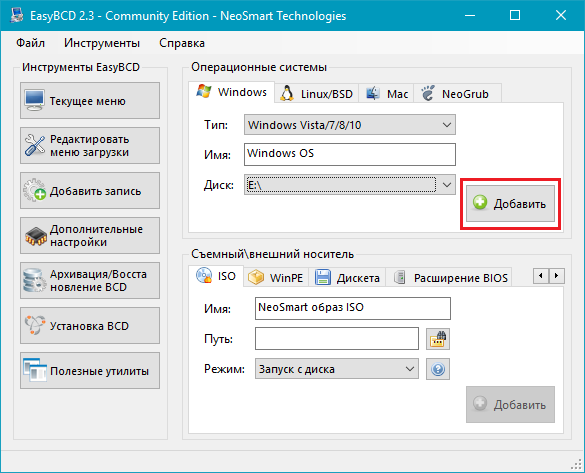
- Нажмите на Добавить.
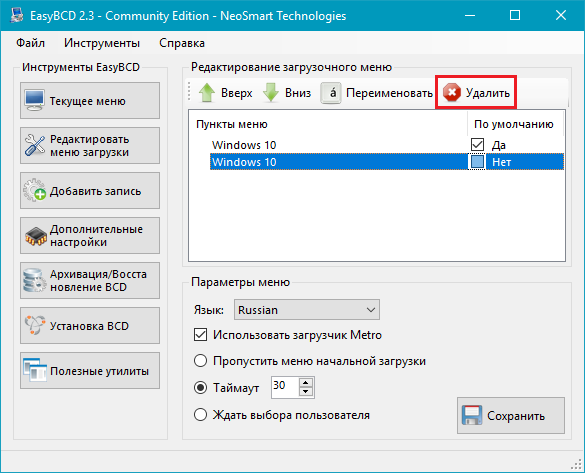
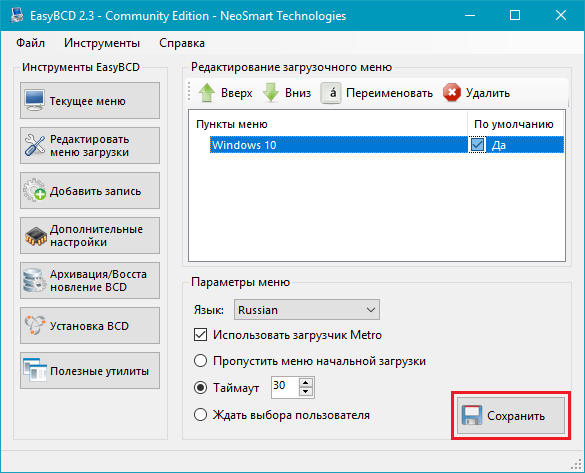
Как удалить запись системы из меню загрузки
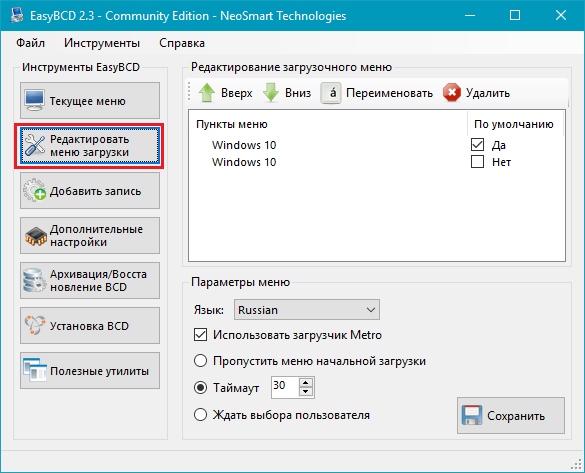
- В программе нажмите на Редактировать меню загрузки.
- Из списка записей выберите нужную и нажмите на Удалить. Подтвердите своё действие.
- Кликните по кнопке Сохранить.
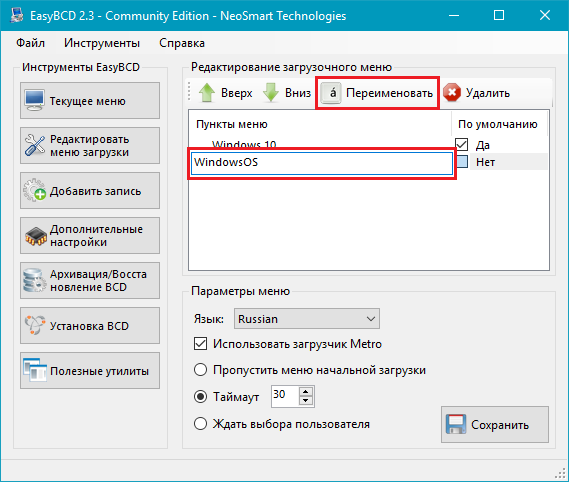
Как переименовать запись системы в меню загрузки
- В разделе редактирования загрузочного меню кликните по записи, имя которой вы хотите сменить.

- Нажмите на кнопку Переименовать и введите новое название.
- Сохраните данное изменение.
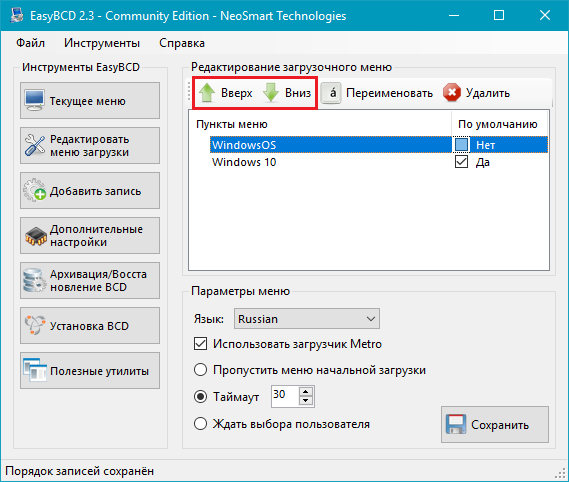
Как переместить запись системы в меню загрузки
- Выберите из списка пункт, позицию которого нужно сменить.
- Используя кнопки Вверх и Вниз измените положение в списке.
- Нажмите на Сохранить.
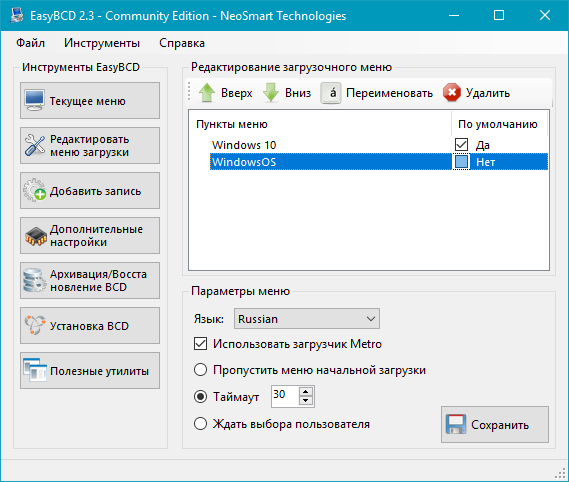
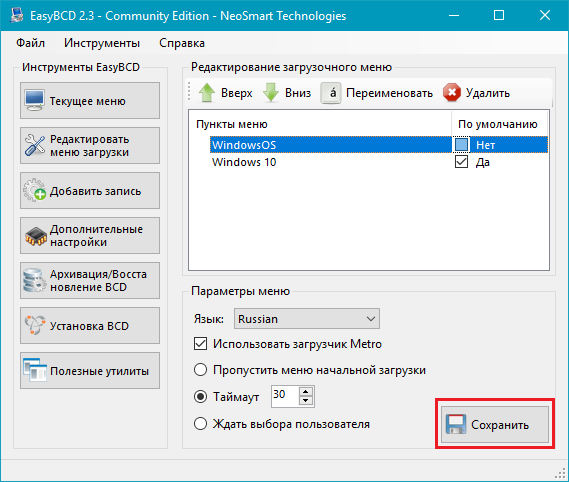
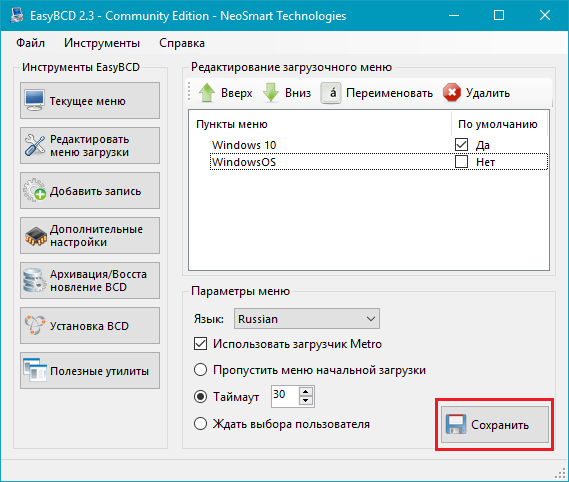
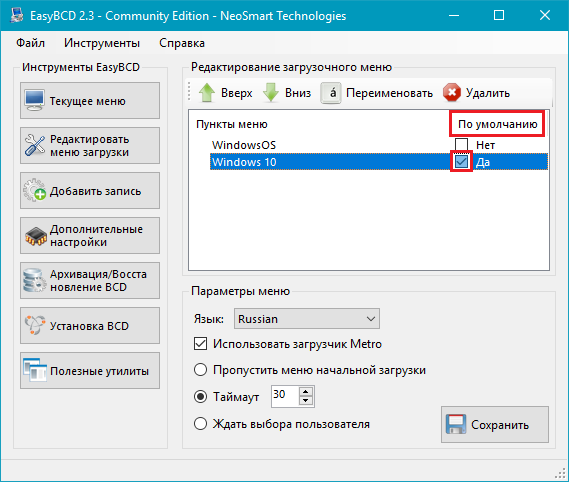
Как выбрать систему для загрузки по умолчанию
- В столбце По умолчанию установите галочку напротив нужной операционной системы.
- Сохраните изменения.
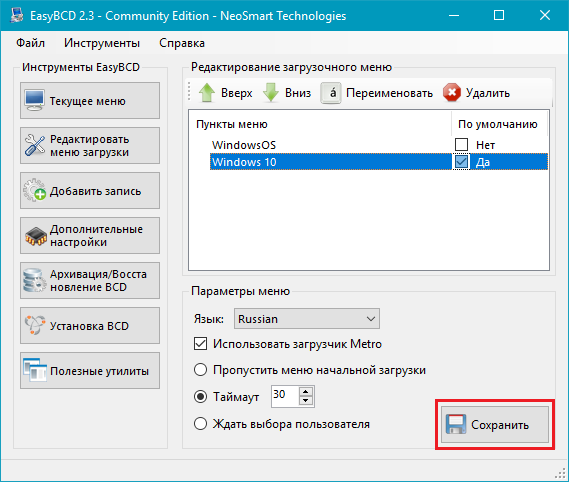
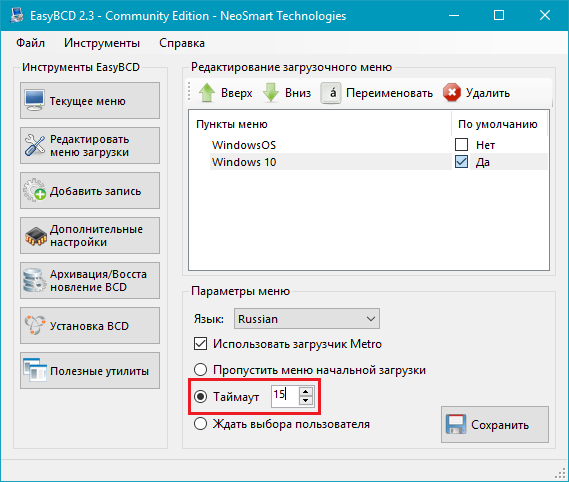
Как изменить время отображения меню загрузки
- Возле пункта Таймаут нажмите на поле и введите оптимальное для вас время. Учтите, что в меню загрузки оно измеряется в секундах.
- После внесения изменений кликните по кнопке Сохранить.

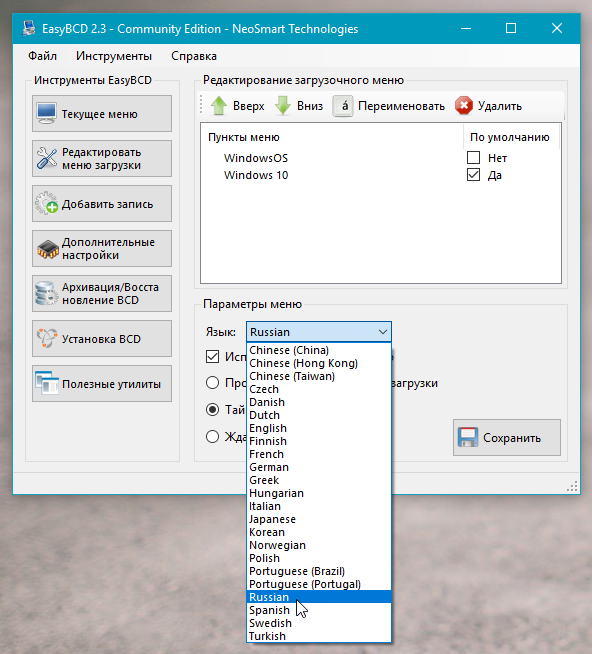
Как изменить язык меню загрузки
- Найдите пункт Язык, разверните список возле него и выберите нужное вам наречие.

- Сохраните внесенные изменения.
Как отредактировать меню загрузки Windows 10 с помощью командной строки
Если вы не доверяете сторонним программам и стараетесь пользоваться исключительно системными инструментами, тогда вам стоит опробовать способы редактирования меню загрузки Windows 10 с помощью командной строки.
Создание или восстановление резервной копии хранилища загрузки Windows
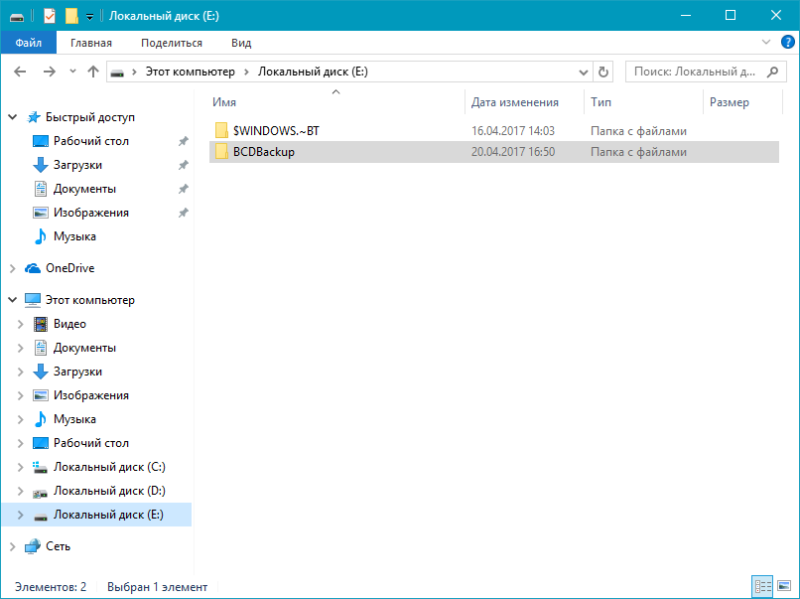
Перед выполнением всех действий создайте резервную копию хранилища загрузки, чтобы вы могли восстановить его в случае необходимости. Создать бекап BCD вы можете следующим образом:
- На любом не системном разделе создайте папку BCDBackup.

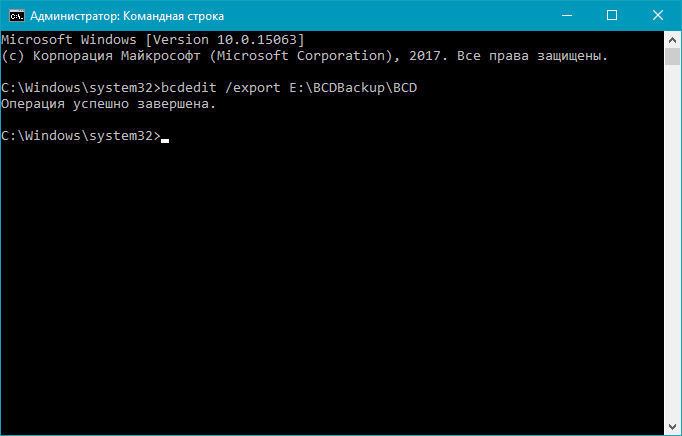
- Запустите командную строку с правами администратора. Для этого нажмите на Win + S, введите Командная строка, кликните правой кнопкой мышки по результату и выберите Запустить от имени администратора.
- Введите команду bcdedit /export E:\BCDBackup\BCD, где E — буква раздела, на котором находится созданная ранее папка.

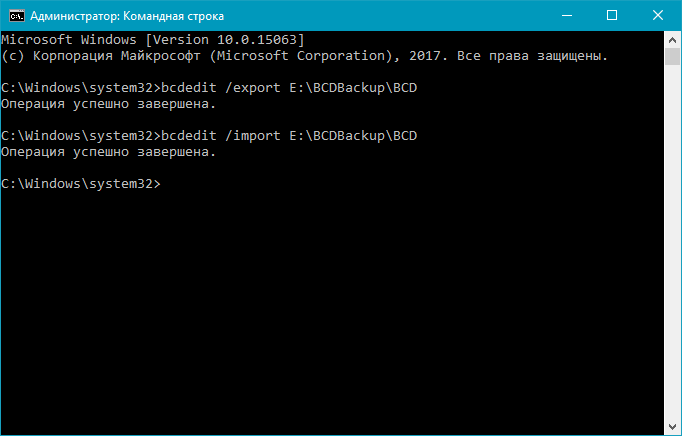
- Для восстановления рабочей копии BCD вам нужно ввести bcdedit /import E:\BCDBackup\BCD, где Е — буква раздела, содержащего каталог с резервной копией хранилища загрузки.
Как добавить запись системы в меню загрузки
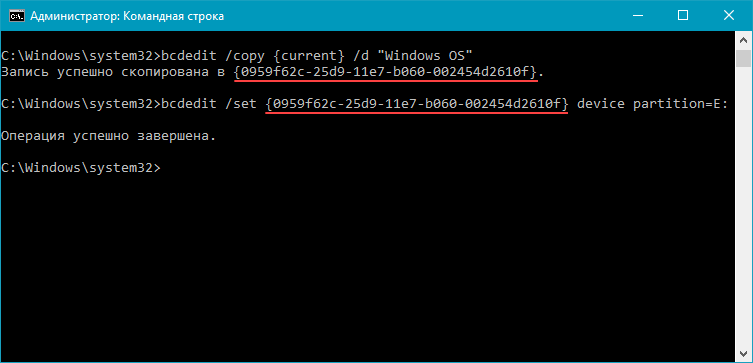
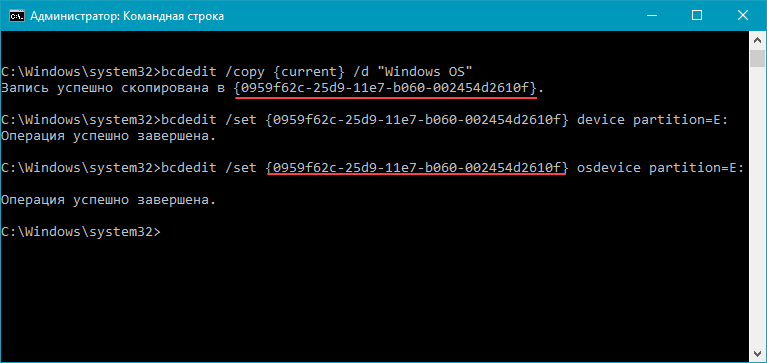
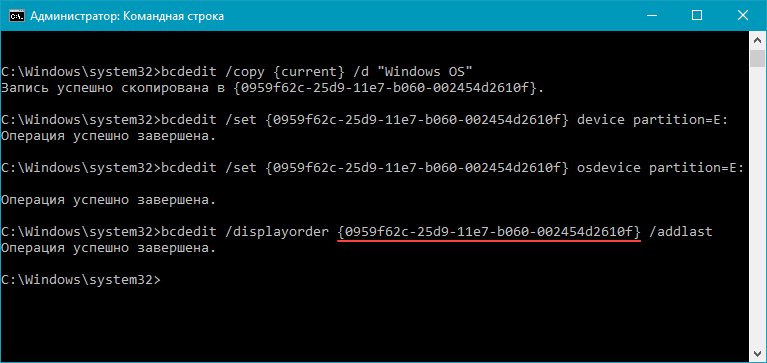
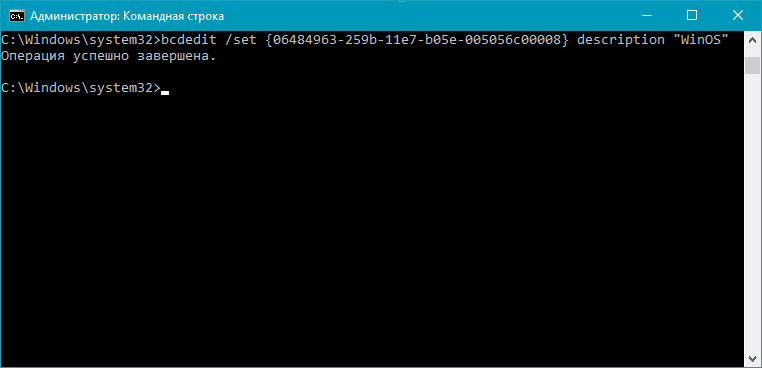
- Всё в ту же командную строку, запущенную от имени администратора, введите bcdedit /copy {current} /d «Windows OS», где Windows OS — произвольное название новой записи. В результате вы должны получить сообщение об успешном копировании существующей записи в новую, а также её уникальный идентификатор.

- Далее наберите bcdedit /set {ИД} device partition=E:, где ИД — идентификатор новой записи, созданной в процессе выполнения предыдущего пункта, а Е — буква локального диска, на котором расположены файлы другой операционной системы. Чтобы не допустить ошибку при вводе длинного ID, скопируйте его в эту команду вместе с фигурными скобками.

- Следом введите bcdedit /set {ИД} osdevice partition=E:, где ИД — код созданной записи, а E — буква раздела, содержащего системные файлы другой ОС.

- В конце всего этого процесса введите команду bcdedit /displayorder {ИД} /addlast, где ИД — код ранее созданной записи операционной системы. Эта команда должна добавить новую запись в самый низ списка ОС, доступных для запуска из меню загрузки.

Как удалить запись системы из меню загрузки
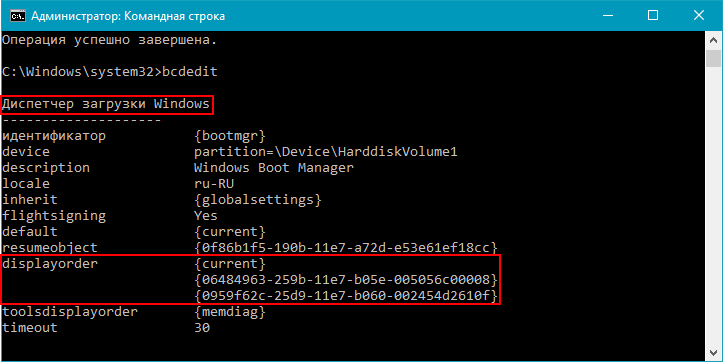
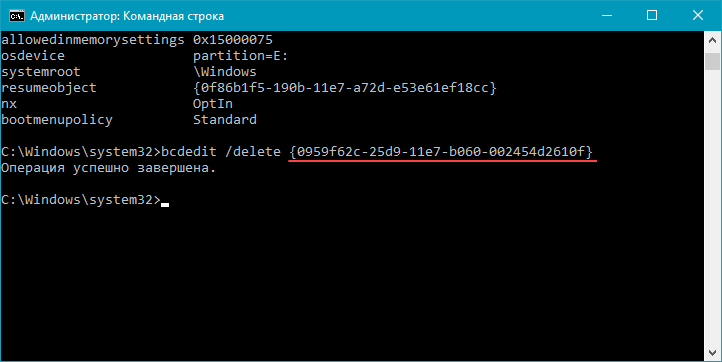
- Введите команду bcdedit, чтобы получить список всех записей установленных ОС. Обратите внимание на пункт displayorder в разделе Диспетчер загрузки Windows. В нём перечислены уникальные коды всех операционных систем. Их порядок точно такой же, как и пунктов установленных систем в меню загрузки.

- Наберите команду bcdedit /delete {ИД}. Вместо ИД вам нужно вставить код записи, которую собираетесь удалить. Его вы можете получить из пункта displayorder. Данная команда уберёт запись не только из диспетчера загрузок, но и из хранилища. Если нужно удалить запись с именем (к примеру, {default}), а не в виде комбинации букв и цифр, тогда команда должна выглядеть так: bcdedit /delete {ИД} /f. Как и во всех остальных случаях, на место ИД нужно вставить идентификатор.

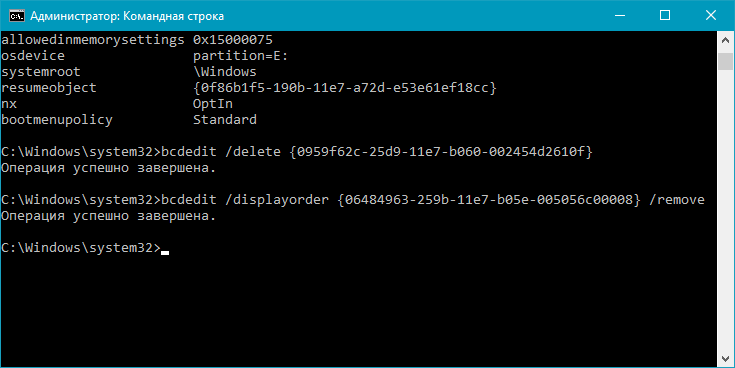
- Если вы желаете лишь на время исключить её из списка, тогда выполните команду bcdedit /displayorder {ИД} /remove. Запись исчезнет из него, но при этом останется в хранилище, что позволит при необходимости восстановить её.

Как изменить порядок отображения систем в меню загрузки
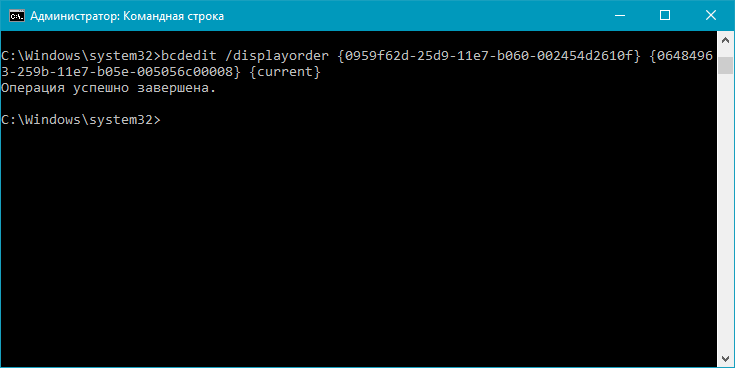
Для редактирования положения записей в загрузчике используйте команду bcdedit /displayorder {ИД2} {ИД1} {ИД3}. Вместо всех ИД укажите реальные коды записей в той последовательности, в которой вы хотите видеть их во время запуска компьютера.
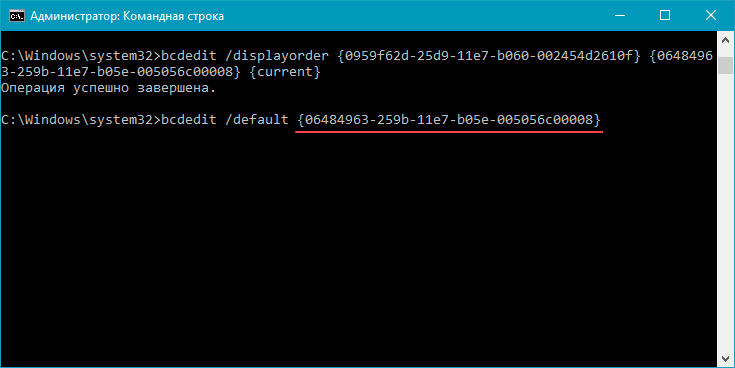
Как выбрать систему для загрузки по умолчанию
Всё, что вы должны сделать, это выполнить команду bcdedit /default с указанием кода системы в фигурных скобках.
Как переименовать систему в меню загрузки
Для изменения названия операционной системы используйте команду bcdedit /set {ИД} description «Новое имя».
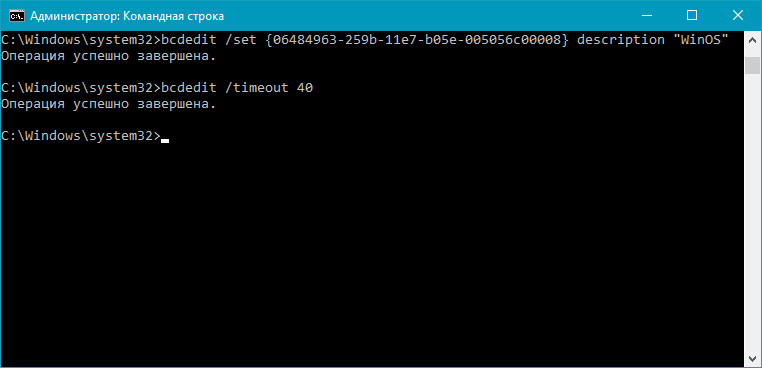
Как изменить время отображения меню загрузки
Чтобы установить оптимальное время отображения меню загрузки наберите команду bcdedit /timeout time, где time — время таймаута в секундах.
Вот, собственно, и все основные способы редактирования меню и хранилища загрузки в операционной системе Windows 10.
In this post, we will show you multiple methods to enable or disable Windows Boot Manager on Windows 11/10.
Windows Boot Manager (BOOTMGR) is one of the main components of the Windows OS that configures the boot environment. It is responsible for managing the boot sequence, initiating the startup of the operating system, and dealing with boot-related errors. It is especially useful when there are multiple operating systems installed on your PC. When you start or restart your PC, you can choose which OS you want to load.

Now, if you want to disable Windows Boot Manager to reduce the overall time spent booting a system, you can do that. Although it is not recommended to do so, it significantly speeds up the boot process. Besides that, Windows also lets you edit the time duration for how long that BOOTMGR will be displayed.
Here are the methods using which you can enable or disable the Windows Boot Manager on Windows 11/10:
- Enable or disable Windows Boot Manager using Command Prompt.
- Use System Properties to enable or disable Windows Boot Manager.
- Enable or disable Windows Boot Manager via the System Configuration tool.
1] Enable or disable Windows Boot Manager using Command Prompt

You can enable or disable Windows Boot Manager using the command line interface. Open the Command Prompt and enter the required command to modify Windows Boot Manager. Here are the steps to do so:
First, run the Command Prompt as an administrator; open Windows Search using Win+S, enter cmd in the search box, hover the mouse over the Command Prompt app from the search results, and select the Run as administrator option.
Now, enter the following commands one by one:
bcdedit / set {bootmgr} displaybootmenu yes
bcdedit /set {bootmgr} timeout 30
Note: In the above command, the timeout value determines the duration (in seconds) for which the boot manager is displayed.
In case you want to disable the Boot Manager completely, you can type the below command and press the Enter button:
bcdedit / set {bootmgr} timeout 0
To re-enable the Boot Manager, simply increase the timeout value in the above command.
2] Use System Properties to enable or disable Windows Boot Manager
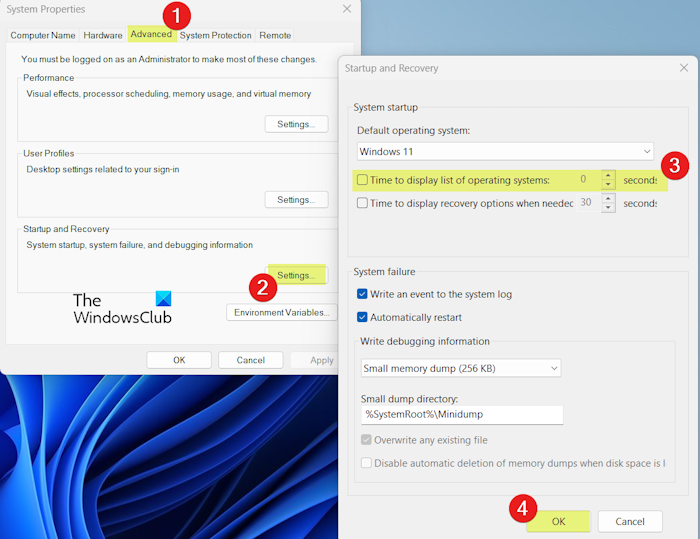
Another method to edit Windows Boot Manager is via System Properties. You can use this utility to enable or disable BOOTMGR. Here are the steps to do that:
First, open the Run command box using Win+R and enter sysdm.cpl in its Open field to quickly launch the System Properties window.
Now, go to the Advanced tab, and under the Startup and Recovery section, click on the Settings button.
After that, uncheck the Time to display list of operating systems checkbox to disable the Boot Manager and click on the OK button. You won’t see the Windows Boot Manager screen when rebooting your PC now.
If you want to modify the time to display Windows Boot Manager, you can tick the Time to display list of operating systems box and then enter the desired time in seconds.
Once done, press OK, then click on the Apply > OK button to save changes, and close the System Properties window.
3] Enable or disable Windows Boot Manager via the System Configuration tool
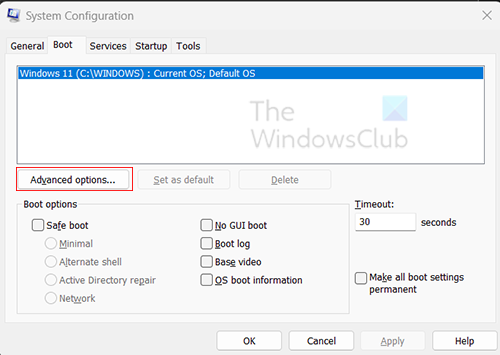
Another method to enable, disable, or modify the BOOTMGR is to use the System Configuration tool. Let us check out how.
First, evoke the Run dialog and enter msconfig in the Open box to launch System Configuration.
Next, go to the Boot tab.
Now, enter the desired Timeout value in seconds to modify the duration of Windows Boot Manager when booting up the system.
If you want to disable Windows Boot Manager, enter 0 in the Timeout box. Otherwise, you can enter values like 30, 40, etc.
When done, click the Apply > OK button to apply modifications and close the window.
Read: Fix Windows Boot Manager is on the wrong drive.
What happens if Windows Boot Manager is disabled?
When you disable Windows Boot Manager, the current or default OS boots up automatically. This reduces the total time Windows takes to start. If you don’t want to disable Boot Manager, you can even reduce the timeout duration to increase the speed of the boot process.
Read: How to boot into legacy Boot Manager in Windows 11
Should I enable Windows Boot Manager?
Yes, you must have Windows Boot Manager enabled if you have multiple operating systems installed on your PC. It lets you select the OS you want to use on your system startup.
Now read: Fix BOOTMGR is Missing error in Windows.
Editing the Windows Boot Manager can be necessary for various reasons, such as changing the default operating system, adding or removing boot entries, or modifying timeout settings. Here are the steps to edit the Windows Boot Manager using the built-in utility called BCDEdit (Boot Configuration Data Editor) and the System Configuration tool (msconfig).
Method 1: Using BCDEdit
-
Open Command Prompt as Administrator:
- Press
Windows + Xor right-click the Start button. - Select Windows Terminal (Admin) or Command Prompt (Admin).
- If prompted by User Account Control (UAC), click Yes.
- Press
-
View Current Boot Configuration:
- Type the following command and press
Enter:bcdedit - This will display a list of boot entries and their configurations.
- Type the following command and press
-
Modify Boot Options:
- To change the default operating system, note the identifier (usually
{current}or a GUID) of the operating system you want to set as default. - Use the following command to set the default OS:
bcdedit /default {identifier}Replace
{identifier}with the actual identifier you noted.
- To change the default operating system, note the identifier (usually
-
Change Boot Timeout:
- To modify the timeout (the time the boot menu is displayed), use:
bcdedit /timeout XReplace
Xwith the desired number of seconds.
- To modify the timeout (the time the boot menu is displayed), use:
-
Delete a Boot Entry:
- To remove an unwanted boot entry, use:
bcdedit /delete {identifier} - Make sure to replace
{identifier}with the actual identifier of the entry you wish to delete.
- To remove an unwanted boot entry, use:
-
Add a New Boot Entry (optional):
- To add a new boot entry for another OS or recovery environment, use:
bcdedit /copy {current} /d "New Entry Name" - The command will return a new identifier for the entry you just created, which you can then further customize.
- To add a new boot entry for another OS or recovery environment, use:
-
Reboot Your Computer:
- After making changes, restart your computer to see the effects.
Method 2: Using System Configuration (msconfig)
-
Open System Configuration:
- Press
Windows + Rto open the Run dialog. - Type
msconfigand pressEnter.
- Press
-
Go to the Boot Tab:
- In the System Configuration window, click on the Boot tab.
- Here, you will see a list of operating systems installed on your computer.
-
Set Default OS and Timeout:
- To set the default operating system, select the desired OS and click on Set as Default.
- You can also adjust the Timeout value (how long the boot menu waits before defaulting to the selected OS).
-
Apply Changes:
- Click Apply, then OK to save your changes.
- You might be prompted to restart your PC.
Important Notes:
-
Backup Boot Configuration: Before making changes, it is advisable to back up your current boot configuration. You can do this using the command:
bcdedit /export C:\bcdbackup -
Be Cautious: Modifying the boot configuration can cause boot issues if done incorrectly. Make sure you understand what each command does before executing it.
-
Recovery Media: Keep a Windows recovery disk or USB handy in case you need to repair the boot loader or restore settings.
By following these steps, you should be able to effectively edit the Windows Boot Manager according to your needs.
This question has been answered using artificial intelligence. If there is any problem please contact us.
Did you like this answer?
Similar Questions
- Can Windows boot without Windows Boot Manager?
- Should I be booting from Windows Boot Manager?
- Windows boot Manager hatası nasıl düzeltilir?
- Windows Boot Manager nasıl kapatılır?
- Windows Boot Manager nasıl çıkılır?
- Windows Boot Manager hangi tuş?
- Windows Boot Manager sorunu nasıl çözülür?
The boot manager is the first thing you see when turning on your computer. It provides a list of programs that will load once Windows starts up. The Boot Manager can be edited by going to Start and then Settings>System, clicking Advanced Startup Options, selecting “Restart now” at the top-left corner of the screen (not shown), click Shutdown menu item in System menu, select Restart from there.,
The “edit boot options commands” is a question that has been asked many times. The “boot manager” is the tool used to edit the boot options on your computer. This can be done by using the command-line tools in windows or terminal in Linux.
With MSCONFIG, you may change the default operating system in the boot menu.
Finally, you may alter the boot timeout using the built-in msconfig utility. In the Run box, press Win + R and enter msconfig. Select the preferred item from the list on the boot tab and click the Set as default button. You’re finished when you click the Apply and OK buttons.
So, how can I make changes to Windows Boot Manager?
- Restart the computer if necessary.
- To access Advanced Boot Options, use the F8 key.
- Choose the option to repair your computer. Windows 7’s Advanced Boot Options
- Enter the code.
- Select Command Prompt from the System Recovery Options menu.
- bcdedit.exe is the command to use.
- Enter the code.
Also, how can I uninstall Windows Boot Manager? To remove a version from the Windows Boot Manager screen, follow these steps:
- Start the msconfig application.
- Select the Boot option from the drop-down menu.
- Choose the version of Windows you’d want to launch straight into.
- Select Set as Default from the drop-down menu.
- By picking the other version and pressing Delete, you can get rid of it.
- Apply the changes.
- Click the OK button.
- Restart the computer if necessary.
So, how can I alter my boot options?
Editing Boot Options in Windows
- Go to the Start Menu, type msconfig in the search box, and Enter the code.
- Select the Boot tab.
- Under Boot settings, choose the Safe boot check box.
- For Safe Mode, choose the Minimal radio option, or Network for Safe Mode with Networking.
How do I rebuild my BCD manually?
Rebuild the BCD (fix #4).
- Insert the installation DVD or USB drive that came with the computer.
- Your computer should be restarted.
- Start the computer from the disc/USB.
- Click Repair your computer or press R on the Install screen.
- Select Troubleshoot from the drop-down menu.
- Select Command Prompt from the drop-down menu.
- Type bootrec /FixMbr bootrec /FixBoot bootrec /ScanOs bootrec /RebuildBcd into the command prompt.
Answers to Related Questions
What is the procedure for launching Windows Boot Manager?
This may be done on most computers by hitting the “F8” key as soon as the machine comes on. When the Windows Boot Manager menu appears, pick an operating system or external boot source using the arrow keys and then press “ENTER” to load it.
How do I change the UEFI settings?
How do you change a UEFI boot entry?
- Click the. button after running EasyUEFI as administrator.
- In the boot order list, choose the boot entry you wish to change.
- In the window, press the. button.
- You must provide the boot entry description, partition, and file that you wish to use in the edit boot entry window.
- To modify the boot entry, click “OK.”
How can I add UEFI boot parameters manually?
Getting into the UEFI Boot Mode In BIOS, manually enter the information.
To do so, navigate to the Boot tab and choose Add New Boot Option from the drop-down menu. The name of the UEFI boot entry may be specified under Add Boot Option. The BIOS detects and registers the Select File System automatically.
What is the location of BCD?
The System Boot Configuration Data (BCD) is kept in a file in the “Boot” folder in Windows Vista, Windows 7, Windows 8/8.1, and Windows 10. “[active partition]BootBCD” is the complete path to this file.
What is Windows Boot Manager, and how does it work?
Windows Boot Manager is a term used to describe a program that allows you to (BOOTMGR)
Windows Boot Manager (BOOTMGR) is a boot manager, which is a tiny piece of software that is loaded from the volume boot code, which is part of the volume boot record. BOOTMGR aids with the startup of Windows 10, Windows 8, Windows 7, or Windows Vista.
What is the location of the boot INI file in Windows 7?
The Boot. ini file is a text file that includes the boot settings for computers running NT-based operating systems prior to Windows Vista that have BIOS firmware. It is usually found at the root of the system partition, c:Boot.
What is the function of the f12 boot menu?
The boot menu may be accessed by hitting one of many keyboard keys while a computer is starting up. Depending on the computer or motherboard manufacturer, the keys to enter the boot menu are Esc, F2, F10, or F12. On the computer’s starting screen, the particular key to hit is frequently indicated.
What is the procedure for resetting the BIOS?
Method 1: Resetting BIOS from Within
- Your computer should be restarted.
- Wait for the first starting screen to show on the machine.
- To enter setup, repeatedly press Del or F2.
- Wait for your BIOS to load before proceeding.
- Choose “Setup Defaults” from the drop-down menu.
- Press Enter after selecting the “Load Setup Defaults” option.
What is the procedure for removing Uefi entries?
How can I get rid of a UEFI boot entry?
- Click the. button after running EasyUEFI as administrator.
- In the boot order list, choose the boot item you wish to remove.
- To remove this entry, click the. button.
- You’ll see a pop-up asking whether you want to remove this entry. “Yes” should be selected.
What is the procedure for entering UEFI mode?
To boot into UEFI or BIOS, follow these steps:
- To access the menus, start the computer and hit the manufacturer’s key. Esc, Delete, F1, F2, F10, F11, or F12 are often used keys.
- Or, if Windows is already installed, from either the Sign on screen or the Start menu, select Power ( ) > hold Shift while selecting Restart.
What’s the best way to get out of the boot menu?
Once In the BIOS navigate to the Startup tab > Boot Priority Order and ensure that the Boot Menu is at the very bottom or at the exclude list. When finished, hit F10 to save and exit and observe.
In Windows 10, how do I go to the boot menu?
This is the quickest method to go to the boot choices in Windows 10.
- All you have to do is restart your computer while holding down the Shift key on your keyboard.
- To access power choices, go to the Start menu and choose “Power.”
- Now, while holding down the Shift key, choose “Restart.”
How can I access to Windows 10’s advanced boot options?
One-time enable the Advanced Boot Options panel in Windows 10.
- Select Settings from the Start menu by left-clicking it.
- Left-click on Update & security.
- Left-click on Recovery in the left column.
- Left-click on Restart now under Advanced startup. You will be logged off and the Choose an option page will appear.
What is RebuildBcd and how does it work?
/RebuildBcd
This option searches all drives for Windows Vista or Windows 7 compatible installs. It also allows you to choose which installations you wish to add to the BCD store. When you need to entirely rebuild the BCD storage, choose this option.
Is it possible to turn off Windows Boot Manager?
Solution 2: Use System Properties to enable or disable Windows Boot Manager. Step 1: Open the “Run” command box by pressing “Win” + “R.” Step 5: To turn off Windows Boot Manager, uncheck the box that says “Time to show list of operating systems” or adjust the time value to 0. “OK” should be selected.
Is dual booting going to slow down my computer?
1 slow down my computer? No, dual booting will not harm your Windows OS or affect the functionality of your computer. When you dual boot two operating systems, they are fully unaware of one other and operate independently. They don’t mess with with any other OS files or folders.
Should the Windows boot manager be the first to load?
Because the Windows Boot Manager is the only one that boots Windows under UEFI, it must always be first in Boot Priority. This is in contrast to Legacy BIOS, which sets the hard disk to boot first.
The “boot manager windows 10” is a command-line tool that allows users to edit the boot order. The boot manager can be accessed from a Windows 10 computer by typing “bootmanager”.
Содержание статьи:
- Настройка загрузки: выбор ОС по умолчанию
- Если установлено несколько версий ОС Windows 7/10/11
- Если установлена Linux + ОС Windows (меню GNU GRUB)
- Вопросы и ответы: 5
Вопрос от пользователя
Здравствуйте.
Подскажите, с одной проблемой. У меня на диске была установлена Windows 10, затем я установил еще одну Windows. Теперь по умолчанию после включения компьютера — загружается именно вторая новая система (мне же приходится вручную на этапе загрузки успевать указывать свою «родную» 10-ку).
Как сделать так, чтобы по умолчанию стартовала моя основная Windows 10. Спасибо!
Здравствуйте.
Да, вы правы, при установке еще одной версии ОС Windows — она будет загружаться по умолчанию! Исправить это можно 👉 в свойствах системы (ниже покажу на примерах, как это делается).
*
Настройка загрузки: выбор ОС по умолчанию
Если установлено несколько версий ОС Windows 7/10/11
Вариант 1
Итак…
Обратите внимание на фото с окном выбора ОС ниже 👇 (такое, обычно, бывает при использовании Windows 10/11, в Windows 7 — просто список на «черном» фоне).
Так вот, в идеале в нижней части окна у вас должна быть ссылка «Изменить значения по умолчанию или выбрать другие параметры» — ее и нужно нажать! (примечание: отображаться может не всегда, у некоторых эта ссылка «уходит» за границы экрана и ее ну видно — в этом случае используйте др. способы, приведенные ниже).
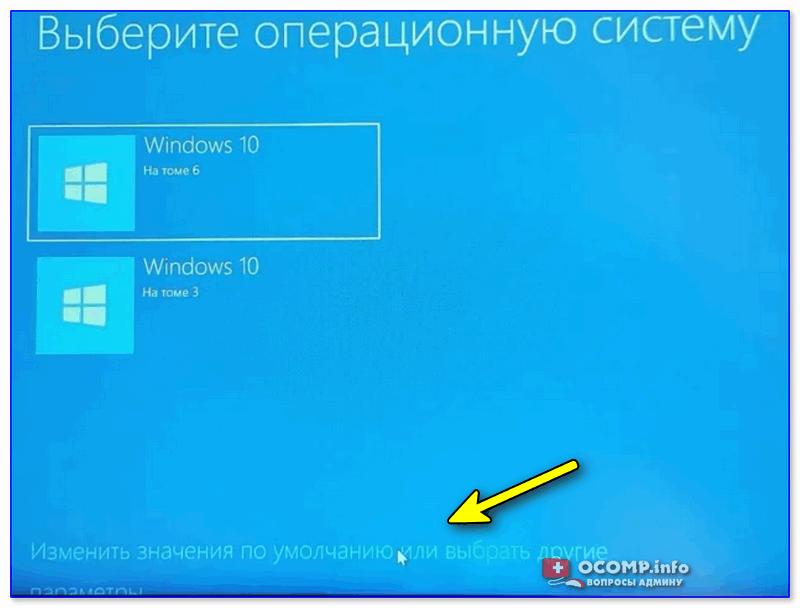
Окно, появляющееся после вкл. ПК/ноутбука (по умолчанию 30 сек. отображается)
Далее появится окно, в котором вы сможете установить таймер (как долго будет отображаться окно с выбором ОС) и выбрать ОС по умолчанию. Если предложенных параметров недостаточно — загрузите пока какую-нибудь копию Windows и переходите к нижеприведенным инструкциям.
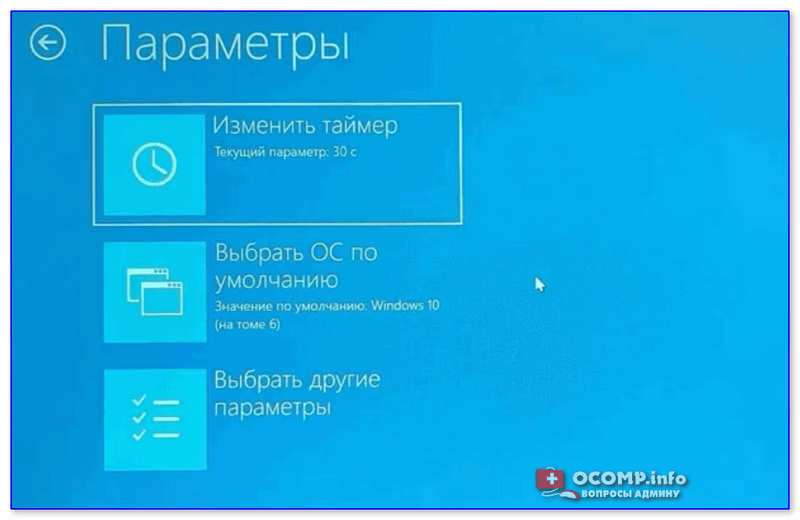
Параметры — изменить таймер, выбрать ОС по умолчанию
*
Вариант 2
Выбрать ОС Windows по умолчанию (как уже говорил выше) можно в 👉 свойствах системы.
Самый простой способ открыть их — вызвать меню «Выполнить» (сочетание кнопок Win+R) и использовать команду sysdm.cpl (также это команду можно использовать в диспетчере задач).
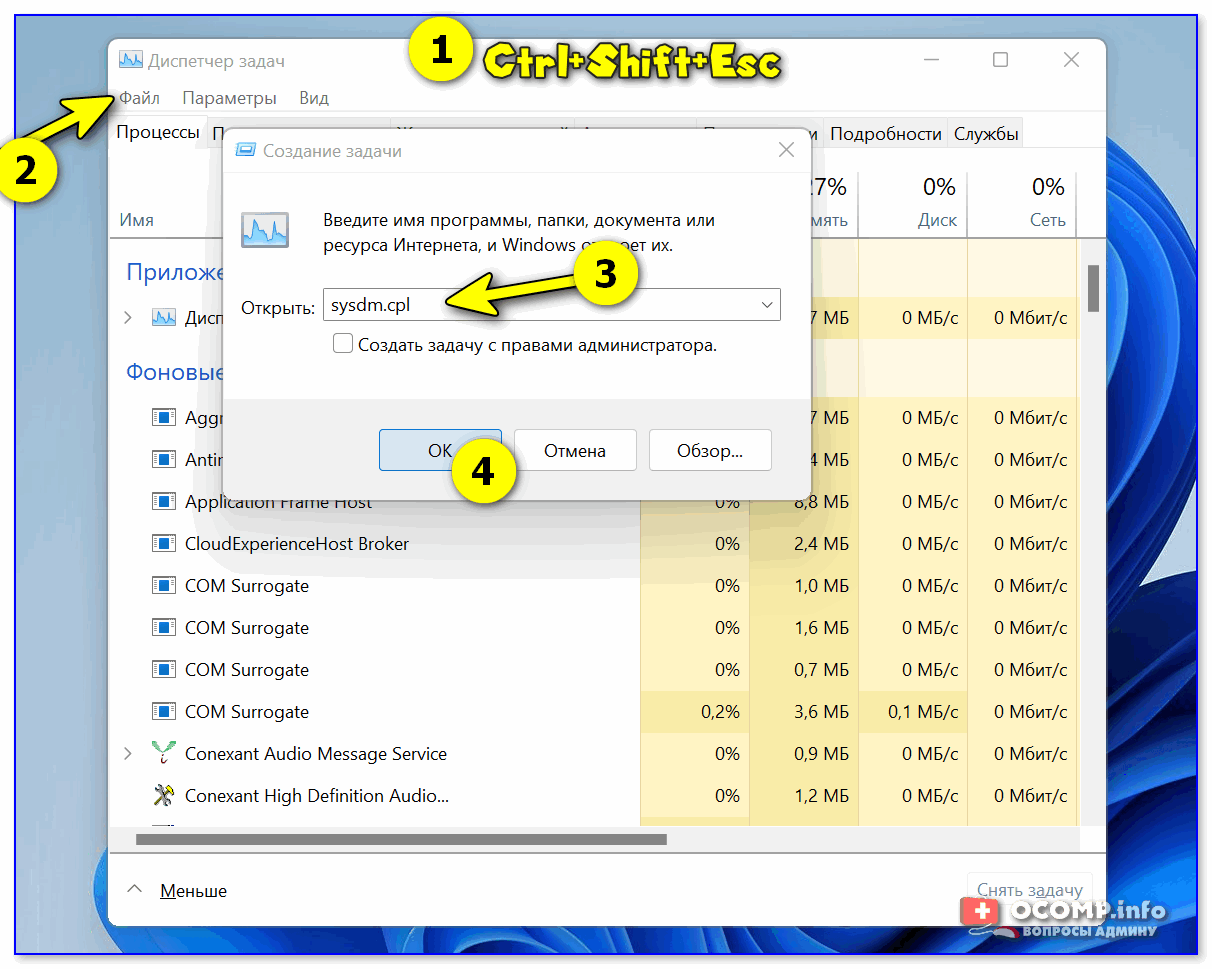
sysdm.cpl — диспетчер задач
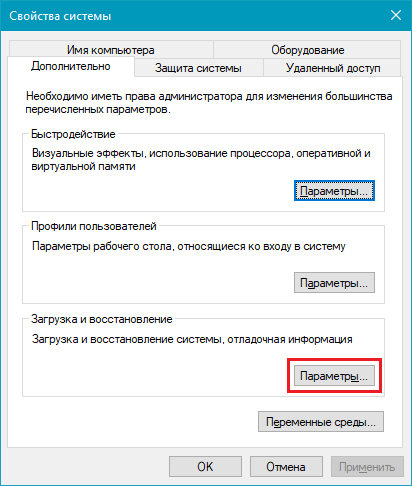
После нужно перейти во вкладку «Дополнительно / параметры загрузки и восстановления». См. скриншот ниже. 👇
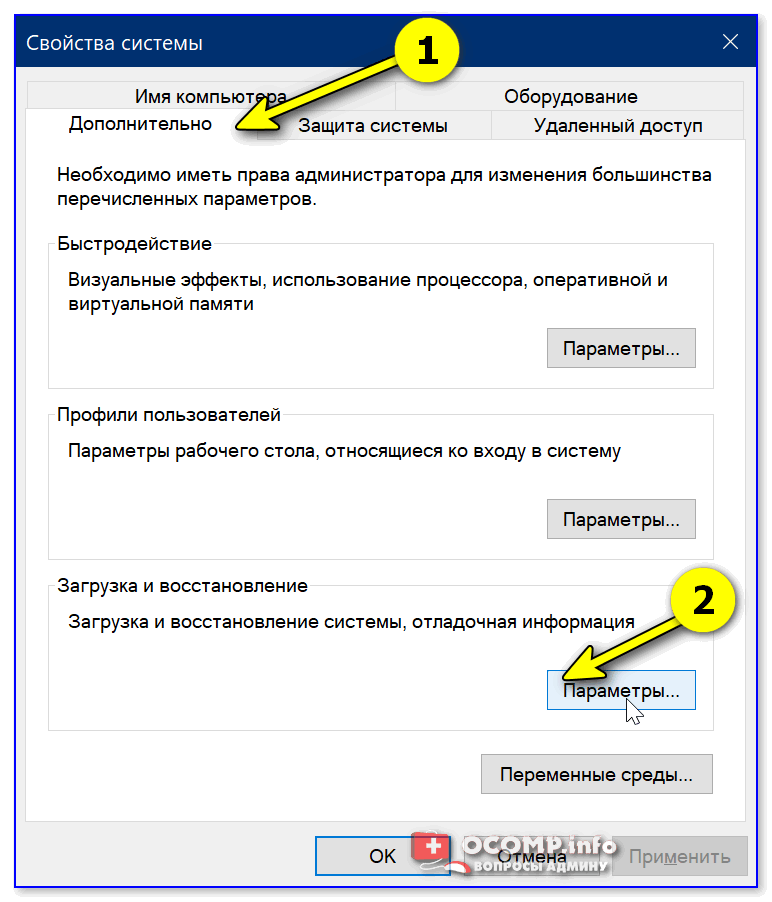
Загрузка и восстановление системы, отладочная информация
В появившемся окне вы сможете выбрать нужную ОС (для ее загрузки по умолчанию) и установить таймер. См. пример на скрине ниже. 👇
Важно! Рекомендую с осторожностью выставлять значение «0» в таймере отображения списка ОС Windows! Например, если вы ошибочно укажите «0» и выберите «неработающую» ОС — могут быть сложности при загрузке… (и придется прибегать к восстановлению).
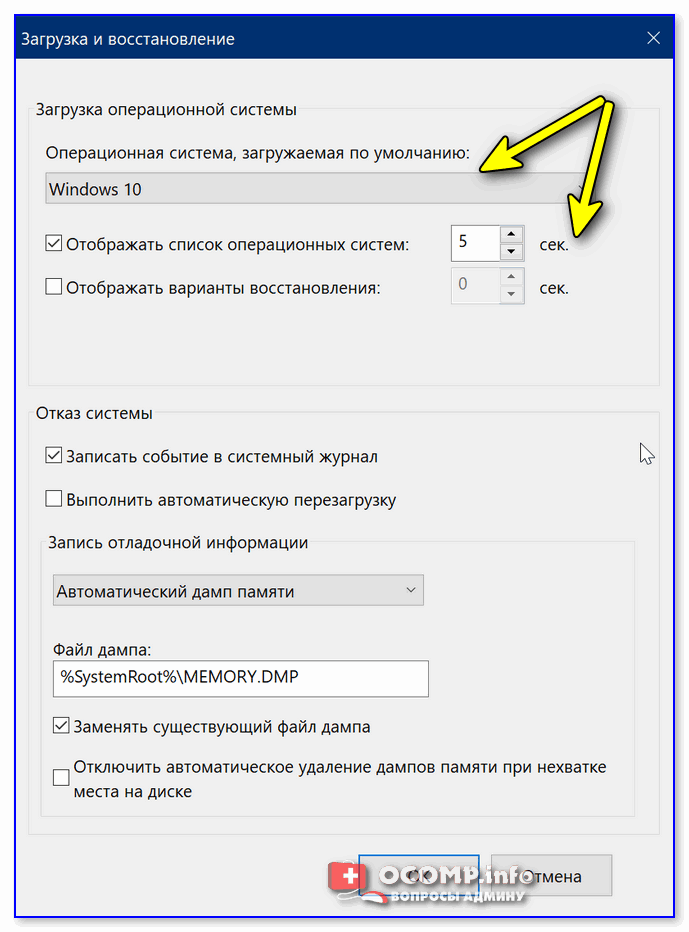
Операционная система, загружаемая по умолчанию
*
Вариант 3 (+ удаление «ненужных» ОС)
Этот способ хорош еще и тем, что позволяет удалить ненужные ОС (правда, с этим следует быть осторожным: если надумали удалять что-то — 👉 см. эту инструкцию).
Сначала нажать сочетание Win+R, и в окно «Выполнить» вставить команду msconfig, подтвердить клавишей Enter.
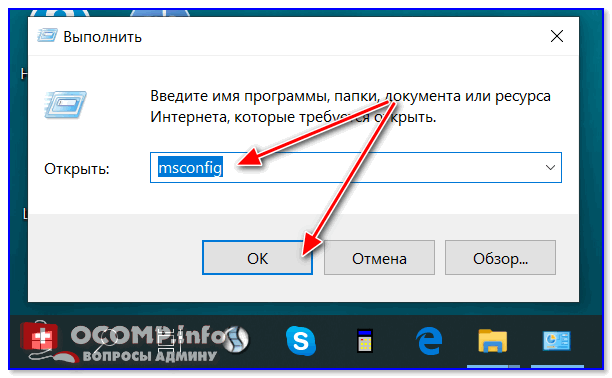
msconfig
Должно открыться окно «Конфигурация системы» — нам нужна вкладка «Загрузка». В ней можно выбрать ОС, которая будет загружаться по умолчанию (+ удалить ненужную ОС), установить таймаут и пр. См. пример ниже. 👇
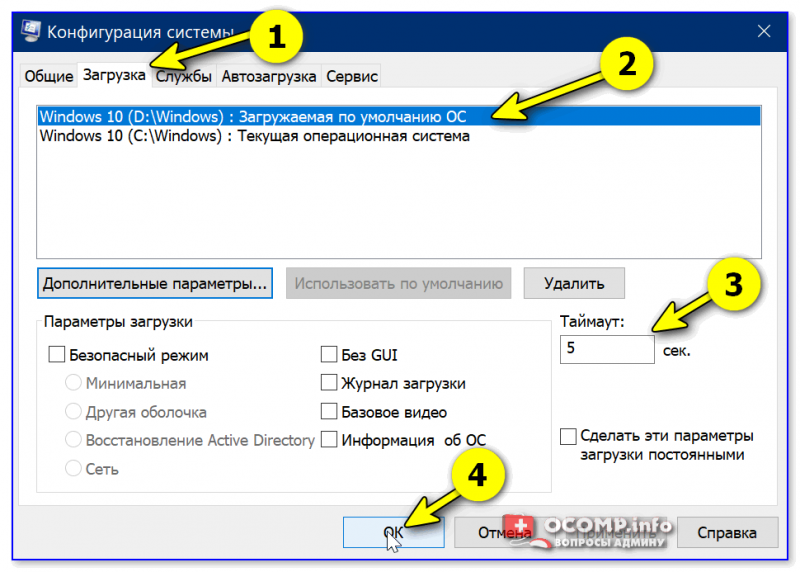
msconfig — конфигурация системы
*
Если установлена Linux + ОС Windows (меню GNU GRUB)
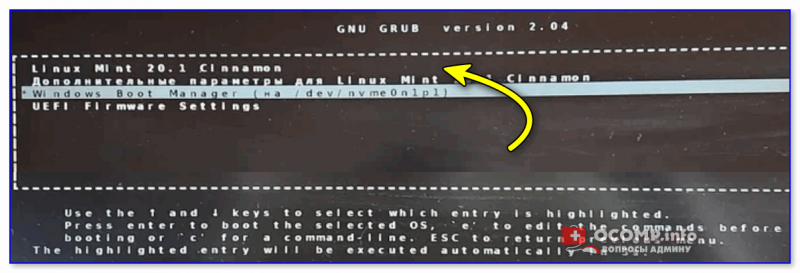
GNU Grub // меню после вкл. ПК/ноутбука // В качестве примера
В этом случае наиболее простой и быстрый путь сконфигурировать загрузчик (GNU Grub) — это воспользоваться утилитой с графич. интерфейсом Grub Customizer. Она позволит изменить не только очередь загрузки, но и установить фоновое изображение, цвет и размер шрифта, и многое другое…
Для ее установки в Ubuntu используйте команду:
sudo apt install grub-customizer
Если появятся ошибки — попробуйте выполнить поочередно следующие команды:
sudo add-apt-repository ppa:danielrichter2007/grub-customizer
sudo apt-get update
sudo apt-get install grub-customizer
После завершения установки — запустите приложение, команда:
grub-customizer
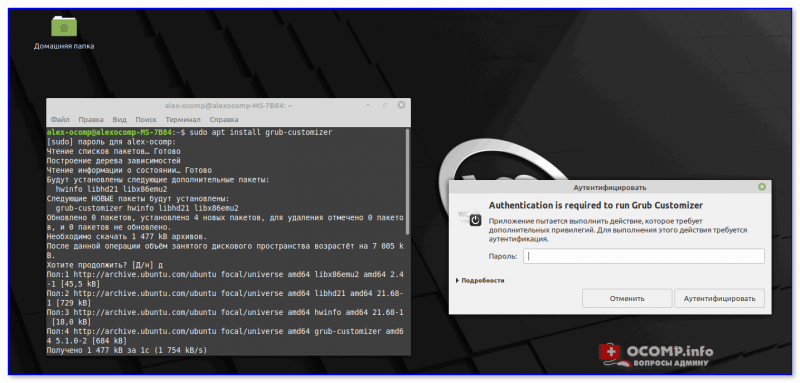
Пример установки и запуска grub-customizer (Linux Mint)
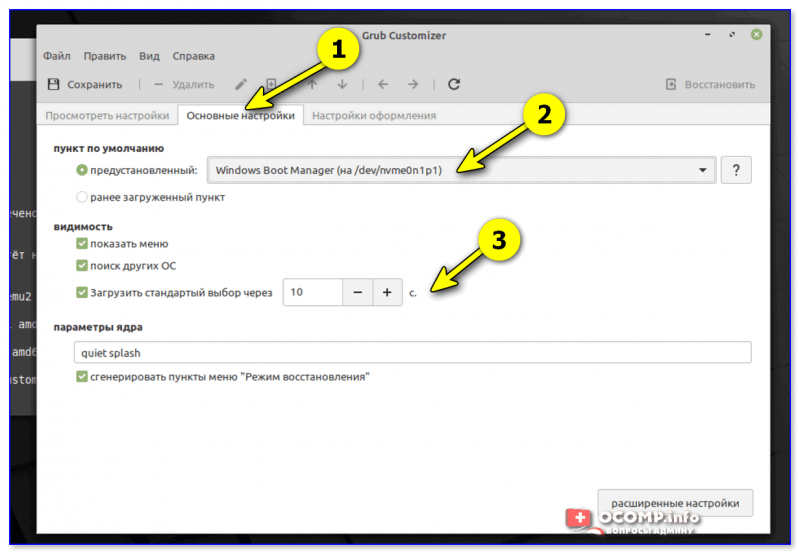
Далее откройте окно основных настроек и установите время отображения меню Grub, а также тот пункт в списке, который будет выбран по умолчанию (в моем случае это Windows Boot Manager). 👇
Меню grub-customizer
Есть также вкладка «Настройки оформления» — может быть архи-полезна, если на вашем экране элементы Grub выглядят мелко / или плохо-читаемы. Шрифт текста можно увеличить вручную!
👉 Важно! После измененных настроек не забудьте нажать кнопку «Сохранить»! (+ перезагрузить компьютер)
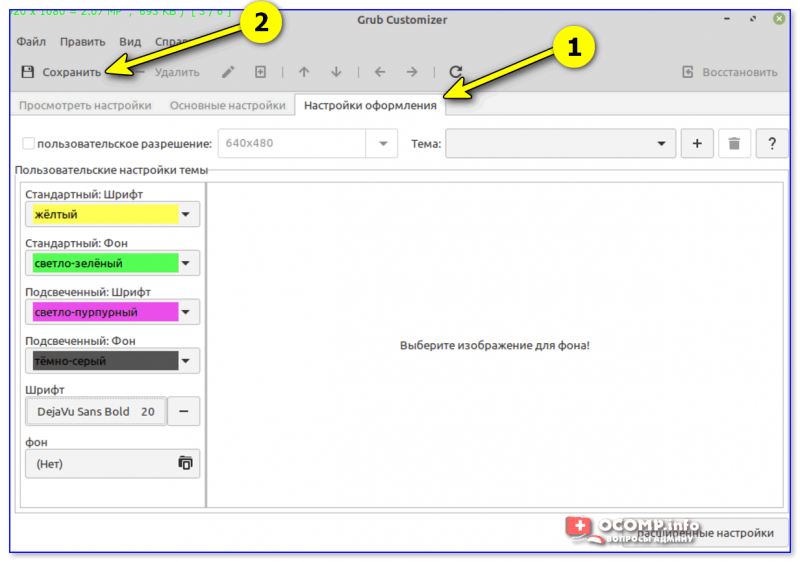
Настройки оформления — сохранить
В общем-то, при следующей загрузке ПК вы должны заметить, что по умолчанию курсор в меню стоит на той ОС, которую вы выбрали. Т.е. задача решена?! 👌😉
*
Дополнения — приветствуются!
Успехов!
👋