
Categories
- Transfer Programs from C Drive to D Drive
- Transfer Installed Software to New PC
- Transfer Files from Old PC to New PC
- Transfer Microsoft Office
- Find Office Product Key
- Move User Folder
- Move Google Chrome Bookmarks
Microsoft doesn’t offer the support service for Windows XP since April 2014, and Windows Server 2003 will end in July 2015. Windows XP and Server 2003 holders have migrated or plan to transfer data, service, paid programs to something else or later system. Backing up to a local network or USB disk is a common choice, if you want to transfer to Windows 7, 10, 11or server 2008, 2012, Windows Easy Transfer would be an efficient solution. Windows Easy Transfer can support setting, data, but not support desk applications; we can try EaseUS Todo PCTrans — the data & programs migrations tool.
Windows Easy Transfer — Not Easy for Windows 8.1, Including Windows 10 and Windows 11
Just transferring files, documents, music, photos, settings among systems, Windows Easy Transfer work well on Windows XP, Vista, Windows 7, and Windows 8. However, it is not easy for Windows 8.1 users, indeed, we still don’t get any official reply about why not successfully transfer data from or to Windows 8.1. Still, now, there is not any feedback and comments about if Windows 10 supports Windows Easy Transfer.
Some people persist in using Windows Easy Transfer to transfer crucial files, setting. Considering Windows 8.1 and applications, highly recommend you EaseUS Todo PCTrans, it can quickly and safely transfer files and applications from Windows XP to Windows 7, 8, 8.1,10.
EaseUS Todo PCTrans — Windows Easy Transfer for Windows XP, Windows 7, 8, 10, 11
EaseUS PC transfer software offers direct and indirect ways to migrate files and applications from Windows XP to Windows 7, 8, 10, and 11. «Via the connected network» to directly move photos, documents, movies, and programs or «Via the compressed files» to create backup files.
Video Tutorial: Transfer Everything to Windows 11/10/8/7/XP
How to Transfer Files from PC to PC via the Connected Network
Step 1. Set Up the Old PC
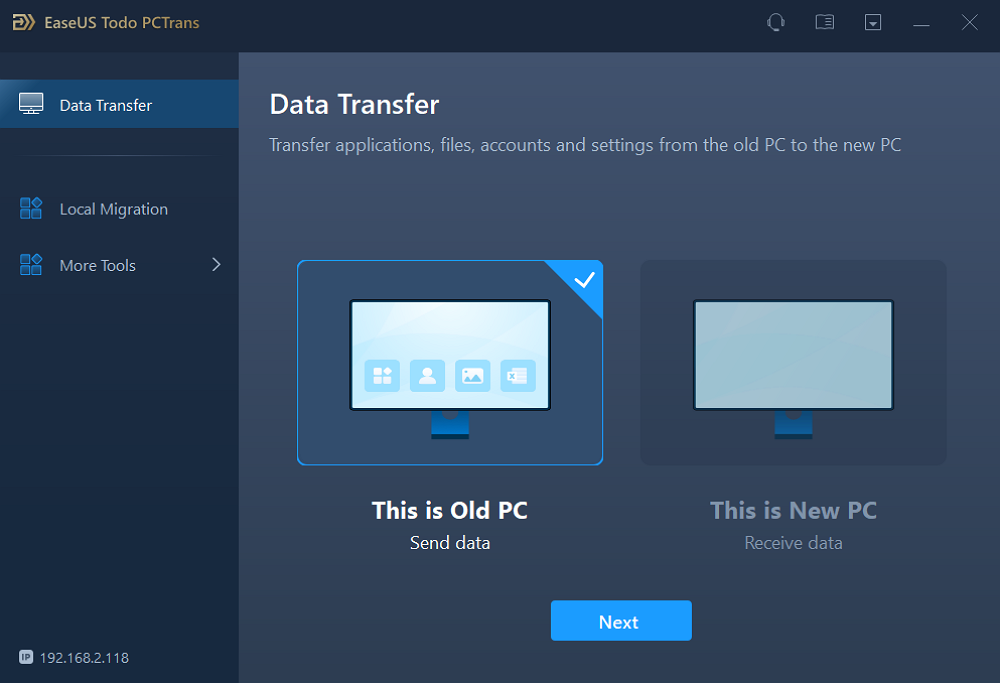
- First, install and launch EaseUS Todo PCTrans and select Data Transfer on the left panel of the main interface.
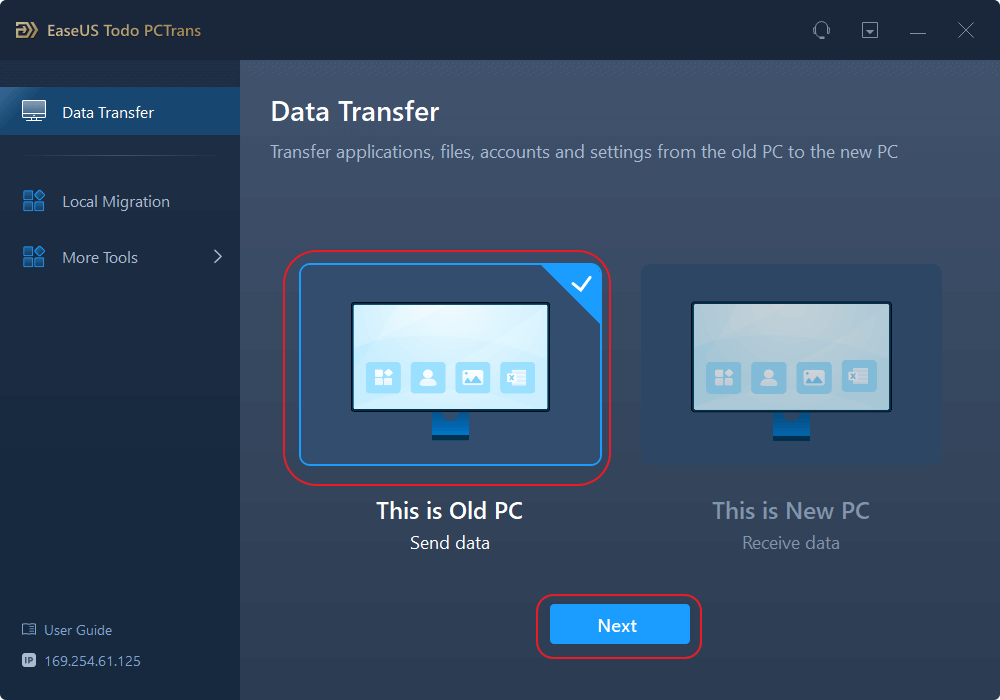
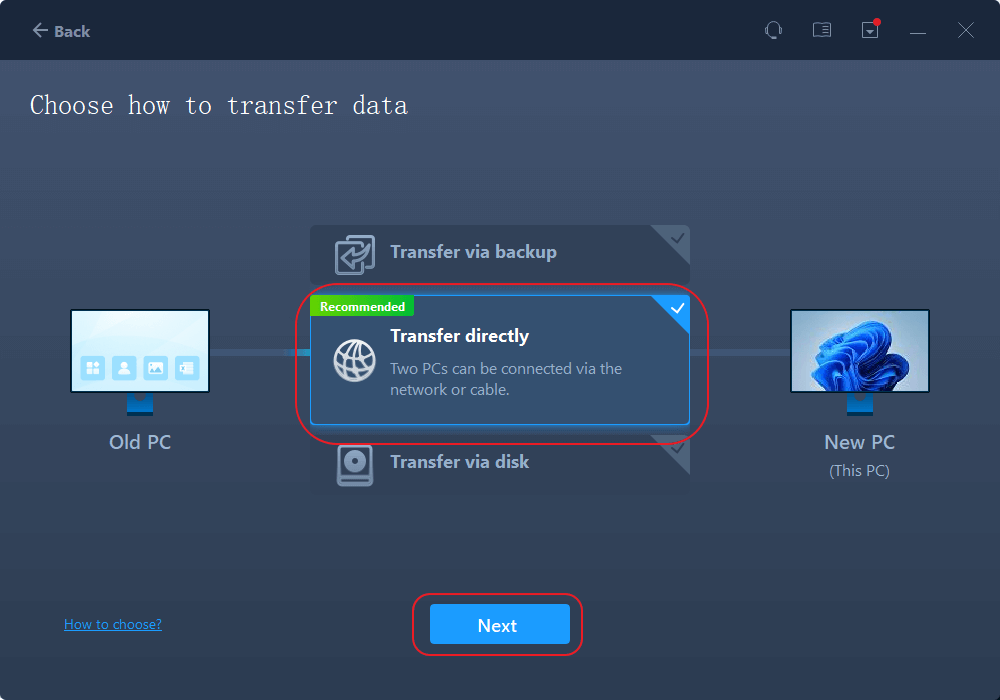
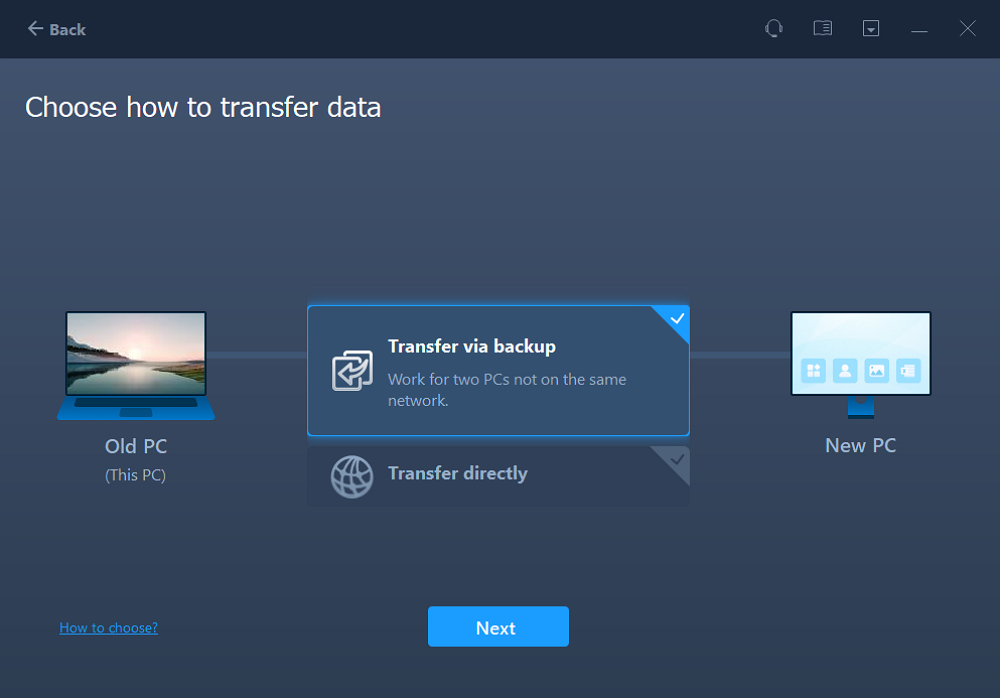
- Select «Transfer Directly» and click «Next» to continue.
Step 2. Set Up the New PC
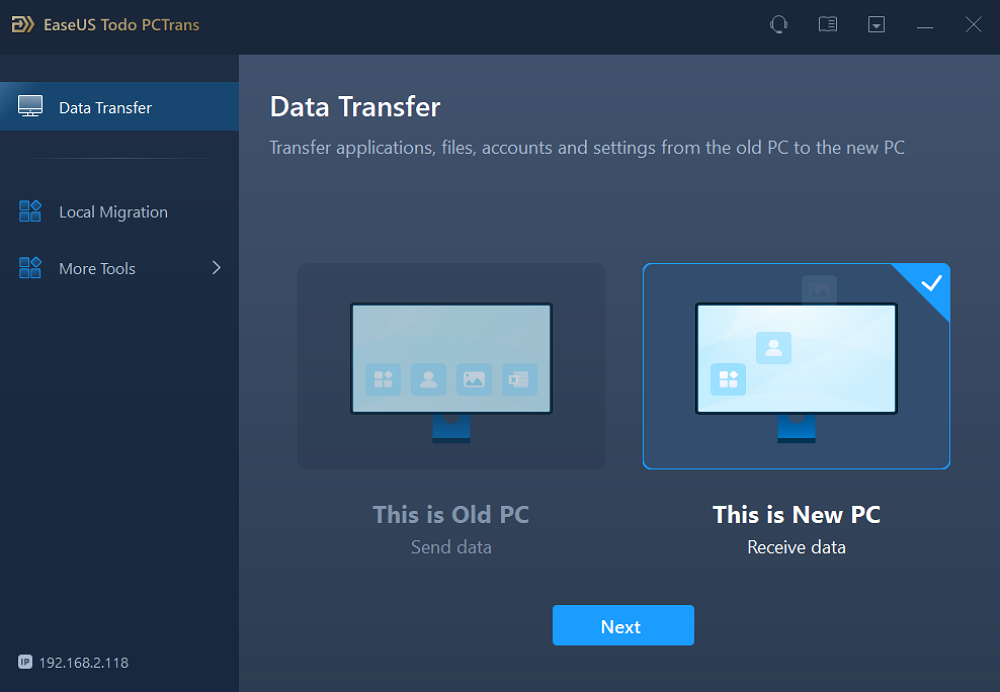
- Download and launch EaseUS Todo PCTrans on the new computer; select «This is New PC» and click «Next».
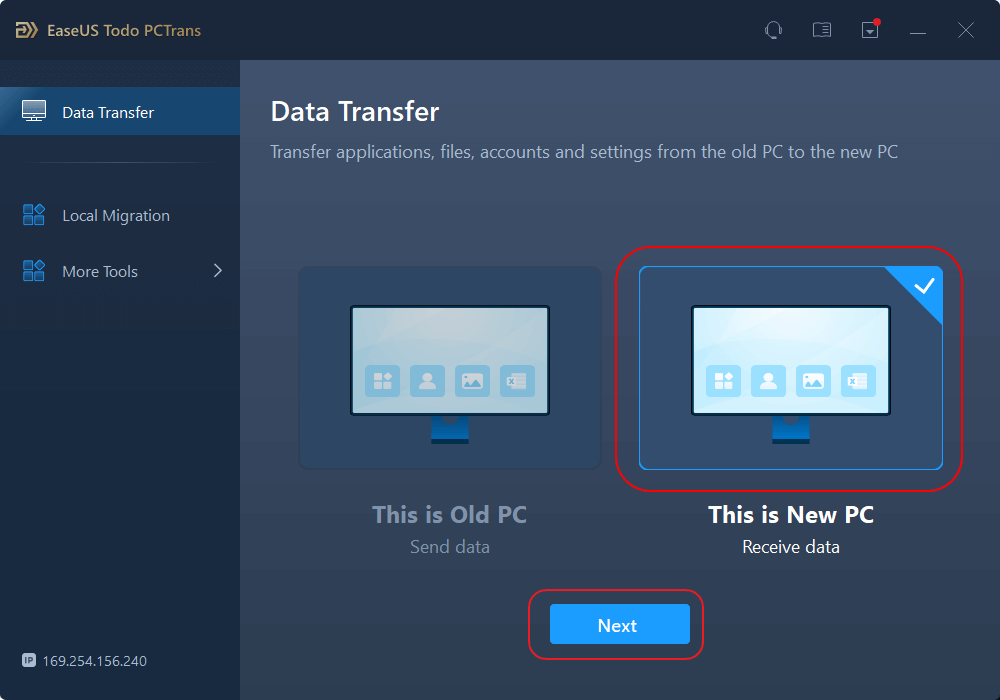
- Select «Transfer directly» and click «Next» to continue.
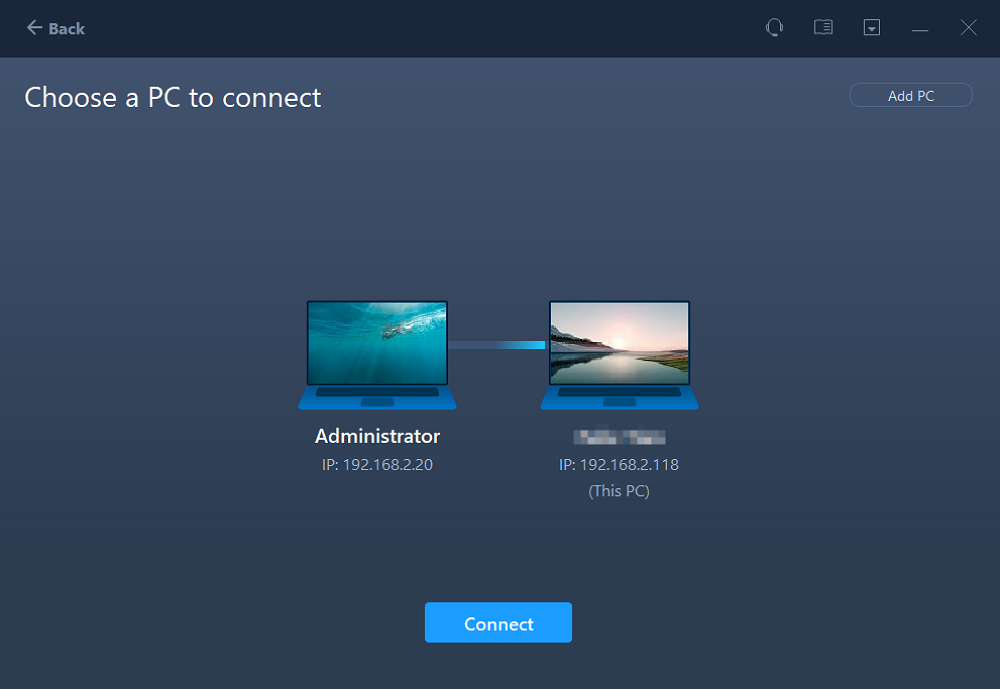
- Select «Network» and click Next to continue. This will automatically scan the old PC. (Make sure the two PCs are connected to the same LAN.)
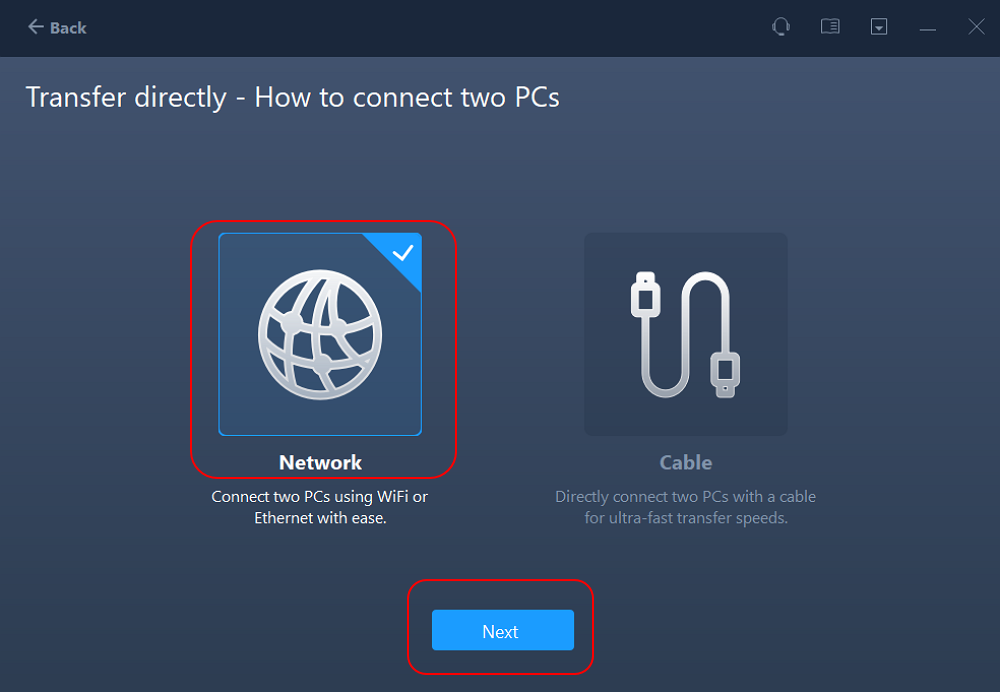
- Select the target PC and click Connect. Then, it will take some time to scan and analyze the data in old PC.
Step 3. Select the Files to Transfer
- Finally, on the new PC, select the Files tab, select the files you need to transfer. Then, click «Transfer» to start.

Transfer Files/Programs via the Backup & Restore
The second method is to use «Backup & Restore,» an easy-to-use and free feature provided by EaseUS Todo PCTrans, enabling you to back up files/programs and restore them.
On the old PC:
Step 1. Launch EaseUS Todo PCTrans and click «Data Transfer» on the main screen. Select «This is Old PC» and click the «Next.»
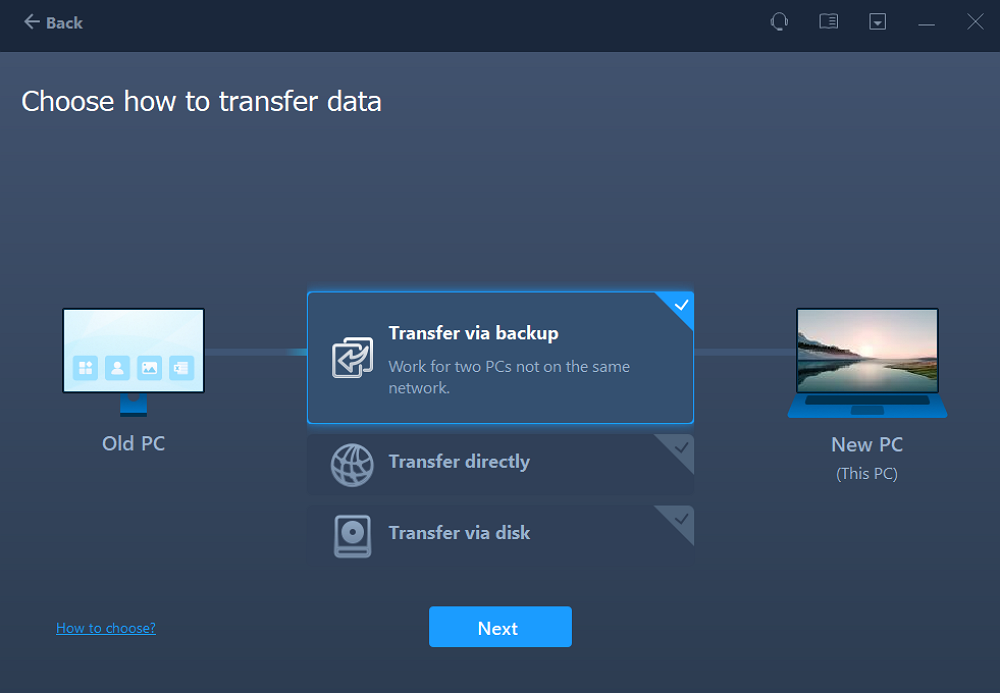
Step 2. Choose the «Transfer via backup» method and click the «Next.»
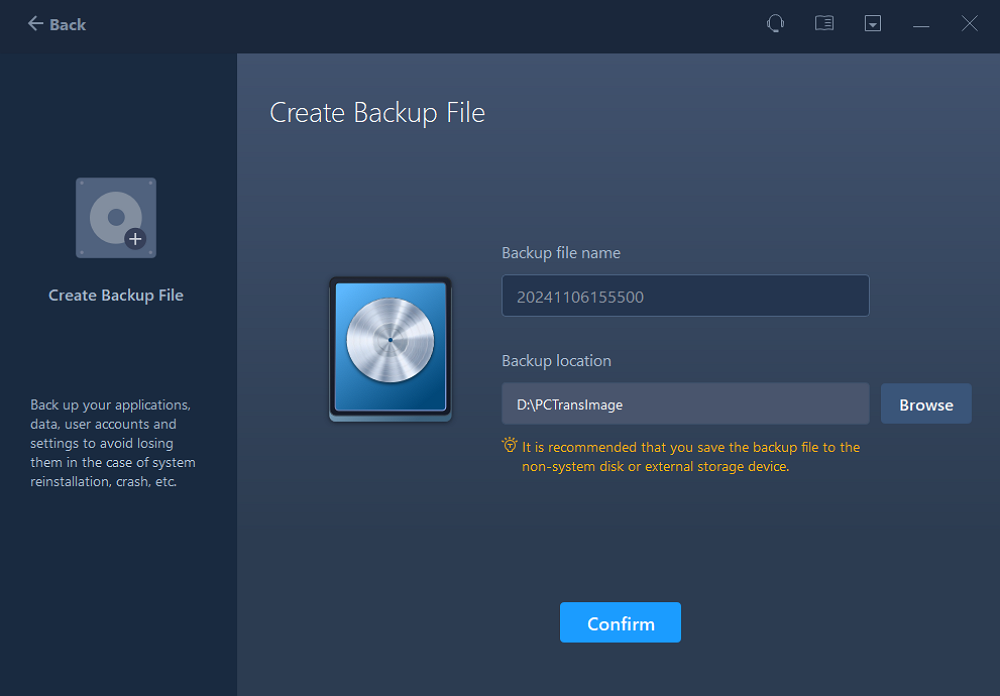
Step 3. Confirm the backup file name and backup location (Please save your files to a location where the new PC can access, like an external hard disk or shared network location.)
Step 4. Tick the Applications, Files, and Accounts that you wnat to backup. Click the «Backup» option to execute the process.

On the new PC:
Step 1. Lauch EaseUS Todo PCTrans on your new PC, and choose «This is New PC» in the «Data Transfer» section.
Step 2. Selcet «Transfer via backup» and click «Next.»
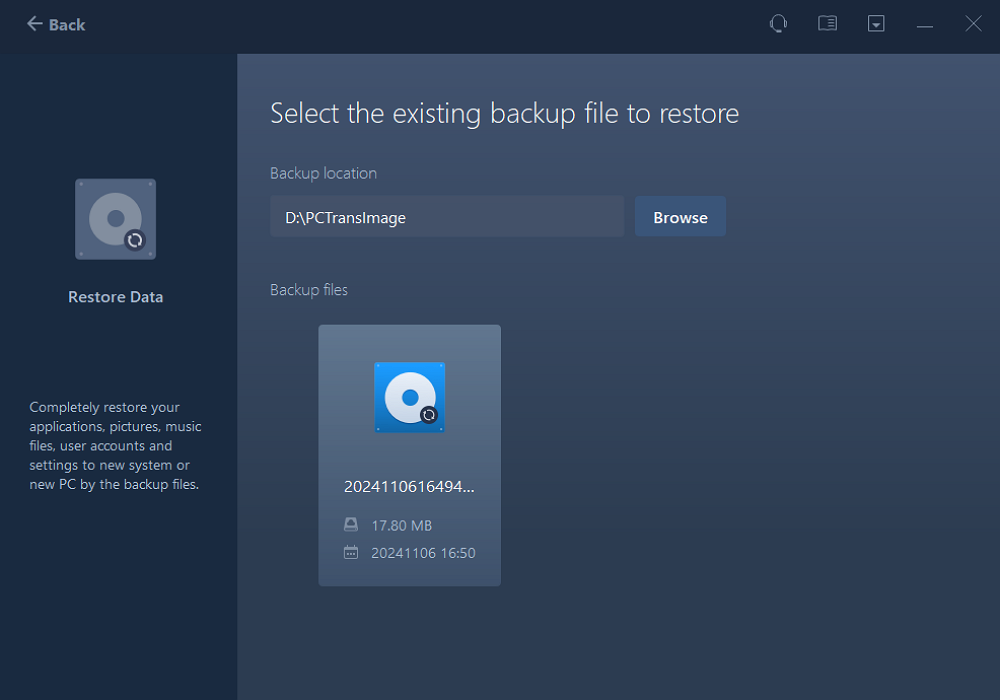
Step 3. Browse the «Backup location» of your existing backup files.
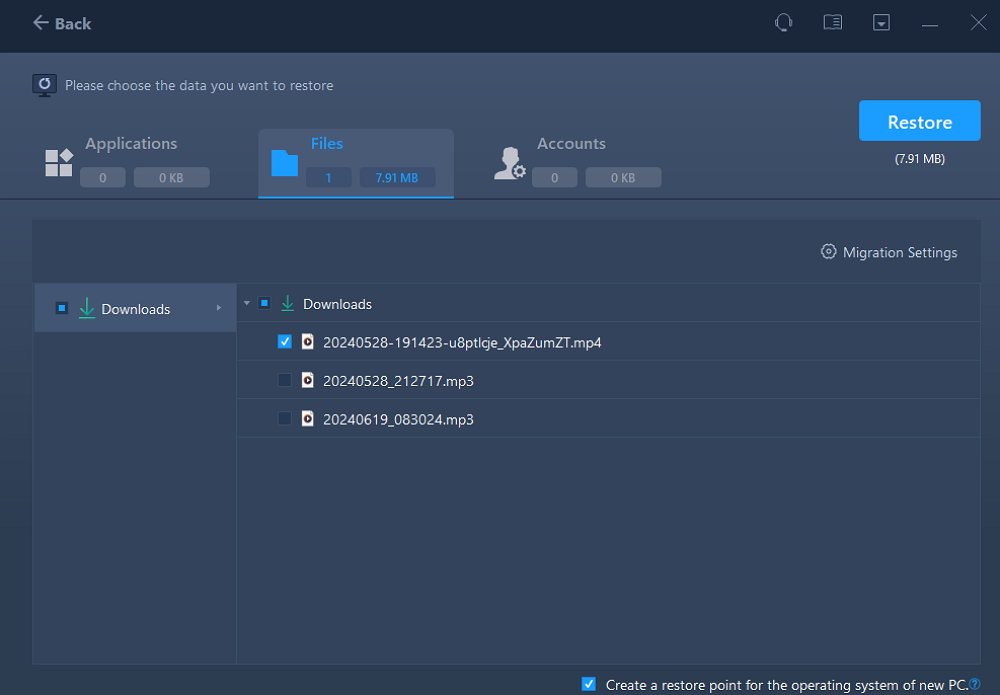
Step 4. Select the wanted Applications, Files , and Accounts to «Restore.»
Средство переноса данных Windows
В комплект Windows 7 входит утилита Средство переноса данных Windows (Windows Easy Transfer) для переноса данных пользователей с компьютеров, работающих по управлением Windows ХР, Windows Vista или Windows 7, на компьютеры с Windows 7. Как показано на рис. 1-5, Средство переноса данных Windows (Windows Easy Transfer) можно применять для переноса учетных записей, документов, музыки, изображений, сообщений электронной почты, закладок, сертификатов и прочих данных.
При переносе данных средствами Windows Easy Transfer используются три различных метода. Выбор метода зависит от конкретных обстоятельств. Методы эти таковы:
- Кабель Easy Transfer. Специальный кабель с USB-разъемами, который можно приобрести в компьютерном магазине. Один конец кабеля подключается к исходному компьютеру, второй — к целевому компьютеру. В процессе переноса оба компьютера включены, и на обоих запущена утилита
Windows Easy Transfer. Таким способом можно выполнить толькопараллельный(side-by-side) перенос. - Сеть. Чтобы осуществить перенос этим методом, вы должны одновременно запустить
Windows Easy Transferна двух компьютерах, включенных в компьютерную сеть. Таким способом можно выполнить толькопараллельный(side-by-side) перенос. При переносе по сети на исходном компьютере задается пароль, который потом нужно будет ввести на целевом компьютере. - Внешний жесткий диск или USB-накопитель. Кроме того, в этом методе можно применять также внутренний жесткий диск или общий сетевой ресурс. Он позволяет выполнять как параллельный перенос, так и перенос с очисткой. Для защиты данных вы задаете пароль на исходном компьютере, а затем вводите его на целевом компьютере перед импортом данных.
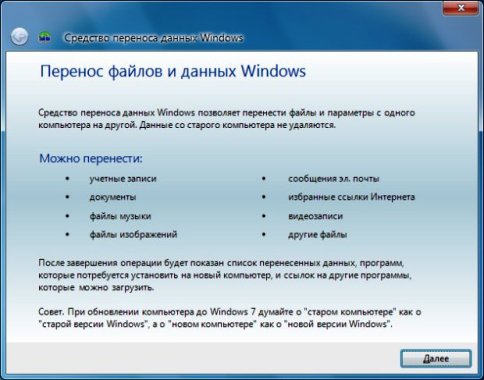
Рис. 1-5. Приветственная страница Windows Easy Transfer
Установка Windows Easy Transfer
Если на исходном компьютере используется ОС, отличная от Windows 7, Средство переноса данных Windows (Windows Easy Transfer) придется специально установить. Это относится и к компьютерам с Windows Vista. Хотя в комплект Windows Vista входит собственная утилита Windows Easy Transfer, для переноса данных на компьютер Windows 7 потребуется более современная версия. Чтобы установить Средство переноса данных Windows на исходном компьютере, выполните следующие действия:
- Запустите
Windows Easy Transferна целевом компьютере и выберите метод переноса, который собираетесь использовать. - Выберите параметр
Это мой новый компьютер(This Is My New Computer). Если вы используете для переноса кабель или сеть, переходите к шагу 3. В противном случае щелкнитеНет(No) в окне с вопросом, производилось ли уже сохранение файлов. - На странице
Необходимо ли установить средство переноса данных Windows на старом компьютере(Do You Need То Install Windows Easy Transfer On Your Old Computer?), щелкнитеНеобходимо установить его сейчас(I Need То Install It Now). - На странице
Выберите способ установки средства переноса данных Windows на старом компьютере(How Do You Want To Install Windows Easy Transfer On Your Old Computer?) установите параметрФлэш-накопитель USB(USB Flash Drive) илиВнешний жесткий диск или общая сетевая папка(External Hard Disk or Shared Network Folder). Установочные файлы Windows Easy Transfer будут скопированы в это расположение, и вы сможете установить приложение на исходном компьютере.
Работа с Windows Easy Transfer
После установки Windows Easy Transfer на исходном компьютере можно приступать к переносу. Если вам нужно перенести данные одной учетной записи, зарегистрируйтесь в системе с этой учетной записью. Если вы собираетесь переносить все учетные записи, зарегистрируйтесь с учетной записью пользователя с административными полномочиями. Запустите Windows Easy Transfer, выберите метод переноса и щелкните команду Это мой исходный компьютер (This Is My Old Computer) на странице Какой компьютер сейчас используется (Which Computer Are You Using Now?). Если вы используете для переноса внешний жесткий диск или USB-накопитель, Windows Easy Transfer проверит переносимые данные и выдаст оценку их размера. Если применяется кабель или сеть, вам будет предложено выбрать элементы для переноса на целевой компьютер.
Выбирая элементы для переноса, вы можете принять параметры по умолчанию или настроить особый способ переноса учетных записей и общих элементов. Чтобы произвести настройку, щелкните ссылку Настройка (Customize) под каждой учетной записью и укажите, нужно ли для данного пользователя переносить его документы, музыку, изображения, видеозаписи, параметры программ, параметры Windows и другие элементы. Если вам нужна еще большая детализация, щелкните Дополнительно (Advanced). Откроется диалоговое окно Изменение выбора (Modify Your Selections). В нем можно указать, какие учетные записи следует перенести, а также какие конкретно файлы и папки подлежат переносу.
Щелкнув ссылку Дополнительные параметры (Advanced), вы сможете задать действия, выполняемые с переносимыми учетными записями. Возможные варианты — сопоставить переносимую учетную запись с существующей учетной записью на целевом компьютере или создать для нее новую учетную запись. Если вы выберете вариант Создание пользователя (Create A New Account), вам нужно будет задать пароль для новой учетной записи. Если вы не щелкнете ссылку Дополнительные параметры (Advanced), программа Windows Easy Transfer создаст на компьютере Windows 7 новые учетные записи с именами старых учетных записей и пустыми паролями. При первой регистрации пользователя с новой учетной записью пароль нужно будет изменить.
При запуске Windows Easy Transfer на целевом компьютере вы первым делом задаете нужный метод переноса и указываете, что средство работает на новом компьютере. Далее в зависимости от выбранного метода происходит следующее:
- Если вы используете для переноса внешний жесткий диск или USB-накопитель, вам нужно будет указать расположение файла переноса и ввести пароль для его открытия.
- При использовании сети перед началом переноса вам нужно будет ввести ключ Windows Easy Transfer. Этот ключ отображается на исходном компьютере. Затем происходит обычный выбор данных для переноса, описанный ранее.
- При работе с кабелем переноса мастер попытается обнаружить кабель и инициализирует перенос. Затем происходит обычный выбор данных для переноса, описанный ранее.
В упражнении после этого занятия вы воспользуетесь утилитой Windows Easy Transfer для переноса данных пользователя.
Характеристики
Описание
Версии
Обновлено
Описание
Windows Easy Transfer это разработанная Microsoft утилита, предназначенная переноса пользовательских файлов из ОС Windows XP в Windows 7. Она переносит файлы, фотографии, музыку, электронные письма, настройки и прочую информацию. Переносить файлы можно, используя съемные носители или по локальной сети.
Версии
Нет официального представителя разработчика на сайте
Нажмите, для быстрой оценки
Оставить отзыв
Похожие приложения
Актуальные статьи
Windows Easy Transfer Wizard in Windows 7: A Comprehensive Guide
In the rapidly advancing world of technology, the need for seamless data migration has become ever more critical, especially for users transitioning from one computer to another. Windows 7 introduced the Windows Easy Transfer Wizard, a tool specifically designed to simplify the process of transferring files and settings between computers. This article delves deep into the functionalities, user experience, and operational mechanics of Windows Easy Transfer Wizard, ensuring users feel equipped to navigate their data migration journey effectively.
What is Windows Easy Transfer?
Windows Easy Transfer is a utility included in Windows 7 that allows users to easily transfer their files, settings, and user accounts from one computer to another. This tool is beneficial for users upgrading their systems, migrating to a new machine, or simply organizing their data across devices. With Windows Easy Transfer, users can effortlessly move documents, pictures, music, emails, and more without the need for manual transfers.
Key Features of Windows Easy Transfer
-
User-Friendly Interface: The Windows Easy Transfer interface is straightforward and uncomplicated, making it accessible even for those who may not be tech-savvy. Users are guided step-by-step throughout the transfer process, ensuring that they know which actions to take at any given moment.
-
Flexible Transfer Methods: Users can transfer data using various methods, including an Easy Transfer cable, an external hard drive, or a network connection. This flexibility allows users to choose the most convenient option based on their resources and preferences.
-
Selective Data Transfer: The wizard allows users to choose exactly what data they wish to transfer, including profiles, folders, files, and system settings. This selective approach prevents unnecessary clutter on the target machine.
-
Backup for Critical Files: Windows Easy Transfer also serves as a means to back up critical files before migrating. Users can create a comprehensive backup of important documents and data, which can be invaluable if they face issues during the transfer.
-
Compatibility: The tool is tailor-made to ensure compatibility between different versions of Windows. Although it primarily serves Windows 7 users, it can also facilitate transfers from previous versions, such as Windows Vista, and even Windows XP, offering a robust solution to users with legacy systems.
Preparing for Windows Easy Transfer
Before you initiate the Windows Easy Transfer process, certain preparations can ensure a smooth experience:
-
Check System Requirements: Ensure that both the old and new computers are running compatible versions of Windows (Windows Vista or XP on the old and Windows 7 on the new).
-
Backup Important Files: While Windows Easy Transfer is designed to be reliable, creating a manual backup of irreplaceable files can offer additional peace of mind.
-
Establish a Connection: Decide how you want to connect both systems for the transfer. Whether it’s through a network, an Easy Transfer cable, or an external storage device, ensuring a stable and effective connection can make a significant difference.
-
Prepare User Accounts: Ensure that the necessary user accounts are established and that you have appropriate permissions on both systems to execute the transfer.
How to Use Windows Easy Transfer: Step-by-Step Guide
Here’s a detailed guide on how to utilize the Windows Easy Transfer Wizard effectively:
Step 1: Accessing Windows Easy Transfer
-
Launch the Wizard: On the new Windows 7 computer, navigate to Start > All Programs > Accessories > System Tools, and click on Windows Easy Transfer.
-
Introduction Screen: The wizard will greet you with an introduction screen. Read through the information and click ‘Next’ to proceed.
Step 2: Choosing Your Transfer Method
You will be asked how you want to transfer files. Available options typically include:
- Using an Easy Transfer Cable: If you have a USB Easy Transfer cable, plug it into both computers.
- Over a Network: This will require both computers to be connected to the same network.
- From an External Hard Drive or USB Flash Drive: If you have previously saved your Easy Transfer files to an external device, you can use this method.
Select the appropriate option and click ‘Next’.
Step 3: Preparing the Old Computer
-
On the New Computer: Once you select your transfer method, you’ll be prompted to prepare the old computer. Follow the on-screen instructions to access Windows Easy Transfer on the old machine.
-
Launching Easy Transfer: Repeat the same steps to launch Windows Easy Transfer on the old computer.
-
Select ‘This is My Old Computer’: When prompted, select “This is my old computer” and follow the instructions to continue.
Step 4: Selecting Files and Settings
-
Choose What to Transfer: The wizard provides a list of data categories for you to select from. This includes folders from your Documents, Pictures, Music, Videos, and other data types.
-
Review and Customize: Review the selected files and settings,, deselect any unnecessary items to streamline the transfer process.
Step 5: Complete the Transfer
-
Start the Transfer: Once you’re satisfied with your selection, start the transfer process. The length of time taken can vary based on the amount of data being transferred.
-
Monitor Progress: A progress bar will display the transfer’s status, helping you track how much is left.
-
Finish and Finalize: Once completed, you will receive a notification. At this point, check the new computer to ensure all files have been successfully migrated. The Easy Transfer wizard may also provide suggestions on setting up the transferred files on the new machine.
Troubleshooting Common Issues
While Windows Easy Transfer is generally smooth, users may encounter issues. Here are some common challenges and solutions:
-
Connection Issues: Ensure that both computers are properly connected, whether via cable or network. Recheck your connections if the wizard does not detect the old computer.
-
File Size Limitations: If transferring over a network, be mindful of file size limitations or interruptions that can lead to incomplete transfers. Utilizing a wired connection can alleviate this.
-
Permissions: Lack of permissions on files or folders may cause some items to be skipped. Make sure you have adequate access to all necessary files on the old machine.
-
Incompatible Applications: Some applications may not be compatible or may need to be reinstalled on the new computer. Ensure that essential software is appropriately set up.
-
Missing Files: If files seem to be missing post-transfer, verify that they were included in your selection process. You might need to rerun the Easy Transfer wizard if necessary.
Limitations of Windows Easy Transfer
Though highly useful, Windows Easy Transfer does have its limitations:
-
No Application Transfer: Windows Easy Transfer does not move installed applications. Users will need to reinstall software on the new computer individually.
-
Settings Transfer: While most personal files and settings can be transferred, certain system settings may not completely migrate, especially more complex configurations.
-
Formatting Issues: Transferring between different versions of files may lead to formatting issues, especially with documents created in different software versions.
-
Limited Cross-Platform Capability: Windows Easy Transfer is not designed for transferring data between different operating systems (for example, from Windows to macOS).
Conclusion
The Windows Easy Transfer Wizard in Windows 7 is a powerful and user-friendly tool, simplifying the data migration process for countless users. Its ability to facilitate the transfer of personal files and settings eases the often daunting task of setting up a new computer. From the straightforward interface to the multiple transfer methods available, Windows Easy Transfer stands out as an essential utility.
For anyone looking to migrate their data, understanding the full capabilities of Windows Easy Transfer and preparing appropriately can ensure a smooth transition. While it has its limitations, the benefits it provides considerably outweigh the downsides for most common scenarios. Whether you’re a casual user or a professional, mastering Windows Easy Transfer can greatly enhance your productivity and efficiency during computer upgrades and transitions.
Applies ToWindows 7 Enterprise Windows 7 Home Basic Windows 7 Home Premium Windows 7 Professional Windows 7 Starter Windows 7 Ultimate Windows Vista Business Windows Vista Enterprise Windows Vista Home Basic Windows Vista Home Premium Windows Vista Starter Windows Vista Ultimate Microsoft Windows XP Home Edition Microsoft Windows XP Professional
INTRODUCTION
Losing data because of a computer problem or a hard disk crash is discouraging, to say the least. You might lose family photos, your music collection, or financial data. And, after you get the computer just the way that you want it, it can take a long time to reconfigure your personal settings on a new computer: desktop background, sounds, screensavers, and wireless network configurations to name just a few
However, a little prevention can go a long way to avoiding this ordeal. To help save you lots of time and aggravation, we recommend that you take the precaution of regularly backing up your data and settings.
This article describes how to manually back up your personal files and settings in Windows 7, Windows Vista, Windows XP, and Windows Server 2003. It also describes how to use the data tools in Windows to back up your files and settings.
More Information
Method 1: Manually back up your files and settings to removable media or to a network location
The simplest method is to manually back up your files and settings to removable media or a network location. You can specify the files and settings that you want to back up and how often you want to perform a backup.
Note Examples of removable media include external hard disks, DVDs, CDs, and USB memory cards. You can back up files to a different computer or a network device if your computer is connected to a network such as a wireless network.
To manually copy your files to a network location or to removable media on a computer that is running Windows 7, Windows Vista, Windows XP, or Windows Server 2003, follow these steps:
-
Click Start , click Computer and then double-click the drive where you currently have Windows 7, Windows Vista, Windows XP, or Windows Server 2003 installed.
-
Open the Users folder, and then open the user folder that contains the files that you want to back up.
-
Copy the necessary folders from the user folder to a network location or to removable media.
Notes
-
To back up data for all users, repeat steps 2–3.
-
To determine the size of all the files in the user folder, select all the folders, right-click those selected folders, and then click Properties.
-
The saved files can be copied to any computer. However, you must have corresponding applications installed on that computer to open those individual files.
-
Not all applications save their files to the user folder. You should make sure that you check other applications and the file system location where the applications save files by default, and then copy those files to the network location or to the removable media.
Method 2: Use the Easy Transfer feature to back up data to a different computer
The next easiest method is to use the Easy Transfer feature in Windows to transfer data to a different computer. This section discusses the following scenarios in which you can use the Easy Transfer feature to back up data to a different computer:
|
Your computer OS |
Target computer OS |
|---|---|
|
Windows 7 |
Windows 7 |
|
Windows 7 |
Windows Vista |
|
Windows Vista |
Windows Vista |
Back up a Windows 7-based computer
Transfer files and settings to another Windows 7-based computer
The Windows Easy Transfer feature lets you to back up user account files and settings. Then you can restore those files and settings to a new computer. To start Windows Easy Transfer, follow these steps:
-
Click Start, type windows easy transfer in the Start Search box, and then click Windows Easy Transfer in the Programs list.
-
Follow the instructions to transfer your files and settings.
Transfer files and settings to a Windows Vista-based computer
If you want to move your data from a Windows 7-based computer to a Windows Vista-based computer, use the Windows Vista version of Windows Easy Transfer. To do this, follow these steps:
-
On a Windows 7-based computer, insert the Windows Vista CD or DVD
-
Click to exit the Windows Vista Setup program.
-
Click Start, click Computer, right-click the CD or DVD drive, and then click Open.
-
Open the support folder, and then open the migwiz folder
-
Double-click the Migwiz.exe file.
-
Follow the instructions to begin the transfer from Windows 7.
Back up a Windows Vista-based computer
Transfer files and settings to another Windows Vista-based computer
The Windows Easy Transfer feature lets you to back up user account files and settings. Then you can restore those files and settings to the new computer. To start Windows Easy Transfer, follow these steps:
-
Click Start, type transfer in the Start Search box, and then click Windows Easy Transfer in the Programs list.
-
Click Next. If you are prompted to close programs, make sure that you have saved any open documents, and then click Close all.
-
Follow the steps to transfer files and settings.
Method 3: Use the Backup and Restore Center
As a precaution, you can use the Backup and Restore Center feature in Windows 7 and Windows Vista to back up your data.
Back up a Windows 7-based computer
Note Data that you back up by using the Windows 7 Backup and Restore Center can be restored only on a Windows 7-based operating system.
-
Click Start, type backup in the Start Search box, and then click Backup and Restore in the Programs list.
Note If you are prompted to close programs, make sure that you have saved any open documents and close those programs. Or, click Close Programs.
-
Under Back up or restore your files, click Set up backup.
-
Select where you want to save your backup, and then click Next.
Note Remember to save your backup files to removable media or a network location.
-
Click Let Windows choose or Let me choose, and then click Next.
-
Make the appropriate selections, and then click Next or Save Settings and run backup.
-
The backup will be saved to the backup location.
Back up a Windows Vista-based computer
Note Data that you back up by using Windows Vista Backup and Restore Center can be restored only on a Windows Vista operating system.
-
Click Start, type backup in the Start Search box, and then click Backup and Restore in the Programs list.
-
Click Back up files under Back up files or your entire computer.
-
Select where you want to store the file backup, and then click Next.
-
Select the disk or disks that you want to back up, and then click Next
-
Select the file type or file types that you want to back up, and then click Next.
-
Click Save Settings, and then start the backup.
-
Your backup will be saved to the selected backup location.
Method 4: Transfer files from a Windows 2000, Windows XP, or Windows Server 2003-based computer
Use the Windows XP Files and Settings Transfer Wizard
You can use the Windows XP Files and Settings Transfer Wizard to transfer files in Windows XP, or Windows Server 2003, or Windows 2000 computer.
-
Click Start, click All Programs, click Accessories, click System Tools, and then click Files and Settings Transfer Wizard.
-
Click Next, click Old computer, and then click Next.
-
Select how you want to transfer your files. If you select Other, you can save to a network location or to removable media so that you can keep a backup for your records.
-
Select what you want to back up, and then click Next.
Additional resources
We recommend the following when you back up data:
-
Don’t back up your files to a recovery partition or to the same hard disk on which Windows is installed.
Note Manufacturers frequently configure a recovery partition on a computer. Typically, a recovery partition is displayed as a hard disk drive.
-
Always store the media that you use for backups in a secure location to prevent unauthorized access to your files.
-
Try to use a fireproof location that’s separate from your computer’s location. Also, consider encrypting the backup data.
Need more help?
Want more options?
Explore subscription benefits, browse training courses, learn how to secure your device, and more.