
Applies ToWindows 10
Setting up your PC to make it more accessible takes only a few steps. Most Ease of Access options are available in Settings. Select the Start button, then select Settings > Ease of Access.
Commonly used options are also available from the sign-in screen. Select the Ease of Access button in the lower-right corner to see them.
Ease of Access options can help make it easier to:
-
Use your PC without a display. Narrator lets you hear audio descriptions for elements on the screen, like text and buttons.
-
See what’s on the screen. Make the content on your screen bigger using Magnifier, or use high contrast mode.
-
Use your keyboard. Turn on Sticky Keys, Toggle Keys, Filter Keys, or the On-Screen Keyboard.
-
Use your mouse. Change the pointer size, or turn on Mouse Keys to use your keypad to move the mouse.
Need more help?
Want more options?
Explore subscription benefits, browse training courses, learn how to secure your device, and more.
The Ease Of Access in Windows 10 lets you make your computer more accessible, based on your needs. You can change a lot of settings to make your PC work the way you want it to and can be useful to you if you are differently-abled. In this post, we will learn about the accessibility options in Windows 10 via Ease of Access Center.
Every accessibility option is available in the Settings app. Pressing Win+I will take open the Settings app. Click on Ease of Access to get this window shown below, along with the various settings.

In the left pane, you will see the Ease of Access Settings segregated into three categories – Vision, Hearing, and Interaction.
1. Vision
- Display
- Cursor & pointer
- Magnifier
- Color filters
- High contrast
- Narrator
2. Hearing
- Audio
- Closed captions
3. Interaction
- Speech
- Keyboard
- Mouse
- Eye control
Let us learn more about these settings.
1. Vision
This section of settings allows the users to customize the size of the text and apps, adjust the screen brightness, change zoom level, use color filters, and so on.
- Display
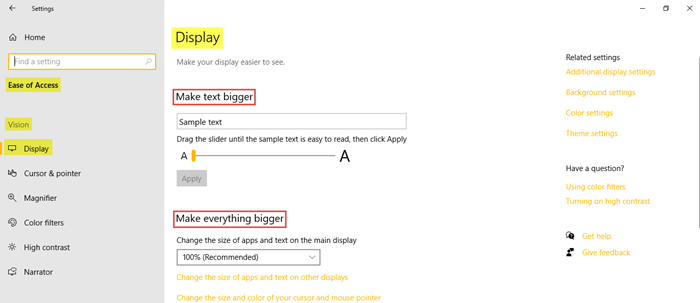
You can make the display on your PC easier to see by making the size of the text and apps bigger. You can adjust the brightness of your built-in display and use night light.
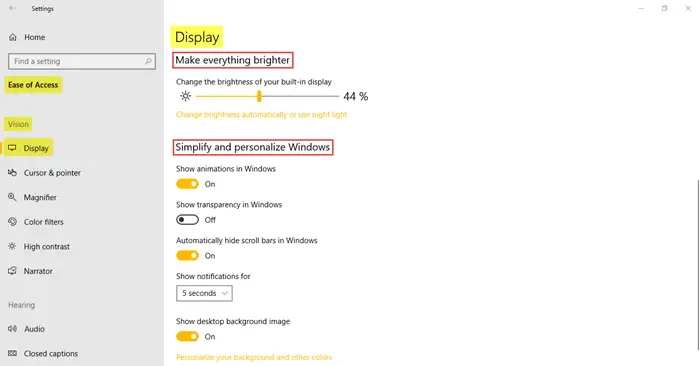
You can further personalize your Windows experience by choosing to show animations and transparency in Windows, to show desktop background image, and to automatically hide scroll bars in Windows. You can also personalize your background and other colors through this tab.
Related settings include additional display settings, background settings, color settings, and theme settings.
- Cursor & pointer
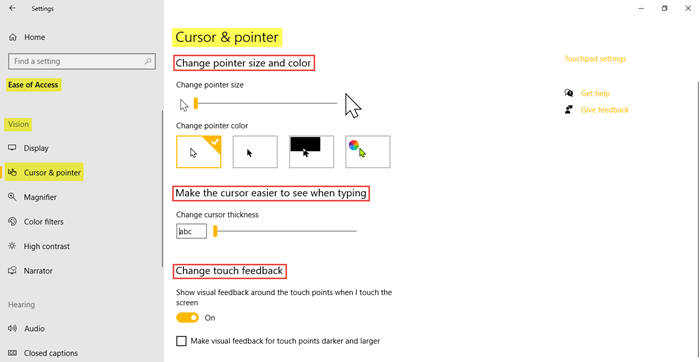
These settings make the cursor, pointer, and touch feedback easier to see. Use the respective sliders to change the size of the pointer and the cursor thickness. You can choose the pointer color from the given options. This tab also allows you to show and make the visual feedback for touch points darker and larger. Related settings include additional mouse settings and touch-pad settings.
- Magnifier
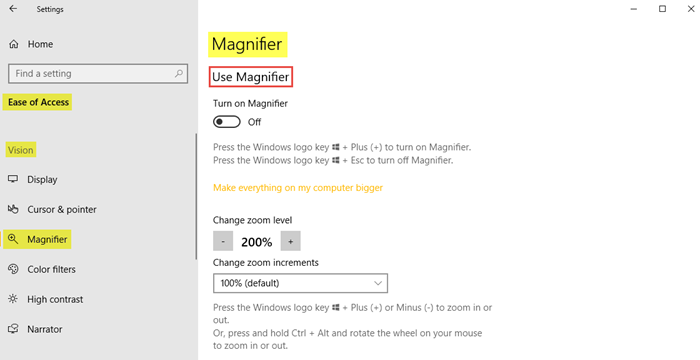
Turning on the Magnifier settings lets you zoom in to the screen. Magnifier can run into full screen, in a separate window, or as a lens that follows your mouse pointer around the screen. Adjust zoom level and zoom increments as preferred.
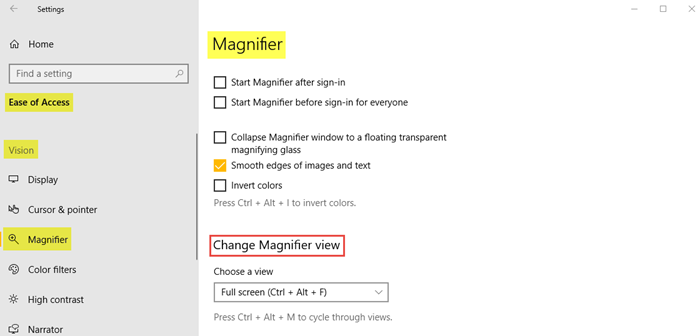
Further, as you can see, you can select the checkboxes where you wish to start magnifier after sign-in, before sign-in for everyone, smooth edges of images and text, invert colors, etc. You can choose a Magnifier view to docked, full screen or lens.
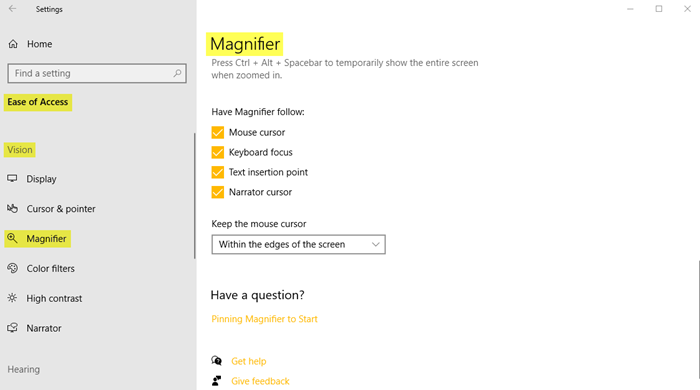
Additionally, you can choose to keep the mouse cursor within the edges of the screen or centered on the screen.
- Color filters

Turn on the color filters to make the photos and colors easier to see. From the given options, you can select a color filter to see the elements on the screen better; or you can select a colorblindness filter from the options mentioned out there.
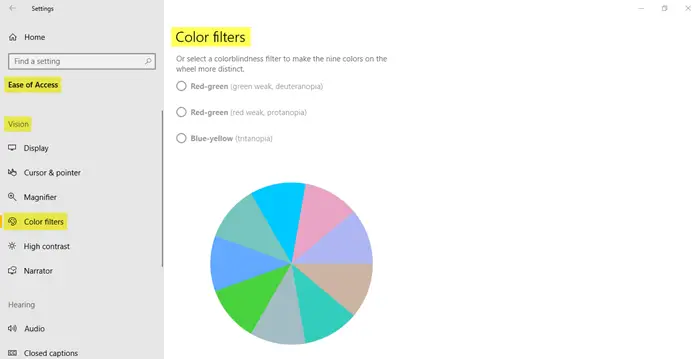
Related settings will take you color settings and theme settings.
Read: How to enable and use Color Filters for Colorblind users in Windows 10.
- High contrast
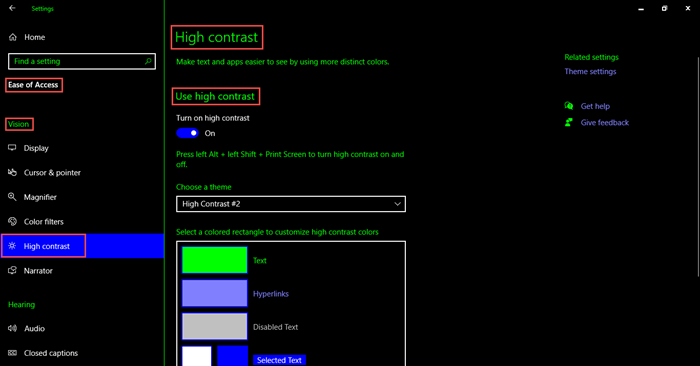
The high-contrast theme uses a more distinct and vibrant scheme of colors to make the apps and texts easier to see.
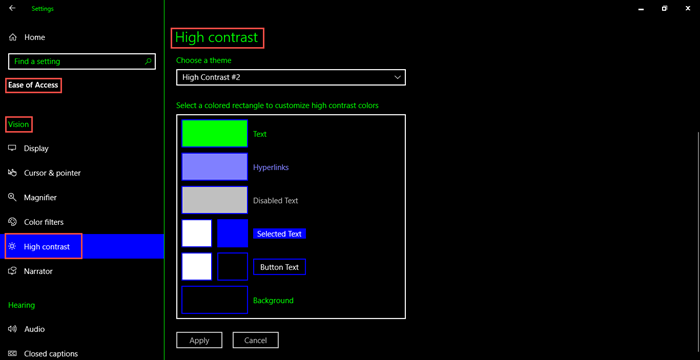
You can choose a high contrast theme from the drop-down menu and customize high contrast colors for text, hyperlinks, background, etc. Related settings include theme settings.
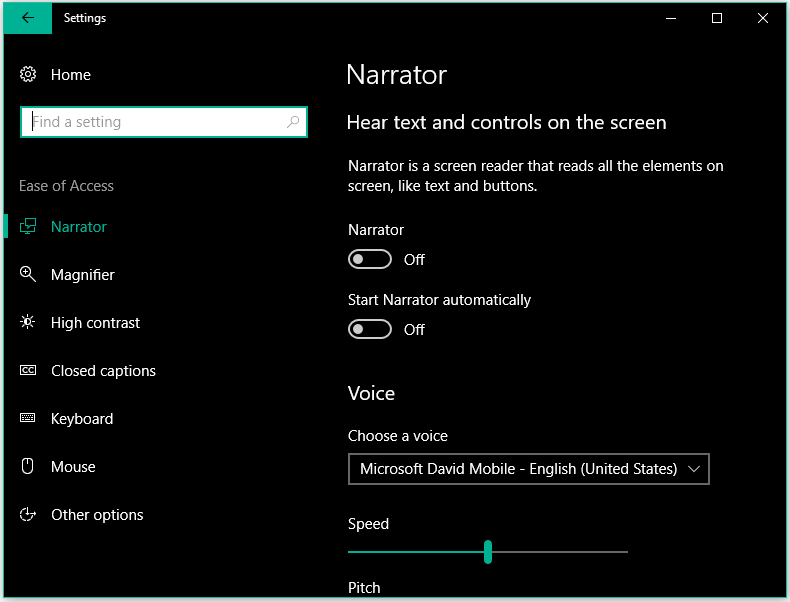
- Narrator

Turn on the Narrator which is a screen reader that describes and reads out everything on your screen. It can be controlled by mouse, touch, and keyboard. You will find the links to open Narrator Home and view the complete guide to Narrator online. Start-up options include settings that allow the shortcut key to start Narrator, show Narrator Home when the Narrator starts, and more. Go through them and check the boxes as required.
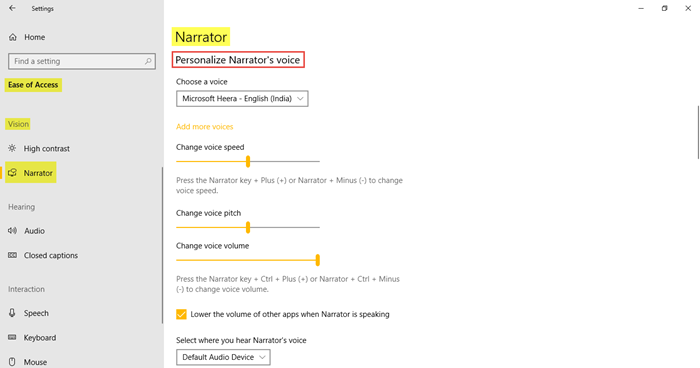
It is possible to personalize the Narrator’s voice by choosing a voice of your preference, and changing voice speed, voice pitch, voice volume by dragging the respective sliders. Next is to change the level of detail the Narrator provides about text and controls from the drop-down menu – whether you would prefer text only, some control details, all control details, some text details, or all text details.
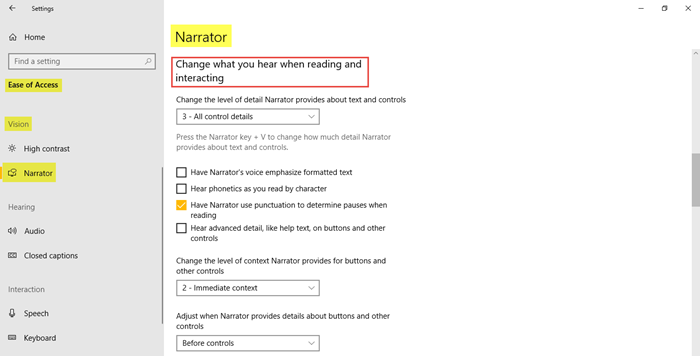
Similarly, there are additional settings that allow you to change the level of context Narrator provides for buttons and other controls, and adjust when the Narrator provides details about buttons and other controls.

Make necessary changes to the Narrator settings under Change what you hear when typing.
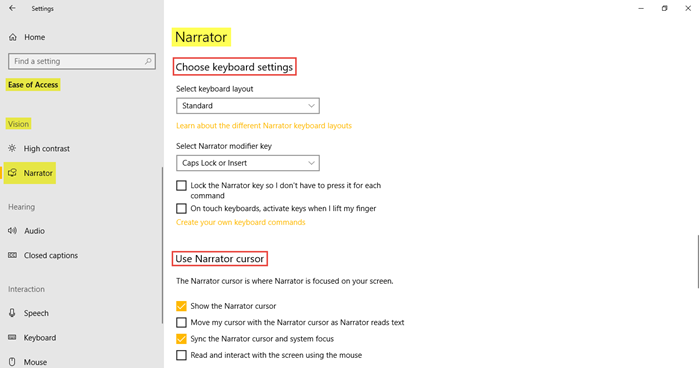
Further, select the keyboard layout, the Narrator modifier key, and the Narrator cursor settings.
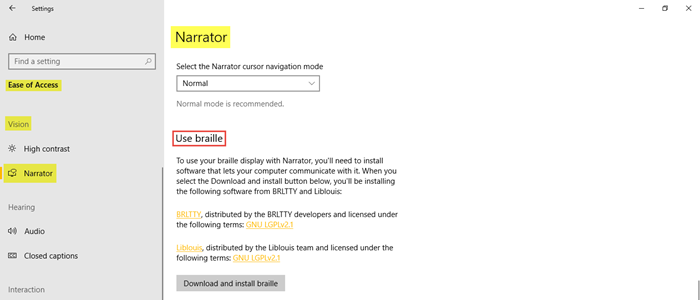
Select the Narrator cursor mode.
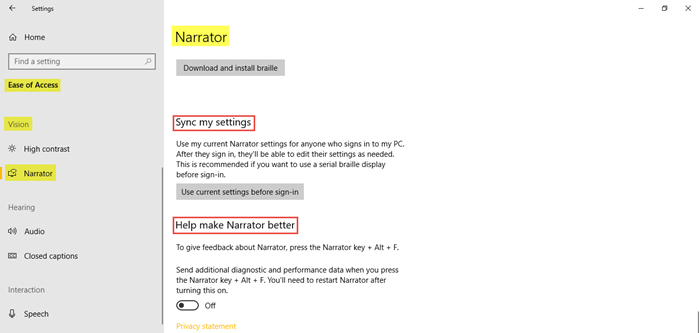
You can also sync your settings and give feedback about the Narrator.
TIP: You can choose your Narrator from Microsoft David (male voice) or Microsoft Zira (female voice).
2. Hearing
This section of settings allows the users to make their device easier to hear and easier to use without sound by displaying audio as text.
- Audio
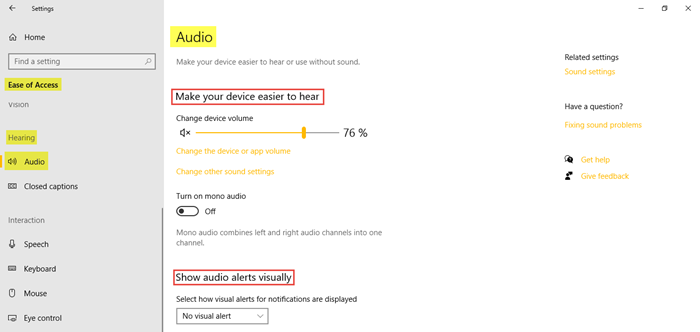
The Audio tab consists of settings that make your device easier to hear or use without sound. You will find the settings here to change device volume, app volume, and other such sound settings. Audio alerts for notifications can be displayed visually. Related settings include sound settings.
- Closed captions
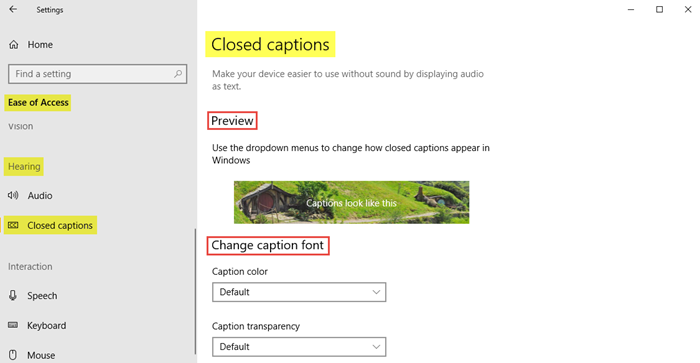
Closed captions make your device easier to use without sound by displaying audio as text.
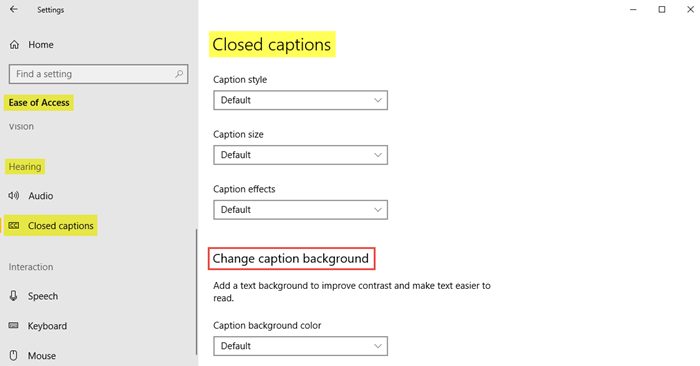
Use the drop-down menus to change the caption color, caption transparency, caption style, caption size, and caption effects.
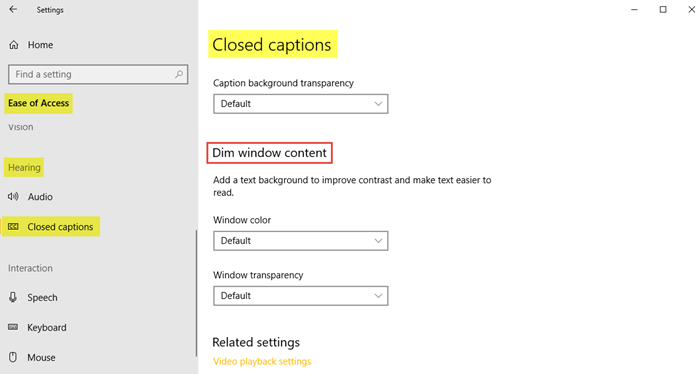
Further, select the desired options from the drop-down menus to change caption background color, caption background transparency, window color, and window transparency. Related settings include video playback settings.
TIP: You can also make the Notifications last longer by adjusting the Show notifications for the setting. Change the notification time from 5 seconds to 5 minutes. You can also control the thickness setting for your cursor.
3. Interaction
This section of settings allows the users to improve the speech, use the on-screen keyboard, control the mouse, and more.
- Speech
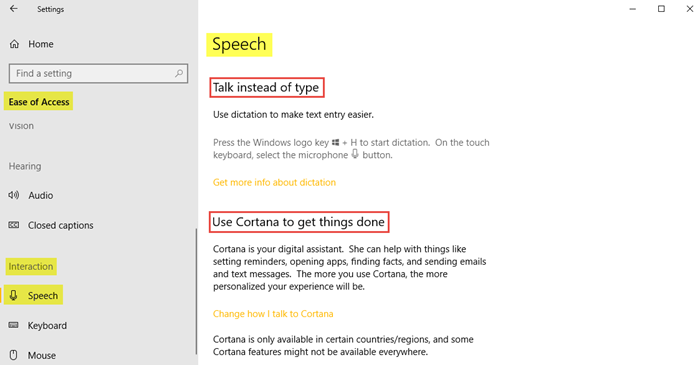
You will learn that by pressing the Windows logo key + H, you can start dictation by turning on speech recognition. You can learn more about Cortana and make the necessary changes at how you talk to Cortana.

Related settings includes Cortana settings and additional speech settings.
- Keyboard
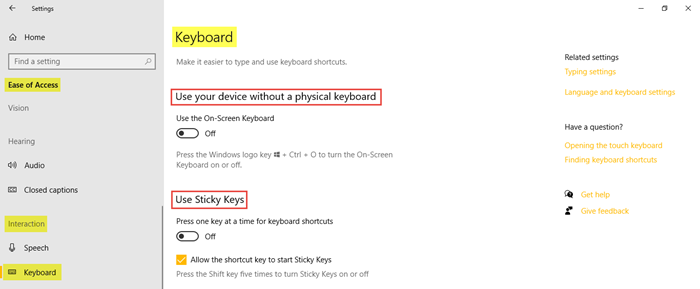
Turn on the Keyboard settings for the ones you wish to use the on-screen keyboard, sticky keys, toggle keys, and filter keys.
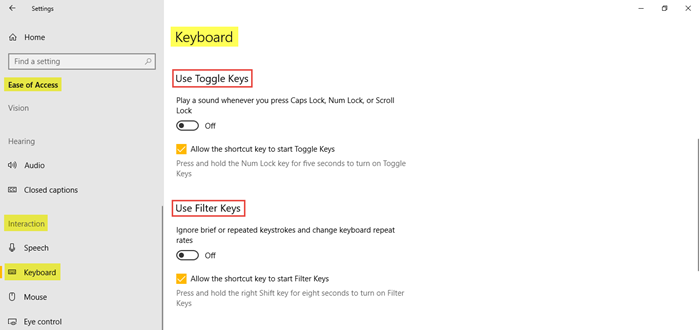
You can allow the shortcut key to start sticky keys, toggle keys, and Filter Keys.
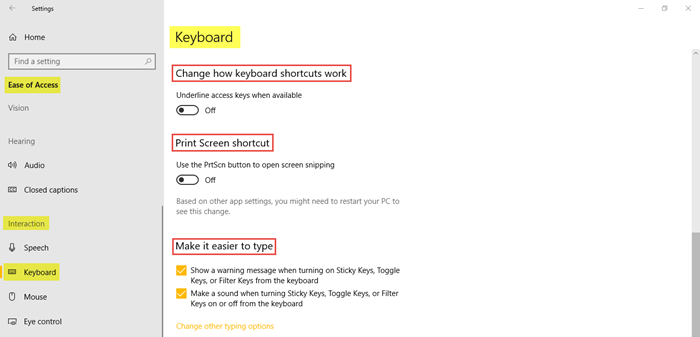
You can underline access keys when available and use the print screen shortcut. Under Make it easier to type, you can check the boxes if you wish to show a warning message or make a sound by turning on various keys from the keyboard. Related settings include typing settings and language and keyboard settings.
You can also change the Accessibility tool that launches when you use Win+Vol keyboard shortcut.
Read more about Windows Onscreen Keyboard Options and Settings.
- Mouse
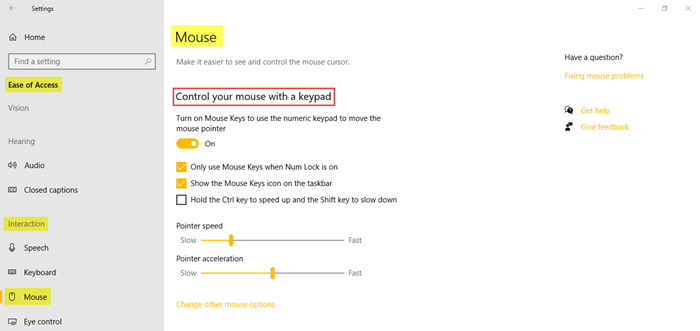
You can control the mouse pointer with the numeric keypad. Drag the respective sliders to adjust the Pointer speed and Pointer acceleration. At the bottom, you will see a link to change other mouse options. You can read here how to use the Windows computer without a keyboard or mouse. You can also Adjust Text Cursor Indicator size, color & thickness for better visibility.
Read: Windows 10 Ease of Access and Settings keyboard shortcuts.
- Eye control
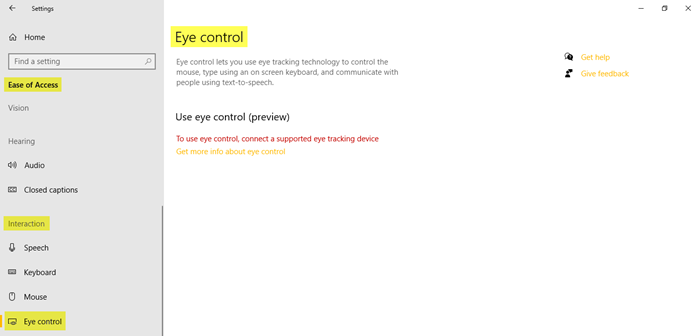
To use the Eye control feature in Windows 10, you need to connect to a supporting eye-tracking device. Eye control supports the following eye-tracking devices –
Tobii
• Tobii Eye Tracker 4C
• Tobii EyeX
• Tobii Dynavox PCEye Plus
• Tobii Dynavox EyeMobile Mini
• Tobii Dynavox EyeMobile Plus
• Tobii Dynavox PCEye Mini
• Tobii Dynavox PCEye Explore
• Tobii Dynavox I-Series+
• Selected laptops and monitors that include eye-tracking integrations
EyeTech
• TM5 Mini
Eye control lets you use eye-tracking technology to control the mouse, type using an on-screen keyboard, and communicate with people using text-to-speech. All you have to do is connect the device, install the software, test the Tobii app, and get started by following the steps. Click on the link Get more info about eye control to learn more about it.
This gets us to the end of the post. All the Ease of Access Settings in Windows 10 related to vision, hearing, and interaction have been covered. Hope you had an interesting read!
Microsoft has paid increasingly more attention to making its Windows operating system easier to use, more convenient, and more user-friendly, especially since Windows 11. On top of this, it includes the “Accessibility Settings,” formerly known as “Ease of access,” using which the end-user can customize their system settings according to their personal needs.
Today we are going to talk about all the things you can configure in Windows 11 which will make your experience on the computer more accessible.
Table of Contents
What are Accessibility Settings Used For in Windows?
The accessibility settings are aimed at a differently enabled audience, which allows them to use Windows OS despite their disabilities. For example, a visually impaired person can use the Narrator to read the text and then take action accordingly. A person who is unable to use the keyboard to type can use Voice Typing to input text.
As we already mentioned above, the accessibility settings in the Windows OS are targeted at the differently-abled, so that they can have the same OS experience as the rest of us. However, others can also benefit from the accessibility options Microsoft provides to make the most of their time on the computer.
Following are the Ease of Access settings in Windows 11:
- Narrator Settings.
- Magnifier Settings.
- Contrast Settings.
- Closed Captions.
- Keyboard Settings.
- Mouse Settings.
- Other Options.
People with the following disabilities can take advantage of Windows accessibility settings:
- Visually impaired (weak eyesight or blindness)
- Hearing disability (weak hearing or deaf)
- Chromophobic (fear of vibrant colors and light sensitivity)
- Physical disability (cannot type)
How to Open Accessibility Settings in Windows 11
Before we dig into the various options available for you to use inside the accessibility settings, let us show you how to access these settings in different ways.
-
From the Settings App
You can open the Accessibility settings from the Windows Settings app. To do so, open the Settings app and you shall find the “Accessibility” tab on the left.
 1")
From Settings -
From Windows Key + U Shortcut Keys
Another way to access the accessibility settings is using the shortcut keys which will directly open the “Accessibility” tab in the Settings app. Press the Windows Key + U keys on the keyboard simultaneously to open these settings.
-
From Quick Access Menu
Windows 11 provides shortcuts to a few accessibility settings from the Quick Access menu in the taskbar.
Accessibility option in Quick Access menu Accessibility settings in Quick Access menu From the Quick Access menu, you can only enable or disable the following settings (not configure them):
- Magnifier
- Color filters
- Narrator
- Mono audio
- Sticky keys
 1")
Accessibility Settings in Windows 11
The accessibility settings in Windows 11 are currently divided into the following 3 categories:
- Vision
- Hearing
- Interaction
These categories include the following set of accessibility settings. Each of the sections below describes what the option is for and how to use it.
Vision
Text Size
The first option under the Vision category in the accessibility settings is Text Size. This option only allows you to adjust the text size which appears on your screen, whilst everything else remains the same.
By default, the text size is at its minimum. This means that the text size can only be increased from there (if it has not already been altered).
 4")
To adjust the size of the text, use the slider in front of “Text size.” The preview box above will show your adjusted text size sample. If you are satisfied with the size of the text inside this preview box, click Apply to implement the changes across the entire OS.
Visual Effects
The second option in the accessibility settings in Windows 11 is “Visual effects.” You can control the following Windows settings:
- Always show the scrollbars.
- Enable or disable transparency effects.
- Enable or disable Windows animations.
- Manage automatic timer to dismiss notifications.
 5")
The scrollbars you see on the sides of the pages are configured to hide by default when they are not in use. However, you can set them to always show and not hide when the mouse cursor is not hovering over it.
Moreover, the Windows built-in components like the taskbar, settings app, etc., have a transparency effect. You can disable that too and make them have a solid background.
Another setting the “Visual effects” page offers is enabling or disabling the animation effects. By default, these are enabled. Disabling this option will disregard the tiny animations you see while performing the basic Windows operating, such as minimizing a window that will animate that it is shrinking down into its icon on the taskbar. Of course, these animations are visible for milliseconds only.
Another important accessibility feature is the automatic dismissal of a notification that pops up in the notification center. By default, it dismisses after 5 seconds. However, if it takes you longer to read it, you can increase its time to up to 5 minutes!
Mouse Pointer and Touch
On the “Mouse pointer and touch” accessibility page, you can manage the color and size of the mouse pointer. Not only that, but if you are using a touch screen, you can also display a touch indicator, which is an enclosing circle, that highlights the area on the screen where the interaction occurred.
 6")
As you can see from the image above, there are 4 mouse pointer styles you can choose from. Below are the details for these options listed from left to right:
- White with black border.
- Black with a white border.
- Inverted – Turns white on a dark background, and black on a light background.
- Custom color – pick a color of your choice from the color palette.
Moving on, you can also adjust the size of the pointer from the slider below. By default, it is the smallest size. Unlike the text size, the pointer size does not need to be applied – the setting is saved and applied automatically.
Text Cursor
You must already see the text cursor when typing inside a text editor. The text cursor blinks, indicating where the action will apply on the screen. However, this is not always easily visible to everyone.
With the text cursor accessibility settings, you can add additional colored indicators on the screen to help you identify it easily. Furthermore, you can also increase its thickness.
 7")
Enabling the text cursor indicator will add a colored leaflet at the top and bottom of the default indicator, as you can see in the preview box in the image above. The size of the leaflets can also be adjusted, along with the color of your choice.
Magnifier
The magnifier, as the name implicates, allows you to zoom in on portions of the screen. This accessibility tool is quite helpful for people with weak eyesight. The magnifier settings page has quite a few options and configurations that you can manage.
 8")
As you can see from the image above, you can enable and disable the magnifier. Magnifier can also be enabled using the Windows Key + Plus (+) key. You can then keep using this shortcut combination to zoom further in, or use the Windows Key + Minus (-) keys to zoom out.
However, you can adjust the zoom increment/decrement from the Magnifier settings page. By default, it is set at 100%. This means that each time you zoom in, it will zoom in by 100 percent. This value can be set between 5% and 400%.
The magnifier can appear in 3 different layout types:
- Docked: Displays the magnified content in a separate window which can be moved around and its size can be adjusted. To switch to this layout, use the CTRL + Alt + D shortcut keys when the magnifier is enabled.
- Full screen: Zooms in the whole screen while cutting out the rest of the page. You can drag your mouse cursor around the edges of the screen to move about the page. To switch to this layout, use the CTRL + Alt + F shortcut keys when the magnifier is enabled.
- Lens: Only zooms in on the portion around the mouse cursor. To switch to this layout, use the CTRL + Alt + L shortcut keys when the magnifier is enabled.
You can also invert the colors of the display when the magnifier is enabled from the settings page, or alternatively use the CTRL + Alt + I shortcut keys.
Color Filters
Here, you can apply color filters so that your screen does not display any colors that are not comfortable for you. This page includes a few pre-configured options you can choose from, which are:
- Red-green (green weak, deuteranopia)
- Red-green (red weak, protanopia)
- Blue-yellow (tritanopia)
- Grayscale
- Grayscale inverted
- Inverted
 9")
The preview box above the configurations will allow you to distinctly see the difference between the options and choose the one easy with your eyes.
Furthermore, you can also toggle the slider in front of the “Keyboard shortcut for color filters” into the On position to use the Windows Key + CTRL + C shortcut keys to enable or disable color filters quickly.
Contrast Themes
The “Contrast themes” settings page allows you to customize the colors of your on-screen text and the background it should have. This includes the following types:
- Background
- Text
- Selected text
- Inactive text
- Hyperlink
- Button text
Here are the steps to apply a contrast theme to your liking:
-
To begin with, you can select any one of the 4 pre-configured themes whose preview is visible in the preview box.
 10")
Choose contrast theme -
When you have chosen a theme, click Edit to customize it.
Edit contrast theme -
On the next page, you can change the colors of each category of text according to your liking, and click Save as. This will allow you to create your theme with a custom name and not make changes to the existing pre-configured contrast theme.
Edit and save the theme -
Now back on the Contrast theme settings page, click Apply to implement the theme.
 10")
 11")
 12")
Narrator
The Narrator is a Windows feature that speaks out the text and other details on the screen through the computer speakers, making it easier for people with disabilities to use it. The Narrator settings page has a plethora of settings and configurations for you to manage.
From enabling/disabling the feature down to the voice of the Narrator, its speed, the cursor, what to say, and what not to say; you can pretty much customize it according to your needs and preferences.
 13")
You can enable or disable Narrator using the Windows Key + CTRL + Enter shortcut keys. However, to use this shortcut, you must first enable the relevant option on the Narrator settings page (which can be seen in the image above).
You can also choose to open Narrator Home, which is an integrated applet for a quick guide about the narrator.
Next, you can change the voice Windows uses for the narrator from one of the preinstalled ones, or download the more voices for other languages. Furthermore, you can also control the speed, volume, and pitch of the narrator, and manage how it behaves when other applications are making sounds as well.
It doesn’t just end there! You can also control the verbosity of the narrator and what it reads out. You can have it read only the text on the screen, or even all its details.
You can also navigate your way around Windows OS using Narrator. So there are a few settings here for that too.
These are all accessibility options for people with visual impairments to make their experience with Windows 11 more convenient.
Hearing
Audio
Here, you can convert the stereo audio of your computer into mono – which combines the left and the right audio channels into one.
This feature is especially useful for people who can only hear from one side.
Furthermore, you can also choose to flash your screen, your current window, or the title bar of the current window when an audio notification appears, so you never miss one again.
 14")
Captions
Windows 11 has the capability to generate live captions automatically, adding text to the audio from your screen. With the Captions accessibility setting, you can customize how these captions appear on the screen.
You can choose from pre-configured setups, or edit them and make a new template customized to your preferences.
-
Select the caption style from the drop-down menu.
Select caption style -
Now click Edit to make customizations.
Edit caption style -
Now you can make changes to the opacity, size, font, and the effects on the captions, along with the colors of the text, background, and the window they appear on
When all customizations are made, simply close the app as the settings are automatically saved and do not need to be applied.
Customize caption style
 15")
 16")
 17")
Interaction
Speech
With the speech accessibility feature in Windows 11, you can control your computer with just your words. Not only that, but you can also dictate the words to it, and it will convert them to text.
The Speech settings page offers Voice Typing, which you can enable or disable using the Windows Key + H shortcut keys, and convert your speech into text. Furthermore, you can also turn on or off “Windows Speech Recognition” using the Windows Key + Ctrl + S shortcut keys, allowing you to perform actions on your PC using speech.
 18")
Keyboard
Here, you can manage your physical keyboard as well as the on-screen keyboard settings. You can configure your keyboard to register the shortcut keys (which need to be pressed simultaneously) as sticky keys, meaning they can be pressed one after the other.
Furthermore, you can also manage keystroke sensitivity if you tend to accidentally hit a few keys, and don’t want Windows to register them. A few other configurations can also e made, as you can see from the image below.
 19")
Mouse
If you are having difficulty using your mouse, you can use the numeric keypad on your keyboard to control your mouse pointer instead. Enable the “Mouse keys” option from the Mouse accessibility settings to use the keypad to control the mouse cursor.
 20")
From here, you can also control how fast or slow the pointer moves, when to use the keypad as a mouse, and when to use it as a regular keypad, etc.
Eye Control
Eye Control allows you to operate the on-screen keyboard, mouse, and text-to-speech using just your eyes. The gestures and eye-tracking lets you control these components. However, a compatible eye-tracking device is required to unlock this feature on a Windows PC. At the time of writing this post, the following eye-tracking devices are supported with Windows 11:
- Tobii Eye Tracker 4C
- Tobii EyeX
- Tobii Dynavox PCEye Plus
- Tobii Dynavox EyeMobile Mini
- Tobii Dynavox EyeMobile Plus
- Tobii Dynavox PCEye Mini
- Tobii Dynavox PCEye Explore
- Tobii Dynavox I-Series+
- Selected laptops and monitors that include eye-tracking integrations
Once your device is connected to the correct driver installed, you should be able to unlock the settings on this page.
Closing Thoughts
Those reading this article may or may not need to use these accessibility features, but we do suggest that spread the word to people who can benefit from it.
Using these Windows accessibility features, a differently-abled end-user can increase their productivity to 100 percent if they were previously having trouble reading the text on their screen, avoiding using the computer due to the vibrant colors, or simply because they could not use the keyboard.
Microsoft did not leave out the people that experience difficulties while using a Windows computer. Thanks to the features discussed above in this post, more individuals can now enjoy the Windows operating system and perform their tasks, just like any regular user.
-
Home
-
Partition Magic
- What Is Ease of Access? How to Open Ease of Access?
By Vicky |
Last Updated
You might have noticed the setting called Ease of Access in the Windows 10 Settings window. What is it? Is there any other way to access it? The post from MiniTool Partition Wizard discusses these questions in this post. Start reading.
What Is Ease of Access?
Ease of Access is a component of Windows NT family of operating systems that makes your computer more accessible.
It replaced Utility Manager which is included with Windows 2000 and Windows XP and came with Windows Vista.
It allows you to customize lots of Windows settings to make your computer work the way you prefer and can be useful to you. The settings include narrator, magnifier, high contrast, closed captions, keyboard, mouse, and so on.
- Narrator is a screen reader that reads all the elements on your computer screen, like text and buttons.
- Magnifier can magnify the things on your computer screen, making your computer much easier for your eyes.
- High contrast adopts a more distinct and vibrant scheme of colors to make the apps and tests easier to see.
- Closed captions can display audio as text when your computer has no sound.
- Keyboard allows you to turn on or off Sticky Keys, Toggle Keys, and Filter Keys.
- Mouse allows you to change the pointer size and do other changes.
- …
As you can see, Ease of Access is useful. Well, how to open Ease of Access in Windows 10? Keep reading.
How to Open Ease of Access Windows 10?
There are four ways to open Ease of Access in Windows 10, and every way is simple. Let’s see.
Way 1: Open Ease of Access via keyboard Shortcut
To open Ease of Access quickly, you can press the Windows + U at the same time. Then, the Ease of Access windows appears.
Way 2: Open Ease o Access via Windows Search Bar
Alternatively, you can open Ease of Access after carrying out the following steps:
- Click the search icon on the Windows taskbar.
- Input Ease of Access.
- Hit the Enter
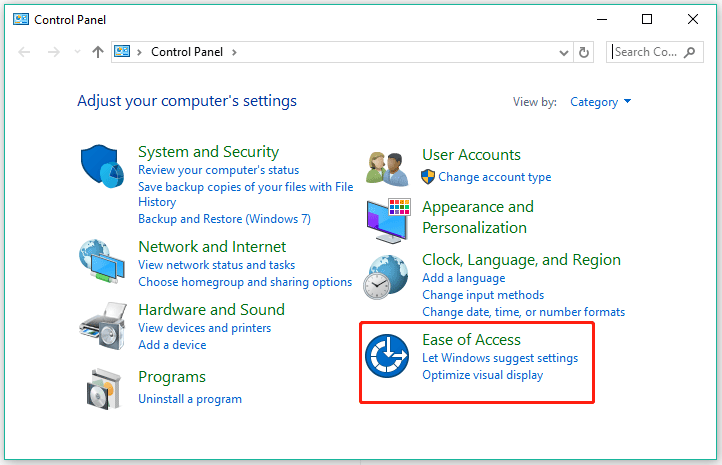
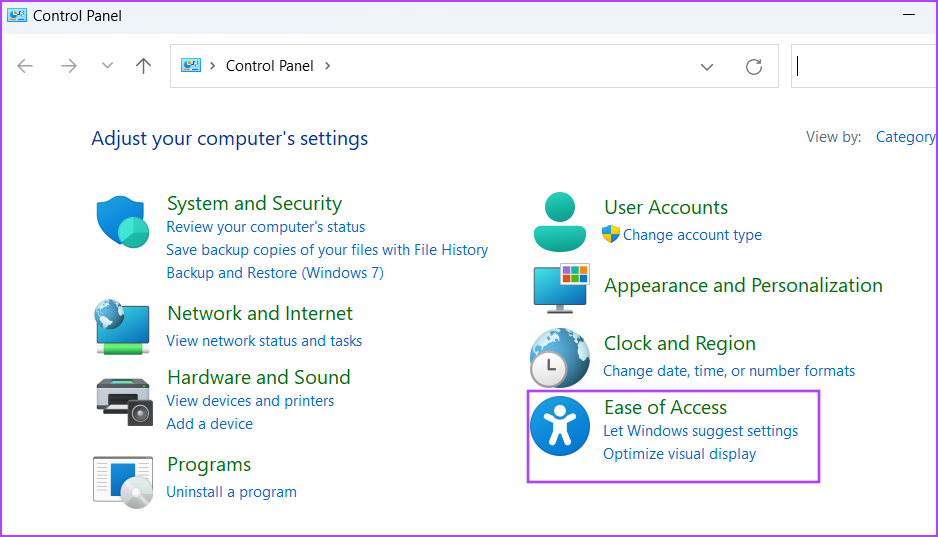
Way 3: Open Ease of Access via Control Panel
You can also open Ease of Access via Control Panel. The steps are as follows:
Step 1: Click the search icon, type Control Panel, and hit the Enter key.
Step 2: Choose Ease of Access in the Control Panel window.
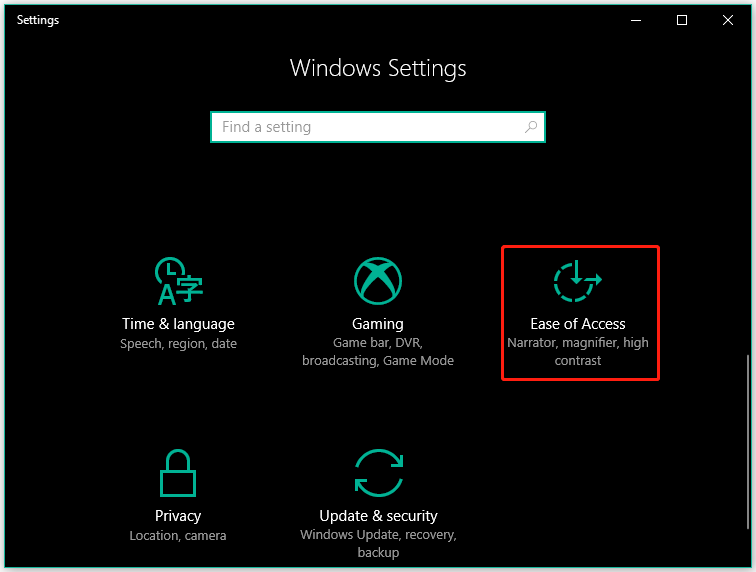
Way 4: Open Ease of Access via Windows Settings
You can also open Ease of Access via Windows Settings. To do that, you need to:
Step 1: Right-click the Windows icon on the taskbar and then choose the Settings option.
Step 2: Choose Ease of Access in the Control Panel window.
Once you open Ease of Access in Windows 10, you can customize some settings to make your computer more useful to you.
Final Thoughts on Ease of Access Windows 10
Ease of Access is a useful Windows 10 feature that can help you make your computer more useful. Plus, it is easy to access in Windows 10.
If you have any doubt about Ease of Access, please leave it in the following comment zone and we will reply to you as soon as possible.
About The Author
Position: Columnist
Vicky is a website editor who has been writing tech articles since she was graduated from university. Most of her articles talk about Windows PC and hard disk issues. Some of her articles also touch on YouTube usage and issues.
During her spare time, she likes to spend time reading, watching videos, and sitting on her Yoga mat to relax.
Helping millions of people navigate the world of technology.
Quick Tips
- Go to the Start menu > type Ease of Access > click on any accessibility option from the prompt.
- If you need an accessibility feature before logging in to your Windows 11 PC, use the Lock Screen. Click on the accessibility icon to access various Accessibility options.
- You can also access the menu using the Windows + U keyboard shortcut.
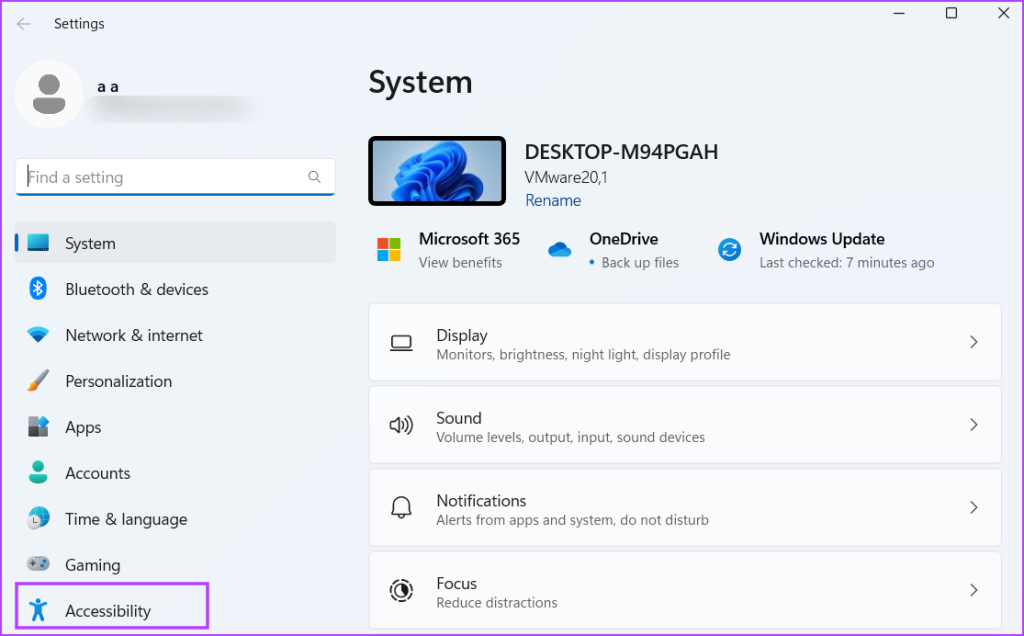
Method 1: Open Ease of Access Center Using Settings
The Settings app incorporates the new Accessibility section, which neatly organizes all the features into categories. Here is how to access it.
Step 1: Press the Windows + I keyboard shortcut to launch the Settings app.
Step 2: Go to the left sidebar and click on Accessibility.
Also Read: How to unpause Windows updates and what to do if you can’t
Method 2: Use the Run Dialog Box
The Run dialog box supports shortcodes for various settings and Control Panel utilities in Windows. Here’s how to get into the Ease of Access Center using the same:
Step 1: Press the Windows + R keyboard shortcut to launch the Run dialog box.
Step 2: Type ms-settings: access in the text box. Press Enter to open the Accessibility section in the Settings app.

Alternatively, type control access.cpl in the text box and press Enter. This will open the tool’s legacy version.
Method 3: Use Control Panel to Open Ease of Access Center
Step 1: Press the Windows key, type Control Panel, and press Enter.
Step 2: In the Control Panel window, click on Ease of Access.
Step 3: Click on the Ease of Access Center option. Here, you will find all the accessibility settings available on your system.

Was this helpful?
Thanks for your feedback!
Last updated on 03 June, 2024
The article above may contain affiliate links which help support Guiding Tech. The content remains unbiased and authentic and will never affect our editorial integrity.