Прежде чем обойти блокировку активации iCloud, необходимо сделать джейлбрейк устройства iOS. Поскольку для системы Windows нет инструмента для джейлбрейка, вы можете следовать этому руководству, чтобы создать среду для джейлбрейка на компьютере с Windows и затем сделать джейлбрейк для вашего устройства iOS.
Примечание:Если возможно, сделайте джейлбрейк своего iDevice на Mac (операционная система должна быть macOS 10.13 — 10.15).
Что Вы должны подготовить перед джейлбрейк?
Вот список необходимых действий перед тем, как сделать джейлбрейк устройства iOS в Windows.
- Убедитесь, что ваш компьютер работает под управлением Windows 7 или более поздней версии, 32 или 64-разрядной.
- Получите флэш-накопитель USB емкостью более 2 ГБ.
- Скачать checkn1x-1.0.6-amd64.iso.
- Скачать rufus-3.1.1.exe.
Пошаговое руководство по джейлбрейку в Windows
Шаг 1. Запишите ISO-файл checkn1x на USB-накопитель
- Вставьте флешку в ваш компьютер.
- После загрузки файла Rufus, нажмите Rufus, чтобы открыть приложение.
-
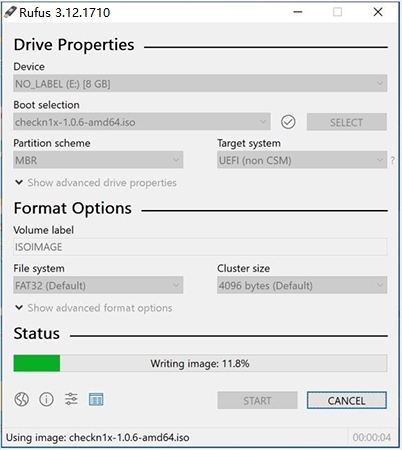
Нажмите кнопку «SELECT», чтобы найти загруженный файл ISO checkn1x. Оставьте другие параметры по умолчанию и нажмите «НАЧАТЬ».
-
Выберите и нажмите «Write in DD Image mode». Затем нажмите кнопку «ОК». И появится всплывающее предупреждение от Rufus, что все данные на USB-устройстве будут отформатированы (пожалуйста, сначала сделайте резервную копию USB, если необходимо), нажмите «ОК» для подтверждения.
-
Запись файла ISO checkn1x на USB-накопитель занимает 2 или 3 минуты.
-
Когда процесс записи завершен, нажмите кнопку «CLOSE».
Внимание: Когда ISO-файл checkN1x будет записан, пожалуйста, отключите и снова вставьте флэш-драйвер USB в компьютер, если система не распознает его.
Шаг 2. Запустите джейлбрейк с checkN1x
- Перезагрузите компьютер. Когда компьютер включен и загружен в это время, нажмите F12 (Параметры загрузки).
- Настройки BIOS / UEFI: как загрузить компьютер с USB / CD / DVD
- Как установить загрузочный компьютер с USB / CD / DVD
-
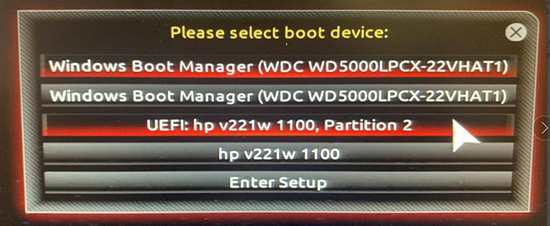
В окне запуска выберите флешку, на которую только что записан ISO-файл checkn1x.
-
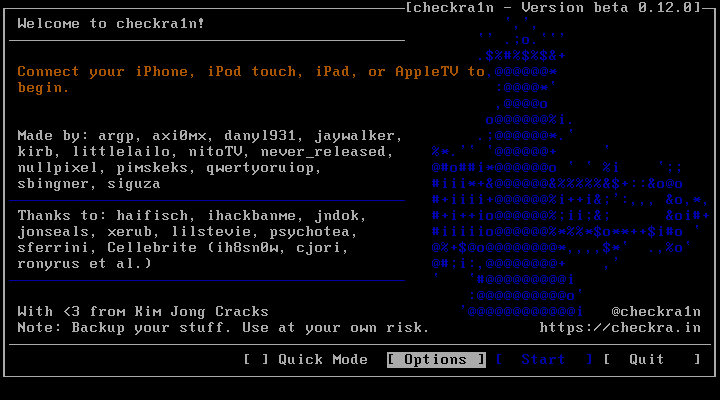
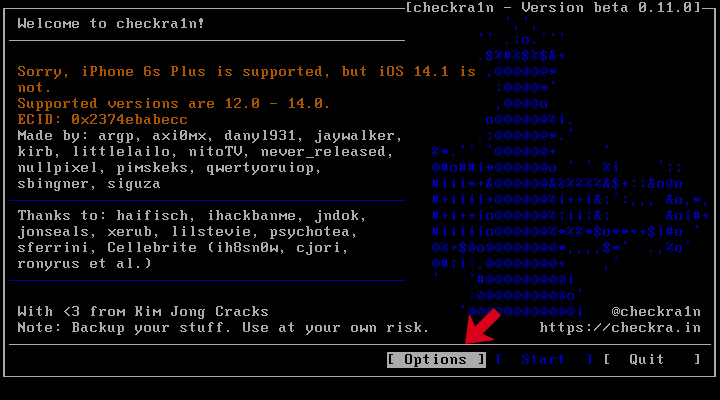
После запуска инструмента checkra1n подключите устройство iOS к компьютеру. Затем с помощью клавиш со стрелками на клавиатуре выберите «Options» и нажмите Enter, чтобы установить средство взлома.
-
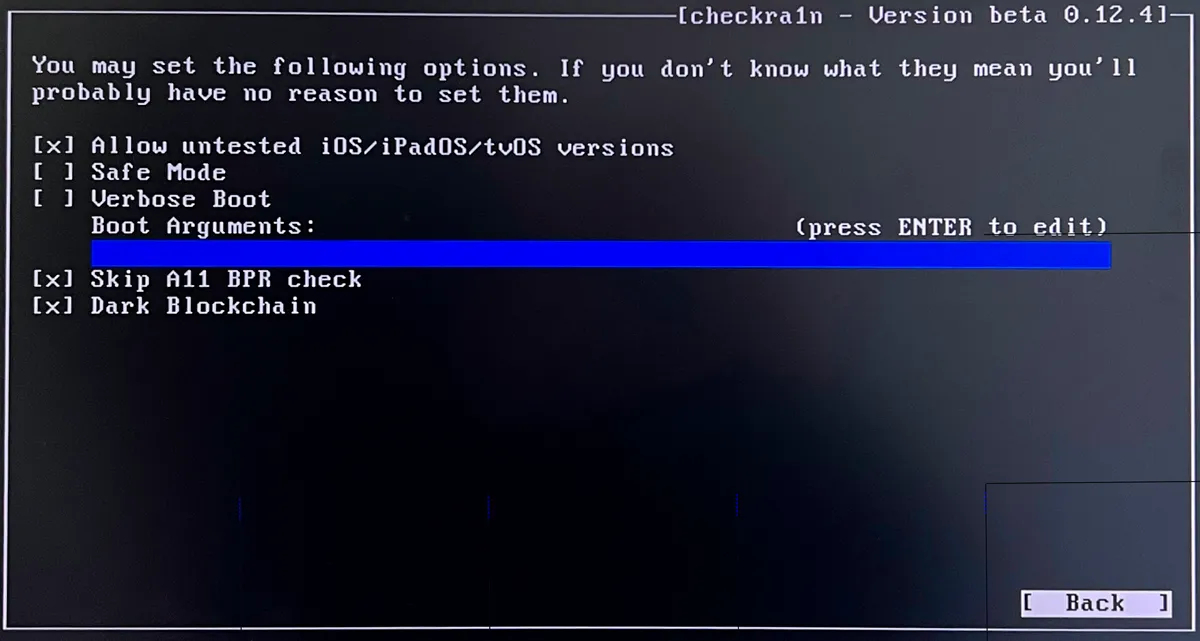
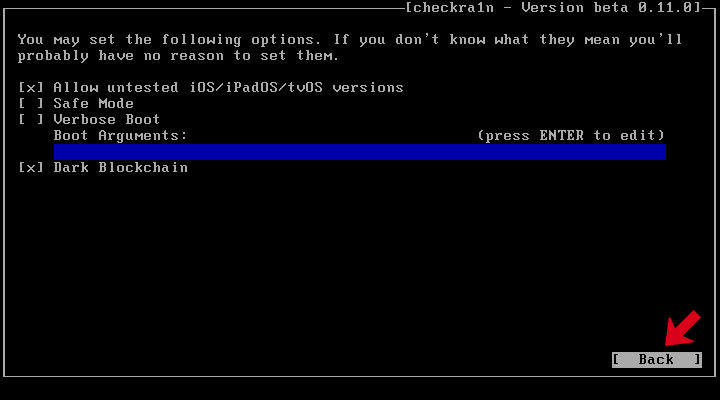
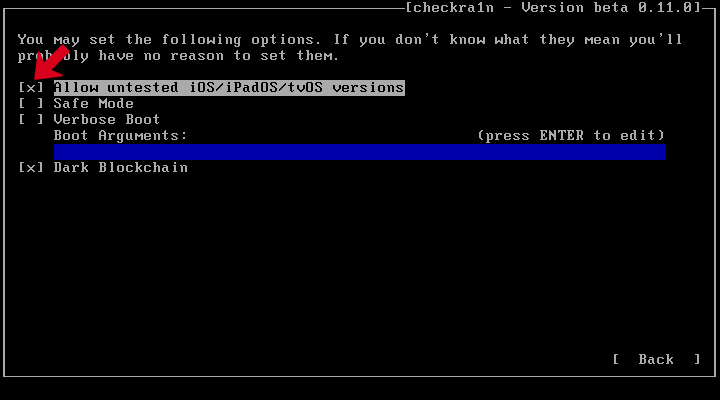
На экране настроек выберите «Allow Untested iOS/iPadOS/tvOS versions» с помощью клавиши со стрелкой на клавиатуре и нажмите Enter, чтобы выбрать его.
-
Затем нажмите кнопку «Back» и нажмите Enter, чтобы вернуться в основной интерфейс.
-
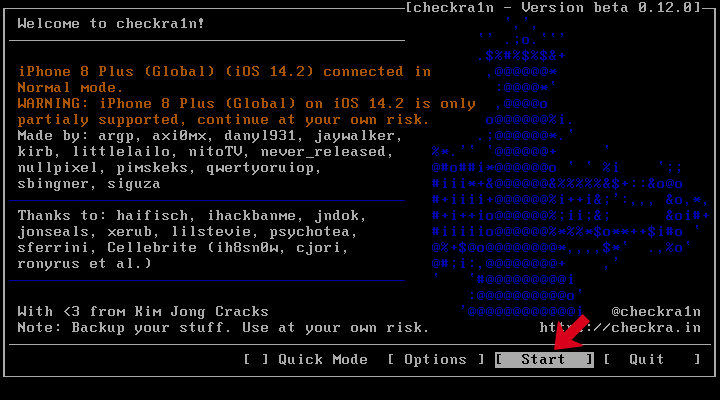
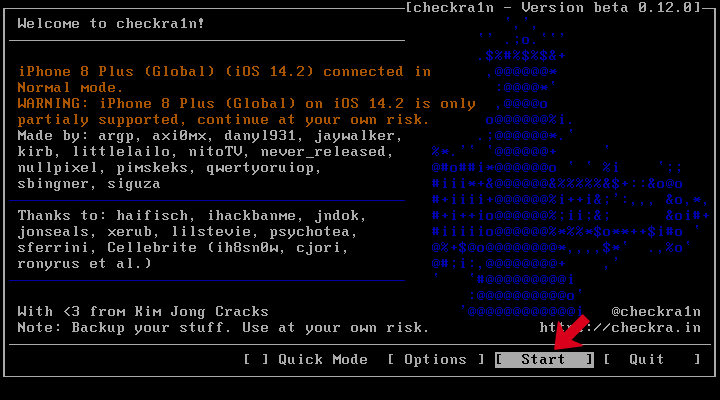
После того, как вы нажмете кнопку «Sart», нажмите Enter, чтобы сделать джейлбрейк для устройства iOS.
-
Перед джейлбрейком checkra1n отобразит всплывающее окно с предложением сделать джейлбрейк устройства iOS. Пожалуйста, выберите ОК и нажмите Enter.
-
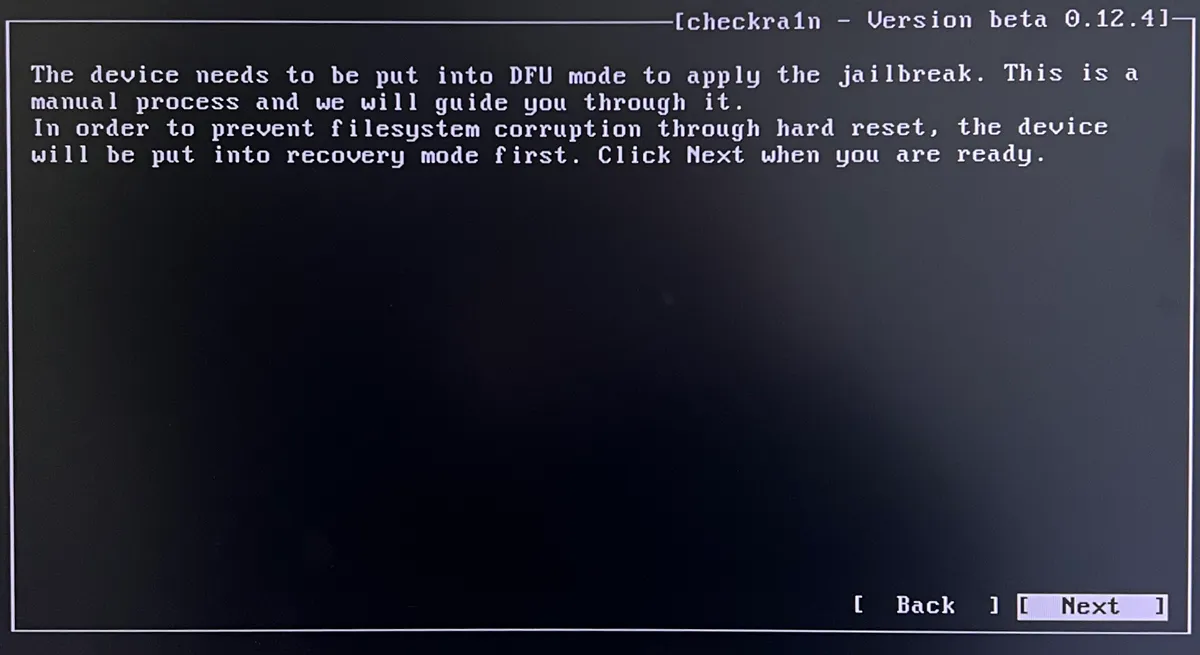
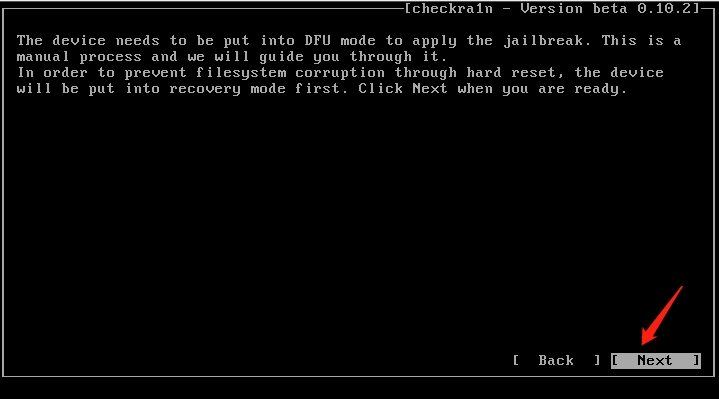
Чтобы сделать джейлбрейк вашего устройства iOS, CheckN1x требует, чтобы ваше устройство находилось в режиме DFU. Выберите «Next», и программа направит вас в режим DFU.
-
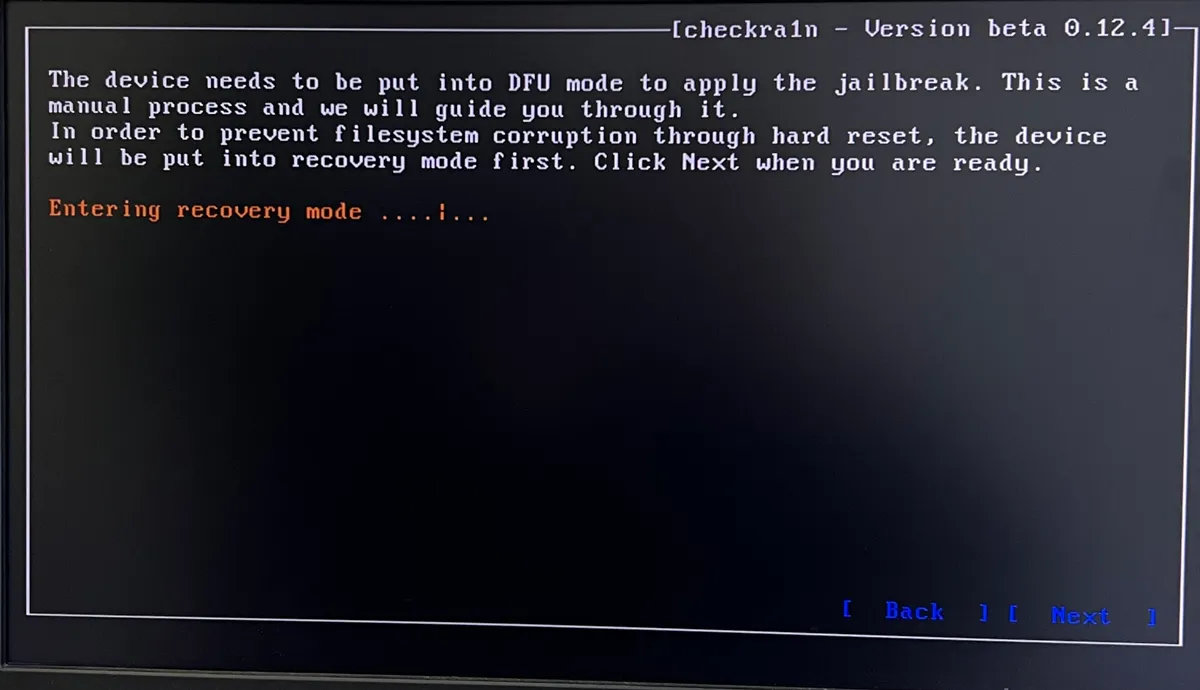
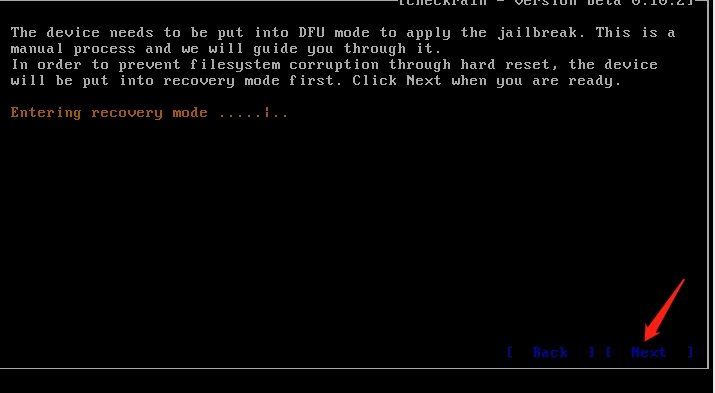
Выберите опцию «Next», и Checkn1x автоматически переведет ваше устройство iOS в режим восстановления.
-
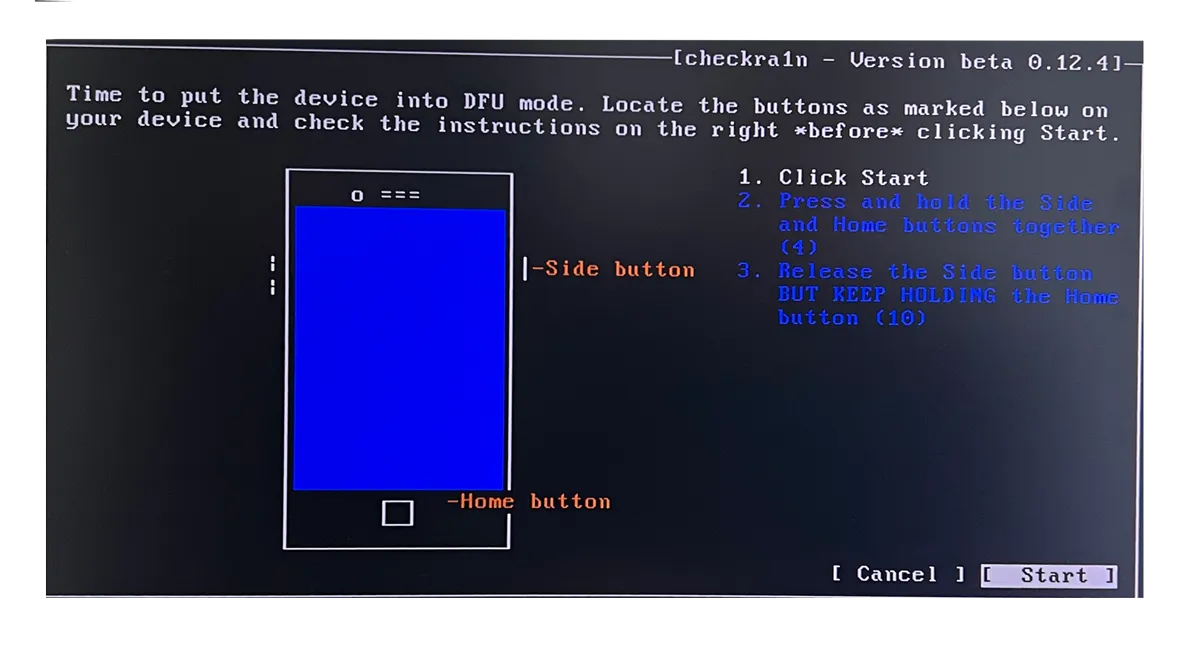
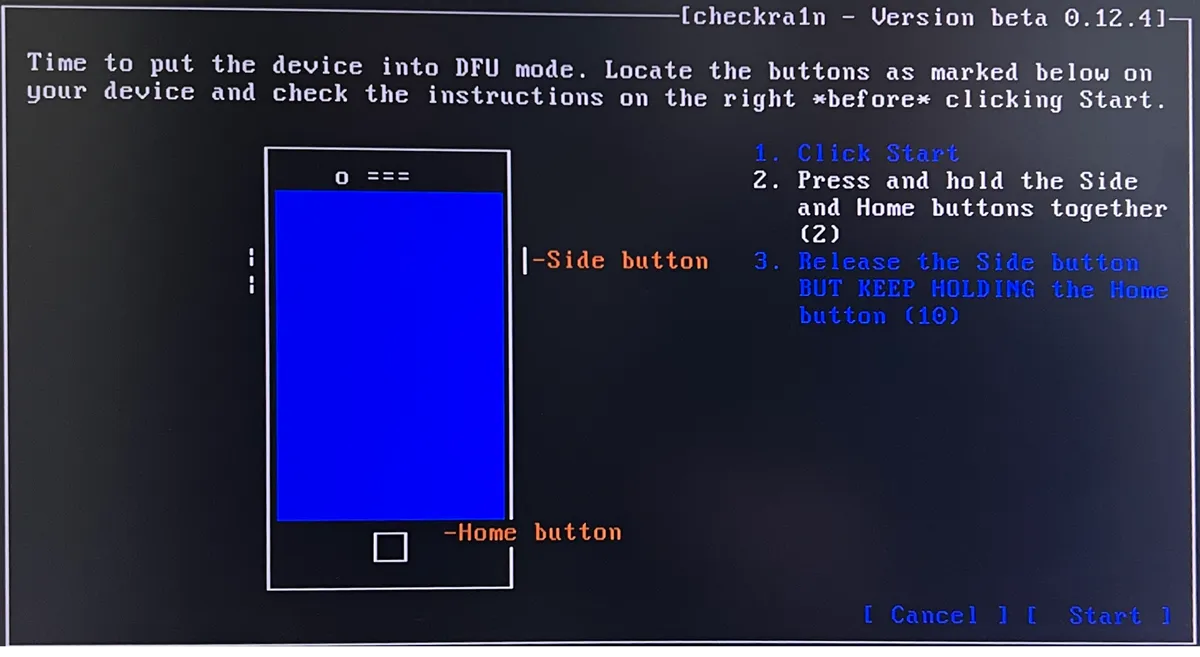
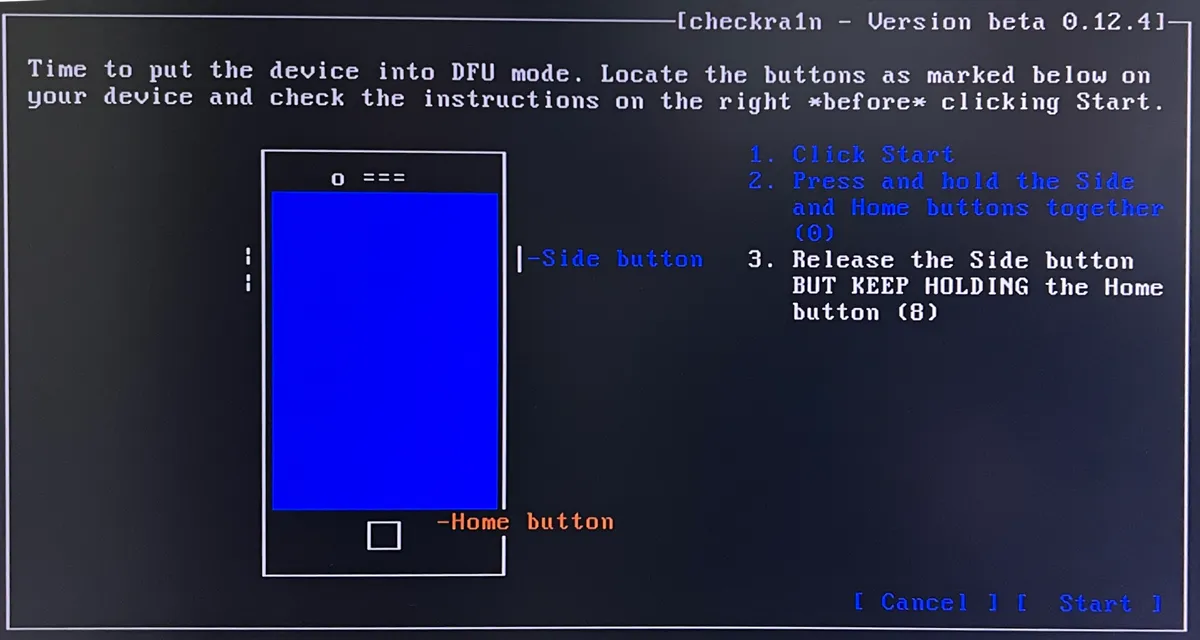
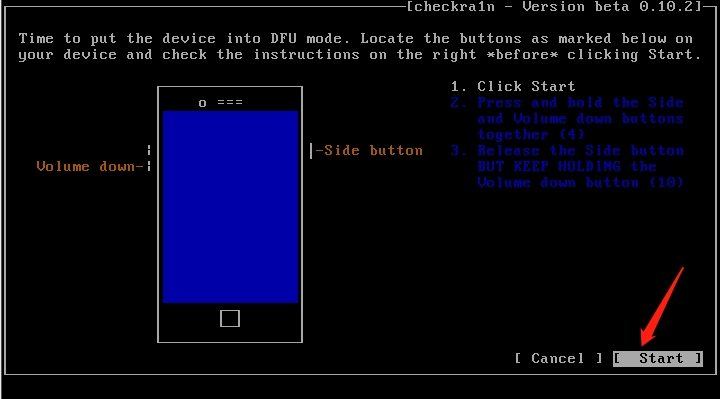
Выберите опцию «Start», а затем следуйте инструкциям на Checkn1x, чтобы перевести ваше устройство iOS в режим DFU.
-
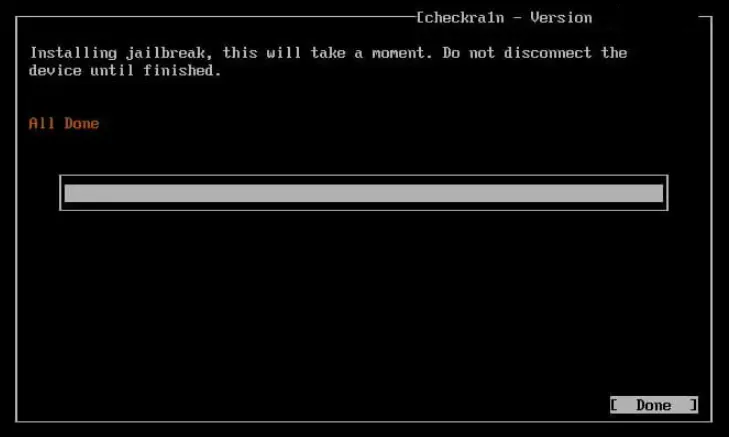
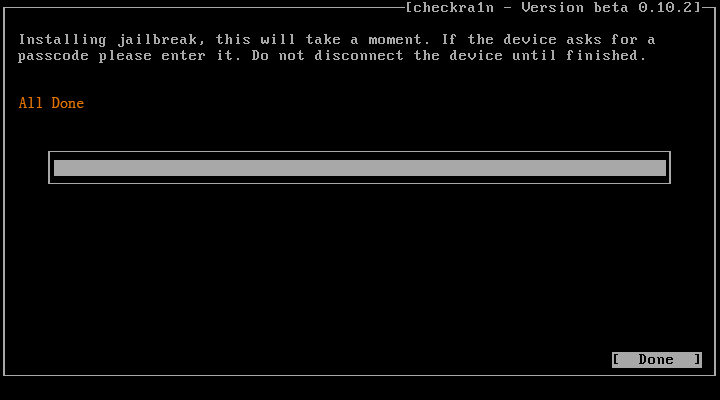
После успешного перехода вашего устройства в режим DFU Checkn1x автоматически сделает джейлбрейк вашего устройства. После завершения процесса джейлбрейка выберите «Готово» и отсоедините USB-накопитель.
Примечание: Для большинства производителей компьютеров сочетание клавиш для параметров загрузки — F12. Вы должны искать правильный ключ, соответствующий вашему компьютеру, если F12 не работает. Вот несколько распространенных сочетаний клавиш для параметров загрузки.
| Boot Menu Key | Настольные бренды | Бренды ноутбуков | Бренды ноутбуков |
|---|---|---|---|
| ESC | Dell | ASUS, Sony | MAXSUN, UNIKA, SUPOX, Spark, SOYO, EPOX, UNIKA, Jetway, J&W, Colorful, ECS, SOYO, FOXCONN |
| F8 | ASUS, BenQ | ASUS, YESTON, J&W | |
| F9 | HP, BenQ | BIOSTAR, GUANMING | |
| F10 | ASL | ||
| F11 | MSI | MSI, ASRock, ONDA, Colorful,ECS, Gamen, Topstar | |
| F12 | Lenovo, HP, Acer, Hasee, eFound, THTF, Haier | Thinkpad, Dell, Lenovo, TOSHIBA, Samsung, IBM, Acer, Hasee, Haier,eFound, THTF, GIGABYTE, Gateway, eMachines | GIGABYTE, Intel, Cthim, SOYO, FOXCONN, Gamen, Topstar |
Примечание: Если вы не можете войти в Boot Menu, войдите в BIOS / UEFI, чтобы изменить настройки Boot Options. Чтобы вы могли запускать Checkra1n в Linux. Пожалуйста, прочтите следующие статьи, чтобы получить подробную информацию.
Совет #1: Если процесс джейлбрейка застрянет, попробуйте несколько способов ниже:
- Измените другую флешку и попробуйте снова сделать джейлбрейк.
- Перезагрузите устройство iOS и компьютер и попробуйте снова сделать джейлбрейк.
Совет #2: Если джейлбрейк не удался, заново подключите устройство к USB-порту на задней панели компьютера и попробуйте снова.
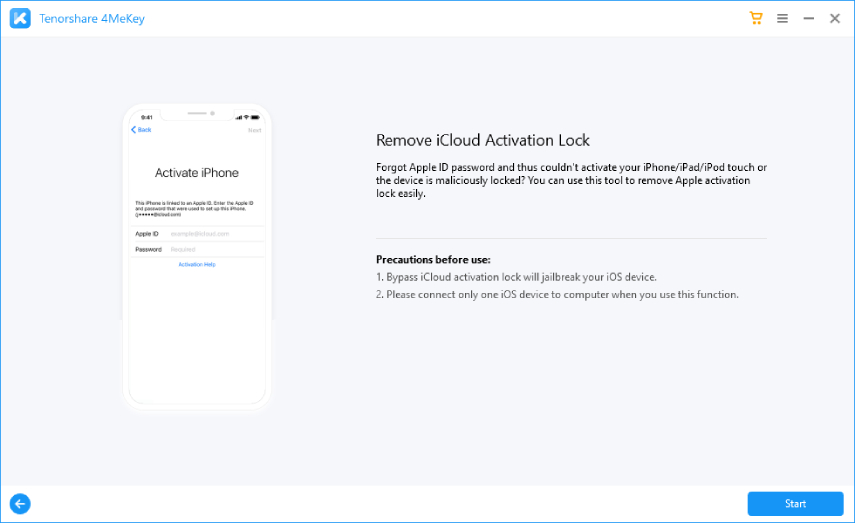
Удалить блокировку активации iCloud на устройстве iOS
После успешного взлома вашего устройства перезагрузите компьютер, и ваш компьютер автоматически перейдет в операционную систему Windows. Используйте Tenorshare 4MeKey , чтобы снять блокировку активации устройства iOS. Представляем вам Учебное пособие по удалению блокировки активации iCloud на Tenorshare 4MeKey.
- Программа Checkn1x для джейлбрейка iOS на Windows
- Пошаговое руководство по джейлбрейку iOS с помощью инструмента Checkn1x
- Обход экрана блокировки активации в Windows с помощью iRemove
Глоссарий
Джейлбрейк iOS в Windows с помощью Checkn1x
В этом руководстве рассказывается, как использовать инструмент Checkn1x для запуска Checkra1n и джейлбрейка iOS 12 до 14.8.1, а также как обойти блокировку активации с помощью программы iRemove на ПК с Windows.
Checkn1x — это самый быстрый и простой способ сделать джейлбрейк iPhone и iPad под управлением iOS 12–14.8.1 на ПК с Windows.
Что такое Checkn1x? Checkn1x — это ISO-образ Linux размером 50 МБ с предустановленным джейлбрейком Checkra1n. Мы хотим напомнить вам, что этот подход не задействует жесткий диск вашего ПК. Все действия производятся на флешке с установленным на ней приложением Checkn1x. Этот инструмент исключает любую потерю файлов на вашем ПК.
Что вам нужно:
- ПК с ОС Windows с 64-разрядным процессором Intel или AMD;
- USB-накопитель емкостью 256 МБ и более;
- Donwload Checkn1x and BalenaEtcher (Запись образов OS на USB-накопитель.)
Пошаговое руководство по джейлбрейку iOS с помощью инструмента Checkn1x
В этом руководстве рассказывается, как использовать инструмент Checkn1x для запуска Checkra1n и джейлбрейка iOS 12 до 14.8.1, а также как обойти блокировку активации с помощью программы iRemove на ПК с Windows.
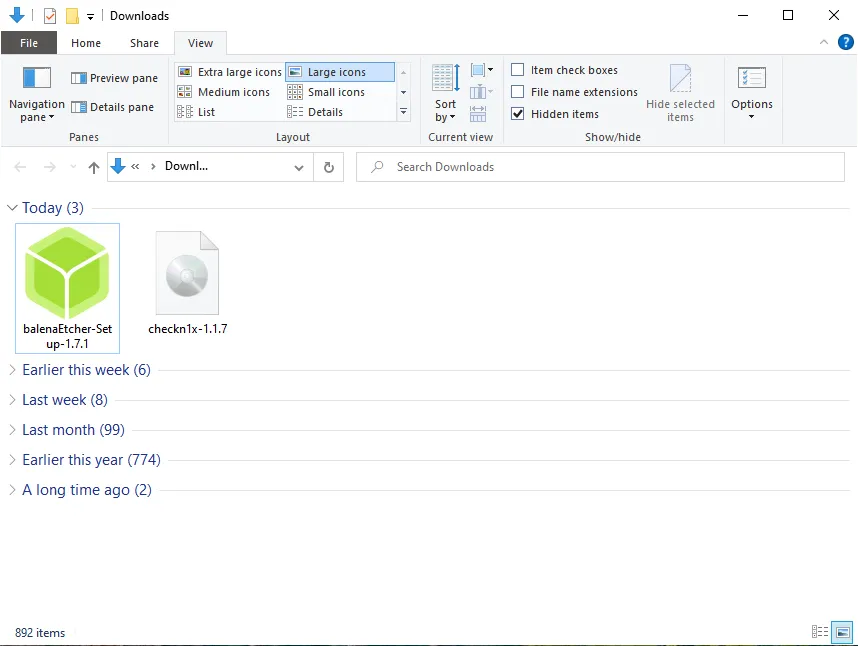
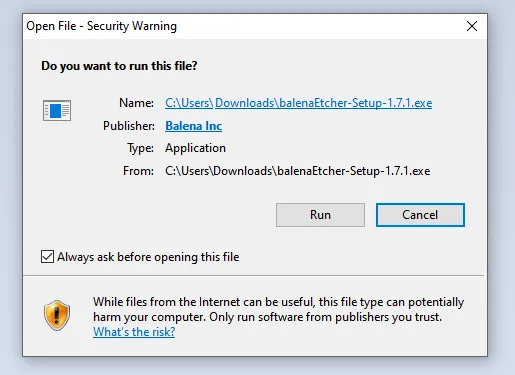
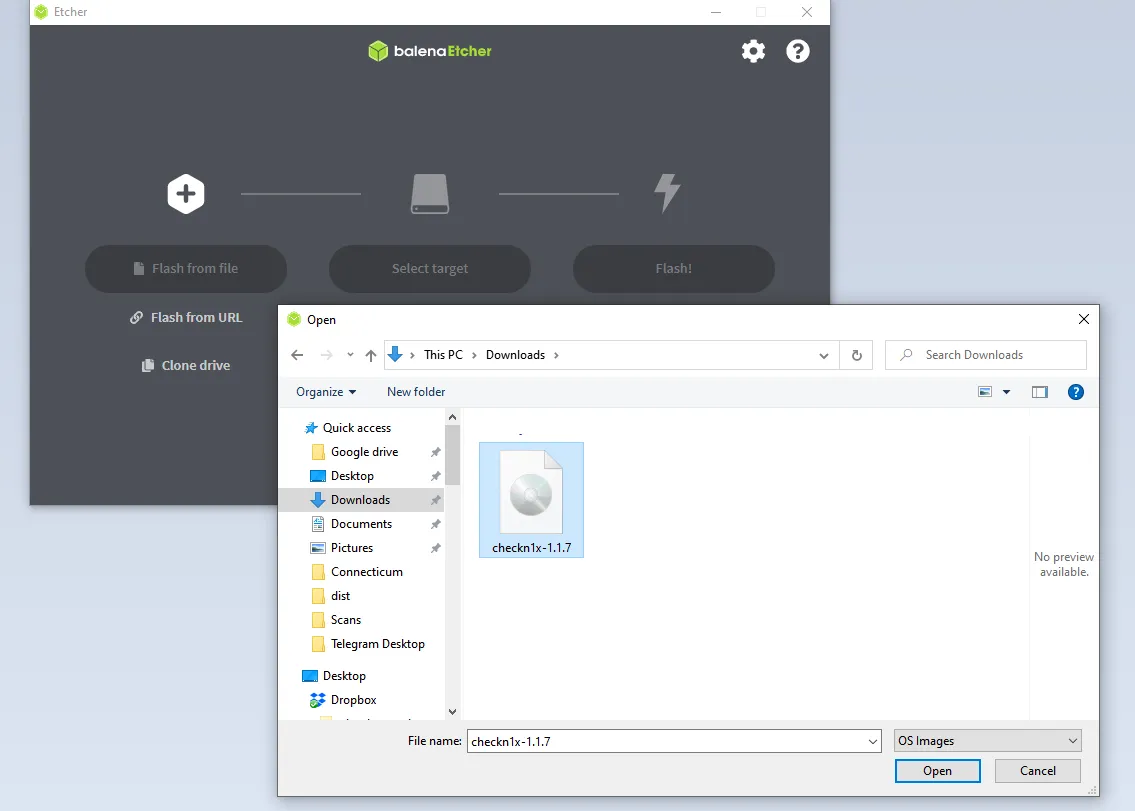
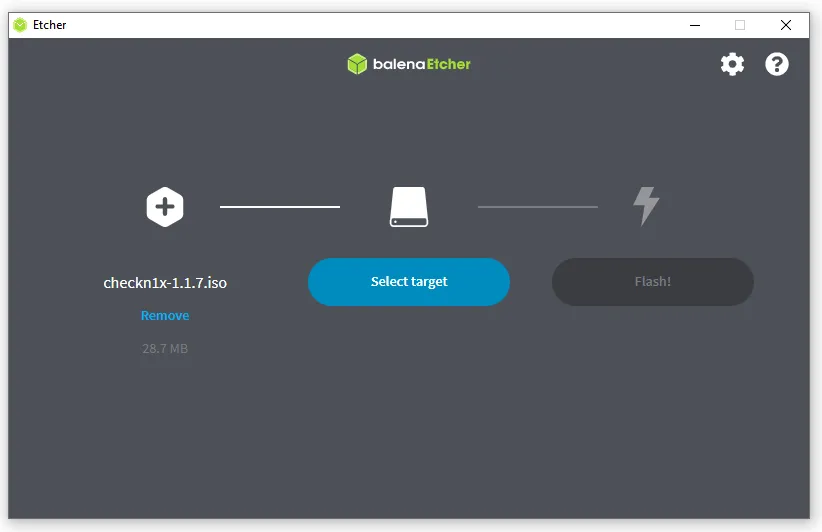
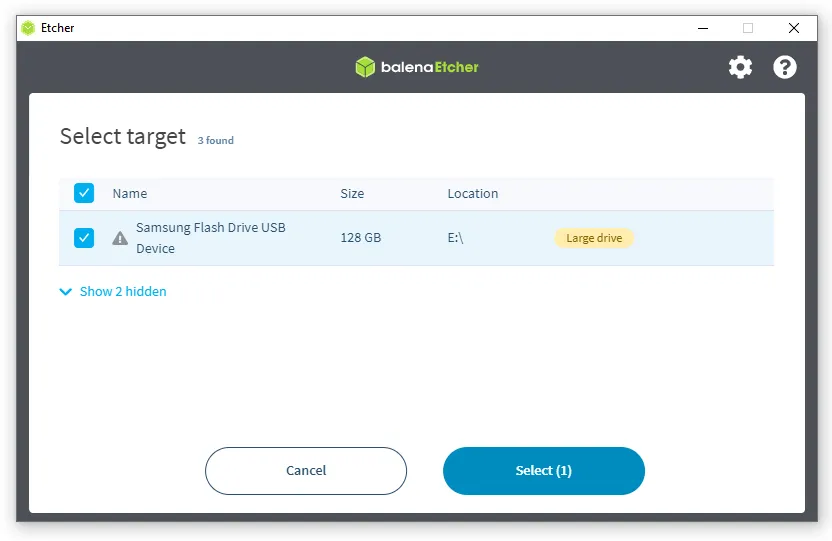
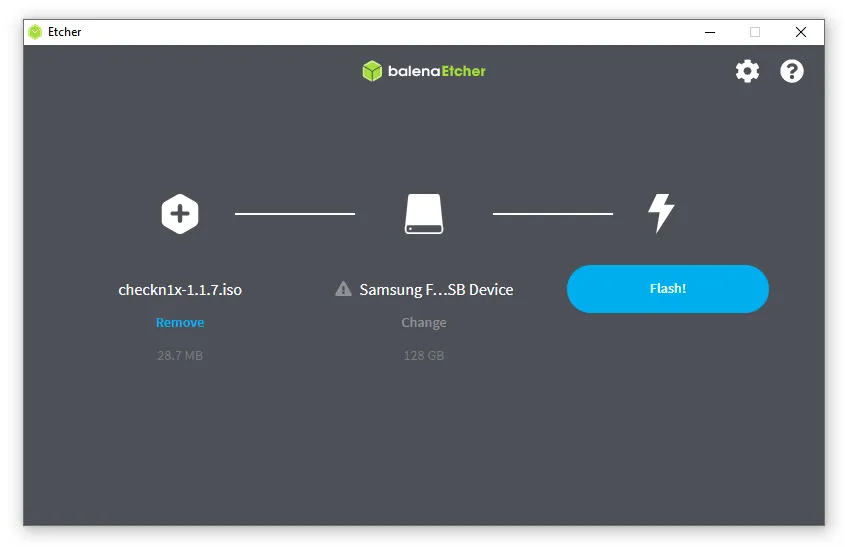
- Установите программное обеспечение BalenaEtcher и запустите программу.

- Выберите файл «checkn1x.iso» из загруженной папки и вставьте флэш-накопитель USB, чтобы развернуть файл ISO. Распакуйте ISO на флешку.
- Перезагрузите компьютер под управлением Windows и войдите в меню загрузки. Стандартными клавишами для доступа к меню загрузки являются ESC, F2, F10 или F12, в зависимости от производителя вашего компьютера или материнской платы. Конкретная клавиша, которую нужно нажать, обычно указывается на стартовом экране компьютера. Если вы не знаете, как войти в загрузочное меню на ПК или ноутбуке, попробуйте поискать марку и модель вашего устройства в Google.
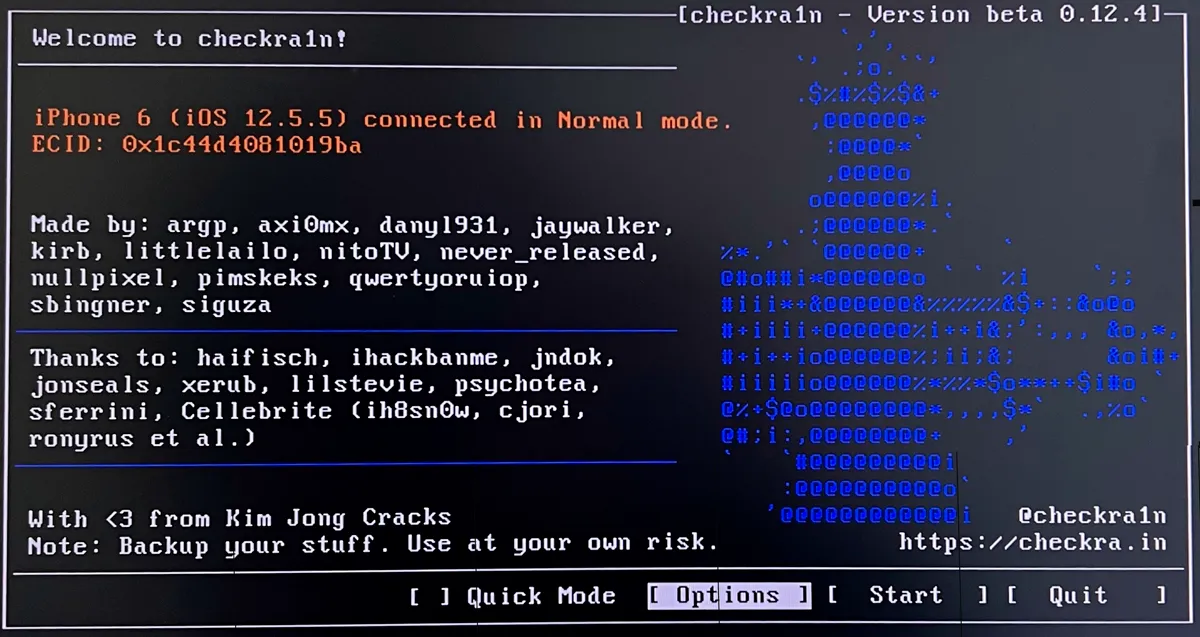
- Выбираем загрузку с флешки. После загрузки вы попадете в графический интерфейс Checkra1n.
Внимание! Используйте только кабель USB-Lightning! Кабель USB Type-C Lightning не работает!
- Выберите Параметры.
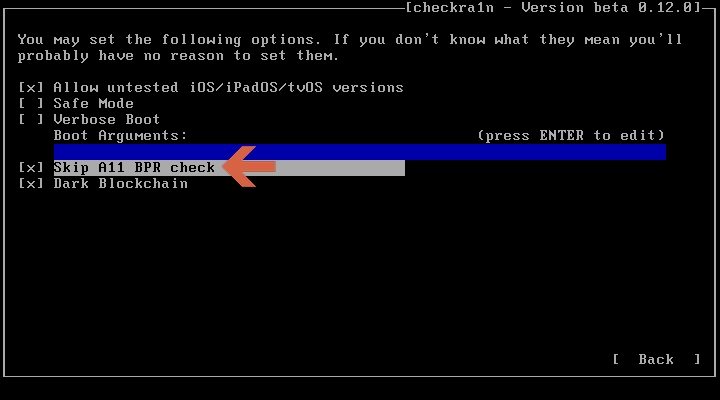
- Установите флажки, чтобы «Разрешить непроверенные версии iOS» и «Пропустить проверку A11 BRP». Нажмите кнопку «Назад».
- Подключите ваше устройство к ПК, нажмите «Пуск».
- Checkra1n уведомит вас о необходимости перевести ваше устройство в режим восстановления. Нажмите «Далее», чтобы продолжить. Программа все сделает автоматически.
- После того, как устройство будет переведено в режим восстановления, Checkra1n попросит вас перевести ваше устройство в режим DFU. Сделайте это, следуя инструкциям на экране, или прочитайте наши инструкции по установке режима DFU, а затем нажмите «Пуск».
- После перевода устройства в режим DFU не выключайте его и дождитесь завершения процесса. Вы увидите сообщение «Все готово», если все получится.

Поздравляем! Ваше устройство прошло джейлбрейк! Теперь вам нужно перезагрузить компьютер и дождаться загрузки Windows.
Обход экрана блокировки активации в Windows с помощью iRemove
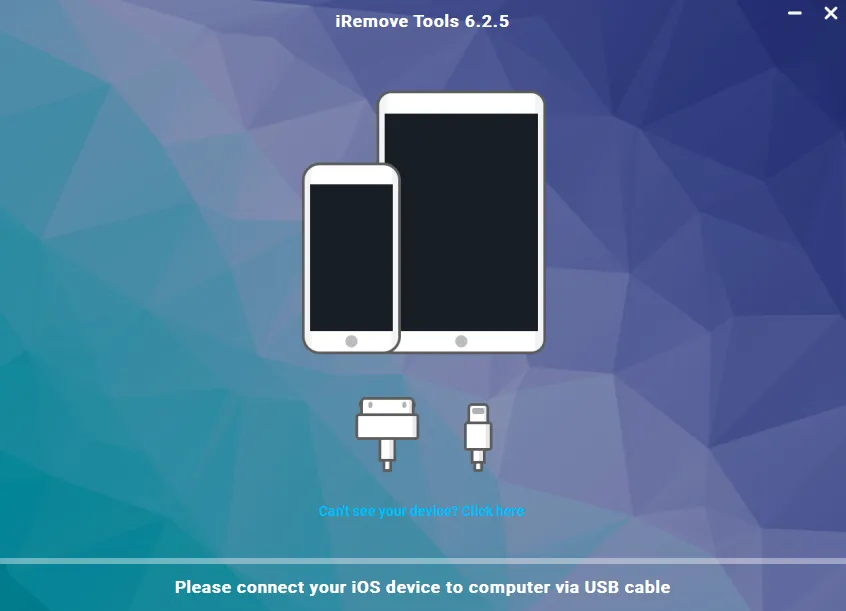
Вы готовы обойти экран блокировки активации на ПК с Windows с помощью приложения iRemove. Пожалуйста, следуйте инструкциям ниже, чтобы завершить процесс.
- Загрузите Windows-версию приложения iRemove для обхода блокировки активации..
- Установите программу iRemove. Примечание! Перед установкой программного обеспечения убедитесь, что никакое дополнительное программное обеспечение не блокирует инструмент iRemove! Отключите антивирус и любое другое программное обеспечение, которое может блокировать интернет-трафик.
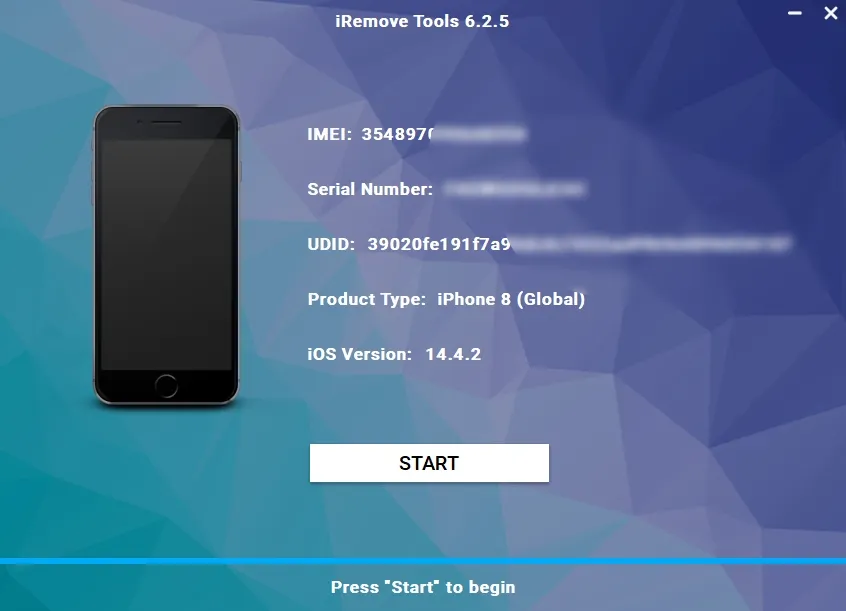
- Запустите приложение iRemove. Программа автоматически проверит ваше устройство.
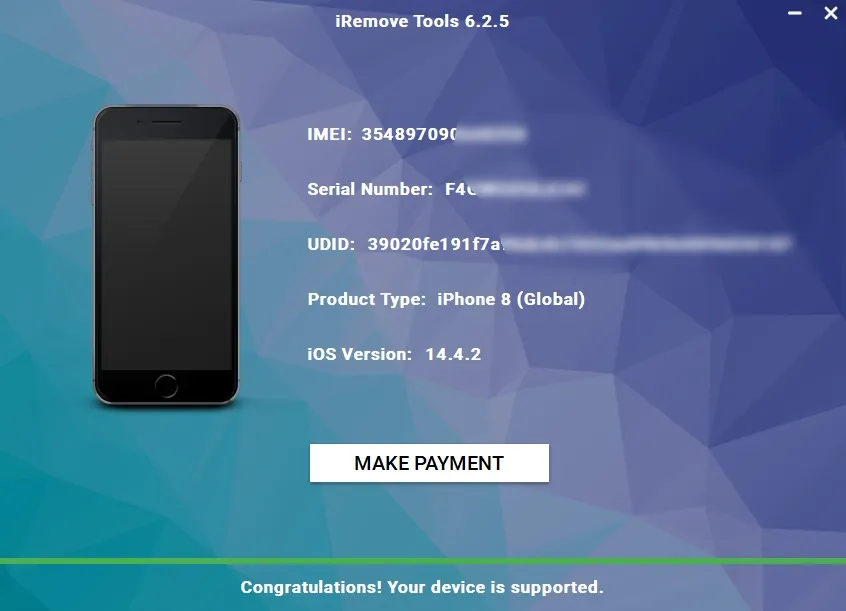
- Если ваше устройство поддерживается, вы будете перенаправлены на страницу оформления заказа.
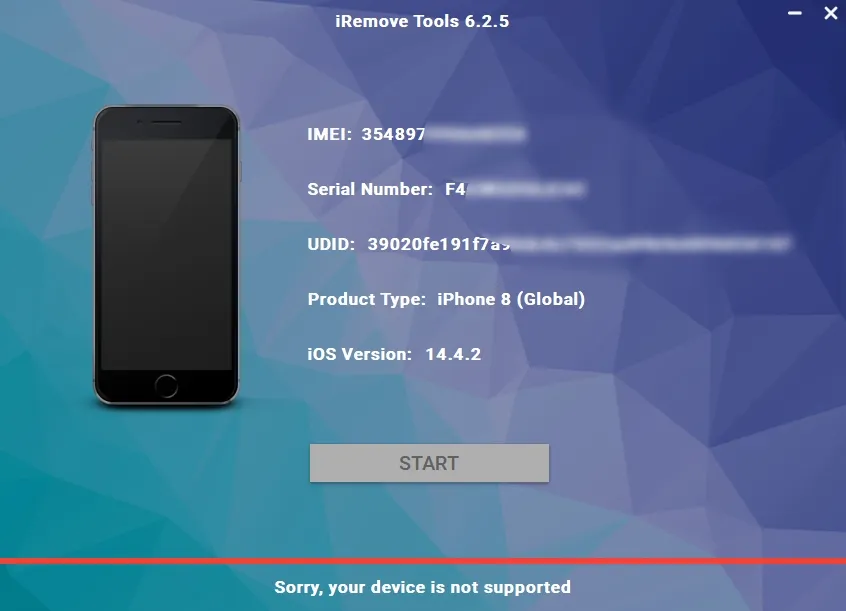
Если ваше устройство не поддерживает обход блокировки активации iCloud, вы получите следующее сообщение:
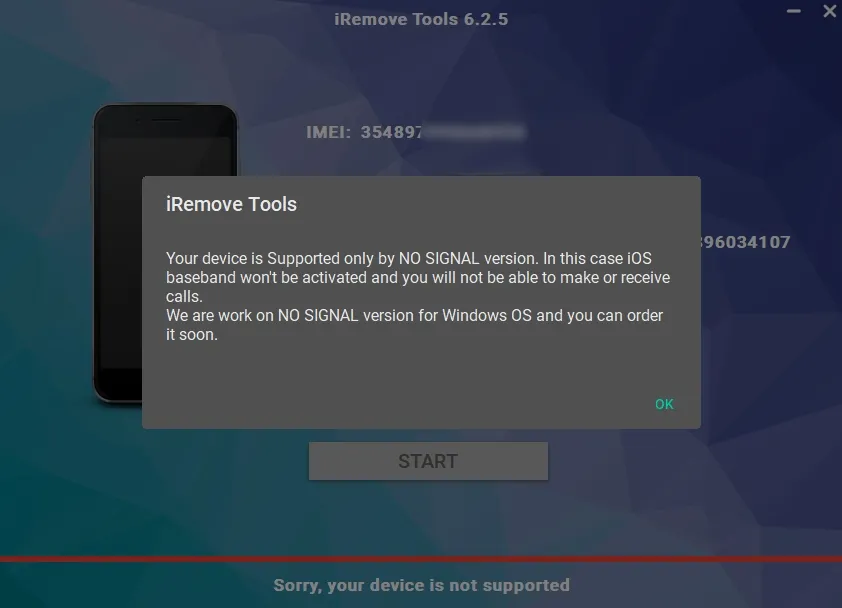
Мы должны отметить, что самое последнее обновление безопасности вредит некоторым устройствам, в том числе занесенным в черный список, с заблокированной SIM-картой и разблокированных в стране с помощью «Политики Next Tether». Вот почему программное обеспечение iRemove должно проверять ваш iPhone или iPad на совместимость перед работой! Предположим, при проверке вашего устройства приложение находит какое-либо из упомянутых выше ограничений. Затем вы увидите сообщение о том, что ваш мобильный гаджет не поддерживается сервисом с СИГНАЛОМ:
- Произведите оплату. После того, как ваш платеж поступит, ваш IMEI или серийный номер будут добавлены в базу данных iRemove. Вы можете сразу же использовать программное обеспечение. Лицензия предоставляется только на одно заблокированное устройство, IMEI или серийный номер которого занесены в базу данных iRemove.
- Обойдите блокировку активации iCloud. Повторно подключите устройство и нажмите кнопку «Обход». Подождите, пока ваше устройство перезагрузится. Программа уведомит вас об успешном завершении обхода экрана блокировки активации iCloud!


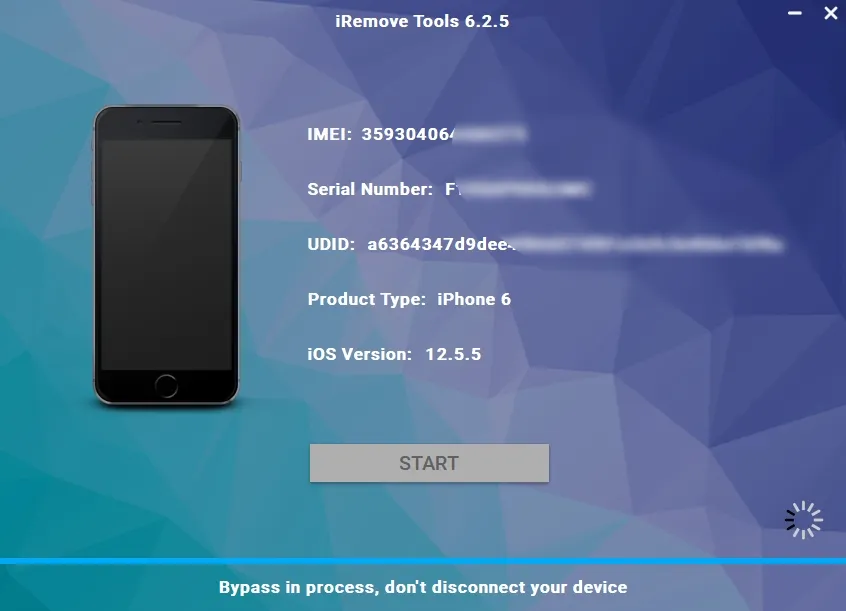

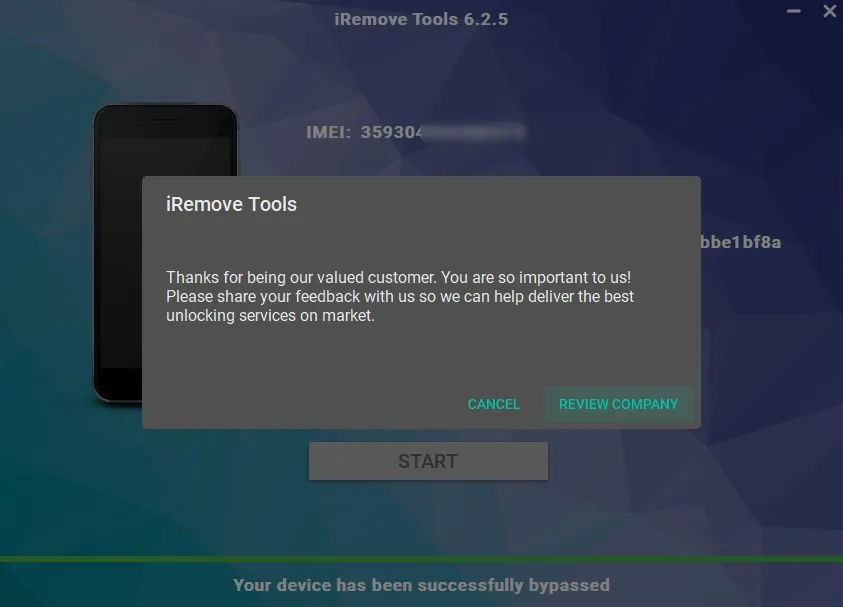
После завершения обхода экрана блокировки активации на iPhone или iPad ваше устройство будет полностью работоспособным. Вы можете использовать на нем свой Apple ID, устанавливать приложения из App Store, совершать и принимать звонки, пользоваться интернетом и не иметь никаких других ограничений.
Поделиться:
Программное обеспечение для разблокировки iPhone и iPad
Программное обеспечение для разблокировки Mac
Будьте в курсе
Получайте специальные предложения на последние разработки от команды iRemove.
Thinking about jailbreaking your iPhone on Windows? That’s great. Jailbreaking has a lot of benefits and will give you more control over what is installed on your iPhone, but it isn’t the easiest thing to do. It is a delicate process and if you don’t follow the correct procedure, you might end up bricking your iPhone and it will be completely unusable.
Many people who are interested in jailbreaking discover methods that require them to use Ubuntu but fortunately, in this article, we’ll be showing you a method that lets you jailbreak iPhone on Windows without Ubuntu. So, let’s jump right in.
Requirements for Jailbreaking an iPhone on Windows
In order for you to jailbreak your iPhone on Windows, there are a few requirements that you must meet for our method to work. These requirements are:
- Must be using a computer with Windows 7/8/8.1/10 installed (32-bit and 64-bit both work)
- You will need to have a USB memory stick with at least 50MB of available storage
For anyone who has an iPhone 5S, we’d recommend that you jailbreak your device using a Mac computer instead. This is because many users experience technical difficulties when they try to jailbreak an iPhone 5S on a Windows computer.
Jailbreaking an iPhone with StarzSoft KeyPass
When it comes to jailbreaking your iPhone the tool that we’re going to be showing you is StarzSoft KeyPass. This software isn’t designed specifically for iOS jailbreaking, rather it is for unlocking an iCloud Activation Lock.
However, the method that StarzSoft KeyPass uses for this involves jailbreaking the device, making it perfect for what we want to do. Follow these steps:
Step 1 – First you will need to download and install the StarzSoft KeyPass software on your computer, so do that now.
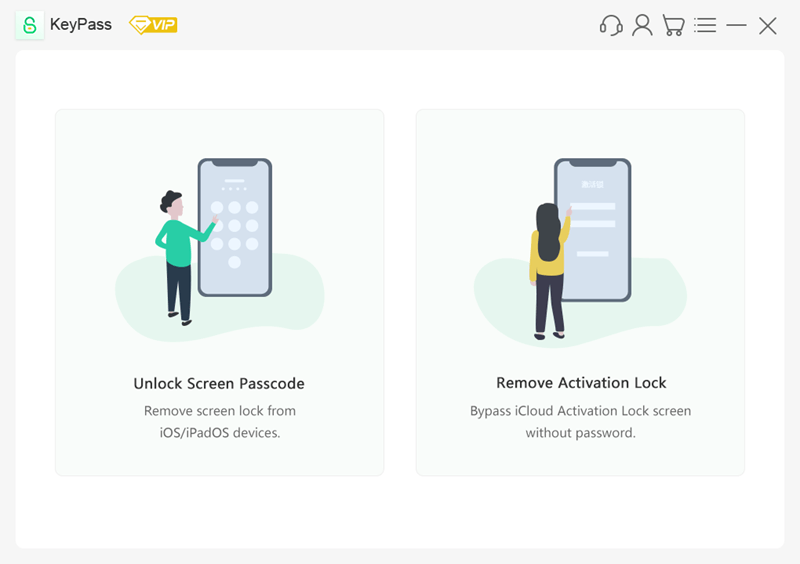
Step 2 – Use a lightning cable to connect your iPhone, launch the program, and select the Unlock iCloud Activation Lock feature.
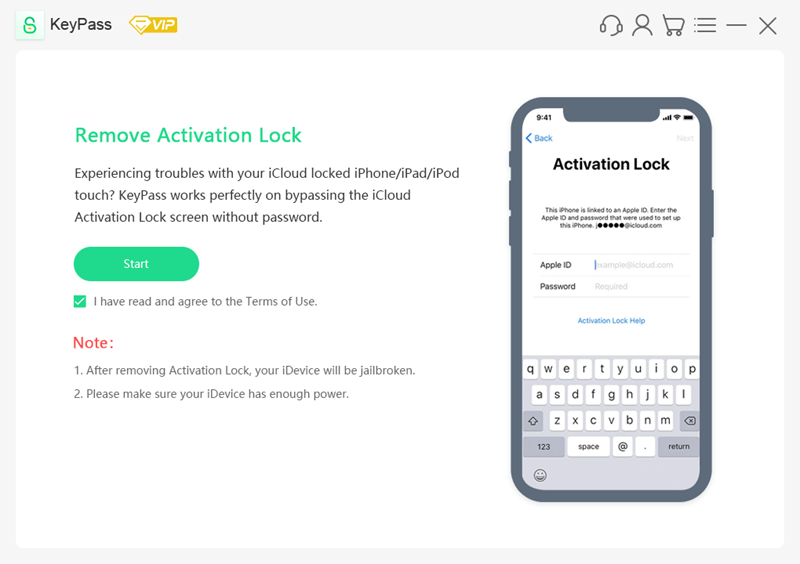
Step 3 – Check the box to agree to the Terms of Use and click Start.
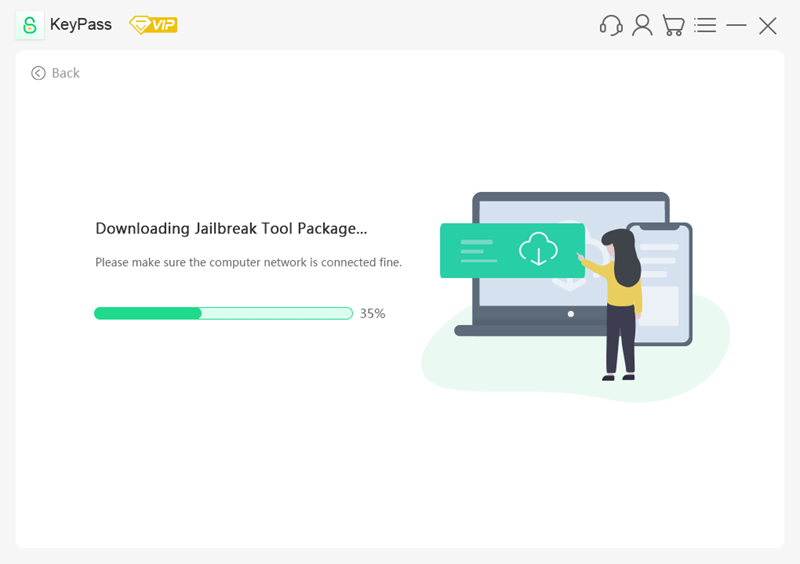
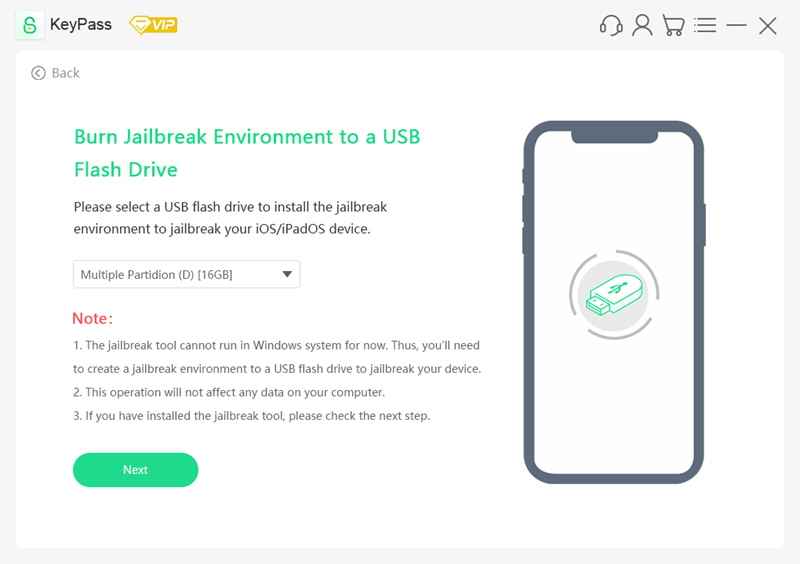
Step 4 – The jailbreaking software will then be downloaded. Afterwards, plug in a USB flash drive with plenty of free storage and click the Next button.
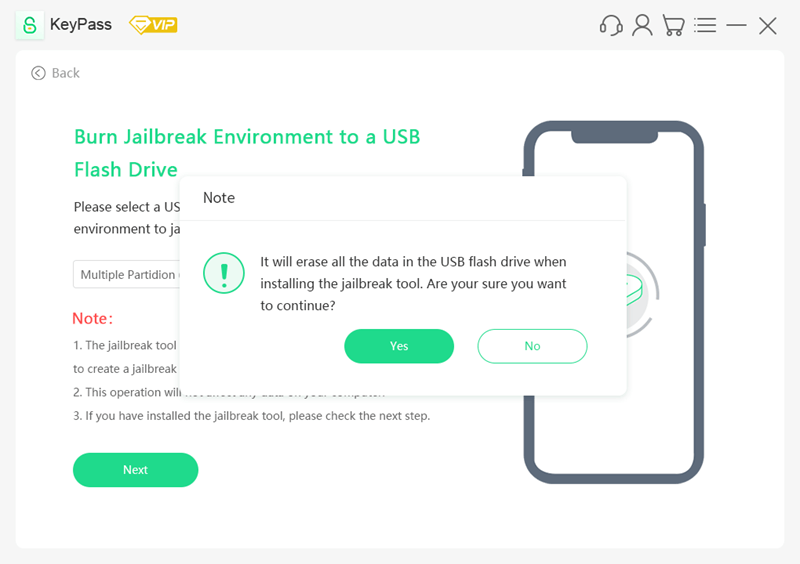
Step 5 – You’ll receive a warning that the USB flash drive will be wiped. Back up any data on the flash drive if you don’t want to lose anything, then click Yes to continue.
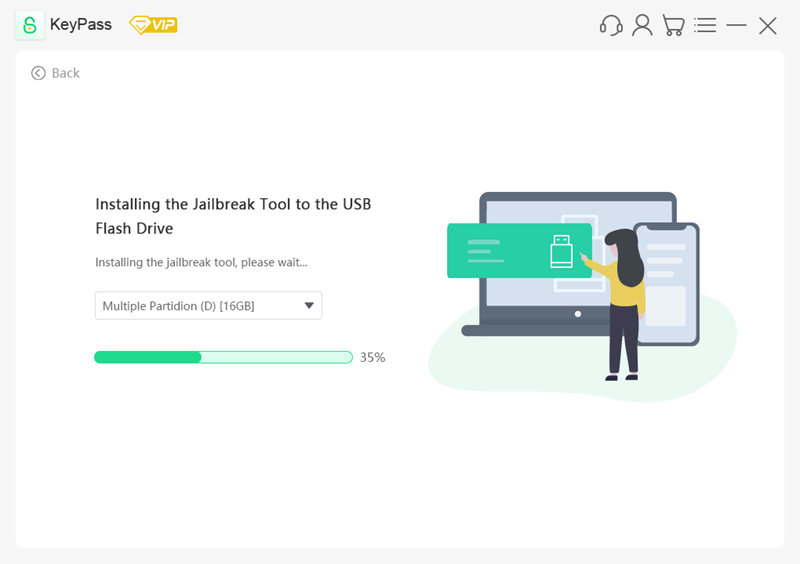
Step 6 – After the flash drive is prepared with the jailbreaking software a QR code will appear. Scan this QR code with your iPhone to open a guide for the remaining steps.
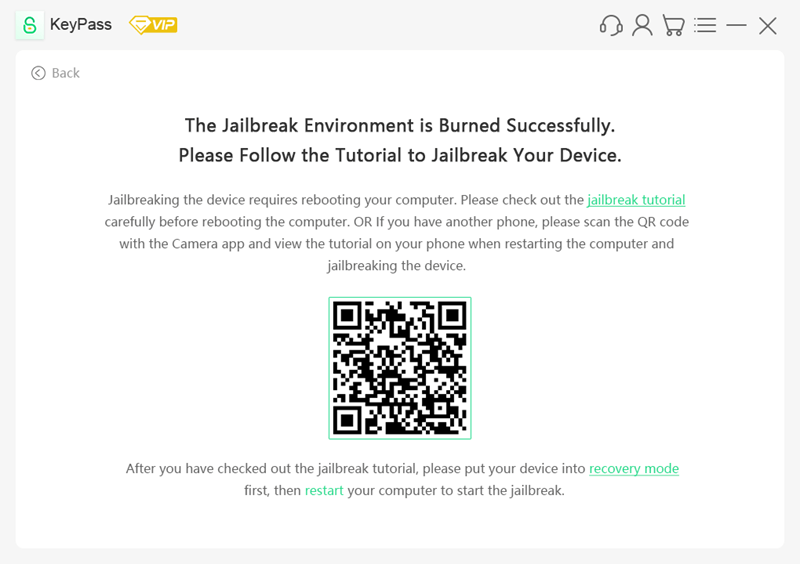
Step 7 – Next, you need to put your iPhone into Recovery Mode by clicking “recovery mode” on the software. Then turn off your computer then turn it back on and repeatedly press F12 as it loads to open the boot menu.
Note: F12 works for most computers although your manufacturer may use a different key, so you will have to look this up beforehand.
| Boot Menu Key | Desktop Brand | Laptop Brand | Motherboard Brand |
|---|---|---|---|
| ESC | Dell | ASUS, Sony | MAXSUN, UNIKA, SUPOX, Spark, SOYO, EPOX, UNIKA, Jetway, J&W, Colorful, ECS, SOYO, FOXCONN |
| F8 | ASUS, BenQ | ASUS, YESTON, J&W | |
| F9 | HP, BenQ | BIOSTAR, GUANMING | |
| F10 | ASL | ||
| F11 | MSI | MSI, ASRock, ONDA, Colorful,ECS, Gamen, Topstar | |
| F12 | Lenovo, HP, Acer, Hasee, eFound, THTF, Haier | Thinkpad, Dell, Lenovo, TOSHIBA, Samsung, IBM, Acer, Hasee, Haier,eFound, THTF, GIGABYTE, Gateway, eMachines | GIGABYTE, Intel, Cthim, SOYO, FOXCONN, Gamen, Topstar |
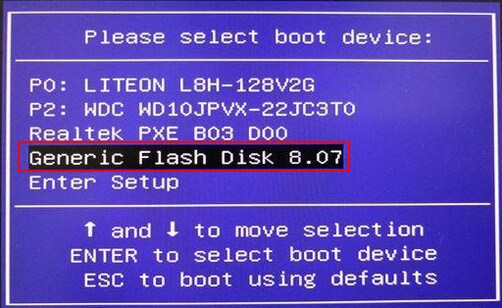
Step 8 – Once in the boot menu, select your USB device and your computer will then boot.
Step 9 – In the jailbreaking software’s main menu, enter Checkra1n by pressing the keys Alt + F2 at the same time.

Step 10 – Next, select Options with the arrow keys and press Enter, then enable Allow untested iOS/iPadOS/tvOS versions in the same way.

If you have a newer iPhone (iPhone 8 and later), you need to enable both Allow untested iOS/iPadOS/tvOS versions and Skip A11 BPR check options.
Step 11 – Press the Back button and then select Start and the jailbreaking process will begin.
Step 12 – Press Next as you follow the instructions that appear on your screen.
You will eventually be shown how to put your iPhone into DFU Mode, press Start to follow the instruction it shows to get your iPhone into DFU mode.
Once your iPhone is in DFU mode, the software will start to jailbreak.

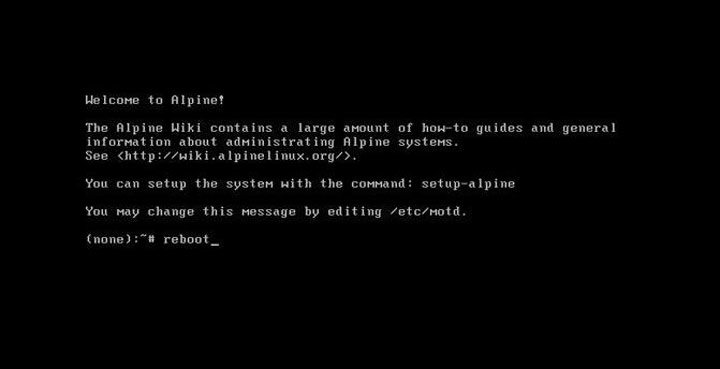
After your iPhone has been jailbroken, simply exit the jailbreaking menu by pressing Alt + F5, then typing “reboot” and pressing Enter. You computer will restart automatically.
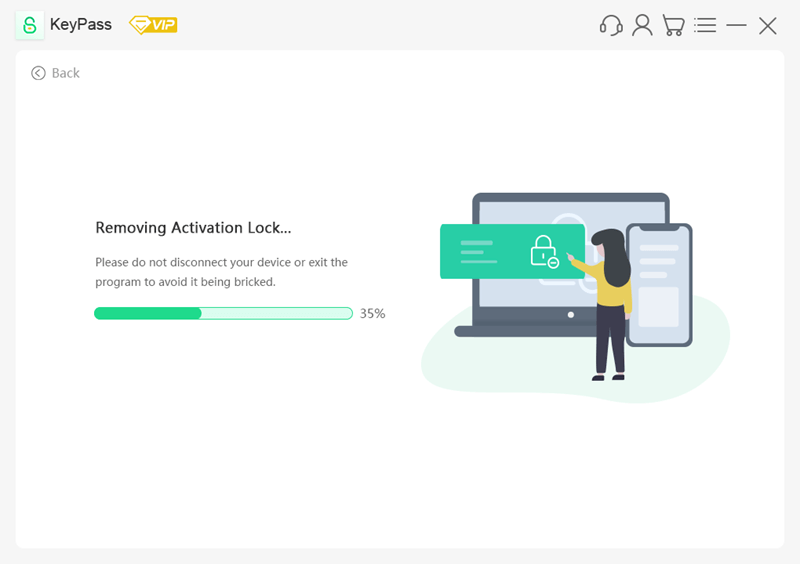
Once your computer restart, open StarzSoft KeyPass to remove iCloud Activation Lock within a few clicks!
There are a lot of steps to this method but it is an effective way of jailbreaking any iOS device without the help of Ubuntu. While you will find simpler solutions, as long as you follow these steps correctly you won’t have any problems with it.
Conclusion
There you have it: the best way to jailbreak iPhone on Windows without Ubuntu. Using software like StarzSoft KeyPass ensures that you get the results you’re hoping for.
Remember that you will have to accept the risks of jailbreaking no matter what type of solution you use, although these specialised software solutions are less likely to result in user error. After using this method, you’ll have much more control over your iPhone and will be able to install a wider range of applications.
-
Home >
- How to Jailbreak My iOS Device on Windows
Before you bypass the iCloud activation lock, you need to jailbreak the iOS device. Because there is no jailbreak tool for Windows system, you can follow this tutorial to create a jailbreak environment on a Windows computer and then jailbreak your iOS device.
Note:
If you have a Mac (for macOS 10.13-10.15), it’s suggested that jailbreaking your iOS device would be a better choice.
A Video Tutorial: How to Jailbreak on Windows
What Should You Prepare Before Jailbreaking?
Here is a need-to-do list before you jailbreak the iOS device on Windows.
- Make sure your computer runs Windows 7 or later, 32 or 64 bit.
- Get a USB flash drive with more than 2 GB capacity.
- Download checkn1x-1.0.6-amd64.iso.
- Download rufus-3.1.1.exe.
Step-by-Step Guide on How to Jailbreak on Windows
Step 1. Burn the checkn1x ISO file to the USB flash drive
- Insert the USB flash drive into your computer.
- After downloading the file Rufus, click Rufus to open the application.
-
Click the “SELECT” button to find the downloaded checkn1x ISO file. Leave the other options as defaults, and then click “START”.
-
Then a warning message pops up saying the data on your USB flash drive will be formatted(If necessary, please back up your USB flash drive). Then select the «Write in DD Image Mode» option, and then click OK.
-
It takes 2 or 3 minutes to burn checkn1x ISO file to USB flash drive.
-
When the burning process is completed, click the «CLOSE» button.


Note:
When the checkN1x ISO file is burned, please unplug and reinsert the USB flash driver into your computer in case the system doesn’t recognize it.
Step 2. Start to Jailbreak with checkN1x
- Restart your computer. When the computer is powered on and loaded in the meanwhile, press F12 (Boot Menu).
-
In the startup window, select the USB flash drive that just burned the checkn1x ISO file.
-
After you’ve launched the Checkra1n, connect your iOS device to the computer. Then select the Options from the keyboard arrow key and press Enter to set the jailbreak tool.
-
From the Settings screen, select Allow Untested iOS/iPadOS/tvOS versions option from the keyboard arrow key, and press Enter to select it.
-
After selecting «Skip A11 BPR check», press Enter to select.
-
Then choose the Back button and press Enter to back to the main interface.
-
After you hit the Start button, press Enter to jailbreak your iOS device.
-
After the checkn1x tool is initiated, connect your iOS device to the computer, and you will see a connected reminder in the program. The select the Start option from arrow keys the on your keyboard and press the enter key.
-
To jailbreak your iOS device, CheckN1x requires your device be in DFU mode. Select «Next» and the program will direct you to DFU mode.
-
Check the «Next» option and Checkn1x will automatically put your iOS device into recovery mode first.
-
Select the «Start» option, and then follow the instructions on Checkn1x to put your iOS device into DFU mode.
-
After your device enters DFU mode successfully, Checkn1x will automatically jailbreak your device. When the jailbreaking process is completed, select «Done» and unplug the USB flash drive.
Note:
For most branded computers, the shortcut key to «Boot Menu» is F12. If F12 is invalid, refer to the following «Boot Menu» shortcuts
Boot Menu Key
Desktop Brand
Laptop Brand
Motherboard Brand
ESC
Dell
ASUS, Sony
MAXSUN, UNIKA, SUPOX, Spark, SOYO, EPOX, UNIKA, Jetway, J&W, Colorful, ECS, SOYO, FOXCONN
F8
ASUS, BenQ
ASUS, YESTON, J&W
F9
HP, BenQ
BIOSTAR, GUANMING
F11
MSI
MSI, ASRock, ONDA, Colorful, ECS, Gamen, Topstar
F12
Lenovo, HP, Acer, Hasee, eFound, THTF, Haier
Thinkpad, Dell, Lenovo, TOSHIBA, Samsung, IBM, Acer, Hasee, Haier, eFound, THTF, GIGABYTE, Gateway, eMachines
GIGABYTE, Intel, Cthim, SOYO, FOXCONN, Gamen, Topstar
Note:
If your computer is unable to enter the «Boot Menu», try entering the COMPUTER BIOS/UEFI and modify the system Boot entry Settings to enter the Linux CheckRA1n environment. For detailed guide, please check the following:
BIOS/UEFI Settings: How to Boot Your Computer from USB/CD/DVD
How to Set Boot Computer from USB/CD/DVD

Note:
If you have an iPhone 8/8 Plus/ X with iOS 14 system, you need to tick «Skip A11 BPR check» option .
Note:
You could not jailbreak an iPhone 8/8 Plus/ X running iOS 14(with lock screen passcode). If with lock screen passcode, please have a deep flash of the firmware firstly, and try to jailbreak again.


Tip 1: If the jailbreaking process gets stuck:
- Change a different USB flash drive and try to jailbreak again.
- Restart your iOS device and computer and try to jailbreak again.
Tip 2: If jailbreak failed:
Re-plug your device into the USB port on the back of your computer host and try again.
Tip 3: Notes for iPhone 8/8 Plus/ X devices with iOS 14 system:
For Phone 8/8 Plus/ X with iOS 14 system before jailbreaking, they should be in inactive and without any lock screen passcode.
Remove iCoud Activation Lock On iOS Device
After your device is jailbroken successfully, restart the computer, and your computer will automatically enter the Windows operating system. Please use Tenorshare 4MeKey to remove the activation lock of the iOS device. Here comes the Tenorshare 4MeKey Remove iCloud Activation Lock Tutorial.