
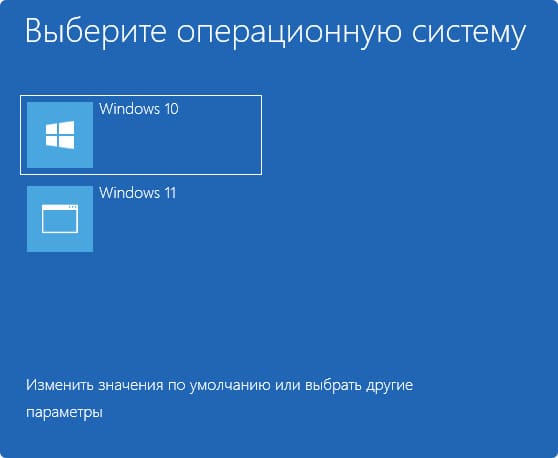
В большинстве случаев при установке двух ОС Windows 11/10 или других версий на одном компьютере, вторая из установленных система автоматически добавляется в меню при загрузке с возможностью выбора нужной ОС. Но не всегда и в этом случае для выбора нужной системы требуется менять параметры загрузки в БИОС или использовать Boot Menu.
В этой инструкции подробно о том, как добавить вторую систему Windows в меню выбора операционной системы при загрузке, если этого не произошло автоматически.
Добавление второй системы в меню загрузки в командной строке
По умолчанию, если диск с первой системой был подключён при установки второй Windows на том же компьютере, запись для её загрузки добавляется в загрузчик и вы видите соответствующее меню при загрузке, а также вторую систему в окне «Конфигурация системы» (Win+R — msconfig). Этого может не произойти в следующих ситуациях:
- Системы установлены в разных режимах (одна — UEFI, другая — Legacy/CSM). Объединить их в одном меню загрузки не получится, но можно преобразовать тип установки второй ОС в UEFI с помощью встроенного инструмента mbr2gpt.exe
- Диск первой системой был отключен при установке второй, либо диск со второй системой был подключён после установки на другом компьютере.
Возможны и иные ситуации, но, если обе системы установлены в одном режиме (UEFI на GPT диске, либо Legacy на MBR диске), мы легко может добавить обе в меню загрузки.
Для добавления второй Windows в меню загрузки в командной строке достаточно выполнить следующие шаги:
- Загрузитесь в Windows с того диска, который решите сделать «Основным» и загружаться с него в дальнейшем.
- Запустите командную строку от имени администратора: для этого можно начать вводить «Командная строка» в поиске на панели задач Windows 11 или 10, затем нажать правой кнопкой мыши по найденному результату и выбрать пункт «Запуск от имени администратора».
- Введите следующую команду, заменив букву диска E: на букву диска, на котором расположена ОС в вашем случае:
bcdboot E:\windows
и нажмите Enter.

- Если вы увидите сообщение, что «Файлы загрузки успешно созданы», всё прошло успешно, вторая система будет добавлена и в меню загрузки, и вы увидите её в окне «Конфигурация системы».


Как правило, какие-либо дополнительные действия не требуются, однако, если это две одинаковых версии Windows 11/10, может пригодиться инструкция Как переименовать и изменить порядок пунктов в меню загрузки Windows.
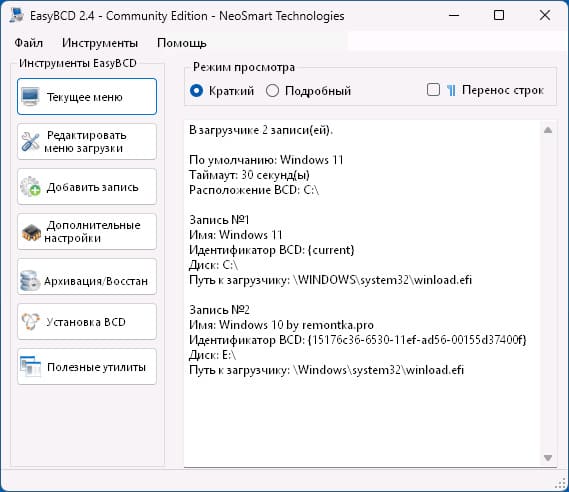
EasyBCD
В большинстве случаев, когда речь идёт о добавлении второй Windows, установленной в том же режиме, что и первая, в меню загрузки, проблем не возникает и сторонние инструменты не требуются. Однако, если предыдущий способ не помог, можно использовать и их, в частности — EasyBCD, бесплатную для личного использования (официальный сайт).
Порядок действий будет следующими:
- Запустите EasyBCD (при включенном режиме EFI может показать предупреждение, игнорируем и продолжаем).
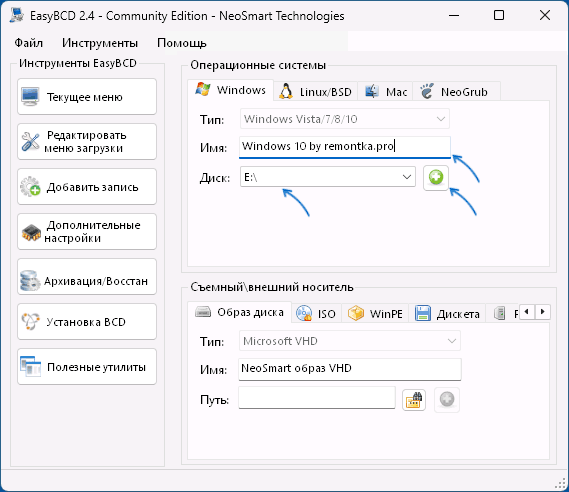
- Перейдите на вкладку «Добавить запись».
- Укажите диск и имя, под которым должна отображаться вторая система в меню.

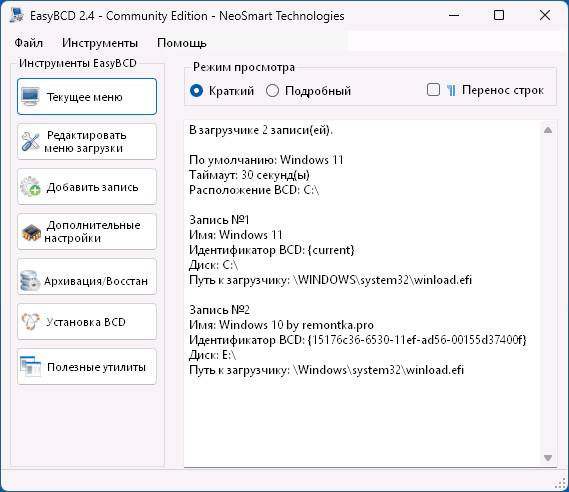
- Нажмите по зелёной кнопке «Плюс» справа от буквы диска. В строке статуса внизу окна программы вы увидите уведомление о том, что система была успешно добавлена в меню загрузки, убедиться в этом можно и просмотрев раздел «Текущее меню»:
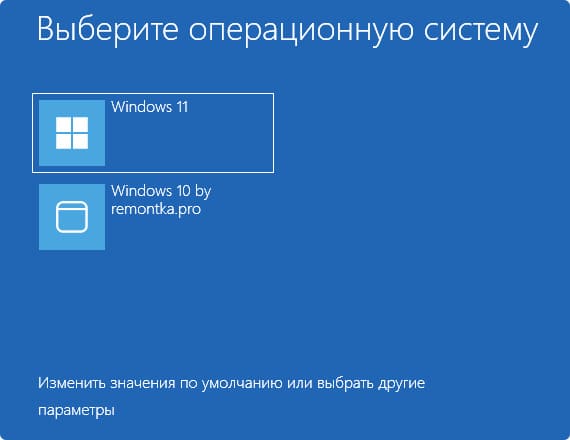
- Закройте программу и перезагрузите компьютер — вы увидите, что меню загрузки с выбором операционных систем появляется.


Надеюсь, в вашем случае также всё сработало исправно. Если же нет и добавить ОС в меню загрузки не удается, опишите в комментариях, о каких системах идёт речь, как они размещены на дисках и в каком режиме установлены, возможно, я смогу помочь.
If your dual boot system does not show the operating system selection menu or the Windows Boot Manager while booting up, you are not alone. A missing dual boot option is common on newly created dual boot systems, mainly caused by an incorrectly configured boot manager.
Fortunately, you can fix this issue by tweaking a few Windows settings. So, here are a few ways to fix the missing dual boot menu on your Windows system.
Note that while the instructions in this article were written for Windows 10 systems, they are applicable to Windows 11 as well.
Why Am I Not Seeing a Dual Boot Option in Windows 10 or 11?
The dual boot option or the Windows Boot Manager during restart may not show for several reasons. Some common causes for this include:
- The boot menu is not activated.
- Systems with fast startup enabled may boot directly into the default OS without offering any boot options.
- The default operating system in Startup and Recovery may be incorrectly configured.
- Some corrupted system files are causing the boot manager to malfunction.
As such, you have recently set up a dual boot system, but you can’t see the option to change operating systems, follow these steps in Windows 10.
1. Enable the Boot Menu Using Command Prompt
If the boot menu has been disabled somehow, you won’t see the dual boot option appear. The boot menu can become deactivated after upgrading to the latest version of the OS.
Fortunately, you can use the Windows command processor to enable the boot menu.
To enable the boot menu using the Command Prompt:
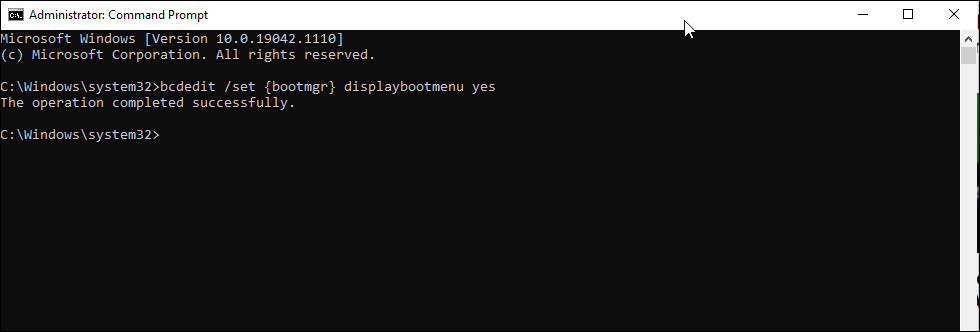
- Type cmd in the Windows search bar, right-click on the Command Prompt, and select Run as Administrator.
-
In the Command Prompt window, type the command listed below and hit the Enter key. If possible, copy and paste the command to avoid the not recognized as an internal command error.
bcdedit /set {bootmgr} displaybootmenu yes - Upon successful execution, you will see the operation completed successfully message.
If you’re curious as to what you’ve just run, BCDEdit is a command-line-based utility to manage BCD (Boot Configuration Data). When executed, it changes the boot configuration and activates the boot menu.
If you want to deactivate or hide the boot menu, open the Command Prompt as admin and enter the following command:
bcdedit /set {bootmgr} displaybootmenu no
Once executed, your system will boot into the set default OS without showing the dual boot option.
2. Configure the Default Operating System in Startup and Recovery
Windows 10’s Advanced System Settings window allows you to select the default operating system to boot into. It can also display a list of operating systems and recovery options during a restart.
Configuring these settings can help you fix a missing dual boot option in Windows 10.
To configure the default operating system in Windows 10:
- Press Win + I to open Settings.
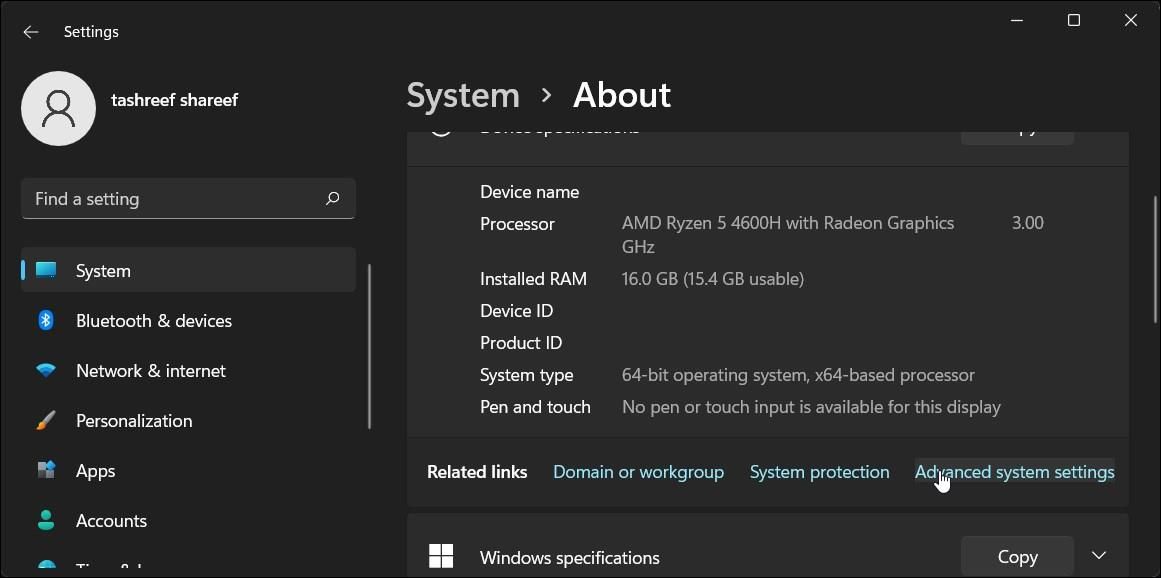
- Then, go to System and open the About tab from the left pane.
-
Scroll down to the Related settings section and click on Advanced system settings. On older Windows 10 computers, go to Control Panel > System and Security and click on Advanced system settings from the left pane.

- In the System Properties window that appears, locate the Startup and Recovery section and click the Settings button.
-
In the Startup and Recovery window, click the drop-down for Default operating system and choose your preferred OS.

- Next, check the Time to display list of operating systems option and set it to 30 seconds. This setting means your computer will show the boot menu for 30 seconds. Once this time elapses, it will load the operating system you selected as default.
- Click OK to save the changes.
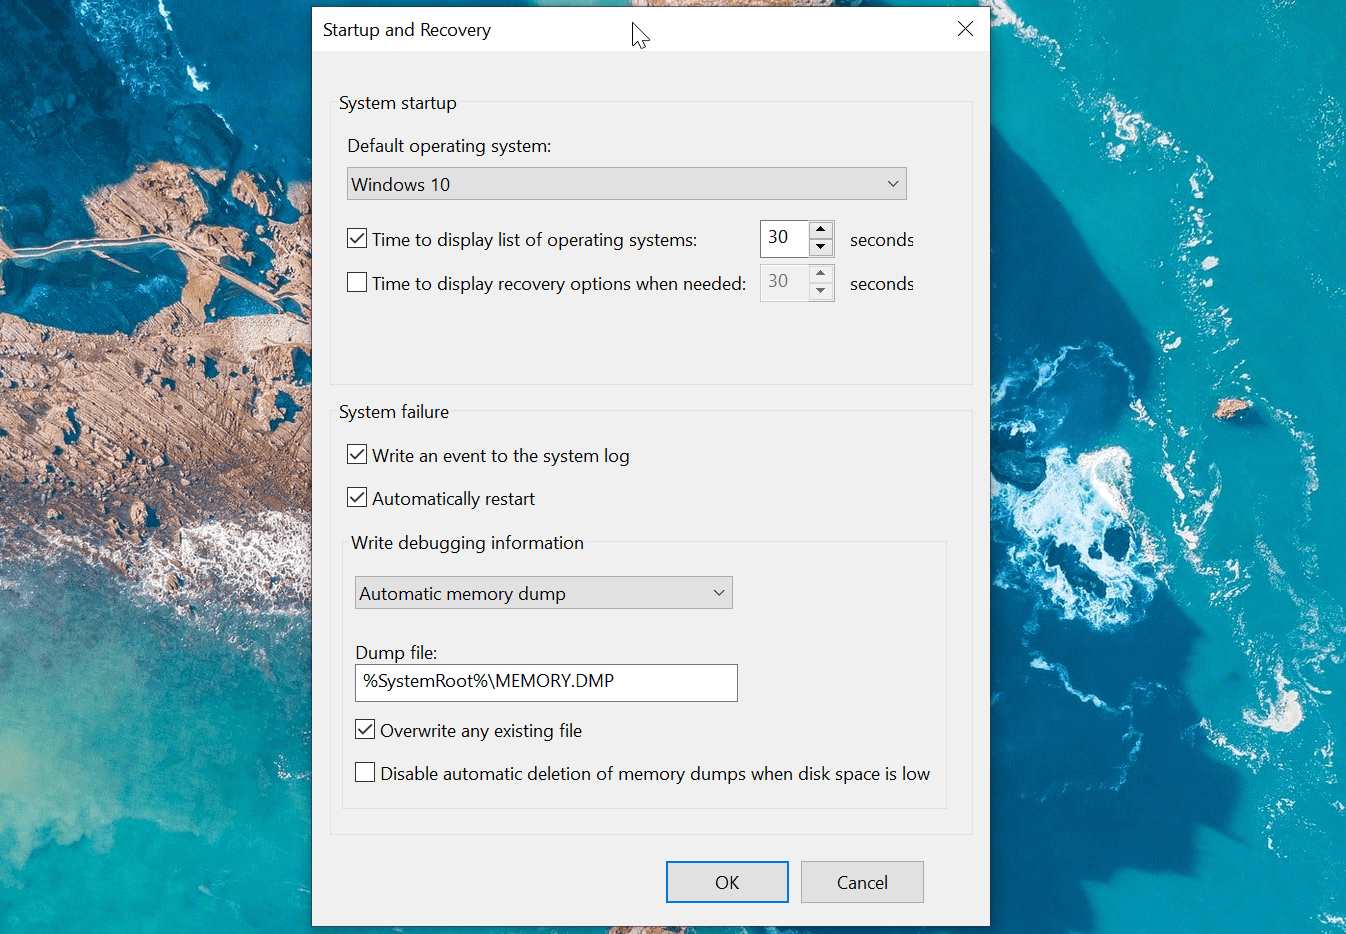
Restart your computer and wait for the boot menu to appear. Next, choose your preferred OS using the arrow key and hit the Enter key. If you don’t make any selection before 30 seconds, your computer will load the set default OS.
3. Configure the Boot Manager With EasyBCD
Sometimes, the bcdedit command won’t work. It either fails to activate the boot menu or will not work even after displaying the success message.
In this situation, you can use a third-party utility called EasyBCD to add a boot entry. EasyBCD is a lightweight program for the Windows platform and free to use for non-commercial purposes.
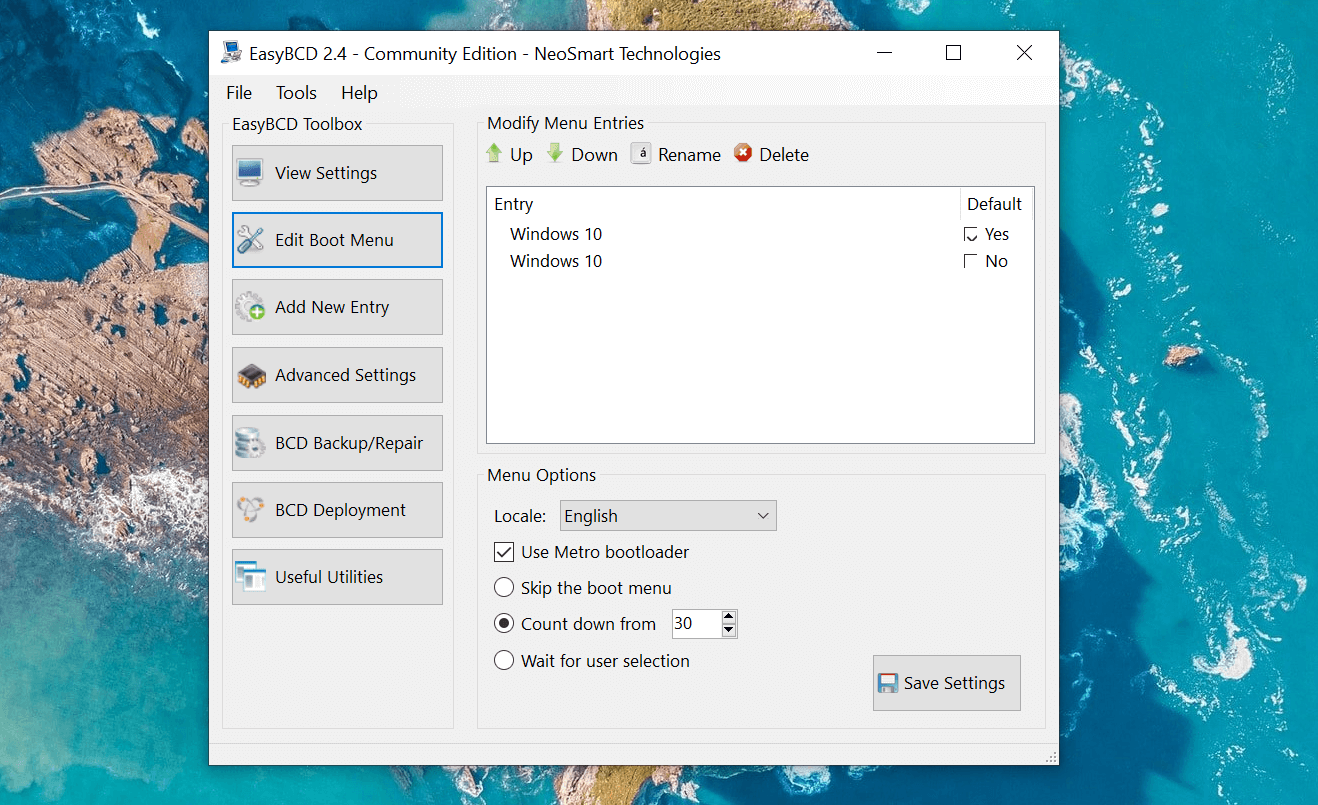
To add boot entry using EasyBCD:
- Go to the Neosmart EasyBCD page and click on See More.
- EasyBCD is available in Commercial and Non-commercial versions. Click on Register for downloading the free version and then enter an email address and username to download the tool.
- Run the installer and wait for the app to finish installing on your computer.
- Launch EasyBCD and click on the Edit Boot Menu button.
- Here you will see a dual boot entry listed by default. If you want to change the default OS, tick the box under the Default column for the entry you want to set as default.
- Under Menu Options, check the Use Metro bootloader option.
- Select Count down from and set it to 30 seconds.
- Click Save Settings, and you will see the Bootloader settings saved successfully message.
Close EasyBCD and restart your PC. During restart, you will see the boot menu with a dual boot option. If the option is still not showing, boot into Windows and launch EasyBCD. Repeat steps 4-8 again and restart your computer.
4. Disable the Windows Fast Startup Feature
The Fast Startup feature in Windows 10 helps you restart your PC faster after shutdown. When enabled, it saves your operating system to a hibernation file that speeds up the boot process. It is a handy feature to have on older systems, especially if your system takes all the time in the world to restart.
However, it has some disadvantages as well. When Fast Startup is enabled, Windows locks the installation drive. As a result, Windows may fail to recognize the OS on a dual-boot configured system.
To disable fast startup, do the following:
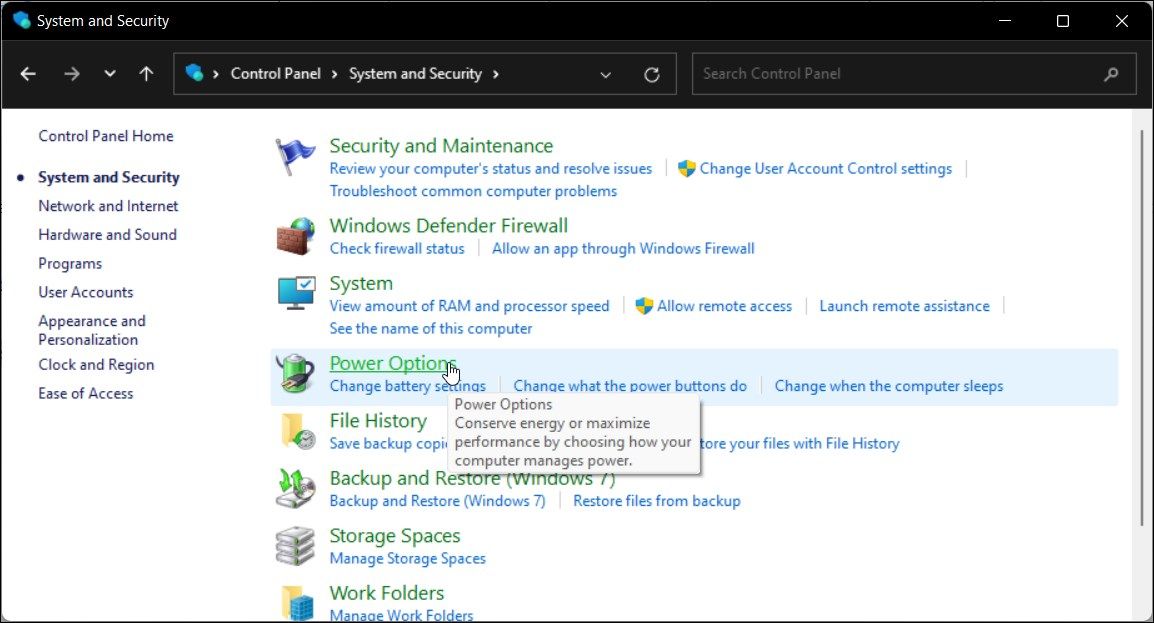
- Press Win + R to open the Run dialog box. Type control and click OK to open the Control Panel.
-
In the Control Panel, go to System and Security > Power Options.

- In the right pane, click on Choose what the power buttons do.
-
Click on Change settings that are currently unavailable. Now you will be able to access the grayed-out Shutdown settings.

- Uncheck the Turn on fast startup (recommended) option.
- Click on Save changes to turn off fast startup in Windows.
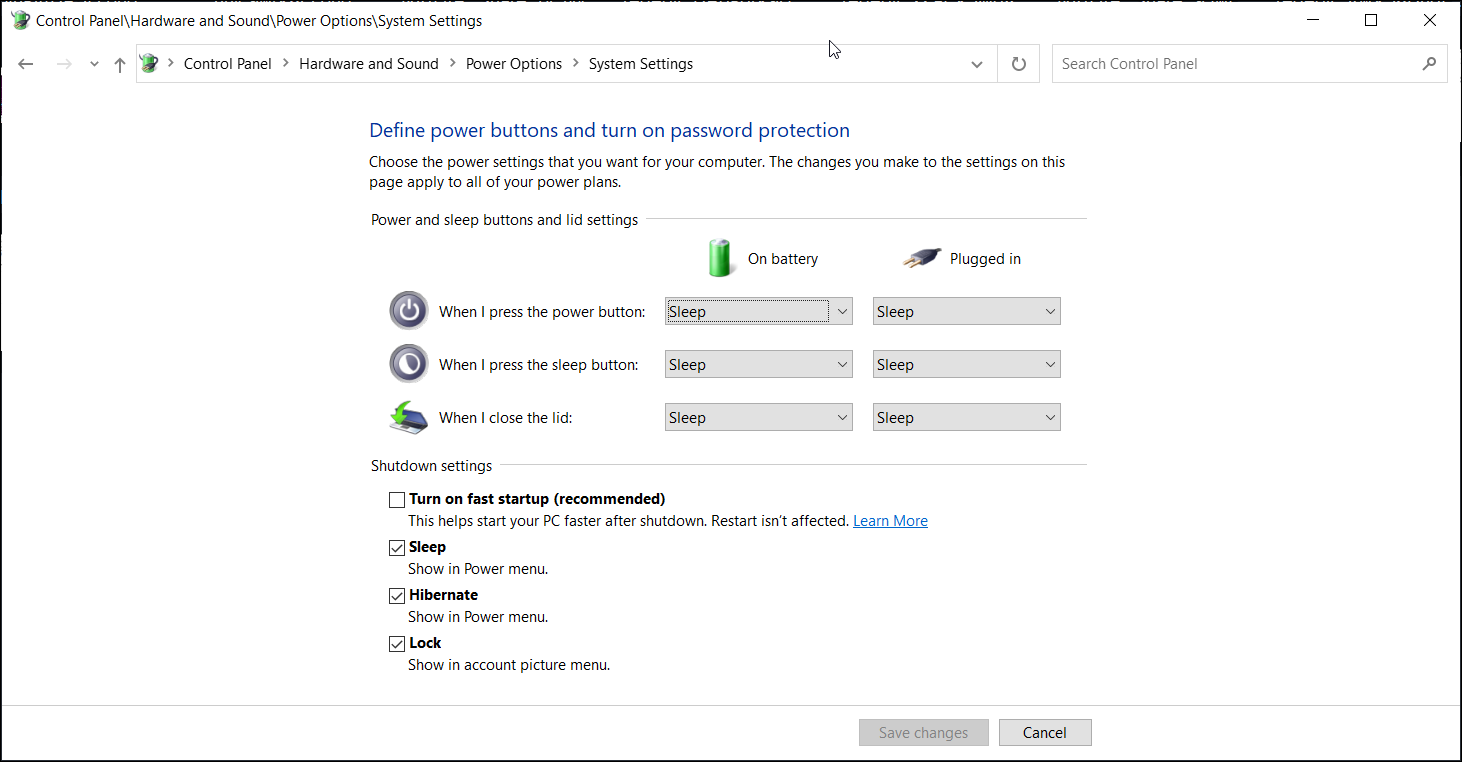
Once successfully disabled, restart your PC and wait for the dual boot option to appear.
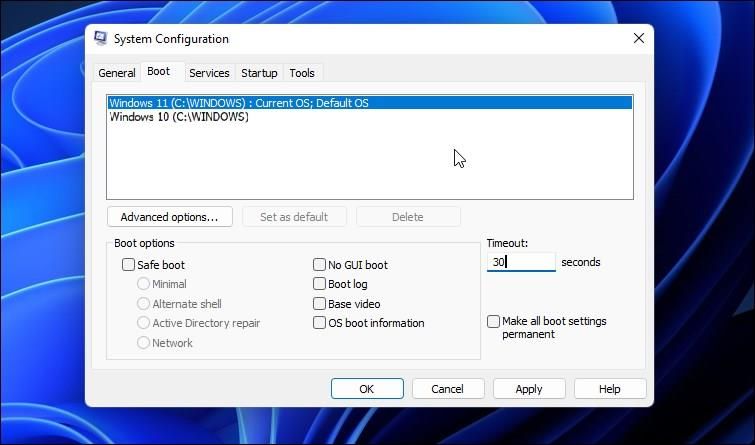
If configuring the Startup and Recovery option doesn’t work, you can configure the boot menu using the System Configuration tool. It lets you manage and set your default OS in a dual boot setup and also set up a timeout for the boot menu.
Follow these steps to configure the boot menu using the System Configuration tool:
- Press Win + R to open Run.
- Type msconfig and click OK to open the System Configuration utility.
- Here, open the Boot tab. If you have a dual boot setup, it will show all the operating systems installed on your PC.
- Select the OS that is not set as default and click the Set as default button.
- Next, under the Timeout field, set the value as 20, 30, or 60. These values are seconds, so if you have set it to 30, the boot manager will wait 30 seconds before loading the default OS.
- Click OK and Apply to save the changes. If a Restart prompt appears, select Restart.
- As your PC restart, you will see the dual boot option. Use the arrow key to select the OS and hit enter to load the operating system.
Whether you want to dual boot Windows 11 with Windows 10 or an older version of Microsoft’s operating system, the boot menu is a critical aspect of any dual boot process. Boot configuration tools such as the BCDEdit and EasyBCD can help you troubleshoot the boot menu missing issue without having to reinstall the OS again.
В этой статье расскажем, как добавить вторую операционную систему Windows в меню загрузки компьютера. Обычно, при установке двух систем Windows на одном ПК, вторая ОС автоматически добавляется в меню загрузки, но иногда этого не происходит. Мы рассмотрим способы, как вручную добавить вторую Windows, чтобы можно было выбирать нужную систему при загрузке.
Приобрести оригинальные ключи активации Windows всегда можно у нас в каталоге от 1099 ₽
Добавление второй системы в меню загрузки в командной строке
По умолчанию, если диск с первой системой был подключён при установке второй Windows на том же компьютере, запись для её загрузки добавляется в загрузчик автоматически, и вы видите соответствующее меню при старте компьютера. Но этого может не произойти в следующих случаях:
— Системы установлены в разных режимах (одна — UEFI, другая — Legacy/CSM). Объединить их в одном меню загрузки не получится, но можно преобразовать тип установки второй ОС в UEFI с помощью встроенного инструмента mbr2gpt.exe.
— Диск с первой системой был отключён при установке второй, либо диск со второй системой был подключён после установки на другом компьютере.
Если обе системы установлены в одном режиме (UEFI на GPT-диске или Legacy на MBR-диске), вы легко сможете добавить их обе в меню загрузки.
Для добавления второй Windows в меню загрузки с помощью командной строки выполните следующие шаги:
1. Загрузитесь в Windows с того диска, который хотите сделать основным для загрузки.
2. Запустите командную строку от имени администратора: введите «Командная строка» в поиске на панели задач Windows 11 или 10, затем нажмите правой кнопкой мыши по найденному результату и выберите пункт «Запуск от имени администратора».
3. Введите следующую команду, заменив букву диска E: на букву диска, на котором расположена вторая ОС:
bcdboot E:\windows
и нажмите Enter.

4. Если вы увидите сообщение «Файлы загрузки успешно созданы», значит, всё прошло успешно. Вторая система будет добавлена в меню загрузки и появится в окне «Конфигурация системы» (Win+R — msconfig).
Если требуется, вы можете изменить название и порядок пунктов в меню загрузки Windows.
EasyBCD
Если добавление второй Windows с помощью командной строки не сработало, вы можете воспользоваться сторонними инструментами, например, приложением EasyBCD, которое бесплатное для личного использования, можно скачать с официальный сайт.
Шаги для добавления второй ОС в меню загрузки с помощью EasyBCD следующие:
1. Запустите EasyBCD (в режиме EFI приложение может показать предупреждение, его можно игнорировать).
2. Перейдите на вкладку «Добавить запись».
3. Укажите диск и имя, под которым должна отображаться вторая система в меню.

4. Нажмите на зелёную кнопку «Плюс» справа от буквы диска. В строке статуса внизу окна приложения появится уведомление о том, что система успешно добавлена в меню загрузки. Убедиться в этом можно, просмотрев раздел «Текущее меню».
5. Закройте приложение и перезагрузите компьютер — вы увидите меню загрузки с выбором операционных систем.
Лицензионный ключ активации Windows от
You are here:
Home » Windows 10 » 3 Ways To Restore The Dual Boot Menu In Windows 10
When you install a version of Windows 10 in dual boot with another version of the Windows operating system, the operating system displays the dual-boot menu (also known as the OS selection menu) so that users can select the Windows OS they want to boot to.
However, at times, especially after upgrading Windows 10 to a newer version, the boot menu might go missing. In other words, the dual boot menu might not appear when you start your PC.

If the dual boot menu is missing from your Windows 10 PC, you can restore it with ease. Following are the three ways out there to restore the missing dual boot menu in Windows 10.
Method 1 of 3
Enable the dual-boot menu again via Command Prompt
Step 1: Open the command prompt as an administrator. To do so, type CMD in the Start or taskbar search box, right-click on the Command Prompt entry in the search results and then click the Run as administrator option.

Click on the Yes button when you get the User Account Control prompt.
Step 2: At the Command Prompt window, copy and paste the following command.
bcdedit /set {bootmgr} displaybootmenu yes
Hit the Enter key to execute the command. You should see the “The operation completed successfully” message.

Tip: If you ever want to hide the boot menu again, use this command:
bcdedit /set {bootmgr} displaybootmenu no
Step 3: Close the Command Prompt window. You may now reboot your computer to see the dual-boot menu.
Method 2 of 3
Use System Configuration tool to restore the dual boot menu
Step 1: Open the System Configuration utility by typing Msconfig either in the Start/taskbar search field or Run command box and hitting the Enter key.

Step 2: As you can see in the picture below, the Boot tab displays the number of Windows operating systems installed, the current default operating system or the boot order. Select a Windows operating system that is not the default currently (non-default OS) and then click the Set as default button.

Finally, click on the Apply button. When asked, click on the Restart button.
Method 3 of 3
Restore the dual-boot menu via the System Configuration dialog
You can also use this method to restore the missing dual boot menu in Windows 10. We use the System Configuration dialog to fix the issue.
Step 1: In the Start/taskbar search field, type Msconfig and then hit the Enter key. This will open the System Configuration dialog.

Step 2: Switch to the Boot tab. Here, check the Timeout value. When it’s 0, Windows 10 does not display the boot menu. Set it’s value to 20 or 30.

Step 3: Click on the Apply button. Click OK.
Step 4: When you get this prompt, click on the Restart button to see the dual boot menu.
- To dual-boot Windows 10 and 11, create an installation media with “Rufus,” use “Disk Management” to shrink the current partition to make room for the new setup, and proceed with the Windows Setup.
- You can also use a separate hard drive to install a second instance of the operating system.
- Alternatively, you can set up a dual-boot system by downloading the Windows 11 ISO file, creating a “VHDX,” using the “DISM” command tool to apply the operating system image into the virtual drive, and restarting the computer to complete the setup without modifying the current installation.
UPDATED 1/7/2025: You can configure a dual-boot system to run Windows 10 and Windows 11 (or vice versa). In this guide, I’ll walk you through the steps to complete this setup using three different methods. A dual-boot (or multi-boot) system allows you to install and run two operating systems on the same computer, enabling you to select your preferred environment from the bootloader during startup.
The ability to boot into multiple operating systems can be useful in different situations. For instance, if you’re still using Windows 10, you can use a dual-boot setup to explore Windows 11 without fully committing to the upgrade. Similarly, if your computer has the latest version of Windows, you might need an additional installation for compatibility with specific applications. You can also use dual-booting to test preview builds from the Windows Insider Program without affecting your primary environment.
No matter your reason, setting up a dual-boot system on Windows is straightforward. You can achieve this in three ways:
- Shrink the primary partition to create space for the second installation.
- Install the second operating system on a separate hard drive.
- Use a Virtual Hard Disk (VHDX) to install another version of Windows without altering your existing setup.
In this guide, I’ll outline three ways to set up a dual-boot system using Windows 10 and 11 in 2025. These instructions can also be used to dual-boot Windows 11 on Windows 10 or even Windows 10 on Windows 10. Additionally, you can adapt these steps to set up a dual-boot system with Windows and Linux on the same computer.
- System requirements for dual-boot systems
- Dual-boot Windows 10 and Windows 11 on same drive
- Dual-boot Windows 10 and Windows 11 on separate hard drives
- Dual-boot Windows 10 and Windows 11 on virtual drive
- Troubleshoot dual-boot problems
System requirements for dual-boot system
Before proceeding, you must understand that setting up a dual-boot using Windows 11 and 10 is different from configuring Windows 10 with 11. The reason is that Windows 11 has higher system requirements than Windows 10, and if you don’t confirm the requirements, you may not be able to complete the setup. (If you have a computer with unsupported hardware, you may be able to bypass the requirements by creating a special USB bootable media.)
If you have a device already running Windows 11, you can install Windows 10 as the second operating system without extra steps. However, if you have a computer running Windows 10, you have to ensure that the device uses UEFI as the firmware type, TPM 2.0 is enabled, and the computer has a supported AMD or Intel processor. Also, at least 4GB of RAM and 64GB of storage are required, and Secure Boot is not a requirement, but it might be needed.
Since you will be using the same hardware, you may be able to activate Windows with the same product key, assuming you’re using compatible versions of the operating system, such as Windows 11 and 10.
Dual-boot Windows 10 and Windows 11 on same drive
If you want to create a dual-boot system using Windows 10 and Windows 11, you will have to shrink the current partition to make space available for the new installation. Then, in the Windows Setup, you can proceed with a standard installation of Windows 11 using the unallocated space. Here’s how.
1. Create a USB bootable media
To use Rufus to create a Windows 11 bootable USB, use these steps:
-
Open Rufus website.
-
Click the link to download the latest version under the “Download” section.
-
Double-click the Rufus executable file to launch the tool.
-
Click the Settings button (third button from the left) at the bottom of the page.

-
Choose the Daily option in the “Check for updates” setting and under the “Settings” section.
-
Click the Close button.
-
Click the Close button again.
-
Open Rufus again.
-
(Optional) Choose the USB flash drive under the “Device” section.
-
Select the “Disk or ISO image” option under the “Boot selection” section.
-
Click the down-arrow button (on the right side) and select the Download option.
-
Click the Download button.
-
Select the Windows 11 option.
-
Click the Continue button.
-
Select the “24H2” option to choose the Windows 11 2024 Update.
-
Click the Continue button.
-
Select the Windows 11 Home/Pro/Edu option.
-
Click the Continue button.
-
Select the language for Windows 11 installation.
-
Click the Continue button.
-
Select the x64 architecture option.
-
Click the Download button.
-
Select the location to save the Windows 11 ISO file automatically.
-
Choose the “Standard Windows 11 Installation” option under the “Image option” setting.
-
(Optional) Continue with the default settings after the download.
-
(Optional) Specify a name for the drive (for example, Windows 11 Setup) under the “Volume label” setting.
-
Click the Start button.
-
Clear all the options from the “Windows User Experience” page to create an installation media without modifications.

-
Click the OK button.


Once you complete the steps, the Rufus tool will create a bootable media with the Windows 11 installation media.
You can also create a bootable USB with the Media Creation Tool, Command Prompt, and a third-party tool known as Ventory.
2. Shrink and create a partition
If you have another hard drive, you don’t need to modify the primary partition, as you can use the secondary drive to install the operating system. If you only have a system with a single hard drive, you will have to shrink the partition to make space available for the new installation.
To create a partition for a dual-boot system from Disk Management, use these steps:
-
Open Start.
-
Search for “Create and format hard disk partitions” and click the top result to open the Disk Management app.
-
Right-click the installation drive (C:) and choose the Shrink Volume option.

-
Confirm at least 64GB of storage (more is recommended).
-
Click the Shrink button.
- Shut down the computer.


After creating the partition, shut down the device and continue with the steps below to dual-boot Windows 11 alongside Windows 10.
You don’t need to create a new partition from Disk Management since Windows Setup can automatically configure the required partitions during the installation. You just need to make the available space.
3. Install Windows 11 on partition
To install Windows 11 to create a dual-boot system with Windows 10, use these steps:
-
Start the PC with the Windows 11 USB flash drive.
-
Press any key to continue.
-
Choose the installation language and format.

-
Click the Next button.
-
Choose the keyboard and input method.

-
Click the Next button.
-
Select the “Install Windows 11” option.

-
Check the “I agree everything” option to confirm this process will delete everything on the computer.
-
Click the “I don’t have a product key” option.

Quick note: The computer will activate automatically when a reinstallation is performed. If this is a new computer, you will have to provide a product key. You can always provide the product key to activate later through the Settings app.
-
Select the edition of “Windows 11” your license key activates (if applicable).
-
Click the Next button.
-
Click the Accept button
-
Select each partition on the hard drive where you want to install Windows 11 and click the Delete button. (Usually, “Drive 0” is the drive that contains all the installation files.)
-
Select the hard drive (Drive 0 Unallocated Space) to install the operating system.
-
Click the Next button.
-
Click the Install button.

-
Choose the “Windows 11” option in the boot menu (if applicable).

-
Select your region and continue with the out-of-the-box experience (OOBE).


Once you complete the steps, you will be able to use two different operating systems on the same computer.
The process will be the same if you want to dual-boot Windows 10 and 10 or 11 and 11. Furthermore, you’re not limited to two operating systems. You can always create additional partitions to set up a triple-boot system or install even more operating systems.
(Optional) Remove an operating system
You can always undo the changes if you no longer need to use the dual-boot setup.
To remove the second Windows installation from the computer, use these steps:
-
Open Start.
-
Search for “Create and format hard disk partitions” and click the top result to open the Disk Management app.
-
Right-click the partition with the installation to delete and choose the Delete Volume option.
-
Click the Yes button.
-
(Optional) Right-click the current setup partition (C:) and click the Extend Volume option to relocate the empty space to the system.
-
Click the Next button.
-
Click the Next button again.

-
Click the Finish button.


Once you complete the steps, the computer will once again have only one operating system.
Dual-boot Windows 10 and Windows 11 on separate hard drives
If you have a separate hard drive, you can install another instance of Windows without modifying the original setup. Here’s how.
1. Create a USB bootable media
To use Rufus to create a Windows 11 bootable USB, use these steps:
-
Open Rufus website.
-
Click the link to download the latest version under the “Download” section.
-
Double-click the Rufus executable file to launch the tool.
-
Click the Settings button (third button from the left) at the bottom of the page.
-
Choose the Daily option in the “Check for updates” setting and under the “Settings” section.
-
Click the Close button.
-
Click the Close button again.
-
Open Rufus again.
-
(Optional) Choose the USB flash drive under the “Device” section.
-
Select the “Disk or ISO image” option under the “Boot selection” section.
-
Click the down-arrow button (on the right side) and select the Download option.
-
Click the Download button.
-
Select the Windows 11 option.
-
Click the Continue button.
-
Select the “24H2” option to choose the Windows 11 2024 Update.
-
Click the Continue button.
-
Select the Windows 11 Home/Pro/Edu option.
-
Click the Continue button.
-
Select the language for Windows 11 installation.
-
Click the Continue button.
-
Select the x64 architecture option.
-
Click the Download button.
-
Select the location to save the Windows 11 24H2 ISO file automatically.
-
Choose the “Standard Windows 11 Installation” option under the “Image option” setting.
-
(Optional) Continue with the default settings after the download.
-
(Optional) Specify a name for the drive (for example, Windows 11 Setup) under the “Volume label” setting.
-
Click the Start button.
-
Clear all the options from the “Windows User Experience” page to create an installation media without modifications.
-
Click the OK button.
Once you complete the steps, the Rufus tool will create a bootable media with the Windows 11 installation media.
2. Install Windows 11 on separate hard drive
To set up a dual-boot system on a separate hard drive, use these steps:
-
Start the PC with the Windows 11 USB flash drive.
-
Press any key to continue.
-
Choose the installation language and format.
-
Click the Next button.
-
Choose the keyboard and input method.
-
Click the Next button.
-
Select the “Install Windows 11” option.
-
Check the “I agree everything” option to confirm this process will delete everything on the computer.
-
Click the “I don’t have a product key” option.
-
Select the edition of “Windows 11” your license key activates (if applicable).
-
Click the Next button.
-
Click the Accept button
-
Select each partition on the hard drive where you want to install Windows 11 and click the Delete button. (Usually, “Drive 0” is the drive that contains all the installation files.)
-
Select the hard drive (Drive 0 Unallocated Space) to install the operating system.
-
Click the Next button.
-
Click the Install button.
-
Choose the “Windows 11” option in the boot menu (if applicable).
-
Select your region and continue with the out-of-the-box experience (OOBE).
After you complete the steps, Windows 11 will install on the other hard drive.
(Optional) Remove an operating system
To delete the second installation from the computer to undo the changes, use these steps:
-
Open Start.
-
Search for “Create and format hard disk partitions” and click the top result to open the Disk Management app.
-
Right-click the partition with the installation to delete and choose the Delete Volume option.
-
Click the Yes button.
-
Repeat step 3 until all the partitions are removed from the drive.
-
(Optional) Right-click the unallocated space and choose the “New Simple Volume” option.
-
Click the Next button.
-
Click the Next button again.
-
(Optional) Confirm the drive letter for the drive.

-
Click the Next button.
-
Confirm a name for the drive in the “Volume label” setting.
-
Continue with the default settings.
-
Click the Next button.
-
Click the Finish button.


Once you complete the steps, the computer will once again have only one operating system.
Dual-boot Windows 10 and Windows 11 on virtual drive
Alternatively, you can set up a dual-boot system without using a USB drive or modifying your current setup by leveraging a virtual hard disk (VHDX). Once the configuration is complete, no virtualization is involved, and Windows 11 will be able to fully utilize the computer’s hardware.
This method allows you to create a dual-boot system on a computer running either Windows 10 or Windows 11, with the option to use either version as the second operating system.
In the past, native boot with a VHDX did not support upgrading to a newer version of Windows. However, this limitation has been resolved, and you should now be able to upgrade the operating system directly. If the upgrade process fails, you can delete the existing setup and recreate it to resolve the issue.
1. Download Windows 11 ISO file
To download the Windows 11 ISO file, use these steps:
-
Open Microsoft Support website.
-
Under the “Download Windows 11 Disk Image (ISO) for x64” section, select the Windows 11 option.

-
Click the Download button.
-
Select the installation language.

-
Click the Confirm button.
-
Click the Download button to save the current Windows 11 ISO file to your computer.


Once you complete the steps, the ISO file of Windows 11 will download to your computer.
If this method isn’t working, you can download the ISO file in several other ways.
2. Create VHDX drive to dual-boot Windows 11 on 10
To create a virtual drive to set up a dual-boot system, use these steps:
-
Open Start.
-
Search for “Create and format hard disk partitions” and click the top result to open the Disk Management app.
-
Click on Action and choose the Create VHD option.

-
Choose the VHDX option under the “Virtual hard disk format” section.
-
Choose the Dynamically expanding option under the “Virtual hard disk type” section.
-
Click the Browse button.
-
Select a location to store the virtual drive, such as the root of the “C:” drive.
-
Confirm a name for the VHDX, such as “windows-11-setup.”
-
Click the Save button.
-
Confirm at least 64GB of storage for the VHDX.
-
Click the OK button.
-
Right-click the newly created drive and choose the “Initialize Disk” option.
-
Choose the GPT option.

-
Click the OK button.
-
Right-click the unallocated space and choose the “New Simple Volume” option.
-
Click the Next button.
-
Click the Next button again.
-
Confirm the drive letter.
-
Click the Next button.
-
(Optional) Use the VHDX name for the “Volume label.”
-
Click the Next button.
-
Click the Finish button.


After you complete the steps, you have to copy the installation files to the virtual drive using the Deployment Image Servicing and Management (DISM) command-line tool.
3. Install Windows 11 on virtual drive
To install Windows 11 on a dual-boot system with Windows 10 without USB, use these steps:
-
Open File Explorer.
-
Open the folder containing the Windows 11 ISO file.
-
Right-click the file and choose the Mount option.
-
Open Start.
-
Search for Command Prompt, right-click the top result, and select the Run as administrator option.
-
Type the following command to open the virtual drive and press Enter:
F:
In the command, change “F” for the letter of the virtual drive with the installation files.
-
Type the following command to open the Sources folder and press Enter:
cd Sources
-
Type the following command to apply the “install.wim” image to the VHDX and press Enter:
dism /apply-image /imagefile:install.wim /index:1 /ApplyDir:E:\

In the command, change “E” for the drive letter of your VHDX. Also, the “index:1” will install the Windows 11 Home image. Usually, if you want to install Windows 11 Pro, you will have to use the “index:6”. However, you can always query this information using the
dism /Get-ImageInfo /ImageFile:F:\sources\install.wimcommand. -
Type the following command to make the Windows 11 setup in the VHDX available to the bootloader and press Enter:
bcdboot E:\Windows
In the command, change “E” for the drive letter of your VHDX.
-
Restart the computer to continue with the Windows 11 setup to create the dual-boot system.
-
Choose the “Windows 11” option in the boot menu (if applicable).
-
Select your region setting and continue with the out-of-the-box experience (OOBE).

After you complete the steps, Windows 11 will be installed on the VHDX on the same partition as Windows 10.
(Optional) Remove an operating system
To delete the Windows 11 installation from the dual-boot system, use these steps:
-
Open File Explorer on Windows 10.
-
Open the location with the VHDX file that contains the Windows 11 installation.
-
Select the file and click the Delete button from the “Home” tab.

-
Confirm the deletion.
-
Open Start.
-
Search for Run and click the top result to open the app.
-
Type the following command and click the OK button: msconfig
-
Click the Boot tab.
-
Select the Windows 11 entry (or the installation installed in the virtual drive).
-
Click the Delete button.
-
Click the Apply button.
-
Click the OK button.

-
Click the Restart button.


Once you complete the steps, the computer will start with the original operating system installation.
Troubleshoot dual-boot problems
When setting up a dual-boot system, the bootloader (or boot manager) might not appear during startup. If this happens, you may need to enable the bootloader manually or disable the Fast Startup feature.
By default, the system assigns the most recently installed operating system as the default. However, you can reconfigure the bootloader to use a different operating system as the default, which will load automatically after the timeout period. You can also adjust the timeout duration to your preferred number of seconds.
If the boot menu continues to appear during startup after you’ve removed an operating system, you’ll need to manually reconfigure the bootloader to remove the unnecessary entry.
Additionally, BitLocker encryption can cause issues with a dual-boot setup. To avoid problems, it’s recommended to disable BitLocker before proceeding with the configuration.
Enable bootloader
To enable the dual-boot menu manually, use these steps:
-
Open Start.
-
Search for Command Prompt (or PowerShell), right-click the top result, and select the Run as administrator option.
-
Type the following command to disable Fast Startup on Windows 11 and press Enter:
bcdedit /set {default} bootmenupolicy standard
After you complete the steps, the next time you restart the computer, the boot menu should appear, letting you choose the operating system.
Disable Fast Starup
To disable Fast Startup, use these steps:
-
Open Start.
-
Search for Command Prompt (or PowerShell), right-click the top result, and select the Run as administrator option.
-
Type the following command to disable Fast Startup on Windows 11 and press Enter:
powercfg /h off


Once you complete the steps, the system will disable Fast Startup, and the bootloader should now appear during startup.
You can use these instructions to learn more about managing Fast Startup on Windows 11 and 10.
Change dual-boot order
To change the dual-boot order, use these steps:
-
Start the computer.
-
Click “Change defaults or choose other options” from the boot manager.
-
Click the “Choose a default operating system” option.

-
Choose the installation you want to start by default.

-
(Optional) Click the “Change the timer” option to set a different timeout for the boot manager.
-
Click the back button from the top-left corner.
-
Select the system to start the computer.


Once you complete the steps, the new settings will apply to the boot manager.
Change bootloader timeout
To change the boot manager menu timeout, use these steps:
-
Open Start.
-
Search for Run and click the top result to open the app.
-
Type the following command and click the OK button: msconfig
-
Click the Boot tab.
-
Choose the number of seconds before booting the default instance of Windows in the “Timeout” setting.
-
Click the Apply button.
-
Click the OK button.
-
Click the Restart button.

After you complete the steps, the new timeout will be reflected in the boot menu.
You can change the timeout settings in multiple ways, and you can learn more with these instructions.
Remove boot menu entry
To remove an operating system entry from the boot menu, use these steps:
-
Open Start.
-
Search for Run and click the top result to open the app.
-
Type the following command and click the OK button: msconfig
-
Click the Boot tab.
-
Select the entry for the operating system that’s no longer available.
-
Click the Delete button.
-
Click the Apply button.
-
Click the OK button.
-
Click the Restart button.

Once you complete the steps, the system will remove the entry, and the boot manager should no longer appear during boot.
Q&A
Dual-booting Windows 10 and 11 allows you to run both operating systems on a single machine, providing flexibility for various tasks. Below are common questions and answers to guide you through the process:
Do I need separate licenses for Windows 10 and Windows 11?
Yes, you should have separate licenses for each operating system installed on your machine. To comply with Microsoft’s licensing terms, you must obtain individual product keys for Windows 10 and Windows 11.
Will dual-booting affect system performance?
Dual-booting itself doesn’t impact performance since only one operating system runs at a time. However, partitioning your drive reduces available storage for each system, which could indirectly affect performance if space becomes limited.
Can I share files between Windows 10 and 11 in a dual-boot setup?
Yes, you can access files stored on different partitions from either operating system. To ensure seamless access, it’s advisable to create a separate data partition for file sharing.
Are there any risks associated with dual-booting?
While dual-booting is generally safe, potential risks include accidental deletion or formatting of partitions, which can lead to data loss. Improper configuration may cause boot problems, preventing access to either operating system. And some apps may not function correctly across both operating systems.
Can I set up dual-boot if one of the systems is using BitLocker?
Yes, but it’s not recommended. It’s possible to dual-boot Windows 10 and 11 with BitLocker enabled on both operating systems. However, special considerations are necessary because both installations may compete for access to the Trusted Platform Module (TPM) for BitLocker management. This competition can lead to conflicts, as each operating system may attempt to use the TPM for its own BitLocker encryption, potentially causing issues.
If you plan to set up a dual-boot system using Windows 11 and 10, it’s best to disable the BitLocker before proceeding.
How should I configure BitLocker in a dual-boot setup to avoid conflicts?
To prevent conflicts between the different Windows installations, you can configure one or both installations to use BitLocker without relying on the TPM. This involves setting BitLocker to require a password or USB key at startup instead of automatic TPM-based unlocking. This will ensure that each operating system manages its encryption independently, reducing the risk of interference.
Update January 7, 2025: This guide has been updated to ensure accuracy and reflect changes to the process.