
From Wikipedia, the free encyclopedia
In computing, the Windows Driver Model (WDM) – also known at one point as the Win32 Driver Model – is a framework for device drivers that was introduced with Windows 98 and Windows 2000 to replace VxD, which was used on older versions of Windows such as Windows 95 and Windows 3.1, as well as the Windows NT Driver Model.
WDM drivers are layered in a stack and communicate with each other via I/O request packets (IRPs). The Microsoft Windows Driver Model unified driver models for the Windows 9x and Windows NT product lines by standardizing requirements and reducing the amount of code that needed to be written. WDM drivers will not run on operating systems earlier than Windows 98 or Windows 2000, such as Windows 95 (before the OSR2 update that sideloads the WDM model), Windows NT 4.0 and Windows 3.1. By conforming to WDM, drivers can be binary compatible and source-compatible across Windows 98, Windows 98 Second Edition, Windows Me, Windows 2000, Windows XP and Windows Server 2003 on x86-based computers. WDM drivers are designed to be forward-compatible so that a WDM driver can run on a version of Windows newer than what the driver was initially written for, but doing that would mean that the driver cannot take advantage of any new features introduced with the new version. WDM is generally not backward-compatible, that is, a WDM driver is not guaranteed to run on any older version of Windows. For example, Windows XP can use a driver written for Windows 2000 but will not make use of any of the new WDM features that were introduced in Windows XP. However, a driver written for Windows XP may or may not load on Windows 2000.
WDM exists in the intermediary layer of Windows 2000 kernel-mode drivers and was introduced to increase the functionality and ease of writing drivers for Windows. Although WDM was mainly designed to be binary and source compatible between Windows 98 and Windows 2000, this may not always be desired and so specific drivers can be developed for either operating system.
Device kernel-mode drivers
[edit]
With the Windows Drivers Model (WDM) for devices Microsoft implements an approach to kernel mode drivers that is unique to Windows operating systems. WDM implements a layered architecture for device drivers, and every device of a computer is served by a stack of drivers. However, every driver in that stack can chain isolate hardware-independent features from the driver above and beneath it. So drivers in the stack do not need to interact directly with one another. WDM defines architecture and device procedures for a range of devices, such as display and the network card, known as Network Driver Interface Specification (NDIS). In the NDIS architecture the layered network drivers include lower-level drivers that manage the hardware and upper-level drivers that implement network data transport, such as the Transmission Control Protocol (TCP).[1]
While WDM defines three types of device drivers, not all driver stacks for a given device contain all types of device drivers. The three WDM device driver types are:[1]
Bus driver: For every bus on the mainboard there is a one bus driver, with the primary responsibility for the identification of all devices connected to that bus and responding to plug and play events. Microsoft will provide bus drivers as part of the operating system,[1] such as PCI, PnPISA, SCSI, USB and FireWire.
Function driver: this is the principal driver for a device and it provides the operational interface for a device by handling read and write operations. Function drivers are written by the device vendors, and for their interaction with the hardware they depend on a specific bus driver being present in the Windows operating system.[1]
Filter driver: This driver is optional, and can modify the behaviour of a device, such as input and output requests. These drivers can be implemented as lower-level and upper-level filter drivers.[1]
Object-oriented driver stack
[edit]
Function drivers and bus drivers are often implemented as driver/minidriver pairs, which in practice is either a class or miniclass, or a port or miniport pair.[2]
Bus drivers for devices attached to a bus are implemented as class drivers and are hardware-agnostic. They will support the operations of a certain type of device. Windows operating systems include a number of class drivers, such as the kbdclass.sys driver for keyboards. Miniclass drivers on the other hand are supplied by the vendor of a device, and only support device specific operations, for a particular device of a given class.[2]
Port drivers support general input/output (I/O) operations for a peripheral hardware interface. The core functionality of port drivers is mandated by the operating system, and Windows operating systems integrate a variety of port drivers. For example, the i8042prt.sys port driver for the 8042 microcontroller connects PS/2 keyboards to the mainboard peripheral bus. The miniport drivers, like the miniclass drivers, are supplied by the hardware vendors and support only device specific operations of peripheral hardware that is connected to a port on the mainboard.[3][4]
Each driver that processes an I/O request for a device has a corresponding object, which is loaded into main memory. A device object is created by the Windows operating system from the associated device class. Device objects contain structures of type DEVICE_OBJECT, which store pointers to their driver. At run time these pointers are used to locate a driver’s dispatch routine and member functions. In the WDM driver stack, the filter driver device object, known as the upper filter, will receive an I/O request packet (IRP) for a device from the I/O manager. If the upper filter driver can not serve the request, it will locate the object of the driver one step down in the driver stack. The IRP is passed down the driver stack by calling the function IoCallDriver(), and processed by the function driver device object, also known as functional device object. The function driver device object in turn may pass the IRP to the lower filter, another filter device object. Then the IRP may be passed down to the bus driver, which operates as the physical device object. The bus driver object is at the bottom of the driver stack, and interacts with the hardware abstraction layer, which is part of the Windows operating system kernel and allows Windows operating systems to run on a variety of processors, different memory management unit architectures, and a variety of computer systems with different I/O bus architectures.[5] The execution of an IRP is finished when any of the driver objects in the stack returns the request back to the I/O manager, with the result and a status flag.[6]
Device drivers for different Windows operating systems
[edit]
The WDM framework was developed by Microsoft to simplify the communication between the operating system and drivers inside the kernel. In Windows operating systems, drivers are implemented as Dynamic Link Libraries .DLL or .SYS files. WDM compliant drivers must follow rules of design, initialisation, plug-and-play, power management and memory allocation. In practice WDM driver programmers reuse large pieces of code when building new object-oriented drivers. This means that drivers in the WDM stack may contain residual functionality, which is not documented in specifications.[6] Drivers that have passed the Microsoft quality test are digitally signed by Microsoft. The Microsoft Hardware Compatibility Tests and the Driver Development Kit include reliability and stress tests.[7]
A device driver that is not designed for a specific hardware component may allow another device to function. This is because the basic functionality of a hardware device class is similar. The functionality of the video card class, for example, allows the Microsoft Basic Display Adapter driver to work with a wide variety of video cards. However, installing the wrong driver for a device will mean that the full functionality of the device can not be used, and may result in poor performance and the destabilization of the Windows operating system. Hardware device vendors may release updated device drivers for particular Windows operating systems, to improve performance, add functionality or fix bugs. If a device is not working as expected the latest device drivers should be downloaded from the vendor website and installed.[8]
Device drivers are designed for particular Windows operating system versions, and device drivers for a previous version of Windows may not work correctly or at all with other versions. Because many device drivers run in kernel mode installing drivers for a previous operating system version may destabilise the Windows operating system. Migrating a computer to a higher version of a Windows operating system therefore requires that new device drivers are installed for all hardware components. Finding up to date device drivers and installing them for Windows 10 has introduced complications into the migration process.[8]
Common device driver compatibility issues include: a 32-bit device driver is required for a 32-bit Windows operating system, and a 64-bit device driver is required for a 64-bit Windows operating system. 64-bit device drivers must be signed by Microsoft, because they run in kernel mode and have unrestricted access to the computer hardware. For operating systems prior to Windows 10 Microsoft allowed vendors to sign their 64-bit drivers themselves, assuming vendors had undertaken compatibility tests. However, Windows 10 64-bit drivers now need to be signed by Microsoft. Therefore, device vendors have to submit their drivers to Microsoft for testing and approval. The driver installation package includes all files in the .inf directory, and all files in the package need to be installed, otherwise the installation of the device driver may fail. For operating system versions before Windows 10 not all files necessary for the driver installation were included in the package, as this requirement was not consistently enforced. Some device driver installers have a user interface GUI, often requiring user configuration input. The absence of a user interface does not mean that the installation of the device driver is not successful. Besides, Windows 10 device drivers are not allowed to include a user interface. The Network Driver Interface Specification (NDIS) 10.x is used for network devices by the Windows 10 operating system. Network device drivers for Windows XP use NDIS 5.x and may work with subsequent Windows operating systems, but for performance reasons network device drivers should implement NDIS 6.0 or higher.[8]
The Device Manager is a Control Panel applet in Microsoft Windows operating systems. It allows users to view and control the hardware attached to the computer. It allows users to view and modify hardware device properties, and is also the primary tool to manage device drivers.[8]
The Windows Driver Model, while a significant improvement over the VxD and Windows NT Driver Model used before it, has been criticised by driver software developers,[9] most significantly for the following:
- Interactions with power management events and plug and play are difficult. This can lead to situations where Windows machines cannot enter or exit sleep modes correctly due to bugs in driver code.
- I/O cancellation is difficult to get right.[10]
- Complex boilerplate support code is required for every driver.
- There is no support for writing pure user-mode drivers.
There were also a number of concerns about the quality of documentation and samples that Microsoft provided.
Because of these issues, Microsoft has released a new set of frameworks on top of WDM, called the Windows Driver Frameworks (WDF; formerly Windows Driver Foundation), which includes Kernel-Mode Driver Framework (KMDF) and User-Mode Driver Framework (UMDF). Windows Vista supports both pure WDM and the newer WDF. KMDF is also available for download for Windows XP and Windows 2000, while UMDF is available for Windows XP and above.
- Windows Driver Frameworks (WDF)
- Kernel-Mode Driver Framework (KMDF)
- User-Mode Driver Framework (UMDF)
- Windows Display Driver Model (WDDM)
- ^ a b c d e Marco Vieira; Joao Carlos Cunha, eds. (2013). Dependable Computing: 14th European Workshop, EWDC 2013, Coimbra, Portugal, May 15-16, 2013, Proceedings. Springer. p. 64. ISBN 9783642387890.
- ^ a b Bill Blunden (2009). The Rootkit Arsenal: Escape and Evasion. Jones & Bartlett Publishers. p. 460. ISBN 9781449661229.
- ^ Bill Blunden (2009). The Rootkit Arsenal: Escape and Evasion. Jones & Bartlett Publishers. p. 460. ISBN 9781449661229.
- ^ «Introduction to the Windows Driver Foundation». Microsoft Developer Network. 2006-10-13. Retrieved 2010-12-06.
The device class-specific driver models are typically structured as a port driver written by Microsoft paired with a miniport driver written by an independent hardware vendor. The port driver does much of the work required for the device class, and the miniport driver supports device-specific characteristics.
- ^ Bill Blunden (2009). The Rootkit Arsenal: Escape and Evasion. Jones & Bartlett Publishers. pp. 460–461. ISBN 9781449661229.
- ^ a b Dave Penkler; Manfred Reitenspiess; Francis Tam, eds. (2006). Service Availability: Third International Service Availability Symposium, ISAS 2006, Helsinki, Finland, May 15-16, 2006, Revised Selected Papers. Springer Science & Business Media. p. 124. ISBN 9783540687245.
- ^ Dave Penkler; Manfred Reitenspiess; Francis Tam, eds. (2006). Service Availability: Third International Service Availability Symposium, ISAS 2006, Helsinki, Finland, May 15-16, 2006, Revised Selected Papers. Springer Science & Business Media. p. 132. ISBN 9783540687245.
- ^ a b c d Byron Wright; Leon Plesniarski (2016). Microsoft Specialist Guide to Microsoft Windows 10 (Exam 70-697, Configuring Windows Devices). Cengage Learning. p. 96. ISBN 9781285868578.
- ^ Oney, Walter (May 6, 2003). «Introducing Windows Driver Framework». Windows Driver Developer’s Digest. Vol. 1, no. 3. Archived from the original on 2016-01-25.
- ^ «I/O Completion/Cancellation Guidelines». MSDN. Microsoft. May 5, 2003. Archived from the original on February 9, 2018. Retrieved 2018-02-08.
- Finnel, Lynn (2000). MCSE Exam 70-215, Microsoft Windows 2000 Server. Microsoft Press. ISBN 1-57231-903-8.
- Oney, Walter (2003). Programming the Windows Driver Model, Microsoft Press, ISBN 0-7356-1803-8.
- WDM Input Output Concepts — This article gives a high level overview of the I/O concepts as defined in the Windows Driver Model.
- Windows driver API basics — This article informs you about the basics behind sound card drivers such as WDM, ASIO, MME, DirectX, etc.
- Channel 9 Video — Interview with the Device Management and Installation team at Microsoft, primarily covering Plug-and-play.
- Lecture Notes on Windows Kernel Programming at the Wayback Machine (archived March 3, 2016) — Free lecture notes book fragment detailing basic creation of Windows Drivers, Kernel Mode programming, and Memory management

Unlocking the Mystery of Windows Driver Model (WDM)
Have you ever wondered what makes Windows devices function seamlessly? Behind the scenes, there is a sophisticated system known as the Windows Driver Model (WDM) that ensures the smooth operation of hardware devices on your Windows computer. In this article, we will uncover the secrets of WDM and shed light on its importance in the world of computing.
Key Takeaways:
- The Windows Driver Model (WDM) is a framework that allows communication between the operating system and hardware devices.
- WDM provides a consistent interface for device drivers, making it easier for developers to create drivers that are compatible with different Windows versions.
Breaking it Down: What is the Windows Driver Model (WDM)?
The Windows Driver Model (WDM) is a framework developed by Microsoft that facilitates communication between the operating system and hardware devices. It acts as a bridge, enabling the operating system to interact with various hardware components, such as printers, network adapters, USB devices, and more. Essentially, it allows the computer’s software to utilize the capabilities of the hardware.
Here are some key aspects to understand about WDM:
- Standardization: WDM provides a standardized interface that device drivers use to communicate with the operating system. With this uniform interface, developers can create drivers that are compatible with different versions of Windows without the need for major modifications. This streamlines the driver development process and ensures device compatibility across Windows platforms.
- Plug and Play: WDM supports Plug and Play functionality, allowing the operating system to automatically detect and configure hardware devices as they are connected or disconnected. This means that when you connect a new device to your computer, the operating system can automatically install the necessary drivers and make the device ready for use.
- Kernel Mode and User Mode Drivers: WDM distinguishes between kernel mode and user mode drivers. Kernel mode drivers operate at a lower level, directly accessing hardware resources and interacting with the operating system’s kernel. User mode drivers, on the other hand, provide a simpler and more restricted interface, mainly used for applications requiring less direct hardware control.
In essence, the Windows Driver Model (WDM) plays a vital role in ensuring the compatibility and smooth operation of hardware devices on Windows computers. Its standardized interface, support for Plug and Play, and differentiation between kernel mode and user mode drivers make it a crucial component of the Windows operating system.
Conclusion:
Now that you have a better understanding of what the Windows Driver Model (WDM) is, you can appreciate its significance in enabling the seamless connection between your computer’s operating system and hardware devices. The next time you plug in a new device or wonder how your printer magically starts working, remember that it is all thanks to the magic of WDM!
While applications with user-friendly interfaces run in user mode, some protected data can only be accessed in kernel mode. To securely and efficiently work with user data, applications rely on software drivers that process user mode requests and deliver results back to the application.
In this article, we provide a practical example of writing a Windows Driver Model (WDM) driver for encrypting a virtual disk that stores user data. Most of the steps described will also work for other types of drivers. This article will be useful for development teams and project leaders who are considering developing a custom software driver.
Contents:
- What do you need to build a Windows software driver?
- Encryption disk architecture
- Building a WDM driver
- Creating a device object
- Registering callback methods
- Implementing callback methods
- Implementing read/write operations for a virtual disk
- Mounting the disk
- Unmounting the disk
- Encrypting the disk
- Running a demo
- Finalizing the implementation of WDM requirements
- Debugging the disk
- Conclusion
What do you need to build a Windows software driver?
In the article How to Develop a Virtual Disk Driver for Windows: A No-Nonsense Guide, we discuss in detail how to build a basic virtual disk driver for Windows. This time, even though we’re once again working with a virtual disk driver, we are building a software driver for Windows that won’t directly interact with any physical devices or hardware. The driver is part of a project written in C, so we also cover some language-related limitations.
In this guide, we show you how to develop a Windows driver for creating an encrypted virtual disk — a file that operates similarly to a physical disk. You’ll be able to see the virtual disk in File Explorer and perform operations in it such as creating, saving, and deleting data. The driver’s key task is to process requests received from the operating system and send them to the virtual disk instead of a real device.
To follow along with our driver development guide, you’ll need the following tools:
- Visual Studio (we used Visual Studio 2019)
- Windows Software Development Kit (SDK) (for versions older than Visual Studio 2017; we used SDK version 10.0.19041.0.)
- Windows Driver Kit (WDK) (we used WDK version 10.0.19041.685)
- VMWare (to create a virtual machine for driver debugging)
Note: Starting with Visual Studio 2017, Windows SDK is installed automatically when you select the Desktop development with C++ option when installing Visual Studio. WDK, however, still must be downloaded separately.
If WDK was installed properly, you’ll see driver project templates in the dialog window for creating new Visual Studio projects:
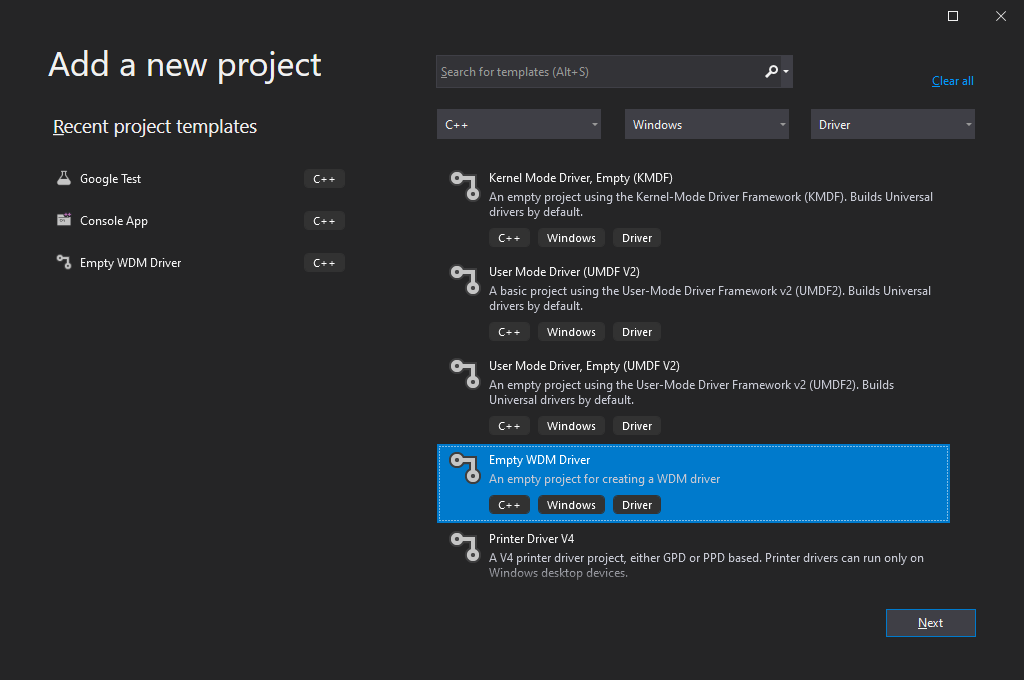
Screenshot 1: Visual Studio 2019 interface for creating driver projects
Working with WDK
Note that your approach to working with WDK depends on the version(s) of Windows you want your driver to be compatible with.
Before Visual Studio 2012 (WDK 8.0), Windows Driver Kit was a standalone solution that had its own compiler and other tools needed for developing a Windows driver. Driver assembly used to consist of two main steps:
- Call the setenv.bat script to set build options
- Call the build.exe utility from WDK
To build a basic driver for Windows, you needed two files:
1. The Makefile file, containing a directive to include the final makefile from the WDK. This directive was always standard:
Makefile
!include $(NTMAKEENV)\makefile.def2. The Sources file, containing build options and a list of driver sources.
WDK is currently integrated into Visual Studio via an extension that gets installed automatically. Therefore, you no longer need to work with Sources and Makefile, as you can select the project type, WDK version, and libraries to link to your driver in project settings.
When you use older versions of WDK to build drivers supporting Windows OS, your driver should also be able to support newer versions of Windows. However, to enable support for older Windows versions, you might need to use older versions of WDK when building your driver.
For example, to build a driver supporting Windows XP, you’ll need to use WDK version 7.1.0 (7600.16385.1) or older. This driver will also work under Windows versions 7, 8, and 10. At the same time, with WDK version 10.0.19041.685 (used in our guide), you can build a driver that supports Windows 7 or later, but it won’t work properly on Windows XP.
To learn more about writing drivers for different Windows versions, read Microsoft’s recommendations.
Overall, if you’re working on a new driver that doesn’t need to support older versions of Windows, it’s best to use the latest WDK version and create the project directly in Visual Studio.
With that in mind, let’s move to the actual process of Windows driver development.
Preparing to develop a Windows driver
Microsoft explains in detail the nature and purpose of drivers in Windows. Below, we summarize the core information you need to know to follow our guide.
First, let’s outline what a driver is and what its tasks are. A driver is a portable executable (PE) file that has a .sys extension. The format of this file is similar to the format of any .exe file, but the driver file links to the kernel (ntoskrnl.exe) and other system drivers (although this capability won’t be used in our example):
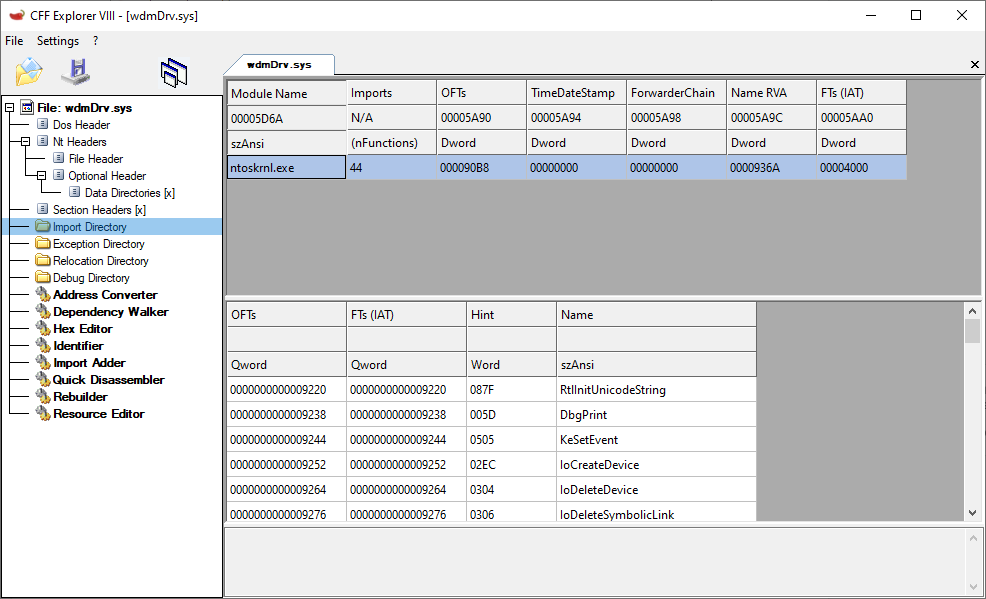
Screenshot 2: List of a driver’s linked modules with imported APIs
Drivers also have a different entry point — the GsDriverEntry function and the /SUBSYSTEM – NATIVE parameter.
Usually, drivers are written in C. However, as Microsoft doesn’t provide things like a C runtime for the kernel or a standard C++ library, you can’t use common C++ features like new/delete, C++ exceptions, or global class object initialization in the kernel. You can still write your code in a .cpp file and state a class, and the compiler will understand it; but full-scale support for C++ is absent.
Also, Microsoft recommends not using standard C++ functions like memcpy and strcpy for kernel driver development, even though they can be exported by the kernel. Instead, they recommend using safe implementations designed specifically for the kernel, such as the RtlCopyMemory and RtlCopyString functions.
To work with a project that relies on C, you can use a C++ runtime (cppLib) and an STL library (STLport) ported to the kernel. To simplify our example, we don’t use either of those and work with almost pure C.
To make it easier to write drivers, Microsoft created the Windows Driver Framework (WDF). This framework can help you significantly shorten the code for interacting with Plug and Play (PnP) devices and power management.
WDF is based on the Windows Driver Model. The choice of a driver model depends on many factors, including the type of driver under development.
With WDF being more suitable for building device drivers, in this article, we build our software driver with WDM.
Encryption disk architecture
To build properly functioning WDM drivers, we need to create two components:
- wdmDrv.sys — a driver that implements a virtual disk in Windows
- wdmDrvTest.exe — a user application that manages the driver
First, we need to mount our disk so it appears in the system and is accessible from File Explorer. To do this, we need a separate user application — wdmDrvTest.exe — that will send commands to the driver to mount and unmount the disk. We can also use the Windows registry to specify mount options for the disk (disk letter, path to the virtual disk file, disk size, etc.) and read those options when the driver is loaded into the system.
Then, for reasons of data security, we need to make sure the data is encrypted before it’s written to the disk and decrypted only after it’s read from the disk. As a result, data stored on the disk will always be encrypted.
Our driver is responsible for performing read/write operations on our virtual disk. The WdmDrvTest.exe application is responsible for encrypting and decrypting data. This application can also read and write data to and from the file where our virtual disk is stored. Therefore, our driver will delegate the processing of read/write operations to wdmDrvTest.exe.
Building a WDM driver
Any Windows driver starts with the DriverEntry function, which is called by the Windows operating system when the driver is loaded:
C
NTSTATUS DriverEntry(
IN PDRIVER_OBJECT DriverObject,
IN PUNICODE_STRING RegistryPath)
In our case, this function is responsible for:
- Creating a device object that will receive control commands.
- Registering callback methods that Windows calls for the created device objects. For example, in the case of a request to read data from the disk, the system will call a read callback in our driver.
- Registering the DriverUnload method, which Windows calls to unload the driver and free the allocated resources.
Basically, the DriverEntry function works similarly to the Main function in user applications.
However, while the Main function executes a certain algorithm and then returns control to the operating system, a driver remains loaded in memory and waits for Windows to call the appropriate handler in response to a new event even after execution of the DriverEntry function.
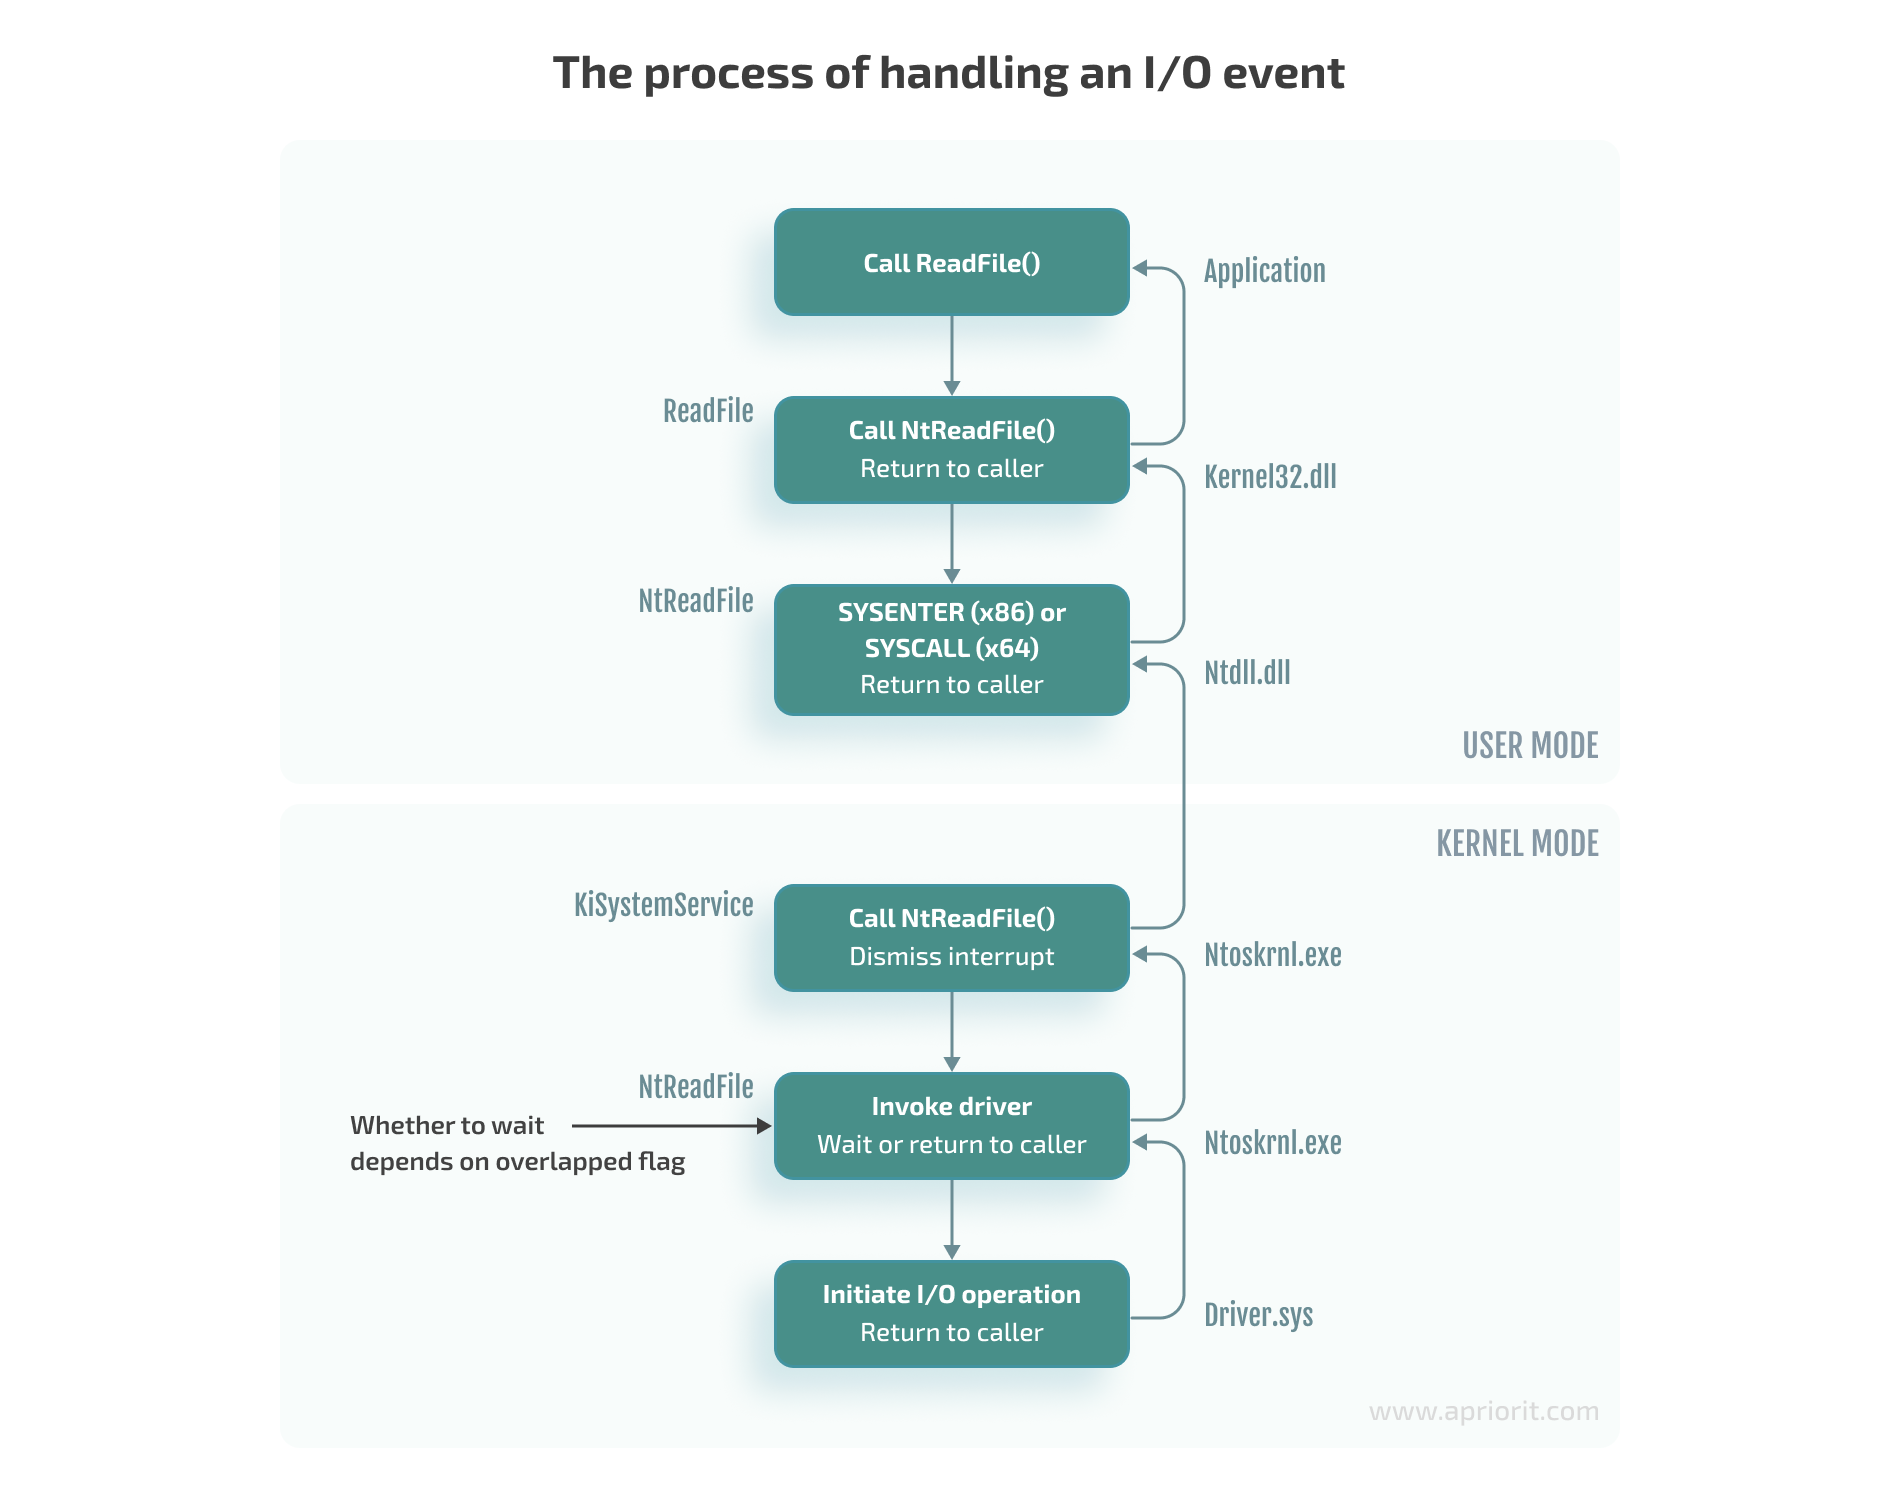
The following diagram shows the execution of a process in user mode and the work of a driver as part of a system process:
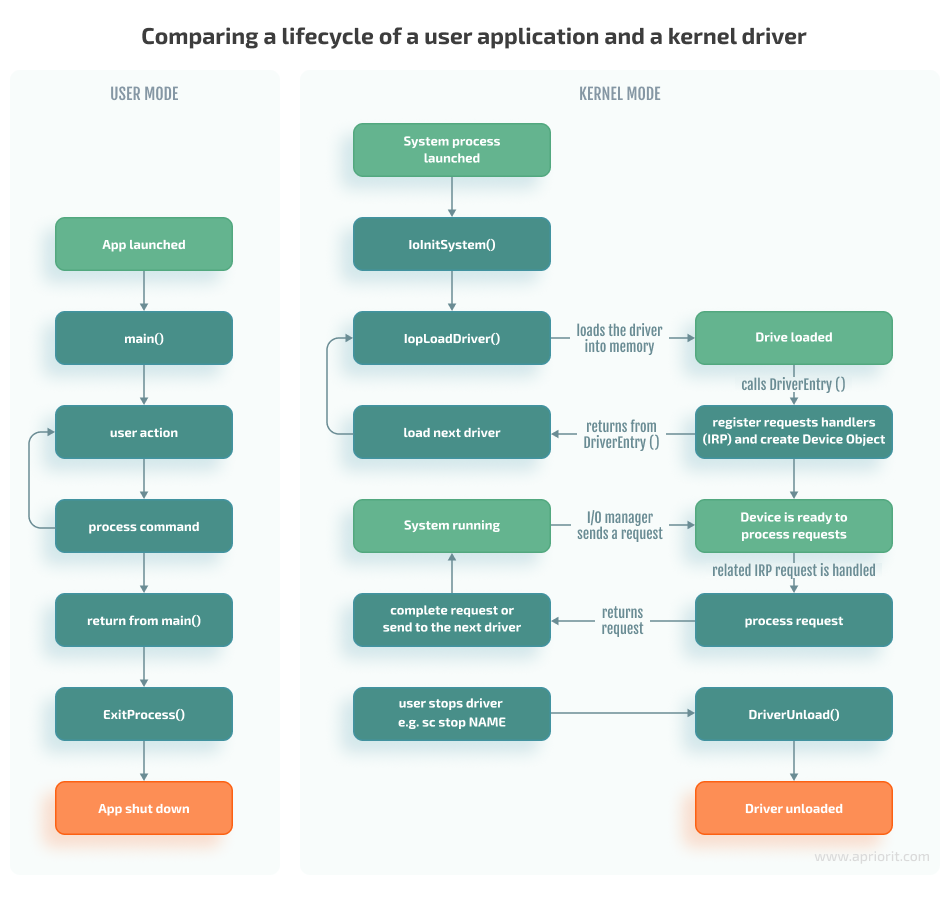
Here, the input/output (I/O) manager should be seen as a set of functions called to process I/O events rather than a separate module in the system.
Creating a device object
To create a device object, use the IoCreateDevice and IoCreateDeviceSecure functions:
NTSTATUS IoCreateDeviceSecure(
    [in]             PDRIVER_OBJECT     DriverObject,
    [in]             ULONG              DeviceExtensionSize,
    [in, optional]   PUNICODE_STRING    DeviceName,
    [in]             DEVICE_TYPE        DeviceType,
    [in]             ULONG              DeviceCharacteristics,
    [in]             BOOLEAN            Exclusive,
    [in]             PCUNICODE_STRING   DefaultSDDLString,
    [in, optional]   LPCGUID            DeviceClassGuid,
    [out]            PDEVICE_OBJECT     *DeviceObject
);
IoCreateDeviceSecure allows us to additionally specify the parameters for the DefaultSDDLString security descriptor. For example, we can specify which user groups can write to the device. Starting from Windows 7, this parameter must be used to, for instance, successfully format a disk.
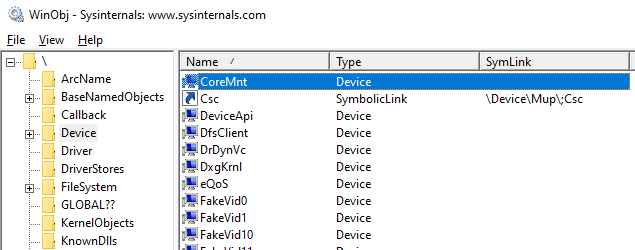
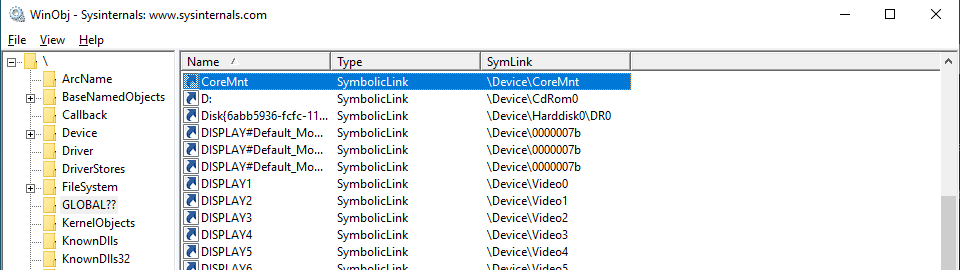
The DeviceName parameter is the name of the device, which might look like \Device\MyDevice. This parameter is created in the Device directory, which is a standard directory where all devices in the system are listed. To view this directory, we can use the winobj utility. Here is our virtual disk in the Device directory:
However, the devices in this directory can’t be accessed from user mode. Therefore, if we try to open a device by calling the CreateFile function, we’ll get the INVALID_HANDLE_VALUE value with the ERROR_FILE_NOT_FOUND error.
To make a device accessible from user mode, we need to create a symbolic link to it in the GLOBAL?? directory. To do that in the kernel, we call the IoCreateSymbolicLink function:
Now, using the name of our device, any user application can open the device object and send requests to it:
C++
CreateFileW(L"\\.\CoreMnt", GENERIC_READ | GENERIC_WRITE, 0, NULL, OPEN_EXISTING, 0, NULL);To learn more on the topic of naming device objects, you can read the guidelines from Microsoft or the Naming Devices section in the book Programming the Microsoft Windows Driver Model by Wolter Oney.
Continuing with our guide, we need to create two devices:
- A control device for interacting with the user application: particularly, for performing mount/unmount commands on our disk. This device is created in DriverEntry.
- A disk device for receiving and processing I/O operations. The control device creates a disk device when it receives the disk mount command.
Now, let’s look closer at the rest of the IoCreateDeviceSecure parameters:
DriverObject is a structure created by Windows and passed to the DriverEntry function. This structure contains a list of all device objects created for the driver.
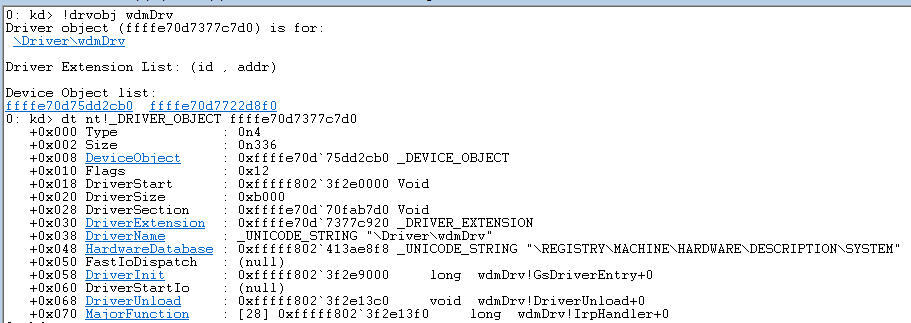
Here’s how we can find a DriverObject by the driver name and see the entire structure using WinDbg (see the Debugging the disk section below) and the !drvobj command:
DeviceExtensionSize is the parameter defining the size of the structure that we want to store in the created device object. This parameter is specified in the DeviceExtension field.
Windows will allocate memory for this structure and save the pointer to it in the created device object. This structure is where we will store everything we need to process requests: the I/O request queue, disk size, etc. In terms of C++ classes, this structure can be seen as the device object’s data members.
DeviceType is one of the numerical values defined in wdm.h, such as FILE_DEVICE_DISK, FILE_DEVICE_PRINTER, and FILE_DEVICE_UNKNOWN. Based on this parameter, the system assigns a default security descriptor to the device object of the virtual disk.
DeviceCharacteristics defines additional device characteristics such as FILE_READ_ONLY_DEVICE. In our case, we pass 0 as the value of this parameter.
Exclusive is a parameter that prohibits the opening of more than one device handler (HANDLE). In our case, we set the value of this parameter to FALSE.
DeviceObject is the address of the created device object.
The next important step in writing WDM drivers is registering its callback methods. Let’s take a look at this process.
Registering callback methods
Windows uses the I/O request packet (IRP) structure to handle various I/O events. For solutions where we have two different drivers interacting with each other, we can create and send IRPs to the second driver ourselves. But in our case, the operating system is responsible for both creating this structure and passing it to the driver.
Let’s see how an I/O event is usually handled, using the ReadFile function as an example. When the ReadFile function is called, this is what happens in the user application:
1. The ReadFile function calls the ntdll!NtReadFile function, which switches to kernel mode and calls the corresponding nt!NtReadFile function in the kernel (ntoskrnl.exe).
2. Using the passed HANDLE for the nt!NtReadFile file, the nt!NtReadFile function:
- Finds the device corresponding to the file. For example, this can be done through calls to ObReferenceObjectByHandle or IoGetRelatedDeviceObject functions.
- Creates an IRP structure using, for example, a call to the IoAllocateIrp function.
- Calls the appropriate device driver by passing the created IRP structure to it. This can be done by, for example, calling the nt!IoCallDriver function.
Note that the HANDLE is stored in the table of process objects and therefore only exists within a specific process.
3. The nt!IoCallDriver function takes a pointer to the driver object from the structure describing the device and passes the received IRP structure to the appropriate handler. The pseudocode for this process looks like this:
C++
NTSTATUS IoCallDriver(PDEVICE_OBJECT device, PIRP irp)

{

// get FunctionIdx from irp

PDRIVER_OBJECT driver = device->DriverObject;

return(*driver->MajorFunction[FunctionIdx])(device, irp);

}
4. The execution flow is then transferred to the IRP_MJ_READ (0x03) handler of the corresponding driver.
Note that there’s a function similar to NtReadFile — the ZwReadFile function. ZwReadFile can be exported by both the kernel and ntdll. If we need to call a function from the user mode, we can work with either NtReadFile or ZwReadFile. But if we need to call a function from the kernel mode, then it’s best to use ZwReadFile, as it allows us to avoid errors when passing the data buffer from the user mode. You can learn more about working with these two functions in Microsoft documentation.
To process various control events or I/O events, the driver needs to register the appropriate handlers in the DriverObject->MajorFunction array. The full list of supported functions can be found in the wdm.h file.
For example, to process read/write requests, we need to provide implementations of functions with the IRP_MJ_READ and IRP_MJ_WRITE indexes:
C++
NTSTATUS IrpHandler(IN PDEVICE_OBJECT fdo, IN PIRP pIrp){...}
NTSTATUS DriverEntry(IN PDRIVER_OBJECT DriverObject, ...)
{
DriverObject->MajorFunction[IRP_MJ_READ] = IrpHandler;
DriverObject->MajorFunction[IRP_MJ_WRITE] = IrpHandler;
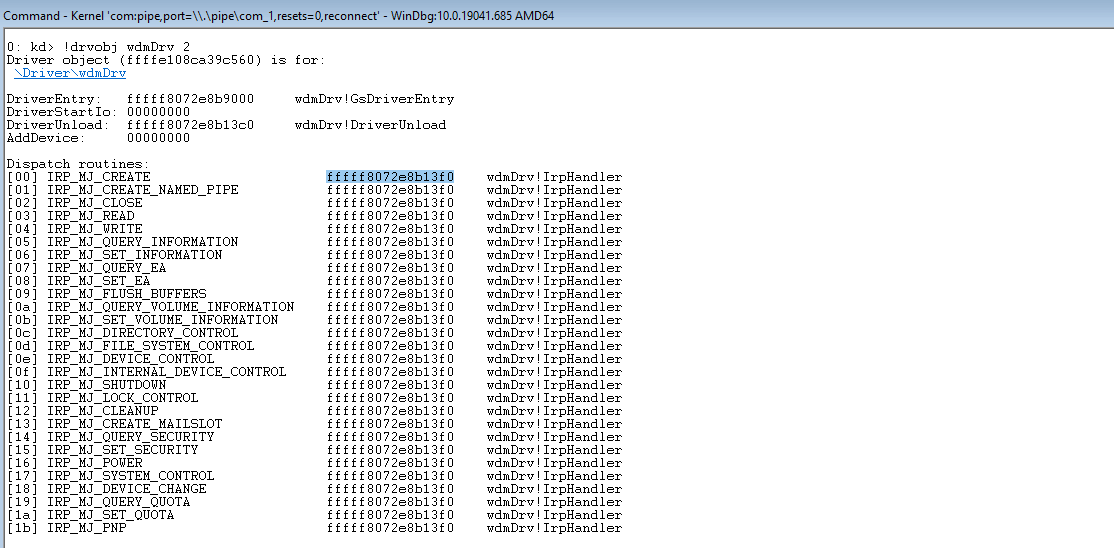
}However, we don’t have to register all possible handlers. The system provides a default implementation that reports failed request processing. We can also see all handlers registered for a particular driver:
Note: It’s impossible to unload a driver without registering the DriverUnload method. Antivirus software and similar products often leverage this feature to ensure that no one can unload their drivers from the system.
Implementing callback methods
When creating the IRP structure, the I/O manager allocates an array of IO_STACK_LOCATION structures for it. This array is located at the very end of the IRP structure.
The array size is specified in the DEVICE_OBJECT structure of the device that will receive this IRP first; specifically, in the StackSize field of this structure. The MajorFunction code is also located in this structure and not in the IRP itself. As a result, the operation code may change when the IRP structure is passed from one device to another. For example, when passing a request to read to a USB device, the operation code may change from IRP_MJ_READ to something like IRP_MJ_INTERNAL_DEVICE_CONTROL.
To access the IO_STACK_LOCATION structure of the current device, we need to call the IoGetCurrentIrpStackLocation function. Then, depending on the value of MajorFunction, we need to perform the corresponding operation:
C++
PIO_STACK_LOCATION ioStack = IoGetCurrentIrpStackLocation(irp);

switch(ioStack->MajorFunction)

{

caseIRP_MJ_CREATE:

...

caseIRP_MJ_WRITE:

...

default:

returnCompleteIrp(irp, STATUS_INVALID_DEVICE_REQUEST, 0);
Overall, there are three possible scenarios for request processing:
1. Process the IRP request immediately. For example, if it’s a request for disk size (IOCTL_DISK_GET_LENGTH_INFO), we can return the result immediately, as this information is known:
C
irp->IoStatus.Status = STATUS_SUCCESS;

irp->IoStatus.Information = 0x1000000;

IoCompleteRequest(irp, IO_NO_INCREMENT);

returnSTATUS_SUCCESS;
In case of failed request processing, the Information field usually has a 0 value in it. If a request is processed successfully, this field will contain the size of the data to be sent.
The IO_NO_INCREMENT (0) value means there’s no need to boost the priority of the threads waiting for IRP completion. If we were building a sound card driver, we could pass the IO_SOUND_INCREMENT (8) value, where 8 would represent the priority level corresponding to the driver type.
2. Pass the IRP request to the next driver in the device stack. While we don’t do this in our example, it can be done with the following command:
C++
IoSkipCurrentIrpStackLocation(irp);

returnIoCallDriver(lowerDeviceObject, irp);
This scenario can be used, for instance, when we need to process requests in a minifilter driver.
3. Save the IRP request to be further processed by the driver and mark it as pending. Add this structure to the list stored in the device’s extension and return STATUS_PENDING (see the example below). This scenario is often applied for read/write operations and can be used when, for example, there’s a call to a real device that needs to be processed after processing the initial request:
C++
IoMarkIrpPending(irp);

ExInterlockedInsertTailList(list, &irp->Tail.Overlay.ListEntry, listLock);

KeSetEvent(&requestEvent, (KPRIORITY)0, FALSE);

returnSTATUS_PENDING;
Next, in the case of a synchronous call, the user mode application that called the Read/WriteFile function will call NtWaitForSingleObject for the HANDLE file to wait for the operation’s completion. Later, our driver will complete the stored IRP request by calling the IoCompleteRequest function. Calling this function will cause the event inside nt!_FILE_OBJECT to be set, which, in turn, will end the waiting for the HANDLE file.
Here’s how you can put a breakpoint in the code above to see the IRP request:
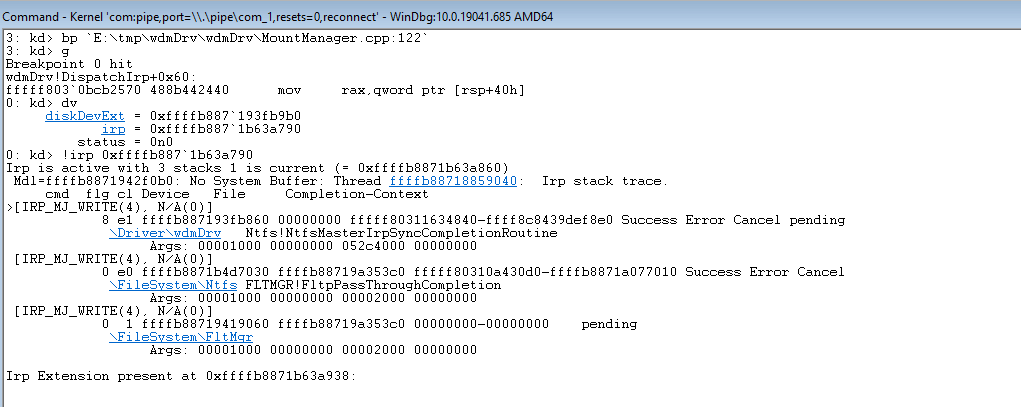
Now, let’s move to implementing read/write operations for a virtual disk.
Implementing read/write operations for a virtual disk
As we mentioned earlier, read/write requests are saved to a list stored in the device extension. Here’s a common way to process such requests:
- Create a thread in the kernel where we subtract requests from this list in a loop.
- Execute the corresponding operation of reading or writing to the file.
- For read operations, copy read data to the irp->MdlAddress buffer.
- Complete the request by calling the IoCompleteRequest function.
With this approach, requests are fully processed within the driver. However, as we need to work with the virtual disk file on the user application’s side, we need to apply a different approach where:
- The wdmDrvTest.exe application creates a thread in which it requests data on the last saved request from the driver.
- Based on the data received after Step 1, wdmDrvTest.exe reads data from and writes data to the disk file.
- The application sends the result back to the driver.
- In the case of a read operation, the driver copies the read data to IRP.
- The driver completes the request by calling the IoCompleteRequest function.
When compared to processing requests directly in the driver, this approach has several advantages. It enables us to:
- Use various libraries available in user mode
- Use programming languages other than C/C++
- Place the logic in DLLs, which we can dynamically load or replace without unloading the entire driver or rebooting the system
- Simplify code testing
- Increase overall system stability, as even if an error occurs, it doesn’t lead to a system shutdown.
However, this approach also has disadvantages — the increased complexity of and time needed for request processing.
Let’s see how this approach works in practice.
To request the saved IRP, we need to send a special control code (ioctl) from the wdmDrvTest.exe application. To do this, we call the DeviceIoControl function so the driver receives the IRP_MJ_DEVICE_CONTROL request.
First, we wait for the setting of the event, indicating that the request has been added to the list (see the previous section). Then we get the object of the saved IRP.
C++
KeWaitForSingleObject(requestEvent, Executive, KernelMode, FALSE, NULL);

PLIST_ENTRY request;

if((request = ExInterlockedRemoveHeadList(list, listLock)) == NULL)

{

// the list is empty, the event is set during unmounting

returnSTATUS_SUCCESS;

}

PIRP lastIrp = CONTAINING_RECORD(request, IRP, Tail.Overlay.ListEntry);
From the IRP, we get data such as the offset on the disk for read/write operations, the size of the data, and the data buffer for write operations. Then we copy this data to irp->AssociatedIrp.SystemBuffer and complete the IRP_MJ_DEVICE_CONTROL request. After that, we can perform steps two through five.
Working with the lpOverlapped parameter
When implementing read/write operations, it’s crucial to properly configure the lpOverlapped parameter when calling the DeviceIoControl function.
lpOverlapped is a pointer to the OVERLAPPED structure for making asynchronous calls. If you don’t pass this parameter to the DeviceIoControl function, the call to this function will be executed synchronously, which may cause wdmDrvTest to hang when sending other ioctl calls.
Here is what can happen when this disk unmounting scenario takes place:
- Thread 1 sends an ioctl call to get a saved request.
- The driver receives this ioctl call and waits for a new request to appear in the request list.
- Thread 0 (main) tries to send an ioctl call to unmount the drive.
- Thread 0 hangs because the DeviceIoControl function is waiting for the call from step 2 to be completed.
Now, we can move to the process of disk mounting.
Mounting the disk
Onсe we’ve created a disk device and implemented IRP processing for it, we need to make this device available for users so that it can be accessed from File Explorer. To do this, we need to create a symbolic link between our disk device and the drive name:
C++
UNICODE_STRING deviceName, symLink;

RtlInitUnicodeString(&deviceName, L"\\Device\\CoreMntDevDir\\disk");

RtlInitUnicodeString(&symLink, L"\\GLOBAL??\\Z:");

NTSTATUS ntStatus = IoCreateSymbolicLink(&symLink, &deviceName);
We need to create such a symbolic link in the global namespace so that the Z drive can be:
- Seen from the wdmDrvTest.exe application launched in administrator mode so we can lock the volume before unmounting (see the next section)
- Found via File Explorer and launched by a regular user
After that, the first time a file or folder is accessed on the drive, the I/O manager will mount the volume:
C++
05 nt!IopMountVolume
06 nt!IopCheckVpbMounted
07 nt!IopParseDevice
08 nt!ObpLookupObjectName
09 nt!ObOpenObjectByNameEx
0a nt!IopCreateFile
0b nt!NtCreateFile
0c nt!KiSystemServiceCopyEnd
0d ntdll!NtCreateFile
0e KERNELBASE!CreateFileInternal
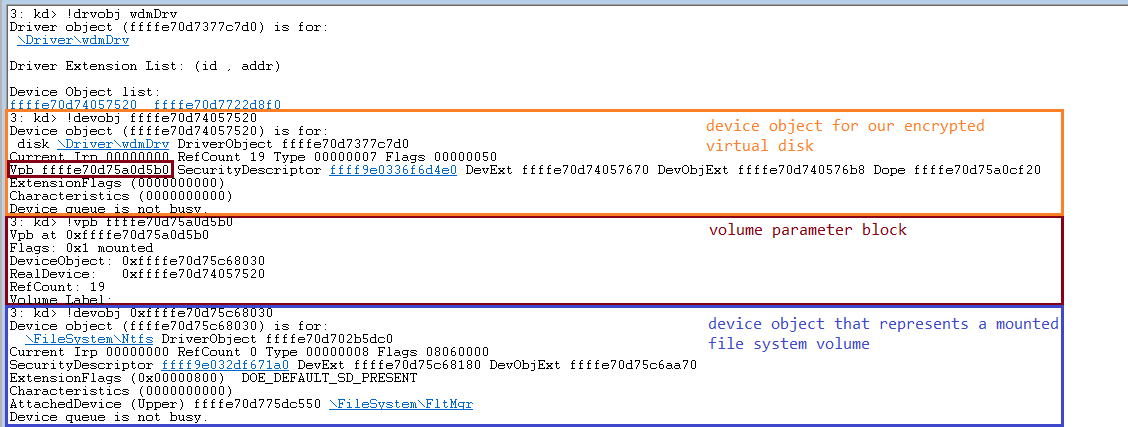
0f KERNELBASE!CreateFileWDuring volume mounting, the system creates a volume parameter block (VPB) and links the volume device object (also created by the system) to the device object of our drive. The VPB address will be saved to the VPB field inside our device object.
Here’s what it looks like for our disk:
Unmounting the disk
While the system automatically creates a device object for the volume and associates it with our disk through the VPB structure, unmounting this volume is still our task.
The whole process consists of the following steps:
- Unmount the volume
- Complete the thread that receives requests from the driver
- Delete our disk device object by calling the IoDeleteDevice function
- Delete the symbolic link to the Z drive
Note: Volume unmounting should always be performed first because the system can write data from the cache to the disk even during unmounting, potentially causing the system to hang.
The logic of the volume unmounting process is implemented in the wdmDrvTest.exe application. The application sends the following ioctl requests to the volume: FSCTL_LOCK_VOLUME, FSCTL_DISMOUNT_VOLUME, and FSCTL_UNLOCK_VOLUME. These commands can only be run by a user with administrator rights.
After executing these commands, the VPB in our Device Object will be updated and will no longer contain a pointer to the volume device object.
At this point, we only have one control device object left for our driver. We can resend a disk mounting request to this device object, thus causing the whole cycle to repeat itself. This control device object will be removed after calling the DriverUnload function and unloading our driver.
Now, let’s talk about the security of our disk’s data.
Encrypting the disk
To secure the disk, we can use OpenSSL to implement data encryption in our wdmDrvTest.exe application.
Here’s what the encryption algorithm would look like when our user application receives a read request from the driver:
1) The application reads the data from the file with the contents of our virtual disk (see screenshot 10 below)
2) The application deciphers the requested data
3) The application returns the deciphered results to the driver so that the driver can copy that data to the IRP request and complete it
C++
void EncryptedImage::Read(char* buf, uint64_t offset, uint32_t bytesCount)
{
    if (bytesCount % SECTOR_SIZE || offset % SECTOR_SIZE)
    {
        throw std::exception("wrong alignment");
    }
    std::vector<unsigned char=""> encData(bytesCount);
    m_image->Read(&encData[0], offset, bytesCount);

    uint64_t startSector = offset / SECTOR_SIZE;
    DecryptLongBuf(encData, bytesCount, startSector, m_key, buf);
}
In the case of a write request, the algorithm would be a bit different — we would first need to encrypt the data, then write it to the disk.
When we mount the disk in the wdmDrvTest.exe application, the system passes a password to the PKCS5_PBKDF2_HMAC function. We get the encryption key from that password.
The size of our encryption key is 256 bits, but since it’s encoded with the 128-bit Advanced Encryption Standard (AES) ciphertext stealing (XTS) cipher, the key gets split into two blocks of 128 bits each. The first block will be used for encrypting the data, and the second block will be used for encrypting the tweak.
A tweak is basically an analog of the initialization vector in Cipher Block Chaining (CBC). The only difference is that a tweak is applied for each block — not only the first one. The tweak is generated from the disk sector number, so different tweaks will be used to encrypt different sectors of our disk.
There are two key advantages of working with this cipher:
1) Each data block (disk sector) is encrypted independently from the others
2) For different data blocks, the same plaintext will return different ciphertext
As a result, even if one disk sector gets damaged, decryption of the remaining sectors won’t be affected. In the case of CBC, this would be impossible because each data block relies on the encryption results of the previous block. At the same time, the use of a tweak prevents data leaks common with electronic codebook (ECB) mode, which also encrypts all blocks independently.
It’s also possible to implement encryption directly in the driver using standard tools like Cryptography API: Next Generation and BitLocker. However, these tools support AES-XTS encryption only in Windows 10 and later versions.
With most of the technical steps of our driver development processes over, let’s try to run the driver we’ve created.
Running a demo
Once we’ve finished with all the preparations, all that’s left is to click the Build Solution button in Visual Studio to complete the process of building our driver. After that, we can configure a virtual machine running Windows 10 to launch and debug our driver. For our example, we used VMWare.
Note: When setting up a virtual machine in VMWare, it’s important to enable secure boot in the settings:
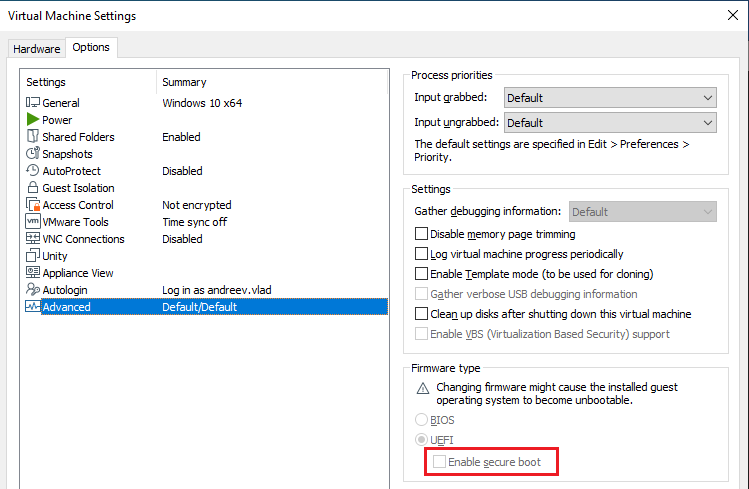
Otherwise, the following commands won’t work.
First, we need to allow the loading of test-signed drivers so that the driver will be automatically signed with the wdmDrv.cer certificate during the build. To do that, we need to run the following command as an administrator:
Bash
> bcdedit.exe -set TESTSIGNING ONThen, we need to copy the binaries and run the deploy.bat script (also as an administrator). This script copies our driver to the \system32\drivers\ directory and loads it.
After that, we can run the wdmDrvTest.exe application. The following command creates a vd.img file in the current folder and mounts the disk:
Bash
> wdmDrvTest.exe --create -p password -i vd.img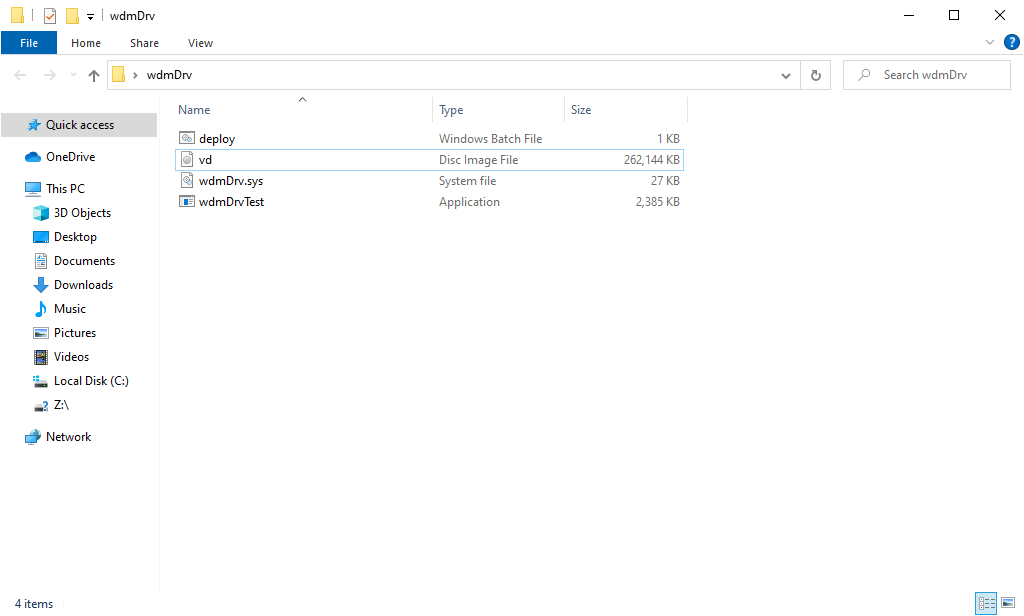
Now we can open the disk, which will cause the formatting window to appear. It allows us to format the disk with the required file system. Then we can create several files on the disk and go back to the wdmDrvTest.exe application and press any button to unmount the disk. To mount the disk from the file once more, we need to remove the –create parameter from the command above. After running the changed command as an administrator, the disk will appear in File Explorer again, but now with all the files created earlier.
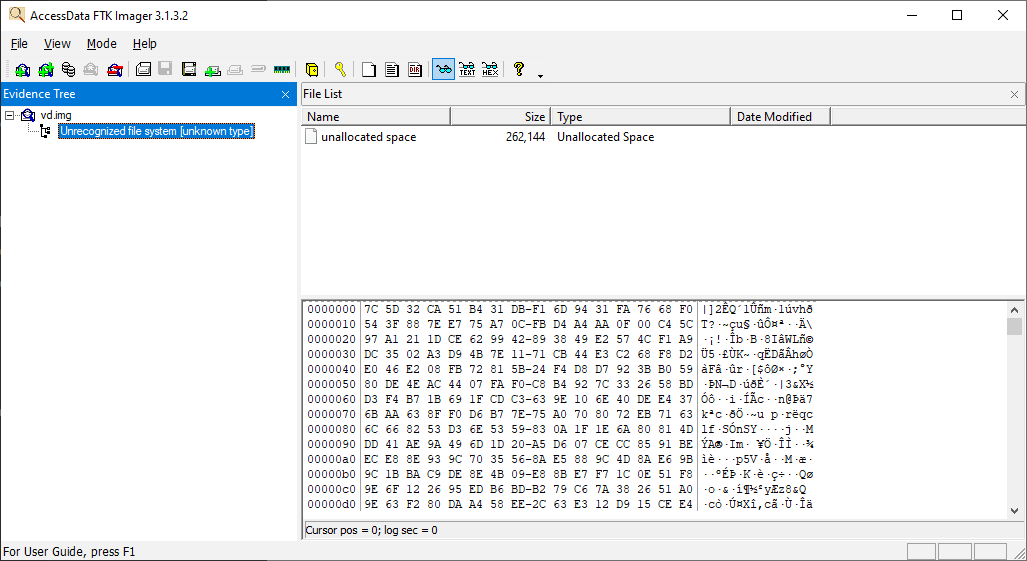
To check if the data on the disk is encrypted, we can try opening the vd.img file with FTK Imager:
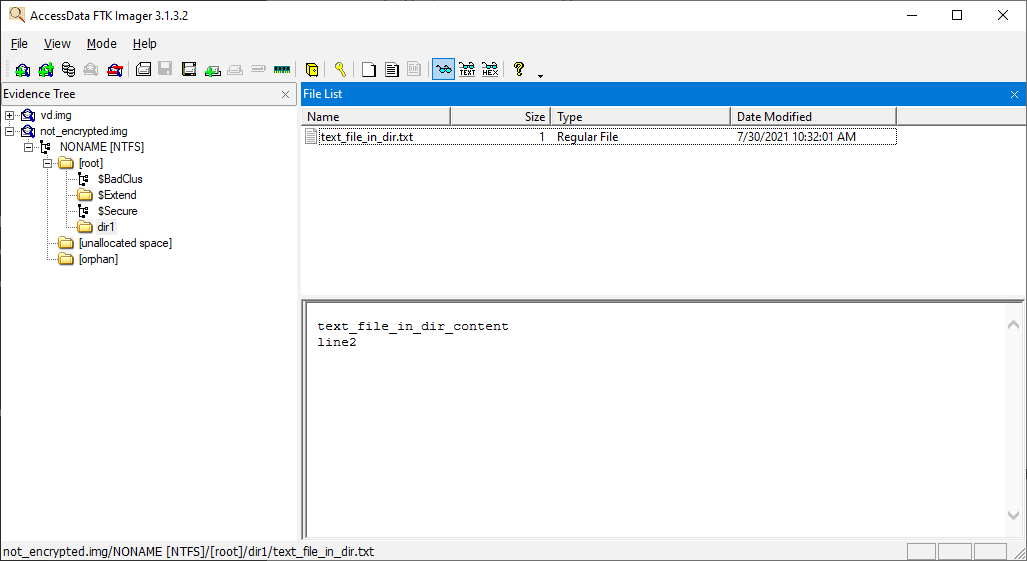
If we turn off encryption, we’ll be able to see all of the contents of our virtual disk:
Finalizing the implementation of WDM requirements
Currently, we have a legacy driver. To turn it into a Windows Driver Model driver, we need to introduce the following changes:
- Create the inf file
- Create the AddDevice routine
- Create callbacks for additional IRPs
To make these changes. Let’s use the toastMon sample from WDK 7600.16385.1. Note that the toaster’s version on GitHub already uses the Kernel-Mode Driver Framework (KMDF).
First, we update the inf file created by default in the beginning. This file contains HardwareID 一 Root\wdmDrv, which the system uses to find a driver which will serve this device:
C++
[Manufacturer]
%ManufacturerName%=Standard,NT$ARCH$

[Standard.NT$ARCH$]
%DeviceDesc%=wdmDrv_Device, Root\wdmDrv

[Strings]
ManufacturerName="VvCorp"
DeviceDesc= "My Device"
Now, if we try to install inf without changes in the driver, we’ll see the Unable to find any matching devices error in C:\Windows\INF\setupapi.dev.log.
Next, let’s add the AddDevice callback and specify its address in DriverEntry:
C++
DriverObject->DriverExtension->AddDevice = AddDevice;Here’s how the system calls the DriverEntry function:
C++
00 wdmDrv!DriverEntry
01 wdmDrv!GsDriverEntry
02 nt!PnpCallDriverEntry
03 nt!IopLoadDriver
04 nt!PipCallDriverAddDeviceQueryRoutine
05 nt!PnpCallDriverQueryServiceHelper
06 nt!PipCallDriverAddDevice
07 nt!PipProcessDevNodeTree
08 nt!PiRestartDevice
09 nt!PnpDeviceActionWorker
0a nt!ExpWorkerThread
0b nt!PspSystemThreadStartup
0c nt!KiStartSystemThread
After that, the system calls the AddDevice function for the device which is defined in the inf file:
C++
00 wdmDrv!AddDevice
01 nt!PpvUtilCallAddDevice
02 nt!PnpCallAddDevice
03 nt!PipCallDriverAddDevice
04 nt!PipProcessDevNodeTree
05 nt!PiRestartDevice
06 nt!PnpDeviceActionWorker
07 nt!ExpWorkerThread
08 nt!PspSystemThreadStartup
09 nt!KiStartSystemThread
Now, we have to create our control device in the AddDevice routine instead of DriverEntry. After this, we’ll attach our created control device to the device stack using the following call:
C++
deviceExtension->TopOfStack = IoAttachDeviceToDeviceStack(
        gDeviceObject,
        PhysicalDeviceObject);
Let’s take a closer look at the elements from the example above:
- PhysicalDeviceObject (PDO) is the device for \Driver\PnpManager, which we received from the system in AddDevice arguments
- gDeviceObject is the control device we created
Here’s how the device stack in WinDbg looks like once the device is successfully attached to the stack:

The call mentioned above also sets the StackSize field for our control device, making it 2: PDO->StackSize+1. And deviceExtension->TopOfStack will hold PhysicalDeviceObject. We’ll use it to pass IRPs down to the stack.
Next, we specify callbacks for PnP, Power Management, and Windows Management Instrumentation (WMI):
C++
DriverObject->MajorFunction[IRP_MJ_PNP]=DispatchPnp;
DriverObject->MajorFunction[IRP_MJ_POWER]=DispatchPower;
DriverObject->MajorFunction[IRP_MJ_SYSTEM_CONTROL]=DispatchSystemControl;
For Power Management and WMI, we only forward the IRP to the next device in the stack.
As for PnP, after AddDevice the system will call the DispatchPnp routine. Here, we are only interested in IRP_MN_START_DEVICE and IRP_MN_REMOVE_DEVICE IRPs (see below). We need to wait for IRP completion by PDO. For that, let’s set our CompletionRoutine and pass IRP down to PDO. When PDO completes IRP, all devices in the stack will be started. So our upper device can finish its start activity:
C++
00 wdmDrv!CompletionRoutine
01 nt!IopfCompleteRequest
02 nt!IofCompleteRequest
03 nt!IopPnPCompleteRequest
04 nt!IopPnPDispatch
05 nt!IofCallDriver
06 wdmDrv!DispatchPnp
07 nt!IofCallDriver
08 nt!PnpAsynchronousCall
09 nt!PnpSendIrp
0a nt!PnpStartDevice
0b nt!PnpStartDeviceNode
0c nt!PipProcessStartPhase1
0d nt!PipProcessDevNodeTree
…
Now, we can install our driver using the inf file and the Device Console (DevCon) tool from WDK:
C++
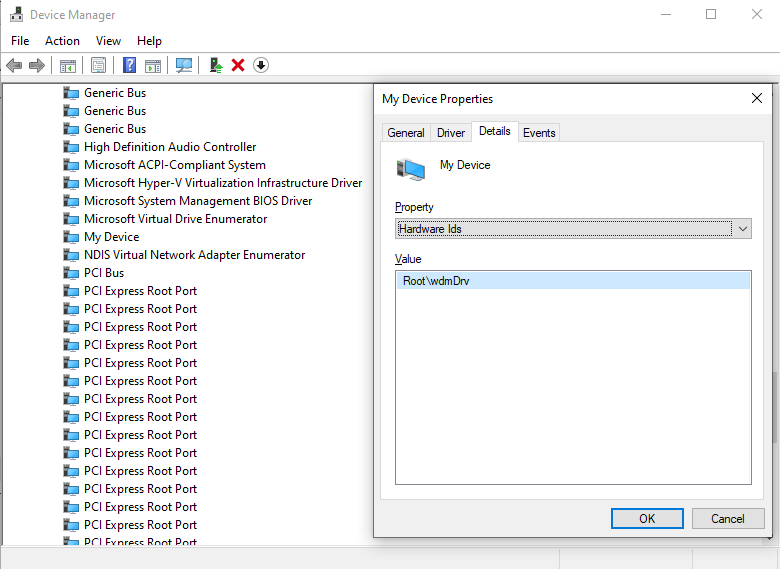
> devcon.exe install wdmDrv.inf Root\wdmDrvAfter that, our driver will be displayed in Device Manager:
We can also see our device in the PnP tree in WinDbg by using “!devnode 0 1” command:
C++
DevNode 0xffffd988b0e0fcc0 for PDO 0xffffd988b23022e0
    InstancePath is "ROOT\SYSTEM\0001"
    ServiceName is "wdmDrv"
    State = DeviceNodeStarted (0x308)
    Previous State = DeviceNodeEnumerateCompletion (0x30d)
To uninstall device, execute:
C++
> devcon remove Root\wdmDrvOur driver will receive IRP_MN_REMOVE_DEVICE IRP and the stack will look like this:
C++
00 wdmDrv!DispatchPnp
01 nt!IofCallDriver
02 nt!IopSynchronousCall
03 nt!IopRemoveDevice
04 nt!PnpRemoveLockedDeviceNode
05 nt!PnpDeleteLockedDeviceNode
06 nt!PnpDeleteLockedDeviceNodes
07 nt!PnpProcessQueryRemoveAndEject
08 nt!PnpProcessTargetDeviceEvent
…
Now, let’s delete our control device here instead of DriverUnload. And after this IRP, our driver will be unloaded from memory.
As you can see, WDM requires handling of additional IRPs for PnP, Power Management, and WMI. If you use KMDF, all of these will be under the hood. So, instead of writing boilerplate code which can potentially have bugs, it would be better to use KMDF. But first, you’ll need to determine which type of driver you need. In our case, a legacy driver was enough. Note: if you need to monitor filesystem activity, for example, you also don’t need KMDF. Consider going with a minifilter driver in such a case.
Now, we can move to the final stage of the driver development process and debug our driver.
Debugging the disk
First, we need to install the WinDbg tool. It comes as part of Windows SDK and WDK, although you can also install it separately by checking only the Debugging tools for Windows option during setup.
Microsoft recommends using the Hyper-V hypervisor for driver debugging. They also provide a detailed guide on a simplified debugging process for Windows 10, which has Hyper-V built in. Recommendations on how to enable Hyper-V and configure a virtual machine with it are also provided on the Microsoft website. Alternatively, you can debug a driver using VirtualKD.
Since we created our virtual machine using VMWare, we use a slightly different approach:
1. Choose Add -> Serial Port in the settings of the virtual machine and check the boxes as shown in the following screenshot:
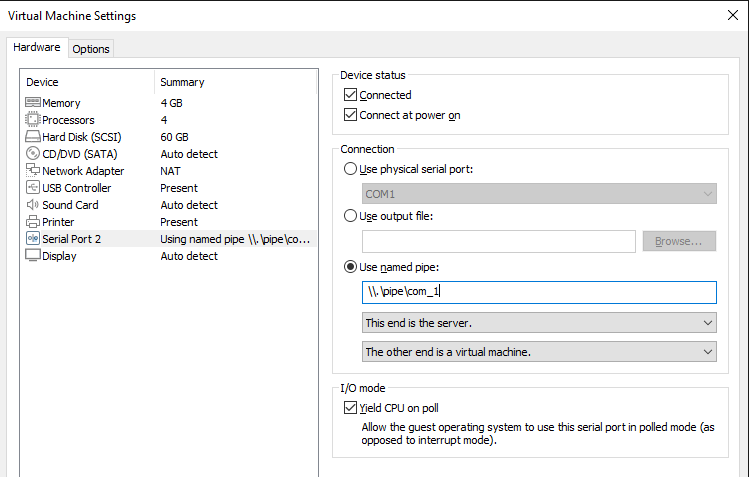
The name com_1 will be used in the WinDbg connection settings, so you can change it to a different one.
2. Start the virtual machine and run the following commands as an administrator:
Bash
> bcdedit /debug on
> bcdedit /dbgsettings serial debugport:2 baudrate:115200
3. On the machine with WinDbg installed, run the following command as an administrator:
Bash
> setx _NT_SYMBOL_PATH srv*c:\symbols*http://msdl.microsoft.com/download/symbolsThis command adds the environment variable indicating where to look for the symbols (.pdb).
4. Create a WinDbg shortcut and add Target parameters at the end to launch kernel debugging:
Bash
-k com:pipe,port=\\.\pipe\com_1,resets=0,reconnectMake sure to change the pipe name when you repeat these actions on your virtual disk.
5. Double-click on the WinDbg shortcut and restart the virtual machine.
Once the system restarts, we can:
- Open WinDbg and press Ctrl+Break
- Specify the path to the pdb driver using the .sympath+ command
- Run the commands listed in this article once again to better memorize the described approach
And that’s it. We’ve successfully created a Windows WDM driver.
To learn details about drivers, check out our articles about Windows driver testing and USB WiFi driver development.
Conclusion
Software drivers play an essential role in building Windows applications and expanding their capabilities. This process requires Windows driver developers to have a deep understanding of driver development specifics, keen knowledge of Windows internals, and expertise in C/C++.
Apriorit driver development professionals have successfully helped many businesses tackle their driver development challenges and deliver well-performing, secure, and competitive products.
Windows Display Driver Model (WDDM, также WVDDM в эпоху Vista) — это архитектура графических драйверов для видеокарты под управлением Microsoft Windows, начиная с Windows Vista[1]. Она является заменой для архитектуры видеодрайверов Windows XP и нацелена на повышение производительности графики и новую функциональность[1].
WDDM предоставляет функциональность, необходимую для отображения рабочего стола и приложений с помощью диспетчера окон рабочего стола — диспетчера составных окон, работающего поверх Direct3D. Она также поддерживает интерфейсы новой инфраструктуры DXGI (DirectX Graphics Infrastructure), необходимые для основных операций создания и управления устройством. Спецификация WDDM требует видеокарту, поддерживающую по меньшей мере Direct3D 9, и должна реализовывать интерфейсы до Direct3D 9 для совместимости со старыми приложениями Direct3D; по желанию она может реализовывать интерфейсы для Direct3D 10/10.1 и выше.
Драйверы WDDM открывают новые функциональные области, которые не предоставлялись на унифицированной основе более ранними моделями графических драйверов:
Виртуализованная видеопамять[править | править код]
В контексте графики виртуализация означает, что отдельные процессы (в пользовательском пространстве) не могут видеть память соседних процессов даже путём вставки фальшивых команд в командный поток. Драйверы WDDM позволяют делать виртуализацию видеопамяти[2] и подстановку страниц видеопамяти в системную память. Если окажется, что доступной видеопамяти недостаточно для хранения всех видеоданных и текстур, данные, не используемые в текущий момент, перемещаются в системную память или на диск. Если вытесненные данные становятся нужны, они загружаются обратно. Виртуализация была в некоторой степени возможна в драйверах, рассчитанных на предыдущие модели построения (такие, как модель драйверов Windows XP), но это была целиком зона ответственности драйвера, а не системы.
Диспетчеризация[править | править код]
Исполняемый модуль управляет диспетчеризацией (планированием) конкурирующих между собой графических контекстов.[3] Каждый список команд помещается в очередь для исполнения графическим процессором, и может быть выгружен исполняемым модулем, если появляется более важная задача и если выполнение списка ещё не началось. Такое поведение отличается от потоков центрального процессора, где задача не может быть прервана и поэтому занять больше времени, чем нужно и заставить компьютер медленнее отвечать на запросы. Гибридный алгоритм планирования между родными и лёгкими потоками со взаимодействием потоков даёт бесшовный параллелизм. Важно заметить, что планирование — это не новая идея, но ранее была сферой ответственности разработчиков драйверов. WDDM пытается унифицировать опыт разных разработчиков, управляя выполнением задач графического процессора.
Межпроцессное совместное использование поверхностей Direct3D[править | править код]
Графическая поверхность Direct3D — это область памяти, содержащая информацию о текстурированных ячейках, используемых для просчёта двумерной или трёхмерной сцены. WDDM позволяет процессам совместно использовать поверхности Direct3D[4]. Поэтому приложение может включить ячейку, созданную другим приложением, в рассчитываемую сцену. Совместное пользование текстур процессами до WDDM было сложной задачей, поскольку требовало копирования данных из видеопамяти в системную память и назад, в видеопамять нового устройства.
Расширенная отказоустойчивость[править | править код]
Если драйвер WDDM зависнет или встретит сбой, графический стек перезапустит драйвер.[1] При сбое графической аппаратуры произойдёт перехват этого события и, если необходимо, драйвер будет перезапущен.
Драйверы для Windows XP были вольны реагировать на аппаратные сбои на своё усмотрение, либо уведомлением пользователя, либо попыткой устранить ошибку молча. С драйвером WDDM все сбои аппаратуры вызывают перезапуск драйвера, а пользователь получает всплывающее сообщение; это унифицирует поведение драйверов разных разработчиков.
Предыдущие драйверы реализовывались полностью в режиме ядра, в то время как WDDM частично реализован в пользовательском режиме. Если область пользователя даст невосстановимую ошибку, это в худшем случае неожиданно прервёт работу приложения вместо синего экрана, как это было в предыдущих моделях драйверов.
WDDM также позволяет перезапускать или вытаскивать графическую аппаратуру без надлежащей перезагрузки. На практике, обновление драйвера не должно требовать перезагрузки.
Одним из основных сценариев, которые делает возможным Windows Display Driver Model, является Desktop Window Manager. Поскольку рабочий стол и окна приложений, управляемые DWM, являются приложениями Direct3D, количество открытых окон напрямую влияет на требуемый объём видеопамяти. Поскольку нет ограничения на количество открытых окон, доступной видеопамяти может оказаться недостаточно, и потребуется виртуализация. Поскольку содержимое окон, которые DWM объединяет в конечный рабочий стол, создаётся разными процессами, необходимо межпроцессное совместное использование графических поверхностей. Также, поскольку одновременно с DWM на рабочем столе могут работать другие приложения DirectX, приложения должны иметь возможность совместного доступа к графическому процессору, что требует диспетчеризации.
Однако сказанное справедливо для Майкрософтовской реализации составного рабочего стола под Windows Vista, с другой стороны, составной рабочий стол теоретически не нуждается в новой модели графических драйверов. Успешные реализации составных рабочих столов существовали до Windows Vista на других платформах, таких, как Quartz, Compiz, WindowFX. Своим подходом Microsoft попытался сделать надёжный WDDM как обобщение опыта по разным графическим процессорам от различных производителей, как стандартизацию их свойств и качеств. Программные свойства, отсутствующие у других моделей драйверов, можно было бы сделать несущественными с помощью дополнений или если бы была доступна менее ограничивающая или просто другая модель драйверов.
Новая модель драйверов требует, чтобы графическая аппаратура поддерживала, по крайней мере, Shader Model 2.0 (fixed function pipeline is now translated to 2.0 shaders). Однако, по информации Microsoft, на 2009 год только около 1—2 процентов аппаратуры использовало модель драйверов Windows XP[5], а остальные уже являются WDDM-совместимыми. Модель также требует наличия некоторых других аппаратных возможностей (по этой причине, например, аппаратура, поддерживающая SM 2.0, такая, как Intel GMA 900, не проходит сертификацию на WDDM[6]).
Одно из ограничений драйвера WDDM версии 1.0 в том, что он не поддерживает одновременно несколько драйверов в многоадаптерном многомониторном окружении. Если у многомониторной системы более одного графического адаптера, оба адаптера должны использовать один и тот же драйвер WDDM. Если используется более одного драйвера, Windows выключит один из них.[7]. У WDDM 1.1 уже нет такого ограничения.[8]
В WDDM 1.0/1.1 отсутствуют некоторые режимы, ранее обслуживавшиеся непосредственно драйвером, такие, как растяжка рабочего стола на несколько мониторов[9][10], хотя режим Dual View[11] по-прежнему доступен.[12]
WDDM 1.1
[править | править код]
Windows 7 поддерживает важные дополнения к WDDM, известные как WDDM 1.1; подробности этой новой версии были раскрыты на WinHEC 2008. Новые возможности включают[5]:
- DXGI 1.1, что характеризует возвращение аппаратного ускорения двумерного графического интерфейса пользователя для использования системой GDI[13] и Direct2D/DirectWrite (но не GDI+)
- BitBlt, StretchBlt, TransparentBlt
- AlphaBlend, ColorFill
- Поддержка шрифтов ClearType
- Интерфейс драйвера устройства Direct3D 11 (DDI)
- DXVA-HD DDI[14]
- Hardware video overlay DDI[15]
- Необязательное шифрование AES 128
- Необязательное декодирование зашифрованного графического содержимого
- Поддержка нескольких драйверов в многоадаптерном многомониторном окружении
Аппаратное ускорение операций GDI и Direct2D/DirectWrite помогает уменьшить расход памяти в Windows 7, поскольку системе компоновки DWM больше не нужно держать копию системной памяти для всех графических поверхностей, используемых GDI/GDI+, как это было в Windows Vista.[16][17]
Драйверы WDDM 1.1 обратно совместимы со спецификацией WDDM 1.0; как драйверы 1.0, так и 1.1 можно использовать в Windows Vista с Platform Update или без него.[5]
WDDM 1.2
[править | править код]
Windows 8 включает WDDM 1.2[18][19] и DXGI 1.2.[19][20] Новые функции были представлены на конференции Build 2011 и включают улучшения производительности и так же поддержку для стереоскопического 3D рендеринга, а также видео воспроизведения.
Другие главные изменения включают вытесняющую многозадачность для GPU вместе с лучшей степенью параллельных вычислений (DMА буфера, примитивов, треугольников, пикселей, или на уровне инструкций),[21] уменьшено потребление памяти, улучшено разделение ресурсов, и более быстрое обнаружение и восстановление. 16-бит цветовой формат поверхностей (565, 5551, 4444) являются обязательными в Windows 8, и Direct3D 11. Поддержка YUV 4:4:4/4:2:2/4:2:0/4:1:1 видео формата с 8, 10, и 16-бит точностью, а также 4 и 8-бит формат палитры.[22]
WDDM 1.2 поддерживаются только WDDM-драйверами, такими как Microsoft Basic Display Driver[23] и WARP-основанный Microsoft Basic Render Driver который заменяет видео драйвер уровня ядра.
На WinHEC 2006 Microsoft говорил о своих планах сделать значительное изменение WDDM для улучшения многозадачности применительно к графическим процессорам. Согласно информации Microsoft, WDDM 1.0 позволяет выполнять лишь элементарное планирование задач с просчётом «batch queue» granularity. WDDM 2.0 и WDDM 2.1′, которые планировались после выхода Vista[24] но относительно которых Microsoft не огласил дату выхода в свет (Windows 8 поддерживает лишь WDDM 1.2), могли бы предложить вытесняющую многозадачность на уровне мелких структурных единиц и потребовали бы нового поколения графических процессоров.[25][26]
Поддерживается в Windows 10.
WDDM 1.3
[править | править код]
Windows 8.1 включает WDDM 1.3[27] и DXGI 1.3.[28] Новые улучшения включают возможность уменьшения потребления памяти DXGI адаптера, многоплановые наложения, перекрытия цепочки переключений и масштабируемые цепочки переключений, выбор экранного буфера субрегиона для цепочки переключений и меньшей задержки цепочки переключений отображения. Функции драйвера могут включать поддержку беспроводных дисплеев (Miracast), формат YUV диапазона, кросс-адаптерные ресуры и GPU движок перечислений возможностей. Улучшения в производительности графического ядра системы.[29]
WDDM 2.0
[править | править код]
Windows 10 включает WDDM 2.0, он был спроектирован таким образом, чтобы значительного уменьшить нагрузку на драйвер уровня ядра для GPU с поддержкой виртуальной адресации памяти,[30] для улучшения многозадачности в пользовательском режиме драйвера и как результат снижения нагрузки на центральный процессор.[31][32][33][34] Windows 10 так же включает DXGI 1.4.[35]
Direct3D 12 API, анонсированный на Build 2014, требует WDDM 2.0. Новый API позволяет автоматически управлять ресурсами, выполнять конвейеризацию запросов и позволяет получить разработчикам более низкоуровневое управление над памятью адаптера и стадиями рендеринга.
WDDM 2.1
[править | править код]
Windows 10 Anniversary Update (версия 1607) включает WDDM 2.1, обеспечивает поддержку Shader Model 6.0 (обязательную для уровня функций DirectX12 12_0 и 12_1),[36] а также DXGI 1.5 с HDR10 — 10-бит High Dynamic Range Rendering, формат широкого диапазона цветов[37] принятый ITU-T Rec. 2100/Rec.2020 — и переменную частоту обновления.[38]
WDDM 2.2
[править | править код]
Windows 10 Creators Update (версия 1703) включает WDDM 2.2, который адаптирован для виртуальной, дополненной и смешанной реальности с стереоскопическим рендерингом для платформы Windows Mixed Reality, и DXGI 1.6.[39]
WDDM 2.3
[править | править код]
Windows 10 Fall Creators Update (версия 1709) включает WDDM 2.3.
- Аппаратная очередь
- Поддержка блока управления памятью (MMU) для операций ввода-вывода
- Поддержка чёрного списка
- Поверхности цепочек буферов
- Просмотр GUID устройства
- Опрос версий (bios/архитектурной информации)
- Опрос производительности (значение частоты (текущая/макс/разгон), напряжение (текущая/макс/разгон), частота памяти, скорость памяти, пропускная способность PCIE, обороты кулера, потребление энергии, температура (макс/внимание), переопределение состояния питания) [1]
WDDM 2.4
[править | править код]
Windows 10 April 2018 Update (версия 1803) включает WDDM 2.4.
- Дополнительные d3d типы распределения памяти
- SDR Регулировка уровня белого [2]
- Паравиртуализация адаптера
- Произвольная защита ядра
- Настраиваемые тайминги рендеринга дисплея
- Поддержка съемных адаптеров
- Поддержка конфигурации дисплея
- Поддержка источника-владельца
- Перенаправление дисплея
- Поддержка трансформации цветового пространства
- Защищенная сессия устройства
- Процесс удаления устройства (проверяет, может ли процесс, использующий адаптер, восстанавливаться после удаления графического устройства)
С момента появления Windows 10 April 2018 Update и благодаря изменениям в WDDM, стало возможным использовать функцию аналогичную двойной графики в ноутбуках. Например, что позволяет запускать программы\игры на более мощной видеокарте, а выводить изображение через встроенную графику напрямую по внутренней (PCI-E) или внешней шине, без необходимости подключать монитор к мощной видеокарте. Так же может выступать в качестве решения проблемы, если на видеокарте нет VGA видеовыхода, а в материнской плате он присутствует.
Важно: Такую поддержку гарантировано обеспечивают процессоры Intel не ниже поколения Haswell и видеокарты nVidia поколения Kepler (600 серия). Для оптимальной производительности cross-adapter clone mode (по описанию в документации nVidia) настоятельно рекомендуется последняя актуальная версия Windows 10, а так же свежие драйверы как на видеоядро, так и на дискретную видеокарту.
Ранее такую возможность предоставлял аппаратно-программный комплекс как LucidLogix, но материнские платы с ее наличием встречались реже и были значительно дороже. Так же все выше указанное может способствовать повышению производительности игр и тяжелых 3D приложений как CAD, и прочих. Плюс использование этого функционала способно снизить энергопотребление и нагрев системы в целом.
Предварительные версии[править | править код]
SDK для Oculus Rift включает DXGI 2 предварительно для Windows 10.
WDDM 2.5
[править | править код]
Windows 10 October 2018 Update (версия 1809) включает в себя поддержку WDDM 2.5.
- Поддержка Shader Model 6.3
- Трассировка лучей
- Требования к универсальной модели драйверов
- SRV-Only Tiled Resource Tier 3
- Проход визуализации
- Мета-команды
- HDR Компенсация яркости
- Поддержка HDR Pixel Format
- SDR Уровень белого
WDDM 2.6
[править | править код]
Windows 10 May 2019 Update (версия 1903/1909) добавляет поддержку WDDM 2.6.
- Поддержка Shader Model 6.4
- Супер мокрые чернила
- Переменный шейдинг
- Сбор информации для диагностики
- Фоновая обработка
- Горячая замена драйвера
WDDM 2.7
[править | править код]
Windows 10 May 2020 Update (версия 2004) привносит поддержку WDDM 2.7.
В данный момент доступно в Windows 10 с использованием драйверов Nvidia версии 451.48[40], Intel 27.20.100.8280 и AMD 27.20.1017.1011, начиная с версии 10.0.19041.
- Планирование графического процессора с аппаратным ускорением: Позволяет видеокарте непосредственно управлять своей видеопамятью, что в свою очередь значительно улучшает плавность игрового процесса и\или скорость отклика тяжелых 3D приложений из-за подъема FPS по минимальному и среднему значению, и тем самым это позволяет снижать задержки в работе. Работает независимо от используемого API для игр и приложений таких как DirectX/Vulkan/OpenGL.[41][42] Поддерживается видеокартами nVidia GeForce начиная с поколения Pascal\10 серии, а поддержка у AMD Radeon возможна только с поколения RDNA[en]/RX 5000 серии или новее в обоих случаях (Это связанно с тем, что функция имеет аппаратную зависимость от наличия Shader Model 6.3 в железе, что можно проверить через Aida64, но не через GPU-Z из-за неправильного отображения информации). Intel временно отключила поддержку в финальных драйверах, но возможно использование тестового драйвера 29.20.100.8674[43] для активации этой функции с видеоядрами от HD 600 модели. Так же данная функция исправляет ошибку со снижением частоты кадров в DWM при работе с разными мониторами, которая проявляется при перетаскивании окон с одного рабочего стола на другой.[44] Возможно еще так, то что данная технология связана с описанием из этого патента. Стоит отметить, что многие сайты по ошибке предлагают принудительно включить эту опцию через реестр c ключем HwSchMode, но этот способ не будет работать из-за отсутствия поддержки драйвером или железом и это можно легко проверить тестами производительности. Сама опция включается пользователем по желанию через параметры Windows 10 в настройках графики по ссылке Ms-settings: display-advancedgraphics или пути: Параметры->Система->Дисплей->Настройка Графики->Планирование графического процессора с аппаратным ускорением. И стоит учитывать, что если кнопка не отображается, то драйвер или видеокарта\видеоядро не имеет поддержки этой функций. (Но можно проверить поддержку драйвером через GPU-Z в разделе WDDM) Плюс, активация этой функции применяется ко всем графическим устройствам в системе, если они поддерживают HAGS (Сокращение от Hardware—accelerated GPU scheduling в английской версии Windows 10 May 2020 Update) и не может быть задана индивидуально для каждого ГП.
- Поддержка Shader Model 6.5
- API DirectX 12 Ultimate
- DirectX 12 Sampler Feedback[45]
- DirectX Raytracing (DXR) Tier 1.1[46]
- Direct3D 12 Mesh Shaders and Amplification Shaders[47]
- Direct3D 12 improved memory allocation control[48]
- Direct3D 12 and Direct3D 9 resource interop[49]
- Direct3D 12 Video Protected Resource support[50]
WDDM 3.0
[править | править код]
Первая финальная версия Windows 11 RTM (версия 21H2) включает поддержку WDDM 3.0[51], который улучшает графическую архитектуру в подсистеме Windows для Linux[52], добавляя следующий функционал[53]:
- Драйвер пользовательского режима, скомпилированный для Linux в пакете WSL
- Хост-драйвер, смонтированный в Linux
- Динамическая частота обновления[54]
- Кодирование видео Direct3D 12[55]
WDDM 3.1
[править | править код]
Windows 11 версии 22H2 включает поддержку WDDM 3.1.
- Поддержка Shader Model 6.7[56]
- Переназначение IOMMU DMA[57]
- Совместное использование хранилища резервных копий с KMD[58]
WDDM 3.2
[править | править код]
Тестовые сборки Windows 11 Insider Preview 25xxx (версия 23H2) включают WDDM 3.2.
- ↑ 1 2 3 Windows Vista Display Driver Model. Дата обращения: 21 июня 2020. Архивировано 11 февраля 2019 года.
- ↑ Graphics Memory Reporting in WDDM. Дата обращения: 25 июня 2010. Архивировано 13 мая 2013 года.
- ↑ The role of the Windows Display Driver Model in the DWM. Дата обращения: 25 июня 2010. Архивировано 20 апреля 2010 года.
- ↑ Cross Process Resource Sharing. Дата обращения: 21 июня 2020. Архивировано 28 октября 2017 года.
- ↑ 1 2 3 WHDC: Graphics Guide for Windows 7. Microsoft (12 июня 2009). Архивировано 30 апреля 2012 года.
- ↑ Intel excuse for no GMA900 WDDM driver: no «HW Scheduler» no driver Архивная копия от 5 марта 2012 на Wayback Machine, Beyond3D, October 26, 2006.
- ↑ MultiMonitor Support and Windows Vista. Дата обращения: 20 октября 2007. Архивировано 30 апреля 2012 года.
- ↑ Working With the Windows 7 Graphics Architecture: WinHEC 2008 Архивировано 20 октября 2013 года.
- ↑ Are there Control Panel features that were available under Windows XP that are no longer available on Windows Vista? Дата обращения: 25 июня 2010. Архивировано 15 июля 2012 года.
- ↑ Stretched Desktop or Spanning Mode Not Available in Catalyst Control Center Under Windows Vista. Дата обращения: 25 июня 2010. Архивировано 17 ноября 2009 года.
- ↑ Description of DualView in Windows XP. Дата обращения: 25 июня 2010. Архивировано 22 февраля 2011 года.
- ↑ MultiMonitor Support and Windows Vista. Дата обращения: 25 июня 2010. Архивировано 30 апреля 2012 года.
- ↑ Windows DDK — GDI Hardware Acceleration. MSDN. Дата обращения: 14 июня 2009. Архивировано 30 апреля 2012 года.
- ↑ Windows DDK — DXVA-HD DDI. MSDN. Дата обращения: 13 июня 2009. Архивировано 30 апреля 2012 года.
- ↑ Windows DDK — Overlay DDI. MSDN. Дата обращения: 13 июня 2009. Архивировано 30 апреля 2012 года.
- ↑ Greg Schechter’s Blog: Redirecting GDI, DirectX, and WPF applications. Дата обращения: 25 июня 2010. Архивировано 5 марта 2010 года.
- ↑ Engineering Windows 7 Graphics Performance. Дата обращения: 25 июня 2010. Архивировано 23 апреля 2010 года.
- ↑ Windows Developer Preview — New for Display devices. MSDN. Microsoft (16 ноября 2013). Дата обращения: 9 декабря 2013. Архивировано 24 февраля 2012 года.
- ↑ 1 2 Windows Display Driver Model Enhancements in Windows Developer Preview. MSDN. Microsoft (28 сентября 2012). Дата обращения: 9 декабря 2013. Архивировано 24 февраля 2012 года.
- ↑ DXGI 1.2 Improvements. MSDN. Microsoft (16 ноября 2013). Дата обращения: 9 декабря 2013. Архивировано 24 февраля 2012 года.
- ↑ DXGI_Graphics_Preemption_Granularity Enumeration. MSDN. Microsoft (16 ноября 2013). Дата обращения: 9 декабря 2013. Архивировано 24 февраля 2012 года.
- ↑ DXGI_FORMAT enumeration. MSDN. Microsoft (16 ноября 2013). Дата обращения: 9 декабря 2013. Архивировано 24 февраля 2012 года.
- ↑ Microsoft Basic Display Driver — Windows drivers | Microsoft Docs. Дата обращения: 19 июня 2018. Архивировано 19 октября 2016 года.
- ↑ WinHEC 2006: Display Driver Logistics And Testing. Дата обращения: 25 июня 2010. Архивировано 6 июня 2020 года.
- ↑ WinHEC 2006: Windows Display Driver Model (WDDM) v2 And Beyond. Дата обращения: 25 июня 2010. Архивировано 7 мая 2022 года.
- ↑ Dan Warne. Windows graphics system to be overhauled. APC Magazine (June 1, 2006). Дата обращения: 2 июня 2006. Архивировано из оригинала 15 июня 2006 года.
- ↑ What’s new for Windows 8.1 Preview display drivers (WDDM 1.3). MSDN. Microsoft (16 ноября 2013). Дата обращения: 9 декабря 2013. Архивировано 4 марта 2016 года.
- ↑ DXGI 1.3 Improvements. MSDN. Microsoft (16 ноября 2013). Дата обращения: 9 декабря 2013. Архивировано 20 июня 2018 года.
- ↑ nabazan-microsoft. Graphics kernel performance improvements (англ.). docs.microsoft.com. Дата обращения: 15 января 2018. Архивировано 9 декабря 2017 года.
- ↑ What’s new for Windows 10 Insider Preview display drivers (WDDM 2.0). Microsoft. Дата обращения: 3 июня 2015. Архивировано 1 июля 2015 года.
- ↑ McMullen, Max. Direct3D 12 API Preview. MSDN. Архивная копия от 12 ноября 2021 на Wayback Machine
- ↑ Moreton, Henry DirectX 12: A Major Stride for Gaming | NVIDIA Blog. Blogs.nvidia.com (20 марта 2014). Дата обращения: 26 марта 2014. Архивировано 11 сентября 2015 года.
- ↑ DirectX 12 — DirectX Developer Blog — Site Home — MSDN Blogs. Blogs.msdn.com (20 марта 2014). Дата обращения: 26 марта 2014. Архивировано 26 марта 2014 года.
- ↑ Smith, Ryan The DirectX 12 Performance Preview: AMD, NVIDIA, & Star Swarm. AnandTech. Purch (6 февраля 2015). Дата обращения: 19 июня 2018. Архивировано 8 февраля 2015 года.
- ↑ MSDN — DXGI 1.4 Improvements. Дата обращения: 19 июня 2018. Архивировано 19 июня 2018 года.
- ↑ HLSL Shader Model 6.0 — Windows applications | Microsoft Docs. Дата обращения: 19 июня 2018. Архивировано 19 июня 2018 года.
- ↑ High Dynamic Range and Wide Color Gamut — Windows applications | Microsoft Docs. Дата обращения: 19 июня 2018. Архивировано 19 июня 2018 года.
- ↑ Variable refresh rate displays — Windows applications | Microsoft Docs. Дата обращения: 19 июня 2018. Архивировано 19 июня 2018 года.
- ↑ PC Gaming | WinHEC December 2016 | Channel 9. Дата обращения: 19 июня 2018. Архивировано 7 ноября 2021 года.
- ↑ К будущим играм готова: NVIDIA представила драйвер с полной поддержкой DirectX 12 Ultimate и Vulkan 1.2. 3DNews — Daily Digital Digest. Дата обращения: 25 июня 2020. Архивировано 24 июня 2020 года.
- ↑ GPU virtual memory in WDDM 2.0 — Windows drivers (англ.). docs.microsoft.com. Дата обращения: 12 января 2020. Архивировано 12 января 2020 года.
- ↑ Windows 10 20H1: Аппаратный планировщик графического процессора. MSReview. Дата обращения: 12 января 2020. Архивировано 12 января 2020 года.
- ↑ 29.20.100.8674 — 10th, 9th, 8th and 7th generation (Ice Lake, Comet Lake, Whiskey Lake, Amber Lake, Coffee Lake, Kaby Lake), Windows 10 (англ.). LaptopVideo2Go Forums. Дата обращения: 23 августа 2020. Архивировано 22 сентября 2020 года.
- ↑ Microsoft занялась «тормозами» в Windows 10 при работе с несколькими дисплеями с разной частотой. 3DNews — Daily Digital Digest. Дата обращения: 16 июня 2020. Архивировано 16 июня 2020 года.
- ↑ Coming to DirectX 12 — Sampler Feedback: some useful once-hidden data, unlocked. devblogs.microsoft.com. Дата обращения: 4 ноября 2019. Архивировано 23 октября 2020 года.
- ↑ DirectX Raytracing (DXR) Tier 1.1. devblogs.microsoft.com. Дата обращения: 6 ноября 2019. Архивировано 9 ноября 2019 года.
- ↑ Coming to DirectX 12 — Mesh Shaders and Amplification Shaders: Reinventing the Geometry Pipeline. devblogs.microsoft.com. Дата обращения: 8 ноября 2019. Архивировано 10 ноября 2019 года.
- ↑ Coming to DirectX 12: More control over memory allocation. devblogs.microsoft.com. Дата обращения: 11 ноября 2019. Архивировано 19 ноября 2019 года.
- ↑ Coming to DirectX 12: D3D9On12 and D3D11On12 Resource Interop APIs. devblogs.microsoft.com. Дата обращения: 13 ноября 2019. Архивировано 19 ноября 2019 года.
- ↑ D3D12 Video Protected Resource Support. microsoft.github.io. Дата обращения: 29 мая 2019. Архивировано 28 февраля 2020 года.
- ↑ Windows Experience Blog. How to get Windows 11 (амер. англ.). Windows Experience Blog (4 октября 2021). Дата обращения: 1 ноября 2022.
- ↑ X.Org Developers Conference 2020. Indico. Дата обращения: 1 ноября 2022.
- ↑ lorihollasch. What’s new for Windows 11 display and graphics drivers — Windows drivers (амер. англ.). learn.microsoft.com. Дата обращения: 1 ноября 2022.
- ↑ Ana Marta Carvalho. Dynamic refresh rate – Get the best of both worlds (амер. англ.). DirectX Developer Blog (28 июня 2021). Дата обращения: 1 ноября 2022.
- ↑ lorihollasch. D3D12 video encoding — Windows drivers (амер. англ.). learn.microsoft.com. Дата обращения: 1 ноября 2022.
- ↑ HLSL Shader Model 6.7 (амер. англ.). DirectX-Specs. Дата обращения: 1 ноября 2022.
- ↑ lorihollasch. IOMMU DMA remapping — Windows drivers (амер. англ.). learn.microsoft.com. Дата обращения: 1 ноября 2022.
- ↑ lorihollasch. Sharing the backing store with KMD — Windows drivers (амер. англ.). learn.microsoft.com. Дата обращения: 1 ноября 2022.
- MSDN — WDDM Introduction Архивировано 6 мая 2010 года.
- List of GPUs supporting WDDM