
Windows Driver Foundation is one of the system files that consists of libraries that developers use when writing code for the driver that runs on Windows OS. When these system files get corrupted due to malware or some issue with the update, it shows irregular behavior like high CPU usage.
Your system will reach extreme CPU temperatures and will start to thermal throttle when the CPU has high usage. This will drastically decrease your overall system performance.
In this article, we have discussed a few details about Windows Driver Foundation, why it causes high CPU usage, and some solutions to fix the problem.
What is Windows Driver Foundation?
Windows Driver Foundation is a set of libraries that reduce complexity when writing code for Windows Driver. It enables users to develop Windows drivers that execute in both kernel and user mode.
There are a few names the Windows Driver Foundation can run as a background process.
- WUDFHost.exe
- Windows Driver Foundation – User-mode Driver Framework (UMDF)
- Windows Driver Foundation – Kernel-mode Driver Framework (KMDF)
Why Does My Windows Driver Foundation Have High CPU Usage?
Windows System files may get corrupted when a Windows update suffers from interruptions, stopping the system from updating. These corrupted system files may stop the entire OS from loading correctly. And in some cases, these files may use high CPU resources.
Besides this, here are a few reasons Windows Driver Foundation has high CPU usage.
- Corrupted System Files
- Malware affected WUDFHost.exe.
- Outdated Windows or its Drivers
- Compatibility issues with Windows driver
Is WUDFHost a Virus?
The WUDGHost.exe is a system file, and its process is a system process. So if you see it running in the background, you can rest assured that it is not a virus.
If you want to check the file’s integrity, you can look at its location.
- Open Task Manager.
- Go to the Processes tab.
- Search for
WUDFHost.exeor Windows Driver Foundation. - Right-click on it and select Open file location.
If the file explorer opens the pathC:\Windows\System32 with the files in it, the process is not malware. Most of the time during a malware infection, it is noted that a different folder along with shortcuts is opened while trying to access the folder.
Perform necessary measures if the file explorer opens with a different file location.
How to Fix Windows Driver Foundation High CPU Usage?
Whenever you see any Windows process take high CPU resources, it is most likely that the process is running some important tasks. So, before performing any of the solutions mentioned below, wait a few minutes for the process to complete.
If Windows Driver Foundation constantly has high CPU Usage and you see the CPU reaching high temperature, perform the solutions mentioned below.
Disable Service
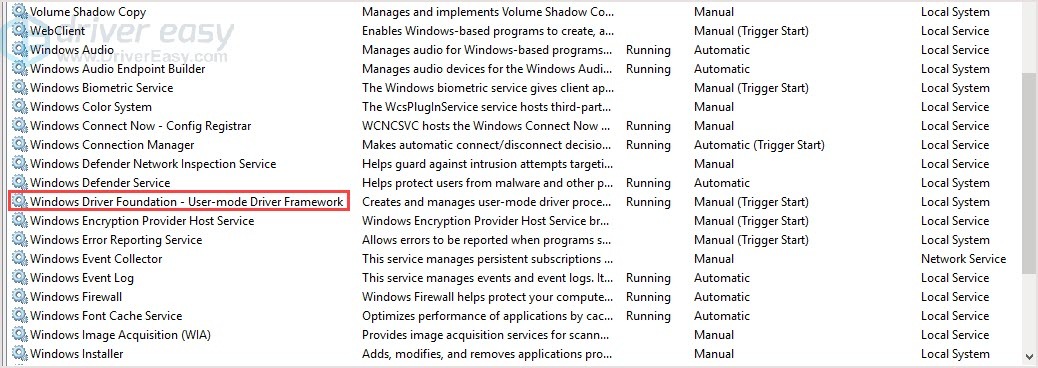
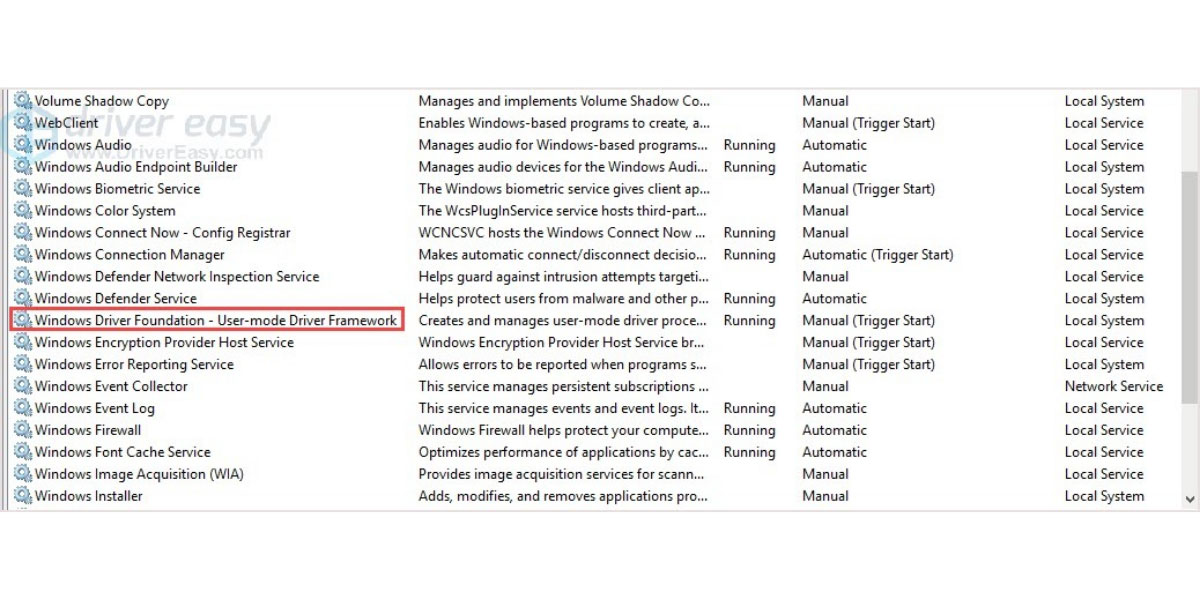
The Windows Driver Foundation service runs in the background as a system process. This means that even if you end its process using the task manager, it may run again. Disabling the process from the Services may stop Windows Driver Foundation from starting automatically.
- Press the Windows + R key to open Run.
- Type
services.mscand press enters to open Services. - Locate Windows Driver Foundation – User-mode Driver Framework or Windows Driver Foundation – Kernel-mode Driver Framework.
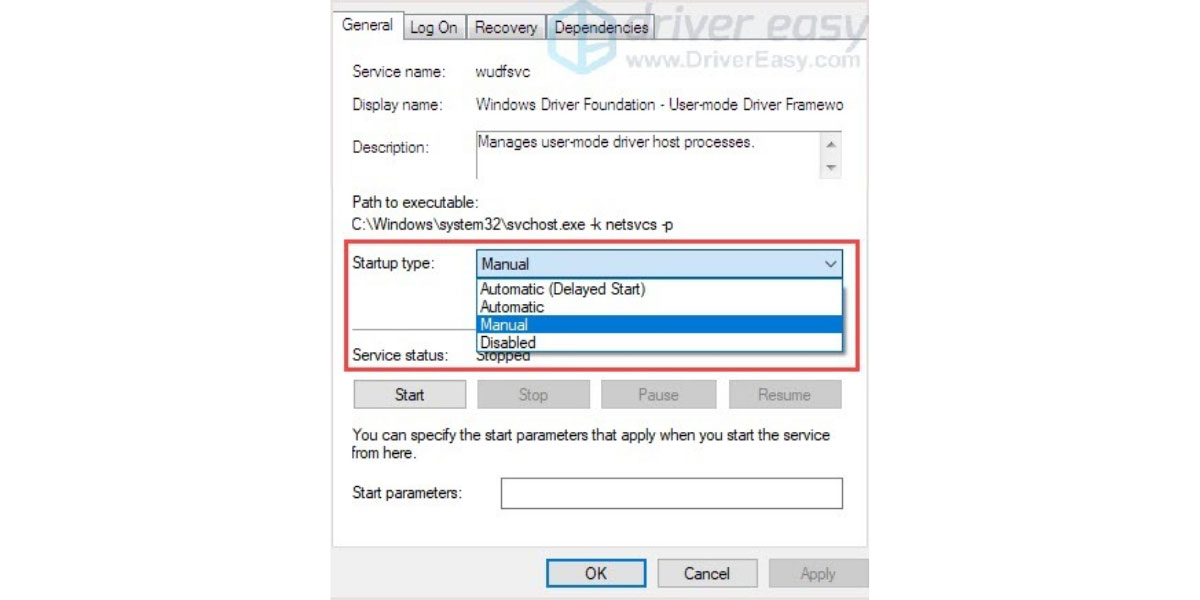
- Double-click on it, change the Startup type to Manual and stop the Service status.


If you cannot change the Startup type and the Service status, follow the steps mentioned below.
- Press the Windows + R key to open Run.
- Type cmd and press Ctrl + Alt + Enter to run the command as Admin.
- Type
sc config “wudfsvc” start=disabledand press Enter to disable the service.
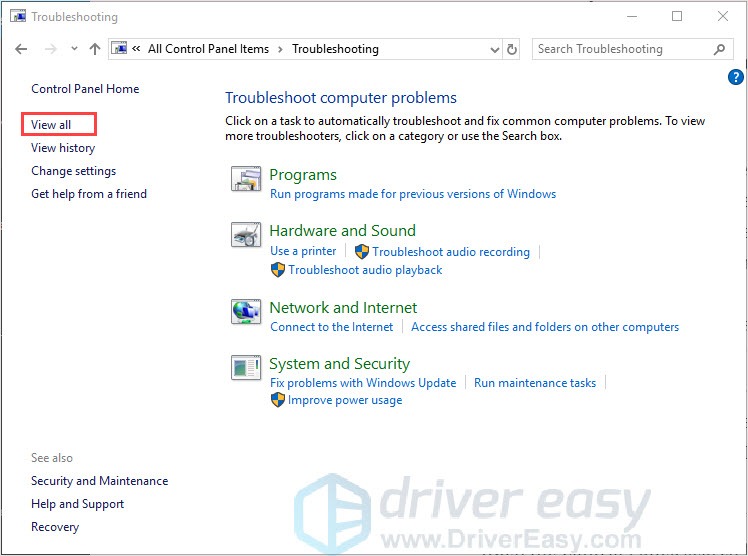
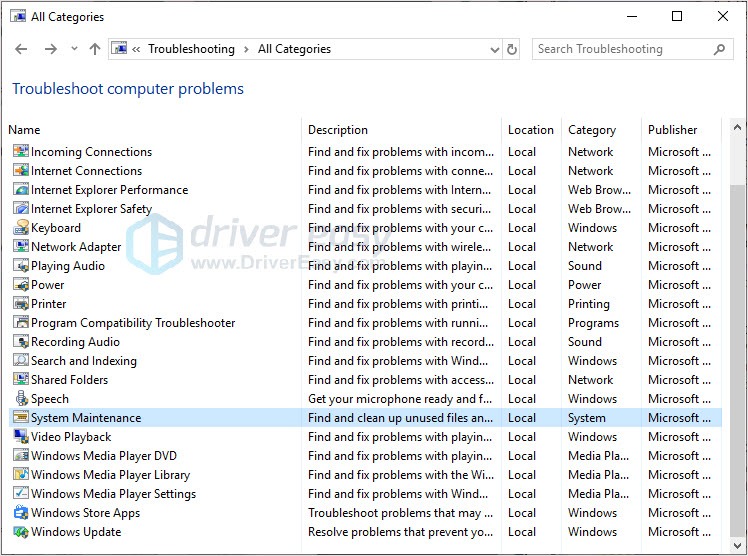
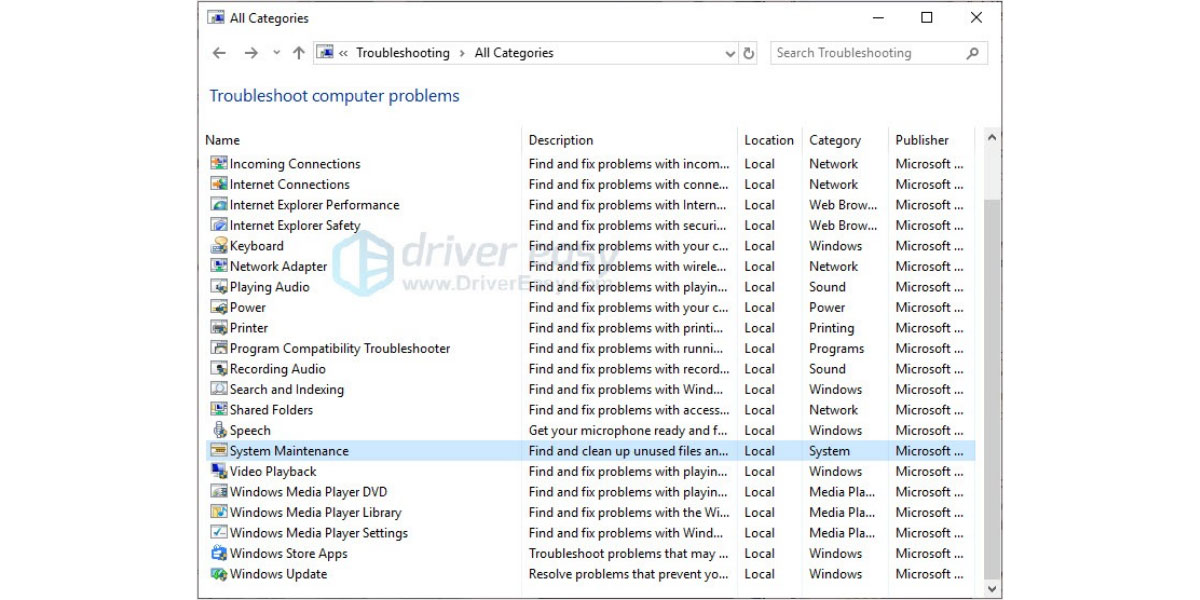
System maintenance troubleshooter
The system maintenance troubleshooter detects and tries to fix any problem with the OS. These problems include complications with disk volume errors, desktop icons, system time, or high CPU usage because of system files. Besides this, it also performs some OS maintenance tasks.
- Press the Window + R key to open Run
- Type
msdt.exe -id MaintenanceDiagnosticto open System Maintenance Troubleshooter. - Click on Advanced.
- Make sure that you check Apply repairs automatically and click Next

- Select Try troubleshooting as an administrator.
- If the troubleshooter finds any issues, it will automatically fix them.
- Restart your computer and check the CPU usage

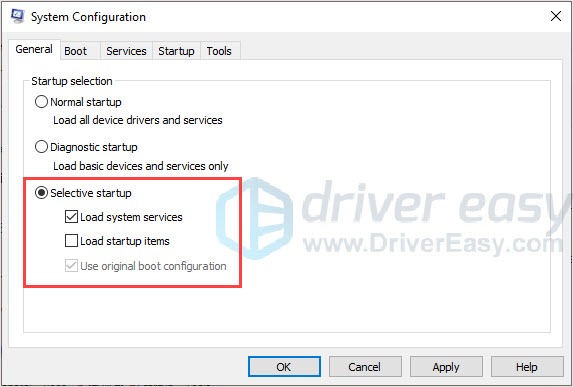
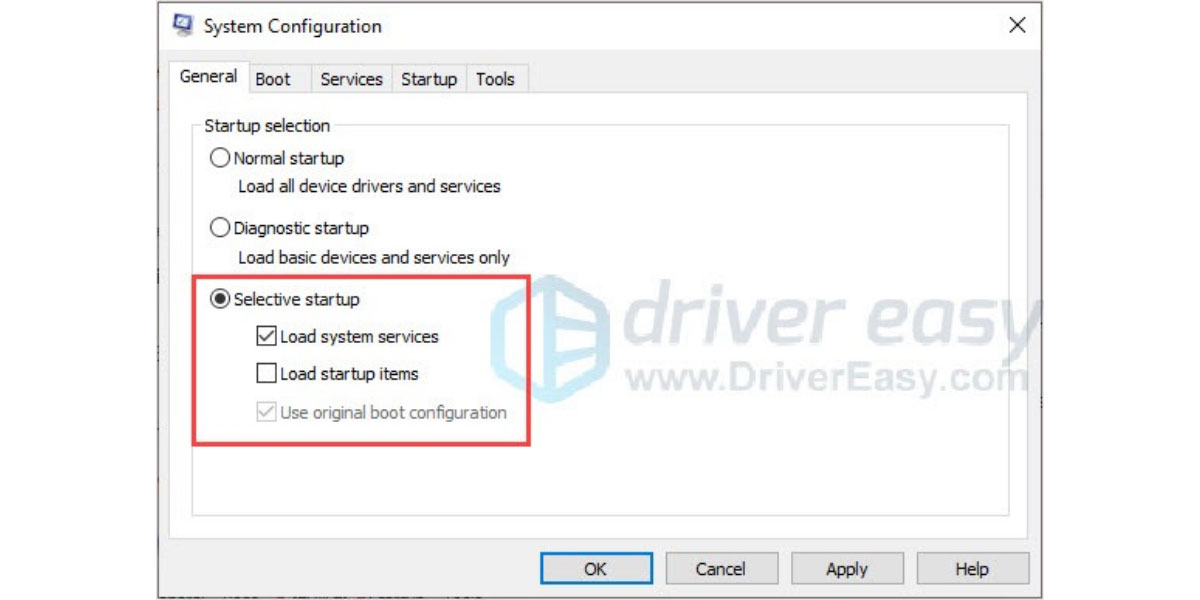
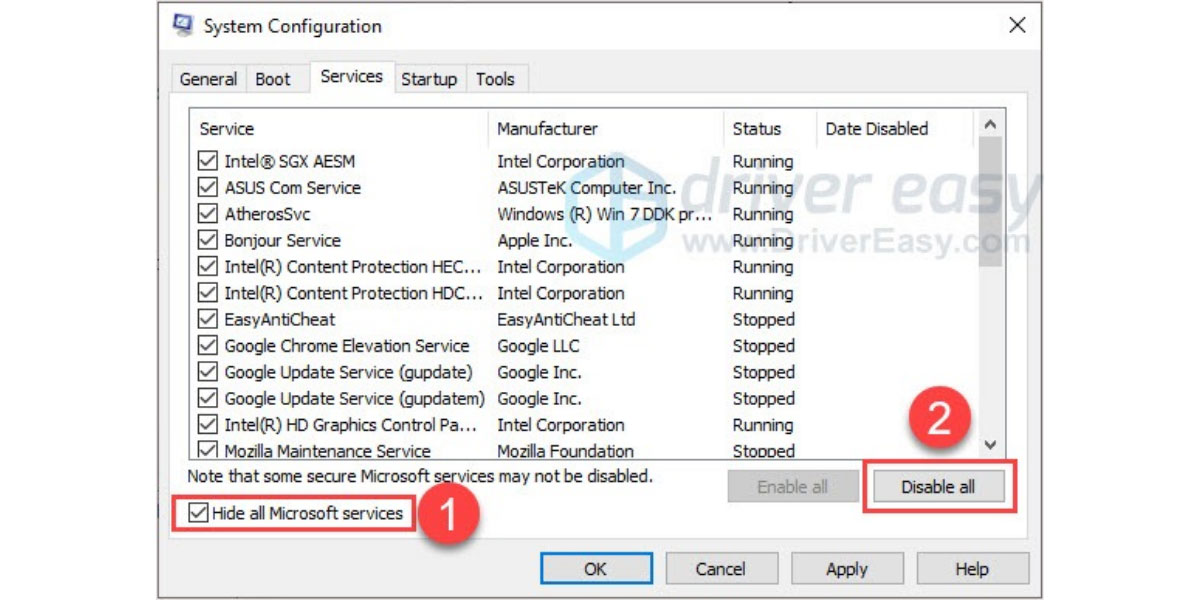
Perform Clean Boot
It can also be that some application in the OS that’s triggering the Window Driver Foundation to start. To check this, you need to perform a Clean Boot. When you perform a Clean Boot, the OS stops any startup application or process.
- Press the Windows + R key to open Run.
- Type
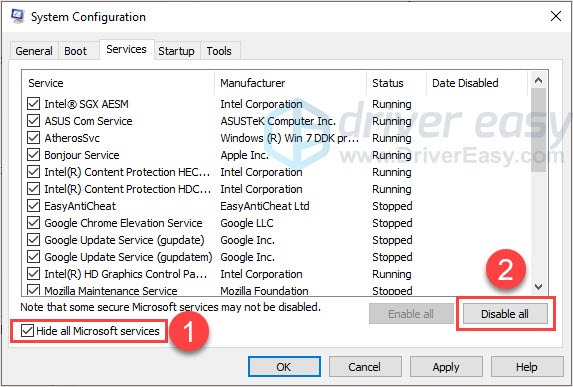
msconfigto open System Configuration. - Go to the Services tab.
- Check Hide all Microsoft’s services and select Disable all.
- Click on Apply.

- Now, go to the Startup tab and click on Open Task Manager.
- Make sure you are in the Startup tab.
- Here, disable all the Startup applications.


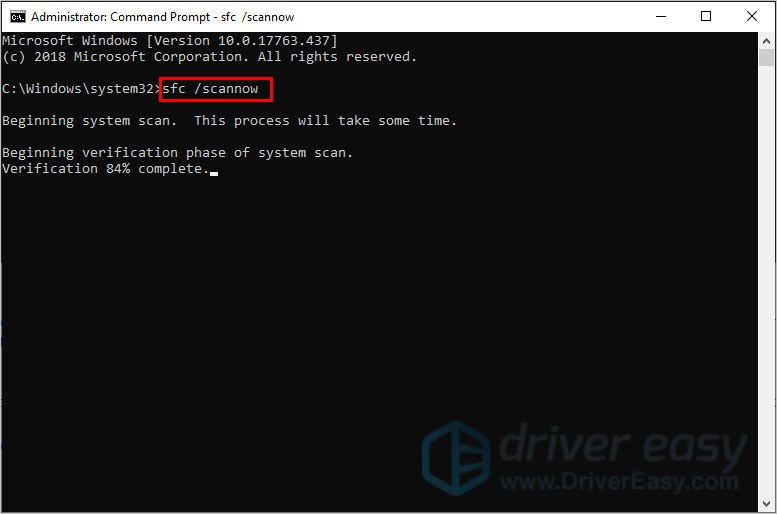
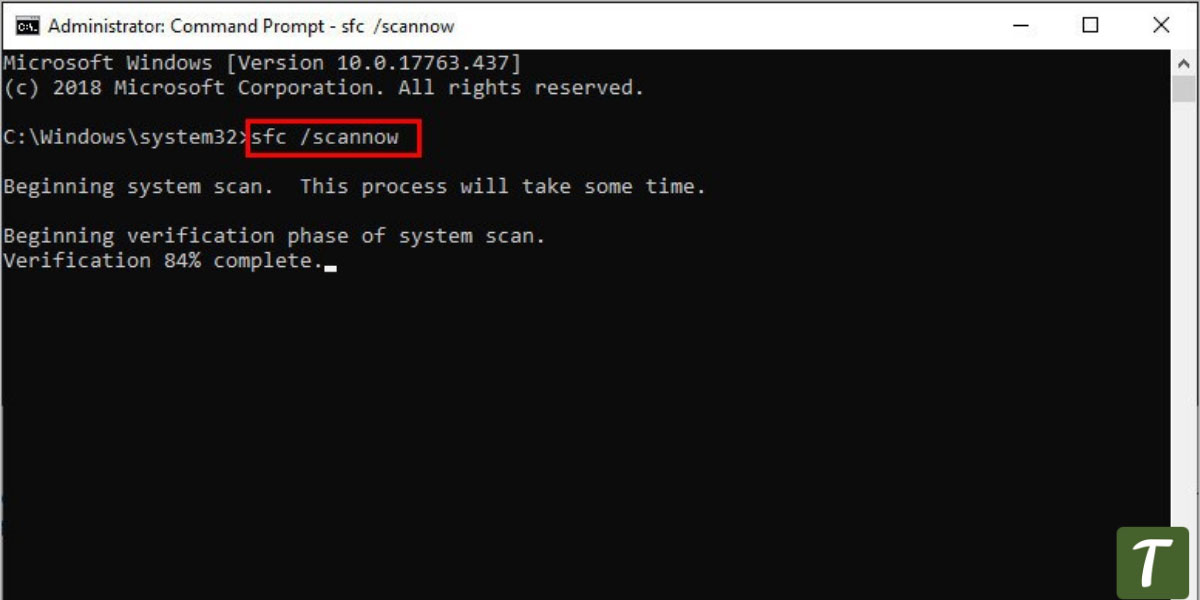
Run SFC And DISM
If the issue is with corrupted system files or the Window Image, you can run the SFC and the DISM command to see if it fixes the high CPU usage issue. The SFC (System File Checker) repairs any corrupted system files located inside C:\Windows\System32.
On the other hand, the DISM (Deployment Image Servicing and Management) checks/scans, and restores the system image.
- Press the Window + R key to open Run.
- Type cmd and press Ctrl + Shift + Enter to run Command Prompt as Administrator.
- Now type
sfc /scannowto run System File Checker.
- Wait for the verification process to complete.
- Once the process completes, type
DISM /Online /Cleanup-Image /RestoreHealthand press enter to run the DISM.
- Once the process completes, restart your computer and check its CPU usage.


Disable HID SensorCollection V2
You may also see High CPU usage from Windows Driver Foundation due to HID sensor on your laptop.
If you are using a device with a type cover and you see high CPU usage every time you remove or re-attach the cover, there’s a high chance that these Human Interface Device (HID) sensors are causing the issue.
For this exact case, you need to disable the HID Sensor Collection V2.
- Press the Windows + X key and select Device Manager.
- Expand Sensors. Here you will see all the sensor devices on your system.
- Disable HID Sensor Collection V2.


Restart your PC and check if the CPU usage is still high
Reinstall Network Adapters
The corrupted drivers also have compatibility issues with the WUDFHost.exe process. Reinstalling these corrupted drivers may fix the issue regarding high CPU usage. One specified driver that is known to cause Windows Driver Foundation high CPU is the Network adapter driver.
Reinstall all its drivers to see if it fixes the issue.
- Press the Window + X key and open Task Manager.
- Expand Network adapters. Here, you will see all the network devices.
- Right-click on any one of the devices and select Uninstall device.
- Repeat this step for all the devices inside the Network adapter.
- Restart your PC to reinstall these drivers automatically.

Update Windows
Since you are facing high CPU usage because of a system file, it can be that the outdated system files are causing the issue. To fix this, update your Windows to its latest version. Updating Windows will update all the necessary system files and may improve the system’s overall performance.
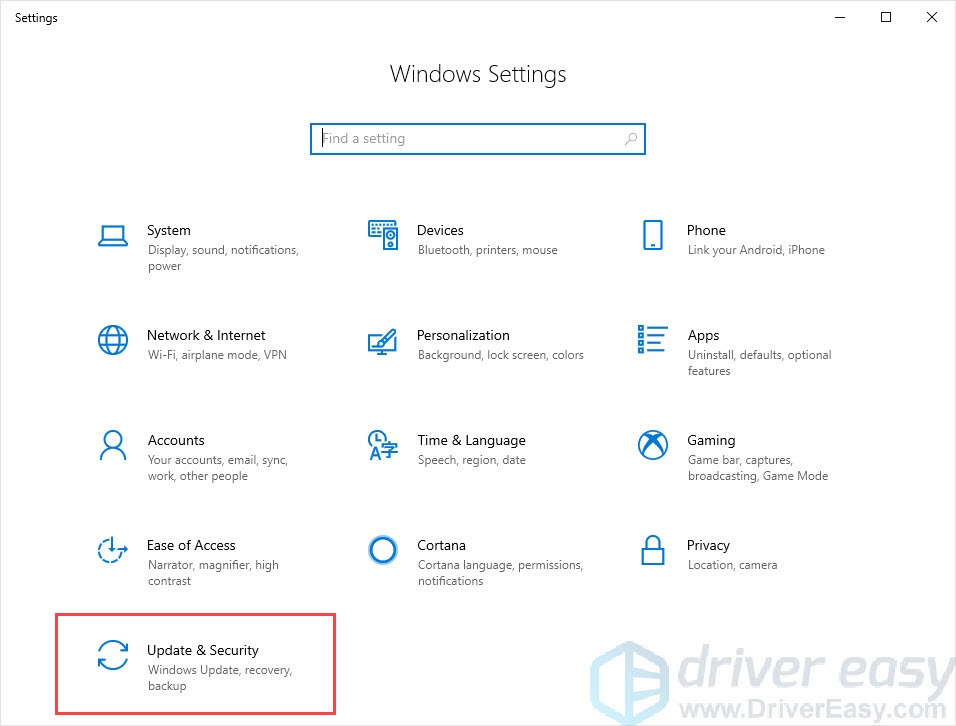
- Press the Window + I key to open Settings.
- Go to Windows Update (Privacy & Security > Windows update).
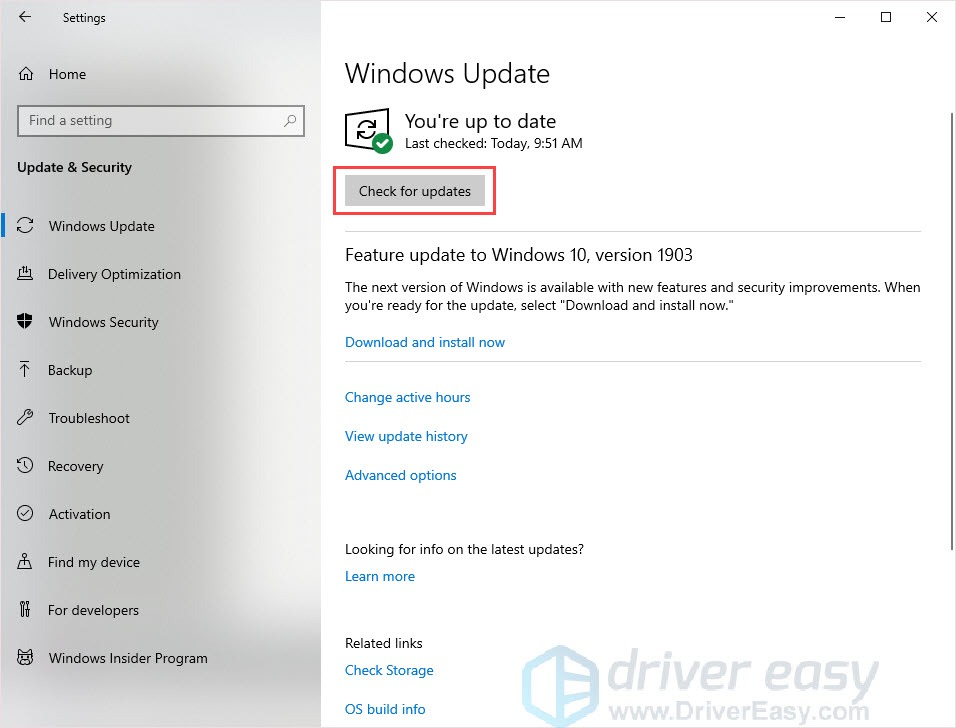
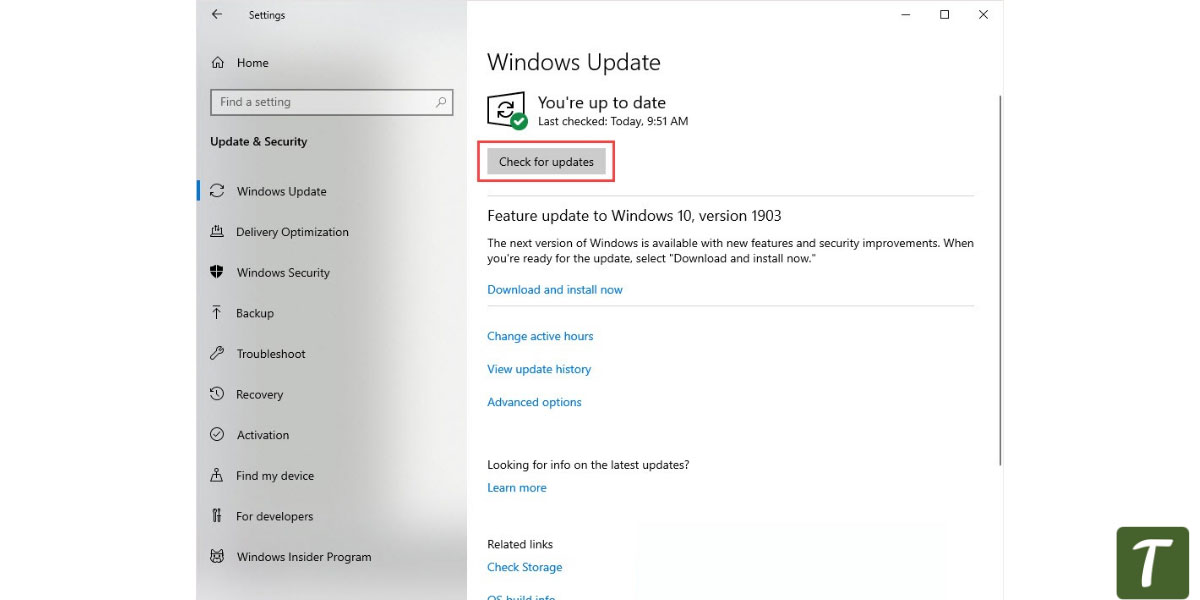
- Click on Check for updates or Install updates to install any pending updates.

- Restart your PC to install the updates.

Reconnect Peripheral Devices
When you connect any peripheral device to your computer, the OS automatically installs its respective driver. However, this installed driver may cause compatibility issues, resulting in Window Driver Foundation using high CPU resources.
Remove all connected peripheral devices and check if the CPU usage decreases. If it does, connect the device one at a time to determine the device whose driver is causing the issue.
Perform System Restore
If the system still has Windows Driver Foundation high CPU usage, you can perform a system restore. The System Restore reverts all the Windows Settings to a Restore Point.
Before performing a System Restore, you need to have set a restore point that stores settings when the system did not have any high CPU usage issue.
If you have previously set a system restore point, follow the steps mentioned below to perform a system restore.
- Press the Window + R key to open Run
- Type
rstruito open System Restore. - Click on Next.

- Set a restore point.

- Select Finish.
- The OS will ask for confirmation. Select Yes.
- The system should restart, reverting to the restore point.


Is it Okay if I Remove WUDFHost Executable File?
WUDFHost.exe is a system file (files inside C:\Windows\System32). Removing any of the system files may cause the entire Operating System to malfunction, and the OS may not load the next time you start the PC.
You may need to reinstall the operating system if you delete the system files.
You might notice that your computer was responding slowly or your game lagged when you’re playing. You open the Task Manager trying to stop some apps to release CPU, but you surprisingly find out that Windows Driver Foundation- User-mode- Driver Framework Host Process was running and occupying over 50% of your CPU and you can’t disable it.
That’s really frustrating. But don’t worry, it’s not totally impossible to lower the CPU usage caused by WDF.
What is Windows Driver Foundation
Windows Driver Foundation is the former name of Windows Driver Frameworks (WDF). It is a set of Microsoft tools that can help create lower the complexity of writing Windows drivers. It’s important to system stability.
When Windows Driver Foundation occupies a major part of CPU, it drains the battery and might cause freezing of the system at times. You may want to end it by clicking End task in the Task Manager, but it won’t work. Because it’s the system process.
Don’t worry, you’re not alone, and there are methods that can help you solve the problem.
Try these methods:
You don’t have to try them all; just work your way down the list until you find the one that works for you.
- Run Windows Update
- Disable Windows Driver Foundation service
- Run System Maintenance troubleshooter
- Repair system files
- Update your WiFi drivers
- Clean Boot state
- Remove peripheral from the computer
- Reset or reinstall Windows
Method 1: Run Windows Update
Make sure your computer has the latest operating system. This is the easiest way to prevent WDF drains your battery.
On Windows 10
- Press the Windows logo key + I together to open the Windows Settings.
- Click Update & Security.

- Click Check for updates.

- Reboot your PC when complete.
On Windows 11
- On your keyboard, hit the Windows key, then type check for updates, then click Check for updates.

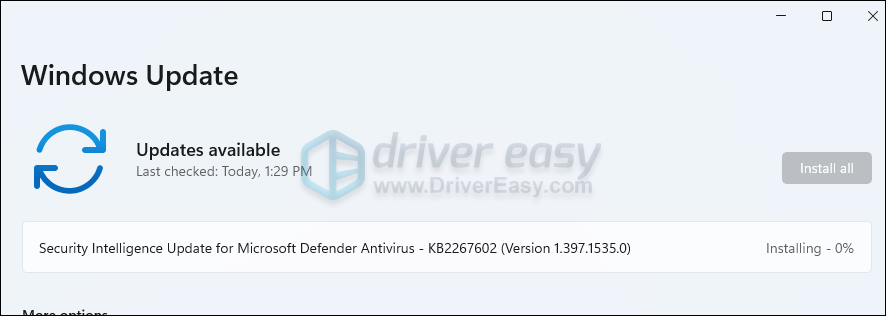
- Click Check for updates, and Windows will scan for any available updates.

- If there are available updates, Windows will automatically download them for you. Restart your computer for the update to take effect if needed.

- If there are no available updates, you’ll see You’re up to date like this.


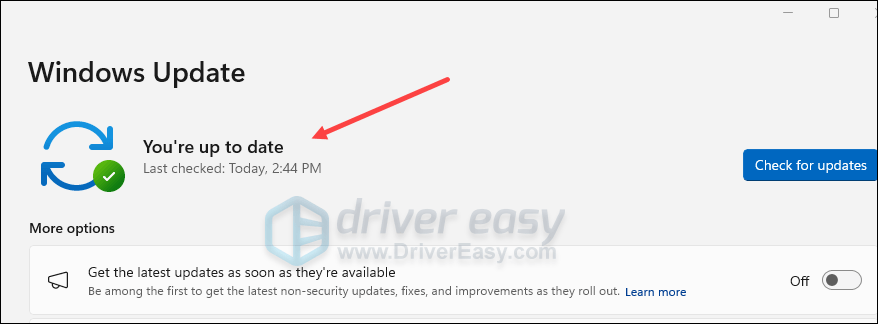
See if WDF still hogs your CPU usage. If the problem remains, please move on to the next fix.
Method 2: Disable Windows Driver Foundation service
Well, the WDF is a service that runs in the system background without a user interface, you can stop or limit it through Windows Services.
- Press the Windows logo key + R together to evoke the Run box.
- Type services.msc and press Enter.
- In the open window, scroll down to find Windows Driver Foundation – User-mode Driver Framework.

- Right-click on it and choose Properties. You can change the Startup type to Disabled or Manual. Then apply the change.
The problem should be solved, and lightning-fast performance.
If you think this method is not efficient, you can use the “Sc config” command in Command Prompt to disable the service.
- Press the Windows logo key + R to open the Run box.
- Type cmd and press Ctrl + Shift + Enter to run as administrator.

- Type sc config “wudfsvc” start=disabled and press Enter. The service will be disabled.

Method 3: Run System Maintenance troubleshooter
Whenever you’re having problems with the Windows system, the easiest method you can try is to run the Windows built-in troubleshooters. Windows 10 has built-in troubleshooters to diagnose and automatically fix common problems. There are many troubleshooters for different problems.
For the Windows Driver Foundation using high CPU issue, you can run a System Maintenance troubleshooter to resolve the problem.
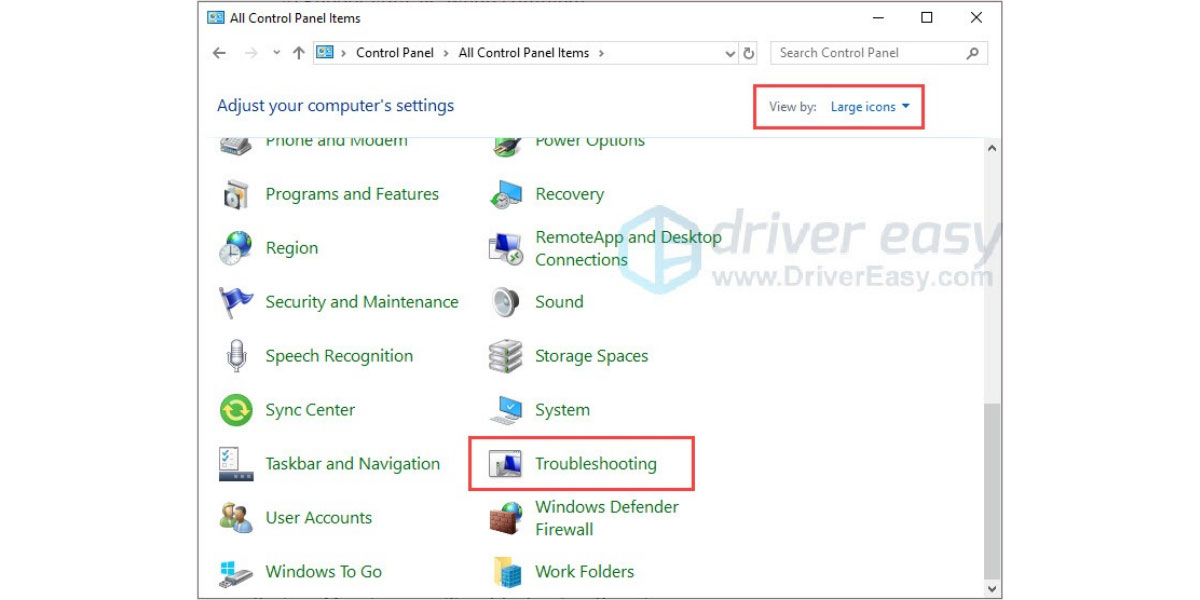
- Type “control panel” in the search box and press Enter.
- Set Control Panel view by Large icons and click Troubleshooting.

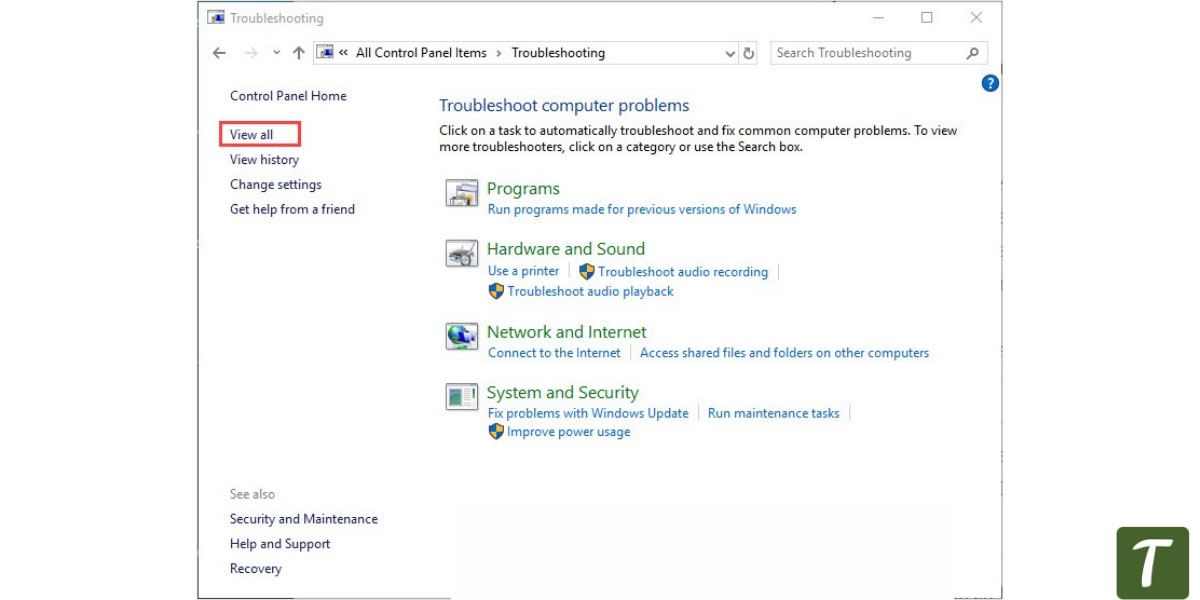
- Click View all.
- Click System Maintenance.
- Follow the on-screen instructions to finish the process.
- Reboot your computer.

It can improve your operating system speed and performance.
Method 4: Repair system files
When your computer’s system file was broken or corrupted, it may cause high CPU usage. To solve it, you can use the following way to repair the broken system files.
Run sfc /scannow command
- On your keyboard, press the Windows logo key + R key at the same time to invoke the Run box.
- Type “cmd” and press Shift+Ctrl+Enter together to open Command Prompt in the administrator mode.
Note: Do NOT click OK or just press the Enter key as that won’t allow you to open Command Prompt in the administrator mode.
- Type “sfc /scannow” in the window and press Enter. Then wait for the verification is 100% complete.

- Restart your computer.

If the result indicates that there are broken files exists but SFC can’t fix it, you can turn to Deployment Image Servicing and Management (DISM) Tool for deeper examine and repair.
Click here for a tutorial on how to use the DISM Tool.
Method 5: Update your WiFi drivers
The problem can be caused by faulty drivers, especially faulty network card drivers. So one of the things you should do is to verify that all your devices have the right drivers, and update those that don’t.
If you don’t have the time, patience or computer skills to update the drivers manually, you can do it automatically with Driver Easy.
Driver Easy will automatically recognize your system and find the correct drivers for it. You don’t need to know exactly what system your computer is running, you don’t need to risk downloading and installing the wrong driver, and you don’t need to worry about making a mistake when installing.
You can update your drivers automatically with either the 7 days free trial or the Pro version of Driver Easy. It takes just 2 clicks, and you get full support and a 30-day money-back guarantee with the Pro version:
- Download and install Driver Easy.
- Run Driver Easy and click the Scan Now button. Driver Easy will then scan your computer and detect any problem drivers.

- Click the Activate & Update button next to the flagged device to automatically download and install the correct version of this driver.
Or click Update All to automatically download and install the correct version of all the drivers that are missing or out of date on your system (You’ll need the Pro version for this – when you select Update All, you’ll get a prompt to upgrade. If you’re not prepared to purchase the Pro version yet, Driver Easy provides a 7-day trial at no cost, granting access to all Pro features like fast downloads and easy installation. No charges will occur until after your 7-day trial period ends.)

- After updating, restart your computer to take effect.


If you need assistance, please contact Driver Easy’s support team at support@drivereasy.com.
Method 6: Clean Boot state
This method helps to identify whether any third-party apps or startups are causing the issue. If you try this method and fix the problem, you can disable/enable each process manually to find out which one is the culprit.
- Press Windows key + R together to open the Run box.
- Type “msconfig” and press Enter.

- In the General tab, click Selective startup, then uncheck Load startup items.
- Ensure you check Load system services and Use original boot configuration.

- Move to the Service tab, click Hide all Microsoft services.
- Click Disable all.
- Click Apply > OK.
- Reboot your computer.

Method 7: Remove peripheral from the computer
Remove external devices one by one and check if it solves the issue. If it does, the device that causes the trouble should be replaced or you should update its driver.
You can update the device driver simply by following Method 4.
Method 8: Reset or reinstall Windows
If all else fails, you may have to reset Windows, or maybe even reinstall it together. We all know reinstalling will delete all the data on your hard drive, you have to back up all your important files before doing it.
But treat these options as a last resort, because they both take quite a long time.
That’s it! Hopefully, these methods can help you resolve the issue. If you have any questions or suggestions, please let us know by commenting below.
9
9 people found this helpful
Windows Driver Foundation – For many years, the computer has provided us with convenience. Due to not taking good care of the computer windows, the laptop also creates problems with us over time.
Troubles start coming while working in what we call Window Driver Foundation (WDF). When you play sports or do some work, you can get lagged due to computer technical faults. Some such processes keep running in your computer in which errors have to be faced while opening some apps and task managers while releasing your CPU.
The main reason for this is the Windows Driver Foundation – User-Mode – Driver Framework host process was occupying more than 50% of your CPU, and you cannot disable it.
Table of Contents
What Is the Window Driver Foundation?
Windows Driver Foundation is also known as Windows Driver Framework (WDF). It is a kind of Microsoft tool that helps to improve by solving the problems of writing in Windows drivers. This system maintains stability in your computer.
This system tends to malfunction when the Windows Driver Foundation completely takes over your CPU, reducing the computer’s battery life and causing the system to freeze.
If you want to end it by clicking on End task in task manager, it will not work. This process is called Windows Driver Foundation; we will also tell you how to fix it below to solve your problem.
Run an Update of Windows
First of all, check the updated version of your computer’s window, if it is about to be updated, then edit it immediately so that the battery problem will solve
- Please tap on the key of Windows logo + I together to open Windows Settings.
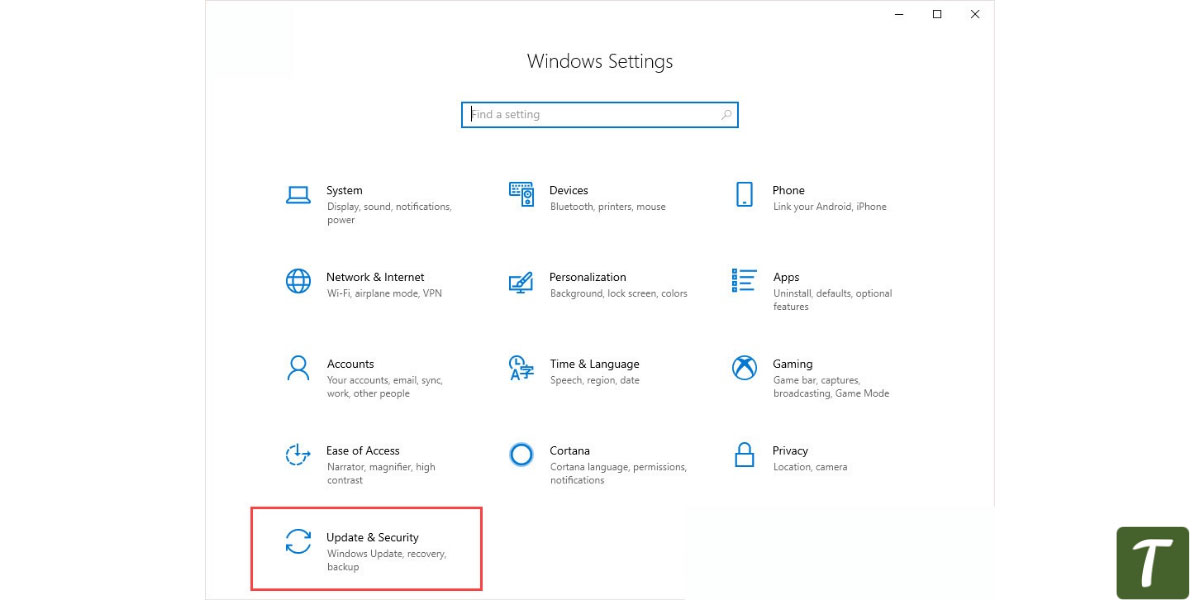
- Click Update & Security.
- Click on Check for Updates.
- Reboot your PC when done.
Disable Windows Driver Foundation Service
Windows Driver Foundation is a service running in the system background without a user interface, and you can control this service on your own; you can follow these points.
- Tap Windows logo key + R together to invoke Run box. Type services.MSC and press Enter button.

- In the opened window, scroll down to find Windows Driver Foundation – User-Mode Driver Framework.
- Right-click on it and choose Properties. You can rectify the startup type to Disabled or Manual. Then apply the change.
- The problem should solve lightning-fast performance.
Apart from this, if you feel that this method is not efficient, you can also disable this service with the help of Sc Config.
- Tap Windows logo key + R to open the Run box.
- Type cmd and press Ctrl+Shift+Enter to run as administrator.

- Sc Config type “wudfsvc” start=disabled and press enter these steps; your service will be disabled.
Run Computer’s System Maintenance Troubleshooter
Here we give you the easiest way to solve the problem of the Windows System. For this, you need to work on Windows built-in troubleshooting. Windows 10 has built-in troubleshooters to diagnose common problems and run fixes automatically. There are many troubleshooters for different issues.
- You can run the System Maintenance troubleshooter for Type “control panel” in the search box and press Enter.
- Set the Control Panel view to Large icons and click Troubleshoot.
- Click View All.
- Click on System Maintenance.
- Follow the provided on-screen steps to finish the process.
- Restart the computer.
This process will improve your operating system speed and performance.
Run System File Checker Tool in Computer
If your computer system is broken or corrupted while working on the computer, the main reason for this can be high CPU usage. To troubleshoot this, you should use System Checker, which works to repair system files.

- On your keyboard, hold the Windows logo key + R key at the same time to request the Run box.
- Type “cmd” and press Shift+Ctrl+Enter simultaneously to unlock Command Prompt in the administrator method.
- Type “SFC /scan now” in the window and hot on the Enter key. Then wait for the verification to be 100% impeccable.
- Restart your computer.
This process will solve your computer file checker problem.
Wifi Drivers Updation
WiFi network can also be the reason for this faulty problem. If you see this fault in your network card, you should verify that your devices have the correct drivers and update those that don’t.
Often you cannot update drivers manually due to a lack of time to update WiFi automatically with this driver. By doing this, Driver Easy will automatically detect your system and find the correct driver for it. You do not need to know which approach your computer is running on; you can install it on your computer.
- press Window + R and type “devmgmt.msc“.
- Press Enter.
- Select Network adapters, and click on your appropriate wifi hardware device, mostly “wireless” is written on that.
- Right click on the desired hardware.
- Click on update drivers.
- After updating the drivers, recheck whether the problem is resolved or not.
Clean Boot State
The method helps you recognize if some app or startup is causing the problem. While Trying this method can give you an idea of fixing every issue, you may have to manually disable, and nurture each way to find out which one is the offender.
- Tap Windows Key + R together to open the Run box.
- “Type “MSConfig” and press Enter

- In the General tab, tap Selective startup, then uncheck Load startup sections.
- Make sure you check Load system services and Use native boot configuration.
- Go to the Services tab; double click Hide all Microsoft services.
- Click Disable All.
- Click Apply OK.
- Restart the computer.
Also Read: Windows 10 Taskbar Not Working (Various Methods)
Also Read: Windows Audio Device Graph Isolation (Solved)
Test at once by removing all the peripherals of the computer!
Yes! Once done, remove all external devices from your computer one by one and check if that solves the problem. If this happens, you should immediately remove the problematic device as it can cause system disturbances in the computer.
Wrapping Up
We told you about how to fix windows driver foundation in widows using various methods. Some FAQs are also included in the article. We hope you like the article, do tell us in the comment section below.
Creates and manages user-mode driver processes. This service cannot be stopped.
The Windows Driver Foundation — User-mode Driver Framework service exists only in:
- Windows 10 Home 1507
- Windows 10 Pro 1507
- Windows 10 Education 1507
- Windows 10 Enterprise 1507
- Windows 10 Home 1511
- Windows 10 Pro 1511
- Windows 10 Education 1511
- Windows 10 Enterprise 1511
- Windows 10 Home 1607
- Windows 10 Pro 1607
- Windows 10 Education 1607
- Windows 10 Enterprise 1607
- Windows 10 Home 1703
- Windows 10 Pro 1703
- Windows 10 Education 1703
- Windows 10 Enterprise 1703
Default Settings
| Startup type: | Manual |
| Display name: | Windows Driver Foundation — User-mode Driver Framework |
| Service name: | wudfsvc |
| Service type: | own |
| Error control: | normal |
| Group: | PlugPlay |
| Object: | LocalSystem |
| Path: | %SystemRoot%\system32\svchost.exe -k LocalSystemNetworkRestricted |
| File: | %SystemRoot%\System32\WUDFSvc.dll |
| Registry key: | HKEY_LOCAL_MACHINE\SYSTEM\CurrentControlSet\Services\wudfsvc |
| Privileges: |
|
Default Behavior
Windows Driver Foundation — User-mode Driver Framework is a Win32 service. In Windows 10 it is starting only if the user, an application or another service starts it. When the Windows Driver Foundation — User-mode Driver Framework service is started, it is running as LocalSystem in its own process of svchost.exe. If Windows Driver Foundation — User-mode Driver Framework fails to start, the failure details are being recorded into Event Log. Then Windows 10 will start up and notify the user that the wudfsvc service has failed to start due to the error.
Dependencies
Windows Driver Foundation — User-mode Driver Framework cannot be started under any conditions, if the User Mode Driver Frameworks Platform Driver service is disabled.
While Windows Driver Foundation — User-mode Driver Framework is stopped, disabled or working incorrectly, the following services do not start:
- Smart Card
- Windows Biometric Service
Restore Default Startup Configuration of Windows Driver Foundation — User-mode Driver Framework
Before you begin doing this, make sure that all the services on which Windows Driver Foundation — User-mode Driver Framework depends are configured by default and function properly. See the list of dependencies above.
1. Run the Command Prompt as an administrator.
2. Copy the command below, paste it into the command window and press ENTER:
sc config wudfsvc start= demand
3. Close the command window and restart the computer.
The wudfsvc service is using the WUDFSvc.dll file that is located in the C:\Windows\System32 directory. If the file is removed or corrupted, read this article to restore its original version from Windows 10 installation media.
Rick Akura
Are you getting high CPU from Windows Driver Foundation, causing your system to freeze up? Here are some tips on how to resolve it.
In this article, you’ll learn «How To Fix Windows Driver Foundation High CPU on Windows 10.»
Windows Driver Foundation is a component of Windows that provides services for drivers. By default, it doesn’t restrict the CPU’s functions.
But due to errors, it can deplete battery power and cause system freezing if it reaches 100% CPU usage.
Let’s dive in and learn how to resolve the «Windows Driver Foundation high CPU» problem.

Table of Contents
- What is the Windows Driver Foundation high CPU?
- Solved: Windows Driver Foundation high CPU usage
- Method 1. Disconnect peripherals from your computer
- Method 2. Boot your system in Clean Boot mode
- Method 3. Use the System Maintenance Troubleshooter
- Method 4. Update Windows to the latest version
- Method 5. Update or reinstall your drivers
- Method 6. Disable HID Sensor Collection V2 on Surface Pro
- Method 7. Repair your system files
- Method 8. Repair your system with System Restore
- Method 9. Reset or reinstall Windows
- Final thoughts
What is the Windows Driver Foundation high CPU?
The Windows Driver Frameworks (WDF), also known as the «Windows Driver Foundation,» is a set of libraries used by device drivers in Windows. Don’t worry — it’s not malware or anything dangerous. It’s an essential part of your operating system. Without drivers, you won’t use many components like computer mice or even your GPU.
Yet, some users experience high CPU usage from the Windows Driver Foundation. This issue can lead to performance loss or even an unresponsive system. If you want to fix this problem, you need to troubleshoot it using one of the following ways:
- Run Windows Update to get the latest optimization features
- Run one of Windows’ built-in troubleshooters
- Try using Clean boot to identify the problem
- Disconnect peripherals from your computer
- Update and/or reinstall your Wi-Fi driver
- Terminate the Windows Driver Foundation service task
- Disable HID Sensor Collection V2 (Surface Pro)
- Use a recovery point
- Reset or reinstall Windows
Let’s review the steps you need to take to carry out these troubleshooting methods. You can find a step-by-step guide for each option below!
Solved: Windows Driver Foundation high CPU usage
Here are all the solutions to help you fix the Windows Driver Foundation process causing high CPU usage. Make sure to follow the steps carefully to avoid causing any further damage to your system.
Method 1. Disconnect peripherals from your computer
If Windows Driver Foundation uses a lot of your CPU power, it might be due to a bad driver. Disconnecting your peripherals will help you figure out what the root cause is. Then, if the problem is with the peripherals or their drivers, you can fix that.
Do you suspect that a damaged or corrupt peripheral driver is causing the high CPU issue? It may be worth disconnecting your peripherals. You can identify whether there are any faulty devices by doing this.
Disconnect your peripherals one by one. Check if the CPU usage of Windows Driver Foundation changes during the process. If the usage drops down after disconnecting a device, you may need to replace the drivers for said device.
Method 2. Boot your system in Clean Boot mode
As a way to ensure that your computer runs without third-party services, start in «clean boot.» This will clear any applications and third-party conflicts off the system before booting. See if there are still issues with Windows Driver Foundation using up CPU resources when in a clean boot state.
This is how you can perform a clean boot on your Windows 10 system:
- Press the Windows + R keys on your keyboard to bring up the Run utility in a new window.
-
Type in “msconfig” without the quotation marks and press the Enter key on your keyboard. This will launch the System Configuration window.
-
Switch over to the Services tab. Make sure that you check the Hide all Microsoft services box. This is going to ensure that you only see third-party services.

-
After hiding all system services, click the Disable all button to disable every third-party service on your device.
- Click the Apply button and restart your computer. When you boot next, your computer will only initiate essential Microsoft services.
- Restart your computer. You’ll be in a clean boot state with only official Microsoft services running. Check if the Windows Driver Foundation is still using up CPU resources in this state.


If you notice that the Windows Driver Foundation is no longer causing high CPU usage in a clean boot state, there’s a service causing the issue. You need to identify it and replace the associated driver, app, or disable the service altogether.
Method 3. Use the System Maintenance Troubleshooter
Microsoft introduced a variety of ways to solve Windows issues. The built-in troubleshooters can help you fix your system not being able to shut down. The System Maintenance troubleshooter will attempt to resolve any problems related or unrelated to the system.
-
Click on the Windows icon in the bottom left of your screen to bring up the Start menu. Choose Settings, or alternatively use the Windows + I shortcut.
-
Click on the Update & Security tile. This is where you can find most of your built-in troubleshooters.
-
Switch to the Troubleshoot tab using the left-side pane. Here, you should be able to see a troubleshooter titled System Maintenance Troubleshooter.
-
Click on the Run the troubleshooter button. Wait for the troubleshooter to scan your device and identify any issues.
-
If you don’t want to share full diagnostic data with Microsoft, click on the Additional troubleshooters link. Locate the System Maintenance troubleshooter.


Bear in mind that this troubleshooter is not perfect, which is why we suggest trying it last. It might not detect any issues, but that doesn’t mean our other methods can’t fix your computer!
Method 4. Update Windows to the latest version
An update to your operating system may fix many underlying issues, such as the Windows Driver Foundation using too much CPU. Download the latest version of Windows and see if the problem persists.
-
Click on the Windows icon in the bottom left of your screen to bring up the Start menu. Choose Settings, or use the Windows + I shortcut.
-
Click on the Update & Security tile. This is where you can find most of your Windows Update settings and choose when to receive updates.
-
Make sure to stay on the default Windows Update tab. Click on the Check for updates option and wait for Windows to find available updates. If you see any updates displayed, click on the View all optional updates link to see and install them.
- When Windows finds a new update, click on the Install option. Wait for Windows to download and apply the necessary updates.


Method 5. Update or reinstall your drivers
Just like your system itself, your drivers can become outdated as well. You might have installed the correct drivers in the past and forgot to update them. It’s also possible that your computer came with built-in drivers when you first got it.
Here’s what you need to do to update your drivers quickly and efficiently to possibly solve high CPU usage from Windows Driver Foundation.
-
Press the Windows + X keys on your keyboard and click on the Device Manager option from the WinX menu.
-
Expand the driver menus by clicking on the arrow next to one. Right-click on the driver you want to update, and then choose Update Driver from the context menu. In this case, we’ll update a Bluetooth device driver.
-
Select the method of updating your driver. You can either let Windows 10 search for a driver automatically or manually locate a new driver file already on your computer.
- Wait for the driver installation to complete. Repeat this for any other drivers you use, and see if the issue has been fixed. For good measure, make sure to restart your computer when you’re done updating your drivers.


Method 6. Disable HID Sensor Collection V2 on Surface Pro
If you’re using a Surface Pro device, you can try to disable the HID Sensor Collection V2 device in order to solve the Windows Driver Foundation using too much CPU. Here’s everything you need to do.
- Attach the type cover to your Surface device if it’s not attached already. Next, press the Windows + X keys on your keyboard and click on the Device Manager option from the WinX menu.
- Locate the Sensors section and expand it.
- Right-click on the HID Sensor Collection V2 option in the list, and choose Disable from the context menu.
- Restart your Surface Pro computer and see if the issue has been resolved.
Method 7. Repair your system files
Corrupted systems files can cause massive problems with your operating system, including high CPU usage. The System File Checker (SFC) is a built-in tool to help troubleshoot toWindows. It’s able to detect and repair corrupt files.
- Open the search bar in your taskbar by clicking on the magnifying glass icon. You can also bring it up with the Windows + S keyboard shortcut.
-
Type Command Prompt in the search box. When you see it in the results, right-click on it and choose Run as Administrator.
-
When prompted by the User Account Control (UAC), click Yes to allow the app to launch with administrative permissions.
- Type in the following command and press Enter to execute it: sfc /scannow
- Wait for the System File Checker to finish scanning your computer. In the case of a discrepancy, the utility will restore system files and fix all errors related to them.


Method 8. Repair your system with System Restore
Your system may have stored a restore point before the shutdown issue happened. In that case, you’ll be able to return your system to that state. This could fix the problem, as it’s like traveling back in time before a system error took place. Check what files will be affected by System Restore here.
- Open the search bar in your taskbar by clicking on the magnifying glass icon. You can also bring it up with the Windows + S keyboard shortcut.
-
Type in System Restore and click on Recovery from the search results. This should be on the top, in the Best match category.
-
This will take you to the Control Panel. Here, click on the Open System Restore link that can be seen in the Advanced recovery tools section.
-
Follow the on-screen instructions to restore a past point in time. You can select a restore point yourself, or use the recommended one if Windows 10 shows the option. Don’t forget to check what files and applications will be affected!
- After choosing the options you’re happy with, click on the Finish button and wait for Windows 10 to restore your computer.


After completing the restoration process, check if the Windows Driver Foundation process uses high CPU resources.
Method 9. Reset or reinstall Windows
If nothing above worked, you may only fix your issue if you reset or reinstall Windows. You may reinstall the system without losing any personal files depending on your preferences. Unfortunately, this will delete most of your applications and system configuration to give your device a fresh start.
Check our install windows 11 guide for detailed, step-by-step instructions on how to install Windows. For refresh and reset instructions, head to the official Microsoft support page.
Final thoughts
That‘s it: How to identify and resolve the Windows Driver Foundation high CPU issue. You should find a solution that will work for your PC’s needs in one of these steps.
If you still have questions after reading our article or need help with anything tech-related, please contact us! We’re happy to help you get back up and running without any hassle at all.
Thanks so much for reading through today’s blog post — it means a lot! We hope to see you again soon. For more articles, check out our Blog and Help Center!
Sign up to our NEWSLETTER below and get early access to our blog posts, promotions, and discount codes!
Recommended articles
» How to Fix High CPU Usage on Windows 10
» How To Fix HD Audio Background Process High CPU Problem
» How to Fix Windows Modules Installer Worker High CPU on Windows 10