
Обновлено:
Опубликовано:
Для загрузки файлов из Интернета в Powershell предусмотрен метод DownloadFile, которому нужно передать два аргумента — что скачиваем и куда. Рассмотрим способ его применения, а также дополнительные команды для загрузки и распаковки архива.
По HTTP или HTTPS
DownloadFile
Invoke-WebRequest
С FTP-сервера
Распаковка архива
Возможные проблемы
Скачать по HTTP или HTTPS
Рассмотрим методы, удобные для загрузки файлов по протоколу http (https).
DownloadFile
Данный метод удобно применять для написания скриптор. Пример:
# Задаем переменные что копируем и куда:
$download_url = «https://download_ahyware/file1.zip»
$local_path = «C:\Downloads\file1.zip»
# Создаем объект WebClient и скачиваем файл с помощью DownloadFile:
$WebClient = New-Object System.Net.WebClient
$WebClient.DownloadFile($download_url, $local_path)
* в данном примере мы скачаем файл https://download_ahyware/file1.zip и разместим его на компьютере по пути C:\Downloads\file1.zip.
Invoke-WebRequest
Данный командлет предназначен для загрузки содержимого html документа. Также с его помощью можно скачивать файлы:
Invoke-WebRequest -URI https://www.dmosk.ru/files/winsetupfromusb.zip -outfile c:\temp\winsetupfromusb.zip
* где URI — путь-источник (что скачиваем); outfile — путь-назначение (куда скачиваем).
Для удобства можно использовать команды wget или iwr — по сути, это алиас на Invoke-WebRequest:
wget https://www.dmosk.ru/files/winsetupfromusb.zip -o winsetupfromusb.zip
iwr https://www.dmosk.ru/files/winsetupfromusb.zip -o winsetupfromusb.zip
* обязательно задаем опцию outfile (-o), в противном случае, загрузка выполнится, но не сохранится файл.
Скачать с FTP
Принцип скачивания файлов с FTP-сервера такой же, за исключением того, что сначала необходима авторизация.
Пример скрипта:
$download_url = «ftp://download_ahyware/file1.zip»
$local_path = «C:\Downloads\file1.zip»
$user = «myFtpUser»
$pass = «myPassword123»
$WebClient = New-Object System.Net.WebClient
$WebClient.Credentials = New-Object System.Net.NetworkCredential($user, $pass)
$WebClient.DownloadFile($download_url, $local_path)
* в данном скрипте мы авторизовываемся на FTP-сервере с учетной записью myFtpUser и паролем myPassword123. После, как в примере выше, мы скачали файл в папку C:\Downloads.
Распаковываем архив
Чаще всего, файлы в сети Интернет хранятся в сжатом виде. Поэтому, после загрузки файла есть необходимость его распаковать. Для этого в Powershell можно использовать следующую команду:
Expand-Archive $archive_file.zip -DestinationPath C:\Unzip\
Однако, не все версии Powershell поддерживают командлет Expand-Archive. В таком случае можно вызвать стороннее приложение, например 7-zip. Пример скрипта:
set-alias sz «$env:ProgramFiles\7-Zip\7z.exe»
sz x -r C:\Downloads\file1.zip -oC:\Unzip\
Возможные ошибки
Исключение при вызове downloadfile с 2 аргументами исключение во время запроса webclient
Причина: как правило, неправильно указан путь для загрузки или отсутствие прав на папку, в которую должно идти скачивание.
Решение: проверяем путь или пробуем указать другой.
To download a file using PowerShell, you can use the `Invoke-WebRequest` cmdlet, which allows you to specify a URL and a destination path for the file being downloaded.
Invoke-WebRequest -Uri "http://example.com/file.txt" -OutFile "C:\path\to\your\file.txt"
Understanding PowerShell File Download Basics
What is PowerShell?
PowerShell is a task automation framework, consisting of a command-line shell and associated scripting language. It is built on the .NET framework, enabling IT professionals to control and automate the administration of Windows operating systems and applications. With its rich set of cmdlets, PowerShell provides users with a powerful tool to streamline repetitive tasks, making it an essential skill for system administrators and developers alike.
The Importance of File Downloads in Automation
In many automation scenarios, the ability to download files programmatically is crucial. For example, systems often need to pull updates, retrieve data files from cloud storage, or download application packages for installation. Mastering the art of downloading files with PowerShell not only enhances productivity but also allows users to incorporate these tasks into larger scripts or workflows, enabling seamless data handling and system maintenance.
PowerShell Upload File: A Quick How-To Guide
How to Download a File with PowerShell
Using the `Invoke-WebRequest` cmdlet
What is `Invoke-WebRequest`?
`Invoke-WebRequest` is a versatile cmdlet in PowerShell designed to send HTTP and HTTPS requests to web servers. This command can be used not only to fetch web pages but also to download files, making it a go-to choice for many users.
Basic Syntax
The syntax to use `Invoke-WebRequest` for downloading files is quite straightforward:
Invoke-WebRequest -Uri '<URL>' -OutFile '<LocalPath>'
Example: Downloading a file from a URL
To download a file using this cmdlet, you can use the following command:
Invoke-WebRequest -Uri 'https://example.com/file.zip' -OutFile 'C:\Downloads\file.zip'
This command sends a request to the specified URL and saves the downloaded file to the local path given in the `-OutFile` parameter.
Explaining Parameters
- `-Uri`: This parameter specifies the URL of the file you want to download. It is crucial to ensure that the URL is correct and accessible.
- `-OutFile`: This parameter indicates where on your local file system the downloaded file should be saved. Make sure the directory exists; otherwise, PowerShell will return an error.
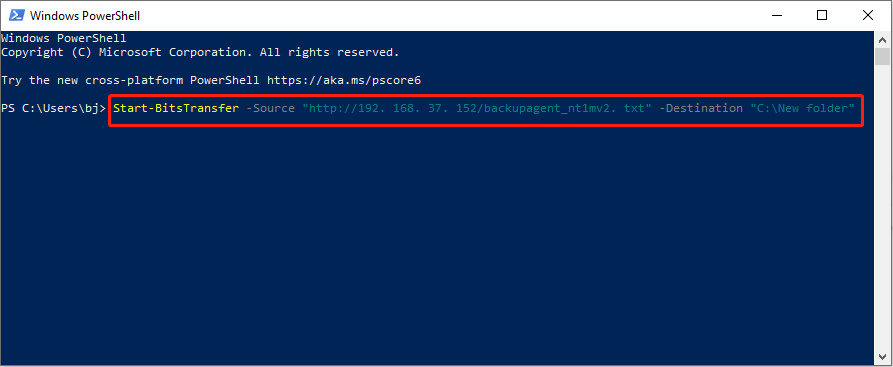
Using the `Start-BitsTransfer` cmdlet
What is `Start-BitsTransfer`?
`Start-BitsTransfer` is another powerful cmdlet that leverages the Background Intelligent Transfer Service (BITS) to manage file transfers. BITS is especially beneficial for downloading files as it can resume broken downloads automatically.
Basic Syntax
Similar to `Invoke-WebRequest`, the syntax for `Start-BitsTransfer` is as follows:
Start-BitsTransfer -Source '<URL>' -Destination '<LocalPath>'
Example: Downloading a file using BITS
Here’s how you can utilize `Start-BitsTransfer`:
Start-BitsTransfer -Source 'https://example.com/file.zip' -Destination 'C:\Downloads\file.zip'
This command begins transferring the file specified in the `-Source` parameter to the path specified in the `-Destination` parameter.
Benefits of Using BITS
Using `Start-BitsTransfer` has several advantages:
- Resumable Transfers: If a download is interrupted (due to network issues, for instance), you can resume it without starting over.
- Bandwidth Management: BITS transfers occur when system resources are available, making it more efficient for large downloads.
Mastering PowerShell Noprofile for Swift Command Execution
Advanced Techniques for Downloading Files
PowerShell Script to Download File from URL
An effective way to automate file downloads is to create a PowerShell script. Below is a simple script that downloads a file from a URL.
Creating a Script File
You can create a new text file with a .ps1 extension (for example, `DownloadFile.ps1`) and include the following code:
$Url = 'https://example.com/file.zip'
$Output = 'C:\Downloads\file.zip'
Invoke-WebRequest -Uri $Url -OutFile $Output
Explanation
- `$Url`: This variable stores the URL of the file to download.
- `$Output`: This variable defines where the file will be saved locally.
- The `Invoke-WebRequest` command uses these variables to perform the download.
Downloading Multiple Files at Once
If you need to download several files efficiently, you can use a list of URLs in combination with a loop. Here’s how to do it:
Using a List of URLs
You can define an array containing multiple URLs and iterate through them to download each file:
$Urls = @(
    'https://example.com/file1.zip',
    'https://example.com/file2.zip'
)

foreach ($Url in $Urls) {
    Invoke-WebRequest -Uri $Url -OutFile "C:\Downloads\$($Url.Split('/')[-1])"
}
This script downloads each file and saves it in the `C:\Downloads` folder, using the name derived from the URL.
Efficiency in Bulk Downloads
By incorporating loops, you can save time and easily manage bulk downloads. This is especially useful in scenarios where files need to be aggregated for processing or reporting.
PowerShell Upload File to Dropbox: A Simple Guide
Error Handling and Troubleshooting
Handling Download Errors
Errors can occur during file downloads due to network issues, invalid URLs, or lack of permissions. Using a `try-catch` block allows you to manage these exceptions gracefully:
try {
    Invoke-WebRequest -Uri '<URL>' -OutFile '<LocalPath>'
} catch {
    Write-Host "Error downloading file: $_"
}
This method catches any errors that occur during the download and displays a user-friendly message.
Common Issues Encountered
- Network Issues: Ensure your internet connection is stable and the URL is reachable.
- Permission Errors: Check that you have write permissions to the specified local directory.
- File Path Problems: Confirm that the path where you are attempting to save the file exists.
Mastering PowerShell Log Files: Tips and Tricks
Conclusion
Understanding how to PowerShell download files opens a world of possibilities for automation and system management. With techniques like using `Invoke-WebRequest` and `Start-BitsTransfer`, as well as the ability to create scripts for bulk downloads, you can efficiently handle file transfers in your workflows. Practice these skills regularly, and they will soon become second nature, enhancing your PowerShell prowess.
Understanding PowerShell Downgrade Attack Techniques
Additional Resources
To further deepen your knowledge, refer to the official [PowerShell documentation](https://docs.microsoft.com/en-us/powershell/) for cmdlets and scripting techniques, and consider exploring community forums and tutorials for more advanced usage.
Mastering the PowerShell Profiler for Efficient Scripting
FAQs
Can I resume a failed download in PowerShell?
Yes, using BITS with the `Start-BitsTransfer` cmdlet allows you to resume downloads that were interrupted.
How do I check if a file downloaded successfully?
After download, you can verify the file’s presence using:
Test-Path 'C:\Downloads\file.zip'
This will return `True` if the file exists.
What if the file URL requires authentication?
If a URL requires authentication, you can use the `-Credential` parameter in `Invoke-WebRequest` to provide a username and password.
By mastering these techniques, you are well on your way to streamlining your workflows with PowerShell!
Do you need to download files from the web but hate repeatedly clicking links? PowerShell is a powerful command-line shell that allows you to perform all kinds of management tasks automatically. So, it’s useful and necessary to learn how to download files using PowerShell with the following methods on MiniTool.
Why Use PowerShell to Download Files
When you download files, do you download them by clicking each of them manually? That’s a tedious way. In this article, you will learn how to use PowerShell to download files from command line quickly. There are some benefits of using PowerShell to download files.
- Firstly, unlike before, it will save a lot of time because you can download numerous files at once without clicking each link manually.
- Secondly, it will improve your files and computer safety because it allows you to authenticate with websites that require login credentials to access files.
- Finally, the PowerShell is scriptable, which means you can write a script to automatically download files on a schedule.
What You Should Do Before Downloading
Before starting to download files, you need to meet the minimum system and PowerShell version requirements to make sure you can download a file with PowerShell successfully.
For the device, you should preferably use a computer with Windows 10 or later. For Windows PowerShell, PowerShell 5.1 or PowerShell 7.1 is recommended. For your information, Windows 10 already includes Windows PowerShell 5.1.
How to Download Files Using Windows PowerShell
Regardless of which methods you use, the underlying logic and components are the same. You need an original URL that points to the file location and a target path that will be used to store the downloaded files. In addition, you may be asked to offer the credential if the Web server needs it. Here are the specific ways on how to download files using PowerShell.
Tips:
For the commands in every method, you need to know that https://example.com/file.zip means the file link and C:\Path\To\Save\file.zip means the location where you want to store the file.
Method 1: Download Files With Invoke-WebRequest
The initial method of downloading files in PowerShell is to use the Invoke-WebRequest cmdlet. This cmdlet is probably the most commonly used in this context and is able to download files from HTTP, HTTPS, and FTP links. The operations are as follows.
Step 1: Right-click on the Start button and choose Windows PowerShell to open it.
Step 2: Input the following command in the window and press Enter.
Invoke-WebRequest -Uri “https://example.com/file.zip” -OutFile “C:\Path\To\Save\file.zip”
Method 2: Download Files With Start-BitsTransfer
Start-BitsTransfer is designed for transferring files between client and server computers. This PowerShell cmdlet requires BITS to run. Here is a way.
Step 1: Press the Win + S keys to open the Search box, type Windows PowerShell, and press Enter.
Step 2: Type the command below and press Enter:
Start-BitsTransfer -Source “https://example.com/file.zip” -Destination “C:\Path\To\Save\file.zip”
Method 3: Download Files With Curl
The curl tool is familiar to you if you usually use the command-line approach. It can be used to download files from the Internet or server quickly and effectively without the browser. Here is how you can use it.
Step 1: Open the Run dialog by pressing the Win + R keys, type PowerShell in the Open box, and press the Shift + Ctrl + Enter keys.
Step 2: Input the following command in the window and hit Enter.
curl -o “C:\Path\To\Save\file.zip” https://example.com/file.zip
Read Also: 5 Methods to Fix Windows PowerShell High CPU Usage
Method 4: Download Files With Wget
This is the quickest and simplest way to help you download files with PowerShell. Work with the following steps.
Step 1: Open the elevated Windows PowerShell.
Step 2: Type the following command in the window and press Enter.
wget https://example.com/file.zip -OutFile “C:\Path\To\Save\file.zip”
Method 5: Download Files With Certutil
When you need to download files but there are no other tools, you can use the certutil tool in PowerShell to download files. Here are the steps.
Step 1: Open Windows PowerShell.
Step 2: Type the following command in the window and press Enter:
certutil -urlcache -split -f “https://example.com/file.zip” “C:\Path\To\Save\file.zip”
The commands listed above cover all the steps needed to download files using PowerShell. It’s crucial to input the accurate file source and destination path during the process to ensure a successful download.
Tips:
Data loss is common in our daily life. If you encounter this problem when you use PowerShell to download files, you can recover them with the help of MiniTool Power Data Recovery. This reliable and free data recovery software can restore almost all types of files that are lost due to accidental deletion, virus attacks, and so on. It supports restoring 1 GB of files for free.
MiniTool Power Data Recovery FreeClick to Download100%Clean & Safe
Final Words
This post introduces the benefits of using PowerShell to download files, what you should do before downloading files, and how to download files using PowerShell with different commands. With these commands in your toolkit, downloading files in PowerShell can be easy. Hope they can help you.
Do you need to download files from the web but hate repeatedly clicking links? If your job involves downloading files from the web regularly, you will probably want to automate the task. Why not use PowerShell to download files much like an alternative PowerShell wget?
Not a reader? Watch this related video tutorial!
Not seeing the video? Make sure your ad blocker is disabled.
Windows PowerShell and PowerShell comes with file-download capabilities. Using PowerShell to download files is a matter of knowing which cmdlets and .NET classes to use and how to use them.
In this article, you’ll learn the various ways to use PowerShell to download files from the web.
Prerequisites
Since this is a learning-by-doing article, there are some prerequisites to ensure that you can follow the examples. Below are the basic requirements.
- A computer that is running on Windows 10 or higher. This computer is where you will run the scripts/commands featured in this article.
- Windows PowerShell 5.1 or PowerShell 7.1 (recommended).
- Windows 10 already includes Windows PowerShell 5.1.
- A web site that hosts the files to download.
- For non-authenticated file downloads, consider using the Tele2 Speedtest site, which is free.
- If you want to test file downloads with authorization, you may have to build your HTTP file server. An example of a free HTTP file server is HFS by Rejetto.
Using PowerShell to Download Files from URLs: Four Ways
There are four methods to use PowerShell to download files that do not depend on third-party tools. These are:
Invoke-WebRequestInvoke-RestMethodStart-BitsTransfer- .NET WebClient Class.
Whichever one of these four methods you use, the logic and components to make them work are the same. There must be a source URL pointing to the file’s location and the destination path to save the downloaded files. If required by the webserver, you need to enter the credentials as well.
The next sections show each of these four methods. In the end, it’s up to you to decide which way you would adapt when using PowerShell to download files.
Using Invoke-WebRequest as a PowerShell wget Alternative
The first method in PowerShell to download files is by using the Invoke-WebRequest cmdlet. Perhaps the most used cmdlet in this article, Invoke-WebRequest, can download HTTP, HTTPS, and FTP links.
Whether the source location requires users to log in, the Invoke-WebRequest cmdlet can handle requests with credentials as well.
To download a file, the syntax below shows the minimum parameters required to achieve the desired outcome.
Invoke-WebRequest -Uri <source> -OutFile <destination>For example, the code below downloads a file with the name 10MB.zip from a website. Then it saves the downloaded file to C:\dload\10MB.zip. You may copy the code below and paste it into your PowerShell session to test.
# Source file location
$source = 'http://speedtest.tele2.net/10MB.zip'
# Destination to save the file
$destination = 'c:\dload\10MB.zip'
#Download the file
Invoke-WebRequest -Uri $source -OutFile $destination
The demonstration below shows the expected result after running the code above in PowerShell. As you can see, the file download was successful.

How about if the source requires authentication before allowing access? For example, the code below downloads a file from a private website where users must log in.
$source = 'https://mirror.lzex.ml/100MB.zip'
$destination = 'c:\dload\100MB.zip'
Invoke-WebRequest -Uri $source -OutFile $destination
However, the download failed due to unauthorized access.

If authentication is required, you should add a credential to the request using the -Credential parameter. The first line in the code below prompts you to enter the credential (username and password) and stores it to the $credential variable.
$credential = Get-Credential
$source = 'https://mirror.lzex.ml/100MB.zip'
$destination = 'c:\dload\100MB.zip'
Invoke-WebRequest -Uri $source -OutFile $destination -Credential $credential
The demonstration below shows what you’d expect to see when you run the above code in PowerShell. As you can see, the Get-Credential cmdlet prompted a PowerShell credential request. This time, using the credential with Invoke-WebRequest resulted in a successful download.

Related: Using the PowerShell Get-Credential Cmdlet and all things credentials
Looking Out for Parsing Errors when using Invoke-WebRequest
A crucial thing to remember when using Invoke-WebRequest in Windows PowerShell is that, by default, this cmdlet uses the Internet Explorer engine to parse data. The error below may happen when using Invoke-WebRequest on computers without the Internet Explorer in it.
You’ll have to re-issue your command, but this time, include the -UseBasicParsing switch.
Invoke-WebRequest -Uri <source> -OutFile <destination> -UseBasicParsingIn Windows PowerShell, you may receive an error message: The response content cannot be parsed because the Internet Explorer engine is not available, or Internet Explorer’s first-launch configuration is not complete. Specify the UseBasicParsing parameter and try again.
Starting with PowerShell Core 6.0, the Invoke-WebRequest cmdlet uses basic parsing only. As such, the -UseBasicParsing parameter is no longer necessary.
Using Invoke-RestMethod
The Invoke-RestMethod cmdlet is more about sending an HTTP or HTTPS request to a RESTful web service. This cmdlet is more suited for requests that interact with REST APIs such as Microsoft Graph API.
When it comes to downloading files straight from the web, Invoke-RestMethod is an excellent contender. Do not be deceived into thinking otherwise. There is not much difference between using Invoke-RestMethod and Invoke-WebRequest when used for downloading files from a direct web link.
Downloading a File using Invoke-RestMethod
To download a file using Invoke-RestMethod, use the syntax below. You’ll notice that the command uses the same parameters as Invoke-WebRequest.
Invoke-RestMethod -Uri <source> -OutFile <destination>In the example code below, the file is downloaded from the URL value in the $source variable. Then, saved to the path defined in the $destination variable.
$source = 'http://speedtest.tele2.net/10MB.zip'
$destination = 'c:\dload\10MB.zip'
Invoke-RestMethod -Uri $source -OutFile $destination
If the source requires authentication, you can pass the credentials using the -Credential parameter. The example below prompts for the credentials and stores it to the $credential variable. The value of the $credential variable is then passed to the -Credential parameter.
Also, since the file link is an HTTP source and not HTTPS, it means that you are sending an unencrypted authentication. Typically, you should avoid using HTTP sources for security. But if you must use an HTTP source, you need to add the -AllowUnencryptedAuthentication switch to your command.
$credential = Get-Credential
$source = 'http://speedtest.tele2.net/10MB.zip'
$destination = 'c:\dload\10MB.zip'
Invoke-RestMethod -Uri $source -OutFile $destination -Credential $credential -AllowUnencryptedAuthentication
Using Start-BitsTransfer
Start-BitsTransfer is designed specifically for transferring files between client and server computers. This PowerShell cmdlet is dependent on the Background Intelligent Transfer Service (BITS) that is native to the Windows operating system.
Because Start-BitsTransfer requires BITS to work means that this cmdlet is not available on non-Windows computers. On the flipside, Start-BitsTransfer enjoys the benefits of BITS itself. Some of these benefits are:
- Network bandwidth and usage awareness.
- Interruption handling (resume, auto-resume, pause, etc.)
- Downloading multiple files as background jobs.
- Ability to set download job priorities.
Downloading a File
The fundamental way to use Start-BitsTransfer in PowerShell to download a file is to specify a source and destination. Using the script below, you only need to change the $source and $destination values according to your requirements.
$source = 'http://speedtest.tele2.net/100MB.zip'
$destination = 'c:\dload\100MB.zip'
Start-BitsTransfer -Source $source -Destination $destination
As you can see from the demo below, the file is downloaded to the path c:\dload\100MB.zip.

Suppose the destination is not specified,
Start-BitsTransferdownloads and saves the file to the current working directory. For example, if you runStart-BitsTransferfrom C:\dload, the file downloads to the same directory.
For downloads that require authentication, Start-BitsTransfer has a -Credential parameter that accepts a PSCredential object.
Downloading Multiple Files
To demonstrate downloading multiple files, you’ll need to create a CSV file with two columns. Name the file filelist.txt. The first column should contain the link to the source, while the second column must contain the destination path. The file contents would like the one below.
# source,destination
http://speedtest.tele2.net/1MB.zip,c:\dload\1MB.zip
http://speedtest.tele2.net/10MB.zip,c:\dload\10MB.zip
http://speedtest.tele2.net/100MB.zip,c:\dload\100MB.zip
Related: Managing CSV Files in PowerShell with Import-Csv
Once the CSV file is ready, use the command below to begin the file download. The command imports the CSV file using Import-Csv and passes the contents to Start-BitsTransfer.
Import-Csv .\filelist.csv | Start-BitsTransferRefer to the demo below to see how the code above works. As you can see, the download starts, and you see the download progress. The PowerShell prompt is not available during the download process.

Suppose you want to start the download process as a background job. To do so, you only have to add the -Asynchronous switch at the end of the Start-BitsTransfer command.
Import-Csv .\filelist.csv | Start-BitsTransfer -AsynchronousInitially, the state of each job would show connecting. The screenshot below shows each file download’s job id.

Now that you’ve started the download process, you’ll want to check whether the download has been completed. To check the download job status, use the Get-BitsTransfer cmdlet. As you can see below, the download jobs’ status has changed to Transferred.

Using WebClient Class and HttpClient Class (.NET Framework)
PowerShell is based on .NET, and its nature makes it capable of leveraging the power of .NET itself. There’s two .NET class you can use in PowerShell to download files; WebClient and HttpClient.
If you want to know more about these two .NET class in more development and technical way, you could start with → When to use WebClient vs. HttpClient vs. HttpWebRequest. In the next section, you will learn how to use WebClient and HttpClient in PowerShell to download files from the web.
Downloading a File using System.Net.WebClient
To use the WebClient class, you need to initiate an object as a System.Net.WebClient **type. In the example below, the $webClient is the new System.Net.WebClient object. Then, using the DownloadFile() method starts the download of the file from the source.
Related: Using PowerShell Data Types Accelerators to Speed up Coding
Please copy the code below and run it in your PowerShell session to test. Note that you will not see any progress or output on the screen unless there’s an error. However, the PowerShell prompt will be locked until the download is complete.
# Define the source link and destination path
$source = 'http://speedtest.tele2.net/10MB.zip'
$destination = 'c:\dload\10MB.zip'
# Create the new WebClient
$webClient = [System.Net.WebClient]::new()
# Download the file
$webClient.DownloadFile($source, $destination)
If the source requires authentication to allow the file download, you can use the code below. The first line prompts for the credential and stores it to the $credentials variable. The value of $credential is then included in the file download request.
# Prompt for username and password
$credentials = Get-Credential
$source = 'http://speedtest.tele2.net/10MB.zip'
$destination = 'c:\dload\10MB.zip'
# Create the new WebClient
$webClient = [System.Net.WebClient]::new()
# Add the credential
$webClient.Credentials = $credentials
# Download the file
$webClient.DownloadFile($source, $destination)
According to this Microsoft document: “We don’t recommend that you use the WebClient class for new development. Instead, use the System.Net.Http.HttpClient class.”
It appears that the WebClient class is obsolete, and the new class that Microsoft is endorsing is the HttpClient class. Don’t worry, though. The next section talks about using the HttpClient class in PowerShell to download files from the web.
Downloading a File using System.Net.Http.HttpClient
Like the WebClient class, you need to create first the System.Net.Http.HttpClient. Using the code below downloads the file from the $source to the $destination. Refer to the comments above each line to know what each line of code does.
The code below is live, and you can test it by running it in your PowerShell session.
# Set the source and destination
$source = 'http://speedtest.tele2.net/10MB.zip'
$destination = 'c:\dload\10MB.zip'

# Create the HTTP client download request
$httpClient = New-Object System.Net.Http.HttpClient
$response = $httpClient.GetAsync($source)
$response.Wait()

# Create a file stream to pointed to the output file destination
$outputFileStream = [System.IO.FileStream]::new($destination, [System.IO.FileMode]::Create, [System.IO.FileAccess]::Write)

# Stream the download to the destination file stream
$downloadTask = $response.Result.Content.CopyToAsync($outputFileStream)
$downloadTask.Wait()

# Close the file stream
$outputFileStream.Close()
In situations where downloading a file requires authentication, you need to add the credential to the HttpClient object. To include a credential to the file download request, create a new System.Net.Http.HttpClientHandler object to store the credentials.
You can copy the code below and run it in PowerShell to test. Or you can also run it as a PowerShell script. In this example, the code is saved as download-file.ps1.
# Set the source and destination
$source = 'http://speedtest.tele2.net/10MB.zip'
$destination = 'c:\dload\10MB.zip'

# Prompt for credentials
$credentials = Get-Credential

# Create the HTTP client download request with credentials
$handler = New-Object System.Net.Http.HttpClientHandler
$handler.Credentials = $credentials
$httpClient = New-Object System.Net.Http.HttpClient($handler)
$response = $httpClient.GetAsync($source)
$response.Wait()

# Create a file stream to pointed to the output file destination
$outputFileStream = [System.IO.FileStream]::new($destination, [System.IO.FileMode]::Create, [System.IO.FileAccess]::Write)

# Stream the download to the destination file stream
$downloadTask = $response.Result.Content.CopyToAsync($outputFileStream)
$downloadTask.Wait()

# Close the file stream
$outputFileStream.Close()
The demo below shows the result when running the PowerShell script to download the file.
At the start, the directory only has the script file in it. There’s a prompt to enter the username and password. Then, the script proceeds to download the file. After downloading the file, you can see that the new file is now inside the destination directory.

Conclusion
Windows PowerShell and PowerShell Core come with built-in capabilities to download files, acting as a PowerShell wget alternative! Whether downloading password-protected sources, single or multiple files – a PowerShell way is available to you.
The file download methods covered in this article works on both Windows PowerShell and PowerShell Core. This means that these methods apply to both Windows and Non-Windows systems, with the exclusion of Start-BitsTransfer.
And since PowerShell is more than a command prompt, you can translate what you learned into scripts. For you, that would mean an opportunity for automation. No more copying URLs, clicking links, and waiting for downloads manually.
Windows PowerShell can be used for downloading files via HTTP and HTTPS protocols.
In PowerShell, as an alternative to the Linux curl and wget commands, there is an Invoke-WebRequest command, that can be used for downloading files from URLs.
In this note i am showing how to download a file from URL using the Invoke-WebRequest command in PowerShell, how to fix slow download speed and how to pass HTTP headers (e.g. API key)
Wget & cURL: The curl and wget commands in PowerShell are the aliases of the Invoke-WebRequest command.
Download a file from URL using PowerShell via HTTP and HTTPS protocols:
PS C:\> Invoke-WebRequest https://path/to/file.txt -OutFile C:\file.txt
Download a large file (hide the progress of the Invoke-WebRequest command, as it extremely slows down the download speed):
PS C:\> $progresspreference = 'silentlyContinue'
PS C:\> Invoke-WebRequest https://path/to/file.txt -OutFile C:\file.txt
PS C:\> $progressPreference = 'Continue'
Download a file passing header values (e.g. pass API key):
PS C:\> Invoke-WebRequest -H @{'apiKey'='keyValue'} https://path/to/file.txt -OutFile C:\file.txt
Download a file passing multiple header values:
PS C:\> Invoke-WebRequest -H @{'authUser'='userValue'; 'authPass'='passValue'} https://path/to/file.txt -OutFile C:\file.txt
Was it useful? Share this post with the world!