
Уровень сложностиСредний
Время на прочтение6 мин
Количество просмотров11K

Если на компьютере под Linux нужно быстренько запустить Windows или MacOS, самый простой и быстрый способ сделать это — ввести команду для скачивания и загрузки докер-контейнера с этой ОС.
В маркетплейсе RuVDS много готовых образов с установленными операционными системами. Там разные дистрибутивы Linux, Windows Server и CentOS. Но нет контейнеров с операционными системами.
Операционная система в докер-контейнере (в QEMU) не требует ручной инсталляции ОС. Всего одна команда в консоли — и контейнер Windows скачивается и запускается.
Набор контейнеров Dockur
Хороший набор докер-контейнеров с готовыми образами операционных систем в виртуальных машинах QEMU можно найти в репозитории Dockur.
Для выбора версии Windows при установке контейнера нужно изменить соответствующее значение в переменной окружения конфигурационного файла:
environment:
  VERSION: "11"
В наличии следующие контейнеры Windows:
Предупреждение. Windows 8 потребляет очень много ресурсов CPU и RAM.
Есть также контейнеры MacOS, тут выбор поменьше:
Запуск через Docker Compose:
services:
  macos:
    image: dockurr/macos
    container_name: macos
    environment:
      VERSION: "13"
    devices:
      - /dev/kvm
      - /dev/net/tun
    cap_add:
      - NET_ADMIN
    ports:
      - 8006:8006
      - 5900:5900/tcp
      - 5900:5900/udp
    volumes:
      - ./macos:/storage
    restart: always
    stop_grace_period: 2m
Из консоли:
docker run -it --rm --name macos -p 8006:8006 --device=/dev/kvm --device=/dev/net/tun --cap-add NET_ADMIN -v ${PWD:-.}/macos:/storage --stop-timeout 120 dockurr/macosДля выбора версии тоже следует изменить значение в переменной окружения конфигурационного файла:
environment:
  VERSION: "13"
Версии MacOS перечислены в таблице выше.
Запуск контейнера Windows на сервере
Установить контейнер можно через Docker Compose, вот файл compose.yaml, который практически идентичен файлу для MacOS:
services:
  windows:
    image: dockurr/windows
    container_name: windows
    environment:
      VERSION: "11"
    devices:
      - /dev/kvm
      - /dev/net/tun
    cap_add:
      - NET_ADMIN
    ports:
      - 8006:8006
      - 3389:3389/tcp
      - 3389:3389/udp
    volumes:
      - ./windows:/storage
    restart: always
    stop_grace_period: 2m
Или из командной строки:
docker run -it --rm --name windows -p 8006:8006 --device=/dev/kvm --device=/dev/net/tun --cap-add NET_ADMIN -v ${PWD:-.}/windows:/storage --stop-timeout 120 dockurr/windowsПо умолчанию устанавливается Windows 11 Pro, другие версии можно указать, изменив параметр переменной окружения, как написано выше.
Дальнейший процесс полностью автоматический, нужно дождаться, пока контейнер скачается и запустится. Docker будет доступен через браузер на порту 8006.
Если зайти по нашему IP-адресу и указанному порту, мы увидим процесс скачивания ISO-образа Windows с сервера Microsoft:

Потом автоматическая установка и настройка Windows:

Это специальная версия Windows for Docker, она свободно распространяется с сайта Microsoft и требует активации для полноценной работы. Более старые версии Windows работают 30 дней без активации.

После завершения процесса в браузере откроется рабочий стол Windows:
Через браузер у нас работает система удалённого доступа к рабочему столу VNC (Virtual Network Computing), которая заметно подтормаживает, не поддерживает передачу звука и некоторых других функций. Для максимального комфорта рекомендуется настроить удалённый доступ через RDP. Собственно, этот доступ уже настроен в вышеуказанном файле compose.yaml, в котором присутствуют такие строки:
- 3389:3389/tcp
- 3389:3389/udp
По этим портам и осуществляется удалённый доступ к системе из RDP-клиента, такого как Microsoft Remote Desktop, можно на той же физической системе.
В командной строке для запуска контейнера мы видим параметр --device=/dev/kvm. Это указывает на использование виртуальной машины KVM (Kernel-based Virtual Machine), опенсорсной технологии виртуализации, встроенной в Linux. В частности, KVM позволяет превратить Linux в гипервизор для запуска нескольких изолированных виртуальных окружений, то есть виртуальных машин.
KVM — это часть Linux с 2006 года (с версии ядра 2.6.20), то есть в данном случае мы работаем с нативной виртуальной машиной Linux. Чтобы это стало возможным, материнская плата должна поддерживать технологию виртуализации на аппаратном уровне:

Чтобы проверить наличие поддержки KVM на сервере под Linux, можно запустить следующую команду:
sudo apt install cpu-checker
sudo kvm-ok
Если kvm-ok выдаёт ошибку, то нужно проверить, что:
- в BIOS включены соответствующие расширения виртуализации (Intel VT-x, VT-d или AMD SVM),
- включена «вложенная виртуализация», если контейнер запускается внутри виртуальной машины.
К сожалению, большинство облачных провайдеров не разрешают вложенную виртуализацию на своих VPS:

Поэтому Windows в докер-контейнере запустится только на выделенном сервере или на домашнем сервере/ПК.
Если kvm-ok не выдаёт никакой ошибки, но контейнер всё равно сообщает об отсутствии KVM-устройства, причиной может быть проблема с правами, в качестве решения можно добавить параметр privileged: true в файл compose (или sudo в команду docker).
KVM обеспечивает виртуальной машине доступ к USB-устройствам и другим аппаратным ресурсам. Он позволит даже редактировать BIOS, как в примере выше.
По умолчанию, контейнеру Windows выделяется два ядра CPU и 4 ГБ RAM, это минимальные требования для запуска Windows 11. Чтобы изменить объём выделяемых ресурсов, следует добавить следующие строчки в конфигурационный файл:
environment:
  RAM_SIZE: "8G"
  CPU_CORES: "4"
Увеличение объёма дискового пространства со стандартных 64 ГБ (по умолчанию) до 100 ГБ:
environment:
  DISK_SIZE: "100G"
Виртуальная машина будет занимать столько места на диске, сколько реально занимает контейнер с файлами, а не максимальное указанное значение.
Добавить несколько дисков:
environment:
  DISK2_SIZE: "32G"
  DISK3_SIZE: "64G"
volumes:
  - ./example2:/storage2
  - ./example3:/storage3
Зачем это нужно
Распространённая причина запуска Windows в контейнере — если у нас чисто линуксовое (или яблочное) окружение, вокруг нет ни одного компьютера под Windows, но срочно понадобилось запустить какую-то специфическую программу, которая работает только под Windows. В окружении виртуализации типа Wine эта программа не полностью функциональна. Например, старая утилита для редактирования BIOS (как AMIBCP на скриншоте) запускается под Wine, но не даёт реально изменять значения BIOS, то есть не сохраняет образ ROM:

Конечно, можно установить на ПК мультизагрузчик и вторую ОС или запустить виртуальную машину, но это тоже непростой и многоступенчатый процесс: сконфигурировать гипервизор, выделить аппаратные ресурсы.
Копия Windows в контейнере — самый простой и быстрый способ, если срочно нужна эта ОС. И самое удобное то, что не нужно проходить через процесс инсталляции системы вручную, потому что она устанавливается автоматически и сразу готова к работе. Вся процедура скачивания и запуска контейнера занимает несколько минут.
Другие наборы контейнеров
Кроме перечисленных выше, в репозитории Dockur есть и другие наборы докер-контейнеров, а также программы, полезные для самохостинга:
- Windows для ARM64,
- сервер Samba SMB,
- Dnsmasq,
- strfry, рилей-сервер Nostr,
- casa, операционная система CasaOS для самохостинга (личное облако или домашний дата-центр),

- statping — страничка с красивыми графиками, аналитикой и плагинами, всё для мониторинга сайтов и приложений,
- lemmy — агрегатор ссылок и форум, аналог Reddit или Hacker News, только для децентрализованной сети будущего, где у каждого пользователя свой сервер.

Windows на виртуальном сервере
Хотя KVM не работает на VPS, в маркетплейсе RUVDS есть четыре образа с установленной системой Windows Server 2019 и специализированным программным обеспечением:
- METATRADER 5 (MT5) – SERVER CORE с торговым терминалом MT5,
- SQL EXPRESS – SERVER CORE c бесплатной редакцией SQL Server 2019 и SQL Server Management Studio 18.4. Максимальный размер БД в этой редакции ограничен 10 ГБ,
- сервер Minecraft,
- VPN L2TP — позволяет сразу после установки шаблона подключаться к серверу по VPN, целиком меняя IP-адрес подключившегося.

Если выбрать такой образ — мы получаем готовую лицензированную Windows и настроенный софт.
Кроме того, при ручной конфигурации сервера в конфигураторе есть возможность выбрать несколько версий серверной ОС Windows для установки:
- Windows Server 2022.
- Windows Server 2019.
- Windows Server 2016.
- Windows Server 2012 R2.
- Windows Server Core 2022.

Есть и готовые тарифы с Windows:

Самая дешёвая Windows 2012 R2 стоит 588 руб. в месяц (470 руб. при оплате за год).
С 2023 года у российских пользователей возникли проблемы с покупкой Windows в условиях санкций. В такой ситуации выбор VPS с предустановленной Windows или докер-контейнер с официальным образом — легальный выход из ситуации.
Кстати, таким же удобным способом в Docker/QEMU можно запускать и Linux-контейнеры.
© 2025 ООО «МТ ФИНАНС»
Telegram-канал со скидками, розыгрышами призов и новостями IT 💻

A Step-by-Step Guide to Containerizing a Windows Virtual Machine — with RDP Access — on a Linux Docker Platform with KVM Hypervisor
Background
Recently, I was tasked with developing a PoC of a lab environment where students can access their pre-installed and pre-configured machines — Linux and Windows — to do necessary training exercises. I wanted to make the access to all machines uniform over HTTP/HTTPS (browser-based). While the web-based access to machines can easily be implemented using a platform like Guacamole, the greater challenge was how to deploy the machines in a way that utilizes system resources — particularly, CPU, RAM, and HDD — efficiently and with speed. It became evident by that point that technology like Docker containerization is the best way to go. However, that presented other challenges.
Each of Windows and Linux machines have their own containerization requirements — as will be discussed in the next section. Natively, one cannot run Linux and Windows containers simultaneously on the same Docker daemon. After some research, the solution that presented itself as the most viable was to install each Windows machine as a virtual machine inside a single Linux container. From the perspective of the Docker daemon, all containers are Linux-based. However, some of those containers run a hypervisor, and on top of which there is a Windows VM. Even though a container with a VM in it takes more disk space than other containers, the efficiency in saving disk space when we have many containerized VMs is still high compared to running un-containerized VMs.
Ultimately, I wanted to access a containerized Windows machine using RDP, and enjoy the full remote desktop access to that machine. Unfortunately, there are not satisfactory detailed tutorials and complete walkthroughs that explain the entire procedure easily and clearly. And I had to face many small challenges along the way. During my research, I have also seen many people — on various technical forums — struggling with such an implementation and expressing their frustration! I hope that this document serves as a complete guide to solving that problem.
Why Containerizing a VM: Our Use Case
You might be asking yourself why would someone want to install a VM inside a Container? It looks strange at first since the Container layer seems unnecessary and one can simply install the VM directly on the base OS. However, there are different reasons why this can be a solution and a necessary requirement.
Our particular use case involves spinning up multiple identical Windows VMs to be used by different users. Had we wanted a single VM only, then, there would not be any need to containerize it. But since we want to create many identical VMs, we will save tremendous resources (HDD, RAM, and CPU) by containerizing those VMs.
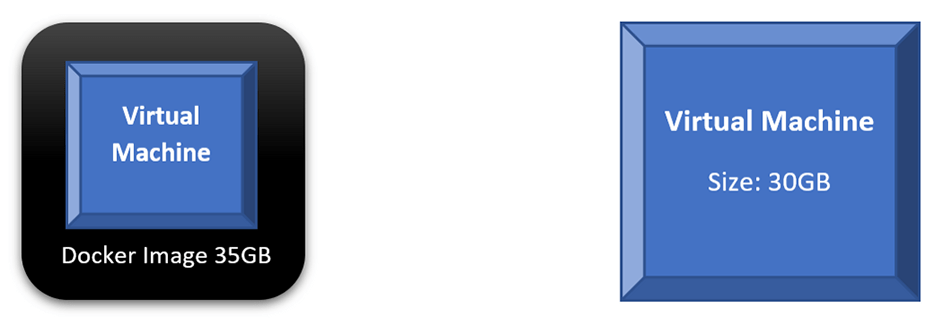
If we compare the scenario where we run a single VM directly on our base OS to a scenario of containerizing that VM, we will find out that both will consume similar disk space and other resources. In fact, every time we want to run the containerized VM, we will do two steps: run the container and then power on the VM. The following diagram shows those two scenarios; a direct VM occupies 30GB on the HDD, while the Docker Image occupies 35GB. Not much benefit — in terms of saving system resources — is achieved here.
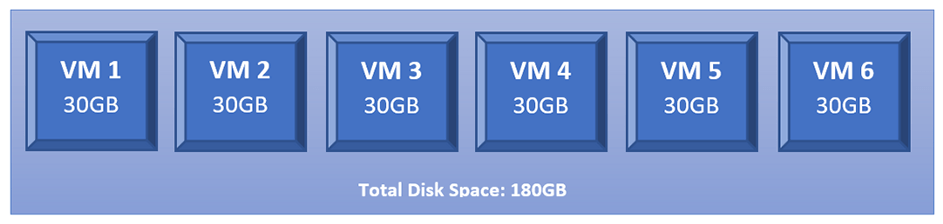
However, what happens if we want to run 6 copies of our intended VMs? We will have to create 6 copies of that VM where each occupies the same disk space as the original one. Thus, if the original VM is 30GB, having 6 copies will occupy 180GB on the HDD.
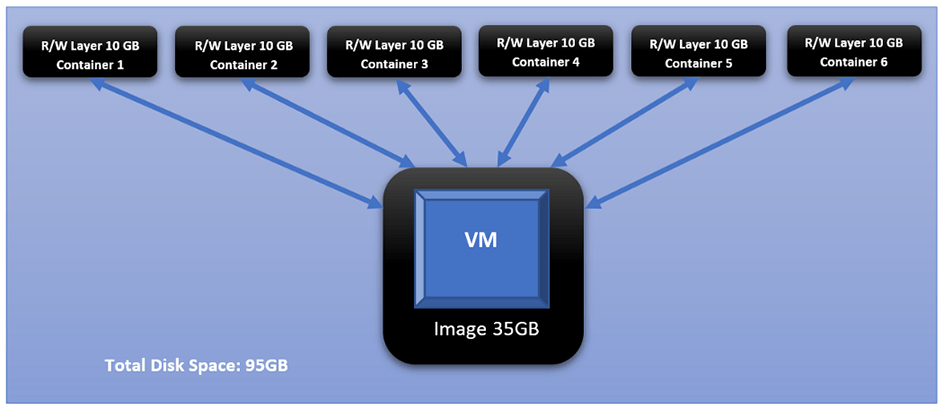
This changes dramatically when we containerize each of those identical VMs. This is the added value of Docker containerization technology. And it owes its value to how Docker differentiates between two main concepts: images and containers. Images are read-only and form the base of containers. Containers created from the same Image share the same read-only core (i.e., the image), while each container adds its own read-write layer that interacts with the read-only image. For more discussion on the difference between Images and Containers, please check this document: <click here>
If we take the 35GB Docker Image, in our example, and creates 6 Containers from it, each Container will create its own read-write layer through which will access the read-only image. At the time of creation, that R/W layer has 0 size; however, as the user starts interacting with the Container — doing things like powering on the VM — that layer’s size starts increasing. And if we assume that all dynamic changes in a single layer have accumulated size of 10GB, that means all 6 containers have added a total of 60BG on top of the original 35GB of the image.
Challenges
Challenge 1 Windows containers on Windows platform, and Linux containers on Linux platform
One of the biggest obstacles you face with Docker, and containerization in general, is that you cannot have Linux and Windows containers running simultaneously on the same platform (i.e., same Docker daemon). The reason for this is that Docker is an OS-Level Virtualization; meaning, its main function is to contain and isolate applications as they run on an Operating System. The Docker daemon provides each container with any necessary kernel-level properties so that the containerized application can run. Because of that, containers running Linux services/applications need to run on a Linux platform, and containers running Windows services/applications need to run on a Windows platform.
The Windows Docker Desktop has the feature of providing a Linux Subsystem; and in this case, running a Linux container can ultimately run on Windows. However, we should note that if this feature is enabled, only Linux containers can run while Windows containers cannot. One has to switch off this feature to run Windows containers; and in this scenario, Linux containers cannot run. It is still not possible to run both Linux and Windows containers simultaneously on the same platform.
If one needs to have Linux and Windows containers running simultaneously and communicating with others, a possible solution is to have each group run on their respective platform, then, configure the network routing, NAT, and port-forwarding rules.
Challenge 2 Windows Docker containers cannot be accessed through RDP or VNC, i.e., no graphical desktop
Even if we decided to have two separate platforms — Windows platform for Windows containers, and Linux platform for Linux containers — with appropriate network configuration, we will face the challenge that Windows containers cannot have a desktop environment. This is a fact for all Windows containers. They are designed and built to run services and applications, and they can be accessed using PowerShell/CMD command-line interface.
Unlike the Linux system where the Desktop environment is an installable service, Windows Desktop comes bundled directly with the OS as shipped by Microsoft. And when it comes to Windows-based containers, Microsoft has published certain images (known as base images) which form the base of any Windows container. Those base images do not come up with a Desktop service, and one does not have the luxury to install it later as an add-on.
For more information about Windows containers/images, <Click Here>
Architecture Overview
Our ultimate goal here is to have a fully running Windows OS, accessible through RDP, and containerized and managed by Docker daemon. And to achieve that, we will have the following:
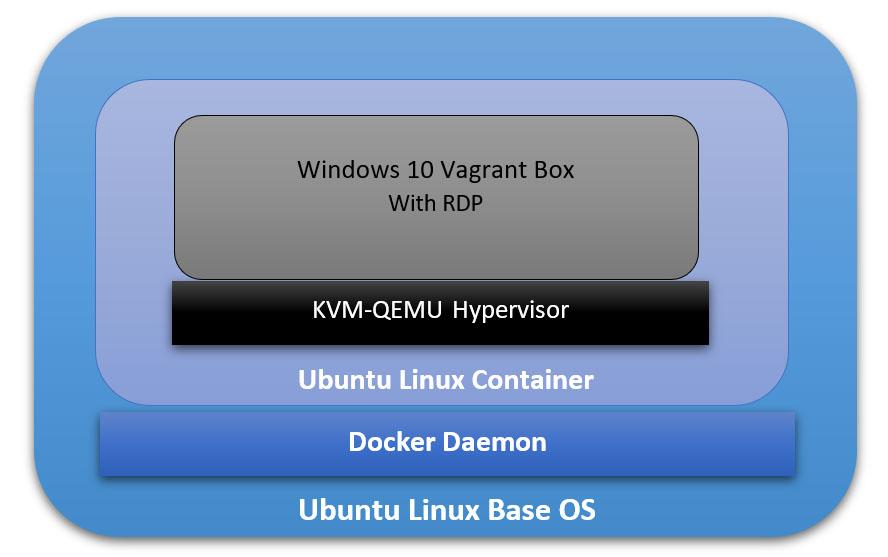
- The Base Operating System: it will be the main platform hosting everything else. In our particular example, it will be an Ubuntu 18.04 Linux machine.
- The Docker Daemon: this is the containerization platform installed on the Base OS. Through Docker, we will create our final “image” out of which we will spawn many containers.
- A Docker Image with an Operating System: This OS will be part of every created container, and its main function is to run a hypervisor on which the Windows VM will be running. In our case here, we will use the Ubuntu:18.04 Docker Image (available on Docker Hub).
- A Hypervisor on the Docker Image: Inside the Ubuntu Docker Image, we will also have a Hypervisor that will allow us to install the Windows VM later. In our particular case, we will use the KVM-QEMU hypervisor.
- The Windows Virtual Machine: this is the machine we are going to access at the end through RDP. In our example, we will use a pre-packaged Windows 10 Vagrant Box available at (https://app.vagrantup.com/peru/boxes/windows-10-enterprise-x64-eval)
Installing Docker on the Main Platform
The first thing we need to do is to install Docker into our main Operating System. For the sake of this tutorial, our main system is Ubuntu 20.04 (Linux Kernel 5.4.0–40-generic) with 70GB HDD, 4GB RAM, and 2 CPU Cores.
Follow the following steps to install Docker:
[1] Update the apt package index and install packages to allow apt to use a repository over HTTPS:
sudo apt-get update

sudo apt-get install apt-transport-https ca-certificates curl gnupg-agent software-properties-common
[2] Add Docker’s official GPG key:
curl -fSSL https://download.docker.com/linux/ubuntu/gpg | sudo apt-key add

sudo apt-key fingerprint 0EBFCD88
[3] Set up the stable Docker’s repository:
sudo add-apt-repository "deb [arch=amd64] https://download.docker.com/linux/ubuntu $(lsb_release -cs) stable"sudo apt updateNote: This is an important step after adding the new repository in Step 3.
[5] Install the latest version of Docker Engine:
sudo apt install docker-ce -yNote: You don’t need to install docker-ce-cli or containerd.io packages since they are installed directly with the docker-ce package.
[6] Start Docker now and configure it to automatically start after a reboot:
sudo systemctl start docker

sudo systemctl enable docker
Building the Right Docker Image
Now that Docker is installed, we can start building the image that will be the base for our Container on which we will have the VM. The first section below explains how to build this image manually without using a Dockerfile. Then, in the second section, I will explain how to automate building the image using a Dockerfile.
However, before building the image, we need to check if our system supports virtualization. Since our Container will run a hypervisor, it will not work unless the main platform supports virtualization. Otherwise, we will face an error later on when trying to install the VM. We can run the following command:
sudo egrep -c '(vmx|svm)' /proc/cpuinfoIf the output is a number greater than 0, then, you are good to proceed further. Otherwise, you need to make sure virtualization (VT-x) is enabled in the BIOS settings. If your main platform is itself a virtual machine, make sure VT-x is enabled through the virtualization software.
- Enable VT-x in VMWare Workstation
- Enable VT-x in Virtualbox
Building the Image without a Dockerfile
[1] Pull the core Docker image ubuntu:18.04:
sudo docker pull ubuntu:18.04Note: to verify that the image has been added successfully, issue the following command:
sudo docker image ls
[2] Run a Container (with the name ubuntukvm) from the Image ubuntu:18:04 with some privileged parameters:
sudo docker run --privileged -it --name ubuntukvm --device=/dev/kvm --device=/dev/net/tun -v /sys/fs/cgroup:/sys/fs/cgroup:rw --cap-add=NET_ADMIN --cap-add=SYS_ADMIN ubuntu:18.04 /bin/bashSince we will install a hypervisor (QEMU-KVM) in this container, we need to run it with certain parameters as follows:
— device=/dev/kvm will map the device /dev/kvm in the main OS inside the Container.
— device=/dev/net/tun will map the device /dev/net/tun in the main OS inside the Container.
—v /sys/fs/cgroup:/sys/fs/cgroup:rw will map the directory /sys/fs/cgroup in the main OS inside the Container, and the Container will have read-write permissions on that directory.
— cap-add=NET_ADMIN will add network admin capabilities to the Container.
— cap-add=SYS_ADMIN will add system admin capabilities to the Container.
Once the command runs successfully, you should be inside the Container with a shell prompt:
root@<container_id>:/#[3] Inside the Container, update the apt package index:
root@<container_id>:/# apt-get update -y[4] Inside the Container, install the hypervisor package QEMU-KVM and Libvirt:
root@<container_id>:/# apt-get install -y qemu-kvm libvirt-daemon-system libvirt-devYou don’t have to install libvirt-clients and bridge-utils as they would already be installed along with libvirt-daemon-sys.
The libvirt-dev is an important package specially to run Vagrant Boxes on.
[5] Change group ownership of /dev/kvm:
root@<container_id>:/# chown root:kvm /dev/kvmNote: the device /dev/kvm must be owned by the group kvm, and any user who needs to run VMs needs to be part of the kvm group.
[6] Start the Libvirt services:
root@<container_id>:/# service libvirtd start

root@<container_id>:/# service virtlogd start
[7] Install the Linux Image package which contains any necessary Kernel modules:
root@<container_id>:/# apt-get install -y linux-image-$(uname -r)Note: this is an important step. There are certain modules (e.g., ip_tables and ip6_tables) that are needed at a later stage; and if they are missing, an error message would be generated.
[8] Install the curl package (it is used to download the Vagrant application):
root@<container_id>:/# apt-get install curl -y[9] Install the net-tools package (it provides ipconfig utility):
root@<container_id>:/# apt-get install net-tools -y[10] Download and run the latest version Vagrant application:
root@<container_id>:/# apt-get install jq -y

root@<container_id>:/# vagrant_latest_version=$(curl -s https://checkpoint-api.hashicorp.com/v1/check/vagrant  | jq -r -M '.current_version')

root@<container_id>:/# echo $vagrant_latest_version

root@<container_id>:/# curl -O https://releases.hashicorp.com/vagrant/$(echo $vagrant_latest_version)/vagrant_$(echo $vagrant_latest_version)_x86_64.deb

root@<container_id>:/# dpkg -i vagrant_$(echo $vagrant_latest_version)_x86_64.deb
Note 1: The above commands perform the following actions:
— Install the JSON Query parser tool, jq, which will be used in the next command.
— Get the Vagrant latest version value and store it in the environment variable vagrant_latest_version.
— Download the latest version of Vagrant package.
— Install the downloaded Vagrant package.
Note 2: It is very important and critical that you download and install Vagrant in this method. Do NOT get it from the Ubuntu repository (or any other Linux repositories, like Red Hat’s) using the command apt-get install vagrant. The reason for this is that the WinRM library is not shipped with Vagrant packages provided by Linux distribution and is shipped natively with the official package. WinRM library is needed to run Windows Vagrant boxes.
[11] Install the Vagrant Libvirt plugin:
root@<container_id>:/# vagrant plugin install vagrant-libvirt[12] Download and install Windows10 Vagrant box:
root@<container_id>:/# mkdir /win10

root@<container_id>:/# cd /win10

root@<container_id>:/win10# vagrant init peru/windows-10-enterprise-x64-eval

root@<container_id>:/win10# VAGRANT_DEFAULT_PROVIDER=libvirt vagrant up
the vagrant init command will download a Vagrantfile which contains the instructions fof building the Vagrant box.
the vagrant up command will build the box. Please note that this command takes some time. The particular Vagrant box we are downloading here (peru/windows-10-enterprise-x64-eval) has a size of 5.62 GB.
once the above command finishes execution, type the following command which will attempt to access the box over RDP. Even though it will fail (since there is no RDP client installed in the Container), we will get the IP address of the Vagrant box:
root@< container_id >:/win10# vagrant rdp==> default: Detecting RDP info…
 default: Address: 192.168.121.68:3389
 default: Username: vagrant
==> default: Vagrant will now launch your RDP client with the connection parameters
==> default: above. If the connection fails, verify that the information above is
==> default: correct. Additionally, make sure the RDP server is configured and
==> default: running in the guest machine (it is disabled by default on Windows).
==> default: Also, verify that the firewall is open to allow RDP connections.
An appropriate RDP client was not found. Vagrant requires either
`xfreerdp` or `rdesktop` in order to connect via RDP to the Vagrant
environment. Please ensure one of these applications is installed and
available on the path and try again.
[13] Set up iptables port forwarding rules:
If you want to access the RDP port on the Vagrant box from out the Container, this is an important step. By default, the Vagrant application configures firewall rules to allow access only from within the Container to the Vagrant box and vice versa. Machines outside the Container do not have any access to the Vagrant box. We would like to set up the rules in such a way to allow our main OS (Ubuntu) to access the Vagrant box on RDP. The following diagram logically illustrates this:

Add the following rules to NAT/Port Forward connections from the main OS to the container on port 3389 to be forwarded to the Vagrant Box on port 3389:
root@<container_id>:/# iptables -A FORWARD -i eth0 -o virbr1 -p tcp --syn --dport 3389 -m conntrack --ctstate NEW -j ACCEPT

root@<container_id>:/# iptables -A FORWARD -i eth0 -o virbr1 -m conntrack --ctstate ESTABLISHED,RELATED -j ACCEPT

root@<container_id>:/# iptables -A FORWARD -i virbr1 -o eth0 -m conntrack --ctstate ESTABLISHED,RELATED -j ACCEPT

root@<container_id>:/# iptables -t nat -A PREROUTING -i eth0 -p tcp --dport 3389 -j DNAT --to-destination 192.168.121.68

root@<container_id>:/# iptables -t nat -A POSTROUTING -o virbr1 -p tcp --dport 3389 -d 192.168.121.68 -j SNAT --to-source 192.168.121.1
After that, we should remove the rules that reject all traffic to/from virb1 interface; these rules take precedent over our newly inserted rules:
root@<container_id>:/# iptables -D FORWARD -o virbr1 -j REJECT --reject-with icmp-port-unreachable

root@<container_id>:/# iptables -D FORWARD -i virbr1 -j REJECT --reject-with icmp-port-unreachable

root@<container_id>:/# iptables -D FORWARD -o virbr0 -j REJECT --reject-with icmp-port-unreachable

root@<container_id>:/# iptables -D FORWARD -i virbr0 -j REJECT --reject-with icmp-port-unreachable
if you mess up the iptables, or if the communication is problematic later, you may want to clear up all tables and then add the rules (mentioned above) on a clean slate. To clear the iptables, issue the following:
root@<container_id>:/# sudo iptables-save > $HOME/firewall.txt

root@<container_id>:/# sudo iptables -X

root@<container_id>:/# sudo iptables -t nat -F

root@<container_id>:/# sudo iptables -t nat -X

root@<container_id>:/# sudo iptables -t mangle -F

root@<container_id>:/# sudo iptables -t mangle -X

root@<container_id>:/# sudo iptables -P INPUT ACCEPT

root@<container_id>:/# sudo iptables -P FORWARD ACCEPT

root@<container_id>:/# sudo iptables -P OUTPUT ACCEPT
[14] Commit all Changes to Create a New Image:
Up to this point, we have a fully running Container with the desired Windows VM. However, we cannot transfer or store that Container. In addition, we cannot create multiple copies of this Container without going through all the steps we have done so far. For this reason, we need to commit the changes to a new Docker Image. The Image can be transferred or stored. Multiple Containers can be created — instantiated — almost immediately.
To commit the changes to a new Image, we need first to exit the Container:
root@<container_id>:/win10# exit

$ sudo docker ps -a
Take note of the Container ID; and then, issue the following command:
$ sudo docker commit <container_id> ubuntukvmNote 1: You can substitute the name “ubuntukvm” with any name you like. This will be the name of the new Image.
Building the Image Using a Dockerfile
Instead of building the Image in a manual way — as shown in the previous section, we can automate the whole process using a Dockerfile.
[1] Prepare the Dockerfile:
In a new directory, create a Dockerfile (with the name Dockerfile), and write the following commands in it. Mostly, they are the same commands we have executed individually in the previous section:
[2] Prepare a Startup Shell Script (startup.sh):
This file will be copied to the Image and will run automatically every time you instantiate a Container from that Image. The script will assign certain permissions and startup the necessary services. In addition, it will create the iptables rules that will port forward RDP traffic.
[3] Build the Container from the Docker file:
sudo chmod +x startup.sh

sudo docker build -t ubuntukvm:latest -f Dockerfile .
[4] Instantiate a Container and Run it:
sudo docker run --privileged -it --name kvmcontainer1 --device=/dev/kvm --device=/dev/net/tun -v /sys/fs/cgroup:/sys/fs/cgroup:rw --cap-add=NET_ADMIN --cap-add=SYS_ADMIN ubuntukvm bashTesting the RDP Access
By now, we should be able to access the RDP service on the Windows Vagrant box by connecting to the IP address of the Docker container. To test that port 3389/tcp (RDP) is reachable from the main OS, we will use a simple Nmap command.
First, if you are inside the Docker container, press Ctrl+p+q to put the Container in the background while running; this should return you to the main OS terminal prompt:
root@<container_id>:/win10# <Ctrl+p+q>

$ sudo nmap -Pn -p 3389 172.17.0.2
Next, we need to install an RDP client for Linux. A popular one is RDesktop:
sudo apt-get install rdesktopFinally, we can access the Windows VM:
sudo rdesktop 172.17.0.2The Windows Vagrant box that we have installed has two built-in accounts:
- Username: vagrant Password: vagrant
- Username: Administrator Password: vagrant
Conclusion
I hope this post has been a comprehensive guide to containerize a virtual machine. There are different advantages of running a VM in a Container; one of them is running multiple Containers simultaneously. You can automatically build the desired image using a Dockerfile, or you can build it manually by running each command individually. We have covered both ways in this post.
The Windows Docker container is gaining significant popularity, allowing users to easily deploy Windows 11, 10, 8.1, XP, etc., as a container and later access it via a browser (with VNC).
Before you confuse it with just a container, let me clarify that it uses Docker to download Windows images from the Microsoft server and then automatically configure it for installation, but behind the scenes, the downloaded image will be running in KVM (virtual emulator).
So, you need to ensure that virtualization is enabled in your BIOS settings, but the question arises: why do you need to run Windows in a Docker container then? The answer is quite simple. I’ve written a few points below that explain the advantages of running Windows in a Docker container.
- It is completely free, open-source, and legal.
- Automatically download the chosen Windows image from the Microsoft Server (for the latest Windows) or Bob Pony (for legacy Windows).
- Easy access to Windows 11, 10, 8.1, 7, Vista, XP, or Windows Server 2022, 2019, 2016, 2012, 2008, and more.
- It automatically configures the image and installs Windows, eliminating the need for going through manual installation. So, you can just run the Docker command and wait for your system to boot up.
- Access your RAM, storage, GPU, USB devices, etc., within the container.
- Easily delete and reinstall Windows like a sandbox.
- Access Windows locally or remotely via a browser.
- Use keyboard shortcuts through the remote desktop.
- Access the Windows applications and games that Wine cannot handle properly.
Now, there are certain things (consider them cons) that you need to take care of; thus, they are.
- Make sure that virtualization is enabled in the BIOS settings for Windows running in the Docker container, which uses KVM.
- The Windows within the container remains unactivated (though activation is possible through a purchased license key).
- Hardware devices like PCI and WiFi adapters cannot function (instead, opt for virtual machines).
- It demands the same system requirements as the original Windows (thus, less RAM results in slower speeds).
So, let’s see how you can install and set up the Windows 11 Docker container and access it via a web browser in Linux (such as Debian, Ubuntu, Arch, RedHat, Fedora, etc.).
How to Setup a Windows 11 Docker Container on Linux
To set up a Windows 11 Docker container, you need to ensure that Docker and Docker Compose are installed and configured on your system, after which you can follow one of the below-mentioned methods to set it up based on your preference.
- Using a single “
docker run” command (ease of use). - Using the “
docker-compose.yml” file (customization options are available).
I’ll explain how to set it up using both of these methods, so you can decide which is the perfect choice for you. Starting with…
Method 1: Using the Docker Run Command
This method is quite easy to follow because all you need to do is run the following command:
- Add the Current User to a Docker Group
$ docker run -it --rm --name windows -v /var/win:/storage -p 8006:8006 -p 3389:3389 --device=/dev/kvm --cap-add NET_ADMIN --stop-timeout 120 dockurr/windowsWhereas:
- “
docker run -it --rm“: This is a Docker command to initiate a container in interactive mode, and with the “--rm” option, the container will be removed once terminated. - “
--name windows“: This sets the name of the container (which you can verify using the “docker ps” command). - “
-v /var/win:/storage“: The downloaded image and configuration files will be stored here, so later, when the container is reinitialized, you do not have to start from scratch. - “
-p 8006:8006 -p 3389:3389“: This exposes port 8006 for browser access through VNC and port 3389 for remote desktop. If you do not plan to use remote desktop, then remove the “-p 3389:3389” part. - “
--device=/dev/kvm“: Specifies the KVM file. - “
--cap-add NET_ADMIN“: Grants additional network capabilities to the container. - “
--stop-timeout 120“: Specifies a grace period in seconds (in this case, 120) for a running container to shut down gracefully before it is forcefully terminated. - “
dockurr/windows“: This is the image of the container.
Once you issue the command, you can check the status of the Windows 11 container by visiting “http://localhost:8006” in your browser.
Method 2: Using Docker Compose File
This method is for advanced users, as it requires a few manual steps to create the Windows 11 container using a compose file. So, to begin, first create a directory, and inside it, create a compose file with the following commands:
$ mkdir ~/Windows-Docker && cd ~/Windows-Docker
$ touch docker-compose.yml
Now, within the compose file, you can copy and paste the following compose template, which I manually adjusted while keeping customization and ease of use in mind. Feel free to change the highlighted red values according to your preferences.
version: "3"
services:
  windows:
    image: dockurr/windows
    container_name: windows
    devices:
      - /dev/kvm
    cap_add:
      - NET_ADMIN
    ports:
      - 8006:8006
      - 3389:3389/tcp
      - 3389:3389/udp
    stop_grace_period: 2m
    restart: on-failure
    environment:
      VERSION: "win11"
      RAM_SIZE: "4G"
      CPU_CORES: "4"
      DISK_SIZE: "64G"
    volumes:
      - /var/win:/storage
In the above compose template, most of the stuff is the same as the previously mentioned “docker run” command in method 1, so if you are directly visiting this method, make sure to first check that out.
The remaining options, which are new and consist of environment parameters such as “RAM_SIZE“, “CPU_CORES“, and “DISK_SIZE“, can be adjusted based on your preference and ensure that your system has the specified resources.
Now, once you have copied and pasted the provided compose template into the compose file, you can save, close the file, and execute the following command to start the container.
$ docker compose up -dHow to Access Windows 11 Running on a Docker Container
Once the container is initialized, it will begin downloading the mentioned Windows image, extracting it, and building it. You can open your favorite Firefox or Chrome browser and visit “http://localhost:8006” to monitor the status of your container.
The following is a picture of when the Windows 11 image is being downloaded.
Once the download process is complete, it will automatically begin installing Windows 11 in a Docker container without requiring any manual steps.
This process will take a few minutes, so you can take a coffee break and come back when you see the following Windows 11 home screen.
Congratulations! You have successfully set up a Windows 11 Docker container on your Linux system. Now, below, I’ve attached a few images of running different applications to give you an idea of how they look.
The following is an image of Notepad running on a Windows 11 Docker container:
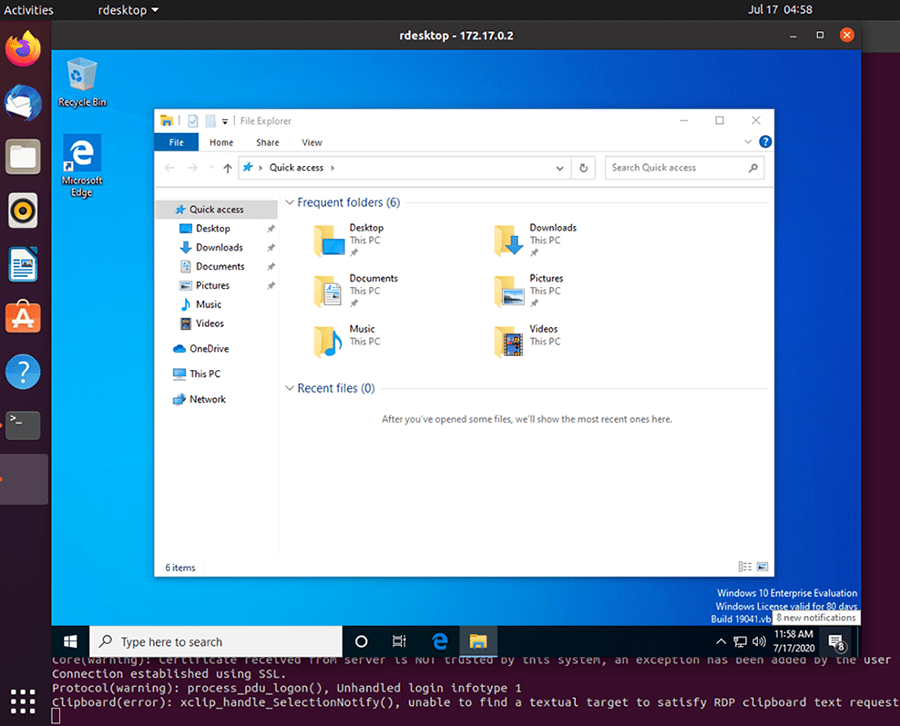
The following is an image of File Explorer on a Windows 11 Docker container:
The following is an image of the Control Panel on a Windows 11 Docker container:
That’s it. Now you can use it like your regular Windows 11 machine on your Linux system without a virtual machine. Once you’re done using it, you can terminate it from your terminal.
Additional Tips on Using Windows on a Docker Container
Instead of accessing the Windows 11 Docker container from your browser through VNC, I would suggest you first enable remote desktop from Windows settings and then access it via a remote desktop client application to easily use keyboard shortcuts and achieve a proper screen view.
Now, in this article, we focus on setting up a Windows 11 container, but you can set up different Windows versions, such as 10, 8.1, 7, XP, or Windows Server, by simply replacing “win11” from “VERSION: "win11"” under environment in the compose file with the value mentioned in the following tables.
| Value | Description | Source | Transfer | Size |
|---|---|---|---|---|
win11 |
Windows 11 Pro | Microsoft | Fast | 6.4 GB |
win10 |
Windows 10 Pro | Microsoft | Fast | 5.8 GB |
ltsc10 |
Windows 10 LTSC | Microsoft | Fast | 4.6 GB |
win81 |
Windows 8.1 Pro | Microsoft | Fast | 4.2 GB |
win7 |
Windows 7 SP1 | Bob Pony | Medium | 3.0 GB |
vista |
Windows Vista SP2 | Bob Pony | Medium | 3.6 GB |
winxp |
Windows XP SP3 | Bob Pony | Medium | 0.6 GB |
2022 |
Windows Server 2022 | Microsoft | Fast | 4.7 GB |
2019 |
Windows Server 2019 | Microsoft | Fast | 5.3 GB |
2016 |
Windows Server 2016 | Microsoft | Fast | 6.5 GB |
2012 |
Windows Server 2012 R2 | Microsoft | Fast | 4.3 GB |
2008 |
Windows Server 2008 R2 | Microsoft | Fast | 3.0 GB |
core11 |
Tiny 11 Core | Archive.org | Slow | 2.1 GB |
tiny11 |
Tiny 11 | Archive.org | Slow | 3.8 GB |
tiny10 |
Tiny 10 | Archive.org | Slow | 3.6 GB |
Final Word
I find it very interesting to use a Windows machine within a Docker container, with the added benefit of its automatic installation process eliminating the need for manual steps. However, you can opt for manual installation by specifying “MANUAL: "Y"” in the environment.
Another great aspect of using it is running legacy games on your system that require older versions of Windows, or free games shipped with Windows XP and 7. It’s better for running most applications that the Windows compatibility layer (such as Wine) can’t handle.
However, I want to know if you find it interesting and, if so, what you plan to use it for. Let me know in the comment section.
Till then, peace!

When it comes to creating reproducible and isolated development environments, two leading technologies reign: Docker and Vagrant. Docker facilitates containerization by bundling applications and dependencies together, making the applications platform-independent. On the other hand, Vagrant is a tool for virtual environments, allowing the creation and management of virtual machines (VMs). Running a Vagrant VM, particularly a Windows VM, inside a Docker container creates a unique combination that can offer remarkable benefits, especially in the field of Continuous Integration (CI) and Continuous Deployment (CD). 🔂 🚀
Today, we’ll tap into an existing GitHub repository that demonstrates how to implement a Windows VM within this Docker/Vagrant setup. The repository can be found at the following URL: https://github.com/vaggeliskls/windows-in-docker-container
Prerequisites 📑
Before proceeding, the following tools should be installed on your system:
- Docker
- Docker-compose
How to Use It 🛠️
- Create an environmental file .env with VMs specifications
# Vagrant image settings
MEMORY=8000 # 8GB
CPU=4
DISK_SIZE=100
Enter fullscreen mode
Exit fullscreen mode
- Create a
docker-compose.ymlfile
version: "3.9"

services:
  win10:
    image: docker.io/vaggeliskls/windows-in-docker-container:latest
    env_file: .env
    stdin_open: true
    tty: true
    privileged: true
    cgroup: host
    restart: always
    ports:
      - 3389:3389
      - 2222:2222
Enter fullscreen mode
Exit fullscreen mode
- Run:
docker-compose up -d

Remote Desktop 🖥️
For debugging purposes or testing, you can always connect to the VM with remote desktop software products. Some software that used when developed was:
- Linux: rdesktop IP:3389 or remina
- macOS: Windows remote desktop
- Windows: build in Remote Windows Connection
User login 👤
The default users based on vagrant image are
- Administrator
- Username: Administrator
- Password: vagrant
- User
- Username: vagrant
- Password: vagrant
Conclusion 👋
Running a Vagrant Windows VM inside a Docker container merges the benefits of Docker’s platform-independent containerization with Vagrant’s controlled, easy-to-manage development environments. Although such a setup won’t fulfill every use case, understanding how Docker and Vagrant operate and interact is highly beneficial for DevOps professionals.
Remember, different configurations exist and this setup can be tweaked to suit specific application requirements. Be aware that running a VM inside a Docker container can be resource-intensive, so always check your system’s specifications before proceeding. 📝
Happy coding!
References 📚
- Windows Vagrant Tutorial
- Vagrant image: peru/windows-server-2022-standard-x64-eval
- Vagrant by HashiCorp
- Windows Virtual Machine in a Linux Docker Container
- Windows GitHub action runner
- Windows in container
Can You Run Windows Containers on Linux? Yes. Linux-based virtualization platform Docker can run Windows containers. As long as you have experience using Kubernetes and clusters of Docker nodes, you can run Windows containers on Linux. However, there are some differences between Windows and Linux containers. Here’s an explanation. The difference between a Windows container and a Linux container is that a Windows container is a virtual machine that runs on a Linux host.
Linux containers have union filesystems, while Windows container images have a hybrid implementation. As a result, Windows containers are slower than Linux ones. Docker images are much larger than Linux ones, so they take longer to download. However, this isn’t a huge disadvantage. If you need to run Windows containers, you’ll want to make sure you have enough disk space for them. Windows containers are best for a single computer, as they have a larger memory footprint.
In order to run Windows containers on Linux, you must have the same version of the Windows operating system as the Linux container. If you’re running Windows containers on Linux, make sure the Windows operating system is matching the build number of the container’s host system. If you’re running Windows containers on Linux, you can also use Docker Desktop to run mixed containers. But make sure to check the compatibility table provided by Microsoft to avoid any mishaps.
If you’re running a Windows server, you may be wondering if Windows-based containers can run on Linux. The answer to this question depends on Microsoft. While it is possible to run Windows-based containers on Linux, this has not been the case for years. Microsoft released the Linux subsystem a year ago, but it didn’t solve the problem of portability. While Windows-based containers can run on Linux, running them on a Mac will require a custom kernel.
The first thing to consider is the type of operating system that you’re running. If you’re running Linux, you’ll need a native system for Docker to run. Alternatively, you can install Windows using the Windows Admin Center. Then, you can run Docker in a virtual environment using a hypervisor. Hypervisors are software that sit on top of the host OS. Because you need a Linux system, you must install the hypervisor separately.
Can I Run Windows Docker Container on Ubuntu?
You’re probably wondering: Can I run Windows Docker Container on Ubuntu? Windows containers are quite different from Linux ones. They take up more disk space, but they are more efficient. That’s because Linux images are much smaller than Windows images, and they’re already in the virtual machine. In addition, running Windows containers on Ubuntu means that you’ll have more memory to run more VMs. But this doesn’t mean that running Windows containers on Linux isn’t worth it if you don’t need it.
While Windows containers are not natively supported by Ubuntu, they can be installed on other Linux distributions, including Mac OS X. You can use the Docker Hub as a repository for Windows containers, but remember that there are rate limits on it. You’ll want to migrate your dependencies to the Artifact Registry or Container Registry. Microsoft provides extensive documentation on Windows containers. There are some common problems when running Windows containers, though. For example, RDP sessions may stop or DNS resolution may fail inside the container.
Can Containers Run on Linux?
When deploying your applications, you may want to use Linux or Windows containers. However, if you want to run your Windows containers on Linux, there are several differences. For one thing, Windows containers do not support Cgroup or separate namespace implementation. Instead, they use the Compute Service Layer, which also provides namespaces, resource control, and UnionFS capabilities. In addition, Windows containers cannot use runC, which is the command-line interface that Linux containers do.
Fortunately, Windows containers can run on Linux as long as they have the Linux subsystem. In addition, Linux containers can communicate with Windows containers if they are on the same host machine. Although Windows containers cannot run as-is on Linux, they can run in a VM on a Linux host. To ensure that Windows containers run on Linux, you should set up port-forwarding rules on your network. If you want to run Windows containers on Linux, you should use the Docker desktop application.
Another important issue is security. Since Windows applications cannot directly make system calls, they have to communicate with a dynamic linked library (DLL). The DLL talks to the windows manager, which performs the action required by the application. The underlying process is not well documented, but the end result is the same: your applications are exposed to vulnerabilities. While there are a few ways to reduce the risk of vulnerabilities, Docker can help you secure your applications.
Which is Better Docker on Windows Or Linux?
If you are looking to use Docker containers, you probably have a choice between Windows and Linux. While Linux users may have the advantage of a native Docker environment, Windows users should be aware that Docker requires additional software. Windows users are better off using VirtualBox, as it offers much better performance than Docker alone. Fortunately, there are a number of benefits to using Docker containers on Windows.
When deciding which is better, it helps to know which platform your application is using. The most obvious reason for using Linux is that Docker is part of CoreOS, which is a specialized OS designed for single-purpose applications. Windows users should not run Docker directly on Windows, but they can run Docker in the virtual machine environment with the Hyper-V mode. This feature allows Windows users to run the software without sacrificing the experience of running Docker.
Another reason for using Docker is the ability to share OS and software. Windows development teams can run containers on a dedicated Hyper-V instance, while Linux users can do the same with a regular virtual machine. However, Linux developers may want to use Windows containers to share files and folders with their Linux counterparts. Using Docker on Windows can make this possible. While Linux has its advantages, Windows developers may find that Windows containers have more advantages.
Is Docker Still Free on Linux?
The question of “Is Docker Still Free on Linux?” arises because Docker is still free for personal use. However, the paid versions of the software come with additional features and premium customer support bundles. In addition to the free version, the paid plans offer scalable consumption of Docker images and ancillary services. In addition to the free version, the paid versions offer Image Access Management and centralized SaaS management for multiple Docker development environments. While Docker does offer paid subscription plans, the free Docker Desktop service is limited to small businesses and individuals. This is a problem because Docker needs money to stay in business.
The Docker Desktop is not free on Linux, but it is available for Windows and Mac users. It acts as a virtual machine. This application is needed if you’re using Docker on a non-Linux OS. Docker’s other components are the Docker CLI and Docker Engine, which are all licensed under an Apache v.2 license. While the Docker Desktop is available for free, the Docker CLI is not.
Can Kubernetes Run Windows Containers?
The official documentation on Kubernetes suggests that you can run Windows containers. Windows containers support most features of Kubernetes, including persistent storage networking. Whether Windows containers will run on Linux is unclear, but there are some factors to consider. Here’s a list of things to keep in mind. Pods should not exceed 3 GB of RAM, and workload resources should be sufficient.
While Kubernetes doesn’t support running Windows containers on Linux, Windows-based operating systems can be used in hybrid clusters. The cluster’s control plane runs on Linux, but the worker nodes run on Windows. The newer version of Kubernetes supports running Windows workloads, so operators can expect to see the same features they have with Linux. Microsoft has been a supportive partner for Kubernetes since 2014.
The pause container holds the network namespace for the pod. It only has a few responsibilities. The job of the pause container is to acquire the IP address of the pod and set up the network namespace. When this is complete, the container goes to sleep and comes back to life without losing its network setup. To run Windows-based containers on Linux, you must ensure that the image you use for the pause container matches the version of the worker node’s Windows operating system. If the two operating systems aren’t compatible, deployment can fail.
Can I Run Windows Inside Docker?
If you run a containerized Windows application on Linux, you’ll need to modify its installer to use the Windows container’s default settings. This way, you can standardize the way the application is launched and deployed. However, this can be difficult, as many applications only support a small set of command line options. You may have to modify the installer to run Windows applications in a Docker container.
The good news is that Windows and Linux containers can be run side by side in the same networking namespace. Windows users will be able to use both Linux and Windows containers in their projects. The key difference between Windows and Linux containers is that the former use the host machine’s resources. While Windows containers cannot run as-is on Linux, you can install them into separate virtual machines. For example, you could install a Windows VM inside a Linux container, and use the latter on a Windows host.
The first step in running Docker on Linux is to install the required software. The installation process requires a paid subscription. You must have at least 25 employees and $10 million USD in annual revenue. A paid subscription will give you access to the software and download instructions. Be sure to install the latest version, or upgrade to an Education or Enterprise version. In addition, you need to make sure that you’re running a version of Docker with WSL 2.
Learn More Here:
1.) Windows Help Center
2.) Windows – Wikipedia
3.) Windows Blog
4.) Windows Central