
Недостатки DNS
Системы разрешения имен DNS, являющаяся одной из основ современной системе сетевых взаимодействий, разрабатывалась более 20 лет назад, когда о вопросах защиты информации почти не задумывались. Одним из основных недостатков системы DNS является возможность подделки ответа на DNS запрос.
Проблема в том, достоверность ответа DNS-сервера никак не проверяется, это означает, что в случае взлома DNS сервера (и перенаправления его на ложные DNS сервера), подделки DNS записи, отравлении кэша DNS (DNS cache poisoning), можно отправить пользователя на произвольный IP адрес, причем пользователь будет находится в полной уверенности, что он работает с легитимным сайтом или сервисом. Этими методиками широко используют злоумышленники, перенаправляя пользователей на сайты, содержащие вредоносные коды или собирая их личные данные (пароли, номера кредиток и т.п.) с помощью т.н. pharming атак.
Зачем нужна технология DNSSEC
DNS Security Extensions (DNSSEC) – технология, предназначена для повышения безопасности службы DNS за счет использования криптографических подписей, позволяющих однозначно удостоверится в подлинности информации, полученной от DNS сервера. Т.е. все запросы и ответы DNS сервера с поддержкой DNSSEC должны обладать цифровой подписью, верность которой может проверить клиент с помощью открытого ключа. Эти цифровые подписи создаются при подписывании зоны (применения к ней DNSSEC).
Упрощенно механизм проверки DNSSEC работает так: клиент отправляет запрос на DNS сервер, сервер возвращает DNS ответ с цифровой подписью. Т.к. клиент обладает открытым ключом центра сертификации, подписавшего записи DNS, он может расшифровать подпись (хэш-значение) и проверить ответ DNS. Для этого и клиент и сервер DNS должны быть настроены на использование одного якоря доверия (trust anchor). Trust anchor – предварительно настроенный открытый ключ, связанный с конкретной зоной DNS. Если DNS сервер поддерживает несколько зон, то может использоваться несколько якорей доверия.
Важно отметить, что основное предназначение DNSSEC – защита от подделки и модификации DNS-запросов и ответов. Но сами передаваемые по сети данные не шифруются (хотя конфиденциальность передаваемых DNS данных и может быть обеспечено с помощью шифрования, но это опционально и не является основной целью DNSSEC).
Основные компоненты DNSSEC определены в следующих стандартах RFC:
- RFC 4033
- RFC 4034
- RFC 4035
DNSSEC в системах Windows
Поддержка технология DNSSEC появилась еще в Windows Server 2008 R2 и Windows 7. Однако из-за сложности и неочевидности настроек, широкого распространения она не получила. Свое дальнейшее развитие DNSSEC получила в Windows Server 2012, в котором функционал DNSSEC был существенно расширен, и предполагает возможность настройки через графический интерфейс.
В этой статье мы опишем базовую установку и настройку DNSSEC на базе DNS сервера с ОС Windows Server 2012, создадим подписанную зону и точки доверия.
Установка и настройка DNSSEC в Windows Server 2012
Создадим новую DNS зону dnssec.contoso.com и добавим в нее одну A запись сервера SRV12 с адресом 192.168.1.14.
Примечание. В Windows 8/2012 вместо утилиты nslookup для получения информации с DNS сервера лучше воспользоваться Powershell командлетом Resolve-DnsName.
Resolve-DnsName srv12.dnssec.contoso.com –Server SRV12-SUB-CA –DnssecOk

Т.к. зона не подписана, запрос не вернет записи RRSIG.
Подпишем цифровым сертификатом внутреннюю DNS зону dnssec.contoso.com. Для этого в консоли DNS щелкните правой кнопкой по зоне и выберите пункт DNSSEC->Sign the Zone.

В появившемся мастере Zone Signing Wizard оставьте все параметры по умолчанию (Use default settings to sign the zone) -> Next -> Next -> Finish.

После окончания работы мастера в подписанной зоне автоматически создадутся следующие новые ресурсные записи:
- RRSIG (Resource Read Signature) — подпись ресурсной записи
- DNSKEY (A Public Key) – хранит публичную часть ключа и его идентификаторы
- DS (Delegation Signer) – содержит хэш доменного имени наследника и его ключа KSK
- NSEC (Next Secure) и NSEC3 (Next Secure 3) – используется для надежной защиты от spoofing атак

После того, как зона подписана, открытый ключ будет сохранен в файле %windir%\system32\dns\keyset-dnssec.
Импортируем в DNS открытый ключ зоны (тот самый якорь доверия), перейдя в консоли DNS в раздел Trust Point, выбрав import -> DNSKEY, и указав путь к файлу keyset-dnssec.
Примечание. Данный ключ необходимо распространить на все DNS сервера, которым будут участвовать в процессе безопасного кэширования данных подписанной зоны.

В результате импорта ключа в разделе Trust Points -> dnssec появится два ключа типа DNSKEY (один ключ активный, другой — standby).

В Windows Server 2012 возможно автоматически реплицировать ключи якорей доверия (Trust Anchors) по всем контролерам домена в лесу, обслуживающем данную зону DNS. Для этого в свойствах нужной зоны (dnssec) на вкладке Trust Anchor включите опцию Enable the Distribution of Trust Anchors for this zone и сохраните изменения.

Попробуем еще раз опросить данную зону с клиента.

Как мы видим, в ответе DNS сервера есть информации об RRSIG записи и цифровой подписи.
Настройка клиентов WIndows на использование DNSSEC
Чтобы заставить клиентов на ОС Windows принудительно использовать только «безопасные» (DNSSEC) запросы, т.е. принимать DNS данные только в том случае, если их цифровая подпись верна, необходимо с помощью GPO задействует политику NRPT (Name Resolution Policy Table).
Для этого в разделе GPO Computer Configuration -> Polices -> Windows Settings -> Name Resolution Policy на вкладке DNSSEC включите опции:
- Enable DNSSEC in this rule
- Require DNS clients to check that name and address data has been validated by the DNS server

Осталось назначить политику на нужную OU. После применения политики убедимся, что клиент настроен на использование «безопасного» DNS:
Get-DnsClientNrptPolicy

Значение DNSSecValidationRequired=True, т.е. на клиенте требуется обязательная валидация ответов DNS.
В том случае, если полученный от DNS сервера ответ не будет подписан, или будет подписан неверным сертификатов, команда вернет ошибку Unsecured DNS packet.
DNSSEC для внешних зон
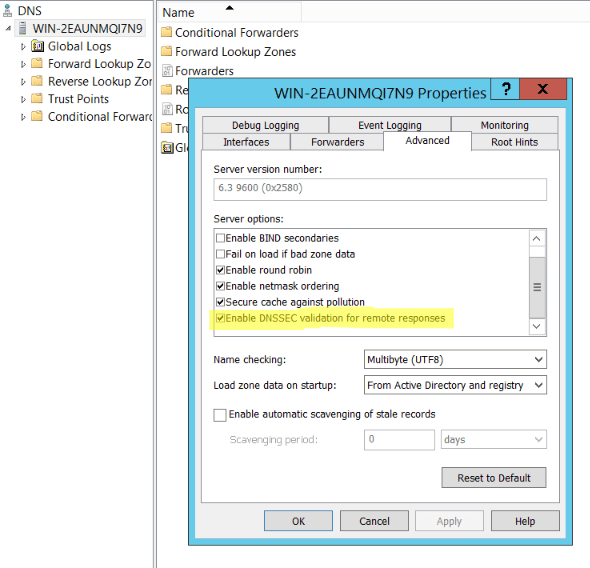
Чтобы DNS сервер требовал обязательной проверки DNSSEC для внешних зон, нужно в его свойствах на вкладке Advanced включить опцию Enable DNSSEC validation for remote responses.

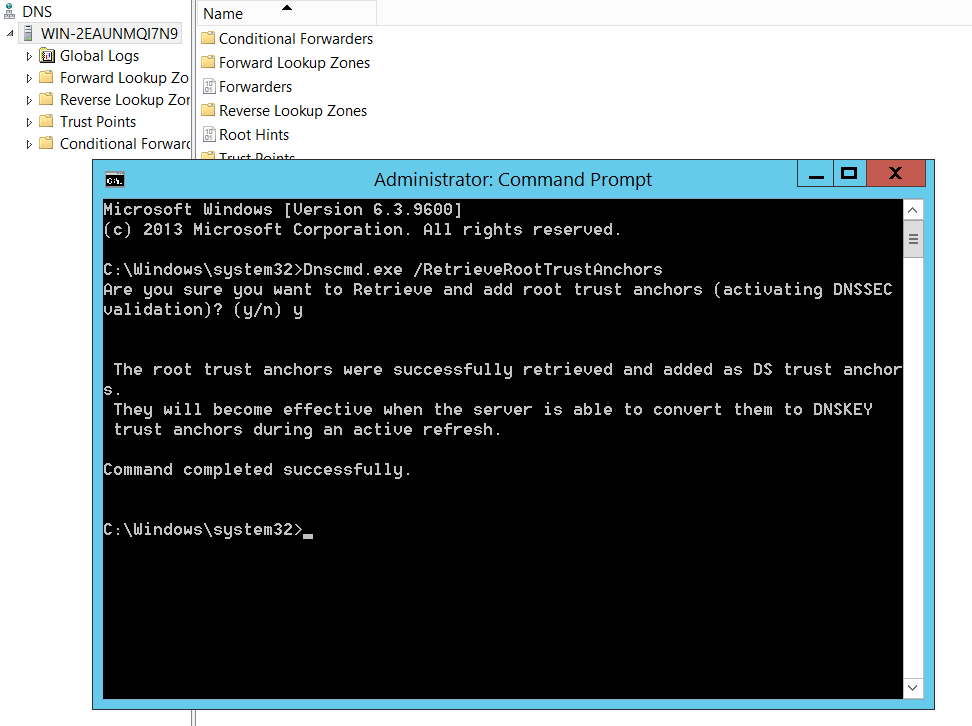
Импортировать якоря доверия корневых зон можно вручную (описано выше), либо с помощью команды:
dnscmd /RetrieveRootTrustAnchors
Совет. Для корректной работы DNSSEC необходимо внести ряд изменений в межсетевые экраны:
- Открыть в обе стороны порт 53 порт протоколов TCP и UDP
- Т.к. размер данных в пакете DNSSec превышают 512 байт, необходимо разрешить прохождение DNS пакетов более 512 байт по UDP и TCP
Tento článek si můžete zobrazit v originální české verzi. You can view this article in the original Czech version.
DNSSEC na Microsoft DNS Serveru
DNSSEC is used to secure DNS records from being spoofed. On Windows Server, we can install the DNS Server role and run an Authoritative Name Server, which manages a specific domain (zone), or a Recursive Name Server, which is used to look up the answer to a client’s DNS query. In both cases, DNSSEC is supported. In this article, we will describe how DNSSEC is used on Microsoft DNS Server. We will focus on public domain signing on the Internet, but we will also mention other uses.
Note: I have practically tested this on Windows Server 2016 and 2019.
The main description of DNSSEC is in the previous article DNSSEC — Domain Name System Security Extensions.
This article first describes specific details and principles for Microsoft — Microsoft and DNSSEC. The second part contains a practical description of zone signing, publishing the DS record with CZ.NIC, and key rollover — DNSSEC on an Authoritative DNS Server.
Microsoft and Domain Name System Security Extensions
Documentation
- Overview of DNSSEC
DNSSEC Support
Microsoft supports DNSSEC on the DNS Server role of the Windows server. It seems that not much has changed since Windows Server 2012 R2. In fact, there is no mention of it in the newer documentation. When enabling DNSSEC on Windows Server 2019, the documentation refers to the 2012 version.
DNSSEC support on the DNS server came with Windows Server 2008 R2, but only with offline signing. It was expanded in Windows Server 2012, where online signing of dynamic zones, support for NSEC3, RSA/SHA-2, and RFC 5011 were added. Signing keys are generated automatically, and automatic key rollover is supported. For zone signing, we can specify parameters or use the settings of another zone. When the zone is updated, it is automatically re-signed. If the zone is integrated into AD, the keys are automatically replicated.
For full DNSSEC functionality, we need:
- the primary authoritative DNS server must support zone signing
- the primary and secondary authoritative DNS servers must support hosting the signed zone
- the recursive DNS server must support DNSSEC validation of the DNS response
DNSSEC requires support for the EDNS0 extension, which supports large UDP packets in the DNS response. These must be able to pass through the entire network (they must not be blocked by active network devices).
DNS Client in Windows
- DNS Clients
Client-side support is available from Windows 7. The DNS client (even in the server OS) is DNSSEC-aware, meaning it supports DNSSEC, but does not perform validation. The exact designation is Non-Validating Security-Aware Stub Resolver. It can be configured to require DNSSEC verification from its DNS server. Even a client that does not support DNSSEC can be protected by DNSSEC if its DNS server performs the verification (it will not send the client a DNS response if the verification fails).
The DNS client in Windows does not automatically require validation of DNS responses. This must be specifically enabled for a particular namespace using the Name Resolution Policy. In the policy, you can set the requirement for verification for certain DNS zones (Namespace).
Description of The NRPT, Procedure: Review Name Resolution Policy Settings, Checklist: Deploy DNSSEC Policies to DNS Clients.
If the DNS Server has installed the Trust Anchor for a certain zone and has DNSSEC validation enabled, it will automatically try to verify the DNS response, even if it is not required in the NRPT Policy. So even a Non-Security-Aware Client is protected because it will not receive a response to an invalid record. If a zone is not signed (unsigned), a Trust Anchor must not be set for it on the DNS servers, otherwise the verification will always fail.
Microsoft DNS Server
Microsoft uses the following terms for the main two Name Server types:
- Authoritative DNS Server — a server that manages (and signs) records for a zone (domain)
- DNSSEC-aware Recursive (or Forwarding) DNS Server — (sometimes also Non-Authoritative DNS Server) a server that, when it receives a query for a signed zone from a DNS client, requests the DNSSEC records from the Authoritative DNS Server as well. It then attempts to perform signature verification.
- it recognizes that the zone supports DNSSEC by the existence of the DNSKEY (Trust Anchor) for the zone
- if verification is successful, it provides the answer
- if not, it responds with the SERVFAIL message
- if the DNS client is DNSSEC-aware, it can be configured to require the DNS server to perform DNSSEC validation
When a zone is signed using DNSSEC, the DNS Server automatically creates all DNSSEC records, except for the DS record. This must be created in the parent zone or in a child zone and propagated to the parent. NSEC or NSEC3 (which cannot be used together) are also automatically created.
The Microsoft DNS server or DNS zone can be:
- Active Directory-integrated — the server is in the domain, the data is stored in AD DS
- File-backed — a standalone server, the data is stored in a file (DNS database)
On the authoritative DNS server, we can create a domain (zone) that is:
- public, delegated on the internet — it belongs to the Internet namespace, which starts with the root zone (.), trust is handled within the DNS tree
- local, internal (non-public) — available only on the internal network, we run a separate namespace (Private DNS zone) on local DNS servers, where the root DNS server is
When operating a Microsoft DNS Server on an internal network, it often serves as recursive for DNS queries from internal clients (it is set as their DNS server in the TCP/IP network adapter settings), but also as authoritative for a certain internal or public domain.
For our DNS server to verify domains on the internet, we must install the root Root Trust Anchor (.) and enable DNSSEC Validation. Otherwise, we can install a Trust Anchor only for a selected zone.
Key Master
Key Master is the DNS server responsible for generating and managing the keys for a signed zone using DNSSEC. Only one DNS server for a given zone can be the Key Master, and it must be the primary authoritative server. One server can be the Key Master for multiple zones. The Key Master function can be moved to another DNS server (that meets the requirements).
RFC 5011
Microsoft supports RFC 5011 for updating Trust Anchors within defined Trust Points (when acting as a recursive DNS Server — Resolver) and also for key rollover on a signed zone (when acting as an authoritative DNS Server). The description of this RFC seems rather vague to me, but I’ve tried to outline some of the main points as I understood them.
The document describes means for automated, authenticated, and authorized DNSSEC Trust Anchor updates. Based on the trust established by the presence of the current Trust Anchor, additional Trust Anchors can be added further up the hierarchy, and eventually replace the existing one.
It adds a new flag (Flag/bit) to the DNSKEY record called REVOKE (bit 8). A key marked with this flag must not be used by the Resolver as a Trust Anchor (it can only be used to verify the DNSKEY signature for the purpose of verifying the revocation). A DNSKEY with the REVOKE bit set has a different digest (and thus Key Tag) than a key without the bit set. This affects the DNSKEY-DS match in the parent zone.
- (Remove) Hold-Down Time — adds a delay where the Resolver accepts a new (or removes an old) Trust Anchor only after (typically) 30 days have elapsed
- Active Refresh — a Resolver set to automatically update keys from a certain Trust Point must query (find the set of DNSKEY records and their signature) at least once an hour, but at least once every 15 days (or half the TTL for DNSKEY or half the signature expiration interval).
Considerations for Enabling DNSSEC for a Domain
Public DNS zones that are connected to the internet (not part of AD DS) and must be publicly accessible are particularly vulnerable to attack. Therefore, it is often worth deploying DNSSEC for them. The significance of the domain must be considered.
Internal DNS zones used for the AD DS domain are usually less vulnerable to attacks because they are not exposed to the internet or are protected by other security mechanisms. Therefore, the administrative burden associated with running DNSSEC may not be worth it.
DNSSEC deployment means adding many records (increasing the size of the zone) and requires encryption and decryption of records. It has an impact on the performance of the DNS infrastructure and increases the administrative burden. The length of the cryptographic keys affects the ability to be compromised by a Brute Force Attack versus a greater impact on performance. Description of DNSSEC Performance Considerations.
Enabling DNSSEC on the DNS Server
Initially, I thought it was just about enabling DNSSEC validation on the DNS server. But in practice, I found that the configuration (activation) is common for the entire DNSSEC operation. If DNSSEC is not enabled on the DNS server, we can still sign the zone, but the server will not return the signatures (DNSSEC records) when queried.
On Windows Server 2012 R2, it was possible to configure using the DNS Manager in the properties of the DNS server on the Advanced tab, the item Enable DNSSEC validation for remote responses. In newer versions, we must use the command line, either a PowerShell cmdlet or the dnscmd command.
Checking the status to see if DNSSEC is enabled.
PS C:\> Get-DnsServerSetting | FL EnableDnsSec
EnableDnsSec : False

C:\>dnscmd /info /enablednssec
Query result:
Dword:  0 (00000000)
Command completed successfully.
Under certain conditions, DNSSEC is automatically enabled. Or we can perform manual activation (the easier way is using the dnscmd command).
$a = Get-DnsServerSetting -All
$a.EnableDnsSec = 1
$a | Set-DnsServerSetting

DnsCmd.exe /Config /enablednssec 1
DNS queries (and NRPT) using PowerShell
For DNSSEC DNS queries, we cannot use nslookup, but there is a PowerShell cmdlet Resolve-DnsName with the DnssecOk parameter.
PS C:\> Resolve-DnsName -name www.seznam.cz -type A -Server 8.8.8.8 -DnssecOk

Name                                           Type   TTL   Section    IPAddress
----                                           ----   ---   -------    ---------
www.seznam.cz                                  A      299   Answer     77.75.75.172
www.seznam.cz                                  A      299   Answer     77.75.74.172

Name        : www.seznam.cz
QueryType   : RRSIG
TTL         : 299
Section     : Answer
TypeCovered : A
Algorithm   : 13
LabelCount  : 3
OriginalTtl : 300
Expiration  : 25.01.2022 6:40:29
Signed      : 11.01.2022 5:10:29
Signer      : seznam.cz
Signature   : {156, 187, 169, 33...}

Name      : .
QueryType : OPT
TTL       : 32768
Section   : Additional
Data      : {}
In the example above, the client requests DNSSEC information, but not response verification, because the Name Resolution Policy Table (NRPT) is not set to require it.
We can list the policy with the following command, if it is not set (using Group Policy), the result will be empty.
Get-DnsClientNrptPolicy
If the policy exists, we can modify the values for a specific NameSpace. For example, to require verification (if set, the DNS query will always have the DO bit set, even if the DnssecOk parameter is not used)
(Get-DnsClientNrptPolicy -NameSpace secure.contoso.com).DnsSecValidationRequired
Trust Anchors and Trust Points
Microsoft uses the term Trust Anchor a lot, and in some places (even interchangeably) the term Trust Point. It describes that it is a public cryptographic key for a signed zone (i.e., obtaining trust in the signatures in that zone). It can be a DNSKEY Trust Anchor, a public key from a DNSKEY record (Keyset — DNSKEYset), or a DS Trust Anchor, a DSset hash of the public key (as in Microsoft documentation, but correctly it is a hash of the DNSKEY record).
The Trust Anchor must be set on each non-authoritative (recursive) DNS server that attempts to verify the signed zone data. Thanks to the Chain of Trust, the root Trust Anchor is sufficient. The authoritative DNS server (hosting the given zone) does not need it for verification, as it trusts its own records (it does not verify its own records).
Delegation is the transfer of authority from one DNS server to another DNS server for a certain namespace. Delegation is commonly used to assign permissions for subordinate zones. For DNSSEC, delegation is done using the DS record, thereby creating a chain of trust.
On the authoritative DNS server, where we sign the zone using DNSSEC and which is also the Key Master, the Trust Anchors are automatically stored in the text files dsset-<zone.name> and keyset-<zone.name> in %windir%\system32\dns\. If it is a public domain on the internet (or there is a parent domain), we must insert the Trust Anchor (as a DS record) into the parent zone.
Trust Points for Validation
I understand a Trust Point as a configured Trust Anchor for verifying a certain zone. Or in other words, a container for a domain that contains the Trust Anchor and performs their automated renewal. It is set on the validating DNS server (DNSSEC-aware Recursive DNS Server with DNSSEC validation enabled). It then performs signature verification for all zones for which it has a Trust Point. If we want to verify DNSSEC on the internet, we must create a Root Trust Point.
We can manage Trust Points on a DNS server with DNSSEC validation enabled using the DNS Manager in the Trust Points container. If the DNS server is integrated into AD DS (and running on a domain controller), the Trust Anchors are stored within the Forest and replicated to all DNS servers running on the DCs. On a standalone DNS server, they are stored in the file %windir%\system32\dns\TrustAnchors.dns (local Trust Anchor Store).
Displaying Trust Points
On a DNS server with DNSSEC validation enabled, we can view the list of Trust Points (we see when they were last refreshed).
Get-DnsServerTrustPoint
Displaying Trust Anchors
For each Trust Point, we can display its Trust Anchors.
Get-DnsServerTrustAnchor -Name firma.cz
Exporting Trust Anchors
Since the DSset and Keyset Trust Anchors are automatically stored in a text file, we can just copy the files, which we can then use to import into the parent zone.
Or we can use a PowerShell cmdlet (the first is for exporting DNSKEY and the second for DS).
Export-DnsServerDnsSecPublicKey -ComputerName DC2.firma.cz -ZoneName sec.firma.cz -Path \\Myshare\keys
Export-DnsServerDnsSecPublicKey -ComputerName DC2.firma.cz -ZoneName sec.firma.cz -Path \\Myshare\keys -DigestType sha256
Importing or Creating Trust Points (Trust Anchors)
- Procedure: Import a Trust Point
On a validating DNS server, we can import a Trust Point using the DNS Manager:
- right-click on the Trust Points container
- under Import, choose DNSKEY or DS
- select the file
Similarly, we can create a record manually:
- right-click on the Trust Points container
- under Add, choose DNSKEY or DS
- enter the values
Or we can use a PowerShell cmdlet.
Import-DnsServerTrustAnchor -KeySetFile \\File1\DNSKeys\keyset-sec.firma.cz
Import-DnsServerTrustAnchor -DSSetFile \\File1\DNSKeys\dsset-sec.firma.cz
Importing the DS Record (Trust Anchor)
The DS record is not automatically created on the parent DNS server. We can add it manually or import the created file with the DS record set (DSset).
Import-DnsServerResourceRecordDS -ZoneName firma.cz -DSSetFile "c:\windows\system32\dns\dsset-firma.cz"
Deploying the Root Trust Point
- Procedure: Deploy a Root Trust Point, Updating of DNS Validating Resolvers with the Latest Trust Anchor
If we want our DNS server to verify DNSSEC for the internet, we must add a Trust Point for the root zone (.), i.e., the IANA Root Trust Anchor. We won’t use this method if we only want to verify DNSSEC in our network, where the local DNS server is the root server.
For deployment, the IANA URL set in the DNS server parameters is used. We can check the settings
PS C:\> Get-DnsServerSetting -All | Select RootTrustAnchorsURL
RootTrustAnchorsURL
-------------------
https://data.iana.org/root-anchors/root-anchors.xml
Adding the Root Trust Point. After creating it, the current DNSKEY record is automatically downloaded and the Trust Anchor is updated. It supports RFC 5011 for automatic Trust Anchor updates, where the existing Trust Anchors can be used to verify the new one.
Add-DnsServerTrustAnchor -Root
DNSSEC on the Authoritative DNS Server
Let’s look at a situation where we are the holder of a public domain on the internet and operate our own DNS server running on a Microsoft DNS server. When we want to secure this domain using DNSSEC, we must:
- sign the zone (the firma.cz domain)
- publish the DS record with the parent authority (to the TLD domain, CZ.NIC)
- when the KSK key changes, update the DS record
Signing the Zone
- DNS Zone — Zone Signing Wizard
Signing records can be activated for a specific zone (domain name — domain). When signing a zone on a Microsoft DNS server, we must first set up a number of parameters. The basis is generating ZSK and KSK key pairs. We can set automatic key rollover for them, so that new keys are generated and swapped after a specified number of days. After activation, the necessary DNSSEC records (DNSKEY, NSEC3, NSEC3PARAM, RRSIG) are created, and all existing records are signed (an RRSIG record is created for them). When a new record is created, it is immediately signed. During automatic ZSK rollover, all records are re-signed.
We can sign the zone using PowerShell cmdlets or the wizard in DNS Manager, which we will focus on. We can also display and edit the set parameters and unsign the zone. The DNS Manager shows the signed zone with a lock. The list shows the signed state and indicates who the Key Master is.
- in the DNS Manager console, use the Zone Signing Wizard
- right-click on the selected zone and choose DNSSEC — Sign the Zone

The wizard includes the following steps
- Signing options — choose Customize zone signing parameters
- Key Master — choose The DNS server … is the Key Master
- Key Signing Key (KSK) — add a new key
- Zone Signing Key (ZSK) — add a new key
- Next Secure (NSEC) — choose Use NSEC3
- Trust Anchors (TAs)
- Signing and Polling Parameters
- a summary of the set parameters is displayed
- complete the wizard and the entire zone will be signed
We’ll describe some of the steps in a bit more detail.
Signing options
To set the DNSSEC parameter values, we can use
- Customize zone signing parameters — enter custom parameters
- Sign the zone with parameters of an existing zone — use the parameters of an existing zone
- Use default settings to sign the zone — use the default parameters

Key Signing Key (KSK)
We must use at least one KSK and one ZSK. If we enable automatic key rollover, another signing key will be generated for each ZSK and KSK. For the KSK, the double signature rollover method is supported, and for the ZSK, the pre-publish rollover method.
The KSK is used to sign the keys (DNSKEY records).
- DNSKEY RRSET signature validity period — the validity period of signatures using the KSK (i.e., the DNSKEY record set), default 168 hours (the documentation states 72)
- Key Rollover — automatic key rollover, we specify the frequency, default 755 days (a shorter period is recommended)

Zone Signing Key (ZSK)
The ZSK signs the data in the zone. It changes more frequently and can have a shorter key length than the KSK.
- we set the validity period of the signatures for certain record types
- DNSKEY signature validity period (168 hours)
- DS signature validity period (168 hours)
- Zone record validity period (240 hours) — what is the validity of the signatures of records in the zone, here 10 days (in practice, e.g., 14 days)
- Key Rollover — automatic key rollover, we specify the frequency, default 90 days (a shorter period is recommended)

Trust Anchors (TAs)
- Enable the distribution of trust anchors for this zone
If we enable this, and the DNS server is a domain controller, the Trust Anchor is distributed to all DNS servers running on DCs in the same Forest. If it’s not a DC, it’s stored in the local Trust Anchor Store %windir%\system32\dns\TrustAnchors.dns. Trust Anchors are not needed for DNS servers that are authoritative for the zone. Within the AD forest, we should only enable it if other DNS servers (running on DCs) will provide non-authoritative responses for the zone with DNSSEC.
- Enable automatic update of trust anchors on key rollover (RFC 5011)
When enabled, the RFC 5011 procedure is followed during key rollover (described at the end of the article). In PowerShell, it’s called EnableRfc5011KeyRollover. (Automatic) update (distribution) of Trust Anchors takes place. According to the mention in the documentation, the configuration is stored in %windir%\system32\dns\RFC5011.csv, but I haven’t seen such a file anywhere.
From observations in practice: If it’s not checked, only one KSK key will be created when the zone is signed. Key rollover happens quickly within an hour (a new key is added, records are signed, the old one is removed).

Signing and Polling Parameters
During zone signing (key rollover), a file with the DS record set (DSset) and Keyset (DNSKEY record set) is automatically created. The values used for their creation are:
- DS record generation algorithm
- DS record TTL
- DNSKEY record TTL
Additional configurable parameters:
- Secure delegation polling period — how often the parent zone queries the DNSSEC-signed subordinate (I would guess this is the interval at which it queries the DS record in the parent zone during KSK rollover, but I couldn’t find a proper description)
- Signature inception — how many hours earlier the created signature is valid

Completing the Zone Signing
We will see a summary of the entered parameters (which we can copy) and click Finish to complete the wizard. Immediately, the zone will be signed. To see the result, we may need to perform a Refresh in the DNS Manager.
Two KSK keys and two ZSK keys are created, and a DNSKEY record is created for each (a total of 4). The entire DNSKEY record set is signed with the private key of the active KSK. The Microsoft DNS server also signs the DNSKEY record set with the private key of the active ZSK. From my understanding of DNSSEC, I would think this shouldn’t happen. But maybe the information that all record sets in the zone are signed using the ZSK also means the DNSKEY. Conversely, I would expect the DNSKEY to be signed using the backup KSK as well, since the double signature rollover method is to be used for KSK rollover.

I tried queries on various signed domains on the internet. Most of them have one published KSK and one ZSK, and only one DNSKEY set signature using the KSK. Some domains have signatures using the ZSK as well.
Information about the DNSSEC zone settings can also be retrieved using PowerShell.
Get-DnsServerDnsSecZoneSetting -ZoneName firma.cz
Publishing DS Records in the .cz Domain Registry
To create DS records in the TLD domain (registry), we must use our registrar. In the registry for the CZ domain, the DS records are generated automatically from the signing key data. A KEYSET (key set) must be created, the complete DNSKEY record data inserted into it, and it must be attached to your domain. How it works with the registrar Active24 is described in DNS Security (DNSSEC).
The actual process of creating a DS record
- on the DNS server, open the file
%windir%\system32\dns\keyset-<zone.name>(e.g., C:\Windows\System32\dns\keyset-firma.cz), where we have all the necessary data (for all keys) to create the KEYSET - in the registrar’s web system (changes in the registry) create a new KEYSET for the .CZ domain
- we must enter a unique name (KEYSET ID), technical contact, Flag 257 (KSK), algorithm, protocol 3 (DNSSEC) and the public KSK key
- we can enter multiple keys in one KEYSET (in the case of Microsoft DNS, we enter two)
- after a while, we receive an email confirmation from CZ.NIC that the KEYSET has been created
- in the registrar’s web system (changes in the registry), we enter the change on the domain, where we assign the KEYSET to the domain, the operation must be confirmed by the holder or admin (link in the email)
- after a short time (15 minutes), we receive confirmation from CZ.NIC that the change on the domain has been made
- when searching for the domain in the registry (https://www.nic.cz), we should see that it is secured using DNSSEC, and also the assigned key set (and its data)
Automatic Key Rollover
Key rollover is important and must be performed correctly, otherwise the domain may stop working. Doing it manually is quite cumbersome, so it’s better to use Automatic Rollover. It’s safer to perform automatic KSK key rollover using RFC 5011 (which is our focus here). ZSK rollover is fully automatic, but when rolling over the KSK, we need to manually update the data with CZ.NIC.
If we enable automatic key rollover with RFC 5011, another signing key is immediately generated for each ZSK and KSK when the zone is signed. We then always have an active key (Active key). And for the KSK, we also have a standby key (Standby key), and for the ZSK, a next key (Next key) is created.
For the KSK, the double signature rollover method is supported, and for the ZSK, the pre-publish rollover method.
- Double Signature — the future key and signatures generated using it are published in the DNS zone before removing the existing key and its signatures, there are always two sets of keys and related signatures in the zone, during key rollover we make the active one from it, remove the old one including the signatures, and add a new standby key and signatures
- Pre-Publication — the future key is added for future use and published in the DNS zone without generating any signatures, so its record is distributed, during key rollover we make it the active one and sign the records in the zone with it, and prepare a new standby key
Unfortunately, I couldn’t find an exact description of how the automatic key rollover works. I tried to observe it in practice and describe it below. With RFC 5011 enabled, the description in RFC 5011 Key Roll-Over should be used. To get an overview of how the key rollover is performed, the event log is the most helpful. The events logged during various operations are listed at the end of the article.
Key Rollover Information
Using PowerShell, we can list the signing keys (or a specific key) for a given zone. Various data is displayed, including the state and other key rollover parameters.
Get-DnsServerSigningKey -ZoneName firma.cz
Get-DnsServerSigningKey -ZoneName firma.cz -KeyId d7a93f55-31b9-46a7-8057-f7cf3625f7de | FL *
Get-DnsServerSigningKey -ZoneName firma.cz | FT KeyType, CurrentState, CurrentRolloverStatus, NextRolloverAction, NextRolloverTime, LastRolloverTime, RolloverType

PS C:\> Get-DnsServerSigningKey -ZoneName firma.cz | FT KeyType, CurrentState, CurrentRolloverStatus, NextRolloverAction, NextRolloverTime, LastRolloverTime, RolloverType

KeyType        CurrentState CurrentRolloverStatus           NextRolloverAction NextRolloverTime    LastRolloverTime RolloverType
-------        ------------ ---------------------           ------------------ ----------------    ---------------- ------------
KeySigningKey  Active       WaitingForRFC5011RemoveHoldDown Normal             3/9/2022 5:21:32 PM                  DoubleSignature
ZoneSigningKey Active       Queued                          Normal             2/1/2022 7:55:30 AM                  PrePublish
Rollover State
The key rollover state (CurrentRolloverStatus) is important. Unfortunately, I couldn’t find any explanations, only a list of possible values (and I would say with some errors).
- NotRolling
- Queued
- RollStarted
- ZskWaitingForDnsKeyTtl
- ZskWaitingForMaxZoneTtl
- KskWaitingForDSUpdate
- KskWaitingForDSTtl
- KskWaitingForDnsKeyTtl
- WaitingForRFC5011RemoveHoldDown
- RollError
Before the time for key rollover arrives, the state is NotRolling.
When ZSK is being renewed, the DNS server waits at least 1 hour (3600 seconds) to allow cached records to expire. If the DNSKEY TTL or the maximum TTL used on another record in the zone is longer than an hour, it waits longer (ZskWaitingForDnsKeyTtl, ZskWaitingForMaxZoneTtl).
When KSK is being renewed, the DNS server waits for the DS record to be updated in the parent zone (which it checks at regular intervals). The state is displayed as KskWaitingForDSUpdate. We can manually proceed to the next step (if the server, for example, cannot verify the DS record) using the Step-DnsServerSigningKeyrollover cmdlet. Then the process reaches the WaitingForRFC5011RemoveHoldDown state, which is 30 days according to RFC 5011.
KSK Key Rollover Process (RFC 5011) and Changing the DS Records in the .cz Domain Registry
- we have an Active key and a Standby key, when the time for key rollover arrives (we see it as NextRolloverTime), a new KSK is generated as the Next key
- its DNSKEY record is created, the state switches to
RollStarted

- then we wait until the corresponding DS record for the new key is created in the parent zone, the state is
KskWaitingForDSUpdate - in the registrar’s web system (changes in the registry), we edit the KEYSET for the .CZ domain, where we add the new key, which we can find again in the file
%windir%\system32\dns\keyset-<zone.name>, the change must be confirmed (link in the email) - after a few minutes, we receive an email confirmation from CZ.NIC that the KEYSET has been changed
- when the DNS server verifies that the correct record exists, it switches to the
KskWaitingForDSTtlstate - after the time expires (default 1 hour), it switches to
WaitingForRFC5011RemoveHoldDown - sometime during this period, a new signature of the DNSKEY record set is created using the standby KSK (Standby key), and the DNSKEY record with the active KSK (Active key) has its flag (from 257) changed to 385 (the Revoke bit is set), which also changes its Key Tag

- now the Hold-Down Time is running, the originally active key (Active key) is revoked, the standby (Standby key) becomes the active one, and the next key (Next key) will become the standby after the time expires
- after the Hold-Down Time expires, typically 30 days, the oldest key (originally active — Active key) and its DNSKEY record (and the signature using it) are removed, the standby (Standby key) becomes the active (Active key), and the next key (Next key) becomes the standby (Standby key)
- we remove the key from the KEYSET at CZ.NIC (i.e., the old DS record)
Note: It’s unclear to me what the purpose is of keeping the DS record for the old key during the Hold-Down Time. Since the flag on the DNSKEY record has changed, the hash in the DS record no longer matches this DNSKEY.
ZSK Key Rollover Process
- we have an Active key and a Next key, when the time for key rollover arrives (we see it as NextRolloverTime), a new key is generated
- the Active key becomes the Standby key, the Next key becomes the Active key, and the new key is set as the Next key
- the set of DNSKEY records is re-signed using the Active key
- we wait for the max Zone TTL
- a DNSKEY record is created for the new key (Next key) and the oldest DNSKEY record (Standby key) is removed
- the Standby key is deleted, so we have the Active key and the Next key again
Logged Events in Various Situations
Interesting information can be found in the event log (Event Log) of the DNS Server. It can be found in Event Viewer — Applications and Services Logs — DNS Server. Again, I couldn’t find any description or list of possible events. So the events from practical test scenarios are listed below.
Signing the Zone
- 25.1. 7:55:30 7650 The DNS server has started signing the zone firma.cz.
- 25.1. 7:55:30 7675 The DNS server has started signing the scope Default of zone firma.cz.
- 25.1. 7:55:30 7676 The scope Default of zone firma.cz is signed with DNSSEC. The server will give DNSSEC compliant responses to DNSSEC queries for this scope.
- 25.1. 7:55:30 7646 The zone firma.cz is now signed with DNSSEC.
Unsigning the Zone
- 20.1. 14:01:38 776 The DNS server has started to unsign the zone firma.cz on server dns1.
- 20.1. 14:01:38 7675 The DNS server has started signing the scope Default of zone firma.cz.
- 20.1. 14:01:38 7678 The scope Default of zone firma.cz is no longer signed with DNSSEC. The server will not provide DNSSEC compliant responses to DNSSEC queries for this scope.
- 20.1. 14:01:38 7647 The zone firma.cz is no longer signed with DNSSEC.
KSK Key Rollover with RFC 5011
- 31.1. 15:07:25 7667 Keys for the Signing Key Descriptor {D7A93F69-31B9-46A7-8057-F7CF3625F7DE} in zone firma.cz will be rolled over in less than 1 day.
- 1.2. 7:55:29 784 The key signing key with GUID {D7A93F69-31B9-46A7-8057-F7CF3625F7DE} of zone firma.cz has moved to stage DNS_SKD_STATUS_ROLL_STARTED of rollover.
- 1.2. 7:55:29 7669 Keys for the Signing Key Descriptor {D7A93F69-31B9-46A7-8057-F7CF3625F7DE} in zone firma.cz are starting the rollover process.
- 1.2. 7:55:29 784 The key signing key with GUID {D7A93F69-31B9-46A7-8057-F7CF3625F7DE} of zone firma.cz has moved to stage DNS_SKD_STATUS_KSK_WAITING_FOR_DS_UPDATE of rollover.
- every minute the same event 784 is logged
- 7.2. 15:51 KEYSET edited at CZ.NIC (new DS record created)
- 7.2. 16:21:32 784 The key signing key with GUID {D7A93F69-31B9-46A7-8057-F7CF3625F7DE} of zone firma.cz has moved to stage DNS_SKD_STATUS_KSK_WAITING_FOR_DS_TTL of rollover.
- 7.2. 17:21:32 784 The key signing key with GUID {D7A93F69-31B9-46A7-8057-F7CF3625F7DE} of zone firma.cz has moved to stage DNS_SKD_STATUS_KSK_WAITING_FOR_5011_REMOVE_HOLD_DOWN of rollover.
- 9.3. 17:21:31 784 The key signing key with GUID {D7A93F69-31B9-46A7-8057-F7CF3625F7DE} of zone firma.cz has moved to stage DNS_SKD_STATUS_ROLL_ERROR of rollover.
- 9.3. 17:21:31 7670 The rollover process for Signing Key Descriptor {D7A93F69-31B9-46A7-8057-F7CF3625F7DE} in zone firma.cz is complete.
KSK Key Rollover without RFC 5011
- 22.2. 21:22:52 7667 Keys for the Signing Key Descriptor {FE806F2E-93CC-44F4-BA50-0B445582B7BB} in zone firma.cz will be rolled over in less than 1 day.
- 23.2. 14:10:59 784 The key signing key with GUID {FE806F2E-93CC-44F4-BA50-0B445582B7BB} of zone firma.cz has moved to stage DNS_SKD_STATUS_ROLL_STARTED of rollover.
- 23.2. 14:10:59 7669 Keys for the Signing Key Descriptor {FE806F2E-93CC-44F4-BA50-0B445582B7BB} in zone firma.cz are starting the rollover process.
- 23.2. 14:10:59 784 The key signing key with GUID {FE806F2E-93CC-44F4-BA50-0B445582B7BB} of zone firma.cz has moved to stage DNS_SKD_STATUS_KSK_WAITING_FOR_DS_UPDATE of rollover.
- 23.2. 14:11:59 784 The key signing key with GUID {FE806F2E-93CC-44F4-BA50-0B445582B7BB} of zone firma.cz has moved to stage DNS_SKD_STATUS_KSK_WAITING_FOR_DNSKEY_TTL of rollover.
- 23.2. 15:11:59 784 The key signing key with GUID {FE806F2E-93CC-44F4-BA50-0B445582B7BB} of zone firma.cz has moved to stage DNS_SKD_STATUS_ROLL_ERROR of rollover.
- 23.2. 15:11:59 7670 The rollover process for Signing Key Descriptor {FE806F2E-93CC-44F4-BA50-0B445582B7BB} in zone firma.cz is complete.
ZSK Key Rollover
- 18.2. 19:10:02 785 The zone signing key with GUID {A47164FC-8C89-4F92-9EBA-8F1A54050BC2} of zone firma.cz has moved to stage DNS_SKD_STATUS_QUEUED of rollover.
- 18.2. 19:10:02 785 The zone signing key with GUID {A47164FC-8C89-4F92-9EBA-8F1A54050BC2} of zone firma.cz has moved to stage DNS_SKD_STATUS_ROLL_STARTED of rollover.
- 18.2. 19:10:02 7669 Keys for the Signing Key Descriptor {A47164FC-8C89-4F92-9EBA-8F1A54050BC2} in zone firma.cz are starting the rollover process.
- 18.2. 19:10:02 785 The zone signing key with GUID {A47164FC-8C89-4F92-9EBA-8F1A54050BC2} of zone firma.cz has moved to stage DNS_SKD_STATUS_ZSK_WAITING_FOR_DNSKEY_TTL of rollover.
- 18.2. 19:10:02 785 The zone signing key with GUID {A47164FC-8C89-4F92-9EBA-8F1A54050BC2} of zone firma.cz has moved to stage DNS_SKD_STATUS_ZSK_WAITING_FOR_MAXZONE_TTL of rollover.
- 20.2. 20:10:01 785 The zone signing key with GUID {A47164FC-8C89-4F92-9EBA-8F1A54050BC2} of zone firma.cz has moved to stage DNS_SKD_STATUS_ROLL_ERROR of rollover.
- 20.2. 20:10:01 7670 The rollover process for Signing Key Descriptor {A47164FC-8C89-4F92-9EBA-8F1A54050BC2} in zone firma.cz is complete.
This series covers the basics of computer networking. Important practical aspects that everyone interested in networking should know are briefly described. It contains some of the most widely read articles on this site. It is used for teaching in schools.
Security tools. Primarily Firewall and the like.
The Domain Name System Security Extensions (DNSSEC) (RFC 2535) is a suite of Internet Engineering Task Force (IETF) specifications for securing certain kinds of information provided by the Domain Name System (DNS) as used on Internet Protocol (IP) networks. It is a set of extensions to DNS which provide to DNS clients (resolvers) origin authentication of DNS data, authenticated denial of existence, and data integrity, but not availability or confidentiality.
RFC 3833 documents some of the known threats to the DNS and how DNSSEC responds to those threats. All answers from DNSSEC protected zones are digitally signed.
DNSSEC works by digitally signing records for DNS lookup using public-key cryptography. The correct DNSKEY record is authenticated via a chain of trust, starting with a set of verified public keys for the DNS root zone which is the trusted third party. DNSSEC was first deployed at the root level on July 15, 2010.
For example, here you can see, visualized, the chain of trust from the root zone to blog.cdemi.io:

Fortunately, enabling DNSSEC Validation in Windows’ DNS Server is fairly easy. First, we need to make sure that our DNS Server is configured to do DNSSEC Validation. We can do this by right clicking the DNS Server in the DNS Manager console and going in the advanced tab and selecting «Enable DNSSEC validation for remote responses«:
Now that we have configured our DNS Server to validate DNSSEC we need to add a trust point. This is someone we trust, and who else better to trust than IANA’s root anchor? This can be found at: https://www.iana.org/dnssec/files. This can be done in two ways:
Using dnscmd.exe
Conveniently for us, Microsoft has added a parameter to the dnscmd.exe to automatically retrieve the root trust anchors. From an elevated command prompt, you can run dnscmd.exe /RetrieveRootTrustAnchors.
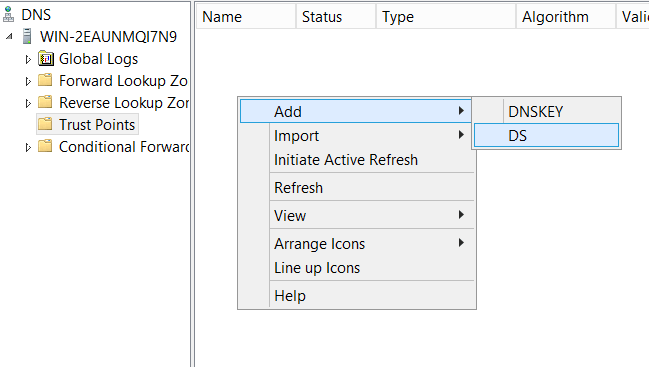
Manually Importing
Alternatively, you can manually add a DS Key as your trust point. From the DNS Manager, we need to go to the Trust Points folder and Add a DS Key:
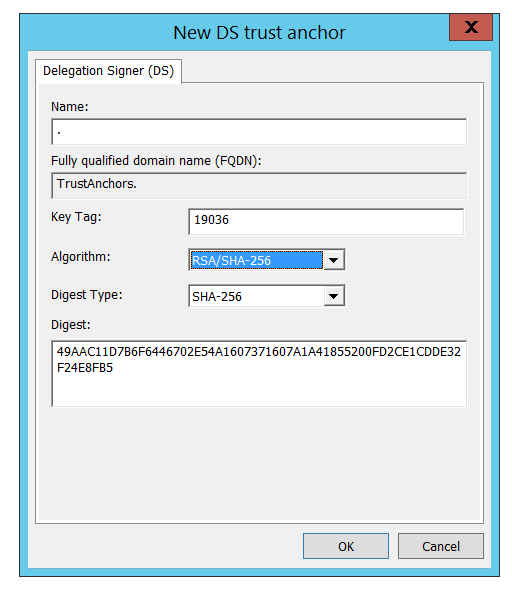
The DS Key can be found at https://data.iana.org/root-anchors/root-anchors.xml:
<?xml version="1.0" encoding="UTF-8"?>
<TrustAnchor id="AD42165F-3B1A-4778-8F42-D34A1D41FD93" source="http://data.iana.org/root-anchors/root-anchors.xml">
    <Zone>.</Zone>
    <KeyDigest id="Kjqmt7v" validFrom="2010-07-15T00:00:00+00:00">
        <KeyTag>19036</KeyTag>
        <Algorithm>8</Algorithm>
        <DigestType>2</DigestType>
        <Digest>
        49AAC11D7B6F6446702E54A1607371607A1A41855200FD2CE1CDDE32F24E8FB5
        </Digest>
    </KeyDigest>
</TrustAnchor>
For convenience:
- Name:
. - Key Tag:
19036 - Algorithm:
RSA/SHA-256or8 - Digest Type:
SHA-256or2 - Digest:
49AAC11D7B6F6446702E54A1607371607A1A41855200FD2CE1CDDE32F24E8FB5
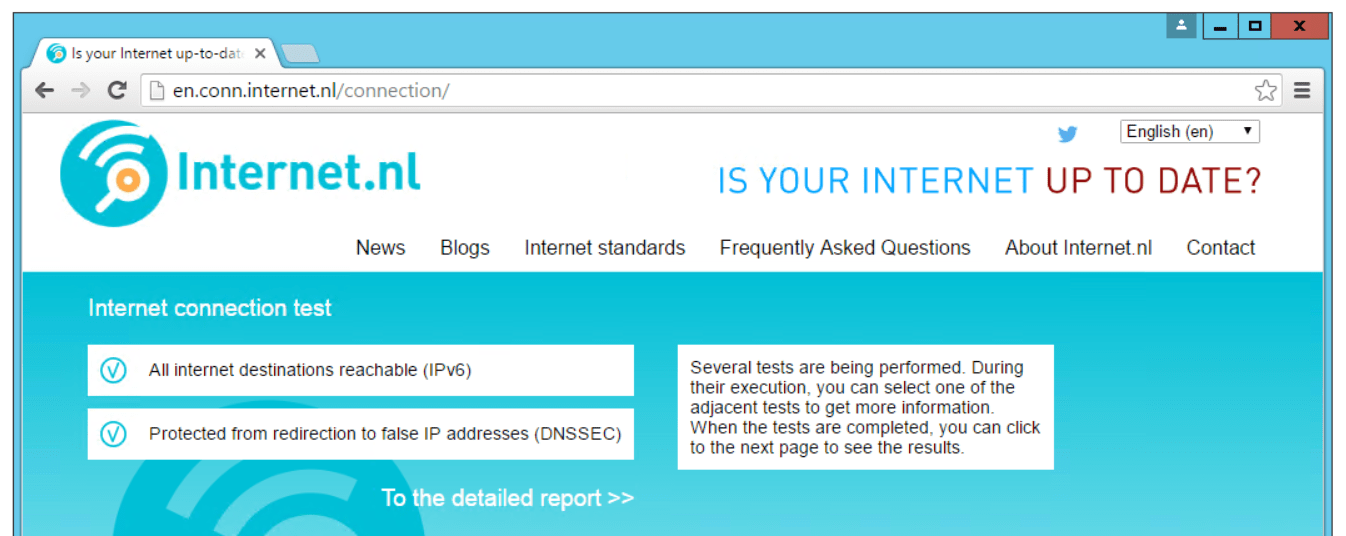
Testing that DNSSEC Validation Works
Hopefully, now, DNSSEC Validation through your Windows DNS Server is working correctly. Flush your DNS cache just in case and go to: http://en.conn.internet.nl/connection/. Hopefully you should see something like this:
Domain Name System Security Extensions or DNSSEC is a collection of extensions to secure the DNS protocol. It is one of the methods to protect the DNS Server, along with DNS Cache Locking and DNS Socket Pool. It uses cryptographic signatures to validate DNS responses in order to protect your system. In this post, we are going to see how you can configure DNSSEC on Windows Server
DNSSEC enhances the security of DNS by using cryptographic signatures to validate DNS responses, ensuring their authenticity and integrity. It protects against common threats like DNS spoofing and cache tampering, making the DNS infrastructure more reliable. By signing DNS zones, DNSSEC adds a layer of validation without altering the basic query-response mechanism. This ensures that DNS data remains secure during transmission, providing a trustworthy environment for users and organizations. Since our primary goal is to secure your DNS Server, we are going to configure not just DNSSEC, but also DNS Socket Pool and DNS Cache Locking.
To configure DNSSEC, DNS Socket Pool, and DNS Cache Locking, you can follow the steps mentioned below.
- Configure DNSSEC
- Configure Group Policy
- DNS Socket Pool
- DNS Cache Locking
Let us talk about them in detail.
1] Configure DNSSEC

Let us first start by setting up DNSSEC in our domain controller. To do so, you need to follow the steps mentioned below.
- Open the Server Manager.
- Then, go to Tools > DNS.
- Expand the server, then Forward Lookup Zone, right-click on the domain controller, and select DNSSEC > Sign the zone.
- Once the Zone signing wizard appears, click on Next.
- Select Customize zone signing parameters and click on Next.
- If you are on the Key Master window, tick The DNS server CLOUD-SERVER is selected as the Key Master, and click on Next.
- When you are on the Key Signing Key (KSK) interface, click on Add.
- Go through the options, and you need to fill in all the fields correctly. You need to fill this out according to your organization’s requirements and then add the key.
- Once added, click on Next.
- After you reach the Zone Signing Key (ZSK) option, click on Add, fill in the form, and save. Click on Next.
- On the Next Secure (NSEC) screen, fill in the details. NSEC (Next Secure) is a DNSSEC record used to prove the non-existence of a domain name by providing the names that come before and after it in the DNS zone, ensuring the response is authenticated and tamper-proof.
- When you are on the TA screen, tick Enable the distribution of trust anchors for this zone check and Enable automatic update of trust anchors on key rollover checkboxes. Click on Next.
- On the Signing and Polling Parameters screen, enter the DS details, and click on Next.
- Finally, go through the summary and click on Next.
- Once you get the successful message, click on Finish.

After configuring the zone, you need to go to Trust point > ae > domain name in the DNS Manager to confirm.
2] Configure Group Policy
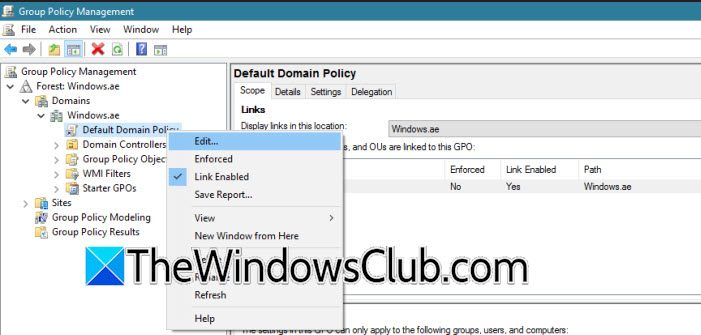
After configuring the zone, we need to make some changes to our domain policy using the Group Policy Management utility. To do so, follow the steps mentioned below.
- Open the Group Policy Management program.
- Now, you need to go to Forest: Windows.ae > Domains > Windows.ae > right-click on Default Domain Policy, and select Edit.
- Navigate to Computer Configuration > Policies > Windows Settings > click on Name Resolution Policy in the Group Policy Management Editor.
- In the right pane, under Create Rules, enter Windows.ae in the Suffix box to apply the rule to the namespace suffix.
- Check both Enable DNSSEC in this rule and Require DNS clients to validate name and address data boxes, then click Create to finalize the rule.
That’s how you can configure DNSSEC. However, our job is not done. To secure our server, we should configure the DNS Socket Pool and DNS Cache Locking
3] DNS Socket Pool
DNS Socket Pool enhances DNS security by making the source ports random for outgoing queries, making it harder for attackers to predict and exploit transactions. You need to open PowerShell as an admin and run the following command.
Get-DNSServer
OR
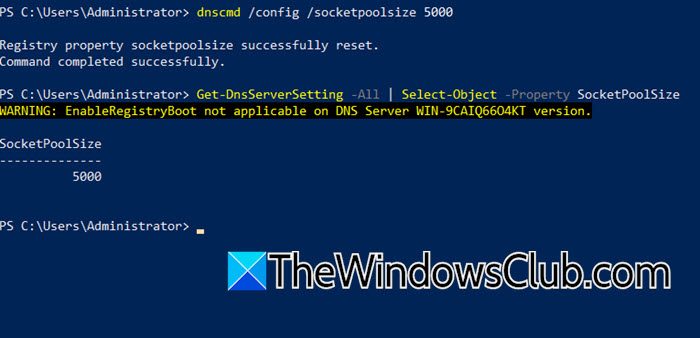
Get-DnsServerSetting -All | Select-Object -Property SocketPoolSize
You need to check SocketPoolSize to know the current size of the pool.
Our goal is to increase the size of the socket; the larger the value, the better the protection. To do so, you need to run the following command.
dnscmd /config /socketpoolsize 5000
Note: The value can only be between 0 – 10000.
Restart your DNS Server, and you will be good to go.
4] DNS Cache Locking
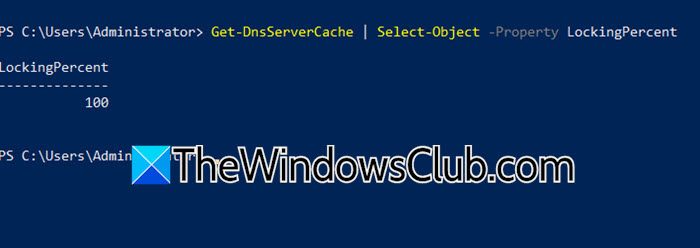
DNS locking prevents cached DNS records from being overwritten during their TTL, ensuring data integrity and protection against cache poisoning. We need to run the following command to check the value.
Get-DnsServerCache | Select-Object -Property LockingPercent
It should be 100; if it’s not, run the command mentioned below to set it to 100.
Set-DnsServerCache –LockingPercent 100
If you take these measures, your DNS Server will be secure.
Read: How to change DNS server with Command Prompt or PowerShell
Does Windows Server support DNSSEC?
Yes, Windows Server supports DNSSEC and allows you to configure it to secure DNS zones. It uses digital signatures to validate DNS responses and prevent attacks like spoofing. You can enable DNSSEC through the DNS Manager or PowerShell commands.
Read: Enable and Configure DNS Aging & Scavenging in Windows Server
How do I configure DNS for Windows Server?
To configure DNS on Windows Server, we need to install the DNS Server Role first. Once done, we need to assign a static IP address and configure the DNS entry. We recommend you check our guide on how to install and configure DNS on Windows Server.
Also Read: Change DNS settings in Windows 11 easily.
DNS (Domain Name System) is the backbone of internet name resolution, yet historically it has been vulnerable to a range of security attacks such as DNS spoofing and cache poisoning. As cyber threats become increasingly sophisticated, organizations must prioritize security for their DNS infrastructure. DNS Security Extensions (DNSSEC) represents a major advancement toward securing DNS, introducing robust cryptographic signatures that help ensure data integrity and authentication. For environments running Windows Server, DNSSEC offers a practical pathway to mitigate critical DNS-related threats. This comprehensive guide examines how to configure DNSSEC on Windows Server, explores best practices, analyzes potential pitfalls, and highlights complementary features like DNS Socket Pool and DNS Cache Locking to further enhance your organization’s resilience.

Why DNSSEC Matters in Modern Network Security
DNS spoofing and cache poisoning remain persistent risks in both enterprise and public environments. These attacks manipulate DNS responses, allowing attackers to redirect users to malicious sites, intercept sensitive information, or disrupt services. By leveraging digital signatures for DNS records, DNSSEC can verify the authenticity of server responses and help prevent such manipulations.
It is widely accepted, and supported by Microsoft’s official documentation, that Windows Server supports deploying DNSSEC across both new and existing DNS zones. The implementation involves digitally signing DNS records so that clients and downstream servers can detect and reject forged or modified data. This verification process is carried out transparently, ensuring users and systems are not disrupted during regular DNS queries.
DNSSEC: The Fundamentals in Windows Server
DNSSEC extends standard DNS by introducing public key cryptography. When a DNS server receives a query for a signed zone, it returns additional signature records (RRSIG), allowing the recipient to verify both the source and the content’s integrity using the corresponding public key (DNSKEY). Windows Server’s DNSSEC mechanism does not change the underlying DNS query/response protocol; it layers validation and trust, preserving performance and compatibility.
Key Concepts
- Zone Signing Key (ZSK): Used to sign individual DNS records within a zone.
- Key Signing Key (KSK): Used to sign the zone’s public keys, providing an additional layer of trust.
- NSEC (Next Secure): DNSSEC records used to prove the nonexistence of a record or name in a DNS zone, protecting against certain attacks by authenticating denial-of-existence responses.
- Trust Anchors: Public keys or hashes distributed to DNS clients to enable validation; distribution and rollover must be carefully managed.
Step-by-Step: Configuring DNSSEC on Windows Server
The process for configuring DNSSEC on Windows Server, as outlined by Microsoft and confirmed by The Windows Club, involves several distinct steps. Each is intended to strengthen DNS security, and collectively they offer comprehensive protection.
Prerequisites
- Windows Server 2012 or later (most features are available starting from this edition, according to Microsoft documentation)
- DNS Server role installed and configured
- Administrative privileges
1. Enable DNSSEC on the DNS Zone
Begin the process from the Server Manager interface:
- Open Server Manager and navigate to Tools > DNS.
- Expand the relevant server node, then Forward Lookup Zones.
- Right-click the domain, select DNSSEC > Sign the zone to initiate the signing wizard.
Signing the Zone
- On the wizard’s first screen, click Next.
- Choose Customize zone signing parameters, and advance with Next.
- Verify or assign the Key Master. The wizard allows you to confirm or select which server will manage cryptographic keys for this zone.
- On the Key Signing Key (KSK) screen, use Add to generate a new key, selecting parameters as required. Recommended best practice is to use an algorithm and key length in line with your organization’s security policies (for example, RSA/SHA-256 with a 2048-bit key—the default on Windows Server 2016 and newer).
- Add a Zone Signing Key (ZSK) following a similar process.
- On the NSEC/NSEC3 step, choose between NSEC (which exposes the ordering of names in the zone) and NSEC3 (adds additional privacy). For most organizations, NSEC3 is recommended, especially for public-facing zones, in order to prevent zone-walking attacks.
- In the Trust Anchors (TA) and Key Rollover step, it’s advisable to enable both options:
- “Enable the distribution of trust anchors for this zone.”
- “Enable automatic update of trust anchors on key rollover.”
- Specify Signing and Polling Parameters (e.g., DS details and polling intervals as dictated by organizational requirements).
- Review the summary page, then proceed and wait for the success message.
After configuration, verification is possible by viewing the Trust Point for the relevant zone in the DNS Manager under Trust Points > domain name.
2. Enforce DNSSEC Validation via Group Policy
DNSSEC is most effective when validating not just at the server but also on client systems. Use Group Policy to enforce validation across the domain:
- Open Group Policy Management.
- Navigate: Forest > Domains > (your domain name), right-click Default Domain Policy, and choose Edit.
- Go to Computer Configuration > Policies > Windows Settings > Name Resolution Policy.
- In the right pane, create a new rule:
- Enter your DNS namespace in the Suffix box.
- Check Enable DNSSEC in this rule and Require DNS clients to validate name and address data.
- Click Create and close the editor.
This ensures all devices joined to the domain will require DNSSEC validation, thereby improving organizational security.
3. Enhance Security with DNS Socket Pool
DNS Socket Pooling improves security by randomizing the source port for outbound DNS queries. Randomization helps prevent attackers from predicting port numbers and launching cache poisoning attacks.
- Check socket pool size with the following PowerShell command:
Get-DnsServerSetting -All | Select-Object -Property SocketPoolSize - Increase pool size for stronger security (maximum value permitted: 10,000):
dnscmd /config /socketpoolsize 5000 - Restart the DNS service to apply changes.
A larger socket pool (within hardware constraints) is generally advantageous, as it exponentially increases the difficulty for attackers attempting to spoof DNS responses.
4. Lock Down DNS Cache
DNS Cache Locking prevents critical cache records from being overwritten during their time-to-live (TTL) period, guarding against cache poisoning.
- Check the current locking percent:
Get-DnsServerCache | Select-Object -Property LockingPercent - Set to maximum (recommended: 100%) if not already configured:
Set-DnsServerCache –LockingPercent 100
Microsoft and security experts recommend a high lock percentage as a principal defense mechanism because it minimizes the attack window for cache manipulation.
Confirming Configuration and Ongoing Management
Once these changes are implemented, administrators should monitor the health and status of DNSSEC using built-in tools and event logs on Windows Server. It’s important to periodically:
- Review DNSSEC signature validity and expiration.
- Ensure key rollover procedures are well-documented and scheduled.
- Monitor client failures (as strict validation may reveal previously unnoticed issues with upstream DNS servers or delegations).
Strengths of DNSSEC on Windows Server
- Layered Security: DNSSEC complements firewall and anti-malware solutions by addressing vulnerabilities at the foundation of name resolution.
- Native Integration: Windows Server DNSSEC is built-in, eliminating the need for third-party plugins or extensions. Management is accessible through GUI (DNS Manager) or automation (PowerShell/CLI).
- Policy Enforcement: Group Policy enables centralized enforcement, simplifying and standardizing security at scale.
- Interoperability: DNSSEC on Windows Server is compatible with both Windows and non-Windows DNS clients, provided they support DNSSEC validation.
Potential Risks and Mitigation
Despite its strengths, DNSSEC is not without caveats and challenges:
- Complexity: DNSSEC introduces additional administrative overhead and requires ongoing maintenance, especially with key rollovers. Misconfigured keys or expired signatures can break zone resolution, potentially causing widespread outages.
- Performance Impact: Zone signing and validation require added computation. Very large zones or infrastructure with limited resources may experience increased load, though for most modern hardware the impact is marginal.
- Compatibility Issues: Some older or misconfigured DNS clients and intermediate devices (such as certain firewalls) may not correctly process DNSSEC-enabled records, leading to failures in name resolution.
- Incomplete Protection: DNSSEC does not encrypt DNS queries; it only authenticates them. Protection against eavesdropping or observation of DNS traffic still requires further measures, such as DNS-over-HTTPS or DNS-over-TLS.
Key Recommendations
- Thorough Testing: Before wide deployment, test DNSSEC in a lab environment, simulating client behavior and failure modes.
- Educate Teams: Train IT staff on DNSSEC essentials and incident response for key expiration or validation failures.
- Automate Key Management: Wherever possible, script and automate key rollovers and trust anchor updates to reduce human error.
- Monitor Alerts: Proactively monitor logs and alerts for DNSSEC-related warnings or failures, responding quickly to prevent outages.
Conclusion: Securing DNS with Confidence
DNSSEC stands as a foundational pillar for securing network infrastructure in organizations of all sizes. On Windows Server, its implementation is both accessible and robust, integrated seamlessly with management tools and best practices advocated by industry leaders. By combining DNSSEC with features like DNS Socket Pool and DNS Cache Locking, administrators can create a multi-layered defense that substantially raises the bar against DNS-based attacks.
As cyber threats evolve, so too must defenses at every level of the networking stack. While DNSSEC does require careful deployment and ongoing vigilance, the security dividends it pays—in reducing the risk of spoofing, cache poisoning, and unauthorized modifications—are invaluable in today’s threat landscape. Organizations that proactively deploy, monitor, and update DNSSEC policies on Windows Server position themselves to not only comply with security best practices but to lead by example in safeguarding the integrity of their digital identities.
For more granular details, Microsoft’s official documentation and reputable community guides remain the best sources for up-to-date best practices and troubleshooting tips. As with any critical infrastructure component, a balanced approach that weighs both strengths and risks is essential to building resilient and trustworthy DNS environments.
Source: The Windows Club How to configure DNSSEC on Windows Server