
Время на прочтение4 мин
Количество просмотров90K

В середине июля 2020 года эксперты портала Tom’s Hardware опубликовали инструкцию по установке Windows 10 на Raspberry Pi 4. Вдобавок они проверили, как работают некоторые сторонние программы (GIMP Photo Editor, Arduino IDE и Python 3.8) в этой связке микрокомпьютера на ARM и последней версии Windows.
Вопрос «зачем» тут не особо уместен, так как экспериментаторам был важен сам факт того, что это можно сделать и все будет работать. Да, медленно и с тормозами и проблемами, но будет.
Официально, единственная операционная система Microsoft для Raspberry Pi — это устаревшая на текущий момент версия Windows 10 IoT Core, которая, например, позволяет выполнять код Visual Studio на микрокомпьютере, но там даже нет графического интерфейса. Тем не менее, разработчики (например, проект «Windows on Raspberry Pi» в Discord) своими силами сделали необходимы программы и нашли способ по установке и запуску полноценной версии Windows 10 на Raspberry Pi 4.
Эксперты портала Tom’s Hardware дополнительно уведомили, что они не могут ручаться за безопасность или законность любых пользовательских файлов, созданных сообществом «Windows on Raspberry Pi», поэтому все действия далее они делали на свой страх и риск.
В 2019 году эксперты портала Tom’s Hardware уже попытались установить Windows 10 на Raspberry Pi 3, но тогда этот трудный процесс у них закончился по большей части проблемами, ошибками и тормозами после установки.
В настоящее время даже после всех стараний команды проекта «Windows on Raspberry», после установки Windows 10 на Raspberry Pi 4 не работают встроенные в микрокомпьютер порт Ethernet, модули Wi-Fi, Bluetooth и GPIO, аудио через HDMI также недоступно. Для сетевого подключения нужно использовать Wi-Fi USB-адаптер, а для вывода звука Bluetooth через USB-адаптер.
Для установки Windows 10 на Raspberry Pi 4 понадобятся:
- последняя версия Raspberry Pi 4 с 4GB или 8GB ОЗУ;
- карта памяти microSD на 16 GB или больше;
- ПК с Windows 10 и доступом в сеть интернет для создания нужной загрузочной сборки;
- адаптер USB to Ethernet или WiFi dongle;
- Bluetooth dongle (если нужен Bluetooth).
Инструкция по установке Windows 10 на Raspberry Pi 4:
- нужно скачать и распаковать на ПК последнюю версию инструмента WoR 2.0.0 alpha 3, там будет архив на 4.7G;
- зайти на Windows on Raspberry Pi Discord server в разделе Downloads channel скачать последнюю стабильную версию Windows on ARM (0.2.1), ссылка на этот файл PublicFlukeByte.iso;
- запустить WoR Alpha tool и выбрать язык установки;
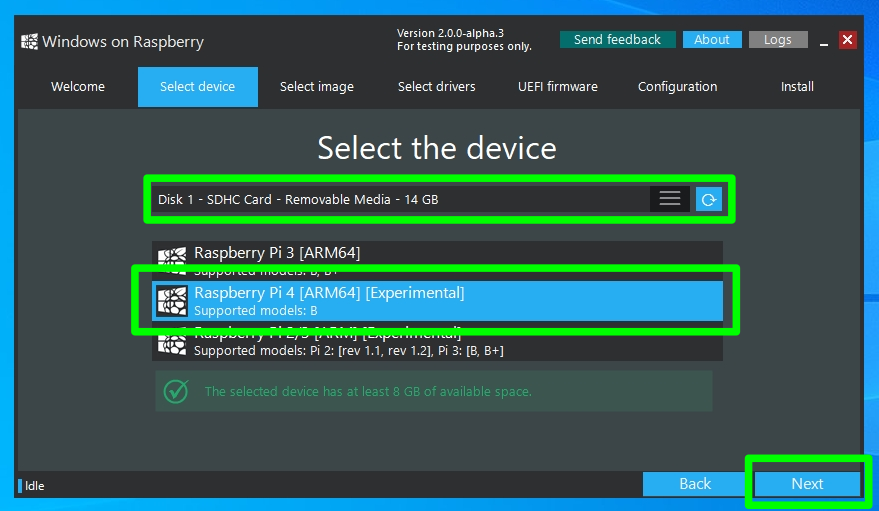
- вставить в ПК карту памяти и выбрать ее в WoR Alpha tool в разделе «Select device», там же выбрать режим «Raspberry Pi 4 experimental mode»;
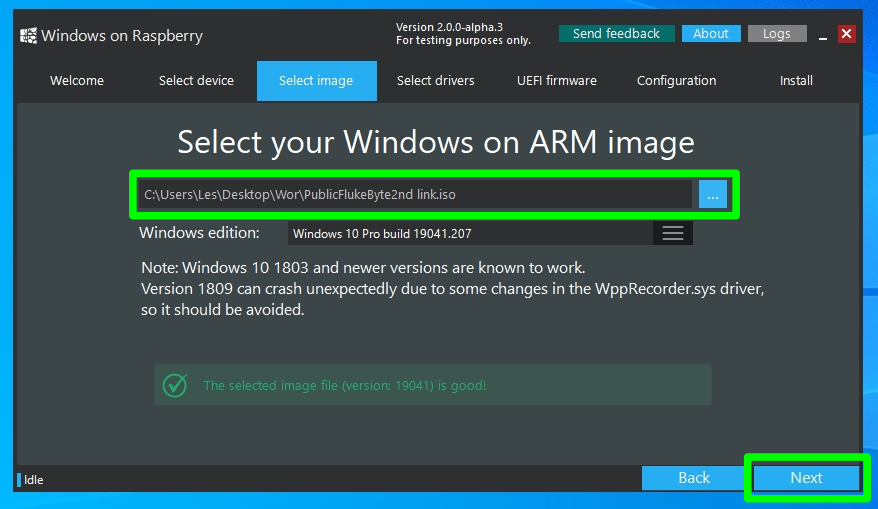
- далее в разделе «Select image» указать место расположения на ПК ранее скаченного файла PublicFlukeByte.iso;
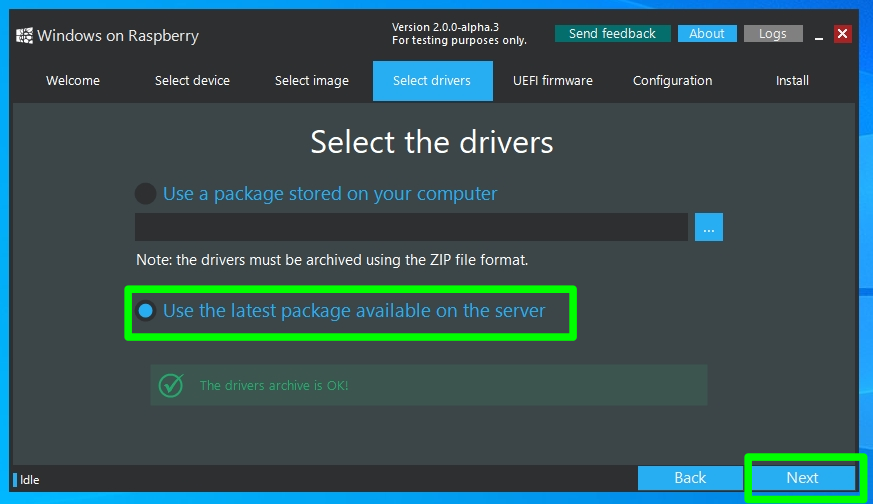
- далее в разделе «Select drivers» выбрать опцию «Use the latest package available on the server.»;
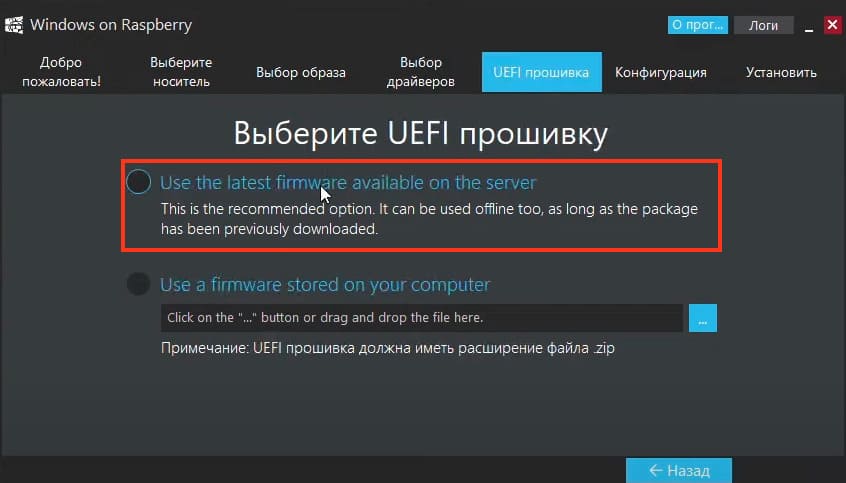
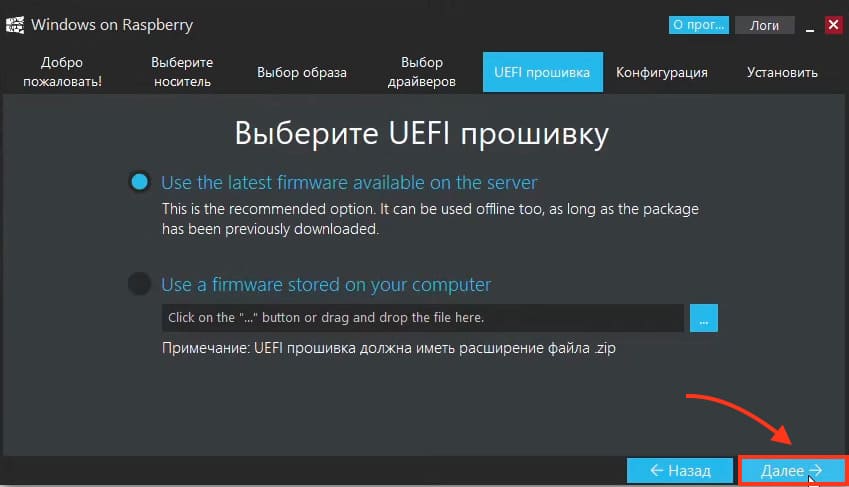
- далее в разделе «UEFI firmware» выбрать опцию «Use the latest firmware available on the server.»;
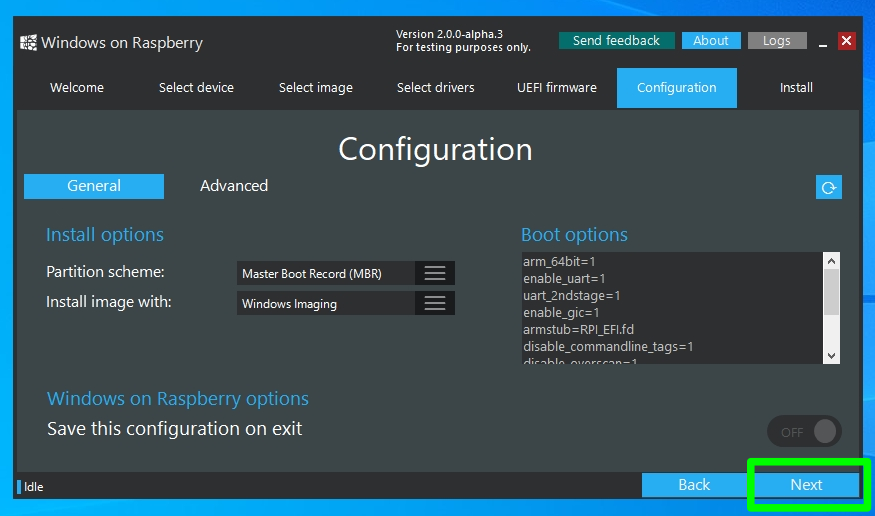
- потом нужно проверить конфигурацию загрузочной сборки и начат ее записать на карту памяти, причем запись может продолжаться более двух часов, в зависимости от параметров карты памяти;
- скачать и распаковать на ПК патч для Raspberry Pi 4 по активации USB-портов и 3 ГБ ОЗУ в Windows 10, скопировать файл winpatch.exe в корень диска C: на ПК;
- пропатчить сборку на карте памяти: в командной строке на ПК выполнить
«winpatch X:\Windows\System32\drivers\USBXHCI.SYS 910063E8370000EA 910063E8360000EA 3700010AD5033F9F 3600010AD5033F9F», где Х — буква диска с картой памяти; - рекомендуется также «разогнать» в настройках Raspberry Pi, но тогда лучше заранее обеспокоиться установкой на микрокомпьютер системы охлаждения, для этого необходимо в файле config.txt на загрузочном карте памяти выставить параметры: «over_voltage=6» и «arm_freq=2000»;
- теперь можно извлечь загрузочную карту памяти из ПК, вставить ее в Raspberry Pi 4 и начать стандартную установку ОС Windows 10;
- после окончания процесса установки Windows 10 на Raspberry Pi 4 необходимо активировать в ОС возможность полноценно использовать 3 ГБ ОЗУ, для этого нужно под администратором в командной строке запустить: «bcdedit /deletevalue {default} truncatememory», далее необходимо перезагрузить микрокомпьютер;
- далее можно подключить сетевые USB-адаптеры, настроить их и скачивать и устанавливать из интернета необходимые для работы приложения, включая браузеры и другое ПО.
Эксперты портала Tom’s Hardware установили на Raspberry Pi 4 с Windows 10 браузер Microsoft Edge, программы GIMP Photo Editor, Arduino IDE и Python 3.8 с оболочкой Python REPL. Все программы запускались и работали нормально. По скорости работы с этой ОС микрокомпьютер оказался на уровне Intel Celeron или Atom начального уровня. Время загрузки ОС Windows 10 составило 2 минуты 12 секунд. Просмотр видео в YouTube возможен, но со средними настройками разрешения роликов. Из проблем — на эту сборку не удалось установить редактор кода Visual Studio Code. Также не работал модуль Python под названием GPIO Zero, который используется для взаимодействия с GPIO Raspberry Pi. Возможно, что в будущем эти моменты будут доработаны разработчиками проекта «Windows on Raspberry Pi».
Ранее в феврале 2020 года Raspberry Pi Foundation выпустил обновленную версию (v1.2) Raspberry Pi 4, в которой было исправлено несколько проблем, включая совместимость с различными USB-C кабелями. Тогда микрокомпьютер не распознавал некоторые кабели как источник питания из-за проблем со схемой питания.
В конце мая 2020 года в продажу поступила 8-гигабайтная модель Raspberry Pi 4. Она доступна по цене в $75. Вдобавок создатели портативного ПК сняли с продажи версию с 1 ГБ оперативной памяти, теперь за $35 можно приобрести Raspberry Pi 4 с 2 ГБ ОЗУ.
См. также:
- «Raspberry Pi Foundation захостила свой сайт на Raspberry Pi 4. Теперь этот хостинг доступен всем»
- «Протокол UASP ускоряет передачу файлов на Raspberry Pi 4 в полтора раза»
- «Любитель подключил PCIe к Raspberry Pi без контроллера USB»
- Home
- Blog
-
Step-by-Step Procedure to Install Windows 10 on A Raspberry Pi 4
/
/

There are a number of reasons why you might need to run Windows 10 on Raspberry Pi. One reason is for educational purposes, as running Windows 10 on the device can provide a great platform to teach coding skills and even create projects with the Windows IoT Core technology. Additionally, running Windows 10 on Raspberry Pi can be useful for small businesses or hobbyists who need a small and affordable device for running Windows applications or controlling hardware connected to the Pi. Finally, running Windows 10 on Raspberry Pi can be great for home automation projects, as it provides a platform for connecting to internet-enabled devices like smart light bulbs and thermostats. All in all, running Windows 10 on Raspberry Pi is a great way to get started with a powerful and affordable device. Let’s see the step-by-step procedure to install Windows 10 on a Raspberry Pi.
A Short Introduction To WoR Project
Windows on Raspberry Pi is a project that provides an easy-to-use way to get Microsoft Windows 10 running on the popular single board computer, Raspberry Pi. This project has been around for several years and has gone through various iterations, but it continues to be actively developed by a dedicated team of developers who are passionate about providing users with the latest and greatest Windows experience on the Raspberry Pi.
The main goal of this project is to give users a full-featured version of Windows 10 that runs well on the Raspberry Pi. This includes providing drivers for peripherals such as cameras, keyboards, and mice, as well as support for industry-standard networking protocols such as Wi-Fi and Bluetooth. By running Windows on the Raspberry Pi, users are also able to take advantage of a wide range of software that has been written specifically for the Windows operating system.
The project provides an easy-to-use installer that walks users through setting up and installing Windows 10 on their Raspberry Pi in just a few simple steps. The installation process is designed to be as streamlined and automated as possible, taking the guesswork out of setting up a Windows environment on the Raspberry Pi.
Prerequisites to Install Windows 10 on A Raspberry Pi
Let’s see what hardware and software are required to install Windows 10 on a Raspberry Pi:
Hardware:
-
Raspberry Pi Board: Well, you can use any Raspberry Pi module 4, or 400. Preferably, Raspberry Pi 3 and 4 with 4 GB RAM.
-
Micro SD Card with Card Reader: This is to write Windows 10 images.
-
USB Drive: This is to install windows operating systems. It is optional. This is required only if you boot your Pi from USB storage.
-
IO Peripheral: Keyboard, Mouse, HDMI Cable, Ethernet Cable, and USB Cable, depending on your requirements.
-
PC or Mac with an Internet connection: This is required to download the Windows 10 ISO file with Imager and write the Windows 10 to the SD Card or USB Storage Drive.
Software:
-
Windows on Raspberry imager: A free utility released by WoR Project for flashing content to SD cards and USB drives on your Raspberry Pi.
-
Internet: An Internet connection is a must to have to download the imager and create windows 10 ISO image.
How to Install Windows 10 on A Raspberry Pi 4?
Once you get all the things listed in the previous section ( Required Hardware & Software) you are good to start the installation procedure. Let’s see how to install Windows 10 on a Raspberry Pi in just a few simple steps.
Installing Windows operating systems on Raspberry Pi is not straight forward as installing other Linux operating systems. You will not get a bootable Windows image to flash on the SD card or USB drive. You should prepare a Windows ISO image on your own using the UUP Dump script and flash the created Windows image to an SD card or USB drive using the ‘Windows on Raspberry imager‘ tool from the WoR project. Don’t worry. We will show you everything that you need to install Windows 10 on a Raspberry Pi in this post.
Step 1. Download the UUP Dump Script to Create Windows 10 Image
We encourage you to take a look at the Getting Windows Images guide before you proceed. This guide will help you to choose the right version of the operating system. We are not going with the ESD image as it supports the WoR-PE package.
Since there is no official Windows ISO image is available for download. You should download the UUP dump scripts.
1. Go to https://uupdump.net
2. You will be greeted with four versions of Windows. Dev Channel, Windows 11, Windows Server, and Windows 10. As soon as you click on Windows 10, a dropdown will appear. Select the latest available build. We have 22H2 as the latest build available at the time of publishing this post.3. Select the Release Type you want to download. We have chosen ‘Feature update to Windows 10‘ that comes with the updated build for regular usage.4. Each Windows image is made available in multiple Architectures. 1. x64, 2. x86, 3. Arm64, and 4. Amd64. Click on the Arm64 as your Raspberry Pi’s processor is made of Arm architecture.5. In the next Window, choose Language, then Click Next.6. In the next step, choose Windows Edition. You can choose Home or Pro or both.7. In the Next Window. Choose the Download and Convert to ISO option. And, under the conversion options, select Include updates as shown in the below diagram.8. At last, click on the Create Download Package button. The package will start downloading as soon you click on it.
Step 2. Create a Windows ISO image running the UUP Dump script
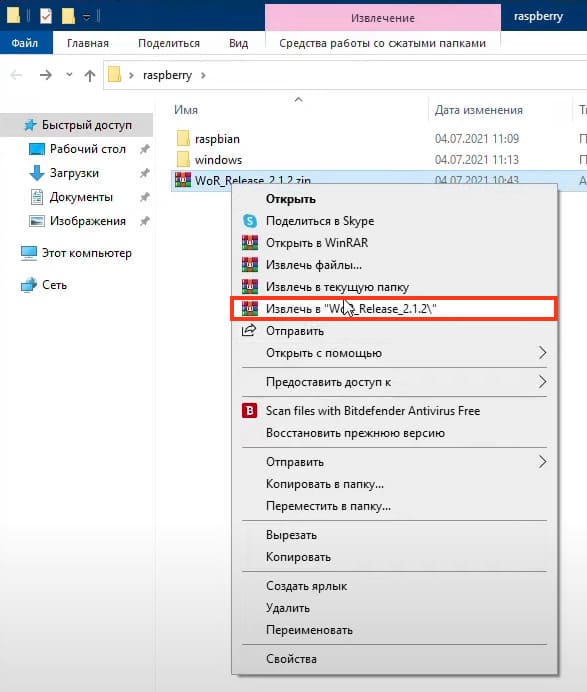
The script will be downloaded as a zip archive file. You should extract the content of the zip file to a different directory. Imp Note: The directory name shouldn’t have any space char.
We have unzipped the file into F:\WindowsForRPI directory. You are free to choose your own path.
In the extracted files, you will see scripts created to run on Windows, mac and Linux since we are using Windows PC in this demo. We ran Windows script: uup_download_windows.cmd.
As soon as you run the file as ‘Run As Administrator,’ the script will start downloading the required files and creating the Windows ISO image to write on the SD card or USB drive.
Note: this is a very time-consuming process. It may take up to 1 hr, depending on your internet and computer processing speed. You should wait until the process gets completed.
Once you are done with the process, you will see the “Press 0 to Exit” message. This indicates that the process is successfully completed. There is an ISO image file in the directory of the script. Imp Note: we would suggest disabling the Antivirus program before you run the UUP Dump script. We ended up in failure in our initial attempts. We got success only upon disabling the Antivirus protection.
For more details, you can join the WoR Discord channel.
Step 3. Download and Run the Windows on Raspberry imager tool
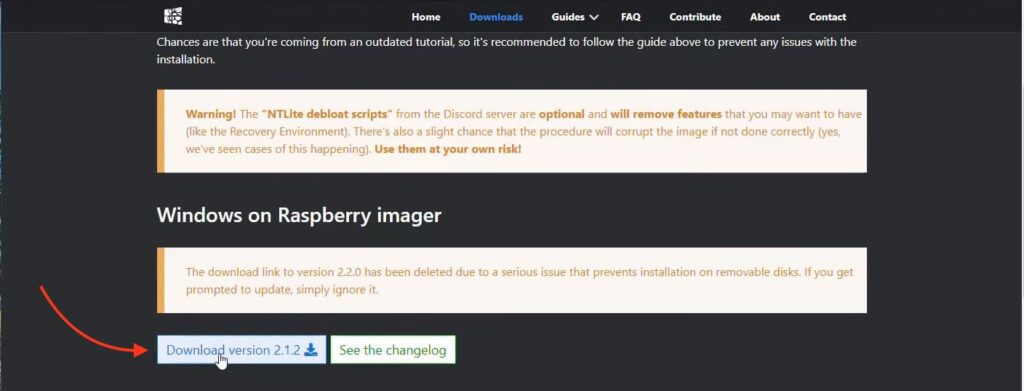
Windows on Raspberry imager is a free tool that you need to download. We downloaded v2.3.1, which is the latest available, while we published this post.
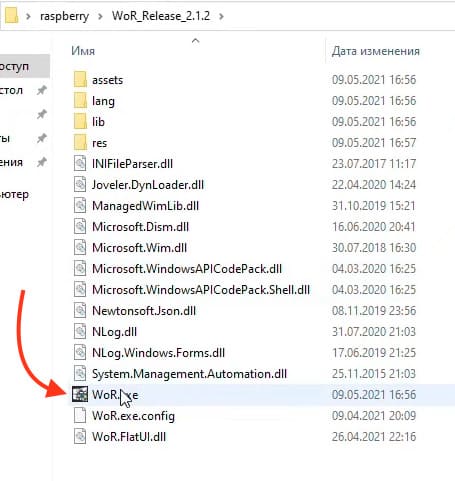
Move the zip file to a different location and unzip it. You will see the ‘WoR.exe’ file upon unzipping. Run the ‘WoR.exe’ file to run the Windows on the Raspberry imager tool.Note: There is a separate imager is made available for download for PE-based installation. We are not covering PE-based installation in this post. If you want to know more about the PE-based installer, please visit this link.
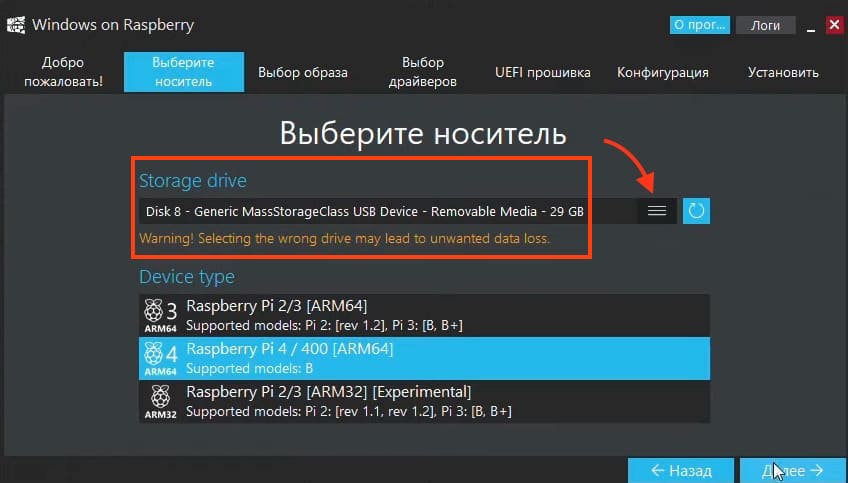
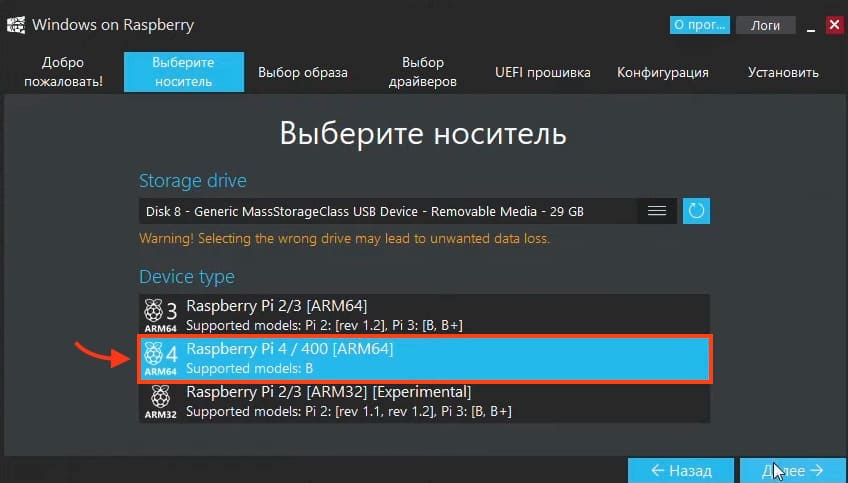
Step 4. Select the Storage device & Device type
Immediately upon hitting the Next button, you will be asked to select the Storage drive, which is your SD card or USB drive, and the Device type, which is your Raspberry Pi device module. Select both the storage and devise type, then click Next.
Note: If you are using a USB drive, then you should use the GPT partition scheme with the latest boot loader.
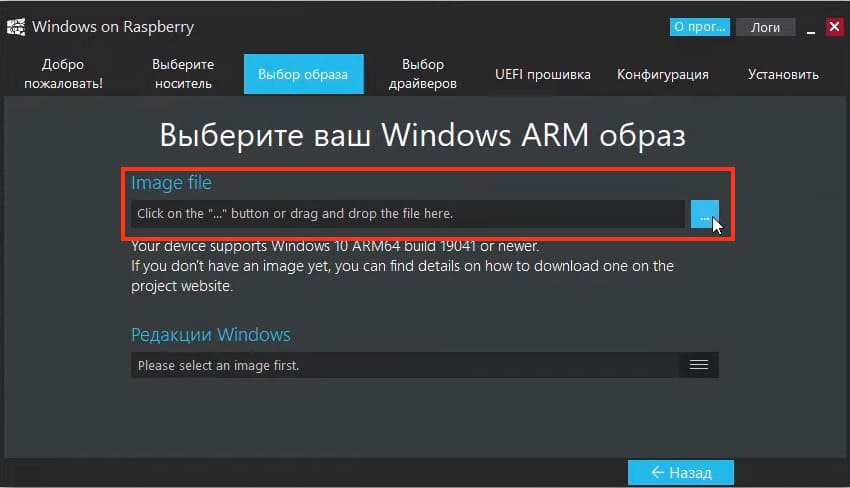
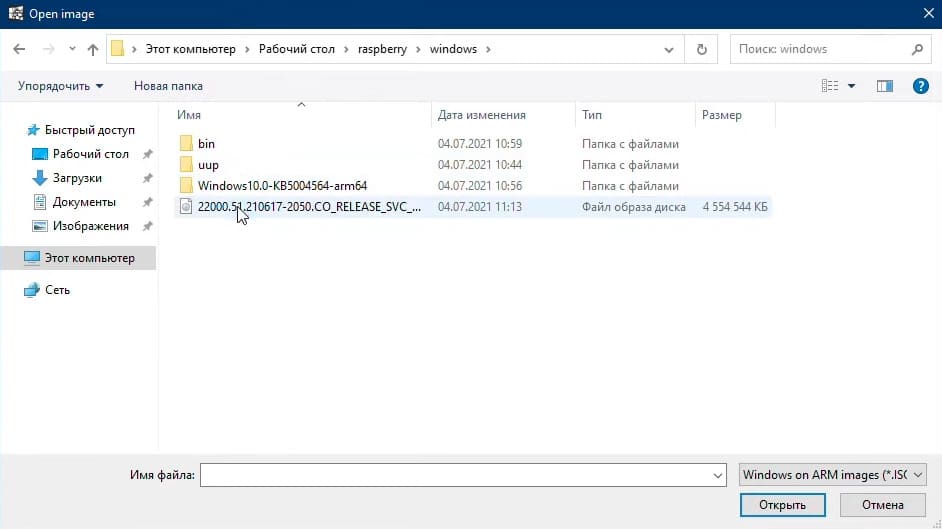
Step 5. Select the Windows ISO image
Browse the Windows ISO file created in Step 2. click Next.
Step 6. Select the Driver
Select the first option, which is “Use the latest package option available on the server.” Click Next.
Step 7. Select the UDFI Firmware
Select the first option, which is “Use the latest firmware available on the server.” Click Next.
Step 8. Configure Install and Boot options
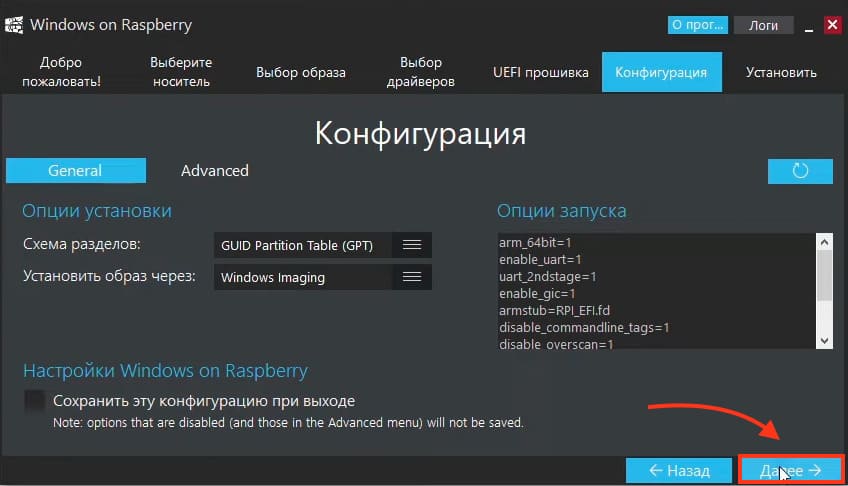
There are a few Install and Boot options available to configure as per your needs. We are not going to tweak anything for now. It is not required either. Click Next with the same default configurations.
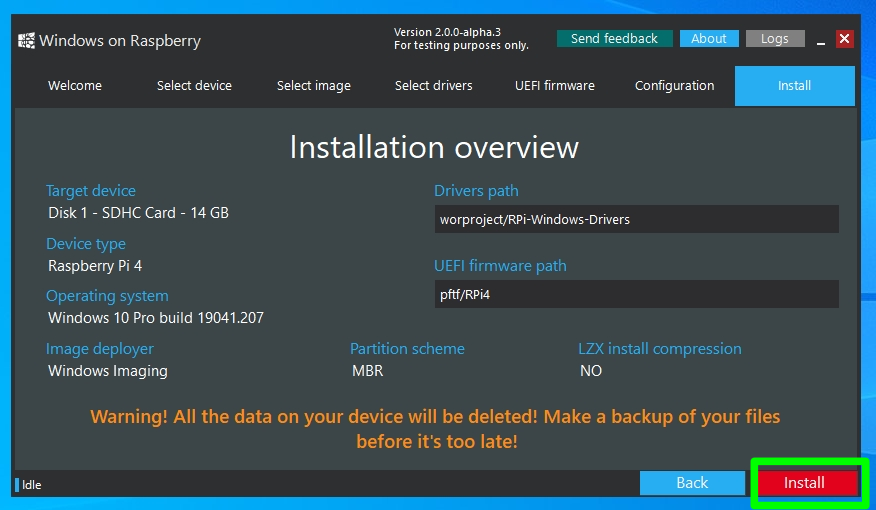
Step 9. Take a look at the Installation Overview
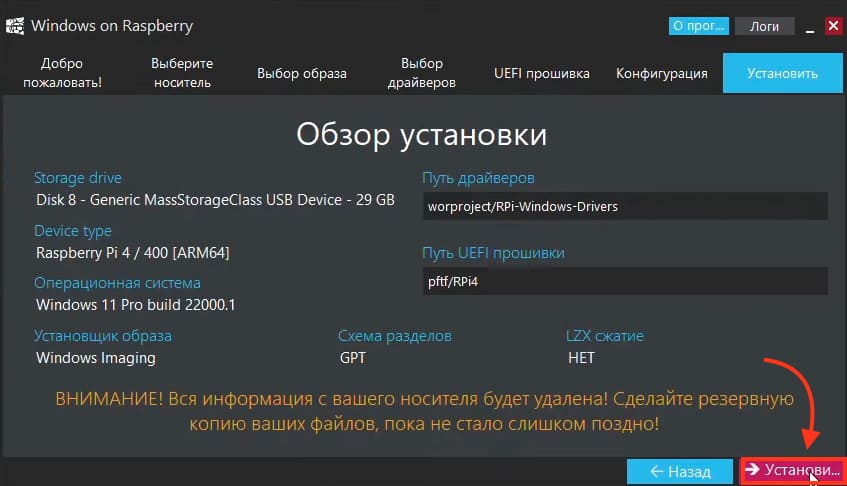
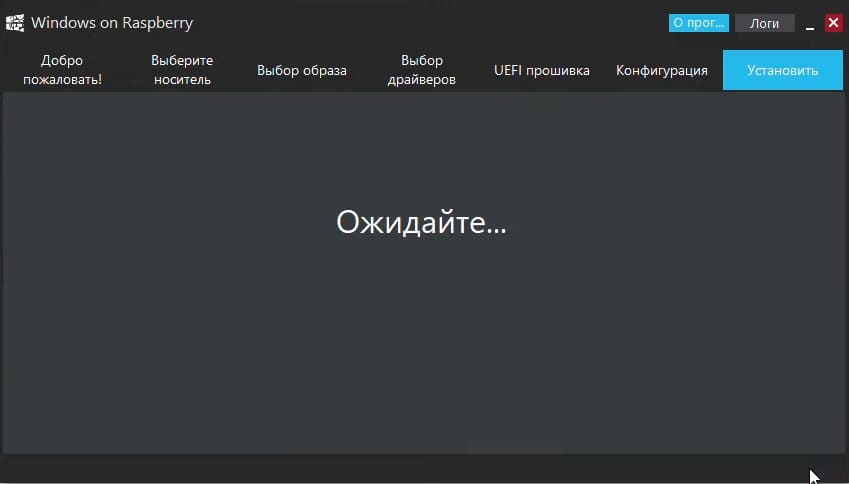
On this screen, you will see the overview of the installation. If you feel you want to change the settings, just go back and tweak the change you want to go with. If not, everything looks perfect. Click Install.
Step 10. Complete the Installation process
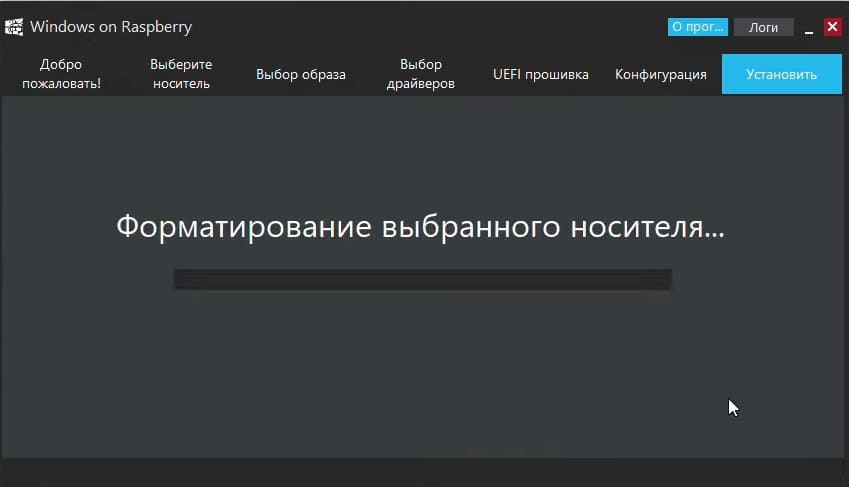
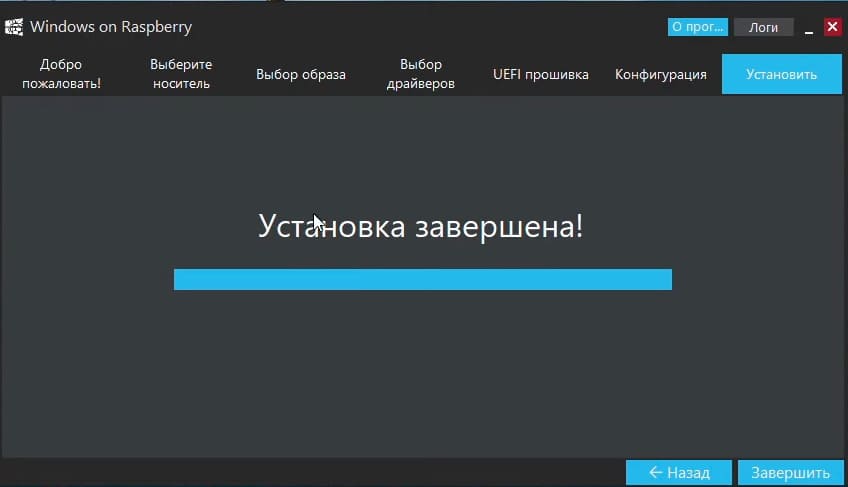
The process will start with formatting the drive and creating partitions before installing the Windows operating system. Depending on your system resources and storage device R/W speed, this process may take several minutes. Let the process complete. Click Finish to complete the installation process.
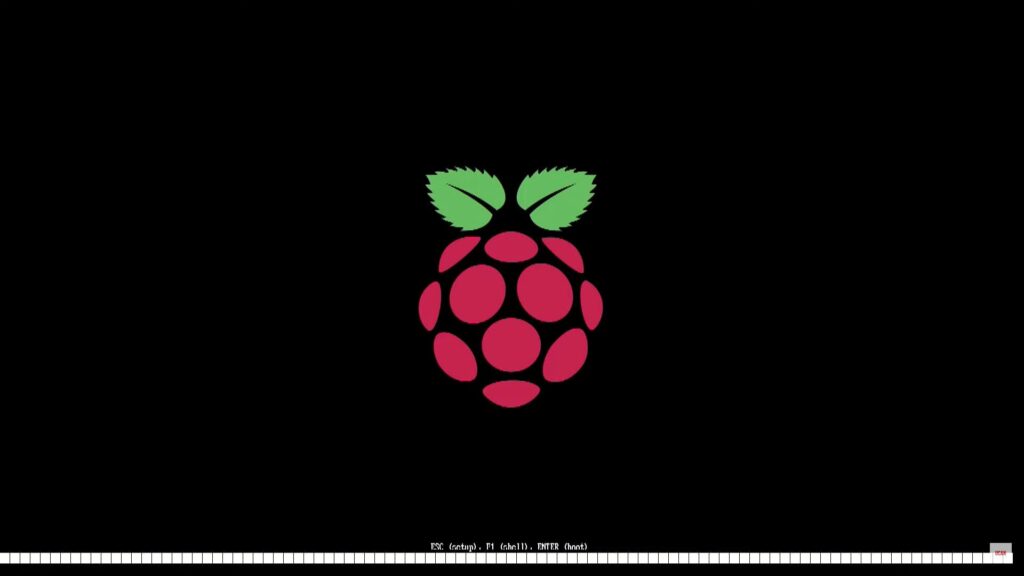
Step 11. Boot the Raspberry Pi inserting the flashed SD card or USB drive
Connect all the peripheral devices like Mouse, Keyboard, power adopter, and monitor to your Raspberry Pi. Insert the Windows image flashed micro SD card or plugin the USB drive fire up the Raspberry Pi.
Step 12. Set up the Windows on Raspberry Pi
Since you are booting Windows on the Raspberry Pi for the first time, it asks to set up your Windows as in the case of your Windows PC. Set up the Language, Keyboard layout, time zone, account, password, security questions, network, and everything that it asks to set up.
Upon finishing the Windows set up process. Your windows 10 desktop is ready to use.
That’s all. This is how you should install Windows 10 on a Raspberry Pi.
Running Windows 10 on Raspberry Pi 4
Once the installation is complete, users can start exploring the Windows 10 operating system and all its features from their Raspberry Pi. With the help of this project, users are able to experience the full power of Windows 10 on the popular single board computer, Raspberry Pi. Windows on Raspberry Pi provides an easy and affordable way to get the most out of your Raspberry Pi with the power of Windows 10. So why wait? Get started today!
We hope this post would help you learn how to install Windows 10 on a Raspberry Pi. Thanks for reading this tutorial post. Visit our social media page on Facebook, LinkedIn, Twitter, Telegram, Tumblr,Medium & Instagram,and subscribe to receive updates like this.
You may also like these articles:
Arun KL
Arun KL is a cybersecurity professional with 15+ years of experience in IT infrastructure, cloud security, vulnerability management, Penetration Testing, security operations, and incident response. He is adept at designing and implementing robust security solutions to safeguard systems and data. Arun holds multiple industry certifications including CCNA, CCNA Security, RHCE, CEH, and AWS Security.
В данной инструкции покажем пример как установить Windows 11 на ARM процессор. Как пример устройства на ARM процессоре — возьмем самый популярный «карманный компьютер» — Raspberry Pi.
Скачать дистрибутив Windows 11 ARM можно в нашем каталоге.
После того как вы скачали дистрибутив Windows 11 ARM, нужно скачать утилиту которая запишет этот установщик Windows 11 на SD карту.
— Переходим на сайт worproject.com, загружаем в разделе Downloads.
— Распаковываем ее в любое удобное для вас место.
Процесс записи Windows 11 ARM на SD диск.
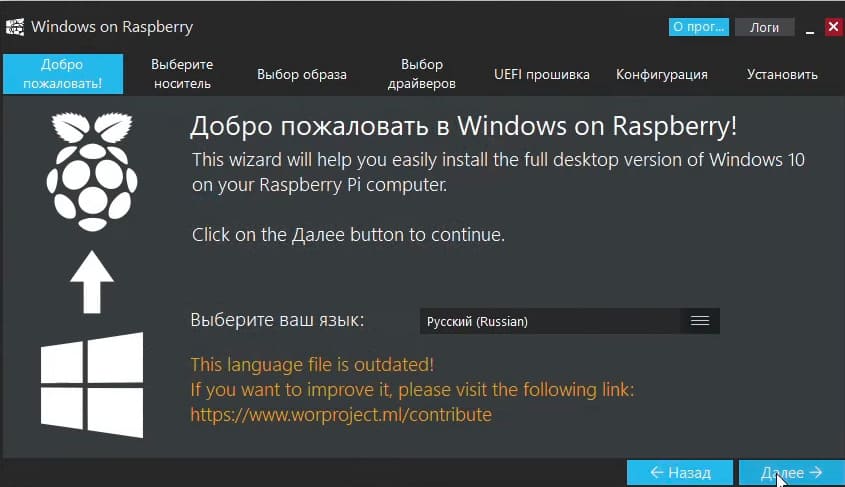
1) Переходим в папку с скачанной утилитой WoR и запускаем файл WoR.exe
2) Выбираем ваш язык установки, в нашем случае по умолчанию стоит Русский. Нажимаем «Далее».
3) Выбираем носитель, то есть вашу SD карту на которую вы хотите записать Windows 11 ARM. Все файлы которые хранятся на вашей SD карте, после начала записи дистрибутива будут стерты. Заранее сохраните их на отдельный жесткий диск или флешку.
4) Выбираем Raspberry Pi4, либо если вы устанавливаете на Raspberry 3 то выбираете соответствующую версию. После чего нажимаем «Далее».
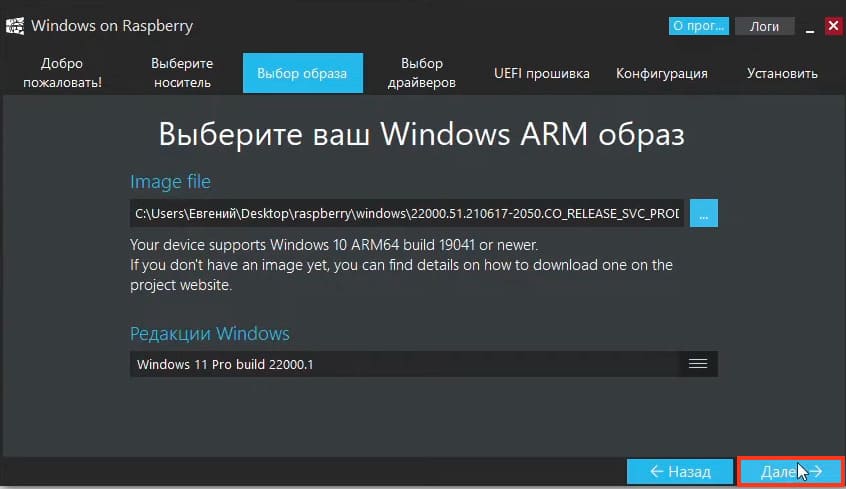
5) Кликаем на три точки в разделе Image File и выбираем заранее скачанный образ Windows 11 ARM.
Нажимаем «Далее»
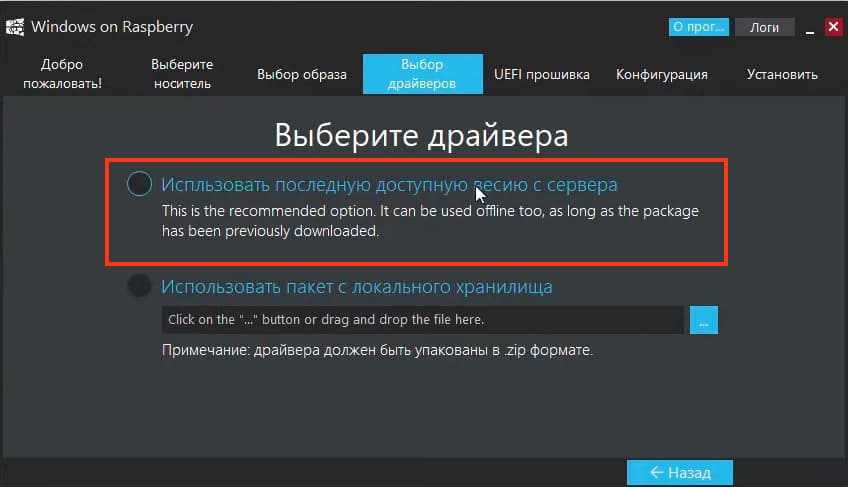
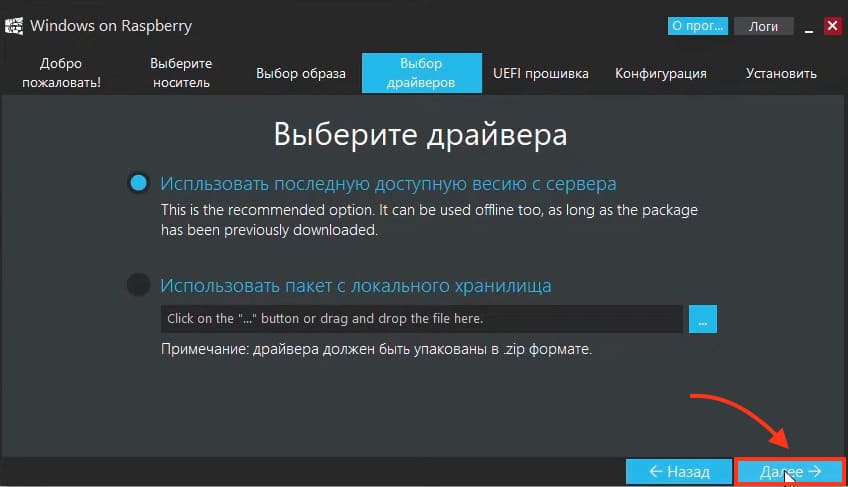
6) Кликаем на «Использовать последнюю доступную версию с сервера».
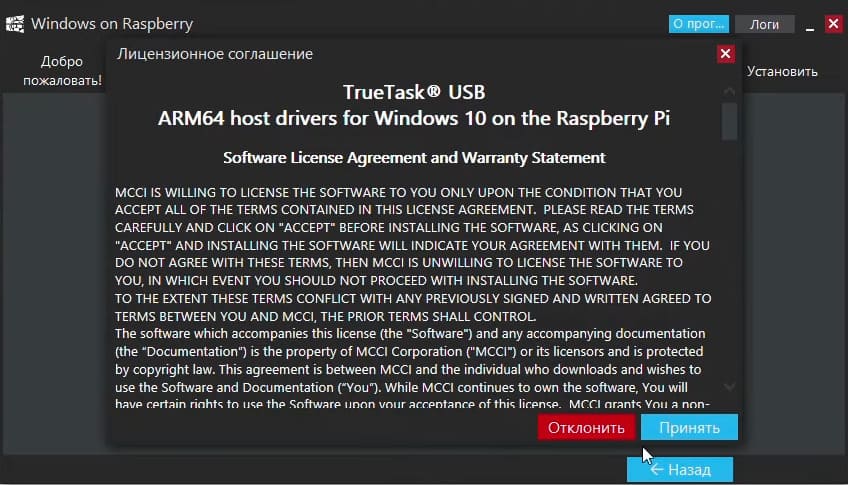
7) «Принять».
 Нажимаем «Далее».
9) В пункте про UEFI прошивку, выбираем «Use the latest frimware on the server». После чего нажимаем «Далее».
10) в Конфигурация ничего не меняем, жмем «Далее».
11) «Установить».
12) Теперь просто ожидаем полного завершения установки Windows 11 на SD карту.
13) После завершения, нажимаем закрыть.
Процесс установки Windows 11 ARM.
1) Достаем SD карту из ПК и подключаем к вашему Raspberry.
2) Включаем питание Raspberry после чего появится стандартное окно устройства.
3) Далее начнется подготовка к Установке.
4) После чего начнется стандартная установка Windows 11

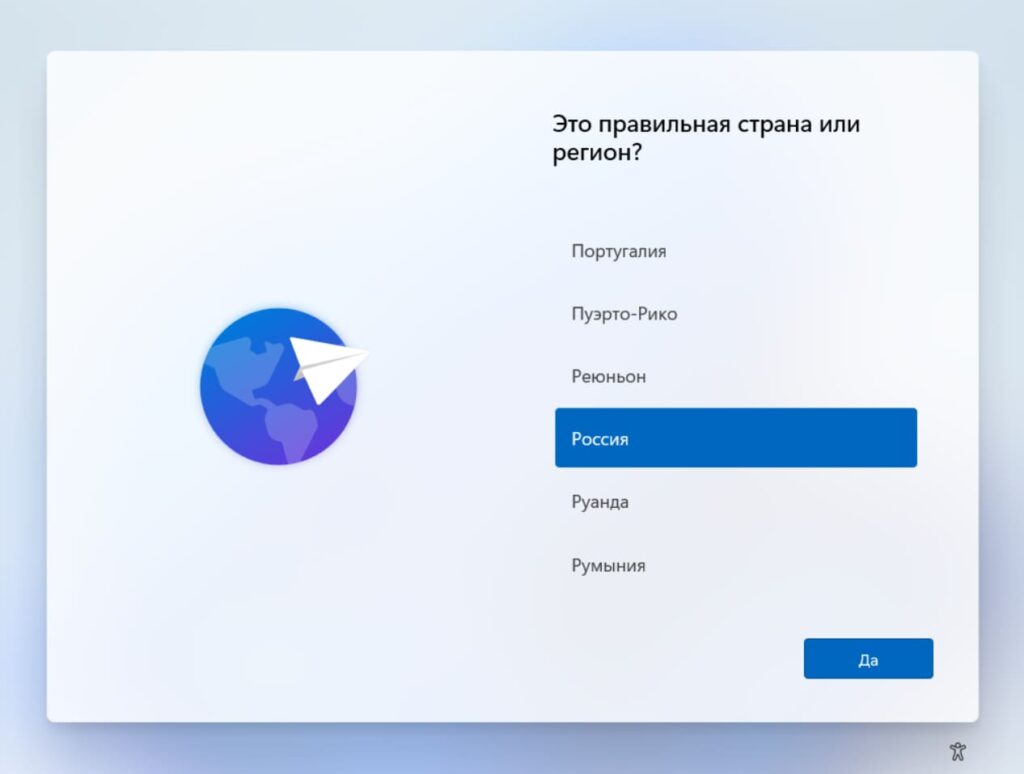
5) Мастер настройки запросит у Вас указать Ваш регион, на примере выберем «Россия».
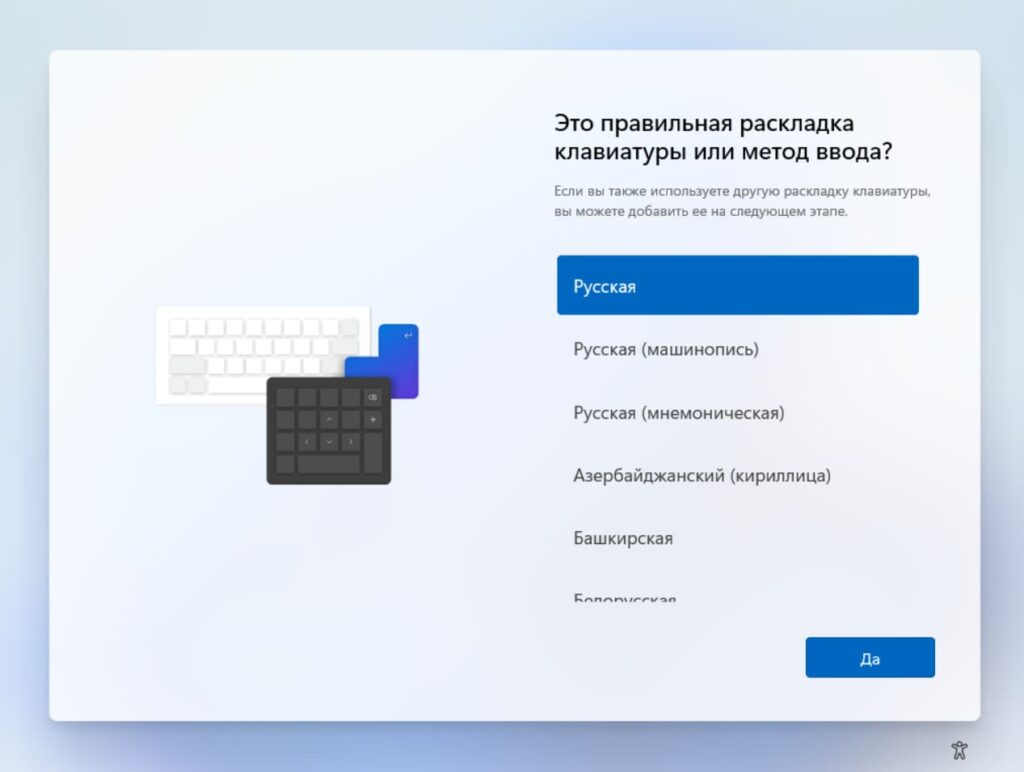
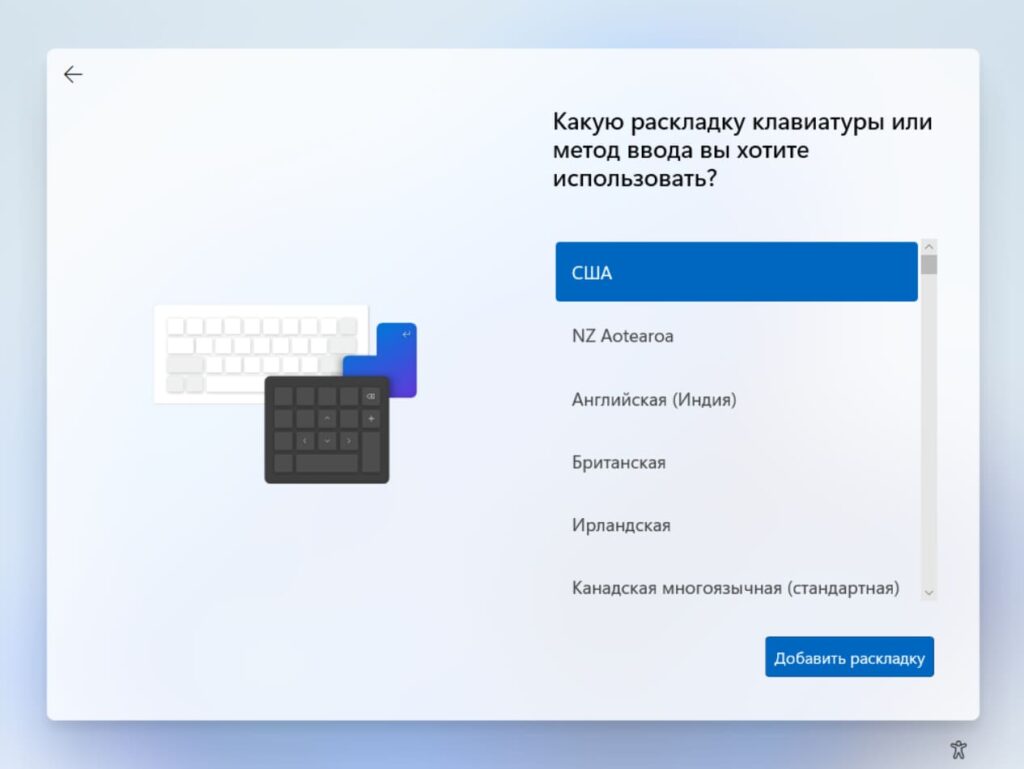
6) Далее выберем язык основной раскладки клавиатуры, выберем «Русская».
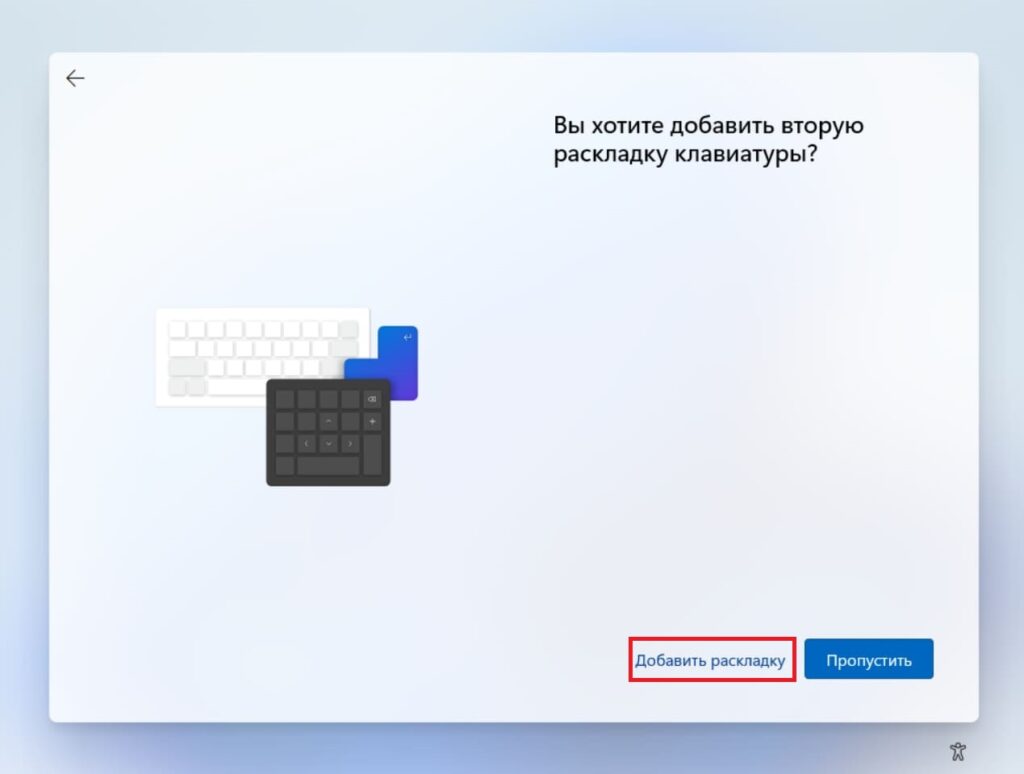
7) После у Вас запросит выбрать вторую раскладку клавиатуры, рекомендуем выбрать и ее для английской раскладки. Нажимаем «Добавить раскладку».
Выберем «Английский (США)» и нажмем «Далее».
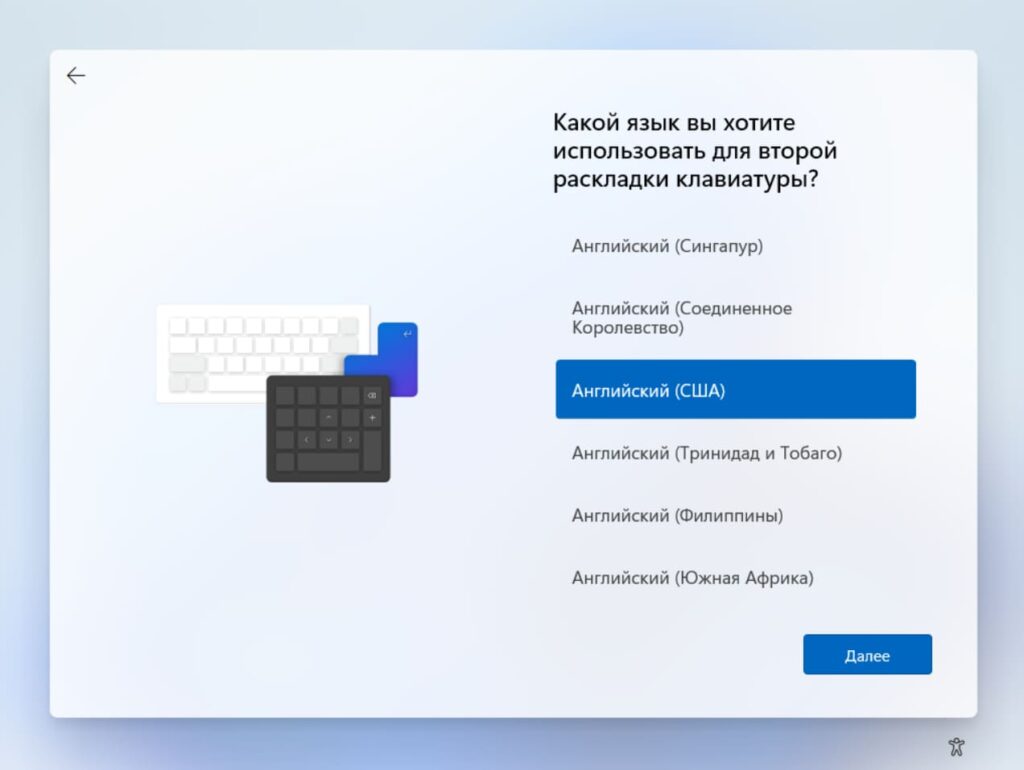
9) После выберем «США» и нажмем «Добавить раскладку».
10) Далее мастер настроек начнет процесс поиска и загрузки актуальных обновлений. Дождемся завершения процесса.


11) После загрузки обновлений продолжим процесс первоначальной настройки. Теперь необходимо задать имя компьютера (системы). Можете задать любое имя до 15 символов.

12) Далее необходимо выбрать назначение устройства. Если Ваш компьютер не входит в корпоративный домен Вашей организации или его не нужно задавать, выберем пункт «Настроить для личного использования» и нажмем «Далее».

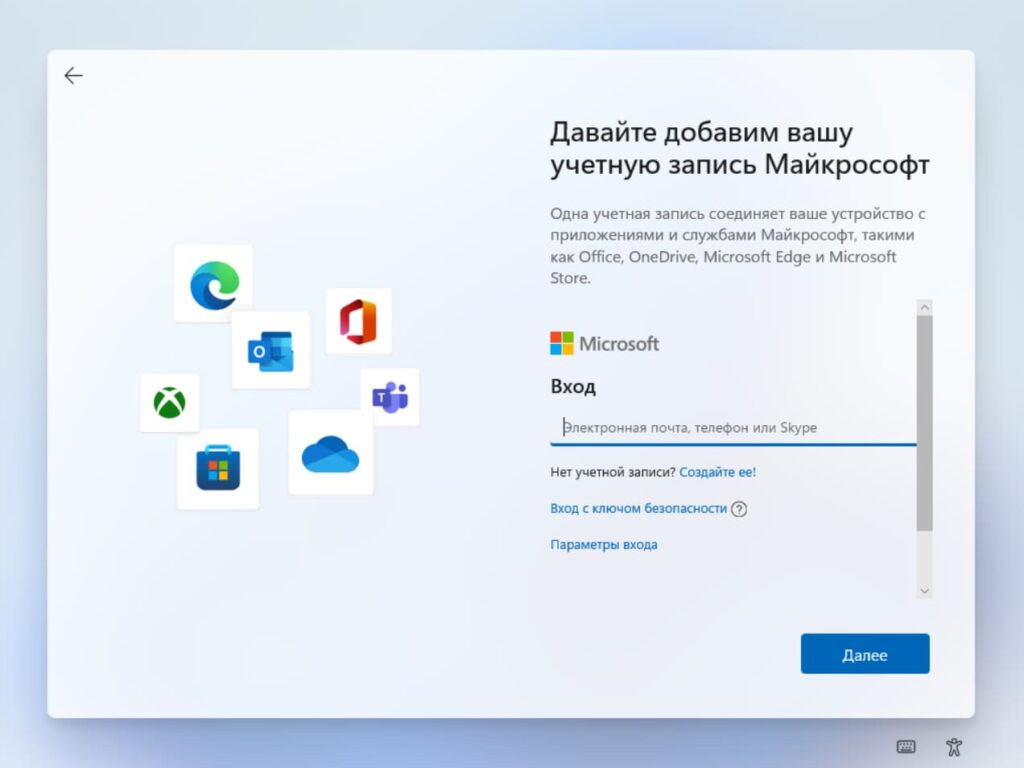
13) Теперь нужно будет войти под Вашей учетной записью Microsoft, совершите авторизацию под Вашим аккаунтом Майкрософт. Если у Вас его нет, то можете создать его, по инструкции в нашей прошлой статье.
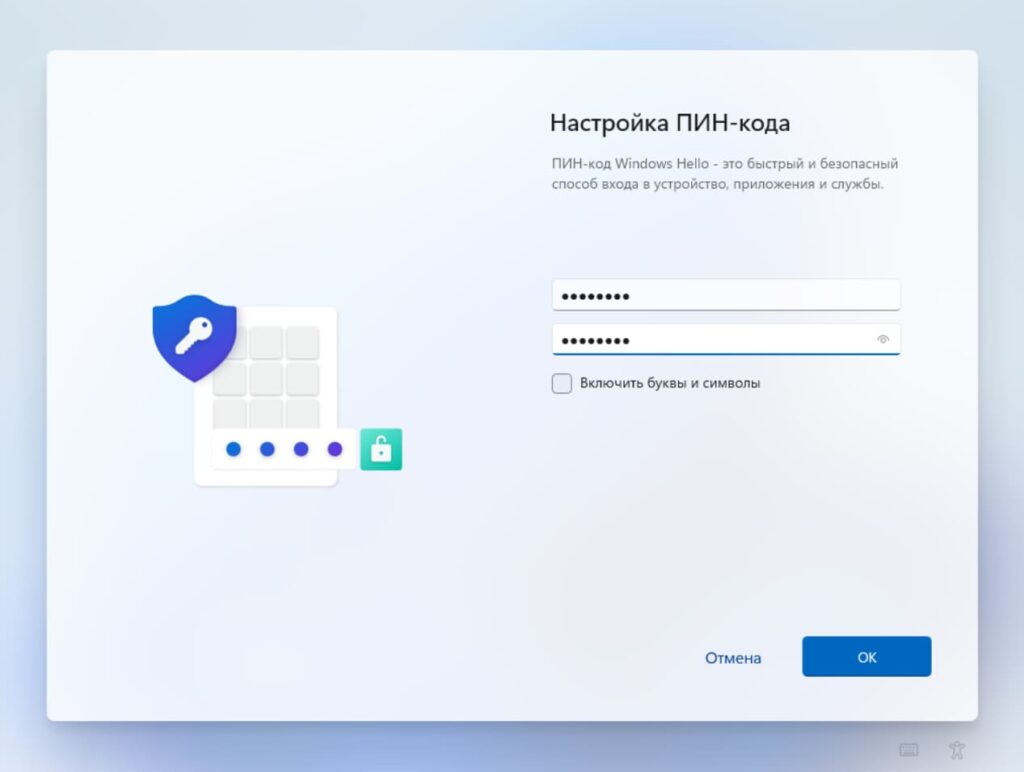
14) После авторизации под Вашей учетной записи Microsoft Вам предложат создать пин-код для входа в систему. Это удобный короткий код, который предназначен для быстрого входа в систему, плюсом данного способа является то, что Вам не нужно будет вводить пароль от Вашей учетной записи для входа в систему, нужно будет лишь ввести короткий пин-код.

15) Придумываем пин-код, необходимо будет его ввести два раза для подтверждения.
16) Следующим пунктом будет настройка параметров конфиденциальности системы. На примере мы снимем все пункты, выбрать данные пункты можете на свое усмотрение.

17) Далее мастер настройки запросит выбрать пункты, задачи которых предположительно будут использоваться на данном ПК. Это не обязательный пункт, на примере мы его пропустим.

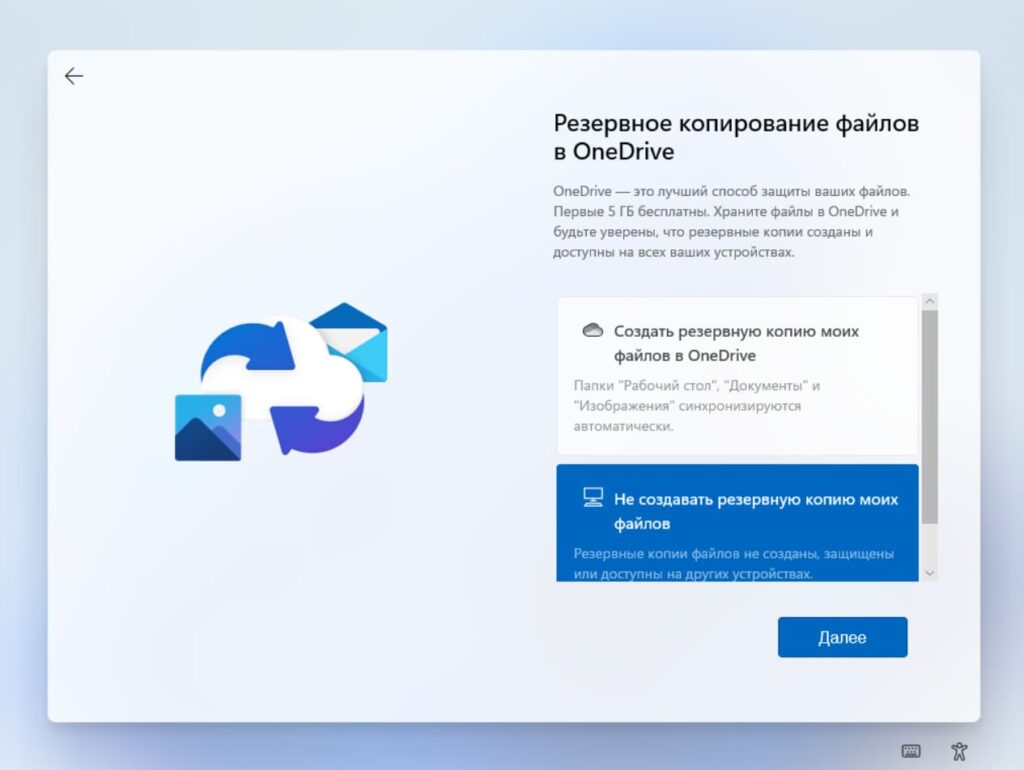
18) Далее, у Вас запросит выбор сохранять ли Ваши файлы (резервную копию определенных папок, а именно «Рабочий стол», папки «Документы» и «Изображения») автоматически в OneDrive. Можете выбрать данный пункт на свое усмотрение, на примере мы выберем «Не создавать резервную копию».
19) Первичная настройка системы на этом закончена, теперь дождитесь загрузки рабочего стола.


Готово! Рабочий стол Windows 11 загружен и можно приступить к работе.
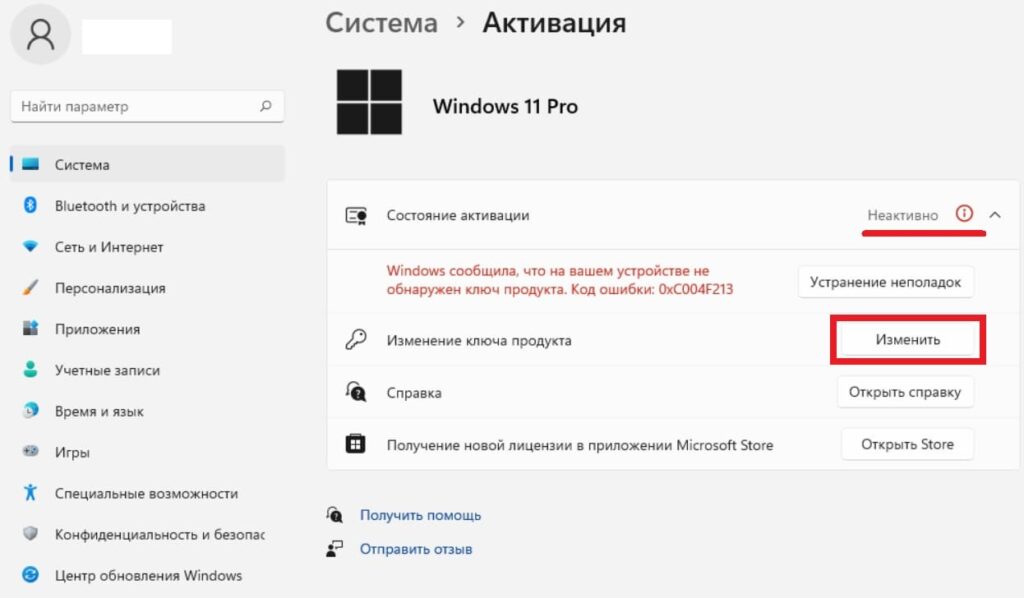
Если Вы установили систему с нуля, то она у Вас скорее всего не активирована, и ее необходимо активировать для корректной бесперебойной работы. Проверить активирована ли Ваша система можно в том же меню «Система» пролистав вниз до пункта «Ключ продукта и активация».
Приобрести ключ активации Windows 11 можете в нашем каталоге. Оригинальные ключи активации, моментальная доставка ключей на Вашу электронную почту сразу после оплаты в автоматическом режиме. Гарантия и техническая поддержка 24/7 нашего магазина.
Итак, если когда у Вас есть в наличие ключ активации под Вашу редакцию Windows 11, можете нажать на кнопку «Изменить» на пункте «Изменение ключа продукта».
Следующим окном введите Ваш ключ активации в поле для ввода ключа.
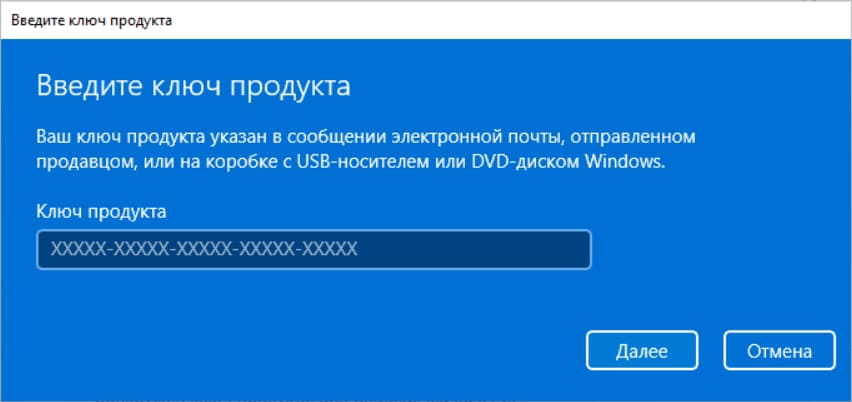
Далее нажимаем кнопку «Активировать».
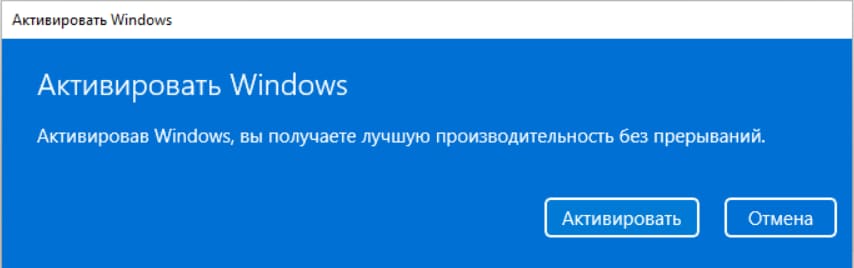
Если ключ подошел, то следующее окно укажет на то, что система Windows активирована.

The Raspberry Pi is commonly associated with Linux operating systems such as Raspberry PI OS. But what about running Windows 10 on your Raspberry Pi? Officially, Microsoft’s only operating system for the Pi is an old version of Windows 10 IoT Core, which just lets you execute Visual Studio code on the computer but doesn’t work as a standalone OS with a GUI (in other words, no “windows”). However, the lack of support from Microsoft hasn’t stopped some ambitious developers from finding a way to run a full desktop version of Windows 10 on Raspberry Pi.
In 2019, we tried installing a hacked version of Windows 10 on a Raspberry Pi 3 and it ran, but it was extremely painful to use. Recent developments have now made it possible to run Windows 10 somewhat-competently on a Raspberry Pi 4, at least as a proof-of-concept We’ll show you how to install Windows 10 on your Raspberry Pi below.
However, before you begin, please note that this is not an official Microsoft product and the source of the images and software used is from a passionate and vibrant community working together to create this project. Amir Dahan is the creator of Windows 10 Lite, Marcin is responsible for UEFI and Pete Batard responsible for the 3GB RAM fix. The Windows 10 image file and RAM fix you’ll need to make this work are constantly changing as are their download locations so you’ll need to find them via the Windows on Raspberry Pi Discord Group, which is where all the developers hang out and share updates. We can’t vouch for the safety or legitimacy of any of the custom files the community has created for this project so proceed at your own risk.
At the time of writing this project runs surprisingly well (see below for more details) but has a lot of caveats. . The Raspberry Pi’s onboard Ethernet, Bluetooth and GPIO do not work so you’ll need a USB Ethernet or USB Wi-Fi dongle to get online (there’s no list of supported dongles so we can’t guarantee yours will work). Audio via HDMI is also not available but Bluetooth audio via a USB Bluetooth dongle is possible.
What you will need to install Windows 10 on a Raspberry Pi 4
- Raspberry Pi 4 4GB or 8GB
- 16GB or larger microSD card, (see best microSD cards for Raspberry Pi)
- Windows 10 PC
- USB to Ethernet or WiFi dongle
- Bluetooth dongle (if you want Bluetooth)
- Keyboard, mouse, HDMI and power for your Raspberry Pi
How to Install Windows 10 on the Raspberry Pi 4
1. Download the latest pre-release version of WoR tool https://www.worproject.ml/downloads and extract the files.
2. Visit the Windows on Raspberry Pi Discord server and go to the Downloads channel to Download the latest stable image, currently 0.2.1.
3. Open the WoR Alpha tool and select your language.
Get Tom’s Hardware’s best news and in-depth reviews, straight to your inbox.

4. Insert microSD card and select the drive. The Raspberry Pi 4 mode is currently experimental, but has worked reliably in our tests.
5. Select your Windows on ARM image.
6. Select the latest package of drivers from the server.
7. Use the latest UEFI firmware available.

8. Check the configuration and when happy click Next.
9. Double check everything before clicking Install.
The installation process can take as long as two hours to complete, depending on the speed of the microSD card.
10. Download the RAM fix for Rpi 4 file from the Windows On Raspberry Pi Discord server. Extract the contents.
11. Copy winpatch.exe to the root of C: drive.
12. Locate the drive containing the Windows 10 on ARM installation, make a note of the drive letter.
13. Open a Command Prompt as Administrator and go to the root of C: drive.
cd \
14. Patch the USB driver to enable USB ports on the Raspberry Pi 4. Change the drive letter to match your installation.
winpatch X:\Windows\System32\drivers\USBXHCI.SYS 910063E8370000EA 910063E8360000EA 3700010AD5033F9F 3600010AD5033F9F
15. Overclock the Raspberry Pi. This step is optional but highly recommended (though you’ll want a cooling fan). Edit the config.txt file found in BOOT drive. Add these two lines at the end of the file. Overclocking will require cooling for your Raspberry Pi.
over_voltage=6
arm_freq=2000
16. Eject the microSD card and insert it into the Raspberry Pi 4. Connect your keyboard, mouse etc and power on the Pi.
17. Follow the standard Windows 10 install process and after a short while you are ready to use Windows 10 on your Raspberry Pi 4.
18. As an administrator open a Command Prompt and run this command to enable 3GB of RAM. Press Enter to run the command.
bcdedit /deletevalue {default} truncatememory
19. Reboot the Raspberry Pi for the update to take effect.
20. For network access, use a USB to Ethernet or a compatible WiFi dongle.
21. Install Microsoft Edge by double clicking on the Microsoft Edge desktop icon.
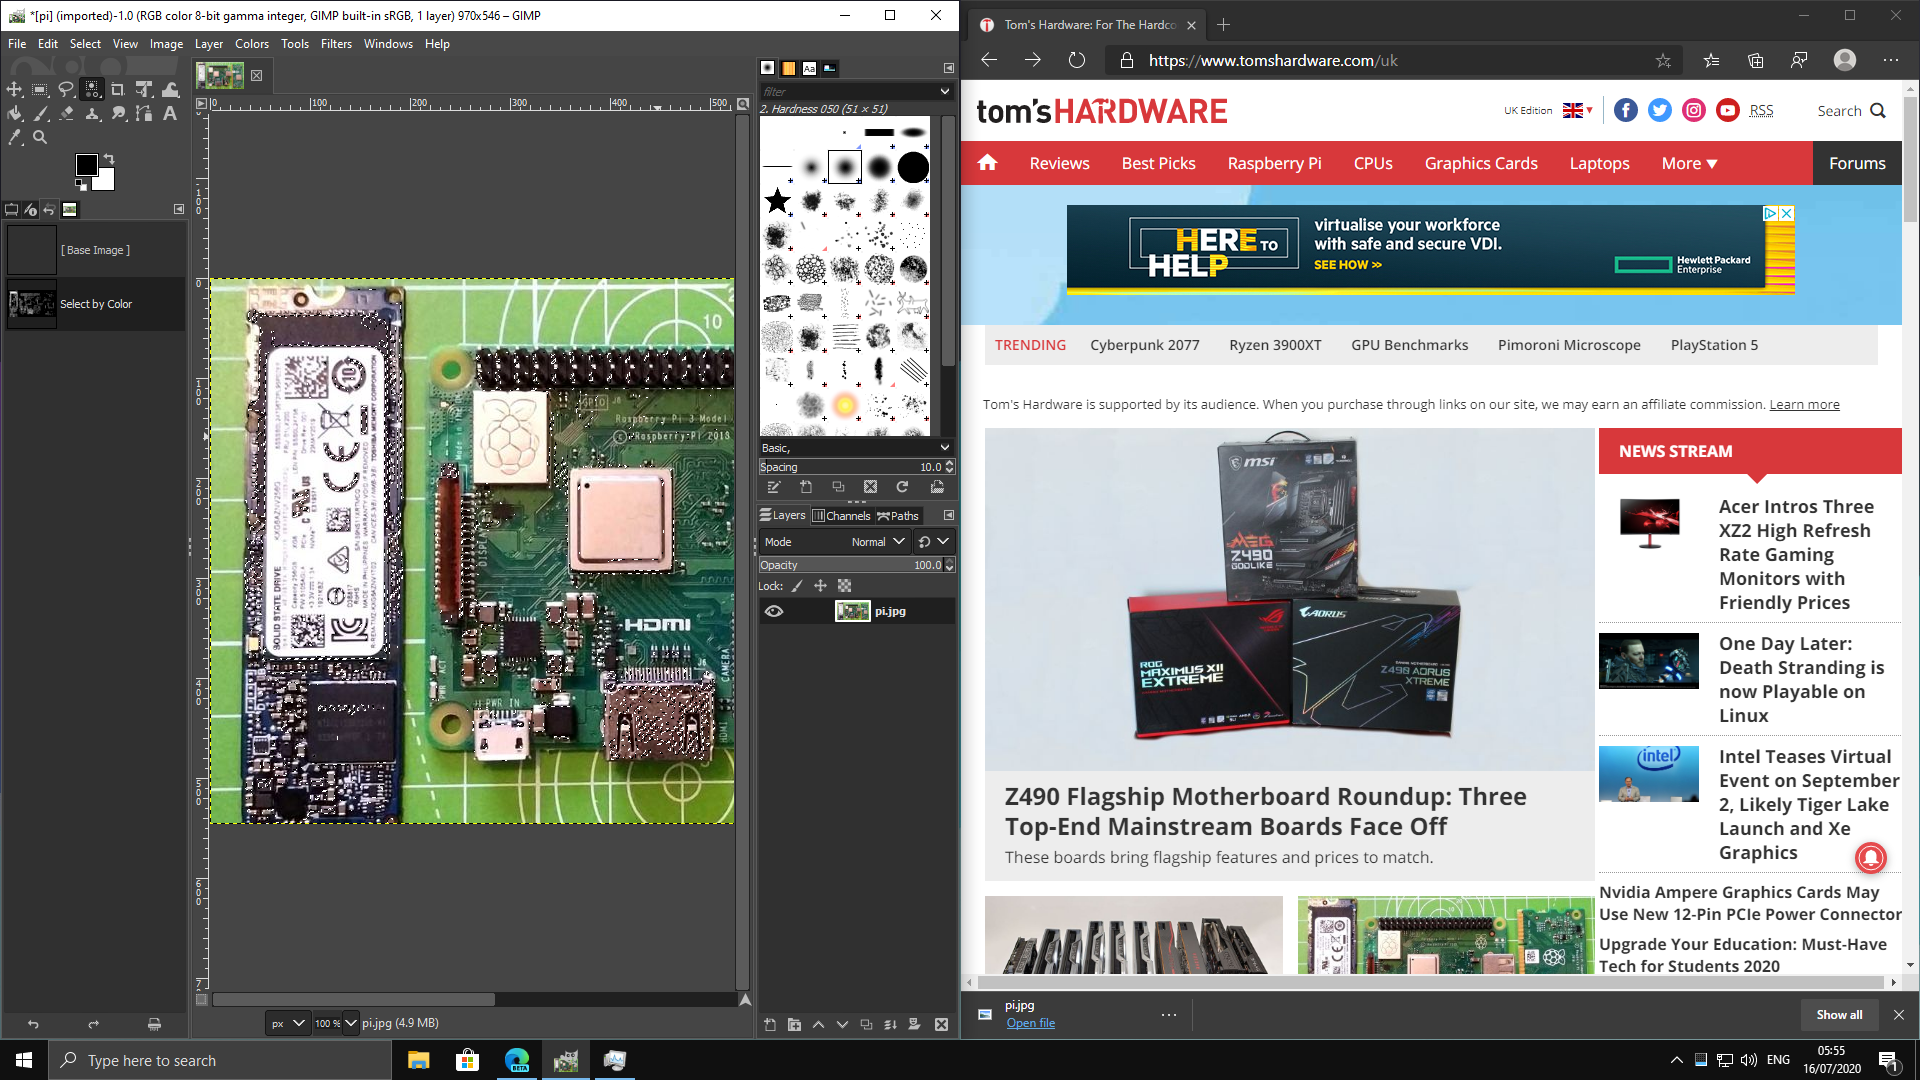
22. Installing software works in the same manner as a typical Windows 10 install. We tested GIMP Photo Editor and the Arduino IDE and both installed, albeit slowly and were usable for basic tasks.
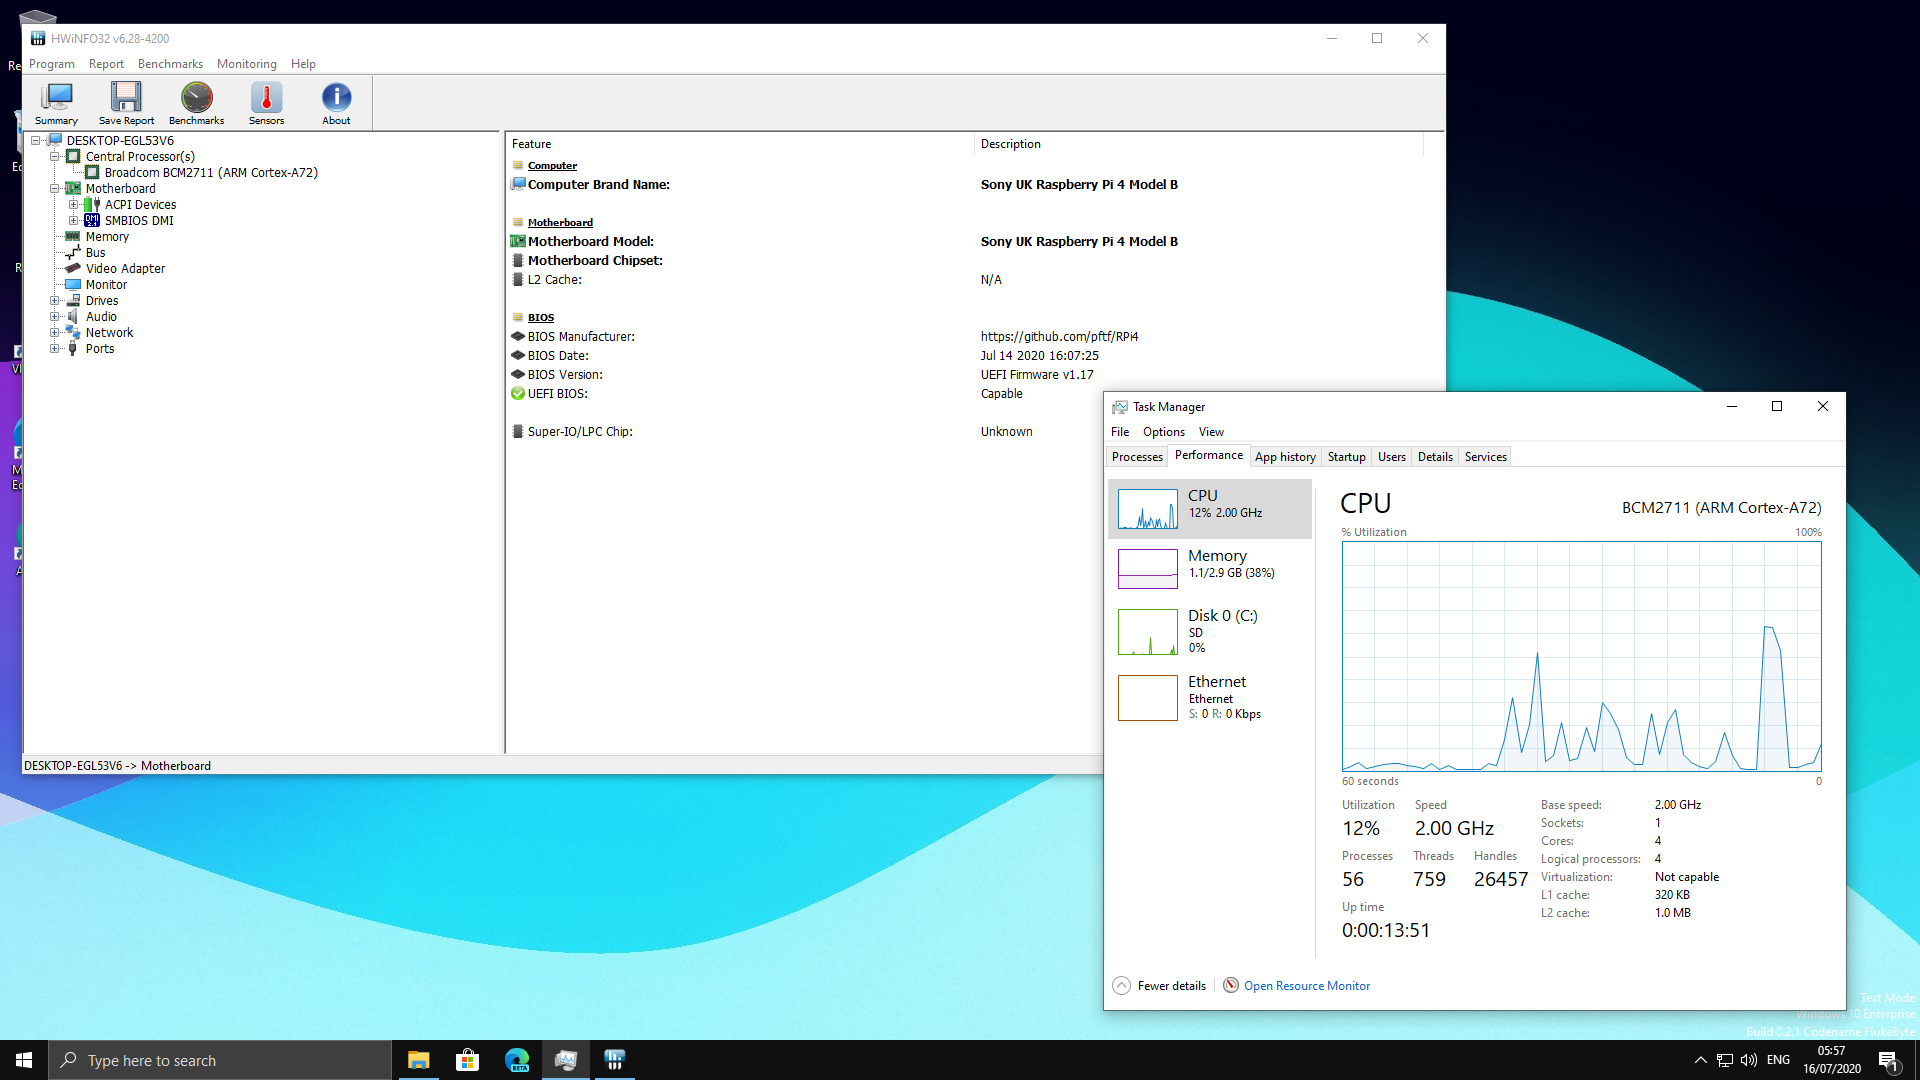
How does Windows 10 on Raspberry Pi Perform?
In our testing, overall performance is akin to a low end Intel Celeron / Atom CPU. Windows 10 on Raspberry Pi is usable, but more as a proof-of-concept than a daily driver. . Boot times were considerably longer than Raspberry Pi OS, at a sluggish 2 minutes 12 seconds.
Once the desktop was loaded the overall feel of Windows 10 on Raspberry Pi was responsive. The Edge web browser provided a good browsing experience. Heavy sites such as YouTube proved troublesome but that was compounded by our sluggish 100 Mbps Ethernet USB dongle and is not indicative of the OS as a whole.
We installed three applications in WIndows 10 on Raspberry Pi: GIMP Photo Editor, Arduino IDE and Python 3.8. We downloaded each program’s 32-bit installer and set it up without any issues. GIMP ran well and, while it would not be up to speed for a professional photo editor, it was quick enough for hobbyists to use.
The Arduino IDE was slow, mainly due to the way that the IDE uses Java behind the scenes. Again if you have a little patience, then the experience is good. Not every application can be installed, though. We tried Visual Studio Code and it flat out refused to install. But Python 3.8 was easily installed and ran well. The Python REPL (interactive shell) was available and the core modules were available for use. We installed an additional module, GPIO Zero, which is used to interact with the GPIO of the Raspberry Pi. Sadly, despite our best efforts, we were unable to use the GPI via Python 3.8 on Windows 10.
MORE: Windows 10 on Raspberry Pi: Hands-On
Introduction
Are you looking to turn your Raspberry Pi 4 into a powerful MiniPC with the latest operating system? In this step-by-step tutorial, we will cover the process of installing Windows 11 on Raspberry Pi 4.
With its new user interface and advanced features, Windows 11 is a revolution in the operating system history. By installing this OS on an advanced and flexible mini-computer, like Raspberry Pi 4, you can now have a wonderful experience. Whether you’re a tech enthusiast or a DIY lover, this tutorial provides all the necessary information and resources you will need to successfully install Windows 11 on your Raspberry Pi 4.
We recommend using Raspberry Pi 4 4GB RAM or Raspberry Pi 4 8GB RAM for optimal performance. So, let’s get started and explore endless possibilities with Windows 11 on this tiny computer!
What You Will Learn
- Installing Windows 11 on Raspberry Pi 4
- Updating the Bootloader of Raspberry Pi 4
Requirements for Installing Windows on Raspberry Pi 4
We need the required hardware to install Windows 11 on Raspberry Pi 4. Windows 11 has some requirements that your Raspberry Pi 4 must meet.
Here they are:
- At least 2GB of RAM (preferably 4GB RAM or higher for better performance)
- At least 32GB of storage capacity (preferably an external SSD)
- High-speed Internet
Note
The built-in WiFi and Bluetooth of Raspberry Pi will not work after installing Windows 11. So, you need to use a dongle or Ethernet instead.
HDMI audio output will not function, so you need to use a 3.5mm jack for audio output.
Tip
To install Windows 11 on external storage, you will need a computer running Windows 10.
Required Materials
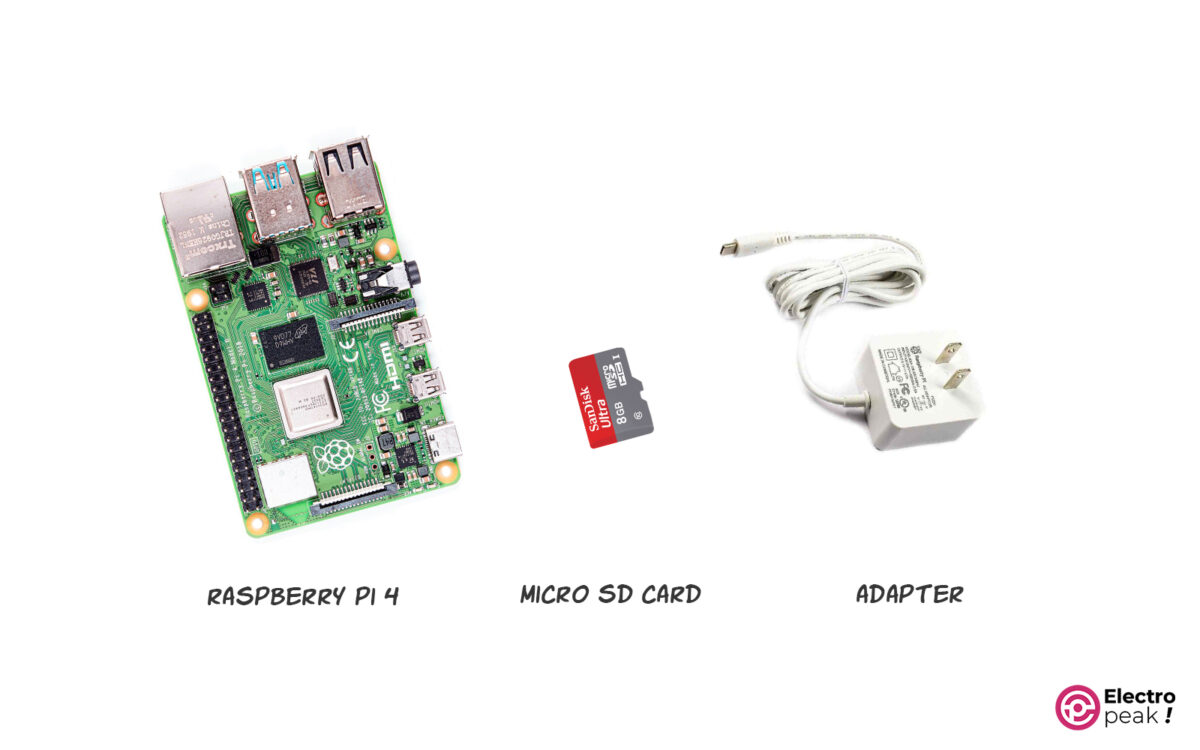
Hardware Components
*: You can also use Raspberry Pi 400. Either way, we recommend having 4GB or 8GB of RAM.
**: You can use various external storage options, including USB flash drives or hard drives.
***: You can also use other similar adapters, but we recommend sticking with the original Raspberry Pi adapter.
Software Apps
| Raspberry Pi Imager | |
| Windows on Raspberry Pi (WOR) |
Installing Windows 11 on Raspberry Pi 4 or 400
Step 1: Preparing Raspberry Pi for Installing Windows 11
Before installing Windows 11 on your Raspberry Pi 4, you need to install the latest version of the bootloader. So, follow these steps:
1- Install and run the Raspberry Pi Imager software.
2- Click on “Choose OS” (the image below).
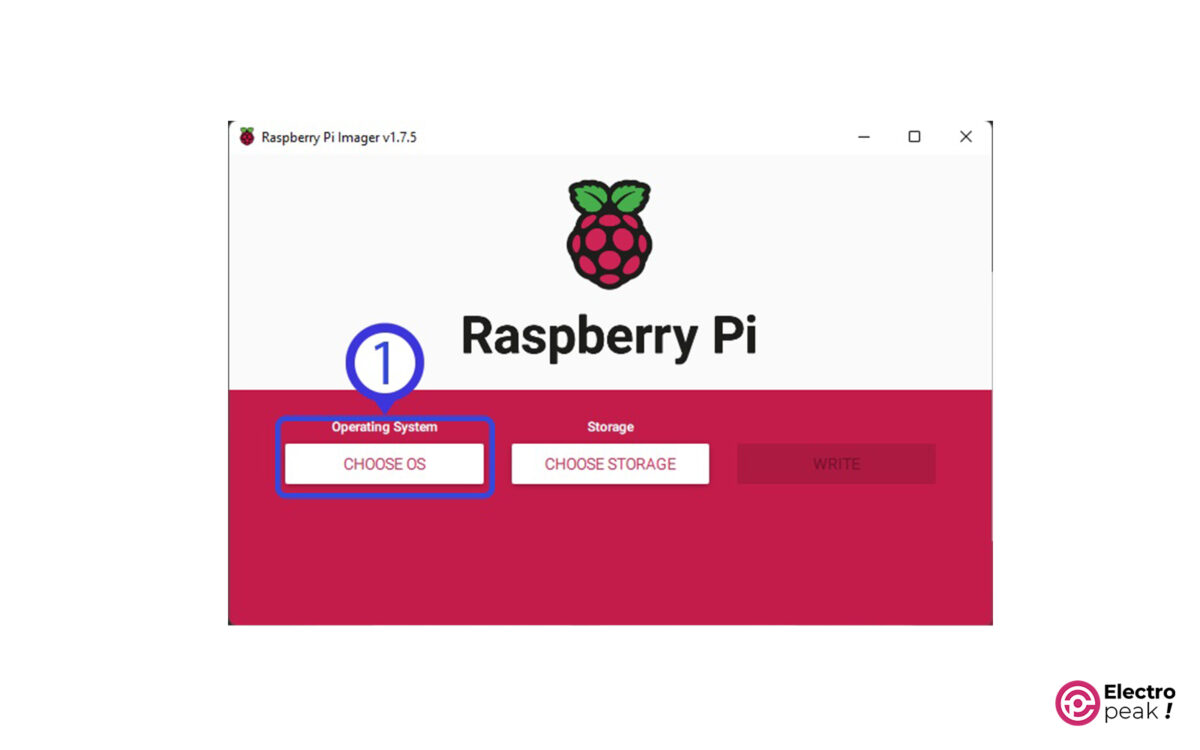
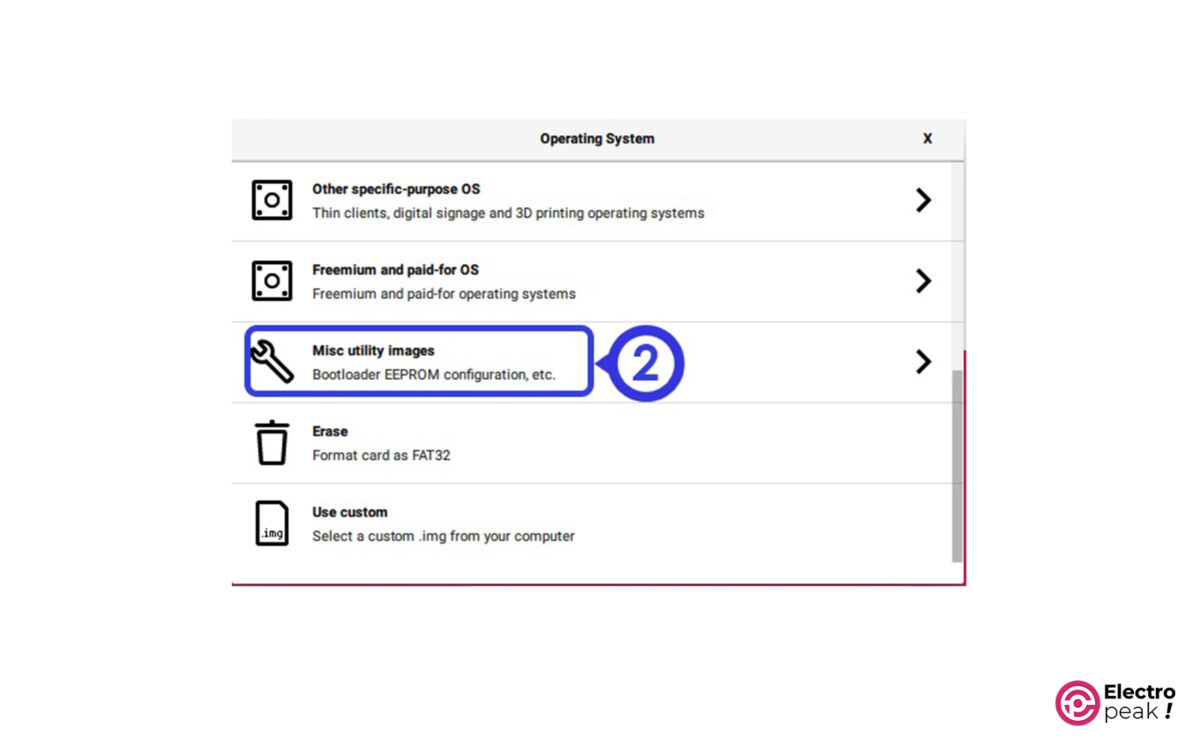
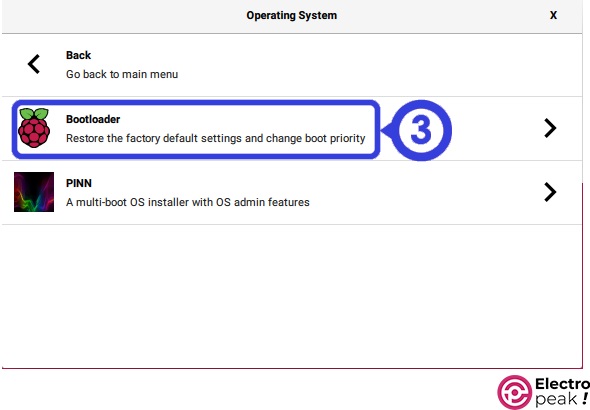
3- Click on “Misc utility Images” and select one of the following options:
• USB Boot: Installing Windows 11 on storage devices other than Micro SSD (such as a flash drive or an external hard drive).
• SD Card Boot: Installing Windows on a Micro SD card.
4- Click on “Choose Storage” to select your desired storage.
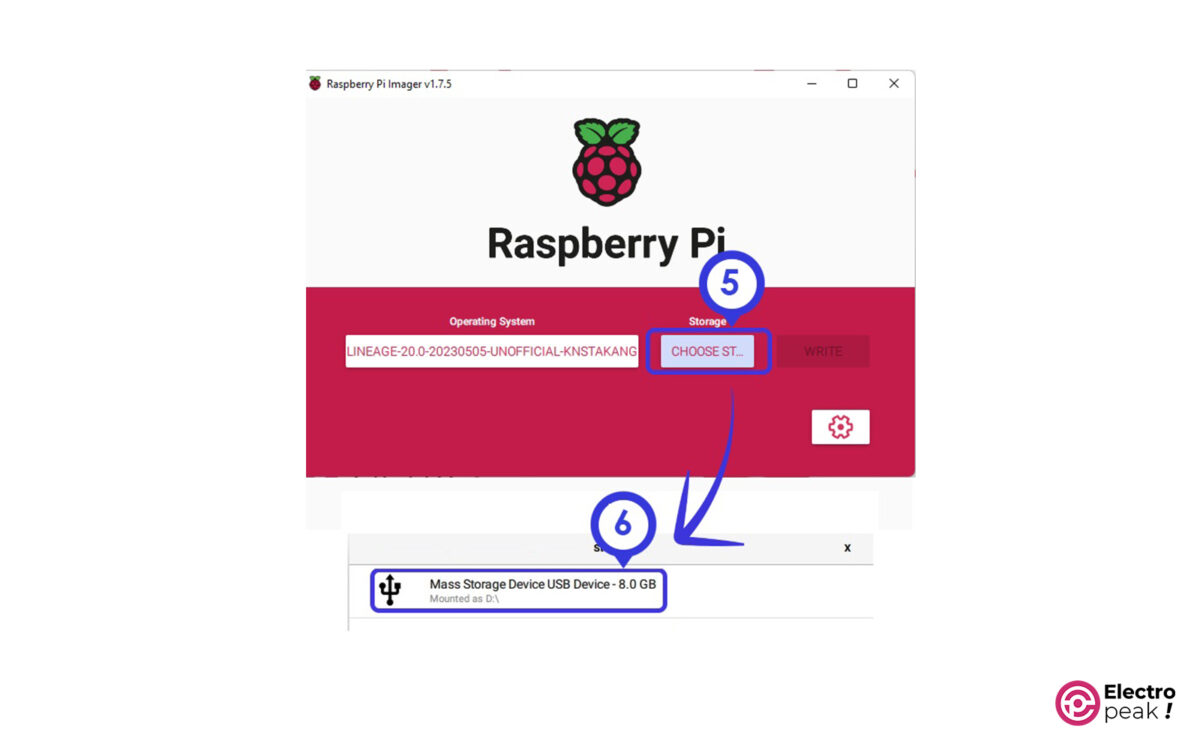
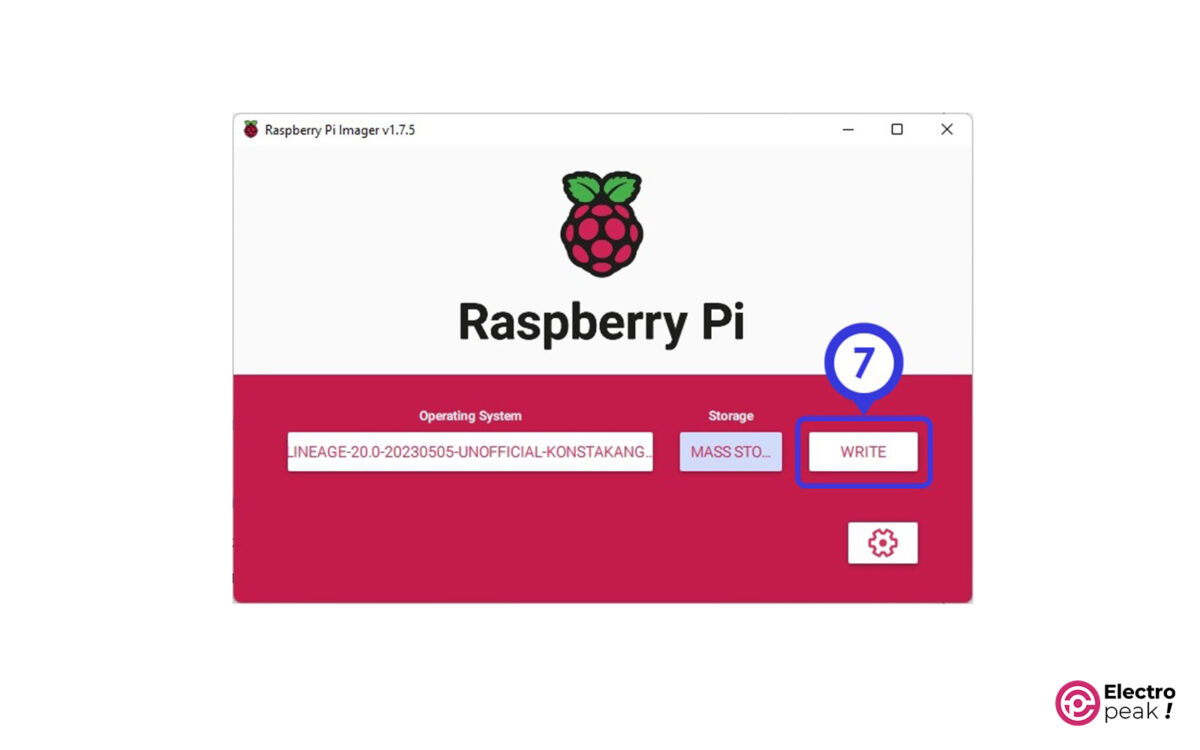
5- Write the “Bootloader” file to the storage by clicking on “Write.”
6- Insert the Micro SD card into the Raspberry Pi board.
By inserting the Micro SD card and connecting its power source, the latest bootloader will be installed on your Raspberry Pi. When the green LED on the board starts blinking repeatedly, it means that the Bootloader installation process is complete. After a few moments, turn off the system.
Step 2: Downloading Windows 11 for Raspberry Pi
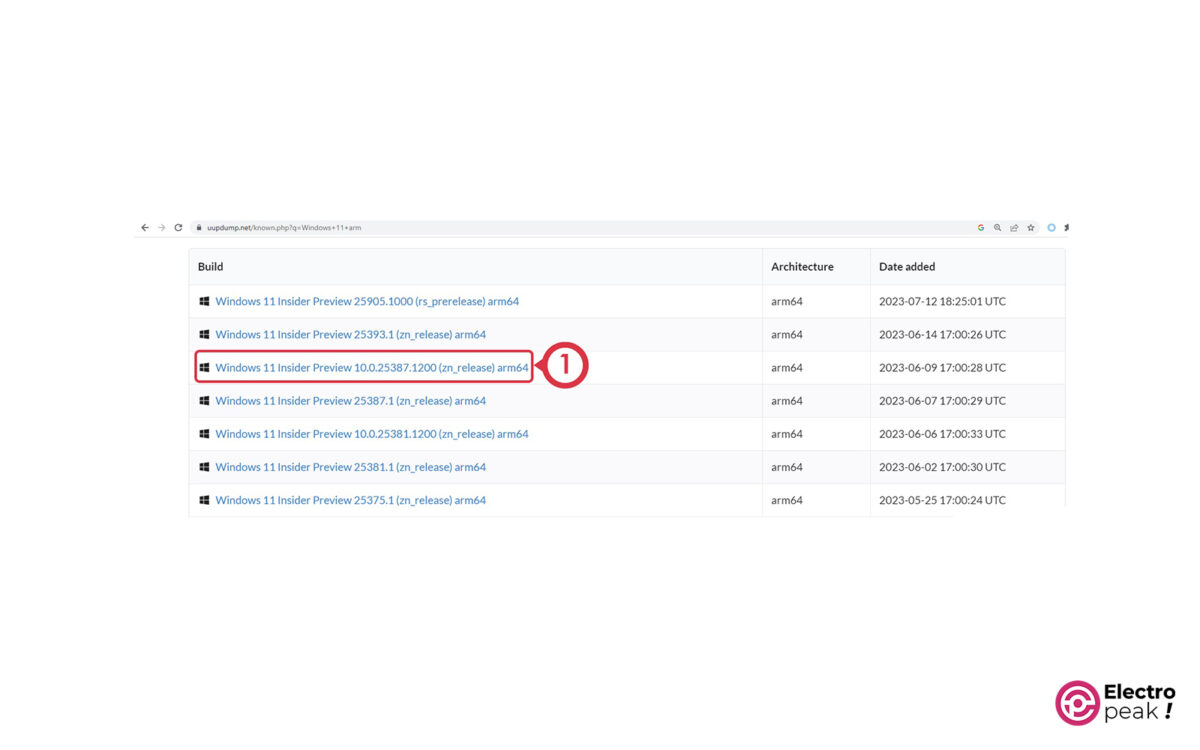
Visit the website below, choose the latest version of Windows 11 designed for arm64 processors, and follow these steps to download Windows:
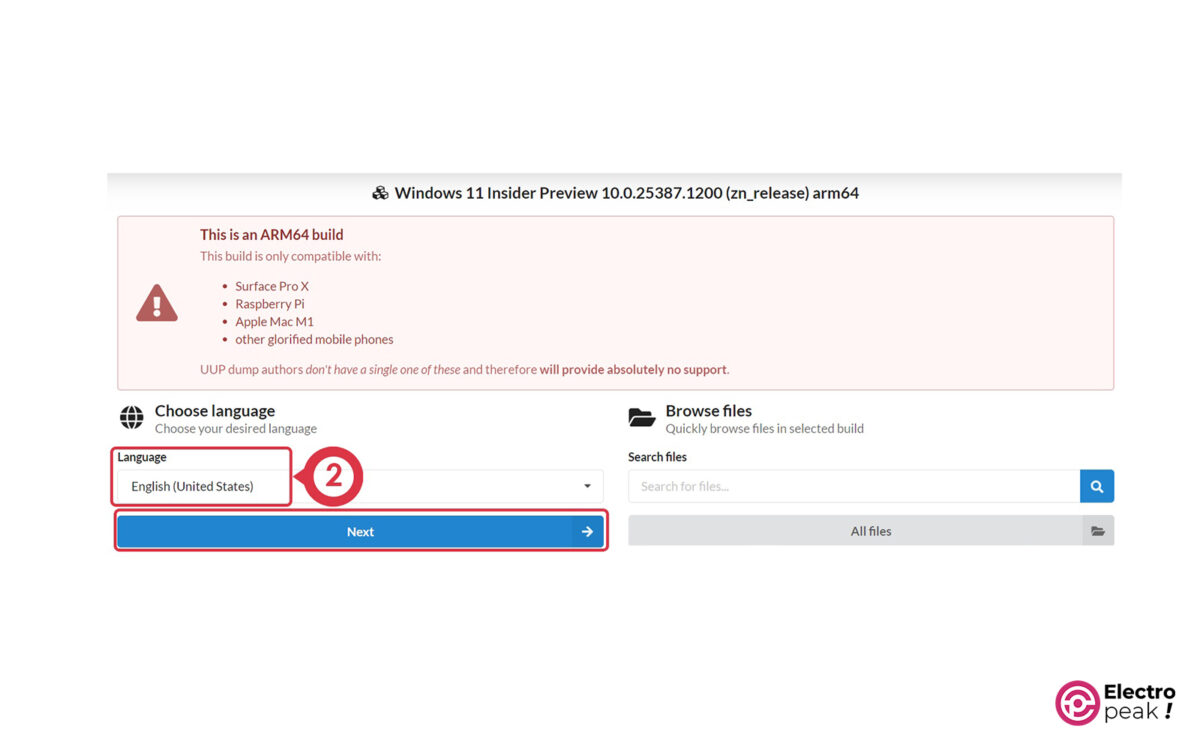
1- Select your desired language.
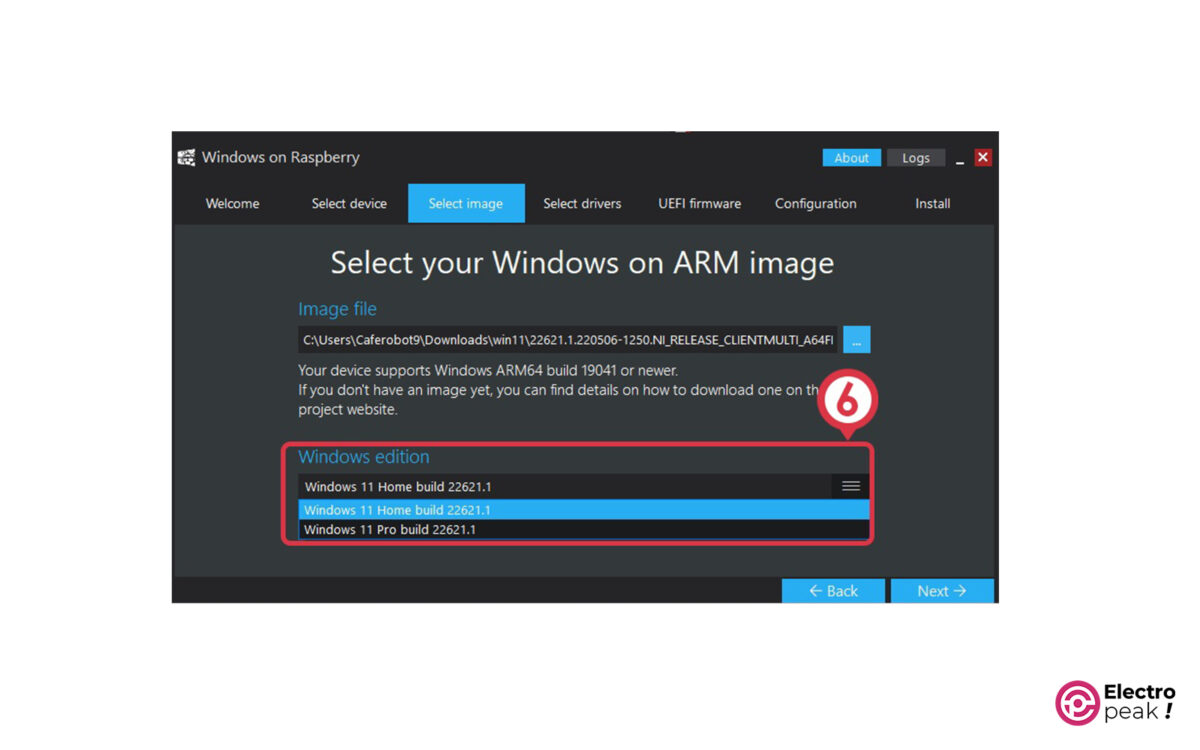
2- Choose the Windows edition you want to install by checking the appropriate boxes. Here, we selected both the “Home” and “Pro” editions.
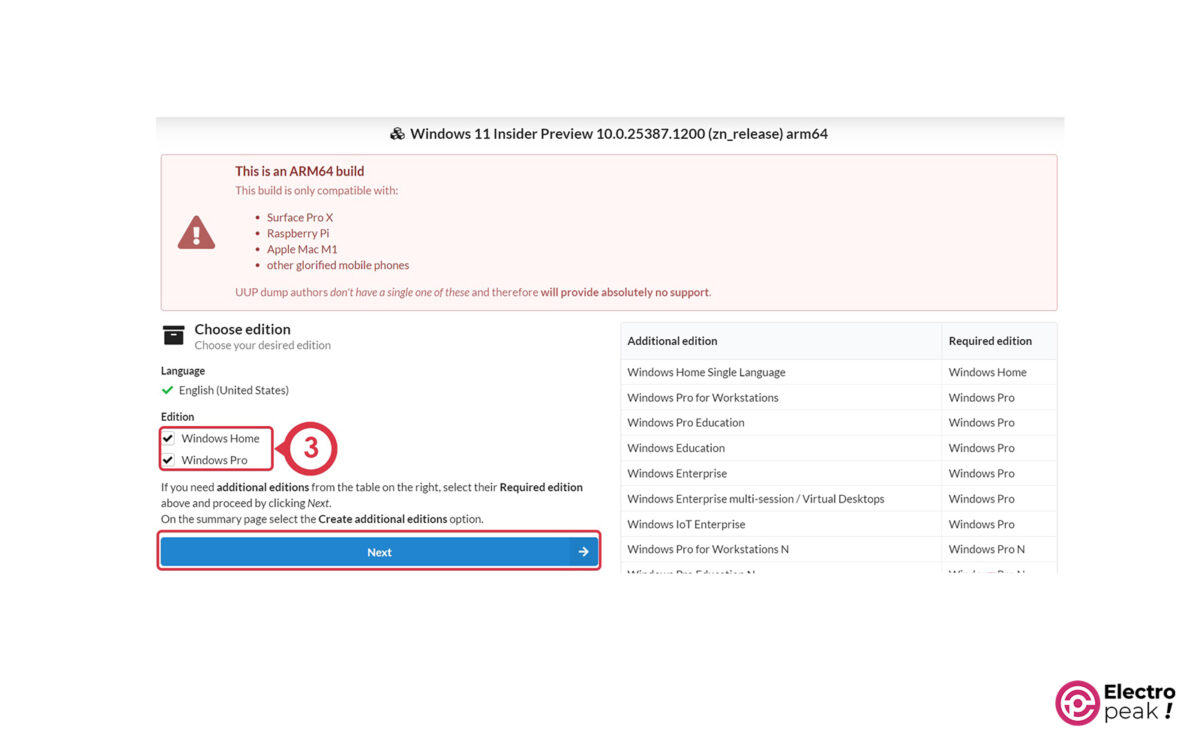
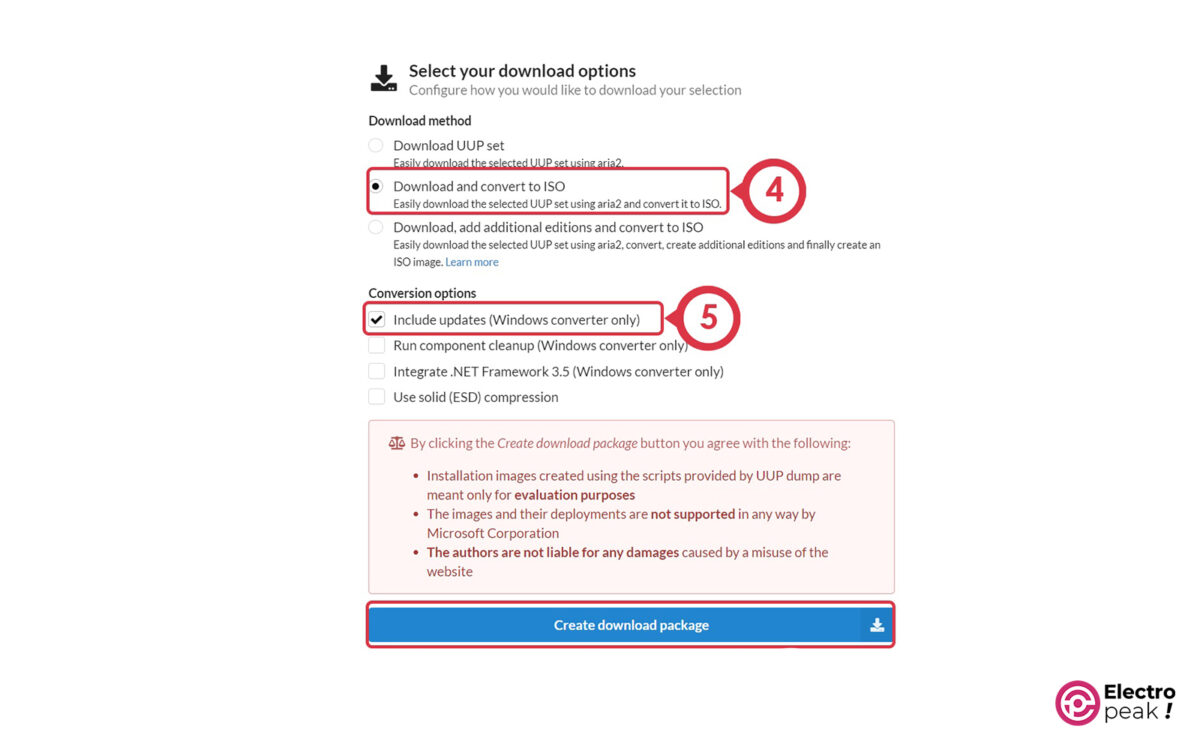
3- Specify the download options: Select the “Download and convert to ISO” option and click “Create download package.” In addition, if you check the “Include updates” box, you’ll receive the latest updates. It’s recommended to do it to avoid any driver issues.
Now click on “Create download package” to download a compressed file.
4- Extract the downloaded file in a folder named “win11” and run the “uup_download_windows.cmd” file.
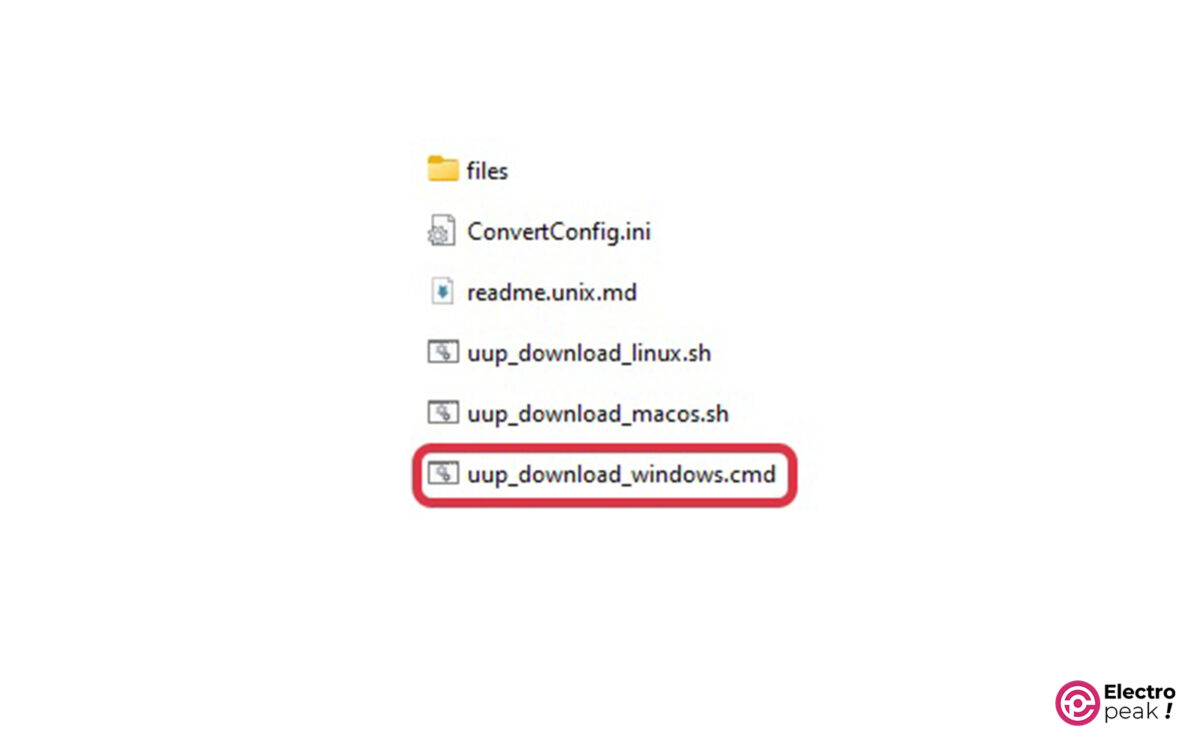
A CMD window will open and start downloading the Windows 11 package. Depending on your internet speed and hardware specifications, it will take a different period.
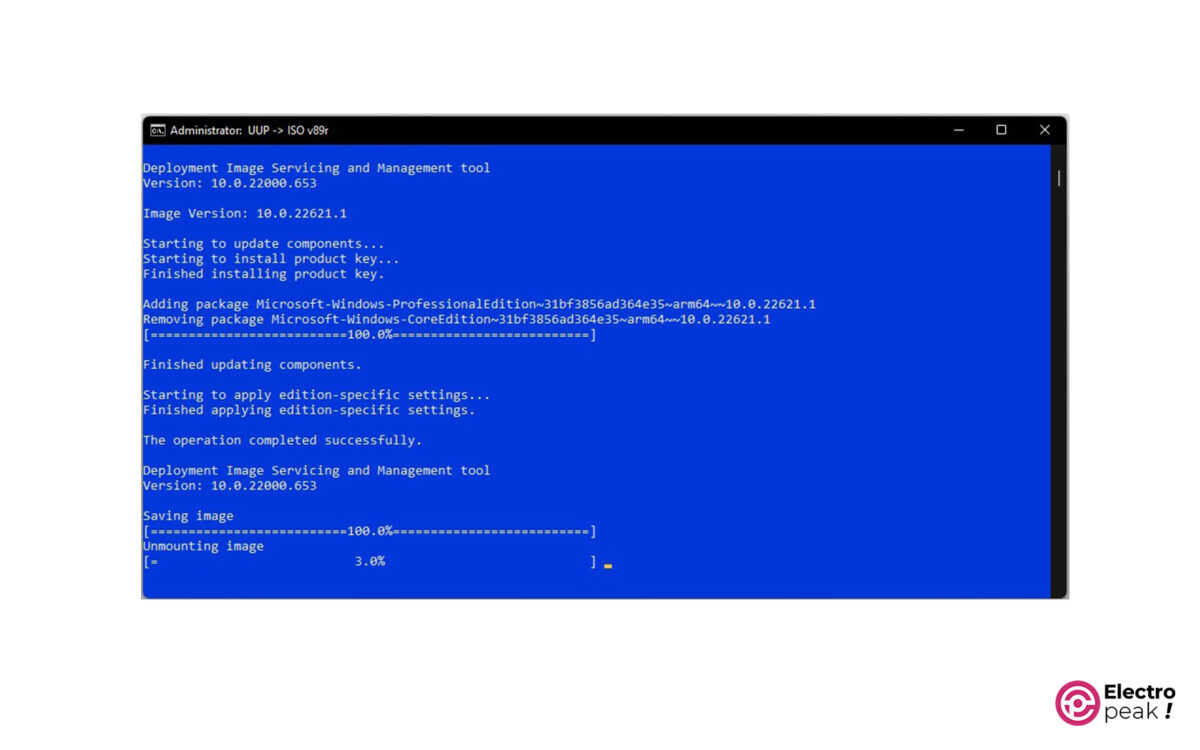
5- Finally, press the “0” key on your keyboard to exit the program.
So far, you have downloaded and created the Windows 11 Img file.
Step 3: Installing Windows 11 on Raspberry Pi 4 and 400
Now, let’s install the downloaded Windows image file using the WoR software.
Follow these steps:
1- Extract the “Wor_Release_x.x.x.zip” software file and copy it into the “win11” folder.
2- Run the “WoR.exe” file.
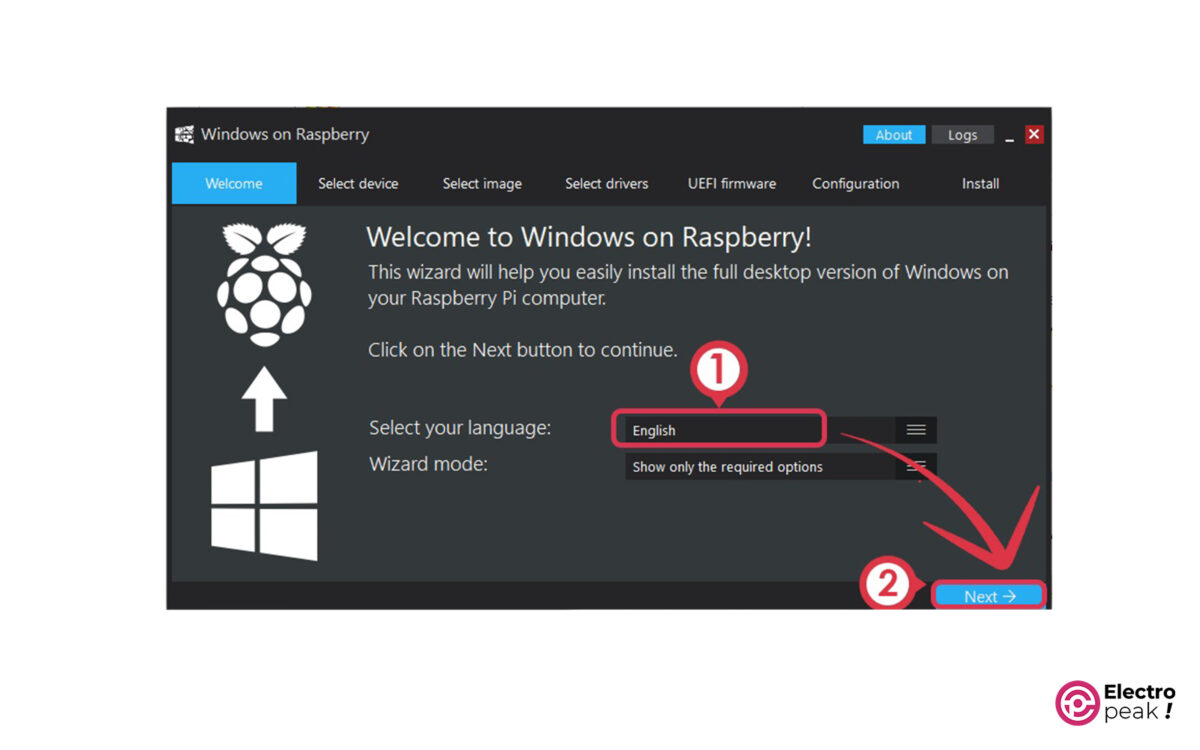
3- Select your desired language and click on Next (image below).
4- Select the storage device for installing Windows and specify the type of Raspberry Pi.
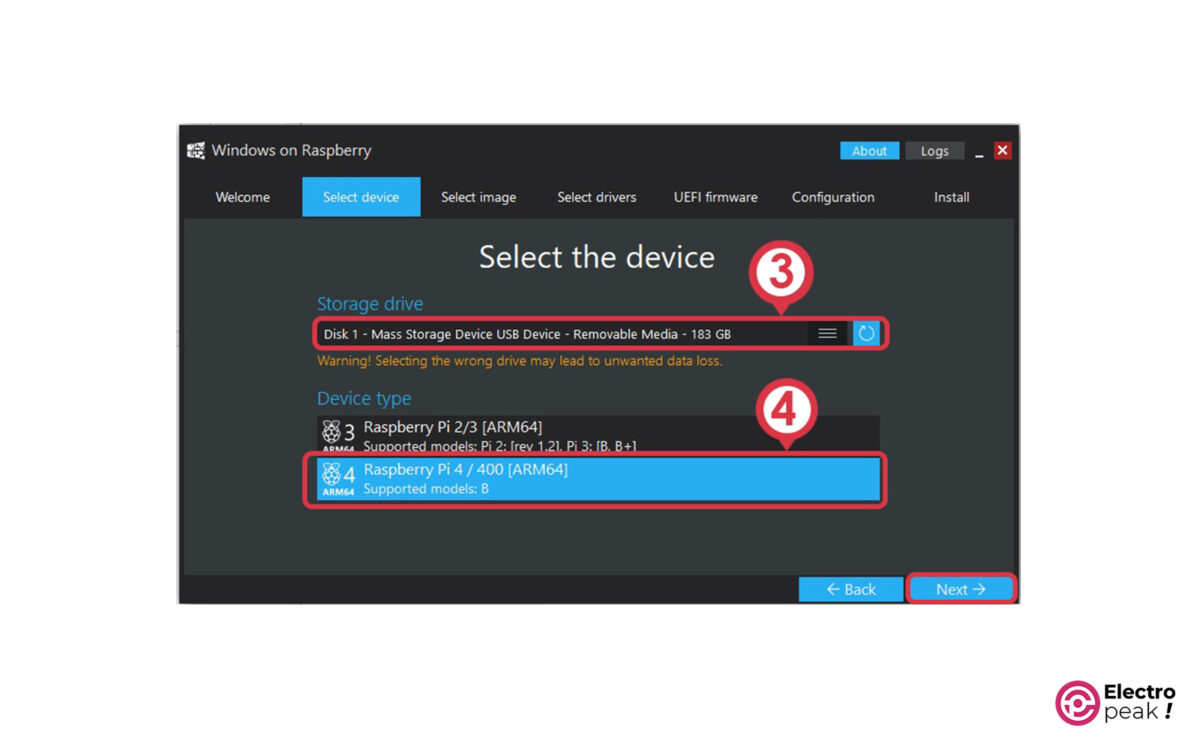
Tip
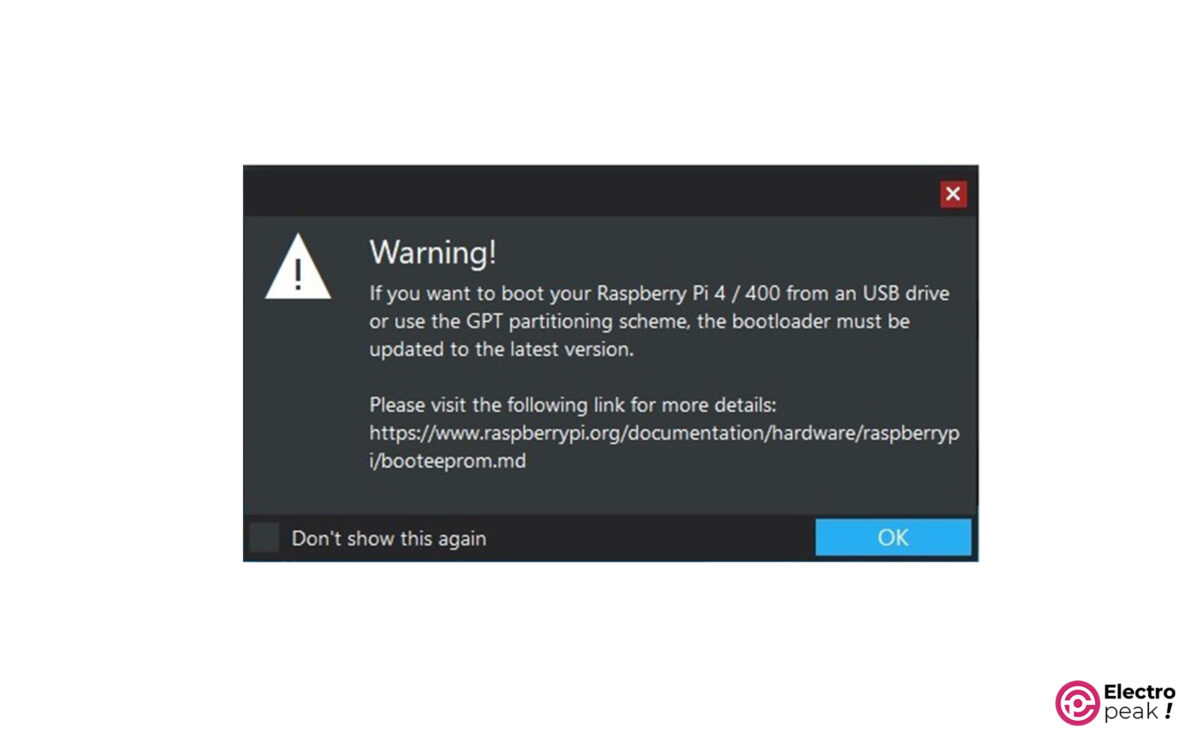
After you click the «Next» button, a window will appear (image below), warning you to update your bootloader. Since we’ve already done that, click «OK.»
5- Select the downloaded Windows image file. It’s in the “win11” folder.
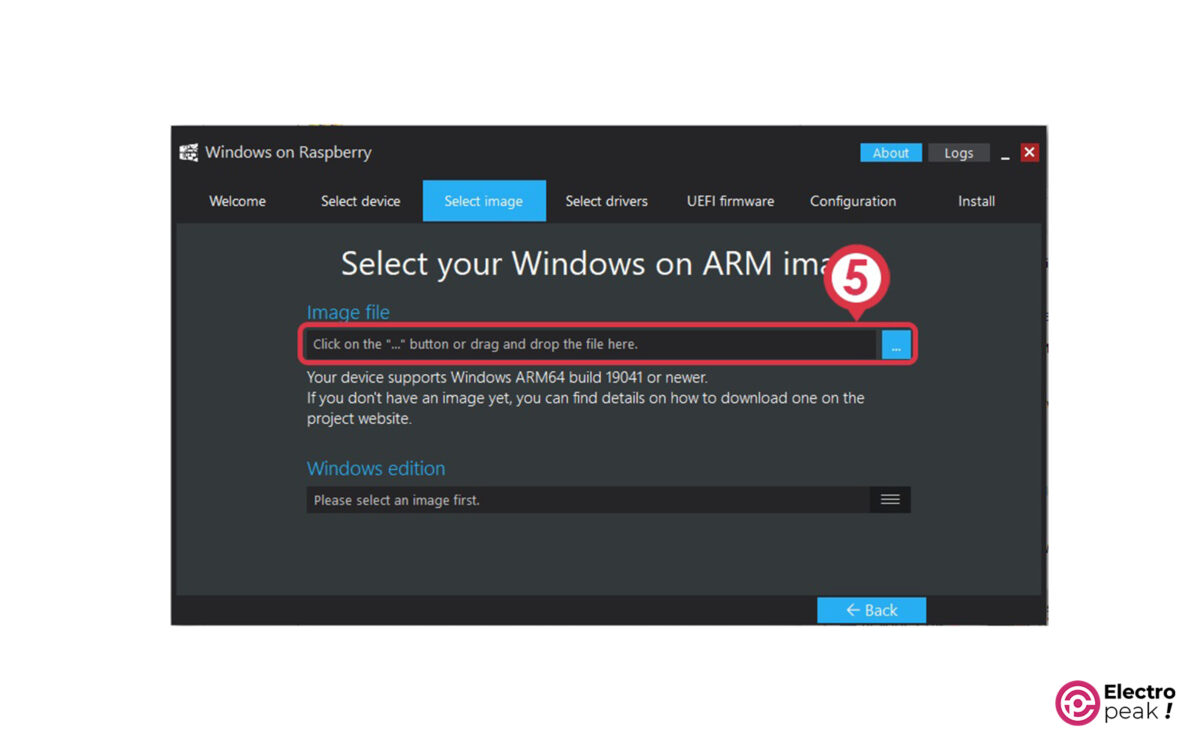
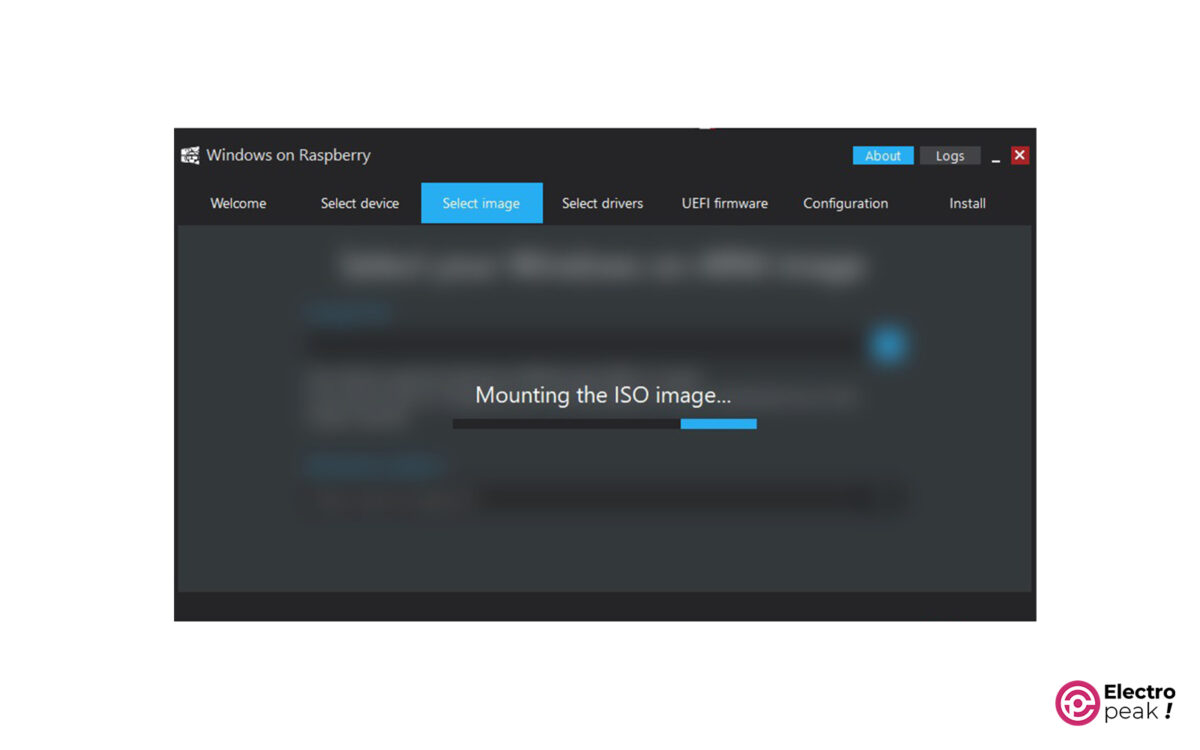
After clicking on the “Next” button, the following image will appear. Wait for the software to mount the ISO image.
6- Select the Windows edition (Home or Pro).
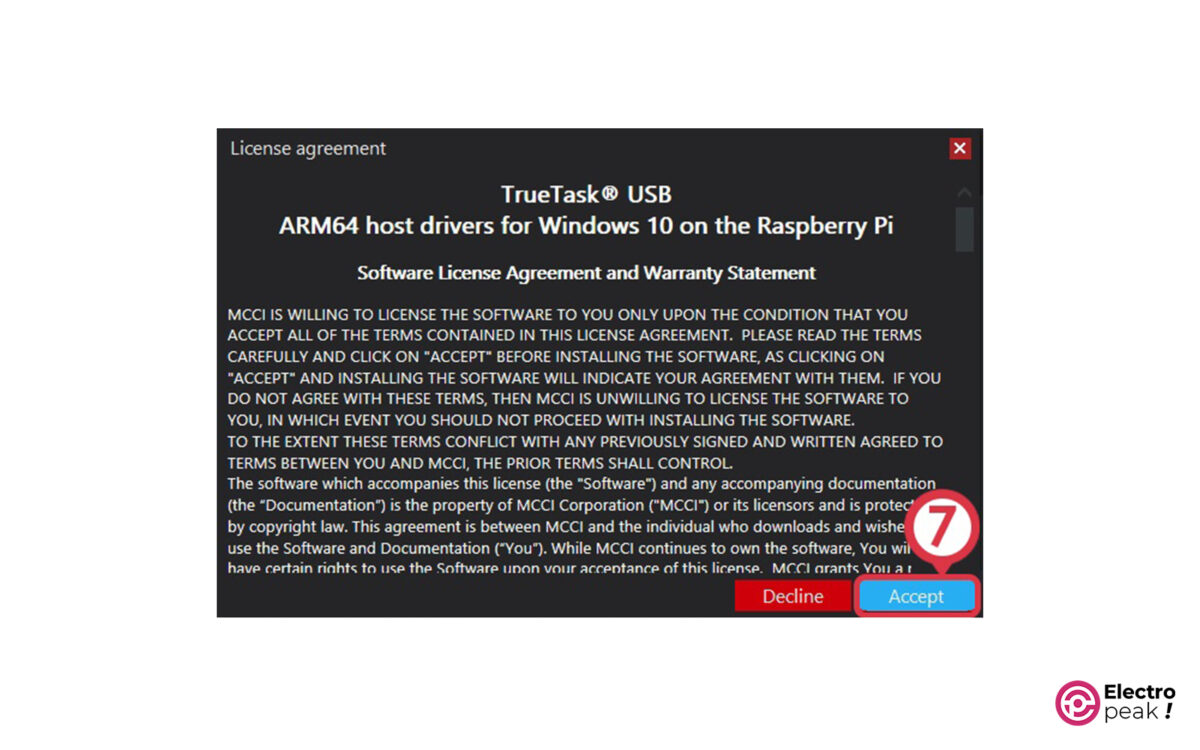
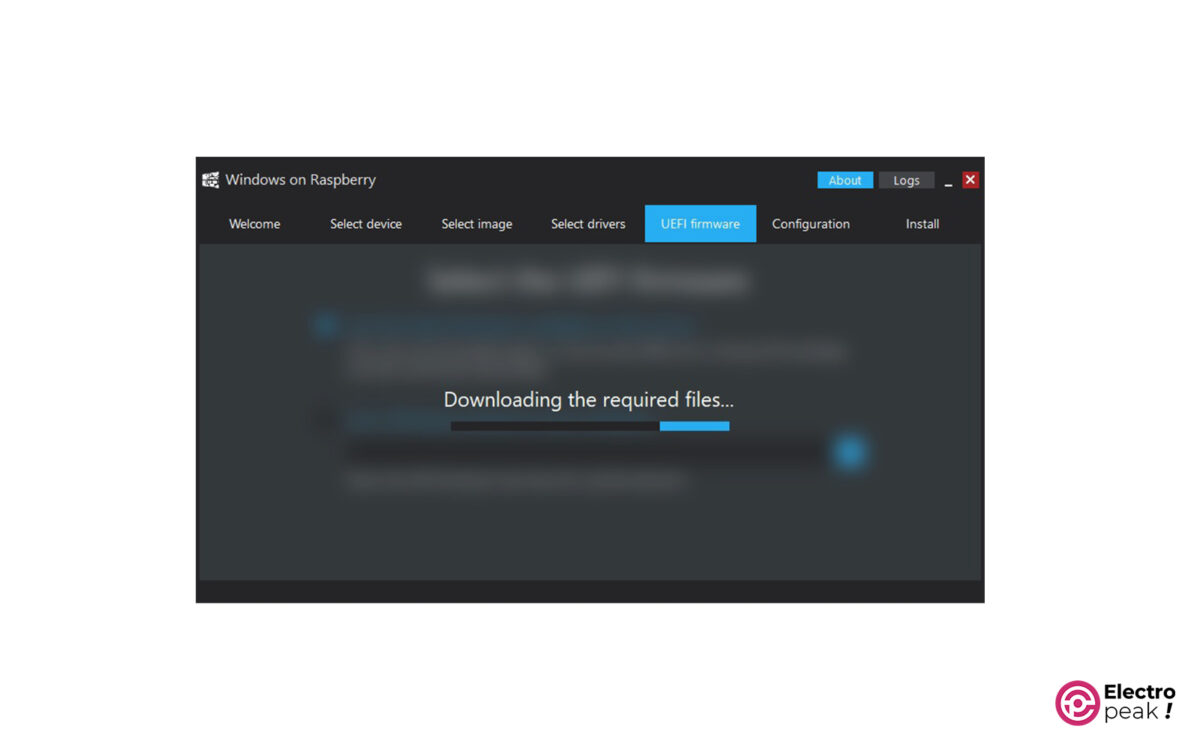
After clicking the “Accept” button, the WoR software will start downloading the required files from the internet.
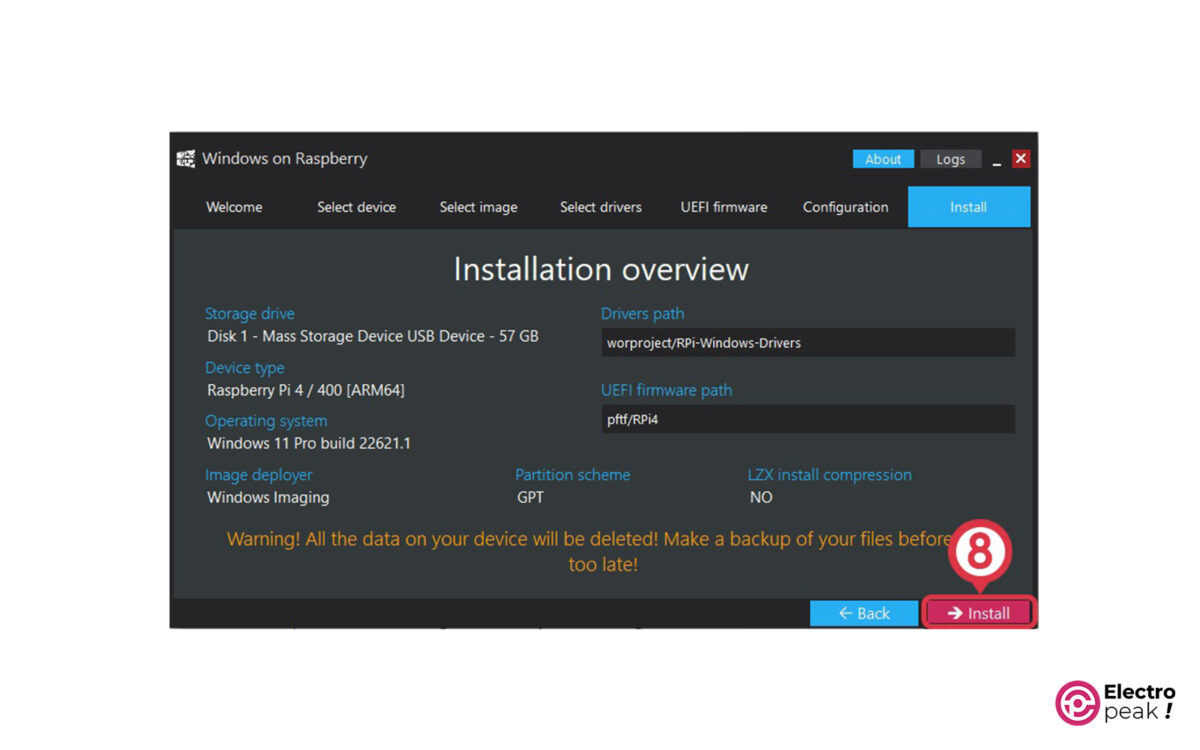
8- Installation overview
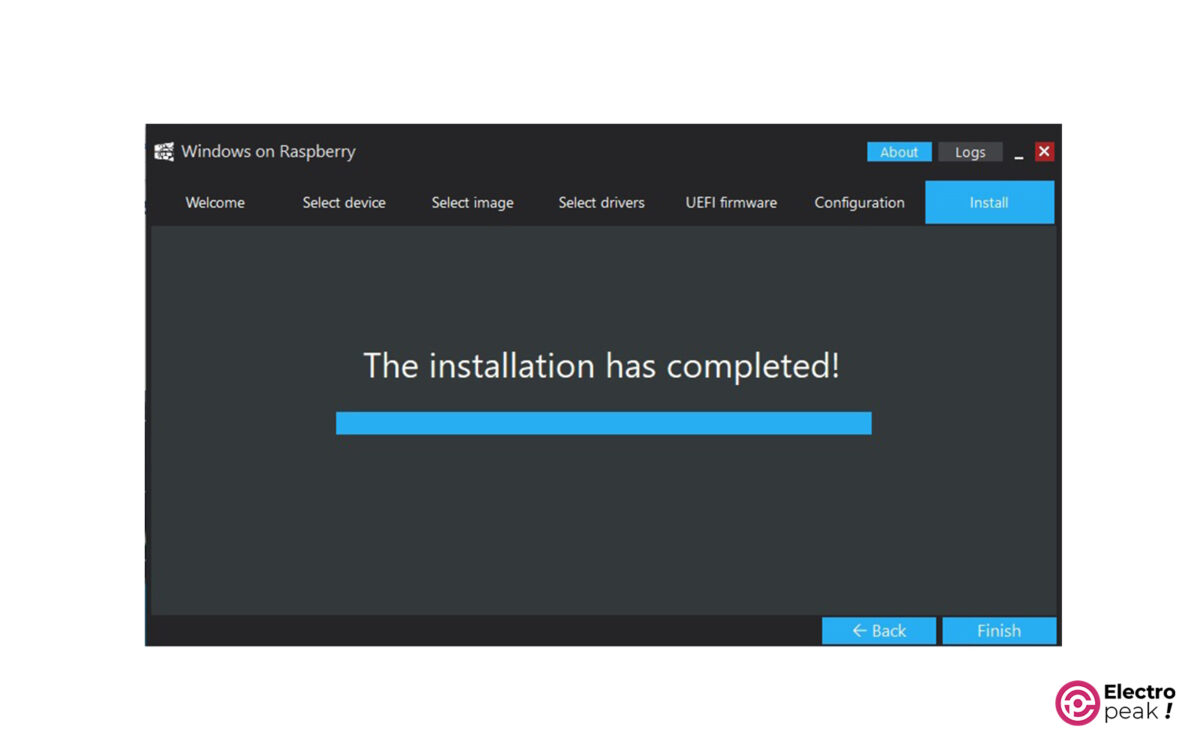
Take a moment to review the settings you’ve made in the previous steps to avoid any mistakes. Then click “Install” to proceed with the Windows installation on your desired storage device.
Now, disconnect the storage device from your computer and insert it into your Raspberry Pi board. Connect peripherals like a monitor, mouse, and keyboard to your Raspberry Pi, and make sure it is connected to the internet via Ethernet. Finally, plug in the adapter to turn it on.
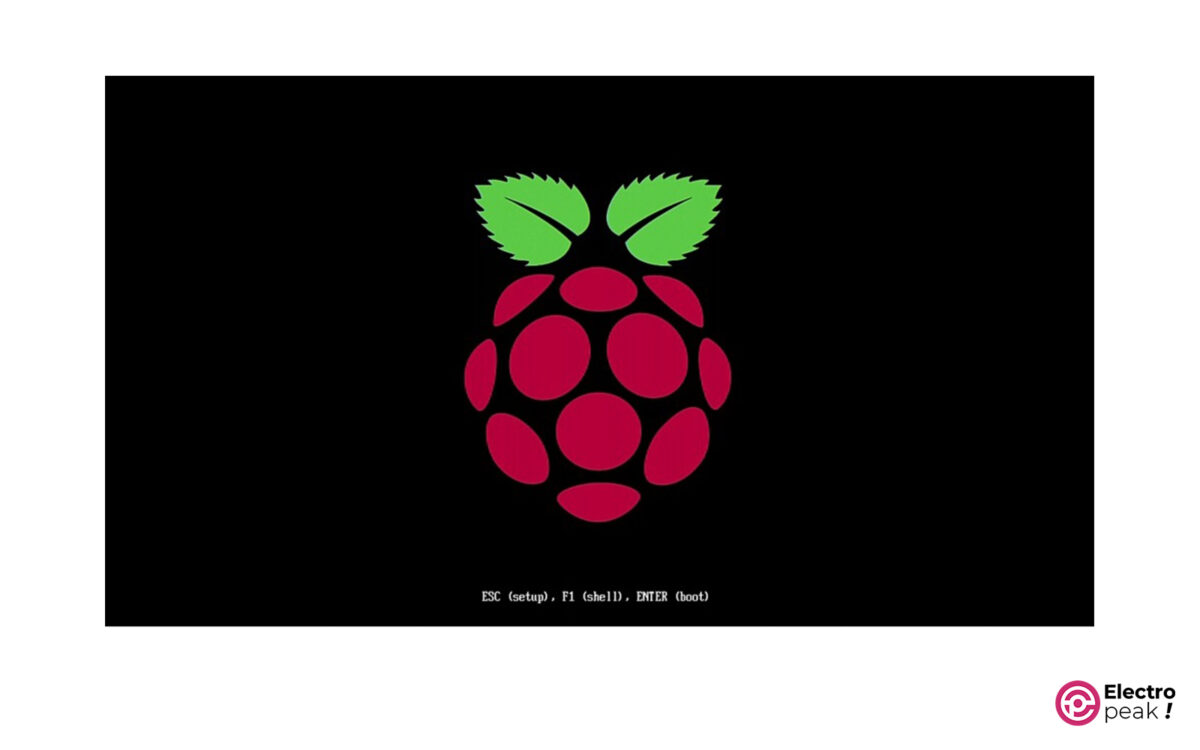
Step 4: Boot Settings
Before enjoying the Windows, perform the following settings:
1- Press “Esc” on your keyboard when you see the image below.
2- Disable the “Limit RAM to 3GB” option. To do that, go to Device Manager->Raspberry Pi Configuration->Advanced Configuration.

3- Press F10 to save the settings, then press Esc to return to the previous menu.
4- Set the display resolution for the monitor connected to Raspberry Pi from the “Display Configuration” section.
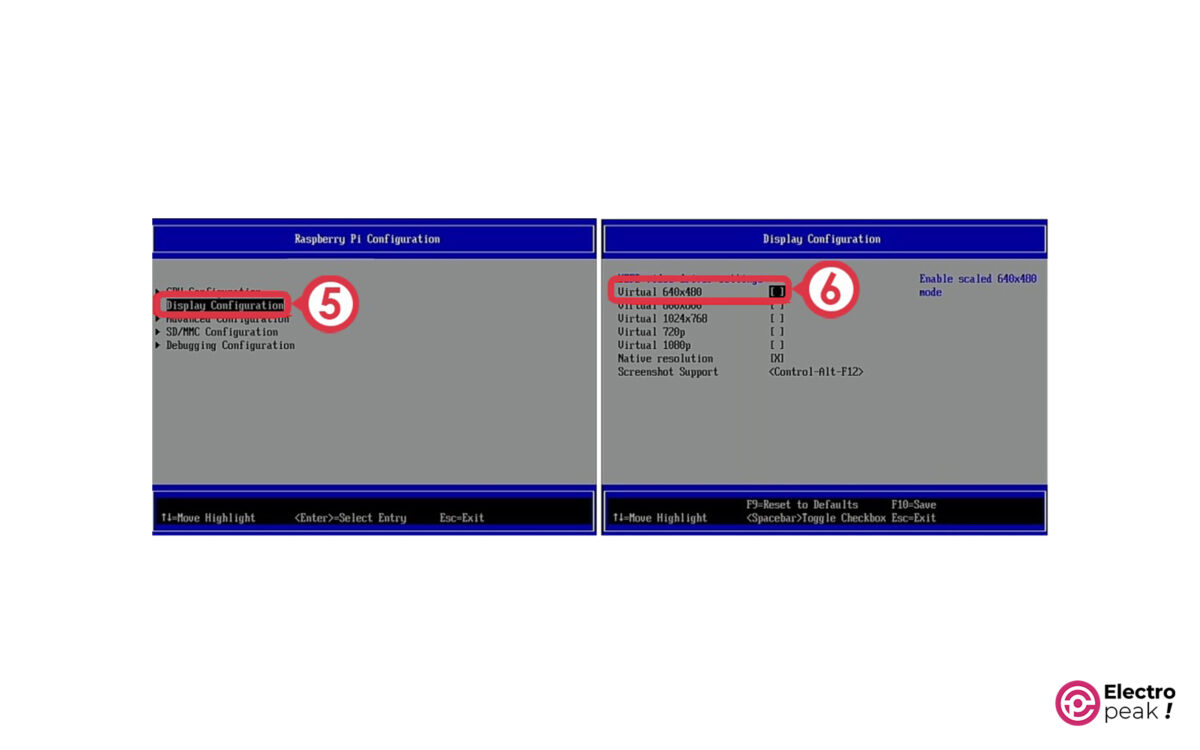
5- Press F10 to save the settings, and then Esc to return to the previous menu.
6- In the “CPU Configuration” section, disable overclocking for the Raspberry Pi processor: set the “CPU Clock” to “Default.”
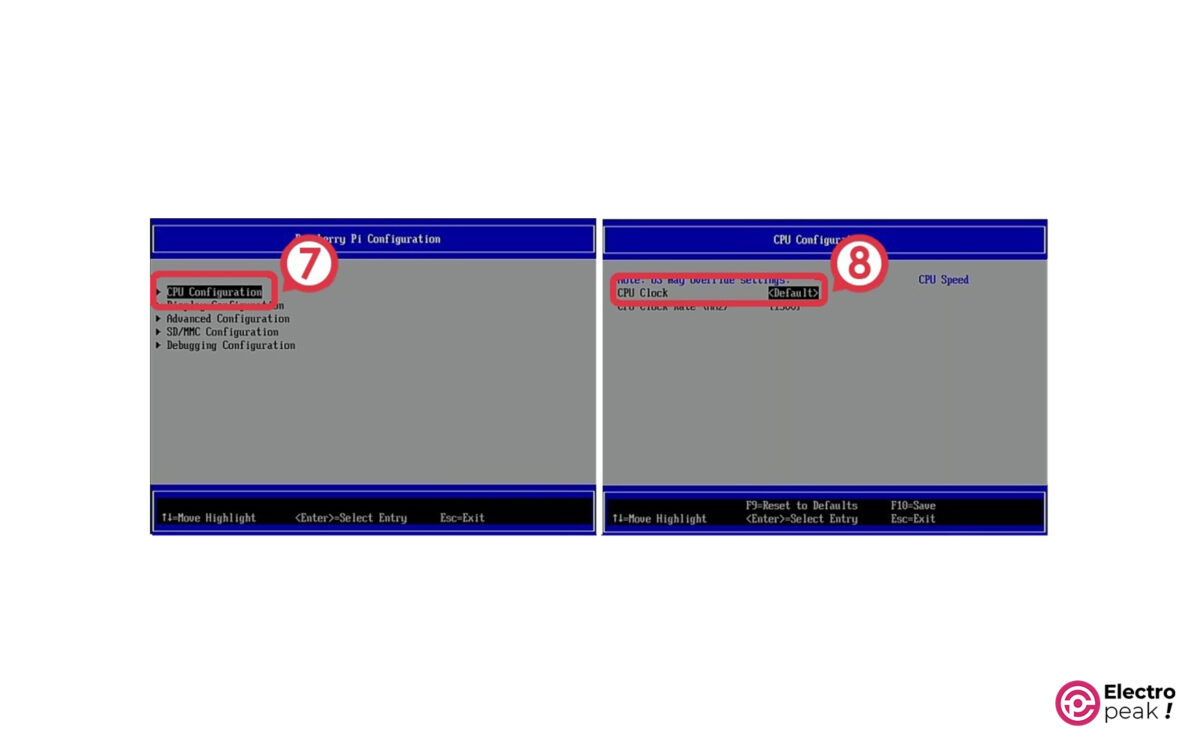
Press F10 to save the settings. Then, press Esc a few times to return to the main menu. Finally, press “Continue” to exit the BIOS menu.
Your Windows is now ready. With the initial Windows settings, you can enter Windows and enjoy all its features!
Success!
You have installed and run Windows on Raspberry Pi!
Step 5: Windows Performance Evaluation on Raspberry Pi
When you turn on the Raspberry Pi for the first time, you will notice that you have to wait a while (about 5 minutes) for it to turn on and enter Windows. But the Windows speed is fairly high, and you can easily take care of your daily tasks. The Edge browser also works pretty well, and you can safely surf the web!
The main environment of the installed Windows looks the same as the computer version, and it gives you a good feeling.
What’s Next?
In this tutorial, we’ve learned how to install Windows step by step. Now, you can use all kinds of software and features that were impossible with Linux-based operating systems.
To run light software such as Word, you no longer need to carry a laptop weighing several kilograms!
If you are an electronics engineer, using Raspberry Pi with Windows instead of Arduino boards will be very appealing! Using Raspberry Pi GPIO pins along with different ports such as USB, HDMI, and FPC connectors, you can communicate with all kinds of digital sensors directly and at high speed.
If you are a robotics engineer, placing this minicomputer on your robot will be a big help for robotics projects! You can now easily set up many devices that were difficult to use with Linux.