
Как форматировать диск или флешку в командной строке
Иногда пользователю может потребоваться отформатировать диск с помощью командной строки. Например, это может пригодиться, когда средствами Windows не удается завершить форматирование, при необходимости удаления разделов и в других ситуациях. Для этого в системе предусмотрено сразу несколько способов.
В этой инструкции подробно о способах форматировать жесткий диск, SSD или USB флешку в командной строке Windows 11, Windows 10 и предыдущих версиях операционной системы, а также пояснения о том, когда какие способы подойдут в большей степени.
Использование команды FORMAT
Format — команда для форматирования накопителей в командной строке, существующая ещё со времён DOS, но исправно работающая и в Windows 11/10. С помощью неё вы можете отформатировать флешку, жесткий диск или SSD, а точнее — раздел на них.
Для флешки это обычно не имеет значения, при условии, что она определяется в системе и видна её буква (так как они как правило содержат лишь один раздел), для жесткого диска или SSD может иметь: с помощью этой команды вы можете отформатировать только разделы по отдельности. К примеру, если диск разделен на разделы C, D и E, с помощью format вы можете отформатировать сначала D, затем — E, но не объединить их.
Порядок действий для форматирования раздела с помощью команды Format будет следующими:
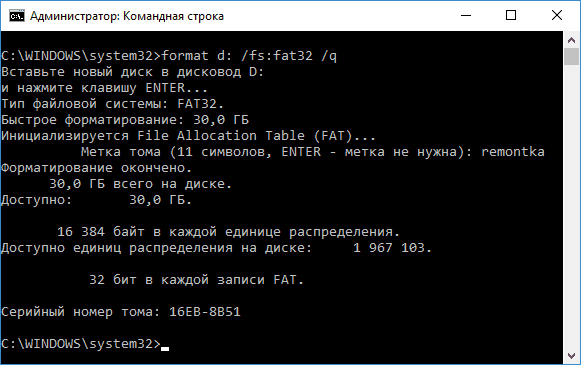
- Запустите командную строку от имени администратора (Как запустить командную строку от имени администратора) и введите команду (пример приведен для форматирования флешки или раздела жесткого диска с буквой D)
format d: /fs:fat32 /q
В указанной команде после fs: вы можете указать NTFS, чтобы форматировать не в FAT32, а в NTFS. Также, если не указать параметр /q то будет выполнено не быстрое, а полное форматирование, см. Быстрое или полное форматирование флешки и диска).

- Если вы увидите сообщение «Вставьте новый диск в дисковод D» (или с другой буквой), просто нажмите Enter.
- Также вам будет предложено ввести метку тома (имя, под которым будет отображаться диск в проводнике), введите на свое усмотрение.
- По завершении процесса вы получите сообщение о том, что форматирование окончено и командную строку можно будет закрыть.
Процедура простая, но несколько ограничена: иногда требуется не просто отформатировать диск, но и удалить все разделы на нем (т.е. объединить их в один). Здесь format не подойдет.
Форматирование флешки или диска с помощью DISKPART
Инструмент командной строки Diskpart, доступный во всех актуальных версиях Windows, позволяет не только отформатировать отдельные разделы флешки или диска, но и удалить их или создать новые.
Сначала рассмотрим использование Diskpart для простого форматирования раздела:
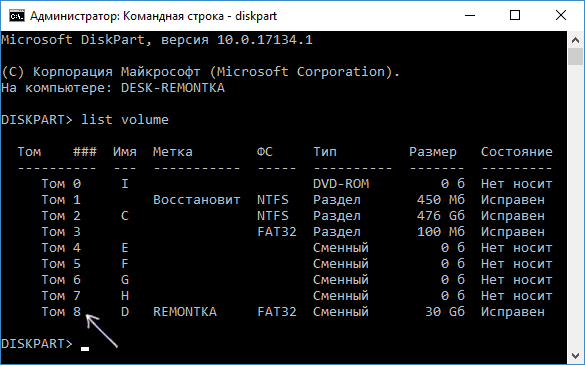
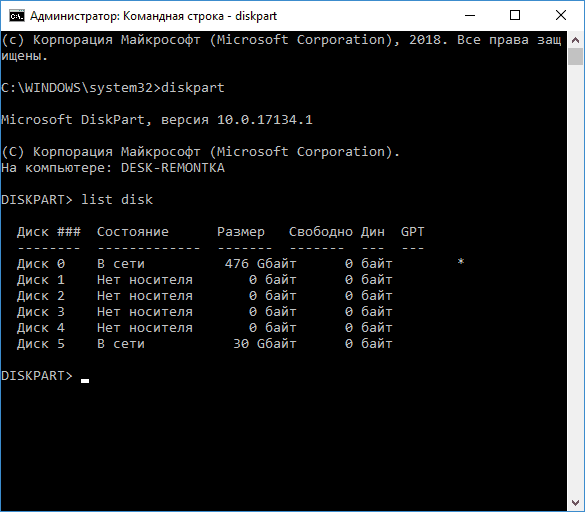
- Запустите командную строку от имени администратора, введите diskpart и нажмите Enter.
- По порядку используйте следующие команды, нажимая Enter после каждой.
- list volume (здесь обратите внимание на номер тома, соответствующий букве диска, который нужно отформатировать, у меня это 8. В следующей команде используйте свой номер вместо N).

- select volume N
- format fs=fat32 quick (вместо fat32 можно указать ntfs, а если вам требуется не быстрое, а полное форматирование, не указывайте quick).
- exit
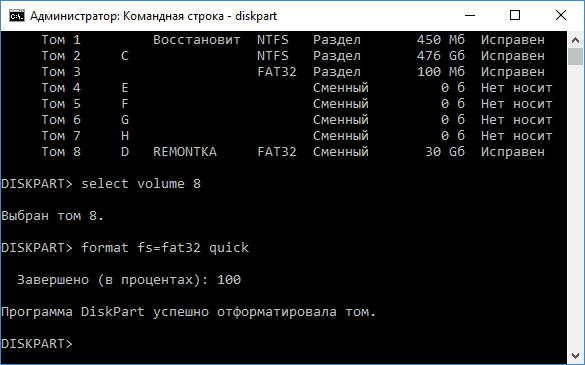
На этом форматирование будет завершено. Если же вам требуется удалить все без исключения разделы (например, D, E, F и остальные, в том числе скрытые) с физического диска и отформатировать его как единый раздел, информация об этом в разделе инструкции про удаление разделов с последующим форматированием накопителя ниже.
Форматирование в PowerShell
В Windows PowerShell также доступны команды для форматирования разделов диска. Пример использования:
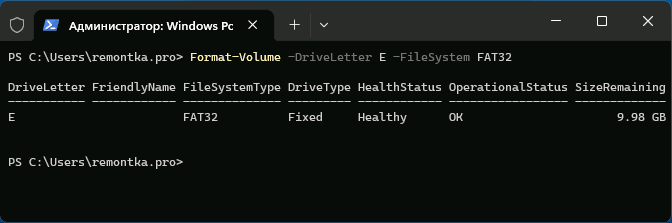
- Запустите Windows PowerShell или Терминал Windows, сделать это можно в меню по правому клику по кнопке «Пуск».
- Введите следующую команду, заменив букву диска D и файловую систему FAT32 на нужную при необходимости:
Format-Volume -DriveLetter D -FileSystem FAT32

- Добавив параметр -FileSystemLabel в команде вы можете указать метку диска, а параметр -Full выполнит полное форматирование вместо быстрого (используется по умолчанию).
Форматирование с удалением разделов
Возможен вариант, когда вам требуется не только выполнить форматирование накопителя, но и удалить имеющиеся разделы на диске или флешке, создав один единственный. Это можно сделать как в командной строке, так и в PowerShell.
При использовании командной строки и DISKPART шаги будут следующими:
- Запустите командную строку от имени администратора, введите команду diskpart и нажмите Enter, после чего используйте следующие команды.
- list disk (вы увидите список подключенных физических дисков, вам нужен номер диска, который будет форматироваться, у меня это 5, у вас будет свой, далее — N).

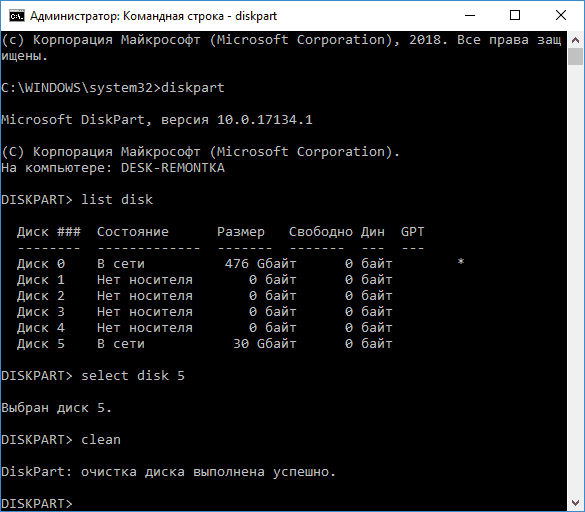
- select disk N
- clean
- create partition primary
- format fs=fat32 quick (вместо fat32 возможно указать ntfs или exFAT).
- exit
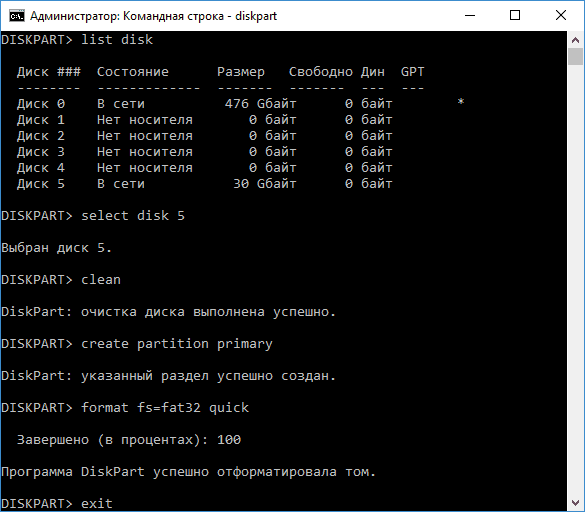
В результате на диске останется один отформатированный основной раздел с выбранной вами файловой системой. Это может быть полезно, например, когда флешка неправильно работает из-за того, что на ней несколько разделов (об этом здесь: Как удалить разделы на флешке).
В Windows PowerShell те же действия будут выглядеть следующим образом:
- Запустите Windows PowerShell или Терминал Windows от имени администратора.
- Используйте команду get-disk чтобы получить информацию о дисках и их номерах, в следующих командах вместо N укажите номер нужного диска, а вместо X — нужную букву диска после форматирования.
- Введите команды (файловую систему FAT32 можно поменять на нужную вам)
Clear-Disk -Number N -RemoveData
New-Partition -DiskNumber N -UseMaximumSize -IsActive -DriveLetter X
Format-Volume -DriveLetter X -FileSystem FAT32
Некоторые дополнительные нюансы, которые могут быть полезными в контексте форматирования накопителей с использованием командной строки:
- Если ваша задача — форматирование системного раздела диска, вы можете сделать это, загрузившись в WinPE, либо путем загрузки с установочной флешки Windows с последующим нажатием клавиш Shift+F10 (Shift+Fn+F10 на некоторых ноутбуках) в программе установки. Это откроет командную строку, где вы сможете выполнить все необходимые действия.
- Форматирование не всегда проходит без проблем: ошибки при форматировании могут быть вызваны как аппаратными проблемами с накопителем, так и другими факторами: например тем, что диск в момент форматирования используется системой (для последнего случая поможет форматирование с использованием WinPE или загрузочной флешки). Здесь могут пригодиться инструкции: Как форматировать флешку, защищенную от записи, Ошибка 0x8004242d при форматировании раздела, Windows не удается завершить форматирование — варианты решения.
Если у вас остаются вопросы, касающиеся рассмотренной темы, вы можете задать их в комментариях ниже, я постараюсь подсказать решение для вашей ситуации.
Which command formats a disk partition?
The answer is: diskpart format command that does the job of disk management using cmd on Windows.
If you want to format an internal hard drive or format external hard drive using cmd diskpart, this tutorial will show you the detailed steps.
This article includes the following
- Diskpart format a new hard disk/usb hdd
- Diskpart format an old disk/external hdd
- Diskpart format disk alternative — disk management
- Software format disk — IM-Magic Partition Resizer
diskpart format disk ntfs/fat32/exfat quick Windows cmd
Format a new hard drive or external hdd with diskpart cmd
If your hard drive or portable hdd is a new bought disk, you may try the following steps to get it formatted.
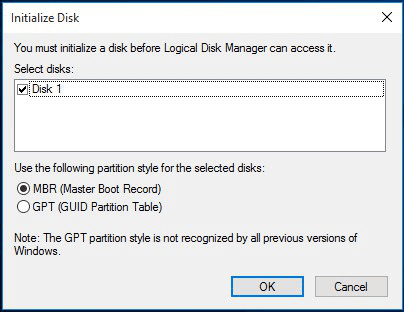
The key: to get it initialized at first and then format.
Also read: how to initialize disk
Alternative: Initialize new disk under disk management
Video — how to add, initialize and format a new disk in Windows 10
Diskpart format an old hard disk or external hard drive
If your hard drive or external hard drive is a healthy working disk, try the following steps to get it formatted.
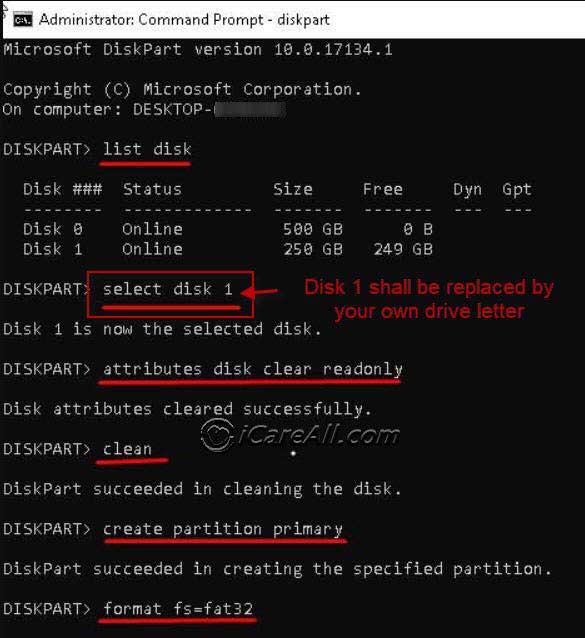
Preparation — Open cmd and type diskpart to get started.
- type ‘list disk’
- type ‘select disk *’
- type ‘attibutes disk clear readonly’
- type ‘clean’
- type ‘create partition primary’
- type ‘format fs=fat32’ or ‘format fs=ntfs’ (with/without quick; fat32/ntfs/exfat depends on what kind of file system you want; if you have no preferance, just go with ntfs.)
Format a disk vs format a partition using diskpart cmd
The difference comes with disk may contain more than 1 partition. If a disk is a whole partition itself, then go with the above steps.
If there are more than two partitions on the disk, the above steps would get all partitions formatted.
If you want to format just one partition on the hard disk instead of the whole, you need to go more further with the following steps.
- run cmd and type diskpart to start
- list volume
- select volume * (the one that you want to get it formatted)
- format fs=ntfs quick
Note: list volume cmd would show all found volumes on your computer and it would be easier for you to select what you want to format, get it selected, and then go with diskpart format fs=ntfs or fat32, or exfat per you need.
Our advice: disk management is much eaiser than diskpart cmd.
Diskpart format disk alternative — disk management
Here we would show you how to use disk management on Windows 10/7 to do the job of Windows 10 format command line to format drive instead of cmd.
- Format by disk management

Video — how to format in disk management
- Format by Windows explorer right click format option
Also read: 8 free ways to format disk/usb; or how to format drive ntfs
Cannot format hard drive?
Windows unable to format? Recommend: Unable to format hard drive fixes, or cannot format pen drive fixes
Free Software to Format, Repair Hard Disk Using IM-Magic Partition Resizer
IM-Magic Partition Resizer is a free Windows disk utility that can not only format a hard disk but also clone it, migrate OS, upgrade to a larger disk, repair logical errors, and regenerate hard disks.
Download Free for Win 11-7
Part 1: Format Hard Disk Using Partition Resizer
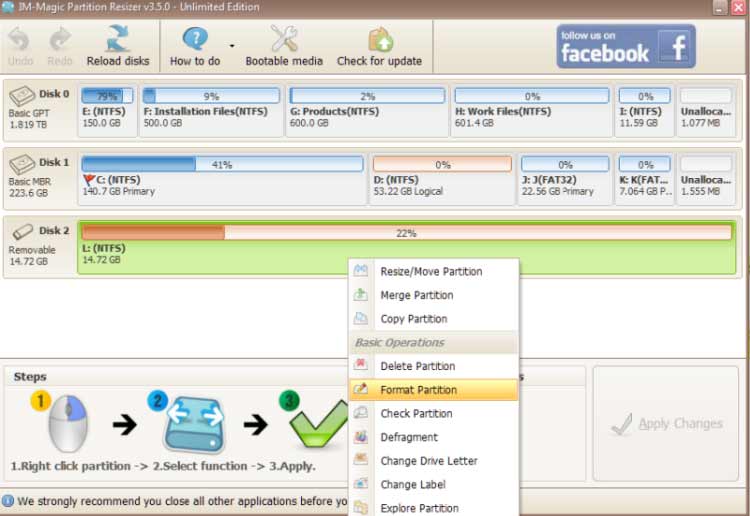
Note: Formatting will erase all data on the hard disk, so please back up your data first.
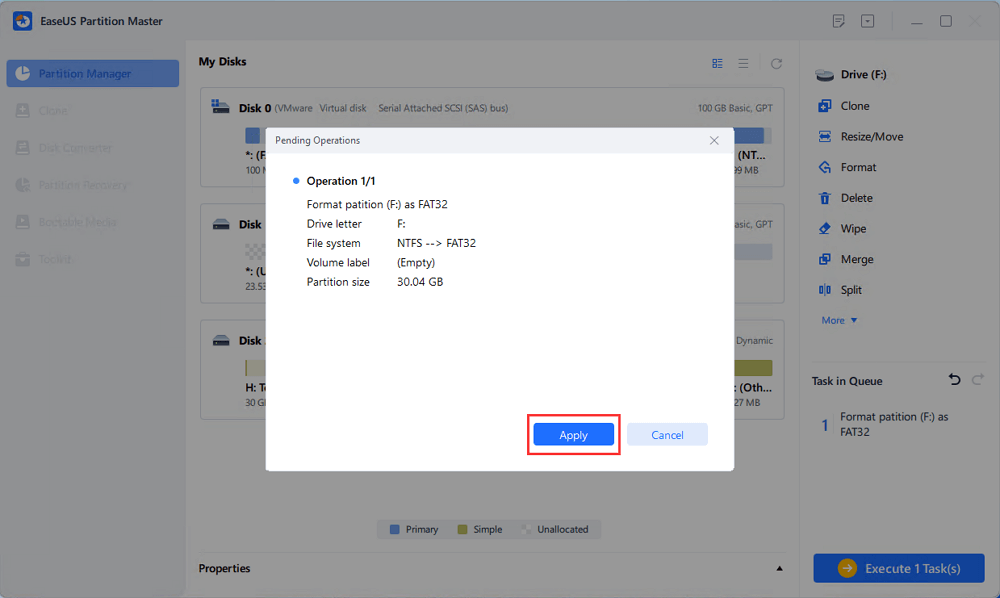
- Step 1: Right-click the hard disk in Partition Resizer, choose ‘Format Partition’, and set it to NTFS, FAT, or FAT32.
- Step 2: Click ‘Apply Changes’ in the software to start formatting the hard disk.
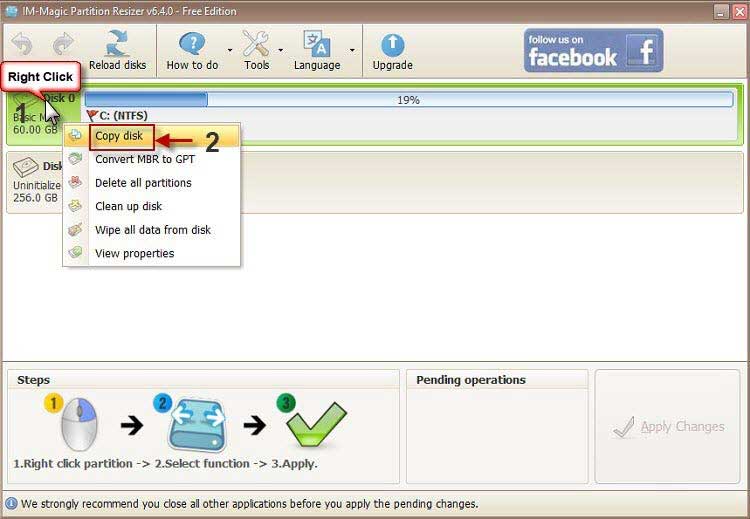
Part 2: Clone the Damaged Hard Disk to Another Drive for Free Using Partition Resizer
- Step 1: Download the free tool, and connect your hard disk to the PC.
- Step 2: Right-click the hard disk in the software, and choose the option «Copy Disk» to start the cloning process.
- Step 3: Choose the target drive for the hard disk backup (Prepare a larger drive or another hard disk as the destination for backup).
- Step 4: Click ‘Apply Changes’. It will begin to clone your hard disk.
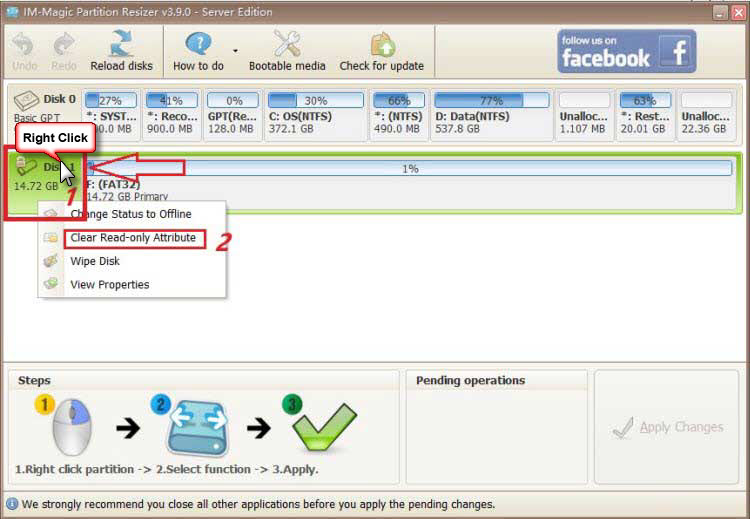
Part 3: Remove Hard Disk Write Protection Using Partition Resizer
- Step 1: Right-click the hard disk in Partition Resizer, and choose ‘Remove attribute read-only’.
- Step 2: Click ‘Apply Changes’ in the software to remove the write protection on the hard disk.
FAQs
Is Diskpart Windows 10 disk management command line?
Answer: YES. Windows disk management provides a user interface that is more easier to manage disk volumes while command line diskpart is for advanced professionals. And there is no difference among diskpart Windows editions no matter 7 or 10.
How do I use diskpart to clean and format a drive?
Answer: Diskpart to clean and format a drive? Just go ahead with the following steps.
- Run cmd and type diskpart to start
- list volume (a list of drives will show up)
- select volume *
- clean
- format fs=ntfs quick
- exit
The above steps shows how to clean and format a drive using diskpart cmd on Windows pcs.
Also read: how to use diskpart format cmd
Related articles
- format fs=ntfs quick
- diskpart format raw ntfs
- diskpart format usb
- diskpart fix raw partition
- diskpart format disk gpt
- diskpart clean
- diskpart create partition
- diskpart delete partition
- fix raw partition without losing data
Here on this page, we’ll include two free methods, diskpart format command and free third-party manager, to help you quick format or fully clean up a hard drive on Windows 10/8/7 with ease:
| Workable Solutions | Step-by-step Troubleshooting |
|---|---|
| Fix 1. DiskPart Alternative — Free Formatting Tool |
|
| Fix 2. DiskPart Quick Format Command |
|
Formatting hard disk, USB flash drive, pen drive, and memory card, etc., is meaningful and helpful in solving some device issues. For examples:
- 1. Incompatible or unsupported file system on a hard drive blocks the computer from recognizing it.
- 2. Switch hard drive format, change hard drive to NTFS, FAT32, exFAT, etc., for specific usage.
- 3. Restore the drive to full size when it only shows partial storage or half-size.
- 4. Fix RAW, corrupted, or inaccessible errors on hard drives.
DiskPart Format Command and Alternative — DiskPart vs EaseUS Formatter
Generally, there are three ways to initiate the task:
- Windows quick format (by using File Explorer or Disk Management)
- Windows DiskPart command
- A free third-party hard drive format tool — EaseUS Partition Master
Click to download EaseUS formatting tool for free here:
Windows quick formatting is easy to get started but with limited functions, so the latter two options become better choices. Check the comparison list between DiskPart Format Tool and EaseUS Partition Master, and learn which is better for you to refer to:
| DiskPart — CMD Format Command | EaseUS Partition Master Free |
|---|---|
|
|
Your Quick Guide:
- As a beginner, you can trust the free formatting tool as a DiskPart alternative to format disk in Fix 1.
- For experienced users, running the DiskPart command to format the disk is quick with instructions in Fix 2.
- Notice:
- As formatting will clean up the hard drive data completely, to avoid unnecessary data loss, make sure to back up all important data in advance before taking the operations.
Fix 1. Format Disk CMD Alternative — EaseUS Partition Master
The other easier way to format disk, compared to Diskpart, is to apply a free DiskPart alternative formatting tool for help. Here we’d like to recommend you try EaseUS Partition Master Free.
It enables you to quickly format or clean up an internal HDD, an external USB stick, pen drive, or an SD card, etc. within only a few simple clicks.
The whole process is simpler and smoother than formatting a hard drive using the DiskPart command prompt.
# 1. 4-Steps: Quick Format Hard Drive using DiskPart Format Alternative
Download EaseUS free disk formatting tool and follow the guide below to see how to format the disk.
Step 1. Run EaseUS Partition Master, right-click the hard drive partition you intend to format and choose «Format».
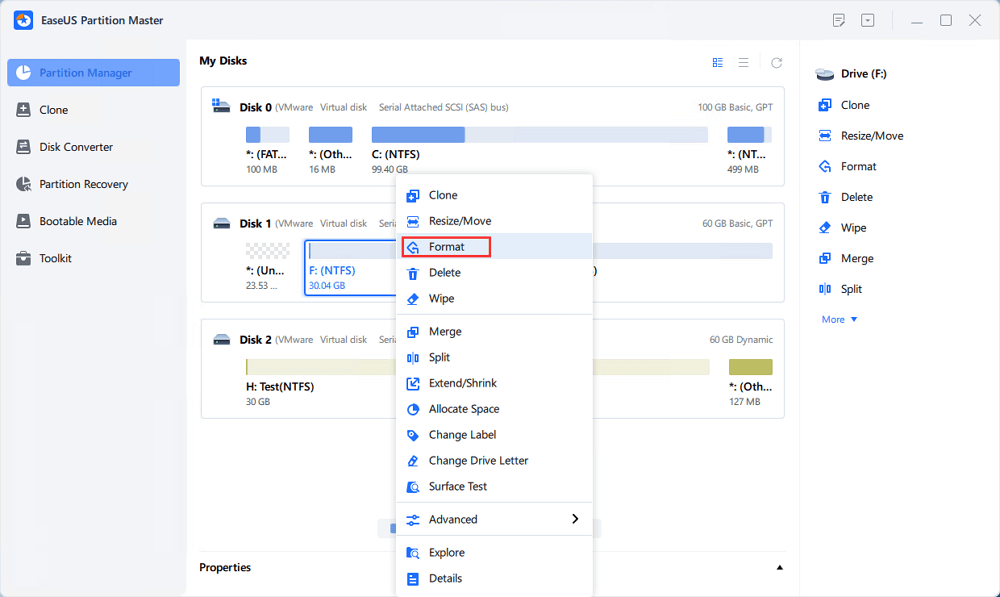
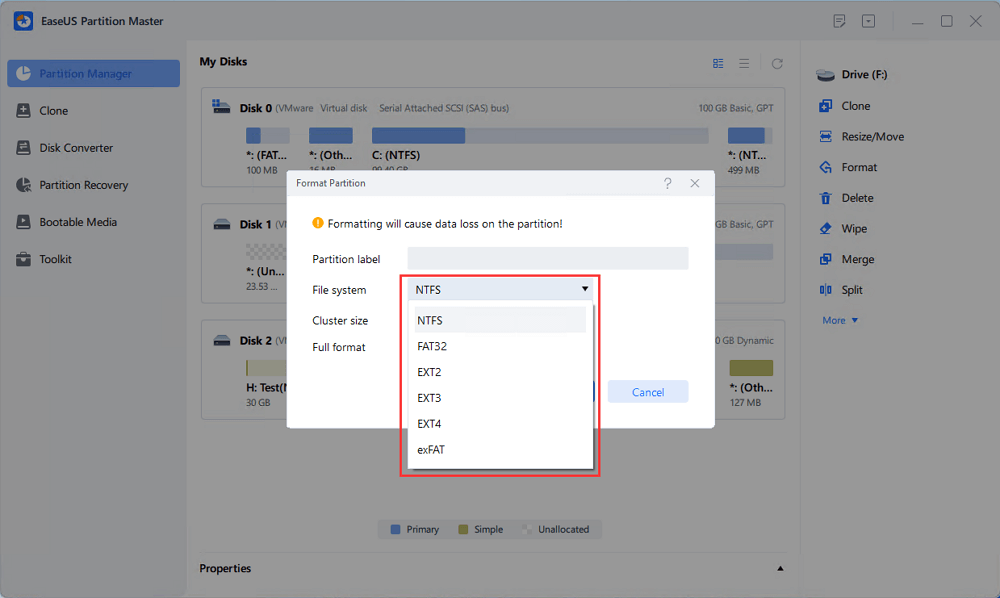
Step 2. In the new window, set the Partition label, File system (NTFS/FAT32/EXT2/EXT3/EXT4/exFAT), and Cluster size for the partition to be formatted, then click «OK».
Step 3. Then you will see a warning window, click «Yes» in it to continue.

Step 4. Click the «Execute 1 Task(s)» button to review the changes, then click «Apply» to start formatting the partition on your hard drive.
Does this fix work? If you have removed your issue, you can share this article to help more people.
To use DiskPart to format a disk, you need to follow the commands below carefully. Any mistakes will cause serious problems.
Here we’ll take the method of formatting hard drive using CMD on Windows 10 as an example to show you to detail steps:
#1. Format Disk Using CMD — DiskPart Quick Format Command
How to format disk using CMD:
Step 1. Right-click on the Windows icon, select «Search» and type: command prompt.
Right-click on Command Prompt and select «Run as administrator».
Step 2. Type diskpart in Command Prompt and hit Enter.
Step 3. Type format command lines in DiskPart and hit Enter each time so as to quick format the hard drive:
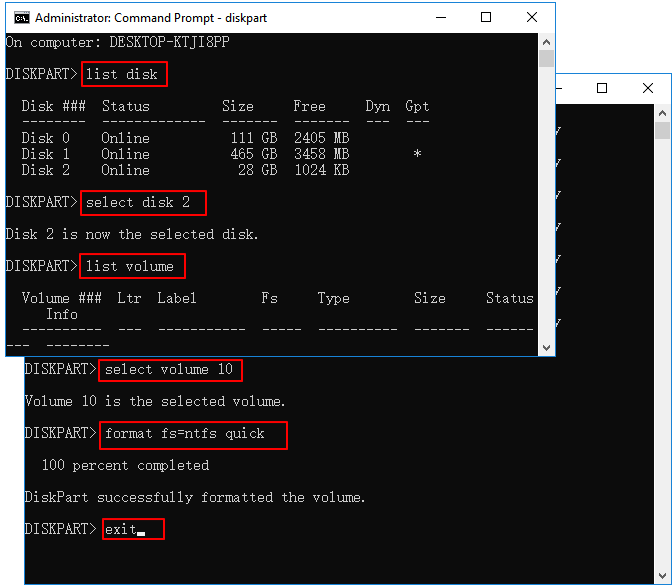
- list disk
- select disk 2 (Replace 2 with your disk number)
- list volume
- select volume 10 (Replace 10 with the volume number of the partition that you want to format)
- format fs=ntfs quick(If you need to format a hard drive partition to FAT32 or other file systems, replace NTFS with FAT32, exFAT, etc.)
- Warning
- If you input format command without «fs=ntfs quick or fs=fat32 quick« in DiskPart, it will execute a full format on your selected hard drive partition.
- This command will erase all saved data sector by sector without data recovery chance. In other words, you’ll permanently lose all saved data on the disk. So please double-check and confirm that you’ve input the right command before hitting Enter.
Step 4. Type exit and hit Enter to close the program when DiskPart reports it has successfully formatted the volume.
That’s a complete guide to formatting a hard disk with DiskPart quick format commands.
Video Tutorial: How to Format a Drive using CMD Format Command
- This tutorial will show how to format a hard drive with the command-prompt-based utility — DiskPart.
#2. Fully Clean and Format Disk Using CMD Command in DiskPart
If you prefer to completely wipe the hard drive, clean and format a hard drive using the CMD command, follow the operations using DiskPart for help.
Step 1. On Windows 10, press Windows + X, select «Search», and type command prompt, right-click on it and choose «Run as administrator».
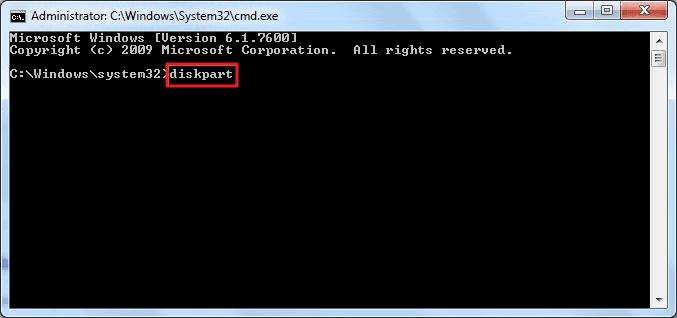
Step 2. On the Command Prompt black window, type diskpart and hit «Enter».
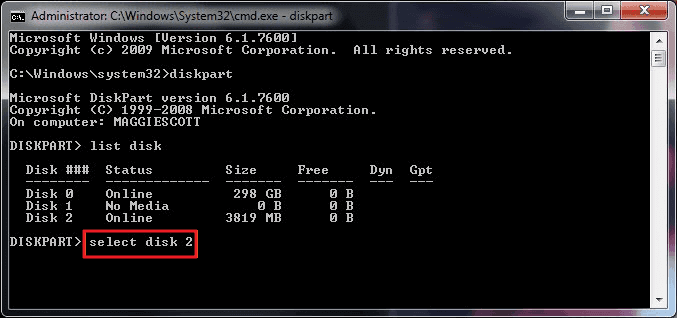
Step 3. Now type list disk and press «Enter».
All the disk drives will be listed, including your external drives that are connected to the computer.

Step 4. Type select disk + disk number, for example, select disk 2 and press enter.
It tells DiskPart to locate and lock disk 2 so as to clean and format it with the continuing steps.
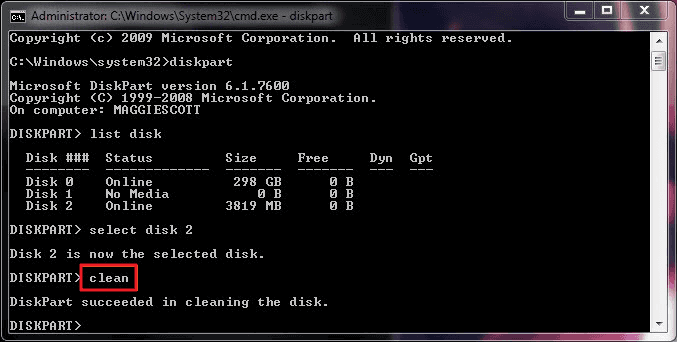
Step 5. Go on to type clean. This step starts to clean up all files and folders on the selected hard disk.
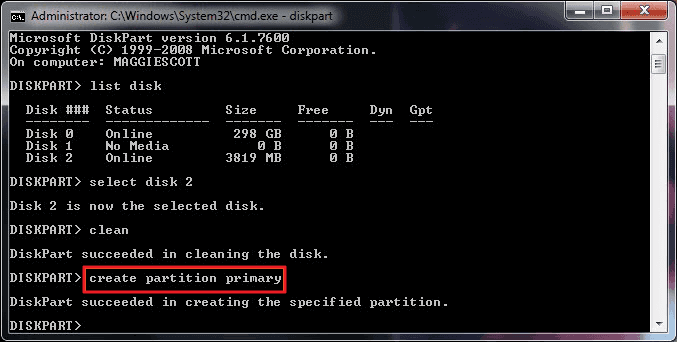
Step 6. Type create partition primary and press «Enter».
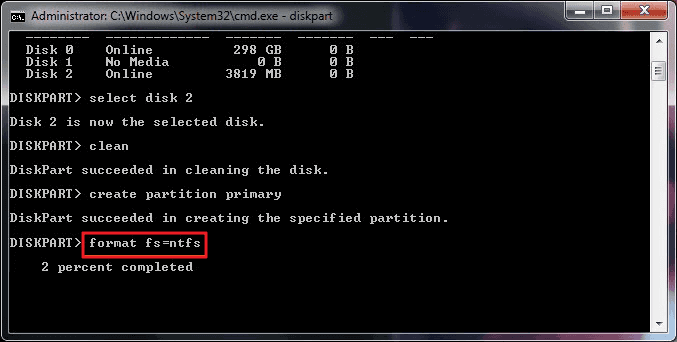
Step 7. After DiskPart successfully created the specified partition, type format fs=ntfs (or format fs=exfat) and press «Enter».
It tells DiskPart to format the disk to a specific file system, let it be NTFS, exFAT, etc.
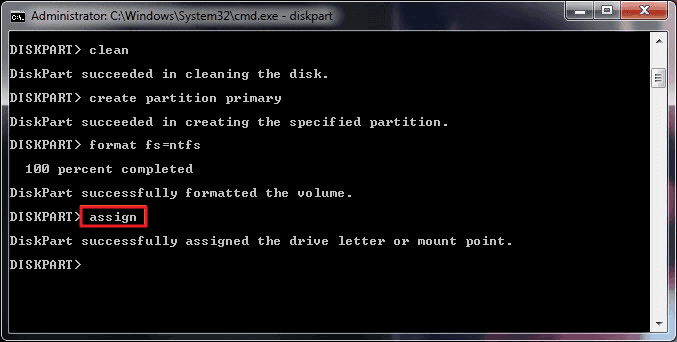
Step 8. At last, assign a drive letter to the newly created partition by typing assign.
Step 9. Type exit to close the DiskPart Command Prompt window when the process finishes.
Bonus Tip: Clean Up Hard Drive by Erasing Disk
Compared to the DiskPart clean command, EaseUS BitWiper — a newly released disk wipe software by EaseUS simplifies the whole process of cleaning up a hard drive.
With it, you can simply erase everything on a hard drive, leaving it as an empty new drive with full size:
Step 1. Run EaseUS BitWiper. Click the «Wipe Disk» tab.
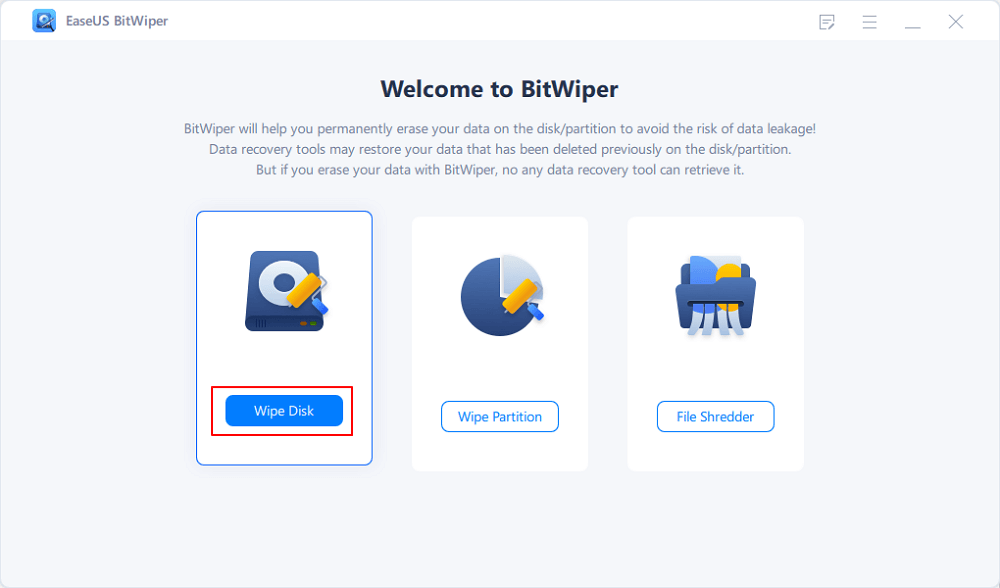
Step 2. Select the targeted HDD or SSD to wipe.
Notice: Please make sure you have chosen the correct HDD or SSD. Once the wiping starts, your data is irrecoverable.

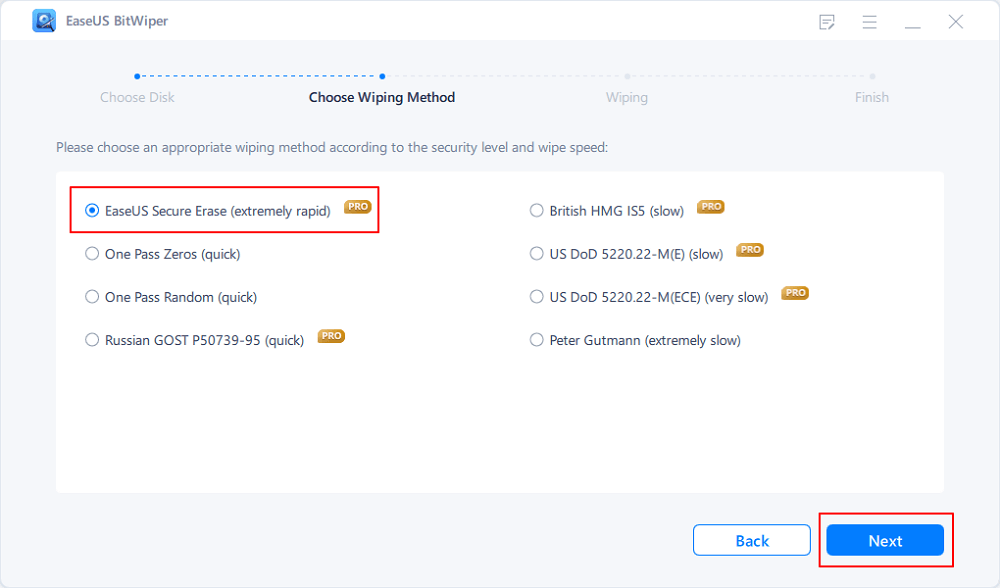
Step 3. Choose Wiping Method and click «Next».
Choose a suitable wiping method. Recommend EaseUS Secure Erase!
Step 4. Check the warning message and click «Wipe» to confirm.

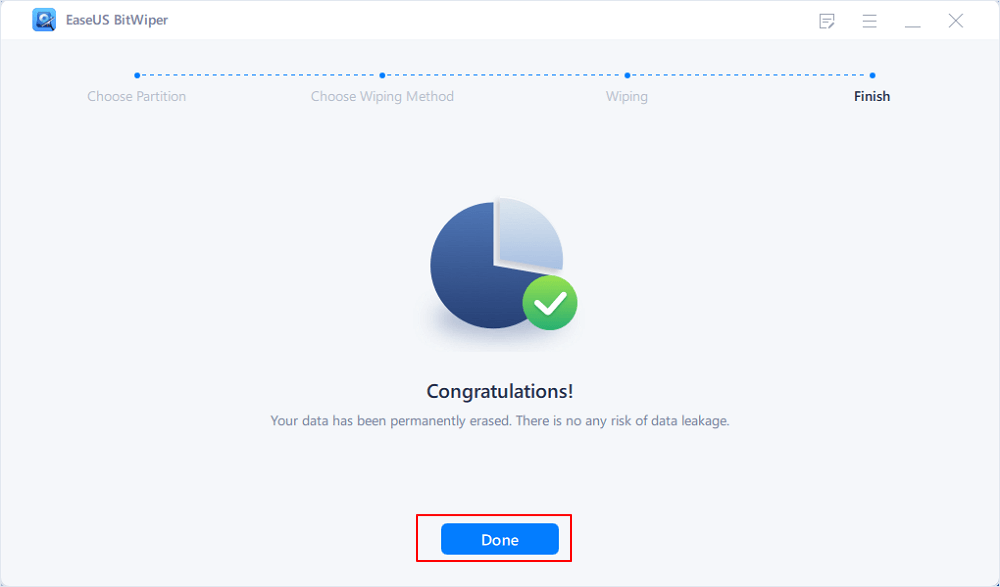
Step 5. Wait for wiping finish and click «Done».
Bottom Line — How to Format A Drive in Hard Disk with Run
On this page, we included two major free methods to help you clean and format a hard drive disk: DiskPart format command lines and DiskPart alternative — EaseUS free formatting tool.
According to many Windows managers and experienced users, you may also try to format a hard drive by using File Explorer and Disk Management on your own.
For quick and smooth operation, EaseUS Partition Master Free should be your best shot.
People Also Ask About Diskpart Format Command
If you are having further DiskPart formatting questions, check the following questions and listed answers for help.
1. How do I use Diskpart?
As DiskPart can execute many operations via different command lines, here we concluded a few of them to help you managing hard disk.
To create a partition: (Open Command Prompt and hit Enter each time.)
- diskpart
- list disk
- select disk 1
- create primary partition size=10000mb (or more)
- format fs=ntfs (or other file systems)
- assign letter=D (or other drives)
- exit
You may also run the DiskPart command to perform the following operations:
- #1. Show hidden files using CMD
- #2. Check and fix disk error using cmd
- #3. Recover deleted files using command prompt
- #4. Fix and repair hard drive errors using CHKDSK command
2. How long does DiskPart take to format?
Being it similar to the Windows formatting feature, you can always apply DiskPart format command to format a hard drive within minutes or half an hour, depending on the hard drive capacity and used space on it.
As estimated, to do a ‘full’ format on a 1TB hard disk in Windows, will take a long time, like 2- hours, and over a USB 2.0 connection, it may take a day!
3. What is the command to format a partition with the NTFS file systems?
Follow the process to format a partition with NTFS file system:
- 1. Right-click Windows icon, «Search», and type «CMD» and then right-click Command Prompt to select «Open as Administrator»
- 2. Type «list disk» into the command prompt without quotes and hit Enter.
- 3. Type «select disk 1» without quotes and hit Enter. (Replace 1 with the disk number of your own hard drive.)
- 4. Type «list volume» without quotes and hit Enter.
- 5. Type «select volume 1» without quotes and hit Enter. (Replace 1 with the target partition number on your drive.)
- 6. Type «format d: /fs: ntfs quick» without quotes and hit Enter. (Replace d: with the drive letter of your target partition.)
- 7. Type «exit» and hit Enter to close the command prompt.
For further resolutions, check the How-To page or use the Search option on our website — https:www.easeus.com to find more exact solutions bases on your issues.
4. How to format a USB flash drive using CMD? — Quora.com
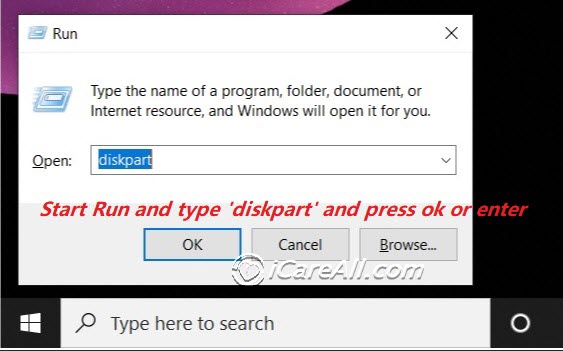
Step 1. Connect USB to PC and press Windows + R keys.
Step 2. Type cmd in the Search box and hit Enter to bring up Command Prompt.
Step 3. Type the following command lines one by one and hit Enter each time:
- diskpart
- list disk
- select disk + X (Replace X with the number of your USB drive.)
- list volume
- select volume + N (Replace N with the volume number of your USB flash drive.)
- format fs=ntfs quick (You can also replace NTFS with FAT32 or exFAT.)
- exit
Last Updated :
12 Apr, 2025
Formatting a hard drive is a common step when setting up a new disk or repurposing an old one. Although there are various methods to format in Windows, using the Command Prompt offers a fast and efficient option, particularly for advanced users.
This article will show you how to format a hard drive using Command Prompt, giving you step-by-step instructions to ensure the process is done safely and effectively. Whether you’re dealing with an internal HDD, an external drive, or a USB stick, formatting a hard drive in CMD is a useful skill to have.
How to Format a Hard Drive Using Command Prompt?
Find the steps below to learn how to format a hard drive using a command prompt. In the section below, we have discussed all the steps in detail.
Step 1: Open Command Prompt
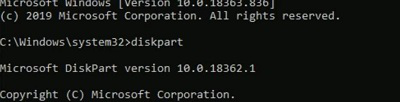
Open the Command Prompt as an Administrator. Execute the ‘diskpart‘ command in CMD. It will go inside the Disk Partition.
Command: diskpart
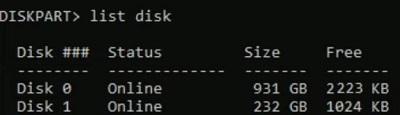
Step 2: Use Disk List Command
Now, let us see all the Windows Disk present on the device. Note down the Disk Number that should be formatted.
Command: list disk
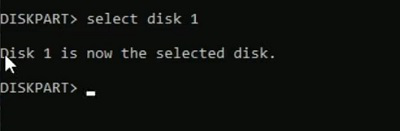
Step 3: Select the Disk Number
Using the following command, select the disk that will be formatted.
Command: select disk <disk number>
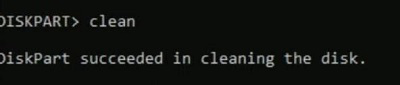
Step 4: Use Clean Commnad
Now, use the simple command to Quick Clean the Drive.
Command: clean
Step 5: Create Primary Partition
Now, it is time to make the driver, the Primary Driver. It will help to reaccess the driver in the future for the OS installation process.
Command: create partition primary

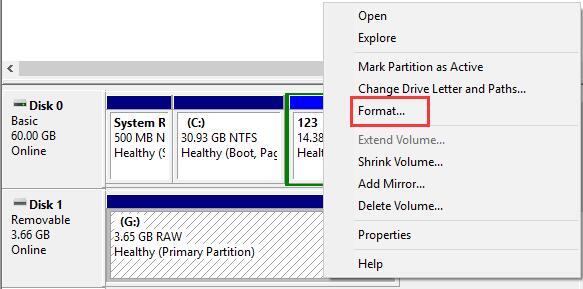
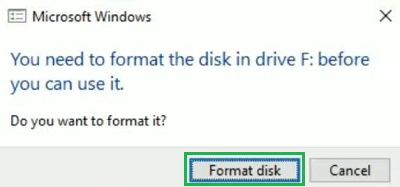
Step 6: Format the Disk
As soon as the above step is complete, the File Explorer will prompt one window. Click on the Format Disk option to complete the process.
Conclusion
Formatting a hard drive using Command Prompt is a straightforward process that gives you more control over your disk management tasks. By following the steps outlined in this guide, you can confidently format a hard drive in Windows CMD, preparing your drive for new data or wiping it clean. Whether you’re troubleshooting, setting up a new drive, or simply clearing space, knowing how to format a disk using CMD is an essential tool in any Windows user’s toolkit.