
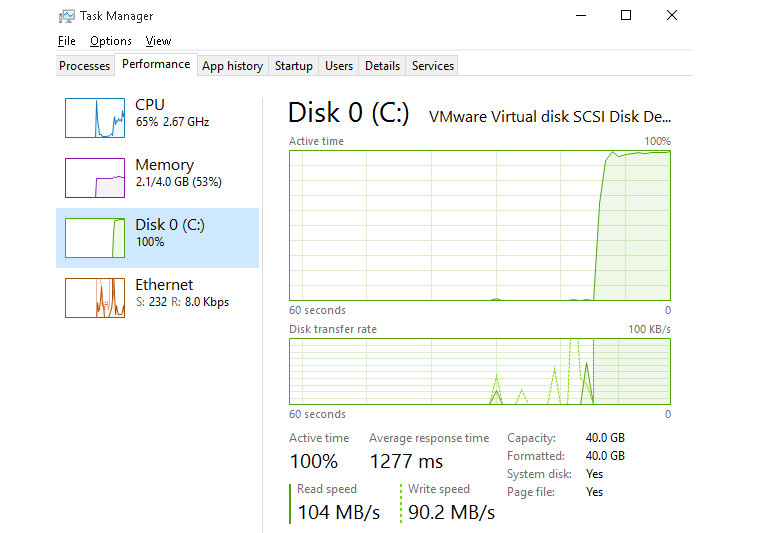
Одна из проблем, встречающаяся в Windows последних версий, похоже, чаще, чем в предыдущих версиях ОС — загрузка диска на 100% в диспетчере задач и, как следствие, заметные тормоза системы. Чаще всего это просто ошибки работы системы или драйверов, а не работа чего-либо вредоносного, но возможны и иные варианты.
В этой инструкции подробно о том, почему жесткий диск (HDD или SSD) в Windows 11/10 может быть загружен на 100 процентов и что делать в этом случае, чтобы исправить проблему.
Программы, активно использующие диск
Несмотря на то, что этот пункт сравнительно нечасто оказывается причиной нагрузки на HDD в Windows 11/10, рекомендую начать с него, особенно если вы не являетесь опытным пользователем. Проверьте, а не является ли какая-то установленная и запущенная (возможно, находящаяся в автозагрузке) программа, служба или вредоносное ПО причиной происходящего. Для этого вы можете выполнить следующие действия:
- Откройте диспетчер задач (сделать это можно через правый клик по меню пуск, выбрав соответствующий пункт в контекстном меню). Если в нижней части диспетчера задач вы увидите кнопку «Подробнее», нажмите ее.
- Отсортируйте процессы в колонке «Диск», нажав на ее заголовок.

- Обратите внимание, а не какая-то из ваших собственных установленных программ вызывает нагрузку на диск (т.е. находится первой в списке). Это может быть какой-либо антивирус, выполняющий автоматическое сканирование, торрент-клиент, или просто неправильно работающее ПО. Если это так, то стоит убрать эту программу из автозагрузки, возможно, переустановить ее, то есть искать проблему с нагрузкой на диск не в системе, а именно в стороннем ПО.
- Нагружать диск на 100% может какая-либо служба Windows, запущенная через svchost.exe. Если вы видите, что именно этот процесс вызывает нагрузку, рекомендую посмотреть статью про svchost.exe грузит процессор — в ней приводится информация о том, как с помощью Process Explorer узнать, какие именно службы запущены через конкретный экземпляр svchost, вызывающий нагрузку.

Если есть подозрение на то, что недавно установленные программы или сторонние службы являются причиной проблемы, можно выполнить чистую загрузку Windows и понаблюдать, исправило ли это ситуацию. Если да — попробовать выяснить, какое именно ПО привело к проблеме, шаги для этого описаны в материале по ссылке.
В некоторых случаях при открытии диспетчера задач нагрузка на диск может сразу пропадать. В такой ситуации можно предположить наличие вредоносного ПО на компьютере, часто — майнера, который «прячется» при открытии диспетчера задач. В такой ситуации рекомендую использовать Miner Search и Kaspersky Virus Removal Tool, либо Kaspersky Rescue Disk для поиска и удаления угроз.
Неправильная работа драйверов AHCI, NVM Express или чипсета
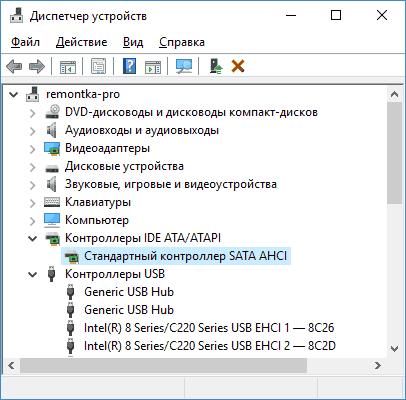
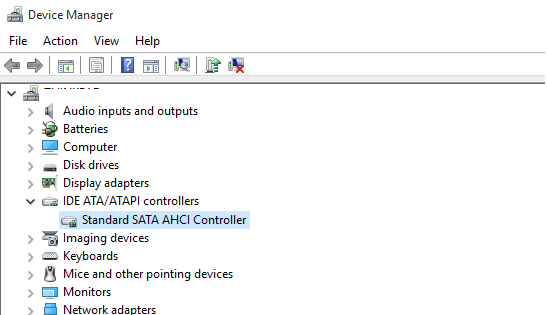
Мало кто из пользователей, устанавливающих Windows 11/10, выполняет какие-либо действия с драйверами контроллеров дисков и чипсета — у большинства в диспетчере устройств в разделе «Контроллеры IDE ATA/ATAPI» или будет «Контроллеры запоминающих устройств» значиться «Стандартный контроллер SATA AHCI» или «Стандартный контроллер NVM Express». И обычно это не вызывает проблем.
Однако, если без видимых причин вы наблюдаете постоянную нагрузку на диск, следует обновить этот драйвер на тот, что предусмотрен производителем вашей материнской платы (если у вас ПК) или ноутбука и доступен на официальном сайте производителя (даже если там он в наличии только для предыдущих версий Windows), при этом влиять могут не только драйверы контроллеров дисков, но и драйверы чипсета: Windows устанавливает их автоматически и они совместимы, но не всегда оптимальны.
Решение — установить драйверы от производителя:
- Зайдите на официальный сайт производителя вашей материнской платы или ноутбука, найдите раздел поддержки вашей модели ноутбука.
- Найдите там драйверы чипсета (всё, присутствующее в разделе Chipset), а при наличии— AHCI, SATA (RAID), NVMe или Intel RST (Rapid Storage Technology) и загрузите их (на скриншоте ниже пример таких драйверов).

- Драйверы могут быть представлены в виде установщика (тогда просто запускаем его), либо в виде zip-архива с набором файлов драйвера. Во втором случае распаковываем архив и выполняем следующие шаги.
- В диспетчере устройств нажмите правой кнопкой мыши по Стандартному контроллеру SATA AHCI и нажмите «Обновить драйверы».
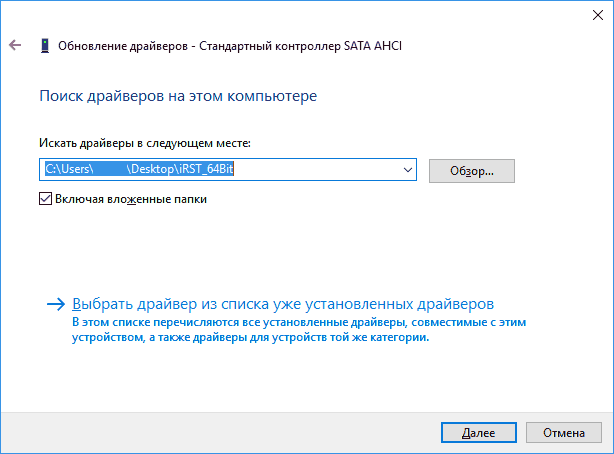
- Выберите «Выполнить поиск драйверов на этом компьютере», затем указываем папку с файлами драйвера и нажимаем «Далее».

- Если всё прошло успешно, вы увидите сообщение о том, что ПО для данного устройства было успешно обновлено.


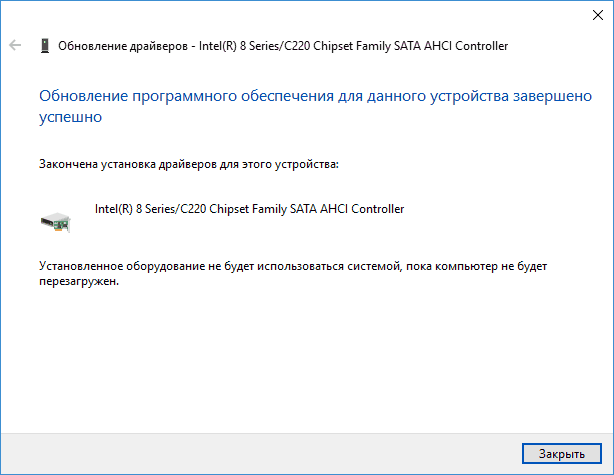
По завершении установки, перезагрузите компьютер и проверьте, остается ли проблема с нагрузкой на HDD или SSD.
Отключение Message Signaled Interrupt
Если аппаратные проблемы жесткого диска или SSD исключены, вы уверены, что нагрузка вызвана не текущими операциями чтения-записи, инициированных программами или вредоносным ПО, проверьте, сработает ли следующий подход, эффективный для решения проблемы 100% нагрузки на диск при использовании стандартного контроллера SATA AHCI (рекомендую создать точку восстановления системы, прежде чем приступить):
- Запустите диспетчер устройств: сделать это можно в меню Win+X, также можно нажать клавиши Win+R и ввести devmgmt.msc
- В диспетчере устройств раскройте раздел «Контроллеры запоминающих устройств» («Контроллеры IDE ATA / ATAPI), дважды нажмите по элементу «Стандартный контроллер SATA AHCI», «Стандартный контроллер NVM Express» или другому контроллеру, к которому подключен диск (если вы не знаете, к какому именно контроллеру он подключен, а их несколько, возможно, придётся повторить действие и для других).
- Перейдите на вкладку «Сведения» выберите в списке значение «Путь к экземпляру устройства» и скопируйте его в буфер обмена: нажмите по значению правой кнопкой мыши и выберите нужный пункт меню.

- Запустите редактор реестра (Win+R — regedit) и перейдите к разделу
HKEY_LOCAL_MACHINE\System\CurrentControlSet\Enum
после чего в адресной строке редактора реестра добавьте «\» справа от Enum, затем вставьте путь, скопированный на 3-м шаге. Если у вас отсутствует строка для ввода пути к разделу, выполните переход к нужному разделу вручную.

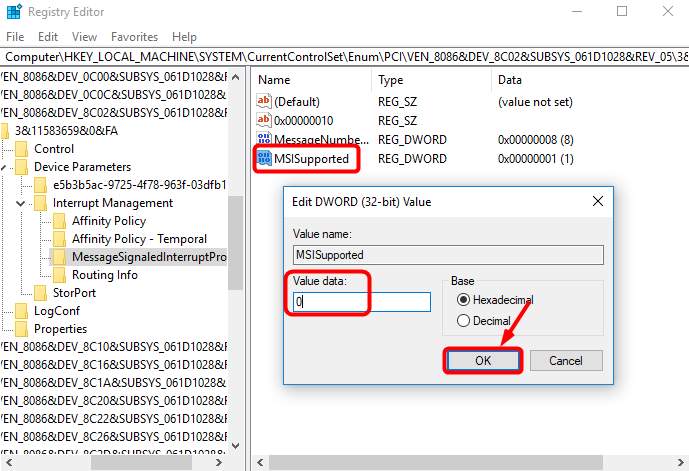
- Перейдите к подразделу
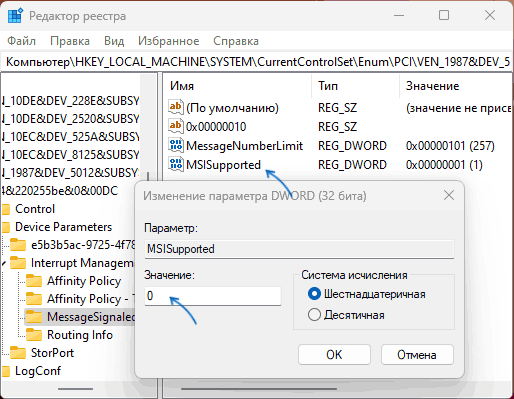
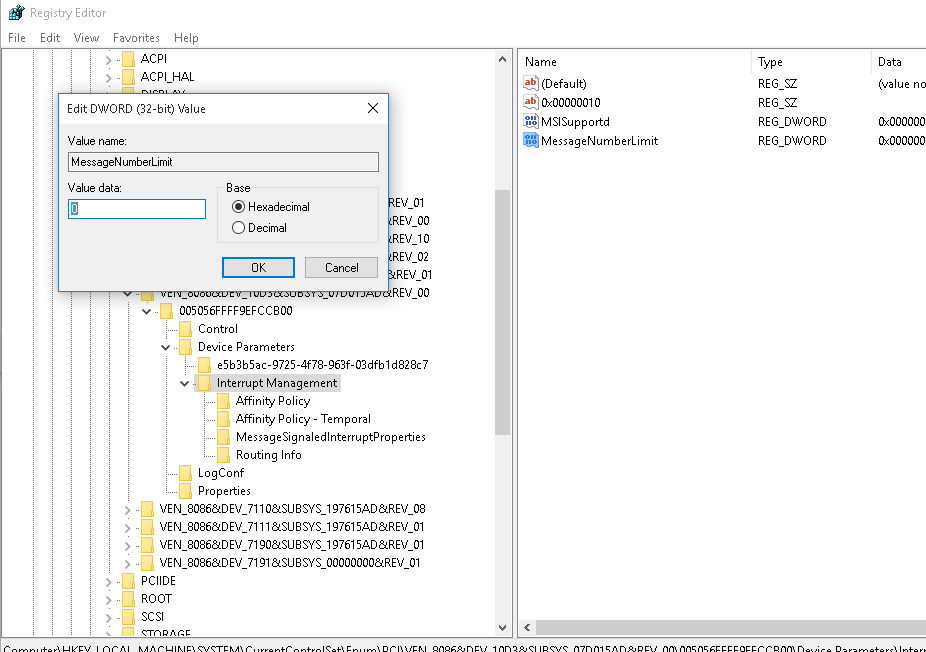
Device Parameters\InterruptManagement\MessageSignaledInterruptProperties
- Дважды нажмите по параметру с именем MSISupported и измените его значение на 0, примените настройки и закройте редактор реестра.

- Перезагрузите компьютер, чтобы изменения вступили в силу.


С большой вероятностью после перезагрузки компьютера проблема более не будет наблюдаться, а нагрузка на диск снизится.
Существуют дополнительные простые способы, которые могут исправить нагрузку на диск в случае некоторых ошибок работы стандартных функций Windows, а также дополнительные причины, которые могут к ней приводить:
- Для SATA-накопителей причиной постоянной высокой нагрузки на диск может быть неисправность или плохое подключение кабеля SATA — следует проверить его подключение, при возможности — попробовать заменить кабель на новый.
- Проблемы с электропитанием (недостаточность мощности, например, вследствие износа компонентов блока питания) также могут приводить к рассматриваемой проблеме.
- При наличии нескольких дисков в системе, неисправности одного могут приводить и к повышенной нагрузке на другом диске: проверить, в этом ли причина, можно отключив все необязательные для работы ОС диски.
- Выход из строя самого диска также может приводить к постоянной высокой нагрузке на диск, рекомендую проверить атрибуты SMART вашего накопителя.
- Для SSD критичным может оказаться высокий нагрев, особенно для производительных моделей накопителей — проблему может решить радиатор или термопрокладки.
- Если проблема возникает с твердотельным накопителем SSD, причем не носит постоянного характера, попробуйте способ с изменением параметров Link Power Management из инструкции Что делать, если зависает SSD в Windows.
- Зайдите в Параметры — Система — Уведомления и действия и отключите пункт «Получать советы, подсказки и рекомендации при использовании Windows».
- Запустите командную строку от имени администратора и введите команду
wpr -cancel
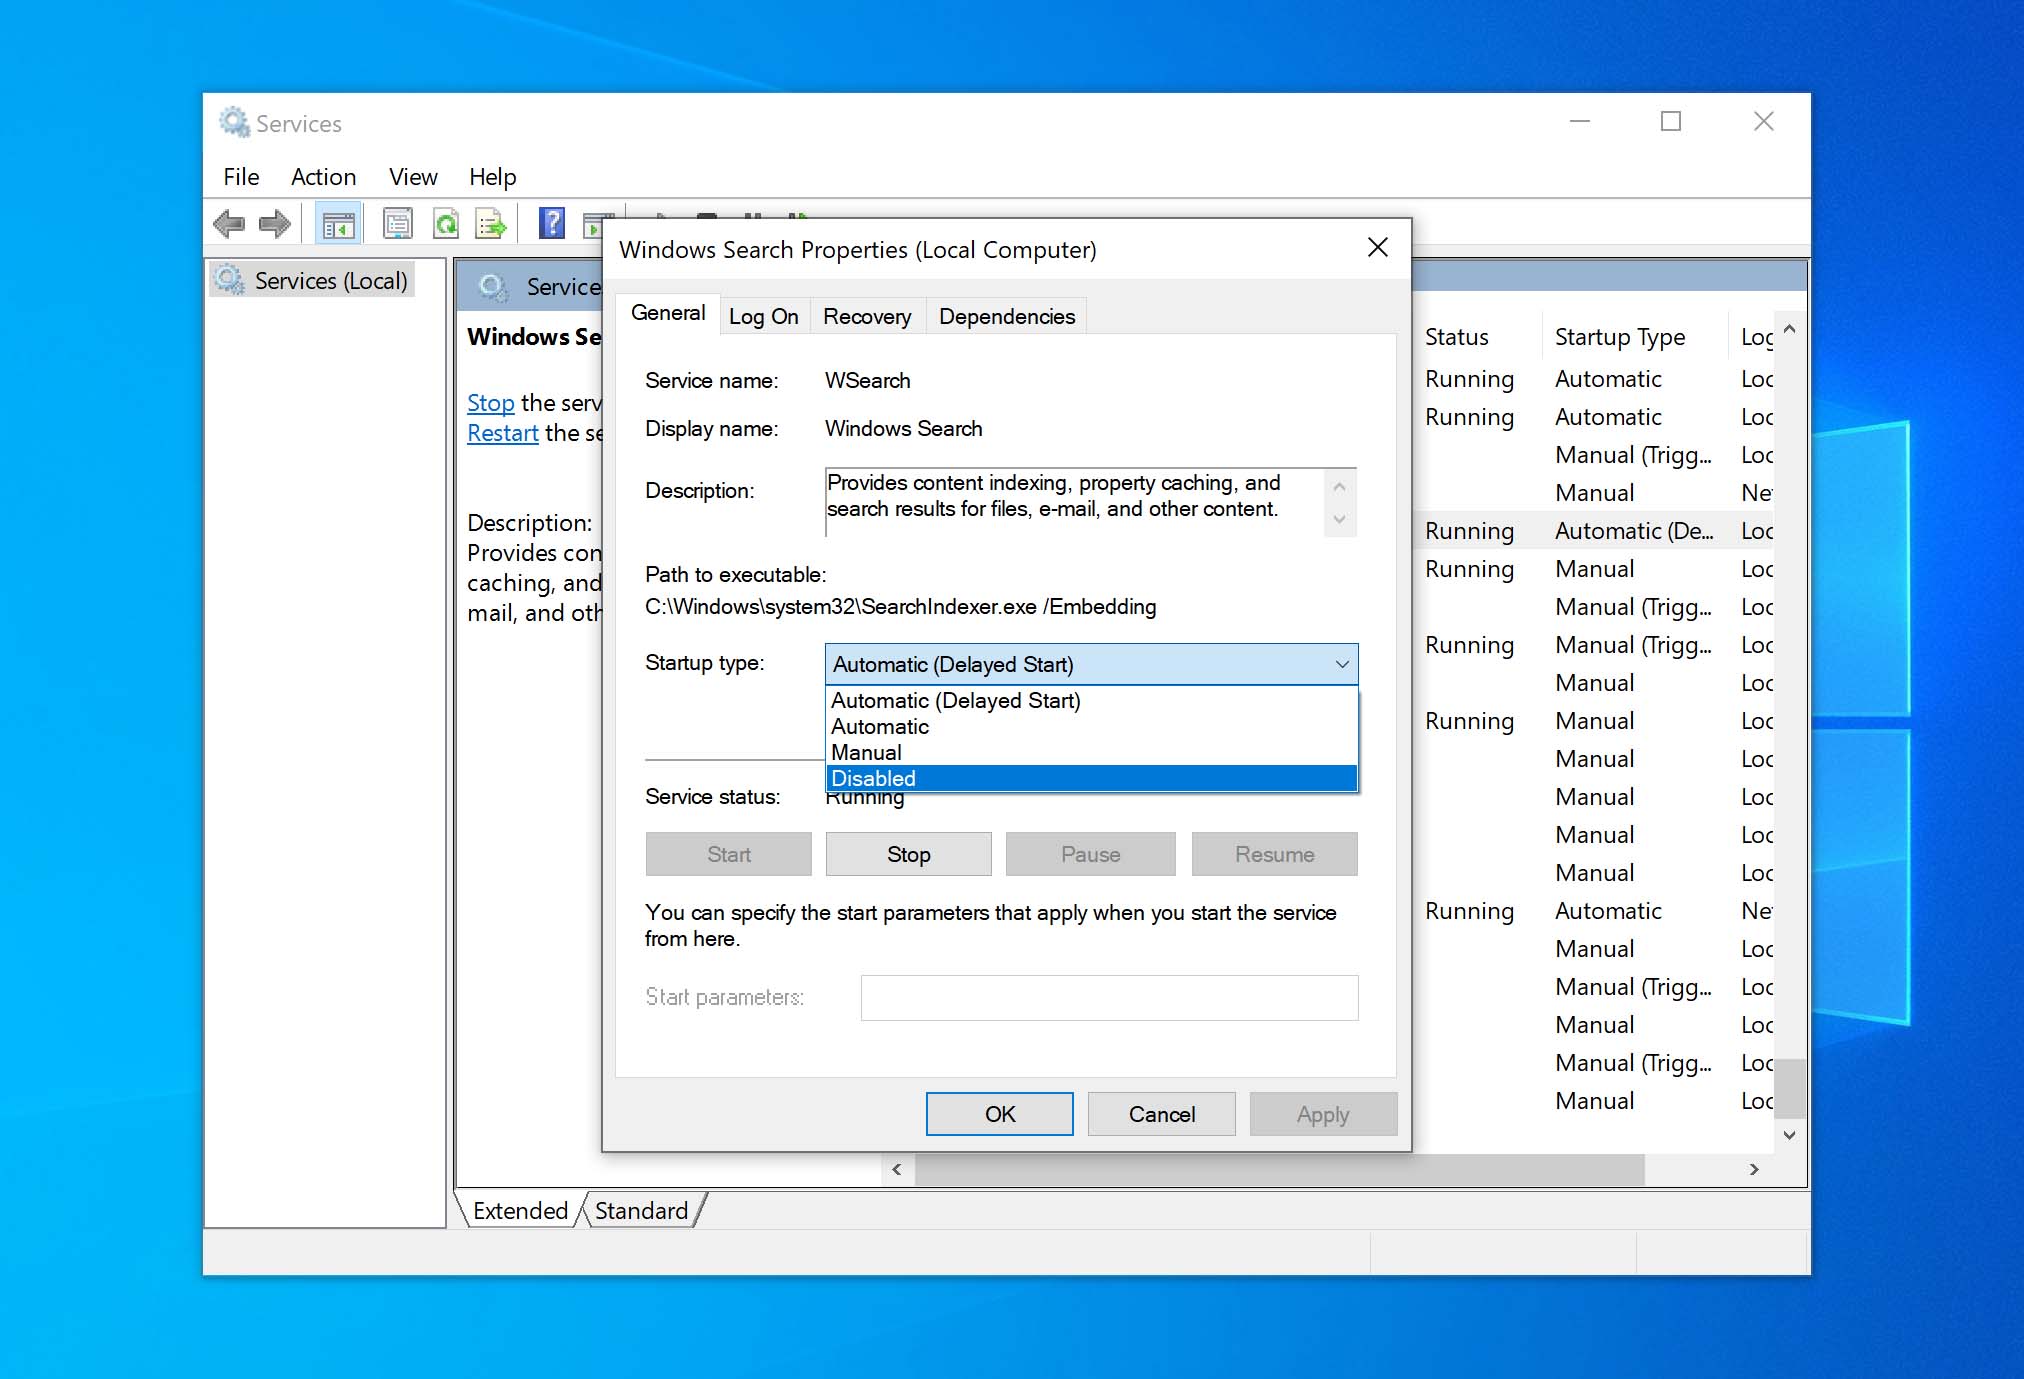
- Отключите службы Windows Search, о том, как это сделать, см. Какие службы можно отключить в Windows 10.
- В проводнике в свойствах диска на вкладке «Общие» снимите отметку «Разрешить индексировать содержимое файлов на этом диске в дополнение к свойствам файла».
- Если проблема появилась недавно, могут помочь точки восстановления системы на дату, когда всё работало исправно.
- В ситуации, когда нагрузка на диск повышается до 100% после завершения работы и последующего включения, но пропадает при перезагрузке (использования пункта «Перезагрузка» в меню Пуск), может помочь отключение быстрого запуска Windows.
На данный момент времени — это все решения, которые я могу предложить на ситуацию, когда диск загружен на 100 процентов. Если ничто из перечисленного не помогает, и, при этом, раньше в этой же системе подобное не наблюдалось, возможно, стоит попробовать сбросить Windows 11 или Windows 10 к заводскому состоянию.
Struggling with constant freezes, painfully slow app launches, and endless loading screens? If you’re seeing 100% disk usage on your Windows 10 PC, you’re not alone, and it’s incredibly frustrating.
Many users turn to quick fixes like disabling SuperFetch or tweaking virtual memory, only to see the problem creep back over time. Why? Because bloated software continues to hammer your system’s limited resources.
In this guide, I’ll show you a two-pronged solution: First, how to fix the system issues causing the disk usage spike, and second, how replacing heavy applications like Microsoft Office with lightweight alternatives like WPS Office can keep your PC smooth for the long haul. Let’s get right into it.
Part 1: Why Your Windows 10 Disk Hits 100% – Top Culprits Explained
If you’ve ever stared helplessly at a frozen screen while your Windows 10 disk usage stubbornly sits at 100%, you’re not imagining things; it’s a common and fixable issue. Let’s walk through the top reasons why your system’s storage drive might be working overtime.
1. System Service Overload
SysMain/SuperFetch: Aggressive prefetching on HDDs
SysMain (previously known as SuperFetch) is a background service that’s supposed to make your system faster by predicting which apps you’ll use next. Sounds great, right? Well, not always. On traditional hard drives (HDDs), SysMain often causes exactly the opposite effect. Instead of speeding things up, it floods your drive with read/write operations, dramatically slowing down performance.
If you’ve ever browsed through Reddit’s r/techsupport threads, you’ll find dozens of users reporting that disabling SysMain immediately fixed their 100% disk usage problem. Especially for older laptops and desktops running mechanical HDDs, shutting down SysMain is often a lifesaver.
Windows Search Indexing: Temporary spikes during file scans
Another common culprit is Windows Search. This service indexes all files on your computer to speed up search results, but during heavy file scanning, it can hammer your disk usage. Microsoft’s own support documents acknowledge that search indexing can cause high disk usage spikes, especially after a major Windows update or if you have large numbers of files.
Disabling or limiting Windows Search temporarily can quickly reveal if it’s the source of your system slowdown.
2. Driver Conflicts
StorAHCI.sys: Firmware bugs in older SATA controllers
If you’re using an older SATA drive, the «StorAHCI.sys» driver can be problematic. Firmware issues sometimes cause your storage controller to flood the system with «interrupts,» resulting in 100% disk usage.
Many users on tech forums like TenForums have solved this by either updating Intel’s Rapid Storage Technology (RST) drivers or adjusting specific registry settings linked to StorAHCI.sys.
3. Software Bloat
MS Office Background Processes: Click-to-Run updates and telemetry
Here’s something you may not expect: Microsoft Office itself can contribute to high disk usage.
The Click-to-Run service used to update Office apps in the background can consume anywhere from 50MB/s to 150MB/s of your disk bandwidth.
Telemetry processes (yes, Office reports usage data back to Microsoft) also add to the load, even when you’re not actively using Word or Excel.
For users on modest systems, bloated background tasks from heavy software like MS Office are a silent performance killer.
From my experience, whenever a client asked me to troubleshoot persistent Windows 10 slowness, one of the first things I’d check after SysMain and Search was the number of active Click-to-Run processes. Disabling unnecessary background apps often gave an immediate, visible performance boost.
Part 2: Solving 100% Disk Usage in Windows 10: A Step-by-Step Guide to Restoring Performance
If your Windows 10 machine is crawling because of 100% disk usage, don’t worry; you’ll not be stuck with a slow PC forever. Here’s a two-tiered approach I personally recommend to my clients: System Optimization first and Hardware Upgrades only if absolutely necessary.
Tier 1: System Optimization (90% Success Rate)
1. Disable SysMain/SuperFetch
Steps:
1. Press Windows + R, type services.msc, and press Enter.

2. Scroll down to find SysMain.

3. Right-click on it → Stop.

4. Then, double-click it, set Startup type to Disabled, and click OK.
Command Line Shortcut: You can also open Command Prompt (Admin) and run:
net stop sysmain
Pro Tip:
Disabling SysMain can cause slightly slower boot times for some users, but overall system responsiveness improves dramatically, especially on older HDDs. From my own tests, disk usage dropped by over 40% within minutes!
2. Adjust Virtual Memory
Sometimes, Windows runs out of RAM and starts using disk space as «virtual memory» — causing huge slowdowns if it’s misconfigured.
Steps:
1. Press Windows + R, type sysdm.cpl, and hit Enter.

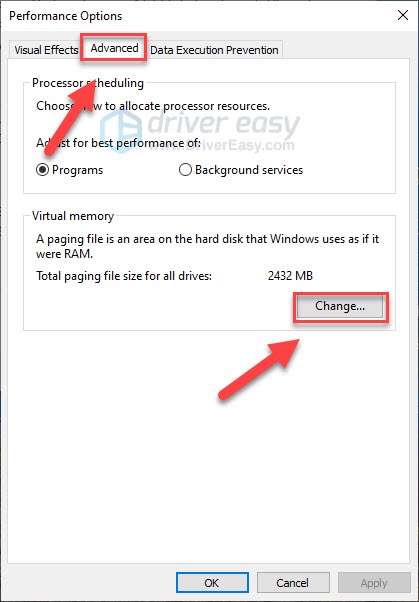
2. Go to Advanced → Performance Settings → Advanced → Virtual memory →Change.

3. Uncheck Automatically manage paging file size.

4. Select your drive (usually C:), click Custom size, and set:
5. Initial Size = 1.5 × RAM amount (in MB)
6. Maximum Size = 3 × RAM amount (in MB)

7. Click Set, then OK, and restart your PC.
Example: If you have 4GB RAM (4096MB), set Initial = 6144MB and Maximum = 12288MB.
Quick Note:
Tweaking virtual memory correctly can prevent disk thrashing. I once optimized a 4GB RAM system this way and reduced boot times from 5 minutes to just 90 seconds!
3. Update AHCI Drivers
If your system is using an outdated SATA controller driver (StorAHCI.sys), it can cause disk usage issues.
Steps:
1. Press Windows + X → Device Manager.
2. Expand IDE ATA/ATAPI Controllers.
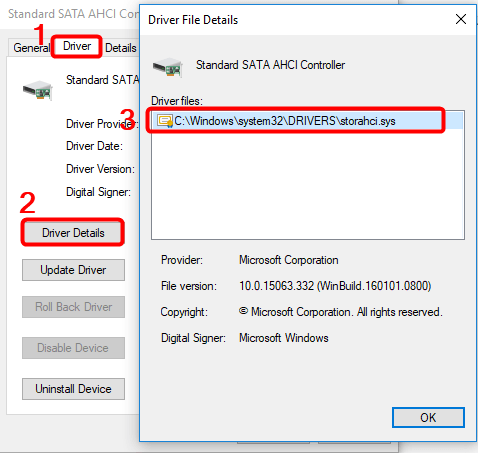
3. Right-click Standard SATA AHCI Controller → Properties.

4. Under Driver Details, if you see storahci.sys, proceed.
5. Update the driver manually from the motherboard/PC manufacturer’s site or install Intel Rapid Storage Technology (RST) drivers.
Alternative Fix: Modify the registry to disable Message Signaled Interrupts (MSI) for AHCI:
Important: Always back up the registry before making changes.
-
Open regedit, and navigate to:
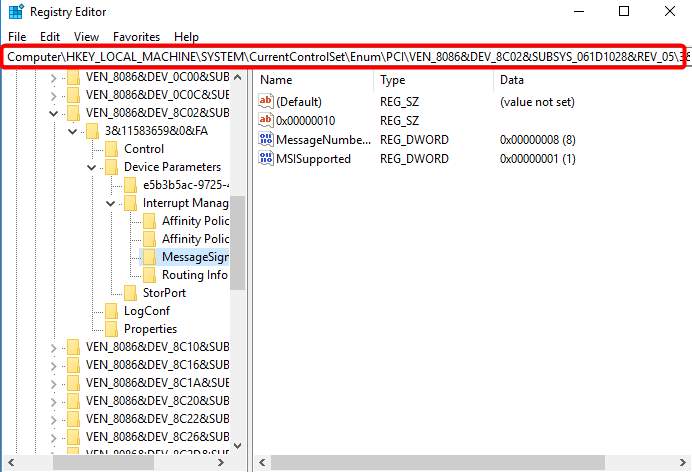
HKEY_LOCAL_MACHINE\System\CurrentControlSet\Enum\PCI\VEN_XXXX&DEV_XXXX\Device Parameters\Interrupt Management\MessageSignaledInterruptProperties
-
Set MSISupported value to 0.
-
Restart your PC.
After applying this fix on a client’s Lenovo laptop, disk usage plummeted from 100% to a steady 3–5% during normal usage.
Tier 2: Hardware Upgrades (Last Resort)
If, after trying all software fixes, your system still chokes, it might be time for an upgrade.
SSD vs HDD: 94% Faster Read Speeds
According to UserBenchmark, SSDs offer up to 94% faster read speeds compared to traditional HDDs.
Whenever I upgraded clients from HDD to SSD, they often described it as getting a «new laptop» app opened in seconds instead of minutes.
RAM Upgrade: 8GB Minimum for Multitasking
If you routinely open lots of tabs or run office apps while browsing, 4GB RAM won’t cut it today.
Minimum Recommendation:
-
8GB RAM for smoother multitasking.
-
16GB RAM if you use heavier tools like Photoshop, video editors, etc.
Part 3: Combatting 100% Disk Usage in Windows 10: Replace Resource-Intensive Software
Fixing system services and drivers can get your PC breathing again, but if you keep using heavy, bloated applications, the 100% disk usage problem will eventually sneak back. That’s why replacing resource-hungry software is the final piece of the puzzle. Let’s start with one of the biggest offenders: Microsoft Office.
MS Office Alternatives: Lightweight Tools That Save Your System
WPS Office: 320MB Install Size vs Office’s 1.2GB
If your PC struggles with limited disk space or RAM, every megabyte matters. Microsoft Office demands over 1.2GB just for the basic installation, and that’s before you even open Word or Excel.

WPS Office, in contrast, installs in just 320MB. That’s almost three-quarters lighter, freeing up valuable resources for what really matters: your work.
I’ve personally tested WPS on old Windows 10 laptops with 4GB RAM, and it ran smoothly as butter, even while multitasking with browsers and email clients.
AI-Powered Efficiency: Built-In PDF Tools and Template Library
Another hidden drain on your PC? Having to install multiple programs to handle different tasks, such as PDF editors, file converters, and resume builders, all adds up.
WPS Office simplifies things by bundling smart tools directly inside the suite:
-
Built-in PDF Reader and Editor
-
Automatic Template Suggestions
-
AI Summarizer for Long Documents
Result? Fewer apps running in the background, fewer disk writes, and a much more efficient system.
Browser Optimization: Chrome Tweaks Matter Too
Even your web browser can contribute to high disk usage!
Chrome Preload Pages Setting:
-
Open Chrome Settings → Privacy and Security → Cookies and other site data.
-
Turn Preload pages for faster browsing and searching OFF.
Disabling preload pages can cut disk writes by up to 30%, according to performance tests.
Quick Note: In my own experience, tweaking Chrome’s background settings gave an instant «lightness» to older machines; pages loaded a split-second slower, but multitasking became way smoother.
WPS Office vs MS Office (Real-World Performance)
|
Feature |
WPS Office |
MS Office |
|---|---|---|
|
Installation Size |
320MB |
1.2GB |
|
RAM Usage (Idle) |
150–200MB |
300–450MB |
|
Background Updates |
Manual control |
Frequent automatic updates |
|
Offline Capability |
Full |
Partial (some cloud reliance) |
|
Free Plan |
90% features available |
Limited functionality without a subscription |
-
WPS Office uses up to 40% less RAM compared to MS Office, tested on devices with just 4GB of RAM.
-
No background update interruptions; you stay in control of when updates happen.
After migrating several small businesses to WPS Office, disk usage stayed below 20%, even during document editing sessions. Fewer crashes, smoother multitasking, and noticeably faster app launches without having to spend a dime on upgrades.
Part 4: Why WPS Office Fits a Disk-Optimized PC
Once you’ve spent the effort fixing your Windows 10 system’s 100% disk usage problem, the last thing you want is heavy software dragging it back down. This is exactly why WPS Office fits so well into a disk-optimized setup; it’s lightweight, smart, and engineered for efficiency.
Lightweight Design: Minimal Impact on System Resources
Unlike traditional office suites that constantly run background services, telemetry uploads, and auto-updates, WPS Office takes a simpler, smarter approach:
-
No background telemetry hammering your disk or network.
-
No constant write cycles from invisible update processes.
-
Launches instantly, even on systems with basic HDDs or low RAM.
After switching a client from MS Office to WPS Office on an aging Dell Inspiron (i5, 4GB RAM, spinning hard drive), app launch times dropped by nearly 50%, the user was genuinely surprised by how «snappy» everything felt.
AI-Driven Workflows: Save Time and Disk Usage
WPS Office doesn’t just save storage, and it saves you time. Here’s how its AI tools help reduce manual work (and reduce heavy disk writes):
-
Smart PDF-to-Word Conversion: Instead of manually reformatting messy PDF files, WPS’s AI conversion tool creates clean, ready-to-edit Word documents in seconds.
-
Template Recommendations: Need to create invoices, resumes, or project proposals?
WPS suggests ready-made templates based on your work type; no need to design from scratch.
I tested the Smart PDF tool recently, a 12-page scanned PDF converted into a fully editable Word doc without layout errors, saving at least an hour of formatting work.
Cloud Sync Without Local Storage Bloat
WPS Office includes smart cloud features, but they’re designed to optimize, not overburden, your system:
-
Selective Sync: Choose exactly what files to sync. No massive folders are automatically dumped onto your drive.
-
Minimal Cache Usage: Cloud files are cached efficiently, avoiding disk saturation.
-
Offline Mode: You control what’s saved locally vs. online.
In environments where storage is tight (like 64GB eMMC drives on older budget laptops), selective syncing can be a total game-changer.
Cost Efficiency: Full Office Experience Without the Bloat
Here’s the cherry on top: WPS Office delivers 90% of Microsoft Office’s features without forcing you into expensive subscriptions.
-
Core Features: Word, Excel, PowerPoint, and PDF tools, all free.
-
AI Premium Features: Available if you need extra power, but optional ($29.99/year).
In real-world use, most casual users, and even most small businesses, never need anything beyond the free version.
FAQs
Q1: Is WPS Office truly free?
Yes! WPS Office’s core features, document editing, spreadsheets, presentations, and PDF tools, are 100% free forever. If you want access to advanced AI tools or premium cloud storage, a subscription is available for $29.99/year, but it’s completely optional.
Q2: Does it work with MS Office files?
Absolutely. WPS Office offers 99.3% formatting fidelity for .docx, .xlsx, and .pptx files, according to TechRadar reviews. In my own tests, documents switched between WPS and Office with virtually no formatting issues.
Q3: What if disk usage spikes persist after optimization?
If you still see occasional spikes, WPS Office provides a built-in Resource Monitor:
-
Open WPS Office → Tools → Performance Optimizer → Check background processes.
This helps you quickly spot and stop resource-hogging apps without third-party software.
Q4: Is there a Mac/Linux version?
Yes, but with a slight catch. WPS Office for Mac offers about 85% of the Windows version’s features, but it’s still great for everyday use. Linux users can download the WPS Office community builds, though updates are less frequent compared to Windows.
Summary
Fixing 100% disk usage on Windows 10 goes beyond quick tweaks; it requires addressing both the root causes and preventing future slowdowns. System services like SysMain, Windows Search indexing, outdated drivers, and bloated software often overwhelm your hard drive. Immediate solutions such as disabling background services, adjusting virtual memory settings, and updating storage drivers can restore normal performance in most cases.
However, for long-term stability, replacing heavy applications with lightweight alternatives like WPS Office is crucial. With its minimal resource footprint, no intrusive background updates, and built-in AI-powered tools, WPS Office helps optimize systems without unnecessary disk strain. In my experience, combining smart system fixes with lightweight software creates a sustainable, high-performing Windows 10 environment without the need for expensive hardware upgrades.
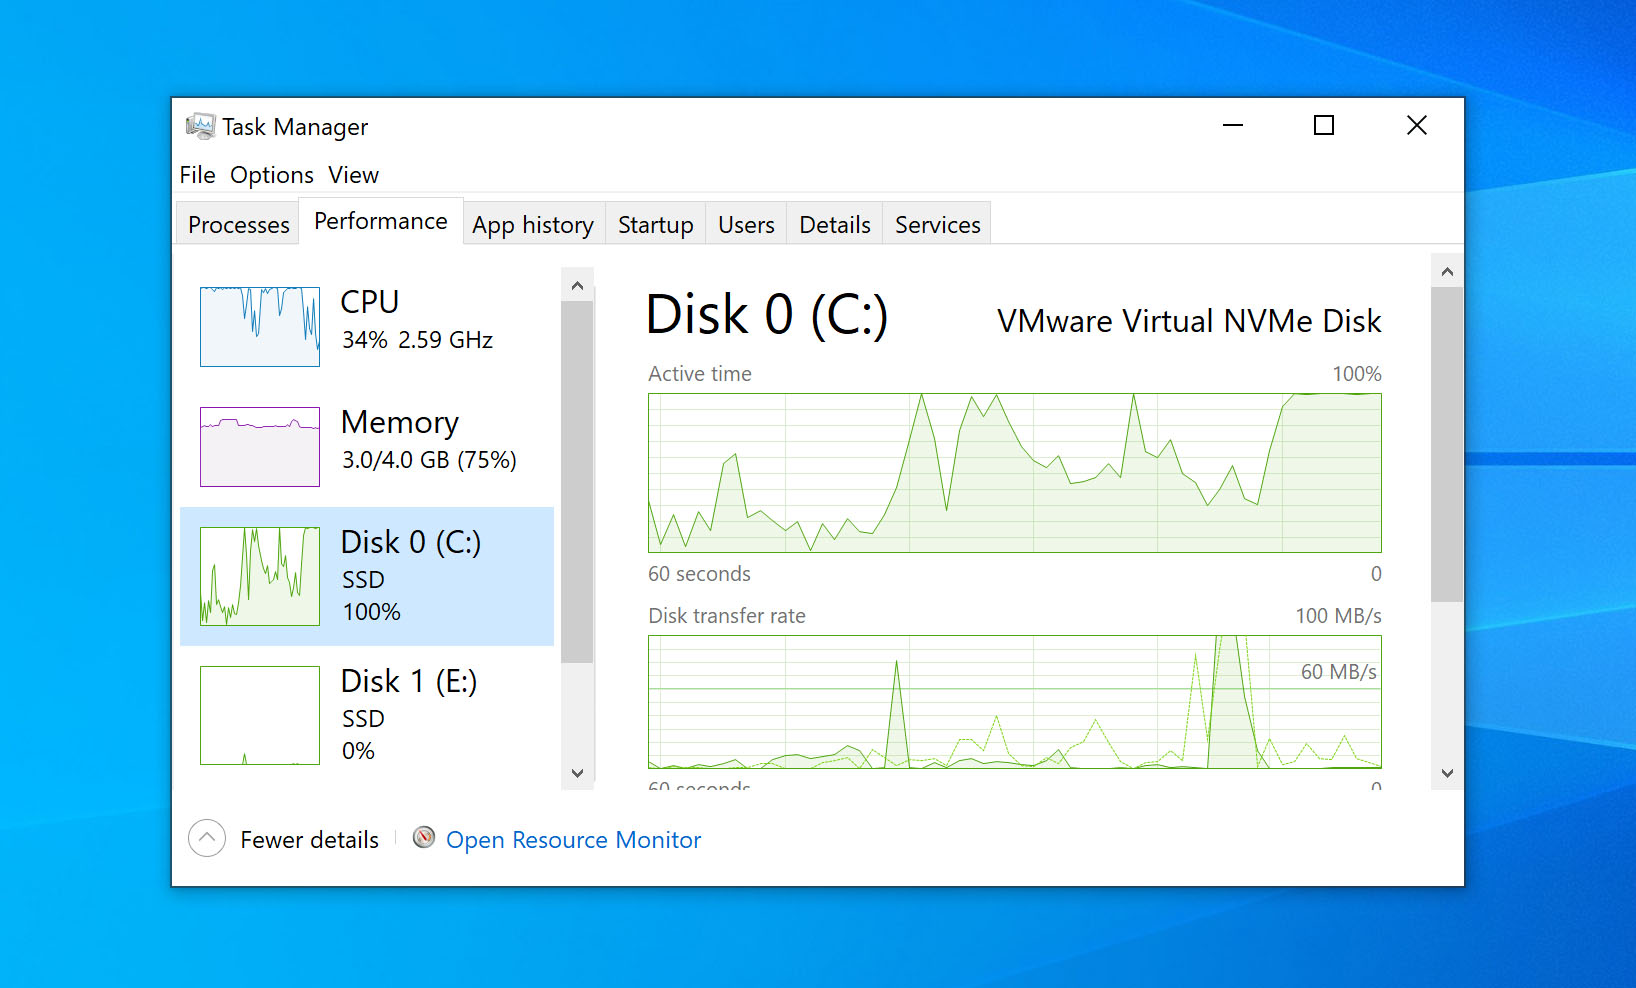
Is your PC struggling? Browser crawls, opening a folder takes ages, and even switching tabs feels like a chore. You check Task Manager, and there it is—100% disk usage. So, what’s eating up your disk? It could be anything from background processes to a faulty drive slowing things down.
But don’t worry. In this article, we will show you the 8 most effective methods to fix the 100% disk usage issue and get your PC up to speed again. Read on…
8 fixes for 100% disk usage on Windows 10
Before diving into anything complicated, try a quick restart to rule out a temporary glitch. If that doesn’t help, just work your way through the list until you find the one that works for you.
- Fix 1: Disable SuperFetch
- Fix 2: Update your device drivers
- Fix 3: Perform a disk check
- Fix 4: Reset Virtual Memory
- Fix 5: Disable Antivirus Software temporarily
- Fix 6: Update StorAHCI.sys Driver in Registry
- Fix 7: Check the health of your disk
- Fix 8: Change energy options
- Wrapping up
Fix 1: Disable SuperFetch
SuperFetch helps reduce boot time and optimize the loading of frequently used programs. However, it has been identified as a potential cause of disk performance issues in Windows 8 and later versions of Windows, including Windows 10.
Here’s how to stop this service:
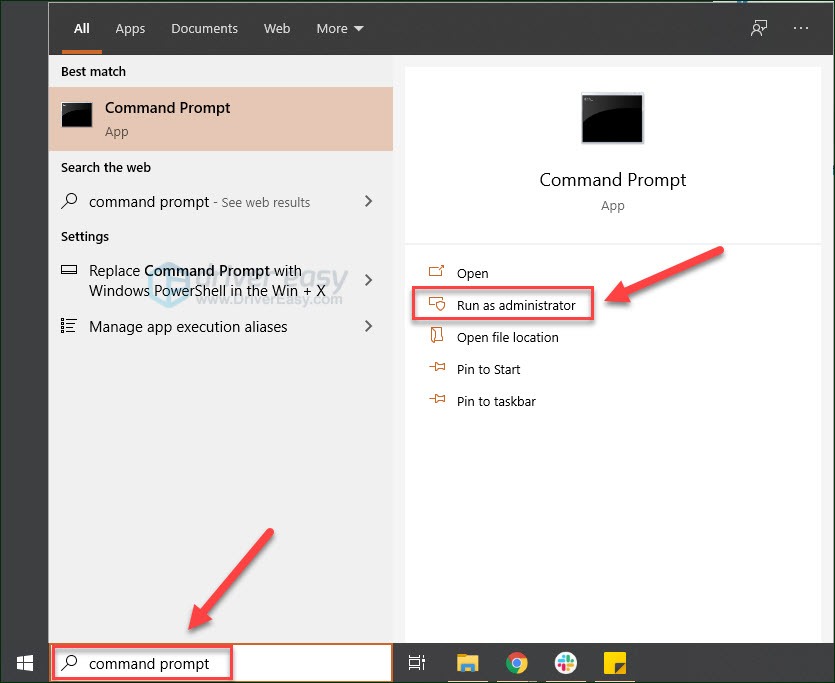
- On your keyboard, press the Windows logo key, type command prompt, then when it pops up as a match, select Run as administrator.

- Click Yes at the User Account Control prompt.

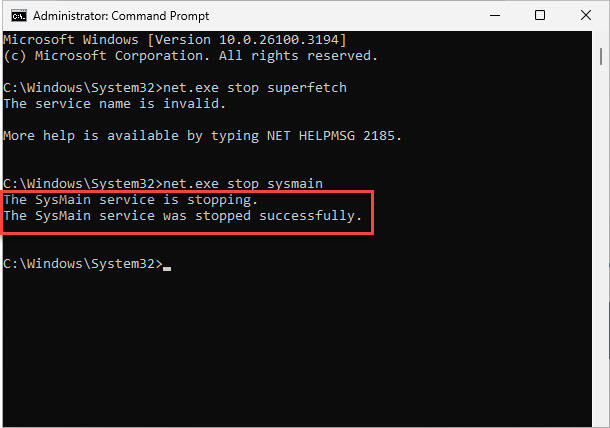
- In the command prompt window, type
net.exe stop superfetchand hit Enter on your keyboard. If the command is successful, you should see a message that says “The Superfetch service was stopped successfully.”
- If the command above doesn’t work and you see a message like “The service name is invalid,” try
net.exe stop sysmaininstead and press Enter. - Wait for a few minutes to see if your computer starts performing better.
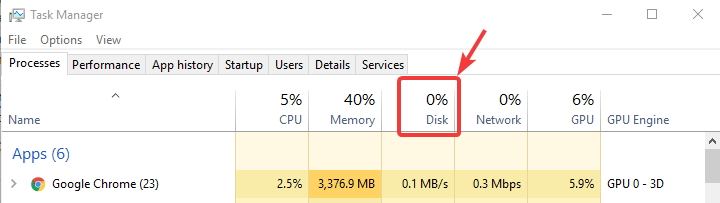
Alternatively, you can check your computer’s disk usage: On your keyboard, press Ctrl, Shift, and Esc at the same time to open Task Manager. Then in the Processes tab, look at the % at the top of the Disk column.- If it’s no longer at 100%, or has significantly dropped, then great! You’ve likely resolved the issue!

- If the 100% disk usage problem persists, please move on to Fix 2, below.
- If it’s no longer at 100%, or has significantly dropped, then great! You’ve likely resolved the issue!

Fix 2: Update your device drivers
Drivers are the essential software that handles the communication between your hardware (like your hard drive, graphics card, and motherboard) and your operating system. However, if they’re outdated or faulty, they can cause your hard drive to work overtime, which pushes the disk usage to 100% and brings your system to a halt. To see if this is the culprit, you should update your drivers.
You can update the drivers manually from the manufacturer’s website, but if you’d rather skip the hassle, you can do it automatically with Driver Easy. Driver Easy is a trusted driver updater that scans your system, finds the correct drivers, and updates them automatically. With Driver Easy, you can rest assured that all drivers are official, safe, and reliable. You don’t have to worry about making mistakes or downloading the wrong drivers.
All it takes is a few clicks:
- Download and install Driver Easy.
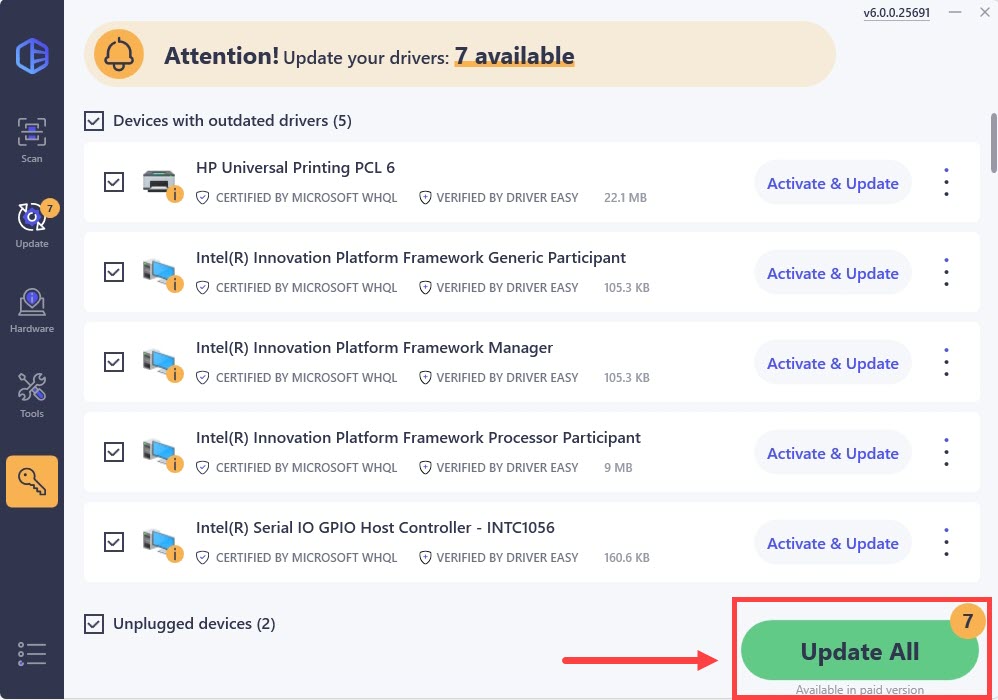
- Run Driver Easy and click Scan Now button. Driver Easy will then scan your computer and detect any outdated or faulty drivers.

- You may see a list of drivers that are missing or out-of-date. To update these drivers, you can start a 7-day free trial or upgrade to Driver Easy Pro. Either option will automatically download and install the latest device drivers for you.

- Once done, open Task Manager and check the Disk column to see if it shows a lower percentage. If yes, then congrats – you’ve fixed the high disk usage issue! If it’s still pegged at 100%, please proceed to Fix 3, below.

If you need assistance, please contact Driver Easy’s support team at support@drivereasy.com.
Fix 3: Perform a disk check
As many Windows users have discovered, running a disk check can often fix the 100% disk usage problem. This is because it systematically identifies and repairs file system errors or bad sectors on your hard drive that directly contribute to excessive disk activity.
Here’s how to perform the check:
- On your keyboard, press the Windows logo key, type command prompt, then when it pops up as a match, select Run as administrator.
- Click Yes at the User Account Control prompt.
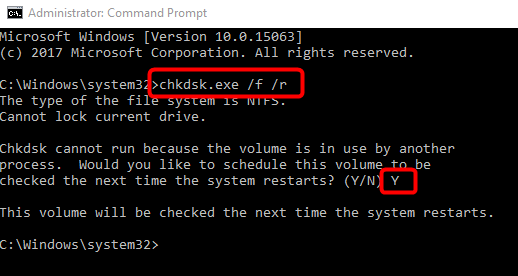
- The command prompt will once again display. Type chkdsk.exe /f /r, hit Enter, then type Y to confirm that you’d like to perform the disk check the next time you restart your computer. Please make sure you have closed all of your applications first.

IMPORTANT: Disk check will start the next time you boot your PC and it might take some time to complete (could be a day for some). If, when you restart, you don’t have time to wait for the disk check to complete, you can skip it. You’ll need to reschedule it again, as described above, though.
- Once the disk check is complete, reopen Task Manager to review your disk usage. If it has returned to a normal level, then you’re in the clear. If it’s still no joy, please continue with Fix 4, below.

Fix 4: Reset Virtual Memory
Virtual memory can be considered an extension of your computer’s physical memory. It’s a combination of RAM and a portion of your hard drive. When the RAM isn’t enough to perform a task, Windows will temporarily store files in virtual memory, then swap them back to RAM when required.
To reset virtual memory:
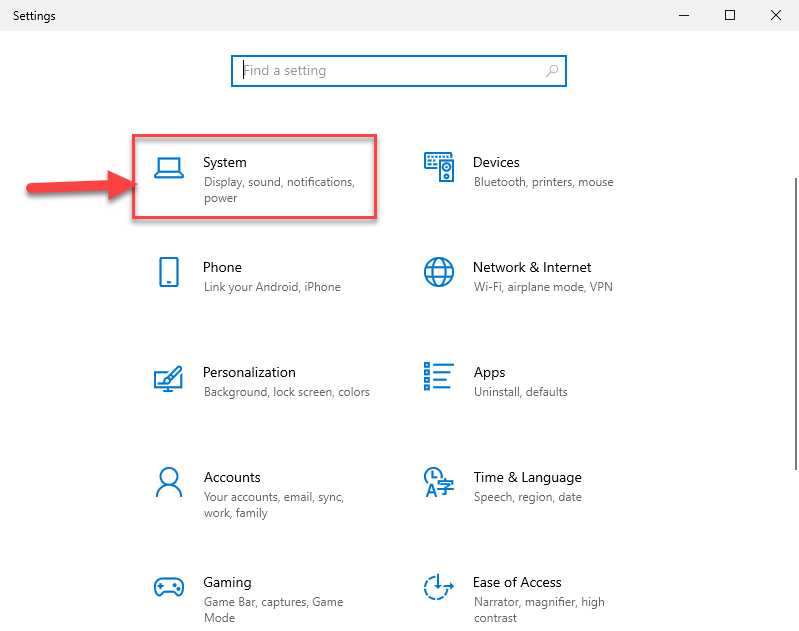
- On your keyboard, press the Windows logo key and I at the same time to open Windows Settings.
- Click System.

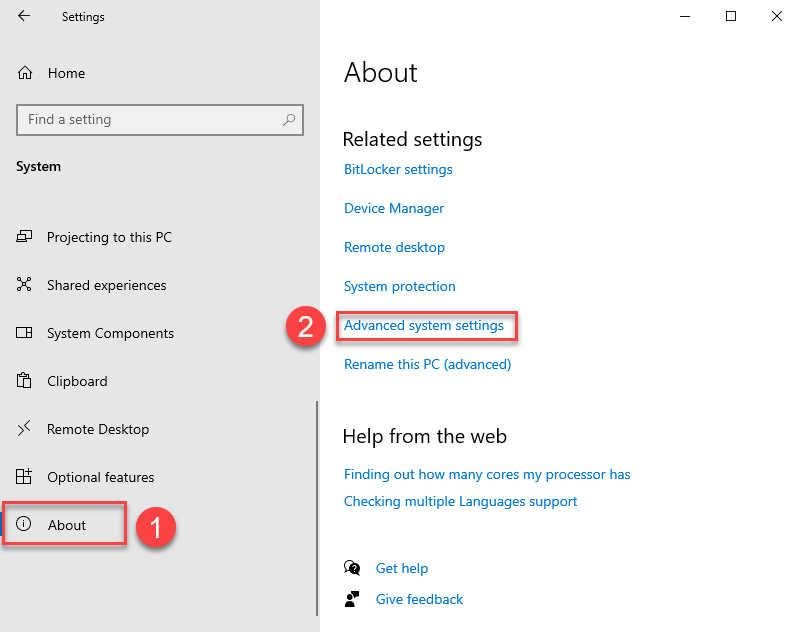
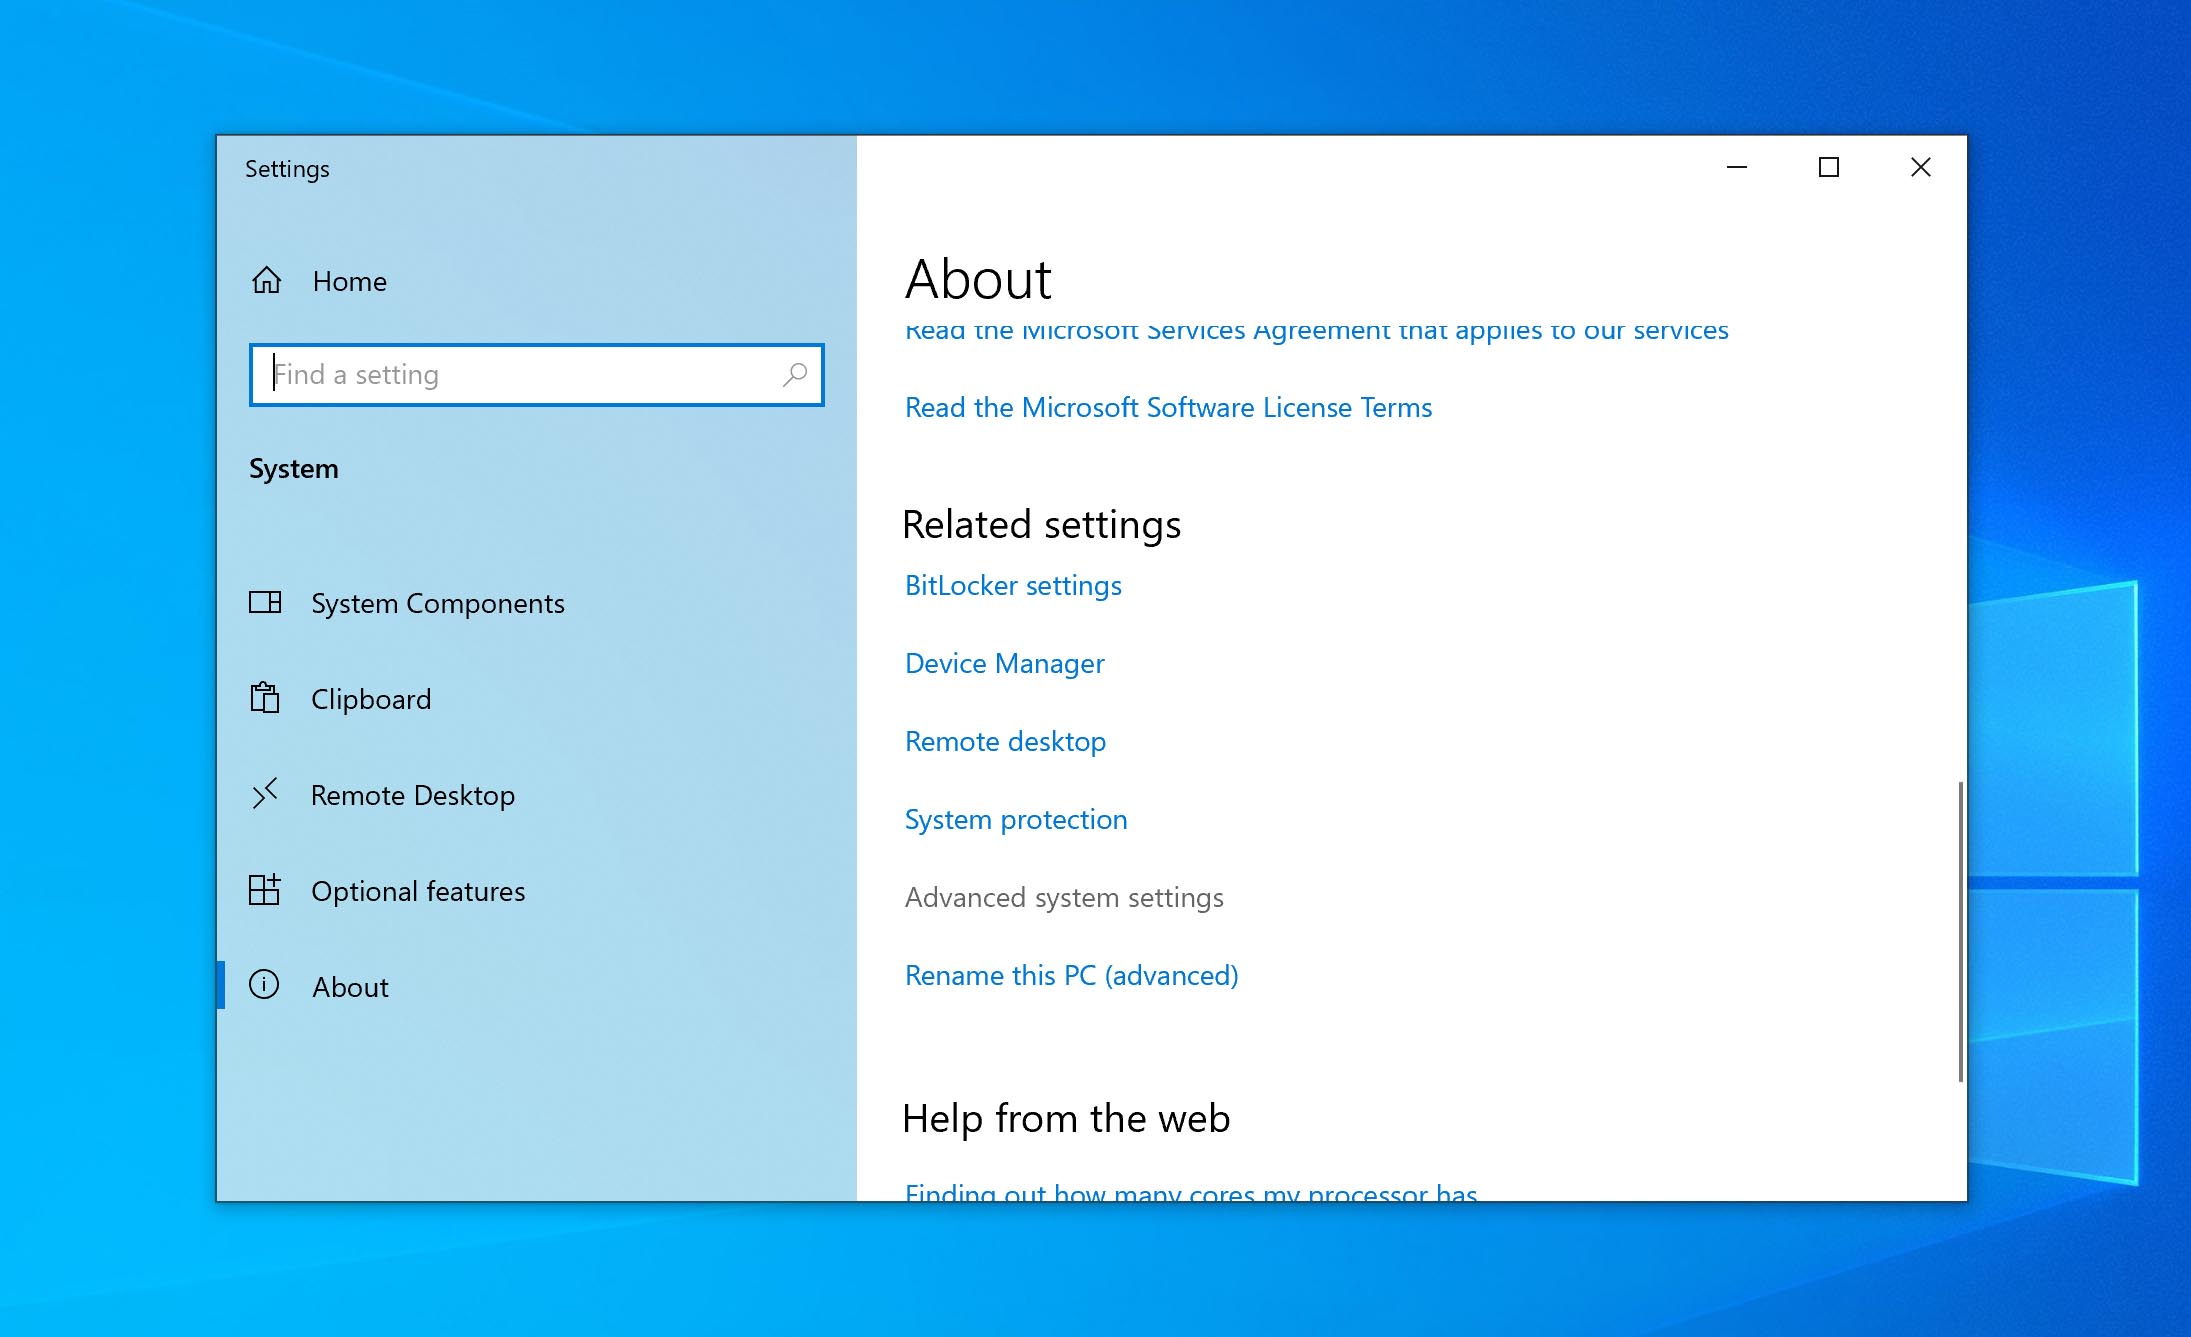
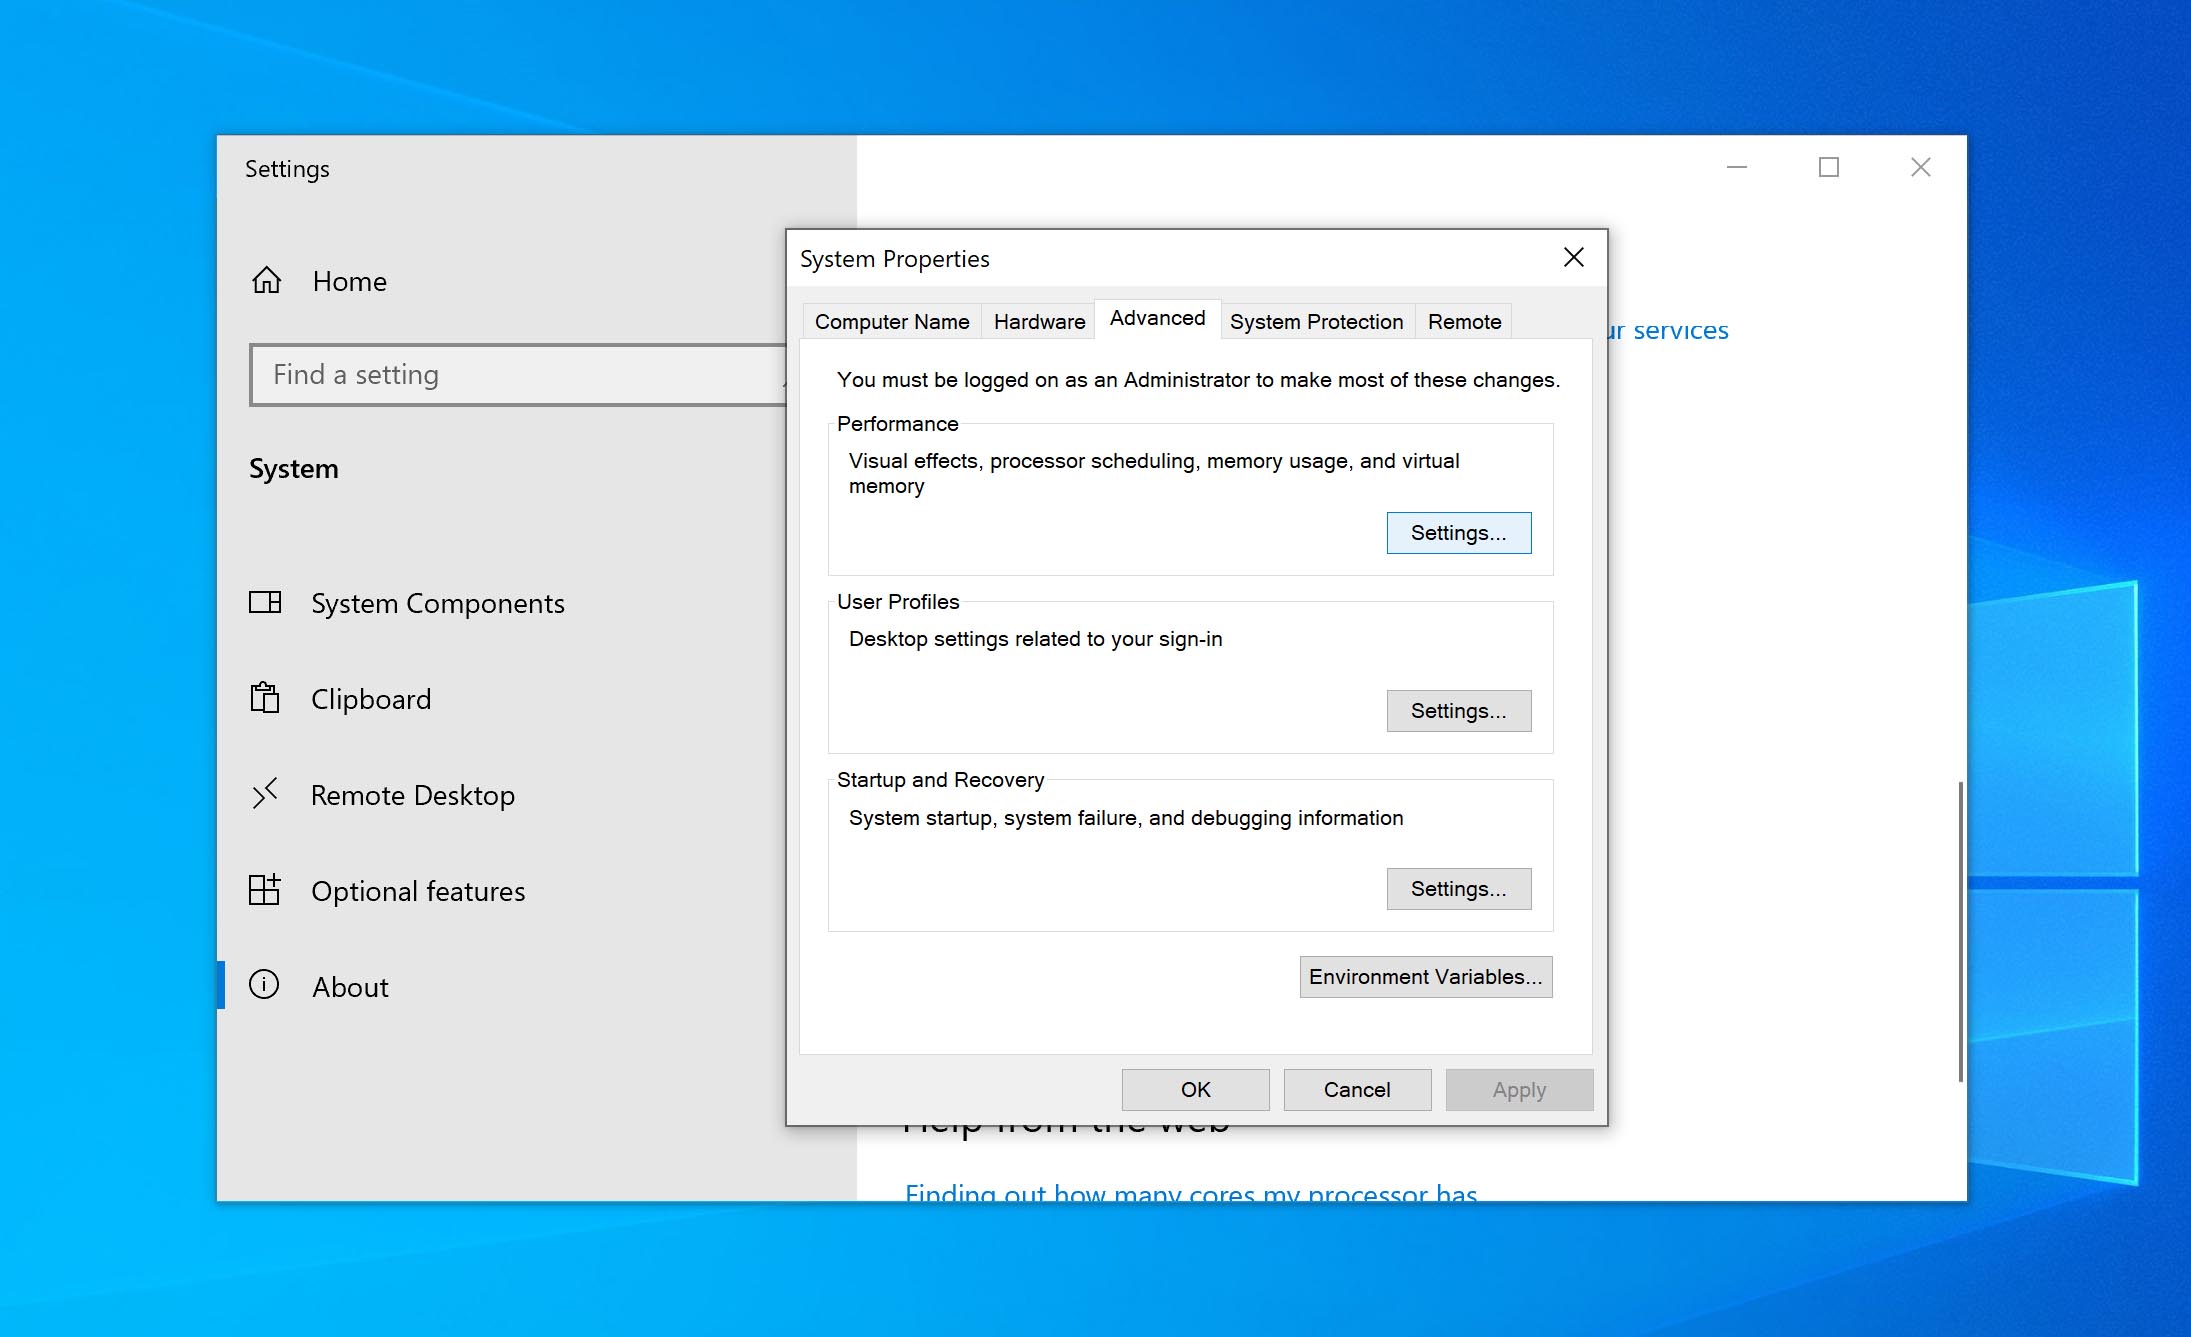
- Select About > Advanced system settings.

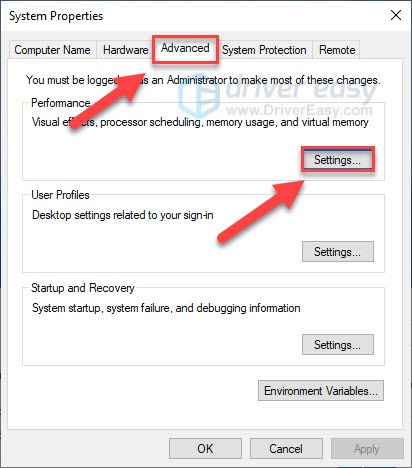
- Go to the Advanced tab, then click Settings.

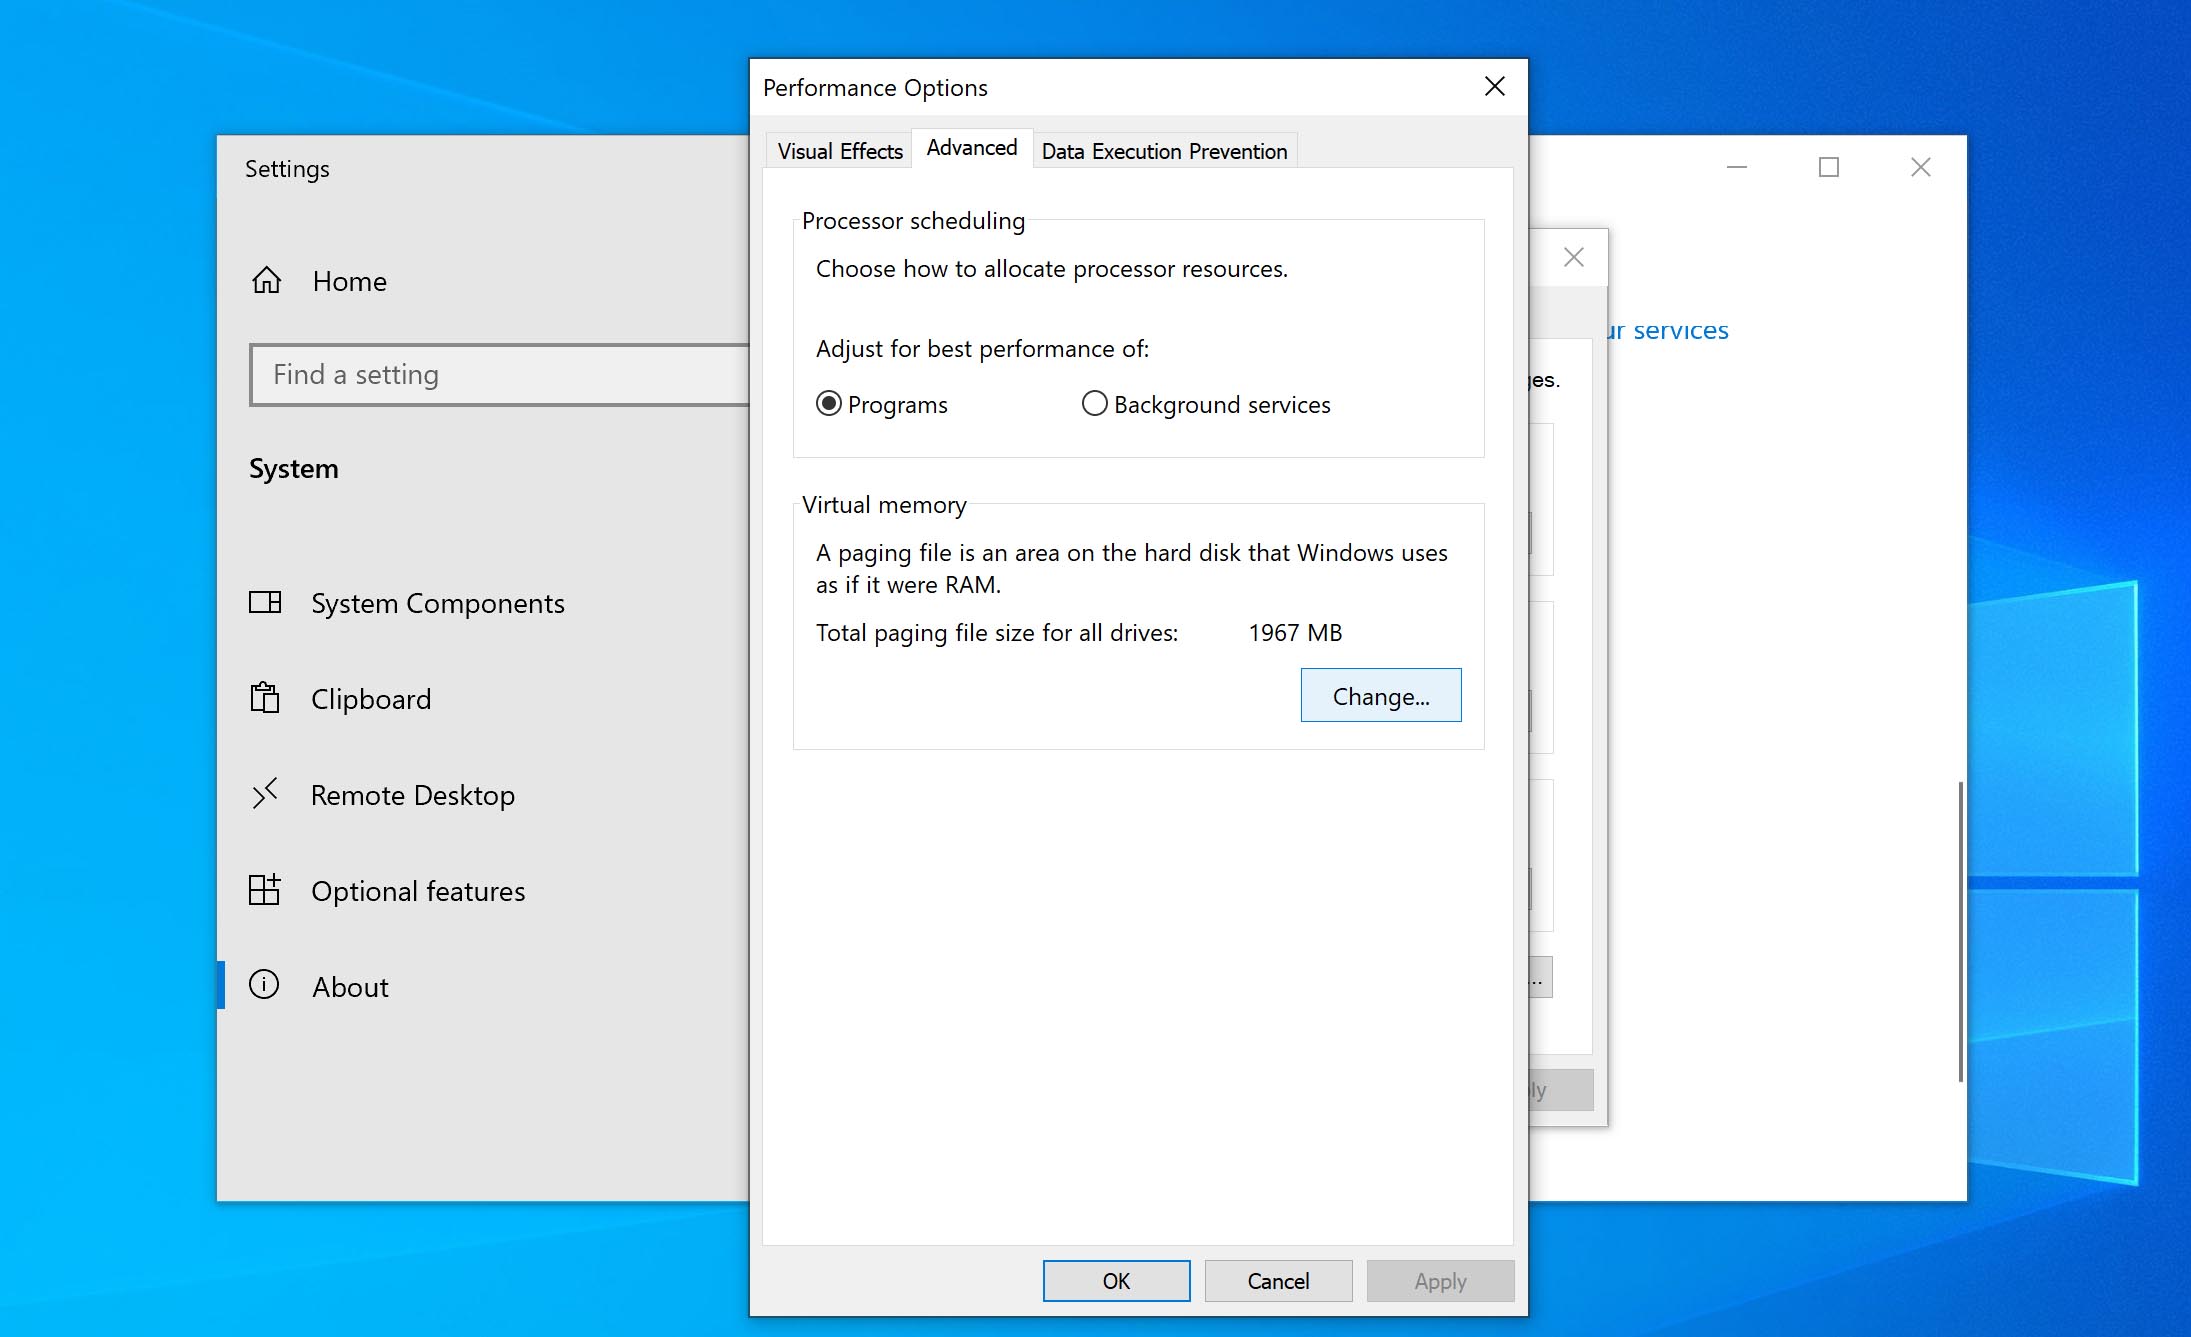
- Go to the Advanced tab again, and choose Change… in the Virtual memory section.
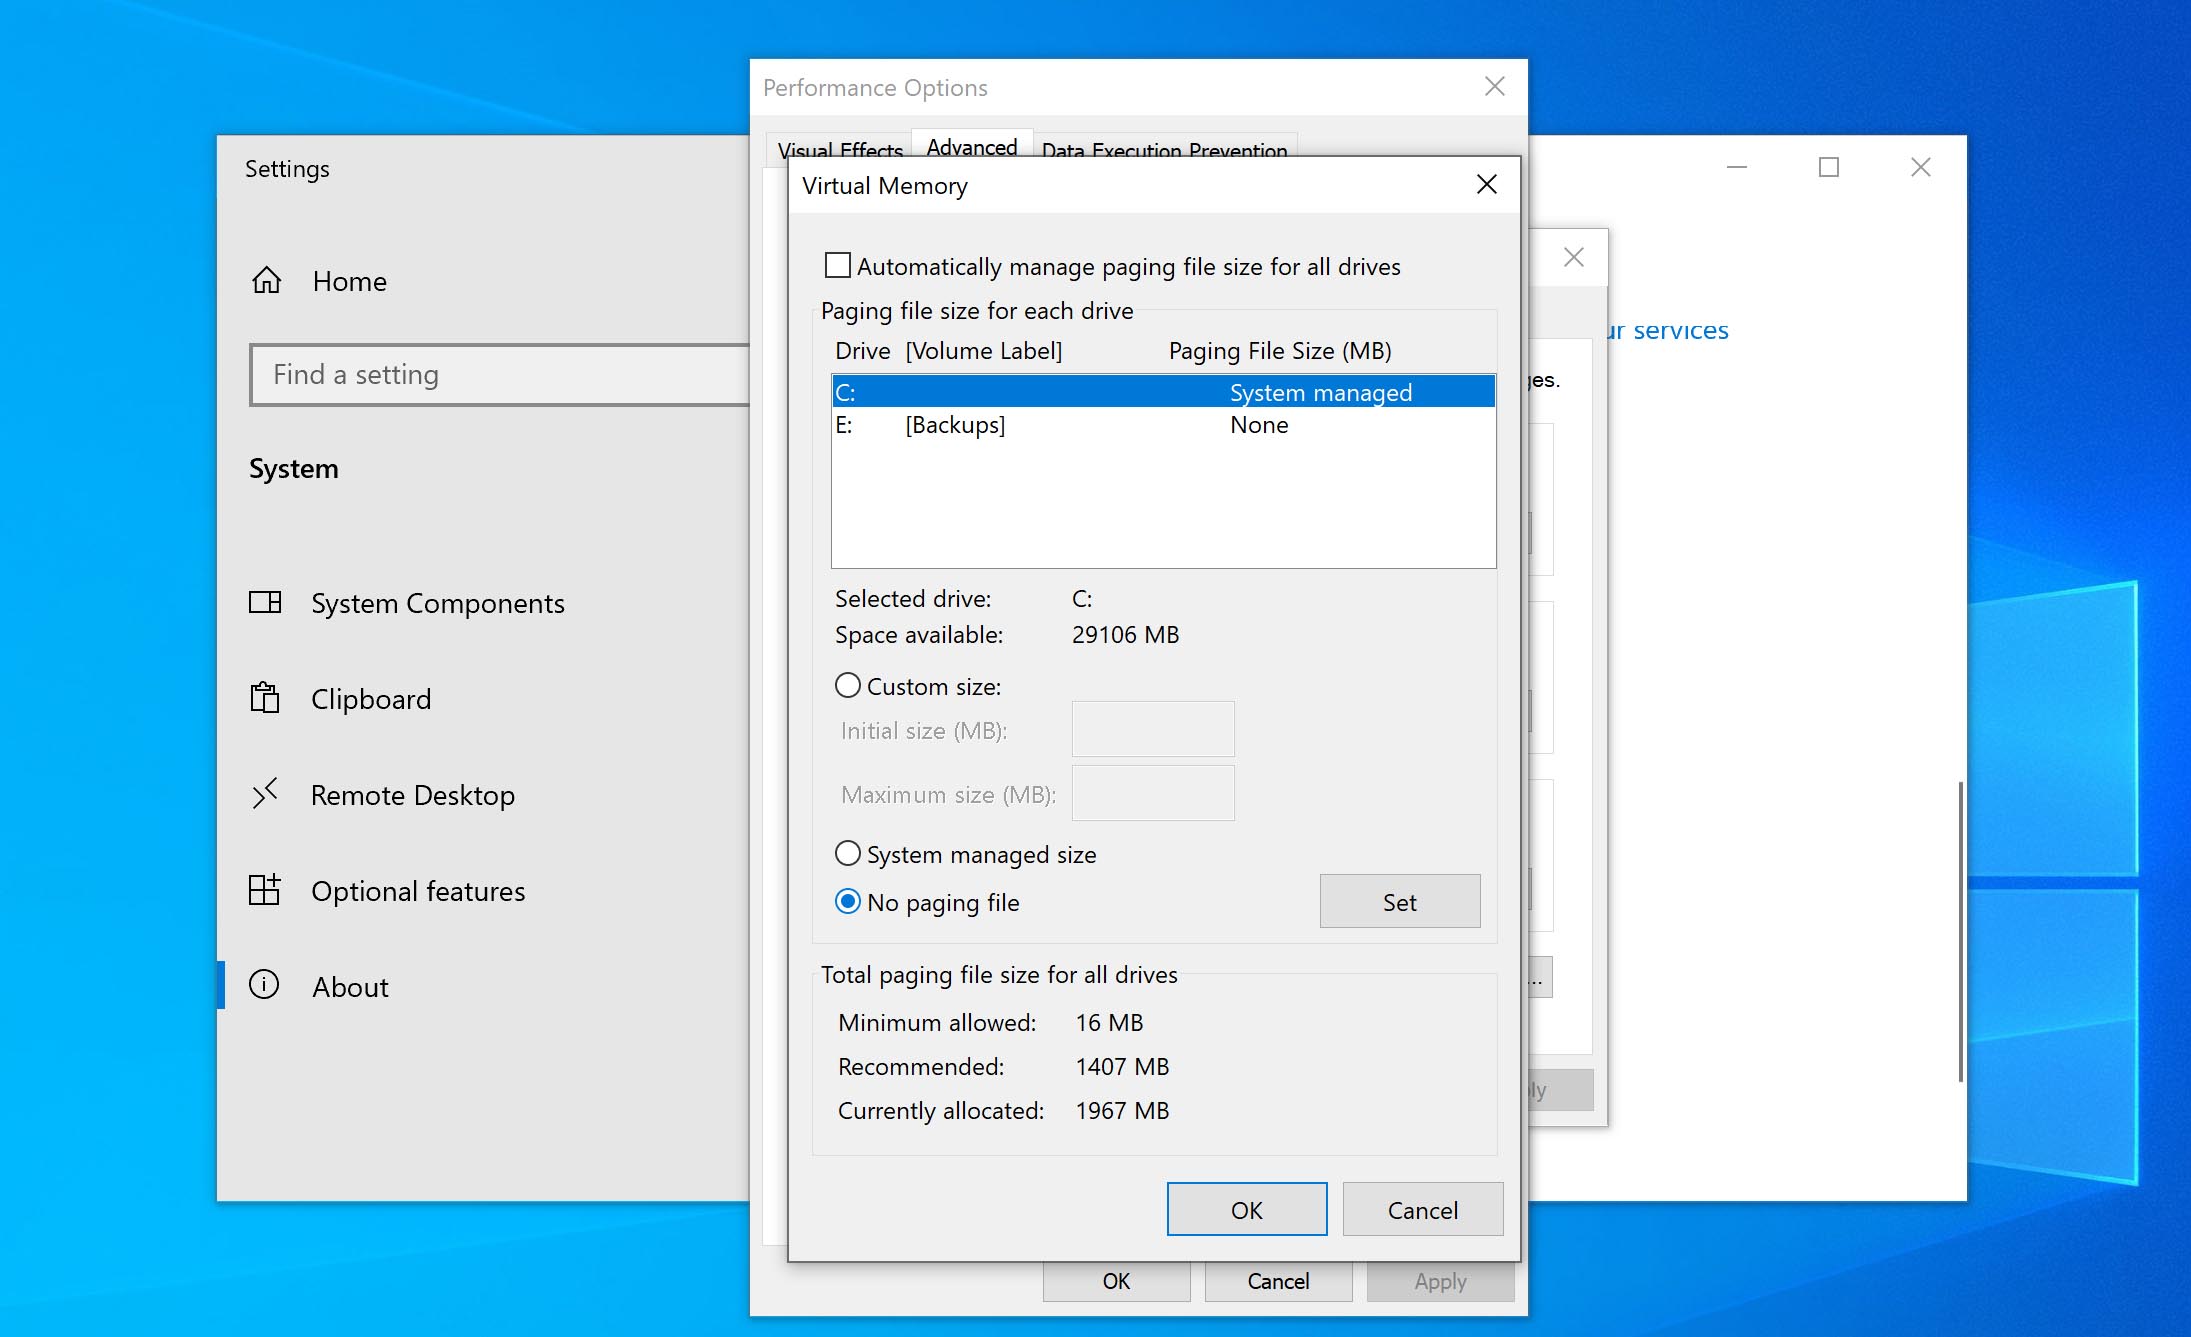
- Ensure the Automatically manage paging file size for all drives checkbox is NOT ticked.

- Select your Windows drive (the hard drive or partition that has Windows installed on it – usually C:), and enter an Initial size and Maximum size for your virtual memory:
- Initial size – This value varies, depending on your computer. If you’re not sure what value to use, just enter whatever the number is in the Recommended category.
- Maximum size – Don’t set this value too high. It should be about 1.5 times the size of your physical RAM. e.g. A PC with 4 GB (4096 MB) of RAM should have no more than about 6,144 MB virtual memory (4096 MB x 1.5).
- Once you’ve entered your virtual memory values, click Set, then click OK to continue.
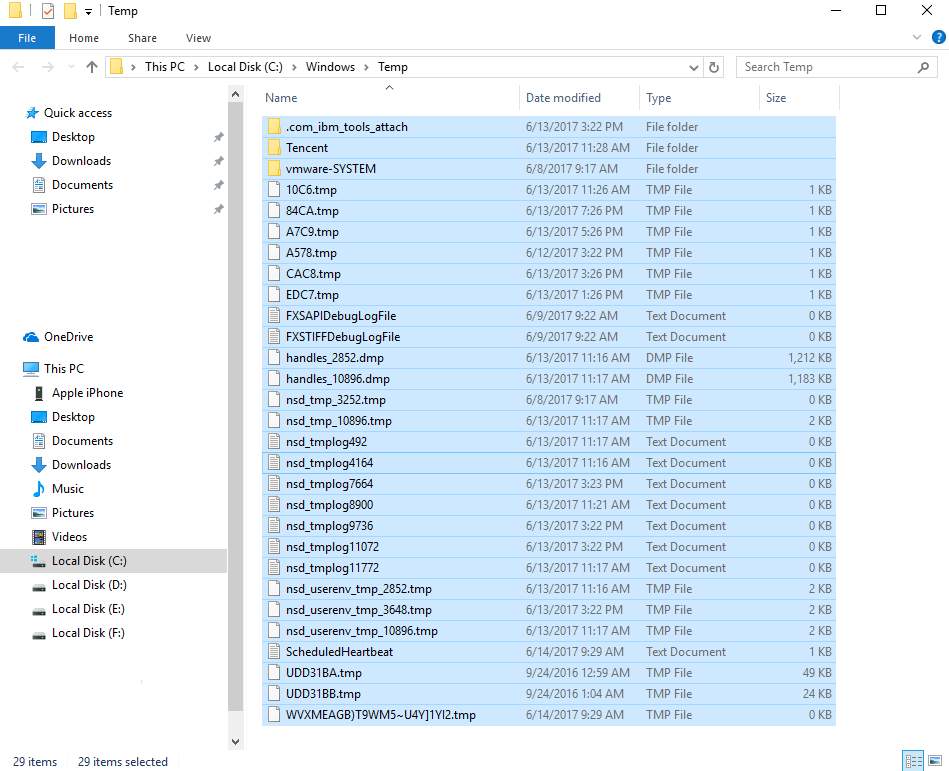
- Clear all the ‘temp’ files on your PC. On your keyboard, press Windows key and R at the same time, then in the Run form, type temp and hit Enter. This will invoke Windows Explorer with your Temp folder open, showing you all the temp files on your computer.
- Select all the files in the Temp folder and delete them.

- Launch Task Manager and review the Disk column under the Processes tab. If the usage has gone down, your issue is likely resolved. If disk usage remains unusually high, please move on to the next fix.
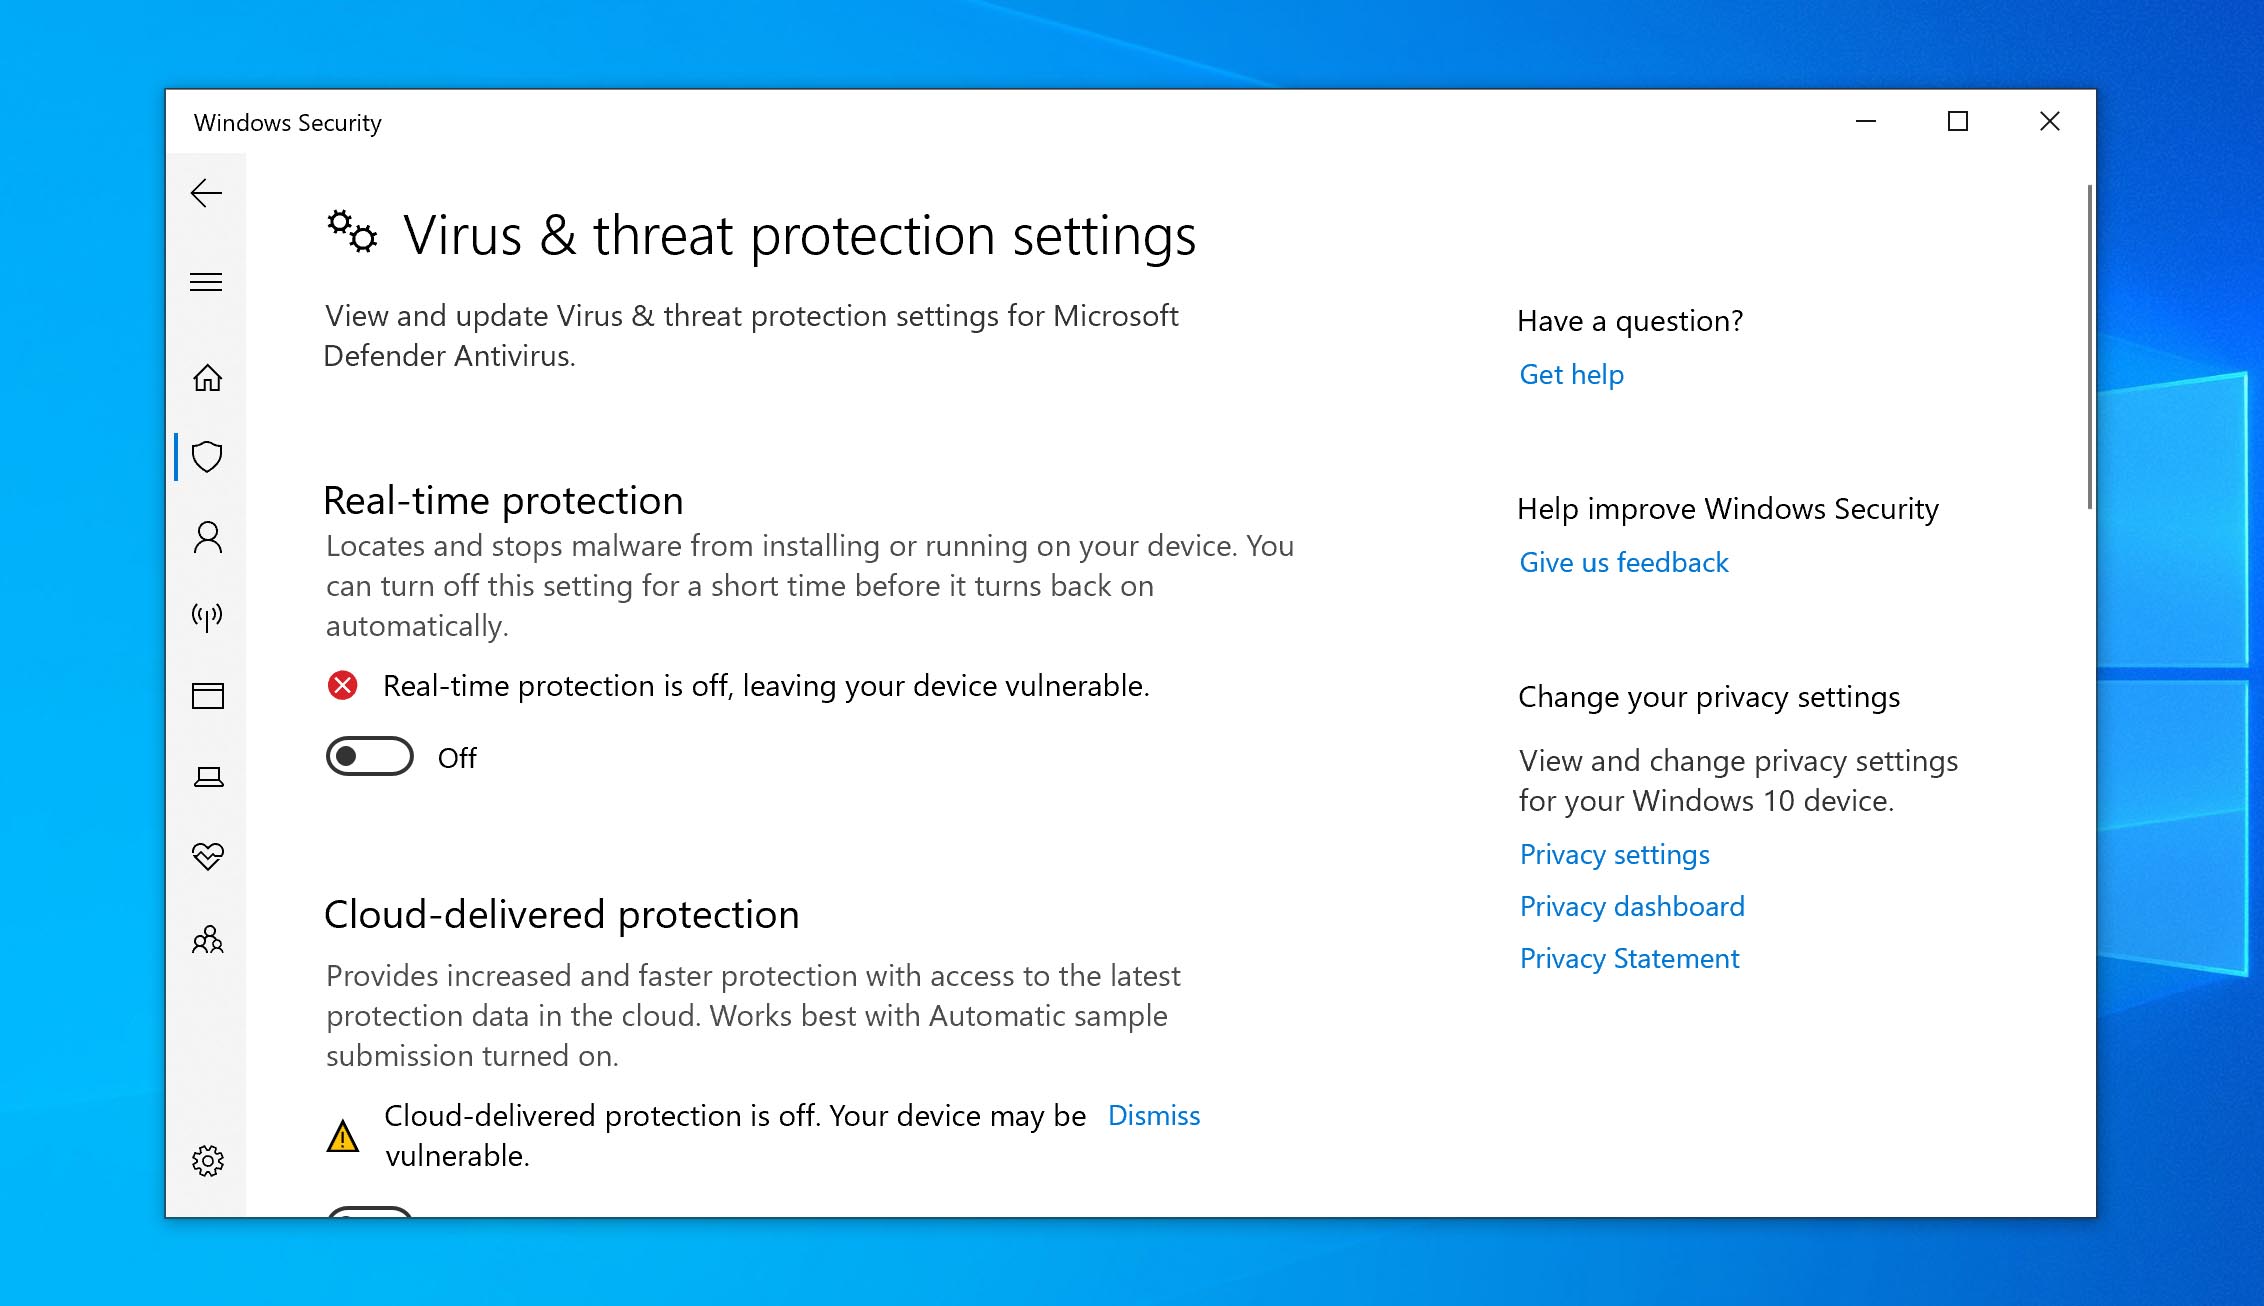
Fix 5: Disable Antivirus Software temporarily
If you’ve installed antivirus or anti-malware programs such as Norton, Kaspersky, AVG, Avast Behavior Shield or Malwarebytes, you should temporarily turn them off or disable them to see if they’re causing your disk usage problem.
Please see your antivirus software’s documentation to learn how to disable it. You might also find these links useful:
- How to temporarily turn off Norton Antivirus program?
- How to stop AVG temporarily?
- How to disable Avast temporarily?
Note that Microsoft has its own default anti-malware, Windows Defender. It’s automatically enabled even if you also have other antivirus applications installed. Even if you disable your other antivirus programs, Windows Defender is always there for you during that certain time range. So, no need to worry too much about temporarily turning your antivirus off.
Once you’ve disabled your antivirus, check your computer’s disk usage again. If the percentage is no longer maxed out, you’ve found the culprit, and you should contact the vendor of your antivirus software to see if they can provide some help.

If your disk usage is still high, please continue with Fix 6.
Fix 6: Update StorAHCI.sys Driver in Registry
Credit: Special thanks to our reader Javier for providing this fix, which has helped many users! 🙌
Some Advanced Host Controller Interface PCI-Express (AHCI PCIe) models running the inbox StorAHCI.sys driver may experience 100% disk usage due to a firmware bug. If this applies to your system, updating the driver settings can resolve the issue.
Here’s how to determine if this is the cause and fix it:
- Open Device Manager by pressing the Windows logo key and X at the same time to choose Device Manager.
- Expand the IDE ATA/ATAPI Controllers category, and double-click the AHCI controller.
- Go to the Driver tab and click Driver Details. If you can see storahci.sys stored in a path of system32 folder, then you are running the inbox AHCI driver.

- Close the Driver Details window and go to Details tab. From the drop-down menu, select Device Instance Path. Make note of the path, starting from VEN_.

- Type regedit in the search box of Start panel, then hit Enter on your keyboard to run Registry Editor. Then go to:
HKEY_LOCAL_MACHINE\System\CurrentControlSet\Enum\PCI\ <AHCI Controller>\<Random Number>\Device Parameters\Interrupt Management\MessageSignaledInterruptProperties
The <AHCI Controller> here refers to the name you see from step 2.
The <Random Number> differs on different machines.
- Double-click the MSISupported key and change the value to 0.

- Restart your computer to apply the change.
- Open Task Manager and check out your disk usage. If it has dropped from 100%, you’ve likely resolved the issue. If it’s still high, please proceed to Fix 7, below.

Fix 7: Check the health of your disk
If you’re still facing issues, it’s a good idea to check whether a hardware problem might be to blame. Thankfully, you don’t need to be a professional to check your disk’s health. Tools like HD Tune and CrystalDiskInfo make it easy to assess the condition of your drive.
Here’s how you can quickly check your disk’s health with HD Tune
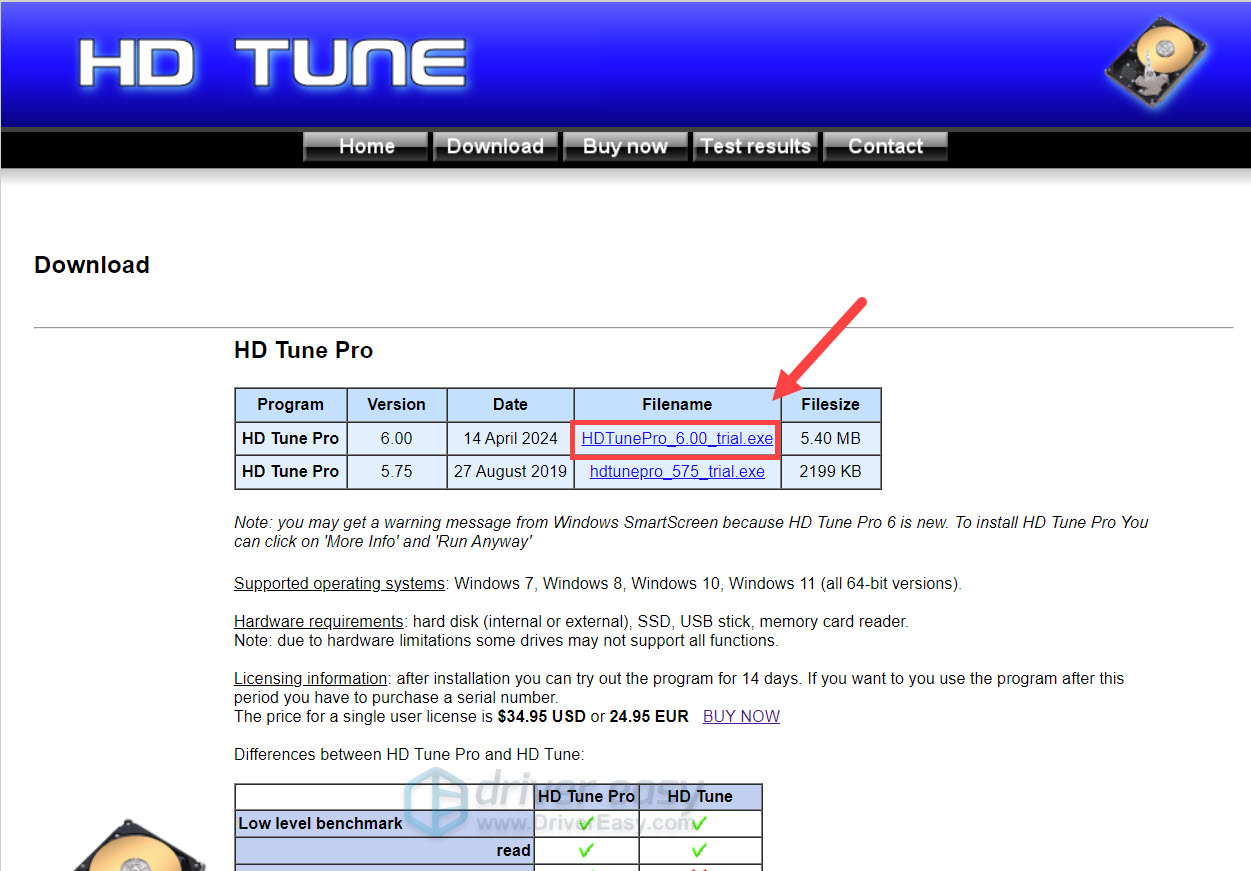
- Download and install the latest version of HD Tune.
(The trial version is enough for troubleshooting. You can get a license if you want to learn more about the disk’s performance.)
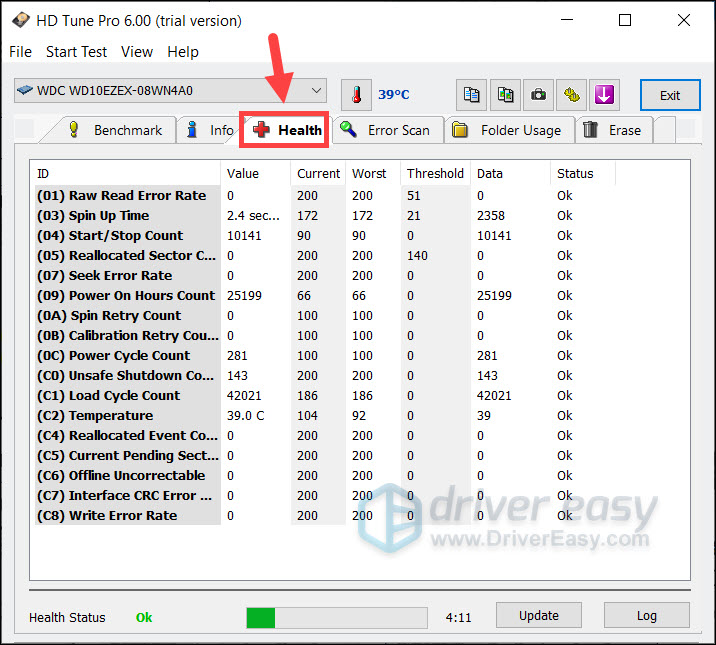
- Launch HD Tune. Select the Health tab.
Here you can see the S.M.A.R.T info of your disk. (S.M.A.R.T is a monitoring system providing a series of attributes or diagnostics for each disk model.) At this moment, you don’t need to figure out each entry’s meaning — simply check if there’s any one of them has a Status that is not “Ok“. If you see a warning, you may need to google the entry label and determine your next step.
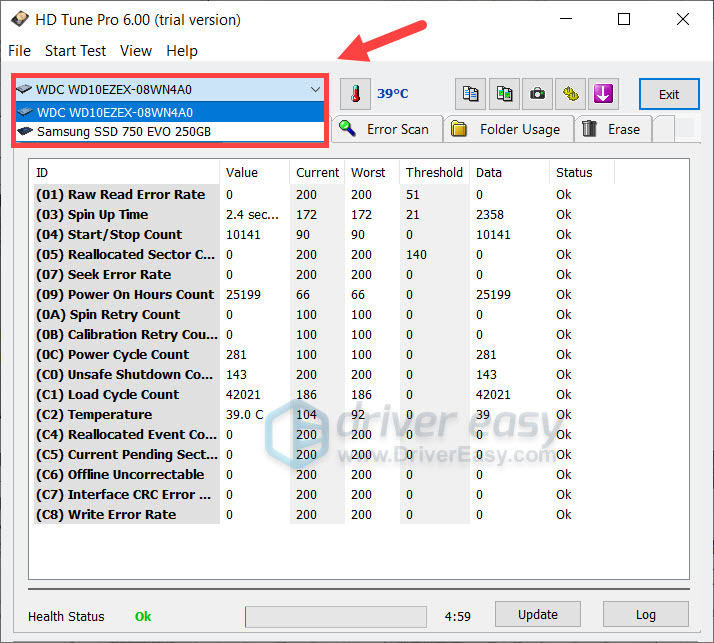
- On the top left corner, you can toggle the drop down menu to select the disk (if you have multiple). This will allow you to check the health of each disk.

You’d also need to check if the disk has bad blocks. Before you start, note that this process could take hours to complete. You may want to try other fixes before this one.
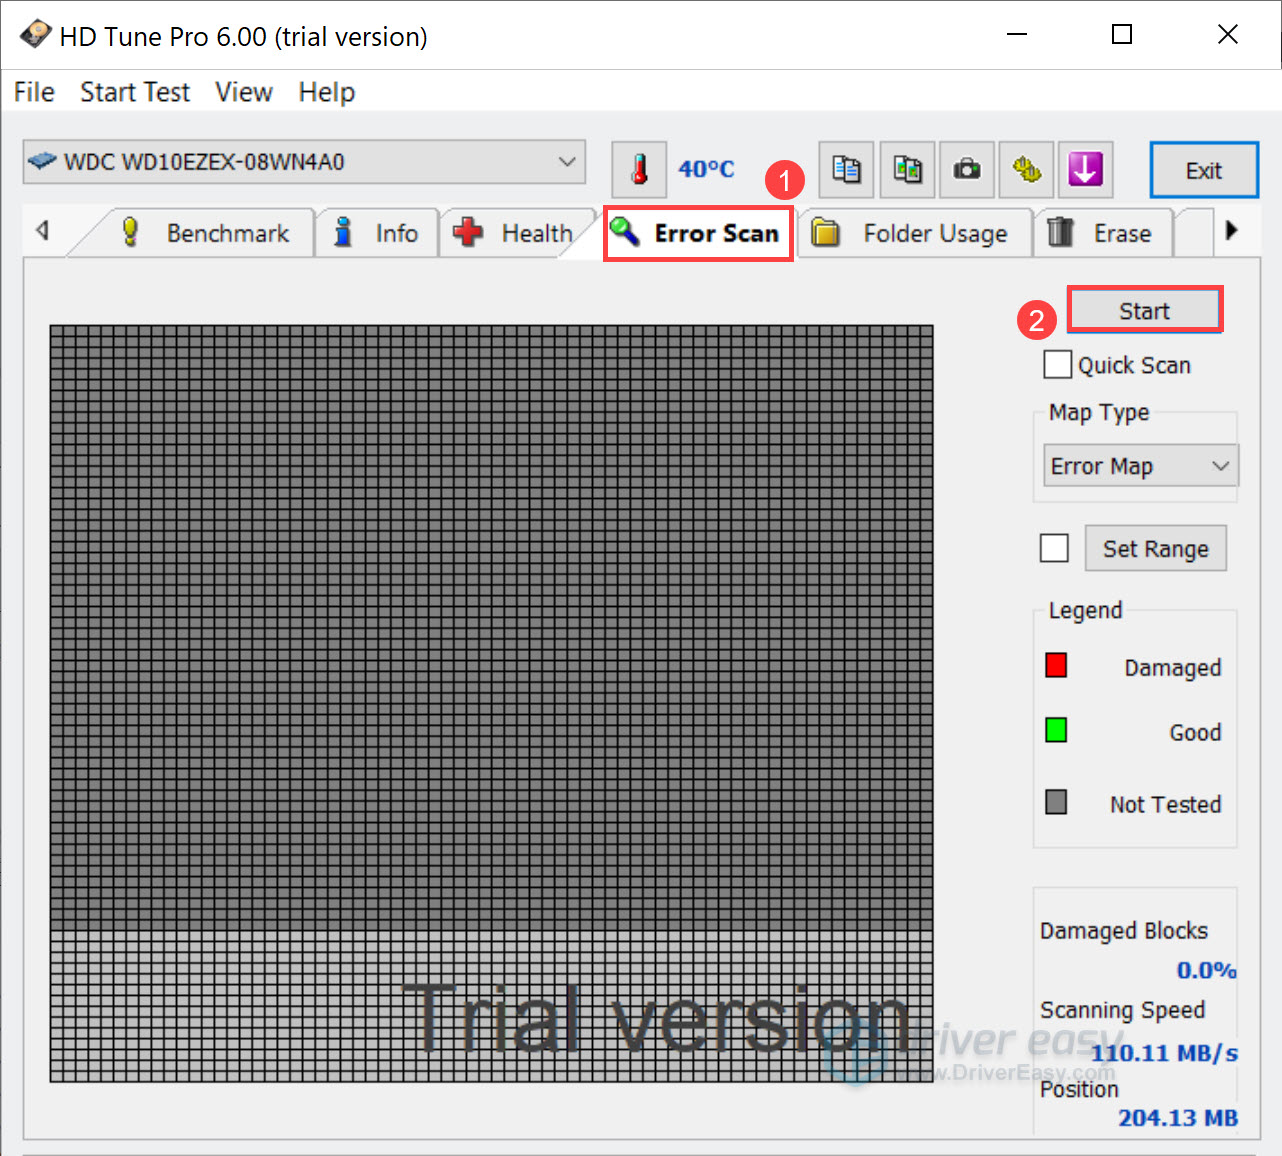
- In HD Tune, select the Error Scan tab. First make sure the Quick Scan checkbox is unchecked. Then click Start.

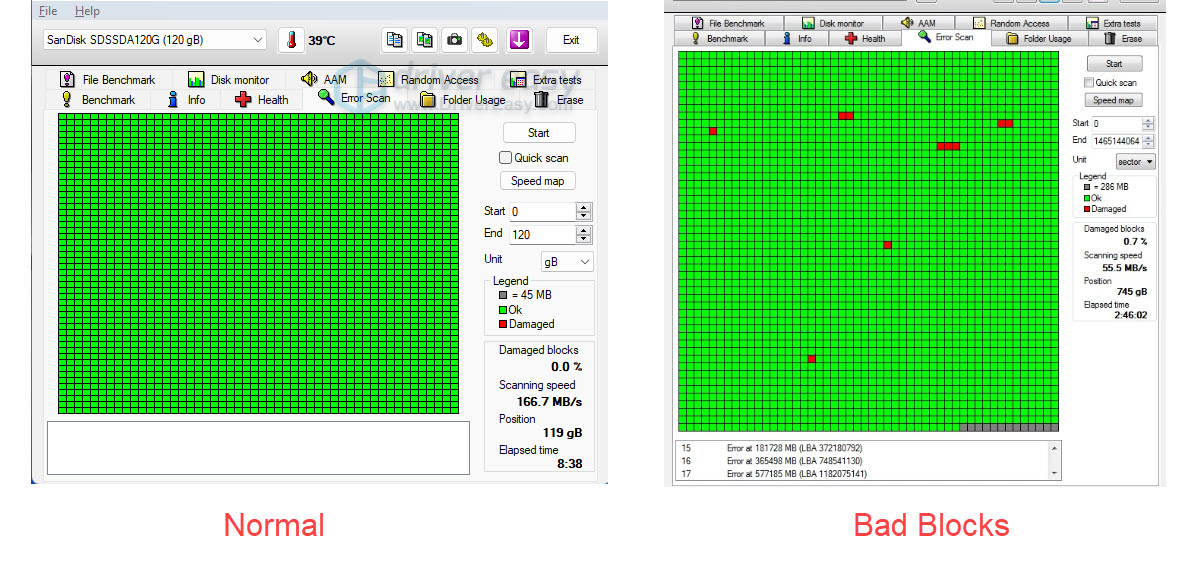
- Once it completes, check the graph and look for yellow or red blocks. If there are any red (damaged) blocks, you should consider backing up your data and replacing the faulty disk.

- Again, you can use the drop-down menu on the top left corner to scan different disks. It’s recommended you scan all the disks to make sure all your hard drives are in good condition.
Tips to secure your data: Hard drives have a limited lifespan and can fail unexpectedly. To protect against data loss, consider using free backup software like AOMEI Backupper to create a system image, especially if your disk contains critical data. This makes sure you’re prepared in case of failure.
Once complete, revisit Task Manager and check if the disk usage level has dropped to a normal range. If yes, then great! If it still hits 100%, please continue with Fix 8, below.
Fix 8: Change energy options
If you’re dealing with 100% disk usage, switching to the High Performance power plan is a proven fix that can make a difference. The High Performance power plan makes sure your PC runs at full capacity and potentially stops energy-saving settings that might slow down your hard drive.
Here is how to do it:
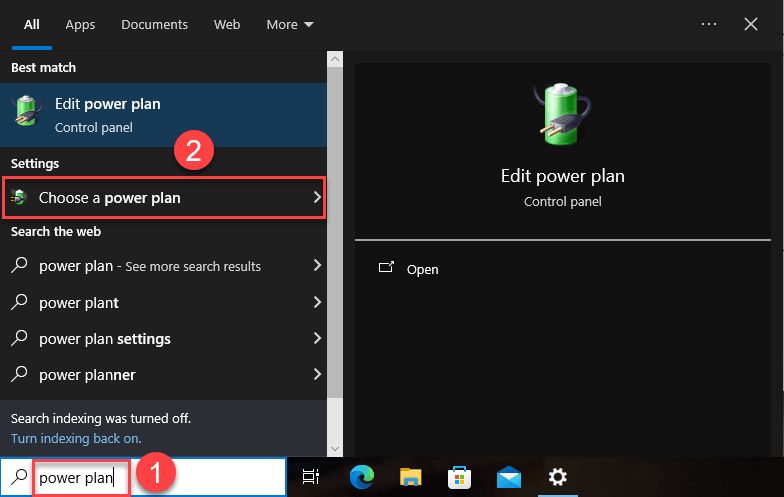
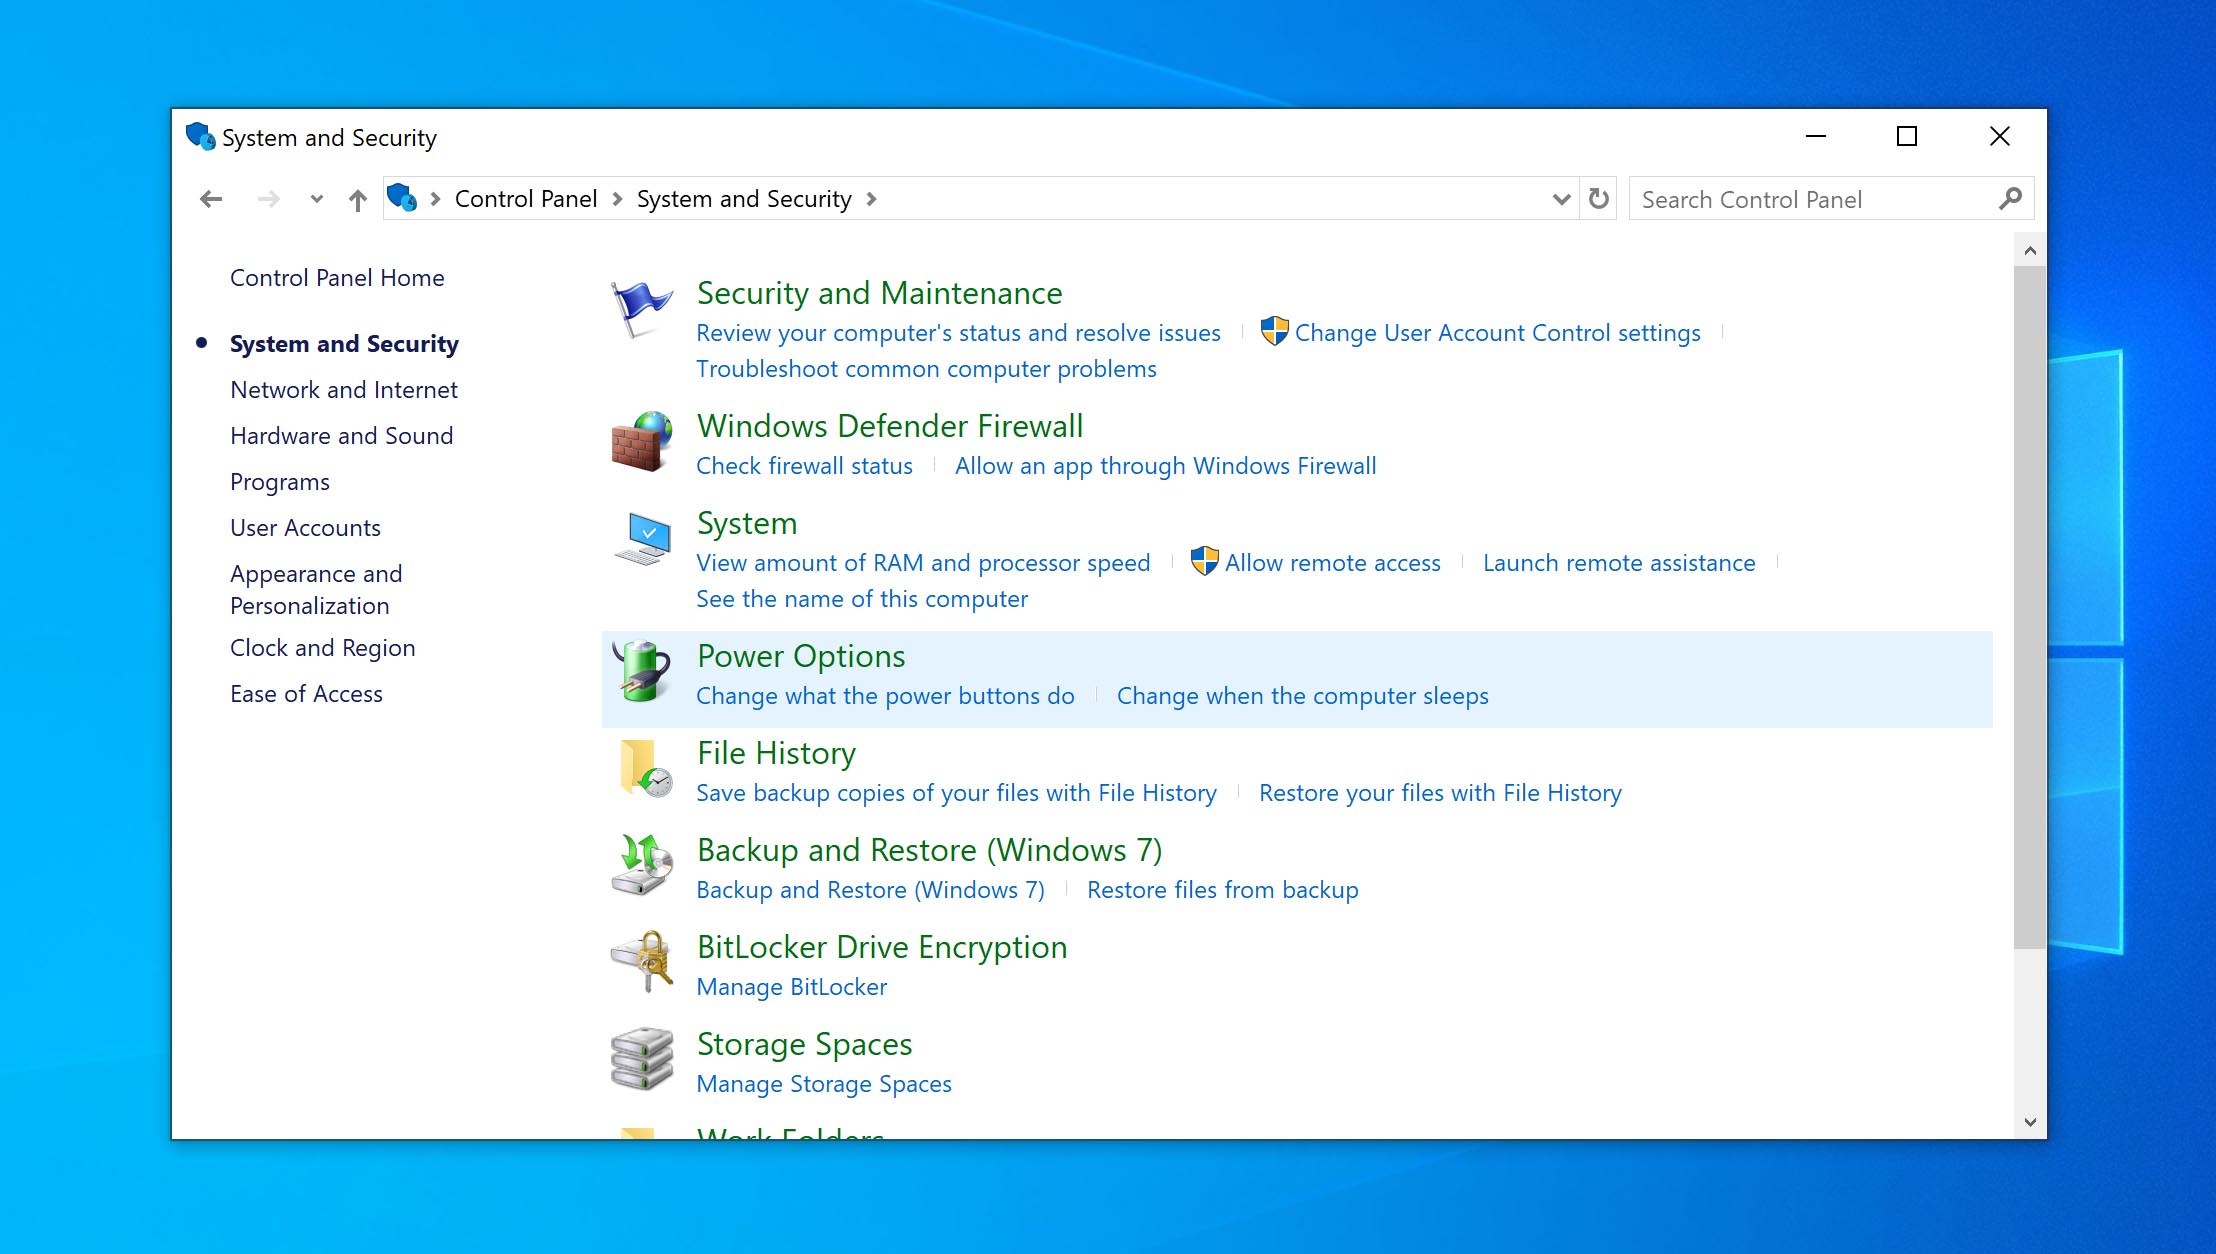
- On your keyboard, press the Windows logo key and type power plan. Then click on Choose a power plan when it pops up as a result.

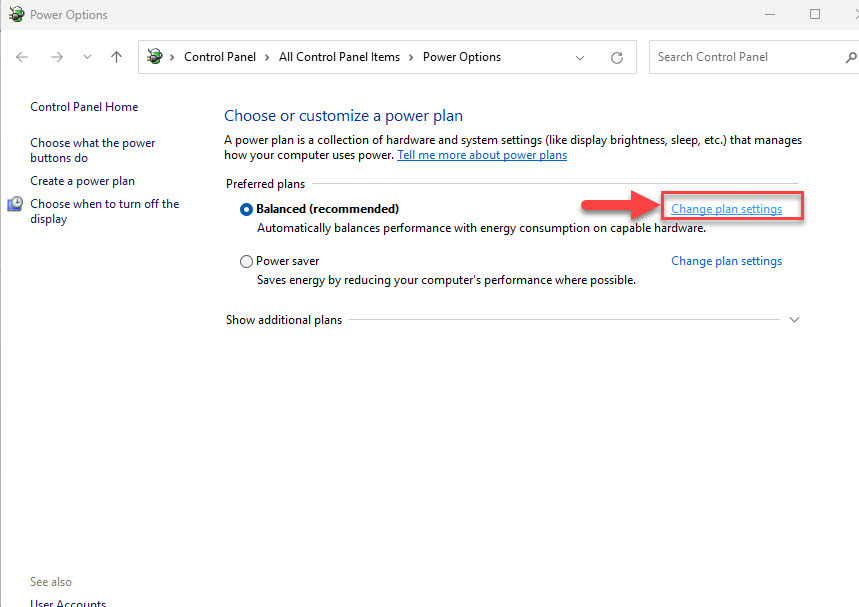
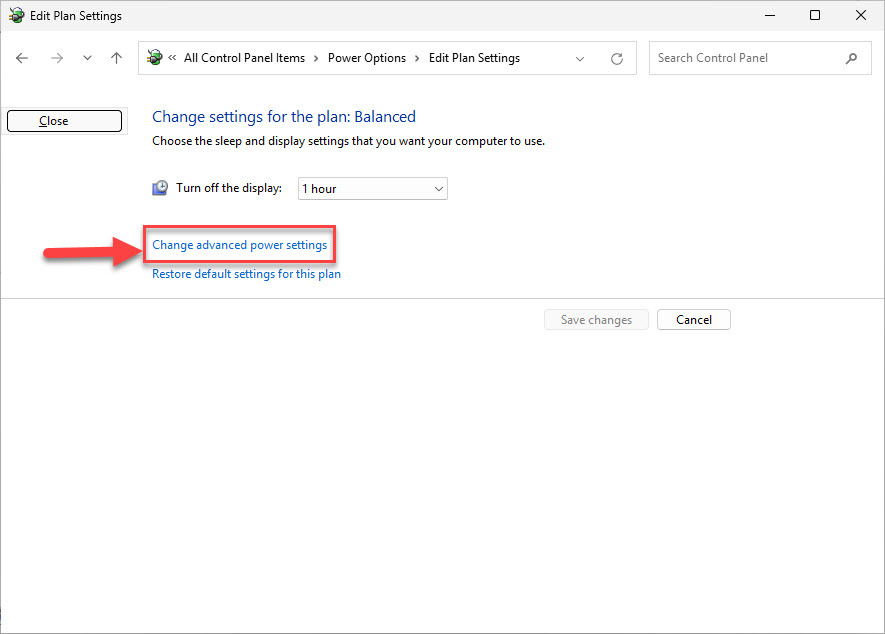
- In the Power Options window, click Change plan settings.

- Click Change advanced power settings.

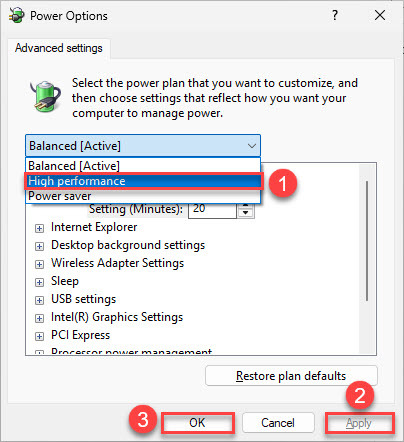
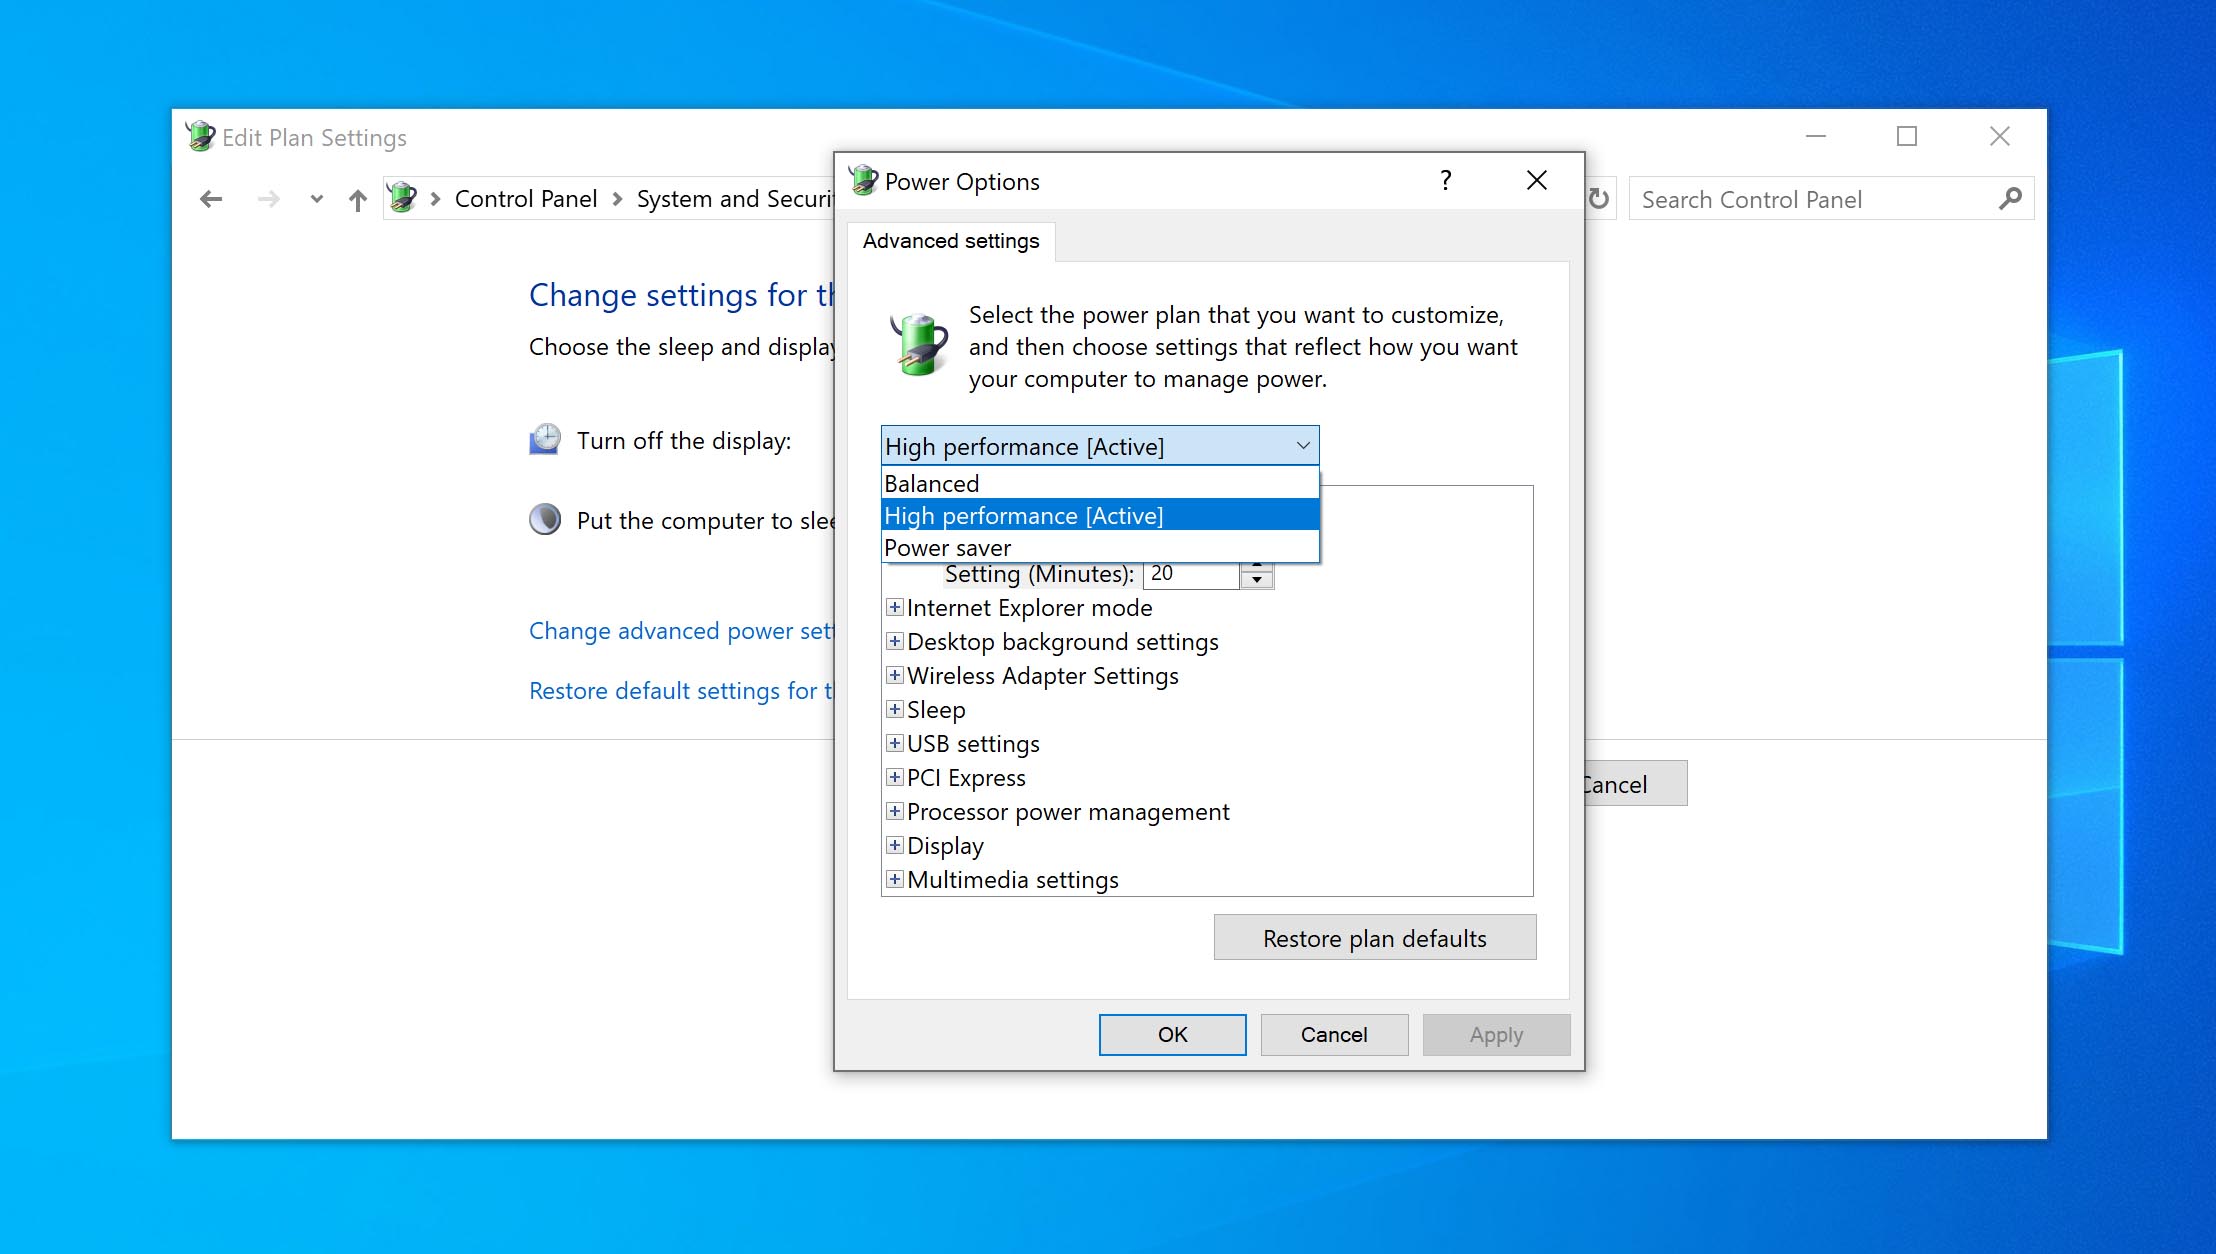
- In the Power Options window that pops up, select the High Performance power plan and then click Apply > OK.

- Check Task Manager to see if the disk usage has returned to normal.
Wrapping up
100% disk usage can slow your PC to a crawl, but with the right fixes, you can resolve the issue and get your system running smoothly again.
If you’re still stuck, consider reinstalling Windows or upgrading to an SSD for a serious speed boost. Also, regular maintenance—like clearing temp files and keeping drivers updated—can help keep disk issues from coming back.
Hope this guide helped! If you found any new fix that worked, please share it with us in the comments. We’d love to hear from you!
Have you been struggling with slow load times on your Windows 10 system, only to open Task Manager and discover that it’s reporting 100% disk usage? This can be normal in times when you’re performing disk-intensive tasks, but if you’re consistently seeing disk usage of 100% during idle periods, you’re going to be battling performance issues with everything you do.
The disk usage metric measures how much load the drive is under and what tasks are using the most resources. As with any component in your computer, there are limits to how fast the drive can work. The good news is that there are actions you can take to reduce the stress on your drive, making your experience faster and smoother. Here’s how you can resolve the problem of high disk usage on your Windows 10 system.
Way 1: Restart Your System
You know from experience that restarting your machine can often resolve all kinds of issues. Your Windows 10 100% disk usage problem is no exception. While taking this route may not help you find out the underlying reason for the problem, if it goes away, that may be sufficient for you.
Windows 10 is constantly running programs, services, and other processes in the background as part of normal operation. The reason why we recommend doing a “Restart” is because these programs and processes can get stalled at some point. Rebooting your system can be enough to return them to a working state.
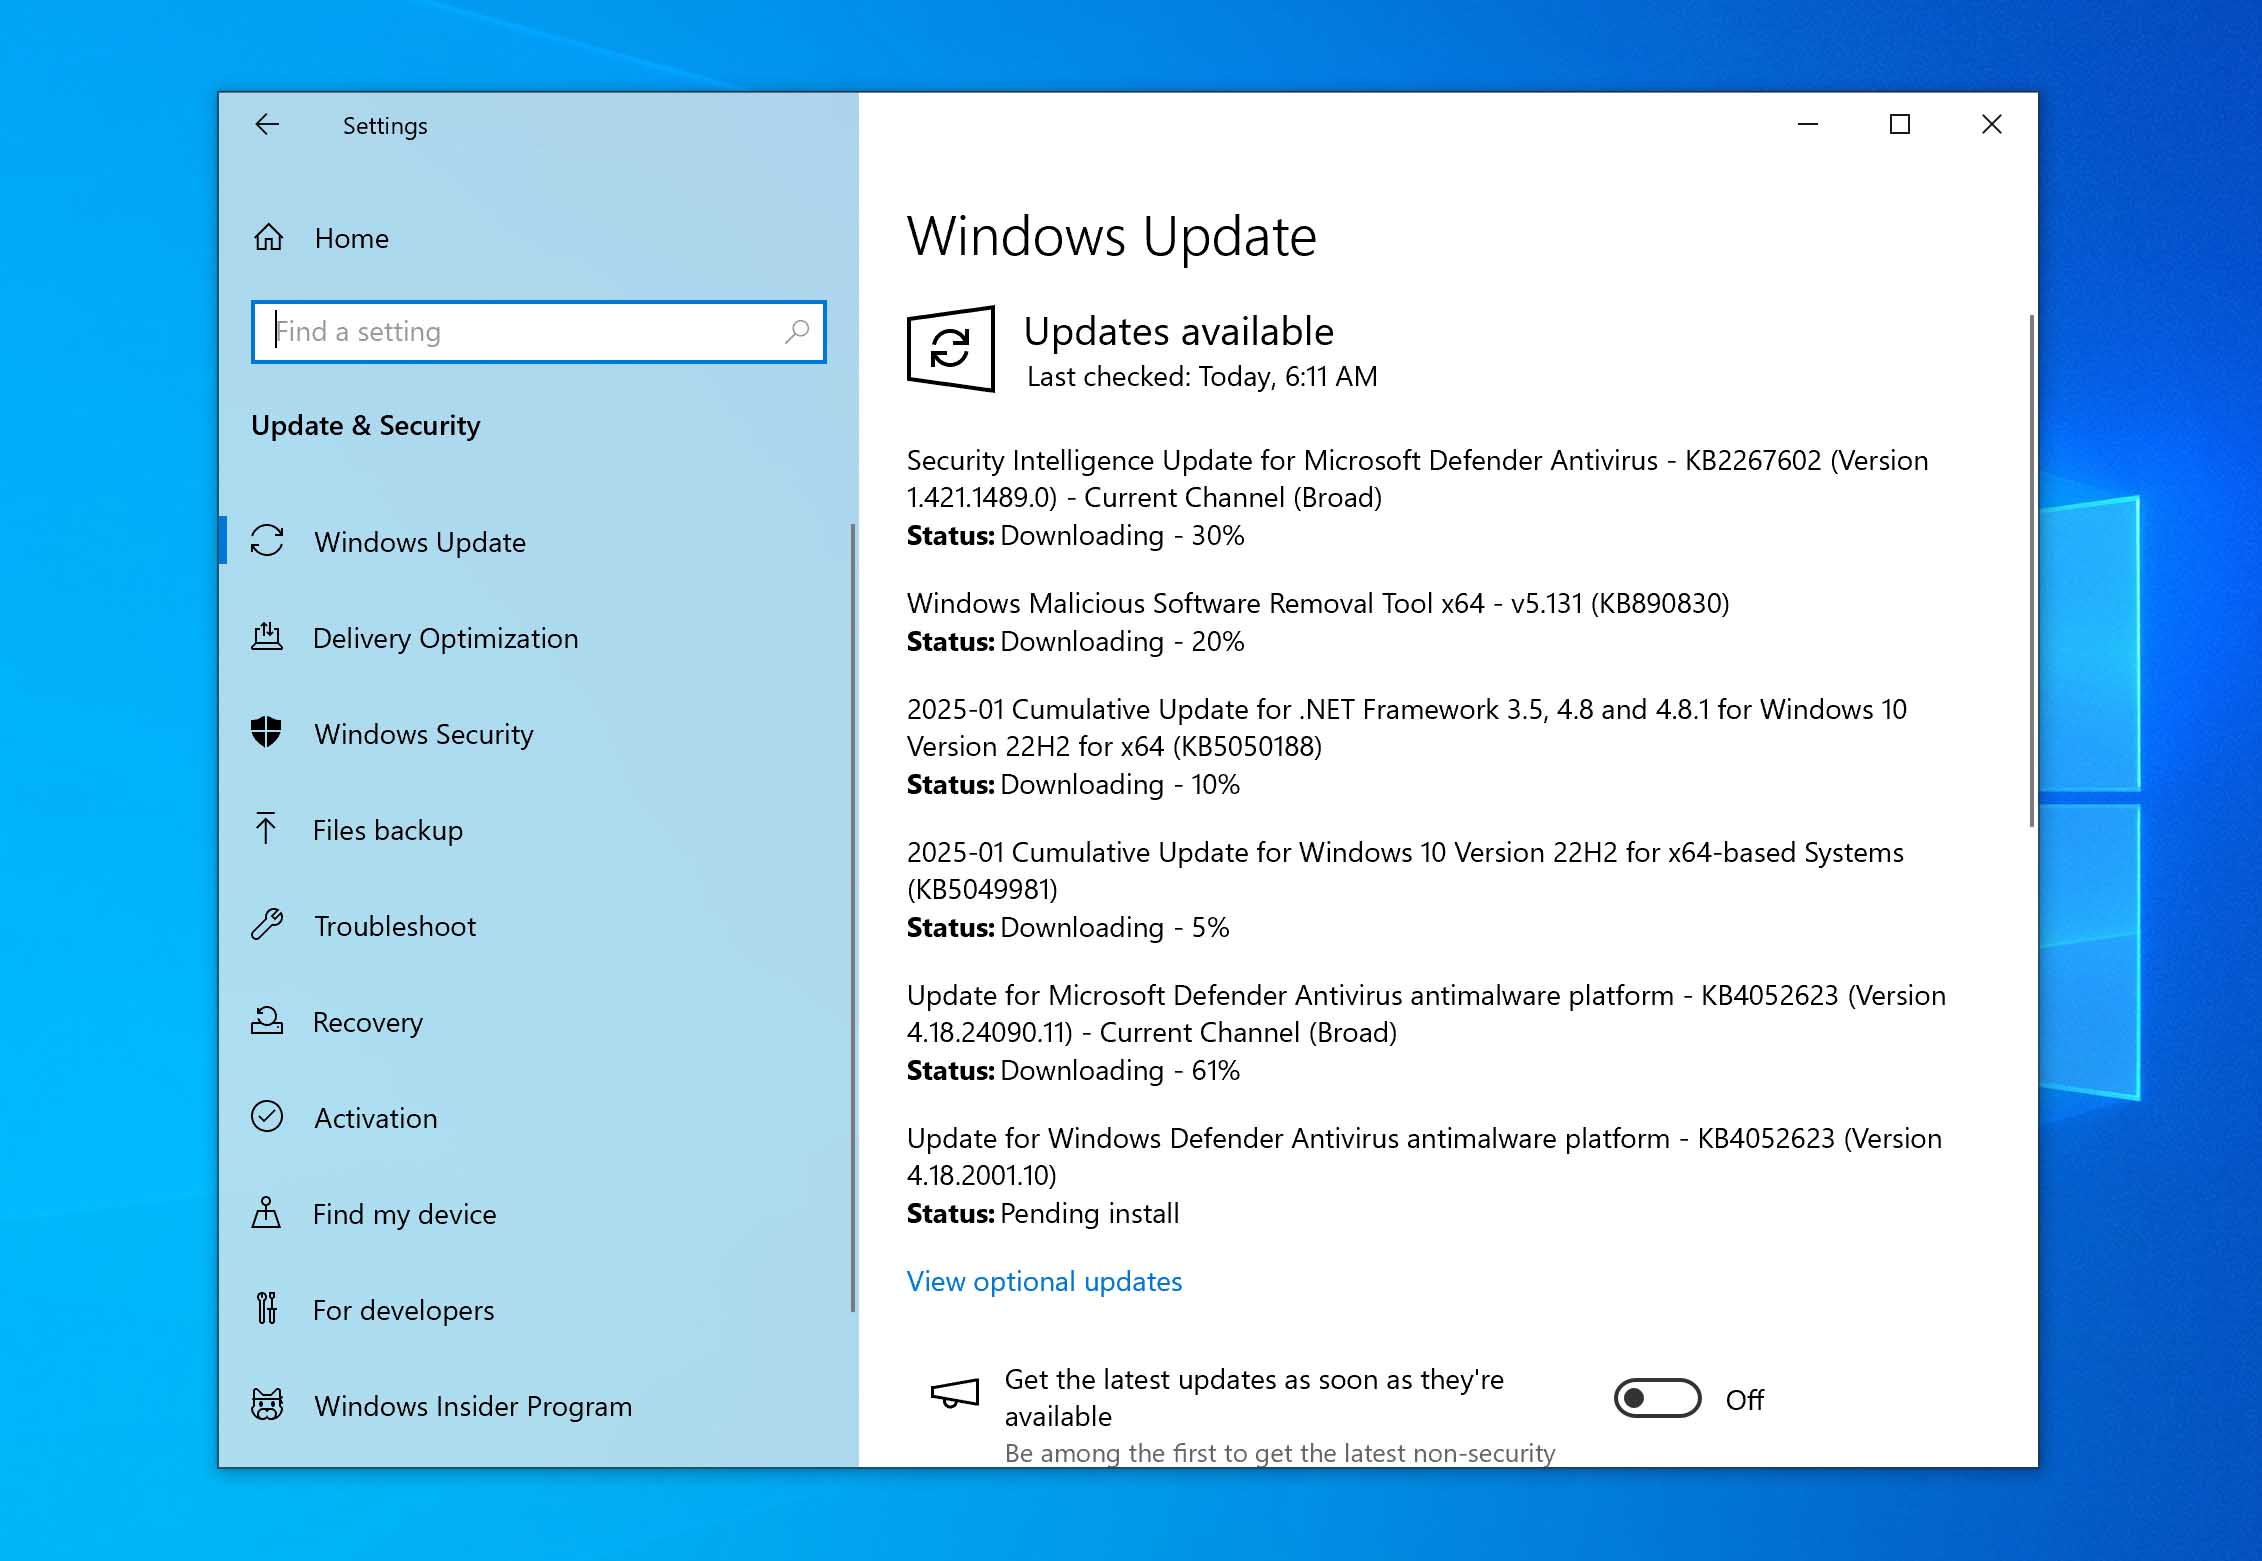
Way 2: Update Windows
Installing the latest updates can often resolve mysterious problems with your Windows 10 system. Additionally, updates that have been automatically downloaded will remain in standby mode until they’re installed, consuming additional resources and putting more load on the disk.
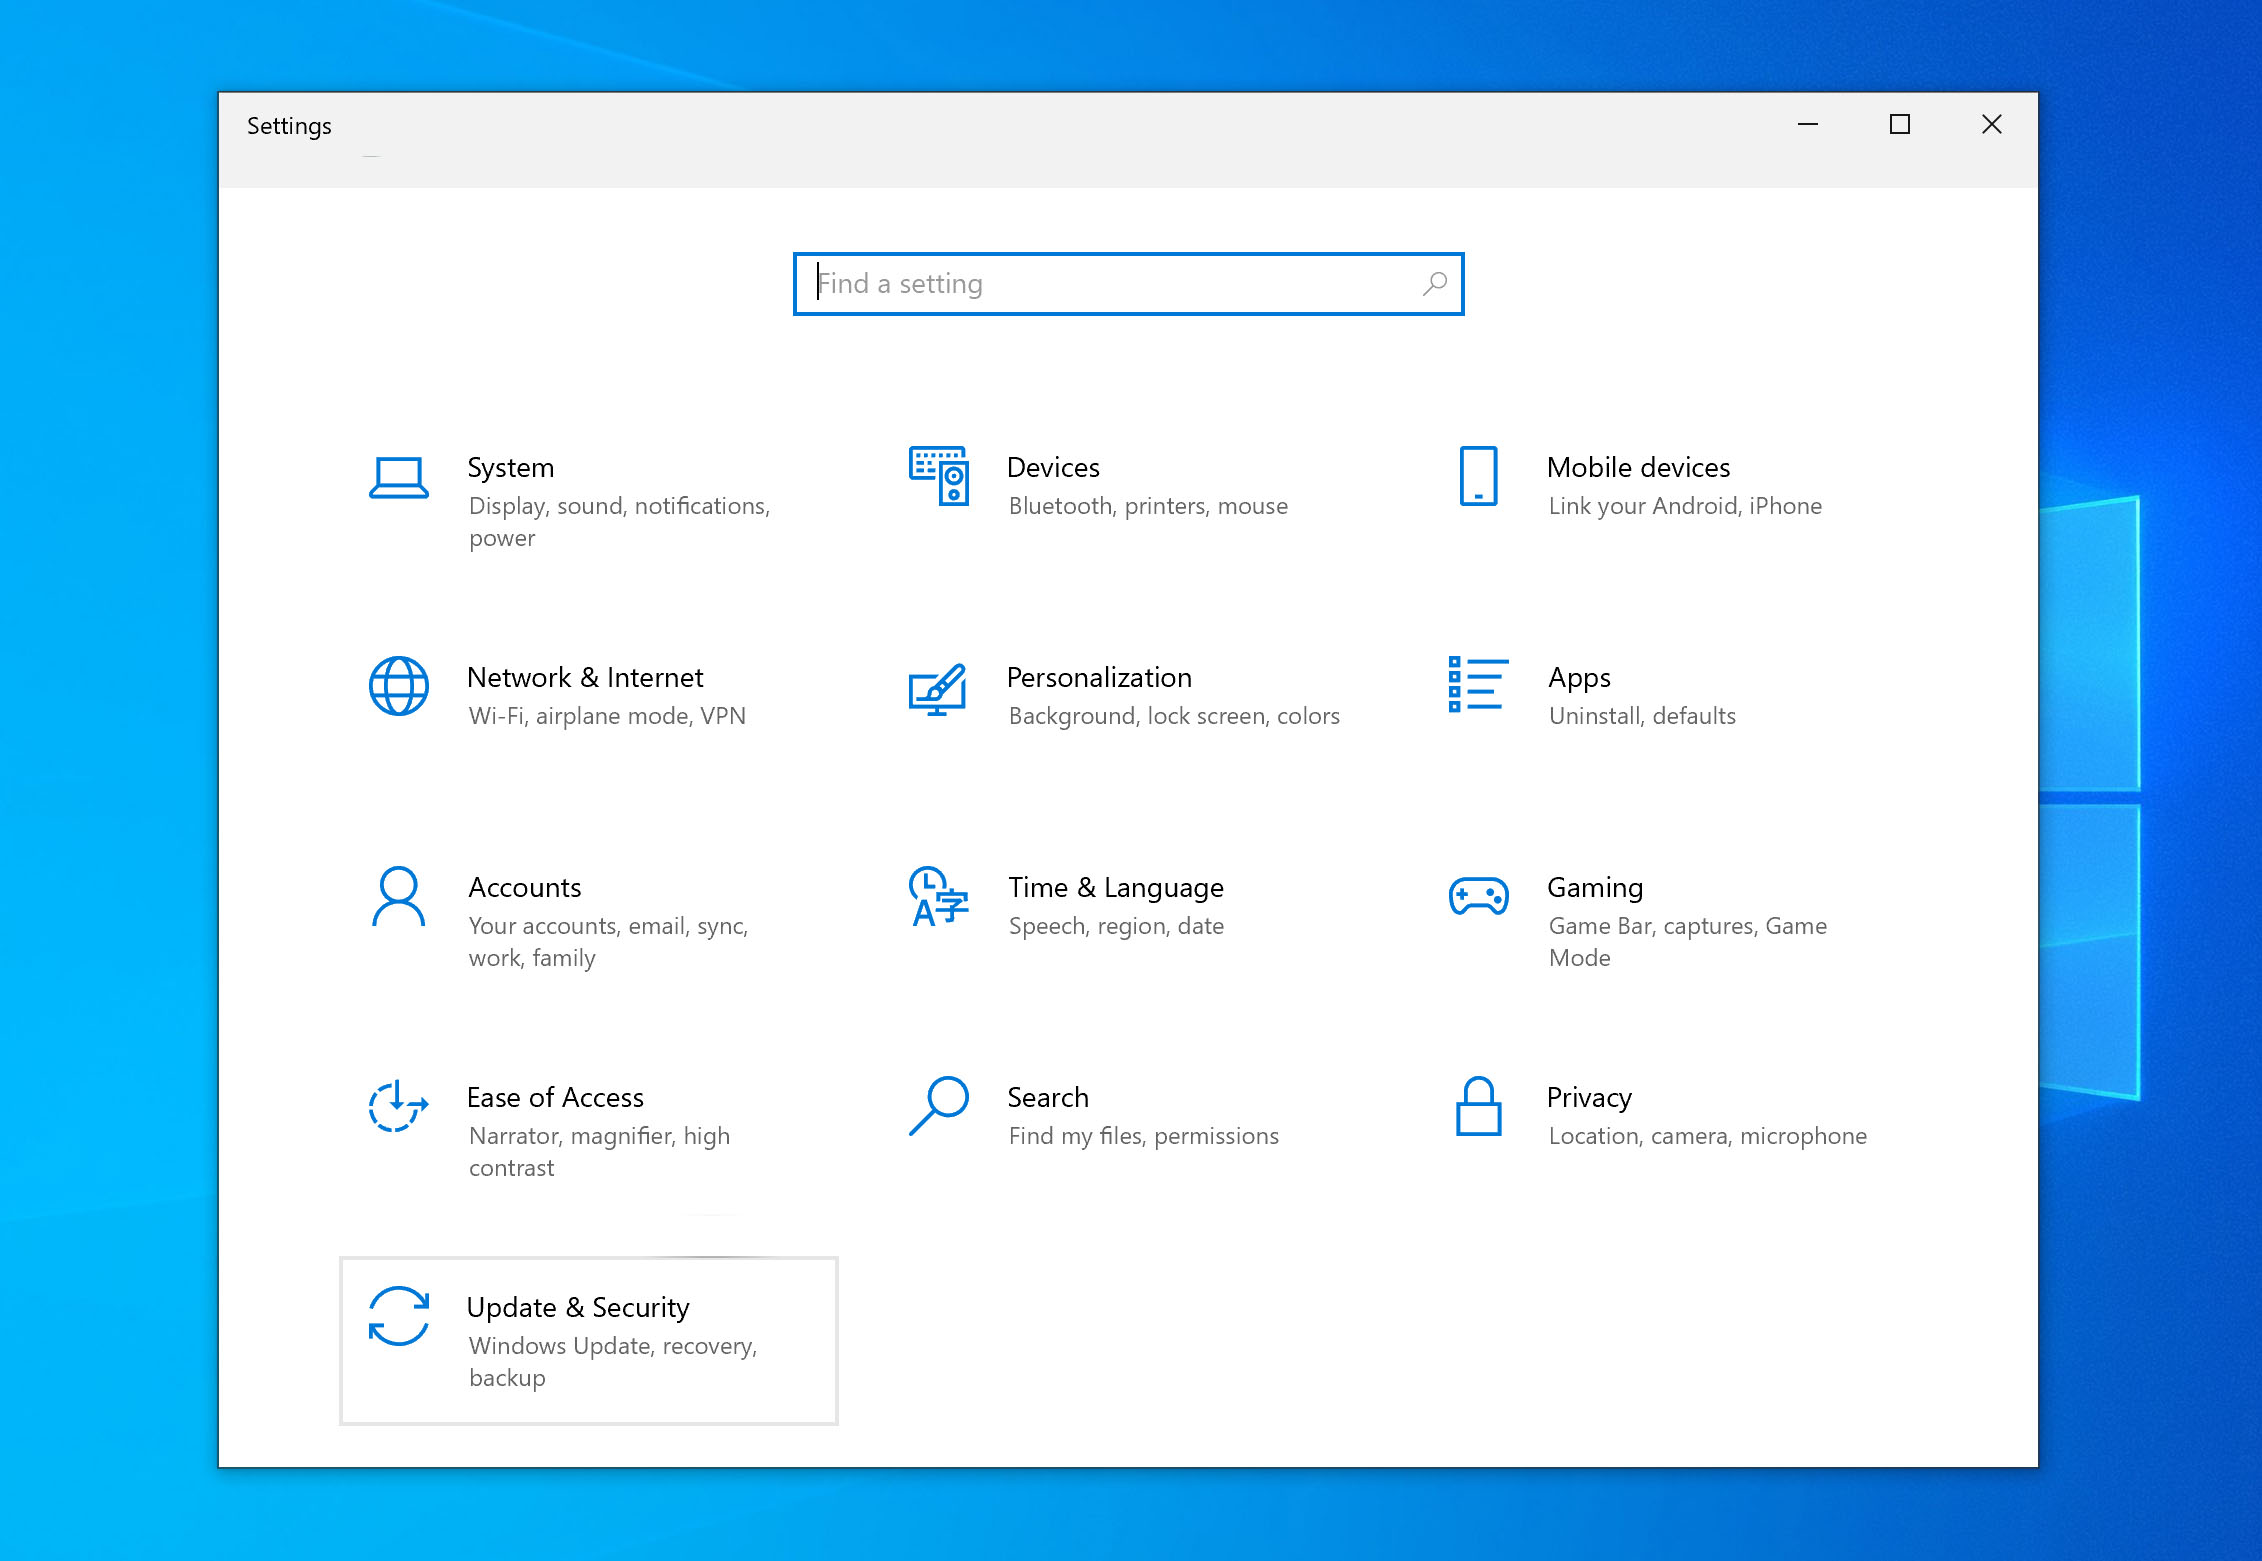
Check if you are up to date by going into the “Update and security” section of the Windows Settings app. You can check for new updates and install them if they are available.
Follow these steps to update Windows 10:
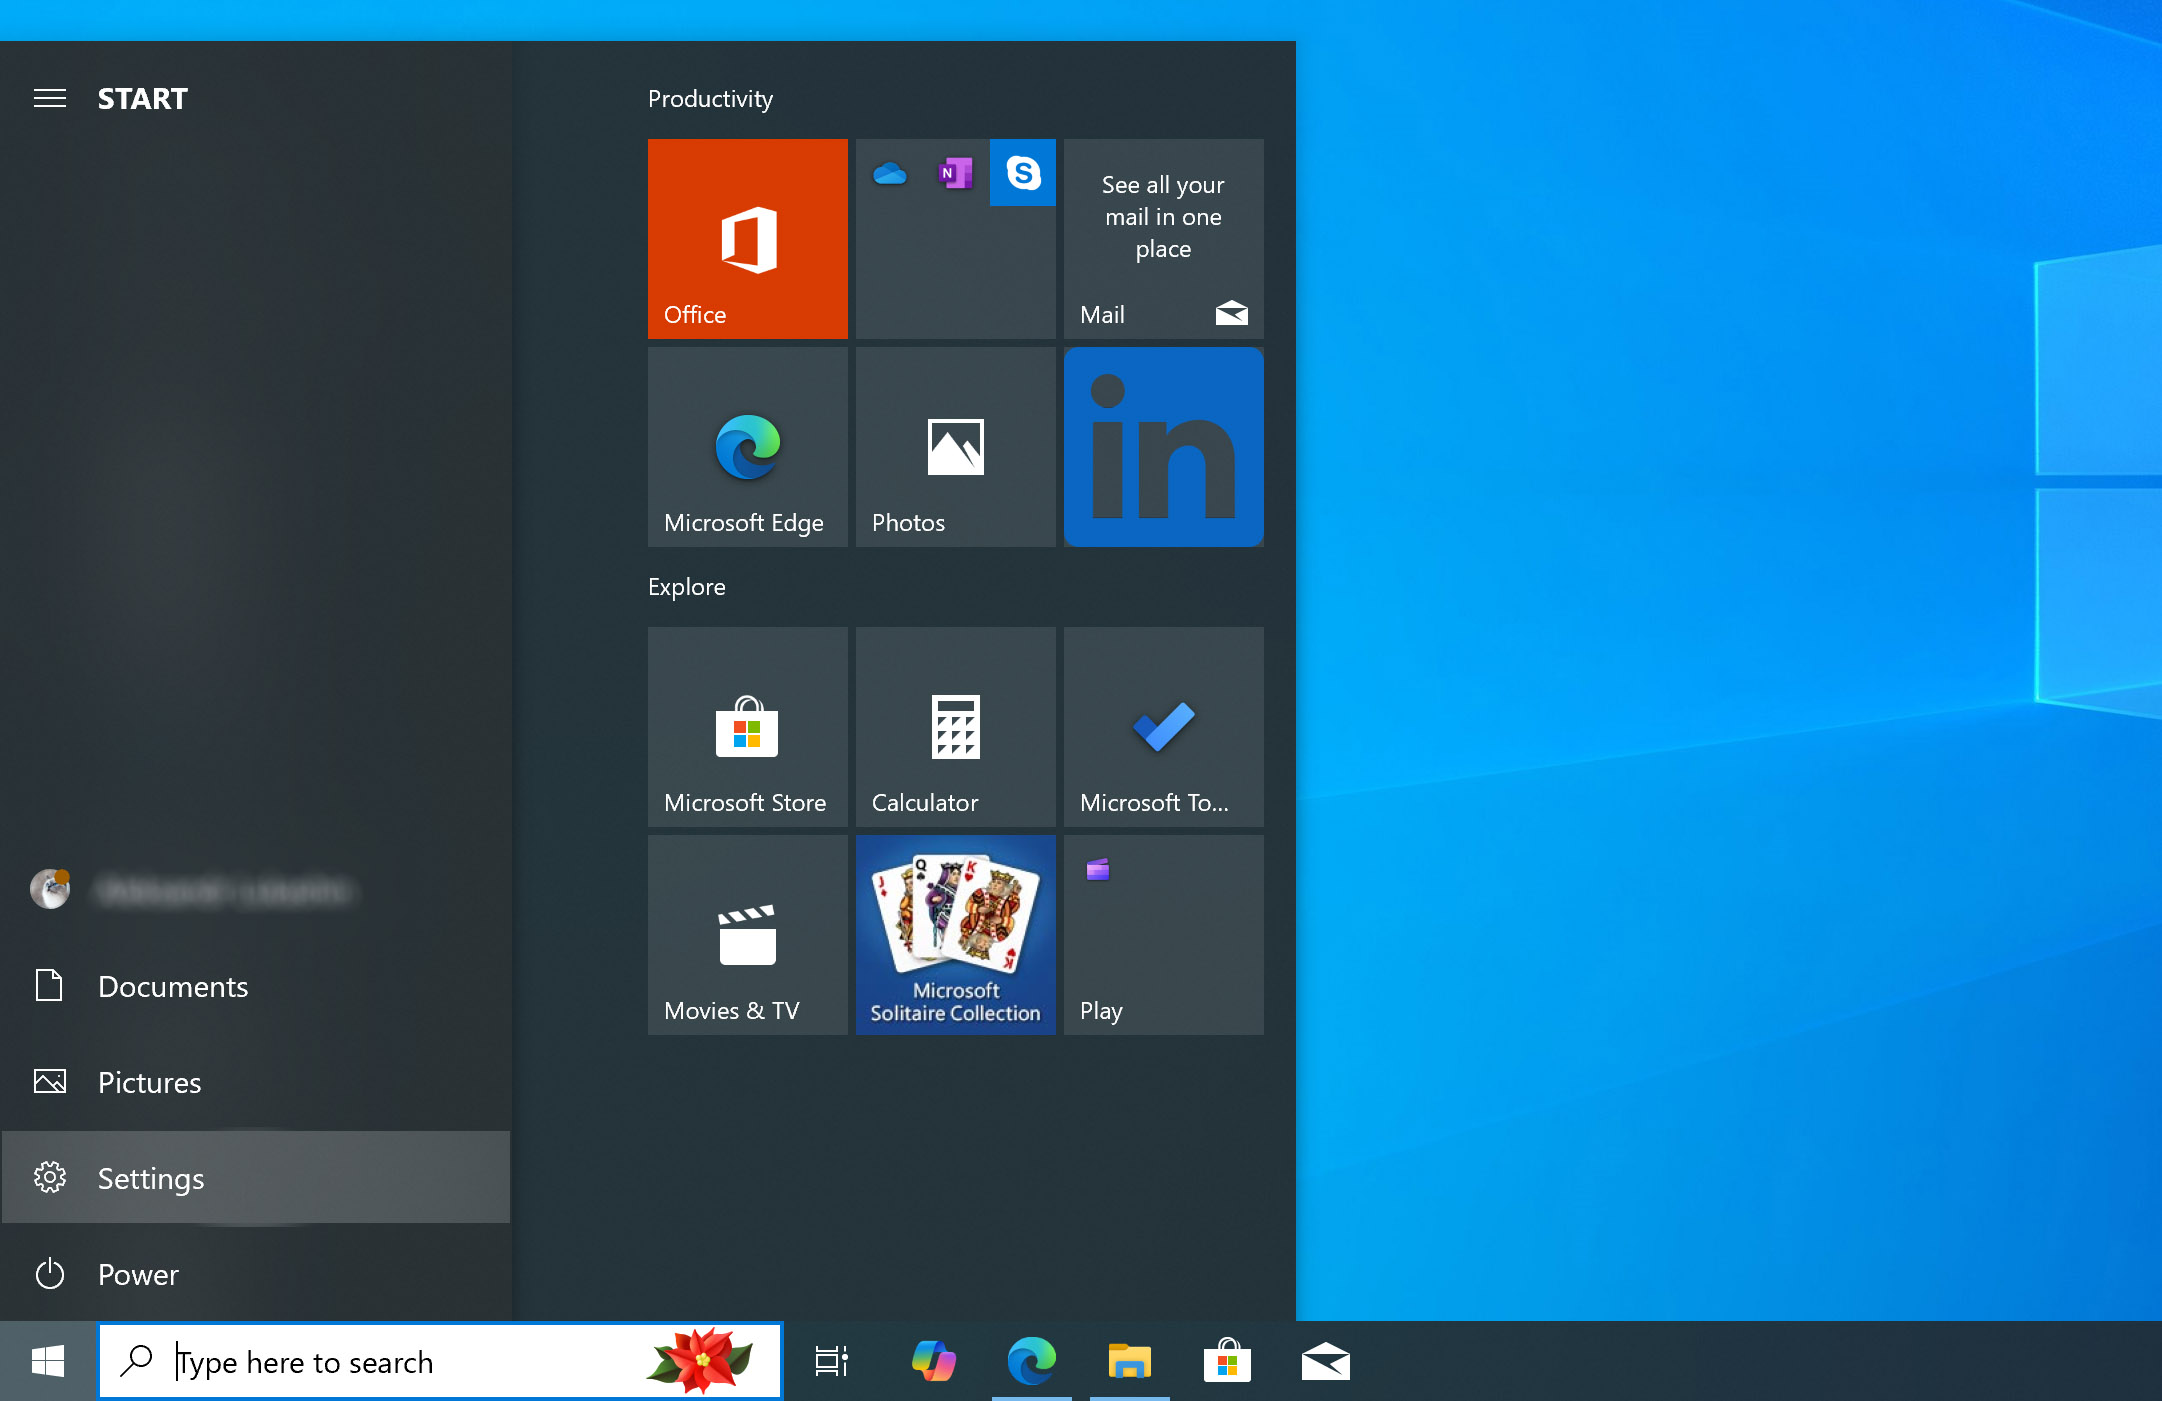
- Open Start and click Settings.

- Click Update & security.

- Click Check for updates.
- Wait for the updates to download and install.
This may improve the overall performance of your system including that of your hard drive.
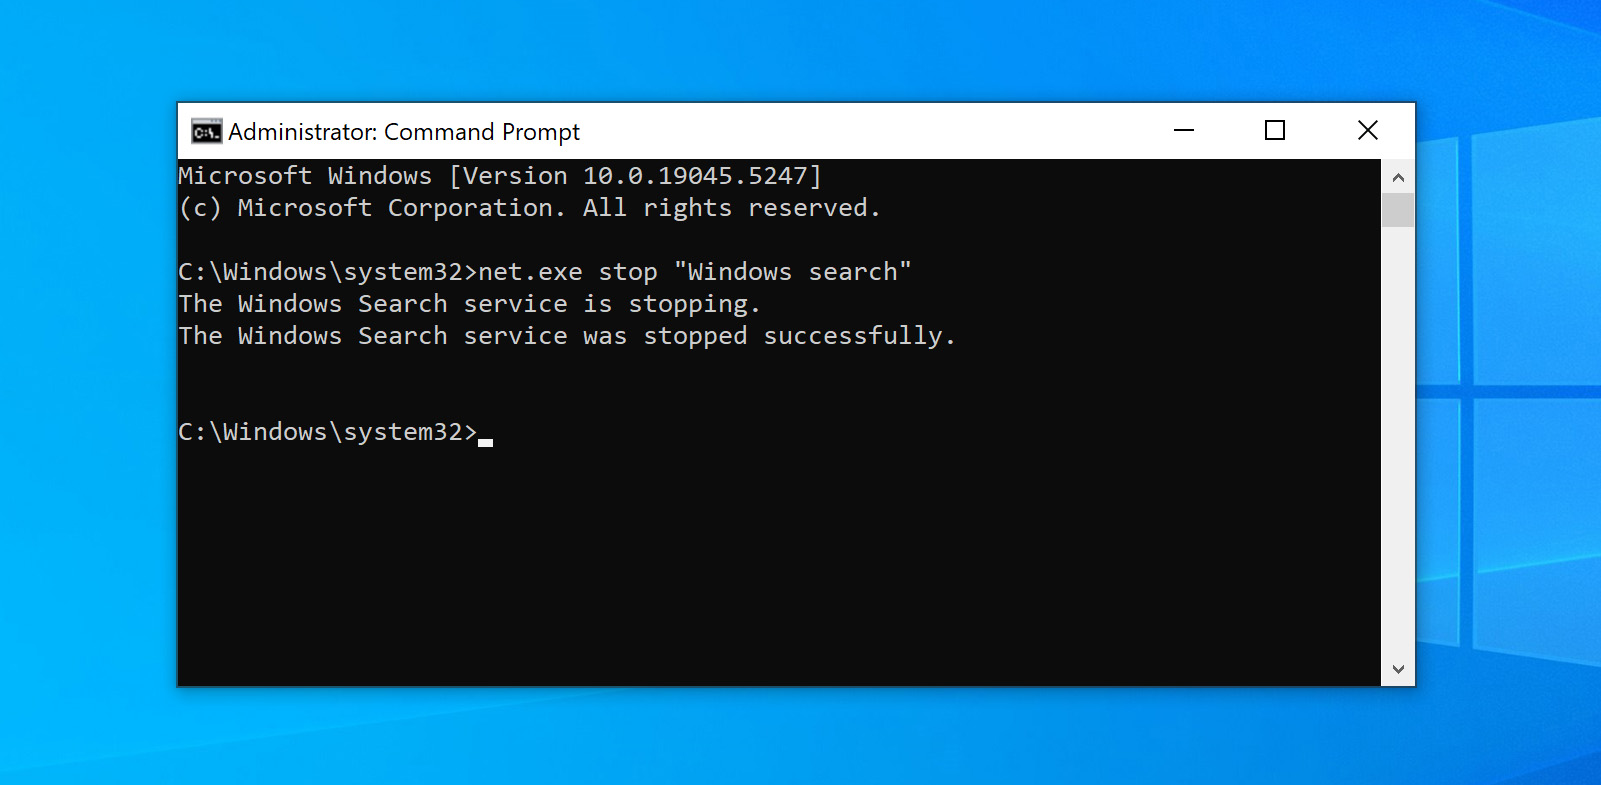
Way 3: Disable Windows Search
A known bug in Windows 8 and 10 can cause a search loop that can be the cause of your high disk usage. To temporarily stop the Windows Search facility and see if it improves your disk issue, open an admin prompt and enter the command: net.exe stop “Windows search”. This will stop Windows search from running until the next time Windows is restarted.
If it turns out that Windows Search was responsible for your Windows 10 disk usage reaching 100%, you can disable it permanently by following this procedure:
- Press the Windows key + R, enter services.msc and hit Enter.
- The services window will open. Select the Windows Search entry and double-click it to update its properties.
- Select Disabled under Startup type and then OK to save your changes.

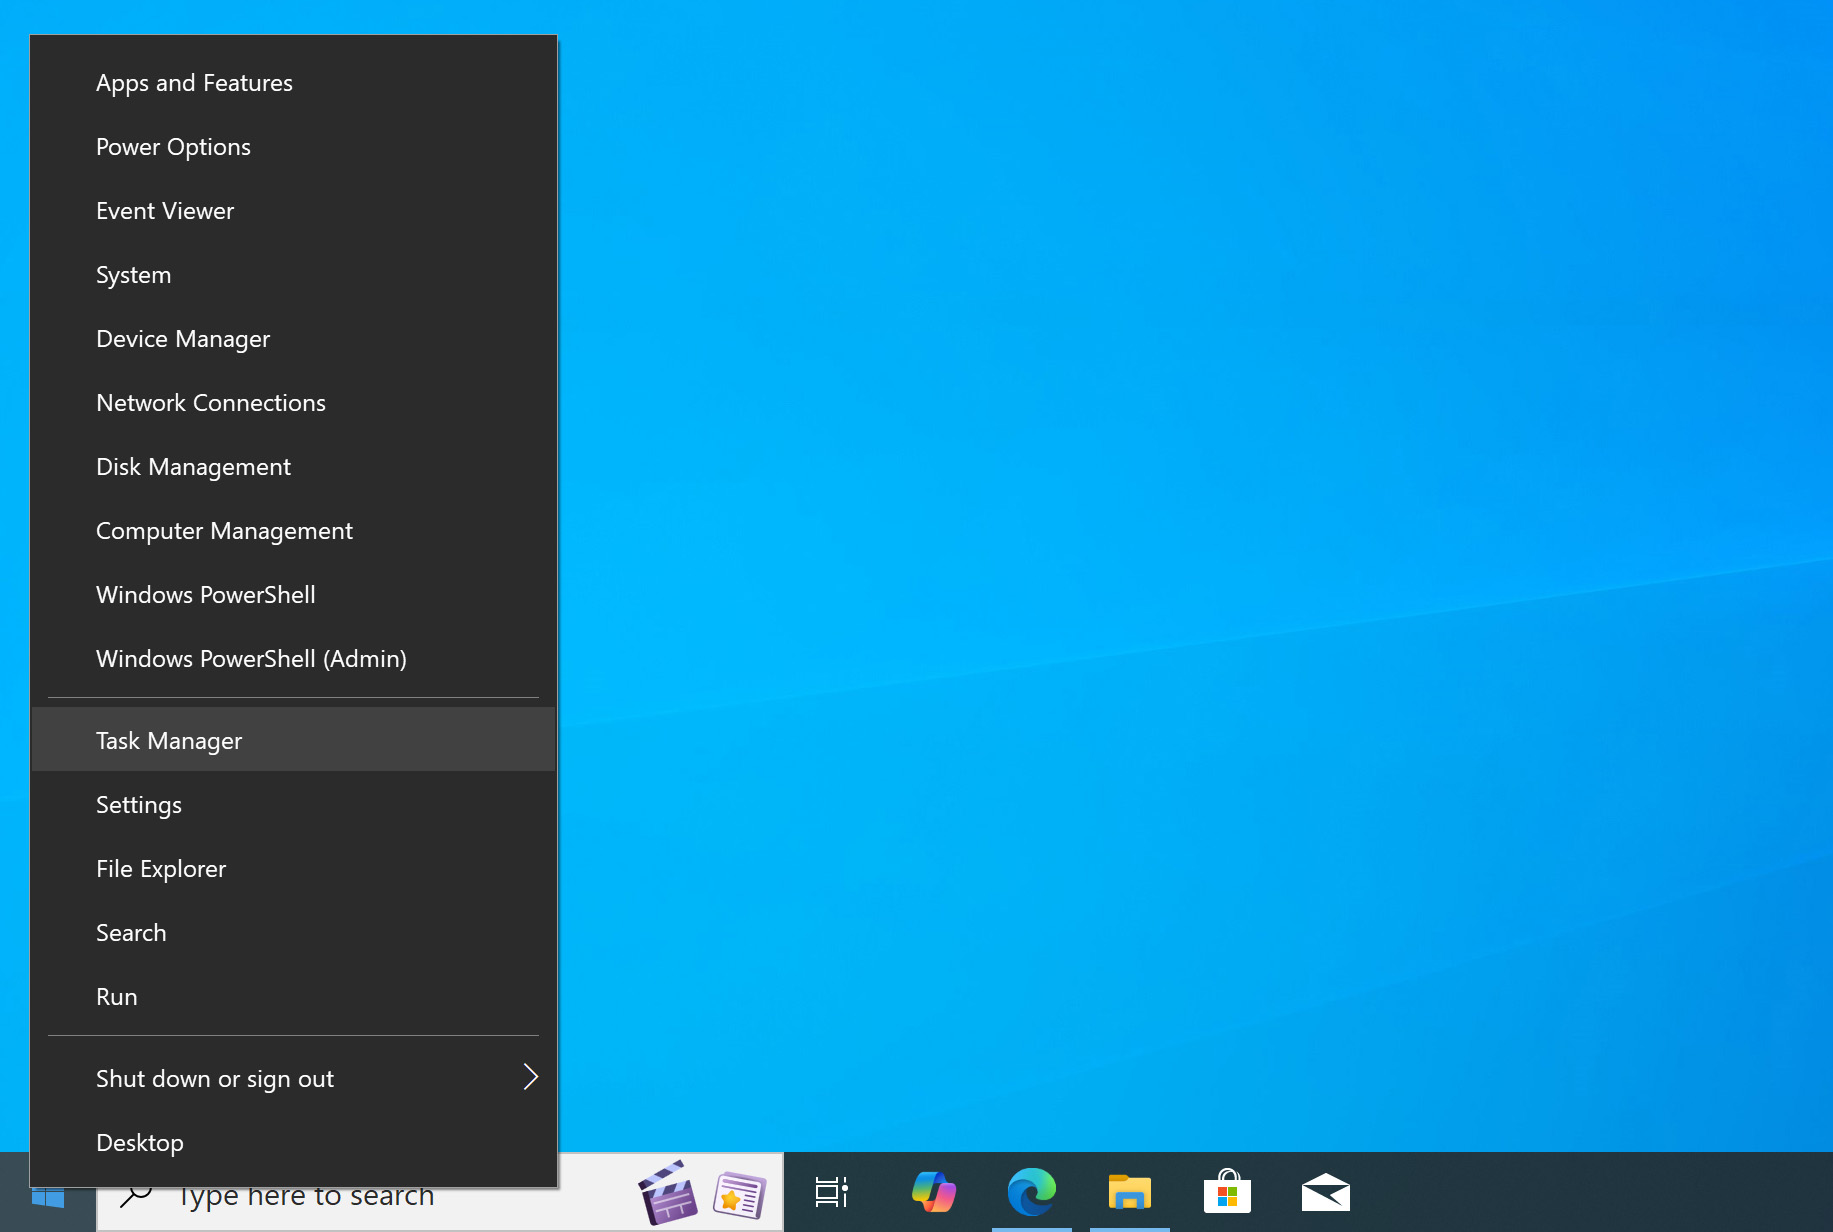
Way 4: Disable Automatic Startup
Upon launching, Windows will automatically start a number of applications and processes. Some of them are essential to the performance of your PC. Others, not so much. Unnecessary programs launching at Windows startup will passively run in the background, increasing your disk usage and providing no benefit.
You can fix 100 percent disk usage by disabling auto startup using these steps:
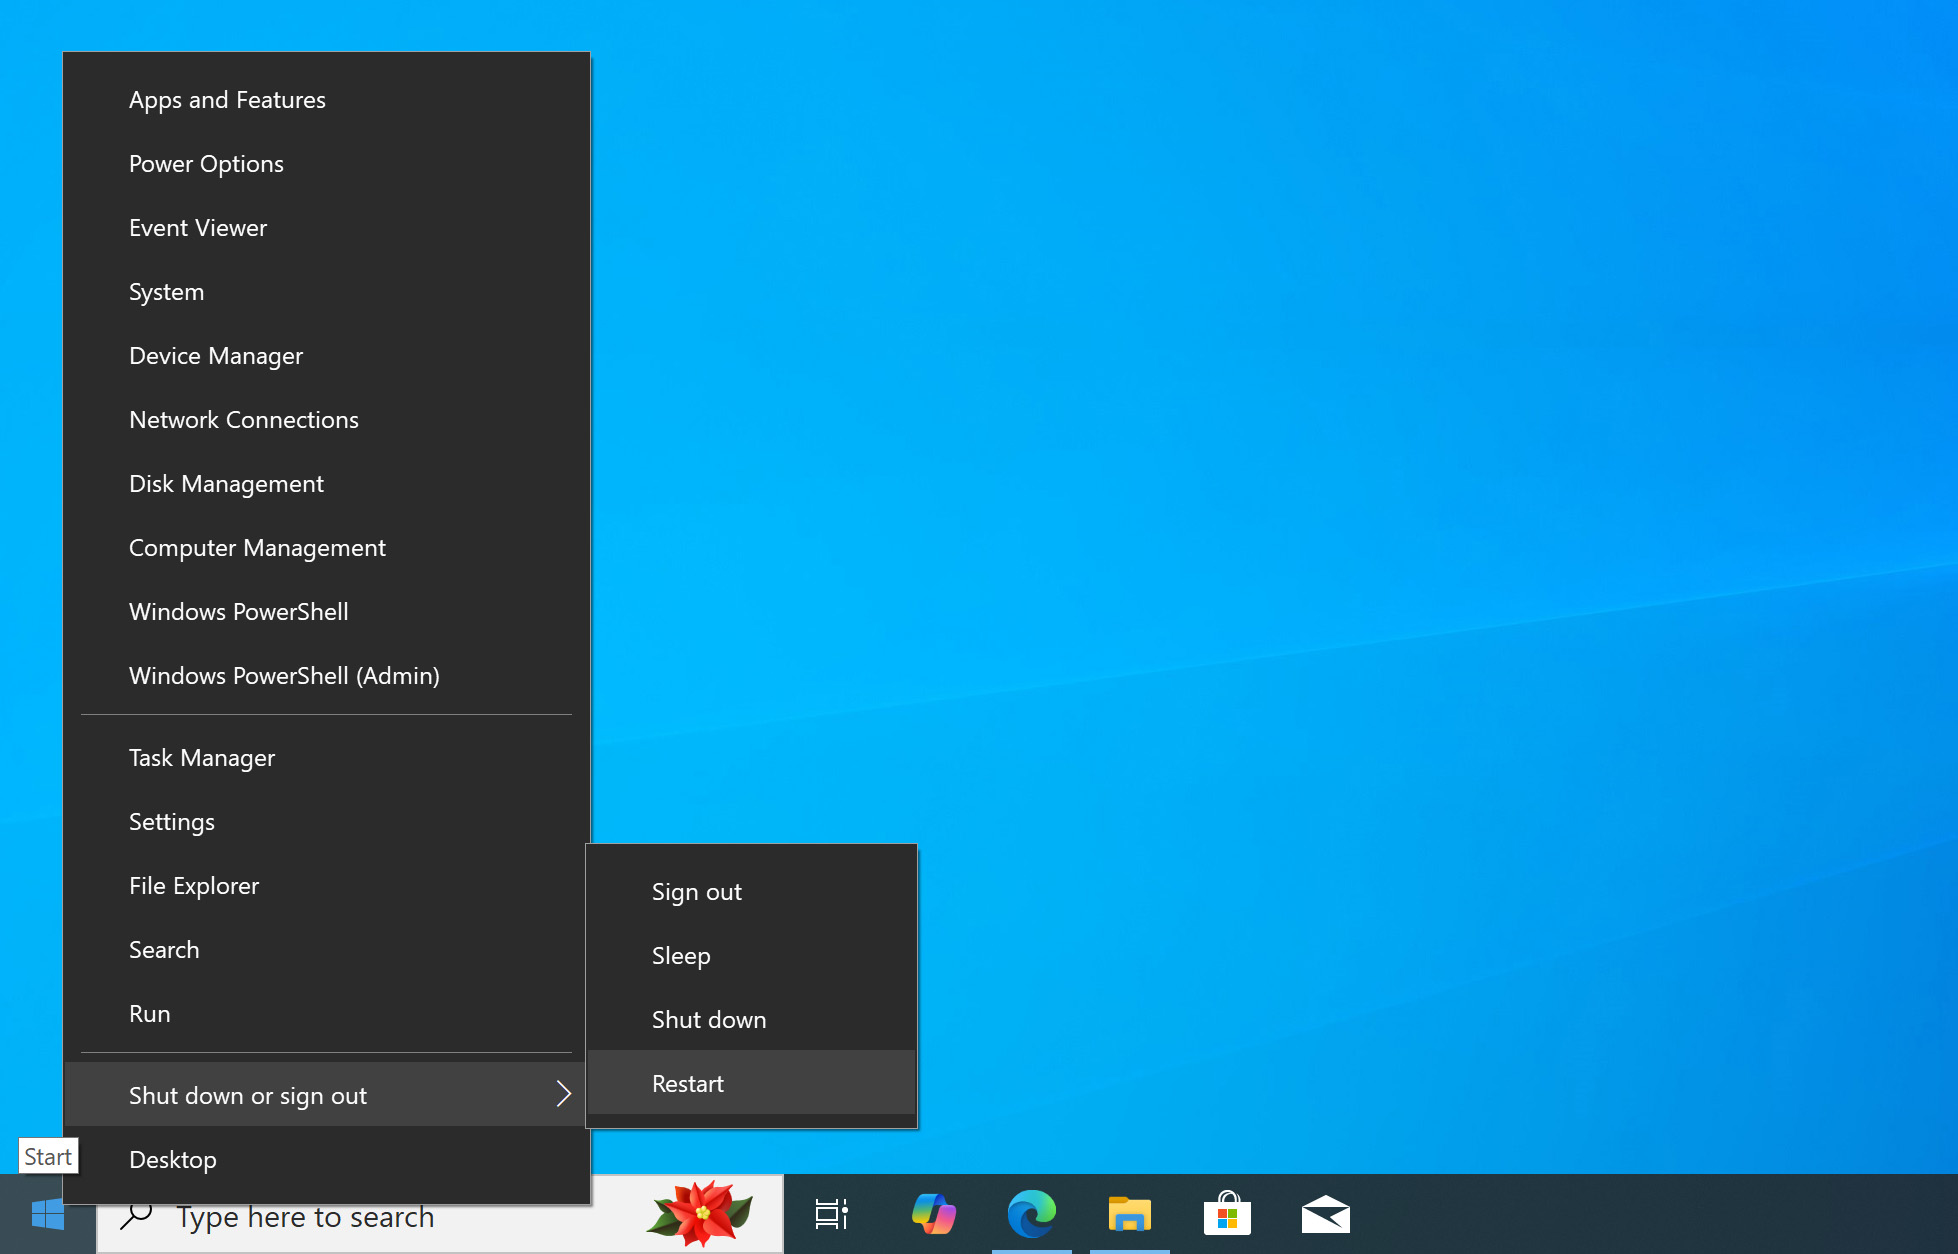
- Right-click Start and open Task Manager.

- Click the Startup tab.
- Locate the programs that you don’t want to run at startup. Right-click each one and click Disable.

- Reboot your computer and review.
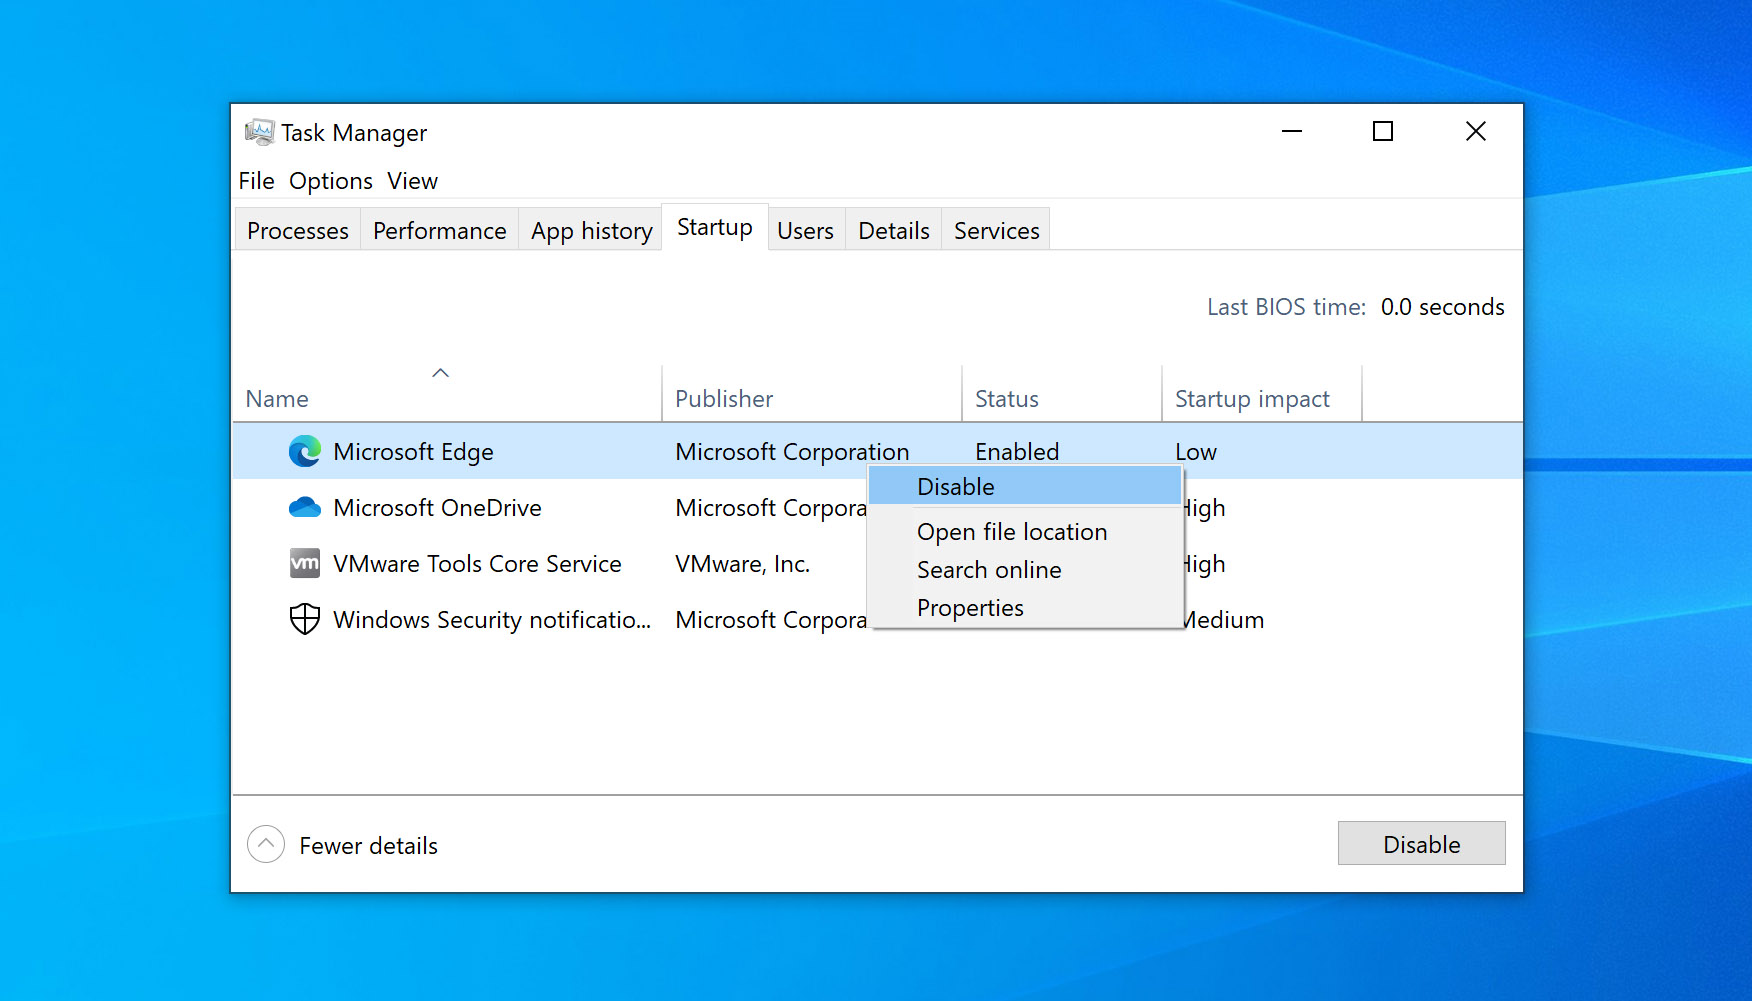
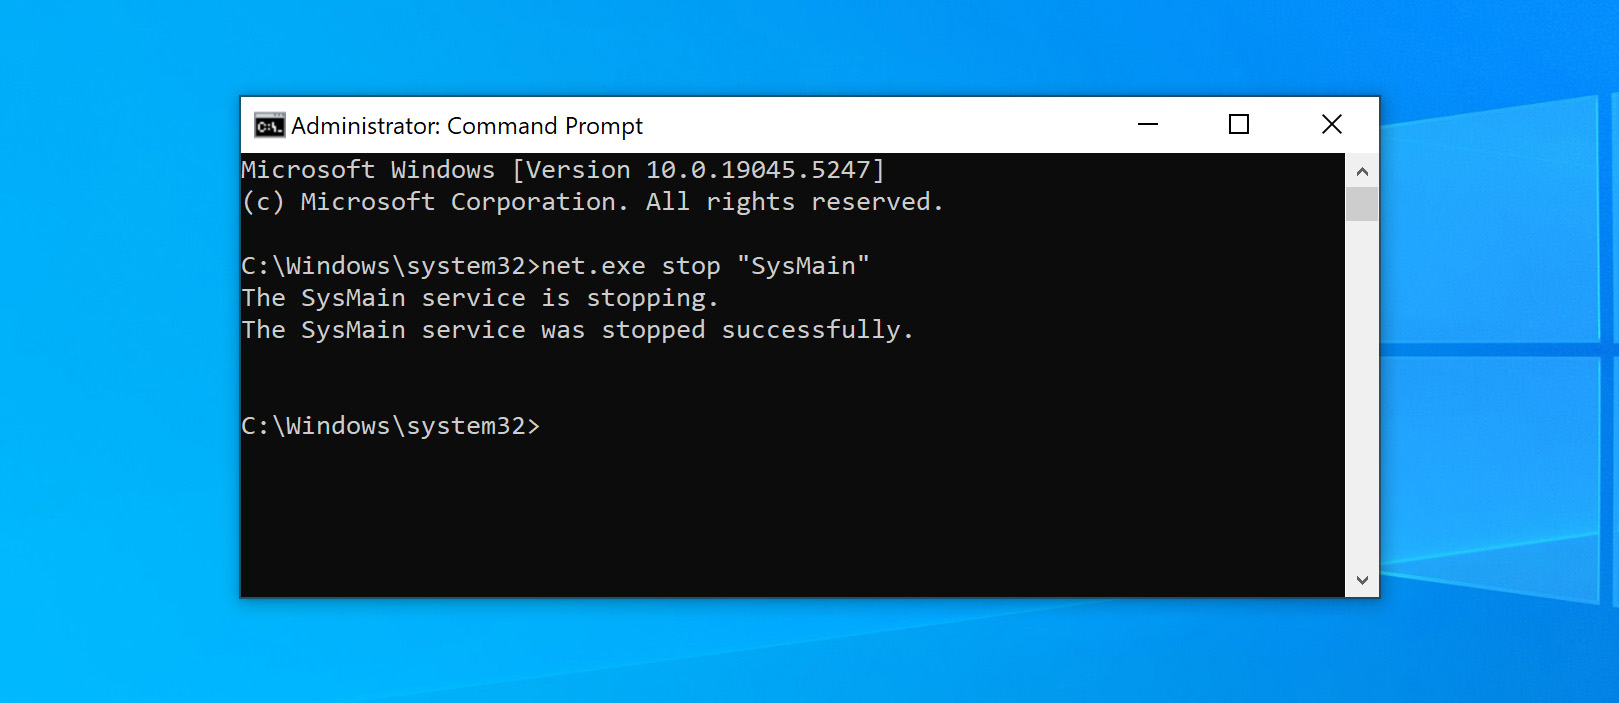
Way 5: Stop the Superfetch Service
Another Windows 10 feature that can cause problems is the Windows Superfetch service. You can disable this service temporarily in a similar fashion to Windows search with the command: net.exe stop "SysMain".
Way 6: Change Energy Options from Balanced to High Performance
This change of energy settings seems to have worked for a number of users who have experienced 100% disk usage on Windows 10. Laptop users will have a more noticeable impact rather than desktop users. Use this procedure:
- Go to Power Options > Change plan settings > Change advanced power settings.

- Select the High-performance option from the drop-down box and make sure all plan settings are set to their defaults.
Way 7: Temporarily Turn Off Your Antivirus Software
Another step to take when investigating the cause behind your Windows 10 100% disk usage problem is to turn off your antivirus software temporarily. See if this improves your disk usage. If so, you may want to consider changing antivirus packages. Even Windows Defender can cause problems by increasing I/O and network usage which might lead to high disk usage.
Way 8: Reset Virtual Memory in Windows 10
Virtual memory treats your disk as if it is RAM and uses it to swap out temporary files when it runs out of actual RAM. Errors in the pagefile.sys can cause 100% disk usage on your Windows 10 machine. The remedy to this problem is to reset your virtual memory settings.
Follow these steps to reset your virtual memory:
- In your computer’s “System Properties” you need to click on “Advanced system settings”.

- Click “Settings” in the Performance section.
- Select the “Advanced” tab and click the “Change” button.
- Make sure the box titled “Automatically manage paging file size” is checked.
- You can also choose “No paging file”, Press OK and then reboot. This will inhibit the use of virtual memory and may improve your system’s disk performance.
Way 9: Run CHKDSK (CheckDisk)
CHKDSK is a command-line tool that scans your file system for logical and physical errors, including bad sectors. Bad sectors can result in the high disk usage issue you’re facing now. If any bad sectors are found, CHKDSK will address them. Soft/logical bad sectors can be repaired, but hard/physical bad sectors cannot be repaired, and will instead be marked as unusable so Windows avoids using them.
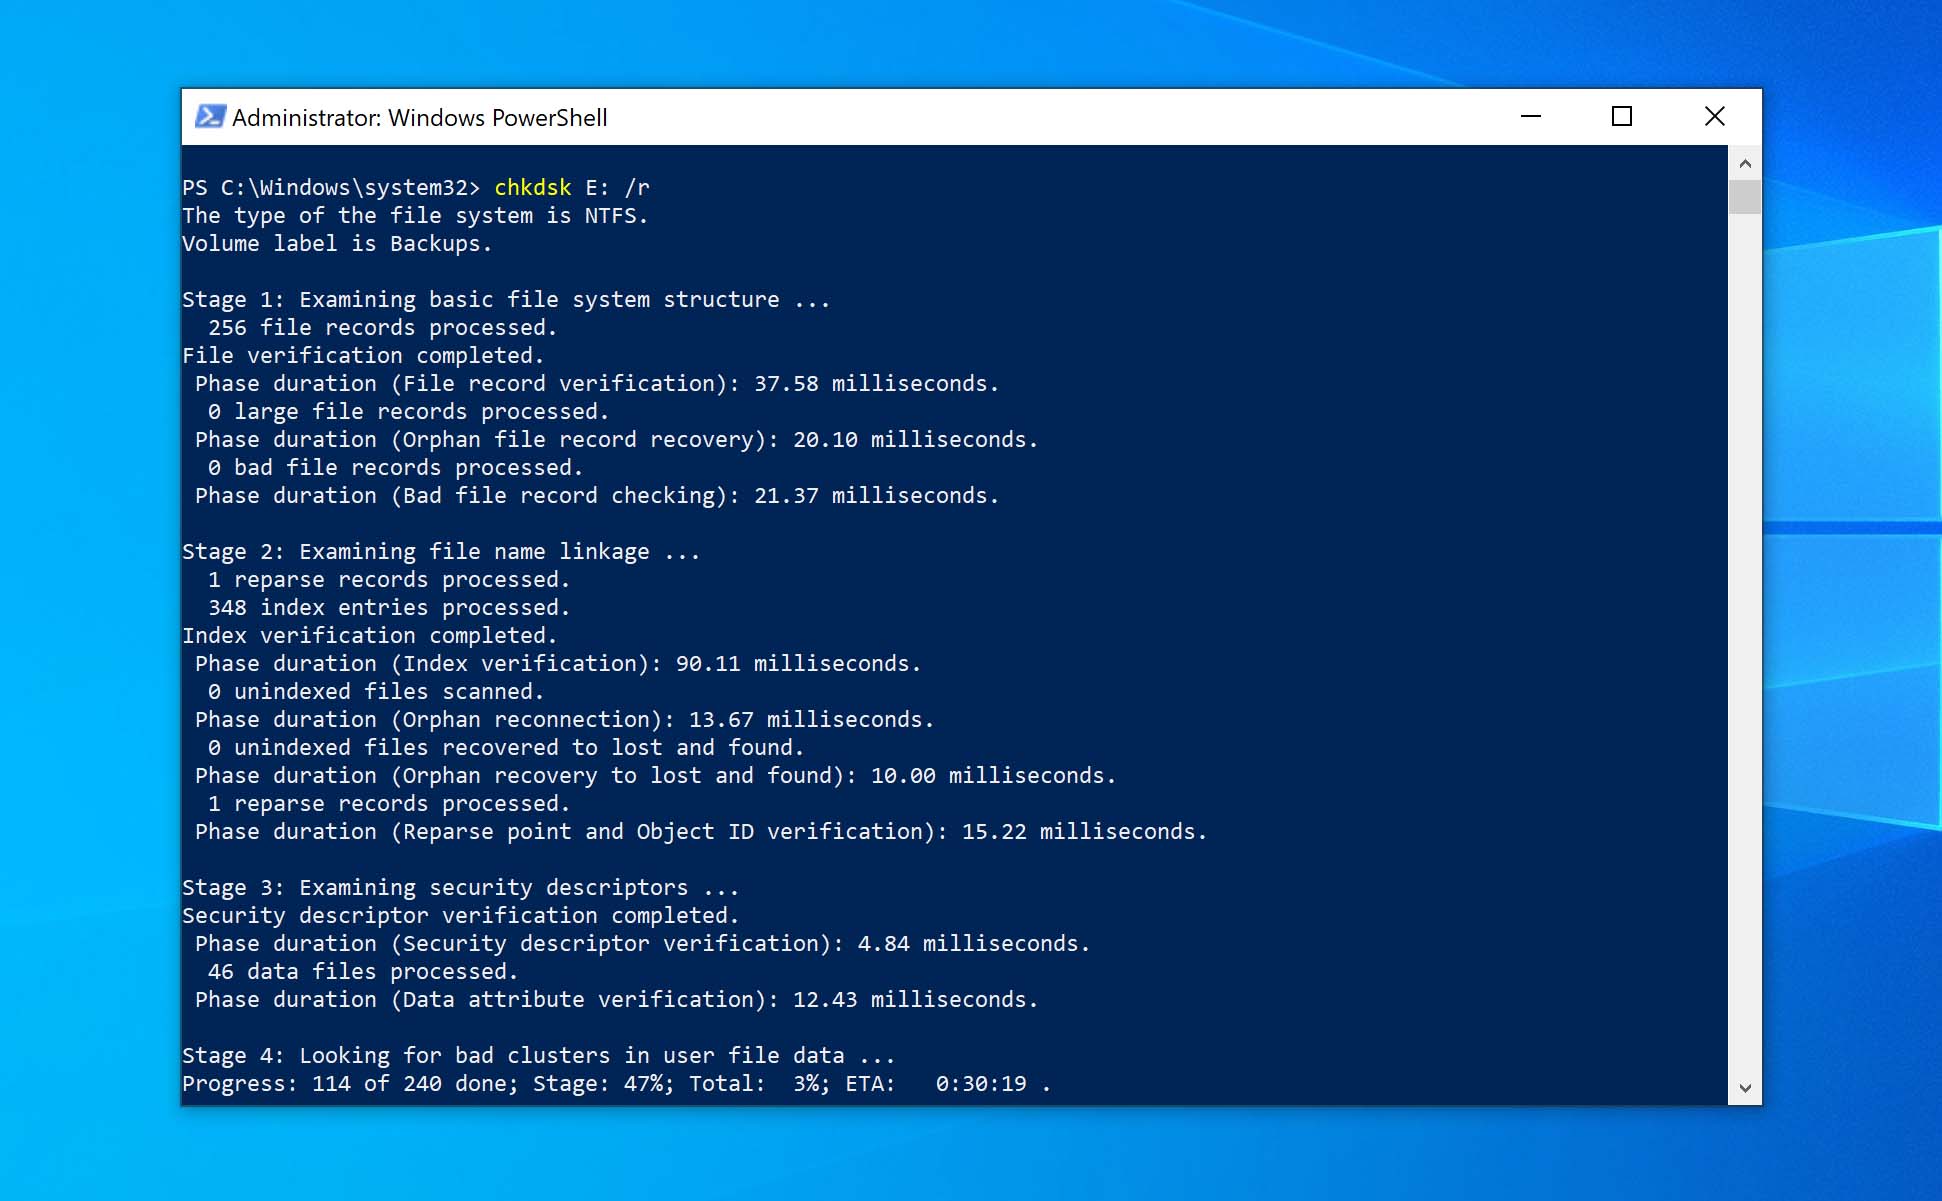
The command we’ll be using is:
chkdsk *: /r
By default, CHKDSK only scans for problems and reports back. The /r flag instructs CHKDSK to attempt to repair any issue it finds.
This is how you run CHKDSK:
- Right-click Start and click Windows PowerShell (Admin).
- Type the
chkdsk *: /rcommand. Replace the * with your drive letter. Press Enter.
Way 10: Run Disk Defragmentation
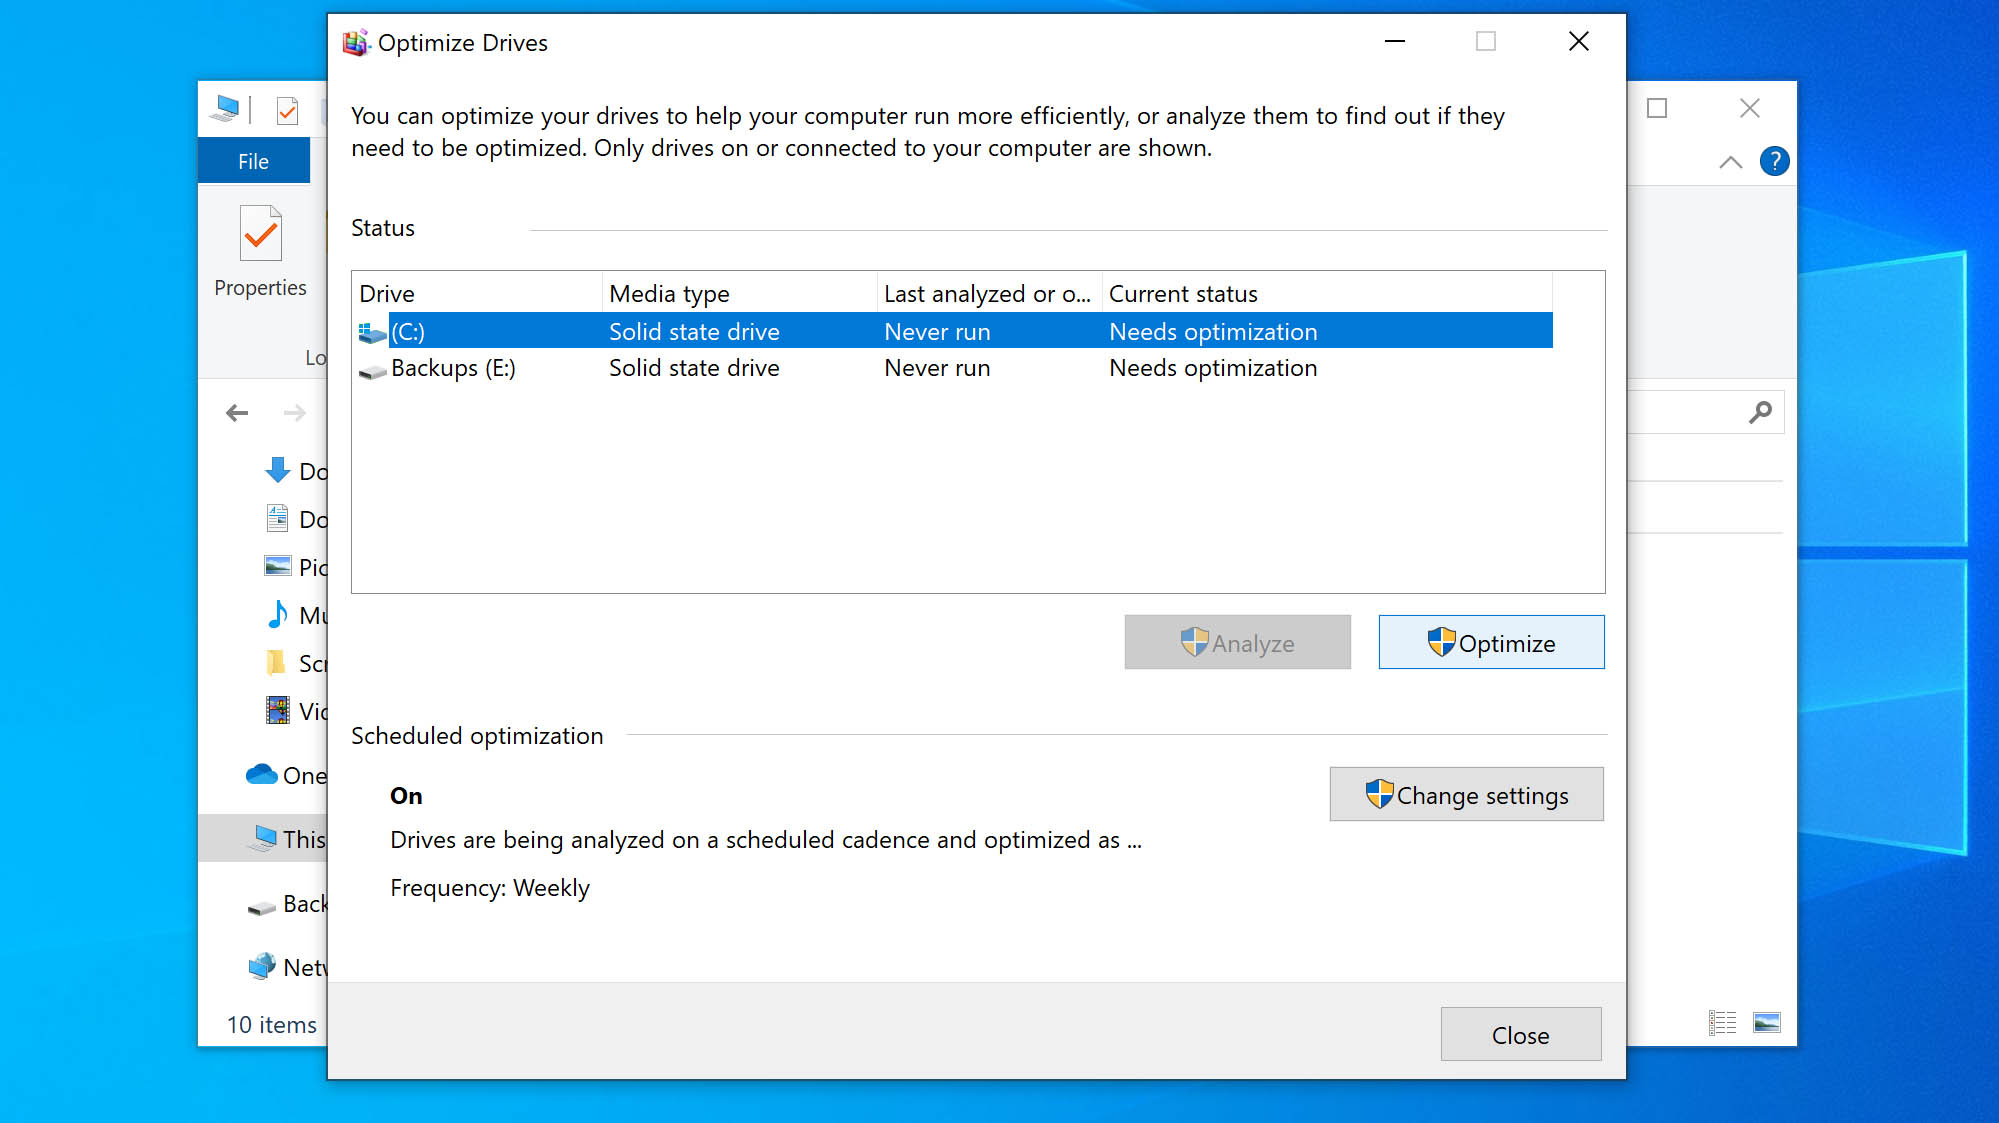
Disk defragmentation is good for keeping your data organized. Data isn’t always written sequentially to the disk. Rather, it often gets stored in non-contiguous sectors. When data is fragmented in this manner, it takes longer for the read/write head to access all parts of a file. While it’s searching for pieces of the file, in addition to performing other functions, it can cause 100% disk usage.
Windows handles disk defragmentation automatically, typically running once a week. However, if this schedule is disputed for one reason or another, you can run it manually. Follow these instructions to defrag your disk on Windows 10:
- Open File Explorer.
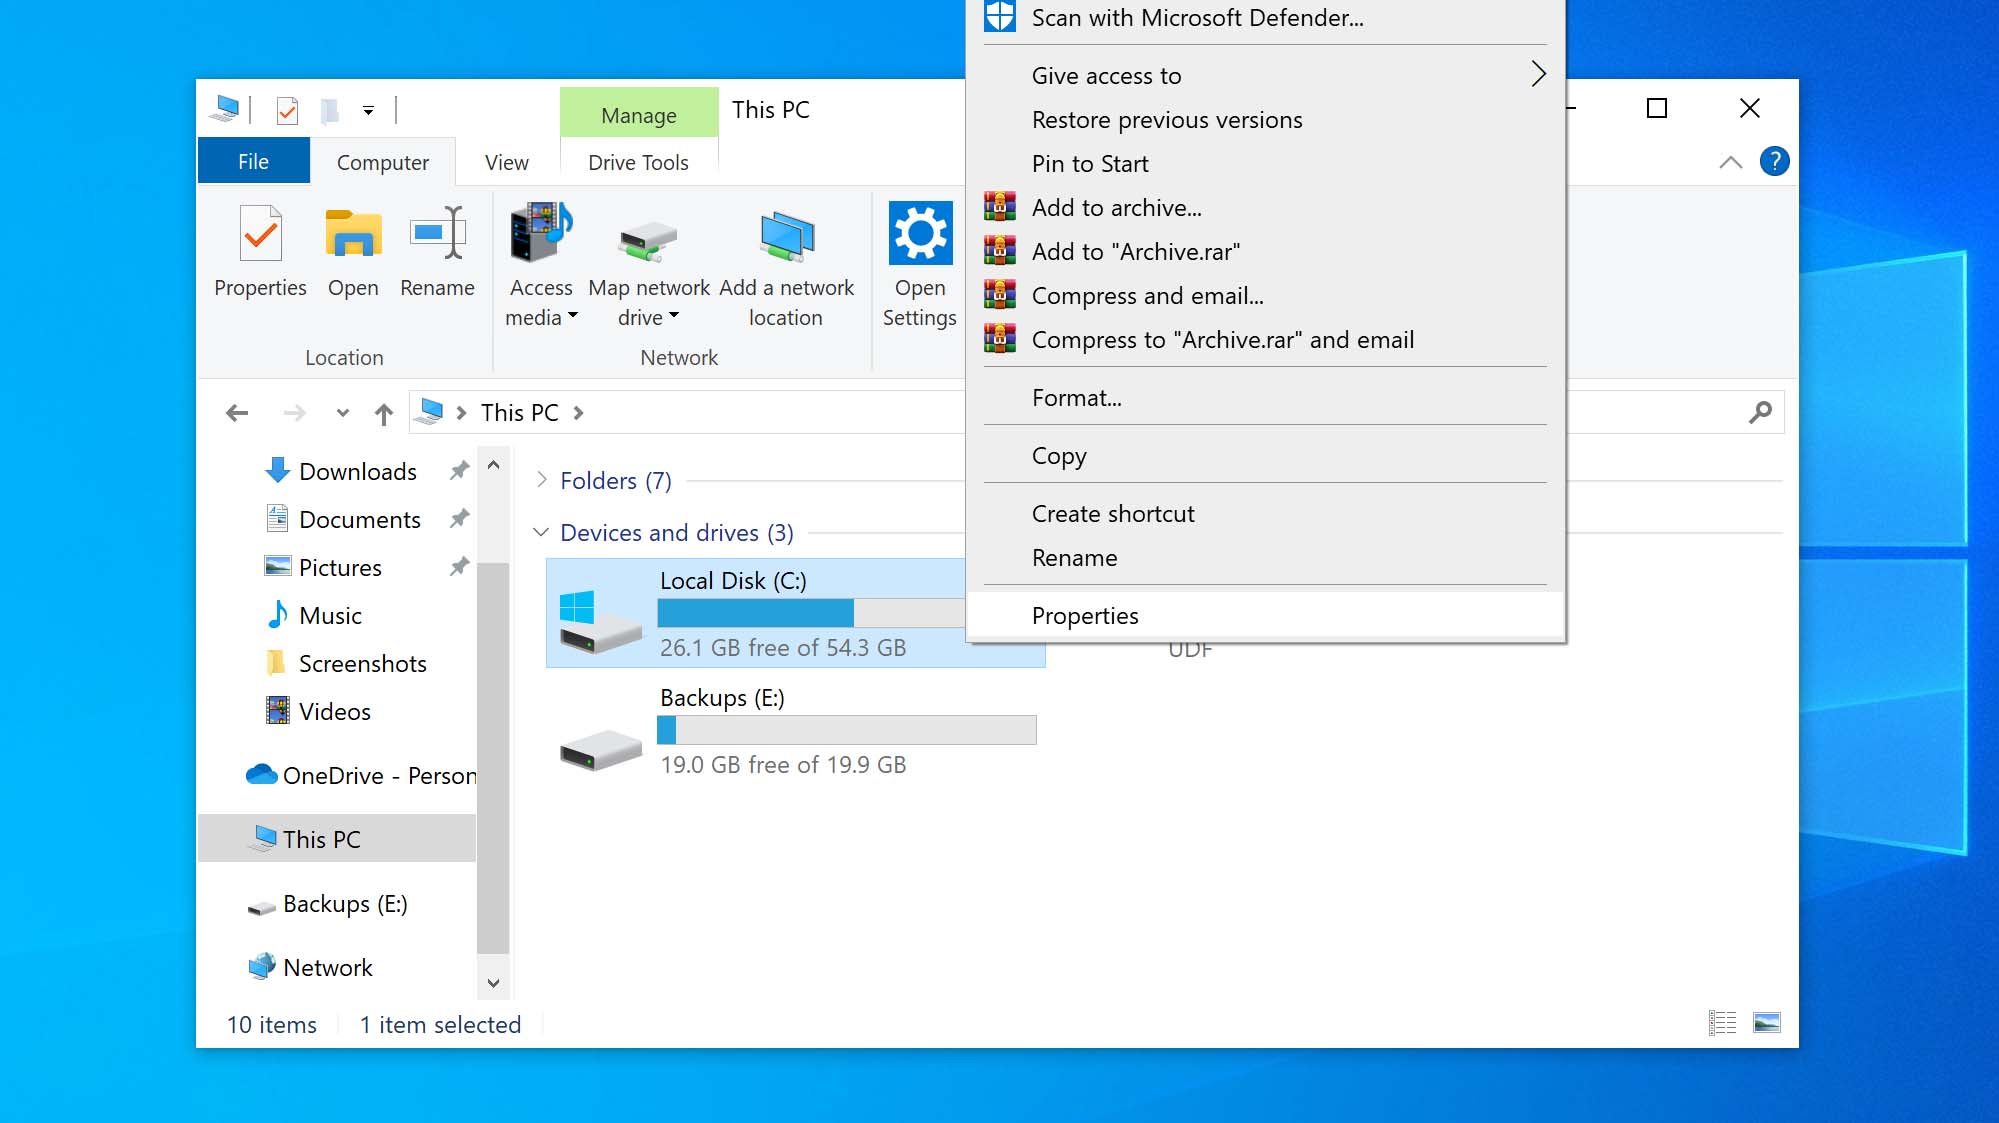
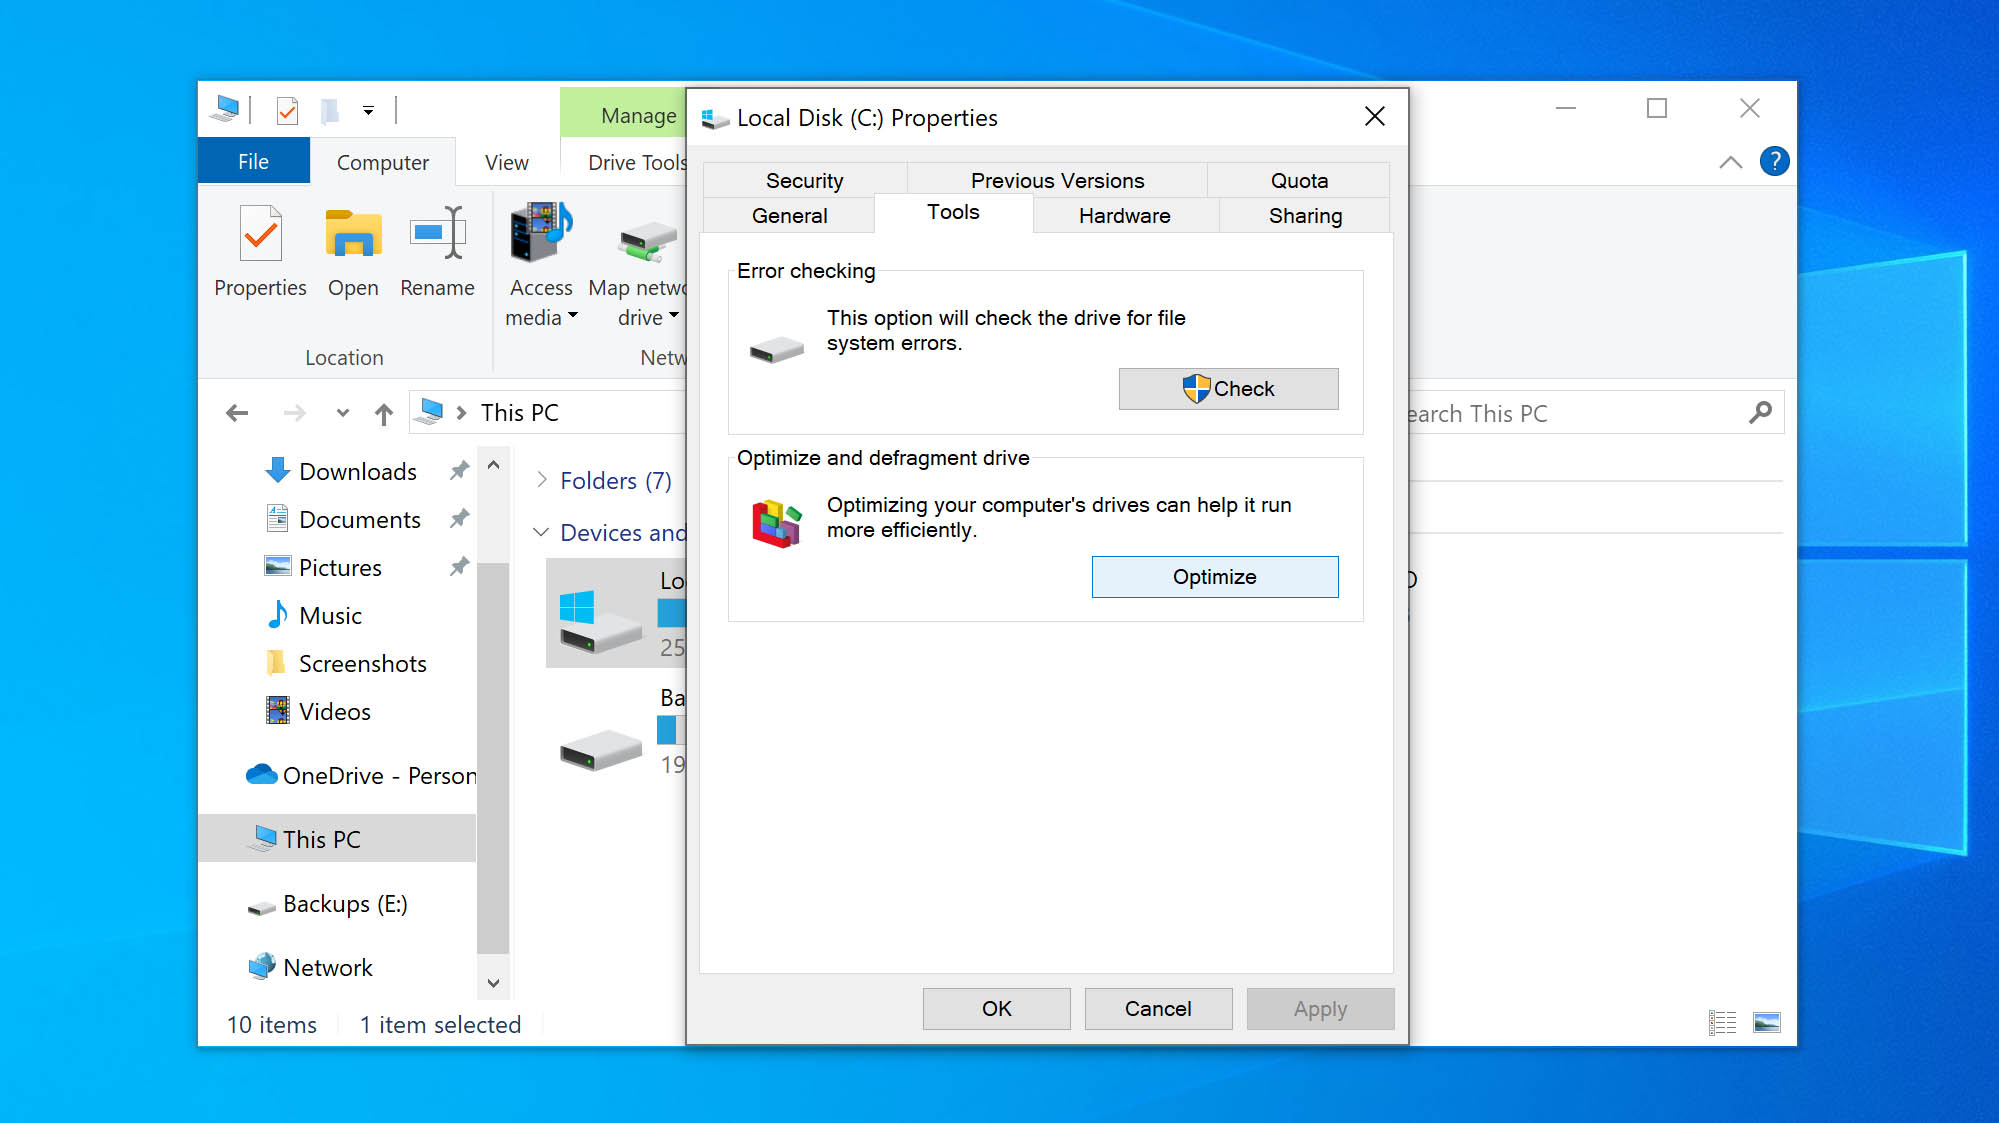
- Right-click the drive with 100% disk usage, then click Properties.

- Go to the Tools tab.
- Click Optimize.
- Click Optimize.
Consider Other Ways to Solve the 100% Disk Usage Problem
In general, your hard drive should never be at 100% usage. If you’ve found that none of the methods outlined so far have been useful, it’s time to look at what options you have going forward.
Upgrade Your Drive
It may not be that your drive is broken. Instead, it could simply be that your drive is too old or low-spec to keep up with your usage. As hard disk drives are mechanical, their speed will gradually decline over time with wear.
Consider upgrading to an HDD with a higher revolutions per minute (RPM) rating. A higher RPM directly correlates to better speeds. Alternatively, you can opt for an SSD. With an SSD, data is stored on flash memory and is much faster to access.
Run Additional Diagnostics
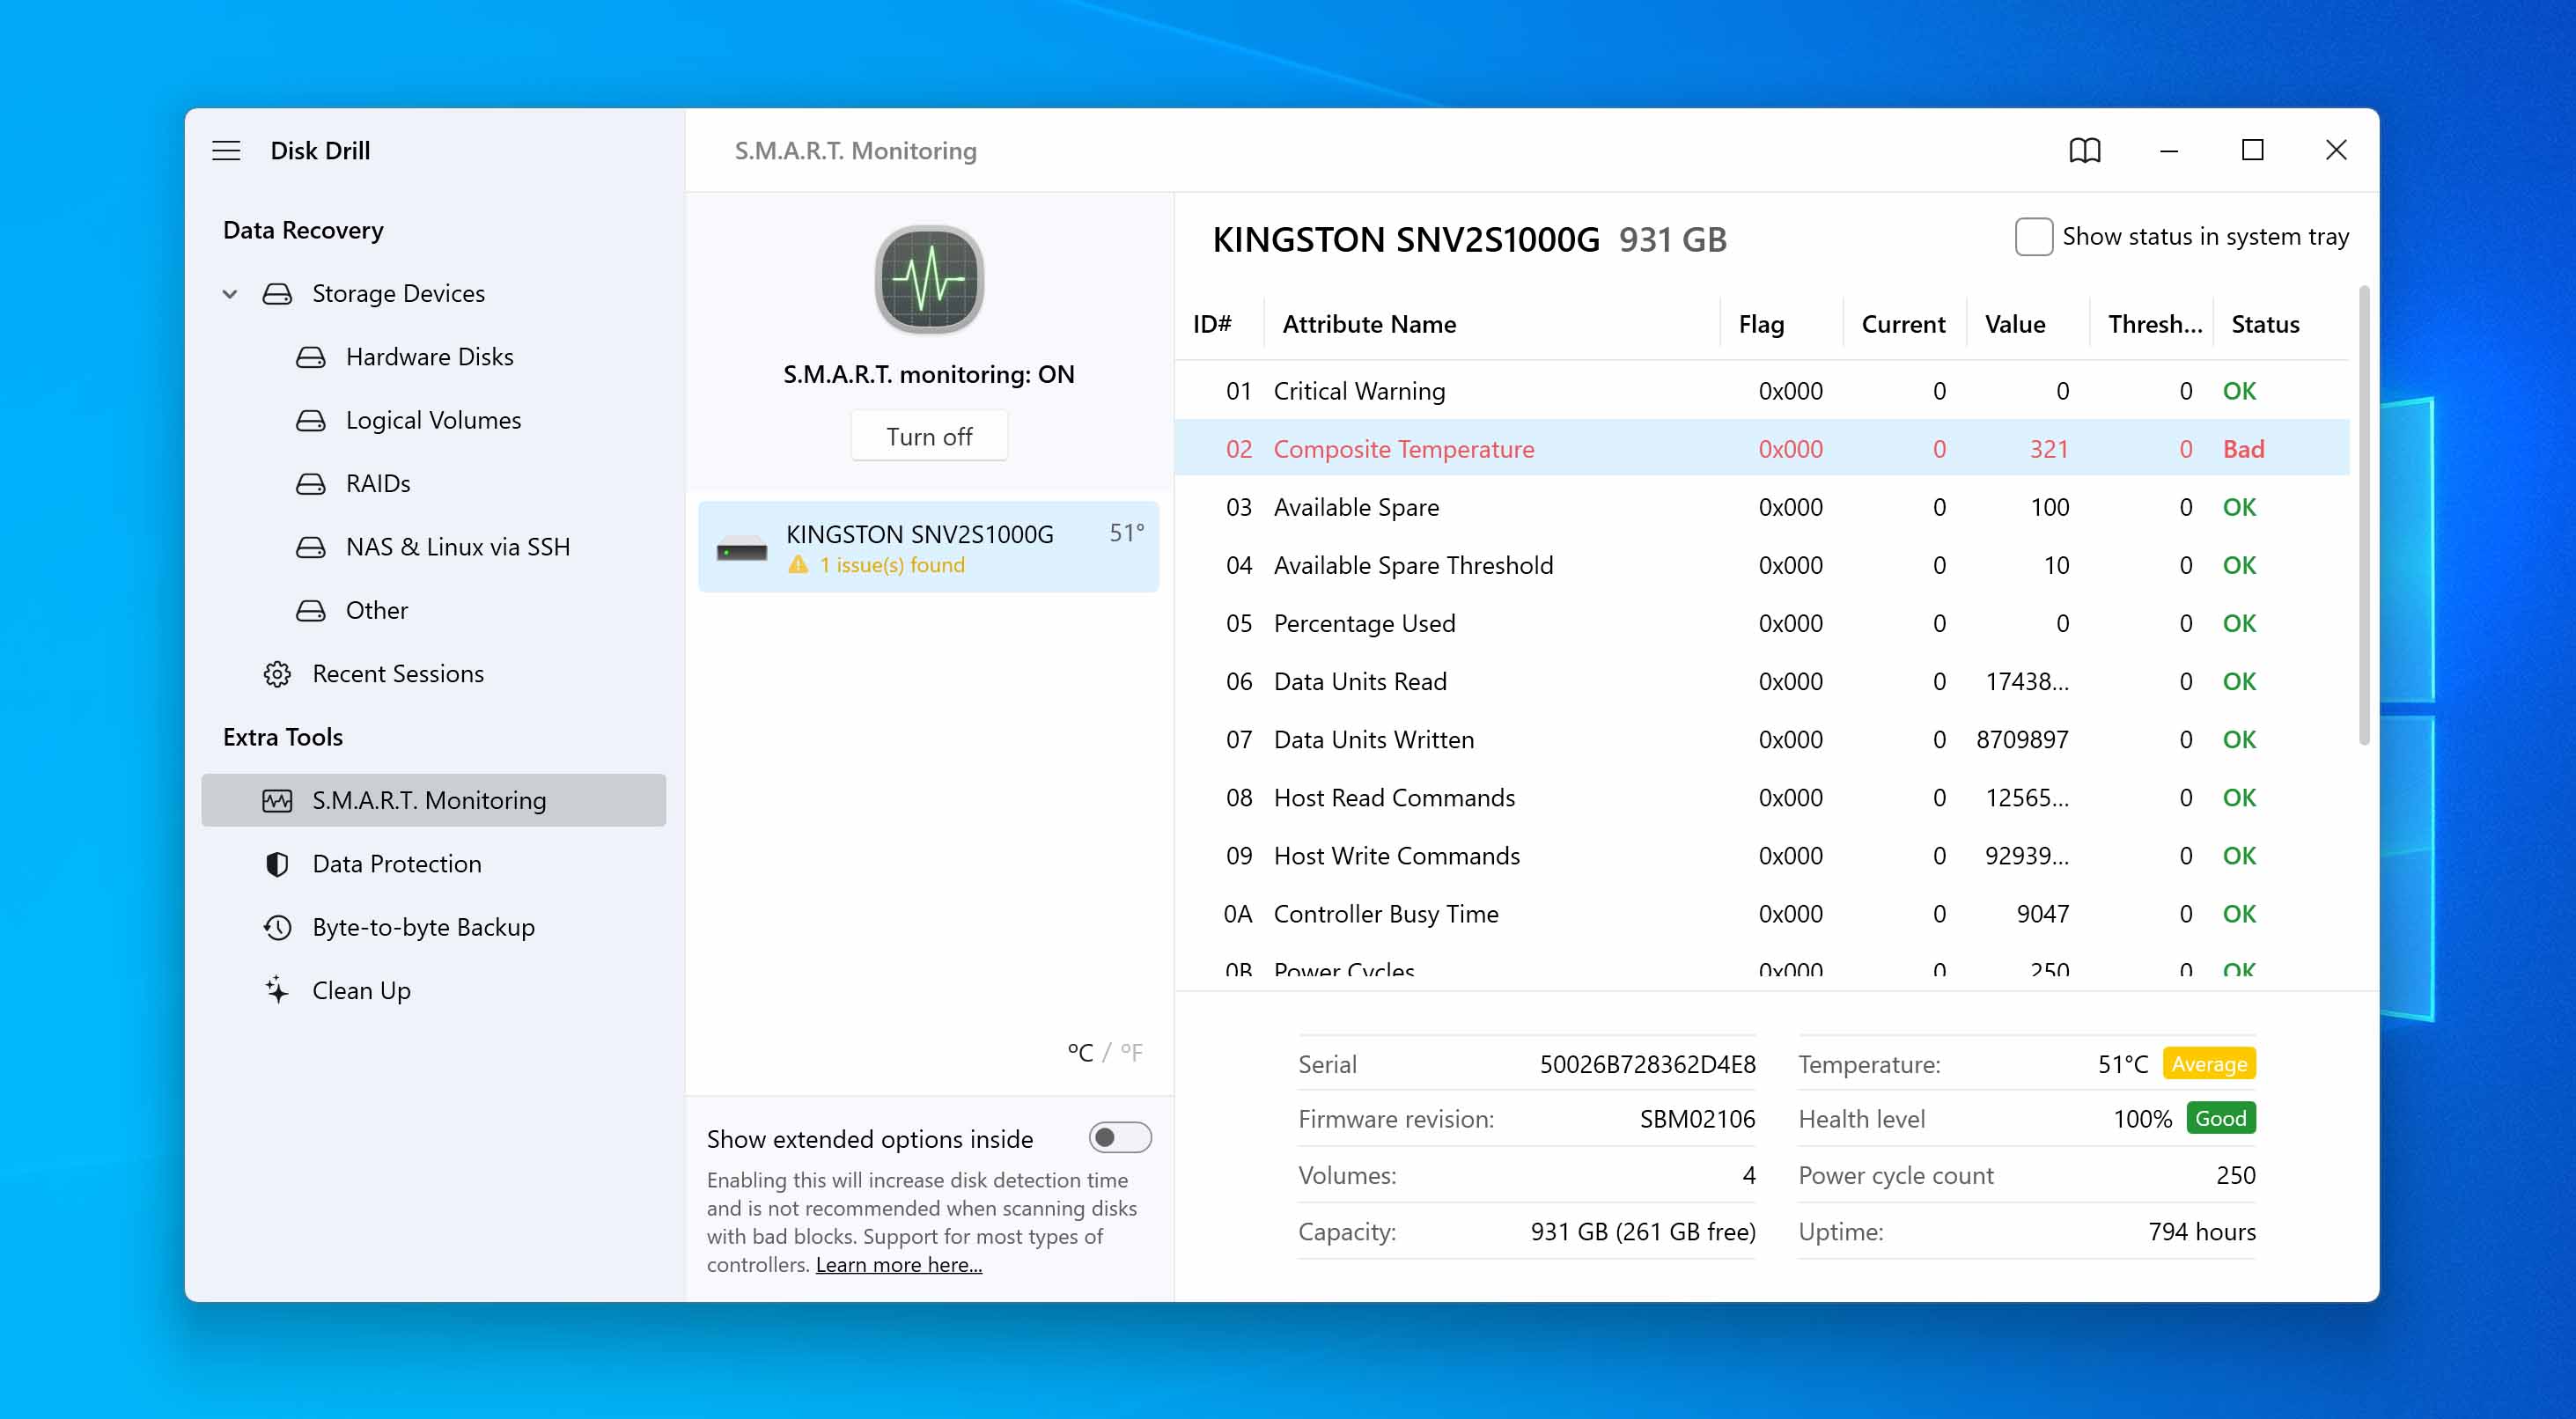
If upgrading your drive isn’t an option at the moment, you may be able to get a better understanding of what the issue is by monitoring your S.M.A.R.T. data. S.M.A.R.T. is a monitoring system that allows you to see valuable information about your drive and its status.
You can get the S.M.A.R.T. status of your drive by running wmic diskdrive get status in PowerShell, but this doesn’t break down each factor that’s measured. Instead, you’ll need to use another tool for that. Disk Drill comes with the ability to monitor your S.M.A.R.T. status in the background. Or, Hard Disk Sentinel is a good option that comes community-recommended.
Use Lightweight Software Alternatives
Sometimes you just have to make do with the drive you have. Where possible, look at using lightweight software alternatives. Let’s look at web browsers, for example. Chrome is a fairly resource-intensive web browser. Edge, on the other hand, has made significant strides in optimization, making it one of the more reliable options nowadays in terms of performance.
Knowing your drive’s limitations and working with what you have can go a long way in keeping your disk usage maintainable.
Sort Processes by Disk Usage
In Task Manager, you can sort the active processes running on your computer by disk usage. In doing so, you will be able to see what processes are causing high disk usage. If you find unfamiliar processes, search for them on Google to understand what they are and whether you need them.
Scan for Malware
Viruses can infect your disk and cause high disk usage through shadow interactions with your PC. Scan your computer for malware with Windows Security or a third-party antivirus solution like Trend Micro.
Jeff Cochin
Jeff Cochin is a data management and recovery expert. He also serves as a technical writer, testing and reviewing tech solutions in various fields.
Jeff Cochin is a professional data management, warehousing and recove…
Read full bio
Jeff Cochin is a data management and recovery expert. He also serves as a technical writer, testing and reviewing tech solutions in various fields.
Jeff Cochin is a professional data management, warehousing and recove…
Read full bio
Approved by
Brett Johnson
This article has been approved by Brett Johnson, Data Recovery Engineer at ACE Data Recovery. Brett has a Bachelor’s Degree in Computer Systems and Network, 12 years of experience.
This article has been approved by Brett Johnson, Data Recovery Engineer at ACE Data Recovery. Brett has a Bachelor’s Degree in Computer Systems and Network, 12 years of experience.
Высокая нагрузка на диск наблюдается в Windows 10 намного чаще, чем в предыдущих версиях ОС. Как, собственно, выглядит проблема: пользователь замечает резкое и продолжительное падение производительности системы, и если открыть окно диспетчра задач (Task Manager), можно заметить, что степень загрузки (использования) диска достигает 100%. Как правило, частое возникновение такой проблемы свидетельствует о некорректности настройки системы, или ошибках в одном из системных драйверов, а не о наличии на компьютере вредоносного ПО (хотя бывают и исключения).
В этой статье мы рассмотрим основные причины, которые могут вызвать высокую загрузку дисковой подсистемы (будь то HDD или SSD) в Windows 10 и типовые способы противодействия.
Примечание. Некоторые из предложенных методов (особенно метод с реестром) следует выполнять с осторожностью, четко понимая что и зачем вы делаете. В противном случае, система может просто перестать загружаться.
Содержание:
- Поиск программ, активно использующих диск
- Проблемный драйвер AHCI
- Еще несколько способов решить проблему с высокой загрузкой HDD или SSD в Windows 10
Поиск программ, активно использующих диск
В первую очередь стоит попытаться обнаружить программу (возможно расположенную в автозагрузке), которая активно использует диск.
Для этого:
- Запустите диспетчер задач Task Manager (Ctrl+Shift+Esc)
- Перейдите на вкладку процессов (Processes) и отсортируйте процессы по столбцу Disk

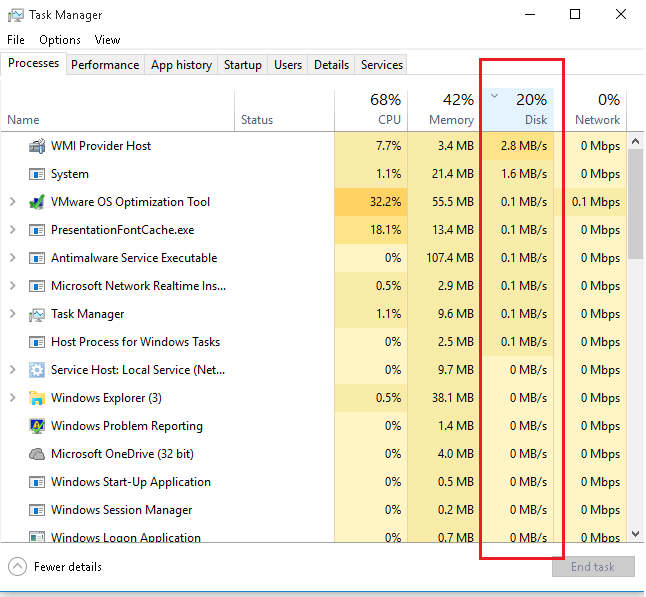
Проверьте, возможно одна из запущенных программ вызывает высокую нагрузку на диск (она будет первая в списке процессов и потреблять существенной количество ресурсов дисковой подсистемы). Это может быть задача антивирусного сканирования, торрент клиент и т.п. В зависимости от ситуации, можно попробовать установить последнюю версию проблемного ПО, удалить его или перенастроить.
Проблемный драйвер AHCI
На большинстве системах с Windows 10 используется стандартных AHCI драйвер для контроллера SATA дисков. В этом можно убедиться, если открыть диспетчер устройств (Device Manager) и посмотреть тип устройства в разделе IDE ATA / ATAPI controllers . Как правило, там будет указано контролер «Standard controller SATA AHCI», и в большинстве случаев это не проблема.
Однако, если без видимых причин на вашем компьютере наблюдается высокая загрузка диска, попробуйте сменить данный драйвер на «родной» драйвер, скачанный с сайта производителя чипсета вашего компьютера.
Совет. На сайте вендора этот драйвер нужно искать по ключевым словам AHCI, SATA (RAID) или Intel RST (Rapid Storage Technology)
После установки драйвера, перезагрузите компьютер и проверьте, осталась ли проблема.
Если вы не смогли найти официальный драйвер AHCI, или он не устанавливается корректно, возможно причина большой нагрузки на диск, в том, что контроллер вашего диска не поддерживает технологию MSI (Message Signaled Interrupt), которая включена по умолчанию в стандартном драйвере. Это довольно распространённое явление.
Совет. Этот метод поможет решить проблему в случае, если используется стандартный драйвер Standard controller SATA AHCI, и в свойствах драйвера в диспетчере устройств присутствует файл storahci.sys.
- Откройте свойства драйвера Standard controller SATA AHCI и перейдите на вкладку Details. В списке свойств драйвера, найдите свойство Device Instance Path и скопируйте его значение.
- Запустите редактор реестра, и перейдите в ветку HKEY_LOCAL_MACHINE\System\CurrentControlSet\Enum\PCI\[your_sata_path]\[тут_некий_уникальный_id]\Device Parameters\Interrupt Management\MessageSignaledInterruptProperties\
- Смените значение ключа MSISupported на 0.
- Закройте редактор реестра и перезагрузите компьютер. Проверьте, пропала ли проблема.
Еще несколько способов решить проблему с высокой загрузкой HDD или SSD в Windows 10
Есть еще несколько типовых способов, которое в некоторых случаях могут помочь снизить высокую загрузку на диск путем отключения некоторых некорректно работающих функций Windows 10. И если ни один из рассмотренных способов не помог решить проблему, попробуйте отключить службы Windows 10 (службу поиска, Prefetch и Superfetch) с помощью следующих команд в консоли PowerShell:
- Отключить службу Superfetch
net stop SysMain
set-service SysMain -StartupType Disable - Отключить службу поиска Windows (Windows Search Service)
net stop Wsearch
set-service Wsearch -StartupType Disable - Отключить Prefetch, изменив ключ реестра с помощью PoSh
set-itemproperty -path «HKLM:\SYSTEM\CurrentControlSet\Control\Session Manager\Memory Management\PrefetchParameters» -name EnablePrefetcher -value 0