
Execute DISKMGMT.MSC for quick access
What to Know
- Open Run from the Start menu or Apps screen. Type diskmgmt.msc and press Enter.
- Alternatively, press WIN+X and select Disk Management.
- Or, open Task Manager via Ctrl+Shift+Esc, go to File > Run new task, and enter diskmgmt.msc.
A quick way to open the Disk Management utility in Windows is from the Command Prompt. Disk Management is buried several layers deep, so having a faster way to access this super-tool for your hard drives and other storage devices can come in handy. Follow these easy steps to start Disk Management from the Command Prompt in Windows 11, Windows 10, Windows 8, Windows 7, Windows Vista, or Windows XP.
How to Open Disk Management With a Command
Using the Disk Management command only takes a few seconds once you learn how it’s done.
-
In Windows 11/10/8, open Run from the Start menu or Apps screen (or see the A Quicker Method… section at the bottom of the page for an even faster method for opening this tool).
In Windows 7 and Windows Vista, select Start.
In Windows XP and earlier, go to Start and then Run.
What Version of Windows Do I Have?
Technically, opening Disk Management from the Command Prompt would require that you actually open the Command Prompt program (which you can do if you want; it works the same way). However, running an executable program from the search or Run box accomplishes the same thing.
-
Type the following Disk Management command in the text box:
diskmgmt.mscThen, press the Enter key or press OK, depending on where you ran the command from.
Diskmgmt.msc isn’t the «Disk Management command» any more than any non command-line tool’s executable is a «command.» In the strictest sense, diskmgmt.msc is just the Run command for the program.
-
Wait while Disk Management opens. It should be immediate, but it might take a few moments for the whole program to load.
Now that it’s open, you can use it to change drive letters, partition a drive, format a drive, and more.
The method you use to open Disk Management doesn’t change what you can do with it. In other words, all the same functions exist no matter which shortcut method you use, whether it be with Command Prompt, the Run dialog box, Computer Management, or even File Explorer.
A Quicker Method in Windows 11, 10 & 8
If you’re using a keyboard or mouse with Windows 11, 10, or 8, opening Disk Management via the Power User Menu is even faster than via its Run command.
Just press WIN+X to bring up the menu, then click Disk Management. In Windows 8.1 and newer, right-clicking the Start button works, too.
In Windows 10, you could also execute diskmgmt.msc directly from the Cortana interface, which is nice if you’re used to using that to execute commands already.
Another way to use the Disk Management command is from Task Manager. This definitely isn’t a quicker method than the procedure described above, but it might be your only option if you’re having trouble displaying the desktop or opening menus.
To do this, open Task Manager via Ctrl+Shift+Esc, and go to Run new task (Windows 11) or File > Run new task. Enter diskmgmt.msc and select OK.
The Task Manager method is the exact same as using the Run dialog box. If you compare the two boxes, you’ll notice that they look nearly the same because you’re accessing the same function in Windows: the command line.
FAQ
-
In the Command Prompt, type start ms-settings: and press Enter to immediately launch the Settings app.
Thanks for letting us know!
Get the Latest Tech News Delivered Every Day
Subscribe
Windows Disk Manager CMD refers to the command-line interface tools in Windows that allow users to manage disk partitions and volumes efficiently, such as creating, deleting, and resizing drives.
Here’s a code snippet to list all disks using the Diskpart utility:
diskpart
list disk
Understanding Windows Disk Manager
What is Disk Management?
Disk Management is a built-in utility in Windows that allows users to manage their computer’s hard drives and partitions. Through this interface, users can create, delete, format, and resize partitions, as well as manage drive letters and disk settings. While most users access Disk Management via the graphical interface, many advanced operations can be more efficiently executed using the command line interface (CLI) through Windows Disk Manager CMD.
Benefits of Using CMD for Disk Management
Using CMD for disk management provides several benefits:
-
Accessibility and Control: Command line operations can often be executed even when the graphical interface is unresponsive or unavailable. This makes it a powerful alternative for troubleshooting and maintenance.
-
Speed and Efficiency: For experienced users, entering commands directly can significantly reduce the time spent navigating through graphical menus. CMD allows for faster execution of repetitive tasks through scripting.
Mastering Windows Time Cmd: A Quick Guide
Getting Started with CMD Disk Management
Accessing Command Prompt
To begin using the Windows Disk Manager via CMD, you need to launch the Command Prompt. Here’s how:
- Press `Windows + R` to open the Run dialog.
- Type `cmd` and hit Enter.
- For elevated permissions, right-click the Command Prompt icon and select «Run as administrator.»
Introduction to Diskpart
Diskpart is a command-line utility that provides advanced disk management capabilities. To launch Diskpart, simply type the following command in the Command Prompt:
diskpart
Once Diskpart is running, you can enter various disk management commands. Be cautious; commands executed in Diskpart can result in data loss if not entered correctly.
Mastering Windows Cmd Disk Management in Minutes
Common Disk Management Commands
Listing Disks and Partitions
To view all connected disks, use the command:
list disk
This command displays a list of all physical disks connected to your machine, including their sizes and available space. Understanding this output is crucial for selecting the right disk for any operation.
Selecting a Disk
After identifying the disk you want to manage, use the following command:
select disk [number]
Replace `[number]` with the appropriate disk number. Selecting a disk places it in focus for subsequent commands. Always verify your selection to prevent accidental operations on the wrong disk.
Creating a New Partition
To create a new partition on the selected disk, execute:
create partition primary size=[size in MB]
For example, if you want to create a 500 MB partition, you would use:
create partition primary size=500
Creating a new partition allows you to organize data effectively or set up additional operating systems.
Formatting a Partition
Once a partition is created, it often requires formatting. Use this command:
format fs=ntfs quick
This command formats the partition with the NTFS file system and uses the quick format option to speed up the process. If you prefer another file system (e.g., FAT32), adjust the command accordingly.
Assigning a Drive Letter
To make a partition accessible to the user, assign it a drive letter:
assign letter=[desired letter]
For example, if you want to assign the letter «E», you would execute:
assign letter=E
This makes the partition easier to access through File Explorer.
Deleting a Partition
If you need to free up space, you can delete a partition with caution. To do this, ensure you have selected the correct partition and then use:
delete partition
This command will remove the selected partition permanently, so it’s vital to ensure all necessary data is backed up before proceeding.
Mastering Windows Services Cmd: A Quick Guide
Advanced Disk Management Commands
Resizing a Partition
In some situations, you might need to resize a partition to better accommodate your data. Use the following commands:
To extend a partition:
extend size=[desired size]
To shrink a partition:
shrink desired=[desired size]
For example, if you want to extend the partition by 200 MB, you would execute:
extend size=200
Understanding how to resize partitions can help you manage disk space more efficiently.
Converting Disk Types
If you plan to upgrade your system or change the partitioning scheme, you may need to convert your disk type. Use these commands based on your requirements:
To convert to MBR (Master Boot Record):
convert mbr
To convert to GPT (GUID Partition Table):
convert gpt
Choosing between MBR and GPT depends on the size of your hard drive and how you plan to use it. GPT is ideal for larger drives and supports modern BIOS systems.
Repairing Disk Issues
To repair common disk issues, leverage the Chkdsk utility with the following command:
chkdsk [drive letter]: /f
For instance, to check and repair drive E, you would execute:
chkdsk E: /f
This command scans for errors on the disk and attempts to fix them automatically, a crucial step in maintaining disk integrity.
Mastering Windows Uptime Cmd for Quick Checks
Practical Examples and Use Cases
Common Scenarios for CMD Disk Management
- Setting up a dual-boot system: Use disk management commands to create and format partitions for installing an additional OS.
- Creating a recovery partition: Reserve space by creating a dedicated partition for system recovery or backup purposes.
- Managing external USB drives: Use diskpart to format and assign drive letters to external drives for better accessibility.
Real-Life Examples
-
Creating a Recovery Partition:
If you want to create a recovery partition on Disk 1 with a size of 1 GB:select disk 1 create partition primary size=1024 format fs=ntfs quick assign letter=R -
Repairing a USB Drive:
If you notice issues with your external USB drive (D:), run:chkdsk D: /f
Mastering Windows Copy Folder Cmd in Minutes
Tips and Best Practices
Safety Precautions
- Always ensure you backup your data before performing any disk operations. Data loss is a significant risk with disk management commands.
- Use the `list` commands to double-check the disks and partitions you are about to modify.
Resources for Further Learning
- Consider checking out online courses or forums dedicated to Windows command line interfaces. These can offer more hands-on experience and community support.
Master Windows Run Cmd Like a Pro
Conclusion
The Windows Disk Manager CMD provides powerful functionalities for managing disk drives and partitions. With a solid understanding of commands such as Diskpart and their applications, you can optimize your storage management and enhance system performance. Practice these commands in a controlled environment to gain confidence and proficiency.
Mastering Windows MySQL Cmd in Simple Steps
Call to Action
If you’re interested in mastering CMD and would like personalized guidance, subscribe to our newsletter for more tutorials or join our classes to boost your command line skills!
Disk Management or diskmgmt.msc is one of the oldest tools in Windows. Although Microsoft hasn’t updated it for many many years, you can still find it in Windows 11 and Windows 10. It’s relatively easy to use and helpful when you need to manage the drives and partitions inside your computer without installing more advanced third-party applications. But, before using it, you need to know how to open it. So, here are all the ways to open Disk Management in Windows 11 and Windows 10:
1. Start Disk Management from the WinX menu
The fastest way to open Disk Management is to use the WinX menu. Right-click or press and hold on the Start button and, in the menu that opens, choose Disk Management.
Press Windows + X followed by K
If you want to achieve the same result using only the keyboard, press Windows + X, followed by K. The Disk Management window opens immediately.
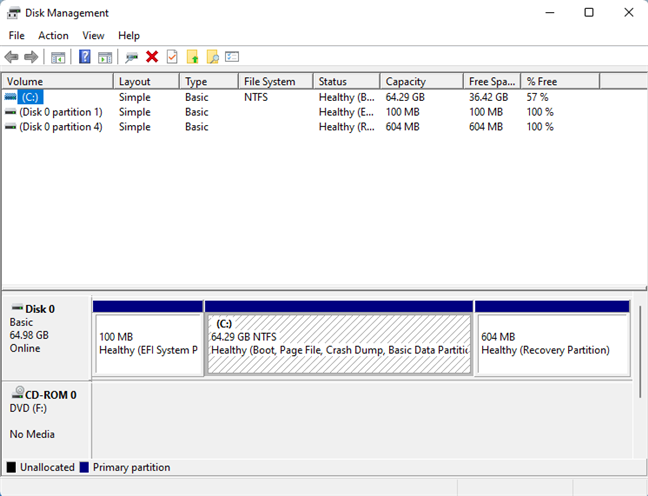
Disk Management in action
TIP: Here are 7 things you can do with the Disk Management tool in Windows.
2. The Run command for Disk Management
Another quick method is this: press the Windows + R keys on your keyboard to open the Run window, and type this command:
diskmgmt.msc
The Run command for Disk Management
Press Enter or click/tap OK to run the command you’ve entered.
3. Open Disk Management from CMD, PowerShell, or Windows Terminal
Open Command Prompt, PowerShell, or Windows Terminal. It doesn’t matter which command-line environment you prefer. Then, type this command and press Enter:
diskmgmt.msc
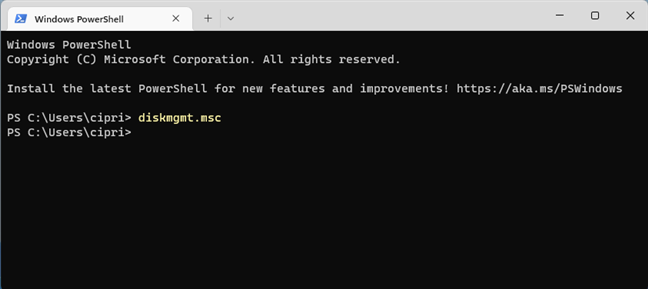
Open Disk Management from CMD
The Disk Management window is opened in seconds.
TIP: If you like working from the Command Prompt, here’s how to use diskpart, chkdsk, defrag, and other disk-related commands.
4. Search for Disk Management or diskmgmt.msc
You can also use the Search bar in Windows 10 or the Search icon from Windows 11. Click on it and then type “disk management.” In the list of results, click or tap “Create and format hard disk partitions” to open Disk Management.
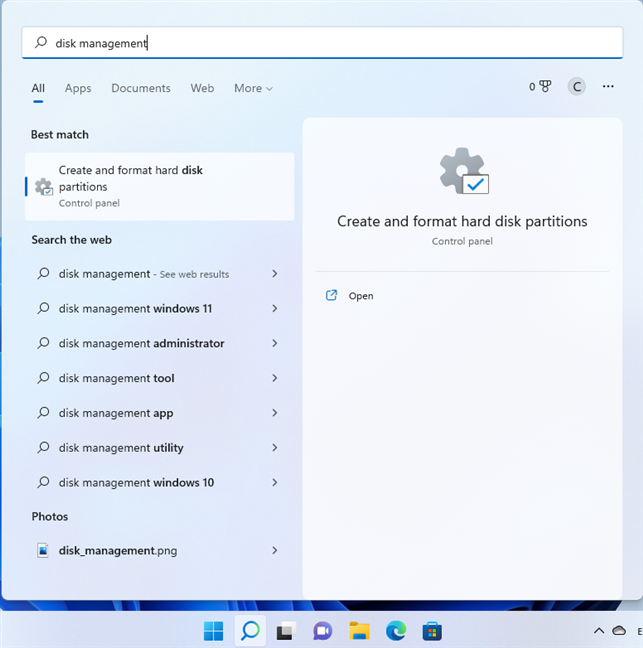
Search for Disk Management
You can also search for “diskmgmt.msc” and click or tap on the first result.
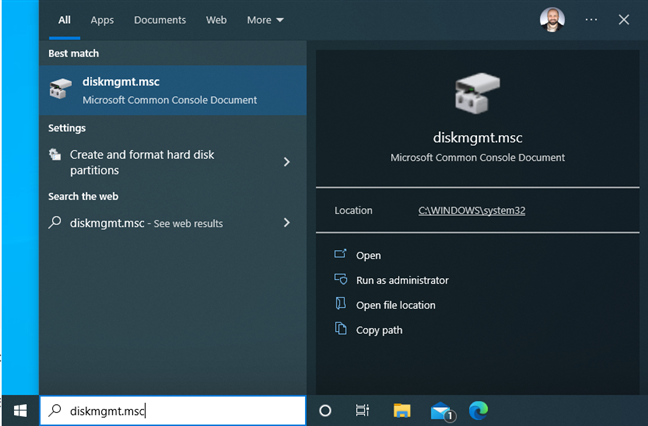
Search for diskmgmt.msc
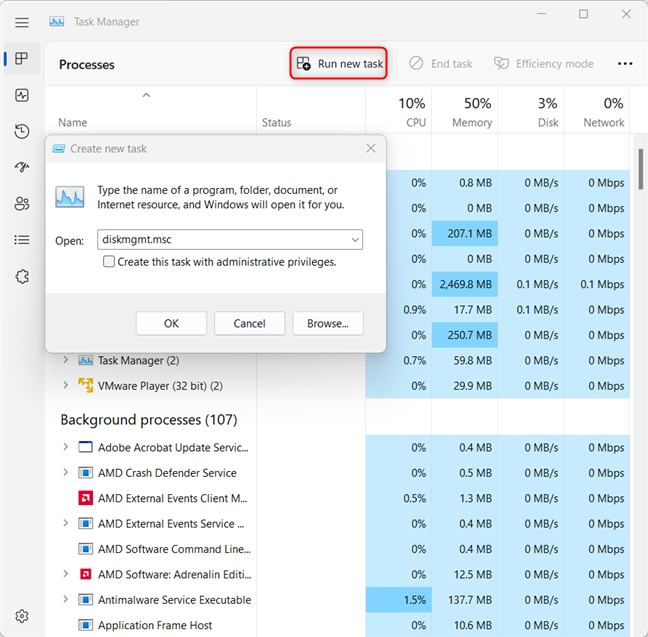
5. Start Disk Management from Task Manager
Open Task Manager by pressing Ctrl + Shift + Escape on your keyboard. If you’re using Windows 10 and the Task Manager opens in its compact view, click or tap More details. Then, click or tap File > Run new task. In the Create new task dialog box, type this command and click or tap OK:
diskmgmt.msc
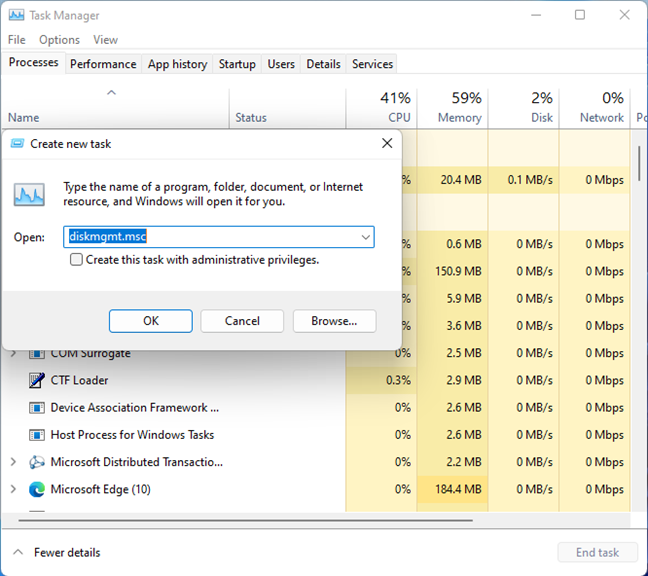
Run diskmgmt.msc from Task Manager
In Windows 11, you won’t see the compact view. In Task Manager, click or tap “Run new task” in the Processes tab to access the Create new task dialog box.
The Task Manager in Windows 11 is a little bit different
6. Open Disk Management (diskmgmt.msc) from File Explorer
You can also navigate to the physical location of Disk Management’s file on your disk. To do that, open File Explorer (Windows + E) and browse to:
C:\Windows\System32\diskmgmt.msc
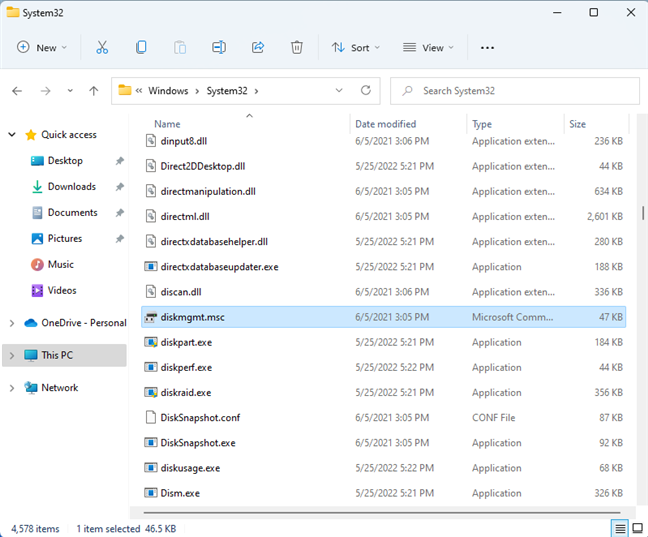
diskmgmt.msc is found in the System32 folder
Double-click on the diskmgmt.msc file to open Disk Management.
7. Create a Disk Management shortcut
You can create a Disk Management shortcut by yourself and place it on your desktop or someplace else. To make the shortcut, right-click or press and hold on an empty space on your desktop, and choose New > Shortcut.
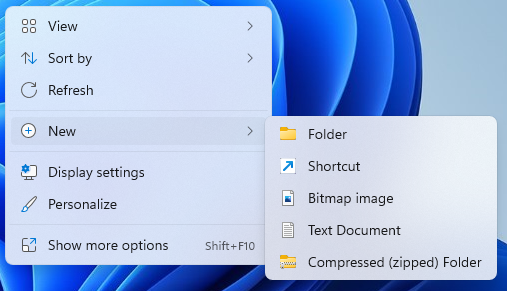
Right-click on the desktop and choose New > Shortcut
In the Create Shortcut wizard, enter diskmgmt.msc as the target.
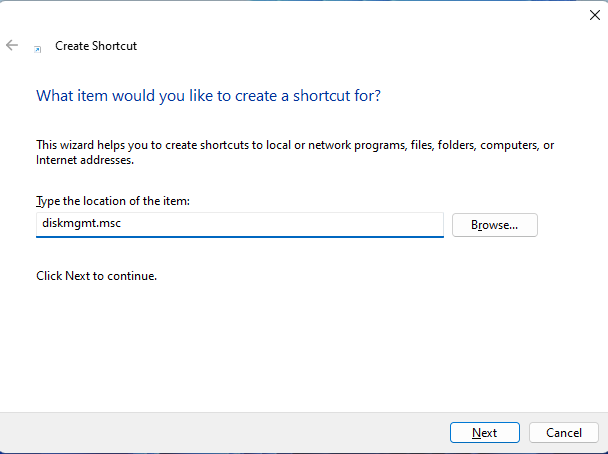
Set the target to diskmgmt.msc
TIP: For help on this topic, here’s how to create shortcuts for files, folders, apps, and web pages in Windows.
8. Access Disk Management from Computer Management
Disk Management can also be accessed via the more complex Computer Management console. Here are 11 ways to open Computer Management in Windows. Disk Management is part of the Storage section of tools on the left side of Computer Management.
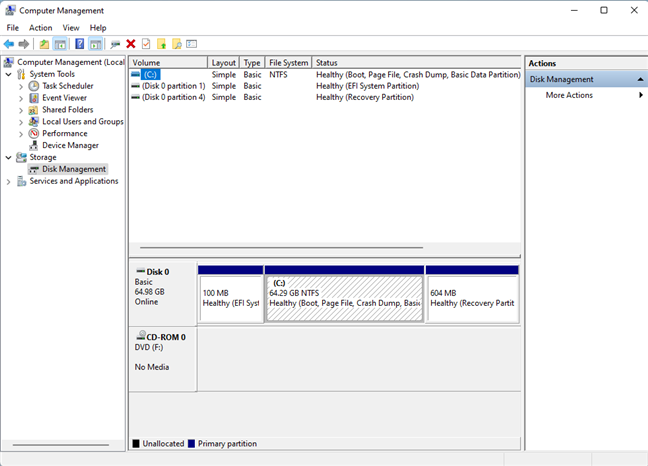
Disk Management is part of Computer Management
How are you using Disk Management?
I use the Disk Management tool in Windows to manage my computer’s partitions and drives. However, the activities I perform most often are changing drive letters and resizing partitions. What about you? Do you use it to format or delete drives? Comment below and share how you use Disk Management.
