
Windows systems write blocks of data to underlying storage – the size of these blocks is given various terms, for example –
- Block size
- Allocation unit
- Cluster size
The important thing to consider is that this unit of allocation can have an impact on the performance of systems. By default Windows will format a disk with a standard 4KB block size. Microsoft Exchange server for example, recommends the unit size be 64KB. Microsoft recommend this for SQL server and virtual machines as well. By not setting the value correctly on an underlying disk we can generate performance problems for our system. Aligning block size with the data set being written can help to ensure efficient IO processing. If we consider SQL server which uses a 64KB extent (which is it’s basic unit, made up of eight, 8KB pages) we can most effectively format the disk with a 64KB block size. Assuming this is a locally attached disk we can then have Windows write the extent as one contiguous block rather than having to split it up into say 4KB default sized blocks. Imagine taking that 64KB extent and having to split that single IO into 16 smaller IO writes – not very efficient.
If we are writing to SAN storage we also want to make sure the block size (or whatever the vendor calls it) is also appropriate, again to try and avoid split IO writes and to ensure performance. It’s a big topic to discuss but I will end here and move on to how we can retrieve this information from our servers.
PowerShell Commands
Microsoft are deprecating the Get-wmiObject cmdlet in favour of the Get-cimInstance cmdlet. I have provided both as a reference in case you are doing this on older systems. Note that the value is described as ‘BlockSize’.
PS C:\> Get-WmiObject -Class Win32_Volume | Select-Object Label, BlockSize | Format-Table -AutoSize
PS C:\> Get-CimInstance -ClassName Win32_Volume | Select-Object Label, BlockSize | Format-Table -AutoSize
Example output –
PS C:\> Get-CimInstance -ClassName Win32_Volume | Select-Object Label, BlockSize | Format-Table -AutoSize

Label                  BlockSize

-----                  ---------

4096

bsa_sqlinfra01_db_vv        4096
bsa_sqlinfra01_logs_vv      4096
bsa_sqlsp_db_vv            65536
bsa_sqlsp_logs_vv          65536
Recovery                    4096
DOS Commands
We can make use of the fsutil amd DiskPart commands. Note that in fsutil the value is ‘Byte Per Cluster’ with a 64KB value while in DiskPart it is called ‘Allocation Unit Size’.
PS C:\> fsutil fsinfo ntfsinfo p:

NTFS Volume Serial Number :       0x5840d42e40d4151a
NTFS Version   :                  3.1
LFS Version    :                  2.0
Number Sectors :                  0x000000007ffbefff
Total Clusters :                  0x0000000000fff7df
Free Clusters  :                  0x0000000000459424
Total Reserved :                  0x0000000000000000
Bytes Per Sector  :               512
Bytes Per Physical Sector :       512
Bytes Per Cluster :               65536
Bytes Per FileRecord Segment    : 1024
Clusters Per FileRecord Segment : 0
Mft Valid Data Length :           0x000000000e840000
Mft Start Lcn  :                  0x000000000000c000
Mft2 Start Lcn :                  0x0000000000000001
Mft Zone Start :                  0x0000000000cf4180
Mft Zone End   :                  0x0000000000cf4c80
Resource Manager Identifier :     0C567257-18F9-11E5-80CE-00155DAEB03C
I will use the DiskPart utility to list all of the volumes attached to this server, then I will select a volume and use the ‘filesystems’ command to display the required information. As mentioned the value is now described as ‘Allocation Unit Size’.
DISKPART> list vol

Volume ###  Ltr  Label        Fs     Type        Size     Status     Info

----------  ---  -----------  -----  ----------  -------  ---------  --------

Volume 0     C                NTFS   Partition     59 GB  Healthy    Boot
Volume 1         Recovery     NTFS   Partition    300 MB  Healthy    Hidden
Volume 2                      FAT32  Partition     99 MB  Healthy    System
Volume 3     P   bsa_sqlsp_d  NTFS   Partition   1023 GB  Healthy
Volume 4     Q   bsa_sqlsp_l  NTFS   Partition    199 GB  Healthy
Volume 5     F   bsa_sqlinfr  NTFS   Partition    499 GB  Healthy
Volume 6     G   bsa_sqlinfr  NTFS   Partition    199 GB  Healthy

DISKPART> select vol 3

Volume 3 is the selected volume.

DISKPART> filesystems

Current File System

Type                 : NTFS
Allocation Unit Size : 64K
Flags : 00000000

File Systems Supported for Formatting

Type                 : NTFS (Default)
Allocation Unit Sizes: 512, 1024, 2048, 4096, 8192, 16K, 32K, 64K (Default)

Type                 : REFS
Allocation Unit Sizes: 64K (Default)

DISKPART>
As you can see Microsoft lack consistency in describing this attribute which is rather frustrating but such is the way of the IT world. It’s always important to check that you are formatting storage with the correct block size to avoid split IO and misalignment issues. I have seen some vendors (especially all flash array sellers) telling administrators not to worry because their system is ‘so fast’ any overhead or inefficiencies caused can be compensated for by the systems speed. Personally I hate this notion and fully believe everything should be optimised and deployed according to best practices to get the most out of the system.
Powershell helps in fetching the block size of the disk volumes in the computer. We can use Powershell cmdlets on a local or remote computer to get the block size of a disk volume within the computer. We look at the multiple ways by which we can use Powershell to find the disk volume’s block size.
To find the disk information, please initiate a Powershell session with administrative privileges. So, run Powershell as an administrator.
Find NTFS block size using fsutil command in Powershell
The Fsutil command is available in Powershell to find all the significant details of a computer’s disk volume. Fsutil can be used through the generic command prompt or through the Powershell environment to execute the fsutil command.
Use the following fsutil command in Powershell to get disk details. From the details, we need to pick the ‘Bytes per Cluster’ as the value of ‘Bytes per Cluster’ corresponds to the NTFS block size.
We share a fsutil command report for checking the ntfs block size for the C:.
fsutil fsinfo ntfsinfo c:\
The command above will get the disk details for the C: drive. The output of this command is shared below as a screenshot. We are, particularly, interested in getting the information contained in the field ‘Bytes per cluster’. It has been highlighted in the command output shared below.

We can see from the command output that the block size for C: is 4096 bytes or 4 KB.
We will look at additional methods by which you can get the block size of disk volumes in Powershell.
Find Block size of disk using WMI Object
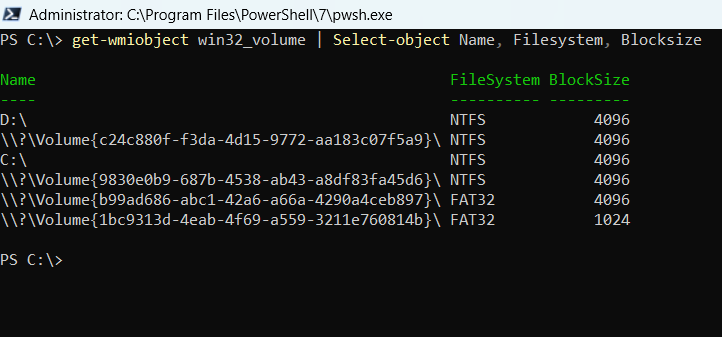
WMI Object can be used to find all the disk details. For this to happen, WMI Object will work on the Win32_Volume class. The command that can be used to get the block size of the disk volume is mentioned below:
get-wmiobject win32_volume | Select-object Name, Filesystem, Blocksize
The command output for this WMIObject cmdlet is given below in the form of a screenshot.
Disk block size using CIM Instance in Powershell
Similar to the WMI Object directive, the CIM Instance directive uses the Win32_Volume class to fetch disk details of the computer. The command output is almost a replica of the WMI Object’s output.
The exact command for getting the block size of a disk using the CIM Instance directive is shared hereunder:
get-ciminstance win32_volume | Select-object Name, Filesystem, Blocksize
The output of this command is shared below as a screenshot. From the command output, you can see that the disk block size for C: and D: is 4096 bytes or 4 KB. The output matches the command output of the fsutil command.

Summary
In this Powershell tutorial, we have discussed three ways by which we can the information about the block size of a disk volume on the computer. We can use the fsutil command, WMI Object directives or the CIM Instance directives to fetch information about the block size of a disk volume in the computer.
Rajesh Dhawan is a technology professional who loves to write about Cyber-security events and stories, Cloud computing and Microsoft technologies. He loves to break complex problems into manageable chunks of meaningful information.
If you want to change the block size of your hard drive from 4K to 64K, you are at the right place. Here, this post from MiniTool Partition Wizard introduces how to change block size from 4K to 64K with/without formatting in detail. You can take it as a reference.
What Is Block Size
In computer file systems, the block is a logical concept like a cluster. It refers to the smallest logical unit of disk space that can be allocated to hold a file. A block can only store one single file no matter if the file size is large or small.
Tips:
In general, the allocation unit in Linux is called block while in Windows it’s called cluster.
To some degree, the block size will influence the disk space utilization efficiency and read/write speed. If you save a very small file in a large block, you will cause a waste of disk space. On the other hand, using a small block size for a large file may lead to a slow read/write speed. As a result, it takes lots of time to access the specific file.
In addition, an improper block size can also result in disk fragmentation issues and increase file system overhead.
Usually, a block consists of a specific number of sectors (like 2, 4, 8…2 ⁿ sectors). The size of each sector is too small (only 512B), making it hard to address and allocate data sector by sector. Therefore, the file system combines contiguous groups of sectors to form blocks for better disk data management.
Often, the block size of a storage device is set by default to best fit within its size and current file system during formatting. Different file systems have different default block sizes. For instance, Windows will typically format an NTFS disk with a default 4KB block size. For FAT32, the default block size used in most systems is also 4KB.
If necessary, you can change the block size according to your needs.
Related articles:
- NTFS cluster size
- FAT32 allocation unit size
- exFAT allocation unit size
Considering the disk performance and space efficiency, it’s important to choose a suitable block size based on file systems and types of stored files. If you plan to save game files, videos, and other large files, it’s better to change the block size to 64K. 64K is much larger than the standard block size of 4K and is always used to store big files.
Why do you need to change block size from 4K to 64K for large files? Below, we summarize the main reasons for changing the 4K block size to 64K.
- Improve Disk Performance: When dealing with large files, a large block enables the disk to read or write more data in a single operation. So, you can access a file faster with an enhanced sequential read/write speed.
- Reduce the Risk of Disk Fragmentation: With a large block size, you just need a few blocks to store the large file, which may help you avoid issues related to disk fragmentation.
- Reduce File System Overhead: As mentioned earlier, the block size also impacts the file system overhead. Each block offers some space for metadata to track and manage file information. The larger the block size is, the fewer blocks and less metadata overhead on the disk will be.
After knowing the benefits of changing block size from 4K to 64K, let’s get down to the details on how to change the block size.
Change Block Size from 4K to 64K Without Formatting
In this section, we discuss how to change block from 4K to 64K with a wonderful block size changer – MiniTool Partition Wizard. It’s a professional and comprehensive disk partition manager that enables you to directly change the block size without formatting.
Besides, this program offers many other features related to partition or disk management. You can use it to partition/resize/clone hard drive, convert MBR to GPT and vice versa, check disk health, test disk speed, recover data from hard drive, and more.
To learn how MiniTool Partition Wizard helps change block size from 4K to 64K without formatting, you can take a look at the following content.
Step 1: Download and install MiniTool Partition Wizard on your PC. Then launch it to enter the main interface.
Note:
Only the Pro or higher editions of MiniTool Partition Wizard allow you to change the block size without formatting. Hence, make sure you upgrade the program to a suitable edition before starting.
MiniTool Partition Wizard DemoClick to Download100%Clean & Safe
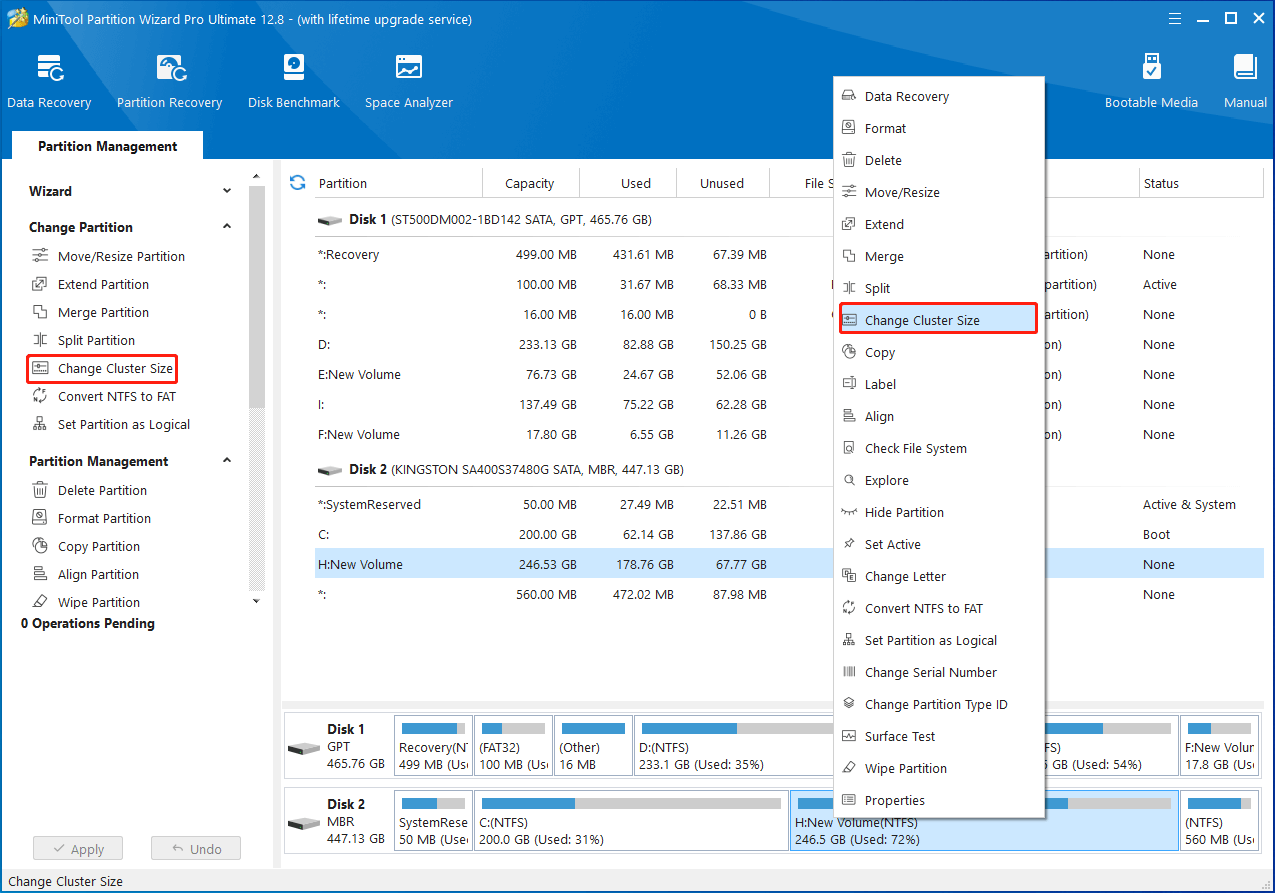
Step 2: To change block size from 4K to 64K without formatting, right-click the target partition and select Change Cluster Size directly. Alternatively, you can highlight the target partition and then choose Change Cluster Size from the left action panel.
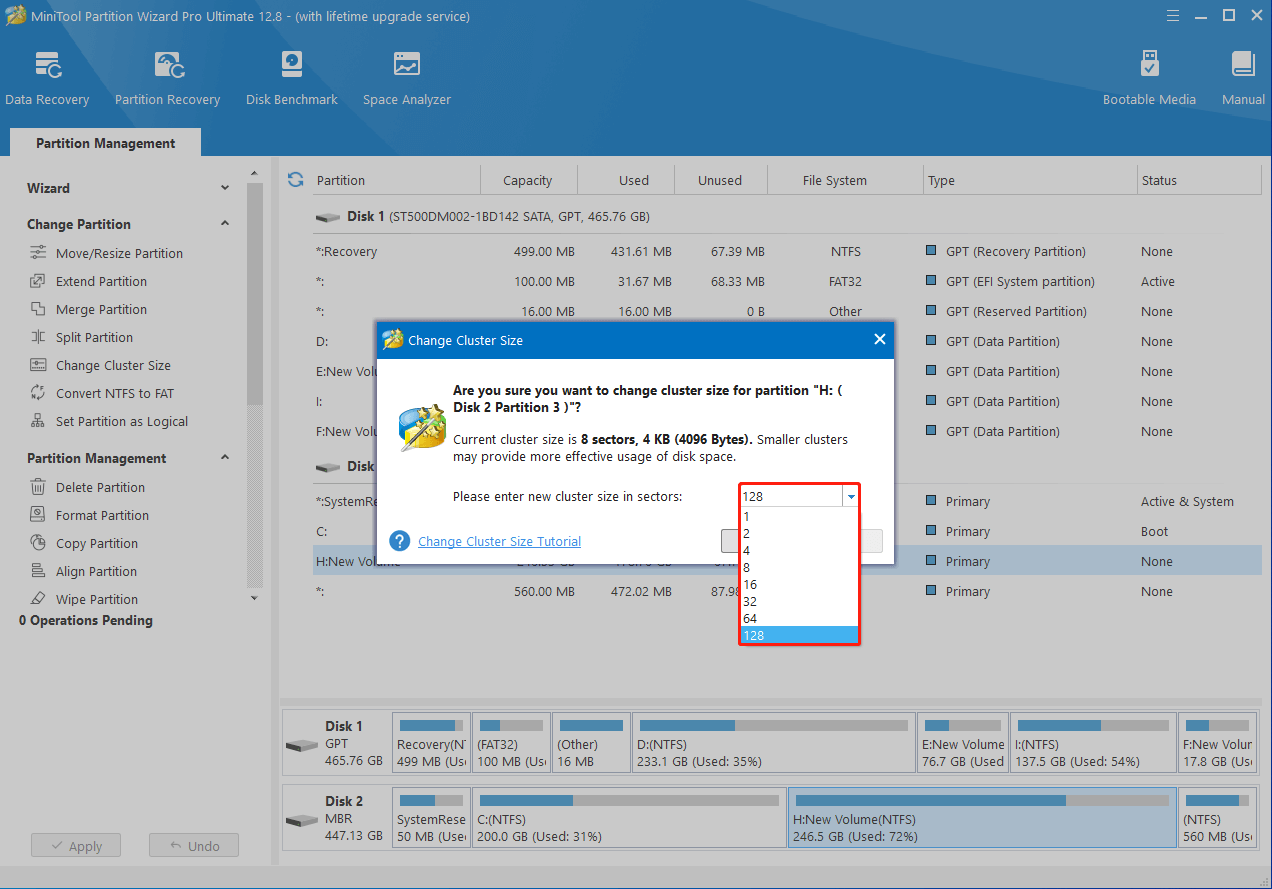
Step 3: In the pop-up box, decide the new cluster size in sectors by selecting a desired number from the drop-down menu. Here, we select 128 to change the cluster size to 64KB.
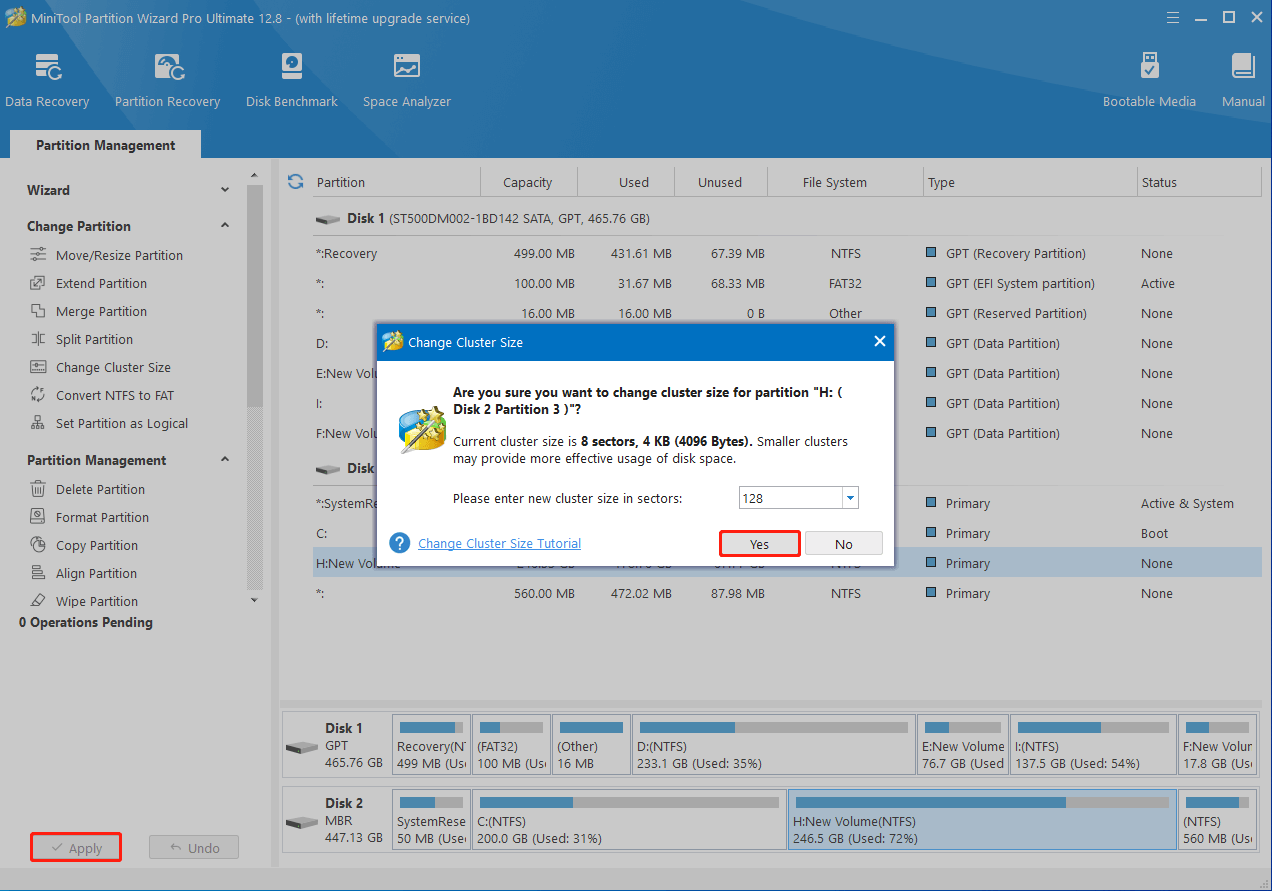
Step 4: After that, click Yes to go back to the main interface of the cluster size changer.
Step 5: Finally, don’t forget to click Apply to execute the pending operation.
Change Block Size from 4K to 64K with Formatting
Is there any way else to change block size from 4K to 64K? Well, as you can know from the above, it’s also possible to change the block size while formatting the specified hard drive. To help change block size from 4K to 64K with formatting, there are 4 ways available. You can pick one according to your preference.
Note:
It’s easy to change block size with formatting. However, it’s worth noting that the formatting process will erase all the data saved on the hard drive. To avoid data loss, you’d better back up important files before the operation.
Way 1: Use MiniTool Partition Wizard
In addition to the Change Cluster Size feature, MiniTool Partition Wizard also enables you to change the block size for free with its Format Partition feature. You can try it with the following guide.
Step 1: Download, install, and launch MiniTool Partition Wizard on your desktop.
MiniTool Partition Wizard FreeClick to Download100%Clean & Safe
Step 2: Right-click the target partition and select Format to proceed.
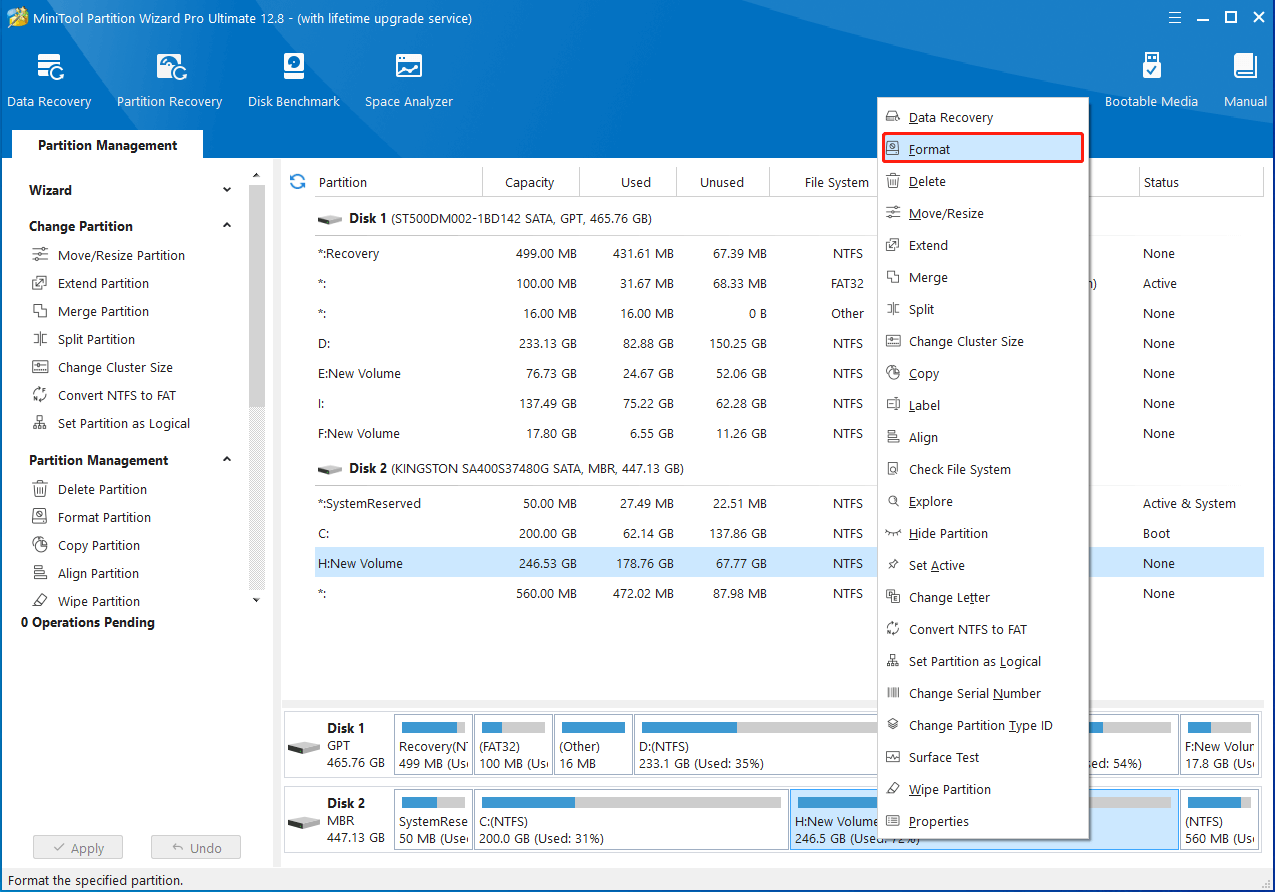
Step 3: Choose 64KB from the Cluster Size drop-down menu and click OK. Meanwhile, you can expand the File System menu and select a different file system according to your preference.
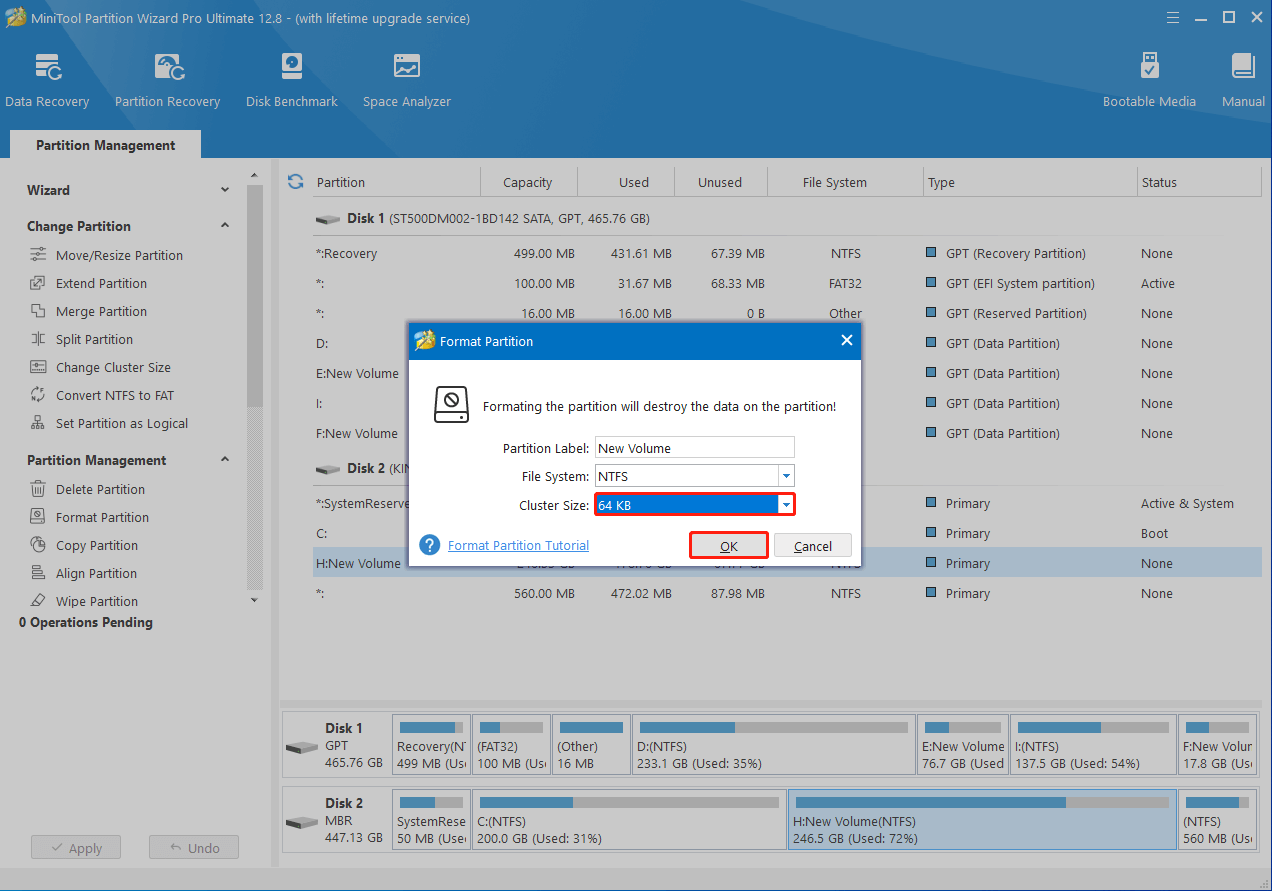
Step 4: At last, click Apply to save the change.
Way 2: Use Disk Management
Disk Management is a Windows built-in utility that includes basic features for managing disks and partitions. You can use it to easily change block size from 4K to 64K with formatting. Here’s how to do this.
Step 1: Right-click the Start icon and select Disk Management.
Step 2: After opening Disk Management, right-click the partition to change block size. Then select Format from the context menu.
Step 3: Select 64K as the size of the Allocation unit. Then tick the checkbox next to the Perform a quick format option and click OK.
Tips:
In this window, you can also decide whether to change the file system or not.
Step 4: When prompted, click OK to confirm the process of changing cluster size.
Way 3: Use File Explorer
File Explorer is another Windows built-in utility that can help change block size from 4K to 64K with formatting. To do this, follow the steps below.
Step 1: Press Windows + E at the same time to open File Explorer.
Step 2: Go to This PC. Then right-click the target hard drive in the right panel and select Format.
Step 3: Select 64 kilobytes under the Allocation unit size section and then check Quick Format.
Step 4: Once done, click Start to begin the formatting process. When a warning box shows up, click OK for confirmation.
Way 4: Use Diskpart
Diskpart is a disk partitioning utility for Microsoft Windows. With this tool, you can finish various disk/partition tasks by using corresponding command lines. The following are details on how to change block size with formatting via Diskpart.
Step 1: Press Windows + R to open the Run dialog.
Step 2: Type cmd in the text box and then press Ctrl + Shift + Enter to run Command Prompt as an administrator.
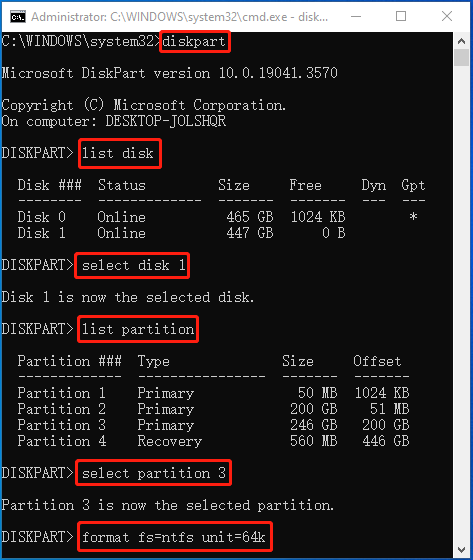
Step 3: In the elevated Command Prompt, input the following commands one by one and press Enter after each.
- diskpart
- list disk
- select disk 1 (1 represents the number of the disk including the target partition)
- list partition
- select partition 3 (3 refers to the number of the partition you want to change block size)
- format fs=ntfs unit=64k (You can replace NTFS with another file system based on your needs)
Are you looking for effective ways to change block size from 4K to 64K? If so, this post deserves your attention. It tells how to change the block size with or without formatting in detail.Click to Tweet
Bottom Line
This post guides on how to change block size from 4K to 64K with/without formatting. When you plan to change the block size of your hard drive, you can make use of MiniTool Partition Wizard to complete the operation directly. Or, you can try to change it during formatting.
If you have any problems with changing the block size, you can leave a message in our comment part below. For any issues associated with MiniTool Partition Wizard, feel free to contact us via [email protected]. We’ll make a reply as soon as possible.
При форматировании диска или флешки вы наверняка замечали, что система предлагает вам выбрать размер так называемого «кластера». Его размер варьируется от типа файловой системы диска. К примеру, для NTFS минимальный размер кластера составляет 512 Байт, а максимальный – 64 Кб. Для FAT32 – от 4 до 64 Кб. Зачастую на выбор доступно много вариантов, которые могут поставить неподготовленного пользователя перед логичным вопросом: какой размер кластера выбрать при форматировании флешки, диска или любого другого накопителя?
Что такое размер кластера
Кластер (Allocation Unit Size, англ.) – это блок, в который система будет записывать информацию на вашем накопителе. Весь диск (флешка) состоит из большого массива этих блоков, каждый из которых содержит в себе определенное количество данных. Размер кластера не влияет на объем диска, но он может повлиять на то, как система работает с файлами на вашем носителе и насколько эффективно использует доступное ей пространство.
Какой размер кластера выбрать
Вы вряд ли заметите невооруженным взглядом разницу при использовании различных размеров кластера, но этот параметр все-таки влияет на производительность файловой системы. При выборе размера кластера все зависит от того, для чего вы будете использовать носитель. Если вы будете сохранять много мелких файлов, тогда лучше уменьшить размер кластера, чтобы система не тратила место зазря. Если же содержимое диска состоит в основном из огромных файлов, тогда можно увеличить размер кластера, что увеличит производительность, поскольку Windows будет проводить меньше обращений к ячейкам
Лучше понять это поможет простой пример:
Если у вас есть файл размером 3 Кб, а размер кластера равняется 4 Кб, тогда файл займет весь кластер или ячейку. Это значит, что 1 Кб свободного пространства будет потерян. В потерянное пространство записать другие файлы нельзя, поэтому место фактически теряется впустую. На 10 таких файлах потеря составит уже 10 Кб, на 100 – 100 Кб, на 1000 – 1000 Кб и так далее. В таком случае лучше использовать размер кластера 512 байт или 1 Кб, поскольку файл займет шесть или три кластера без фрагментации и не будет тратить ячейки диска зря. Таким образом увеличивается эффективность хранения информации, но при этом уменьшается производительность, поскольку системе надо выполнять больше обращений к блокам.

В современном мире размеры накопителей становятся все больше и больше, а вместе с этим размер кластера играет все меньшую и меньшую роль. Исходя из этого, универсальным решением будет использовать параметры размера кластера по умолчанию и не менять их. Конечно, если вы дотошный пользователь, который хочет делать все как надо и по руководству, тогда исходите из того, что для больших файлов используем большой размер кластера, а для маленьких – маленький. Но опять же, особой разницы вы не заметите, если только не храните десятки и сотни тысяч файлов объемом 2-3 Кб на своих флешках или жестких дисках.
Как узнать размер кластера диска или флешки
Простая команда, выполненная в командной строке, позволит вам узнать, какой размер кластера используется на подключенном к компьютеру диску. Примечание: для выполнения этой команды вам нужна учетная запись с правами Администратора. Если ваш профиль не имеет этих прав, система попросит ввести пароль Администратора.
- Откройте меню Пуск и введите команду cmd. В поисковой выдаче отобразится Командная строка. Кликните правой кнопкой мыши по ней и выберите Запустить от имени Администратора.
- В Командной строке введите fsutil fsinfo ntfsinfo X:. В этом случае Х – буква вашего диска.

- Система отобразит вам подробные сведения о вашем диске. Поле Байт на кластер отображает размер вашего кластера. На скриншоте он равен 4 096 байт или 4 Кб.
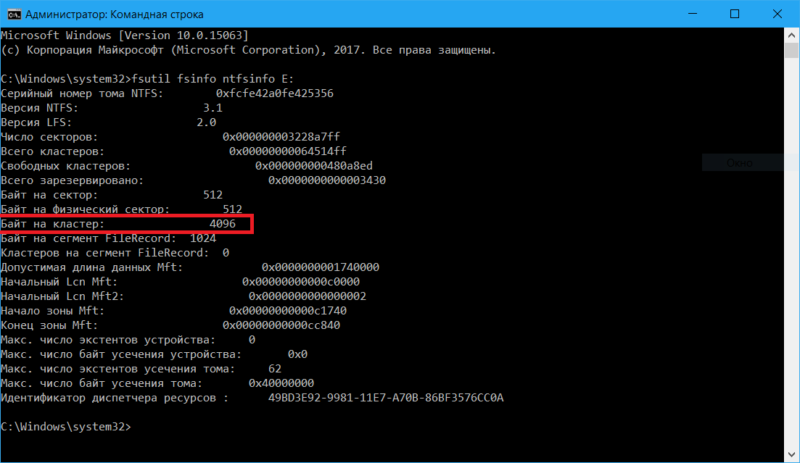
Теперь вы знаете для чего нужен размер кластера и из какого принципа исходить при форматировании диска или флешки.
All file systems that Windows uses to organize the hard disk are based on cluster (allocation unit) size, which represents the smallest amount of disk space that can be allocated to hold a file. The smaller the cluster size, the more efficiently your disk stores information.
If you do not specify a cluster size for formatting, Windows XP Disk Management bases the cluster size on the size of the volume. Windows XP uses default values if you format a volume as NTFS by either of the following methods:
- By using the format command from the command line without specifying a cluster size.
- By formatting a volume in Disk Management without changing the Allocation Unit Size from Default in the Format dialog box.
The maximum default cluster size under Windows XP is 4 kilobytes (KB) because NTFS file compression is not possible on drives with a larger allocation size. The Format utility never uses clusters that are larger than 4 KB unless you specifically override that default either by using the /A: option for command-line formatting or by specifying a larger cluster size in the Format dialog box in Disk Management.
What’s the difference between doing a Quick Format and a Full Format?
http://support.microsoft.com/kb/302686
Procedure
- To check what cluster size you are using already type the below line into a command prompt
- fsutil fsinfo ntfsinfo :
- You can see that this drive I am using has a cluster size of 32K. Normally Windows drives default to 4K
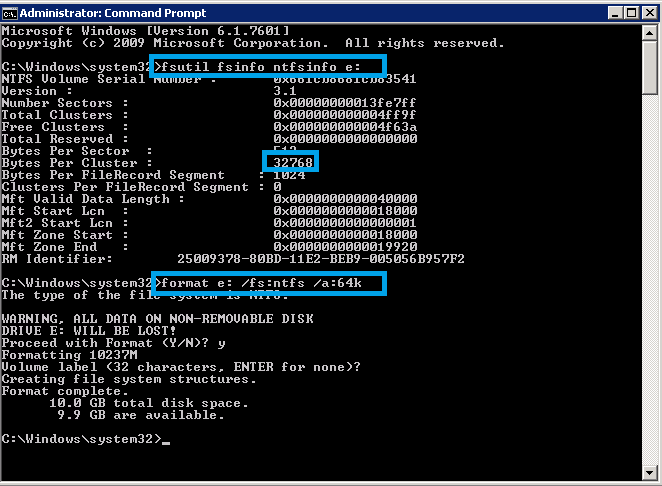
- Remember that the following procedure will reformat your drive and wipe out any data on it
- Type format : /fs:ntfs /a:64k
- In this command, is the drive you want to format, and /a:clustersize is the cluster size you want to assign to the volume: 2K, 4K, 8K, 16KB, 32KB, or 64KB. However, before you override the default cluster size for a volume, be sure to test the proposed modification via a benchmarking utility on a nonproduction machine that closely simulates the intended target.
Other Information
- As a general rule there’s no dependency between the I/O size and NTFS cluster size in terms of performance. The NTFS cluster size affects the size of the file system structures which track where files are on the disk, and it also affects the size of the freespace bitmap. But files themselves are normally stored contiguously, so there’s no more effort required to read a 1MB file from the disk whether the cluster size is 4K or 64K.
- In one case the file header says “the file starts at sector X and takes 256 clusters” an in the other case the headers says “the file starts at sector X and takes 16 clusters”. The system will need to perform the same number of reads on the file in either case no matter what the I/O size is. For example, if the I/O size is 16K then it will take 128 reads to get all the data regardless of the cluster size.
- In a heavily fragmented file system the cluster size may start to affect performance, but in that case you should run a disk defragmenter such as Windows or DiskKeeper for example.
- On a drive that performs a lot of file additions/deletions or file extensions then cluster size can have a performance impact because of the number of I/Os required to update the file system metadata (bigger clusters generally = less I/Os). But that’s independent of the I/O size used by the application – the I/Os to update the metadata are part of NTFS itself and aren’t something that the application performs.
- If you’re hard drive is formatted NTFS then you can’t use NTFS compression if you raise the cluster size above 4,096 bytes (4KB)
- Also keep in mind that increasing cluster size can potentially waste more hard drive space
Iometer Testing on different Block Sizes
The following 9 tests were carried out on one Windows Server 2008 R2 Server (4 vCPUs and 4GB RAM) which is used to page Insurance Modelling data onto a D Drive which is located on the local disk on a VMware Host Server. The disk is an IBM 300GB 10K 6Gps SAS 2.5” SFF Slim-HS HDD
The Tests
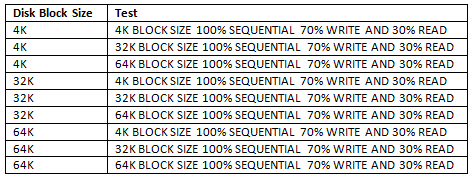
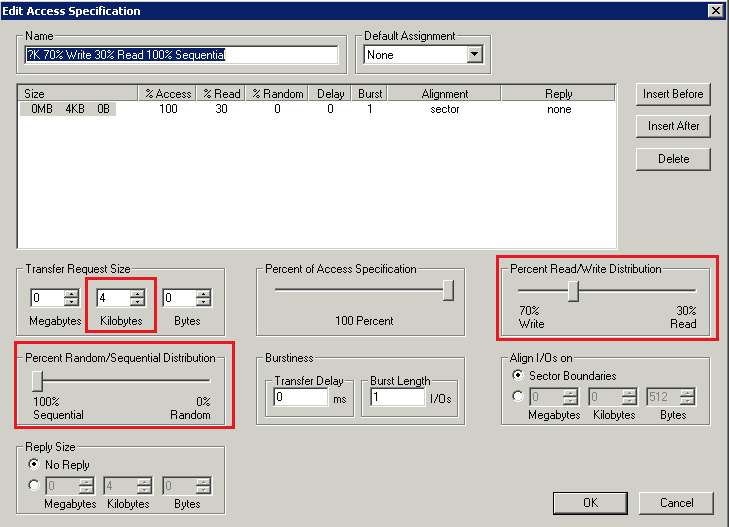
The Testing Spec in Iometer
Just adjusted for Disk Block Size which is the Transfer Request Size in the spec below
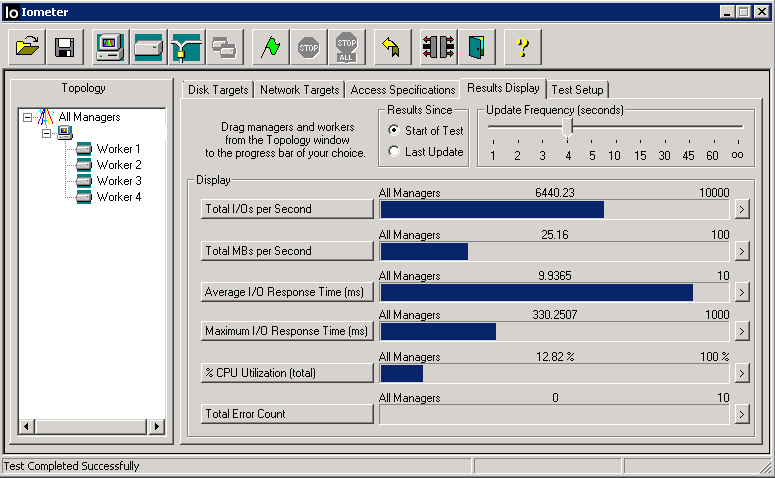
Testing and Results
- 4K Block Size on Disk
- 4K BLOCK SIZE 100% SEQUENTIAL 70% WRITE AND 30% READ
- 4K Block Size on Disk
- 32K BLOCK SIZE 100% SEQUENTIAL 70% WRITE AND 30% READ
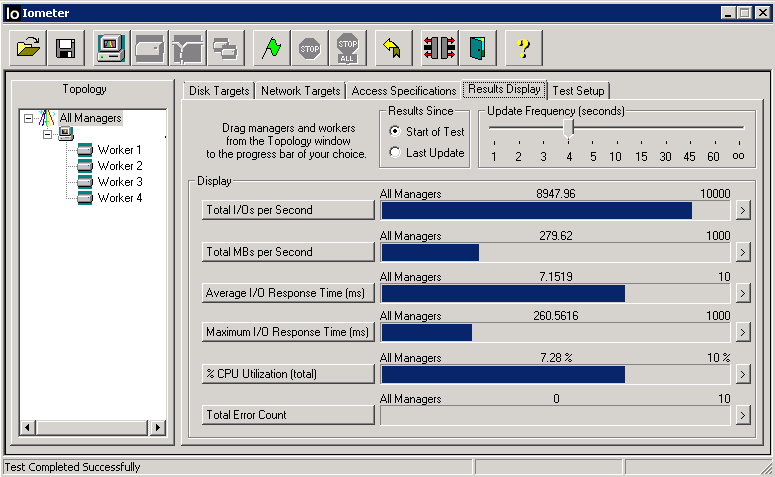
- 4K Block Size on Disk
- 64K BLOCK SIZE 100% SEQUENTIAL 70% WRITE AND 30% READ
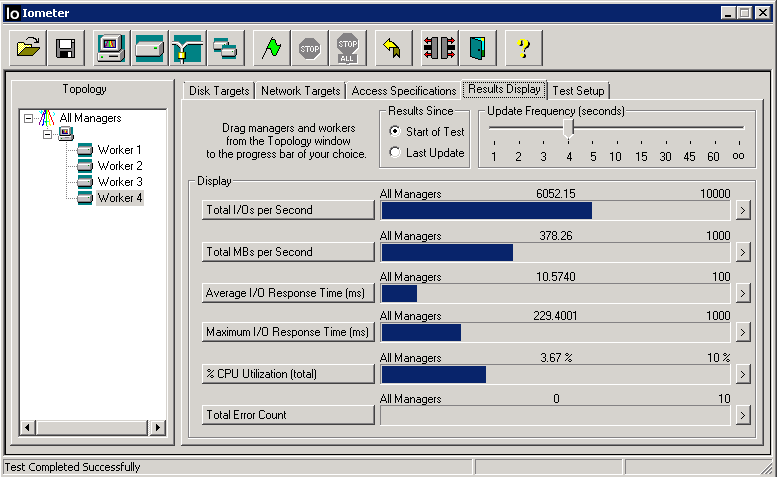
- 32K Block Size on Disk
- 4K BLOCK SIZE 100% SEQUENTIAL 70% WRITE AND 30% READ
- 32K Block Size on Disk
- 32K BLOCK SIZE 100% SEQUENTIAL 70% WRITE AND 30% READ
- 32K Block Size on Disk
- 64K BLOCK SIZE 100% SEQUENTIAL 70% WRITE AND 30% READ

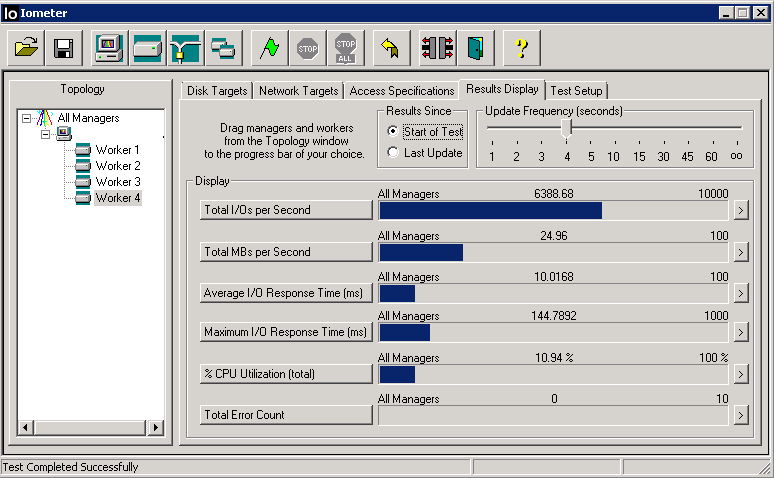
- 64K Block Size on Disk
- 4K BLOCK SIZE 100% SEQUENTIAL 70% WRITE AND 30% READ
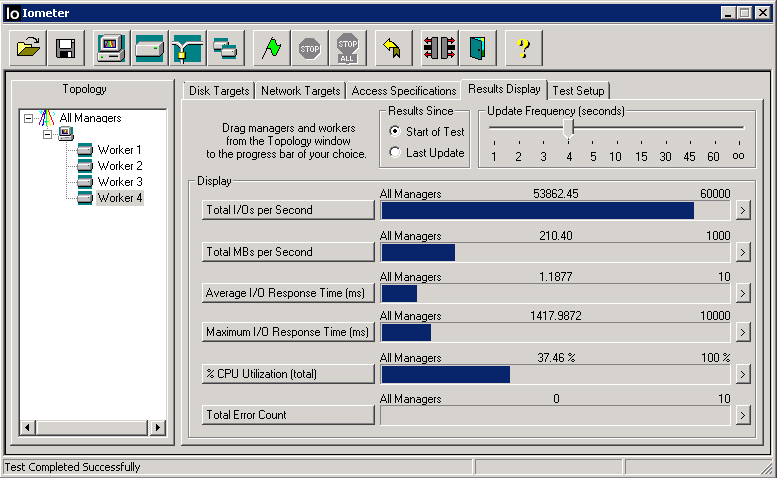
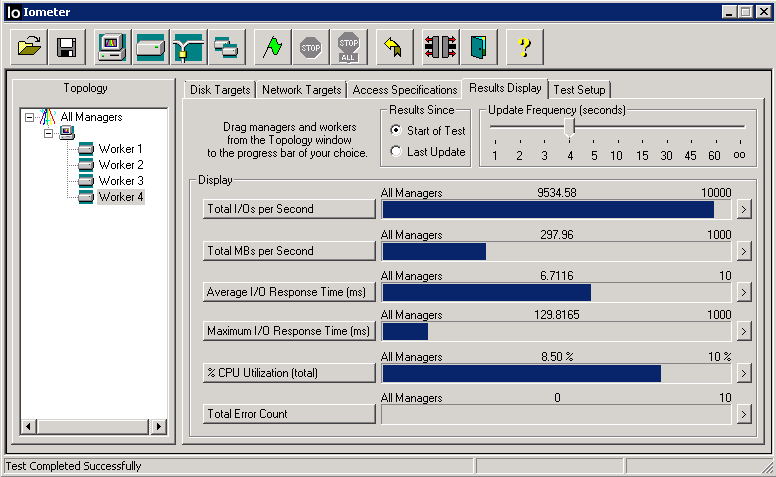
- 64K Block Size on Disk
- 32K BLOCK SIZE 100% SEQUENTIAL 70% WRITE AND 30% READ
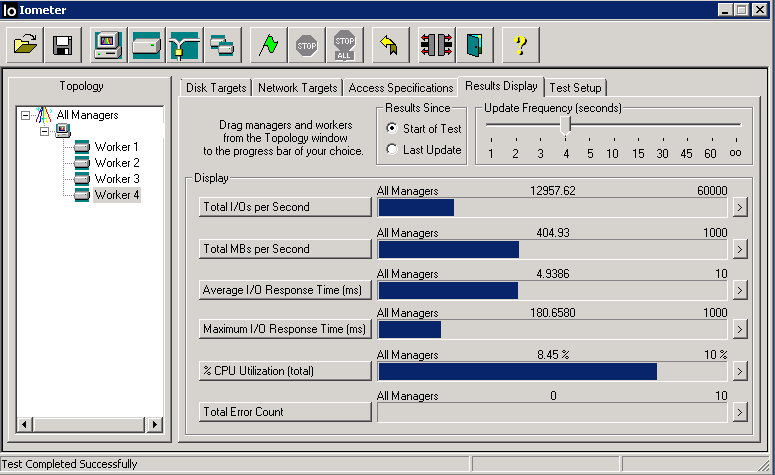
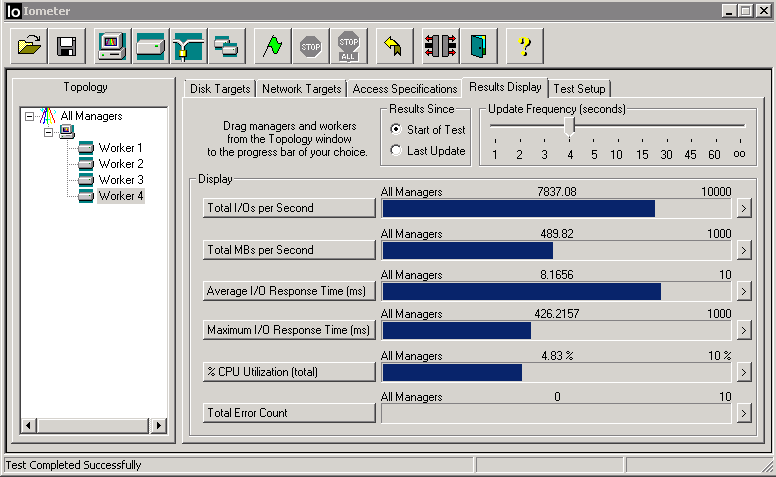
- 64K Block Size on Disk
- 64K BLOCK SIZE 100% SEQUENTIAL 70% WRITE AND 30% READ
The Results
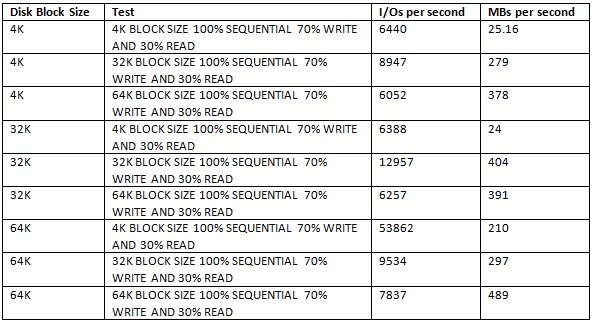
The best thing to do seems to be to match up the expected data size with the disk block size in order to achieve the higher outputs. E.g 32K workloads with a 32K Block Size and 64K workloads with a 64K Block size.
Fujitsu Paper (Worth a read)
https://sp.ts.fujitsu.com/dmsp/Publications/public/wp-basics-of-disk-io-performance-ww-en.pdf