
Если по какой-то причине вам потребовалось отключить клавишу Windows на клавиатуре, сделать это достаточно просто: с помощью редактора реестра Windows 10, 8 или Windows 7, или же используя бесплатную программу для переназначения клавиш — об этих двух способах я и расскажу. Еще один способ — отключение не клавиши Win, а определенной комбинации с этой клавишей, который тоже будет продемонстрирован.
Сразу предупрежу, что если вы, как и я, часто используете комбинации клавиш наподобие Win + R (диалоговое окно «Выполнить») или Win + X (вызов очень полезного меню в Windows 10 и 8.1), то после отключения они вам станут недоступны, как и многие другие полезные сочетания клавиш.
Отключение сочетаний клавиш с использованием клавиши Windows
Первый способ отключает только все сочетания с клавишей Windows, а не саму эту клавишу: она продолжает открывать меню Пуск. Если вам не требуется полное отключение, рекомендую использовать именно этот способ, поскольку он самый безопасный, предусмотрен в системе и легко откатывается.
Реализовать отключение можно двумя способами: с помощью редактора локальной групповой политики (только в Профессиональной, Корпоративной редакциях Windows 10, 8.1 и Windows 7, для последней доступно также в «Максимальная»), или с помощью редактора реестра (доступно во всех редакциях). Рассмотрим оба способа.
Отключение сочетаний с клавишей Win в редакторе локальной групповой политики
- Нажмите клавиши Win+R на клавиатуре, введите gpedit.msc и нажмите Enter. Откроется редактор локальной групповой политики.
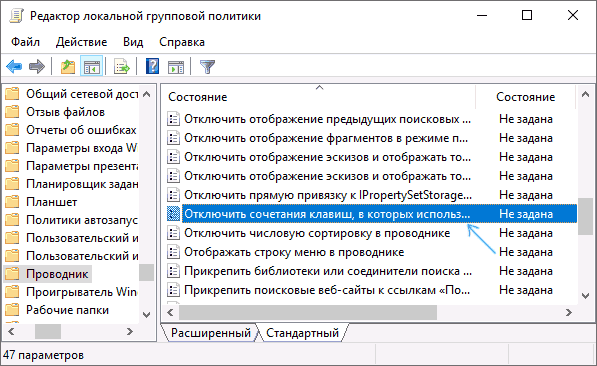
- Перейдите к разделу Конфигурация пользователя — Административные шаблоны — Компоненты Windows — Проводник.

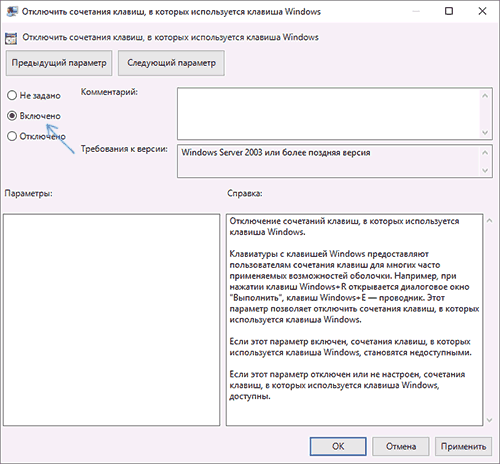
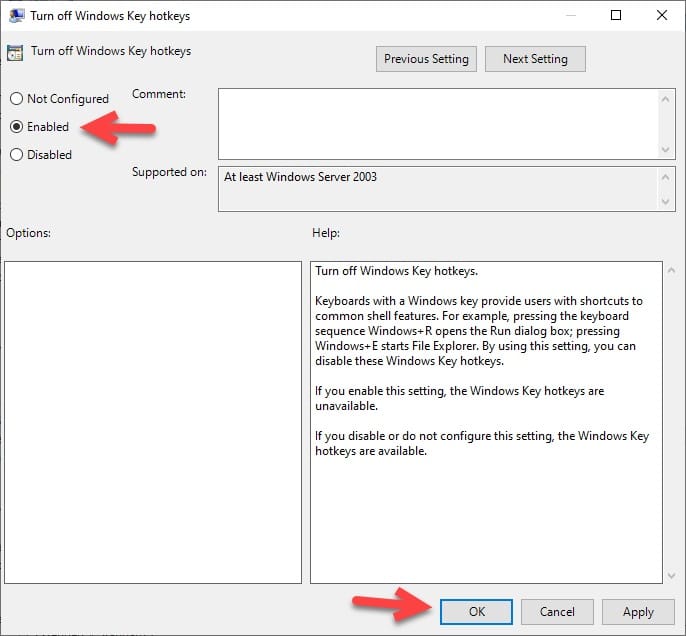
- Дважды кликните по параметру «Отключить сочетания клавиш, в которых используется клавиша Windows», установите значение «Включено» (я не ошибся — именно включено) и примените сделанные изменения.

- Закройте редактор локальной групповой политики.
Чтобы изменения вступили в силу потребуется перезапустить проводник или перезагрузить компьютер.
Отключаем сочетания с Windows в редакторе реестра
При использовании редактора реестра шаги будут следующими:
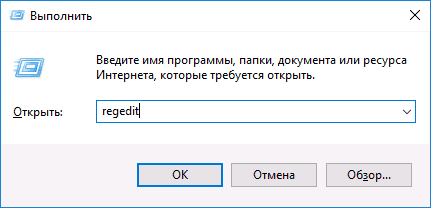
- Нажмите клавиши Win+R на клавиатуре, введите regedit и нажмите Enter.
- В редакторе реестра перейдите к разделу
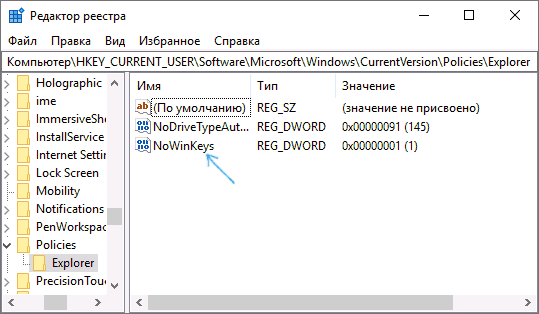
HKEY_CURRENT_USER\Software\Microsoft\Windows\CurrentVersion\Policies\Explorer
При отсутствии раздела создайте его.

- Создайте параметр DWORD32 (даже для 64-битной Windows) с именем NoWinKeys, кликнув правой кнопкой мыши в правой панели редактора реестра и выбрав нужный пункт. После создания, дважды нажмите по этому параметру и задайте значение 1 для него.
После этого можно закрыть редактор реестра, также, как и в предыдущем случае, сделанные изменения заработают только после перезапуска проводника или перезагрузки Windows.
Как отключить клавишу Windows с помощью редактора реестра
Этот метод отключения также предлагается самой компанией Майкрософт и судя по официальной странице поддержки, работает в Windows 10, 8 и Windows 7, но отключает клавишу полностью.
Шаги по отключению клавиши Windows на клавиатуре компьютера или ноутбука в данном случае будут следующими:
- Запустите редактор реестра, для этого вы можете нажать клавиши Win+R и ввести regedit

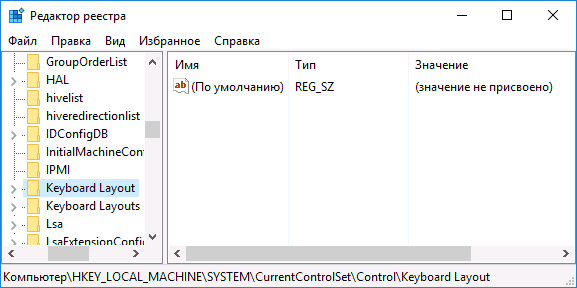
- Перейдите к разделу (папки слева) HKEY_LOCAL_MACHINE\ SYSTEM\ CurrentControlSet\ Control\ Keyboard Layout

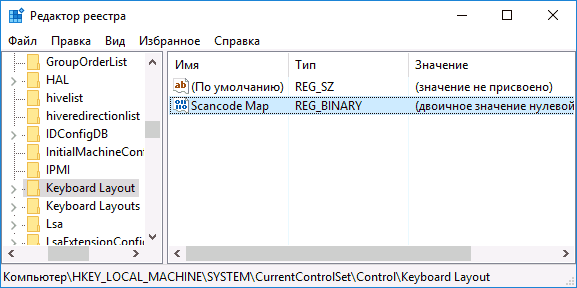
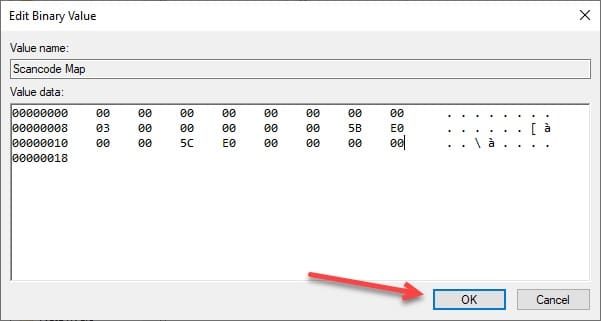
- Кликните в правой части редактора реестра правой кнопкой мыши и выберите в контекстном меню «Создать» — «Двоичный параметр», а затем введите его имя — Scancode Map
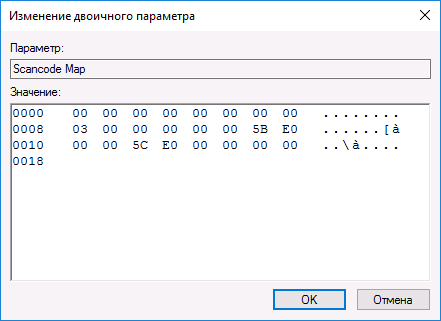
- Дважды кликните по этому параметру и введите значение (или скопируйте отсюда) 00000000000000000300000000005BE000005CE000000000

- Закройте редактор реестра и перезагрузите компьютер.
После перезагрузки клавиша Windows на клавиатуре перестанет работать (только что протестировано на Windows 10 Pro x64, ранее при первом варианте этой статьи, тестировалось в Windows 7). В дальнейшем, если вам снова потребуется включить клавишу Windows, просто удалите параметр Scancode Map в том же разделе реестра и перезагрузите компьютер — клавиша снова будет работать.
Оригинальное описание этого способа на сайте Майкрософт находится здесь: https://support.microsoft.com/en-us/kb/216893 (на этой же странице предлагается две загрузки для автоматического отключения и включения клавиши, но почему-то они не работают).
Использование программы SharpKeys, чтоб отключить клавишу Windows
Несколько дней назад я писал о бесплатной программе SharpKeys, позволяющей легко переназначить клавиши на клавиатуре компьютера. Помимо прочего, с помощью нее можно и отключить клавишу Windows (левую и правую, если у вас их две).
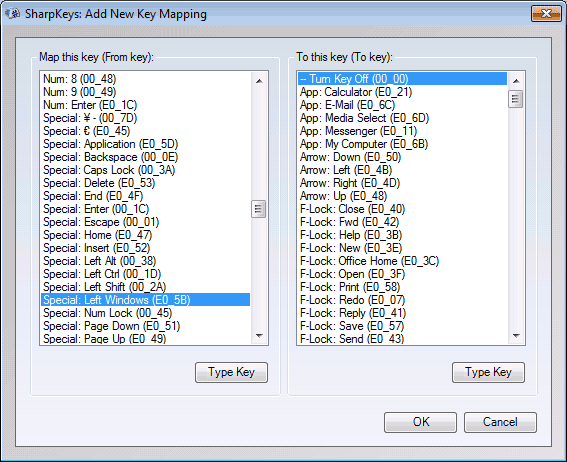
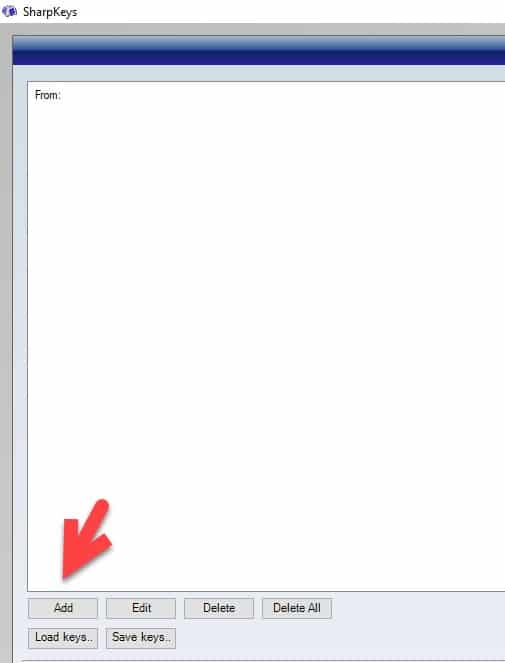
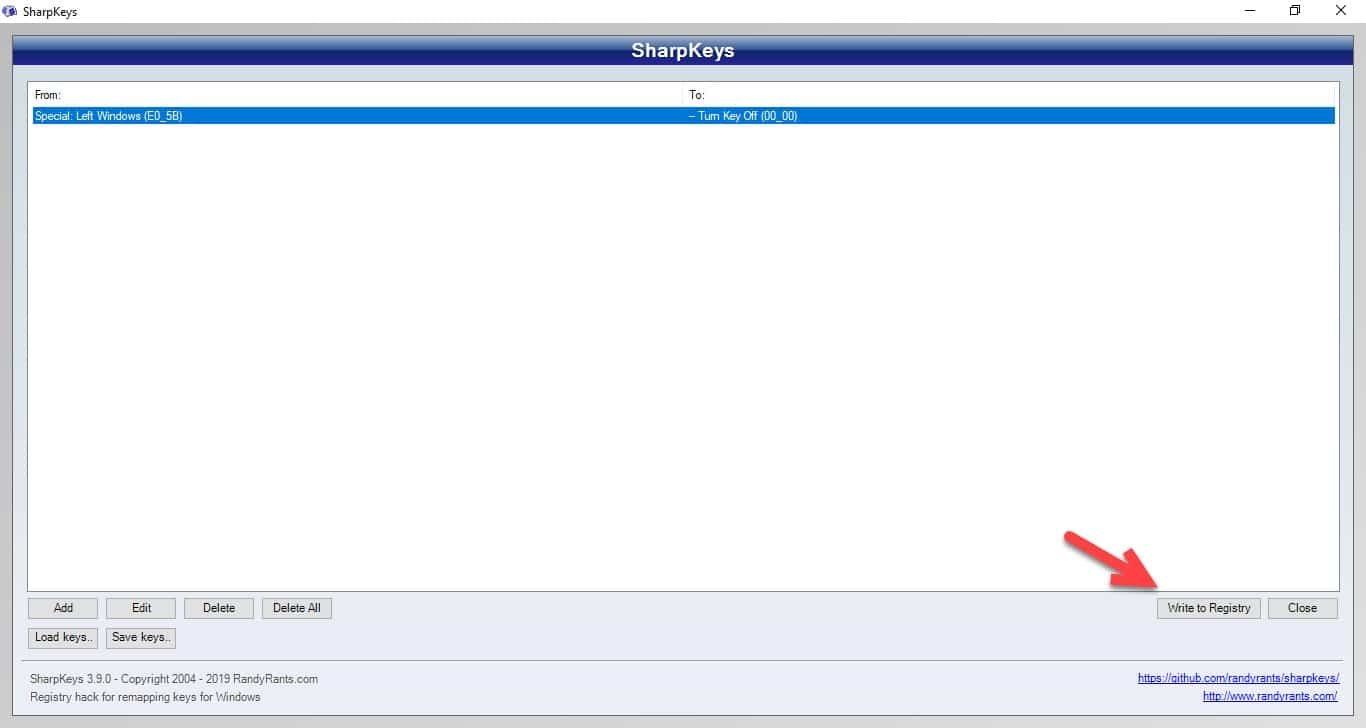
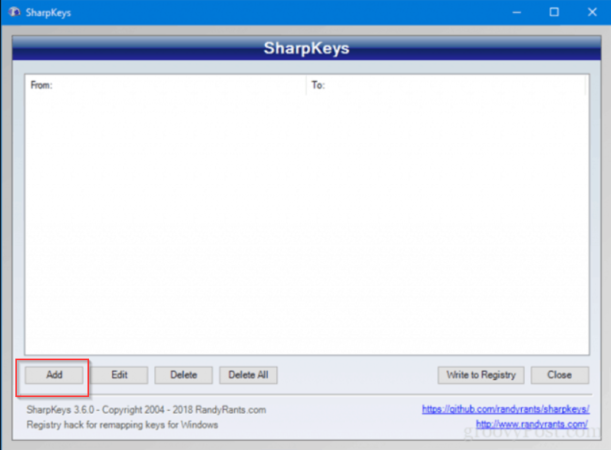
Для этого, в главном окне программы нажмите «Add» (Добавить), в левой колонке выберите пункт «Special: Left Windows», а в правой — «Turn Key Off» (выключить клавишу, выбрано по умолчанию). Нажмите «Ок». Проделайте то же самое, но для правой клавиши — Special: Right Windows.

Вернувшись в главное окно программы, нажмите кнопку «Write to registry» и перезагрузите компьютер. Готово.
Чтобы вернуть работоспособность отключенных клавиш, вы можете снова запустить программу (в ней будут отображаться все сделанные ранее изменения), удалить переназначения и снова записать изменения в реестр.
Подробно о работе с программой и о том, где скачать ее в инструкции Как переназначить клавиши на клавиатуре.
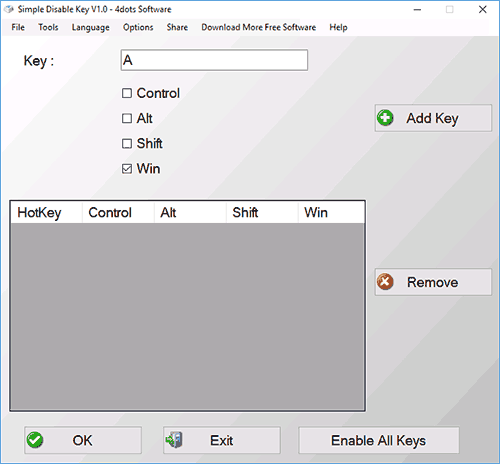
Как отключить комбинации с клавишей Win в программе Simple Disable Key
В некоторых случаях необходимым бывает не полностью отключить клавишу Windows, а только её комбинации с определенными клавишами. Недавно мне попалась бесплатная программа Simple Disable Key, которая умеет это делать, причем достаточно удобно (программа работает в Windows 10, 8 и Windows 7):
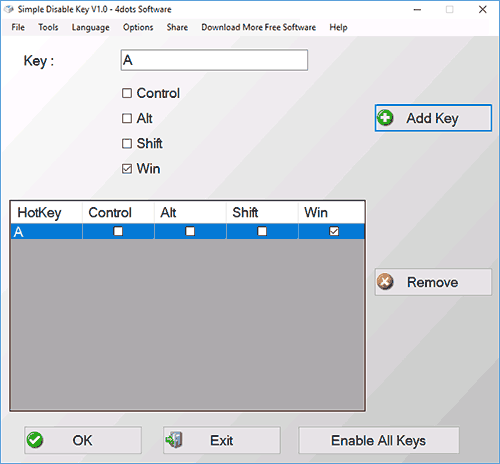
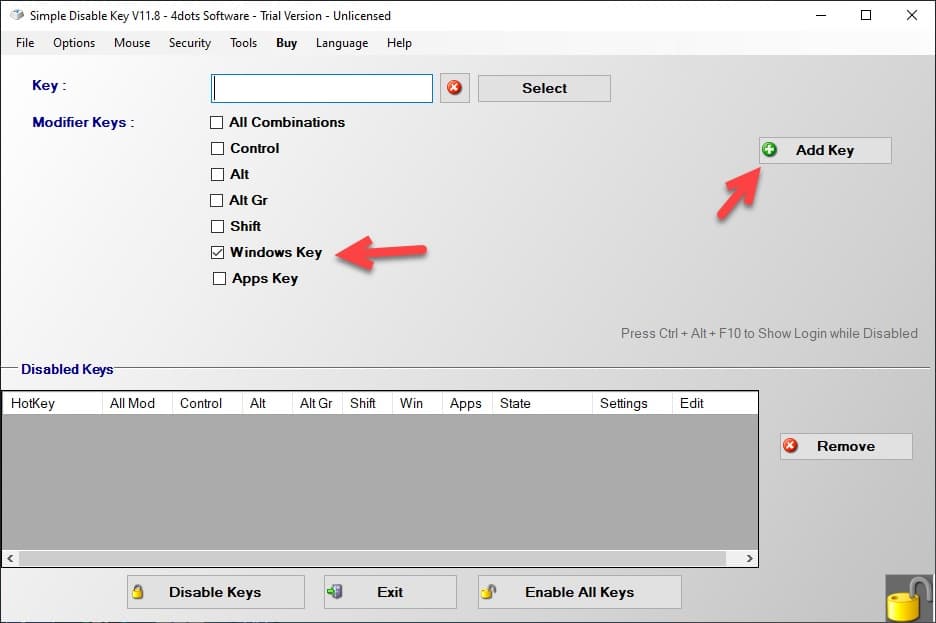
- Выделив окно «Key», вы нажимаете клавишу, а потом отмечаете «Win» и нажимаете кнопку «Add Key».
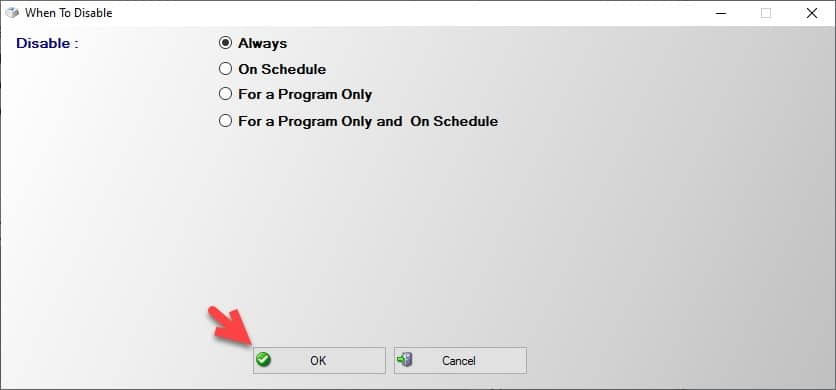
- Появится запрос — когда отключать комбинацию клавиш: всегда, в определенной программе или по графику. Выберите желаемый вариант. И нажмите Ок.
- Готово — указанное сочетание Win + клавиша не работают.
Работает это до тех пор, пока запущена программа (можно поставить ее в автозапуск, в пункте меню Options), а в любой момент, кликнув правой кнопкой по значку программы в области уведомлений, вы можете снова включить все клавиши и их комбинации (Enable All Keys).
Важно: на программу может ругаться фильтр SmartScreen в Windows 10, также VirusTotal показывает два предупреждения. Так что, если решите использовать, то на свой страх и риск. Официальный сайт программы — www.4dots-software.com/simple-disable-key/
Download Article
Eliminate annoying Windows key interruptions with just a few clicks
Download Article
- WinKill
- Microsoft PowerToys
- Group Policy Editor
- Windows Registry
- Logi Options+
- Video
- Tips
|
|
|
|
|
|
It’s possible to disable your Windows key using both built-in programs and third-party options. If you’re not sure where to start, you’ve come to the right article—we’ll walk you some of the most popular options out there (like WinKill or Microsoft PowerToys), so you can figure out which one is best for you and your PC.
Quick Steps
- Download WinKill.
- Extract the download into a new folder.
- Run the WinKill.exe application file.
- Click on the WinKill icon in your taskbar to switch it on and off.
-

Download the WinKill file. It’s hosted on the MajorGeeks website.
-
Unzip the file. If you don’t have any extraction software, download a free program like 7-Zip so you can access the .exe file.
Advertisement
-
Make sure you’re clicking on the application itself rather than the .dll extension.
-
In the small icon panel next to the taskbar clock, look for a black-and-white version of the Windows logo. Simply click on it to toggle the feature on or off.[1]
- If there’s no red “X” blocking the logo, your Windows button should be activated.


Advertisement
-
-
It may open automatically after you download it. If not, search “PowerToys” in your search bar to find it.
-
It’s between Image Resizer and Mouse Utilities.
-
[2]
-
This pulls up a new pop-up window.
-
-
You can also adjust the key selection via the drop-down menu.
-
It should be at the very top of the menu.
-
You might get a pop-up warning that you haven’t assigned anything to the Windows key, but that’s okay. It will still be disabled once you close out from the pop-up.
-
Open up the Remap keys pop-up again and click on the trash can at the far right of the key-mapping assignment. Then, hit OK to confirm these new changes.


Advertisement
-
Alternatively, search for gpedit in the main search bar to open the Group Policies shortcut.[3]
If your PC doesn’t seem to have the file, try this:- Pull up a blank Notepad file.
- Paste the following:
@echo off
pushd «%~dp0»dir /b %SystemRoot%\servicing\Packages\Microsoft-Windows-GroupPolicy-ClientExtensions-Package~3*.mum >List.txt
dir /b %SystemRoot%\servicing\Packages\Microsoft-Windows-GroupPolicy-ClientTools-Package~3*.mum >>List.txtfor /f %%i in (‘findstr /i . List.txt 2^>nul’) do dism /online /norestart /add-package:»%SystemRoot%\servicing\Packages\%%i»
pause - Save the Notepad file as gpedit_enabler.bat. Make sure to delete the .txt suffix!
- Right-click on the .bat file you created and hit Run as administrator. This will automatically run the file through your PC’s command prompt, which will create the gpedit.msc file on your PC.[4]
-
Go to User Configuration > Administrative Templates > Windows Components > File Explorer.
-
You may find it between the Prevent access to drives from My Computer and No Computers Near Me in Network Locations options.
-
You can find this option in the top-left portion of the Turn off Windows Key hotkeys
-
Your Windows key should now be disabled.
-
Go to the Group Policies editor, find the Turn off Windows Key hotkeys in the File Explorer folder, and toggle the setting back to Not Configured.


Advertisement
-
Registry Editor should pop up in the search results.
-
To find it, navigate through the following folders:
- HKEY_CURRENT_USER
- Software
- Microsoft
- Windows
- CurrentVersion
- Policies
- Explorer
-
Keep the name as NoWinkeys and the Base as Hexadecimal.
-
This should disable your Windows key when you press it.
-
To make sure this worked, reboot your PC and try pressing the Windows button to confirm that it’s disabled.
-
Open the Registry Editor, navigate to the Explorer folder, right-click the NoWinkeys option, and click DWORD Value to make the change.
- Restart your computer again to make sure the change goes through.


Advertisement
-
Keep in mind that this program only works if you have a Logitech-brand keyboard, and some models might not have many customization options available within the Logi Options+ app.
- If you don’t have Logi Options+ installed, download it here.
-
The app will likely ask you to turn the keyboard off and then back on to help sync it—just follow the onscreen instructions.
-
You can find this on the left side of the app window.
-
Click the checkbox next to Windows/Start to disable the button.
- When you’re ready to re-enable the Windows key, uncheck the box next to Windows/Start in this part of the app.


Advertisement
Ask a Question
200 characters left
Include your email address to get a message when this question is answered.
Submit
Advertisement
Video
-
If you have a membrane keyboard, some tech enthusiasts believe that removing the Windows keycap could disable the key as a temporary measure. (A membrane keyboard registers keystrokes with a combination of a circuit board and rubber membrane.)[5]
Thanks for submitting a tip for review!
Advertisement
References
About This Article
Thanks to all authors for creating a page that has been read 3,519 times.
Is this article up to date?
Windows 10 key is one of the oldest and the most useful key in Windows OS; it has been serving users since 1994 and will continue to do.
The best thing about this key apart from it being the quickest way to launch the Start Menu, the shortcuts that allow you to do things quickly.
It is very easy to disable the Windows key; in this article, we will do just that.
There are a plethora of methods by which you can easily disable the Windows Key. According to many professional gamers, they don’t want any accidental presses, and if the windows key is enabled then the chances of accidental presses increases.
Let’s just use methods to disable the Windows Key.
1. Disable Windows Key by Registry
The registry is one of the best ways to alter settings in your computer is by Registry. In this section, we will use Registry to disable the Windows Key.
Note: Be careful while doing anything with the registry as it can damage some other settings as well.
To disable Windows Key with the help of Registry, you need to follow the prescribed steps:-
Step 1: Launch the Registry Editor by searching it out from the start menu or by RUN(Win + R), type “regedit” and hit enter.
Step 2: Now, we will create a backup as it can be helpful if things go wrong by File> Export.
Step 3: From the Export Range section select All, file name: Backup, and click Save.
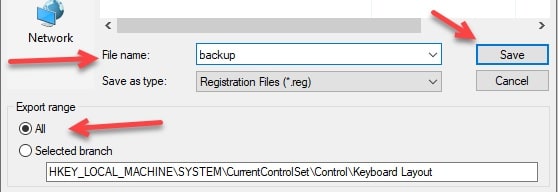
This will create a backup and will help you in the future if things go wrong.
Now you need to alter the settings with the help of the following steps:-
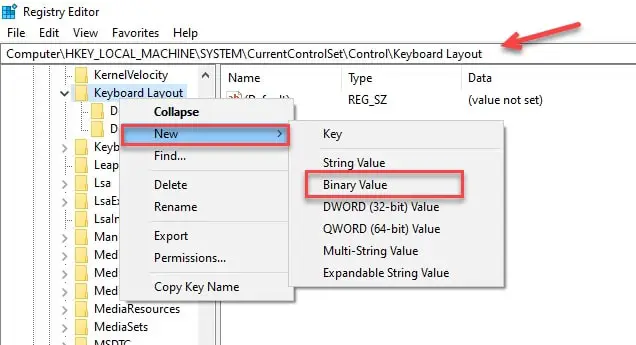
Step 4: Now, either navigate to the Keyboard layout with the help of the given route by clicking on the drop arrow from the left panel or by copying the given route and pasting it in the search bar.
Computer\HKEY_LOCAL_MACHINE\SYSTEM\CurrentControlSet\Control\KeyboardLayout
Step 5: Now, right-click on the Keyboard Layout then New> Binary Value and rename the newly created entity to ScancodeMap.
Step 6: Launch the ScancodeMap by double-clicking on it and insert the following value.
Note: You can’t just copy and paste the value, you have to manually enter it.
00000000000000000300000000005BE000005CE000000000
Then click Apply and OK to confirm the alteration.
Finally, restart your PC and you are good to go.
The best thing about this method is that whenever you feel like you need to enable the Windows Key, just go to the registry and delete the created entity ScancodeMap.
2. Disable Windows Keys by SharpKeys
SharpKeys is a third-party application that allows you to remap the keyboard keys. In this section, we are going to use it to disable the Windows Keys. To do that, you need to follow the prescribed steps:-
Step 1: Download the SharpKey and launch it.
Step 2: On the appeared screen, click on the Add button.
Step 3: Now, from the appeared screen, click on the Type Key of the left panel.
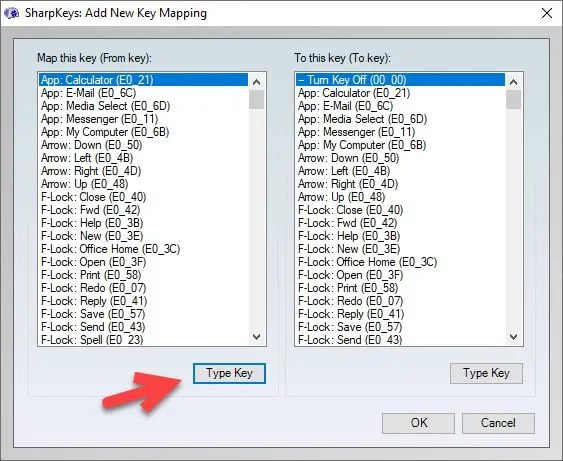
Step 4: On the appeared screen, press the Win key and click OK.
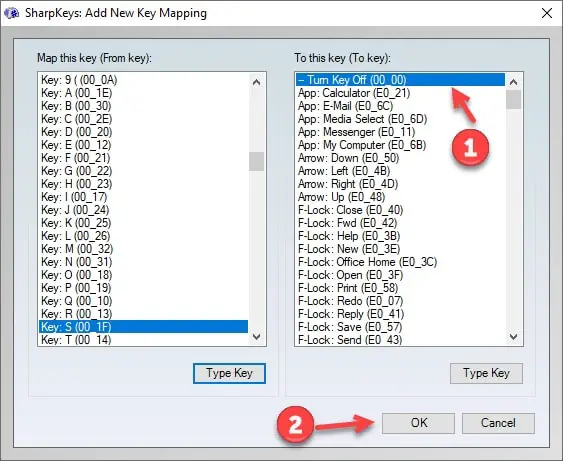
Step 5: Now from the left panel of the Window, choose Turn Key Off and click OK.
Step 6: Finally, click on the Write to Registry option to end the task.
This will turn the Windows Keys off, to get things right you need to restart your computer and hopefully, you will be able to enjoy a seamless gaming experience.
If you want to revert the settings and allow the Windows Key then do as follows:-
Step 1: Launch the application.
Step 2: Select the created entity and then click on the Delete button.
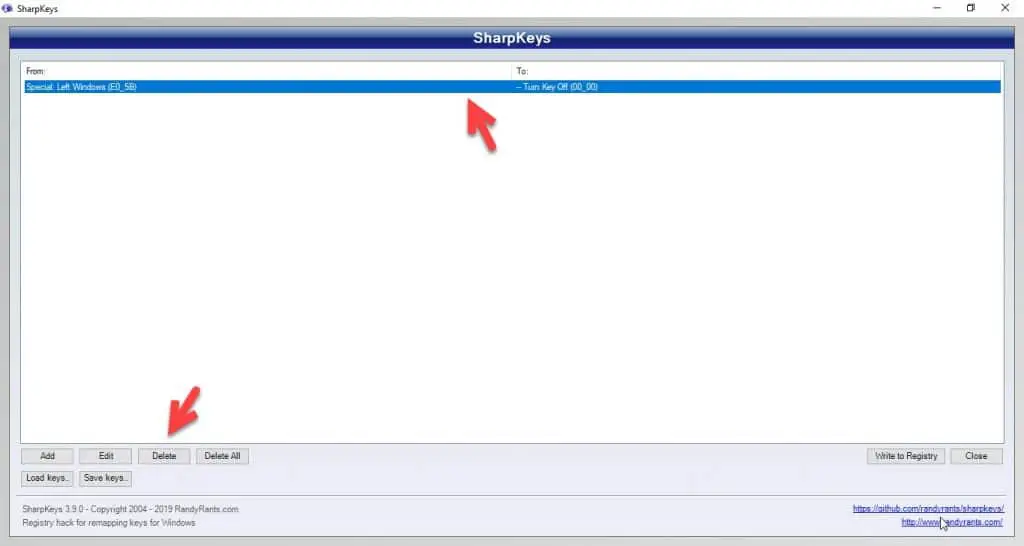
Step 3: Click on the Write to Registry button and you are good to go.

This will enable the Windows Key but you still should restart your computer once, in order to get things in the right place.
3. Disable Windows Key by using a Gaming Mode
If you are someone looking to disable the Windows Key then the chances of you being a gamer are high. If you are interested in gaming and have a Gaming Keyboard then you can use its gaming mode to disable the Windows Keys.
Many gaming keyboards have either a physical manual or a virtual one. In that manual, you can see the shortcuts by which you can enter the Gaming mode which usually disabled the Windows Key.
One thing you should know, this option is temporary and best for gamers as you don’t want to disable the Windows Keys permanently because of its plethora of features.
4. Disable Windows Keys from the Keyboard Applications
This one goes hand in hand with the former method. As we have already mentioned, gaming keyboards allow you to disable the Windows Key with the help of an application provided to you by the manufacturer or the one you downloaded from the manufacturer’s official website.
Many applications allow you to disable the Windows Key, you can either ask your vendor to provide you the software or visit the official website to download the software.
5. Disable Windows Keys by AutoHotKey Script
Now, let’s write some script and disable the AutoHotKey. AutoHotKey is an open-source software on which you can write short scripts and then run it to perform a specific task.
But before going any further you need to download the AutoHotKey. After downloading follow the prescribed steps to disable the Windows Key.
Step 1: Right-click on the desktop screen, New> AutoHotKey Script.
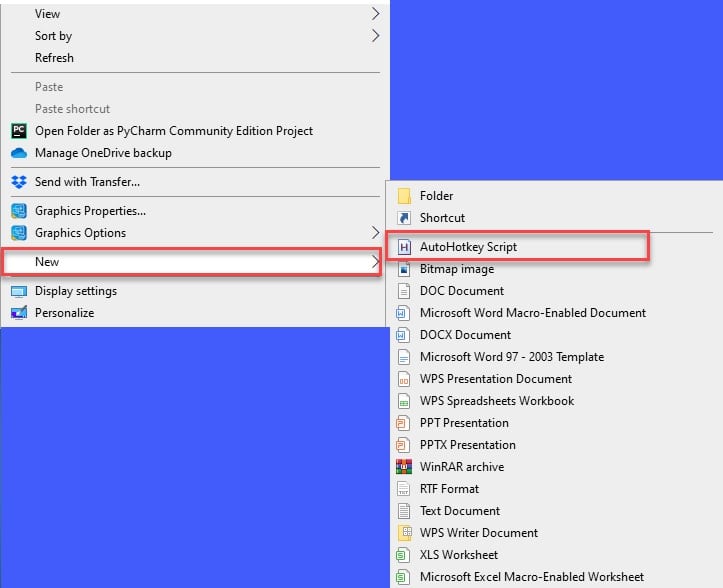
Step 2: A new blank AutoHotkey file will be formed, right-click on it, and then select Edit Script.
Step 3: This will redirect you to the AutoHotKey coding panel, there, you need to type the following commands.
~LWin Up::return
~RWin Up::return
Save the script, right-click on the AutoHotKey file, and select Run Script from the appeared list.
Now, every time you need to disable the Windows Key just RUN the formed script. And you are good to go.
There is a lot more cool stuff that you can do with AutoHotKey other than disabling the Windows Key. read our guide on Best AutoHotKey Script To Make Your Life Easier.
6. Disable Windows Keys by blocking HotKeys with register
In this section, we are going to use the registry editor to block Windows Key hotkeys. To do that, you need to be obedient to the following steps:-
Step 1: Launch the Registry Editor by either searching it out from the start menu or by RUN(Win + R), type “regedit” and hit enter.
Step 2: Now reach the Explorer by either expanding the folders in the following order or just by copying and pasting the following route.
HKEY_CURRENT_USER\Software\Microsoft\Windows\CurrentVersion\Policies\Explorer
Step 3: Now, right-click on Explorer from the left panel and then New> DWORD(32-bit) value.
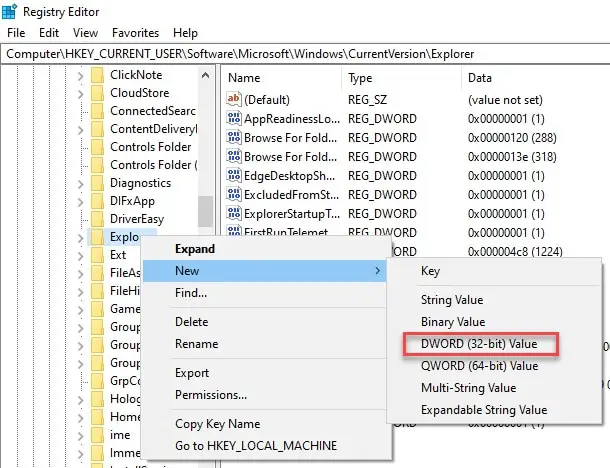
Step 4: Name the newly created value, like NoWinKey.
Step 5: Launch the newly created registry, change the values to 1, and hit enter.
This will disable the Windows Key. Restart your computer to get things on track and you are good to go.
Now, you can enjoy them without thinking about the accidental presses.
7. Disable Windows Keys by Group Policy Editor
Group Policy Editor allows you to alter the settings of your Windows OS and enable or disable features like PowerShell or command prompt. In this section, we are going to disable the Windows Keys with the help of the Group Policy Editor.
To do that, you need to follow the prescribed steps:-
Step 1: Launch the Group Policy Editor either by searching it out from the start menu or by RUN(Win + R), type “gpedit.msc” and hit enter.
Step 2: Now, we need to reach File Explorer from the given path by expanding the folders from the left panel of the screen.
User Configuration> Administrative Templates> Windows Component> File Explorer
Step 3: After reaching the File Explorer double click on “Turn off Windows Key hotkeys” from the right side of the screen.

Step 4: Now, from the appeared screen, select Enabled and click OK.
Finally, restart your computer and you longer will be able to use the Windows Key.
If you want to enable it, go to the same location, launch the “Turn off Windows Key hotkeys” and select disabled.
8. Disable Windows Keys by third-party apps
There are tons of applications out there in the market by which you can easily turn off the Windows Key. They may or may not be specifically for this purpose but they get the job done.
Winkill:-
Winkill is one of those applications specifically built to disable the Windows Key and shortcuts associated with it. The best thing about Winkill is that you don’t need to restart your computer as you did in all the previous methods.
You just need to download and launch and Windows Key and shortcuts associated with it will be blocked.
This software was primarily built for gamers in order to save them from accidental presses. Any version of Windows(XP or after) is supported by this application. Therefore download it and use this small and simple tool to disable the Windows Key.
Simple disable Key:-
Simple Disable Key is another of those third-party applications that will allow you to disable the Windows Key. The best part about this application is that you can disable any key on your keyboard with its help.
To disable Windows Key with the help of Simple Disable Key you need to follow the prescribed steps:
Step 1: Download and launch the Simple Disable Key application.
Step 2: Now from the appeared screen, select Windows Key and then click Add key.
Step 3: This will redirect you to the “When to disable Windows”, there you need to select according to your need and then click OK to end the process.
📗FAQ
How do I disable a key on my keyboard in Windows 10?
To disable a key on your keyboard in Windows 10, you can use a third-party application like SharpKeys. It allows you to remap keys, including disabling specific keys on your keyboard.
Once you have installed SharpKeys, you can select the key you want to disable and remap it to “Turn Key Off” or another key that you don’t use.
How do I lock the Windows button on my keyboard?
To lock the Windows button on your keyboard, you can use a registry tweak in Windows.
First, press “Windows key + R” to open the Run dialog box, type “regedit” and press Enter. Navigate to “HKEY_LOCAL_MACHINE\SYSTEM\CurrentControlSet\Control\Keyboard Layout” and create a new binary value named “Scancode Map”.
Set the value data to “00 00 00 00 00 00 00 00 03 00 00 00 00 00 5B E0 00 00 5C E0 00 00 00 00” to remap the Windows key to the null character.
How do I turn off Windows key hotkeys?
To turn off Windows key hotkeys, you can use the Group Policy Editor in Windows. Press “Windows key + R” to open the Run dialog box, type “gpedit.msc” and press Enter.
Navigate to “User Configuration\Administrative Templates\Windows Components\File Explorer” and enable the “Turn off Windows Key hotkeys” policy. Once enabled, Windows key hotkeys will be disabled.
How do I turn off special keys on my keyboard?
To turn off special keys on your keyboard, you can use the Ease of Access settings in Windows.
Go to Settings > Ease of Access > Keyboard and toggle off the “Sticky Keys”, “Toggle Keys”, and “Filter Keys” options. This will disable special keys like Caps Lock, Num Lock, and Scroll Lock.
Why is my keyboard locked on Windows key?
If your keyboard is locked on the Windows key, it might be due to a malfunctioning keyboard driver or a physical issue with the keyboard.
You can try updating the keyboard driver or plugging the keyboard into a different USB port to see if that resolves the issue.
Why is my Windows button locked?
If your Windows button is locked, it might be due to a registry tweak or a third-party application that remapped the Windows key to another function. Check if you have any registry tweaks or third-party applications that might have caused this issue.
Is there a key lock on keyboard?
Yes, some keyboards come with a key lock feature that allows you to lock specific keys like Caps Lock, Num Lock, and Scroll Lock to prevent accidental keystrokes. Look for a “Lock” or “Fn” key on your keyboard to activate the key lock feature.
How do I change Windows key hotkeys?
To change Windows key hotkeys, you can use the Registry Editor in Windows. Press “Windows key + R” to open the Run dialog box, type “regedit” and press Enter.
Navigate to “HKEY_CURRENT_USER\Software\Microsoft\Windows\CurrentVersion\Explorer\Advanced” and create a new DWORD value named “DisabledHotkeys”.
Set the value data to the hotkey you want to disable, like “3” for “Windows key + E” or “15” for “Windows key + L”.
Can I disable a key on my keyboard?
Yes, you can disable a key on your keyboard using third-party applications like SharpKeys or through the Windows Registry Editor.
Be careful when modifying the Windows Registry as it can cause system issues if not done correctly.
How do I change my keyboard back to normal keys?
If you have accidentally changed your keyboard settings, you can change it back to normal keys by going to Settings > Time & Language > Language. Select your language and click on “Options”.
Click on “Add a keyboard” and select your keyboard layout. Remove any other keyboard layouts that you don’t use.
How do I unlock my Windows key on my HP keyboard?
To unlock the Windows key on your HP keyboard, try pressing “Fn + Windows key”. This should toggle the Windows key on and off. If this doesn’t work, check if you have any third-party software that might have remapped the Windows key.
Why is my Windows key not working Windows 11?
If your Windows key is not working on Windows 11, it might be due to a system issue or a hardware issue with your keyboard. Try updating your system to the latest version or connecting a different keyboard to see if the issue persists.
How do you remove a window button lock?
To remove a window button lock, you can use a registry tweak in Windows. Press “Windows key + R” to open the Run dialog box, type “regedit” and press Enter.
Navigate to “HKEY_LOCAL_MACHINE\SYSTEM\CurrentControlSet\Control\Keyboard Layout” and delete the binary value named “Scancode Map”. This will remove the remapping of the Windows key.
How do I enable Windows key in Windows 11?
To enable the Windows key in Windows 11, check if you have any third-party software that might have disabled the Windows key.
If not, try pressing “Fn + Windows key” to toggle the Windows key on and off. If this doesn’t work, try updating your system or connecting a different keyboard to see if the issue persists.
How do you unlock keyboard keys?
To unlock keyboard keys, try pressing the key again to see if it toggles on and off. If this doesn’t work, try pressing “Fn + the key” or “Ctrl + Alt + the key”.
If the key is still locked, check if you have any third-party software that might have caused the issue.
What function key locks the keyboard?
The function key that locks the keyboard depends on your keyboard model. Look for a “Lock” or “Fn” key on your keyboard and press it to activate the key lock feature.
What is Sticky Keys Windows 10?
Sticky Keys is an accessibility feature in Windows 10 that allows you to press one key at a time for keyboard shortcuts instead of pressing multiple keys at once. It can be useful for people with physical disabilities who find it difficult to press multiple keys simultaneously.
How do I change my function key settings?
To change your function key settings, go to Settings > Devices > Keyboard. Toggle on “Use F1-F12 as standard function keys” to use the function keys as standard keys. Toggle it off to use special functions like volume and brightness control.
Wrap-up:-
In this article, we have seen different methods by which you can disable the Windows key and a few third-party applications that you can use.
All of them work well, and you can choose one for you.
Let’s just quickly go over them:-
- By registry: Launch the registry editor, navigate via Computer\HKEY_LOCAL_MACHINE\SYSTEM\CurrentControlSet\Control\KeyboardLayout then right-click on the Keyboard Layout then New> Binary Value, double-click on the newly created entity, enter 00000000000000000300000000005BE000005CE000000000 and click OK
- By SharpKey: Add> Type Key> press win key> OK from the left panel Turn Key Off> OK> Write to registry.
- Using Gaming: Check your keyboard’s official website or provided manual.
- By Keyboard Application.
- By AutoHotKey Script: Right-click on desktop> New> AutoHotKey, right-click on AutoHotKey file> Edit Script> type “~LWin Up::return ~RWin Up::return” > Save, right-click on AutoHotKey file> Run Script.
- By Registry: Launch the registry editor, navigate via
HKEY_CURRENT_USER\Software\Microsoft\Windows\CurrentVersion\Policies\Explorer
Then right-click on Explorer> New> DWORD(32-bit) value, launch the newly created entity, and change the value to 1.
- By Group Policy: Launch the Group Policy Editor, navigate to File Explorer by User Configuration> Administrative Templates> Windows Component> File Explorer and then double click on “Turn off Windows Key hotkeys”, select Enabled, and click OK.
- By Third-party app: Winkill and Simple Disable Key.
Disabling the Windows key on your keyboard can be a lifesaver if you often find yourself accidentally pressing it during intense gaming sessions or while working. It’s a straightforward process that involves tweaking some settings in the Windows Registry. Don’t worry, though; it’s not as scary as it sounds! In just a few steps, you’ll have your Windows key disabled, allowing for an uninterrupted experience. Always remember to back up your data before diving into the registry, as it’s a crucial component of your operating system.
Disabling the Windows key will prevent it from interrupting your workflow or gameplay by accidentally opening the Start menu.
Step 1: Open the Run Dialog
Press Win + R to open the Run dialog box.
The Run dialog is a quick way to access various Windows settings and tools. By pressing these keys, you’ll be able to open the dialog box where you can type in commands or access certain features.
Step 2: Open the Registry Editor
Type regedit and press Enter.
The Registry Editor is where you can modify settings that control how Windows operates. You’ll need to be cautious here because changes can affect your system.
Step 3: Navigate to the Keyboard Layout Key
In the Registry Editor, go to HKEY_LOCAL_MACHINESYSTEMCurrentControlSetControlKeyboard Layout.
This path leads you to where keyboard settings are stored. It’s like finding a specific book in a massive library; you need to follow the right path to get there.
Step 4: Create a New Binary Value
Right-click on the right pane, select New > Binary Value, and name it Scancode Map.
Creating a new binary value is like adding a new entry or chapter in a book. This specific entry will inform your computer to disable the Windows key.
Step 5: Modify the Scancode Map
Double-click on Scancode Map and enter 00 00 00 00 00 00 00 00 02 00 00 00 00 00 5B E0 00 00 00 00.
This series of numbers tells Windows to ignore the Windows key. It’s akin to giving a secret code that your computer understands to bypass the key’s function.
Step 6: Restart Your Computer
Close the Registry Editor and restart your computer.
Restarting ensures that all changes are applied properly. It’s like rebooting a device to make sure everything is working as it should be.
After completing these steps, the Windows key will no longer open the Start menu or perform any other default actions. You should notice that your workflow or gaming sessions have become more seamless without those accidental interruptions.
Tips for Disabling Windows Key
- Always back up your registry before making changes to avoid accidental data loss.
- Consider using third-party software if you’re uncomfortable with modifying the registry directly.
- Disabling the Windows key affects all users on the computer, so inform others who share the device.
- If you play games, check if they have built-in options to disable the Windows key.
- To re-enable the key, simply delete the
Scancode Mapentry and restart your computer.
Frequently Asked Questions
What does the Windows key do?
The Windows key opens the Start menu and offers shortcuts for various Windows features.
Is it safe to modify the registry?
Yes, if you follow the steps carefully. Always back up your data to prevent any issues.
Can I still use shortcuts without the Windows key?
Some shortcuts will be unavailable, but most programs offer alternative shortcuts.
How do I re-enable the Windows key?
Remove the Scancode Map entry from the registry and restart your computer.
Are there easier ways to disable the Windows key?
Yes, third-party software can achieve this without editing the registry.
Summary
- Open the Run Dialog with
Win + R. - Type
regeditand press Enter. - Navigate to
HKEY_LOCAL_MACHINESYSTEMCurrentControlSetControlKeyboard Layout. - Create a new Binary Value named
Scancode Map. - Enter
00 00 00 00 00 00 00 00 02 00 00 00 00 00 5B E0 00 00 00 00. - Restart your computer.
Conclusion
Disabling the Windows key can be a fantastic way to enhance your productivity or gaming experience, especially if you frequently hit it by mistake. Although it might seem daunting to venture into the Registry Editor, the steps are straightforward and manageable even for those with basic computer skills. By following the directions above, you’ll ensure a smoother, interruption-free environment on your PC.
Remember, the Registry Editor is a powerful tool, so always handle it with care. Consider backing up your data before making changes, and don’t hesitate to seek professional help if you’re unsure about the process. If you’re looking for a more user-friendly approach, you might explore third-party software that can achieve the same result with less technical involvement.
In the end, whether you choose to disable the key manually or with additional software, the benefits of a distraction-free session are well worth the effort. So, go ahead and give it a try, and enjoy the newfound ease in your daily tasks!
Kermit Matthews is a freelance writer based in Philadelphia, Pennsylvania with more than a decade of experience writing technology guides. He has a Bachelor’s and Master’s degree in Computer Science and has spent much of his professional career in IT management.
He specializes in writing content about iPhones, Android devices, Microsoft Office, and many other popular applications and devices.
Read his full bio here.
Readers help support Windows Report. We may get a commission if you buy through our links.
Read our disclosure page to find out how can you help Windows Report sustain the editorial team. Read more
The Windows key is somewhat helpful and is a part of many shortcuts on Windows 10. However, many users use it frequently, and some want to disable it.
The key can sometimes be a problem, especially during intense gaming sessions. By default, pressing the Windows key will open the Start Menu, which can make you lose focus while gaming.
This guide will show you the easy ways to disable the Windows key and prevent any distractions.
Can you disable the Windows key while gaming?
There are limited ways to disable the Windows key in game mode. This is because Microsoft views and has placed much importance on the key.
However, some gaming keyboards have a unique feature to lock and unlock the Windows key. Another option is to disable the Windows key from opening the Start Menu in-game.
This will require you to alter the keyboard configuration and controls in the game.
How can I disable the Windows key?
1. Modify your registry
- Press the Windows key + R, type regedit, and click OK.
- To be on the safe side, click File > Export… to create a backup.
- Select All as Export range, choose a safe location, enter the desired file name and click on Save.

- In the left panel, navigate to:
Computer\HKEY_LOCAL_MACHINE\SYSTEM\CurrentControlSet\Control\Keyboard Layout - In the right pane, right-click the space and choose New >Binary Value from the menu.
- Enter Scancode Map as the name of the new value.

- Double-click the Scancode Map value and enter 00000000000000000300000000005BE000005CE000000000 in the Data field.
- Be extra cautious and double-check if the entered value is correct. Now click OK.

- After doing that, close Registry Editor and restart your PC.


Keep in mind that your registry has sensitive information in it. So, if you want to edit it, use extra caution. If you encounter problems with your PC after modifying the registry, restore the backup created.
After your PC restarts, the Scancode Map you created in the registry should disable the Windows key altogether. Therefore, you need to delete the Map from the Registry Editor to enable it later.
Finally, if you are uncomfortable editing your registry manually, download Disable Windows key.reg and run it. This will perform the task for you quickly. To enable the key later, you must download and run Enable Caps Lock and Windows keys.reg.
2. Use Registry Editor to block Windows Key hotkeys
- Open Registry Editor.
- When Registry Editor opens, from the left panel, go to:
HKEY_CURRENT_USER\Software\Microsoft\Windows\CurrentVersion\Policies\Explorer - Right-click any space in the right panel and choose New > DWORD (32-bit value).
- Enter NoWinKeys as the name of the new DWORD.

- Double-click NoWinKeys DWORD to open its properties.
- Set Value data to 1 and click OK to save changes.
- After you’re done, close Registry Editor and restart your PC to apply the changes.

This solution is ideal for you if you want to disable the Windows key because of a shortcut affecting games like Razer Huntsman and Apex Legends. It disables all shortcuts related to the Windows key entirely.
3. Use Group Policy Editor
- Press the Windows key+ R, enter gpedit.msc, and click OK.
- Now navigate to the User Configuration > Administrative Templates > Windows Components > File Explorer in the left pane.
- Locate and double-click the Turn off Windows key hotkeys option in the right pane.

- Select the Enabled option and click on Apply and OK to save changes.

- After that, restart your PC and check if that solves the problem.


This is a simple solution, but like before, it should disable only the Windows key shortcuts. If you need to disable the Windows key entirely, you might want to try a different solution.
4. Use a third-party software
- Download and start SharpKeys.
- Once the application starts, click on Add.

- Now you’ll see two columns. Click on the Type Key in the left pane and press the Windows key.

- Now click on OK to select the pressed key.
- Select Turn Key Off in the right pane and click OK to save changes.

- Now, click on the Write to Registry button.

- From here, restart your PC or log out and log back in to apply the changes.
- Start Sharpkeys, select the desired key from the menu to enable the Windows key again and click on Delete.

- After deleting the key, click on the Write to Registry button.

- Now restart your PC or log off and back on to apply the changes.


This free and portable tool allows you to remap your keys but can also disable keys or assign them to certain functions. Remember that this is a powerful application, so you’re using it at your own risk.
Other third-party options include the simple-to-use Winkill and creating a script with Autohotkey to disable the Windows key.
- Microsoft wants Windows 10 users to upgrade to Windows 11 or Copilot + PCs
- Deleting ‘inetpub’ folder lets hackers permanently stop Windows updates, Microsoft warns
- The latest KB5055612 for Windows 10 22H2 brings huge stability to the OS
5. Use Gaming mode on your keyboard
Many gaming keyboards have a Gaming mode feature that allows you to block the Windows key with ease. However, you usually have to press a particular keyboard shortcut to activate Gaming mode.
Some keyboards even have a controller icon on one of its keys so you can easily find the shortcut key for Gaming mode. However, if you can’t find the shortcut, we advise you to check your keyboard manual for detailed instructions on activating Gaming mode.
Remember that not all keyboards support this feature, so check if your keyboard supports it.
The Windows key is beneficial but can get in your way sometimes. While there are many ways to disable it, the best and safest option is to use a gaming keyboard and set it to Gaming mode.
After reading this article, you may have a better understanding of why the Windows key is not working on Windows 11.
If you need a list of the best Logitech gaming keyboards, you can buy them today; check our detailed guide for the top picks you can select from.
If you have suggestions or questions, leave them in the comments section below, and we’ll take a look.
Milan Stanojevic
Windows Toubleshooting Expert
Milan has been enthusiastic about technology ever since his childhood days, and this led him to take interest in all PC-related technologies. He’s a PC enthusiast and he spends most of his time learning about computers and technology.
Before joining WindowsReport, he worked as a front-end web developer. Now, he’s one of the Troubleshooting experts in our worldwide team, specializing in Windows errors & software issues.