
This tutorial demonstrates how to enable or disable the Diagnostic Data Viewer on Windows 10 and Windows 11 PCs. The Diagnostic Data Viewer can help you troubleshoot your PC, and to better understand the diagnostic reports that are automatically sent to Microsoft from your device.
What is the Diagnostic Data Viewer and what does it show?
The Windows Diagnostic Data Viewer is an interface for viewing diagnostic data that is collected by Microsoft from your device, and sent to them so that they can use it for product improvement and debugging. The goal of this is to collect information from millions of consumer Windows devices, and analyze it for potential problems or compatibility issues that can be fixed through Windows updates.
You have limited control over how much diagnostic data your Windows device shares with Microsoft:
- Required: This mandatory reporting data is limited to what Microsoft deems necessary to keep your device operational and secure
- Optional: Includes additional data about the apps you use, the websites you visit, and additional error details
Whether you send only the required, or the additional optional data is configured when you first set up your Windows device. It can also be configured in the Settings app in the Privacy & Security > Diagnostics & feedback section.
Reasons to enable or disable the Diagnostic Data Viewer
Enabling the Diagnostic Data Viewer lets you see information that can help you troubleshoot issues with your PC. Reviewing the contents of the telemetry that is sent to Microsoft can also assist with understanding and improving your online privacy.
It is not possible to completely disable the collection of diagnostic data in Windows 10 and Windows 11 (disabling the Diagnostic Data Viewer only hides the information — it is still collected by Microsoft). You can, however, configure firewall policies or use third-party tools to block your PC from connecting to the servers to upload the data.
You may wish to disable the Diagnostic Data Viewer if you share your PC and do not want the information in it (which may include data about your website or app usage) to be visible to other users, or for compliance reasons.
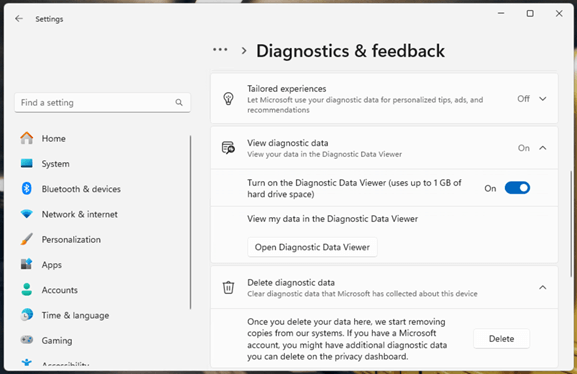
How to turn on the Diagnostic Data Viewer (Windows 11)
Use the following tutorial steps to turn on the Diagnostic Data viewer in Windows 11:
- Right-click on the Start button and select Settings
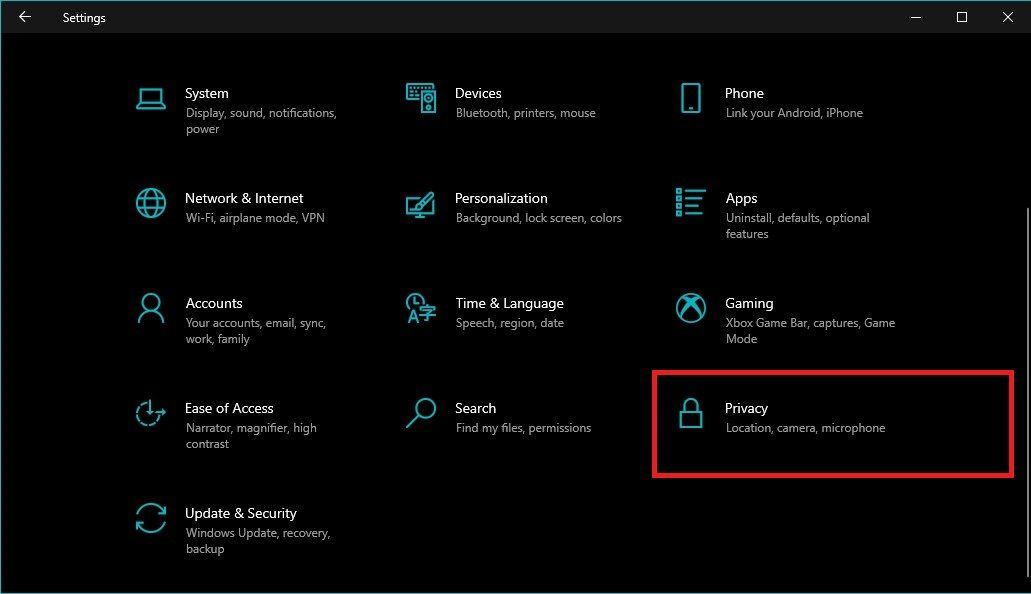
- Select Privacy & Security in the sidebar to the left
- Select Diagnostics & feedback from the list of Windows permissions to the right
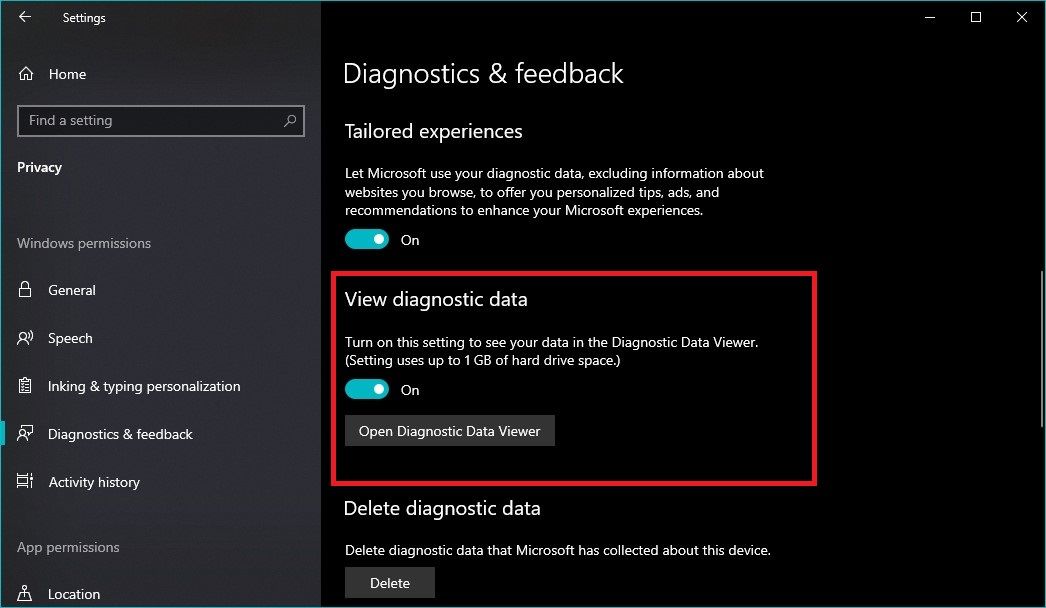
- Scroll down to and expand the View diagnostic data option
- Toggle the Turn on the Diagnostic Data Viewer option to enable

- Click the button to Open Diagnostic Data Viewer
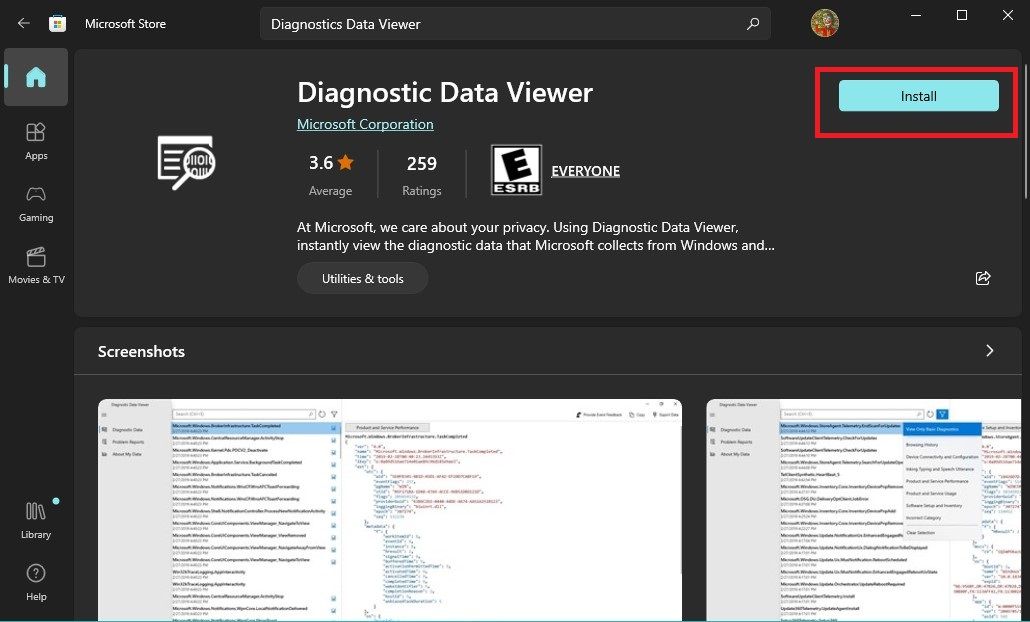
- If the Diagnostic Data Viewer is not installed, the Windows Store page for the tool will open so that it can be downloaded
- Once the Windows Diagnostic Data Viewer is installed it can be opened with the button in the Settings app described above, or directly from the Start menu
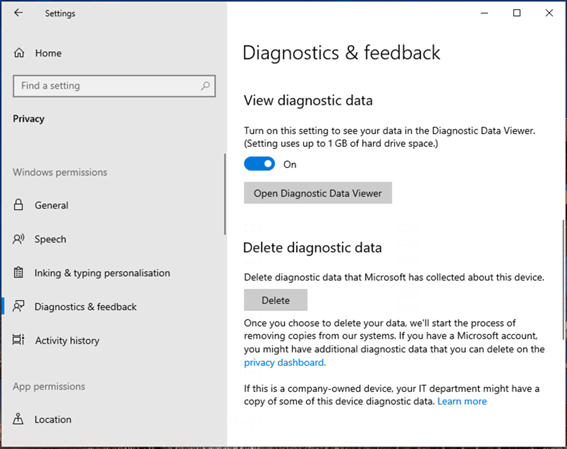
How to turn on the Diagnostic Data Viewer in Windows 10
The instructions to enable the Diagnostic Data Viewer differ slightly for Windows 10 devices:
- Open the Settings app from the Start menu
- Select Privacy and then select Diagnostics & feedback in the left sidebar
- Scroll down to View diagnostic data and toggle the option on

- Click Open Diagnostic Data Viewer (if it is not installed, the Windows Store page for it will open)
- Once installed, you can open the Diagnostic Data Viewer from the start menu, or through the Diagnostics & feedback section of the Settings app
How to turn off the Diagnostic Data Viewer in Windows 10 and Windows 11
To disable the Diagnostic Data Viewer in Windows 10 or Windows 11, follow the relevant instructions above, but instead, toggle the View diagnostic data option to off. You can then also uninstall the Diagnostic Data Viewer app.
Enabling or disabling the Diagnostic Data Viewer with the Local Group Policy Editor
Note that using the Windows Settings app is the preferred method for enabling the Diagnostic Data Viewer as it is less error-prone than using Local Group Policy or the Registry. If you do use either of these methods, you may no longer be able to change diagnostic data options in the Settings app, and will need to return the Local Group Policy and Registry settings to their defaults before you can again do so.
To enable diagnostic data using the Local Group Policy editor:
You will also need to install the Diagnostic Data Viewer from the Windows store.
To disable the Diagnostic Data Viewer using Local Group Policy:
- Follow the steps described immediately above
- Set the state of the Disable diagnostic data viewer setting to Enabled
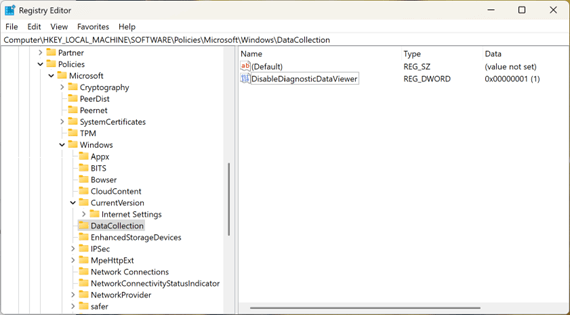
How to enable or disable the Diagnostic Data Viewer with the Windows Registry Editor
It is also possible to utilize the Windows Registry Editor to enable or disable viewing diagnostic data:
- Open the Registry Editor
- Navigate to HKEY_LOCAL_MACHINE\SOFTWARE\Policies\Microsoft\Windows\DataCollection
- If the DisableDiagnosticDataViewer DWORD value does not exist, create it by selecting Edit > New > DWORD (32-Bit) Value from the toolbar
- Rename the new DWORD value DisableDiagnosticDataViewer

- To disable the Diagnostic Data Viewer, click on the DisableDiagnosticDataViewer value and set its Value data to 1, then press OK
- To enable the Diagnostic Data Viewer, set its value to 0
How to view Windows Diagnostic Data logs
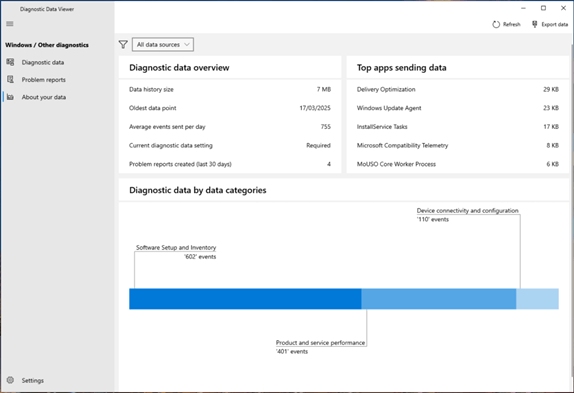
To view the diagnostic data that has been collected:
- Open the Windows Diagnostic Data Viewer from the Privacy & security section of the Settings app, or from the Start menu
- If diagnostic data viewing is disabled, you will receive a warning that you need to enable it to view telemetry

- If it is enabled, you will be able to view the diagnostic data that has been collected, including diagnostic data, problem reports, and a summary of your data.

How to delete/clear Windows diagnostic data
While you cannot prevent consumer versions of Windows (including Pro and Home editions) from collecting diagnostic data and can only block it using external tools, you can delete the data from your device and request that Microsoft remove the data from their systems.
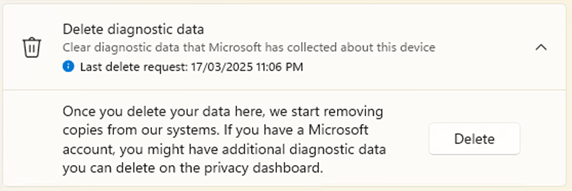
You can do this by opening the Settings app, navigating to Privacy & security (just Privacy on Windows 10), and then Diagnostics & feedback. From there, under Delete diagnostic data, there is the option to delete the diagnostic data Microsoft has collected about your device. Clicking the Delete button will delete the data from your device, and signal to Microsoft that they need to remove copies of that data from their systems (which may not happen immediately). This only applies to the data collected to this point in time, so you may wish to do this periodically.
Managing user and customer privacy in enterprise and education
Enabling or disabling the Windows Diagnostic Data Viewer does not affect the collection of required telemetry data, which is mandatory in consumer versions of Windows. While Enterprise and Education versions of Windows give you the option to completely disable diagnostic data, many organizations choose to deploy additional tools to monitor and block the collection and sending of potentially sensitive information.
Endpoint management and security by NinjaOne gives you the tools to deploy firewall and security policies to secure your important proprietary and user data, as well as monitor for potential cybersecurity breaches.
Download Windows Speedup Tool to fix errors and make PC run faster
If you are using Windows 11/10, you may be aware that Microsoft collects diagnostic data. Microsoft has launched a new tool called Diagnostic Data Viewer, which helps users know which diagnostic data has been sent to Microsoft server from their computers.
Your computer sends diagnostic data like information about installed software or apps, the apps’ workflow, hardware configuration, and compatibility, installed drivers, etc., to Microsoft to improve the user experience. Now using the Diagnostic Data Viewer, you will be able to find out what data Microsoft has collected from your computer.
How do I enable Diagnostic Data in Windows?
If you want to enable Diagnostic Data Viewer on Windows 11 or Windows 10 computer, then this can be done using the Settings app available in both operating systems. The steps for enabling Diagnostic Data Viewer on Windows 11 and Windows 10 are also covered separately by us in this post above.
To get started, you need to enable Diagnostic Data Viewer in the Windows Settings panel.
Windows 11

To enable or turn on Diagnostic Data Viewer in Windows 11, you need to follow these steps:
- Use Win+I This will launch the Settings app
- Click on the Privacy & security category
- On the right-hand section, click on Diagnostics & feedback menu
- Expand View diagnostic data section
- Use the button available for the Turn on the Diagnostic Data Viewer option.
That will enable this feature. Now you can install the Diagnostic Data Viewer app from Microsoft Store and start using it.
Windows 10

In Windows 10, open Windows Settings and go to Privacy > Diagnostics & feedback.
Now scroll down on your right-hand side until you get an option called Diagnostic data viewer. Click the toggle button to enable this feature.
Related:
- Allow or Prevent Users from deleting Diagnostic Data in Windows
- How to disable Diagnostic Data Viewer in Windows 11
How do I delete Windows Diagnostic Data?
To delete the Diagnostic Data in Windows 11/10:
- Use Win+I This will launch the Settings app
- Click on the Privacy & security category
- On the right-hand section, click on Diagnostics & feedback menu
- Press the Delete diagnostic data button.
Install Diagnostic Data Viewer from Microsoft Store
Following that, click the Diagnostic Data Viewer button to open the tool in the Microsoft Store. You need to install this app on your Windows computer.
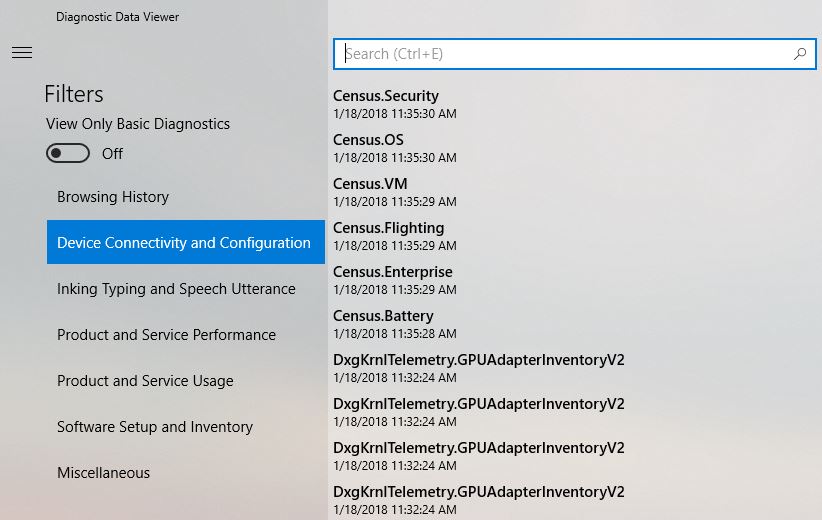
After installing the app, you can see that it has the following categories-
- Browsing history
- Device Connectivity and Configuration
- Inking Typing and Speech Utterance
- Product and Service Performance
- Product and Service Usage
- Software Setup and Inventory
You can check this data using this free app.
What is Diagnostic Data Viewer?
Based on the privacy settings set by you in the diagnostics settings on your Windows computer, Microsoft collects data from Windows and Office apps in real-time to improve Windows experience, keep your operating system up to date, secure it, etc. You have the option to send required data as well as optional data to Microsoft. But you can’t see what type of data you’re sending from your system to Microsoft directly. For that, Diagnostic Data Viewer is needed.
Diagnostic Data Viewer is an app by Microsoft that helps you see what type of information is being collected from your Windows 11/10 computer. You can use this app to view diagnostic data as well as export all your diagnostic data as a CSV file.
Export data from Diagnostic Data Viewer app

If you want to analyze the data further on a different computer, you can export the data in .csv format. The steps are:
- Launch Diagnostic Data Viewer app using the Search box or Start menu
- Click on the Diagnostic data option available on the left section
- Click on the Export data option available on the top right part of its interface.
- After that, you can select the output location, and save all the diagnostic data in a CSV file.
Hope this helps.
Anand Khanse is the Admin of TheWindowsClub.com, a 10-year Microsoft MVP (2006-16) & a Windows Insider MVP (2016-2022). Please read the entire post & the comments first, create a System Restore Point before making any changes to your system & be careful about any 3rd-party offers while installing freeware.
Windows 10 has made the headlines with the fact that it sends all kinds of data to Microsoft. To alleviate suspicions of wrongdoing, and increase transparency, Microsoft released the Diagnostic Data Viewer app which anyone can use to see what data Windows 10 sends to its parent company. One other convenient use of Diagnostic Data Viewer is for troubleshooting. With this app, you can see what does not work on your Windows 10 PC or device, what is causing the problems, and take measures to fix them. Here’s how:
Where to look for the data that tells you what is malfunctioning in Windows 10
When you open Diagnostic Data Viewer, you see data that might scare you at first, due to its technical character, and structure.
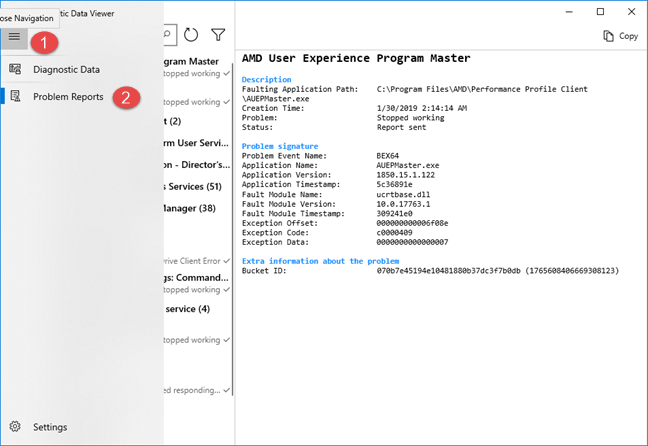
However, if you have some patience and read our guide about this tool, you can understand what data Windows 10 sends to Microsoft, and also use it to understand what does not work and causes errors on your Windows 10 computer or device. To see the data that helps you find what does not work on your PC, click or tap the burger button from the top-left corner of the app, and then go to Problem Reports, in the menu that opens.
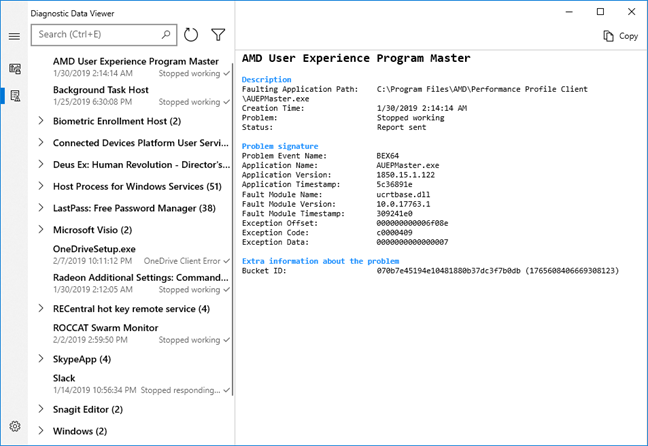
Now you should see only reports about the problems found on your Windows 10 PC, and which were sent to Microsoft so that it can fix them through upcoming updates. By default, the data is listed alphabetically, by source. For each source, you see the name, the date when the problem occurred, and its status. If a source of problems had many recurrences, you see a number near its name.
Let’s take a couple of sample problems that occurred on my Windows 10 PC, and see how to interpret and fix them.
How to understand what does not work in Windows 10, with Diagnostic Data Viewer
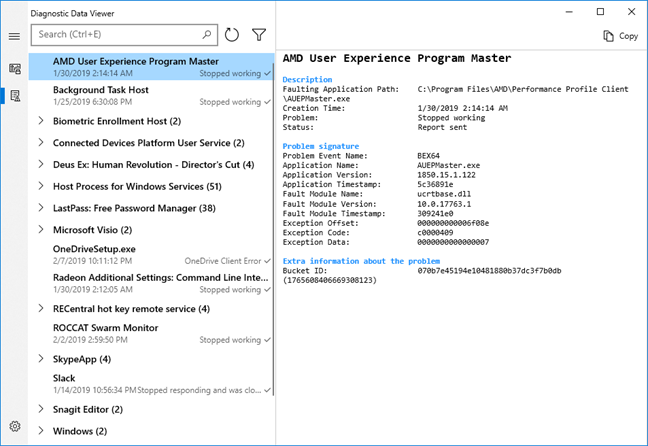
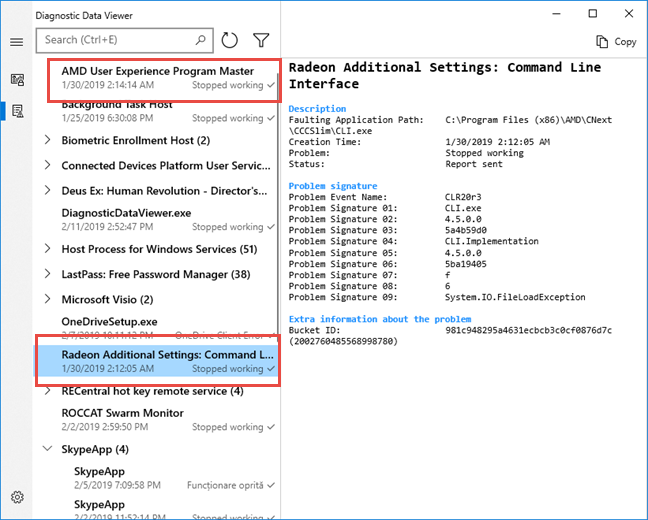
For example, I noticed that I had two problems, on the same day, two minutes apart, caused by my AMD Radeon video card drivers, listed in two different entries. The Radeon Command Line Interface caused one problem, and the AMD User Experience Program Master caused the other. I could see the exact files that stopped working and find information about the bugs from the drivers that I had installed, using Google or Bing.
The solution? Updating the AMD Radeon video card drivers to a newer version. Once I did that, those crashes went away, and no new reports appeared in Diagnostic Data Viewer, caused by AMD drivers.
In my list of problem reports, there were many entries under «Host Process for Windows Services.» This seemed like gibberish at first, but then I looked into the details: there was a CameraStartupFailureEvent that kept repeating each time I started my Windows 10 PC. Also, there were a couple of problems under «Biometric Enrollment Host.» I looked at the details for those too, and they all mentioned the camera.
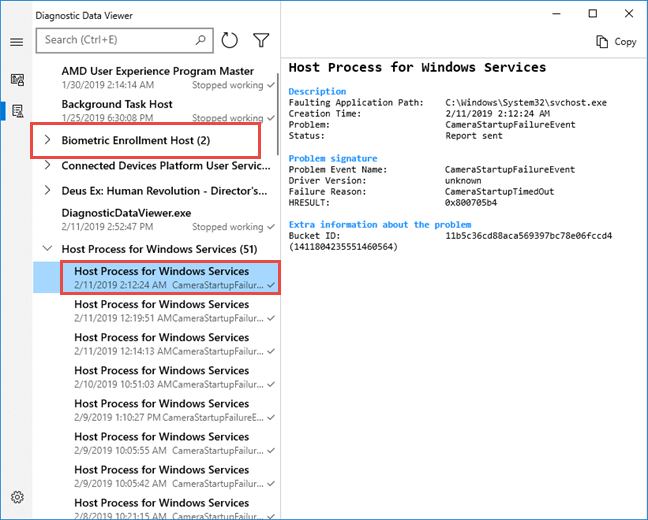
Then it became logical: I recently installed a webcam with support for Windows Hello, and authentication through face recognition. That camera did not always start on time for the face recognition to work during the Windows 10 login. When I looked at the dates and times of those errors, the trend was clear: there was something wrong with the camera, and Windows 10 reported crashes during the startup procedure. I double checked the webcam’s connection to the PC, and it was fine. I also checked for new drivers on its manufacturer site, and guess what? New drivers were available for download, that fixed reliability problems. The solution? Install the new drivers for my webcam and monitor if the problems keep repeating, using Diagnostic Data Viewer.
Most Windows 10 users are going to see problems categorized as Windows Shell Experience. This list always includes errors that take place in Windows, due to different reasons. For example, I found an error, where the «Fault Module Name» was a file used by the Action Center that displays notifications.
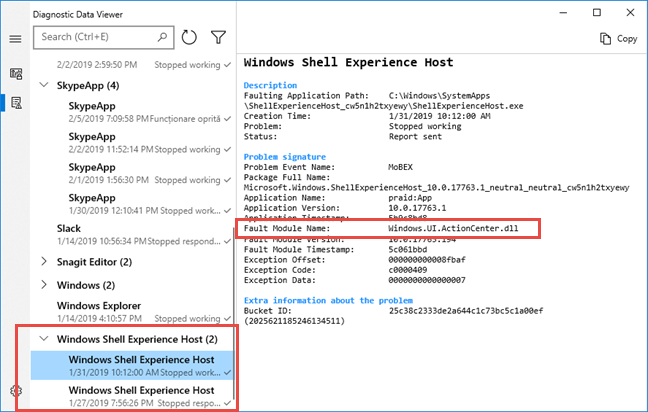
This time there was no action I could take. I remembered Action Center crashing, but I did not know why, and what I could do to fix it. What is good though, is that Microsoft received the error report, so that they can understand the bug, and take action through Windows Update.
What does not work on your Windows 10 PC or device?
Now you know how to use the Diagnostic Data Viewer app in Windows 10, not only to view what data is sent to Microsoft, but also to help you understand what goes on on your PC, and take measures to fix problems, where possible. Try it out and share with us the problems that you discover and the errors that take place the most often on your Windows 10 computer or device.
Summary
- Microsoft’s Diagnostics Data Viewer reveals hidden details of your computer’s behavior, helping to diagnose and resolve system issues quickly.
- The Viewer simplifies complex technical details into a plain format, making it easier to understand what’s happening inside your Windows 10 PC.
- It offers personalized recommendations for resolving problems, such as identifying the root cause of sluggishness and providing ways to make your PC faster.
Microsoft’s Diagnostics Data Viewer can help you diagnose issues slowing down your PC, acting as a window into the hidden details of your computer’s behavior. It also provides valuable insights into resolving obscure system issues.
Let’s explore this powerful tool and learn how it can help us fix problems with computer health and performance.
What Is the Windows 10 Diagnostics Data Viewer?
The Windows 10 Diagnostics Data Viewer is a virtual microscope that allows you to examine your system’s activities closely. It gathers important data about how your computer is running, just like how a doctor collects information to diagnose your illnesses.
This software serves as a translator for your computer, simplifying complex technical details into a plain format. This transparency helps you to understand what’s happening inside your Windows 10 PC.
Besides identifying problems, the Diagnostics Data Viewer offers tailored recommendations for resolving them. This personalized approach streamlines the troubleshooting process, allowing you to apply precise fixes that match your computer’s unique behavior.
For instance, when your computer experiences sluggishness, the Diagnostics Data Viewer attempts to pinpoint the root cause. It reveals the factors contributing to the slowdown and shows you ways to make your Windows 10 PC faster.
Furthermore, in the unfortunate event of a virus infection, this software transforms into a digital doctor, identifying the specific virus and offering recommendations for its removal. It also helps you navigate the path to recovery, thus restoring your computer’s security.
How to Find the Windows Diagnostics Data Viewer
To initiate the troubleshooting process, use Windows search to find the Diagnostics Data Viewer. From the search results, choose the corresponding application and open it.
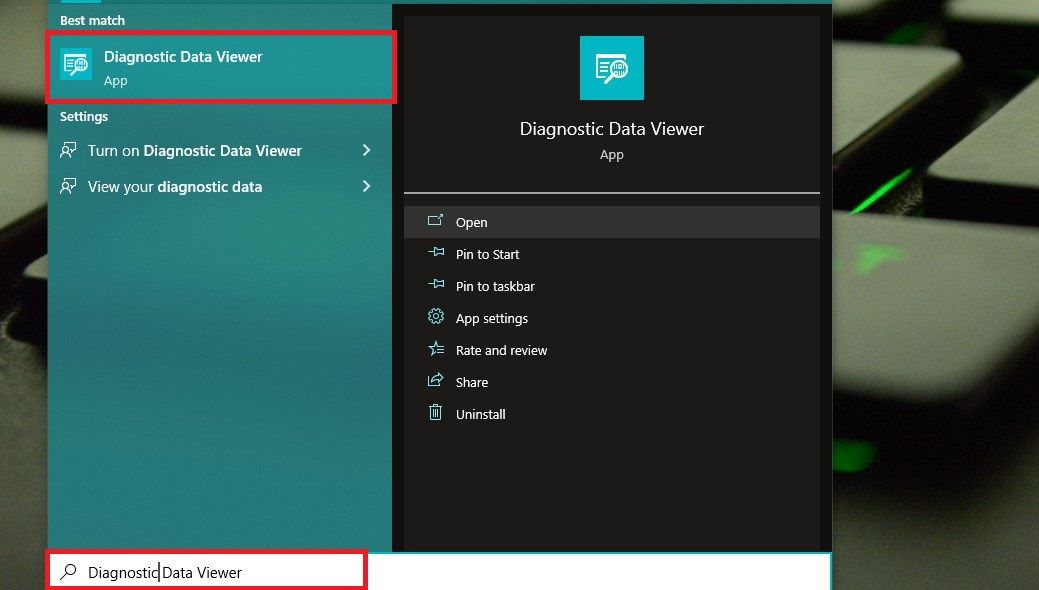
If you can’t find the application on your PC, you can get it from the Microsoft Store. Simply visit the Diagnostic Data Viewer page on the Microsoft Store or search for it and click Install to download it to your PC.
How to Use the Diagnostics Data Viewer to Troubleshoot Windows
After opening the Diagnostics Data Viewer, click on the filter icon to view the list of diagnostic events. Each of them offers valuable insights into different aspects of your computer’s behavior. So, your first task is to identify the specific event that aligns with the issue you’re encountering.
For example, if you’re grappling with a connection issue, focus on events related to device connectivity and configuration.
Once you’ve selected a relevant event, switch to the Problem Reports tab to open a more detailed report of the selected diagnostic data.
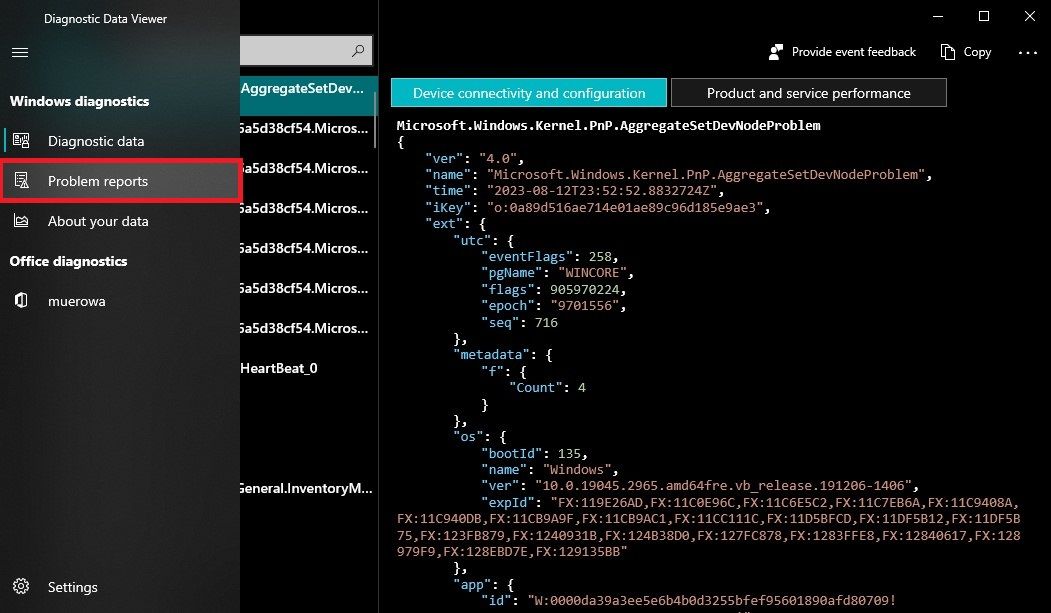
This report includes additional information about the data, such as the time and date it was collected, the source of the data, and the specific events that were recorded.
Once you’ve read and understood the diagnostic insights and recommendations, implement the prescribed solutions based on the information you’ve gathered. For example, you may need to adjust system settings, replace outdated Windows drivers, or perform routine maintenance tasks.
If you can’t find reports within the Diagnostics Data Viewer, ensure that your PC is configured to collect diagnostic data. To do this, open the Settings app and navigate to Privacy > Diagnostics & Feedback.
Within this tab, locate the Diagnostic Data section and choose whether to gather Required diagnostic data and Optional diagnostic data.

Scroll down the same page to find additional options like Tailored Experiences and View Diagnostics Data. Toggle on the latter to see your data in the Diagnostic Data Viewer.
After you’ve made your selections, your Windows 10 PC will begin gathering information about performance, errors, and other system activities.
How to Optimize Performance Using Data Viewer’s Insights

The Windows 10 Diagnostics Data Viewer isn’t just a troubleshooter; it’s also a powerful tool for fine-tuning your computer and enhancing its performance. To that end, here’s how to use Data Viewer insights to ensure your PC is operating at its peak.
1. Optimize System Resource Usage
One of the most significant advantages of the Diagnostics Data Viewer is its ability to unveil performance issues that may otherwise remain hidden. It provides information about CPU usage, memory allocation, and disk activity data, allowing you to pinpoint areas where your computer might be slowing down.
The insights you glean from the Data Viewer can help you optimize your computer’s resource allocation. For instance, if you observe high memory consumption during specific tasks, you can adjust system settings or close unnecessary applications to free up RAM and reduce its usage.
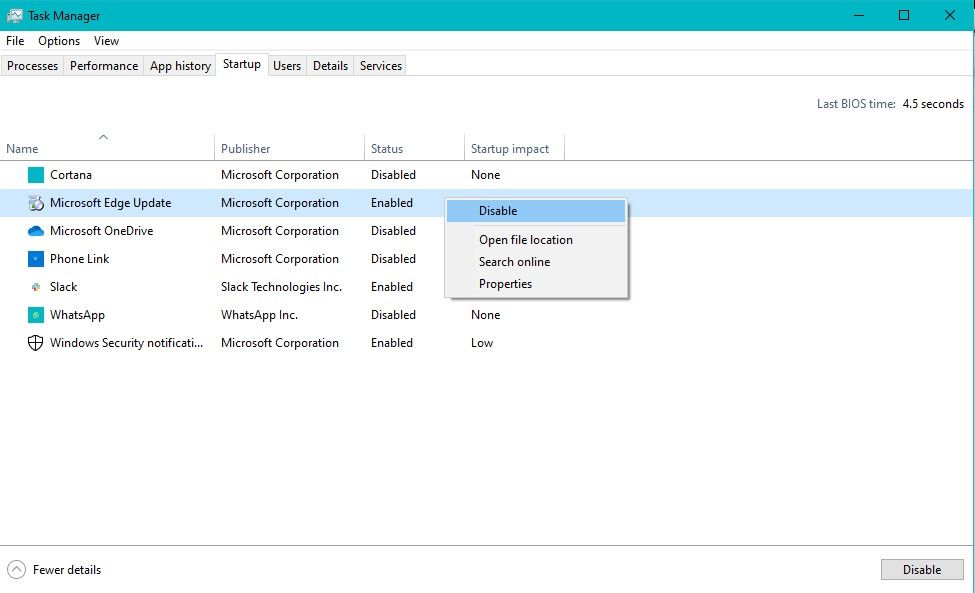
2. Disable Startup Programs
Data Viewer can analyze the impact of startup programs on your computer’s boot time. It reveals which applications consume the most resources during startup, allowing you to determine which startup programs you can safely disable.
3. Adjust Power Settings
Another method of optimizing system performance is adjusting power settings. Luckily, the Diagnostics Data Viewer offers insights into power consumption patterns and their effects on your computer’s performance.
Armed with this knowledge, you can tweak Windows 10’s power options to strike a balance between energy efficiency and optimal performance.
Windows System Maintenance and Optimization Made Easy
The Diagnostics Data Viewer is a valuable companion to have when optimizing your Windows 10 PC. With this tool, you can decipher technical nuances, identify system problems, and fix them with tailored solutions. This way, you can ensure your PC is at its best.
Written By
published
January 24, 2018

In a world that’s constantly evolving with new technologies like Artificial Intelligence and smart devices, our commitment to deliver on our Privacy Principles and work with you to evolve the Windows privacy experience doesn’t change.
To kick off the new year ahead of Data Privacy Day we are giving our Windows Insiders an early preview of the Windows Diagnostic Data Viewer coming in our next release of Windows. Our commitment is to be fully transparent on the diagnostic data collected from your Windows devices, how it is used, and to provide you with increased control over that data. This is all part of our commitment to increase your trust and confidence in our products and services.
In addition, the Microsoft Privacy Dashboard will enable you to see and manage more data associated with your Microsoft account. These changes are part of the greater enhancements we are rolling out now and in the coming months.
Windows Diagnostic Data Viewer:
The Windows Diagnostic Data Viewer provides even greater transparency to all the diagnostic data received from your Windows device. Available to everyone in the Microsoft Store, the Diagnostic Data Viewer is separate from the Microsoft Privacy Dashboard and allows you to see, search, and take action with your diagnostic data.
You are able to see and search all Windows diagnostic data that’s in the cloud related to your specific device.
The diagnostic data presented in the menu includes;
- Common Data, like the Operating System’s name, the Version, Device ID, Device Class, Diagnostic level selection and so on.
- Device Connectivity and Configuration such as device properties and capabilities, preferences and settings, peripherals, and device network information.
- Product and Service Performance data that show device health, performance and reliability data, movie consumption functionality on the device and device file queries. It’s important to note that this functionality is not intended to capture user viewing or, listening habits.
- Product and Service Usage data includes details about the usage of the device, operating system, applications, and services.
- Software Setup and Inventory such as installed applications and install history, device update information.
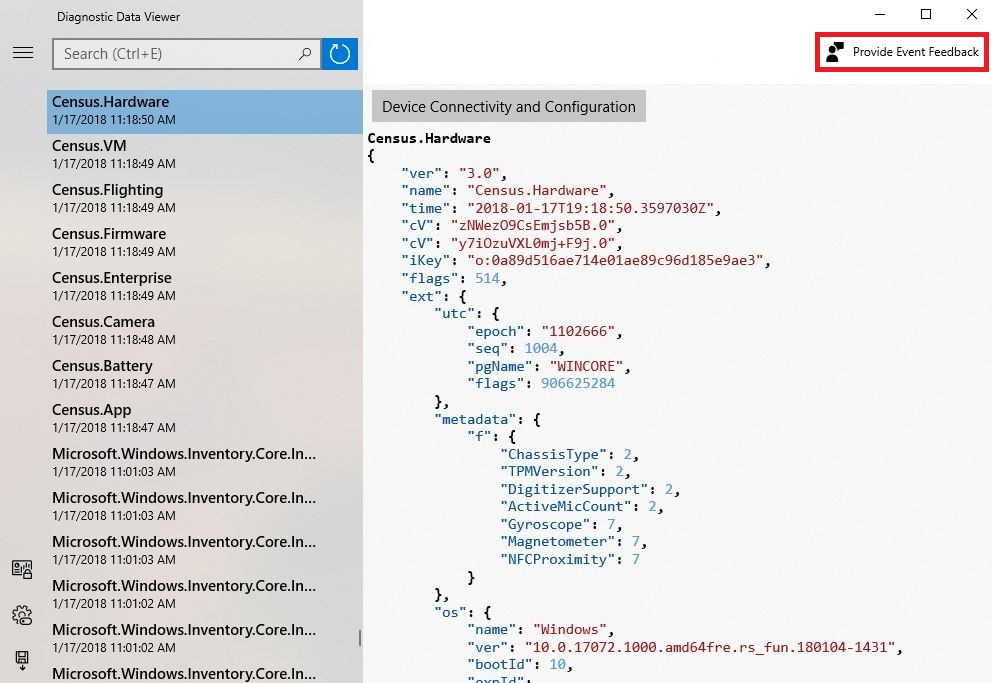
The Diagnostic Data Viewer provides you with the features such as view, search and filter of your diagnostic data, as well as the ability to provide feedback about the viewer.
Microsoft Privacy Dashboard
We’ve updated the Microsoft Privacy Dashboard with a new Activity History page which provides a clear and easy to navigate way to see the data that is saved with your Microsoft account. The Microsoft Privacy Dashboard allows you to manage your data and change what data is collected by adjusting the privacy settings on your device or browser at any time.
And in the coming months, we’ll also bring additional features that will allow you to;
- View and manage media consumption data, as well as product and service activity on the Activity History page
- Export for any of the data you see on the dashboard
- Delete specific items to allow for greater individual control
Participants in the Windows Insider Program will have the first opportunity to explore all of these new features. They’ll also get an early look at some additional changes in functionality and settings in the coming weeks, and we’re looking forward to their feedback.
Your data privacy will continue to be a priority towards making Windows 10 the best and most secure experience. From improving in-product control, transparency and information about your privacy, while providing a complete list of the diagnostic data collected at the Basic level, among others, to launching the Microsoft Privacy Dashboard and the enhancements we’ve made since then, we want you to be able to easily see and manage your activity data online across multiple Microsoft services.
I look forward to the continued dialogue around our privacy enhancements and welcome you to submit your feedback here, too.
Microsoft introduces new privacy tools ahead of Data Privacy Day