
Are you looking to configure a DHCP server in VMware Workstation? Look no further! DHCP (Dynamic Host Configuration Protocol) is a crucial component in network administration, allowing devices to automatically obtain IP addresses and other network parameters. Configuring a DHCP server in VMware Workstation can simplify network management and streamline the process of assigning IP addresses to virtual machines. In this guide, we will explore the steps involved in setting up a DHCP server in VMware Workstation, providing you with a comprehensive understanding of the process.
Setting up a DHCP server in VMware Workstation involves a few essential steps. First, ensure that you have a virtual machine with an operating system compatible with acting as a DHCP server, such as Windows Server or Linux. Next, configure the virtual machine’s network settings to a Bridged or NAT mode to enable communication with other devices in the network. Then, install and configure the DHCP server software on the virtual machine, assigning a range of IP addresses to be distributed to client devices. Finally, test the DHCP server by connecting client devices to the network and verifying that they receive the assigned IP addresses. By following these steps, you can successfully configure a DHCP server in VMware Workstation and streamline your network management processes.
Need to configure DHCP server in VMware Workstation? Here’s a step-by-step guide:
- Launch VMware Workstation and open your virtual machine.
- Go to «Edit» and click on «Virtual Network Editor.»
- Select the network adapter you want to configure and enable the DHCP checkbox.
- Define the DHCP settings like the range of IP addresses, DNS server, and default gateway.
- Save the settings and start your virtual machine. The DHCP server is now configured!

Introduction: Understanding DHCP and VMware Workstation
In today’s digital era, virtualization plays a significant role in various IT infrastructure setups. VMware Workstation, a popular virtualization software, allows users to create and manage virtual machines on a single physical device. When configuring a virtual environment, one essential component is the DHCP (Dynamic Host Configuration Protocol) server. DHCP enables the automatic assignment of IP addresses and network configuration settings to the virtual machines, eliminating the need for manual configuration.
This article will guide you through the process of configuring a DHCP server in VMware Workstation, ensuring seamless connectivity and efficient network management within your virtual environment.
Understanding DHCP Server Configuration
The DHCP server in VMware Workstation is responsible for assigning IP addresses, subnet masks, default gateways, DNS (Domain Name System) servers, and other network parameters to the virtual machines running on the virtual network. By leveraging the automation capabilities of the DHCP server, administrators can streamline network management and reduce manual configuration efforts.
The DHCP server operates under a client-server model, with the DHCP server providing network configuration details and the virtual machines acting as DHCP clients, requesting the necessary information during network initialization. The DHCP server maintains a pool of IP addresses that it can assign to the clients, ensuring each machine on the network has a unique address for seamless data communication.
To configure the DHCP server in VMware Workstation, you need to access the settings and provide the necessary parameters such as IP address range, subnet mask, default gateway, DNS servers, and lease duration. Once the DHCP server is configured, it will dynamically allocate IP addresses to the virtual machines as they join the virtual network, simplifying the network setup process.
Step 1: Enabling DHCP Server in VMware Workstation
The first step in configuring the DHCP server in VMware Workstation is to enable the DHCP service for the virtual network. To do this, follow the steps below:
- Open VMware Workstation and navigate to the Virtual Network Editor by clicking on «Edit» in the top menu and selecting «Virtual Network Editor.»
- In the Virtual Network Editor window, select the virtual network adapter you want to configure as the DHCP server. If you haven’t created a custom virtual network adapter, you can choose one of the default adapters like VMnet1 or VMnet8.
- Check the box labeled «DHCP» to enable the DHCP service for the selected virtual network adapter.
- Click on the «Apply» button to save the changes and close the Virtual Network Editor.
Enabling the DHCP service for the virtual network adapter sets the foundation for the DHCP server configuration in VMware Workstation, allowing the automatic assignment of IP addresses to virtual machines connected to that network.
Step 2: Configuring DHCP Server Settings
After enabling the DHCP service, the next step is to configure the specific settings for the DHCP server. Here’s how:
- In VMware Workstation, go to the «Edit» menu and select «Virtual Machine Settings.»
- From the virtual machine settings window, select the virtual machine for which you want to configure the DHCP server.
- In the virtual machine settings, click on the «Network Adapter» option on the left panel.
- On the right panel, select the «Bridged» network connection type to ensure the virtual machine is connected to the virtual network adapter with the DHCP service.
- Check the box labeled «Connect at power on» to establish the network connection when the virtual machine starts.
- In the «Device status» section, choose the option to «Use DHCP» to obtain an IP address automatically from the DHCP server.
- Click on the «OK» button to save the settings for the virtual machine.
By configuring the DHCP server settings for each virtual machine, you enable them to automatically obtain the necessary network configuration details from the DHCP server, simplifying the setup process.
Step 3: DHCP Server Configuration Parameters
To ensure the DHCP server assigns the correct network parameters to the virtual machines, you need to configure the DHCP server specific parameters. Here are the essential settings:
| Parameter | Description |
| IP Address Range | The range of IP addresses that the DHCP server can assign to the virtual machines. Choose a range that doesn’t conflict with the IP addresses used in your physical network. |
| Subnet Mask | The subnet mask that defines the network segment for the DHCP server and virtual machines. |
| Default Gateway | The IP address of the default gateway that the virtual machines should use for outgoing network traffic. |
| DNS Servers | The IP addresses of the DNS servers that the virtual machines can use for domain name resolution. |
| Lease Duration | The amount of time for which the IP addresses assigned by the DHCP server remain valid on the virtual machines. |
By setting up these DHCP server configuration parameters, you ensure efficient network connectivity and seamless communication between virtual machines within the virtual environment.
Testing DHCP Server Configuration
After configuring the DHCP server settings, it is essential to test the functionality to ensure the virtual machines receive the correct network parameters. Here’s how you can test the DHCP server configuration:
- Start the virtual machine for which you configured the DHCP server settings.
- Once the virtual machine is running, check if it successfully obtains an IP address from the DHCP server.
- Open the command prompt within the virtual machine and use the ipconfig command to verify the obtained IP address, subnet mask, and default gateway.
- Verify network connectivity within the virtual environment by pinging other virtual machines or external resources.
- If all the network parameters are correctly assigned and network connectivity is established, the DHCP server configuration is successful.
Performing these tests ensures that the DHCP server is assigning the necessary network parameters and the virtual machines are correctly configured to utilize the DHCP service for automatic network configuration.
Exploring Advanced DHCP Server Configuration
In addition to the basic DHCP server configuration, VMware Workstation also provides advanced options for fine-tuning the DHCP server settings. These options allow for more granular control over the network configuration within the virtual environment.
Here are some of the advanced DHCP server configuration options you can explore:
Reserving IP Addresses
In certain situations, it may be necessary to reserve specific IP addresses for certain virtual machines. This ensures that those machines always receive the same IP address from the DHCP server. To reserve IP addresses in VMware Workstation, follow these steps:
- Open the Virtual Network Editor in VMware Workstation.
- Select the virtual network adapter with the DHCP service.
- Click on the «DHCP Settings» button.
- In the DHCP Settings window, click on the «Add…» button.
- Enter the MAC address of the virtual machine for which you want to reserve an IP address.
- Specify the reserved IP address and click «OK» to save the reservation.
- Repeat these steps for any other virtual machines that require reserved IP addresses.
- Click on «Apply» and close the Virtual Network Editor.
By reserving specific IP addresses for virtual machines, you can ensure consistent network configurations for critical systems or when configuring specific network applications.
Customizing DHCP Lease Duration
The DHCP lease duration determines the length of time for which the DHCP server leases an IP address to a virtual machine. By default, DHCP servers assign a lease duration of 8 days. However, you can customize this duration based on your requirements. To modify the DHCP lease duration in VMware Workstation, follow these steps:
- Open the Virtual Network Editor in VMware Workstation.
- Select the virtual network adapter with the DHCP service.
- Click on the «DHCP Settings» button.
- In the DHCP Settings window, adjust the lease duration according to your desired value.
- Click on «Apply» and close the Virtual Network Editor.
Customizing the DHCP lease duration ensures that IP addresses are allocated for an appropriate amount of time, balancing network efficiency and IP address pool utilization.
Configuring Multiple DHCP Servers
In complex virtual environments with multiple virtual networks, it may be necessary to configure multiple DHCP servers to manage network configuration efficiently. VMware Workstation allows the use of multiple DHCP servers, each serving a different virtual network adapter. To configure multiple DHCP servers, follow these steps:
- Open the Virtual Network Editor in VMware Workstation.
- Create a new virtual network adapter by clicking on the «Add Network» button.
- Select the newly created virtual network adapter and enable the DHCP service for the adapter.
- In the DHCP Settings window, configure the necessary DHCP server settings for the new adapter.
- Click on «OK» to save the settings.
- Configure the virtual machines to use the respective virtual network adapters and their associated DHCP servers.
By configuring multiple DHCP servers in VMware Workstation, you can ensure efficient network management with dedicated DHCP services for specific virtual networks.
Conclusion
Configuring a DHCP server in VMware Workstation provides seamless network connectivity for virtual machines and reduces manual network configuration efforts. By enabling the DHCP service and configuring the necessary parameters, virtual machines can dynamically obtain network configuration details, ensuring efficient communication within the virtual environment. Additionally, exploring advanced DHCP server options such as IP address reservations, custom lease durations, and multiple DHCP servers allows for more granular control over network management. By following the steps outlined in this article and leveraging the powerful features of VMware Workstation, you can successfully configure and optimize a DHCP server in your virtual environment.

Configuring DHCP Server in VMware Workstation
Follow these steps to configure a DHCP server in VMware Workstation:
- Open VMware Workstation and navigate to the virtual machine settings by selecting «Edit» and then «Virtual Machine Settings».
- In the «Hardware» tab, select «Network Adapter» and enable the «Bridged» mode to connect the virtual machine to the network.
- In the same tab, select the «Network Adapter» and click on the «Advanced» button.
- Under the «Advanced» settings, click on the «Configure» button next to «DHCP» and enable the DHCP server.
- Set the «Start IP Address» and «End IP Address» range for the DHCP server.
- Click «OK» to save the settings and close the virtual machine settings window.
- Configuring a DHCP server in VMware Workstation allows you to automatically assign IP addresses to virtual machines.
- Start by opening the Virtual Network Editor from the Edit menu in VMware Workstation.
- In the Virtual Network Editor, select the network adapter that you want to configure as a DHCP server.
- Click on the DHCP Settings button and specify the range of IP addresses you want to assign to the virtual machines.
- Enable the DHCP server and click Apply to save the changes.
Once the DHCP server is configured, the virtual machine will be assigned an IP address automatically from the specified IP range.
It is important to properly configure the DHCP server to ensure smooth network connectivity for the virtual machine in VMware Workstation.
Key Takeaways: How to Configure Dhcp Server in Vmware Workstation
Frequently Asked Questions
Setting up a DHCP server in VMware Workstation can greatly simplify the process of managing IP addresses on virtual networks. Here are some commonly asked questions and answers to help you configure a DHCP server in VMware Workstation.
1. What is DHCP and why is it important in VMware Workstation?
DHCP stands for Dynamic Host Configuration Protocol. It is a network management protocol that automatically assigns IP addresses, subnet masks, default gateways, and other network configuration parameters to devices on a network. In VMware Workstation, DHCP is important because it allows virtual machines to automatically obtain network settings and join the network without manual configuration. It simplifies the process of managing IP addresses on virtual networks, especially in large-scale deployments.
To configure a DHCP server in VMware Workstation, you need to follow these steps:
2. How do I enable the DHCP service in VMware Workstation?
To enable the DHCP service in VMware Workstation, follow these steps:
a. Open VMware Workstation and navigate to the Virtual Network Editor.
b. Select the network adapter you want to enable DHCP for.
c. Click on the «DHCP Settings» button and configure the DHCP service parameters, such as IP range, subnet mask, gateway, DNS servers, and lease time.
d. Click on «OK» to save the DHCP settings.
Once the DHCP service is enabled, the virtual machines connected to the selected network adapter will automatically receive IP addresses and network settings from the DHCP server.
3. How do I check if the DHCP server is working in VMware Workstation?
To check if the DHCP server is working in VMware Workstation, follow these steps:
a. Power on a virtual machine connected to the network adapter with DHCP enabled.
b. Open the command prompt or terminal within the virtual machine.
c. Run the command «ipconfig» (Windows) or «ifconfig» (Linux) to view the network configuration information.
d. Check if the virtual machine has received an IP address, subnet mask, default gateway, and DNS servers from the DHCP server.
If the virtual machine has obtained the network settings automatically, it means that the DHCP server is working correctly.
4. Can I customize the DHCP settings in VMware Workstation?
Yes, you can customize the DHCP settings in VMware Workstation to meet your specific network requirements. In the Virtual Network Editor, you can configure parameters such as IP address range, subnet mask, default gateway, DNS servers, and lease time. By customizing these settings, you can ensure that the virtual machines on your network receive the desired network configuration.
However, it’s important to note that the DHCP settings should be carefully configured to avoid conflicts with other devices on the network. It’s recommended to consult network administrators or follow best practices when customizing DHCP settings.
5. How do I troubleshoot DHCP server issues in VMware Workstation?
If you encounter DHCP server issues in VMware Workstation, you can try the following troubleshooting steps:
a. Verify that the DHCP service is enabled in the Virtual Network Editor.
b. Check if the DHCP server settings, such as IP range, subnet mask, gateway, and DNS servers, are correctly configured.
c. Restart the DHCP service in VMware Workstation.
d. Ensure that there are no conflicting DHCP servers on the network.
e. Verify network connectivity between the DHCP server and the virtual machines.
f. Check if there are any firewall rules or security settings blocking DHCP traffic.
If the
To conclude, configuring a DHCP server in VMware Workstation is a straightforward process that allows you to manage and allocate IP addresses efficiently. By following the step-by-step instructions provided in this article, you can easily set up and configure a DHCP server to automatically assign IP addresses to your virtual machines.
Remember to ensure that the necessary network settings are properly configured, and that you have a clear understanding of the DHCP server’s role within your virtual network. By leveraging the power of DHCP, you can simplify network management and ensure seamless connectivity for your virtual machines. Happy configuring!
In the modern landscape of network management, Dynamic Host Configuration Protocol (DHCP) serves as a cornerstone for automating the assignment of IP addresses within a network. By implementing a DHCP server, network administrators can streamline the process of IP address allocation and significantly reduce the chances of conflicts. With VMware Workstation as a powerful virtualization tool, it is possible to set up a DHCP server quickly and effectively, offering an invaluable resource for both learning and practical applications.
This article provides a detailed guide on configuring a DHCP server in VMware Workstation, walking through the necessary steps, best practices, and troubleshooting tips.
Understanding DHCP
Before diving into the configuration process, it’s essential to understand what DHCP is and how it operates.
What is DHCP?
DHCP is a network management protocol used on IP networks where a server dynamically assigns IP addresses and other configuration information to devices (clients) on the network. The core components of a DHCP-enabled network include:
- DHCP Server: The machine responsible for distributing IP addresses to clients.
- DHCP Clients: Devices that request IP addresses from the DHCP server.
- DHCP Lease: The time period for which the DHCP server allows a client to use the assigned IP address.
- DHCP Options: Additional configuration parameters such as the default gateway, DNS servers, and domain name.
Setting Up VMware Workstation Environment
Before configuring the DHCP server, ensure your VMware Workstation is correctly set up to host your virtual machines.
- Install VMware Workstation: Download and install the latest version of VMware Workstation on your host machine.
- Create a Virtual Machine (VM): You can set up a dedicated VM for your DHCP server:
- Open VMware Workstation.
- Click on “Create a New Virtual Machine”.
- Follow the wizard to select the type of configuration (typical/recommended).
- Choose the desired operating system (e.g., Windows Server, Linux).
- Allocate resources (CPU, RAM, disk space) to your VM as per your requirements.
- Network Configuration: Ensure the VM’s network adapter settings enable connectivity:
- Go to the VM settings, navigate to the “Network Adapter” section, and select “Bridged” or “NAT”, depending on your needs.
Installing DHCP Server Software
Depending on the operating system chosen for your VM, the installation of the DHCP server software can vary. Below are instructions for setting up DHCP on both Windows Server and Linux systems.
Installing DHCP Server on Windows Server
-
Prepare Windows Server:
- Start your VM and complete the Windows Server installation.
- Update Windows to ensure you have the latest features and security updates.
-
Add DHCP Role:
- Open Server Manager from the Start Menu.
- In Server Manager, go to “Add roles and features”.
- Click “Next” until you reach the “Server Roles” section.
- Check the box for “DHCP Server” and follow the prompts to install the role.
-
Verify Installation:
- After installation, a DHCP management console will appear in Server Manager.
- Complete the DHCP Post-Installation configuration wizard to authorize the server in Active Directory if applicable.
Installing DHCP Server on Linux (Ubuntu as an example)
-
Prepare Your Linux VM:
- Start your VM and install a fresh copy of Ubuntu Server.
- Ensure that you have an active internet connection.
-
Install DHCP Server:
- Open a terminal and update the package index:
sudo apt update - Install the DHCP server package:
sudo apt install isc-dhcp-server
- Open a terminal and update the package index:
-
Configure the DHCP Server:
- The primary configuration file is located at
/etc/dhcp/dhcpd.conf.
- The primary configuration file is located at
Configuring DHCP Server Settings
Configuration on Windows Server
-
Open the DHCP Management Console:
- In Server Manager, navigate to the DHCP section.
-
Create a New Scope:
- Right-click on “IPv4” and select “New Scope”.
- Follow the New Scope Wizard to define:
- Name and Description
- IP Address Range: Specify the start and end IP address for the DHCP scope.
- Subnet Mask: Automatically selected based on the IP range.
- Exclusions and Delay: IP addresses to exclude from DHCP allocation.
- Lease Duration: Define how long an IP is reserved for clients.
- Configure DHCP Options: You can set options like Default Gateway (Router), DNS Servers, etc.
-
Activate the Scope:
- After completing the wizard, right-click the newly created scope and select “Activate”.
Configuration on Linux
-
Edit the DHCP Configuration File:
- Open the configuration file with a text editor:
sudo nano /etc/dhcp/dhcpd.conf -
Add or modify the configuration as follows:
option domain-name "example.com"; option domain-name-servers ns1.example.com, ns2.example.com; subnet 192.168.1.0 netmask 255.255.255.0 { range 192.168.1.10 192.168.1.100; option routers 192.168.1.1; option subnet-mask 255.255.255.0; } - Save and exit the file.
- Open the configuration file with a text editor:
-
Specify the Network Interface:
- You may need to edit the
/etc/default/isc-dhcp-serverfile to specify which network interface the DHCP server should listen on.
- You may need to edit the
-
Restart the DHCP Service:
- Restart the service to apply the changes:
sudo systemctl restart isc-dhcp-server
- Restart the service to apply the changes:
Testing Your DHCP Configuration
With the DHCP server configured, testing the setup is crucial to ensure that clients can successfully obtain an IP address.
Testing on Windows Client
-
Set Up a Test Client:
- Create a new VM in VMware Workstation and install any Windows OS.
-
Configure Network:
- Ensure the network adapter is set to the same mode (NAT/Bridged) as the DHCP server.
-
Obtain an IP Address:
- Open Command Prompt and release any current IP configuration:
ipconfig /release - Request a new IP address:
ipconfig /renew - Check the assigned IP address:
ipconfig
- Open Command Prompt and release any current IP configuration:
Testing on Linux Client
-
Set Up a Test Client:
- You can set up another Linux VM.
-
Network Configuration:
- Like before, ensure the network adapter is in the same mode over which the DHCP server is running.
-
Obtain an IP Address:
- Release and renew the DHCP lease:
sudo dhclient -r sudo dhclient - Check the new IP address:
ip addr show
- Release and renew the DHCP lease:
Troubleshooting Common DHCP Issues
Even after setting up the DHCP server, issues might arise. Understanding common problems will save time and effort.
-
Clients Not Receiving IP Address:
- Ensure that the DHCP server service is running. On Windows, check services; on Linux, use
systemctl status isc-dhcp-server. - Check that the client’s network adapter is correctly set up.
- Verify the DHCP scope is activated and has available addresses.
- Ensure that the DHCP server service is running. On Windows, check services; on Linux, use
-
IP Conflicts:
- If duplicate IP addresses arise, check for static IP addresses configured outside of the DHCP range.
-
Firewall Issues:
- Ensure the firewall settings on both the DHCP server and client allow DHCP traffic (UDP ports 67 and 68).
Best Practices for DHCP Configuration
-
Use Reservations for Critical Devices: Assign static IPs for essential devices such as servers, printers, and routers.
-
Regularly Monitor Logs: The DHCP server logs can provide insights into operation and errors. Regular monitoring can help catch issues early.
-
Backup Configuration: Regularly back up your DHCP configuration files so you can restore them in case of failure.
-
Document Your Setup: Keep detailed documentation of the DHCP setup, including IP ranges and options configured, for future reference.
-
Update Software Regularly: Ensure your DHCP server software and underlying OS are kept up to date for security and stability.
Conclusion
Setting up a DHCP server in VMware Workstation can enhance your networking capabilities, providing both a learning platform and a practical tool for real-world applications. By implementing these configurations, you facilitate seamless IP address management, streamline network operations, and ultimately better understand networking principles.
As technology and best practices evolve, staying informed about updates in DHCP protocols, VMware advancements, and networking trends will ensure the efficiency and security of your systems. By following this guide, you now possess the foundational knowledge required to configure a DHCP server, and you are well-equipped to tackle any subsequent challenges.
| Purchase and download the full PDF and ePub editions of this VMware eBook for only $8.99 |
In order for a client to connect to a TCP/IP based network, it needs a Internet Protocol (IP) address which uniquely identifies it among the other devices connected to the network. In addition, the addresses of one or more DNS servers and a gateway may optionally be configured. One way to configure this is to manually assign this information to each client on the network. Whilst this approach can work for a small network, it quickly becomes unmanageable in larger enterprises. To alleviate this problem, the Dynamic Host Configuration Protocol was created. This takes the form of one or more servers on a network which dynamically allocate IP addresses and other network configuration information to network clients.
As outlined in the chapter entitled VMware Server Virtual Network Architecture, the VMware Server infrastructure includes a built-in Dynamic Host Control Protocol (DHCP) server for the purpose of assigning dynamic IP addresses, DNS and gateway information to virtual machines running in NAT and Host Only virtual networks. Virtual machines running on a bridged VMware Server virtual network must either have a static IP address assigned, or obtain one from a DHCP server running on the external network to which the bridge connects.
As with any other DHCP server, the one embedded into VMware Server provides a number of different configuration options. As such, this chapter will focus on configuring the VMware Server DHCP server on both Linux and Windows host operating systems.
Contents
|
||
Static and DHCP IP Address Allocation Ranges
When a NAT or HostOnly network is created it is assigned a Class C IP subnet address range (for example 192.168.33.0 — 192.168.33.254). In practice, VMware divides this address range and allocates specific addresses and address ranges for specific uses. These divisions differ between NAT and HostOnly virtual networks and are outlined in the following tables:
HostOnly Virtual Network IP Addresses
|
IP Range |
Description |
|---|---|
|
subnet.1 |
The IP address of the host machine. Provides a way for the virtual machines to communicate with the host. Example: 192.168.33.1. |
| subnet.2 — subnet.127 | Reserved for use as static addresses for virtual machines which are not configured to obtain an IP address from the VMware DHCP server. Example: 192.168.33.2 — 192.168.33.127 |
|
subnet.128 — subnet.253 |
The pool of IP addresses available for dynamic allocation to virtual machines by the VMware DHCP server. Example: 192.168.33.128 — 192.168.33.254 |
| subnet.254 | Used as the IP address of the VMware DHCP server. |
|
subnet.255 |
The HostOnly virtual network broadcast address. |
NAT Virtual Network IP Addresses
|
IP Range |
Description |
|---|---|
|
subnet.1 |
The IP address of the host machine. Provides a way for the virtual machines to communicate with the host. Example: 192.168.33.1. |
| subnet.2 | The IP address to the VMware Server NAT device. |
| subnet.3 — subnet.127 | Reserved for use as static addresses for virtual machines which are not configured to obtain an IP address from the VMware DHCP server. Example: 192.168.33.3 — 192.168.33.127 |
|
subnet.128 — subnet.253 |
The pool of IP addresses available for dynamic allocation to virtual machines by the VMware DHCP server. Example: 192.168.33.128 — 192.168.33.253 |
| subnet.254 | Used as the IP address of the VMware DHCP server. |
|
subnet.255 |
The NAT virtual network broadcast address. |
Configuring the VMware Server DHCP Server on Windows Hosts
The built-in VMware DHCP server is configured on Windows host systems using the Virtual Network Editor tool, launched via the Start -> All Programs -> VMware -> VMware Server -> Manage Virtual Networks menu option. Once loaded, the DHCP settings are accessed by clicking on the DHCP tab as illustrated in the following figure:

The screen displays a list of currently configured virtual networks for which the built-in DHCP server is available. In the above example this includes the vmnet1 (host only) and vmnet8 (NAT) virtual networks. Beneath the virtual network list is the DHCP service panel which lists the current status of the server and provides options to stop, start and restart the service.
To adjust the DHCP settings for a specific virtual network, simply select the network from the list and click the Properties button to display the DHCP settings dialog:
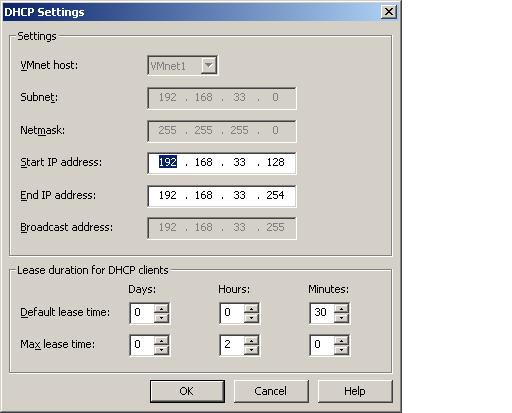
The range of the IP address pool (essentially the range of addresses from which the DHCP server can allocate addresses to clients) may be altered by changing Start IP address and End IP address fields.
Also available for configuration are the lease values. A lease time is the duration for which an IP address is assigned to the same network client before it is returned to the pool for future use by another client. The lease time may be anything from a few minutes up to thousands of days. The optimal lease value depends on the network. If the virtual network environment is one in which virtual machines are frequently created and destroyed it is better to have a shorter lease time to prevent the pool of available IP addresses being exhausted. The reason for this being that the DHCP server will reserve IP addresses long beyond the life expectancy of the virtual machines to which they are assigned, thereby limiting the pool of available addresses for new virtual machines. For more virtual networks with a low turnover of virtual machines, longer lease times are often preferred, allowing each virtual machine to retain the same IP address for as long as possible.
The Default lease time is the lease time that will be used by the DHCP server if the network client does not specify a lease time when requesting an IP address from the DHCP server. The Max lease time is the maximum lease length permitted by the DHCP server, regardless of the lease requested by the client.
Once the necessary modifications have been made on the DHCP Settings dialog, click the OK button to return to the DHCP page of the Virtual Network Editor and click on Apply followed by OK to commit the changes.
Configuring the VMware Server DHCP Server on Linux Hosts
The built-in DHCP server is configured on Linux host systems by manually editing the DHCP configuration files. There is one DHCP configuration file for each HostOnly or NAT virtual network. These files can be found in:
/etc/vmware/vmnetn/dhcpd/dhcpd.conf
where n represents the number of the virtual network, for example /etc/vmware/vmnet1/dhcpd/dhcpd.conf. A typical dhcp.conf file will read as follows when viewed in a suitable text editor:
allow unknown-clients;
default-lease-time 1800;                # 30 minutes
max-lease-time 7200;                    # 2 hours

subnet 192.168.103.0 netmask 255.255.255.0 {
    range 192.168.103.128 192.168.103.254;
    option broadcast-address 192.168.103.255;
    option domain-name-servers ns1.techotopia.com, ns2.techotopia.com;
    option domain-name "techotopia.com";

}
The file conforms to the standard dhcpd.conf file, and extensive details can be obtain via the Linux dhcpd.conf man page. The default settings are as follows:
- allow unkown-clients — Controls whether the DHCP server is permitted to assign IP addresses to clients which do not have a host declaration.
- default-lease-time — The length of lease (in seconds) associated with an IP address when the requesting client does not specify a required lease time.
- max-lease-time — The maximum permitted lease time, in seconds, allowed for an IP address by the DHCP server. A request for a greater lease length by a client will be fulfilled at using the max-lease-time value.
- subnet / netmask — The Class C subnet and netmask for the HostOnly or NAT virtual network to which the DHCP server is assigned.
- range — The range of addresses which constitute the pool from which IP addresses may be dynamically allocated to clients by the DHCP server.
- option broadcast-address — The TCP/IP broadcast address of the VMware virtual network.
- option domain-name-servers — The optional IP addresses or fully qualified domain name (FQDN) of name servers on the network. For example, ns1.virtuatopia.com. Multiple servers must be comma separated.
- option domain-name — The optional name of the network domain. For example, techotopia.com.
| Purchase and download the full PDF and ePub editions of this VMware eBook for only $8.99 |

Dhcp Server 2019 How To Configure Dhcp Server In Windows Server 2019 About press copyright contact us creators advertise developers terms privacy policy & safety how works test new features nfl sunday ticket press copyright. In this guide, we a going to install and configure a dhcp server in the new windows server 2019. we hope you already have one that is up and purring. step 1: server manager.

How To Configure Dhcp Server In Windows Server 2019 In this quickstart, you install a dynamic host configuration protocol (dhcp) server on windows server. first, you need to install the dhcp server role, then authorize the server in your active directory domain, and then configure a scope to automatically assign dhcp ip addresses and options to ipv4 dhcp clients. In the first part of this tutorial, i will show you the steps to install and configure the dhcp server role on windows server 2019. dynamic host configuration protocol (dhcp) is a network protocol used in internet protocol (ip) networks. the server that supports the protocol is called a dhcp server. This is why i will install dhcp on separate windows server 2019 vm. if you are thin with resources in your lab, you can do it on a same machine with active directory, but i would not advise that in a production environment. settings for my dhcp vm: name: sbasicsdhcp. After selecting dhcp and following through with the install, the dhcp console should be available in the tool menu of server manager. for the lab environment, i will configure two dhcp scopes – one for vlan 100 and one for vlan 110.

Windows Server 2019 Training 13 How To Install And Configure Dhcp This is why i will install dhcp on separate windows server 2019 vm. if you are thin with resources in your lab, you can do it on a same machine with active directory, but i would not advise that in a production environment. settings for my dhcp vm: name: sbasicsdhcp. After selecting dhcp and following through with the install, the dhcp console should be available in the tool menu of server manager. for the lab environment, i will configure two dhcp scopes – one for vlan 100 and one for vlan 110. 1. install dhcp on windows server 2019. the dhcp service is not automatically installed on windows server 2019. it is easy to add, however, using either server manager or windows powershell. to add dhcp using server manager, select add roles and features, and then select dhcp in the roles list. In this tutorial we will create ipv4 dhcp scope using dhcp management console. you can also refer my video on to install and configure dhcp on server 2019. 1. on server manager console, click on tools and select dhcp to open dhcp management tool. 2. on the dhcp console, expand your server name. in my case it is ws2k19 dc01.mylab.local. 3. Part 1 will include download and configuration of windows server 2019 network operating system on vmware workstation pro environment. the second part will be configuring this server into a. Today we’ll see how to install dhcp on windows server 2019. here are the steps our support engineers follow to install the dhcp server on windows server 2019. 1. open server manager & add roles and features. first, open the “server manager” in order to start the installation process.

Setup Windows Server 2019 On Wmware Setup Dhcp Server 1. install dhcp on windows server 2019. the dhcp service is not automatically installed on windows server 2019. it is easy to add, however, using either server manager or windows powershell. to add dhcp using server manager, select add roles and features, and then select dhcp in the roles list. In this tutorial we will create ipv4 dhcp scope using dhcp management console. you can also refer my video on to install and configure dhcp on server 2019. 1. on server manager console, click on tools and select dhcp to open dhcp management tool. 2. on the dhcp console, expand your server name. in my case it is ws2k19 dc01.mylab.local. 3. Part 1 will include download and configuration of windows server 2019 network operating system on vmware workstation pro environment. the second part will be configuring this server into a. Today we’ll see how to install dhcp on windows server 2019. here are the steps our support engineers follow to install the dhcp server on windows server 2019. 1. open server manager & add roles and features. first, open the “server manager” in order to start the installation process.

Install And Configure Dhcp Server On Windows Server 2019 Mushaaf Blog Part 1 will include download and configuration of windows server 2019 network operating system on vmware workstation pro environment. the second part will be configuring this server into a. Today we’ll see how to install dhcp on windows server 2019. here are the steps our support engineers follow to install the dhcp server on windows server 2019. 1. open server manager & add roles and features. first, open the “server manager” in order to start the installation process.

Windows Server 2019 Dhcp Server Install Server World
Step by Step Installation and Configuration of Windows 2022 Domain Controller DNS and DHCP Server on VMware Workstation Pro 17 Environment
Updating vCenter Server Appliance failed because my Windows 2019, Domain Controller’s license, has expired. In this video, I will attempt to replace it with Windows 2022 without removing it from the network by creating and adding another Domain Controller to the existing network so that containers, objects and others from the expired Domain Controller gets replicated to the new server therefore I don’t have to recreate them. Once replicated we will demote the expired Server, remove it from the domain and delete it. I thought it was a good idea but I can tell you in advanced that I was not able to do so.
source
by Efren Plaza
linux dhcp server