
Сегодня поговорим о таком актуальном вопросе, вызванной переходом на новую версию серверной ОС от Microsoft, как миграция старого dhcp сервера на новую платформу Windows Server 2012.
Обычно в продуктивной службе DHCP настроено множество параметров, в том числе огромные списки dhcp резерваций для клиентов (это всевозможные принтера, сендеры, компьютеры), поэтому о ручном переносе DHCP на новый Windows Server 2012 думать даже не хочется. К счастью существует возможность экспорта/импорта конфигурации DHCP сервера.
Нас интересуют два сценария переноса DHCP со старого сервера на Windows Server 2012:
1) Миграция DHCP сервера с Windows 2008/2008 R2
2) Миграция DHCP сервера с Windows 2003/ 2003 R2
Разберем оба эти сценария более подробно.
Миграция DHCP сервера с Windows 2008 на Windows Server 2012
Предположим, у нас имеется старый сервер с развернутой ролью DHCP, работающий под управлением Windows Server 2008 / 2008 R2 (пусть его имя srv-dhcp2008) и новый сервер с Windows 2012 (srv-dhcp2012), на который планируется осуществить перенос службы DHCP со всеми настройками.
На новом сервере с Windows Server 2012 установим роль DHCP с помощью команд Powershell:
Import-Module ServerManager
Add-WindowsFeature -IncludeManagementTools dhcp
Обратите внимание на параметр «IncludeManagementTools«, без которого роль DHCP будет установлена, но без соответствующей консоли управления.
Следующий шаг – авторизация нового DHCP сервера в Active Directory. Эту операцию также выполним с помощью Powershell :
Add-DhcpServerInDC -DnsName srv-dhcp2012.winitpro.ru -IPAddress 192.168.10.22
В Windows Server 2012 появились специальные PowerShell командлеты, позволяющие осуществить импорт/экспорт любых параметров DHCP сервера. Отметим, что Microsoft максимально упростило всю процедуру, и нам необходимо будет выполнить всего две команды PowerShell: Export-DhcpServer и Import-Dhcpserver, которые могут работать и в удаленном режиме.
Итак, для экспорта настроек DHCP сервера, всех зон и резерваций с сервера под управление Windows Server 2008/R2, в консоли powershell на новом сервере (srv-dhcp2012) выполните следующую команду:
Export-DhcpServer -ComputerName srv-dhcp2008.winitpro.ru -File C:\DHCP\w2008dhcpconfig.xml -verbose

Конфигурация старого сервера экспортируется в XML формате в файл w2008dhcpconfig.xml. Отключите службу DHCP на сервере srv-dhcp2008:
Stop-Service DHCPserver
Затем запускаем команду импорта:
Import-Dhcpserver –ComputerName srv-dhcp2012.winitpro.ru -File C:\DHCP\w2008dhcpconfig.xml -BackupPath C:\ DHCP\backup\ -verbose
Удостоверимся, что все dhcp зоны, резервации и мигрированы на новый сервер.

Если нужно импортировать только часть dhcp-зон, команда импорта будет выглядеть так:
Import-Dhcpserver –ComputerName srv-dhcp2012.winitpro.ru -File C:\DHCP\w2008dhcpconfig.xml -BackupPath C:\ DHCP\backup\ -verbose –ScopeId 10.1.1.0, 10.1.2.0
Перенос DHCP с Windows Server 2003 на Windows 2012
К сожалению, прямой перенос настроек базы DHCP из Windows 2003 в Windows Server 2012 невозможен, т.к. Powershell-модуль экспорта не совместим со старыми версиями Windows Server, а команда netsh dhcp не поддерживается в Windows 2012 (функционал netsh dhcp был перенесен в PoSh ), так что в этом случае придется сначала перенести базу DHCP на Windows 2008, а затем уже с помощью Powershell мигрировать ее в Windows Server 2012. Как мигрировать базу из Windows 2003 в Windows 2008 R2 описано ниже.
Перенос базы DHCP из Windows Server 2003 в Windows 2008
Допустим, у нас есть DHCP сервер, работающая под управлением ОС Microsoft Windows Server 2003. Экспортируем базу данных DHCP в бинарный файл командой:
netsh dhcp server export C:\dhcp_conf2003.dat all
В результате, в корне диска C:\ появится бинарный файл dhcp_conf2003.dat, содержащий все настройки старого DHCP сервера. Для предотвращения dhcp конфликтов в сети, остановим службу DHCP на старом сервере:
net stop "dhcp server"
Затем зайдем на сервер с Windows Server 2008 (на котором предварительно развернутся роль DHCP сервера, авторизованная в домене) и импортируем конфигурацию со старого сервера:
netsh dhcp server import \\win2003dhcp\c$\dhcp_conf2003.dat all
После этого нужно перезапустить службу DHCP на новом сервере с Windows 2008:
restart-service dhcp
Процедура миграция службы DHCP со всеми настройками со старого сервера на новый под управлением Windows Server 2016 довольно проста. Если старый сервер DHCP работает под управлением Windows Server 2008 / R2 или Windows Server 2012 / R2, вы можете напрямую перенести настройки, зоны и резервации DHCP.
В первую очередь на новом сервере под управлением Windows Server 2016 необходимо установить роль DHCP. Эту роль можно установить с помощью консоли Server Manager, где нужно запустить мастер добавления ролей Manage -> Add Roles and Features и выбрать роль DHCP Server.
Но гораздо проще и быстрее установить данную роль вместе с инструментами для ее управления (консоль DHCP и модуль PowerShell для работы с сервером DHCP) с помощью PowerShell.
Add-WindowsFeature -IncludeManagementTools DHCP
Параметр -IncludeManagementTools нужен, чтобы дополнительно установить MMC консоль управления сервером DHCP (по умолчанию командлет Add-WindowsFeature устанавливает роль DHCP без соответствующей консоли).
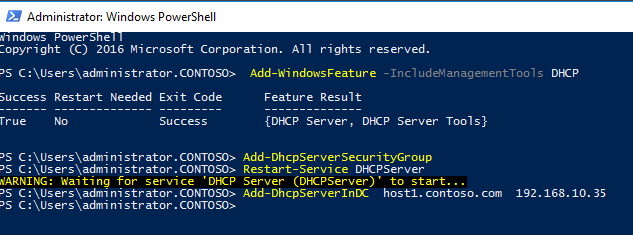
Затем нужно создать локальные группы безопасности для управления сервером DHCP (группы DHCP Administrators и DHCP Users):
Add-DhcpServerSecurityGroup
Чтобы включить параметры безопасности DHCP и связать их с созданными группами безопасности, перезапустите службу DHCP-сервера:
Restart-Service DHCPServer
Авторизуйте новый сервер DHCP в домене Active Directory:
Add-DhcpServerInDC host1.contoso.com 192.168.10.35
Однако после установки роли DHCP и выполнения первичных настроек, при попытке подключится к серверу через Server Manager появится предупреждение о том, что требуется дополнительная донастройка роли (хотя по факту мы ее уже сделали). Убрать это предупреждение не поможет даже перезагрузка сервера.
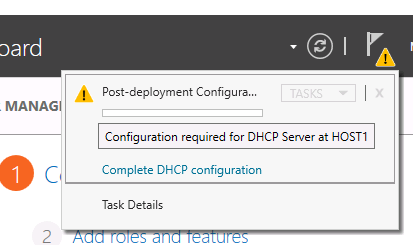
Чтобы исправить эту проблему, нужно изменить ключ в реестре, отвечающий за статус настройки роли:
Set-ItemProperty –Path registry::HKEY_LOCAL_MACHINE\SOFTWARE\Microsoft\ServerManager\Roles\12 –Name ConfigurationState –Value 2
В Windows Server 2012 появились специальные командлеты PowerShell, позволяющие импортировать / экспортировать любые настройки DHCP-сервера. Microsoft максимально упростила процедуру миграцию, которую можно провести с помощью всего двух команд PowerShell: Export-DhcpServer и Import-Dhcpserver, которые могут быть выполнены удаленно с одного сервера (например, с того, куда планируется выполнить перенос службы):
Создайте каталог c:\dhcp и выполните следующую команду для выполнения экспорта настроек старого сервера DHCP в XML файл с именем OldDHCPConf.xml
new-item c:\dhcp -type directory
Export-DhcpServer -ComputerName "oldDhcp.contoso.com" -Leases -File "C:\DHCP\OldDHCPConf.xml" –Verbose
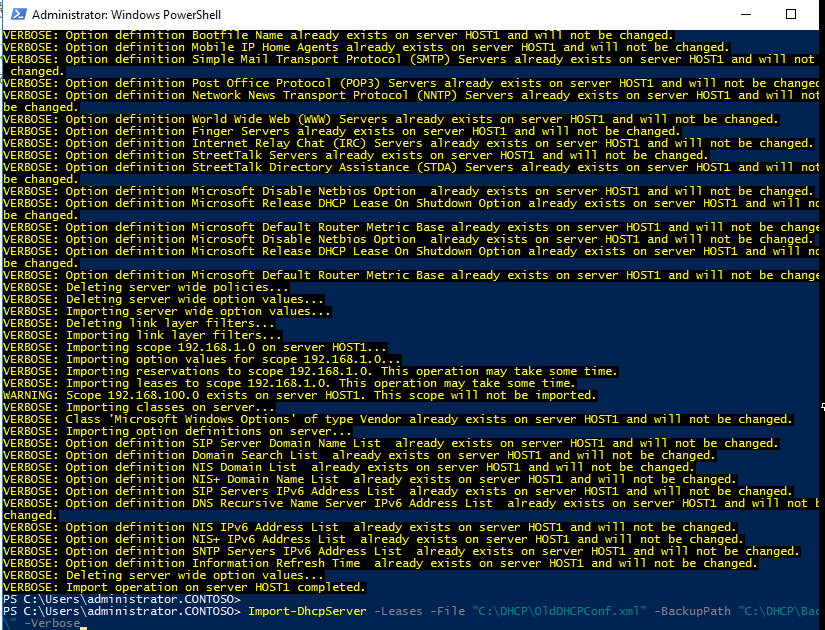
Теперь можно выполнить импорт настроек из полученного файла на новый сервер
Import-DhcpServer -Leases –File "C:\DHCP\OldDHCPConf.xml" -BackupPath "C:\DHCP\Backup\" –Verbose
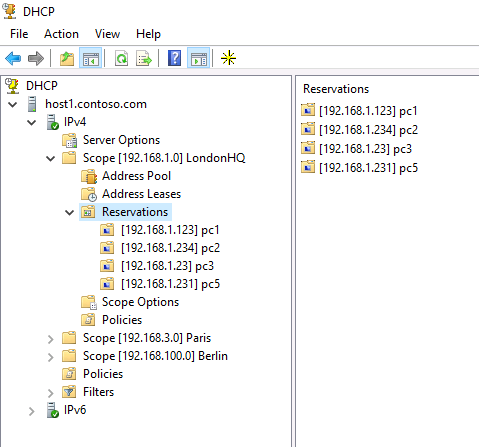
Все готово! Откройте консоль DHCP и проверьте, что все зоны DHCP, резервации, арендованные IP адреса были перенесены успешно.
Если вы создаете отказоустойчивую конфигурацию DHCP с использованием DHCP Failover, конфигурацию DHCP-сервера нужно импортировать также и на второй сервер
Import-DhcpServer -Leases –File "C:\DHCP\OldDHCPConf.xml" -ServerConfigOnly -BackupPath "C:\DHCP\Backup\" –Verbose
После завершения миграции сервера DHCP не забудьте повторно настроить агентов DHCP Relay (IP Helper) на сетевых маршрутизаторах и коммутаторах 3 уровня.
-
-
#1
Здравствуйте коллеги, подскажите как осуществляется перенос dhcp на другой сервер? Мне нужно с windows server 2008 r2 перенести на windows server 2016 и ничего не обвалить..:think2:
-
-
#2
1. Создаем резервную копию на текущем сервере DHCP
Для этого сделаем специальную папку например c:\backup
2. Далее из оснастки выбираем сервер и нажимаем Архивировать (см картинку) для windows server 2008
Для windows server 2012 и больше экспорт настроек dhcp
Код:
new-item c:\dhcp -type directory
Export-DhcpServer -ComputerName "old_dhcp.domen.org" -Leases -File "C:\DHCP\old_dhcp.domen.xml" –Verbose
2. На новом сервере
Manage -> Add Roles and Features и выбрать роль DHCP Server или тоже самое через powershell
Код:
Add-WindowsFeature -IncludeManagementTools DHCPДобавляем группы безопасности
Код:
Add-DhcpServerSecurityGroupАвторизуем новый сервер DHCP в домене Active Directory:
Код:
Add-DhcpServerInDC newDHCP.domen.org 172.29.1.56Импорт настроек из полученного файла на новый сервер
Код:
Import-DhcpServer -Leases –File "C:\DHCP\old_dhcp.domen.xml" -BackupPath "C:\DHCP\Backup\" –VerboseВроде все
-
-
#3
Последнее редактирование модератором:
This article describes how to migrate a configured DHCP server from one Windows Server host to another, while retaining all DHCP scope settings. You can use this guide to migrate DHCP settings, zones, and DHCP reservations from an earlier version of Windows Server to a newer version (for example, from Windows Server 2012/R2 to Windows Server 2022), or to move a DHCP role to a new host in Active Directory domain.
Prepare New Windows Server Host for DHCP Role
Prepare a new host to which you are going to migrate the DHCP server. Install the version of Windows Server you need (2022, 2019, or 2016), set a unique host name and IP address, and join the computer to the Active Directory domain.
Install the DHCP Server host on the new server using the Server Manager console (Manage > Add Roles and Features > DHCP Server) or via PowerShell:
Add-WindowsFeature -IncludeManagementTools DHCP
Then run the following command, which will create two local security groups that will be used to manage DHCP server:
Add-DhcpServerSecurityGroup
- DHCP Administrators — these are users with full permissions on the DHCP server (they can change any settings), but without local admin permissions on Windows Server;
- DHCP Users — users with the rights to view DHCP server settings and statistics (including the DHCP Leases info).
Restart the DHCP Server service:
Restart-Service DHCPServer
Then authorize the new DHCP server in the Active Directory domain. Run the following command as the domain admin account that is a member of the Enterprise Admins group.
To authorize the new DHCP server in the Active Directory domain:
Add-DhcpServerInDC -DnsName host1.contoso.com -IPAddress 192.168.10.35
Replace the DnsName and IPAddress values with your own.

You can start a DHCP server without authorization in AD if you don’t have Enterprise Admin rights. Create the following registry parameter:
Set-ItemProperty -Path "HKLM:\SYSTEM\CurrentControlSet\Services\DHCPServer\Parameters" -Name DisableRogueDetection -Value 1 -Force
To prevent the ‘Configuration required for DHCP server on host’ alert from being displayed in the Server Manager console, set the reg key to assume that the DHCP configuration is complete:
Set-ItemProperty –Path registry::HKEY_LOCAL_MACHINE\SOFTWARE\Microsoft\ServerManager\Roles\12 –Name ConfigurationState –Value 2

Then restart the DHCP service:
Restart-Service -Name DHCPServer -Force
Temporarily change the Lease duration (DHCP scope option) on the source server to 2 hours. This will allow your client to obtain IP addresses from the new DHCP server more quickly.

Transferring DHCP Server Role to Another Windows Server Host
The easiest way to transfer DHCP server settings to a new host in modern versions of Windows Server (2022/2019/2016/2012/R2) is to use the PowerShell cmdlets Export-DhcpServer and Import-DhcpServer.
These commands allow you to connect to a remote DHCP server over the network, export its settings and import them into a new server.
Create the C:\DHCP folder on the new DHCP server machine. Open the PowerShell console under an account that is a member of the DHCP Administrators group and export the configuration of the old DHCP server to the XML file:
Export-DhcpServer -ComputerName "oldDhcp.contoso.com" -Leases -File "C:\DHCP\OldDHCPConf.xml" –Verbose

Then import the resulting DHCP configuration file into your new server:
Import-DhcpServer -Leases –File "C:\DHCP\OldDHCPConf.xml" -BackupPath "C:\DHCP\Backup" –Verbose
Run the DHCP console and check that all the DHCP scopes, reservations, and IP leases are in place.
Once the DHCP server migration is complete, do not forget to reconfigure the DHCP Relay (IP Helper) agents on the routing network devices. Reconfigure them to point on the IP address of the new DHCP server.
Reboot several workstations to test and confirm that they are receiving DHCP leases from the new server (check the lease information for your DHCP scope).
How to Migrate the DHCP Role Using the Backup and Restore
In Windows Server 2016 and newer, you can migrate your DHCP server settings using the Backup and Restore options in the DHCP Management console GUI.
- Open dhcpmgmt.msc console;
- Right-click on the DHCP server and select Backup;
- Specify the directory to save the backup copy of the DHCP server settings.
You can use this backup copy to restore the DHCP server settings on the current or another Windows Server host. However, if you simply copy the DHCP backup files to a new server and try to restore the configuration using the Restore option in DHCP console, an error will occur when importing the DHCP database:
The database was not restored correctly. No changes were made. For more information, please see Event Viewer on the specified server.

To successfully migrate your DHCP server config to a new device, copy your DHCP backup to the %SystemRoot%\System32\DHCP\backup directory on a new machine. Then click the Restore option in the DHCP console and select to restore the configuration from this folder.

If everything was successful, the following message should appear:
The database was restored successfully.
Note that by default, Windows backs up the DHCP configuration and leases every 60 minutes to the %SystemRoot%\System32\DHCP\backup directory.
The backup directory is configured in the DHCP server settings.

You can list the current DHCP backup settings using the PowerShell command:
Get-DhcpServerDatabase
FileName : C:\Windows\system32\dhcp\dhcp.mdb
BackupPath : C:\Windows\system32\dhcp\backup
BackupInterval(m) : 60
CleanupInterval(m) : 60
LoggingEnabled : True
RestoreFromBackup : False

If your DHCP Windows Server host fails, you can manually copy the DHCP database files from the backup directory on the failed server’s disk and restore its configuration to the new server.
Migrate DHCP Server from Windows Server 2003
If you are using a legacy DHCP server on Windows Server 2003/R2, you need to use a different migration method. This is because Windows Server 2003 does not support the PowerShell cmdlets for exporting DHCP settings that are available in newer versions of Windows Server.
To export the DHCP server configuration to a binary file on Windows Server 2003, use the following command:
netsh dhcp server export C:\ps\dhcp2003_config.dat all
You can import the DHCP configuration on a new host using the command:
netsh dhcp server import \\winsrv2003dhcp\c$\ps\dhcp2003_config.dat all
DHCP Server Post Migration Steps
Change the lease duration settings on the new server if you have previously changed them. The default lease duration for the DHCP scope on Windows Server is 8 days.
Now you need to disable the DHCP service on the old server:
Stop-Service DHCPserver

Set-Service -Name DHCPServer -StartupType "Disabled"
And unauthorize the old DHCP server from Active Directory from the DHCP console (right-click on the DHCP server name > Unauthorize)
Or use the PowerShell command:
Remove-DhcpServerInDC -DnsName "oldDhcp.contoso.com” -IPAddress 192.168.10.36
Then uninstall the DHCP Server Role:
Uninstall-windowsfeature dhcp -remove

Uninstall-WindowsFeature RSAT-DHCP
And reboot the server:
Restart-Computer -Force
Cyril Kardashevsky
I enjoy technology and developing websites. Since 2012 I’m running a few of my own websites, and share useful content on gadgets, PC administration and website promotion.
Migrating the DHCP service from the old server to the new Windows Server 2016/2019 with the saving of all the settings of the old server is quite easy. If the old DHCP server is running Windows Server 2008/R2 or Windows Server 2012/R2, you can directly transfer DHCP settings, zones, and reservations.
Deploying DHCP Server Role on Windows Server 2016/2019
First of all, you need to install the DHCP Server role on a new server which is running Windows Server 2016/2019. You can install the DHCP Server role using the Server Manager console, where you need to run the Add Roles Wizard in the Manage > Add Roles and Features menu and select the DHCP Server.
But it’s much easier to install the DHCP role and role management tools from RSAT (the DHCP MMC console and PowerShell module to interact with DHCP server) using PoSh. Run the PowerShell console as Administrator and run the following command:
Add-WindowsFeature -IncludeManagementTools DHCPThe -IncludeManagementTools parameter must be specified to install the DHCP server management console. By default, the Add-WindowsFeature cmdlet installs the DHCP server role without the appropriate console.
Next, you need to create local DHCP security groups (DHCP Administrators and DHCP Users):
Add-DhcpServerSecurityGroupNote. These security groups are used to manage the local DHCP server:
- DHCP Administrators — these are users with full permissions on the DHCP server (they can change any settings), but without local admin permissions on Windows Server;
- DHCP Users — users with the rights to view DHCP server settings and statistics (including the DHCP Leases info).
To enable DHCP security settings associated with the local security groups created, restart the DHCP Server service:
Restart-Service DHCPServerAuthorize DHCP Server in Active Directory
The list of authorized DHCP servers in the AD domain can be displayed as follows:
Get-DhcpServerInDC
In order to authorize the new DHCP server in the Active Directory domain:
Add-DhcpServerInDC host1.contoso.com 192.168.10.35
If you want to start a DHCP server without authorization in AD, you need to change the DisableRogueDetection registry parameter:
Set-ItemProperty -Path "HKLM:\SYSTEM\CurrentControlSet\Services\DHCPServer\Parameters" -Name DisableRogueDetection -Value 1 -Force
However, after the DHCP role is installed and the post-installation settings with PowerShell are performed, you can’t connect to the DHCP Server. You can see an alert message in the Server Manager console: a post-installation configuration is required, even though it has actually already been performed. In this case, even the server reboot won’t help to make this alert disappear.

To remove this warning message and notify Server Manager that post-install DHCP configuration is complete, you need to modify the ConfigurationState registry parameter. Use the following PowerShell command to indicate that the actual DHCP server role has already been configured:
Set-ItemProperty –Path registry::HKEY_LOCAL_MACHINE\SOFTWARE\MicrosoftServerManager\Roles12 –Name ConfigurationState –Value 2
After that, you need to restart the DHCP service:
Restart-Service -Name DHCPServer -Force
Moving DHCP Server from Windows Server 2008/R2/2012 to 2016/2019
In Windows Server 2012 special PowerShell cmdlets have been added, allowing you to import/export any DHCP server settings. Note that Microsoft simplified the procedure as much as possible, and we will need to execute only two PowerShell commands: Export-DhcpServer and Import-Dhcpserver, which can work remotely. All commands can be executed on one machine (the one to which the server migrates).
Create the folder C:\DHCP (new-item C:\DHCP -type directory) and run the command to export the configuration of the old DHCP server to the XML file named OldDHCPConf.xml.
Export-DhcpServer -ComputerName "oldDhcp.contoso.com" -Leases -File "C:\DHCP\OldDHCPConf.xml" –Verbose

Now you can perform a full import of the DHCP configuration on the new server:
Import-DhcpServer -Leases –File "C:\DHCP\OldDHCPConf.xml" -BackupPath "C:\DHCP\Backup" –Verbose
Everything is ready. Run the DHCP console and check that all the DHCP scopes, reservations, and IP leases are in place.
After the migration of the DHCP server completed, do not forget to reconfigure the DHCP Relay (IP Helper) agents on the routing network devices. Reconfigure them to the IP address of the new DHCP server.
DHCP Server Migration from Windows Server 2003 to 2016/2019
If you are using a legacy DHCP server on Windows Server 2003/R2, you need to use a different migration method. This is because Windows Server 2003 does not support the PowerShell cmdlets for exporting DHCP settings that are available in newer versions of Windows Server.
Log in to the Windows Server 2003 and open the command prompt. Run the following command in order to export DHCP server configuration to a binary file:
netsh dhcp server export C:\ps\dhcp2003_config.dat all
Now copy the dhcp2003_config.dat file to the new DHCP Server running Windows Server 2016/2019 and import the configurations from a local file or over the network (using a UNC path):
netsh dhcp server import \\winsrv2003dhcp\c$\ps\dhcp2003_config.dat all
Migrating DHCP Failover Configuration
If you are using a DHCP failover or load balancing DHCP configuration, after importing the DHCP settings on the first server, you only need to import only the server configuration on the second Windows Server:
Import-DhcpServer -Leases –File "C:\DHCP\OldDHCPConf.xml" -ServerConfigOnly -BackupPath "C:\DHCP\Backup" –Verbose
After that, you need to perform the standard DHCP Failover configuration.
Remove the Old DHCP Server
Now you need to disable the DHCP service on the old server:
Stop-Service DHCPserver

Set-Service -Name DHCPServer -StartupType "Disabled"
And unauthorize the old DHCP server from Active Directory using the DHCP console (Right click on the DHCP server name > Unauthorize)
Or unauthorize your old DHCP Server in AD, using the following PowerShell command:
Remove-DhcpServerInDC -DnsName "oldDhcp.contoso.com” -IPAddress 192.168.10.36
Then uninstall the DHCP Server Role:
Uninstall-windowsfeature dhcp -remove
Uninstall-WindowsFeature RSAT-DHCP
And reboot the server:
Restart-Computer -Force