
Прочитано: 39 740
Задача: разобрать действия по организации сервиса времени для всей локальной сети дабы рабочие станции, сервера получали точное время и оно везде было одинаковым. Сервис времени организовывается на домен контроллере под управлением операционной системы Windows Server 2012 R2, также действия ниже аналогичны и для Server 2008 R2
Схема: интернет — Mikrotik — DC – Workstations
Открываю на srv-dc консоль командной строки с правами администратора:
Win + X — Command Prompt (Admin)
Определяю какой домен контроллер (Windows Server 2012 R2 Std) имеет роль PDC если домен контроллеров несколько в домене:
C:\Windows\system32>netdom query fsmo
Schema master srv-dc.polygon.local
Domain naming master srv-dc.polygon.local
PDC srv-dc.polygon.local
RID pool manager srv-dc.polygon.local
Infrastructure master srv-dc.polygon.local
The command completed successfully.
Как видно из вывода, это контроллер домена srv-dc.polygon.local, подключаюсь теперь к нему по RDP или VNC соединению для выполнения следующих команд:
C:\Windows\system32>net stop w32time
Настраиваем внешний источник времени:
C:\Windows\system32>w32tm /config /syncfromflags:manual /manualpeerlist:"0.pool.ntp.org"
Cделать ваш контроллер домена PDC доступным для клиентов:
C:\Windows\system32>w32tm /config /reliable:yes
Запускаю службу времени:
C:\Windows\system32>net start w32time
Также можно изменения вносить и через реестр в ключе: HKEY_LOCAL_MACHINE\SYSTEM\CurrentControlSet\Services\W32Time\Parameters
Чтобы после принудительно запросить получение точного времени проделываем:
C:\Windows\system32>W32tm /config /reliable:yes

The command completed successfully.

C:\Windows\system32>W32tm /config /update

The command completed successfully.

C:\Windows\system32>W32tm /resync

Sending resync command to local computer

The command completed successfully.
Вот и все, служба времени Windows начинает синхронизацию времени с внешним источником, посмотреть этот процесс можно так:
C:\Windows\system32>w32tm /query /configuration
После нужно добавить параметр в DHCP оснастку, что сервер времени это наш домен контроллер:
Win + X — Control Panel — Administrative Tools — запускаю оснастку DHCP: DHCP → srv-dc.polygon.local → IPv4 → Scope [10.10.10.0] local → и через правый клик мышью по Scope Options вызываю меню Configure Options… где добавляю опцию для всего домена: 042 NTP Servers
Теперь доменные Windows станции будут знать, что сервер времени это домен контроллер, а для моих Ubuntu системы после установке sudo apt-get install ntp -y в файле /etc/ntp.conf нужно будет в параметре server указать IP адрес этого домен контроллера и перезапустить службу времени sudo service ntp restart.
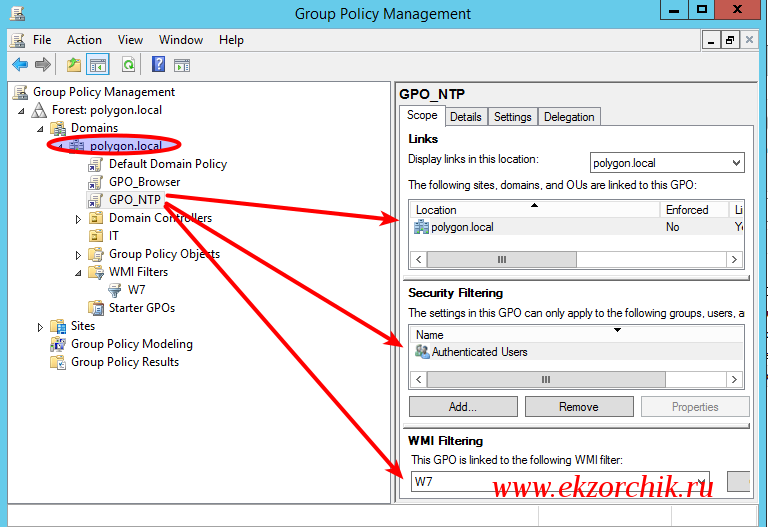
Если же у Вас DHCP сервис развернут не на Windows, то донести до всех где брать точное время можно через групповые политики GPO. Создаем GPO_NTP и предопределяем, что ориентирована она будет на текущий домен и все рабочие станции посредством WMI-фильтра.
Открываю оснастку на srv-dc управления групповыми политиками домена:
Win + X — Control Panel — Administrative Tools — Group Policy Management, открываю на редактирование: Group Policy Management → Forest: polygon.local → Domains → polygon.local → и через правый клик мышью по WMI Filters вызываю меню New…
- Name: W7
- Decription: Windows 7 x86/x64
- Queries: → Add
- Namespace: root\CIMv2
- Query: Select
* from WIN32_OperatingSystem where ((Version > "6") and
(ProductType = 1))
и
нажимаю OK, OK, Save
После перехожу к редактированию групповой политики для рабочих станции домена, через правый клик мышью по GPO_NTP вызываю меню Edit.
Computer Configuration → Policies → Administrative Tools → System → Windows Time Service → Time Providers → Configure Windows NTP Client, включаю ее Enabled и определяю настройки:
NtpServer: srv-dc.polygon.local,0x9
все остальное оставляю по умолчанию.
После нажимаю Apply & OK.
И не забываем к политике добавить WMI фильтр. В конечном итоге политика должна выглядеть так:
После когда политика применится к системам согласно WMI-фильтру можно будет проверить куда смотрит рабочая станции если ей нужно точное время:
C:\Users\alektest>w32tm /query /status

Индикатор помех: 0(предупреждений нет)

Страта: 4 (вторичная ссылка - синхронизирована с помощью (S)NTP)

Точность: -6 (15.625ms за такт времени)

Задержка корня: 0.0876923s

Дисперсия корня: 7.8503892s

Идентификатор опорного времени: 0x0A0A0A02 (IP-адрес источника: 10.10.10.2)

Время последней успешной синхронизации: 30.04.2017 16:46:38

Источник: srv-dc.polygon.local

Интервал опроса: 10 (1024s)

C:\Users\alektest>w32tm /monitor

srv-dc.polygon.local *** PDC ***[10.10.10.2:123]:

ICMP: 0ms задержка

NTP: +0.0000000s смещение относительно srv-dc.polygon.local

RefID: ground.corbina.net [85.21.78.91]

Страта: 3
Работает.
На замету: Если же в локальной сети появятся рабочие станции под управлением Windows 8 и выше, то нужно будет модифицировать WMI фильтр.
Но как известно, в случае чего с домен контроллером его роли можно забирать, так может произойти в случае различных проблем. Вот забрали роль PDC и время поехало во всем домене, чтобы этого не произошло нужно создать групповую политику ориентированную только на домен контроллер с ролью PDC: GPO_PDC и WMI фильтр с именем PDC следующего содержания:
Select * from Win32_ComputerSystem where DomainRole = 5
Computer Configuration → Policies → Administrative Tools → System → Windows Time Service → Time Providers → Configure Windows NTP Client, включаю ее Enabled и определяю настройки:
NtpServer: 0.pool.ntp.org,0x9
все
остальное оставляю по умолчанию.
После нажимаю Apply & OK.
и Computer Configuration → Policies → Administrative Tools → System → Windows Time Service → Time Providers -> Enable Windows NTP Client включить Enable.
Также параметр Type вместо NT5DS можно использовать и NTP
И не забываем к политике добавить WMI фильтр ← PDC. Теперь не важно кто является домен контроллером, точное время на нем будет.
А раз так, что рабочие станции не обязательно привязывать/создавать к политике назначения точного времени, ведь по умолчанию рабочие станции домена, итак, забирают точное время с контроллера домена по умолчанию.
Подведу итог:
- Настраиваю GPO и привязываю ее через WMI фильтр к серверу у которого есть роль PDC
- В оснастке DHCP указываю параметр кто в домене является сервером у которого клиентским рабочим станциям запрашивать точное время.
- Если DHCP не на базе Windows, то можно настроить GPO и сделать нацеливание на определенную ось.
На заметку: Если домен контроллер развернут на виртуальной системе, то следует проверить, что время берется не с гипервизора, а через настройку этой заметки.
На заметку: если роль PDC была переназначена на другой сервер, то я советую перезагрузить домен контроллер и все остальные также.
На этом у меня все. Задача выполнена и задокументирована, с уважением автор блога Олло Александр aka ekzorchik.
Configuring PresenTense Time Client via DHCP
Introduction
DHCP is usually associated with obtaining an IP address for a computer however in more recent years, the protocol has allowed clients to request a list of parameters. The client is under no obligation to accept the options and this exchange of information can be done without the IP address of the host computer changing. In other words, using DHCP configuration for PresenTense Time Client will not in any way effect the operation of your network parameters and you can even have statically assigned addresses on your network and still use DHCP to configure PresenTense Time Client. Option 43 (vendor specific information) is used to deliver the configuration parameters to PresenTense Time Client. The format is BFxx:value: where BFxx is the option number and value is the value you choose to set for that option number.
PresenTense Time Client Exports DHCP Configuration String
New in version 4.2 of PresenTense Time Client is the ability for a configured client to export it’s DHCP settings. This takes the hard work out of configuring clients via DHCP. You simply install PresenTense Time Client on a computer, set all options how you want them and click the button «Create DHCP server parameters from this installation». This button can be found on the Advanced Settings dialog and when clicked will show a dialog box similar to the image below.

The configuration string is copied to the clipboard as well as displayed on the screen. Once this string is configured on your DHCP server, all PresenTense Time Clients which are set to receive their configuration via DHCP and receive a response from the DHCP server will use these parameters for their running configuration after next restart.
Manual Configuration of the DHCP Server String
You can naturally configure the DHCP server strings manually rather than use the export function shown above. You will need to use the DHCP options section of this help file to learn which option numbers correspond to configuration options within PresenTense Time Client. The options are divided into two sections: DHCP Options 1-40 and DHCP Options 41-80. Below is an example of manual configuration.
Example
Set Option 43 on your DHCP Server as follows:
BF39:4:BF22:swisstime.ethz.ch:BF21:ntp2.sp.se:BF4:1:BF35:3
Explanation:
BF39 is the reference time source. Setting it at 4 corresponds to NTP4 time server.
BF22 is primary time source. In this case it is set to swisstime.ethz.ch which is an NTP server based in Switzerland.
BF21 is the secondary time source. In this case, it is set to ntp2.sp.se which is an NTP server based in Stockholm, Sweden.
BF4 is to enable logging and is set to 1 which is means logging will be turned on.
BF35 is log level. 1 is Minimal, 2 is Detailed and 3 is Errors Only. In this case it is set as Errors Only.
Checking DHCP Server Responses
Ensure that logging is turned on and that the log level is set to detailed. Click on the Log Tab and see which entries are present. A successful configuration via DHCP should look similar to the following image. Note that in this case, the blue skin was turned off remotely by the DHCP configuration so the interface has reverted to the standards Windows look and feel.
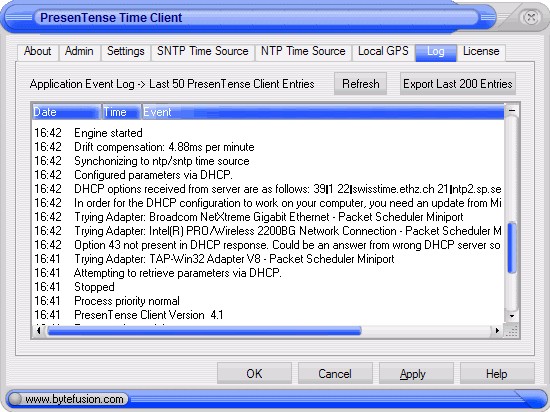
In the above example, you can see that PresenTense Time Client reports when it is attempting to retrieve parameters via DHCP. It also reports which adapters it is trying. The first entry at 16:42 is of interest above as it shows that there was a DHCP server on the network which the first adapter was connected to HOWEVER the response did not contain DHCP option 43. This is referring to DHCP option 43 (vendor specific information) and should not be confused with the PresenTense Time Client option 43.
PresenTense Time Client will show the options received from the DHCP Server in raw format. In the example above, you can see the options and values and that PresenTense Time Client was successfully configured.
The Dynamic Host Configuration Protocol (DHCP) provides a centralized and automated method for configuring the network attributes of hosts when they connect to the network. The DHCP server assigns IP addresses to hosts, along with configuration information such as DNS servers, the domain name used for DNS searches, the default gateway, an NTP (Network Time Protocol) server, a server from which a network boot can be performed if necessary, and more. DHCP eliminates the need to configure each network host individually.
DHCP is also useful for configuring laptops, mobile phones, tablets, and other devices which might connect as unknown guests. This configuration is typical for WiFi access in public places. However, DHCP offers even more advantages when used in a closed, private network to manage static IP address assignments for known hosts using the central DHCP database.
The DHCP server uses a database of information created by the sysadmin. This database is entirely contained in the /etc/dhcp/dhcpd.conf configuration file. DHCPD stands for DHCP Daemon, which is the background server process. Like all well-designed Linux configuration files, it is a simple ASCII plain text file. This structure means that it is open and knowable. It can be examined by standard, simple text manipulation tools like cat and grep, and be modified by any text editor such as EMACS or Vim, or a stream editor such as sed.
The DHCP client is always installed on Linux hosts—at least on Red Hat-based distros and all other distros I have tried—because of the high probability that they will be connected to a network using DHCP and not with a static configuration.
When a host configured for DHCP boots or its NIC is activated, it sends a broadcast request to the network asking for a DHCP server to respond. The client and the server engage in a bit of conversation, and the server sends the configuration data to the client, which uses it to configure its network connection. Hosts may have multiple NICs connected to different networks. Any or all may be configured using DHCP or a static configuration. I will keep the setup for this article simple with only a few hosts—my own personal network.
Network description
This article uses my own network for illustration. This is much more interesting and realistic than using a set of virtual machines on a virtual network. Each host on my network has the Fedora 36 Xfce spin installed. Due to my desire to experiment, my network is smaller but contains more complex network configurations than might be found in a standard home or small business network.
Before setting up DHCP, I created a network address map like the one shown in Figure 1. This diagram includes MAC addresses, IP addresses, and NIC names for each host. The map enabled me to visualize my network’s logical structure and determine which hosts needed DHCP configuration and which needed static IP configuration.
|
NIC |
MAC |
Static/DHCP |
IP Address |
Comments |
|
wally1 |
Primary firewall and router |
|||
|
eno1 |
04:d9:f5:1c:d5:c5 |
Static |
N/A |
Disabled due to errors |
|
enp1s0 |
84:16:f9:03:e9:89 |
Static |
192.168.10.1/24 |
SSID Linux Boy |
|
enp2s0 |
84:16:f9:03:fd:85 |
Static |
192.168.0.254/24 |
Inside network |
|
enp4s0 |
84:16:f9:04:44:03 |
Static |
45.20.209.41/29 |
WAN connection |
|
yorktown |
Main server |
|||
|
enp0s31f6 |
e0:d5:5e:a2:de:a4 |
Static |
192.168.0.52/24 |
DHCP, NTP, DNS, HTTP, + |
|
david |
Main workstation |
|||
|
enp0s31f6 |
b0:6e:bf:3a:43:1f |
DHCP |
192.168.0.1/24 |
|
|
bunkerhill |
Testing workstation |
|||
|
eno1 |
2c:f0:5d:26:c2:09 |
DHCP |
192.168.0.9/24 |
|
|
enterprise |
Workstation |
|||
|
eno1 |
30:9c:23:e9:a4:e6 |
DHCP |
192.168.0.2/24 |
|
|
essex |
Testing workstation |
|||
|
eno1 |
e0:69:95:45:c4:cd |
DHCP |
192.168.0.6/24 |
|
|
intrepid |
Testing workstation |
|||
|
enp0s25 |
00:1e:4f:df:3a:d7 |
DHCP |
192.168.0.5/24 |
|
|
wasp |
Testing workstation |
|||
|
eno1 |
e8:40:f2:3d:0e:a8 |
DHCP |
192.168.0.8/24 |
|
|
hornet |
Testing workstation |
|||
|
enp0s25 |
e0:69:95:3c:07:37 |
DHCP |
192.168.0.07/24 |
|
|
voyager |
Laptop |
|||
|
enp111s0 |
80:fa:5b:63:37:88 |
DHCP |
192.168.0.201/24 |
Figure 1: Network Address Map
The yorktown server hosts the DHCP service and the rest of my server services. Host wally is my firewall and router. The hosts yorktown and wally both use static network configurations and the rest use DHCP configuration, as shown in Figure 1.
Install the DHCP server
First, I checked the DHP installation status and then installed the DHCP server, as shown in Figure 2.
[root@yorktown ~]# dnf list installed dhcp*
Installed Packages
dhcp-client.x86_64     12:4.3.6-28.fc29           @anaconda
dhcp-common.noarch     12:4.3.6-28.fc29           @anaconda
dhcp-libs.x86_64       12:4.3.6-28.fc29           @anaconda

[root@yorktown ~]#
Figure 2: Check which DHCP packages are installed on my server.
The DHCP server is not installed by default, so I added it myself. This task must be performed as root. The result shows the DHCP client has been installed along with libraries and supporting files common to the client, server, and possibly the DHCP development packages. The DHCP server is not installed, so I installed it using the command in Figure 3.
[yorktown ~]# dnf install -y dhcp-server
Last metadata expiration check: 2:39:06 ago on Wed 26 Dec 2018 12:19:46 PM EST.
Dependencies resolved.
=================================================================================================
 Package                Arch              Version                        Repository         Size
=================================================================================================
Installing:
 dhcp-server            x86_64            12:4.3.6-28.fc29               fedora            431 k
[...]
Installed:
  dhcp-server-12:4.3.6-28.fc29.x86_64

Complete!
Figure 3: Installing the DHCP server package.
That was easy, and no reboot of the server was required.
Configure the DHCP server
With the DHCP server installed, the next step is to configure the server. Having more than one DHCP server on the same network can cause problems because one would never know which DHCP server is providing the network configuration data to the client. However, a single DHCP server on one host can listen to multiple networks and provide configuration data to clients on more than one network.
DHCP can provide DNS names for the gateway and other servers. For example, the NTP server could use that server’s hostname (NTP1) instead of the IP address. Most of the time, this works well, but this configuration might cause problems if the DNS name services server were to be disabled or my own server does not exist.
The IP addresses specified in Figure 1 are the ones that DHCP will assign to the hosts on my internal network. I have arbitrarily chosen these IP addresses for my network.
The details like the values for hostnames, MAC addresses, and IP addresses will be different for your network, but the basic requirements will be the same.
The dhcpd.conf file
As root, you can look at the existing dhcpd.conf file, which is non-functional when first installed. Make /etc/dhcp the PWD and then cat the dhcpd.conf file to view the contents. There is not much in the file, but it does point to an example file named /usr/share/doc/dhcp-server/dhcpd.conf.example that you can read to understand the main components and syntax of the dhcpd.conf file. I strongly suggest you read this example file.
I started with a previous version of the example file many years ago when I first decided to move to DHCP configuration for my network. The comment I added in this section indicates that it was probably based on the Fedora 18 version of dhcpd.conf and my file is still based on that older file. I have left many of the original comments and commented out the default settings in my final file. Since this file is intended as a guide and the basis for a working dhcpd.conf configuration, I decided to leave as much intact as possible in case I needed that information later.
The dhcpd.conf(5) man page also has some excellent descriptions of the various configuration statements that are likely to be needed by a DHCP server.
There are two major sections in any dhcpd.conf file. The global section contains settings for all subnets for which this server provides DHCP services. The second section is the subnet declaration. You can use multiple subnet declarations if this server provides DHCP services for multiple networks.
Syntax
The dhcpd service is very strict in its interpretation of the dhcpd.conf file. Each subnet and each host declared within each subnet must begin and end with curly braces ({}), and all statements must end in a semicolon (;). A missing curly brace has caused me much angst and gnashing of teeth more than once in the past. The curly braces for the subnet declaration also surround the host declaration because the host declarations need to be inside the subnet declaration.
The global section
This global section, shown in Figure 4, contains global configuration items common to the subnets that DHCP serves. I have only a single subnet, but I still placed these statements in the global section because they are likely to be the same for all subnets. If they were to differ for a given subnet, creating a statement with different values in the subnet declaration overrides the global declaration.
Since I only have one network, I have kept the option declarations found in this section of the sample file because I had no reason to change or delete them.
# DHCP Server Configuration file.
#   see /usr/share/doc/dhcp*/dhcpd.conf.sample
#   see dhcpd.conf(5) man page
#
#
# Changes based on the sample dhcpd.conf for Fedora 18.
# option definitions common to all supported networks...
# option domain-name "example.org";
# option domain-name-servers ns1.example.org, ns2.example.org;
#
# All networks get the default lease times
default-lease-time 7200;        # 2 hours
max-lease-time 14400;           # 4 hours

# Use this to enable / disable dynamic dns updates globally.
ddns-update-style none;
#
# If this DHCP server is the official DHCP server for the local
# network, the authoritative directive should be uncommented.
authoritative;
#
# ignore client-updates;
# If this DHCP server is the official DHCP server for the local
# network, the authoritative directive should be uncommented.
authoritative;
#
Figure 4: The global section of the dhcpd.conf file.
I made three changes in this section from that of the original file:
- Default lease time:I set the default lease times in seconds. This setting determines how frequently the client hosts must refresh the lease on the IP address. Shorter times are good if clients connect and disconnect frequently. The default lease time of 10 minutes is pretty short, so I set it for two hours. I also changed the maximum lease time from two hours to four hours.
- Dynamic DNS: I disabled dynamic DNS because I don’t use that in my network.
- Authoritative server: I specified that this is the authoritative DHCP server for my network.
The subnet section
The subnet section of the dhcpd.conf file contains two subsections. The first has the values common to all hosts in the defined subnet. The host declaration subsection includes declarations for all hosts specifically managed by DHCP.
The common part of the subnet section
This common subsection of the subnet section, shown in Figure 5, sets numerous common values for all of the hosts declared in the host subsection of this subnet. I define the subnet in the first line as type C range 192.168.0.0 in the old classful notation, with a subnet mask of 255.255.255.0. This translates to 192.168.0.0/24 in the Classless Inter-Domain Routing (CIDR) network notation.
I don’t see any indication in any documentation that the dhcpd.conf file can use CIDR notation for IPv4 at this time. The dhcpd.conf man page indicates that you can use CIDR notation for IPv6.
This subsection specifies the router IP address and netmask, the domain name, and the DNS domain search name. The domain search name is used when performing searches where no domain name is specified in the query. When a command such as ping essex is specified, the DNS search is performed for essex.both.org instead.
Since I don’t use NIS domain names, I commented out that option.
This section also provides a list of DNS servers to the clients. Clients search these servers in the order they are listed. I use the Google DNS servers as the backup to my internal DNS server, partly because I registered my domain names with Google Domains.
subnet 192.168.0.0 netmask 255.255.255.0 {

# --- default gateway
        option routers                  192.168.0.254;
        option subnet-mask              255.255.255.0;

#       option nis-domain               "both.org";
        option domain-name              "both.org";
        option domain-search            "both.org";
        option domain-name-servers      192.168.0.52, 8.8.8.8, 8.8.4.4;

        option time-offset              -18000; # Eastern Standard Time
        option ntp-servers              192.168.0.52;
#       option netbios-name-servers     192.168.0.1;
# --- Selects point-to-point node (default is hybrid). Don't change this unless
# -- you understand Netbios very well
#       option netbios-node-type 2;

################################################################################
# Dynamic DHCP allocation range for otherwise unknown hosts                    #
################################################################################
        range dynamic-bootp 192.168.0.220 192.168.0.229;
#       default-lease-time 21600;
#       max-lease-time 43200;
Figure 5: The common subsection of the subnet section for my network.
I specified my local Network Time Protocol (NTP) server and the offset from GMT. This service synchronizes the time on all of my hosts.
Configuring the network settings for guest hosts such as laptops and other mobile devices is also possible with DHCP. I have no information (such as the MAC address) for these computers but must assign an IP address anyway. In most cases, the guest hosts must trust the DHCP service. I dislike having guests on my network, so I usually relegate guest hosts to a second network subnet. This approach protects my primary network because the guest hosts have no access to it.
The last active line in this part of my dhcpd.conf file specifies a small range of IP addresses for devices that might plug into my wired network. For example, I plug laptops and desktop systems into my network when working on them after I have determined that they are not infected—usually only when I have wiped the hard drives and installed Linux. I never, ever connect a Windows computer directly to my network.
The original sample file used different lease times for this first subnet than I specified in the global section, so I have commented them out.
The host declaration part of the subnet section
The subnet section shown in Figure 6 is where the individual hosts are declared. Each host requires a name, the MAC address of its NIC, and the fixed address it will always use.
I use comments in this host declaration subsection to help define and document the address structure for my network. I also use comments in my DNS zone file to record the same information.
################################################################################
# The range from 192.168.0.1 - 20 is for my personal hosts and workstations.   #
################################################################################
        # david
        host david {
                hardware ethernet b0:6e:bf:3a:43:1f;
                fixed-address 192.168.0.1;
        }
        # bunkerhill
        host alice {
                hardware ethernet 30:9C:23:E9:A4:E6;
                fixed-address 192.168.0.2;
        }
        # intrepid
        host intrepid {
                hardware ethernet 00:1e:4f:df:3a:d7;
                fixed-address 192.168.0.5;
        }
        # essex
        host essex {
                hardware ethernet E0:69:95:45:C4:CD;
                fixed-address 192.168.0.6;
        }
        # Hornet
        host hornet {
                hardware ethernet e0:69:95:3c:07:37;
                fixed-address 192.168.0.7;
        }
        # Wasp
        host wasp {
                hardware ethernet e8:40:f2:3d:0e:a8;
                fixed-address 192.168.0.8;
        }
        # bunkerhill
        host bunkerhill {
                hardware ethernet 2c:f0:5d:26:c2:09;
                fixed-address 192.168.0.9;
        }


################################################################################
# IP Addresses between 192.168.0.50 and 192.168.0.59 are for physical servers  #
# which always use static IP addressing.                                       #
################################################################################

################################################################################
# The range from 192.168.0.70 - 80 is for network printers.                    #
################################################################################
        host brother1 {
                hardware ethernet 30:05:5C:71:F7:7C;
                fixed-address 192.168.0.70;
        }

################################################################################
# The range from 192.168.0.91 - 100 is for various hosts under test            #
################################################################################
        host test1 {
                hardware ethernet 00:1E:4F:B1:EB:78;
                fixed-address 192.168.0.91;
        }
        host admin {
                hardware ethernet 00:22:4d:a6:5c:1b;
                fixed-address 192.168.0.92;
        }
################################################################################
# The range from 192.168.0.100 to 192.168.0.150 is for most virtual machines.  #
################################################################################
        host testvm1 {
                hardware ethernet 08:00:27:7B:A7:0C;
                fixed-address 192.168.0.101;
        }
        host testvm2 {
                hardware ethernet 08:00:27:BE:E1:02;
                fixed-address 192.168.0.102;
        }
        host fedora35vm {
                hardware ethernet 08:00:27:A8:E7:4F;
                fixed-address 192.168.0.135;
        }
        host fedora36vm {
                hardware ethernet 08:00:27:07:CD:FE;
                fixed-address 192.168.0.136;
        }

################################################################################
# The range from 192.168.0.160 - 192.168.0.179 is reserved                     #
################################################################################

################################################################################
################################################################################
################################################################################
# The range from 192.168.0.180 to 192.168.0.189 is for virtual machines used   #
# in book research. These addresses usually connect to a second or third NIC   #
# for those hosts to provide a back-door access.                               #
################################################################################
################################################################################
################################################################################
        # Adapter 2
        host studentvm1 {
                hardware ethernet 08:00:27:C4:6E:06;
                fixed-address 192.168.0.181;
        }
        # Adapter 2
        host studentvm2 {
                hardware ethernet 08:00:27:9F:67:CB;
                fixed-address 192.168.0.182;
        }

################################################################################
# The range from 192.168.190 - 199 is for windows and other strange stuff      #
################################################################################
        # Windows10 VM
        host win10 {
                hardware ethernet 08:00:27:8C:79:E8;
                fixed-address 192.168.0.190;
        }
################################################################################
# The range from 192.168.0.200 - 209 is for mobile and miscellaneous devices   #
################################################################################
        # voyager (System76 Oryx Pro 4)
        host voyager {
                hardware ethernet 80:fa:5b:63:37:88;
                fixed-address 192.168.0.201;
        }
        # voyager2  (System76 Oryx Pro 6)
        host voyager2 {
                hardware ethernet 80:fa:5b:8d:c6:75;
                fixed-address 192.168.0.202;
        }
}
Figure 6: The host declaration section of the dhcpd.conf file.
Different option declarations can be made for any subnet or any host within a subnet. For example, one subnet may specify a different router than the rest of the subnets, or one host may use a different router than the other hosts in a subnet.
To activate the new DHCP configuration, I started, enabled, and verified the DHCP service, as seen in Figure 7.
[yorktown ~]# systemctl start dhcpd

[yorktown ~]# systemctl enable dhcpd
Created symlink /etc/systemd/system/multi-user.target.wants/dhcpd.service → /usr/lib/systemd/system/dhcpd.service.

[yorktown ~]# systemctl status dhcpd
● dhcpd.service - DHCPv4 Server Daemon
     Loaded: loaded (/usr/lib/systemd/system/dhcpd.service; enabled; vendor preset: disabled)
    Drop-In: /etc/systemd/system/dhcpd.service.d
             └─override.conf
     Active: active (running) since Sun 2022-06-26 15:57:12 EDT; 11s ago
       Docs: man:dhcpd(8)
             man:dhcpd.conf(5)
    Process: 1347205 ExecStartPre=/bin/sleep 60 (code=exited, status=0/SUCCESS)
   Main PID: 1347220 (dhcpd)
     Status: "Dispatching packets..."
      Tasks: 1 (limit: 38318)
     Memory: 4.9M
        CPU: 15ms
     CGroup: /system.slice/dhcpd.service
             └─ 1347220 /usr/sbin/dhcpd -f -cf /etc/dhcp/dhcpd.conf -user dhcpd -group dhcpd --no-pid

Jun 26 15:57:12 yorktown.both.org dhcpd[1347220]: Wrote 10 leases to leases file.
Jun 26 15:57:12 yorktown.both.org dhcpd[1347220]: Listening on LPF/enp0s31f6/e0:d5:5e:a2:de:a4/192.168.0.0/24
Jun 26 15:57:12 yorktown.both.org dhcpd[1347220]: Sending on   LPF/enp0s31f6/e0:d5:5e:a2:de:a4/192.168.0.0/24
Jun 26 15:57:12 yorktown.both.org dhcpd[1347220]: Sending on   Socket/fallback/fallback-net
Jun 26 15:57:12 yorktown.both.org dhcpd[1347220]: Server starting service.
Jun 26 15:57:12 yorktown.both.org systemd[1]: Started dhcpd.service - DHCPv4 Server Daemon.
Jun 26 15:57:16 yorktown.both.org dhcpd[1347220]: DHCPREQUEST for 192.168.0.2 from 30:9c:23:e9:a4:e6 via enp0s31f6
Jun 26 15:57:16 yorktown.both.org dhcpd[1347220]: DHCPACK on 192.168.0.2 to 30:9c:23:e9:a4:e6 via enp0s31f6
Jun 26 15:57:17 yorktown.both.org dhcpd[1347220]: DHCPREQUEST for 192.168.0.8 from e8:40:f2:3d:0e:a8 via enp0s31f6
Jun 26 15:57:17 yorktown.both.org dhcpd[1347220]: DHCPACK on 192.168.0.8 to e8:40:f2:3d:0e:a8 via enp0s31f6
Figure 7: Start and verify that the DHCP server started without errors. You can even see a couple of fulfilled requests in this example.
There should be no errors from the status command, but, like my server above, there may be several statements indicating the DHCP daemon is listening on a specific NIC and the MAC address of the NIC. If this information is not correct, verify that the dhcpd.conf file is valid and restart the DHCP server. If there are syntactical errors in the configuration, they will appear in the status report.
I also ran the command shown in Figure 8 on some of my hosts to verify that the network is configured with the correct IP address, router, and DNS servers. This command shows the installed NICs on each host, including the loopback device, lo.
[essex ~]# nmcli
eno1: connected to Wired connection 1
        "Intel 82579V"
        ethernet (e1000e), E0:69:95:45:C4:CD, hw, mtu 1500
        ip4 default
        inet4 192.168.0.6/24
        route4 192.168.0.0/24 metric 100
        route4 default via 192.168.0.254 metric 100
        inet6 fe80::3220:6681:4348:71df/64
        route6 fe80::/64 metric 1024

lo: unmanaged
        "lo"
        loopback (unknown), 00:00:00:00:00:00, sw, mtu 65536

DNS configuration:
        servers: 192.168.0.52 8.8.8.8 8.8.4.4
        domains: both.org
        interface: eno1
Figure 8: Verify DHCP provided the correct data to the hosts.
Wrap up
DHCP provides network configuration data to client hosts on a network, allowing for centralized network configuration management. A DHCP server can provide various configuration options to clients, including many required for Windows hosts that might connect to the network. This configuration data includes gateway routers, NTP servers, DNS servers, PXE boot servers, and much more.
I use DHCP for most of my hosts because it is less work in the long run than static configurations on each host. The default setup for NetworkManager on newly installed hosts is to use DHCP.
Содержание
Network Time Protocol (NTP) — сетевой протокол для синхронизации внутренних часов компьютера.
Публичные NTP серверы
Cервер NTP
Установка
Настройка
Файл: /etc/ntp.conf
server ИМЯ_СЕРВЕРА iburst dynamic
Пример:
server 0.ru.pool.ntp.org
server 1.ru.pool.ntp.org
server 2.ru.pool.ntp.org
server 3.ru.pool.ntp.org
Тестирование через ntpq
NTP query program
ntpq -p
Изменение временной зоны
DHCP
При получении адреса NTP сервера по DHCP создаётся и используется файл /var/lib/ntp/ntp.conf.dhcp
Windows NTP клиент
NTP in Windows 10 Windows 8 systems benefit from using the full set of NTP servers, but cannot be configured to obtain NTP server information from DHCP. Because the control panel does not allow setting multiple servers, settings on these systems must be verified and changed from a command prompt.
When configuring DHCP options on a Windows Server 2016 What is the number corresponding to the NTP Server option?
It looks like there are two options for providing network time settings to a DHCP client; option 004 and option 042. The description for 004 is “Time Server”, while 042 specifies NTP.
What is DHCP option125?
Option 125 is a vendor-specific DHCP Server feature that is required if you are using AIM’s multi-subnet mode. It provides additional information to the Infinity Receivers and Transmitters when requesting an IP Address from the DHCP Server.
Does Windows 10 have a built in DHCP server?
Windows 10 itself doesn’t come with a good DHCP server. It has a very minimal one, as part of the “Internet Connection Sharing” feature (still exists on Win10), but you can’t really configure it in any way and I wouldn’t recommend using it.
Does DHCP set NTP?
If the dhcp server you are using is configured to provide the ntp-servers option, you can configure your dhclient to request ntp-servers by adding ntp-servers to the default request line in dhclient.
Can DHCP assign NTP server?
What is option125 Huawei?
125. Function as. server/relay. Option Description. Vendor-identifying vendor-specific information option, used only by a DHCP server to send enterprise number information to a client.
How do I enable DHCP on Windows 10?
To enable DHCP or change other TCP/IP settings
- Select Start, then type settings. Select Settings > Network & internet.
- Do one of the following:
- Next to IP assignment, select Edit.
- Under Edit network IP settings or Edit IP settings, select Automatic (DHCP) or Manual.
- When you’re done, select Save.
What is the best DHCP server?
The best DDI/IPAM systems and DHCP servers
- SolarWinds IP Address Manager (FREE TRIAL) The SolarWinds IP Address Manager includes DHCP functions as well as DNS management, which makes it a full DDI system.
- BlueCat IPAM.
- OpUtils IPAM.
- Infoblox IPAM.
- Morpheus.
- GestióIP.
- Men & Mice Suite.
- LightMesh IPAM.
What is option 43 DHCP Cisco?
When the DHCP server sees a recognizable VCI in a DHCP discover from a DHCP client, it returns the mapped vendor specific information in its DHCP offer to the client as DHCP Option 43. On the DHCP server , option 43 is defined in each DHCP pool (Scope) that offers IP address to the LAPs.