
-
Home
-
News
- How to Troubleshoot Windows Server 2022 DHCP Not working?
By Nan |
Last Updated
Why does your DHCP server not work? Do you know how to solve Windows Sever 2022 DHCP not working? You can figure it out and get some helpful solutions in this article edited by MiniTool. Let’s get to the point.
What Is DHCP?
DHCP (Dynamic Host Configuration Protocol) is a user-friendly network management protocol that automatically assigns IP addresses to any device or node on a network, enabling seamless communication via IP.
Whenever a device moves to a new location, DHCP conveniently allocates it a fresh IP address, sparing network administrators from the hassle of manually configuring each device with valid IP settings or adjusting its address when relocating within the network.
This automated process centralizes configuration management and can be easily implemented in both small local area networks and large enterprise environments.
However, you may encounter some DHCP errors such as unable to contact your DHCP, or Windows Server 2022 DHCP not working over the period of use. This way, how to get a working DHCP server? In the following part, we will walk you through each step in turn.
How to Fix Windows Server 2022 DHCP Not Working?
First, you should do some checks and tests about the DHCP server so as to identify the cause and location of the DHCP errors. Then you can find the corresponding solutions in line with the issues.
1. Check Network Connectivity: Take a moment to check the network cables, switches, and routers to ensure they are working well, so that your Windows Server 2022 device can enjoy a smooth network connection.
2. See DHCP Configuration: Verify that the DHCP server configurations are accurate, including the DHCP scopes, IP address ranges, subnet masks, and any other configuration parameters.
3. Test DHCP Client Configuration: You can test the DHCP client configuration on your device to see if it can successfully receive IP addresses and network settings from the DHCP server. This will help you figure out whether the issue lies with the server or your device.
4. Check DHCP Server Status: Check if the DHCP server is running and if there are any errors or warnings in the event log. If there are any error messages or warnings, you may find the solutions based on the messages provided.
5. Check DHCP Pool: Check if there are any available IP addresses that can be assigned to the client device. If not, you may need to consider extending the IP address range or extending the lease time.
6. View Firewall and Security Settings: Make sure that firewall and security settings have been enabled on both the server and client devices to allow for DHCP communication between the server and client device.
Second, you can do some techniques to see if they can fix the DHCP not working issue.
1. Reboot the DHCP Server: Restarting the DHCP server on your Server 2022 may fix some small service-related issues.
2. Update or Reinstall DHCP Server: Sometimes, the old DHCP server or issues related to software may lead to Windows Server 2022 DHCP not working. Then update or reinstall the DHCP server can be an optional fix.
3. Resort to Microsoft Support: If the issue remains after trying the steps above, you should turn to the official Microsoft support for help.
Also read: 4 Ways to Fix “DHCP Is Not Enabled for Ethernet” Error
Precautions to Change DHCP Server Settings
Before changing the configurations of the DHCP server, you had better consider backing up your data. Backup can always protect your important data that you stored in Windows Server in case your computer faces with some unexpected disasters.
As to data backup creation, MiniTool ShadowMaker is worth having a try, which is user-friendly and enables you to backup files and system, sync files, build media, and more. With it, you can easily back up data with a few clicks. Here’s a brief tutorial below.
MiniTool ShadowMaker TrialClick to Download100%Clean & Safe
Step 1: Open the tool and click Keep Trial.
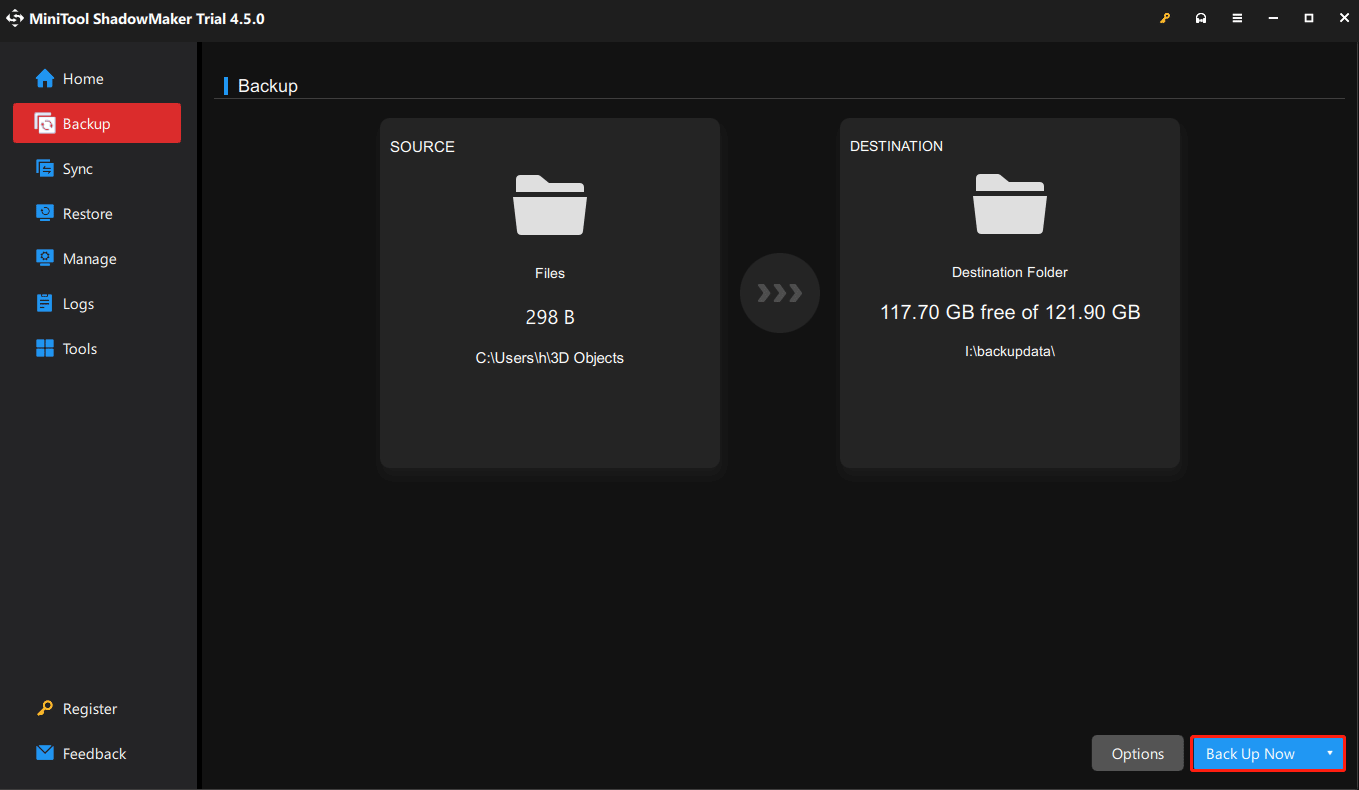
Step 2: Go to Backup, choose SOURCE to select your desired data, and click OK. Then select DESTINATION to choose a path and click OK.
Step 3: Click Back Up Now to start the backup task.
Bottom Line
As you can see, this post explains how to solve Windows Server 2022 DHCP not working so that you can get a working DHCP server. Meanwhile, we kindly suggest that you make a regular backup for your computer.
About The Author
Position: Columnist
Nan is always interested in writing and exploring new things. Her enthusiasm for writing leads her to become an English editor. She likes to share helpful information about kinds of Android issues with readers and focuses on PC backup and restore. She also loves to read books and watch documentaries in her spare time.
The Dynamic Host Configuration Protocol, aka DHCP, is an essential network protocol that enables a client machine to automatically obtain a unique IP address, one or more DNS server addresses, and a default route, from a central DHCP server. This is important when configuring an internet connection on your Windows 11 PC or laptop.
As, without DHCP, you will need to configure your IP address manually, which could be tedious and complicated. So, in this article, we have listed some of the best fixes for when your router or your Windows 11 client system fails to obtain the IP address from the DHCP server.
Fix DHCP Not Working in Windows 11
However, before we proceed to the technical solutions, make sure to restart your router and check if DHCP is working properly on your Windows 11 device or not. If it does not or some error occurs, try out the solutions listed right below.
1. Turn Off Antivirus and/or Firewall in Windows 11 Temporarily
Starting with one of the most common reasons why the DHCP might not be working in Windows 11, the Windows Firewall and/or any third-party antivirus software. If you are using any, it may be preventing the network protocol to work properly. You can try disabling the antivirus software or Windows Firewall on your Windows 11 PC or laptop and check if the DHCP is working or not.
If it works, you can contact the customer support of your antivirus program or research the program to see what is preventing DHCP to function in Windows 11 and how to fix it. However, if the DHCP is still not working on your device, proceed to the next fix.
2. Troubleshoot Network Adapter in Windows 11
Minor issues or misconfigured settings in the Network Adapter on your Windows 11 PC or laptop might also prevent DHCP to function properly. However, the good news is that Windows 11 comes with built-in, dedicated troubleshooters to fix generic issues on your PC or laptop.
Hence, you can use the Network Adapter troubleshooter in Windows 11 to fix the DHCP not working issue. To run the Network Adapter troubleshooter in Windows 11, follow the steps right below:
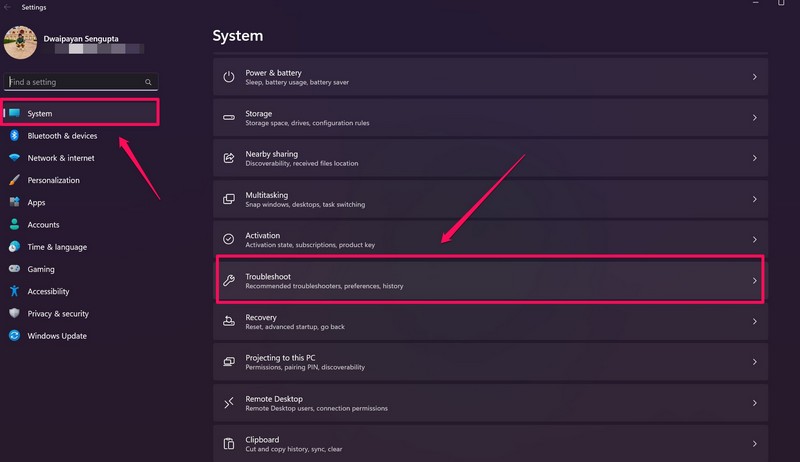
1. Press the Windows + I keyboard shortcut to open the Settings app in Windows 11.
2. While in the System tab, go to the Troubleshoot option.
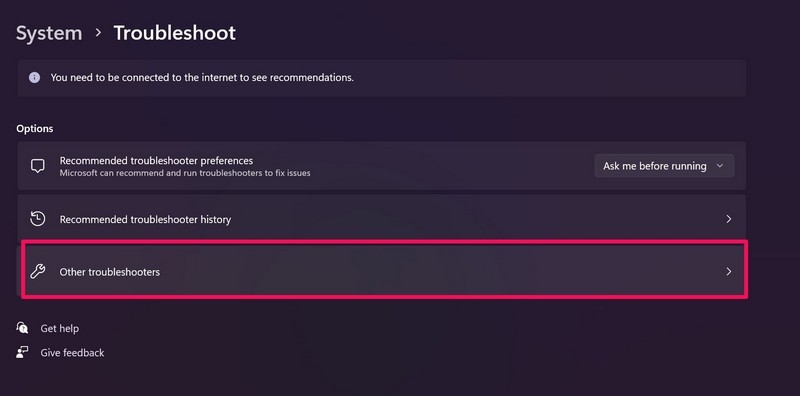
3. Click on the Other troubleshooters option on the next page.
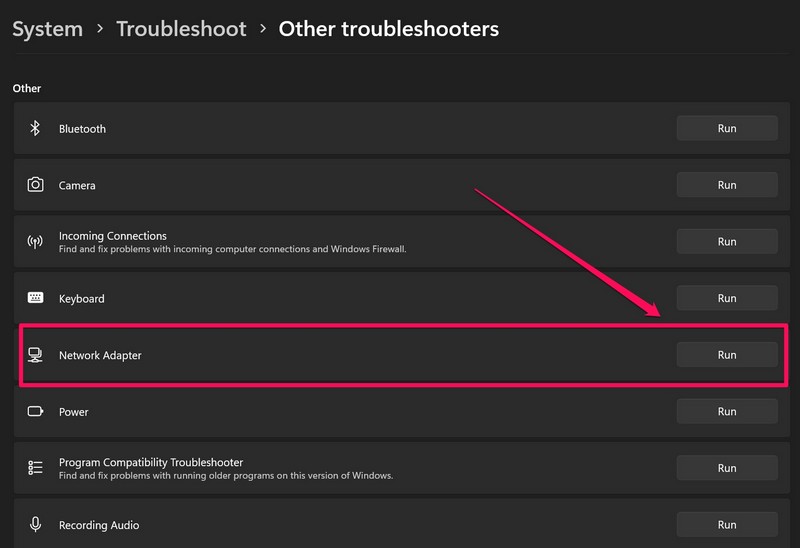
4. Find the Network Adapter option on the following list and click the Run button beside it.
After the troubleshooter completes troubleshooting the network adapters on your Windows 11 PC or laptop, restart your device. Then, check whether the DHCP not working issue has been fixed or not. If it did not, check out the next solution.
3. Check if DHCP is Enabled for Your Network in Windows 11
Now, the next thing you might want to check when the DHCP is not working in Windows 11 is if it is indeed enabled for your network. To check this, follow the steps right below.
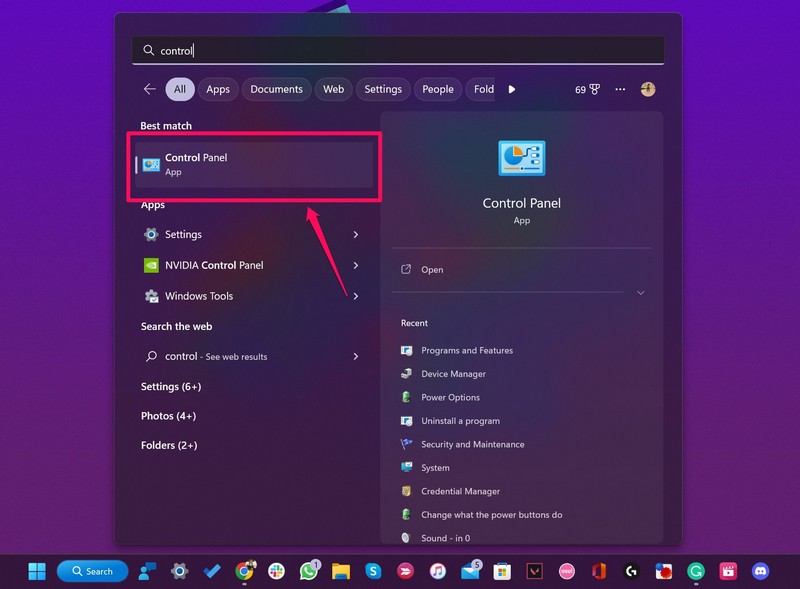
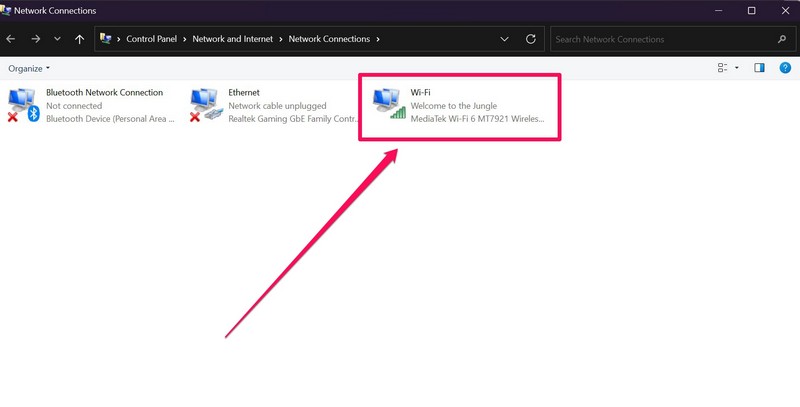
1. Use Windows search to find Control Panel and open it in Windows 11.
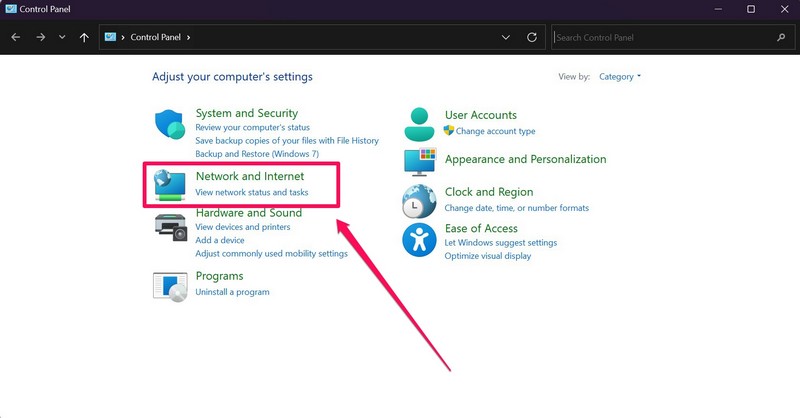
2. Click the Network and Internet option.
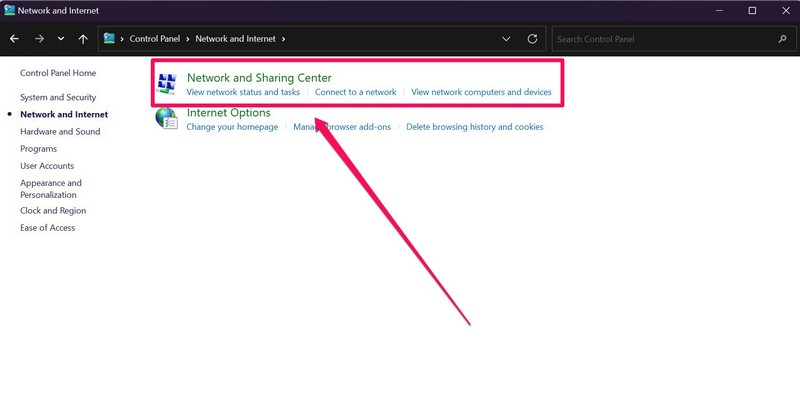
3. Then, open the Network and Sharing Center menu.
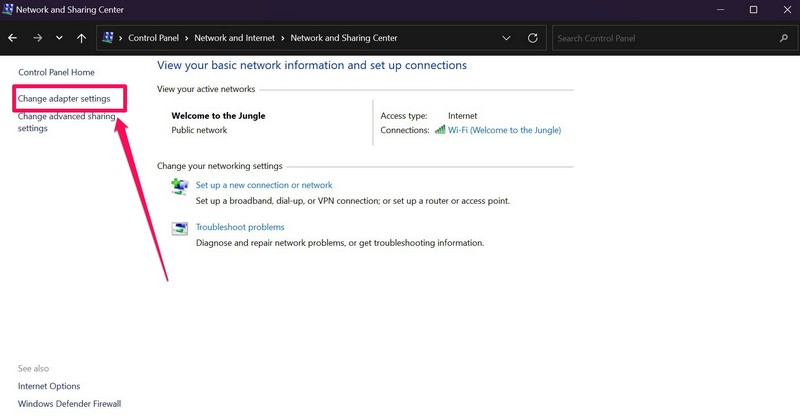
4. On the left pane, click on the Change adapter settings option.
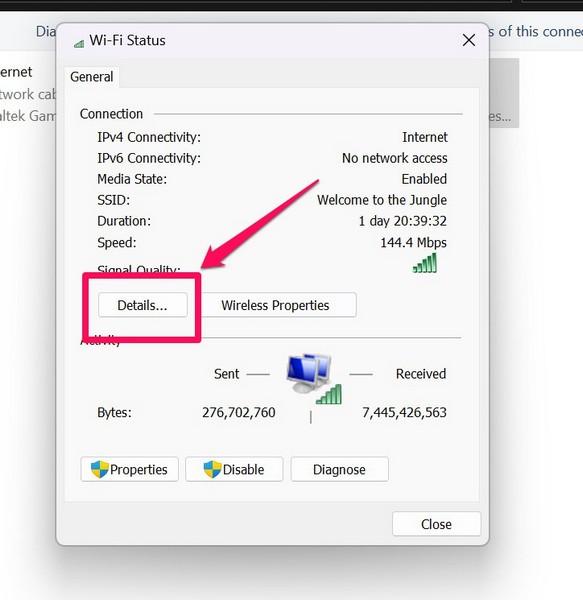
5. Double-click on your active network connection.
6. On the following prompt, click the Details… button.
7. Check if it is marked Yes beside the DHCP Enabled option.
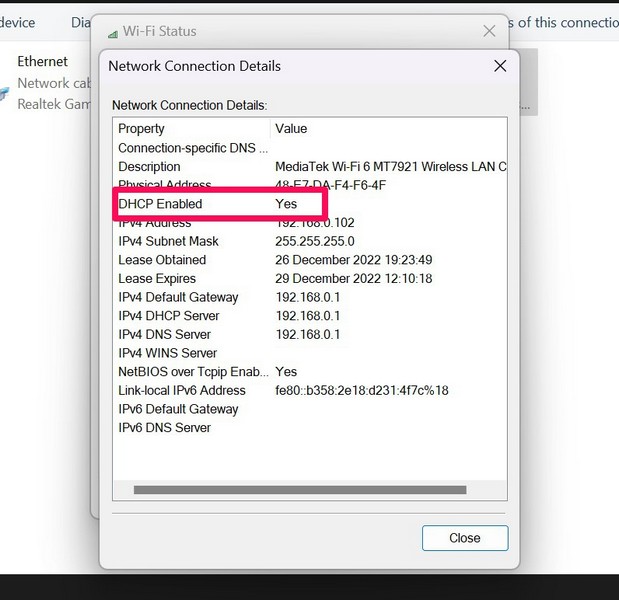
If the DHCP Enabled option is marked with a No, it means that DHCP is disabled on your Windows 11 system. In this case, you must enable the network protocol on your PC or laptop. To do this, follow the steps right below:
1. Follow steps 1-4 from the previous section to open your network connections page.
2. Now, right-click on your active network connection and open Properties.
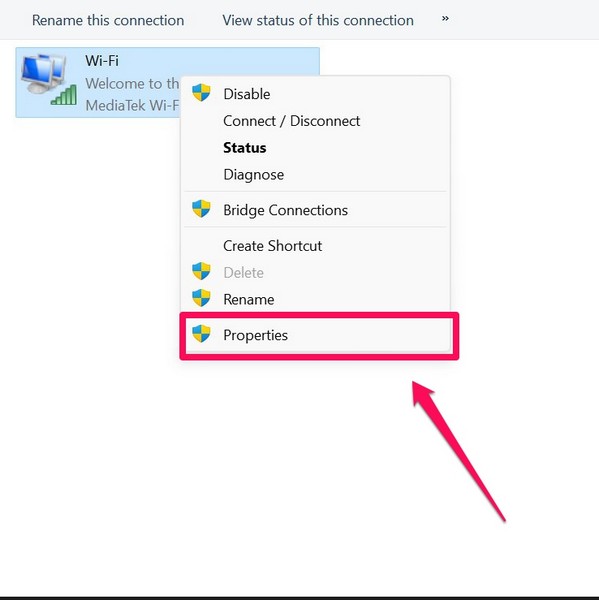
3. Double-click on the Internet Protocol Version 4 (TCP/IPv4) option.

4. Mark the checkboxes beside the following options:
- Obtain an IP address automatically
- Obtain DNS server address automatically.
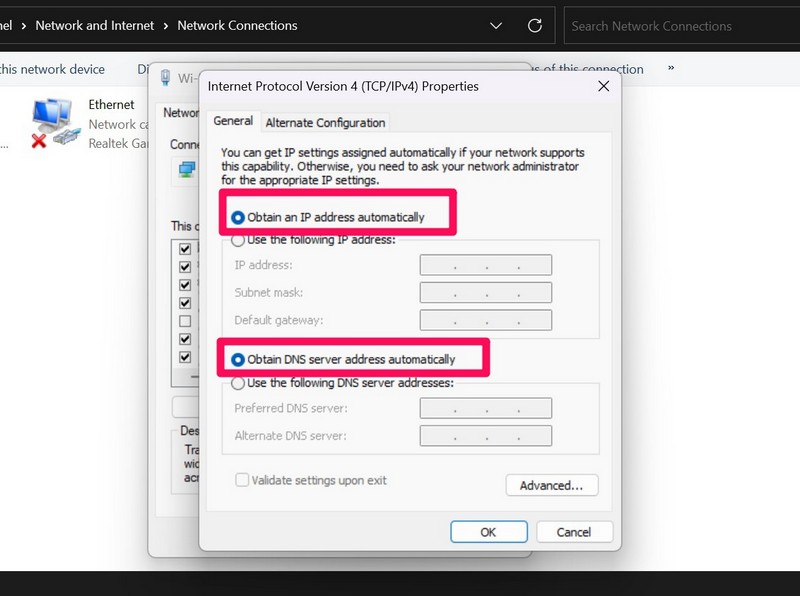
5. Now, close all the windows and restart your Windows 11 PC or laptop.
Following the restart, the DHCP should function properly on your Windows 11 device and the issue should be fixed.
4. Re-install Network Adapter in Windows 11
If the above solutions failed to fix the DHCP on your Windows 11 device, you can try re-installing the network adapters on your PC or laptop. Uninstalling and reinstalling the network adapter in Windows 11 fixes many network issues and updates the adapter.
Hence, there is a high chance that this might fix the DHCP not working issue in Windows 11. So, to re-install the network adapter in Windows 11, follow the steps right below.
1. Use the Windows + X shortcut to open the Quick Links menu and click on the Device Manager option.

2. Find the Network adapter option and click the tiny arrow beside it to expand.
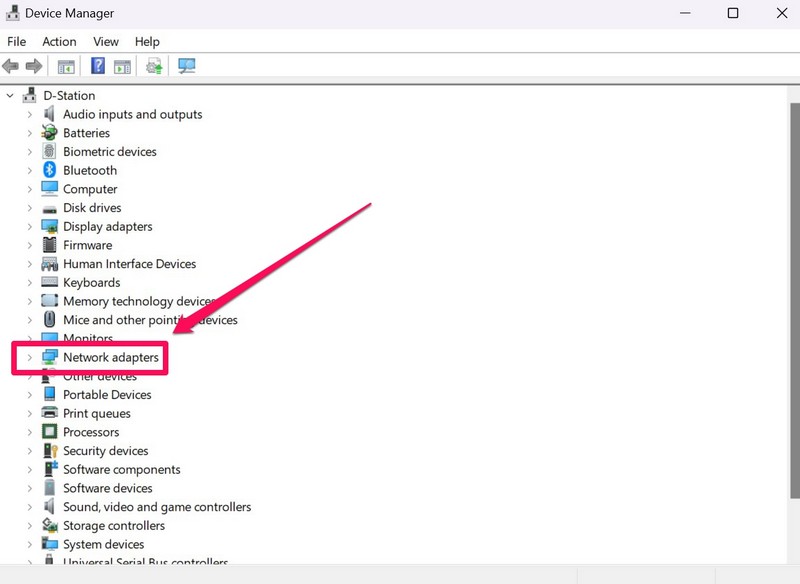
3. Now, right-click on your active network adapter and choose the Uninstall device option from the context menu.

4. Following the uninstallation, restart your Windows 11 PC or laptop.
Restarting your Windows 11 PC or laptop allows Windows to detect the hardware change on your device and automatically install the network adapter. So, following the restart, try running the DHCP in Windows 11. It should be fixed at this point.
5. Restart DHCP Client using Command Prompt/ Services App in Windows 11
The next thing you can try when the DHCP stops working in Windows 11 is to restart the DHCP client in Windows 11. You can do this in two different ways. One of the methods involves the Command Prompt tool and the other one can be executed with the Services app in Windows 11. You can use either of the two ways, mentioned below, to restart the DHCP client in Windows 11.
Restart DHCP client using Command Prompt in Windows 11
Below are the steps to restart DHCP client using Command Prompt in Windows 11.
1. Use Windows Search to find the Command Prompt tool and click the Run as administrator option.

2. Once Command Prompt opens up in Windows 11, type in the following commands and press Enter one by one:
net stop dhcpnet start dhcpNote: Do not execute the above commands simultaneously in Command Prompt. Execute the first one and then move on to the next.
3. Restart your Windows 11 PC or laptop after execution and the DHCP client would be restarted in Windows 11.
Restart DHCP Client Using the Services app in Windows 11
You can also use the Services app to restart DHCP client in Windows 11.
1. Press the Windows + R shortcut to open the Run tool in Windows 11.
2. Type in “services.msc” (without quotes) in the text field and press Enter.
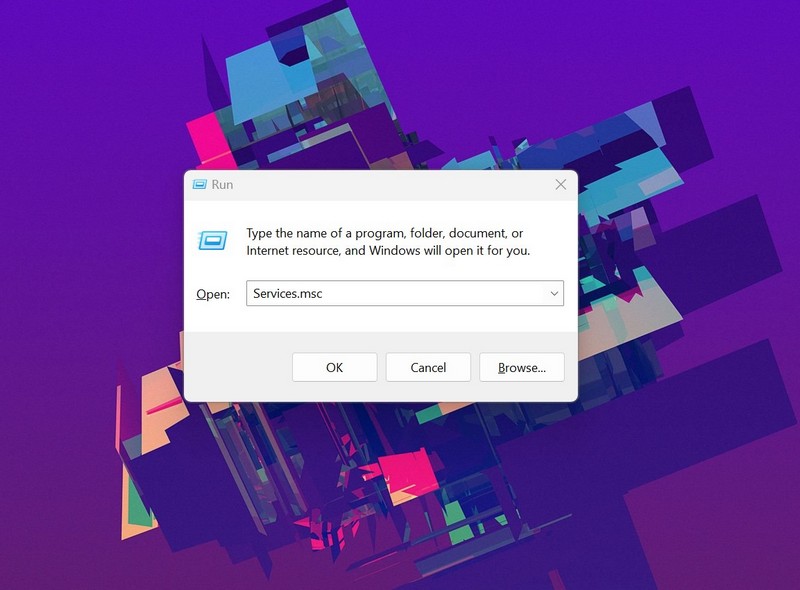
3. In the Services app, scroll down to find the DHCP Client on the list.
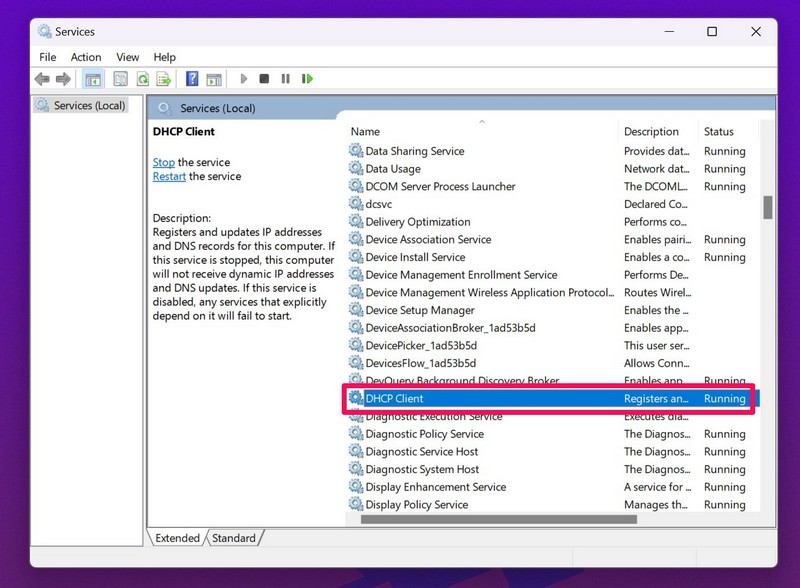
4. Right-click on DHCP Client and click on the Restart option on the context menu.
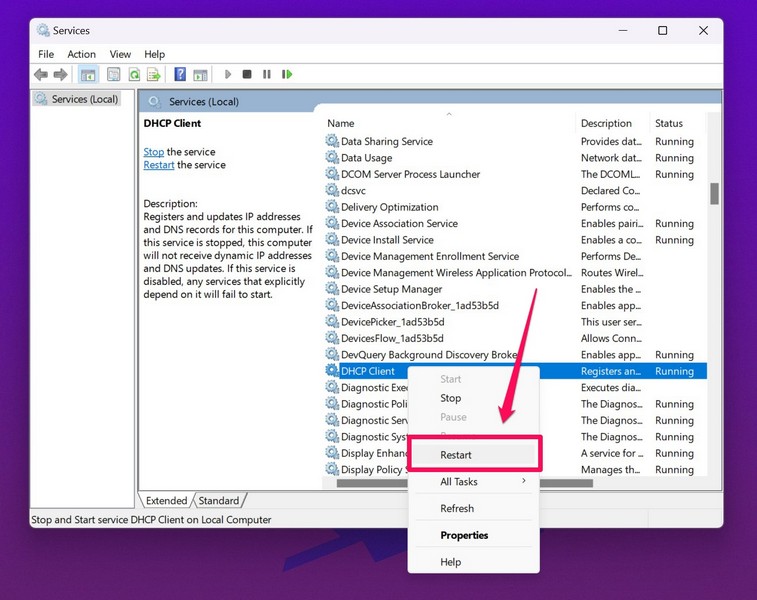
5. Following the restart, double-click the DHCP Client to open its settings.
6. In its Properties dialog box, make sure the Startup type option is set to Automatic.
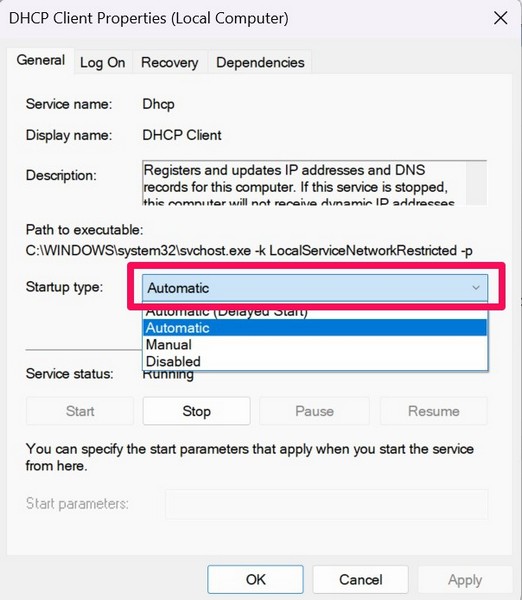
7. If it is not, click on it to set it as Automatic and click the Apply button.
8. Restart your Windows 11 PC or laptop.
This way, you can use the Services app to restart the DHCP client in Windows 11.
Restarting the DHCP Client in Windows 11 can fix various issues, including the DHCP not working on your PC or laptop. If, however, it still does not work, move on to the next fix.
6. Disable IPv6 in Windows 11
Now, another thing that could cause issues in the DHCP in Windows 11 is the Internet Protocol version 6 (IPv6). You see, we mainly use the IPv4 Internet Protocol to access the DHCP server to obtain IP addresses, default routes, and DNS server addresses.
However, if the IPv6 protocol is somehow enabled on your Windows 11 PC or laptop, it might interfere with the DHCP client, preventing it to work properly. In this case, you must disable the IPv6 protocol on your device. To disable the IPv6 protocol for your network in Windows 11, follow the steps right below:
1. Follow steps 1-4 from the 3rd solution to open your active network connections page via Control Panel in Windows 11.
2. Right-click on your active network connection and click on Properties on the context menu.
3. On the following window, find the Internet Protocol Version 6 (TCP/IPv6) option and uncheck the box beside it.
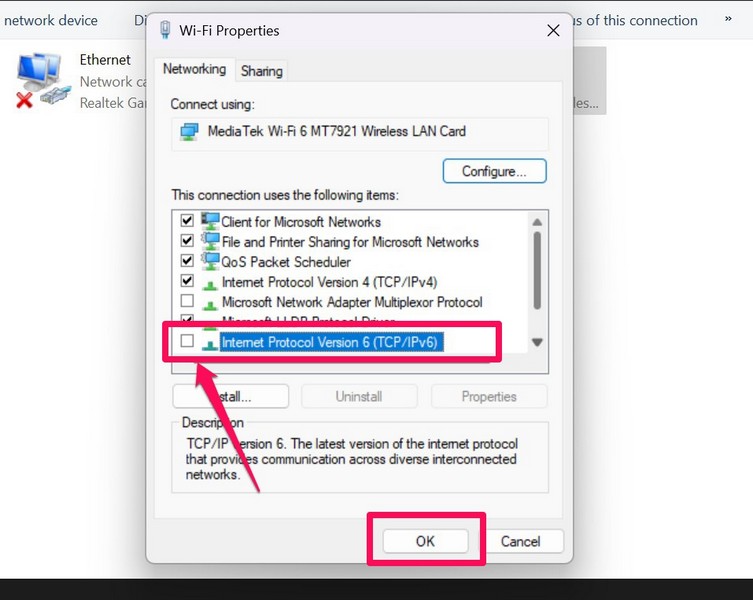
4. Click the OK button to close the Network Properties window and save your change.
5. Restart your Windows 11 PC or laptop.
Following the restart, check whether the issue with the DHCP has been fixed in Windows 11 or not. At this point, the issue with the DHCP should be fixed on your Windows 11 PC or laptop, and your internet should be up and running.
Frequently Asked Questions
What happens when DHCP stops working in Windows 11?
If DHCP stops working, you will need to manually configure their IP addresses, default route, and DNS server addresses, which could be tedious, and if not done right, you will not be able to connect to the internet in Windows 11.
Why is DHCP not enabled on my Windows 11 laptop/ PC?
Issues in router configuration, DHCP server, and/ or network adapters in Windows 11 might cause issues in the DHCP client, preventing it to work or automatically disabling it on a PC or laptop.
How to enable DHCP in Windows 11?
To enable DHCP in Windows 11, you must open the IPv4 Properties of your active network connection, and switch to the Automatic template for obtaining IP address and DNS server addresses.
Final Words
So, above are some of the best fixes that you can try to fix the DHCP not working issue in Windows 11. We hope one of the listed solutions works for you and you are able to get the internet up and running on your Windows 11 PC or laptop.
If this article helped you fix the issue, do let us know about it in the comments below. You can also check out our other in-depth guides on how to fix Windows 11-related issues from right here.
Реализация DI в PHP
Jason-Webb 13.05.2025
Когда я начинал писать свой первый крупный PHP-проект, моя архитектура напоминала запутаный клубок спагетти. Классы создавали другие классы внутри себя, зависимости жостко прописывались в коде, а о. . .
Обработка изображений в реальном времени на C# с OpenCV
stackOverflow 13.05.2025
Объединение библиотеки компьютерного зрения OpenCV с современным языком программирования C# создаёт симбиоз, который открывает доступ к впечатляющему набору возможностей. Ключевое преимущество этого. . .
POCO, ACE, Loki и другие продвинутые C++ библиотеки
NullReferenced 13.05.2025
В C++ разработки существует такое обилие библиотек, что порой кажется, будто ты заблудился в дремучем лесу. И среди этого многообразия POCO (Portable Components) – как маяк для тех, кто ищет. . .
Паттерны проектирования GoF на C#
UnmanagedCoder 13.05.2025
Вы наверняка сталкивались с ситуациями, когда код разрастается до неприличных размеров, а его поддержка становится настоящим испытанием. Именно в такие моменты на помощь приходят паттерны Gang of. . .
Создаем CLI приложение на Python с Prompt Toolkit
py-thonny 13.05.2025
Современные командные интерфейсы давно перестали быть черно-белыми текстовыми программами, которые многие помнят по старым операционным системам. CLI сегодня – это мощные, интуитивные и даже. . .
Конвейеры ETL с Apache Airflow и Python
AI_Generated 13.05.2025
ETL-конвейеры – это набор процессов, отвечающих за извлечение данных из различных источников (Extract), их преобразование в нужный формат (Transform) и загрузку в целевое хранилище (Load). . . .
Выполнение асинхронных задач в Python с asyncio
py-thonny 12.05.2025
Современный мир программирования похож на оживлённый мегаполис – тысячи процессов одновременно требуют внимания, ресурсов и времени. В этих джунглях операций возникают ситуации, когда программа. . .
Работа с gRPC сервисами на C#
UnmanagedCoder 12.05.2025
gRPC (Google Remote Procedure Call) — открытый высокопроизводительный RPC-фреймворк, изначально разработанный компанией Google. Он отличается от традиционых REST-сервисов как минимум тем, что. . .
CQRS (Command Query Responsibility Segregation) на Java
Javaican 12.05.2025
CQRS — Command Query Responsibility Segregation, или разделение ответственности команд и запросов. Суть этого архитектурного паттерна проста: операции чтения данных (запросы) отделяются от операций. . .
Шаблоны и приёмы реализации DDD на C#
stackOverflow 12.05.2025
Когда я впервые погрузился в мир Domain-Driven Design, мне показалось, что это очередная модная методология, которая скоро канет в лету. Однако годы практики убедили меня в обратном. DDD — не просто. . .
В статье рассказывается:
В статье рассказывается:
- Симптомы
- Диагностика на стороне клиента
- Диагностика на стороне сервера
-
Пройди тест и узнай, какая сфера тебе подходит:
айти, дизайн или маркетинг.Бесплатно от Geekbrains
Чтобы взаимодействовать с другими, каждому устройству в сети необходимо иметь четыре основные настройки на сетевом адаптере — IP-адрес, маску, шлюз по умолчанию и адреса DNS-серверов (хотя последнее на самом деле опционально). Есть два основных способа назначения сетевых настроек — статически (вручную) и динамически (автоматически по протоколу DHCP от DHCP-сервера).

Второй вариант чаще всего гораздо удобнее, ведь настройки не придётся прописывать руками. Но наверняка многим приходилось сталкиваться с ситуацией, когда клиентское устройство получает совершенно другой IP-адрес вместо корректных настроек от DHCP-сервера. И тогда очень важно понять, почему так происходит и как всё быстро исправить. В посте я расскажу об этом.
Симптомы
Обычно всё начинается с жалоб на неработающий интернет или отсутствие доступа к локальным сетевым ресурсам. Иногда достаточно провести диагностику только на стороне клиента, но может понадобиться полная диагностика и со стороны сервера в том числе. Начнём с первой опции.
Топ-30 самых востребованных и высокооплачиваемых профессий 2023
Поможет разобраться в актуальной ситуации на рынке труда
Подборка 50+ бесплатных нейросетей для упрощения работы и увеличения заработка
Только проверенные нейросети с доступом из России и свободным использованием
ТОП-100 площадок для поиска работы от GeekBrains
Список проверенных ресурсов реальных вакансий с доходом от 210 000 ₽
Уже скачали 34217
Диагностика на стороне клиента
Чтобы понять, что происходит, первым делом, конечно, следует проверить, подключён ли клиент физически к проводной или беспроводной сети. Если да, то самое время приступать к проверке сетевых настроек на устройстве клиента с помощью утилит ipconfig /all (в командной строке Windows), ifconfig или ip addr (в терминале Linux).
Вывод команд покажет текущий IP-адрес и другие настройки на сетевом адаптере (или всех адаптерах, если их несколько). При этом, если на сетевом адаптере нет корректного IP-адреса, возможных вариантов его настроек может быть немного.
Вариант 1. Текущий IP-адрес имеет вид 169.254.Х.Х
Скорее всего, на клиентской машине при этом установлена ОС Windows. Это значит, что клиенту действительно не удалось получить сетевые настройки, потому что DHCP-сервер не отвечал, и адрес был сгенерирован службой APIPA (Automatic Private IP Addressing) из диапазона 169.254.0.0 – 169.254.255.255. Если клиент — Linux-машина, адрес может принимать вид 0.0.0.0, либо отсутствовать в принципе.
Пожалуй, самое очевидное действие в такой ситуации — попытаться снова получить IP-адрес, отправив повторно DHCP-запрос, а заодно убедиться, что на устройстве запущен DHCP-клиент. Это можно сделать несколькими способами:
- отключиться от сети на 10–30 секунд и подключиться снова;
- перезагрузить устройство;
- выполнить последовательно команды. В командной строке Windows: ipconfig /release, затем ipconfig /renew. В терминале Linux: dhclient -v -r, потом dhclient или dhcpcd -k, затем dhcpcd ().
При выводе каких-либо ошибок и/или предупреждений нужно в первую очередь их устранить — например если DHCP-клиент не запущен, сперва его необходимо включить. После этого нужно снова проверить настройки. Если результат остался прежним, проверьте работоспособность сетевого драйвера и стека протоколов TCP/IP в целом. Проще всего это сделать с помощью команды ping 127.0.0.1 (так называемая проверка внутренней обратной петли). Если в результате выполнения команды ответ от собственного сетевого адаптера получен, можно считать диагностику на стороне клиента завершённой и переходить к диагностике со стороны DHCP-сервера.
Вариант 2. Текущий IP-адрес не из диапазона 169.254.0.0 – 169.254.255.255, но и не из того диапазона адресов, которые должен выдавать DHCP-сервер
Как известно, чудес не бывает. Если настройки, которые получает клиент, не от доверенного DHCP-сервера в сети, значит, их раздаёт кто-то другой. Тот, кто случайно или специально подключил к сети DHCP-сервер со своей конфигурацией. Возможно, это обычный Wi-Fi-роутер, к которому кабель по ошибке подключили через один из LAN-портов. Тогда ваша задача — найти недоверенный DHCP-сервер и предотвратить такие попытки в будущем.
Здесь нужно вспомнить, как работает DHCP-протокол. Клиент отправляет широковещательный запрос (DHCPDISCOVER), который получат все DHCP-серверы в сети и отправят в ответ свои предложения IP-адреса (DHCPOFFER). При этом клиент примет первое полученное предложение (DHCPOFFER), скорее всего, от ближайшего DHCP-сервера, а остальные отклонит.
Очевидно, что предложение от доверенного DHCP-сервера приходит позже, скорее всего, потому, что он дальше от клиента. Для последующей диагностики на устройстве клиента нужно установить анализатор сетевого трафика (Wireshark или tcpdump), запустить его, отфильтровав трафик по типу протокола DHCP или портам 67–68, и посмотреть в DHCP-ответах IP и MAC адрес DHCP-сервера, который их отправляет:

Дальше дело за малым. Во-первых, можно воспользоваться сервисом macvendors.com или аналогичным и по MAC-адресу определить производителя оборудования этого устройства. У Wireshark есть такая функция. Во-вторых, если есть управляемые коммутаторы в сети, найти по MAC, в какой порт какого коммутатора подключено это устройство. После нейтрализации недоверенного DHCP-сервера клиенту, скорее всего, удастся получить верные настройки. Для предотвращения таких инцидентов в будущем рекомендуется внедрить методы защиты от атак на DHCP на сетевом оборудовании.
Вариант 3. Текущий IP-адрес корректный, но доступа к интернету и другим сетевым ресурсам по-прежнему нет
Если это так, то стоит вернуться к проверке не только самого IP-адреса, но и всех остальных настроек. И особенно к проверке маски, адреса шлюза по умолчанию и адресов DNS-серверов, так как именно через шлюз устройству предстоит связываться с другими сетями, а с помощью DNS-серверов — преобразовывать доменные имена в IP-адреса.
Следует помнить, что DHCP-сервер может раздавать настройки выборочно, а сам клиент может выборочно их применять. Например, только IP-адрес, маску и шлюз. Это скорее исключение, но в таком случае адреса DNS придётся прописать руками. Гораздо хуже, если настройки адресов DNS-серверов от DHCP-сервера игнорируются просто потому, что их переопределяет стороннее ПО или неверные статические настройки. Такое тоже бывает.
Только до 19.05
Скачай подборку материалов, чтобы гарантированно найти работу в IT за 14 дней
Список документов:
ТОП-100 площадок для поиска работы от GeekBrains
20 профессий 2023 года, с доходом от 150 000 рублей
Чек-лист «Как успешно пройти собеседование»
Чтобы получить файл, укажите e-mail:
Введите e-mail, чтобы получить доступ к документам
Подтвердите, что вы не робот,
указав номер телефона:
Введите телефон, чтобы получить доступ к документам
Уже скачали 52300
Диагностика на стороне сервера;
Итак, диагностика на стороне клиента показала, что проблем не обнаружено. Независимо от реализации DHCP-сервера, теперь необходимо пошагово проверить ряд предположений, начиная с самых простых и очевидных.
Запущен ли DHCP как сервис?
В зависимости от ОС, дистрибутива и реализации DHCP-сервера, проверить это можно по-разному. Если сервис остановлен и есть ошибки в конфигурационных файлах, то запустить его не удастся. Это первая отправная точка. Если сервис запущен, можно переходить к следующему шагу.
Приходят ли запросы от клиентов на DHCP-сервер?
Чтобы определить это, нужно снова запустить анализатор сетевого трафика. На этот раз на сервере. После запуска на сервере tcpdump, dhcpdump или Wireshark клиенту, у которого проблемы с получением адреса, необходимо попытаться получить его снова любым способом, описанным в начале статьи. Если DHCP-сервер работает в штатном режиме, то должны быть и запросы, и ответы. Но всё может быть иначе.
Нет ни запросов, ни ответов?
Предположим, что у нас есть по крайней мере один клиент, которому не удаётся получить настройки, и запрос от него точно должен был прийти на сервер. Если этого не произошло, очевидно, что клиент либо сам не отправляет запрос, либо запрос не доходит до сервера по разным причинам. Может, он блокируется на промежуточном сетевом оборудовании или в сети некорректно работает ретрансляция DHCP-запросов dhcp_relay.
Чтобы это проверить, можно в первом случае вернуться к диагностике на стороне клиента и проследить с помощью анализатора сетевого трафика, что клиент отправляет DHCP-запрос. Во втором — проверить настройки на промежуточном сетевом оборудовании.
Запрос(ы) есть, ответа(ов) нет?
Самая простая и очевидная причина в этом случае — закончился пул свободных адресов. Это легко проверить на самом DHCP-сервере по списку выделенных IP-адресов (leases). Если причина действительно в этом — задумайтесь: возможно, пришло время для увеличения пула пригодных для использования IP-адресов на сервере.
Дарим скидку от 60%
на курсы от GeekBrains до 18 мая
Уже через 9 месяцев сможете устроиться на работу с доходом от 150 000 рублей
Забронировать скидку

.Чтобы решить проблему прямо сейчас, можно почистить список существующих адресов, выданных в аренду клиентам, уменьшить время аренды и перезапустить сервис DHCP. Но быстрые решения помогают не всегда, а причин может быть гораздо больше. В таком случае придётся детально просматривать логи, а также последние изменения в конфигурации на сервере.