You might face Windows 10 activation error 0x80072ee7 when you install any updates on your device. Unless you fix the root cause of the problem, you will be continuously annoyed with Windows 10 activation error 0x80072ee7. This error may appear in various situations, but the most conflicting reason is the presence of viruses or bugs. Since this error leads to performance issues in your computer, you have to consider it seriously and resolve the same as soon as possible. In the past, few users have stated that the same error occurred on their browsers. It’s completely a scam. If you guess any scam regarding the update, it is always recommended to run an antivirus scan on your Windows 10 computer before you proceed with anything. In another case, if you are confident that you are facing the following error, this troubleshooting guide will help you a lot.

Table of Contents
Following is the exact error code that you may face:
We can’t activate Windows on this device as our activation servers aren’t available right now. Make sure you’re connected to the Internet and we’ll automatically try to activate Windows when the service becomes available. Error code: 0x80072ee7
Here are some critical reasons that cause this Windows 10 activation error 0x80072ee7. You may face the discussed error under any of these circumstances.
- Missing or damaged files on PC.
- Corrupt programs.
- Virus or malware attack on PC.
- Incomplete or interrupted Windows Update Components in PC.
- Other background programs interfere with the updating process.
- Invalid Windows registry keys in PC.
- Antivirus program interference.
- Unstable internet connection.
- Improper Windows services.
- Corrupt components in Windows registry and file system.
- Adware components.
- Damaged Network Configuration.
- Outdated drivers.
In this guide, we have compiled a list of methods to resolve Windows activation error. The methods are arranged from simple to advanced steps so that you might attain faster results. Follow them in the same order as instructed below.
Ensure you create a restore point when something goes wrong.
Method 1: Basic Troubleshooting Steps
Before you follow the advanced troubleshooting methods, here are some basic fixes that will help you fix Windows activation errors.
- Restart PC.
- Check internet connection.
- Ensure you use a valid product key for Windows 10.
- Remove external USB devices.
- Run an Antivirus scan.
- Ensure your hard drive has enough space to install new updates.
Method 2: Run Windows Update Troubleshooter
If you cannot fix the issue, try running Windows Update troubleshooter. This inbuilt feature in Windows 10 PC helps you analyze and fix all the update errors like 0x80190001. See (How to Run Windows Update Troubleshooter).
Method 3. Sync Windows Date and Time
You must ensure whether the date and time settings synchronize to the world clock. To avoid error 0x80072ee7, make sure there are no incorrect date and time settings in Windows 10 PC.
1. Hit the Windows key and type Date & time settings and click on Open.

2. Select the Time zone from the drop-down list and ensure if it is your current geographic region.

3. Make sure the time and date match with the Universal time and date.
4. If there is any variation, fix it and check if you have resolved the problem.
Also Read: How to Fix Access is Denied Windows 10
Method 4: Clean Disk Space
To install Windows updates, your PC must have enough space in it. You can use the Free up space tool to clean space removing large junk files. Follow our guide on 10 ways to free up hard disk space on Windows 10.
Method 5: Repair Corrupt Files
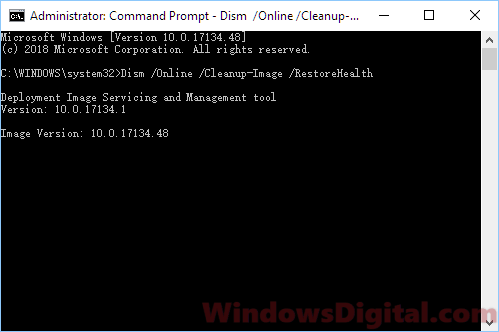
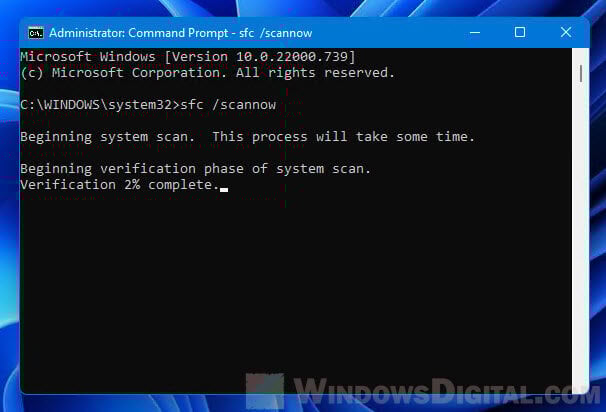
If you encounter 0x80072ee7 Windows 10, you may have corrupt files on your computer. Anyways, you have inbuilt features SFC (System File Checker) and DISM (Deployment Image Servicing and Management) in Windows 10 computer to scan and remove the harmful corrupt files. Read our guide to repair system files on Windows 10.
Method 6: Use Command Prompt
You can also fix Windows 10 update error 0x80072ee7 by using simple command lines. This is an effective troubleshooting method where you can resolve the error with simple commands.
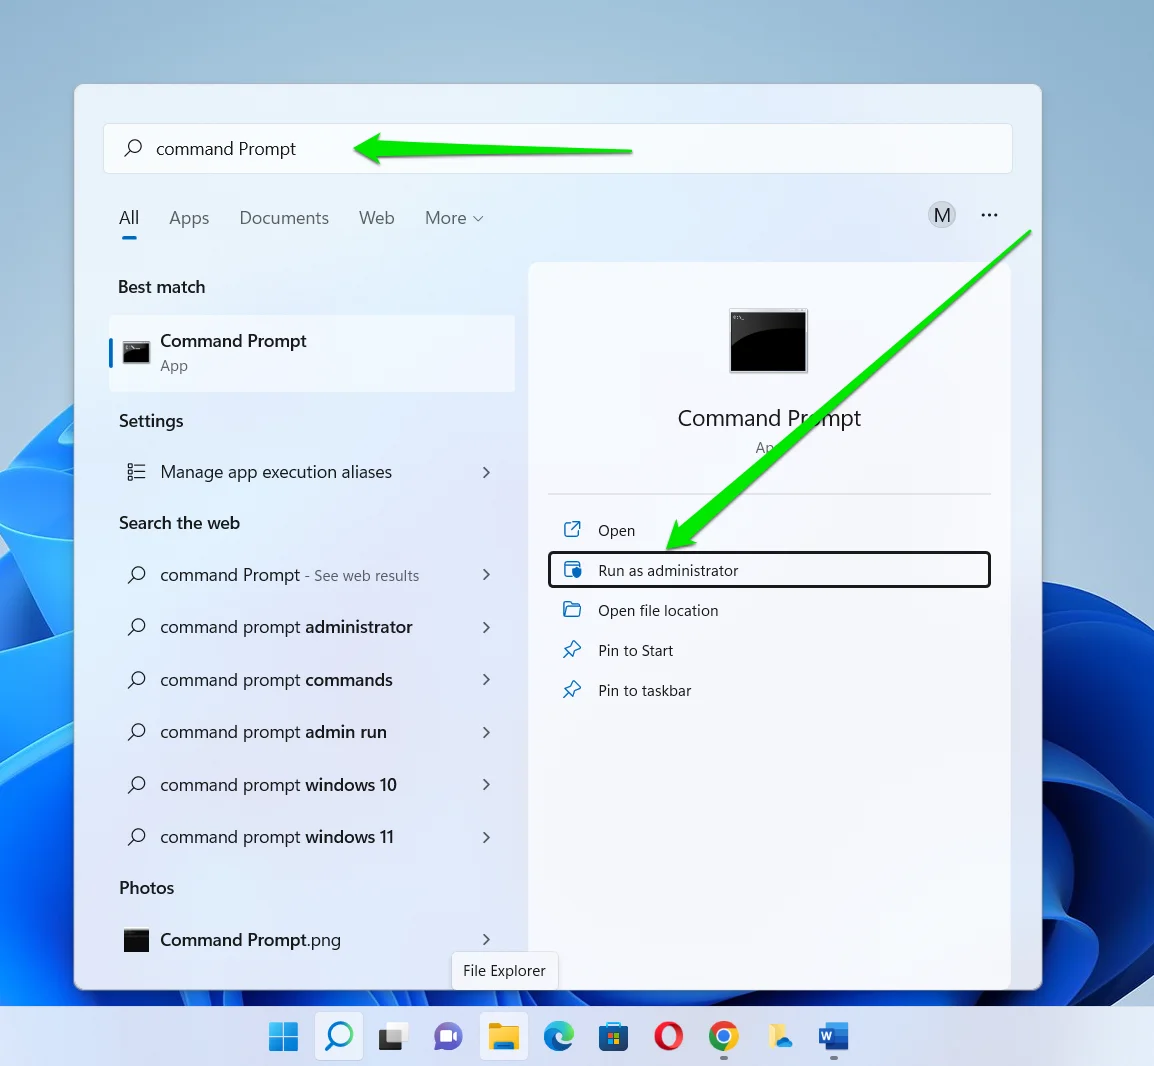
1. Hit the Windows key, type Command Prompt, and click on Run as Administrator.

2. Type the following commands one by one. Hit Enter after each command.
SC config wuauserv start= auto
SC config bits start= auto
SC config cryptsvc start= auto
SC config trustedinstaller start= auto

3. Once the commands are executed, reboot your PC.
Also Read: How to Fix Windows Update Error 80072ee2
Method 7: Enable Windows Update Services
To fix 0x80072ee7 Windows 10 error, check if Windows Update services are running. Here is how to do it.
1. Hit the Windows key and type Services and click on Run as administrator.

2. Scroll down and select Windows Update Services. Click on Properties
Note: You can also double-click on Windows Update Services to open the Properties window.

3. Set the Startup type to Automatic.

4. Finally, click on Apply and OK to save the changes. Check if you have fixed the issue.
Method 8: Disable Antivirus (Temporarily)
Windows 10 activation error 0x80072ee7 may take place due to antivirus interference. So, if you are using third-party antivirus software, then disable it temporarily. Read our guice to disable Antivirus temporarily on Windows 10.
Method 9: Use Google DNS
Several users have recommended that switching to Google DNS addresses has helped 0x80072ee7 Windows 10 solved. Follow our article on 3 ways to change DNS settings on Windows 10.
Method 10: Manually Download Updates
If none of these methods have worked out, try downloading the updates manually as instructed below.
1. Press the Windows + I keys together to open Settings in your system.
2. Select Update & Security.

3. Click on the View update history option.

4. In the list, note down the KB number that is pending to be downloaded due to an error message.
5. Here, type the KB number in the Microsoft Update Catalog search bar.

6. Follow the on-screen instructions to download and install the update manually.
Also Read: Fix Windows Update Error 0x800704c7
Method 11: Use Recovery Options
Recovery options will help you fix 0x80072ee7 Windows 10 error if you didn’t attain any solution even after manually deleting the files of the Software Distribution Folder.
1. Hit the Windows key and type Recovery options and click on Open.

2. In the Settings window, click on Restart now option under Advanced startup.

3. Now, your PC reboots. Click on Troubleshoot in the Choose an option window.
4. Click on Advanced options.

5. Click on Startup Settings.

6. Now, in the Startup Settings window, click on Restart.
7. When your PC restarts, you will see the below screen. Here, hit the F5 key on your keyboard to Enable Safe Mode with the Networking option.

8. Now, press and hold Windows + E keys together to open File Explorer. Navigate to the following location.

9. Select all the files in the Software Distribution folder and Delete them.

10. Reboot your PC and try updating the Windows Update.
Method 12: Reset Update Components
To resolve all update-related issues, there is an effective troubleshooting method, resetting Windows Update components. Follow our guide to reset windows update components on Windows 10.
Method 13: Perform a Cloud Reset
Performing a cloud reset will help you fix 0x80072ee7 Windows 10 activation error. Here is our guide to reset Windows 10 without losing Data.
Still, if you encounter this issue, then you could restore the system to its previous version. Restoring your computer to its previous state will give solutions for problems that cannot be solved at the software level. This will help you to solve the discussed Windows activation error for sure.
Recommended:
- How to Record Zoom Meeting Without Permission in Windows 10
- Fix Trusted Platform Module 80090016 Error in Windows 10
- Fix Windows 10 0xc004f075 Error
- Fix Bluetooth Driver Error in Windows 10
We hope that this guide was helpful and you have fixed Windows 10 activation error 0x80072ee7. Feel free to reach out to us with your queries and suggestions via the comments section below. Let us know which topic you want to learn next.
Ошибка активации 0×80072ee7 в Windows 10 и 11 часто вводит пользователей в заблуждение, так как возникает сразу после установки операционной системы. Эта ошибка может быть вызвана различными причинами, но чаще всего связана с отсутствием важных обновлений Windows.
Причины возникновения ошибки 0×80072ee7
- Недавно Установленная ОС: Если Windows была только что установлена, она может не содержать всех необходимых обновлений, которые требуются для успешной активации.
- Проблемы С Подключением к Серверам Активации: Иногда ошибка может возникать из-за проблем с сетью или доступом к серверам активации Microsoft.
- Системные Ошибки: В редких случаях, системные ошибки или повреждение файлов могут привести к появлению данной ошибки.
Решение проблемы
Шаг 1: Установка обновлений Windows
Одним из самых надежных способов исправления ошибки 0×80072ee7 является установка всех доступных обновлений Windows. Для этого:
- Откройте «Настройки» > «Обновление и безопасность».
- Нажмите «Проверить наличие обновлений» и установите все доступные обновления.
- После установки обновлений перезагрузите компьютер и попробуйте активировать Windows снова.
Шаг 2: Проверка сетевого соединения
Убедитесь, что ваше сетевое соединение стабильно и не блокирует доступ к серверам активации Microsoft. Иногда использование VPN или прокси может мешать процессу активации.
Шаг 3: Использование утилиты устранения неполадок
Windows предлагает встроенную утилиту для устранения неполадок активации:
- Откройте «Настройки» > «Обновление и безопасность» > «Устранение неполадок».
- Выберите «Активация» и следуйте инструкциям для запуска утилиты.
Шаг 4: Контакт со службой поддержки
Если ни один из перечисленных методов не помог, рекомендуется обратиться в службу поддержки Microsoft для получения дополнительной помощи.
Заключение
Ошибка 0×80072ee7 при активации Windows 10 и 11, хотя и может показаться сложной, чаще всего успешно решается путем установки всех необходимых обновлений. Важно помнить, что активация Windows — ключевой шаг для обеспечения безопасности и стабильной работы вашей системы. Надеемся, что эти советы помогут вам успешно активировать вашу копию Windows и насладиться всеми преимуществами, которые она предлагает.
Полезная статья?
Ваша оценка
поможет нам стать лучше
-
3
Товары из статьи
Table of contents
- What Is the Error 0x80072ee7?
- Why Am I Seeing the Error 0x80072ee7?
- Step-by-Step Solutions to Fix the Error 0x80072ee7
- Solution one: Check your internet connection
- Solution two: Run the Windows Update troubleshooter
- Solution three: Flush the DNS cache
- Solution four: Adjust your DNS servers
- Solution five: Temporarily disable your firewall and antivirus
- Solution six: Manually reset Windows Update components
- How to Fix the Windows Update Error 0x80072ee7 on Windows 10?
- FAQ
This is why it can be really frustrating to run into Windows update errors such as the error 0x80072ee7. This error can disrupt your system’s ability to download and install crucial updates, but with a systematic approach, overcoming this challenge is within reach.
What Is the Error 0x80072ee7?
The error 0x80072ee7 often comes up when Windows can’t connect to the update servers. This can happen because of network issues, server unavailability, or incorrect DNS settings. Let’s try to understand the error a bit better.
Why Am I Seeing the Error 0x80072ee7?
There may be several reasons for why the error 0x80072ee7 comes up on your screen:
- Network connectivity issues: Problems with your internet connection can prevent Windows from reaching the update servers.
- DNS configuration errors: Incorrect DNS settings can lead to Windows being unable to resolve the server addresses it needs to download updates.
- Firewall or antivirus interference: Security software might mistakenly block Windows Update services or related server communication.
- Corrupted Windows Update components: Damaged or corrupted files within Windows Update itself can cause this error.
- Server unavailability: Sometimes, the Windows Update servers themselves may be down or overloaded, leading to connectivity errors.
- Corrupted DNS cache: A corrupt DNS cache can prevent proper resolution of server addresses, causing update failures.
Step-by-Step Solutions to Fix the Error 0x80072ee7
There are several things you can do to fix the error 0x80072ee7. Here’s how to get started:
Solution one: Check your internet connection
The first step is as basic as it gets. Ensure your internet connection is stable and robust. Temporary connectivity issues can often be mistaken for more serious problems.
- Restart your router to refresh your connection.
- Try connecting to a different network to rule out network-specific issues.
Solution two: Run the Windows Update troubleshooter
Windows 10 comes with an array of troubleshooters designed to automatically fix common problems, including update errors .
- Go to Settings > Update & security > Troubleshoot.
- Select Windows Update and click Run the troubleshooter.
- Follow the prompts and let Windows address any detected issues.
Solution three: Flush the DNS cache
Corrupted DNS cache can lead to connectivity issues with Windows Update servers. Clearing the cache can resolve these issues.
Here’s your detailed guide on how to do this: Simple Guide: How to View and Clear DNS Cache on Windows 10/11?
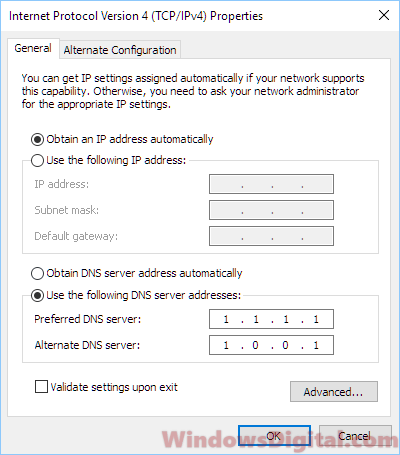
Solution four: Adjust your DNS servers
Sometimes, the default DNS servers provided by your ISP may have trouble connecting to Windows Update servers. Switching to a public DNS can help.
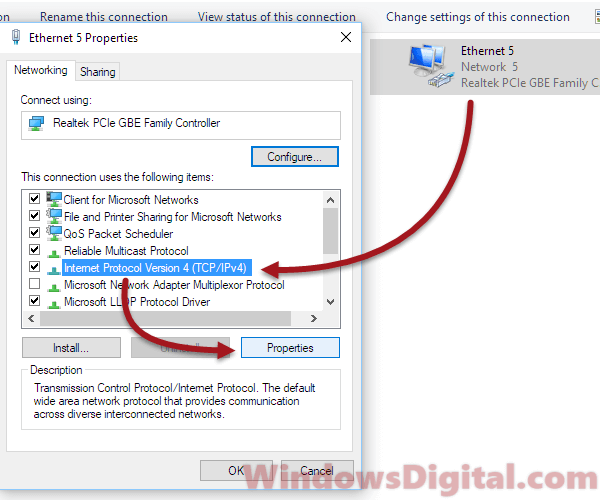
- Open Control Panel > Network and Sharing Center > Change adapter settings.