
What is Audio Device Manager?
Audio Device Manager is a program that allows you to manage the audio devices on your computer. It provides a centralized interface to view and control audio devices like speakers, headphones, microphones etc. that are connected to your computer 1.
The main functions of Audio Device Manager include:
- Viewing all connected audio input and output devices
- Setting default devices for playback and recording
- Configuring audio device properties and sound settings
- Updating audio drivers and troubleshooting audio issues
- Enabling/disabling devices
So in summary, Audio Device Manager provides a centralized interface to manage all your connected audio devices and adjust the audio settings on your computer.
Why Open Audio Device Manager?
The main reason to open the Audio Device Manager is to manage your computer’s audio devices and adjust the sound settings. This allows you to change the default playback and recording devices, update audio drivers, troubleshoot sound issues, and optimize the audio performance.
Some common reasons to use the Audio Device Manager include:
- Switching between different audio playback devices like speakers, headphones, or external devices (source)
- Changing the default microphone or recording device (source)
- Updating audio drivers to fix compatibility issues or improve performance
- Troubleshooting “no audio device installed” errors
- Adjusting sound enhancement features like equalization and spatial sound
Having easy access to manage audio devices and settings ensures you get the best audio experience on your computer.
Accessing Audio Device Manager in Windows
To open Audio Device Manager in Windows 10 or 11, follow these steps:
1. Click on the Start menu and select Settings (1).
2. Click on System.
3. Select Sound from the left sidebar.
4. Under the Input and Output sections, click Device properties.
5. This will open the Sound settings window. Go to the Related Settings section at the bottom.
6. Click on Sound Control Panel. This will open the classic Audio Device Manager.
Here you can view, manage, and configure all audio input and output devices connected to your Windows PC.
Accessing Audio Device Manager on Mac
On Mac computers, the Audio Device Manager can be accessed through the Audio MIDI Setup utility. Here are the steps to open Audio Device Manager on Mac OS:
1. Click on the Apple menu in the top left corner of the screen and select “System Preferences”.
2. In the System Preferences window, click on the “Sound” icon.
3. In the Sound settings, switch to the “Output” tab. Click on the “Open Sound Preferences…” button at the bottom. This will open the Audio MIDI Setup utility.
4. In Audio MIDI Setup, go to the menu bar at the top and click on “Window”. Select “Show Audio Devices” from the drop-down menu.
5. This will open the Audio Devices window, which allows you to view, configure and manage all audio devices connected to your Mac.
6. Here you can change default audio devices, modify device settings, update drivers and troubleshoot audio issues on your Mac.
So in summary, the Audio Device Manager on Mac can be accessed through the Audio MIDI Setup utility’s Audio Devices window, by going to System Preferences > Sound > Open Sound Preferences and then Show Audio Devices in Audio MIDI Setup.
Source: https://support.apple.com/guide/audio-midi-setup/audio-devices-window-ams1010/mac
Using Audio Device Manager on Linux
On Linux, the default audio device manager is called PulseAudio Volume Control, or pavucontrol for short. Pavucontrol allows you to manage audio devices and direct audio streams on Linux systems using the PulseAudio sound server.
To open pavucontrol on most Linux distributions like Ubuntu and Linux Mint, you can search for it in the app menu or launch it by typing “pavucontrol” at the command line. On Arch Linux, you may need to install it first by typing “sudo pacman -S pavucontrol”.
Once launched, pavucontrol provides an intuitive graphical interface to change default input and output devices, adjust volume levels, redirect audio to different outputs, configure audio profiles, and more. It’s a powerful tool for managing all aspects of audio on Linux. This source provides an in-depth look at using pavucontrol on Linux.
There are also various command line utilities that can change default audio devices and settings as well, such as pactl, alsa and amixer. However, pavucontrol offers a more full-featured and user-friendly management experience for daily audio needs on the Linux desktop.
Changing Default Audio Devices
Windows allows you to configure separate default playback and recording devices. This means you can set your speakers as the default playback device for music and videos, while setting your microphone as the default recording device for calls and voice recordings.
To change the default playback device in Windows 10:
- Open the Start menu and select Settings > System > Sound.
- Under Choose your output device, select the speaker or headphones you want to set as the default playback device.
As per this guide, this will set your selected output as the default for playing audio in Windows.
To change the default recording device:
- Go to Settings > System > Sound.
- Under Choose your input device, select the microphone or other input you want as your default.
This will set the chosen device as the default for recording audio and voice calls in Windows, as explained in this tutorial.
You can switch between audio devices as needed, but setting explicit defaults ensures your preferred playback and recording devices are used automatically for most applications.
Updating Audio Drivers
Keeping your audio drivers up-to-date is important for maintaining optimal audio performance on your computer. Outdated drivers can cause a variety of issues like crackling sounds, no audio output, and errors connecting headphones or speakers.
Windows, Mac, and Linux operating systems include tools to help check for and install the latest available audio drivers. On Windows 10 and 11, you can use Device Manager to update drivers manually. Simply right-click on your audio device, select “Update driver”, and follow the prompts to search online and install an updated version (Microsoft Support).
You can also try dedicated driver update utilities like Driver Booster or Driver Easy to identify outdated drivers and streamline the update process. These tools can automatically find and download the latest audio drivers from your hardware manufacturer.
On Mac computers, check for available audio driver updates using the Software Update utility. Linux users can update ALSA audio drivers through most package managers like APT or Yum.
Updating audio drivers regularly can prevent a range of sound issues, ensuring you have the best listening experience on your computer.
Troubleshooting Audio Issues
Audio issues like no sound, static, crackling, or distorted audio can often be fixed by trying some basic troubleshooting steps. Here are some common fixes for audio problems:
Check physical connections – Make sure speakers, headphones, and audio cables are properly plugged in. Loose connections can cause various audio issues. Reconnect any loose cables or try different cables if possible.
Restart computer – Simply restarting your computer can fix temporary software glitches causing sound problems.
Check default devices – Open Audio Device Manager and confirm that the correct speakers/headphones are set as the default playback device. An incorrect default can result in no audio output.
Update audio drivers – Outdated, corrupt, or missing audio drivers are a common cause of audio problems. Open Audio Device Manager, select your audio device, and check for driver updates [1].
Run audio troubleshooter – Windows, Mac, and Linux have built-in troubleshooting tools that can automatically detect and fix common audio issues [2].
Optimizing Sound Settings
To get the best audio performance on your Windows PC, it helps to optimize the sound settings. Here are some tips for tweaking sound settings:
Go to Control Panel > Sound and check that your intended audio device is set as the default device for playback and recording. Make sure enhancements like “Equalizer” and “Spatial Sound” are disabled as they can negatively impact audio performance (Presonus).
Open Sound Settings in Windows and disable audio enhancements like “Equalizer” and “Spatial Sound.” Turning these off reduces processing overhead for optimal audio playback and recording (Audinate).
Go to Power Options and choose the “High Performance” power plan. This prevents the CPU from throttling down and maintains full processing power for audio tasks.
Consider using the BIOS to disable onboard audio if you use an external audio interface, as this reduces usage of system resources.
By optimizing these sound settings, you can achieve lower audio latency, less glitches and improve overall system performance for audio applications.
Conclusion
Audio Device Manager allows you to configure and manage the audio devices on your computer. Whether you want to change the default playback or recording device, update the audio drivers, or troubleshoot issues you’re experiencing, Audio Device Manager is the central place to control all your audio settings.
Across Windows, Mac, and Linux operating systems, you can open Audio Device Manager through the system settings or control panel. Once inside, you’ll find various options to update drivers, select new default devices, configure sound enhancements, manage audio permissions, and test that everything is working properly.
Optimizing your audio setup can improve the quality and reliability of sound on your computer. But if issues arise, tools within Audio Device Manager help diagnose and fix many common problems. With robust audio device management being so accessible, you can enjoy great audio performance on any computer.
When it comes to troubleshooting sound issues on your computer, one of the first steps is to locate the audio settings in the Device Manager. However, finding this specific option may not be as straightforward as it seems. In this quick guide, we will explore different methods that can help you easily locate and access the sound settings in the Device Manager, ensuring a hassle-free experience in adjusting your audio preferences.
Understanding The Device Manager And Its Importance In Managing Audio Settings
The Device Manager is a vital tool for managing various hardware components on your computer, including audio settings. It plays a crucial role in providing control and troubleshooting capabilities for audio devices.
By accessing the Device Manager, you can easily view all the installed audio devices on your system. This allows you to identify any potential issues, such as disabled or outdated audio drivers, which can impact sound performance.
Furthermore, the Device Manager helps users troubleshoot audio problems by providing detailed error information and the ability to disable or enable specific devices. This can help in diagnosing and resolving common sound issues, such as audio distortion or no sound output.
Understanding the Device Manager’s importance in managing audio settings allows users to take full advantage of the features it offers. By harnessing the power of this tool, you can optimize your audio experience, enhance sound quality, and ensure proper functionality of audio devices on your computer.
Navigating The Device Manager: Where To Find Audio Settings
Navigating the Device Manager may seem overwhelming at first, but it is essential to locate audio settings and make necessary changes. To access audio settings, follow these steps:
1. Open the Device Manager: Press Windows key + R to open the Run dialog box. Type “devmgmt.msc” and hit Enter, or click on the OK button.
2. Locating the audio devices: Once the Device Manager window appears, scroll down and look for the “Sound, video and game controllers” category.
3. Expand the category: Double-click on the category to expand it. Here, you should be able to see audio devices such as speakers, headphones, and microphones.
4. Access audio properties: Right-click on the specific audio device you want to configure and select “Properties” from the context menu.
5. Customizing audio settings: In the properties window, you’ll find various tabs such as General, Driver, and Details. Each tab provides specific options for managing audio settings. You can update drivers, enable/disable devices, adjust volumes, and perform other necessary configurations from these tabs.
6. Apply changes: After making the desired changes, click on the “OK” or “Apply” button to save and apply the settings.
By following these steps, you can easily navigate the Device Manager and locate audio settings to make necessary adjustments for your sound devices.
Checking For Disabled Or Outdated Audio Devices In The Device Manager
When troubleshooting audio issues, one of the first steps is to check for disabled or outdated audio devices in the Device Manager. Sometimes, an audio device may be disabled, preventing it from functioning correctly. Other times, the audio device may be outdated, which can cause compatibility issues and result in poor sound quality.
To locate disabled or outdated audio devices in the Device Manager, simply open the Device Manager by right-clicking on the Start menu and selecting “Device Manager” from the list. Once the Device Manager opens, expand the “Sound, video and game controllers” category.
In this category, you will find a list of audio devices installed on your computer. Look for any devices with a yellow exclamation mark or a downward arrow. These symbols indicate disabled or outdated devices. To enable a disabled device, right-click on it and select “Enable.” To update an outdated device, right-click on it and select “Update Driver.”
By checking for disabled or outdated audio devices in the Device Manager, you can ensure that your sound settings are optimized and that you are experiencing the best possible audio performance on your computer.
Troubleshooting Audio Issues Using The Device Manager
When it comes to troubleshooting audio issues on your computer, the Device Manager can be a valuable tool. This powerful feature in Windows allows you to identify and resolve any problems with your audio devices quickly.
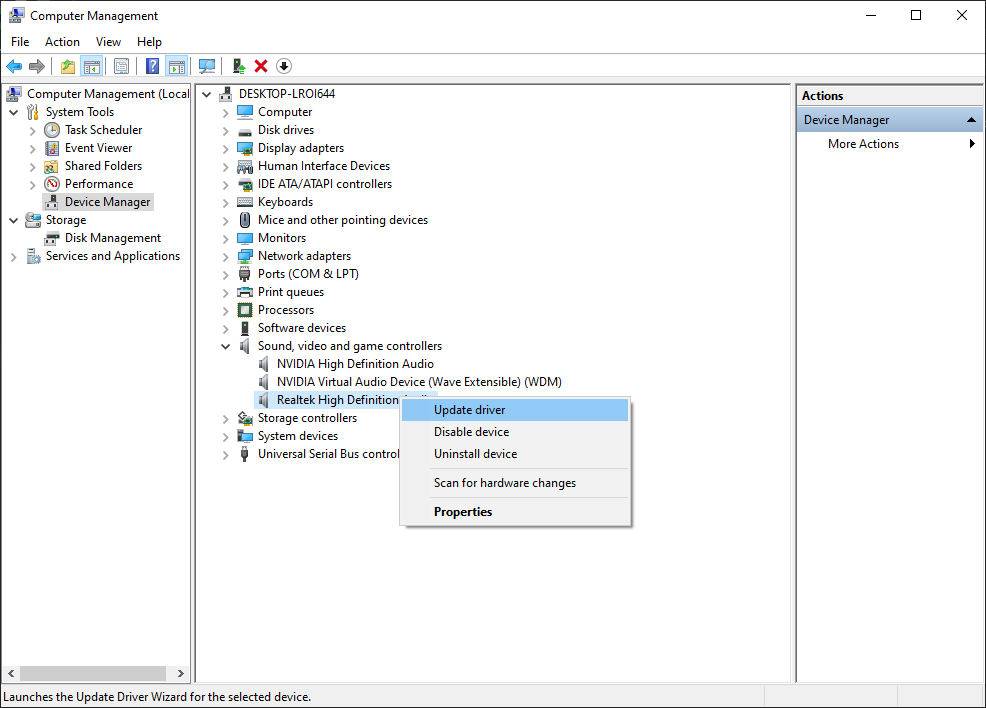
To begin troubleshooting, open the Device Manager by right-clicking on the Start menu and selecting “Device Manager” from the list of options. Once the Device Manager window opens, navigate to the “Sound, video, and game controllers” category.
Here, you will find a list of all the audio devices installed on your computer. Look for any devices with a yellow exclamation mark or a red “X” icon. These symbols indicate that there is a problem with the device.
To fix the issue, right-click on the problematic device and select “Update driver.” You can choose to either let Windows search for the latest driver automatically or browse your computer and select a specific driver file. Windows will then update the driver for that device, resolving any issues that may have been causing audio problems.
If updating the driver doesn’t solve the problem, you can also try uninstalling the device and then restarting your computer. This will trigger Windows to reinstall the audio driver automatically.
By utilizing the troubleshooting capabilities of the Device Manager, you can easily pinpoint and resolve audio issues on your computer, ensuring a smooth and hassle-free audio experience.
Updating Audio Drivers Through The Device Manager For Improved Sound Performance
Updating audio drivers can significantly enhance the sound performance of your device. Outdated drivers can lead to various audio issues such as crackling sound, low volume, or even no sound at all. Fortunately, the Device Manager provides an easy and convenient way to update audio drivers.
To update audio drivers through the Device Manager, follow these steps:
1. Open the Device Manager by right-clicking on the Start button and selecting “Device Manager” from the menu.
2. Expand the “Sound, video and game controllers” category by clicking on the arrow next to it.
3. Right-click on the audio device you wish to update and select “Update Driver.”
4. In the pop-up window, choose the option to search automatically for updated driver software.
5. Windows will now search for the latest driver software and install it automatically if available.
It’s important to have an active internet connection during this process. If Windows cannot find an updated driver, you can also visit the manufacturer’s website to download and install the latest driver manually.
By regularly updating audio drivers, you can ensure your device has the latest improvements and compatibility for optimal sound performance.
Configuring Playback And Recording Devices In The Device Manager:
Configuring playback and recording devices is an essential step when it comes to customizing your audio experience. In the Device Manager, you can easily access these settings and make adjustments according to your preferences.
To configure playback devices, simply go to the Device Manager and select the “Sound, video, and game controllers” category. Here, you will find a list of audio devices connected to your computer. Right-click on the desired device and select “Properties.” In the properties window, you will see various tabs, including “General,” “Levels,” “Enhancements,” and “Advanced.” These tabs allow you to control audio volume, enable or disable audio enhancements, and adjust advanced settings like sample rate and bit depth.
To configure recording devices, follow the same procedure. In the Device Manager, navigate to the “Sound, video, and game controllers” category and locate the recording device you want to configure. Right-click on it and select “Properties.” In the properties window, you will find tabs like “General,” “Listen,” “Levels,” “Enhancements,” and “Advanced.” These tabs provide options to adjust recording volume, enable or disable listening to the device, apply enhancements, and modify advanced settings.
By configuring playback and recording devices in the Device Manager, you can ensure optimal audio performance and tailor the sound settings to suit your needs.
Adjusting Sound Settings And Enhancements Through The Device Manager
Adjusting sound settings and enhancements through the Device Manager is crucial for optimizing audio performance on your computer. By making proper adjustments, you can enhance the quality of sound output and customize audio settings according to your preferences. Here’s a brief overview of how to adjust sound settings and enhancements through the Device Manager.
First, open the Device Manager by right-clicking on the Start menu and selecting “Device Manager” from the options. Once the Device Manager window opens, locate the “Sound, video and game controllers” category and expand it.
Under this category, you will find your audio devices such as the sound card or integrated audio. Right-click on your audio device and select “Properties” from the context menu.
In the properties window, navigate to the “Enhancements” tab. Here, you will find various audio enhancements options that can improve the sound quality. These options may include equalizers, virtual surround sound, loudness equalizations, and more.
To enable an enhancement option, simply check the box next to it. You can also adjust the settings of each enhancement option to fine-tune the audio output. Keep in mind that the available options may vary depending on your audio device and driver.
Once you have made the desired adjustments, click “Apply” and then “OK” to save the changes. You can now enjoy improved sound quality and customized audio settings on your computer.
Advanced Audio Settings In The Device Manager: Exploring Additional Options And Features
When it comes to managing audio settings on your device, the Device Manager offers more than just the basic features. In this section, we will delve into the advanced audio settings that can enhance your sound experience.
One of the notable advanced options you can explore in the Device Manager is the ability to adjust the audio format. By modifying the audio format, you can optimize it for different scenarios, such as virtual surround sound for gaming or high-fidelity audio for music production.
Another powerful feature is the ability to assign different audio outputs to specific applications. This means you can direct audio from a particular program to a specific device, allowing you to create a personalized audio setup tailored to your preferences.
Furthermore, the Device Manager allows you to enable and configure audio enhancements. These enhancements include options like virtual sound positioning, bass boost, and room correction. By fine-tuning these settings, you can customize your audio to suit your listening environment and personal taste.
Lastly, the Device Manager provides access to additional audio-related features, such as the ability to set microphone levels, adjust sample rates, and enable exclusive mode, which allows certain applications to take full control of the audio device.
By exploring these advanced audio settings in the Device Manager, you can take full control of your sound experience and ensure that it matches your specific requirements.
Frequently Asked Questions
1. Where can I find the Audio settings in Device Manager?
Answer: To locate the Audio settings in Device Manager, follow these steps: Go to the Start menu and type “Device Manager.” Open the Device Manager from the search results. Look for the “Sound, video and game controllers” category, and click on it to expand the options. Here you will find the audio devices listed.
2. Why can’t I see the Audio options in Device Manager?
Answer: If you are unable to see the Audio options in Device Manager, there could be a few reasons. Firstly, ensure that you have administrative privileges on your computer, as non-admin users may not have access to Device Manager. Secondly, check if your audio drivers are installed and up to date. If the drivers are missing or outdated, the audio options may not be visible. Lastly, in some cases, if your computer does not have a dedicated audio card, it may not show audio options in Device Manager.
3. How can I update my audio drivers in Device Manager?
Answer: To update your audio drivers in Device Manager, you can follow these steps: Open Device Manager by typing “Device Manager” in the Start menu search bar. Expand the “Sound, video and game controllers” category. Right-click on your audio device and select “Update driver.” You will then have the option to search automatically for updated driver software. If an update is available, Windows will download and install it. Alternatively, you can visit the manufacturer’s website and manually download the latest audio drivers compatible with your operating system.
Wrapping Up
In conclusion, locating sound settings in the Device Manager is a relatively quick and straightforward process. By following the steps outlined in this guide, users can easily navigate through the Device Manager to find and adjust audio settings according to their preferences. It is important to note that the exact location of sound settings may vary depending on the operating system, but with a little patience and exploration, users can successfully locate and modify their audio settings to enhance their overall multimedia experience.
Introduction
Navigating through the digital space, audio output is a crucial element that enhances our interactive experience on Windows 10/11. However, encountering the “No Audio Device Installed or Found” error can throw us off balance, hindering our smooth sail through the digital sphere. Fear not! This piece serves as a beacon, guiding you through a step-by-step method to resolve this common but vexing issue. By the end of this tutorial, the sweet sound of resolution will echo through your speakers, marking a victorious end to the silence imposed by this error. So, let’s march forward and reclaim the audio realm that rightfully belongs to us!
Check Windows Audio Services
We’ll start by checking if the Windows Audio service is running properly:
-
Click on the
Start Menu(the little windows icon on the bottom left corner of your screen), typeservices, and then pressEnter. -
A new window will open showing a list of services. Look for
Windows Audioin this list. You can press the letterWon your keyboard to quickly jump to services starting with the letter W. -
Once you find
Windows Audio, right-click on it and selectProperties. -
In the new window, look for
Startup Typeand make sure it is set toAutomatic. -
Also, check if the
Service statusisRunning. If not, click on theStartbutton. -
Click
Applyand thenOKto save any changes.

Windows Services Manager > Windows Audio Properties
Check Realtek Audio Service
Now, we’ll check another service:
-
In the same list of services, press the letter
Ron your keyboard to findRealtek Audio Universal Service. -
Right-click on
Realtek Audio Universal Serviceand selectProperties. -
Make sure the
Startup Typeis set toAutomaticand theService statusisRunning. -
Click
Applyand thenOKto save any changes.
Now, try playing a sound to see if enabling these two services has fixed the audio issue on your PC.
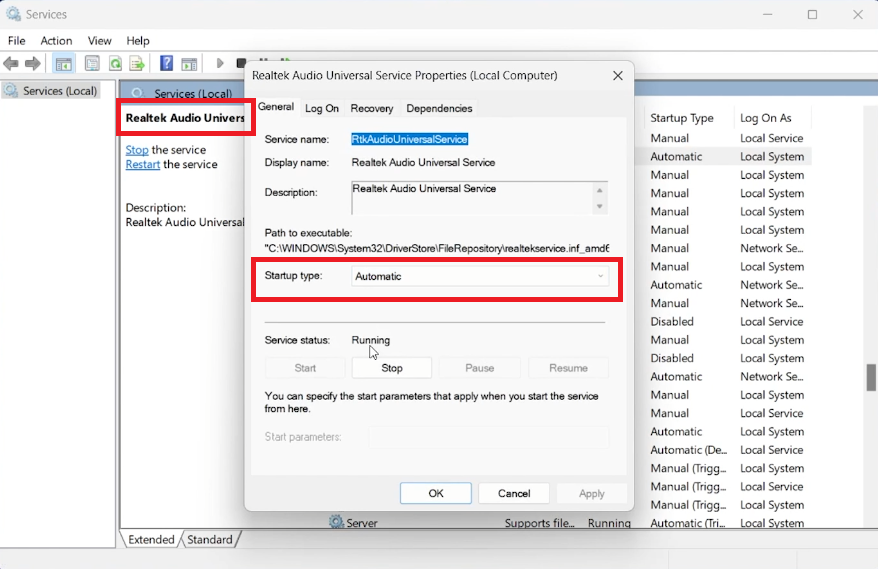
Windows Services Manager > Realtek Audio Universal Service Properties
Check for Updates
It’s possible that a new Windows update might have changed the drivers on your PC. Let’s check if there are any new updates:
-
Click on the
Start Menuand typeSettings, then pressEnter. -
Go to
Windows Updatesettings. -
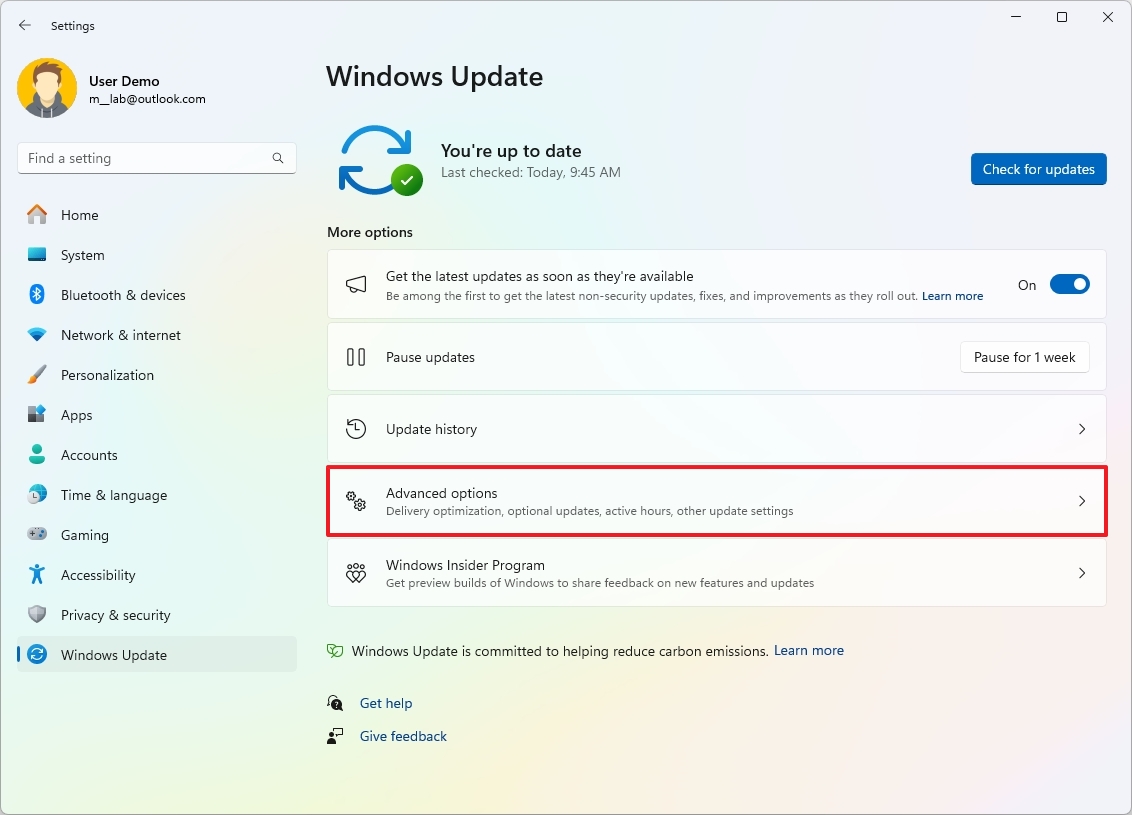
Click on
Advanced Options. -
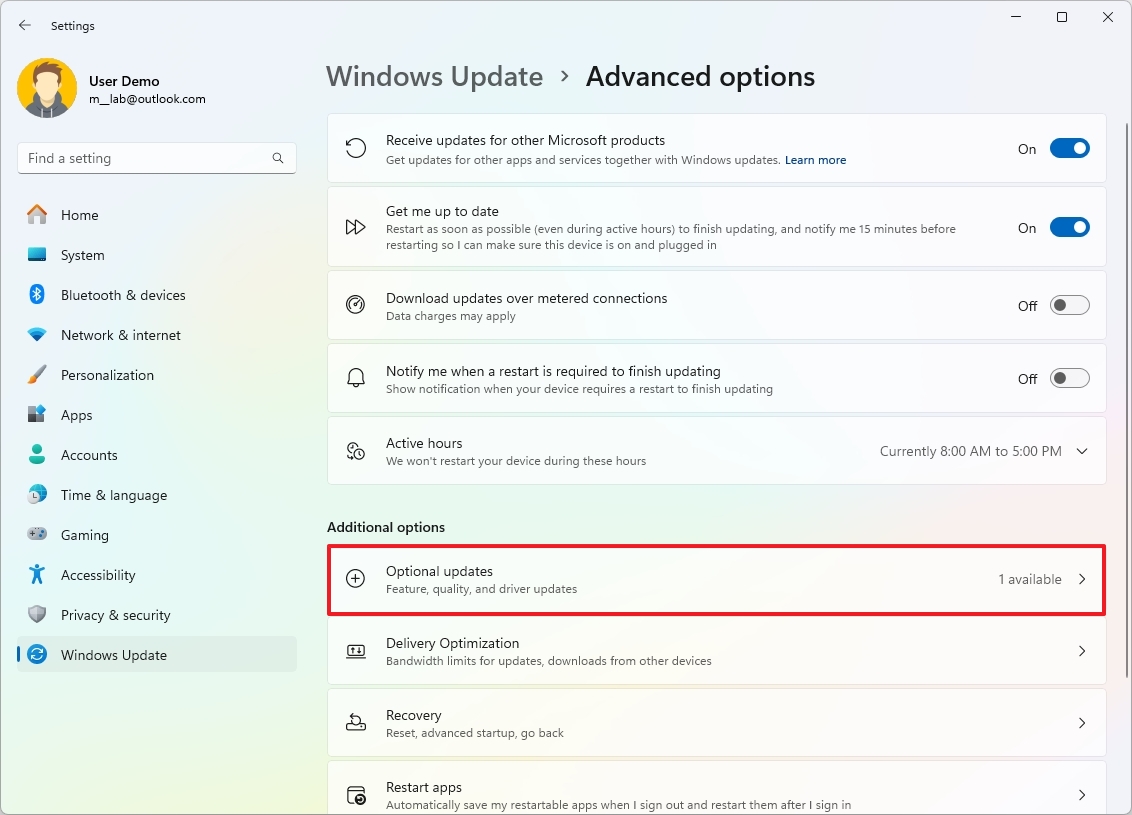
Under
Additional Options, find the section calledOptional Updates. Click on it to see if there are any available updates. -
Download any updates you find, especially if they are related to audio.
After the updates are installed, restart your PC to see if the audio issue is resolved.

Windows Update > Advanced Options > Optional Updates
Update Audio Driver in Device Manager
If the problem is still there, let’s check the audio drivers:
-
Click on the
Start Menu, typeDevice Manager, and pressEnter. -
In the Device Manager window, find and expand the
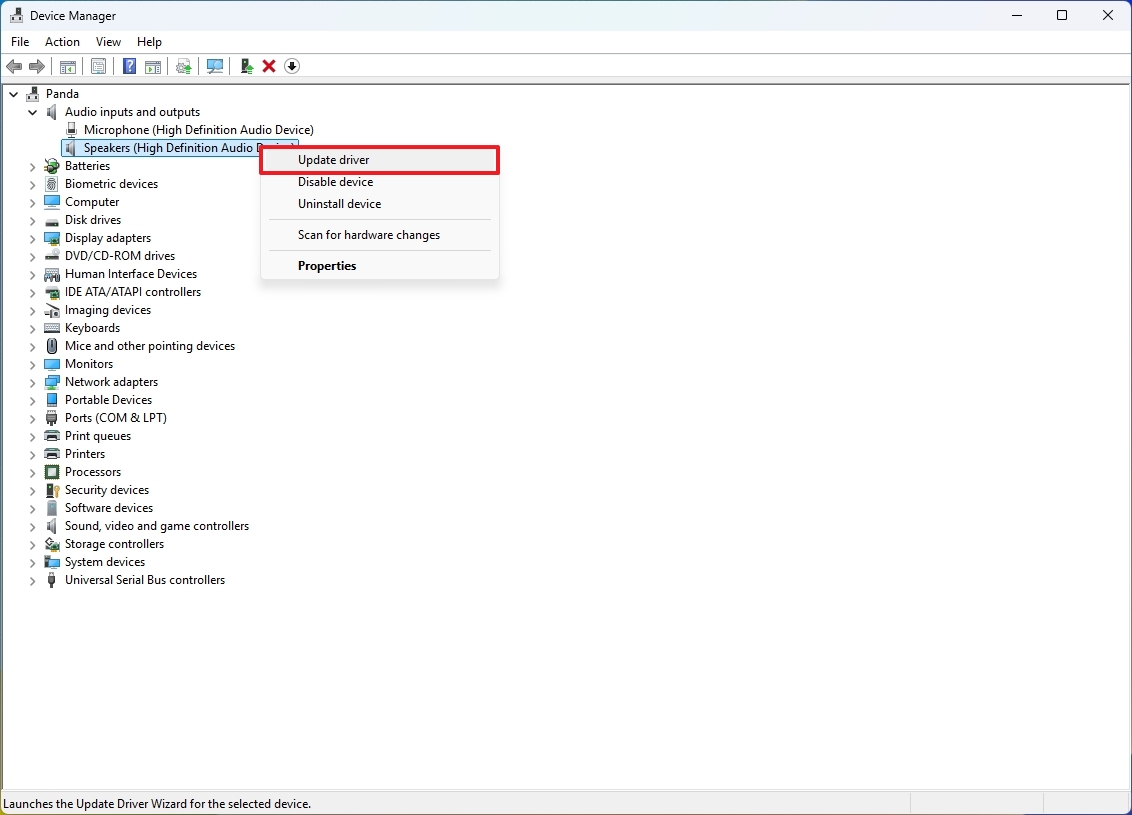
Audio Inputs and Outputssection. -
Right-click on your audio output device listed there, and select
Update Driver. -
Choose
Search automatically for updated driver softwareand wait for the process to complete.
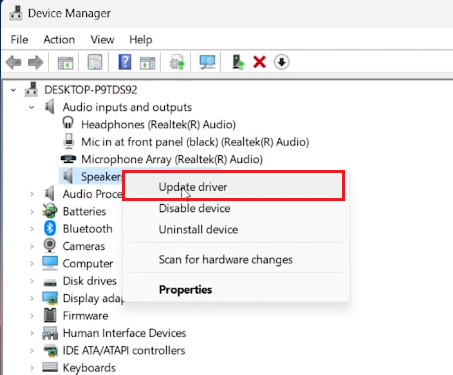
Device Manager > Audio inputs and outputs > Update Driver
Enable Audio Device
If the audio device is disabled, you can enable it easily:
-
In the same
Device Managerwindow, right-click on your audio device underAudio Inputs and Outputs. -
Select
Enable Devicefrom the menu. -
If your audio device isn’t showing, check the connections. If it’s a USB device, try a different USB port. If it’s a Bluetooth device, pair it again with your PC.
Reinstalling Audio Driver
Sometimes the audio driver might need a fresh install to work properly. Here’s how you do it:
Step 1: Check Your Audio Device
-
Go to the
Device Manager(you can find it in theStart Menu). -
Look for
Sound, Video, and Game Controllersand click on it to see the devices. -
Find your audio device in the list. If it’s disabled, right-click on it and select
Enable Device.
Step 2: Update Driver
-
Right-click on your audio device again, but this time select
Update Driver. -
Choose
Search automatically for updated driver softwareto find and install any new drivers.
Step 3: Reinstall Driver
If the issue still isn’t fixed:
-
Right-click on your audio device in the
Device Manager. -
Select
Uninstall devicefrom the menu. -
A new window will pop up asking for confirmation, click
Uninstall. -
After uninstalling, restart your PC.
When your PC starts again, it will automatically look for and install the missing audio driver. This step often fixes the «No Audio Device Installed or Found» error on Windows PCs.
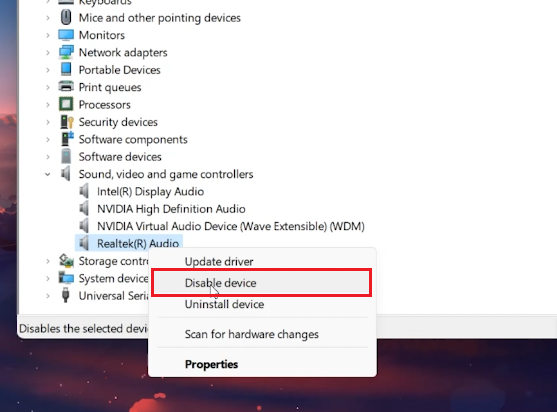
Device Manager > Audio Device > Disable Device
Troubleshoot Your Audio Issues with PassFab FixUWin
Encountering the ‘No Audio Device Installed or Found’ error on Windows 10 or 11 can be a major setback, especially if you rely on your PC for entertainment or work. PassFab’s FixUWin application offers a robust solution for this and other Windows-related issues. Capable of diagnosing and rectifying over 200 common problems, including audio device errors, FixUWin is an essential tool for any Windows user. It ensures that your system’s audio capabilities are running smoothly, thus enhancing your overall experience on Windows. Whether it’s driver conflicts or system errors causing the issue, FixUWin is designed to get to the root of the problem and provide an effective fix.

-
This error often occurs due to issues with your audio drivers or Windows services. The article guides you through various steps to resolve this issue including checking Windows audio services, updating drivers, and reinstalling audio drivers.
-
Navigate to the Windows Services Manager, locate Windows Audio and Realtek Audio Universal Service, ensure both are set to Automatic and are currently Running.
-
Use the Device Manager to locate your audio device under Sound, Video, and Game Controllers, right-click on it, select Update Driver, and follow the prompts to search for and install updated drivers automatically.
-
Right-click on the disabled audio device and select Enable Device. If it’s not appearing, ensure it’s properly connected or try switching USB ports or re-pairing for Bluetooth devices.
-
In the Device Manager, right-click on your audio device, select Uninstall device, confirm the action, and restart your PC. Upon restarting, Windows will automatically reinstall the missing drivers.
Affiliate Disclosure: This section contains affiliate links. By using these links to get PassFab’s FixUWin, you’re not only solving your audio issues but also supporting our website, all at no extra cost to you.
(Image credit: Mauro Huculak)
On Windows 11, you can make sure that the audio device drivers are up-to-date in more than one way, and in this guide, I will outline the steps to complete this configuration.
It’s not a secret that ensuring that device drivers are critical for the functionality of the hardware installed on your computer. In the case of the audio card, maintaining the drivers updated will ensure compatibility, and it helps fix common issues, such as crackling noises, sudden volume drops, or even complete audio failure.
If you want to update the drivers for the audio card on your computer, Windows 11 offers at least two ways to complete this task, including using the Settings app and Device Manager. You can also reinstall the drivers, which refreshes the current installation, a method that can help fix common issues.
In this how-to guide, I will show you the different ways to ensure you have the latest audio drivers on your Windows 11 device.
How to update audio drivers from Settings
To manually update the audio drivers on Windows 11, use these steps:
- Open Settings.
- Click the Windows Update.
- Click the Advanced options page.
- Click the Optional updates setting under the «Additional options» section.
- Click the Driver updates setting.
- Check the audio driver update available.
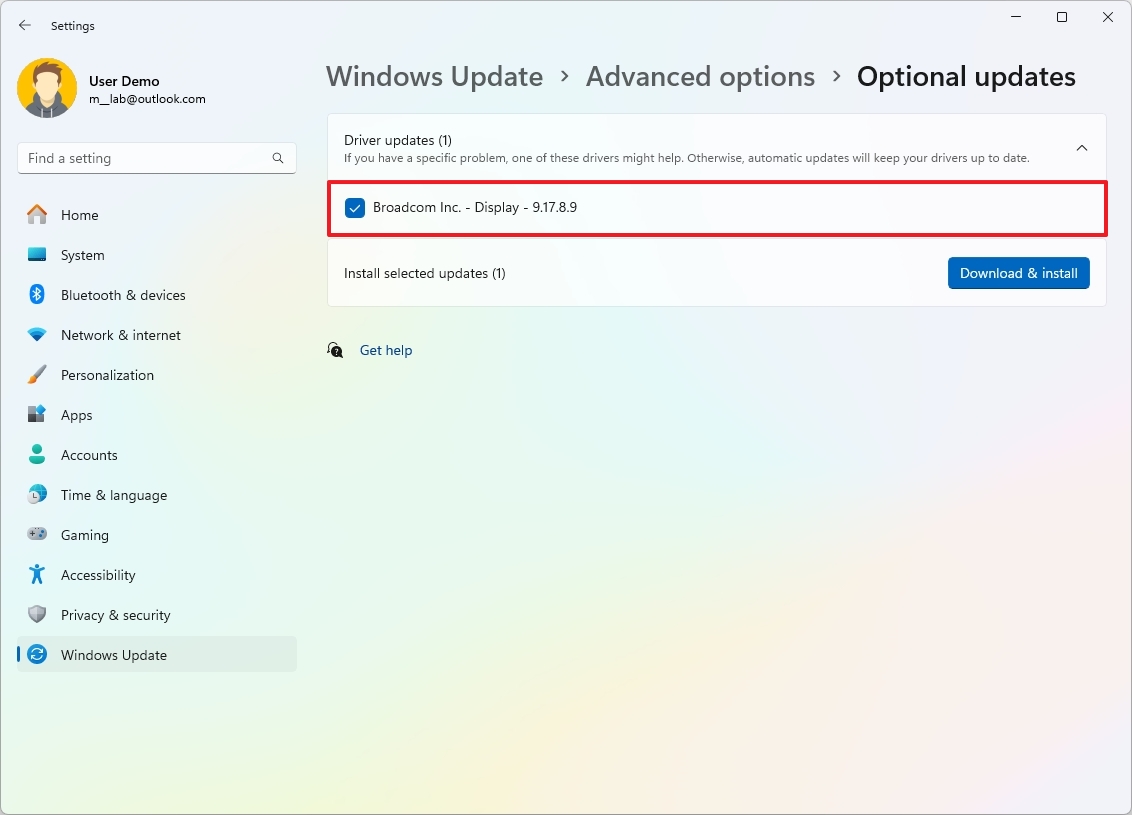
- Click the Download & install button.
Once you complete the steps, the audio drivers will download and install automatically on Windows 11.
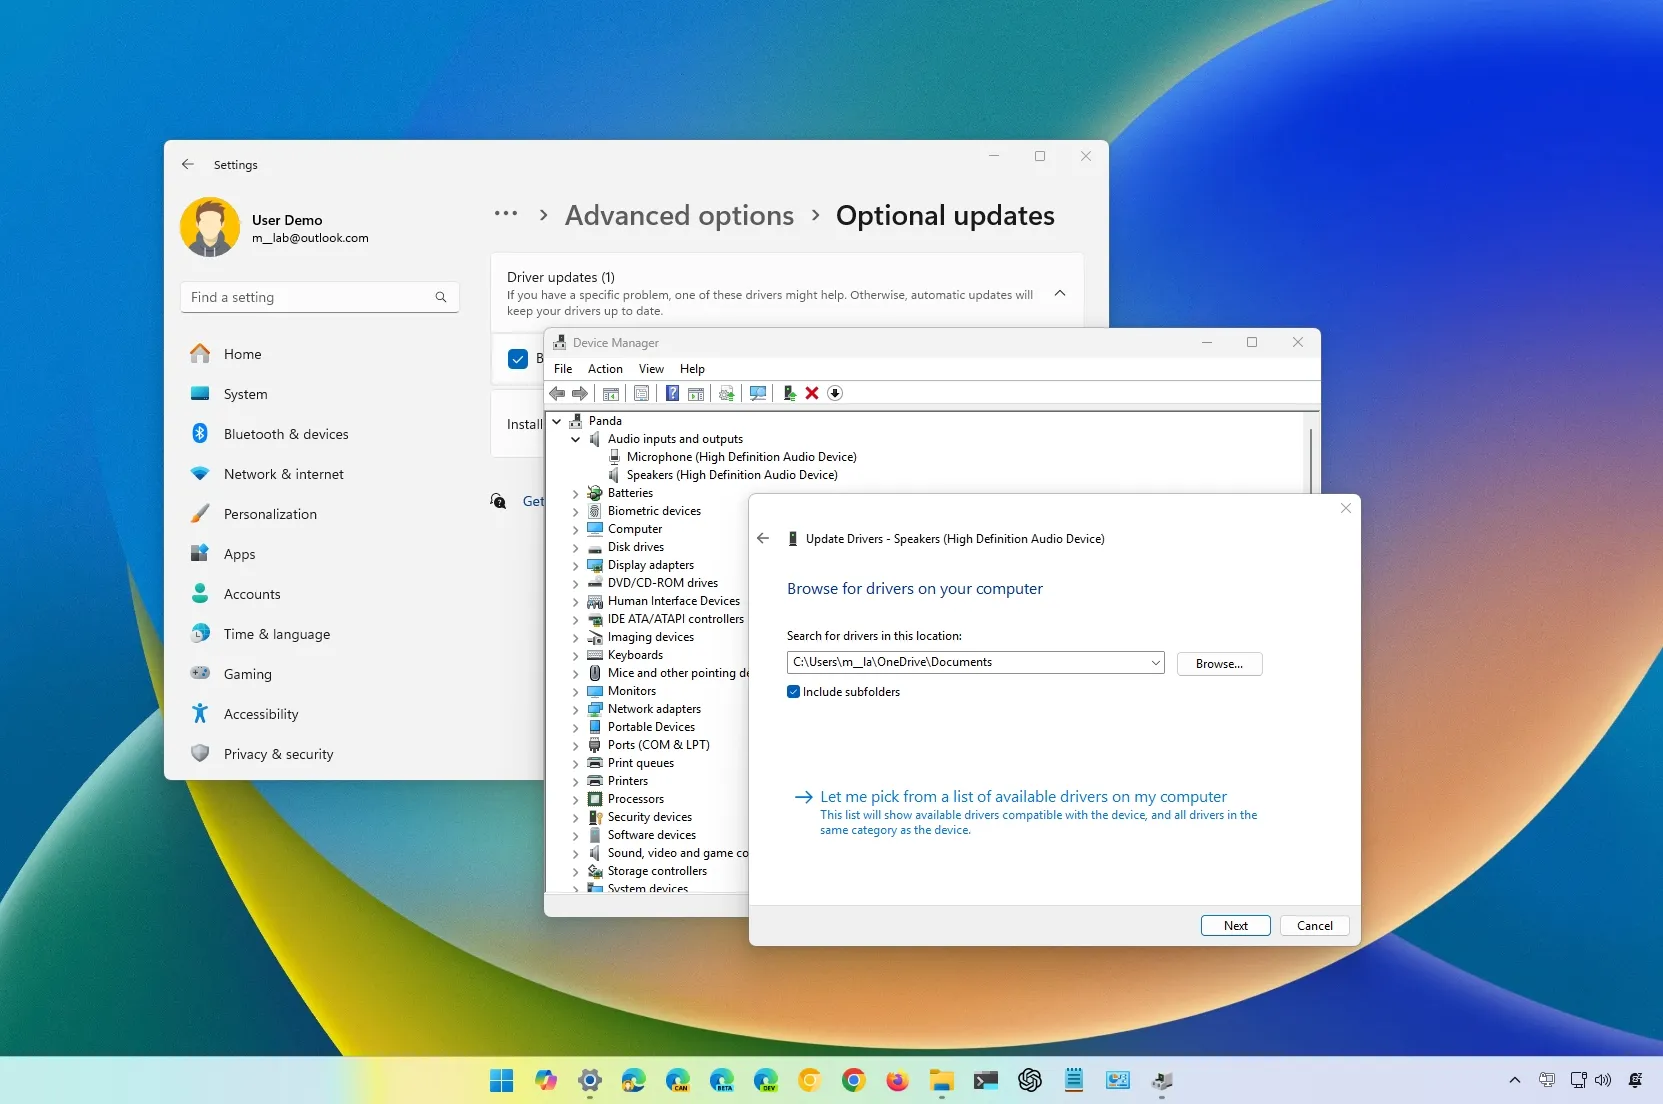
How to update audio drivers from Device Manager
If you plan to update the audio drivers through Device Manager, you must first download the drivers from the manufacturer’s support website and extract the files.
All the latest news, reviews, and guides for Windows and Xbox diehards.
Usually, the package comes with a self-extracting mechanism. If it doesn’t, you may have to extract the «.zip» file before continuing with the steps below.
If you have a laptop, I recommend downloading the latest drivers from the computer manufacturer rather than the audio device manufacturer. The reason is that computer manufacturers sometimes provide custom drivers with special configurations or specific features.
On the other hand, if you have a custom workstation, you may want to download the audio card drivers from the motherboard’s manufacturer support website. Unless you have a dedicated audio card, in which case you will want to get the drivers from the card manufacturer.
You should always use the manufacturer’s instructions, but if your support website doesn’t provide them, you can refer to these instructions.
To update the audio drivers from Device Manager, use these steps:
- Open Start.
- Search for Device Manager and click the top result to open the app.
- Quick tip: You can also launch the app using the «Ctrl + Shift + Esc» keyboard shortcut or right-clicking the Start button and choosing the «Device Manager» option.
- Expand the Audio inputs and outputs list.
- Right-click the «Speakers» device that corresponds to your audio device and choose the Update driver option.
- Click the «Browse my computer for drivers» option.

- Click the Browse button.

- Select the folder with the audio driver installation files.
- Click the OK button.
- Check the Include subfolders option.
- Click the Next button.
- Click the Close button.
After you complete the steps, the updated version of the drivers should be installed on your computer.
How to reinstall audio drivers on Windows 11
To reinstall the audio drivers on Windows 11, use these steps:
- Open Start.
- Search for Device Manager and click the top result to open the app.
- Expand the Audio inputs and outputs list.
- Right-click the «Speakers» device that corresponds to your audio device and choose the Uninstall device option.
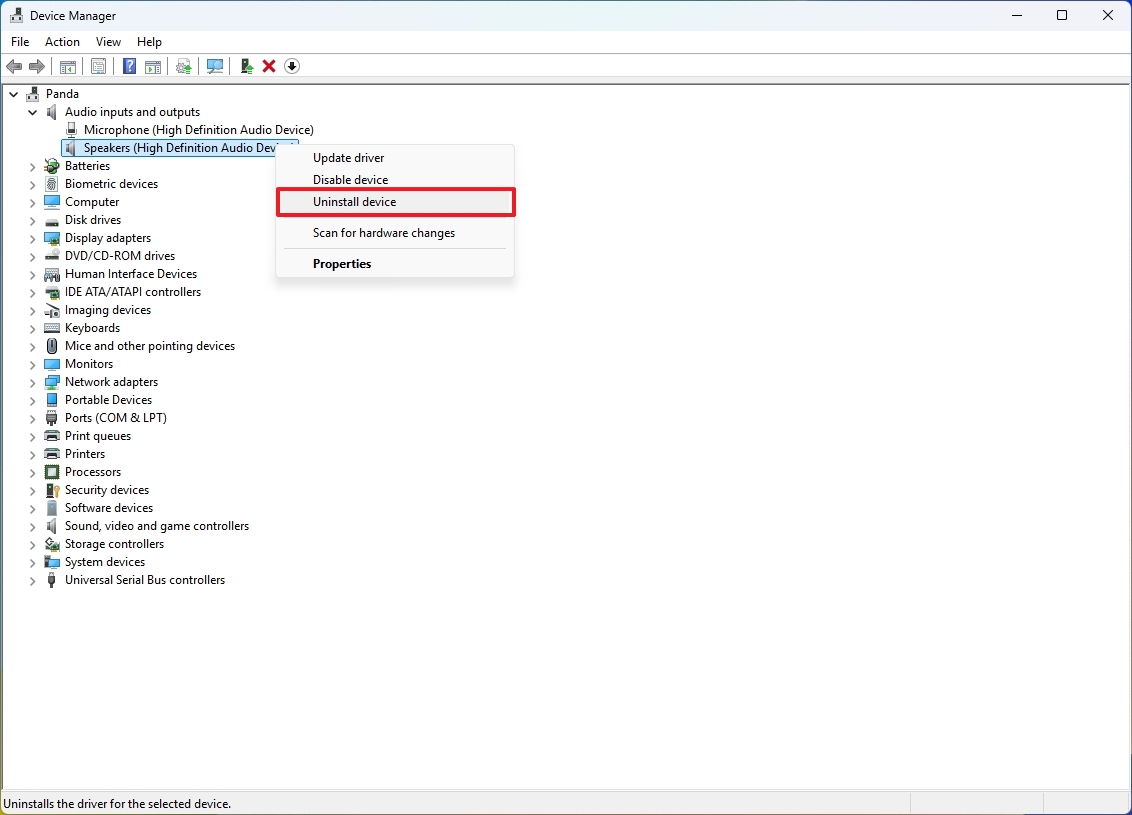
- Click the Uninstall button.
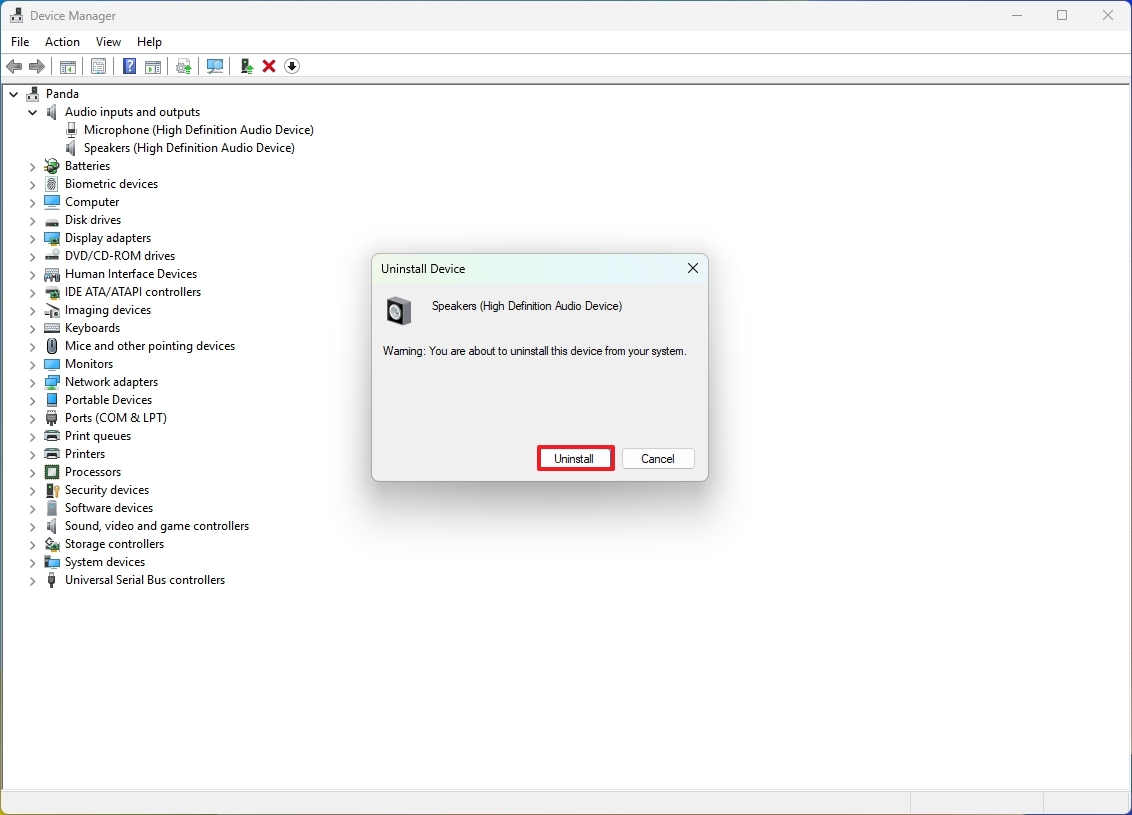
- Restart the computer.
- (Optional) Open Settings.
- Click the Windows Update.
- Click the Advanced options page.
- Click the Optional updates setting under the «Additional options» section.
- Click the Driver updates setting (if applicable).
- Check the available audio driver update (if applicable).
- Click the Download & install button.
Once you complete the steps, the system should be able to detect and reinstall the audio drivers.
More resources
For more in-depth insights, troubleshooting tips, and the latest updates on Windows 11 and 10, be sure to explore these resources:
- Windows 11 on Windows Central — All you need to know
- Windows 10 on Windows Central — All you need to know
Mauro Huculak has been a Windows How-To Expert contributor for WindowsCentral.com for nearly a decade and has over 15 years of experience writing comprehensive guides. He also has an IT background and has achieved different professional certifications from Microsoft, Cisco, VMware, and CompTIA. He has been recognized as a Microsoft MVP for many years.
Today, Microsoft rarely stresses on improving hardware compatibility on Windows 10 OS. Consequently, most device drivers are either preloaded or shipped via feature updates. No doubt it has brought a seamless experience for the users.
Still, every now and then you’ll find users complaining about audio not working after a Windows 10 update or problems related to other components.
Due to external hardware and Windows software conflicts, mostly on third-party hardware, Windows users might experience audio muffled in Windows 10. In this guide, we are going to tell you how to fix the audio issue in Windows 10.
In the past, from the deletion of new files to drivers abruptly stopping, Windows users have faced various problems. Moreover, the situation was getting so severe that Microsoft was forced to pull the October update before it disappoints any other Windows 10 users.
In this article, we will be addressing the Windows 10 sound issues. Of course, you will always have the option to roll back to the previous version, but we will keep that for the end. On its website and YouTube page, Microsoft has published a set of videos telling users how to fix audio issues in Windows 10.
No sound on the computer? You need to first check your speakers and headphone connections and see if some audio cable is loose or connected to the wrong jack. This is a pretty basic and very first step to fix audio issues in Windows 10.
Now check your volume levels from the audio icon, and don’t forget to check the volume levels of your external speakers.
Sometimes your external speakers might be the reason why you are facing sound issues on Windows 10. Don’t forget to check them on a device other than your Windows 10 PC.
Use Device Manager to fix audio issues in Windows 10
Another reason why your Windows 10 PC might be giving you problems could be related to driver issues. Make sure that your sound card is working properly and is running with updated drivers.
One of the most common audio errors users see is “No Audio Output Device Is Installed”. Updating the audio driver with the help of the below method may fix the issue.
To fix audio issues in Windows 10, just open the Start and enter Device Manager. Open it and from a list of devices, find your sound card, open it, and click on the Driver tab.
Now, select the Update Driver option. Windows should be able to look at the internet and update your PC with the latest sound drivers. If it fails to do so, you can find the right drivers at your PC manufacturer’s website.
Alternatively, you can try to update the drive using the generic audio driver that comes with Windows. For this –
Select Update driver > Browse my computer for driver software > Let me pick from the list of available drivers on my computer > High Definition Audio Device > Next > Install it.
How to fix audio issues in Windows 10 by running the troubleshooter?
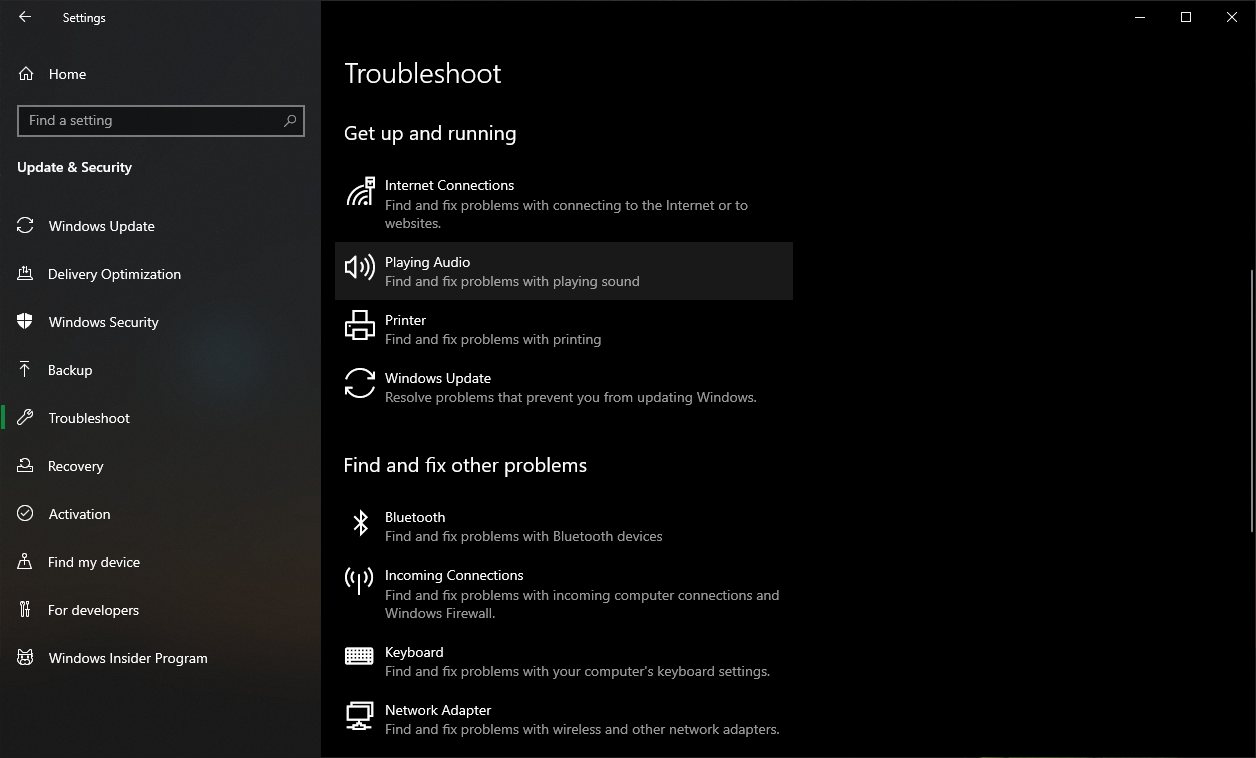
Troubleshooter is always the first thing one should do after any sort of issue in Windows 10. Gone are the times where the troubleshooter was never able to identify issues; the Windows 10 troubleshooter works very efficiently.
To run the audio troubleshooter in Windows 10, go to Windows 10 Settings > Update and Security > Troubleshoot > Playing Audio.
Just follow through the steps, and the Windows 10 Troubleshooter will automatically fix any sound issue that you are facing.
Set default playback device to fix audio issues in Windows 10
Using USB or HDMI may be the reason why audio is not working on Windows 10 as you need to set the external devices as default. Audio enhancements can sometimes interfere with hardware drivers. Thus, it is important to disable them until a new driver update arrives on your PC.
To fix audio issues in Windows 10 by setting the default device option, just open Start and enter Sound. Now open the appropriate results and click on the Playback tab. Here, find the suitable audio device and Set Default.
Fix audio issues in Windows 10 by choosing the correct audio playback
To choose the correct default playback in Windows 10, just open Start and enter Sound. Now open the appropriate result and click on the Playback tab. On your default device, right-click and select Properties. On the Advanced tab, under default format, change the setting and hit the Test button. If it doesn’t work, change the setting and hit Test.
We hope that these tips will help you to fix sound issues in Windows 10 when audio is not working on a laptop or other device. If you have some other suggestions or problems, comment below.
If these problems persist, you could head over to Microsoft Support Desk and tell them your problems.
Check out the Windows 10 Guide from Fossbytes for more help.