
Download Windows Speedup Tool to fix errors and make PC run faster
While installing Windows, some users encountered the error Windows detected that the EFI system partition was formatted as NTFS. This error terminated the Windows installation process, and users could not install Windows. If you encounter the same error while installing Windows, use these fixes to resolve the issue.

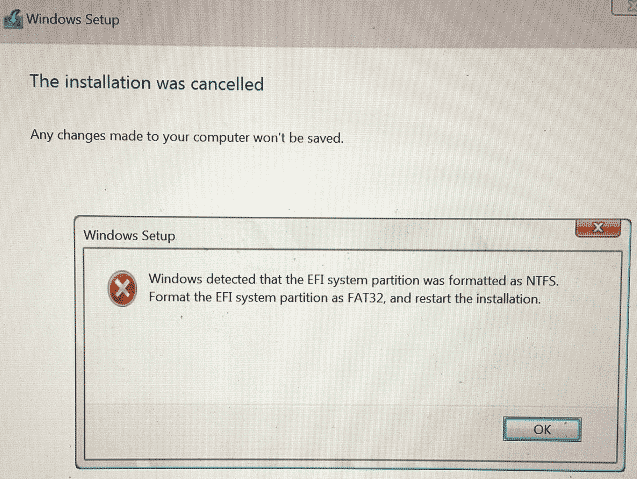
The complete error message is:
Windows detected that the EFI system partition was formatted as NTFS. Format the EFI system partition as FAT32, and restart the installation.
The error “Windows detected that the EFI system partition was formatted as NTFS” usually occurs when you install Windows on a GPT disk and the EFI system partition on that disk is formatted in the NTFS file system.
The EFI system partition contains crucial operating system files and does not have a drive letter. You can view it in the Disk Management app. If this partition already exists and is formatted as NTFS, you will encounter issues while installing Windows. To fix this error, use the following fixes:
- Format the EFI system partition as FAT32
- Delete all critical partitions
Both these fixes are explained in detail below:
1] Format the EFI system partition as FAT32
The first fix is to format the EFI system partition as FAT32. First, note down the size of the system partition. While installing Windows, all the partitions are displayed, including Recovery, EFI, and other partitions. From here, you can note the size of the EFI system partition.
Press the Shift + F10 keys on the Windows installation screen to open the Command Prompt. Now, type Notepad and hit Enter. This will open the Notepad. Go to File > Open to access File Explorer directly from the Windows installation screen.

Select This PC and then select the EFI system partition. This EFI system partition should be of the same size you saw on the installation screen. Right-click on it and select Format. Select FAT32 in the File System drop-down and format the selected partition. Be careful while selecting the partition during formatting, as an incorrect selection will erase your crucial data.
Exit and close File Explorer, Command Prompt, and Notepad. Now, click on Refresh on the installation screen and proceed with the installation.
2] Delete all critical partitions
If your system has multiple partitions, including the System partition, Recovery partition, etc., it is better to delete all of them. On the installation screen, select the System partition and all other critical partitions (the partitions that do not have a drive letter and have a size typically in MB). After that, delete the partition you want to install Windows to create an unallocated space. Select the partition with an unallocated space and proceed with the Windows installation. The error should not occur this time.
That’s it.
Can an EFI system partition be NTFS?
Windows creates an EFI system partition automatically during the installation process. Its file system is FAT32. It should not be in the NTFS file system. If a previous EFI system partition exists on your system and is in the NTFS file system, you will encounter errors while installing Windows.
How to remove NTFS format?
To remove an NTFS file system, you must format that particular hard disk or partition. While formatting that partition or hard disk, select the NTFS file system from the respective drop-down and start formatting.
Read next: PC crashes during Windows installation.
Anand Khanse is the Admin of TheWindowsClub.com, a 10-year Microsoft MVP (2006-16) & a Windows Insider MVP (2016-2022). Please read the entire post & the comments first, create a System Restore Point before making any changes to your system & be careful about any 3rd-party offers while installing freeware.
-
Home
-
News
- Fix: Windows Detected EFI System Partition Was Formatted as NTFS
By Vega | Follow |
Last Updated
Do you get the message “Windows detected that the EFI system partition was formatted as NTFS” when try to install Windows? How can you fix this error? Read this post from MiniTool Partition Wizard to know the answer.
Sometimes, you may be prompted with the following error message:
Windows detected that the EFI system partition was formatted as NTFS. Format the EFI system partition as FAT32, and restart the installation.
As the error message suggests, you need to format the EFI system partition as FAT32. Follow the steps below to know the details. Before that, you could learn what the EFI system partition is.
About EFI System Partition
EFI (Extensible Firmware Interface) System Partition or ESP is a partition on a data storage device used by computers with Unified Extensible Firmware Interface (UEFI). When starting a computer, UEFI firmware loads files stored on the ESP to begin installing the operating system and various utilities.
The EFI system partition has a capacity of approximately 100~500MB and contains data files such as bootloader, device driver files, system utilities, and error logs. UEFI firmware loads those files stored on the ESP to start Windows at boot time.
Tips:
If you accidentally delete the EFI system partition, the Windows system will become unbootable. Try this post to solve it.
How to Format System Partition to FAT32
As mentioned above, to solve the “Windows has detected that the EFI system partition was formatted as NTFS” problem, you should try to format it to FAT32. Since the EFI system partition is a protected partition, you cannot format the EFI partition using the Windows built-in tool – Disk Management. Well, you can use professional disk management too – MiniTool Partition Wizard.
It is a reliable partition management tool that spares no effort to provide effective solutions to various problems. The software can help you resize partitions, convert FAT to NTFS without data loss, wipe hard drives and reinstall Windows, convert MBR to GPT disks, and more.
For formatting system partitions, you should use MiniTool Partition Wizard Bootable in case of boot issues. And you’d better copy all data from the partition before formatting it.
MiniTool Partition Wizard DemoClick to Download100%Clean & Safe
Here are the steps on how to do that with MiniTool Partition Wizard:
Step 1: Plug the prepared USB into the computer or insert the prepared CD/DVD into its CD/DVD burner.
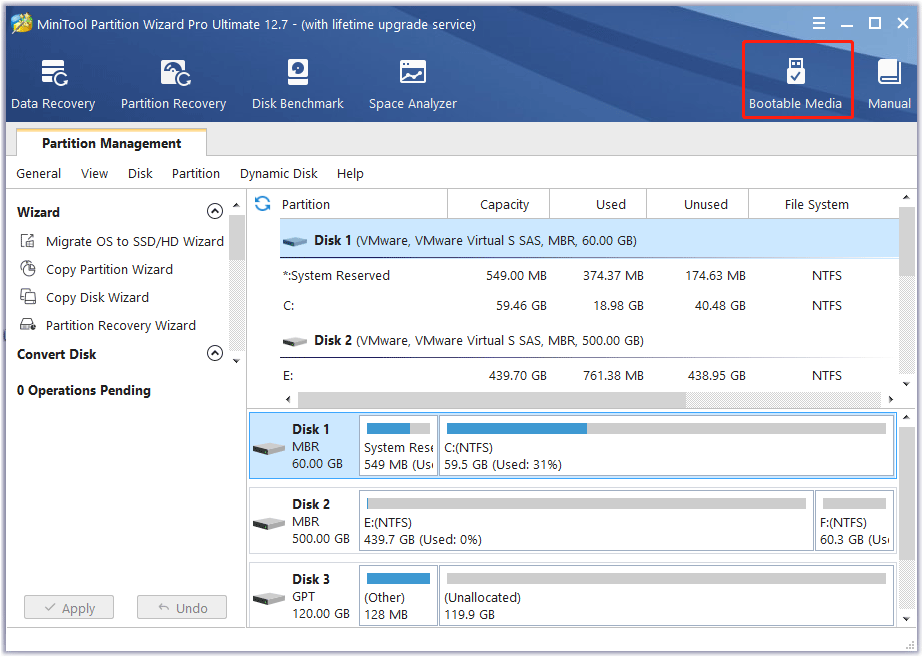
Step 2: Download the software and then launch it to access its main interface. Click Bootable Media in the upper right corner and follow the on-screen instructions to create a bootable USB, CD, or DVD.
Step 3: Restart the computer and press F2 or another key to enter BIOS menu. Change boot settings to make your computer boot from the USB or CD/DVD flash drive.
Step 4: In the main interface of MiniTool Partition Wizard, select EFI system partition and click on Format Partition.
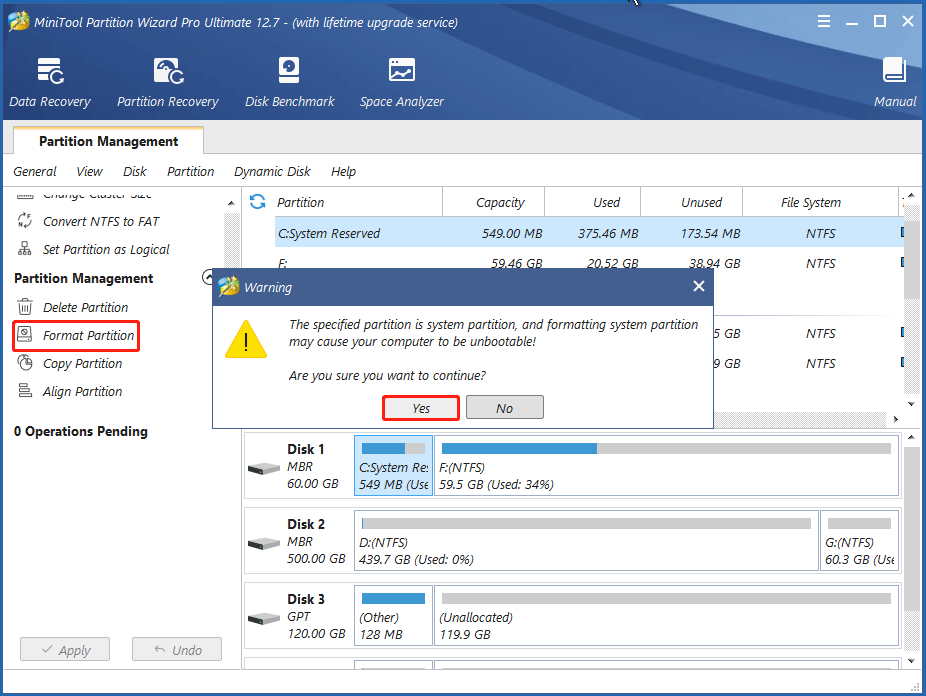
Step 5: Then a warning will appear with the “The specified partition is system partition, and formatting system partition may cause your computer to be unbootable” message. Click Yes to perform this operation.
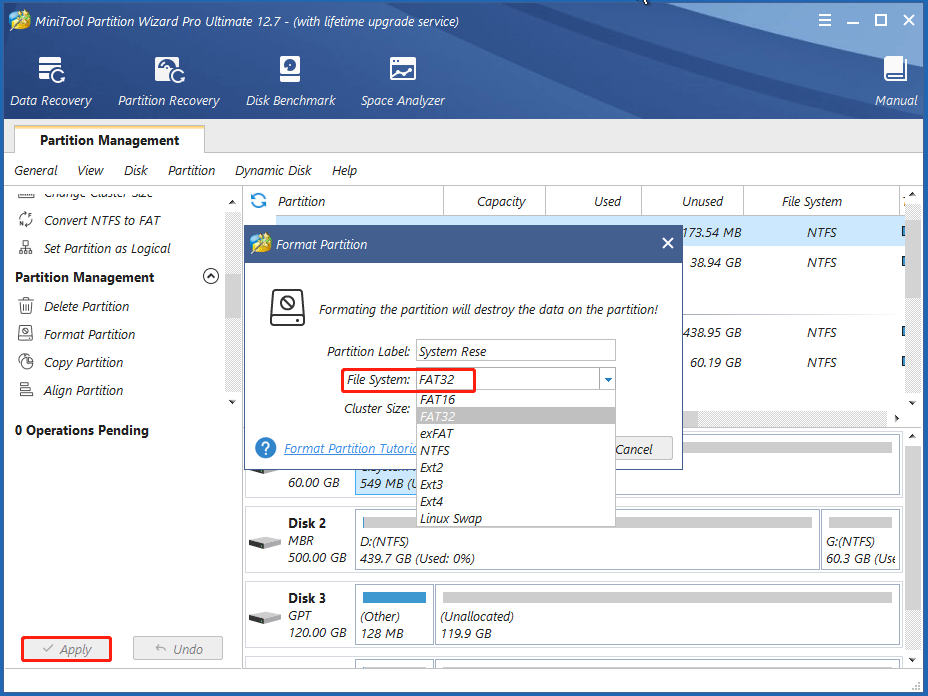
Step 6: Select FAT32 next to File System. Then click on OK. Finally, click on Apply to execute this operation.
After formatting the EFI system partition, you need to reinstall Windows. Once done, check if the “Windows detected that the EFI system partition was formatted as NTFS Windows 10” problem gets fixed.
About The Author
Position: Columnist
Vega joined MiniTool as an editor after graduation. She enjoys helping people with computer problems, including disk management, data recovery, and more. She is constantly expanding her knowledge in related fields. And she will continue to bring more easy-to-understand professional articles to help people solve various problems on the PC. In her daily life, Vega enjoys hanging out with friends, shopping online and listening to music. She is someone who knows how to enjoy life.
Learn how to resolve the EFI system partition formatting error and successfully install Windows on your computer.
Published
2 min read

The “Windows detected that the EFI system partition was formatted as NTFS” error can halt your Windows installation process. This issue typically occurs when attempting to install Windows on a GPT disk where the EFI system partition is incorrectly formatted. Let’s explore how to fix this problem and get your Windows installation back on track.
What Causes the EFI System Partition Error?
The EFI (Extensible Firmware Interface) system partition is a critical component for booting your operating system. It contains essential files that the UEFI firmware uses to start Windows. This partition should always be formatted as FAT32, not NTFS. When Windows detects an NTFS-formatted EFI partition, it cannot proceed with the installation.
Method 1: Format the EFI System Partition as FAT32
The most straightforward solution is to reformat the EFI system partition to FAT32. Here’s how to do it:
Step 1: During the Windows installation process, when you encounter the error, press Shift + F10 to open the Command Prompt.
Step 2: Type notepad and press Enter to open Notepad.
Step 3: In Notepad, go to File > Open. This will open File Explorer, allowing you to access your disk partitions.
Step 4: Locate the EFI system partition. It’s usually a small partition (100-500 MB) without a drive letter.
Step 5: Right-click on the EFI partition and select Format.
Step 6: In the Format window, choose FAT32 as the file system and click Start.
Step 7: After formatting is complete, close all windows and return to the installation screen.
Step 8: Click Refresh on the installation screen and proceed with the Windows installation.
This method should resolve the error and allow you to continue with the Windows installation process.
Method 2: Delete All Critical Partitions
If the first method doesn’t work or you’re dealing with multiple partitions, you might need to take a more drastic approach:
Step 1: On the Windows installation screen where you select the installation drive, identify all critical partitions. These are typically small partitions without drive letters, including the System partition, Recovery partition, and any other unlettered partitions.
Step 2: Select each of these partitions and click on Delete. Be extremely careful during this step, as you’ll be removing all partitions, including the one where you intend to install Windows.
Step 3: After deleting all partitions, you should see a single large unallocated space.
Step 4: Select this unallocated space and click Next.
Step 5: Windows will automatically create the necessary partitions, including a properly formatted EFI system partition, and proceed with the installation.
This method effectively gives Windows a clean slate to work with, eliminating any pre-existing partition issues.
Preventing Future EFI Partition Issues
To avoid encountering this error in the future:
- Always use the official Windows Media Creation Tool to create your installation media.
- If you’re using third-party tools to create bootable USBs, ensure they’re set to create UEFI-compatible media.
- Regularly back up your important data to prevent loss during partition management.
- If you’re dual-booting or working with multiple operating systems, be cautious when modifying partitions to avoid accidentally formatting the EFI partition as NTFS.
By following these methods, you should be able to overcome the “Windows detected that the EFI system partition was formatted as NTFS” error and successfully install Windows on your system. Remember, working with disk partitions can be risky, so always proceed with caution and back up your data before making any changes.
В этой статье мы покажем, как вручную восстановить случайно удаленный загрузочный EFI раздел Windows на компьютере с UEFI. Этот простой способ ручного пересоздания загрузочного EFI и MSR разделов Windows позволит вам загрузить ОС после случайного форматирования или удаления загрузочного EFI раздела. Инструкции в статье актуальны для всех версий Windows (в том числе Windows 10 и 11, и Windows Server).
Если вы случайно (или не очень случайно, например при попытке удалить с диска OEM разделы производителя) удалили или отформатировали загрузочный EFI раздел на компьютере с UEFI (не BIOS), ваша Windows 11/10/8.1 /7 перестанет загружаться и будет циклически предлагать выбрать загрузочное устройство (
Reboot and select proper boot device or insert boot media in selected
или
Windows Boot Manager: No media
). Далее мы покажем, как восстановить загрузку Windows при удалении раздела диска с загрузчиком Boot Manager без переустановки ОС.
Предупреждение. Инструкция предполагает работу с разделами диска и не предназначена новичкам. В случае неверной интерпретации команд, вы можете случайно удалить все данные на жестком диске. Также настоятельно рекомендуется создать резервную копию важных данных на отдельном носителе.
Содержание:
- Структура разделов GPT диска для Windows
- Что будет, если в Windows отсутствует раздел EFI?
- Как вручную создать EFI и MSR разделы на GPT диске?
- Восстановление EFI загрузчика и BCD в Windows
Структура разделов GPT диска для Windows
Рассмотрим, как должна выглядеть таблица разделов загрузочного жесткого диска Windows с GPT разметкой на UEFI компьютере. Как минимум должны присутствовать следующие разделы:
- Системный раздел EFI (Extensible Firmware Interface, или EFI System Partition — ESP) с загрузчиком – 100 Мб (тип раздела — EFI);
- Резервный раздел Майкрософт (Microsoft Reserved) – 128 Мб (тип раздела — MSR);
- Основной раздел Windows – раздел с Windows.
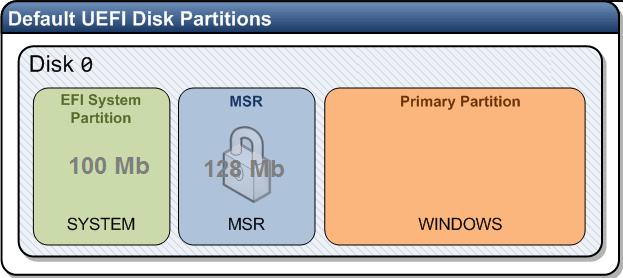
Это именно минимальная конфигурация. Эти разделы создает установщик Windows при чистой установке системы на неразмеченный диск.
Производители компьютеров или сами пользователи могут дополнительно создавать собственные разделы, содержащие, к примеру раздел Recovery со средой восстановления Windows в файле winre.wim (Windows RE), раздел с резервным образом системы от производителя (позволяет откатится к исходному состоянию компьютера), пользовательские разделы и т.д.
Раздел EFI c файловой системой FAT32 является обязательным на дисках с GPT разметкой на UEFI системах и имеет GUID
c12a7328-f81f-11d2-ba4b-00a0c93ec93b
. Стандартный размер EFI раздела 100Мб (на дисках расширенного формата с секторами 4Кб /4K Native / размер EFI раздела 260Мб).
MSR раздел раздел (Microsoft System Reserved) на GPT диске используется для упрощения управления разделами и используется для служебных операций (например, при конвертировании диска из простого в динамический). Это резервный раздел c GUID
e3c9e316-0b5c-4db8-817d-f92df00215ae
, которому не назначается код раздела. На этом разделе нельзя хранить данные пользователя. В Windows 10 и 11 размер MSR раздела – всего 16 Мб (в Windows 8.1 размер MSR раздела – 128 Мб), файловая система – NTFS. MSR раздел должен находиться между разделами EFI (ESP) и первичным разделом с операционной системой Windows.
На основном разделе с файловой системой NTFS находится установленная Windows, программы и данные пользователя. Также на диске могут присутствовать дополнительные разделы с данными.
Что будет, если в Windows отсутствует раздел EFI?
На EFI разделе (по аналогии с разделом System Reserved на дисках с MBR разметкой) хранится хранилище конфигурации загрузки (BCD) и ряд файлов, необходимых для загрузки Windows. При загрузке компьютера среда UEFI загружает загрузчик (EFI\Microsoft\Boot\bootmgfw.efi) с раздела EFI (ESP) и передает управление ему. Исполняемый файл bootmgfw.efi выполняет запуск основного загрузчика Windows Boot Manager, который загружает данные конфигурации из BCD. После загрузки BCD начинается загрузка Windows через winload.efi.
При загрузке UEFI компьютера он ищет системный раздел EFI на всех подключенных дисках. Если раздел EFI удален или поврежден, вы не сможете загрузить Windows с такого диска. Появится ошибка UEFI:
could not locate \efi\boot\bootx64.efi – not found
, пустой UEFI Shell с предложением выбрать загрузочное устройство.
Также вы не сможете загрузить Windows, если EFI раздел отформатирован в файловой системе NTFS. Даже при чистой установке Windows в таком случае вы получите ошибку:
Windows detected that the EFI system partition was formatted as NTFS. Format the EFI system partition as FAT32, and restart the installation.
Установлено, что системный раздел EFI отформатированный в NTFS. Отформатируйте системный раздел EFI в формате FAT32 и перезапустите программу установки.
Как вручную создать EFI и MSR разделы на GPT диске?
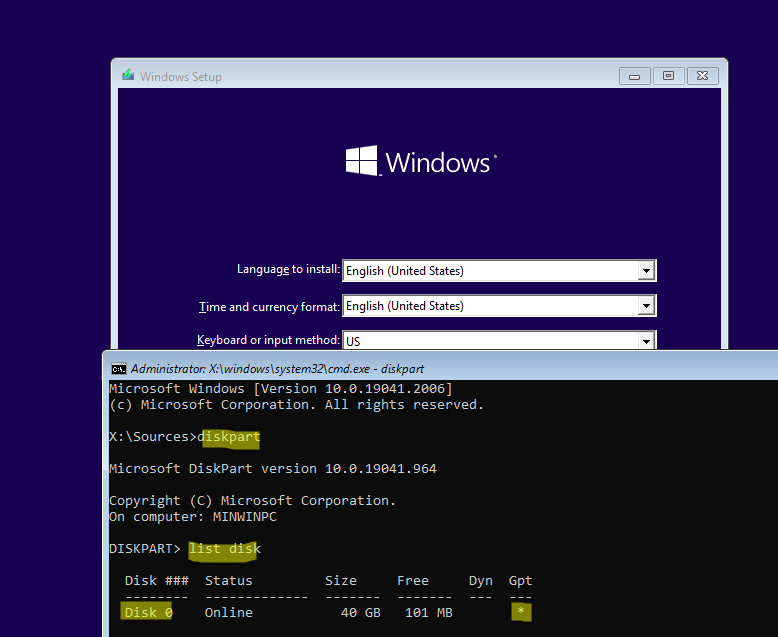
Т.к. Windows не загружается корректно, нам понадобится загрузочное устройство с Windows 10/11 или любой другой загрузочный диск (см. как создать загрузочную USB флешку c Windows для UEFI компьютера). Загрузите компьютера с установочного диска и на экране начала установки нажмите комбинацию клавиш Shift+F10. Должно открыться окно командной строки
Запустите утилиту управления дисками и разделами:
Diskpart
Выведите список жестких дисков в системе:
list disk
В этом примере к компьютеру подключен только один disk 0. Звездочка (*) в столбце Gpt означает, что на диск создана таблица разделов GPT).
Если в столбце GPT отсутствует *, значит на диске MBR таблица разделов. Вам нужно убедиться, что ранее вы загружали компьютер в нативном UEFI режиме (иначе следовать данной инструкции бессмысленно). Если вы уверены, что тип таблицы разделов сменился, возможно его нужно стоит переконвертировать из MBR в GPT.
Выберите этот диск:
Select disk 0
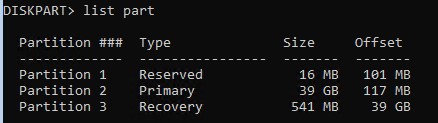
Выведите список разделов на диске:
List partition
В нашем примере в системе осталось всего 3 раздела:
- Раздел Reserved (MSR) — 16 Мб
- Системный раздел с Windows – 30 Гб
- Recovery (раздел восстаовления0) – 541 Мб
Как вы видите, раздел EFI (может называться System) отсутствует (удален).
Совет. Если на разделе EFI были повреждены только файлы среды EFI, а сам раздел остался на месте, вы можете пропустить процесс пересоздания разделов с помощью diskpart. В большинстве случаев достаточно восстановить загрузчик по статье Восстановление EFI загрузчика в Windows . Если у вас компьютер с BIOS и MBR диск, вы можете пересоздать BCD так.
Наша задача удалить оставшийся MSR раздел, так чтобы на диске осталось неразмечено как минимум 228 Мб свободного места (для разделов MSR и EFI). Вы можете удалить оставшийся раздел с помощью графической утилиты GParted или непосредственно из командной строки (именно так и поступим).
Важно! Здесь будьте максимально внимательными и не удалите случайно раздел с Windows или разделы с пользовательскими данными (если таковые имеются).
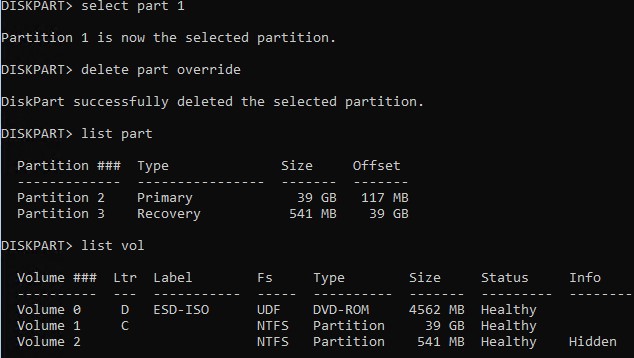
Выберите раздел для удаления:
Select partition 1
И удалите его:
Delete partition override
Убедитесь, что остался только Primary раздел с Windows размером 30 Гб (в нашем случае) и раздел восстановления:
List partition
Теперь вы можете вручную создать разделы EFI и MSR для размещения загрузчика Windows. Для этого в контексте утилиты diskpart последовательно выполните команды:
Выберите диск:
select disk 0
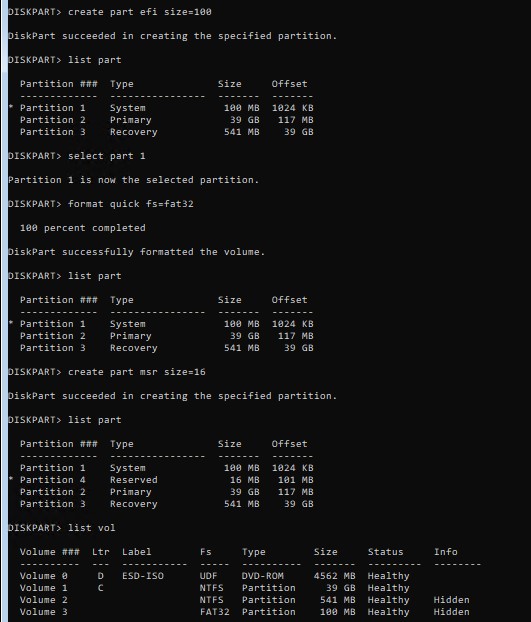
Создайте EFI раздел размером 100 Мб, отформатируйте его в файловой системе FAT32 и назначьте ему букву диска:
create partition efi size=100
Убедитесь, что в diskpart выбран раздел 100 Мб с именем System (звездочка напротив строки Partition 1):
list partition
select partition 1
format quick fs=fat32 label="System"
assign letter=G
Теперь нужно создать MSR раздел размером 16 Мб (для Windows 10 и 11):
create partition msr size=16
list partition
list vol
В нашем случае основному разделу с Windows уже назначена буква диска C:. Если это не так, назначьте ему букву следующим образом:
select vol 1
assign letter=C
exit
Назначьте букву диска вашему EFI разделу:
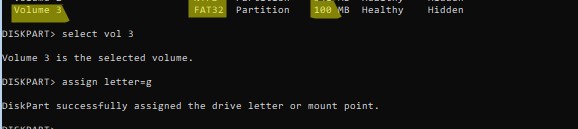
Select vol 3
Assign letter=G
Закройте diskpart:
exit
При создании EFI или MSR раздела может появится ошибка
No usable free extent could be found. It may be that there is insufficient free space tocreate a partition at the specified size and offset. Specify different size and offset values or don't specify either to create the maximum sized partition. It may be that the disk is partitioned using the MBR disk partitioning format and the disk contains either 4 primary partitions, (no more partitions may be created), or 3 primary partitions and one extended partition, (only logical drives may be created).
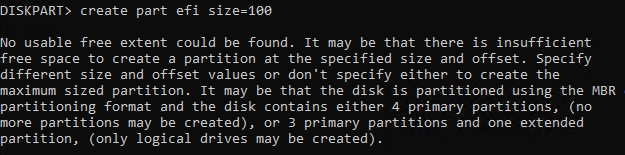
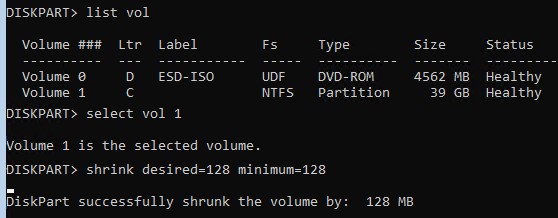
В этом случае вам нужно уменьшить раздел основного раздела с Windows на 128 Мб(в нашем примере это volume 1):
select volume 1
shrink desired=128 minimum=128
После этого создайте разделы EFI и MSR как описано выше.
Восстановление EFI загрузчика и BCD в Windows
После того, как вы создали минимальную структуру разделов для GPT диска на компьютере с UEFI, нужно скопировать загрузочные файлы EFI на ваш диск и создать конфигурационный файла загрузчика (BCD).
Теперь с помощью утилиты bcdboot.exe скопируйте файлы среды загрузки UEFI из системного каталога Windows в загрузочный EFI раздел и пересоздайте конфигурацию загрузчика BCD. Выполните команду:
bcdboot c:\windows /s G: /f UEFI
Boot files successfully created.
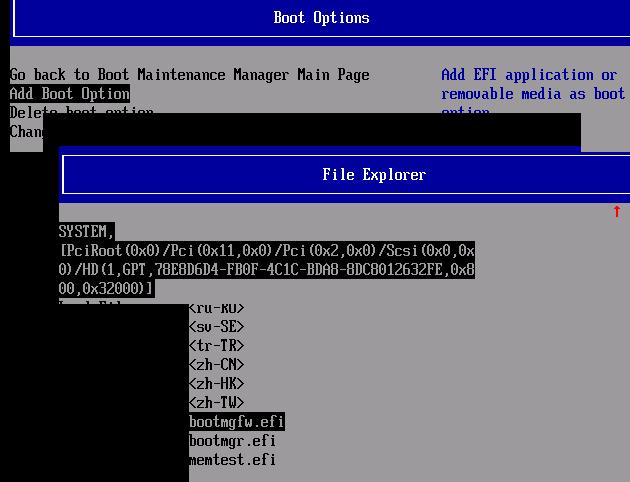
В результате на EFI разделе будет создана структура каталогов. На системном разделе EFI должны обязательно присутствовать следующие файлы:
- \EFI\Microsoft\Boot\bootmgfw.efi
- \EFI\Microsoft\Boot\bootmgr.efi
- \EFI\Microsoft\Boot\memtest.efi
- \EFI\Microsoft\Boot\BCD
- \EFI\Microsoft\Boot\Fonts\wgl4_boot.ttf
- \EFI\Boot\bootx64.efi
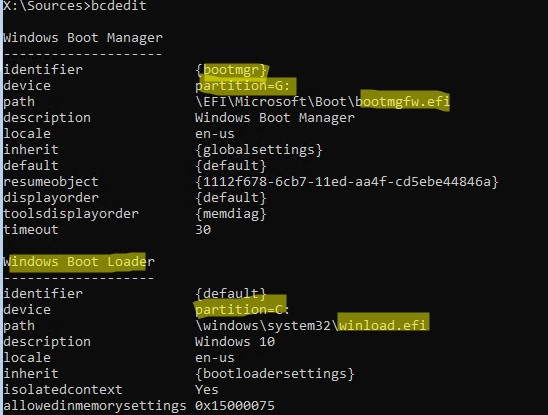
Выведите текущую конфигурацию загрузчика Windows Boot Manager. В разделе {bootmgr} должна появиться запись, которая указывает на раздел с файлом управления загрузкой UEFI (
\EFI\MICROSOFT\BOOT\bootmgfw.efi
). В этом примере это
partition=G
, или
partition=\Device\HarddiskVolume2
(если вы не назначили букву EFI разделу).
Загрузчик UEFI затем должен передать управление файлу загрузчика Windows Boot Loader
\Windows\system32\winload.efi
на partition=C:
Перезагрузите компьютер (для перезагрузки из среды WinPE нужно выполнить команду wpeutil reboot) и извлеките загрузочную флешку.
Опционально! Вы можете вручную выполнить действия, которые выполняет команда bcdboot. Далее мы покажем, как самостоятельно скопировать системные файлы EFI и пересоздать BCD.
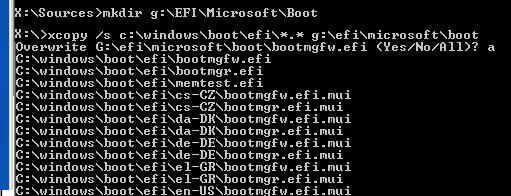
Скопируйте загрузочные файлы среды EFI из каталога вашего диска, на который установлена ваша Windows:
mkdir G:\EFI\Microsoft\Boot
xcopy /s C:\Windows\Boot\EFI\*.* G:\EFI\Microsoft\Boot
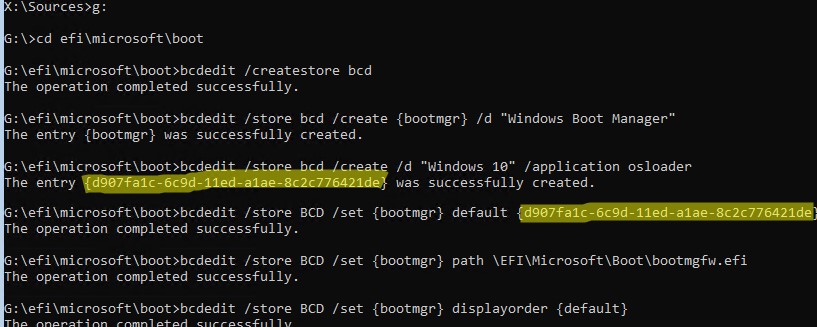
Пересоздайте конфигурацию загрузчика Windows:
g:
cd EFI\Microsoft\Boot
bcdedit /createstore BCD
bcdedit /store BCD  /create {bootmgr} /d “Windows Boot Manager”
bcdedit /store BCD /create /d “Windows 10” /application osloader
Команда возвращает GUID созданной записи. Этот GUID нужно подставить в следующей команде вместо
{your_guid}
.
bcdedit /store BCD /set {bootmgr} default {your_guid}
bcdedit /store BCD /set {bootmgr} path \EFI\Microsoft\Boot\bootmgfw.efi
bcdedit /store BCD /set {bootmgr} displayorder {default}
Дальнейшие команды bcdedit выполняются в контексте {default}:
bcdedit /store BCD /set {default} device partition=c:
bcdedit /store BCD /set {default} osdevice partition=c:
bcdedit /store BCD /set {default} path \Windows\System32\winload.efi
bcdedit /store BCD /set {default} systemroot \Windows
exit
Если с первого раза Windows не загрузился, выполните следующие действия:
- Отключите питание компьютера;
- Отключите (физически) жесткий диск;
- Включите ПК, дождитесь появления окна с ошибкой загрузки Operating System not found. Выключите компьютер;
- Подключите диск обратно.
Если это не помогло, опять загрузитесь с установочной USB флешки и выполните команду:
bootrec /rebuildbcd
Перезагрузите компьютер
Затем в нашем случае (тестирование проводилось на виртуальной машине VMWare с UEFI средой) пришлось добавить новый загрузочный пункт меню, выбрав файл EFI\Microsoft\Boot\bootmgrfw.efi на EFI разделе.
В некоторых UEFI меню по аналогии нужно изменить приоритет загрузочных разделов.
После всех рассмотренных манипуляций Windows должна загрузиться корректно.
Совет. Если что-то не заработало, рекомендуем проверить, что загрузочный флаг (boot flag) установлен только у раздела EFI. Проще всего в этом убедится с помощью LiveCd GParted.
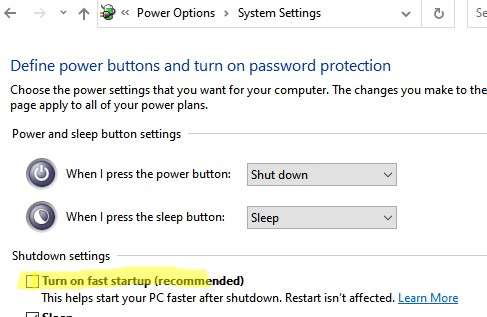
В некоторых случаях после пересоздания разделов EFI и MSR и восстановления BCD Windows может перестать корректно выключаться. Если у вас проявляется эта проблема, чтобы исправить ее нужно отключить функцию быстрого запуска в Windows в настройках электропитания компьютера:
- Откройте панель управления электропитанием
powercfg.cpl
; - Выберите Choose what the power buttons does;
- Нажмите кнопку Change settings that are currently unavailable и отключите опцию «Turn on fast startup» в разделе «Shutdown settings».

When I am installing Windows 10 after I format the Bootcamp partition, I receive the following error message:
«Windows detected that the EFI system partition was formatted as NTFS. Format the EFI system partition as FAT32, and restart the installation»
I am not sure what is going on. I have the latest Windows 10 ISO image and my system is completely up to date. USB drive is formatted to exFAT.
iMac,
OS X 10.11
Posted on Apr 21, 2020 10:24 AM
Posted on Apr 21, 2020 4:12 PM
jsisney wrote:
I have been through those steps many times.
Once you run Create+Download, you do not need to run it again. Install should be run only once. If it fails, any extraneous partitions should be cleaned, SMC and NVRAM Reset, before the next attempt.
Do the EFI NoName partitions need to be removed?
Yes, otherwise you will not be able to install Windows.
Run
dskutil eraseVolume free free disk0s3
and repeat this command for disk0s4 through disk0s15. Post the output of
diskutil list
before we go further.