
При проверке жесткого диска или SSD на ошибки в свойствах диска, возможны два основных исхода: «Диск успешно проверен. Ошибки не обнаружены» и «Восстановить этот диск. Система Windows обнаружила на этом диске ошибки, которые необходимо исправить. Закройте это диалоговое окно и восстановите диск».
Во втором случае начинающие пользователи могут не знать, что именно следует сделать, чтобы восстановить диск при обнаруженных ошибках. В этой инструкции — подробно об этом.
Восстановление диска после проверки на вкладке «Сервис» в свойствах диска
При использовании свойств диска в Windows для проверки его состояния в случае, если дело касается системного диска, автоматическое исправление ошибок не производится, вам лишь сообщают о них: «Система Windows обнаружила на этом диске ошибки».
Предполагается, что вы вручную исправите эти ошибки и «восстановите» диск. Учитывайте, что в случае неисправности диска или проблем с питанием, описанные далее действия, особенно 5-й шаг, могут усугубить ситуацию.
Исправление ошибок можно выполнить в командной строке:
- Запустите командную строку, Windows PowerShell или Терминал Windows от имени администратора. В Windows 11 и 10 это можно сделать в меню по правому клику на кнопке «Пуск».
- Введите команду (при необходимости заменив букву диска C на нужную)
chkdsk C: /f
и нажмите Enter.
- Если речь идёт о диске с данными, проверка начнётся сразу же, для системного диска вам будет предложено выполнить проверку после перезагрузки. Введите Y и нажмите Enter, после чего перезагрузите компьютер.

- После перезагрузки вам будет предложено нажать любую клавишу, чтобы прервать проверку (не нажимайте), после чего начнётся проверка диска, а затем загрузится Windows. Обычно этих действий хватает, чтобы исправить ошибку.

- Если ошибка сохранилась, тем же способом используйте команду
chkdsk C: /r
но учитывайте, что её выполнение займёт много времени, в случае ноутбука — подключите его к источнику питания.


В некоторых случаях проверка диска после перезагрузки не начинается, а Windows 11/10 запускается как обычно. В такой ситуации вы можете:
- Используя меню завершения работы, удерживая клавишу Shift, нажать кнопку «Перезагрузка».
- В результате вы попадёте в среду восстановления Windows. Перейдите в раздел «Поиск и устранение неисправностей» — «Дополнительные параметры» — «Командная строка».

- Используйте команды
chkdsk C: /f
и, если потребуется,
chkdsk C: /r
для проверки диска.

В ситуации, когда после исправления ошибок они появляются вновь, либо исправление выполнить не удаётся, есть вероятность что причиной является износ диска (можно попробовать проверить состояние в CrystalDiskInfo), проблемы с его подключением (проверить подключение кабелей для SATA дисков, заменить кабели) или питанием.
Также на эту тему могут быть полезными статьи: Программы для проверки жесткого диска на ошибки, Как проверить SSD на ошибки.
Сегодня мы рассмотрим причины и методы исправления ошибки «Windows обнаружила неполадки жесткого диска», приводящей к критическим неполадкам с системой.

Содержание
- Возможные причины ошибки
- Как исправить ошибку «Windows обнаружила неполадки жесткого диска»?
- Проверка диска chkdsk
- Оценка состояния носителя
- Проверка и исправление системных файлов
- Как убрать сообщение об ошибке «Windows обнаружила неполадки жесткого диска»?
- Что делать, если в результате ошибки были утеряны файлы?
Ошибка «Windows обнаружила неполадки жесткого диска» является достаточно серьезным сигналом, который свидетельствует о неполадках в работе системы или жесткого диска. Данная ошибка может возникать с некоторой периодичностью, что значительно снижает удобство использования компьютером. Помимо этого, после ошибки может возникать «мертвое» зависание ПК, синий экран или другие проблемы.
Если пользователь хотя бы раз увидел подобную ошибку, следует немедленно обезопасить себя и произвести резервное копирование всей важной информации на другой носитель. Если под рукой ничего не оказалось, следует загрузить резервные копии в любой облачный сервис. Такие меры предосторожности обусловлены тем, что появление ошибки говорит о возможной поломке жесткого диска.
Возможные причины ошибки
Ошибка «Windows обнаружила неполадки жесткого диска» может быть вызвана целым списком причин, в который входят:
- Физические поломки HDD или SSD.
- Логические проблемы с файловой системой, разделами, загрузочной записью.
- Проблемы с реестром операционной системы.
- Действие вредоносного вирусного ПО.
- Неправильный «разгон» компонентов компьютера.
- Неисправность компонентов.
- Перегруженность системы требовательными программами и другими утилитами.
- Проблемы с системными файлами, отвечающими за работу жесткого диска.
Как исправить ошибку «Windows обнаружила неполадки жесткого диска»?
Вне зависимости от причины возникновения ошибки, следует обязательно сделать резервные копии важной информации, после чего можно приступать к различным манипуляциям, способных решить проблему.
Не перезагружайте компьютер при возникновении ошибки, поскольку возможно система не сможет запуститься в следующий раз! Стоит отметить, что в некоторых случаях ошибка может возникать при сильном износе или неисправности жесткого диска. В таком случае ошибку можно исправить лишь с помощью замены накопителя на новый.
Проверка диска chkdsk
Поскольку ошибка может быть вызвана проблемным жестким диском, первым делом следует проверить диск встроенной утилитой для проверки дисков chkdsk.
Для ёё активации необходимо:
Шаг 1. Нажать правой кнопкой мыши по «Пуск» и выбрать пункт «Windows PowerShell (администратор)» или «Командная строка (администратор)».
Шаг 2. В открывшемся окне следует ввести команду «chkdsk C: /f» и Enter (вместо диска C может быть любой другой. Если установлен один диск, разбитый на логические разделы, следует провести проверку для всех отдельных разделов). В некоторых случаях система попросит подтвердить действие буквой Y.

После выполнения данных действий система автоматически проверит диск и попробует исправить его проблемы.
Более детально узнать про команду chkdsk можно в статье «Команда CHKDSK».
Оценка состояния носителя
Чтобы исключить проблему с накопителем следует воспользоваться утилитами для оценки состояния накопителя. Для этого следует получить и самостоятельно проанализировать показания SMART. Проверка и получение показаний, зачастую, выполняются при помощи сторонних программ.
Одной из самых популярных является утилита для проверки дисков Victoria. В статье «Как протестировать и исправить жесткий диск используя бесплатную программу Victoria» Вы сможете найти детальное описание работы программы, а также способы исправления ошибок, удаления плохих секторов и других манипуляций, которые позволят вернуть накопителю работоспособность.
Проверка и исправление системных файлов
Возможно причина ошибки кроется в системных файлах, неправильная работы которых вызывает проблемы.
Что проверить и исправить это, следует также открыть командную строку, подобно первому способу, и ввести команду «sfc /scannow».

Проверка системных файлов может занимать значительное время. Результат станет доступен после проверки, поэтому рекомендуем внимательно ознакомиться с текстом, который выдаст утилита sfc. Если в тексте проверки будет обнаружено, что программа не может восстановить некоторые файлы, это может говорить о серьезных логических неполадках или поражении системы.
Пример сообщения после проверки, при котором системные файлы работают корректно:

Если присутствует сообщение, о невозможности исправления, в таком случае лучшим выходом станет переустановка операционной системы.
Как убрать сообщение об ошибке «Windows обнаружила неполадки жесткого диска»?
Если причиной ошибки стал выходящий из строя жесткий диск с плохими показателями SMART, избавиться от ошибки можно, но стоит понимать, что такое действие не является исправлением проблемы, а просто маскирует её.
Также следует помнить, что диск с замаскированным сообщением об ошибке может выйти из строя в любую минуту, поэтому рекомендуем не хранить на таком носителе важную информацию или сделать резервные копии данных.
Для отключения сообщения об ошибке следует:
Шаг 1. Нажимаем правой кнопкой мыши по «Пуск», выбираем пункт «Выполнить», в открывшемся окне вводим команду «gpedit.msc» и нажимаем «Ок».

Шаг 2. Переходим по пути: «Конфигурация компьютера», «Административные шаблоны», «Система», «Диагностика», «Диагностика диска». В последнем каталоге следует найти раздел «Диагностика диска. Настроить пользовательский текст оповещения» и дважды кликнуть по нему.

Шаг 3. В открывшемся окне выбираем «Отключено» и подтверждаем действие кнопкой «Применить».
После этого уведомление больше не будет демонстрироваться системой.
Что делать, если в результате ошибки были утеряны файлы?
Проблемы с жестким диском являются частой причиной утери ценной информации, которая храниться на компьютере, поэтому к любым сообщениям с ошибками винчестера следует относиться со всей серьезностью. Мы настоятельно рекомендуем создавать резервные копии важных файлов при любых подозрениях неисправности накопителя. Странные звуки, заторможенная работа, ошибки, «мертвые зависания» при копировании или считывании информации – все это лишь небольшая часть симптомов, свидетельствующих о скорой поломке.
Если в ходе работы Вы заметили, что некоторые важные данные исчезли или не сохранились, рекомендуем воспользоваться специальной утилитой для восстановления данных с проблемных жестких дисков RS Partition Recovery.
Данная программа сможет вернуть все возможные для восстановления данные даже в самых трудных случаях. Для быстрой работы RS Partition Recovery не требуется мощных ресурсов компьютера, поэтому программа отлично справляется с восстановлением любых файлов даже на офисных системах и слабых нетбуках. Отметим, что RS Partition Recovery сможет вернуть данные после форматирования, случайного удаления, проблем с физическим или программным состоянием накопителя, уничтожения вирусами и т.д.
Помимо этого, RS Partition Recovery превосходно подходит для восстановления файлов с флешек, HDD и SSD жестких дисков, карт памяти и любых других носителей. Это позволяет получить максимально широкий спектр применения для самых различных ситуаций.
Часто задаваемые вопросы
Ошибка «Windows обнаружила неполадки жесткого диска» может возникать из-за физических проблем с диском, логических проблем, проблем с реестром Windows, действий вирусов, слишком большого количества требовательных программ, проблем с системными файлами или неправильного разгона компонентов компьютера.
Проверить и исправить ошибки на жестком диске можно выполнив в командной строке команду chkdsk /f /r
Воспользуйтесь программой RS Partition Recovery. Программа позволяет восстанавливать данные, утерянные после случайного удаления файлов, форматирования накопителя и во многих других случаях. А встроенный мастер восстановления файлов позволяет восстановить файлов в несколько кликов мышки.
Ни в коем случае нельзя, поскольку система может не загрузится в следующий раз. Настоятельно рекомендуется исправить ошибку «Windows обнаружила неполадки жесткого диска» используя инструкцию на нашем сайте.
Запустите командную строку или среду Windows PowerShell от имени администратора и выполните команду «sfc /scannow».
Summary: The error message Windows detected a hard disk problem is a more or less common problem that many users run into due to various causes. You can dismiss the message and later the computer still works fine. However, one of the disks is likely failing and the error can entail various and severe harms to the computer if you chose to ignore it. Hence, for users who are persistently annoyed by the problem, this article comprises the 7 useful solutions and the data recovery method for you to walk through.
WIN VERSION MAC VERSION
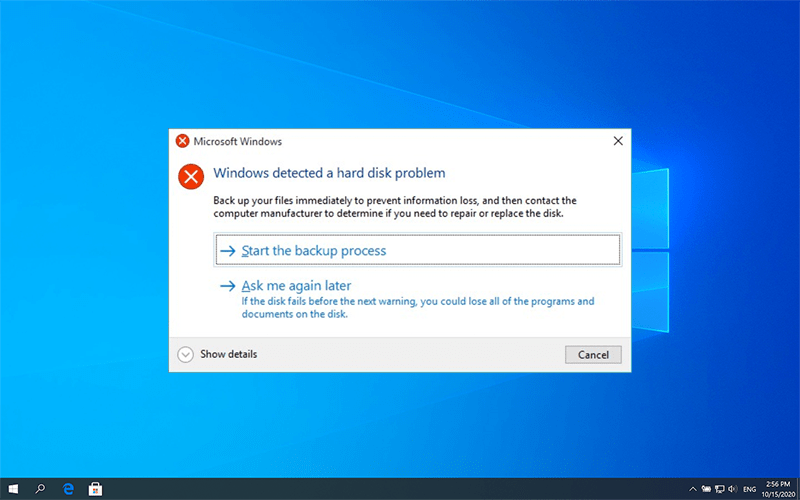
Table of Contents
Possible Reasons for the Error
Usually, hard drive failure is the main culprit. But it has been reported that other causes can generate the error. Below are a few examples:
- Hard disk/drive failure
- System file damage
- Virus attack
- Mechanical or logical error
- Bad sectors on the drive
- Improper human operations
Possible Consequences of the Error
If you encounter the error, below are a few consequences it could result in.
- Blue screen of death
- Computer freezes frequently
- Damage to the system files
- Data loss from the drive
How to tackle Windows detected a hard disk problem
After knowing the possible causes that encounter the Windows detected a hard disk problem error, then please read the solutions carefully and slowly and make sure you have backed up the important data before going through the steps described below.
Solution 1: Use System File Checker
System File Checker is one of the basic tools offered by Windows to help users fix errors. Its main purpose is to help users check system files and tackle integrity issues.
Step 1: Type in Command Prompt in the Search Bar and then choose Run as administrator.
Step 2: In Command Prompt, type sfc/scannow and press the Enter key.
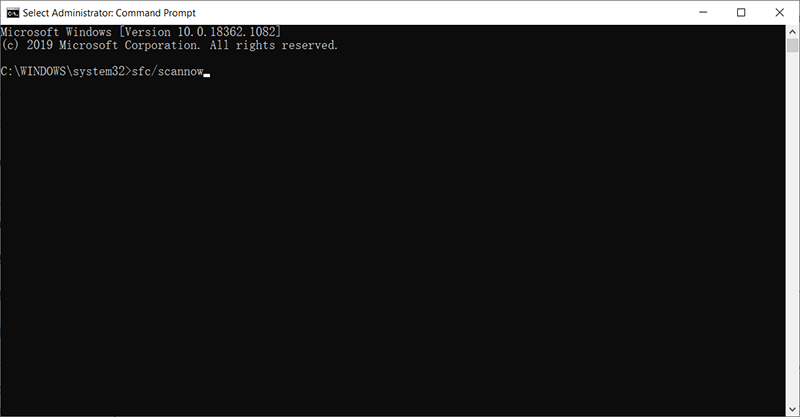
The scanning process should be fast, and the result tells whether there is a system file integrity issue. It scans system files and replaces corrupted ones with the backup stored in the cache. You shouldn’t close the window until the verification has been 100% complete.
Note: If the computer fails to find the system file in the cache, it will ask for a Windows installer to access the inaccessible system file. You can grant permission to allow it to do so.
Solution 2: Run DISM
When your computer is experiencing unexpected issues that you fail to tackle using the SFC command, the next best choice is to use DISM to fix the issues. Note: Before instructing Command Prompt to carry out DISM, you should do a full backup of the important files stored in the disk because the command may alter the data on it.
Step 1: Run the Command Prompt (Admin) from the Start Menu.
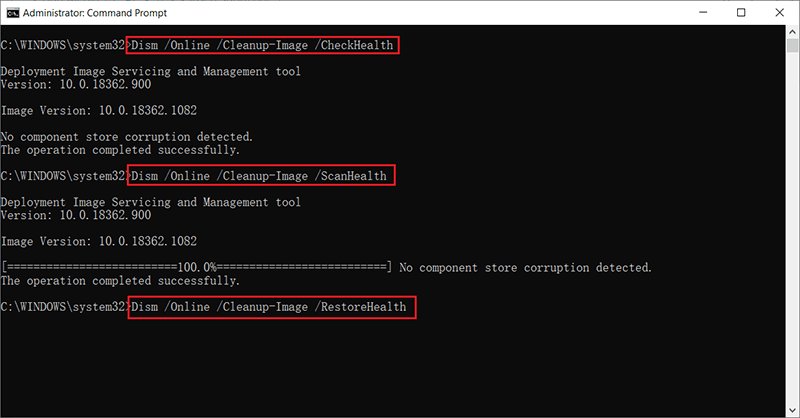
Step 2: Enter the following commands in order:
- Dism /Online /Cleanup-Image /CheckHealth
- Dism /Online /Cleanup-Image /ScanHealth
- Dism /Online /Cleanup-Image /RestoreHealth
Step 3: After the completion of the process, reboot your computer to save changes.
Solution 3: Run CHKDSK
CHKDSK is a system tool that can be used to check and repair errors for NTFS and FAT file systems. To use the tool, refer to the following steps:
Step 1: Type in Command Prompt in the search bar, right-click on the application and select Run as administrator.
Step 2: Type in CHKDSK /F /R X: You should replace the X with the partition drive letter that you want to check.
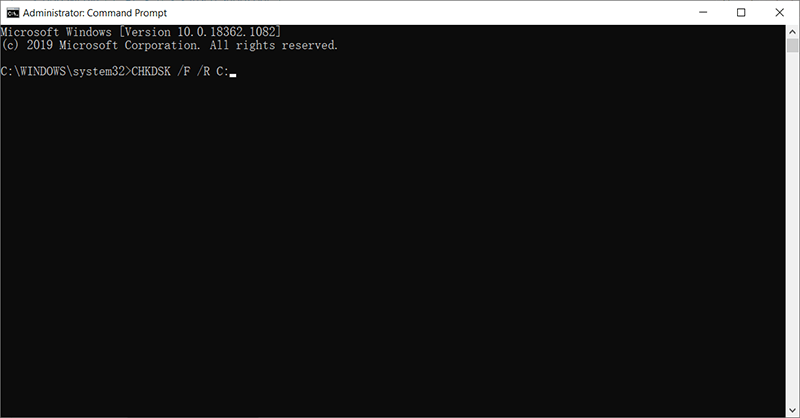
The tool will automatically fix the problem if it detects any issue. After the process has ended, restart the computer.
Note: You should back up those important files before using the command as running CHKDSK risks losing the data on the drive.
Solution 4: Change SATA Configuration
Step 1: Turn off your computer.
Step 2: Power on it and enter into the BIOS setup by pressing the BIOS key, which is set up by your computer’s manufacturer and could be F1, F2, F10, F12, or DEL.
Step 3: Look for the setting called SATA configuration.
Step 4: Click on the brackets next to Configure SATA, and then select AHCI.
Step 5: Press F10 to save the change and exit.
Recover Lost Data Using Bitwar Data Recovery
Many hard disk issues or system failures wind up causing serious data loss problems. So, if you are experiencing Windows detected a hard disk problem, in addition to trying all the solutions recommended above, doing a backup of your data is equally important. However, in case that the data has been lost and the hard drive has stopped working properly, use Bitwar Data Recovery to bring your files back.
First, you need to make sure the hard drive isn’t physically damaged in this way: Press Win + R and type in diskmgmt.msc, check whether the hard drive shows in the Disk Management or not; if yes, you need to follow the below steps as soon as you can to prevent the data from being overwritten by the new data. Reminder: Stop using your hard drive during the scanning!
Step 1: Go to the official website to download Bitwar Data Recovery for Win version and install it.
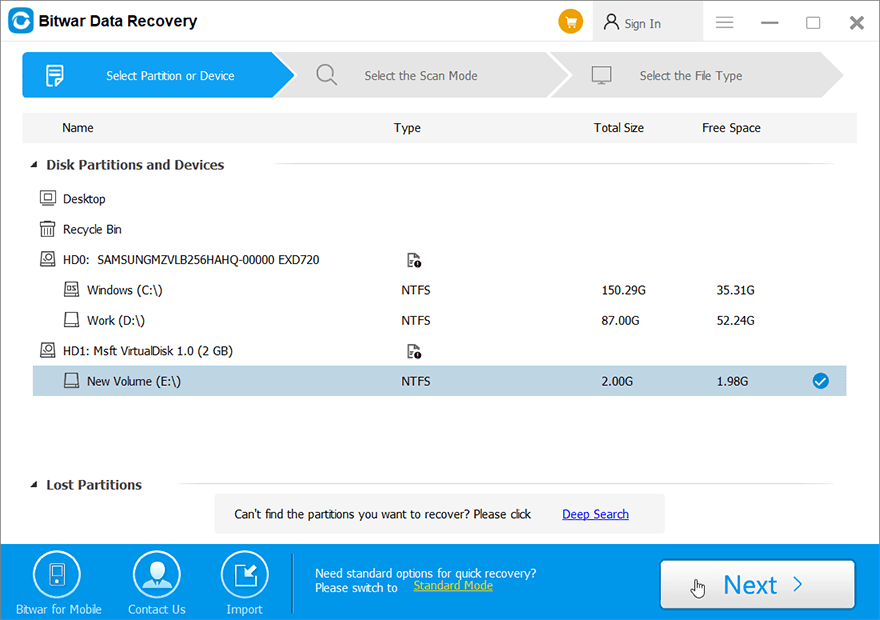
Step 2: Select the disk/partition where your lost files were deleted. Click Next.
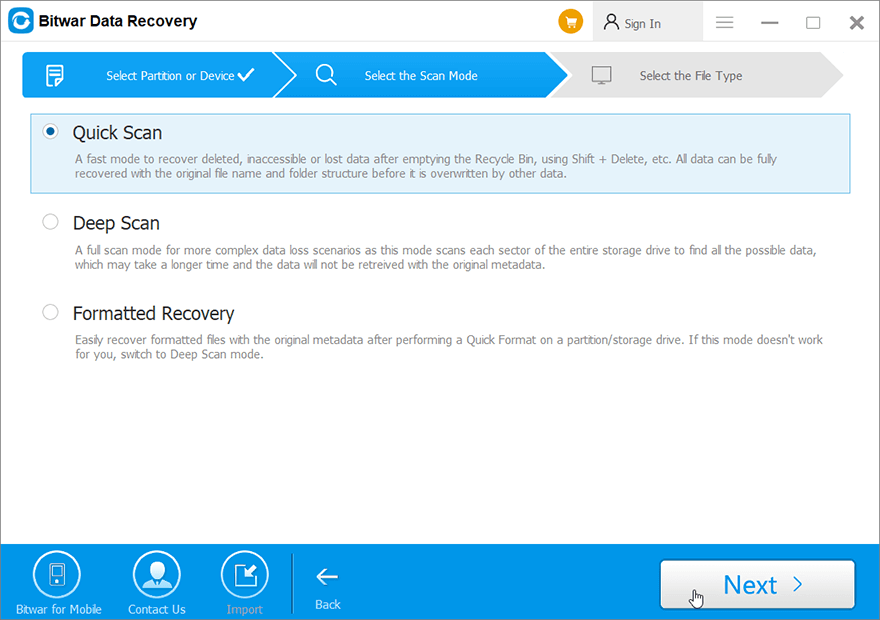
Step 3: Here, we should select a recovery mode. We strongly recommend Quick Mode, in which the whole disk can be scanned in a few minutes. However, if this scan mode doesn’t work on the drive, you can try Deep Scan next time.
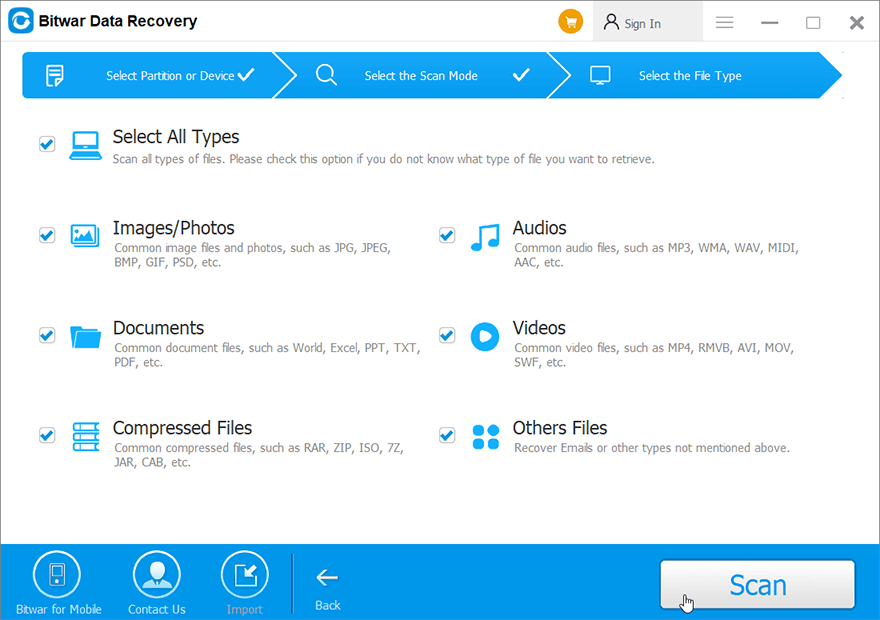
Step 4: Select file types and then click Scan.
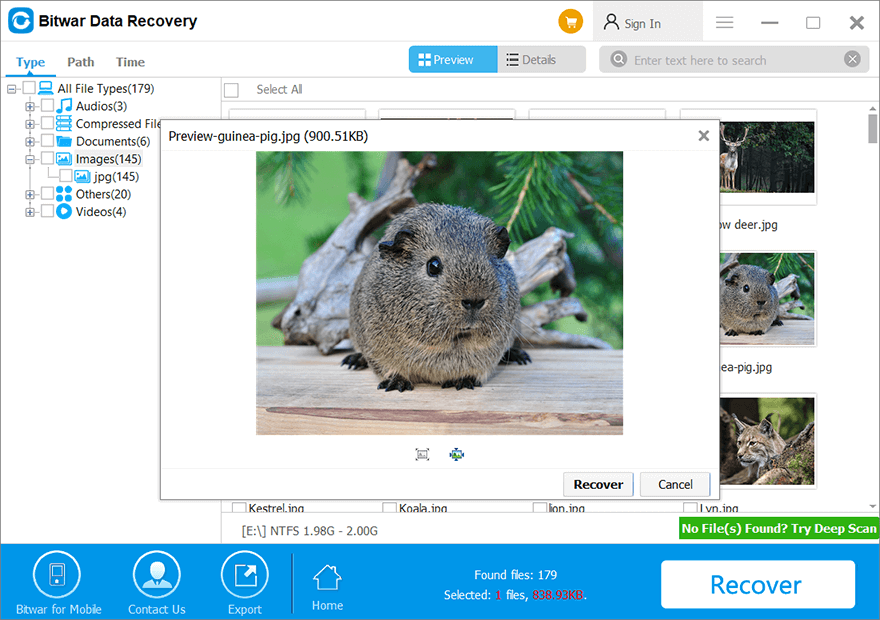
Step 5: Double-click on a file to preview it, and then select the wanted files to be recovered.
Other Workable Solutions Worth A Try
Solution 5: Run an Anti-Virus Program
Since one of the causes of the error is a virus attack, it’s sensible to try running anti-virus software to scan the drive and remove its malicious content and malware.
Solution 6: Check Bad Sectors for the Drive
If the attempts to repair the system and to root out malware fail, you can start to look into the health state of the hard drive. “bad sectors” is a common problem facing many computer users. There are two types of bad sectors, which are often divided into physical and logical bad sectors. To get a comprehensive view of your hard drive, download a reliable third-party tool that helps users check disk heath.
Solution 7: Reinstall Windows (Final Solution)
One of the easiest and outright ways to fix any intractable computer problem is to reinstall the operating system. Make sure that the partition where you are going to install the OS has enough space to store it and that you have backed up all the important files.
How to Disable the Error Message
If you have tried out all the solutions mentioned above and are sure that all your disks are healthy, you may want to disable the Windows detected hard disk problem message. Use the following steps to do so:
Step 1: Press Win + R to open the Run dialog box.
Step 2: Type in Gpedit.msc and click on OK.
Step 3: Navigate to Administrative Templates > System > Troubleshooting and Diagnostics > Disk Diagnostics.
Step 4: On the right page, double-click on the Disk Diagnostics: Configure execution level.
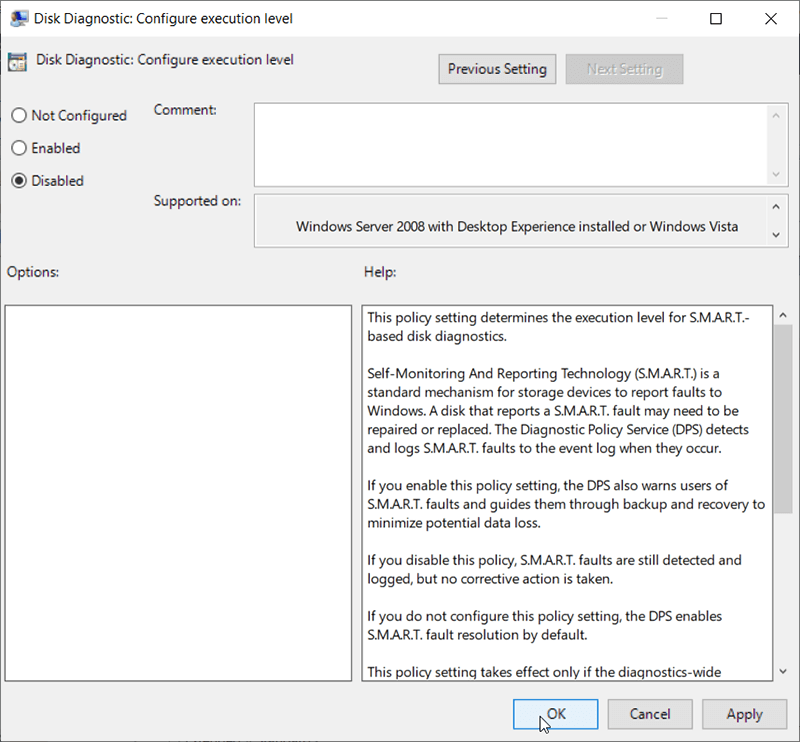
Step 5: Tick off Disabled and click on OK.
Note: In most cases, this is not a solution we would like to recommend because having a feature that warns users of potential drive risks is central to keeping your disk healthy. If your hard drive is experiencing an issue, disabling the error message will definitely worsen the situation. Make sure the error message is completely wrong before disabling it.
Conclusion
This article lays out how to tackle the error of Windows detected a hard disk problem and comprises everything that you need to know related to this error; however, we strongly recommend you not to hurry for fixing the hard disk error before making sure whether you have the important data stored on it, at least, retrieve the data before everything goes wrong. After that, use any solutions mentioned above to get everything right! Remember to backup your data first.
Updated on April 22, 2024
| Workable Solutions | Step-by-step Troubleshooting |
|---|---|
| Fix 1. Use system file checker to fix hard disk error | Step 1: Type cmd in the search bar and click Enter; Step 2: Type sfc /scannow and press Enter…Full steps |
| Fix 2. Run CHKDSK to fix the hard disk problem |
Method 1: Step 1: Press «Win+R» keys to open Run, type cmd, and hit Enter to open Command Prompt…Full steps (Clean Genius) Method 2: Step 1: Click «File Showing» to proceed to the next step…Full steps |
| Fix 3. Use partition manager software to check and repair hard disk/drive errors | Step 1: Right-click the problematic target partition; Step 2: Select «Advanced» > «Check File System»…Full steps |
«Windows检测到硬盘问题,求助!»
«Have you ever encountered an issue where your computer suddenly displays an error message stating ‘Windows detected a hard disk problem’?
This morning, after turning on my PC, this error kept appearing, warning me of a ‘Windows detected a hard disk problem’ and suggesting I initiate the backup process. It’s quite perplexing, and I’m unsure how this issue occurred on my computer. I’m curious about the possible reasons for a hard disk problem and how to resolve it. If you have any knowledge on how to fix a hard disk problem on a Windows PC, please assist me. I am using Windows 8. Thank you in advance.»

It appears that hard disk errors or issues are no longer a novel concern but have been烦扰几乎所有Windows用户相当长一段时间了。就连Windows 10用户也在他们的电脑中遇到“Windows检测到硬盘问题”。那么,如何解决此类问题呢?让我们现在就来找出硬盘问题出现的原因、诱因以及修复硬盘问题的解决方案。
Sure, please provide the text that needs to be translated.
Why Do Hard Drive Problems/Errors Occur?
Before proceeding with solutions to fix the hard disk issue, it’s highly advisable to identify the root cause of the problem. This knowledge will prove invaluable in preventing similar issues from reoccurring in the future.
1. Causes of hard disk problems — How do they arise?
- Hard drive/disk failure;
- System errors, such as registry errors, etc;
- Logical/mechanical errors;
- File system corruption/damage;
- Bad sectors appearing on the hard disk partition;
- Virus attack;
- Misoperation/human error, etc.
If any of the above issues happens to your hard drive on PC, Windows would detect the problems and remind you of the error message — ‘Windows detected a hard disk problem’.
- Sure, please provide the text that needs to be translated.
# 3 Fixes for the «Windows Detected a Hard Disk Problem» Error
So how can you exactly fix the error in your PC? If you are looking for methods to fix the hard disk problem, keep reading and you’ll find what you need here right now.
1. Use System File Checker to fix hard disk errors
Windows offers some basic tools to assist with error repair, such as the System File Checker. This straightforward utility enables users to check the status of system files and address numerous seemingly severe issues. Importantly, it’s not complicated to use. Here are the detailed steps for employing the Windows System File Checker:
- Type: cmd in the search bar and click Enter.
- Type: sfc /scannow and press Enter.

This command will scan all protected system files and replace any corrupted files with a backup copy. Once the process is complete, your hard drive should function correctly again.
2. Run CHKDSK to fix the hard disk issue
CHKDSK is a system tool and command in computer operating systems. It checks the file system integrity of a volume and tries to repair logical file system errors. To use the CHKDSK command to examine and resolve system issues, follow these steps:
- Translate the following text into English, focusing on translation only:
- Press «Win+R» keys to open Run, then type: cmd and press Enter to open the Command Prompt.
- Type: chkdsk C: /f /r /x and press Enter.

CHKDSK Alternative
Download the tool CleanGenius and install it on your computer. Let’s begin checking and rectifying the file system error on your device.
Step 1. Click «File Showing» to proceed to the next step.

Step 2. Select the target device and check the box for «Check and fix file system error.» Click «Execute» to begin repairing the problematic device.

Step 3. Once the repair process finishes, click «here» to open and use your device.

3. Use partition manager software to check and repair hard disk/drive errors
If you’re unfamiliar with Windows administration, you can try a free and professional partition management software from tools, called tools Partition Master Free. This software supports checking, finding, and repairing bad sectors on your hard disk or drive.
Download this tool for free and follow the below tips to check and fix hard disk drive errors/problems right now:
Step 1. Right-click the problematic partition.
Step 2. Select «Advanced» > «Check File System».
Step 3. Confirm whether you want to hide the partition or not.
Step 4. In the Check File System window, select the «Try to fix errors if found» option.
Step 5. Click «Start» to scan for errors on your partition.
Now that you’ve successfully resolved the hard disk partition issue and all data is safely saved.
Prevent Computer from Displaying Error Message If No Hard Drive Issue Exists
The reason why Windows displays error messages is that when the system detects an existing or potential error on your hard disk, it prompts you to back up your data. However, if there is no hard disk error or issue, you can follow the tips below to prevent the computer from reporting error messages:
Step 1. Type: gpedit.msc in the search bar and press Enter.
Step 2. Go to «Administrative Templates» > « System» > «Troubleshooting and Diagnostics» > «Disk Diagnostics».
Step 3. Click on «Disk Diagnostic» and disable the «Configure execution level» option.
Step 4. Click «Apply» and «OK».
Step 5. Restart your computer, and the error message should not appear again.

What Can You Do When an Unexpected Hard Disk Problem Occurs?
Thus, you may wonder what to do when a hard drive issue occurs and your Windows system prompts an error message – “Windows has detected a hard disk problem. Would you like to start the backup process? Or remind me later?”
Yes, it’s about backing up data beforehand. You can selectively copy and paste individual files and documents one by one onto another secure storage device.
However, if you find it too slow or need to back up your entire hard drive data, you can try using third-party software to easily clone/duplicate the disk. For this purpose, you can also utilize the tool Partition Master. With its disk copy/clone function, you can clone the data from one disk to another.
