
Время на прочтение8 мин
Количество просмотров249K
Начало и конец

Добрый день всем читающим!
Много статей было об этом, много блогов, но статья HowTo, без напильника, найдена не была, и это крайне печально.
Для небольших развертываний эта вещь, из коробки просто незаменима.
Для тех кто не знает: WDS (центр развертывания) это специальное средство, которое есть в серверной ОС Microsoft, с помощью него можно установить систему на большое количество компьютер одновременно, с помощью сети, используя PXE.
Также тут будет информация о препарировании wim, и немножко о DHCP.
Итак начнем под катом.
Часть 1. Установка
Эту часть можно пропустить тем, кто хоть раз делал установку служб\компонентов в Server 2012R2. Из этого блока нужен только пункт 1.3.
Идеалом для WDS является, если DHCP сервером является эта же машина. Тогда он может корректно передать информацию о PXE Boot.
1.1 Включение WDS
Установка WDS в картинках. Все просто.
Дальше начинается то, что потребует чуть больше, чем просто Nextnextnext)/
1.2 Включение роли
Настройка
После установки выбираем в списке консоли наш сервер WDS.


Так как по умолчанию предлагается загрузочные и установочные образы хранить на системном диске (что не рекомендуется), то создадим на разделе E: папку RemoteInstall, которая и была указана мастеру настройки сервера.
Тут на ваш выбор
1.3 Образы
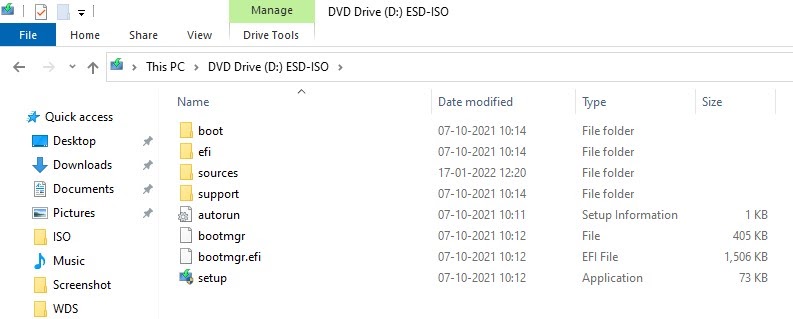
На установочном диске с любой системой, начиная с Vista, есть папка source, там лежат два файла boot.wim и install.wim
Boot.wim — это образ для запуска, предзагрузочный.
install.wim — это образ самой системы.
Если boot.wim ещё надо будет подготовить, для работы, то install.wim сразу готов для установки.

В диспетчере сервера boot — образы загрузки, install — образы установки.
Часть 2. Препарирование Boot.wim
Очень часто возникает одна большая пролема:
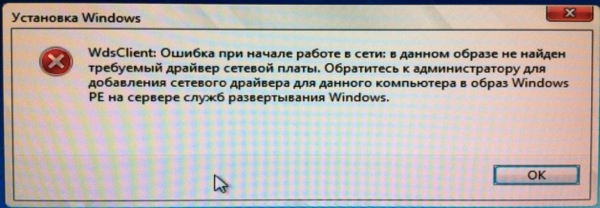
Сразу интегрируем необходимые драйвера в этот образ, дабы избежать этой проблемы.
Она возникает, из-за отсутствия в образе драйверов для сетевой карты, которая интегрирована \ установлена в компьютер, на котором будет происходить установка ОС.
2.1 Утилиты
По умолчанию в 2012 сервере, после установки WDS, утилита dism может работать с образами wim в полной мере.
Для 2008/R2 или 7 вам понадобится Windows Automated Installation Kit (WAIK) и у вас появится инструмент dism.
Создаем структуру папок: c:\drivers\mount — папка монтирования WIM образа; c:\drivers\lan_drivers — папка с драйверами для сетевой карты.
Копируем boot.wim от ОС в папку c:\drivers
Предостерегаю! Чем больше драйверов, тем больше универсальности, но и размер образа сильно увеличивается, это необходимо учитывать. Образ целиком заливается в RAM.
2.2 Препарирование
Для 2008\7 запускаем Deployment Tools Command Prompt из меню пуск с правами администратора.
Для 2012 — запускаем командную строку с правами администратора.
Смотрим содержимое загрузочного образа boot.wim:
dism /get-wiminfo /wimfile:c:\drivers\boot.wim
По идее там должно быть так:

Как видно из скриншота boot.wim содержит два образа — Windows PE (Индекс 1) и Windows Setup (Индекс 2). Драйвера для сетевой карты надо добавлять в Windows Setup, поэтому будем работать с образом 2 (Индекс 2).
Но не так всё просто.
Компания добра
Microsoft заблокировала для изменения этот образ, для его редактирования его надо «перезалить».
Выполняем:
Dism /Export-Image /SourceImageFile:c:\drivers\boot.wim /SourceIndex:1 /DestinationImageFile:c:\drivers\boot1.wim
Dism /Export-Image /SourceImageFile:c:\drivers\boot.wim /SourceIndex:2 /DestinationImageFile:c:\drivers\boot1.wim
Соответственно, мы перезалили образы Windows PE\Setup в новый файл.
Сначала скопировали первый, потом второй индекс.
Удаляем boot.wim, переименовываем boot1.wim в boot.wim
dism /get-wiminfo /wimfile:c:\drivers\boot.wim
Должна выдать те же два раздела, с index 1 & 2.
2.3 Добавление драйверов
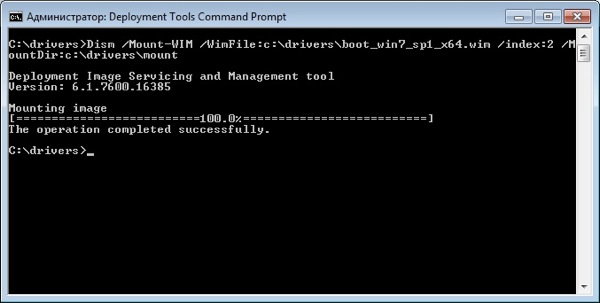
Монтируем образ с индексом 2 из файла boot.wim в папку «c:\drivers\mount» командой:
dism /Mount-Wim /WimFile:c:\drivers\boot.wim /index:2 /MountDir:c:\drivers\mount
Добавляем драйвера в образ. Драйвера можно добавлять по одному, либо сразу все из определенной директории.
Для добавления драйвера указываем полный путь к файлу .INF:
dism /image:c:\drivers\mount /add-driver /driver:«C:\drivers\lan_drivers\E1C5232.INF»
Если драйверов много, то указываем каталог в качестве источника для поиска и добавления драйверов:
dism /image:c:\drivers\mount /add-driver /driver:«C:\drivers\lan_drivers» /recurse /forceunsigned
параметр /recurse используется, чтобы установить драйвера из вложенных каталогов, а /ForceUnsigned для установки неподписанных драйверов.
После добавления всех драйверов загрузочный образ нужно закрыть (отмонтировать).
dism /unmount-wim /mountdir:c:\drivers\mount /commit
параметр /commit указывает, что нужно сохранять все изменения в образе, без него все изменения будут потеряны.
2.4 Образ в хранилище
Теперь перекопируем его в любую директорию, где у вас будут хранится образы.
И установим на сервер WDS.

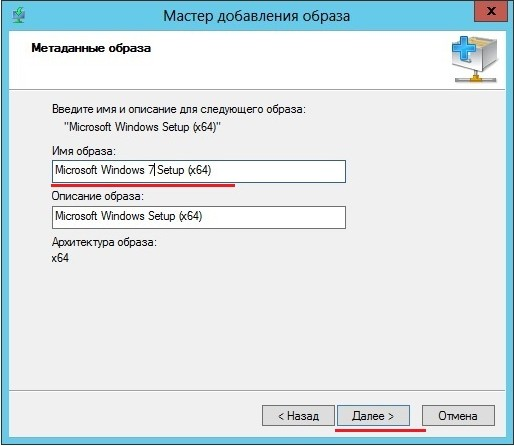
Теперь необходимо указать имя. Имя образа — это то, что будете видеть вы, при выборе загрузчиков, если у вас их несколько.
2.5 Безопастность
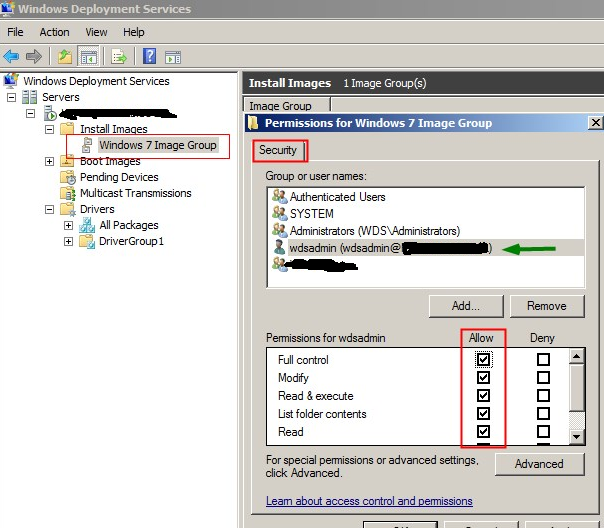
Security — Чтобы добавить разрешения для учетной записи пользователя на группу образов, щелкните правой кнопкой мыши группу оразов и нажмите security. Добавьте учетную запись пользователя из AD и настройте полный контроль. Если вы используете учетную запись администратора домена во время установки WDS, то это можно не делать.
Часть 3. Образ системы. Кастомный вариант
Для начала устанавливаем ОС. Ставим всё что надо.
Далее препарируем её. По ссылке создание настроенного образа операционной системы
Хорошая статья по IMAGEX + WINPE созданию образа там же есть ссылки вначале статьи для создания WIN7 & WIN8. Либо находим на просторах интернета WindowsPE, по вашему желанию)
Для дальшейшего нам нужен образ WinPe с утилитой ImageX правильной битности.
3.1 Создание образа и его копирование на сетевой ресурс с помощью Windows PE и программы ImageX
Теперь запишем образ компьютера, с помощью среды Windows PE и программы ImageX и сохраним на сетевом ресурсе.
Для этого необходимо загрузиться с диска Windows PE.
Для того чтобы иметь доступ на запись к сетевому ресурсу, необходимо к нему подключиться, введя следующую команду:
NET USE y: \\nmp\oem\<имя папки> /USER:AD\ *
И ввести свой пароль.
! надо понять какой диск является каким, для этого с помощью команды DIR C: (D,E,F & etc), перебираем диски, если их несколько
Далее необходимо записать образ основной установки с помощью программы ImageX, расположенной в среде Windows PE, или на другом диске, на сетевой ресурс. Для этого необходимо ввести следующую команду:e:\imagex.exe /capture d: y:\ <имя>.wim «<название>» /compress fast /verify
Где e:\ — RAM Disk, D: — OS Disc, Y: — сетевой диск. После этого пойдёт процесс создания и копирования образа на указанный сетевой ресурс.
По завершении создания образа и его копирования на сетевой ресурс необходимо ввести команду exit и приложение закроется и компьютер начнёт перегружаться.3.1.1 Ручное развертывание
Если необходимо руками образ развернуть (без WDS) но по сети
Битность системы должна быть той же, что и у системы, которую мы распаковываем.
После создания образа, можно развернуть его на новое оборудование с помощью программы ImageX и среды Windows PE.
Форматируем диск, для распаковки на него WMI.
Для этого надо ввести следующие команды:diskpart
select disk 0
clean
create partition primary size=100
select partition 1
format fs=ntfs label=«system»
assign letter=c
active
create partition primary
select partition 2
format fs=ntfs QUICK
assign letter=e
exitМожно создать сценарий для данной процедуры, сохранив приведенную информацию в текстовый файл в папке с образом. Чтобы выполнить сценарий из командной строки среды Windows PE, необходимо ввести команду: diskpart /s <имя_сценария>.txt
Форматирование следует проводить ТОЛЬКО в среде Windows PE. Если отформатировать жёсткий диск на другом компьютере средствами Windows, а затем вставить этот жёсткий диск в конечный компьютер, то образ с вероятностью 80% НЕ РАЗВЕРНЁТСЯ.
Подключаемся к сетевому ресурсу для развёртывания образа, введя следующую команду:
NET USE y: \\nmp\oem\<имя папки> /USER:AD\ *
Вводим пароль.
! надо понять какой диск является каким, для этого с помощью команды DIR C: (D,E,F & etc), перебираем диски, если их несколько
Разворачиваем образ на жесткий диск с помощью программы ImageX, с сетевого ресурса, введя следующую команду:d:\imagex.exe /apply y:\<имя>.wim 1 e: /verify
После этого пойдёт процесс развёртывания образа на указанный жёсткий диск с сетевого ресурса.
Далее, с помощью средства BCDboot необходимо инициализировать хранилище данных конфигурации загрузки (BCD) и скопировать файлы среды загрузки в системный раздел, введя в командной строке следующую команду:
e:\windows\system32\bcdboot e:\windows
По завершении создания образа и его копирования на сетевой ресурс необходимо ввести команду exit и приложение закроется и компьютер начнёт перегружаться.
Настроенный образ развернут на конечный компьютер.
3.2 Сервер
Настроим сервер, для работы с образами.
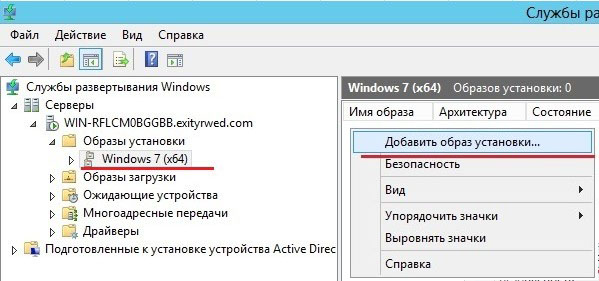
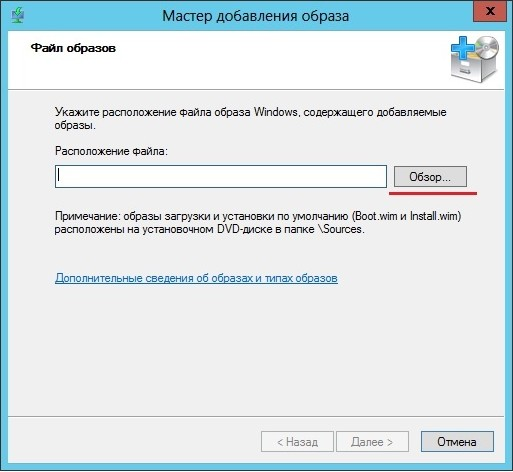
Добавим наш готовый образ в «Образы установки»:

Как в случае с загрузочным образом указываем мастеру путь к файлу wim, который мы создали:
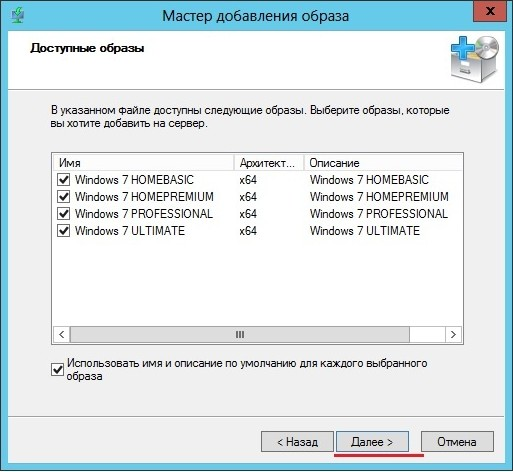
В оригинальном файле install.wim может содержаться несколько редакций:
Но в созданном должна быть только одна.
Часть 4. Великий и ужасный DHCP
1) WDS и DHCP установлены на одном сервере.
WDS и DHCP не могут занимать порт UDP 67 одновременно. Запретив службе WDS прослушивать порт UDP 67, можно предоставить порт для DHCP-трафика и присвоить DHCP-параметру 60 (параметр области или сервера) значение PXEClient, устранив конфликт.
Если служба WDS устанавливается на DHCP-сервере, в ходе настройки появляется страница DHCP Option 60. Установите флажки Do not listen on port 67 и Configure DHCP option 60 to PXEClient. В сообщении, получаемом клиентом от сервера DHCP, содержится IP-адрес, маска подсети и параметр 60.
В результате клиенту становится ясно, что сервер DHCP является одновременно и сервером WDS. Если позднее добавить DHCP к серверу WDS, можно настроить этот параметр, щелкнув правой кнопкой мыши на имени сервера в оснастке WDS и выбрав пункт Properties. На вкладке DHCP имеются аналогичные флажки.2) WDS и DHCP находятся на различных серверах, в одной подсети с клиентами.
Дополнительной настройки не требуется, так как WDS и DHCP расположены на разных серверах. Обе службы могут прослушивать порт UDP 67, а клиенты находятся в одной подсети с серверами WDS и DHCP, поэтому широковещательный трафик доступен для всех.
3) WDS и DHCP устанавливаются на различных серверах, в разных подсетях.
Службы WDS и DHCP, установленные на разных серверах, не мешают друг другу прослушивать порт UDP 67.
Вы должны настроить маршрутизатор на отправку широковещательных пакетов, потому что чаще всего мы видим, что широковещательные пакеты не могут идти в другие подсети. Кроме того, весь трафик на UDP порт 4011 от клиентских компьютеров к серверу служб развертывания Windows должен быть направлен соответствующим образом.
Чтобы помочь клиенту WDS найти сервер WDS мы должны настроить DHCP опцию 66 и DHCP опцию 67.
Настройка параметров DHCP в сети IPv4 выполняется из оснастки DHCP, доступной из раздела Administrative Tools меню Start.В оснастке DHCP разверните IPv4, а затем щелкните правой кнопкой мыши Server Options (или параметры области) и выберите пункт Configure Options. Прокрутите список до элемента 066 Boot Server Host Name, установите флажок и введите имя узла сервера WDS в текстовом поле (можно использовать имя, но желательно IP).
Затем установите флажок 067 Bootfile Name. В текстовом поле введите путь и имя файла Preboot Execution Environment (PXE) для загрузки на клиенте. Текстовое значение для параметра 67:
boot\x86\wdsnbp.com — 32 bit
ИЛИ
boot\x64\wdsnbp.com — 64 bitТакже есть рекомендации с иностранных сайтов:
Configure DHCP option 67 with the right boot image file.
For 32-bits systems \boot\x86\wdsnbp.com
For 64-bits systems \boot\x64\wdsnbp.com4.1 CNP
Client Naming Policy — в настройках сервера WDS, выберите AD DS. В Client Naming Policy указать формат, на основании которого компьютерам будет задаваться имя.
Шаблон по умолчанию именования %61Username% #, это означает, WDS создаст имя компьютера, используя имя пользователя, вошедшего на удаленный при выполнении процесса установки и # это число 1,2,3… до 999 будет добавлен после имени пользователя.4.2 Cisco DHCP MODE
Тут не так страшно как кажется:
BU# ip dhcp pool DATA
BU# option 66 ascii «1.2.3.4»
BU# option 67 ascii «bootfile.pxe»Часть 5. немного послесловия
Собственно всё. Это небольшая статья, и кажется она закончена.
Кто-бы что не говорил, но для небольших сеток это очень нужная вещь.
Для тех, кто захочет расширить функционал, есть просто отличная статья на Geektimes: «Добавляем WDS универсальности».На этому спешу откланяться, спасибо всем кто заинтересовался этой статьёй.
Гиктаймс форевер!
Если есть оЧепятки в тексте пиши в личных сообщениях, флудить и троллить не спортивно! Если можете что-то важное добавить, добавлю в статью.
UPD. спасибо darthslider и
navionСуществует MDT (Microsoft Delpoyment Toolkit).
С помощью него можно сразу добавить ключ в образ и установить продукты с quiet установкой.
Также настроить имя пользователя администратора и его пароль.
Требует отдельного компьютера и установленных зависимостей.darthslider
В первую очередь MDT — это поддежка Task Seqence, то есть это любые скрипты и настройки на любом этапе установки.
Так же это удобный редактор unattend.xml
Ну и в придачу установка ПО, постнастройка, ввод в домен и тд, а так же поддержка сценариев обновления ОС (захват по и настроек, установка новой ос, восстановление), миграции пользователя на новый пк (схоже с предыдущим сценарием). Но последние 2 пунтка это довольно сильное шаманство.(О настройке и поднятии видео ТУТ.)

From Wikipedia, the free encyclopedia
Windows Deployment Services
| Developer(s) | Microsoft |
|---|---|
| Included with | Windows Server 2008 through Windows Server 2022 |
| Predecessor | Remote Installation Services |
| Successor | Windows Assessment and Deployment Kit (WADK), Microsoft Deployment Toolkit,[1] System Center Configuration Manager[1] |
| Type | Remote deployment |
| License | Part of Microsoft Windows |
| Website | learn |
Windows Deployment Services (WDS) is a deprecated component of the Windows Server operating system that enables centralized, network-based deployment of operating systems to bare-metal computers. It is the successor to Remote Installation Services (RIS).[2] WDS officially supports remote deployment of Windows Vista and later, as well as Windows Server 2008 and later. However, because WDS uses disk imaging, in particular the Windows Imaging Format (WIM), it could deploy virtually any operating system. This is in contrast with its predecessor, RIS, which was a method of automating the installation process.
WDS was first bundled with Windows Server 2008 and made available as a supplement for Windows Server 2003 R2. Microsoft deprecated some parts of WDS in Windows Server 2022. It can no longer deploy Windows 11 using a boot.wim file used directly from a Windows ISO or from physical media.[1]
Automated image capture and apply
[edit]
WDS functions in conjunction with the Preboot Execution Environment (PXE) to load a miniature edition of Windows known as Windows PE for installation and maintenance tasks. WDS functions as both a storage repository for the PXE network boot images as well as a repository for the actual operating system images to be installed on the target computer.
When multiple boot images are available, PXE booting via WDS will present the end-user with a boot menu to select the image to load.
Windows PE automation using Windows Assessment and Deployment Kit
[edit]
To simplify the tasks of capturing and applying images, two special scripted Windows PE boot images can be created which automate these tasks. These scripted Windows PE boot images are created using the Windows Assessment and Deployment Kit (Windows ADK; previously named Windows Automated Installation Kit, WAIK), in combination with Windows 7 installation media containing the source WIM images, and then added to the WDS server’s boot image repository. The Windows PE boot images may be either 32- or 64-bit, but 32-bit tends to be more universally compatible across all potential hardware types.
A difficulty of Windows PE booting is that it needs to include network drivers and disk controller drivers intended to work with the target hardware to be imaged. The process of adding drivers to the Windows PE boot image can be automated using the WDS server console:
- Select the source WIM image, which may be either a new one created from original Windows 7 installation DVDs (32- or 64-bit), or a previously configured WIM.
- Select the drivers to install into the WIM
- WDS mounts the WIM to a virtual path, adds drivers to the virtual path, and generates a new WIM
- The updated WIM image is added to the boot image section of the WDS repository
This process can be repeated at a later time when a new system type needs to be captured but the current Windows PE Capture boot image does not include network drivers for it. The boot image is updated with the additional drivers using the WDS interface and automatically re-added to the WDS boot image collection to replace the original.
For specialty one-off systems this WIM driver update process is not necessary if the hard drive of the target system to be captured is removed from the source system after sysprepping, and is either installed in a computer with supported network drivers, or attached to the supported system using an external «USB to hard drive» adapter.
Automated apply process
[edit]
Applying a captured image involves running a second Windows PE «Apply» boot image on the target system to receive the image. This boot image also needs the appropriate network and disk controller drivers as with the Windows PE Capture boot image.
- The system is booted using PXE network booting and the Windows PE Apply image is loaded.
- The operator logs on to the domain, and selects the boot image to apply.
- A disk partitioning screen appears and the location for the target image is selected. If the target storage is unformatted, a default partition set is created. For Vista and Windows 7, a small 100 megabyte boot partition is created for storing bootloader data separate from the rest of the system partition. This boot partition is normally hidden from the Windows Vista/7 user.
- The image data is applied to the selected partition, and the system reboots, either running the Sysprep manual mini-setup process or following the script created during the initial Sysprepping.
The WDS image creator may optionally select a separate WAIK / Sysprep installation script to be applied to the image during the first boot. This alternate script is selected within WDS by viewing the properties of each uploaded system image.
Manual image capture and deploy
[edit]
It is technically possible to create scripts that manually perform the imaging, capture, and apply processes, using command line tools provided by Microsoft. However, the methods for doing this are complex and difficult.
In general, the tools involved are:
- dism – Deployment Image Service and Management Tool, used to add drivers to Windows PE boot images.
- imagex – used to capture and apply images. Creates either a single WIM structure, or can deduplicate data using a second shared resource WIM. Does not require a Windows Deployment Server to capture or apply images, and can work solely with a logged-on network share or mapped drive letter.
- wdsutil – used to manage the WDS server without the graphical user interface, and to add captured images to the repository.
Using imagex to manually create a WIM does not require the source operating system to be sysprepped or for the source partition to contain a Windows operating system. Any type of Windows-accessible file system can be imaged, including MSDOS, but the source system either needs to be able to run Windows PE or the source system’s hard drive is moved into a newer system that supports Windows PE.
Microsoft generally requires Windows 2000, XP, Vista, and Windows 7 to be sysprepped before imaging, due to certain security-related disk data that Microsoft requires to be unique across duplicated system images. Sysprep randomizes this data when the image is applied to a new system.
Imagex does not have any disk formatting and partitioning capabilities. Separate Windows command line tools such as diskpart are needed to define partitions on the target system for imagex to use.
- List of Microsoft Windows components
- FOG Project
- Microsoft Configuration Manager
- ^ a b c «Windows Deployment Services (WDS) boot.wim support». Microsoft 365 Library. Microsoft. 2 December 2022 – via Microsoft Learn.
- ^ «Windows Deployment Services Overview». Windows Server 2012 R2 and Windows Server 2012 Technical Library. Microsoft. 31 August 2016 – via Microsoft Learn.
- Official website
- Windows Deployment Services on Windows App Development Center (Microsoft)
Современные требования к удобству и мобильности в управлении сетевыми ресурсами вызывают необходимость в новых решениях. Одним из таких решений является применение беспроводных технологий для развёртывания сетевых сервисов, которые часто включают различные аспекты таких понятий, как роутер и точка доступа. С этими технологиями можно добиться значительных улучшений в управлении сетевыми устройствами и упрощении задач администрирования.
В данной статье будет подробно рассмотрен механизм работы wireless deployment services в контексте Windows-среды. Будут освещены ключевые аспекты настройки и управления этими сервисами, что позволит вам эффективно интегрировать и использовать их в вашем сетевом окружении.
Особое внимание уделим настройке и конфигурированию роутеров и точек доступа, так как это является основой для успешного развёртывания беспроводных сетей. Подробно обсудим, как с их помощью можно обеспечить стабильность и безопасность сетевых соединений, а также избежать распространённых проблем и ошибок.
Надеемся, что этот материал будет полезен для айти-специалистов, системных администраторов и всех, кто интересуется технологиями беспроводных сетей. Изучив наш детальный гайд, вы сможете с легкостью применять полученные знания на практике и улучшить качество своих сетевых решений.
Как работает WDS
Работа WDS основана на идее создания беспроводной сети, которая позволяет увеличить дальность действия Wi-Fi сигналов путем связки нескольких точек доступа. Это устраняет необходимость использовать проводные соединения для расширения сети, предоставляя пользователям стабильное и качественное подключение.
Сначала необходимо создать основную точку доступа, функционирующую как центр вашей сети. Она будет обеспечивать связь между остальными элементами системы. Далее, дополнительные точки настраиваются таким образом, чтобы они могли принимать и передавать сигнал от основной точки. Это позволяет связывать и расширять территорию покрытия беспроводной сети без потери качества соединения.
Когда маршрутизатор или точка доступа включены в режим WDS, они начинают работать в качестве мостов, объединяющих разные части сети. Важно правильно настроить все устройства, чтобы избежать конфликтов. Учтите, что весь трафик проходит через главную точку и маршрутизатор, что делает их основными узлами сети.
WDS полезен при развертывании беспроводных сетей в больших зданиях или на открытых территориях, где кабельное соединение становится невозможным или дорогостоящим. Он также поддерживает передачу данных между точками доступа, что улучшает общую производительность сети и позволяет легко добавлять новые узлы.
Службы, такие как DHCP и NAT, продолжают работать через основную точку доступа и могут быть централизованно управляемы. Таким образом, вся сеть ведет себя как единое целое. При правильном развертывании, можно добиться существенного улучшения качества Wi-Fi на больших расстояниях.
Знание особенностей WDS позволяет оптимизировать настройку сети и обеспечить стабильное соединение для всех пользователей, независимо от их местоположения.
Преимущества использования WDS
Использование технологии WDS (Windows Deployment Services) приносит существенные выгоды для организаций и IT-специалистов. Она обеспечивает упрощение процессов настройки и управления сетевыми устройствами и операционными системами, повышает эффективность и снижает издержки. Рассмотрим основные преимущества, которые дает применение этой технологии.
- Централизованное управление: WDS позволяет централизованно управлять процессами установки и обновления операционных систем на различных устройствах. Это значительно упрощает задачи администраторов и способствует повышению общей продуктивности.
- Скорость развертывания: Благодаря WDS, установка и конфигурирование операционных систем на новые устройства проходят значительно быстрее. Этот аспект особенно важен при массовом внедрении новых рабочих станций или серверов.
- Экономия ресурсов: Снижение требуемого времени и человеческих ресурсов на первоначальную настройку и последующее обслуживание устройств. Вся процедура deployment может быть автоматизирована и выполнена с минимальными затратами.
- Безопасность данных: Технология обеспечивает более защищенное развертывание ОС, уменьшая риски связанных с передаче данных по сети. Возможность настроить дополнительные параметры безопасности способствует защите конфиденциальной информации.
- Совместимость с существующими сетями: WDS интегрируется с имеющимися сетевыми инфраструктурами, такими как роутеры и точки доступа. Она подходит как для небольших офисов, так и для крупных корпоративных сетей.
- Гибкость настройки: Поддержка различных сценариев развертывания, таких как установка через сеть или съемные носители. Это позволяет выбирать наиболее подходящий способ deployment в зависимости от конкретной ситуации.
Таким образом, применение WDS позволяет значительно повысить общую производительность IT-отдела, улучшить управление инфраструктурой и сократить операционные расходы. Это делает технологию важным инструментом в арсенале любого системного администратора.
Настройка WDS на устройствах
Настройка WDS на устройствах позволяет эффективно расширить радиус охвата беспроводной сети без необходимости установки дополнительных физических кабелей. Этот метод упрощает развертывание сети в больших зданиях или на территории со сложной планировкой. Давайте подробно разберем процесс настройки, шаг за шагом.
| Шаг | Описание |
|---|---|
| 1 | Откройте веб-интерфейс вашего роутера и войдите в настройки. |
| 2 | Перейдите в раздел, связанный с беспроводными сетями или Wi-Fi. В разных моделях это может называться по-разному. |
| 3 | Найдите опцию, отвечающую за Wireless Distribution System, и активируйте её. |
| 4 | При активации WDS, укажите SSID и MAC-адрес основной точки беспроводного доступа (роутера или access point). |
| 5 | Настройте параметры безопасности, такие как тип шифрования и пароль. Убедитесь, что они совпадают на всех используемых устройствах. |
| 6 | Сохраните изменения и перезагрузите устройства, чтобы применение новых настроек стало активным. |
| 7 | Проверьте работоспособность сети, подключившись к любому из созданных вами беспроводных узлов. |
После выполнения этих шагов ваша сеть будет расширена и сможет охватывать большее количество устройств без потери качества сигнала и скорости передачи данных. Deployment таких сетей становится намного проще с использованием WDS, позволяя максимально эффективно использовать имеющиеся ресурсы и минимизировать затраты на дополнительные сетевые компоненты. Убедитесь, что все используемые роутеры или точки доступа поддерживают WDS для корректного функционирования системы.
Сравнение WDS с другими технологиями
-
WDS и традиционные роутеры:
WDS (Wireless Distribution System) отличается от стандартных маршрутизаторов, предоставляя уникальную возможность бесшовного расширения сети через множественные точки доступа. Тогда как обычные роутеры ограничены определенным радиусом действия, точки доступа, поддерживающие WDS, позволяют создать единую сеть без потери сигнала и снижения скорости, что особенно важно для больших офисов и производственных помещений.
-
WDS и Windows Deployment Services:
Технология Windows Deployment Services (WDS) предоставляет возможность разворачивания Windows-образов на множество компьютеров одновременно. WDS, в отличие от беспроводных точек доступа, нацелен на предприятие, где необходимо автоматизировать процесс установки операционной системы Windows, что позволяет сэкономить время и ресурсы ИТ-отделам. Правда, WDS требует настройки серверного оборудования и сети.
-
WDS и PXE Boot:
PXE (Preboot Execution Environment) представляет собой еще один способ для удаленной установки ОС, но он часто используется в связке с WDS для создания более гибких и мощных решений. PXE загружает минимальное окружение операционной системы с сервера, в то время как WDS может предоставить полный набор средств для установки и настройки Windows. Это делает комбинацию этих технологий более универсальной и мощной для крупных предприятий.
-
WDS и SCCM:
Система управления конфигурацией System Center Configuration Manager (SCCM) также часто используется для развертывания операционных систем, приложений и обновлений. В отличие от WDS, SCCM предоставляет более широкие возможности управления устройствами и конфигурациями, подходя для сложных корпоративных сред с большим числом разнообразного оборудования и программного обеспечения. Однако, SCCM имеет более высокий уровень сложности в настройке и администрировании, что может потребовать дополнительных ресурсов.
Каждая из этих технологий имеет свои преимущества и недостатки, и выбор подходящего решения зависит от конкретных нужд и инфраструктуры организации. Важно учитывать не только возможности техники, но и ресурсные затраты на ее развертывание и поддержку.
Типичные проблемы и решения
-
Проблемы с подключением
Нередко возникают затруднения с подсоединением различных устройств к точке доступа. Причины могут варьироваться от неверно введенных учетных данных до несовместимости устройств.
-
Решение:
- Проверить правильность ввода пароля и имени точки доступа.
- Убедиться в совместимости устройств с используемой сетью.
- Перезагрузить роутер и устройства, которые пытаетесь подключить.
-
-
Проблемы с развертыванием
Некорректная настройка сетевых служб может привести к трудностям в процессе deployment. Это включает долгую загрузку, ошибки подключения или даже полный отказ системы.
-
Решение:
- Перепроверьте настройки конфигурации всех задействованных элементов.
- Используйте актуальные версии программного обеспечения и драйверов.
- Изучите журналы ошибок чтобы узнать подробности о возникших проблемах.
-
-
Проблемы безопасности
Обеспечение безопасности сети является критически важным. Несанкционированный доступ может привести не только к потере данных, но и к серьезным финансовым убыткам.
-
Решение:
- Используйте сложные пароли для доступа к сети и учетным записям.
- Регулярно обновляйте программное обеспечение на всех устройствах.
- Внедрите многофакторную аутентификацию и используйте VPN для удаленного доступа.
-
What is Windows Deployment Service (WDS)
Windows Deployment Service (WDS) is a windows technology that enables you to deploy Windows operating systems over the network from one central location. It allows you to set up new clients without requiring administrators to visit each computer or install directly from CD or DVD media, enabling the faster and easier deployment of windows images.
Using WDS is an effective way to manage windows operating system deployments. As part of its core features, WDS allows you to configure a server for network-based installation, perform automated installations, and update images. Configuration is done through the Windows Deployment Services Configuration Wizard and can be fine-tuned with additional settings via the WDS console or command line tools
WDS (Windows Deployment Services) is available on Windows Server 2003 with Service Pack 2, Windows Server 2008 till Windows Server 2019. This server needs to be joined to a domain or be a domain controller, but it’s not recommended for larger networks. If the server isn’t part of a domain already, an event will occur when you try to add it for the first time in the Windows Deployment Services console.
Add WDS Role on Windows Server
Step 1: Open server manager and go to Manage then select Add Roles and Features as below picture.
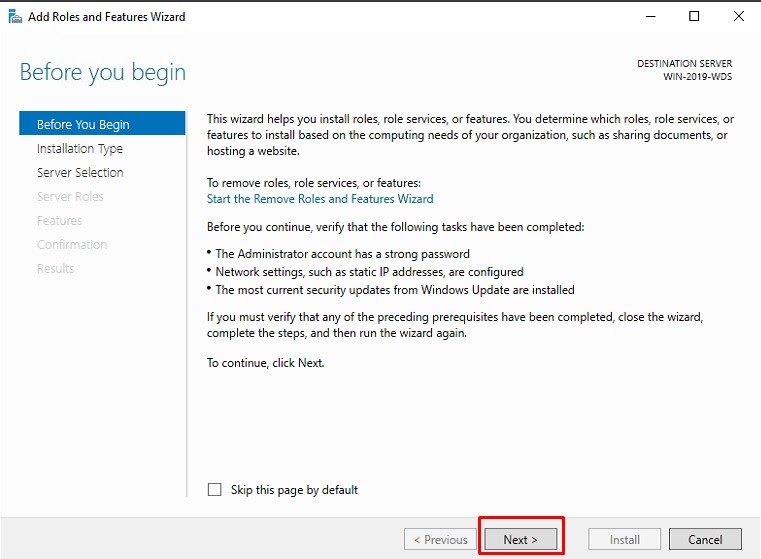
Step 2: Click on Next
Step 3: Select the option as below picture and press the Next button.

Step 4: Select the option as below picture and press the Next button.

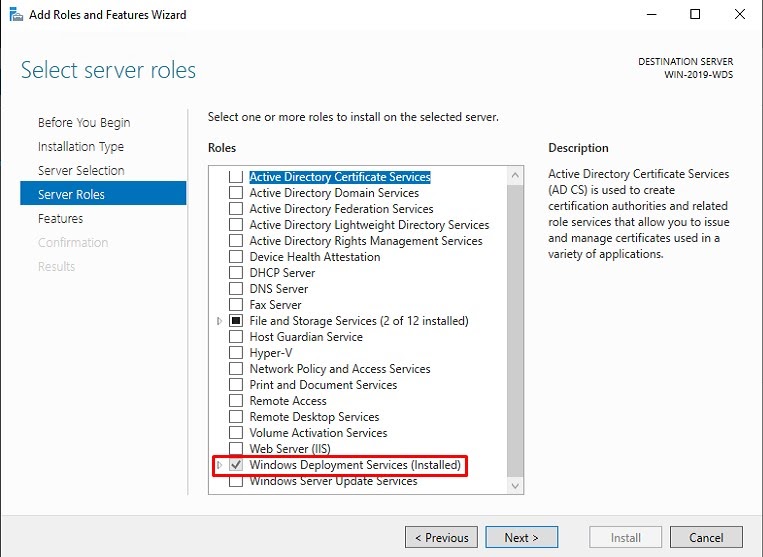
Step 5: Select the Windows Deployment service and click Next button.
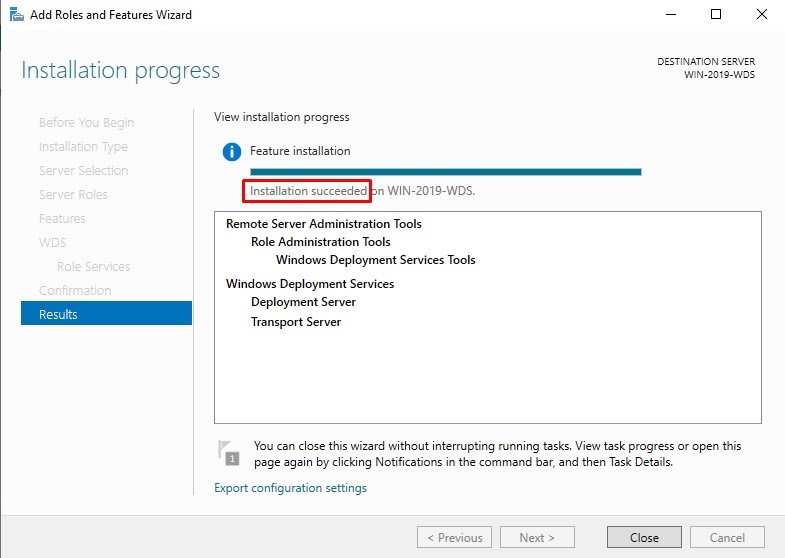
Step 6: Wait for the installation succeeded message as below picture and press the close button.
WDS Configuration Steps
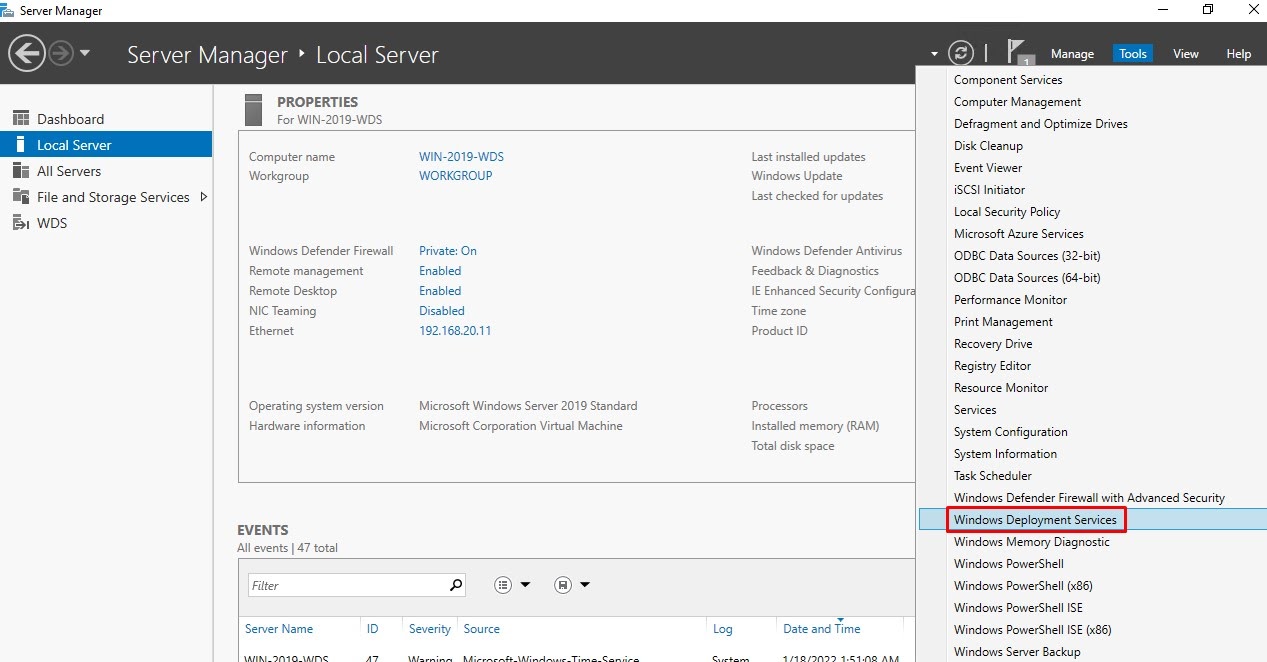
Step 7: Open Server Manager and go to Tools and select Windows Deployment Service.
Step 8: Right click on the server name and click on Configure Server.

Step 9: Click on the Next button.
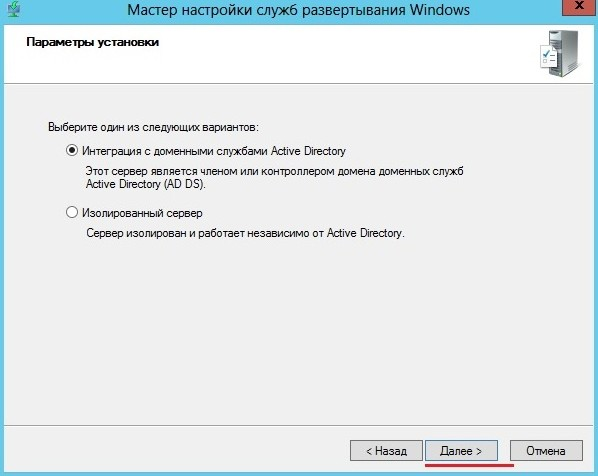
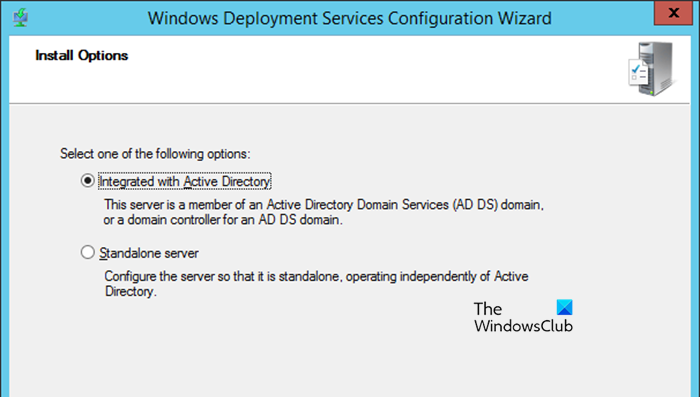
Step 10: If the server you are configuring is a member server of a domain then select Integrated with Active directory otherwise select Standalone server.

Step 11: Select the install folder where you want to store all the Windows images. These images are basically the boot.wim and install.wim files.
Step 12: Select the option as shown in the picture below.

Step 13: Uncheck the option Add images to the server now.

How to add boot images in WDS
Step 14: First of all you need a Windows installer media or ISO file and make it accessible through file browser.
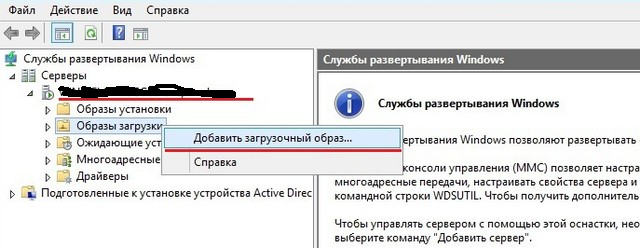
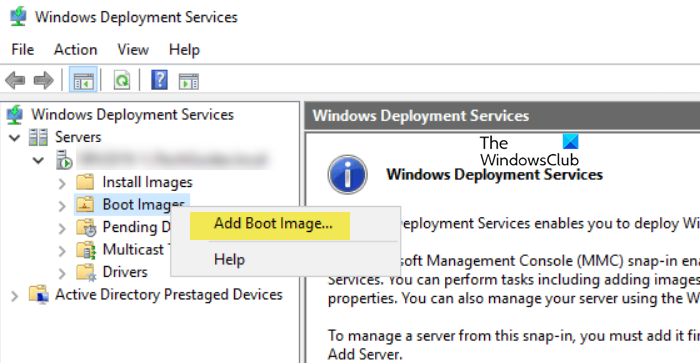
Step 15: Right click on Boot Images and select Add boot image option.
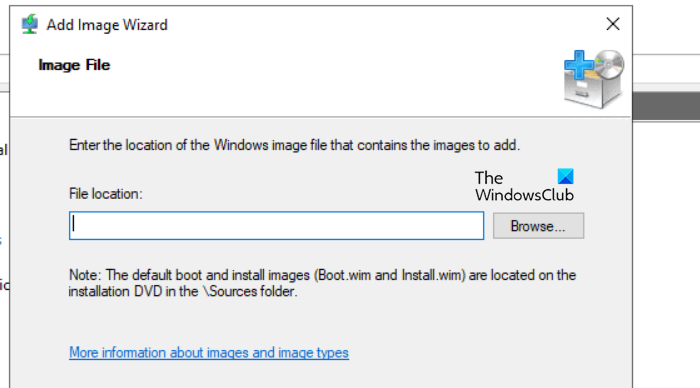
Step 16: Browse the boot.wim file in your Windows installation media. The default location is the source folder in your Windows installation media.

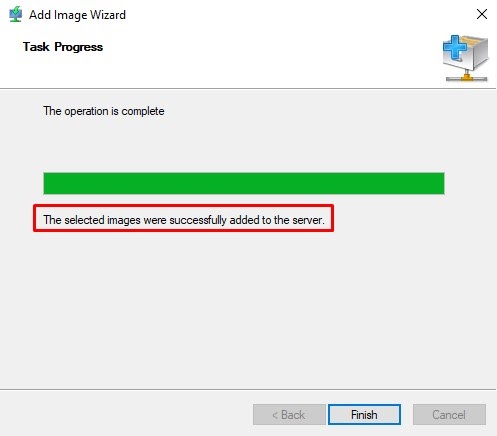
Step 17: Wait for the successful message and click on Finish.
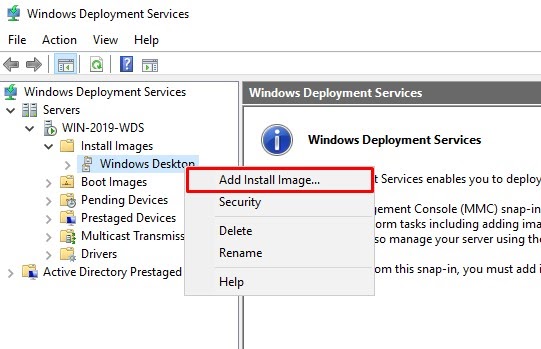
Step 18: Right click on Install images and select Add Image Group.
Step 19: Give it a descriptive name. For example, you will add Windows 10 images in this group so the group name could be “Windows Desktop”.
Step 20: Right click on the image group name and select Add install image.
Step 21: Browse the install.wim file in your Windows installation media. The default location is the source folder in your Windows installation media.

Step 22: Wait for the successful message and click on Finish.
Your Windows Deployment server is ready. Now go to the client PC and enable PXE boot in BIOS setup. The client PC should be in the same ip addresses of your existing network and it should have a DHCP Server. Once you boot the client PC from PXE network boot it will automatically discover the WDS server and will start the installation.
How to capture an image
A capture image is helpful when you want to deploy a similar OS with commonly needed software. It will save lots of administrative efforts and time required for large deployment.
Step 1: Right click on an existing boot image and select Create capture image.

Step 2: Select a temporary location to store the captured image.
Step 3: After successfully creating the capture image we have to upload that image to the server for that check the Add image… checkbox and press the Finish button as in the picture below.
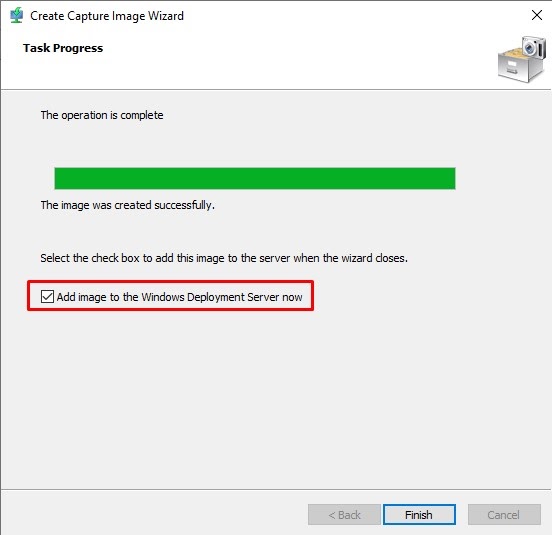
Step 4: By default, the newly created image should be selected if not please select the same.

Step 5: Give it a descriptive name so you can identify the image as a capture image and finish the process.

Capture a Windows 10 Image in WDS
Steps to Sysprep and Capture a Windows 10 Reference Image for WDS Server.
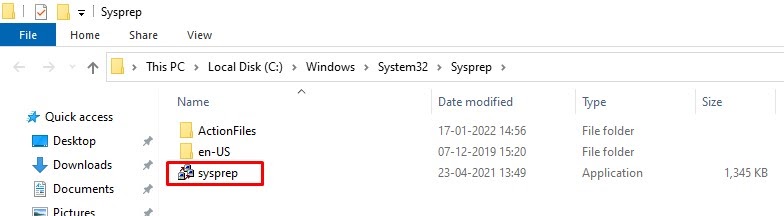
Step 6: Make sure you have logged in as administrator on the Windows 10 PC. Go to Run and type sysprep and hit Enter.

Step 7: A folder will open and it will contain a sysprep application as in the picture below. Run the sysprep application by double clicking it.
Step 8: Check the Generalize checkbox and select the Shutdown option as Shutdown and press the ok button. This process will take time and the PC will shutdown automatically.
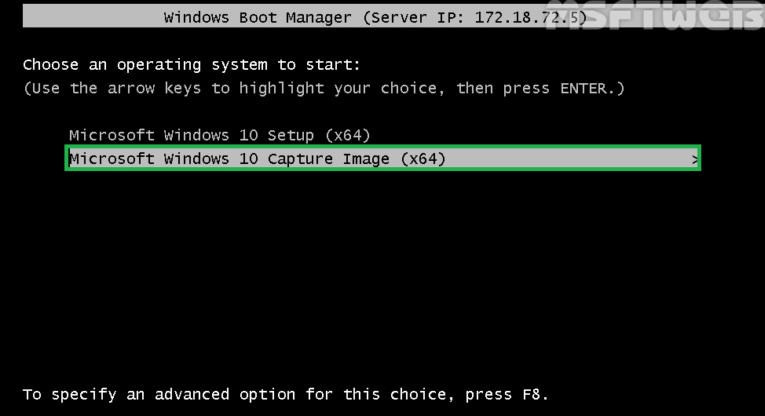
Step 9: Configure your system to boot from the network for that you have enabled PXE boot in your BIOS setup.

Step 10: Now select Capture Image from the list to capture Windows 10 reference image. You can use arrow keys for navigation.
Step 11: Click Next on the Welcome page.

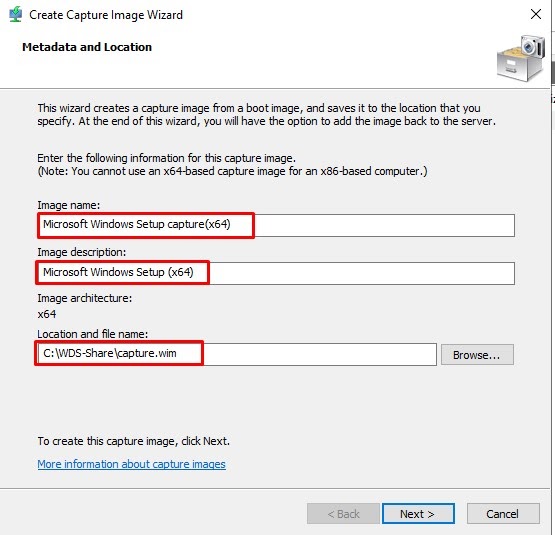
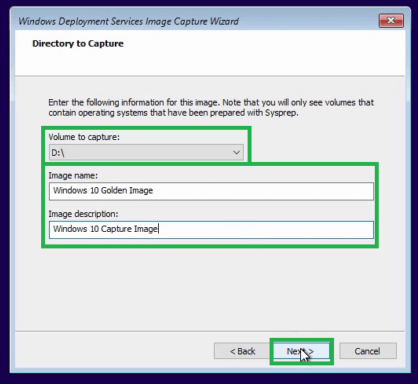
Step 12: Specify the volume to capture. Specify the image name and description then click Next.
Step 13: Click on browse to specify the location to save this reference image file locally.
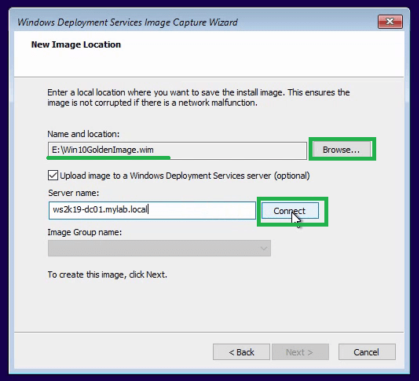
If you want to upload the image to the WDS server at the same time, then check on the “Upload image to a Windows Deployment Services Server”.
If you chose to upload the image to the WDS server, Enter the name of the WDS server in the Server Name field and click on connect.
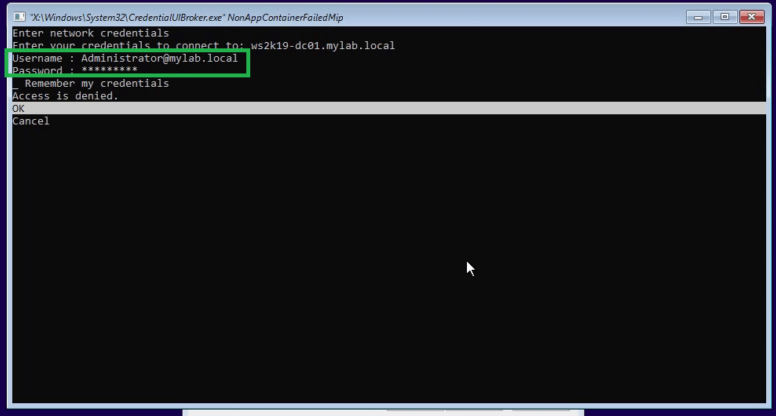
Step 14: Enter the credentials and click on OK.
Step 15: Select the group menu from the drop-down menu and click on Next to start capturing Windows 10 reference image.

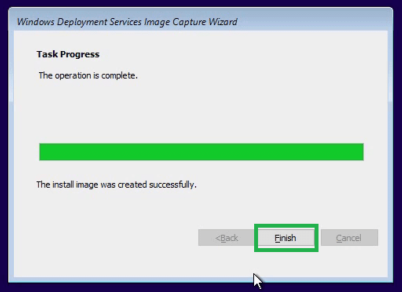
Step 16: Click on Finish to close the wizard.
Create a Windows Server image in WDS
Note: Separate Boot image is not required as we can use the existing boot image to boot to the Windows Setup process
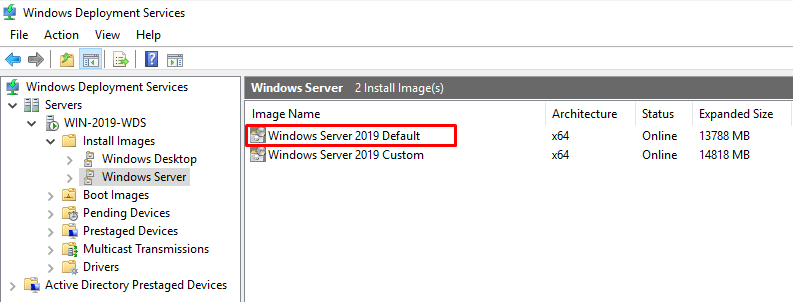
Step 1: Created a new group under install images as Windows Server
Step 2: Create a server image using the Windows Server ISO and the same steps as creating the Windows Desktop image
Install VM through PXE Boot Image
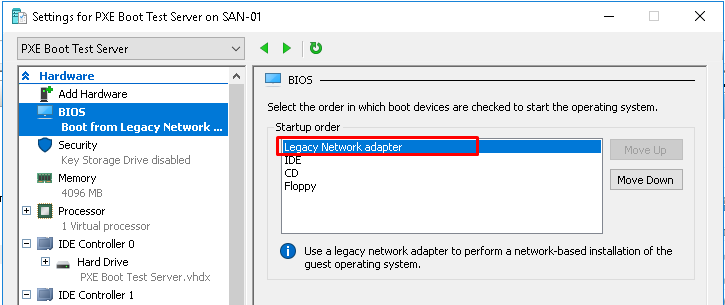
Step 1: Go to settings of the VM and set Legacy Network adapter at top in BIOS.
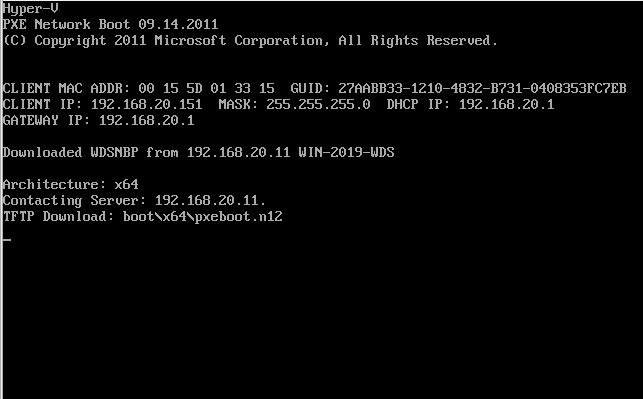
Step 2: Start the VM and it should boot from PXE Network Boot.
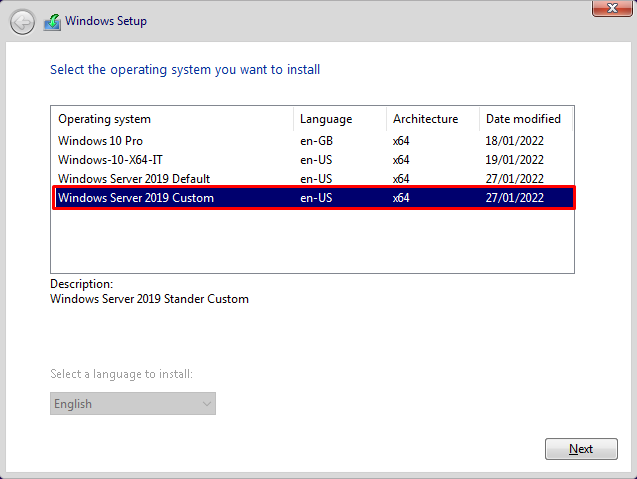
Step 3: Select the non-capture Operating system to start the installation.

Step 4: Set Keyboard or input method to US.
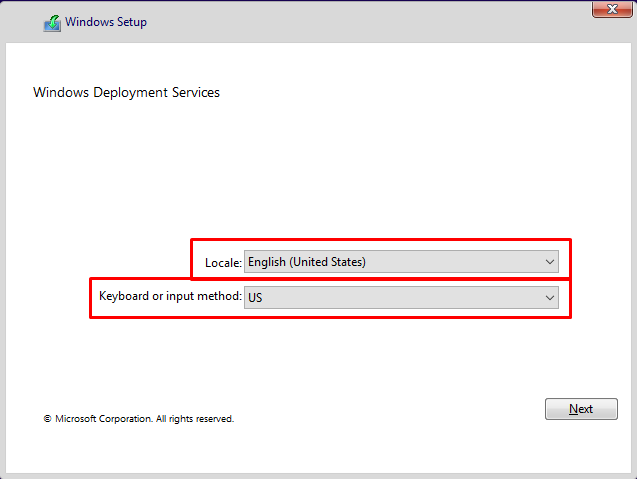
Step 5: Put the WDS server credential.
Step 6: Select the Operating system you want to install.
Step 7: Create partitions as your need and select the same.

WDS Server FAQs
What are the benefits of using Windows Deployment Service?
Windows Deployment Services (WDS) is a server role in Microsoft Windows Server that enables administrators to deploy Windows operating systems over the network, using an automated installation process.
There are many benefits of using WDS. One of the primary benefits is that it allows administrators to automate the installation process, which can save time and money. Additionally, WDS can be used to deploy operating systems to multiple machines simultaneously, which can speed up the deployment process.
How do I deploy an image using WDS?
To deploy an image using WDS, you must first create a deployment share and add the appropriate images to the share. You then create a task sequence that will install the image on client computers. Finally, you configure a boot image and set up a server to distribute the boot image to client computers.
What are some common troubleshooting tips for WDS?
1. Check your WDS server’s event logs for errors.
2. Make sure the WDS server is joined to the same domain as the target PCs.
3. Make sure DHCP and DNS are both configured and working correctly on your network.
4. Verify that the target PCs can connect to the WDS server using PXE boot.
5. If you’re using TFTP, make sure there is enough free disk space on your TFTP server to store all of the Images you want to deploy.
6. Verify that Image files are accessible from the WDS server share folders and that they have the correct permissions set up.
What is the difference between WDS and SCCM?
SCCM (System Center Configuration Manager) is a comprehensive systems management solution that enables you to manage devices and users across your organization from a central point. It offers features for deploying, managing, monitoring and securing Windows operating systems and applications.
WDS (Windows Deployment Services) is a server role in Windows Server that enables you to remotely deploy Windows operating systems over the network, without needing any media. WDS can be used to install Windows Vista, Windows 7, Windows 8, and later versions of the Windows operating system. You can use it to deploy both client and server versions of the Windows operating system.
What are some common best practices for using Windows Deployment Service?
Creating a custom image for your organization’s standard desktop configuration. This will help to ensure that all desktops are configured the same way and that any software or updates deployed through WDS are applied uniformly.
Ensuring that your DHCP server is enabled and properly configured to provide addresses to clients booting from the WDS server.
Testing your WDS deployment before rolling it out to production systems. This will help to identify any potential issues and allow you to fix them before users are impacted.
Conclusion on Configuring WDS Server
WDS is an efficient server deployment solution that can help to quickly install and configure Windows operating systems over networks without the need of physical media. It helps in reducing time, resources and cost associated with large-scale deployments. Administrators can also use the imaging feature to capture single or multiple client images for future deployment.
Diadem Technologies offers fully managed setup and maintenance of windows hyper-v hosting & windows deployment service. With the help of our experienced team, you can set up and manage windows server systems remotely over a network with ease and speed.
Looking for a Managed Windows WDS Hosting Provider?
Low latency SSD VPS Hosting, TIER IV IDC
+ Weekly DR Backups & Managed Support

Windows Deployment Service (WDS) is a powerful tool that allows network-based installation of Windows OS to computers without needing physical media. This guide will walk us through installing and configuring WDS on a Windows server, ensuring efficient and streamlined OS deployment across the network.
If you want to learn how to install and configure Windows Deployment services on a Windows server, refer to the guide below:
- Ensure the prerequisites are satisfied
- Install the Windows Deployment Services Role
- Configure Windows Deployment services
- Add boot and install images
- Add a boot image to the WDS server
- Add the Install image to the server
Let’s get started with this guide.
1] Ensure the prerequisites are satisfied
Before installing and configuring Windows Deployment Service, it is necessary to verify that the prerequisites are met. Failure to do so can lead to issues during the installation or operation of WDS.
- Active Directory (AD): The server must be a domain controller or member.
- DHCP: WDS relies on DHCP to provide PXE (Preboot Execution Environment) booting capabilities to client computers.
- DNS: Domain Name System must be configured and operational.
- NTFS Partition: The WDS server requires an NTFS partition for the image.
After verifying that prerequisites are in place, the next step is to install the Windows Deployment Services Role.
2] Install the Windows Deployment Services Role

After verifying the prerequisites, the first step in setting up Windows Deployment Service is to install the WDS role. This role enables the server to deploy the Windows operating system to the client computer via a network-based installation.
- Launch Server Manager, go to the Manager Tab, select Add Roles and Features, and hit the Next button.
- In the Select Installation Type window, select the Role-based or feature-based installation option, and click the Next button.
- Select the server where WDS Roles will be installed, so click on Select a server from the server pole, and then hit the Next button.
- The next step is to select server roles, so, tick the Windows Deployment Services followed by clicking the Next button.
- In the Feature window, click the Add Features button, followed by Next.
- The Role services window wizard will appear on the screen. By default, both the Deployment Server and Transport Server boxes will be ticked.
Lastly, click the Installation button, follow all the prompts, and then click the Close button.
3] Configure Windows Deployment Services
After installing the WDS Roles, the next step is to configure them. Configuring WDS involves specifying where WDS stores its files, setting up the PXE boots option, and configuring how the server responds to clients’ requests.
- Launch Server Manager, go to the Tools tab, and click on Windows Deployment Services.
- In the Windows Deployment Services window, expand the Server option, and then right-click on the server.
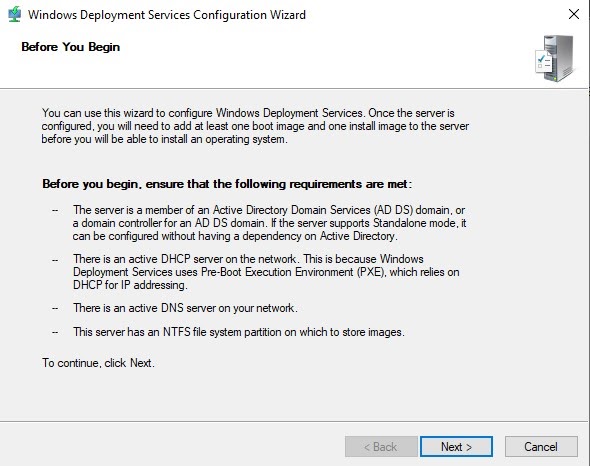
- Select the Configure Server option, and hit the Next button when Windows Deployment Services Configuration Wizard pops up on the screen.
- In the Install options window, choose to either integrate WDS with Active Directory or configure it in Standalone mode (for non-domain environment), but we are going to select the former for now. Click the Next button after each step.
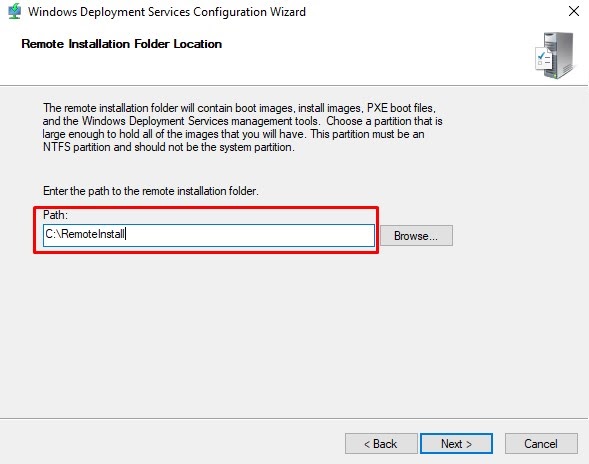
- Enter the path to the Remote installed folder location > Next > Yes.
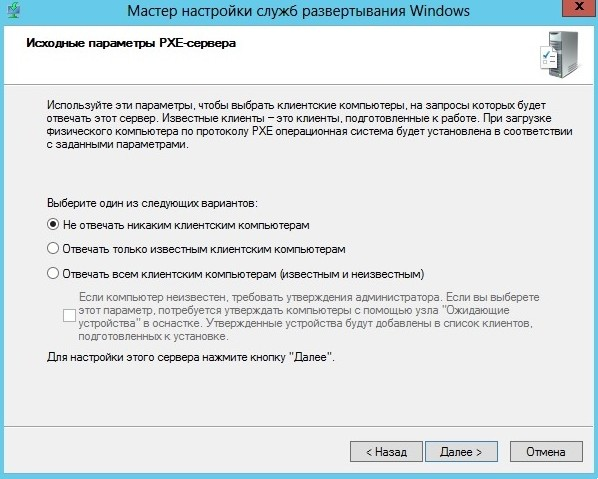
- In the PXE Server Initial Setting, choose one option and click Next.
WDS Configuration will take some time, so wait for it to finish. Once done, uncheck the Add Images to the Server Now option and select Finish.
4] Add boot and install images

Boot and Install images are essential components. One is responsible for booting client machines into a pre-installed environment, while the latter contains the OS files that will be installed on client machines.
- Insert the Windows installation media into the server’s optical drive or mount the Windows Installation ISO File if you use an image. Alternatively, users can use a bootable USB drive containing the Windows installation file. You need to copy the Boot.win file from the Source folder to the WDS Server.
- Now, convert install.ESD (in Windows Installation Media) to install.WIM. You can use the DISM command to do this. Open the Command Prompt as an admin and then run the following commands.
- Navigate to the directory containing install.esd using ‘cd’ command.
cd c:/filepath
- Run the following command to list available images and their index numbers.
dism /Get-WimInfo /WimFile:install.esd
- Convert the install.esd to install.wim by using the dism /export-image command to convert the file. Replace SourceIndex with the index number of the image you want to export (e.g., 1, 2, etc.):
dism /export-image /SourceImageFile:install.esd /SourceIndex:1 /DestinationImageFile:install.wim /Compress:max /CheckIntegrity
Now, you will see install.win file created in the destination folder.
5] Add a boot image to the WDS server
After preparing the boot.wim file, the next step is to add it to the Windows Deployment Services server. The boot image is essential for booting the client into Windows PE, where the installation process begins. Here’s how to do the same:
- Launch the Windows Deployment Services console, expand the Servers section, and then expand the name of the WDS server.
- To add a boot image, right-click on Boot images, and then select Add Boot Image.
- In the Image File field, click Browse to navigate to the location where Boot.wim is installed, select it, and hit the Open option.
- After selecting the Boot.wim file, customize the Image name to something descriptive as this will be the identifier later when selecting it during PXE boot on client machines.
- Click Next for each window to begin adding the boot image WDS server.
Once the boot image has been installed successfully, click the Finish button. The boot image is now configured in WDS that will be used to boot client machines into Windows PE when they boot from the network.
6] Add the install image to the server
After the boot image, users now need to add an Install image. The install image is what contains the actual operating system that will be deployed to client machines. This image usually comes from the install.wim file we prepared earlier.
- Launch the Windows Deployment Services console, and expand the Server node and then the WDS server.
- Right-click on Install Image, select Add Install Image, and for the first time adding an install image, users must create a new image group. Alternatively, pick one from the Select an existing image group drop-down menu if an image group already exists.
- Once done, select the Finish and Next buttons. After creating the image group, click on Browse to navigate to the location where install.wim file is installed, select it, and hit the Open option.
- After selecting the Install.wim file, customize the Image name to something descriptive as this will be the identifier later when selecting it during PXE boot on client machines.
- Click Next for each window to begin adding the boot image WDS server.
Wait for the images to be imported. Depending on the size of the install,wim file, this process might take a few minutes. When the process completes, click Finish. The install image will now appear under the Install images node in the WDS console.
That’s it!
Also Read: How to install and configure File Server on Windows Server.
How to install Windows Deployment Service?
The Windows Deployment Service is a role that you can install from the Server Manager. You can open the Server Manager, go to Add roles and features, look for Windows Deployment Service, and then install it by following the above guide.
Read: How to configure Secured-core Server for Windows Server?
How to install and configure RSAT?
You can install RSAT features from Windows Settings. Open Settings by Win + I and go to System > Optional features. Click on View features placed next to Add an optional feature, search for RSAT, and install it.
Also Read: Windows deployment services encountered an error 0xc0000023.