
Device drivers are an important component of Windows. They tell the Operating System how to operate a particular hardware device. The drivers are a bridge of communication between the software Operating System and the hardware. Without drivers installed, Windows will not be able to communicate with the hardware.
Windows 10 comes with a collection of trusted driver packages of the most common hardware from Microsoft and third-party vendors. This is called the Driver Store.
Windows 10 saves all the drivers inside of this folder called DriverStore. Its exact location is:
%SystemRoot%\System32\DriverStore
Since the files inside this folder are critical for system functioning, it is advisable not to touch the folder.
Table of Contents
When to delete old drivers?
Over time, Windows will keep on installing device drivers for all new hardware plugged into the PC like printers, USB devices, monitors, etc.
If new drivers are available for a particular device, Windows will automatically try to download and install the latest version through Windows Update.
There is one caveat to this. While Windows keeps on adding and installing new drivers, it will not delete the old ones. The old drivers keep on taking up hard drive space and eventually will fill up the system drive.
This is when you should worry about deleting old drivers from the system to free up disk space from the system volume. There are a few ways to clean up the old drivers safely. We will discuss each method step by step.
Cleanup old driver versions using Storage Sense or Disk Cleanup
Windows 10 comes with Storage Sense option which can automatically remove unnecessary files from the system drive. You can also schedule the cleanup process to keep your system tidy.
- Go to Settings (Windows key + i)
- Go to System –> Storage
- Click on Free up space now

This will automatically scan for unnecessary files including the device driver packages which are no longer being used. Click the Remove files button when the scan is complete.

For previous versions of Windows, you can use the Disk Cleanup utility.
- Go to Run –> cleanmgr
- Disk Cleanup window will open for C drive. Click on “Clean Up System Files” and select system drives again when asked.
- Then it will calculate the free space, you can have in C drive.
- A Disk Cleanup window will open again with a list of all files you can delete to free up the C drive for some extra space. Check the checkbox of “Device Driver Packages”, and press OK.
All old drivers which were present on your system will get deleted by Disk Cleanup.
Uninstall old drivers using Device Manager
The above-mentioned method does not remove all old device drivers. If we want to uninstall all the drivers for devices not currently connected to our system, we will have to manually scan through the device manager. Here’s how we do it:
- Go to Device Manager (Windows key + X + M)
- From the View menu, select Show hidden devices. This will show hidden devices in the list. Hidden devices are denoted by faded icons.
Hidden devices are the ones which are not currently connected to our system at the moment. Right-click any faded entry and select Uninstall to uninstall the device and remove its driver.

If you go to the Properties of any hidden device, you will see the following error message:
Currently, this hardware device is not connected to the computer. (Code 45)
To fix this problem, reconnect this hardware device to the computer.
Remove old and unused drivers using PowerShell script
Manually scanning through the old and unused drivers is a long and tiring process. The guys at ITBros have done a great job and created a PowerShell script to uninstall old and unused drivers automatically. Follow the instructions below to download and run the script.
- Download the PowerShell script from here:
Uninstall Old Drivers Automatically (3.4 KiB, 9,298 hits)
- Open PowerShell with administrative privileges.
- Run the following command to allow unsigned scripts:
Set-ExecutionPolicy -Scope Process -ExecutionPolicy Bypass - Next, run the ps1 script downloaded from the above link.
C:\Users\itechtics\Downloads\driver_cleanup.ps1

Step no. 3 is necessary. Otherwise, you will get the following error message:
.\driver_cleanup.ps1 : File C:\users\itechtics\Desktop\driver_cleanup.ps1 cannot be loaded because running scripts is disabled on this system.
If you are not comfortable with the above-mentioned methods, you can select one of the following tools and uninstall drivers with ease. Third-party software is a preferable and safer option to use if you don’t know much about Windows drivers.
Device Cleanup Tool
Device Cleanup Tool is a very simple utility to remove non-present devices from Windows installation. It is very similar to the Windows Device Manager but lists down the non-present devices separately and will let you select all and uninstall the drivers simultaneously.

Download Device Cleanup Tool
Driver Store Explorer
Driver Store Explorer is a free tool which lets you see what’s inside the DriverStore in a ‘human readable’ way. You can list all the driver packages stored in the current driver store, add/delete a driver, etc.
The biggest advantage of Driver Store Explorer is that you can sort the drivers by size. This way, you can delete the most space consuming drivers and easily recover previous system drive space.

Download Driver Store Explorer
Note: Driver Store Explorer requires .NET Framework 4 or later to run.
Driver Magician
Driver Magician is a paid tool but it’s worth it. It is an all in one package to manage system device drivers with updating, backup, restore, and uninstalling support.
- Download Driver Magician
- Run the program and select Uninstall Drivers
- The list of drivers will appear in the right-hand pane. The ones highlighted in red can be removed safely.
![Uninstall/Remove Old Drivers From Windows [The Ultimate Guide] 6](data:image/svg+xml,%3Csvg%20xmlns='http://www.w3.org/2000/svg'%20viewBox='0%200%20672%20461'%3E%3C/svg%3E "Uninstall/Remove Old Drivers From Windows [The Ultimate Guide] 13")
![Uninstall/Remove Old Drivers From Windows [The Ultimate Guide] 6](https://www.itechtics.com/ezoimgfmt/itechtics.com/wp-content/uploads/2017/07/2017-07-19_23-43-11.jpg "Uninstall/Remove Old Drivers From Windows [The Ultimate Guide] 13")
As a network admin, I prefer the PowerShell method which is free and easy to replicate. I can run the PS script on any no. of systems remotely resulting in desirable consequences for all the hosts.
What is your favorite way to clean up or remove old device drivers in Windows?
When you install or update device drivers in Windows, older versions of the drivers remain on the system drive. This allows the user to roll back to a previous driver version if the new driver is unstable. However, Windows doesn’t automatically remove old and useless versions of drivers, so over time, the amount of space occupied by drivers on the system drive becomes quite large. In this article, we will look at several ways to remove obsolete and old versions of drivers (duplicates) in Windows using built-in and third-party tools.
Contents:
- How to Find and Remove Old Drivers in Windows with PowerShell
- Delete Old Drivers in Windows using the Disk Cleanup Tool
- Removing Unused Drivers with DevManView
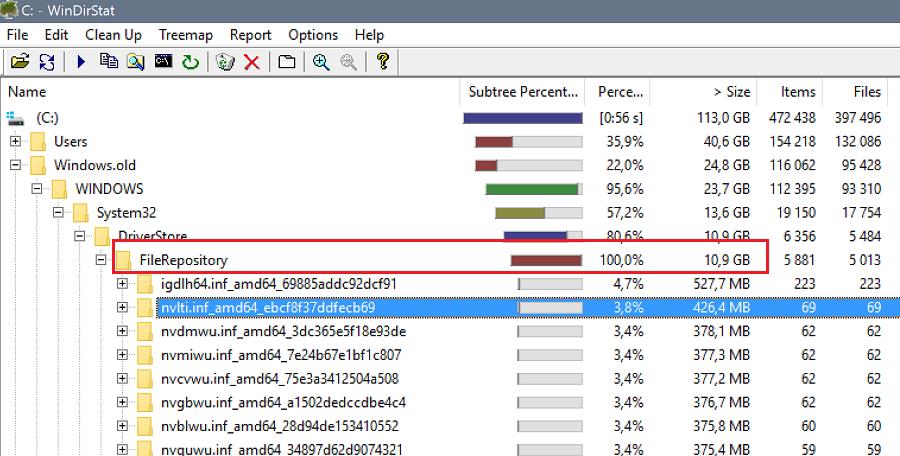
Windows stores all driver files in its driver repository (Driver Store) located in the %WINDIR%\System32\DriverStore\FileRepository.
You can get the driver store directory size with PowerShell ( "{0:N2} GB" -f ((gci –force $Env:windir\System32\DriverStore\FileRepository –Recurse -ErrorAction SilentlyContinue| measure Length -s).sum / 1Gb) ) or graphic tools. On my home Windows laptop, the FileRepository directory takes up about 11 GB of disk space and contains over 5,000 files. There are over 20 different versions of the NVIDIA video graphic driver stored in this directory.

Important!
- Never delete any files from DriverStore manually;
- It is highly recommended to create a system restore point before cleaning device drivers (
Checkpoint-Computer -Description "BeforeDriversDelete") or backup your Windows system image; - After cleaning the driver store, you will have to download and install drivers when you connect new devices.
How to Find and Remove Old Drivers in Windows with PowerShell
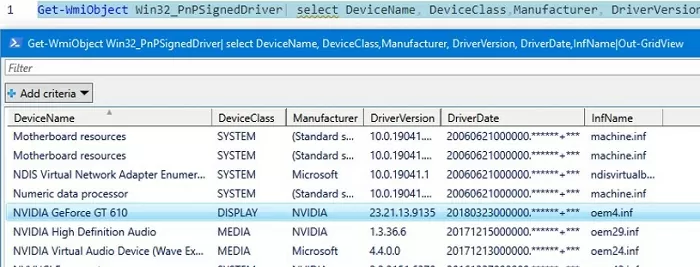
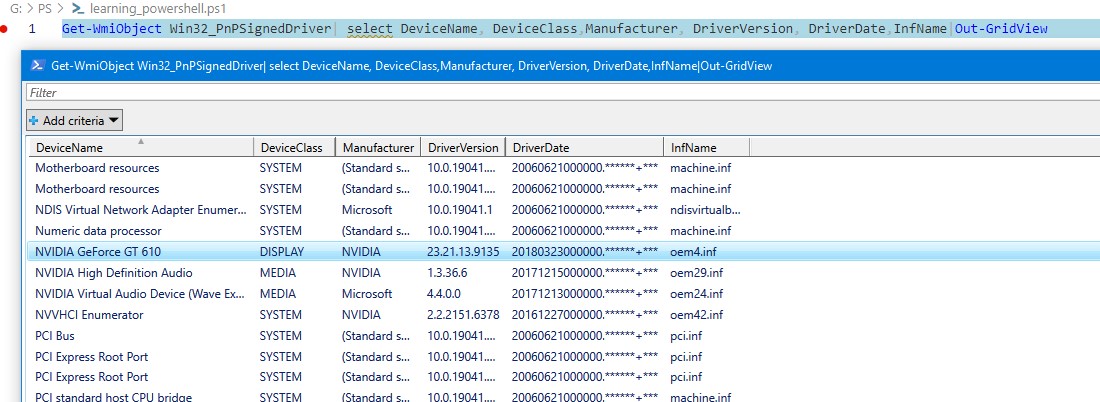
Let’s look at how to find out and remove old versions of drivers in Windows. You can display a complete list of installed drivers using PowerShell and WMI (CIM) class Win32_PnPSignedDriver:
Get-WmiObject Win32_PnPSignedDriver| select DeviceName, DeviceClass,Manufacturer, DriverVersion, DriverDate,InfName|Out-GridView
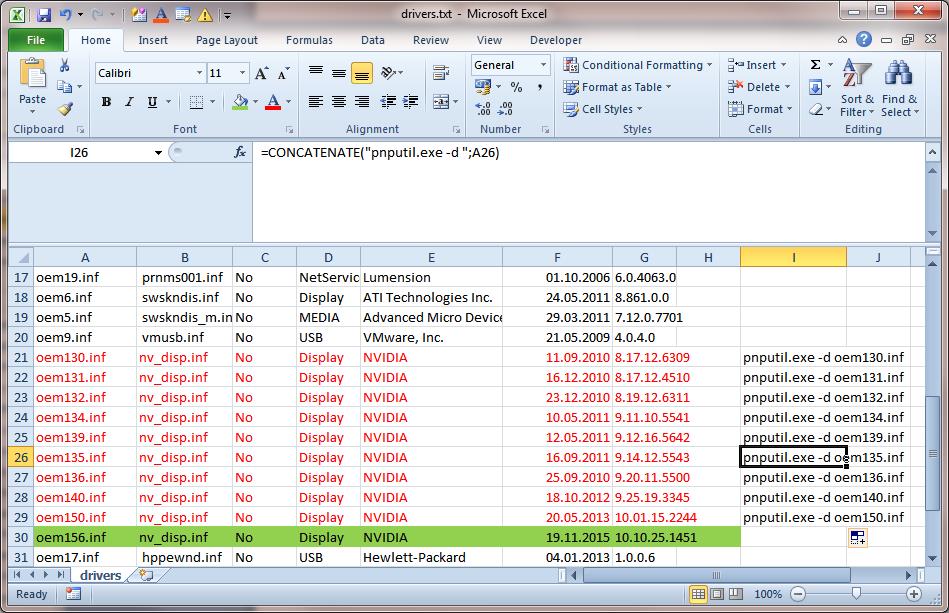
In my example, I got an Out-GridView table with a list of drivers in the Windows repository in the format: device name, device class, manufacturer, driver version, installation date, driver inf file name (oemXXX.inf).
You can get a list of third-party drivers installed on Windows using the Get-WindowsDriver cmdlet:
Get-WindowsDriver –Online| select Driver, ClassName, BootCritical, ProviderName, Date, Version, OriginalFileName|Out-GridView
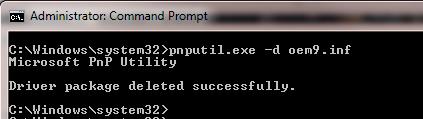
You can remove any of the installed drivers using the pnputil CLI tool:
pnputil.exe /remove-device oemxxx.inf
Note. In some cases, only remove the driver with the /force (-f) switch:
pnputil /remove-device oemxxx.inf /force
Look in the table for drivers that have multiple versions and remove all older versions of the driver (except the latest one) using pnputil.exe.
Be especially careful with drivers that are critical to the Windows boot process (BootCritical=True).
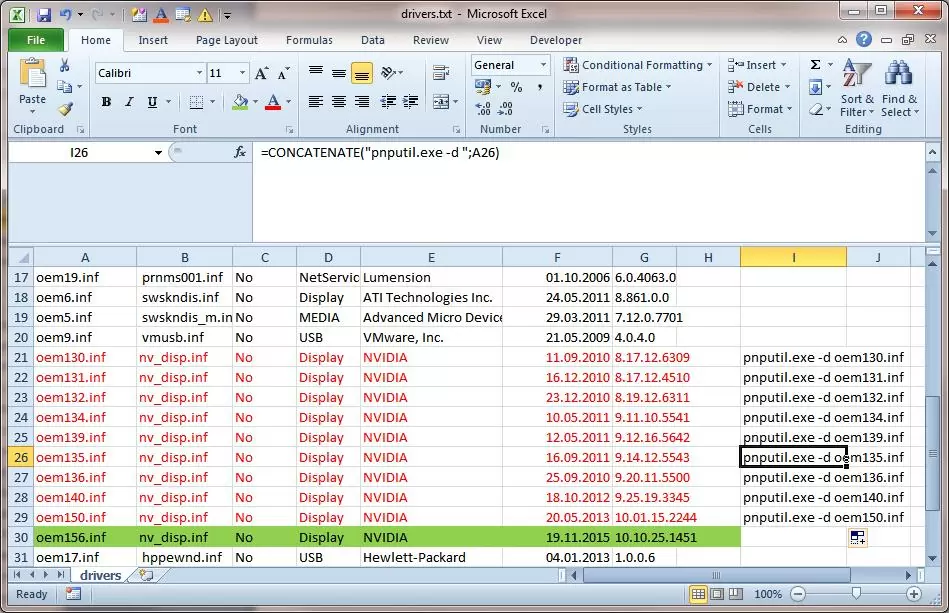
You can also export the list of installed drivers to a text file and then import it into Excel:
dism /online /get-drivers /format:table > c:\tmp\drivers.txt
Delete all unnecessary data in the table and leave only the following columns: the driver file in the system (oemXXX.inf), the name of the source INF file, device class, manufacturer, installation date, and driver version. Sort this table by column B (containing the name of the original INF file) and column F (driver installation date). Among the drivers with the same name, mark for removal all driver versions except the last one. In my case, you can see that most old drivers are referred to the NVIDIA video adapter.
To make it more convenient, let’s create an additional column with the command to uninstall each driver using the simple formula: =CONCATENATE("pnputil.exe -d ";A21)
Copy and run the pnputil commands in the command prompt or a BAT file.
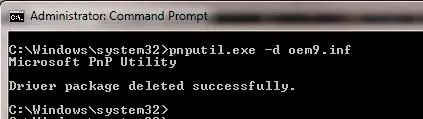
pnputil.exe –d oem9.inf
 Microsoft PnP Utility
 Driver package deleted successfully
In my case, I deleted about 40 old versions of drivers in Windows and cleared about 8 GB of space (mostly due to removing NVIDIA video card drivers).
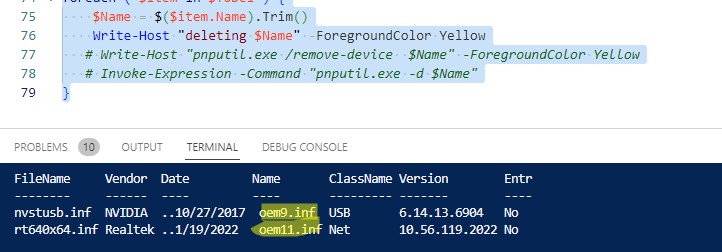
You can use the RemoveOldDuplicateDrivers.ps1 PowerShell script to automatically find device drivers that have multiple driver versions (duplicates) installed. (https://github.com/maxbakhub/winposh/blob/main/WindowsDesktopManagement/RemoveOldDuplicateDrivers.ps1 ).
The script will display a list of old driver versions that can be removed because newer versions are installed. The lines with automatic removal actions of found drivers are commented out in the script by default.
Delete Old Drivers in Windows using the Disk Cleanup Tool
In current versions of Windows 10 and 11, you can use the built-in cleanmgr.exe (Disk Cleanup tool) to clean up the Driverstore Filerepository folder.
- Run the Disk Cleanup: Win+R -> cleanmgr;
- Select the system drive;
- Click Clean up system files;
- Check Device driver packages in the list;
- Click OK;
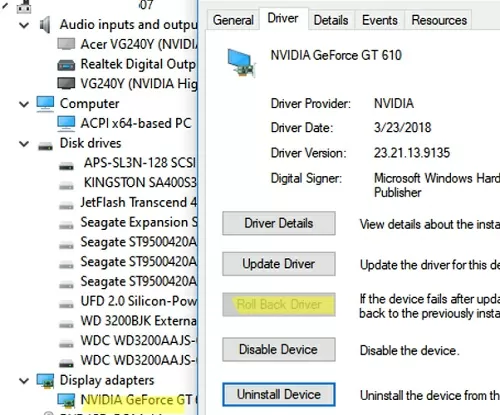
- This cleanup task will remove all previous versions of drivers installed through Windows Update or manually. Only the latest version for each of the drivers will remain in Windows DriverStore. However, you should be aware that the “Roll back driver” button in the Driver Properties tab of Device Manager will become inactive.

The cleanmgr task only removes duplicate versions of drivers. Unused device drivers should be removed manually.
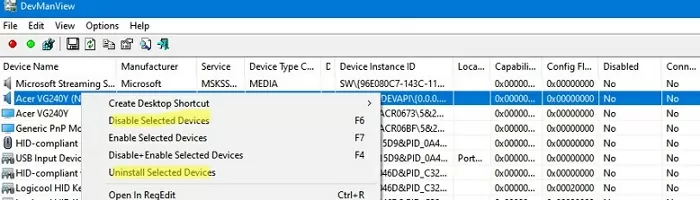
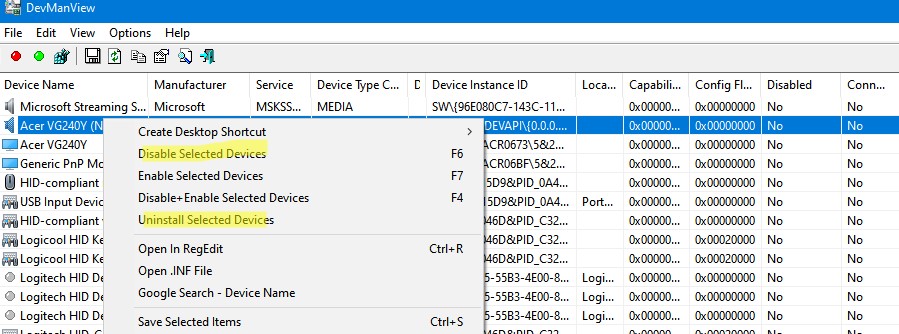
Removing Unused Drivers with DevManView
You can use a small free tool DevManView (by NirSoft) to view and manage the list of installed drivers in the Windows Driver Store.
DevManView is an excellent alternative to the standard Windows Device Manager MMC snap-in and allows you to present a list of drivers installed on your computer as a flat list (table).
- Download and run the DevManView tool;
- Enable the following items in the Options menu: Mark Connected Devices and Show Non-Plug and Play Drivers;
- Sort the table by the Connected column. This will allow you to see which devices are currently connected and which are not;
- We recommend you disable the selected device drivers first (Disable Selected Devices –> F6) and only after restarting the computer, remove the drivers using the Uninstall Selected Devices option.

При установке или обновлении драйверов устройств в Windows, старые версии драйверов сохраняются в системе. Это позволяет пользователю откатиться к предыдущей версии драйвера, если новый драйвер работает нестабильно. Однако Windows автоматически не удаляет старые и неиспользуемые версии драйверов, поэтому со временем размер места, занимаемого драйверами на системном диске становится довольно большим. В этой статье мы рассмотрим несколько способов удаления старых версий драйверов (дубликатов) в Windows с помощью встроенных и сторонних средств.
Содержание:
- Поиск и удаление старых версий драйверов в Windows с помощью PowerShell
- Удаление старых драйверов в Windows с помощью утилиты очистки диска cleanmgr
- Удаляем неиспользуемые драйвера с помощью DevManView
Windows хранит все файлы в драйверов в своем репозитории драйверов (Driver Store), находящемся в каталоге
%WINDIR%\System32\DriverStore\FileRepository.
Размер каталога с драйверами можно получить с помощью PowerShell (
"{0:N2} GB" -f ((gci –force $Env:windir\System32\DriverStore\FileRepository –Recurse -ErrorAction SilentlyContinue| measure Length -s).sum / 1Gb)
) или графических утилит. В моем случае на домашнем ноутбуке с Windows каталог FileRepository занимает на диске около 11 Гб и содержит >5000 файлов. В частности, в этом каталоге хранится более 20 различных версий видеодрайвера Nvidia.
Важно!
- Не удаляйте файлы и каталоги драйверов из папки DriverStore вручную;
- Перед очисткой драйверов настоятельно рекомендуется создать точку восстановления системы (
Checkpoint-Computer -Description "BeforeDriversDelete"
) или резервную копию образа системы; - При подключении новых устройств вам придется загружать и устанавливать драйвера заново.
Поиск и удаление старых версий драйверов в Windows с помощью PowerShell
Рассмотрим способ поиска и удаления старых версий драйверов в Windows. Вы можете вывести полный список установленных драйверов с помощью PowerShell и WMI (CIM) класса Win32_PnPSignedDriver:
Get-WmiObject Win32_PnPSignedDriver| select DeviceName, DeviceClass,Manufacturer, DriverVersion, DriverDate,InfName|Out-GridView
В нашем примере мы получили таблицу Out-GridView со списком драйверов в репозитории Windows в формате: имя устройства, класс устройства, производитель, версия драйвера, дата установки, имя inf файла драйвера (oemXXX.inf).
Вы можете получить список сторонних драйверов, установленных в Windows с помощью командлета:
Get-WindowsDriver –Online| select Driver, ClassName, BootCritical, ProviderName, Date, Version, OriginalFileName|Out-GridView
Вы можете удалить любой из установленный драйверов с помощью утилиты pnputil:
pnputil.exe /remove-device oemxxx.inf
Примечание. В некоторых случаях удалить драйвер можно только с ключом force (-f):
pnputil /remove-device oemxxx.inf /force
Найдите в таблице драйвера, для которых присутствуют несколько версий и удалите все старые версии драйвера (кроме самой последней) с помощью pnputil.
Будьте особо внимательными с драйверами, важными при загрузке Windows (
BootCritical=True
)
Также вы можете выгрузить список драйверов в текстовый файл и импортировать его в Excel:
dism /online /get-drivers /format:table > c:\tmp\drivers.txt
Удалите все лишние данные в таблице и оставьте только столбцы: файл драйвера в системе (oemXXX.inf), имя оригинального inf файла, класс устройства, производителя, даты установки и версии драйвера. Отсортируйте таблицу по столбцам B (содержит имя оригинального inf файл) и столбцу F (дата установки драйвера). Среди групп одноименных драйверов отметьте для удаления все версии драйверов, кроме последней. В моем случае видно, что большинство старых версий драйверов принадлежит NVIDIA.
Для удобства сформируйте в пустом столбце команду для удаления каждого драйвера с помощью формулы
=CONCATENATE("pnputil.exe -d ";A21)
Осталось скопировать команды pnputil и выполнить их командной строке или bat файле.
В моем случае я удалил в Windows порядка 40 старых версий драйверов и освободил около 8 Гб места (в основном за счет драйверов видеокарты NVIDIA).
Для автоматического поиска драйверов устройств, для которых установлено несколько версий драйверов (дубликаты) можно использовать готовый PowerShell скрипт FindDriverDuplicates.ps1 (https://github.com/winadm/posh/blob/master/Desktop/FindDriverDuplicates.ps1).
Скрипт выведет список старых версий драйверов, которые можно удалить, т.к. для этих устройств установлены более новые версии. Строки с автоматическим удалением найденных драйверов по-умолчанию закомментированы в скрипте.
Удаление старых драйверов в Windows с помощью утилиты очистки диска cleanmgr
В современных версиях Windows 10 и 11 вы можете использовать утилиту очистки диска
cleanmgr.exe
для удаления старых версий драйверов (эта же утилита позволяет удалить устаревшие обновления).
- Запустите утилиту «Очистка диска»: Win+R -> cleanmgr
- Выберите системный диск
- Нажмите на кнопку Clean up system files
- Отметьте в списке Device driver packages (Пакеты драйверов устройств)
- Нажмите ОК;
- Данное задание очистки удалит все предыдущие версии драйверов, установленные через Windows Update или вручную. В Windows останется только последняя версия для каждого из драйверов. При этом устройств кнопка “Откатить драйвер” (RollBack Driver) в свойствах драйвера в диспетчере устройств станет неактивной.

Задание очистки cleanmgr удаляет только дубликаты (версии) драйверов. Неиспользуемые драйверы устройств вам придется удалить вручную.

Удаляем неиспользуемые драйвера с помощью DevManView
Для просмотра списка установленных драйверов в Windows можно использовать небольшую бесплатную утилиту DevManView от NirSoft (https://www.nirsoft.net/utils/device_manager_view.html)
Утилита DevManView предоставляет собой альтернативу стандартному диспетчеру устройств Windows и позволяет представить список драйверов, установленных на компьютере, в виде плоского списка (таблицы).
- Скачайте и запустите утилиту DevManView;
- Включите следующие параметры в меню Options: Mark Connected Devices и Show Non Plug and Play Drivers;
- Отсортируйте таблицу по столбцу Connected. Это позволит понять какие устройства сейчас подключены, а какие нет;
- В целях стабильности рекомендуем сначала отключить выбранные драйвера (Disable Selected Devices –> F6) и только после перезагрузки удалять драйвера с помощью опции Uninstall Selected Devices.

Even though the old drivers gets overwritten by the new version of the driver, some drivers remain in the system even after updating or uninstalling, which can lead to a conflict between drivers and cause startup problems. Therefore, you should remove them permanently from your system.

Additionally, when we plug a new hardware device into our computer, the Windows update utility automatically downloads its driver from the server. However, when we are done with that device, we unplug it from the computer, but its driver remains on the computer and takes up space on the system drive.
To avoid these issues and free up space, we will provide some methods for removing old or unused drivers from Windows.
1. Uninstall old drivers from Device Manager
You will be able to remove the drivers that are not being used by the hardware, as the hardware device is not connected to your computer.
If you plugged many hardware devices into your computer and then unplugged them, you will need to remove their drivers to clean your disk, as they are not required unless you plug the hardware device again.
However, it does not matter, as the Windows update utility will again install it from its server if you need to use that device again.
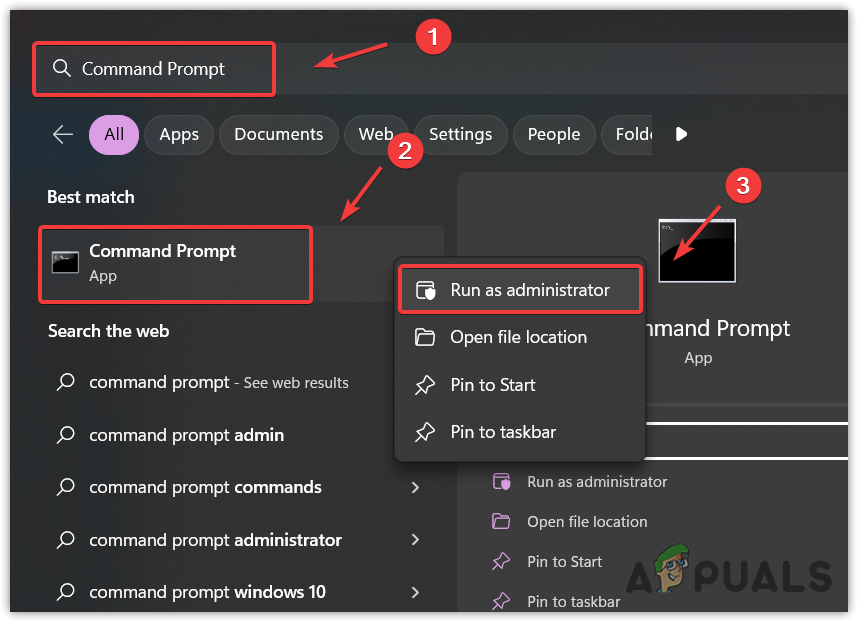
- Press the Windows key and type Command Prompt.
- Right-click on it and select Run as administrator.

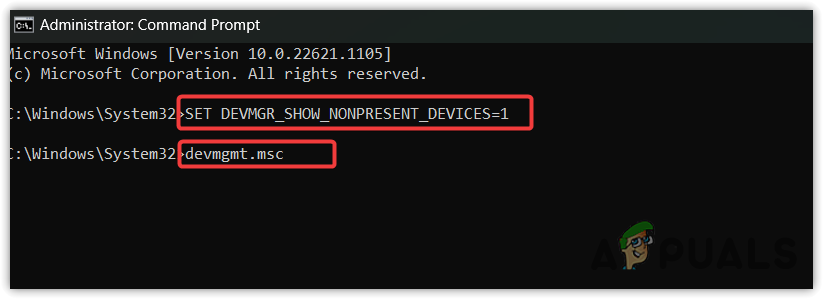
Running command prompt as administrator. - Once it is launched, paste the following command to see the unused devices in the device manager. This means the devices that were connected to your computer and have been removed will be displayed on the device manager.
SET DEVMGR_SHOW_NONPRESENT_DEVICES=1
devmgmt.msc

Opening device manager using command prompt - Once done, again, enter the following command to open the device manager.
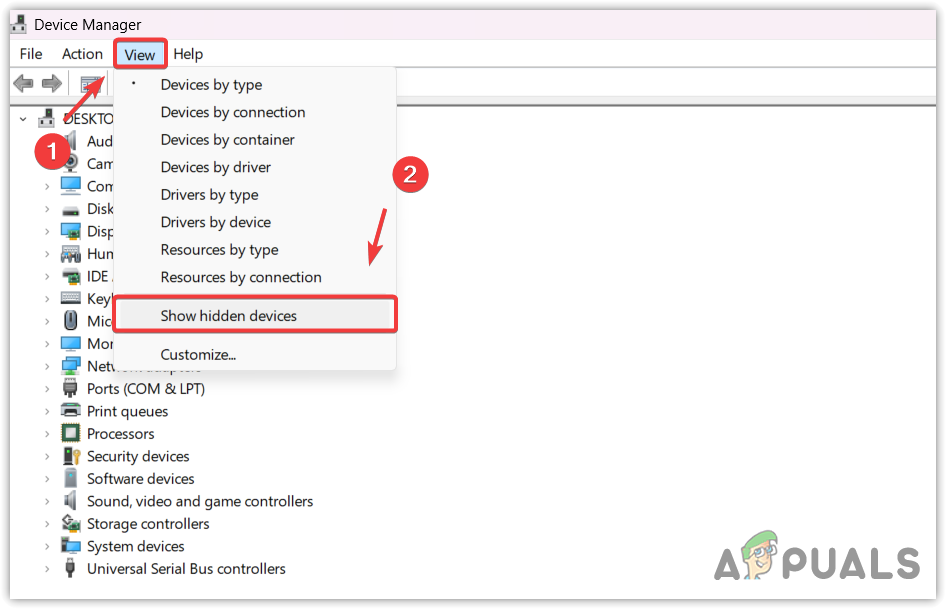
- Once the device manager is opened, click View and then select Show hidden devices.

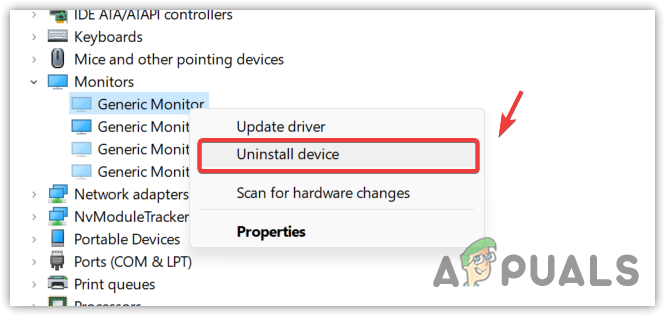
Enabling the device manager to show hidden devices - Expand the devices menu one by one to find the transparent or highlighted drivers. If you can find it, right-click on it and select Uninstall device.
Note: Be careful while removing the drivers, don’t remove the drivers that are currently in use, as it will stop that hardware device until you reinstall the driver again.
Uninstalling drivers from the device manager - Click Uninstall to confirm the action.
2. Uninstall old drivers using the disk cleanup utility
You can also remove the depreciated drivers using the disk cleanup utility to free up some space on a system drive as it removes the temporary files, unused drivers, cache data, and the files that end up in recycle bin. However, it is now shifted to the Windows Settings, but in the previous version of Windows, you can find this utility on disk properties settings.
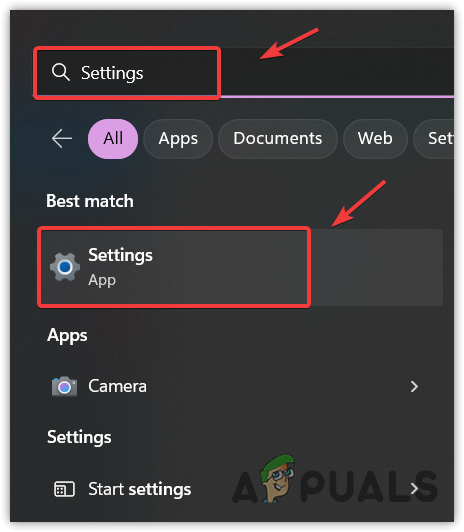
- To use a disk cleanup utility, click Start Menu and search for Settings.

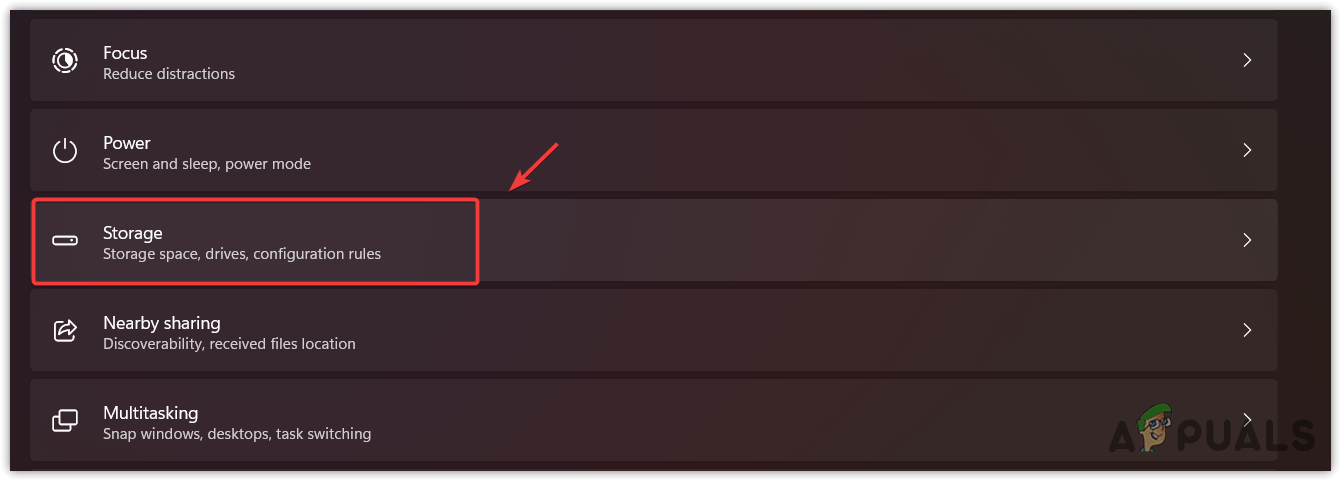
Opening Windows Settings - Open Settings and navigate to Storage.

Navigating to Storage settings - Then, go to Temporary Files and then click Remove Files.

Clearing temporary files - Click Continue and wait for the utility to remove the data.
- Once done, the old or unused drivers are permanently deleted from your Windows.

3. Uninstall old drivers using third-party software
This method will automatically remove the old drivers not being used by the hardware, as there is an already updated version of that driver currently being used by the system. Hence, to remove the old drivers automatically, you will have either use third-party software or uninstall the driver manually before updating to the new one.
There are various free applications available on the internet that allows users to remove old or unused drivers automatically from the system.
Hamza Mohammad Anwar
Hamza Mohammad Anwar is an intermediate JavaScript web developer with a focus on developing high-performance applications using MERN technologies. His skill set includes expertise in ReactJS, MongoDB, Express NodeJS, and other related technologies. Hamza is also a Google IT Certified professional, which highlights his competence in IT support. As an avid problem-solver, he recreates errors on his computer to troubleshoot and find solutions to various technical issues.
При установке (обновлении) драйверов устройств Windows, копии старых версий драйверов остаются в системе, занимая при этом место на диске. И это содержимое можно очистить вручную, что и продемонстрировано в инструкции далее.
Если удаление старых драйверов Windows 10, 8 и Windows 7 интересовало в распространенных контекстах удаления старых драйверов видеокарты или USB устройств, рекомендую использовать отдельные инструкции на эту тему: Как удалить драйверы видеокарты, Компьютер не видит флешку и другие USB устройства.
Также на схожу тему может оказаться полезным материал: Как создать резервную копию драйверов Windows 10.
Удаление старых версий драйверов с помощью утилиты очистки диска
Во всех последних версиях Windows присутствует встроенная утилита очистки диска, о которой уже писалось на этом сайте: Использование утилиты очистки диска в расширенном режиме, Как очистить диск C от ненужных файлов.
Этот же инструмент дает нам возможность легко удалить старые драйверы Windows 10, 8 или Windows 7 с компьютера. Для этого выполните следующие действия.
- Запустите «Очистку диска». Нажмите клавиши Win+R (где Win — клавиша с эмблемой Windows) и введите cleanmgr в окно «Выполнить».
- В утилите очистки дисков нажмите по кнопке «Очистить системные файлы» (для этого требуется, чтобы у вас были права администратора).
- Отметьте пункт «Пакеты драйверов устройств». У меня на скриншоте указанный пункт не занимает места, но в некоторых случаях размер хранимых драйверов может достигать нескольких гигабайт.

- Нажмите «Ок» для запуска удаления старых драйверов.

После непродолжительного процесса, старые драйверы будут удалены из хранилища Windows. Однако учитывайте, что при этом, в свойствах драйверов в диспетчере устройств кнопка «Откатить» станет неактивной. Если же у вас, как и на скриншоте, указано, что пакеты драйверов устройств занимают 0 байт, когда на самом деле это не так, используйте следующую инструкцию: Как очистить папку DriverStore FileRepository в Windows 10, 8 и Windows 7.