
- To empty the Recycle Bin from the desktop, right-click it and then click “Empty Recycle Bin“.
- Alternatively, you can view the hidden and protected files, and then delete the folder “C:\$RECYCLE.BIN“.
- You can also delete the “$RECYCLE.BIN” folder with the command “rmdir /q /s C:\$RECYCLE.BIN” in the Command Prompt.
The Windows operating system has a Recycle Bin, whose purpose is to store the deleted items for 30 days temporarily, or unless you delete them permanently yourself. However, sometimes the data inside the Recycle Bin exceeds the expected limits and significantly impacts the storage space available on the PC.
There are also reports of users seeing more than one Recycle Bin on the desktop. Moreover, if the utilized storage space on a volume cannot be accounted for, it is usually occupied by the hidden Recycle Bin folder, or the “$RECYCLE.BIN“.
In this guide, I am going to show you how to clear safely the Recycle Bin on a Windows computer, regardless of where you find it. For example, you may see the “$RECYCLE.BIN” folder occupying space on non-boot system partitions, or even external hard drives.
Table of Contents
What is the Recycle Bin
The first thing to note is that the “Recycle Bin” folder and the hidden “$RECYCLE.BIN” folder are the same. The former is what you see at the front end, and usually on your desktop. The latter is the link folder for the Recycle Bin, where the actual trash is stored.
The Recycle Bin is an essential feature in every PC, designed to safeguard your important files and folders from accidental deletion. It serves as a safety net, keeping a copy of the files you delete until you choose to permanently delete them or restore them to their original location.
It’s like a virtual trash can that holds all the files you’ve deleted, providing a way to recover them, if needed, but only for a certain number of days. By default, the Recycle Bin holds your deleted files and folders for 30 days before they are permanently removed.
Is a file too big to delete and send to the Recycle Bin? Here is a guide to fix it.
Is it safe to delete the $RECYCLE.BIN folder?
Deleting the Recycle Bin folder on the desktop and deleting the “$RECYCLE.BIN” are two different things.
If you try to delete the Recycle Bin icon on the desktop, you will find that it is not possible. The option to delete it does not exist in the context menu, and pressing the delete button on the keyboard doesn’t work either.
However, deleting the hidden “$RECYCLE.BIN” folder in a system volume is a different thing. Deleting the $RECYCLE.BIN hidden folder will empty the Recycle Bin, and the folder itself will remain.
 Folder On Windows 2")
To sum up, it is safe to delete the $RECYCLE.BIN folder inside the volumes and partitions. Same way, it is also safe to delete them from USB flash drives or other external storage drives if you find that they are occupying significant space that can be used otherwise.
How to check if the Recycle Bin is occupying space?
Before we move on to empty or hide the Recycle Bin, you should verify that the extraordinary amount of space occupied is by the elements inside the Recycle Bin.
 Folder On Windows 3")
One way to do that is by opening the Recycle Bin and checking the size of the individual items inside. But that could take too long and complex. Instead, I recommend that you use the free tool called “WinDirStat“.
WinDirStat is a free utility that scans your storage spaces and presents you with a visual representation of the items occupying the space.
 Folder On Windows 4")
This utility will show you exactly what is occupying your storage – from the largest folders to the smallest of files.
Use these steps to install and use WinDirStat to check whether the Recycle Bin is occupying significant storage space.
-
Open the WinDirStat download page.
-
Click either of the links in the “Latest installer” section, and your download shall begin.
 Folder On Windows 5")
Download WinDirStat -
When downloaded, execute the .EXE file and proceed with the on-screen instructions to install the WinDirStat tool.
-
Once installed, launch the tool.
-
In WinDirStat, select the C Drive to scan and click OK.
 Folder On Windows 6")
Scan boot drive with WinDirStat Alternatively, you can also select “All Local Drives” and scan all partitions.
-
Once the scan completes, go to C:\$RECYCLE.BIN and check the size of the block highlighted in the lower section of WinDirStat.
 Folder On Windows 7")
Check Recycle Bin size using WinDirStat
 Folder On Windows 5")
 Folder On Windows 6")
 Folder On Windows 7")
After performing the steps above, you will know exactly what size the Recycle Bin is occupying, and whether or not it is time to empty it.
Note that the non-boot drives and partitions also have a hidden $RECYCLE.BIN folder, which is just a link to the main Recycle Bin folder. It is best to scan them with WinDirStat as well and check the $RECYCLE.BIN size there as well.
How to hide the Recycle Bin folder on desktop
As discussed above, the Recycle Bin folder on the desktop cannot be deleted. It can, however, be hidden. Here is how:
-
Press the Windows key + i to open the Settings app.
-
Go to Personalization.
-
Click Themes.
 Folder On Windows 8")
Open Themes settings -
Under Related Settings, click “Desktop icon settings“.
Open Desktop icon settings -
Uncheck “Recycle Bin” in the Desktop icons section, and then click Apply and OK.
Hide Recycle Bin from Desktop
 Folder On Windows 8")
 Folder On Windows 10")
After performing the steps above, the Recycle Bin folder will no longer appear on the desktop. In case you want to restore it, perform the same steps above, and in Step 5, select “Recycle Bin” instead of unchecking it.
How to empty the Recycle Bin folder
The steps discussed above will only hide the Recycle Bin icon on the desktop – it will not empty it. If you find that the Recycle Bin is occupying significant space on your PC, you can empty it by right-clicking on the icon on the desktop, and then clicking “Empty the recycle bin“.
After this, you may or may not be asked for a confirmation to delete everything inside permanently. If asked, verify that there is nothing important in the Recycle Bin that you may need to recover later.
Make sure to recheck with WinDirStat that the Recycle Bin is no longer occupying space. I say this because there can be multiple Recycle Bins on a PC sometimes, and the other one may still be occupying significant storage space.
That said, if you are experiencing issues with the Recycle Bin, it is possible that the method above may not work to empty the Recycle Bin. If so, then use the following steps to delete/clear the Recycle Bin directly from the link folder ($RECYCLE.BIN).
-
Press the Windows key + E to open a File Explorer window.
-
Click on the 3 dots in the top menu and then click Options.
 Folder On Windows 12")
Open Explorer options -
Switch to the View tab.
-
Select “Show hidden files, folders, and devices“, and uncheck the option “Hide protected operating system files“.
Show hidden and protected files -
Click Apply and OK.
-
Now navigate to the boot volume (usually C drive).
-
Right-click the hidden folder “$RECYCLE.BIN” and then click Delete.
Delete the hidden $RECYCLE.BIN folder -
If asked for confirmation, select “Do this for all current items” and then click Yes.
Permanently delete everything in the Recycle Bin folder
 Folder On Windows 12")
 Folder On Windows 13")
 Folder On Windows 14")
 Folder On Windows 15")
After performing the steps above, you will notice that the “$RECYCLE.BIN” folder remains. However, the folder will now be empty and everything inside will have been permanently deleted.
To avoid performing all of the complex steps above, you can also run the following command in an elevated Command Prompt to delete the “$RECYCLE.BIN” folder in the C drive:
rmdir /q /s C:\$RECYCLE.BINThis command will silently, and permanently, delete all the items inside the Recycle Bin.
Frequently Asked Questions (FAQs)
Why are there two Recycle Bins on my computer?
There is likely a shortcut created on your desktop for the Recycle Bin, which makes it seem like you have 2 Recycle Bins on your, when in fact, there is only one.
You can simply delete the Recycle Bin shortcut (which has a small arrow), and this will have no negative impact on your PC.
How to check if the Recycle Bin is occupying a large space?
The Recycle Bin itself does not tell the total size of files inside it. To check the size of the Recycle Bin, you can use third-party apps like WinDirStat and Folder Size Explorer.
How to show or hide the Recycle Bin icon on the desktop?
To show or hide the Recycle Bin icon on the desktop, go to Settings > Personalization > Themes > Desktop Icon Settings. Here, select whether you want to display the Recycle icon (or others) on the desktop.
Updated on Apr 28, 2025
| Workable Solutions | Step-by-step Troubleshooting |
|---|---|
| Permanently Delete Files from Recycle Bin in Windows 10/7 |
Permanently Delete Files in Recycle Bin…Full steps Permanently Delete Recycle Bin…Full steps |
| Permanently Delete Files on Windows 11/10/8/7 Bypassing Recycle Bin | In Windows Explorer, find the files you want to remove, then hold down the Shift + Delete keys at the same time…Full steps |
| Extend C Drive Without Deleting or Formatting- EaseUS Partition Master | Right-click on the D: partition with enough free space and select «Allocate Space»…Full steps |
The Recycle Bin is a storage room for all the files you temporarily delete from your PC. The deleted files remain there until you remove them permanently from Recycle Bin. The Recycle Bin folder is typically located in C:\$Recycle.Bin directory, all the metadata of the deleted files will heap up in C: partition.
As the Recycle Bin grows larger and larger, you may get notifications such as «You are running out of space on Local Disk (C:)…» or «Low Disk Space». These warnings will appear when you are trying to store new content on the partition, even preventing the smooth system performance. So, how to free up C drive to make your computer running faster? Emptying the recycle bin by permanently deleting files is probably the quickest and simplest way to achieve the goal.
This tutorial focus on how to permanently delete files from Recycle Bin on Windows 10, Windows 8, or Windows 7. There are several ways to do it. Read in-depth.
How to Permanently Delete Files from Recycle Bin in Windows 10/7
To empty the Recycle Bin on Windows 10, Windows 8, or Windows 7 computer, there are three available ways. You should first make sure there is no file in the Recycle bin that you want to keep.
- Notice:
- If you accidentally clean out the Recycle Bin and there are important files you need, don’t worry, you still have the chance to get data back. Using professional data recovery software to help you recover permanently deleted files from the emptied Recycle Bin. Jump to check the detailed guides.
1. 2 Ways to Permanently Delete Files in Recycle Bin
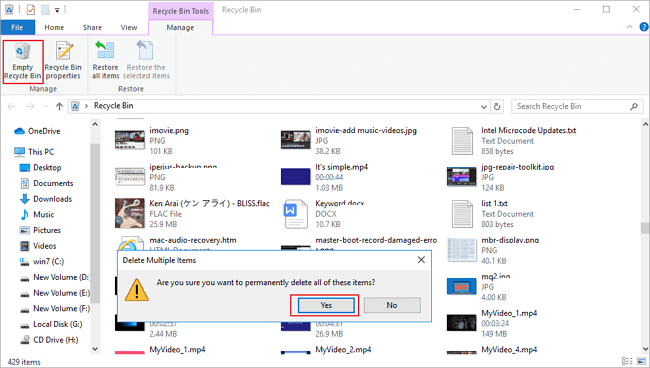
- Right-click on the Recycle Bin icon located on your desktop and select Empty Recycle Bin.
- Or, alternatively, double-click on the Recycle Bin on your desktop. Then, click the Empty the Recycle Bin button along with the top menu.
- A warning box will appear. Click Yes to permanently delete files.
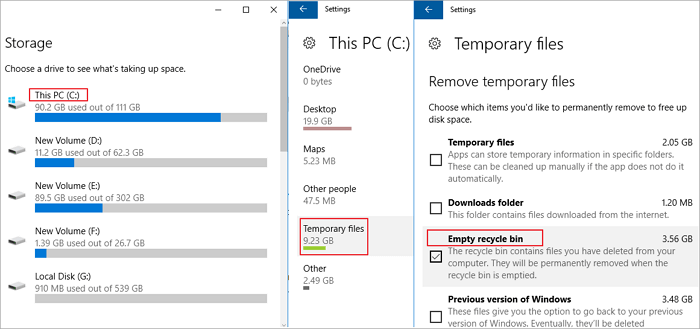
2. Permanently Delete Recycle Bin on Windows 10 Using Settings
- If you are using Windows 10, go to «Settings» > «System» > «Storage».
- Then, select «This PC» and click on «Temporary files». In the new window find and click the option «Empty recycle bin».
- Press Delete to confirm.
Bonus Tip: How to Recover Permanently Deleted Files from Emptied Recycle Bin
If you accidentally empty the recycle with crucial files you need, you still have a way to recover permanently delete files from the emptied Recycle Bin. EaseUS Data Recovery Wizard, a world-famous data recovery tool, can help you recover lost data in any complex circumstances.
It enables you to recover lost Word document, recover deleted files from SD card, recover deleted emails, recover permanently deleted files in Windows 10, and so on.
Download this capable file recovery software, and follow the steps below to recover files from emptied Recycle Bin.
Step 1. To specifically recover files from emptied Recycle Bin on Windows 11/10/8/7, hover the mouse pointer over the «Recycle Bin» option under the «Hardware Disk» section and click «Search for Lost Data».
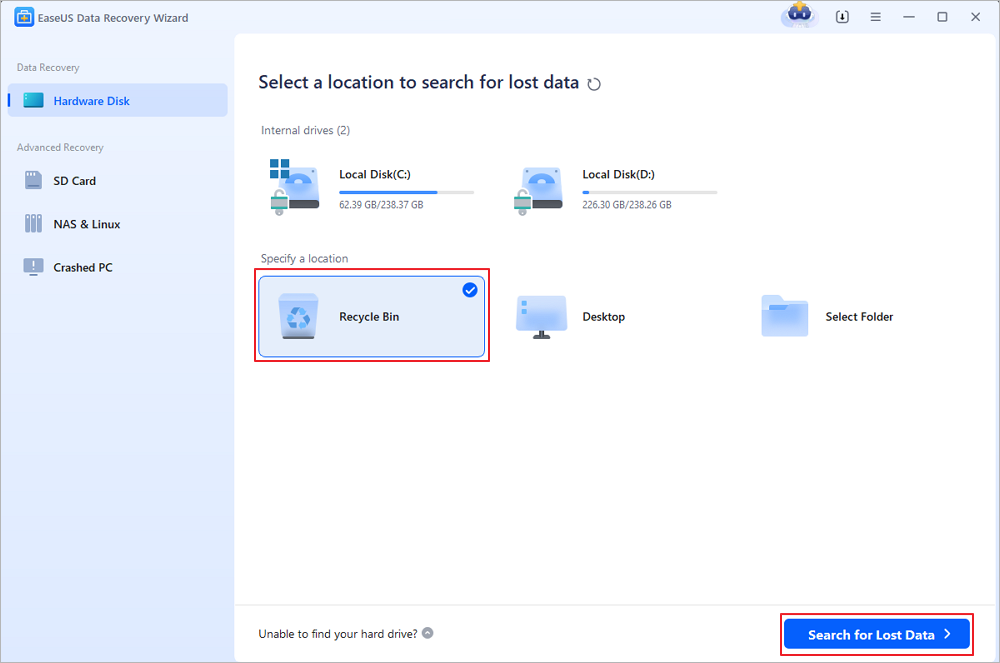
Step 2. EaseUS data recovery software will start a quick scan immediately for all deleted files, and later a deep scan will launch automatically to scan more lost files. After the scanning process, you can use the «Filter» feature to select a specific file type, such as Pictures, Word, videos, etc.

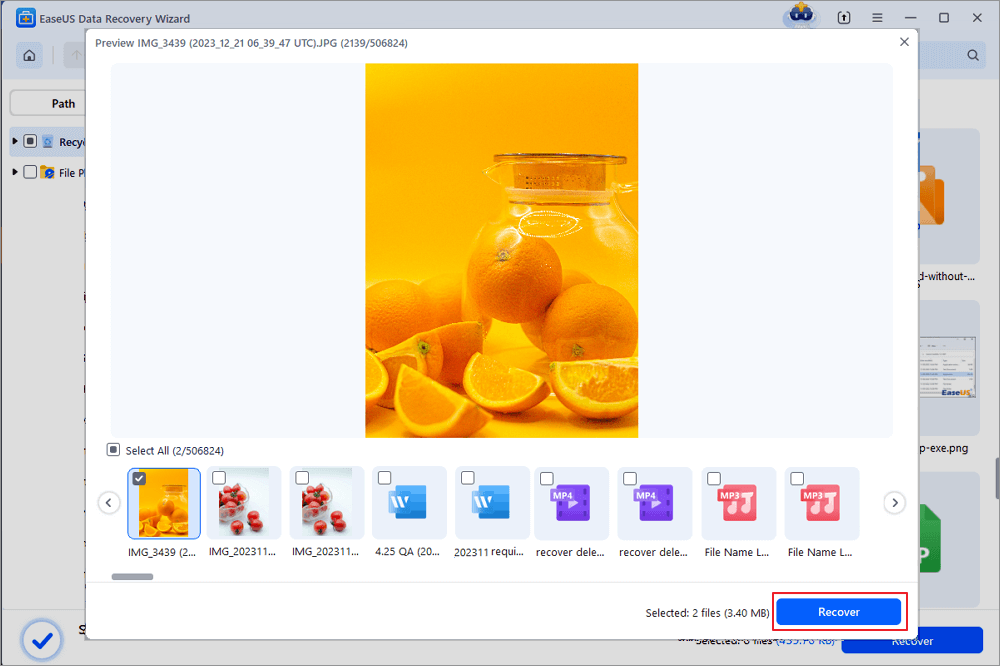
Step 3. Once you locate the files you want to restore, you can double-click it for a full preview. Then, select the target files and click «Recover». We suggest you select a different volume or an external USB drive to save the recovered files to avoid data overwriting. You can choose a cloud storage, such as OneDrive, Google Drive, etc., and click «Save» to save your recovered files.
How to Permanently Delete Files on Windows 11/10/8/7 Bypassing Recycle Bin
If you want to permanently delete files on Windows computer rather than moving then to the Recycle Bin, do as the following two ways show.
1. In Windows Explorer, find the files you want to remove, then hold down the Shift + Delete keys at the same time. You’ll be asked to confirm that you want to permanently delete the file.
2. Permanently delete files by configuring Recycle Bin’s Properties. Follow these instructions:
- Right-click on the Recycle Bin, and choose «Properties».
- Mark the option called «Don’t move files to the Recycle Bin. Remove files immediately when deleted.».
- Next, click the «Apply» button and then click «OK» to save the settings.
After these settings, the deleted files will disappear from your computer permanently without going to the Recycle Bin. You can change this setting any time you want.
How to Extend C Drive Without Deleting or Formatting
Permanently deleting files from Recycle Bin can free up space on C drive. What if you still run out of C-disk space after cleaning out the Recycle Bin? You can extend your C drive without deleting or formatting with EaseUS Partition Master — an ultimate disk and partition management tool.
With EaseUS partition manager, you can allocate free space from other drives to C drive directly without deleting and data loss. Other outstanding functions of EaseUS Partition Master are listed below.
- Resize/move partitions, create, format, delete, and merge partitions
- Copy and clone an entire disk to another even the target partition is smaller than the source
- Convert a logical partition to primary or primary partition to logical, FAT to NTFS partition, MBR disk to GPT, or GPT disk to MBR
- Completely wipe out all the data on the hard disk to prevent information from being leaked or recovered
- Migrate OS to SSD to speed up Windows to upgrade hard disk and speed up Windows
Now, download this disk management program, and extend your C drive by allocating space from D drive or other data drives to the system drive.
Step 1. Right-click on the D: partition with enough free space and select «Allocate Space».
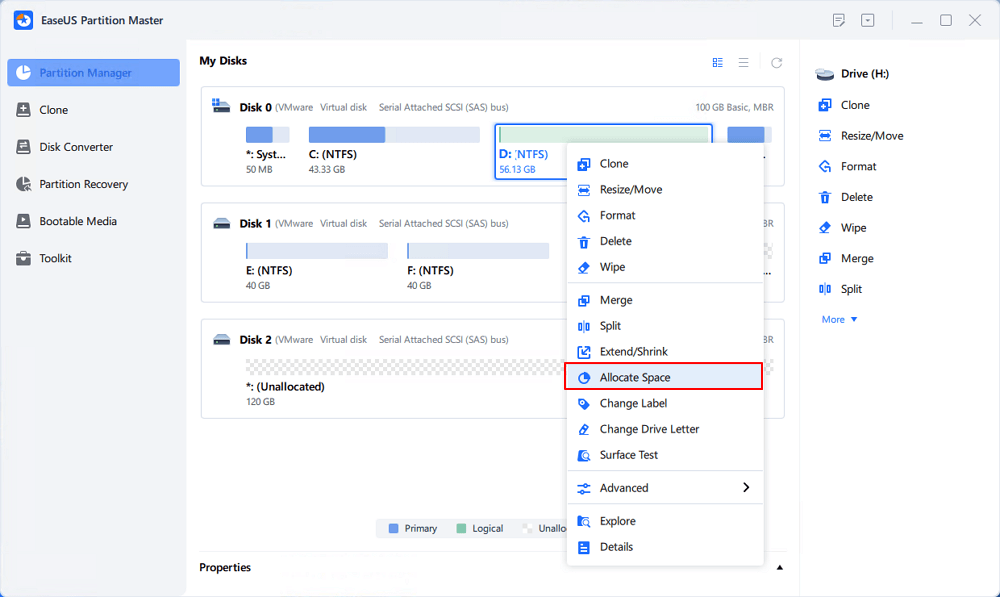
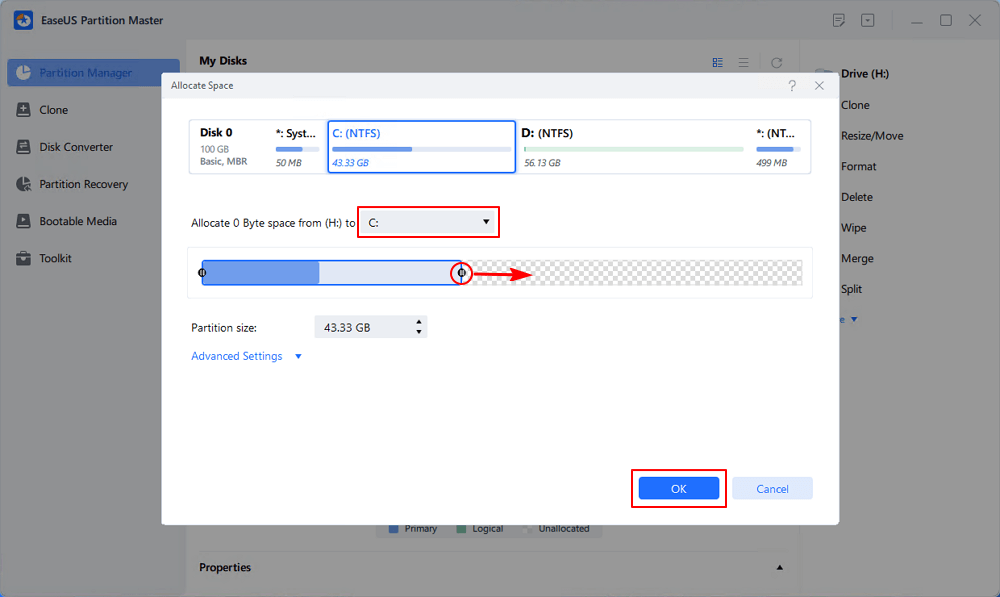
Step 2. Select the target partition — C: drive and drag the partition panel rightward to add the free space from D: drive to C: drive. Then click «OK» to confirm.
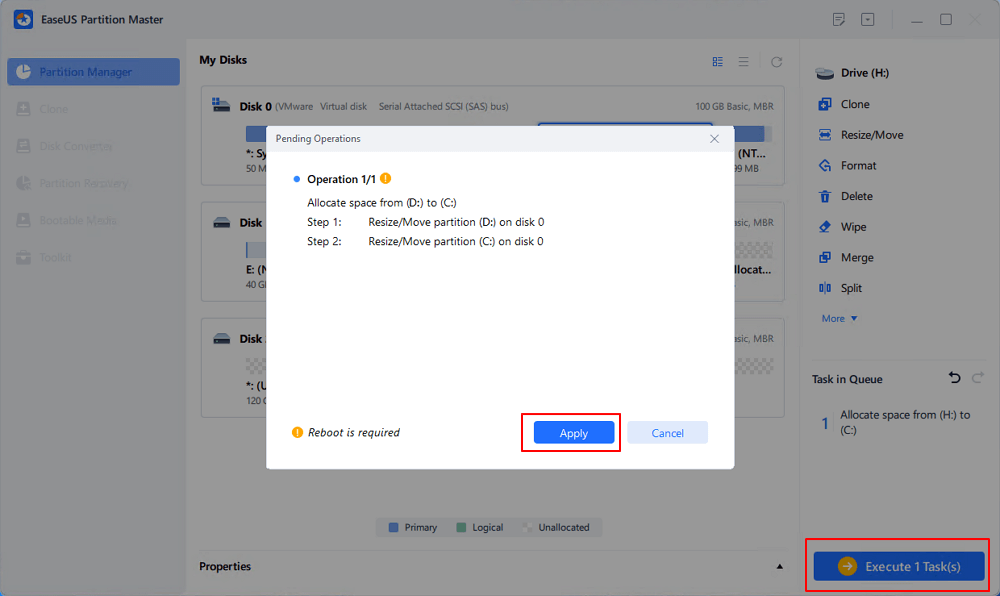
Step 3. Click the «Execute Task» button and click «Apply» to start the process of moving free space from D: drive to C: drive.
Final Verdict
This post provides the most comprehensive guides about how to permanently deleted files from Recycle Bin. You can permanently delete Recycle Bin in 3 simple ways.
Besides, if you empty your Recycle Bin but realize there are some important files you want have been permanently removed, instantly use EaseUS data recovery software to get back the lost files.
How to Permanently Delete Files from Recycle Bin FAQs
The following topics are highly relevant to how to permanently delete Recycle Bin. Read them to get more guides.
How do I permanently delete files from Recycle Bin Windows 10?
In order to wipe out Recycle Bin, you can:
- Right-click on the Recycle Bin icon located on your desktop and select Empty Recycle Bin.
- OR double-click on the Recycle Bin and click on the Empty Recycle Bin option located on top of the folder window.
- Go to Settings > System > Storage. Then, select This PC and click on Temporary files and recycle bin. In the new window find and click the option Empty recycle bin. Press Delete to confirm.
How do I permanently delete Recycle Bin virus?
To remove virus from your computer, you can download and install anti-virus software. Run a virus scan, and delete or quarantine the virus.
How do I delete a .bin file?
You can try deleting the file using the right-click «Delete» option. If you can’t delete the bin file, you can check to see if there are any associated programs still installed on the computer. If so, uninstall the same and try deleting the file.
Or you can start your computer in safe mode and try deleting the file. See if it helps.
The Recycle Bin is a key part of Windows that can’t be deleted for good. But, you can take it off your desktop to make it look cleaner. This guide will show you how to remove the Recycle Bin icon from your desktop on Windows 11, 10, 8, and 7. You’ll learn to do it using Windows Settings, Registry Editor, and Group Policy Editor.
Key Takeaways
- The Recycle Bin is a core component of the Windows operating system and cannot be completely removed, only hidden from the desktop.
- There are multiple methods to remove or hide the Recycle Bin icon, including using Windows Settings, Registry Editor, and Group Policy Editor.
- The process for removing the Recycle Bin is similar across Windows 10 and Windows 11, with a few simple clicks required.
- Hiding the Recycle Bin can provide a cleaner and more organised desktop appearance, but the Recycle Bin functionality remains available.
- Restoring the Recycle Bin icon can be achieved through the same settings or registry modifications if needed.
Understanding the Windows Recycle Bin
The Windows Recycle Bin is a key part of Windows. It’s where deleted files and folders go first. It’s in the top-left corner of your desktop. It helps you get back files you might have deleted by mistake.
What is the Recycle Bin?
The Recycle Bin is a special folder. It keeps deleted files and folders safe, not deleting them for good. This gives you a chance to get back deleted stuff if you need to. It’s set up to hold these items until you decide to delete them for real or it gets too full.
Default Location and Functions
The Recycle Bin sits in the top-left corner of your desktop. It’s easy to find. When you delete something, it goes to the Recycle Bin instead of being gone forever. This lets you check the Recycle Bin and bring back anything you didn’t mean to delete.
Why Remove the Recycle Bin Icon
Some people remove the Recycle Bin icon from their desktop. They might want a cleaner look, or to change how their computer looks. Or they might just want to keep their desktop tidy. Even without the icon, you can still use the Recycle Bin through Windows Settings or File Explorer.
Whether to keep or remove the Recycle Bin icon is up to you. Some like a tidy desktop and hide the icon. But they still use the Recycle Bin to manage files and recover deleted ones.
“The Recycle Bin is a valuable feature that allows us to undo accidental file deletions, but its persistent presence on the desktop can be seen as a clutter by some users.”
Customising your Windows desktop is rewarding. One key thing you might want to change is the Recycle Bin icon. Removing it is easy, with several methods to choose from. You can use Windows Settings, Registry Editor, or Group Policy Editor. Let’s look at how to hide the Recycle Bin and make your desktop cleaner.
Using Windows Settings
The easiest way to remove the Recycle Bin icon is through Windows Settings. Here’s how:
- Open the Start menu and search for “Settings”.
- Click on the “Personalization” option.
- Select “Themes” from the left-hand menu.
- Under “Related settings”, click on “Desktop icon settings”.
- Uncheck the box next to “Recycle Bin” and click “Apply” to save the changes.
These steps will hide the Recycle Bin icon from your desktop in Windows 11 and Windows 10.
Using Registry Editor
For those who like a challenge, the Registry Editor is an option. But be careful, as wrong changes can harm your system. Always back up your Registry first.
Using Group Policy Editor
Windows 10 Enterprise and Windows 11 Pro or Enterprise users can use the Group Policy Editor. It’s a great way to customise your desktop across many devices.
Even if the Recycle Bin icon is hidden, the Recycle Bin itself is still important. You can still find and manage deleted files using Search or the Recycle Bin folder directly.
Using Windows Settings to Hide Recycle Bin
If you want a clean Windows desktop, hiding the Recycle Bin is easy. You can remove it from your desktop through Windows Personalisation settings. This works on Windows 11, 10, 8, and 7.
Accessing Personalisation Settings
To start, open the Settings app on your Windows device. Or, right-click on the desktop and choose “Personalise.” This will open the Personalisation settings.
Modifying Desktop Icon Settings
In the Personalisation menu, find the “Themes” section and click on “Desktop icon settings.” This opens a window to manage your desktop icons.
In the Desktop Icon Settings window, find the “Recycle Bin” option. Uncheck the box next to it. This will remove the Recycle Bin icon from your desktop.
Applying Changes and Verification
After changing settings, click “Apply” to save them. You might need to refresh your desktop to see the changes. Once refreshed, the Recycle Bin icon should be gone.
Even with the icon hidden, you can still access the Recycle Bin. Open File Explorer and go to the Recycle Bin folder. This way, you can still recover deleted files, even without the icon on your Windows personalisation settings.
“Keeping your desktop organised and clutter-free can boost productivity and enhance your overall Windows experience.”
Alternative Methods Using Registry Editor
If you’re okay with editing the Windows registry, you can remove the Recycle Bin icon. Start by typing “regedit” in the Run dialog. Then, go to HKEY_LOCAL_MACHINE\SOFTWARE\Microsoft\Windows\CurrentVersion\Explorer\Desktop\NameSpace and delete {645FF040-5081-101B-9F08-00AA002F954E}. Always back up the registry first to avoid problems.
This method was suggested in a post with 840 views in a year. It involves editing the registry to hide the Recycle Bin icon. The post also offered a PowerShell command, Remove-Item, as an alternative.
If editing the registry seems daunting, the article suggests using Group Policies as a workaround. It also provides steps for creating a key and setting a DWORD value in the registry.
The post tested these steps on Windows 11. It shows these methods work on various Windows versions, including Windows 10, 8, 7, and Vista. For Windows XP users, extra instructions were given, highlighting the article’s broad applicability.
Even if the Recycle Bin icon is hidden, you can still access and use it. You can view, restore, or delete files permanently, as its functionality remains unchanged.
| Technique | Description | Complexity |
|---|---|---|
| Registry Editor | Directly delete a specific registry key to remove the Recycle Bin icon | High (requires registry editing skills) |
| PowerShell Command | Use the Remove-Item cmdlet to delete the registry key |
Moderate (requires some PowerShell knowledge) |
| Group Policy Editor | Configure desktop settings to hide the Recycle Bin icon | Moderate (requires access to Group Policy Editor) |
| Registry Key Creation | Create a new registry key and set a DWORD value to remove the icon | Moderate (requires registry editing skills) |
These methods offer various ways to customise your Windows desktop. They help hide the Recycle Bin icon, catering to different user needs and preferences.
Remove Recycle Bin Using Group Policy Editor
The Group Policy Editor is a great way to hide the Recycle Bin icon. It’s especially useful for Windows Pro and Enterprise editions. This tool lets you change many desktop settings, including the Recycle Bin’s visibility.
Accessing Group Policy Editor
To open the Group Policy Editor, type “gpedit.msc” in the Run dialog and press Enter. It will open, letting you explore different policy settings.
Configuring Desktop Settings
In the Group Policy Editor, go to User Configuration > Administrative Templates > Desktop. Look for “Remove Recycle Bin icon from desktop”. Double-click it to turn it on, then apply the changes.
Implementing Changes
After turning on the policy, restart your computer. The Recycle Bin icon will disappear from your desktop. This makes it invisible.
The Group Policy Editor is a powerful tool for managing desktop settings. It’s great for hiding the Recycle Bin icon. It’s especially helpful for system administrators who manage many Windows machines.
For more details on using the Group Policy Editor and other ways to hide or show the Recycle Bin icon, check out the EaseUS guide.
FAQ
What is the Recycle Bin in Windows?
The Recycle Bin is a key part of Windows. It holds deleted files and folders temporarily. It helps users get back items they didn’t mean to delete and keeps disk space free.
Can the Recycle Bin be permanently deleted from the Windows desktop?
No, you can’t delete the Recycle Bin from Windows for good. But, you can hide or remove its icon to tidy up your desktop.
Why would someone want to remove the Recycle Bin icon from the desktop?
Some people remove the Recycle Bin icon to make their desktop look cleaner. It’s a way to personalise their Windows experience.
What are the methods to hide the Recycle Bin icon on the Windows desktop?
There are a few ways to hide the Recycle Bin icon. You can use Windows Settings, the Registry Editor, or Group Policy Editor. Each method offers different levels of customisation.
How do I use the Windows Settings to remove the Recycle Bin icon?
To hide the Recycle Bin icon with Windows Settings, go to Personalisation. Then, find Desktop icon settings, uncheck Recycle Bin, and apply. This works on Windows 11, 10, 8, and 7.
Can I use the Registry Editor to hide the Recycle Bin icon?
Yes, if you’re okay with the Registry, you can hide the icon. Just delete a specific key. But, always back up the registry first to avoid problems.
How do I use the Group Policy Editor to remove the Recycle Bin icon?
The Group Policy Editor is another option, mainly for Windows Pro and Enterprise. Go to the right policy settings, turn on the “Remove Recycle Bin icon from desktop” policy, and apply.
Корзина в ОС Windows — специальная системная папка, в которую по умолчанию временно помещаются удаляемые файлы с возможностью их восстановления, значок которой присутствует на рабочем столе. Однако, некоторые пользователи предпочитают не иметь значка или самой функциональности корзины в своей системе.
В этой пошаговой инструкции подробно о том, как убрать корзину с рабочего стола в Windows 11 и Windows 10, а также в более ранних версиях системы — 8.1 и 7. А при необходимости — полностью отключить (удалить) корзину таким образом, чтобы удаляемые любым способом файлы и папки не помещались в нее, а также немного о настройке корзины. Очень близкая тема: Как добавить значок Этот компьютер на рабочий стол Windows 11, Как включить значок компьютера на рабочем столе Windows 10.
Как убрать корзину с рабочего стола Windows 11 и Windows 10 последних версий
Для того, чтобы корзина не показывалась на рабочем столе в Windows 11 и 10, достаточно выполнить следующие простые шаги:
- Нажмите правой кнопкой мыши по кнопке «Пуск» и выберите пункт «Выполнить» в контекстном меню, либо нажмите сочетание клавиш Win+R на клавиатуре.
- Введите desk.cpl ,5 (пробел перед запятой обязателен) в диалоговое окно «Выполнить» и нажмите Enter.

- Снимите отметку «Корзина» в окне настроек значков рабочего стола и примените настройки.

В результате корзина перестанет отображаться на рабочем столе. Дополнительно следует отметить следующие нюансы:
- Несмотря на то, что корзина показываться не будет, работать она продолжит, то есть файлы всё так же будут удаляться в неё по умолчанию. Чтобы отключить это поведение, можно нажать правой кнопкой мыши по корзине, открыть её свойства, а затем отметить пункт «Уничтожать файлы сразу после удаления, не помещая их в корзину», подробнее об этом и дополнительных способов — далее в инструкции.
- Попасть в настройки значков рабочего стола, чтобы убрать корзину, можно и через «Параметры». В Windows 11 и 10 расположение одинаковое: Параметры — Персонализация — Темы — пункт «Параметры значков рабочего стола» в разделе «Сопутствующие параметры».
- Вы можете отключить показ всех значков на рабочем столе Windows: нажмите правой кнопкой мыши по пустому месту рабочего стола и снимите отметку с «Отображать значки рабочего стола» в пункте «Вид».

- Если вы убрали корзину с рабочего стола, но вам потребовалось в неё попасть, способ для этого описан в конце статьи.
Как удалить корзину с рабочего стола в ранних версиях Windows
В ранних версиях Windows 10, а также в Windows 8.1 или Windows 7 убрать корзину с рабочего стола можно через Панель управления. При этом она продолжает функционировать (т.е. файлы, удаляемые через «Удалить» или клавишу «Delete» будут помещаться в нее), но не отображается на рабочем столе.
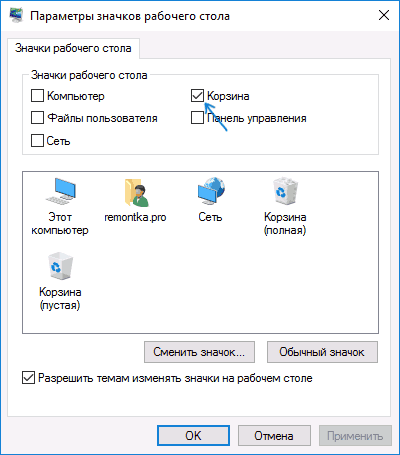
- Зайдите в панель управления (в пункте «Просмотр» вверху справа установите крупные или мелкие «Значки», а не «Категории») и откройте пункт «Персонализация». На всякий случай — Как зайти в панель управления.

- В окне персонализации, слева, выберите пункт «Изменение значков рабочего стола».

- Снимите отметку с пункта «Корзина» и примените настройки.

Готово, теперь корзина не будет отображаться на рабочем столе.
Как полностью отключить корзину в Windows
Если ваша задача — отключить удаление файлов в корзину, то есть сделать так, чтобы при удалении они действительно удалялись (как по Shift+Delete при включенной корзине), сделать это можно несколькими способами.
Первый и самый простой способ — изменить настройки корзины:
- Нажмите по корзине правой кнопкой мыши и выберите пункт «Свойства».
- Для каждого диска, для которого включена корзина выберите пункт «Уничтожать файлы сразу после удаления, не помещая их в корзину» и примените настройки (если опции не активны, то, судя по всему, параметры корзины изменены политиками, о чем — далее в руководстве).
- При необходимости, очистите корзину, так как то, что уже было в ней на момент изменения настроек, продолжит в ней оставаться.
В большинстве ситуаций этого достаточно, однако есть и дополнительные способы удалить корзину в Windows 11, 10, 8.1 или Windows 7 — в редакторе локальной групповой политики (только для Windows Профессиональная и выше) или с помощью редактора реестра.
Отключение корзины в редакторе локальной групповой политики
Данный способ подойдет только для систем Windows редакций Профессиональная, Корпоративная и Максимальная.
- Откройте редактор локальной групповой политики (нажмите клавиши Win+R, введите gpedit.msc и нажмите Enter).
- В редакторе перейдите к разделу Конфигурация пользователя — Административные шаблоны — Компоненты Windows — Проводник.

- В правой части выберите параметр «Не перемещать удаляемые файлы в корзину», нажмите по нему дважды и в открывшемся окне задайте значение «Включено».

- Примените настройки и при необходимости очистите корзину от файлов и папок, находящихся в ней на настоящий момент времени.


Как отключить корзину в редакторе реестра Windows
Для систем, в которых не представлен редактор локальной групповой политики, проделать то же самое можно с помощью редактор реестра.
- Нажмите клавиши Win+R, введите regedit и нажмите Enter (откроется редактор реестра).
- Перейдите к разделу
HKEY_CURRENT_USER\SOFTWARE\Microsoft\Windows\CurrentVersion\Policies\Explorer
- В правой части редактора реестра кликните правой кнопкой мыши и выберите пункт «Создать» — «Параметр DWORD» и укажите имя параметра NoRecycleFiles
- Дважды нажмите по этому параметру (или кликните правой кнопкой мыши и выберите пункт «Изменить» и укажите значение 1 для него.

- Закройте редактор реестра.

После этого файлы не будут перемещаться в корзину при удалении.
Как открыть корзину, если она не показывается на рабочем столе
Если корзина просто убрана с рабочего стола и её потребовалось открыть, то попасть в нее можно следующими способами:
- Включить показ скрытых и системных файлов и папок в проводнике, а затем зайти в папку $Recycle.bin (либо просто вставить в адресную строку проводника C:\$Recycle.bin\Корзина\ и нажать Enter).
- В Windows 11 и Windows 10 — в проводнике в адресной строке нажать по стрелке рядом с указываемым «корневым» разделом текущего местоположения (см. скриншот) и выбрать пункт «Корзина».


На этом всё. Если же остаются какие-либо вопросы, имеющие отношение к Корзине, задавайте в комментариях, буду стараться предложить рабочее решение.
Removing the Recycle Bin from your Windows 11 desktop is a simple task that involves accessing your desktop icon settings and unchecking the Recycle Bin option. This can be done in just a few minutes. Whether you’re looking to tidy up your desktop or you simply don’t use the Recycle Bin often, following these steps will help you achieve a cleaner desktop space.
In this guide, we’ll walk you through the steps to remove the Recycle Bin icon from your Windows 11 desktop. These steps are straightforward, and you should have your desktop cleared up in no time.
Step 1: Right-click on the Desktop
The first step is to right-click on an empty space on your desktop.
By right-clicking on the desktop, you open a context menu with several options to customize your desktop. This is the initial step to access deeper settings.
Step 2: Select “Personalize”
In the context menu, click on “Personalize.”
This option will take you directly to the Personalization settings in Windows 11, where you can change various desktop elements, including themes, backgrounds, and icons.
Step 3: Click on “Themes”
In the Personalization window, click on “Themes” in the sidebar.
Themes settings will allow you to access and modify the desktop icon settings where you can hide or show certain icons like the Recycle Bin.
Step 4: Select “Desktop icon settings”
Under the Themes section, find and click on “Desktop icon settings.”
This will open a new window where you can choose which icons appear on your desktop, including system icons like This PC, Network, and the Recycle Bin.
Step 5: Uncheck “Recycle Bin”
In the Desktop Icon Settings window, uncheck the box next to “Recycle Bin” and then click “OK.”
Unchecking the box will remove the Recycle Bin icon from your desktop. Clicking “OK” will save your changes and close the window.
After completing these steps, the Recycle Bin icon will no longer be visible on your desktop. However, it’s still accessible through file explorer if you need it.
Tips for Removing Recycle Bin from Desktop Windows 11
- Accessing Recycle Bin: Even after removing it from the desktop, you can find the Recycle Bin by typing “Recycle Bin” in the search bar or navigating through File Explorer.
- Temporary Removal: If you change your mind, you can easily add the Recycle Bin back by following the same steps and rechecking the box.
- Other Icons: You can also use this method to hide or show other system icons, such as This PC and Network.
- Customization: Use the Personalization settings to further customize your desktop and make it more to your liking.
- System Restore: If you encounter any issues, you can always use System Restore to revert to previous settings.
Frequently Asked Questions
Can I still use the Recycle Bin after removing it from the desktop?
Yes, you can access the Recycle Bin through File Explorer or by searching for it in the Start menu.
Will removing the Recycle Bin affect my files?
No, it will not affect your files. Removing the icon simply hides it from the desktop. All deleted files will still go to the Recycle Bin.
How can I permanently delete files without using the Recycle Bin?
You can permanently delete files by selecting them and pressing “Shift + Delete.” This bypasses the Recycle Bin.
Can I remove other system icons from the desktop?
Yes, you can use the same Desktop Icon Settings window to hide other system icons like This PC, Network, and Control Panel.
Is it possible to restore the Recycle Bin icon if I change my mind?
Yes, you can restore it by going back to Desktop Icon Settings and checking the box next to Recycle Bin.
Summary
- Right-click on the Desktop.
- Select “Personalize.”
- Click on “Themes.”
- Select “Desktop icon settings.”
- Uncheck “Recycle Bin.”
Conclusion
Removing the Recycle Bin from your Windows 11 desktop is a quick and easy way to declutter your workspace. By following the steps outlined above, you can make your desktop look cleaner and more organized. It’s a simple task, but it can make a big difference in how you perceive your work environment.
If you ever need to access the Recycle Bin, remember that it’s still available through File Explorer. And if you change your mind, adding it back is just as easy as removing it. For those who like to keep their desktop minimalistic and distraction-free, this small tweak can make a world of difference.
For more tips and tricks on customizing your Windows 11 experience, stay tuned for our upcoming articles. Happy computing!
Matthew Burleigh has been writing tech tutorials since 2008. His writing has appeared on dozens of different websites and been read over 50 million times.
After receiving his Bachelor’s and Master’s degrees in Computer Science he spent several years working in IT management for small businesses. However, he now works full time writing content online and creating websites.
His main writing topics include iPhones, Microsoft Office, Google Apps, Android, and Photoshop, but he has also written about many other tech topics as well.
Read his full bio here.